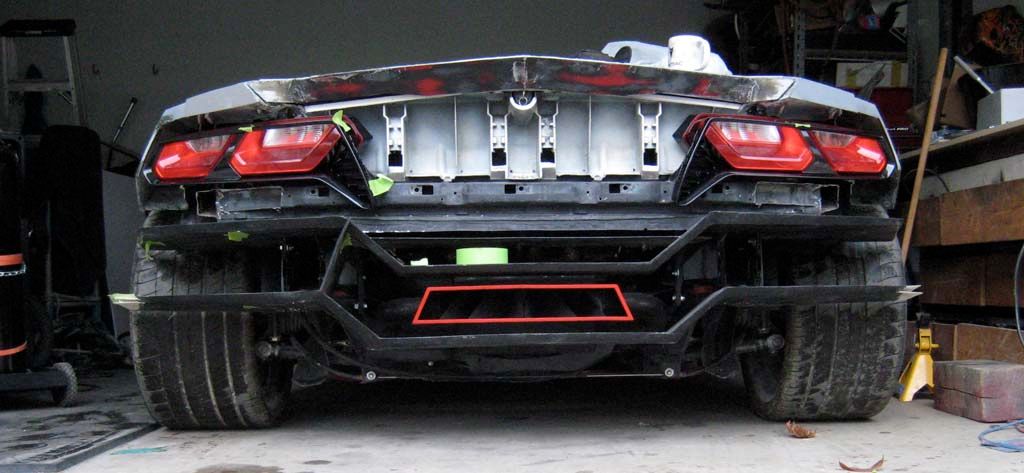
Move the four upper bumper ribs to align with and match the angles of the tail lights. Install a hide a plate for the center section. Remove and use the lower grates from the original engine vents for the openings as they have a much smaller pattern. You can make patterns from wood for the openings and shape the new grates over them with a hammer to fit the contours exactly while folding over the ends of the grates for easy mounting.
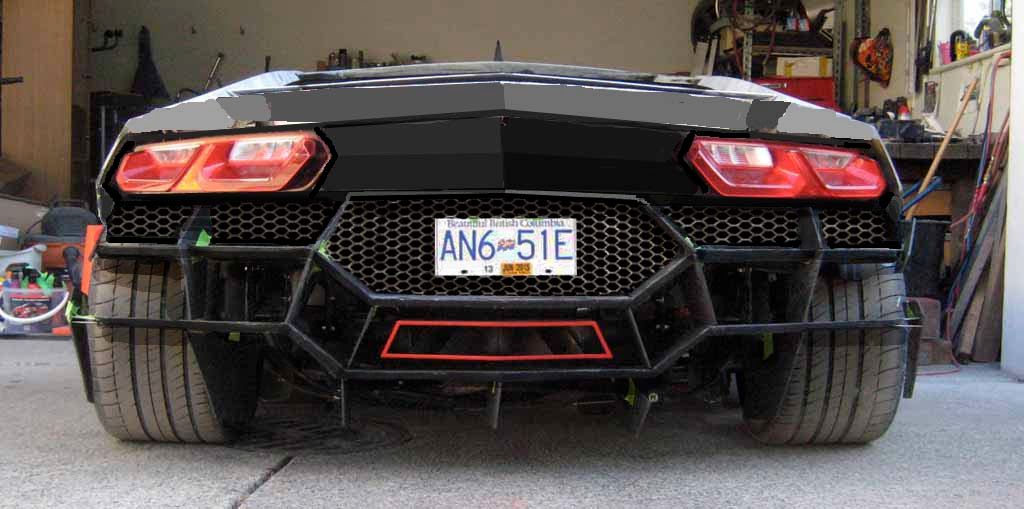
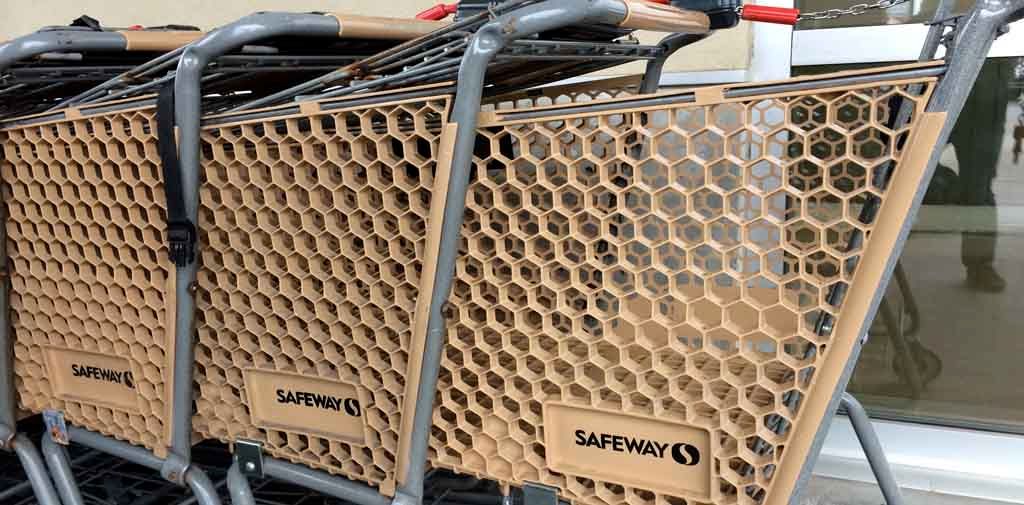
Thanks for the input lou and thanks for the PM I was going with your idea too with the engine mesh, but it's a bit to light, she wants something bolder as the Solstice...
quote
Originally posted by lou:
Move the four upper bumper ribs to align with and match the angles of the tail lights. Install a hide a plate for the center section. Remove and use the lower grates from the original engine vents for the openings as they have a much smaller pattern. You can make patterns from wood for the openings and shape the new grates over them with a hammer to fit the contours exactly while folding over the ends of the grates for easy mounting.
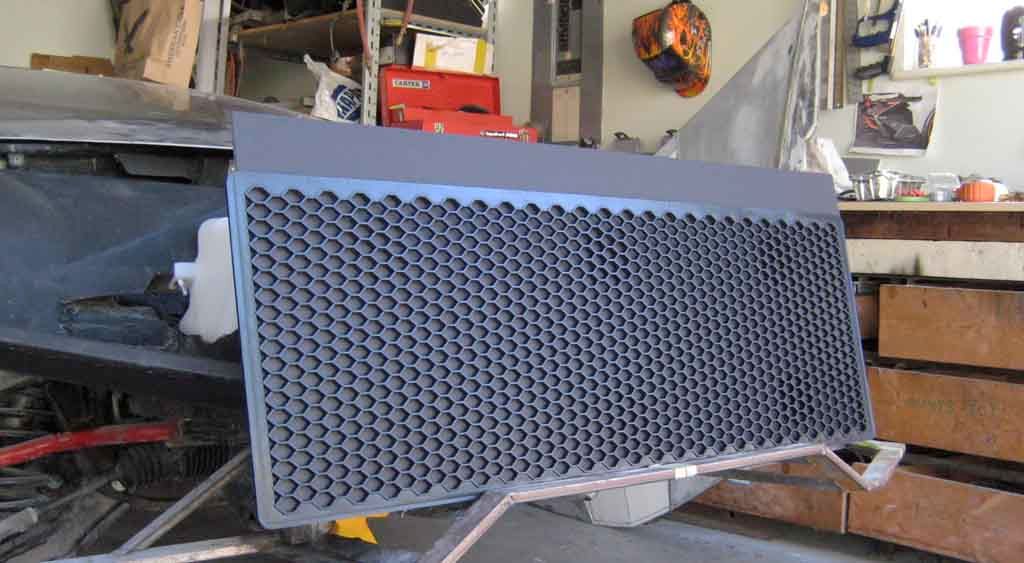
I ordered two sheets to start with I'll be fabricating frames for the honeycomb mesh
Photoshop mesh shown below is not to scale. Actual mesh will be smaller I blacked out top clip panel just to visualize a lot more tweaking to get diffuser looking better
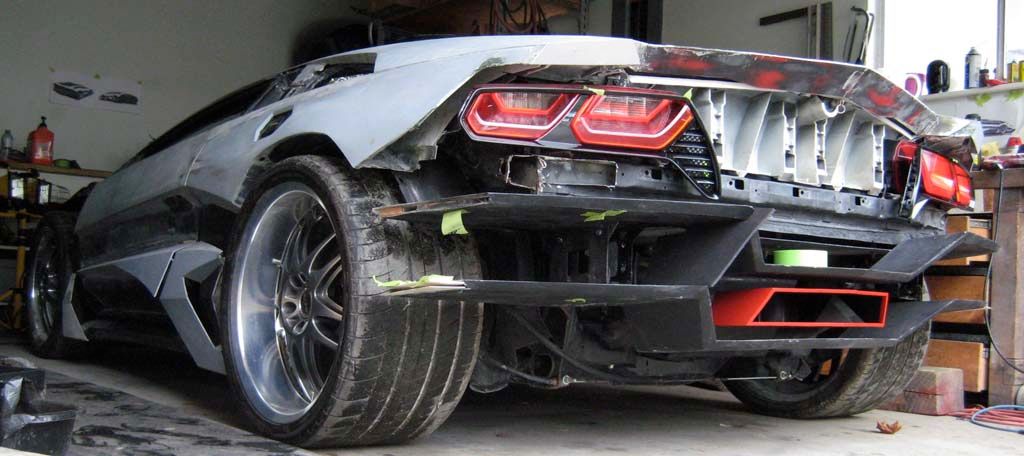
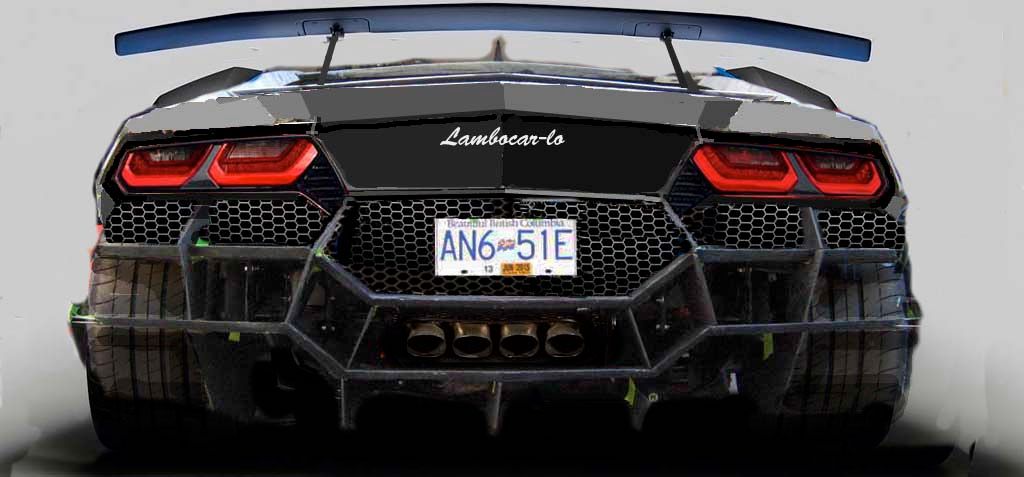
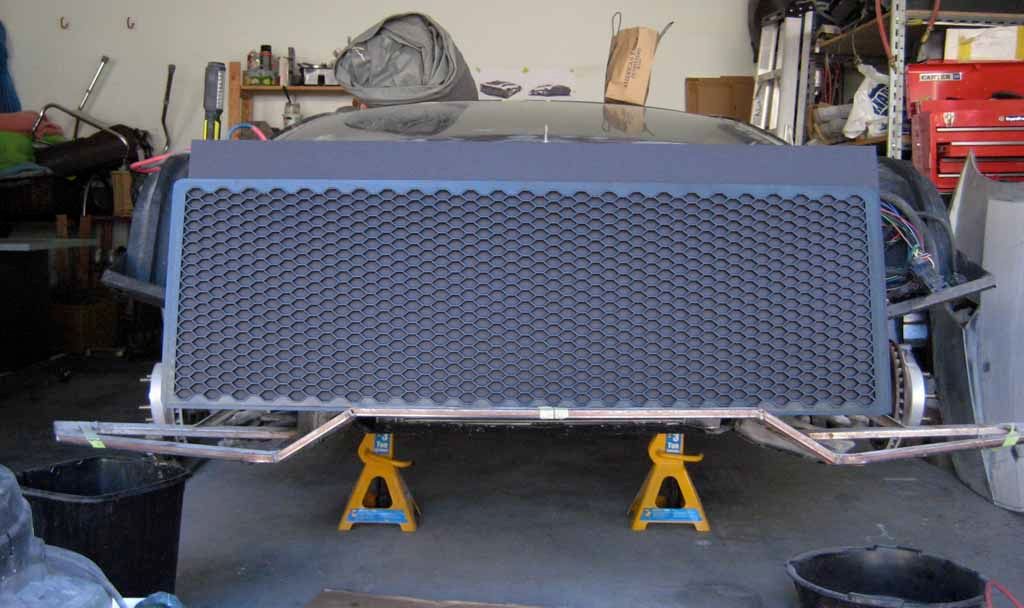
And the REAL DEAL hey Nells88, she's getting jealous about your project
[This message has been edited by Car-Lo (edited 09-04-2015).]
I do not know if I like the wing ? But had to play with her a little Have you put the stock tips in the hole to see if you like it, I do! But my scale of it might be a little off?
Thanks Terry you did a better cloning of the hex mesh feel free to play with any different ideas
At this point the rear is on pause waiting for insert frames to play around them I love the blue Lambo that I'm stealing things off of it now the wing seems to belong and the exhaust tips too.
quote
Originally posted by 85SEnochie:
I do not know if I like the wing ? But had to play with her a little Have you put the stock tips in the hole to see if you like it, I do! But my scale of it might be a little off?
[This message has been edited by Car-Lo (edited 09-09-2015).]
Car-Lo, I don't how to draw on images that you have posted, so I'm going to try to use 10,000 words to suggest something.
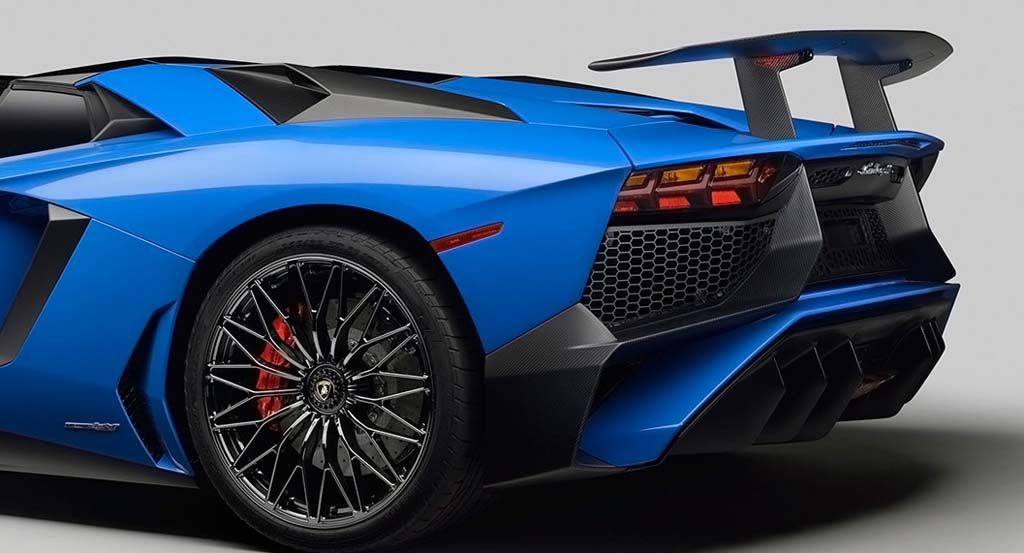
Taking a somewhat vague cue from the blue Lambo from the rear, I'm wondering what you think of continuing to extend upward and outward the lower "bumper" members on the angle that is presently shown until it closely approaches the upper horizontal "bumper" member, at which point it becomes parallel to the upper member extending outward. Then the rear bumper wouldn't be just upper and lower members mirroring one another the entire width.
quote
Originally posted by Car-Lo:
Thanks Terry you did a better cloning of the hex mesh feel free to play with any different ideas
At this point the rear is on pause waiting for insert frames to play around them I love the blue Lambo that I'm stealing things off of it now the wing seems to belong and the exhaust tips too.
John I am not sure exactly what it was, but you either have a vacuum leak in the brake system or something. There is a distinct hiss going from throttle to brakes and back. Without being there to see exactly what is going on, I can't exactly pinpoint it. However when you turn the car around again take a second to pop the deck and record sounds in the engine bay AND record under front hood sounds. Also ask tony if the brakes felt hard to push or normal for a modern car. As you know Lisa and I have your same motor in our Family car, the 2000 GTP. It might just be that you have the intake tube off, and its making the air bleeding past the intake butterfly really loud, so it may be nothing, but I think checking it would be a good idea.
David
------------------ 857GT Part 85GT Part 87GT Part Caddy, 93 Eldorado 4.9, 5spd Dual O2 Custom Chip, Custom Exhaust. MSD Everything Now with Nitrous. Capt Fiero --- My Over View Cadero Pics For Sale $4000, Yellow 88GT 5spd Full Poly Suspension, Lowered 1/2" in front, Corner Carver.
Thanks for your input but I can't make out what you're trying to describe we'll have to ask Terry to jump in and photoshop your image
quote
Originally posted by kennn:
Car-Lo, I don't how to draw on images that you have posted, so I'm going to try to use 10,000 words to suggest something.
Taking a somewhat vague cue from the blue Lambo from the rear, I'm wondering what you think of continuing to extend upward and outward the lower "bumper" members on the angle that is presently shown until it closely approaches the upper horizontal "bumper" member, at which point it becomes parallel to the upper member extending outward. Then the rear bumper wouldn't be just upper and lower members mirroring one another the entire width.
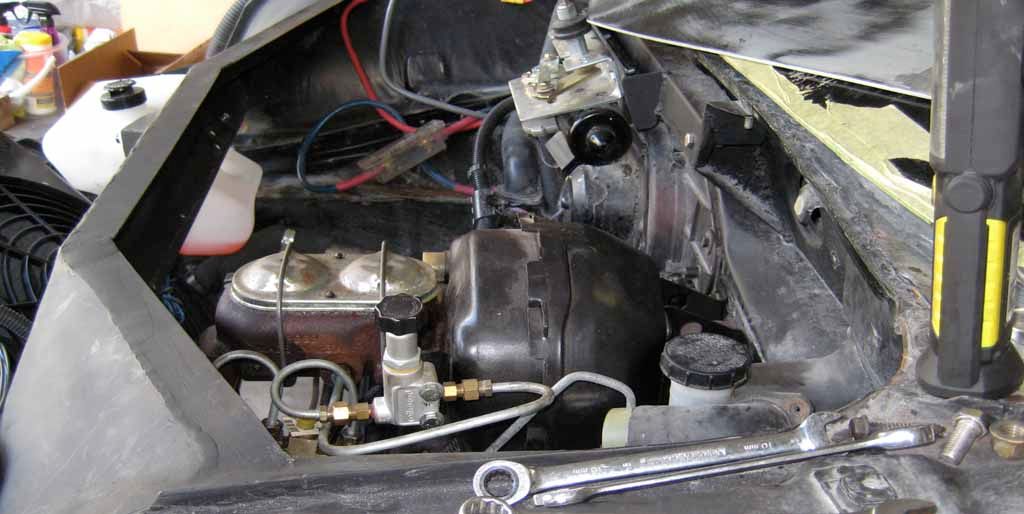
I always had that hiss in RBS from day one you'll have to zip over and have a look maybe it's the exposed filter
quote
Originally posted by Capt Fiero: John I am not sure exactly what it was, but you either have a vacuum leak in the brake system or something. There is a distinct hiss going from throttle to brakes and back. Without being there to see exactly what is going on, I can't exactly pinpoint it. However when you turn the car around again take a second to pop the deck and record sounds in the engine bay AND record under front hood sounds. Also ask tony if the brakes felt hard to push or normal for a modern car. As you know Lisa and I have your same motor in our Family car, the 2000 GTP. It might just be that you have the intake tube off, and its making the air bleeding past the intake butterfly really loud, so it may be nothing, but I think checking it would be a good idea.
Lisa and I are packing like Crazy and loading a 26ft moving truck this weekend, so I won't be able to come by anytime soon. At this rate I am not going to have any free time till after new years. However yes I will have to pop by at some point and check it out. If its a noise you have had since day one, and I didn't notice it when I drove RBS around that afternoon its probably just the intake butterfly.
------------------ 857GT Part 85GT Part 87GT Part Caddy, 93 Eldorado 4.9, 5spd Dual O2 Custom Chip, Custom Exhaust. MSD Everything Now with Nitrous. Capt Fiero --- My Over View Cadero Pics For Sale $4000, Yellow 88GT 5spd Full Poly Suspension, Lowered 1/2" in front, Corner Carver.
I'll check out where the hiss is coming from so David where are you guys moving too, I hope it's not to far ?
quote
Originally posted by Capt Fiero:
Lisa and I are packing like Crazy and loading a 26ft moving truck this weekend, so I won't be able to come by anytime soon. At this rate I am not going to have any free time till after new years. However yes I will have to pop by at some point and check it out. If its a noise you have had since day one, and I didn't notice it when I drove RBS around that afternoon its probably just the intake butterfly.
Nope not too far, you will still be able to pop by on your way to and from Pick A Part. We are moving out to Abbotsford as it was much better bang for the buck in terms of housing. Decent houses around here start at $800,000 that was just too far out of reach for Lisa and I.
------------------ 857GT Part 85GT Part 87GT Part Caddy, 93 Eldorado 4.9, 5spd Dual O2 Custom Chip, Custom Exhaust. MSD Everything Now with Nitrous. Capt Fiero --- My Over View Cadero Pics For Sale $4000, Yellow 88GT 5spd Full Poly Suspension, Lowered 1/2" in front, Corner Carver.
Good for you guys it's a nice drive out there and I'll have to stop in for coffee
quote
Originally posted by Capt Fiero:
Nope not too far, you will still be able to pop by on your way to and from Pick A Part. We are moving out to Abbotsford as it was much better bang for the buck in terms of housing. Decent houses around here start at $800,000 that was just too far out of reach for Lisa and I.
We had nice weather I took time off to enjoy it
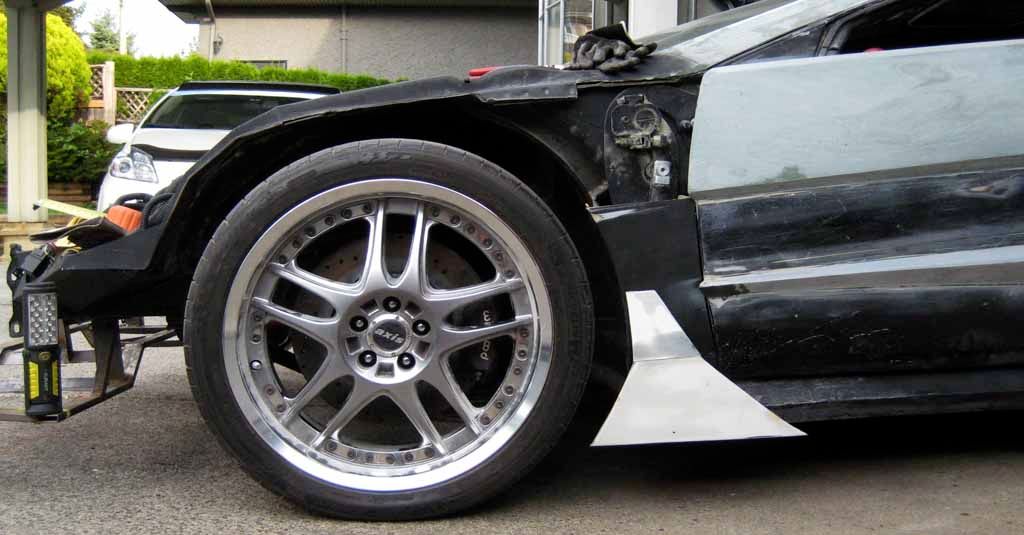
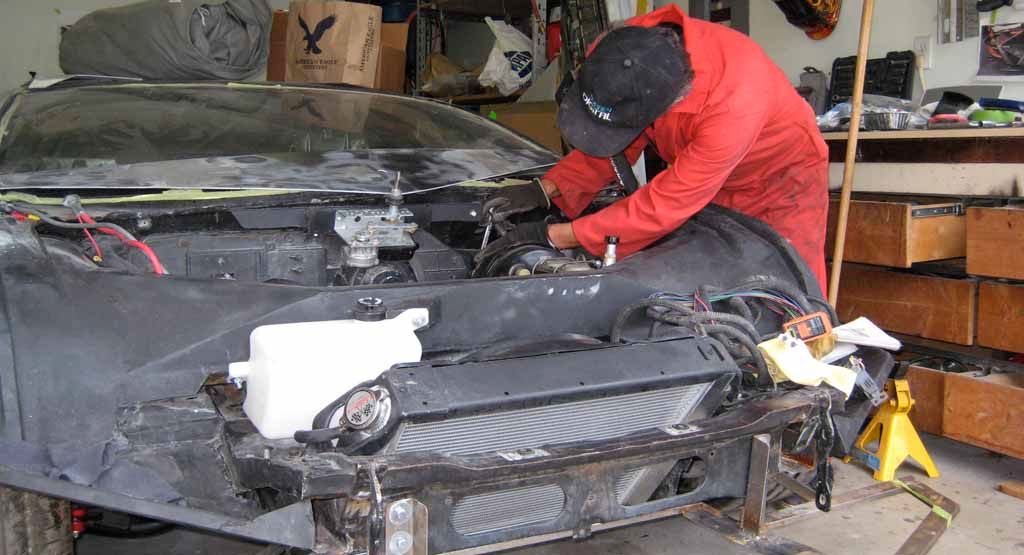
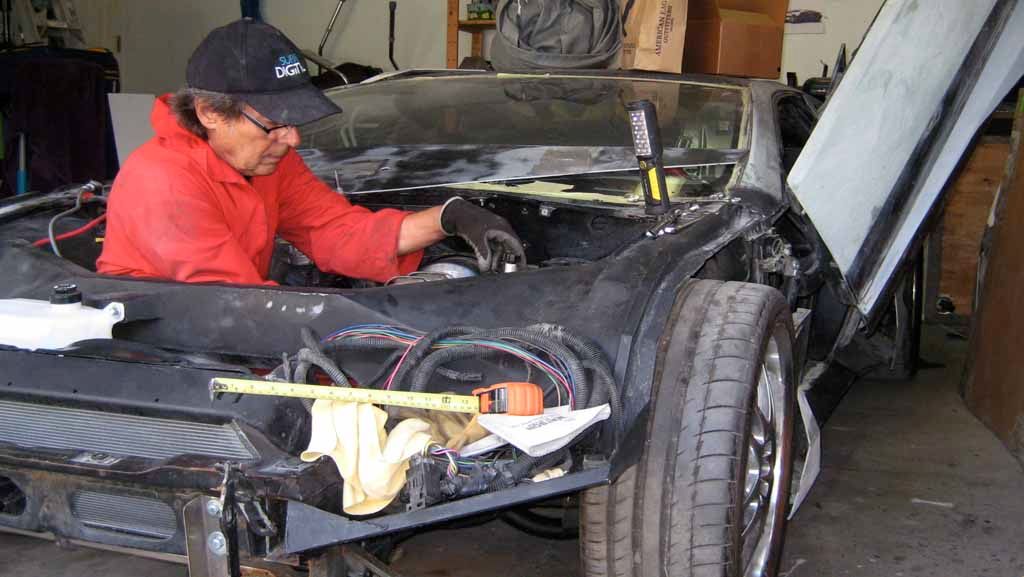
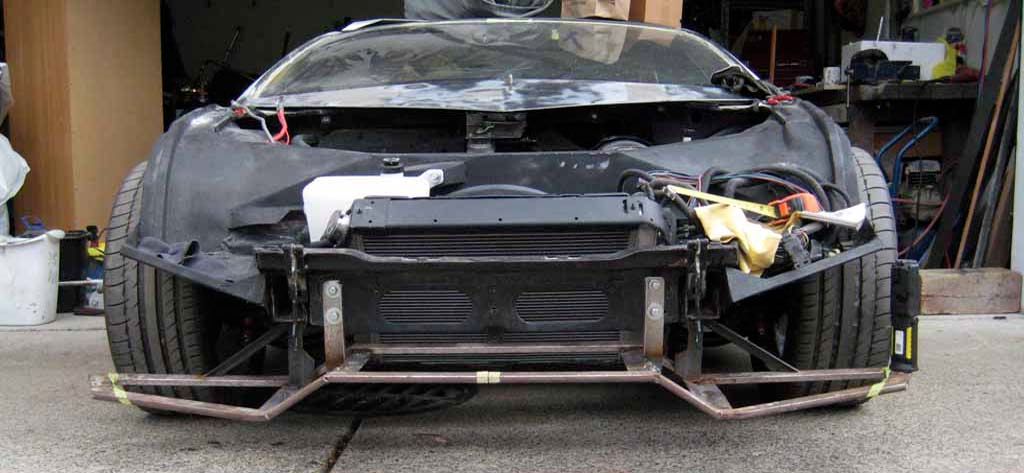
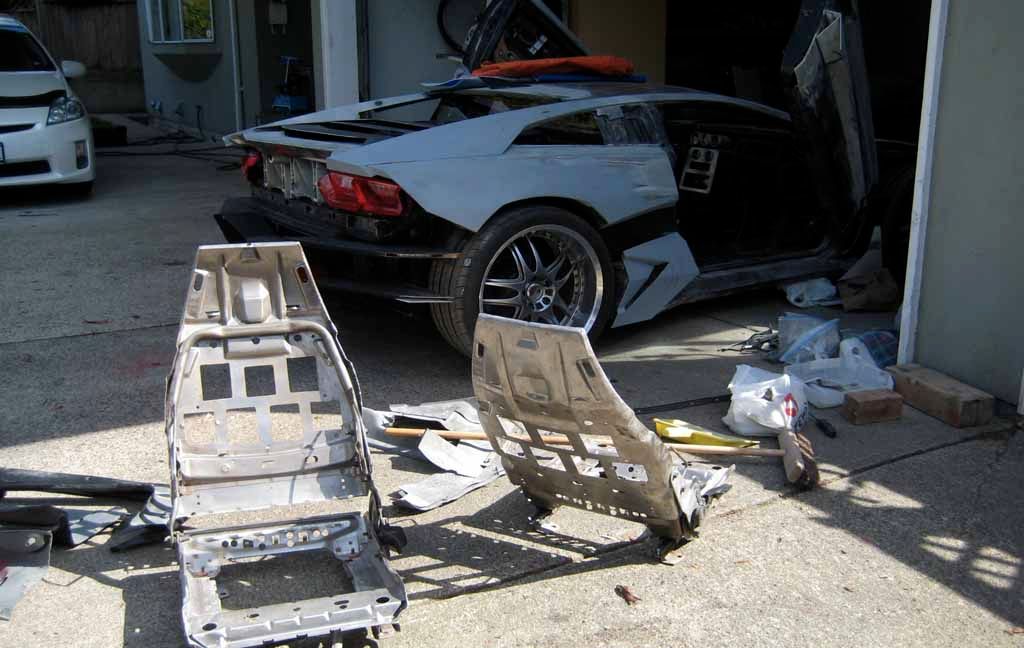
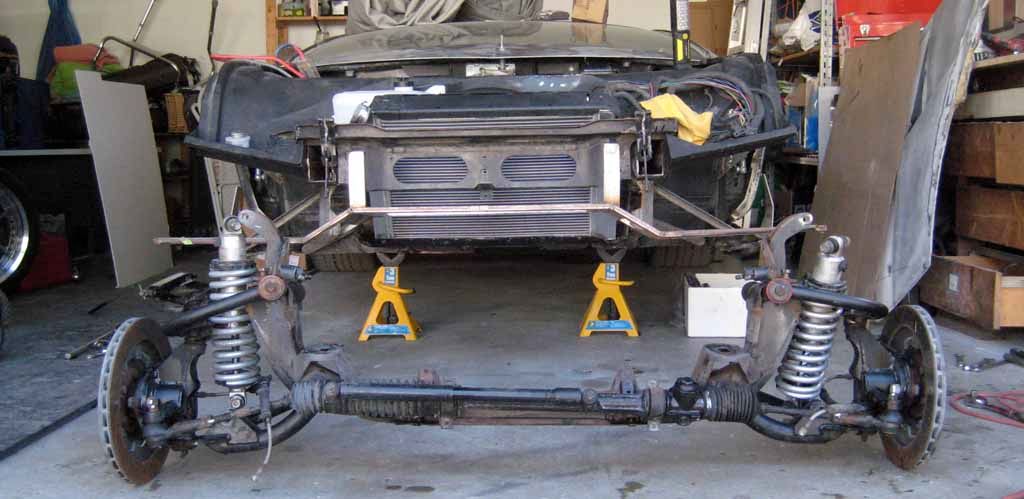
The latest update... My nephew and I where able to remove the old front suspension without snapping off any bolts, we where told not to use impact gun/ just use a longer pipe for leverage, it was slow but came off smooth
Replacing with used 13" Wilwood sport front suspension (this suspension wasn't driven much at all)
[This message has been edited by Car-Lo (edited 09-13-2015).]
Ya know I helped transport that suspension to your place and I am still impressed when I see it. The only that worries me and it just might be camera angle but it looks like the new suspension is wider that your old one. Did or can you measure it from rotor to rotor on both to make sure. Its possible Hugh got longer control arms to work with his body kit. It won't kill you as if its too wide, RBS will just get an extra wide body front. Plus maybe some wheels with a deeper offset. Either way it looks dead sexy. Congrats on it. That truly is my dream suspension and brakes setup.
I see your old suspension appears to have Grand Am slotted / cross drill rotors ? Any chance you might want to sell it as a package. I would not need the cross member, just the hubs rotors and possibly the rack and pinion. The control arms appear to have Poly bushings, you could probably sell that for a few bucks too. People like to buy control arms with poly as it saves them the hassle of installing them. I did that with my 88GT bought an entire 88 suspension front to back with poly installed. Might it so easy to drop and swap.
I would have to wait until are moved and settled in to the new house though so if you don't mind waiting a few weeks.
------------------ 857GT Part 85GT Part 87GT Part Caddy, 93 Eldorado 4.9, 5spd Dual O2 Custom Chip, Custom Exhaust. MSD Everything Now with Nitrous. Capt Fiero --- My Over View Cadero Pics For Sale $4000, Yellow 88GT 5spd Full Poly Suspension, Lowered 1/2" in front, Corner Carver.
Oh I forgot to mention, when you put the new suspension in LOCK TIGHT THE HELL OUT OF THOSE BOLTS. USE THE RED LOCK TIGHT. As you don't want those bolts ever coming loose.
------------------ 857GT Part 85GT Part 87GT Part Caddy, 93 Eldorado 4.9, 5spd Dual O2 Custom Chip, Custom Exhaust. MSD Everything Now with Nitrous. Capt Fiero --- My Over View Cadero Pics For Sale $4000, Yellow 88GT 5spd Full Poly Suspension, Lowered 1/2" in front, Corner Carver.
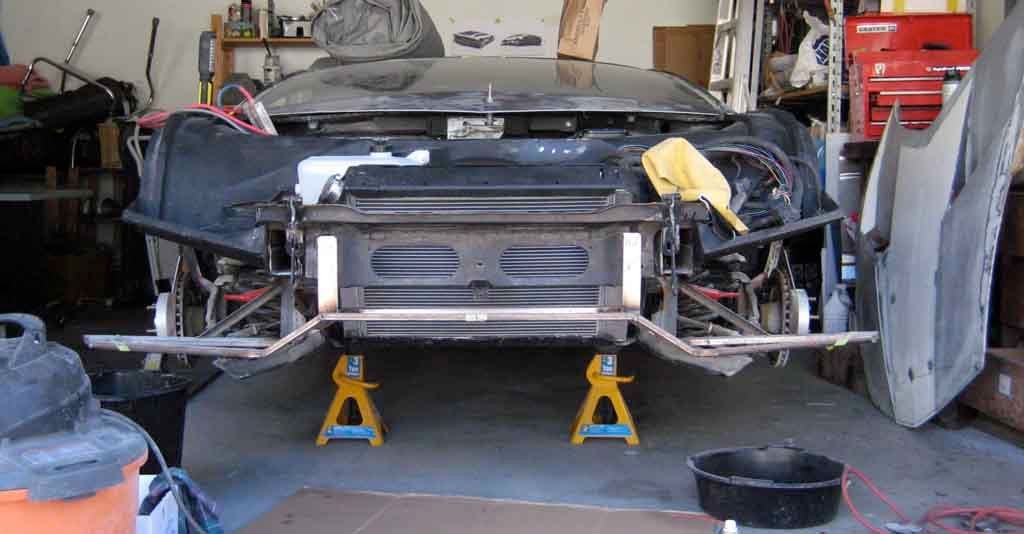
THE GOOD... installing the new suspension went very smooth, it 's the same size we jacked it up and bolted it on / but wait for the BAD.
Here we are two amateur wrencher-ers celebrating job well done
quote
Originally posted by Capt Fiero:
Ya know I helped transport that suspension to your place and I am still impressed when I see it. The only that worries me and it just might be camera angle but it looks like the new suspension is wider that your old one. Did or can you measure it from rotor to rotor on both to make sure. Its possible Hugh got longer control arms to work with his body kit. It won't kill you as if its too wide, RBS will just get an extra wide body front. Plus maybe some wheels with a deeper offset. Either way it looks dead sexy. Congrats on it. That truly is my dream suspension and brakes setup.
I see your old suspension appears to have Grand Am slotted / cross drill rotors ? Any chance you might want to sell it as a package. I would not need the cross member, just the hubs rotors and possibly the rack and pinion. The control arms appear to have Poly bushings, you could probably sell that for a few bucks too. People like to buy control arms with poly as it saves them the hassle of installing them. I did that with my 88GT bought an entire 88 suspension front to back with poly installed. Might it so easy to drop and swap.
I would have to wait until are moved and settled in to the new house though so if you don't mind waiting a few weeks.
Thanks David for posting all those tips to late
THE BAD...
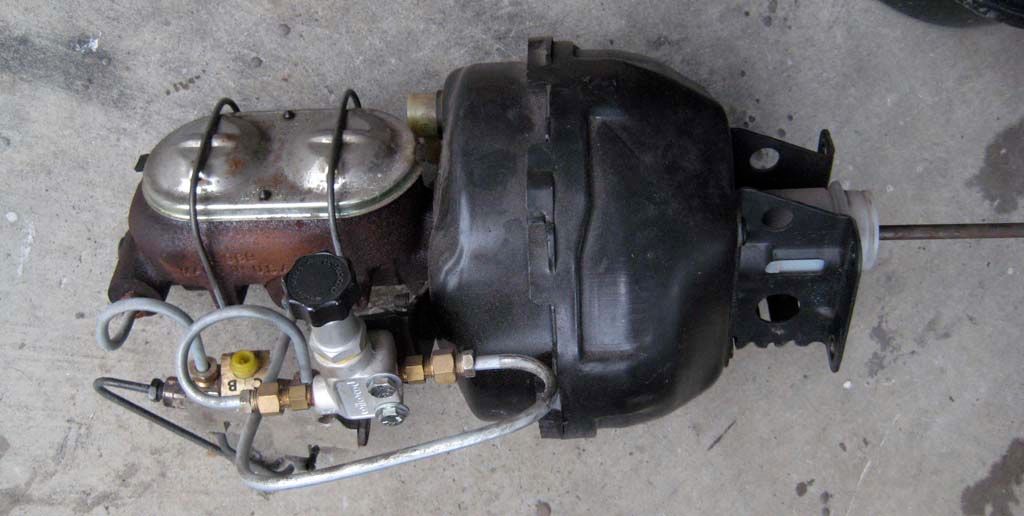
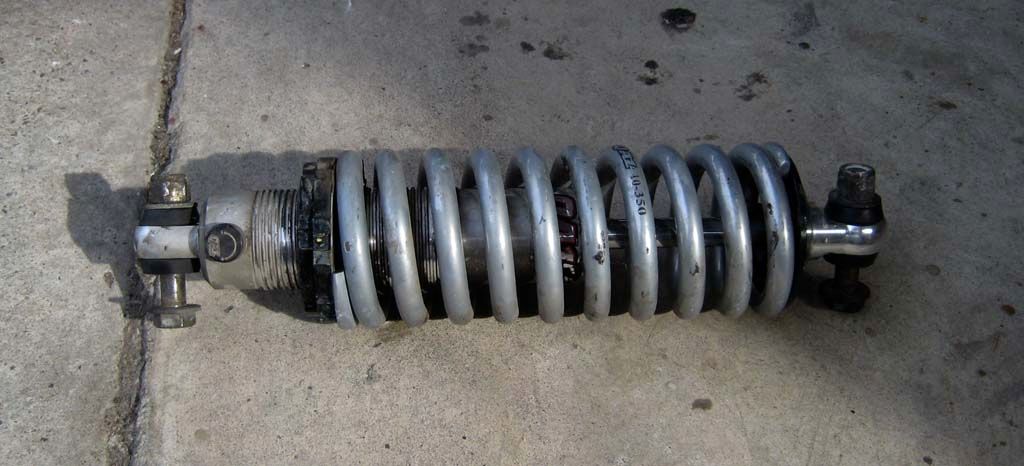
I think I installed the shock upside down, is the valve at top or bottom ? pic is at bottom and let us know The red sway bar, the links look to long Didn't use any lock tight / I can do one at a time tomorrow
Tomorrow I'll have to slowly change the bad
Yeah David, you can zip over anytime and take what you need from old suspension (it's free) no rush !
[This message has been edited by Car-Lo (edited 09-14-2015).]
Yes, as cyruss88 notes, ordinarily the valve is at the bottom. However, some people like to mount the spring/shock with the heavier end mounted to the chassis to reduce unsprung mass in order to achieve optimum handling. In your case it would be to mount it with the valve end mounted to the cross member; it appears that both ends have the same mounting detail. The actual benefit? Slight I imagine, since our cars are relatively heavy in relation to race cars.
To be honest I thought it had to be down, but my brain is not really thinking straight at the moment, I can't grasp what effect up or down will have with the adjustment of the coil over. You might want to contact Chris Zander <fire451@gmail.com> as he was the one that originally built the car.
and
Thank You TONS for the suspension, that is awesome.
If there is ever anything you need from my parts bin just let me know and its yours.
No updates yet just busy with other things to catch up
quote
Originally posted by cyrus88:
The valve should be at the bottom
Thanks cyrus88 for your input
quote
Originally posted by kennn:
Yes, as cyruss88 notes, ordinarily the valve is at the bottom. However, some people like to mount the spring/shock with the heavier end mounted to the chassis to reduce unsprung mass in order to achieve optimum handling. In your case it would be to mount it with the valve end mounted to the cross member; it appears that both ends have the same mounting detail. The actual benefit? Slight I imagine, since our cars are relatively heavy in relation to race cars.
Ken
Thanks kennn that is good info so maybe in RBS2 case it shouldn't matter to much which is at top or bottom What do you think if I have valve at top for easier access for valve/ride hight adjustments or just leave it as is with valve at bottom ??
Dr.Fiero sent photo from another Fiero with valve at top as shown below...
[This message has been edited by Car-Lo (edited 09-15-2015).]
The valve at the top is located at the heavier end of the spring/shock. My counsel is to then place the valve adjuster at the top for less unsprung mass for better handling. If I had a choice, that's what I would do.
To be honest I thought it had to be down, but my brain is not really thinking straight at the moment, I can't grasp what effect up or down will have with the adjustment of the coil over. You might want to contact Chris Zander <fire451@gmail.com> as he was the one that originally built the car.
and
Thank You TONS for the suspension, that is awesome.
If there is ever anything you need from my parts bin just let me know and its yours.
David
Thanks David, I got a hold of Chris and he said to switch it to the top for access to the setting.
quote
Originally posted by kennn:
The valve at the top is located at the heavier end of the spring/shock. My counsel is to then place the valve adjuster at the top for less unsprung mass for better handling. If I had a choice, that's what I would do.
Ken
Thanks again kennn for your help, today I'll change the valve to the top for those reasons hook up brake lines and drop her down.
[This message has been edited by Car-Lo (edited 09-16-2015).]
QA-1 shocks like the ones you have can be mounted in any position .They are great shocks you are going to love them .One problem with the sport suspension is not enough travel .I had to modify the upper perch to get the travel and ride height I wanted .Someone may have already done that to your setup because the QA-1 shocks do not fit the standard width sport suspension without mods .That is the front of my car in the picture .I feel like I have made it to the big leagues now lol .
Thanks for the info wftb so that's where Dr.Fiero dug up your photo I had to check out your build thread and you're doing an amazing custom work to the suspension Today I call Richard (West Shore Fab) and said the same thing in the way I drive I can have it both ways, one on top and other at bottom anyway today I ordered wide bumpsteer 3" each side and doing away with the adapters The sport suspension with QA-1 shocks came off 308 replica, I seen it drive at meetings and Capt. Fiero drove it too and everything worked fine, so I guess they made the mods.
quote
Originally posted by wftb:
QA-1 shocks like the ones you have can be mounted in any position .They are great shocks you are going to love them .One problem with the sport suspension is not enough travel .I had to modify the upper perch to get the travel and ride height I wanted .Someone may have already done that to your setup because the QA-1 shocks do not fit the standard width sport suspension without mods .That is the front of my car in the picture .I feel like I have made it to the big leagues now lol .
[This message has been edited by Car-Lo (edited 09-19-2015).]
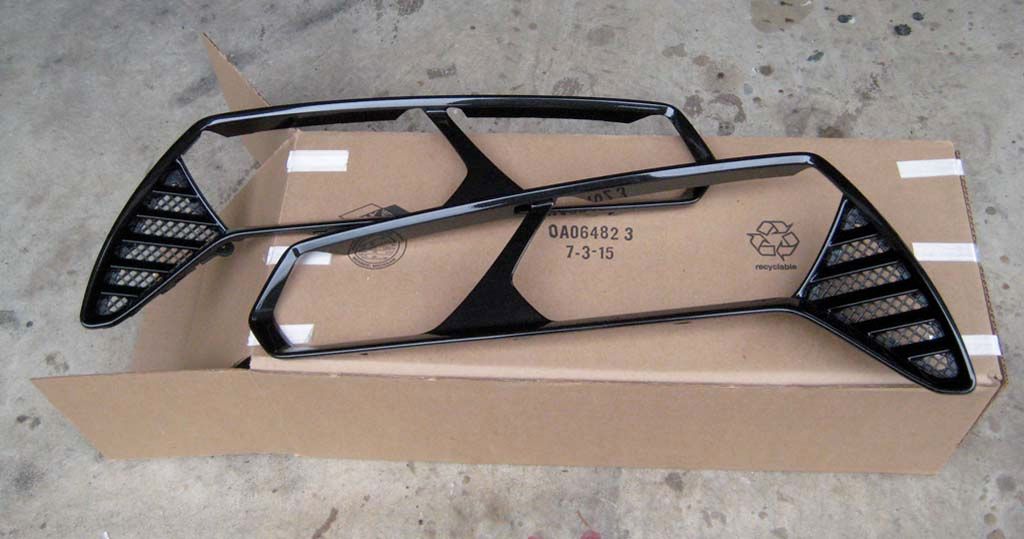
A little update... Yesterday came the C7 taillight frames
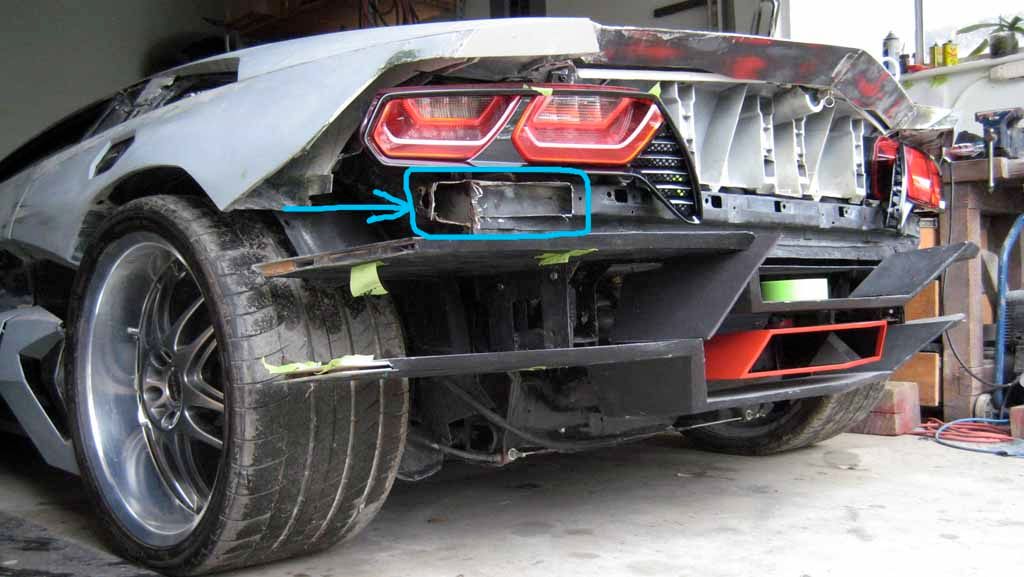
Front suspension is done today I turned RBS2 around to work on the rear again Blue marking showing corner trimmed same angle as lights/ next weld on caps onto corners also showing frames over lights
Hard for me to visualize those structural areas (corners) you trimmed, in order to get trim clearance under lamps. If it looks like it weakened those corners, try to fabricate a cap so that it adds strength back into the corner caps you plan to weld in. If corner strength is reduced, it will add some flex to corner that will crack those existing welds that remain.
Thanks California Kid for the heads up on the structure I'm not to worried about that by capping corners should bring some strength back also the second wall from trunk might just carry enough load ? I'm just curious why your name isn't "Michigan Kid" let us know
quote
Originally posted by California Kid:
Hard for me to visualize those structural areas (corners) you trimmed, in order to get trim clearance under lamps. If it looks like it weakened those corners, try to fabricate a cap so that it adds strength back into the corner caps you plan to weld in. If corner strength is reduced, it will add some flex to corner that will crack those existing welds that remain.
Thanks California Kid for the heads up on the structure I'm not to worried about that by capping corners should bring some strength back also the second wall from trunk might just carry enough load ? I'm just curious why your name isn't "Michigan Kid" let us know
I named my car "California Kid", for many reasons, but mainly because it spent all it life on the road in California. Michigan is my home State, I flew out to LA in 1999 to buy the car and drove it back to MI.


 I was going with your idea too with the engine mesh, but it's a bit to light, she wants something bolder as the Solstice...
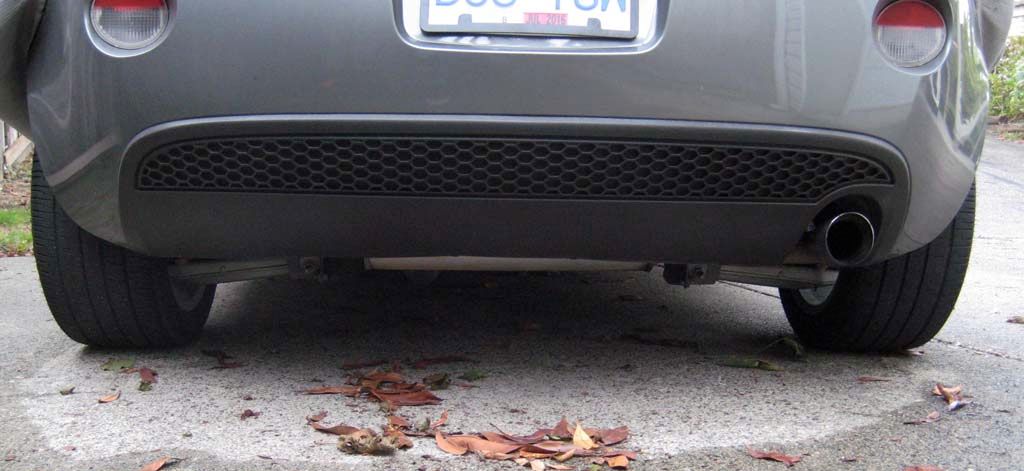
 I'll be fabricating frames for the honeycomb mesh
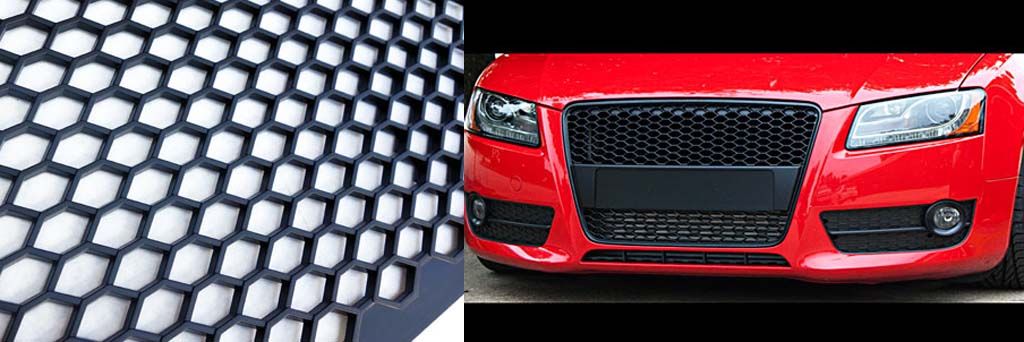
 a lot more tweaking to get diffuser looking better
 hey Nells88, she's getting jealous
  about your project
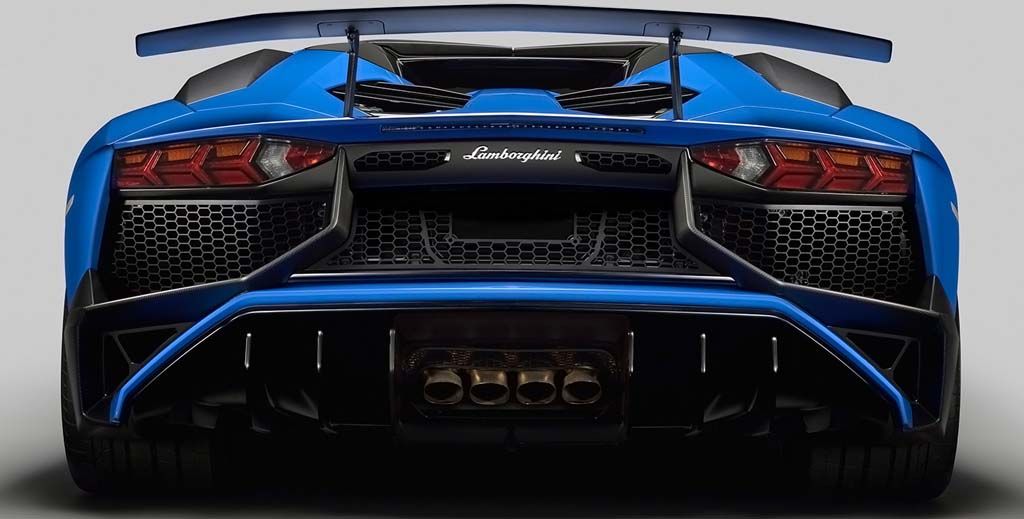
 anyways, it's a start
 85SEnochie and kennn for your input


 she likes hex BOLD as sample shown below

 the wing seems to belong


 maybe she'll stay until some one else changes her
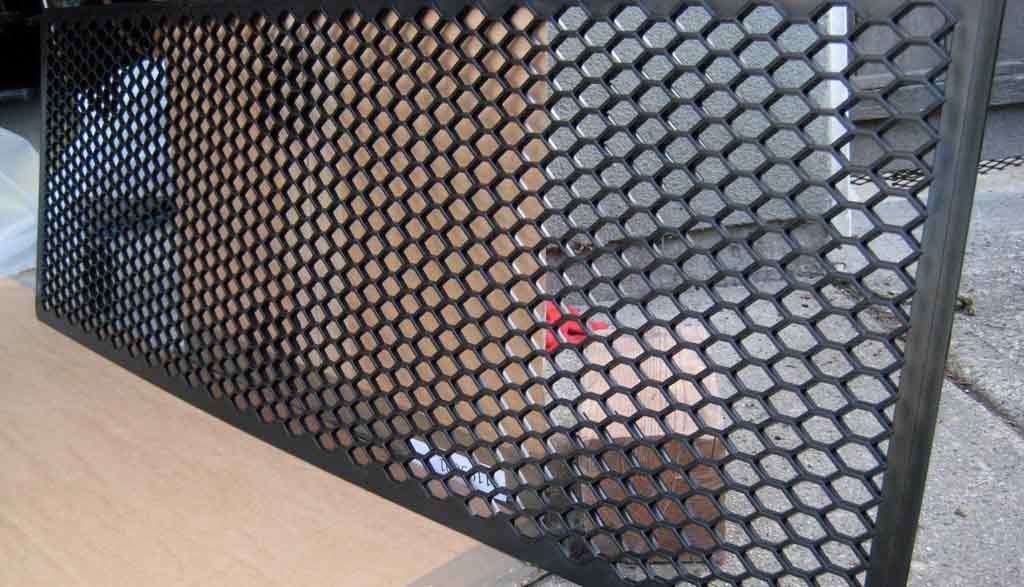


 we'll have to ask Terry to jump in and photoshop your image
 maybe it's the exposed filter


 we jacked it up and bolted it on / but wait for the BAD.
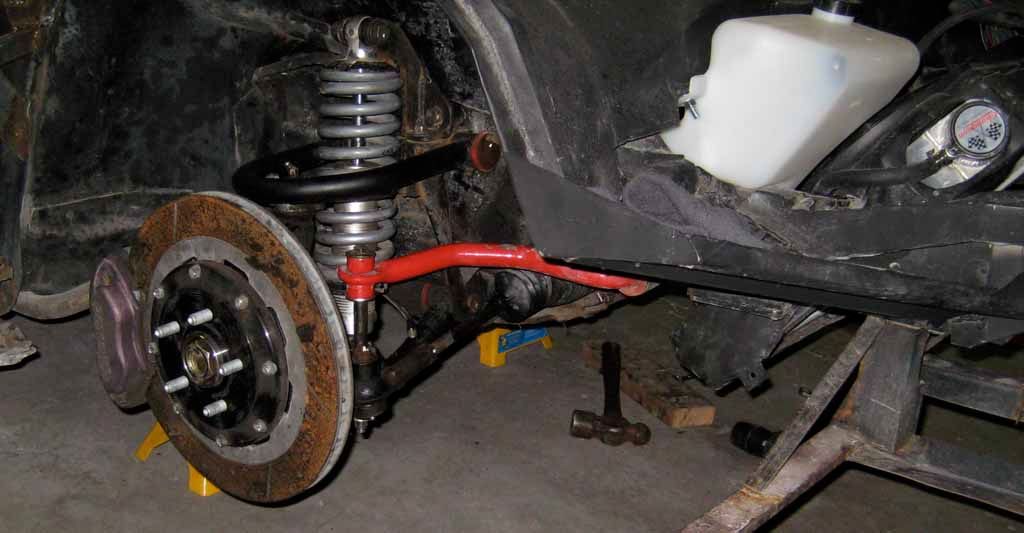
 two amateur wrencher-ers celebrating job well done
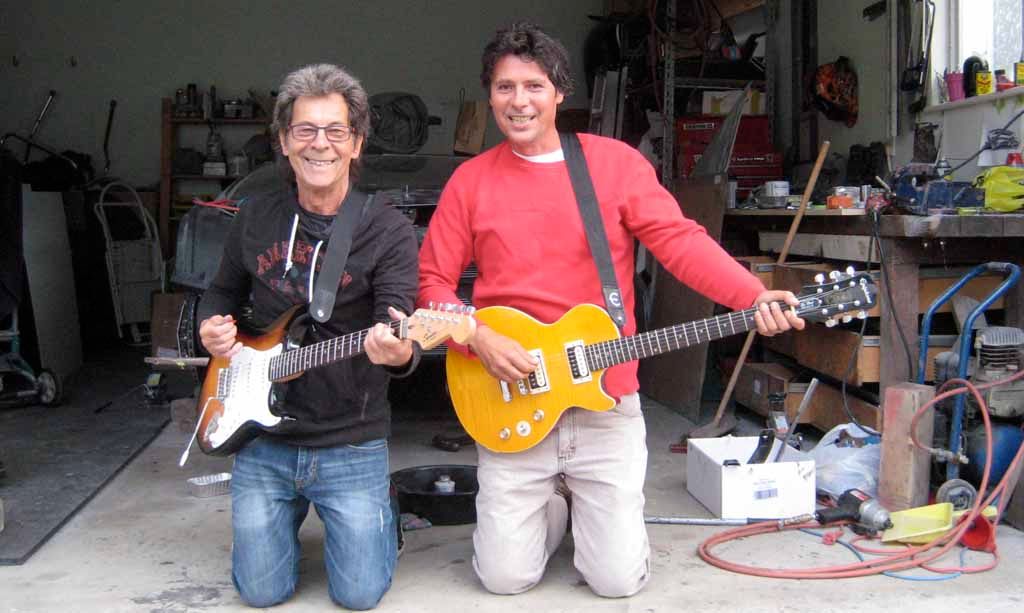
 just busy with other things to catch up
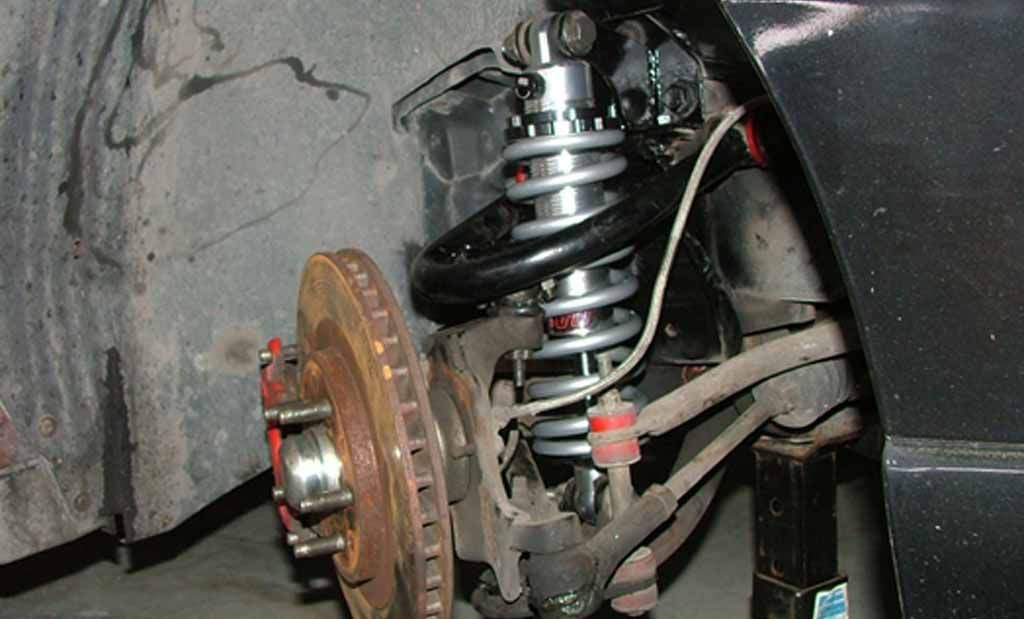
 with better suspension and bigger brakes