Pennock's Fiero Forum
  The Construction Zone
  newest project (Page 58)

Post New Topic  Post A Reply
Email This Page to Someone! | Printable Version

This topic is 78 pages long:  1   2   3   4   5   6   7   8   9   10   11   12   13   14   15   16   17   18   19   20   21   22   23   24   25   26   27   28   29   30   31   32   33   34   35   36   37   38   39   40   41   42   43   44   45   46   47   48   49   50   51   52   53   54   55   56   57   58   59   60   61   62   63   64   65   66   67   68   69   70   71   72   73   74   75   76   77   78 
Previous Page | Next Page
next newest topic | next oldest topic
newest project by bubbajoexxx
Started on: 09-12-2003 06:18 PM
Replies: 3111 (374039 views)
Last post by: Trinten on 04-23-2023 11:02 PM
Fiero2m8
Member
Posts: 1928
From: Niagara, Ontario, Canada
Registered: Feb 2006


Feedback score:    (10)
Leave feedback

Rate this member

Report this Post12-29-2008 06:39 PM Click Here to See the Profile for Fiero2m8Click Here to visit Fiero2m8's HomePageSend a Private Message to Fiero2m8Edit/Delete MessageReply w/QuoteDirect Link to This Post
 
quote
Originally posted by fieroboom:
That's my opinion, and I'm stickin to it!
Let me know what you think.
-Paul


Thanks for info and I agree that the glass patterns do appear to start from the hinge area and move outward.
Since I've ruled out user abuse, I'd rather blame the extreme environmental conditions over the workmanship since the hatch was installed in Sept 2004.
But hey, the project is still envolving and many modifications have been redone and upgraded along the way and I'm hoping to continue that trend.

Ryan
IP: Logged
ezramore
Member
Posts: 338
From: colorado springs co
Registered: Oct 2003


Feedback score: N/A
Leave feedback

Rate this member

Report this Post12-30-2008 05:25 PM Click Here to See the Profile for ezramoreSend a Private Message to ezramoreEdit/Delete MessageReply w/QuoteDirect Link to This Post
Just a thought. once you repare and determin if its a hinge stress issue or not. you could use a layer of good quality window tinting film over the glass to reflect some of the heat back out of the cabin area. would not have to be a dark tint. I have the formula 1 on my caprice from when i lived in California and you notice a big difference ib the inside glass temperature. does the inside cab of the car get hot when the engine is running. Also i used to do a lot of glazing work (windshields, and we would often find a minor chip someware near an edge that when cold would run like crazy. If this were to happen on tempered glass i could definatley imagine it responding the way it did. could have been nicked when the rear glass hinges were added which would explain the spidering near the hinge. you might look into safty glass between the engine and cab. would reduce heat and would not shatter even if it were cracked. It would also act as an indicator if it were a hinge problem. Just need a little denatured alcohal, a match, a glass cutter, and a belt sander to make your own back glass. Fiero glass is pretty streight which is a nice advantage.
IP: Logged
Fiero2m8
Member
Posts: 1928
From: Niagara, Ontario, Canada
Registered: Feb 2006


Feedback score:    (10)
Leave feedback

Rate this member

Report this Post12-30-2008 08:33 PM Click Here to See the Profile for Fiero2m8Click Here to visit Fiero2m8's HomePageSend a Private Message to Fiero2m8Edit/Delete MessageReply w/QuoteDirect Link to This Post
Today I removed the seats and disassembled the driver's seat to bring to an uphostery shop to get an estimate on refurbishing.
The centre cloth is in good shape and could be dry cleaned too I guess.
I do like the carpeted back sides and the map pockets on the originals, so replacing the front leather might be a good way to go.
Not sure what to do about the headrests yet though (speakers and holes) - ideas?
I also have a set of heated seating pads with wiring and switches I got from Bubba to install during the recovering process.

Here are the pics:


IP: Logged
maryjane
Member
Posts: 69576
From: Copperas Cove Texas
Registered: Apr 2001


Feedback score: (4)
Leave feedback


Total ratings: 441
Rate this member

Report this Post12-31-2008 08:37 AM Click Here to See the Profile for maryjaneSend a Private Message to maryjaneEdit/Delete MessageReply w/QuoteDirect Link to This Post
I don't know about dry cleaning the red material--as you mentioned in the other thread. For sure, you would want to take it to a very reputable business that is knowledgeable in all types of fabrics and dyes--not just your corner 1 hr dry cleaners. That red material btw, if you could find any new, runs well over $100 per seat. Guard it with your life.
IP: Logged
Fiero2m8
Member
Posts: 1928
From: Niagara, Ontario, Canada
Registered: Feb 2006


Feedback score:    (10)
Leave feedback

Rate this member

Report this Post12-31-2008 10:36 AM Click Here to See the Profile for Fiero2m8Click Here to visit Fiero2m8's HomePageSend a Private Message to Fiero2m8Edit/Delete MessageReply w/QuoteDirect Link to This Post
Thanks Maryjane - I might go with they clone covers for now and keep my originals to either refurbish or sell in the future.

Happy New Year everyone
IP: Logged
jscott1
Member
Posts: 21676
From: Houston, TX , USA
Registered: Dec 2001


Feedback score:    (15)
Leave feedback


Total ratings: 415
Rate this member

Report this Post12-31-2008 03:59 PM Click Here to See the Profile for jscott1Send a Private Message to jscott1Edit/Delete MessageReply w/QuoteDirect Link to This Post
 
quote
Originally posted by Fiero2m8:

Not sure what to do about the headrests yet though (speakers and holes) - ideas?


I replaced my factory speakers with Sony Xplod XS-W3521 Coaxial Car Speakers.

http://www.buy.com/prod/son...455.html?dcaid=17988

I wasn't expecting much, but they sounded much better than I expected. I guess I had never heard seat speakers that were not already worn out. I had to cut away a bunch of foam to get them to fit right, but it was worth it.

IP: Logged
Fiero2m8
Member
Posts: 1928
From: Niagara, Ontario, Canada
Registered: Feb 2006


Feedback score:    (10)
Leave feedback

Rate this member

Report this Post01-02-2009 01:40 PM Click Here to See the Profile for Fiero2m8Click Here to visit Fiero2m8's HomePageSend a Private Message to Fiero2m8Edit/Delete MessageReply w/QuoteDirect Link to This Post
 
quote
Originally posted by jscott1:
I replaced my factory speakers with Sony Xplod XS-W3521 Coaxial Car Speakers.
http://www.buy.com/prod/son...455.html?dcaid=17988
I wasn't expecting much, but they sounded much better than I expected. I guess I had never heard seat speakers that were not already worn out. I had to cut away a bunch of foam to get them to fit right, but it was worth it.


Thanks Jonathan - they look like 3.5 inch - did you cut the foam since there is no grill on the speakers?

[This message has been edited by Fiero2m8 (edited 01-03-2009).]

IP: Logged
30+mpg
Member
Posts: 4049
From: Russellville, AR
Registered: Feb 2002


Feedback score: (2)
Leave feedback


Total ratings: 97
Rate this member

Report this Post01-02-2009 02:07 PM Click Here to See the Profile for 30+mpgSend a Private Message to 30+mpgEdit/Delete MessageReply w/QuoteDirect Link to This Post
 
quote
Fiero2m8:Today I removed the seats and disassembled the driver's seat to bring to an uphostery shop to get an estimate on refurbishing...


Have Mr. Mike quote you a set reusing your red inserts.

IP: Logged
Fiero2m8
Member
Posts: 1928
From: Niagara, Ontario, Canada
Registered: Feb 2006


Feedback score:    (10)
Leave feedback

Rate this member

Report this Post01-03-2009 01:15 AM Click Here to See the Profile for Fiero2m8Click Here to visit Fiero2m8's HomePageSend a Private Message to Fiero2m8Edit/Delete MessageReply w/QuoteDirect Link to This Post
 
quote
Originally posted by 30+mpg:
Have Mr. Mike quote you a set reusing your red inserts.


I contacted Mr. Mike via email and he claimed that he does not work with used materials...
IP: Logged
jscott1
Member
Posts: 21676
From: Houston, TX , USA
Registered: Dec 2001


Feedback score:    (15)
Leave feedback


Total ratings: 415
Rate this member

Report this Post01-03-2009 02:32 PM Click Here to See the Profile for jscott1Send a Private Message to jscott1Edit/Delete MessageReply w/QuoteDirect Link to This Post
 
quote
Originally posted by Fiero2m8:


Thanks Jonathan - they look like 3.5 inch - did you cut the foam since there is no grill on the speakers?


Yes, I cut away the foam so that it would not be pushing in the surface of the speaker. I was worried about the lack of protection for the face of the speaker, but so far that has not been an issue.

Did you get that estimate yet on the seat covers??

I'm hoping someday to get mine redone, at a cost in the neighborhood of $500 USD. If it's more than that then I'll get the clone covers.

(sorry for posting in that other thread)

[This message has been edited by jscott1 (edited 01-03-2009).]

IP: Logged
Fiero2m8
Member
Posts: 1928
From: Niagara, Ontario, Canada
Registered: Feb 2006


Feedback score:    (10)
Leave feedback

Rate this member

Report this Post01-04-2009 05:59 PM Click Here to See the Profile for Fiero2m8Click Here to visit Fiero2m8's HomePageSend a Private Message to Fiero2m8Edit/Delete MessageReply w/QuoteDirect Link to This Post
Just got the other seat cover removed today from the passenger seat.
I checked the original speakers by wiring them to my home theatre system.
All four worked and sounded suprisingly good so I'll probably leave them alone.
Another option I might go with is Mr. Mikes in Grey leather with a black Indy 500 logo.
As far as refurbishing the originals, I should have a quote for us in about a week.
IP: Logged
PFF
System Bot
bubbajoexxx
Member
Posts: 1630
From: Ontario Canada
Registered: Aug 2003


Feedback score: N/A
Leave feedback


Total ratings: 112
Rate this member

Report this Post01-05-2009 10:16 PM Click Here to See the Profile for bubbajoexxxClick Here to visit bubbajoexxx's HomePageSend a Private Message to bubbajoexxxEdit/Delete MessageReply w/QuoteDirect Link to This Post
 
quote
Originally posted by fieroboom:


Ok, whew. At first I was worried that as a result of your stretch, there was undue stress at the bottom of the window from the upper frame rails, forcing it to shatter after a period of the frame settling, but now I have a revised theory...
Having recently removed my rear glass, and seeing how little steel there is around it, I believe the culprit is your driver side hinge (or maybe both hinges), in conjunction with the stress from the compressed struts of the closed hatch.
My basis for this theory is how you have the hinge mounted:


And the striations, or shattering pattern of the glass:


Note how the general pattern moves outward from the hinge... If you didn't reinforce that upper lip where the hinge is mounted, then I'm not surprised at all that it shattered; in fact, I can't believe it took that long. If you carefully measure the height differences between the roof & hatch (in closed position), I can almost guarantee that the hatch is just a gnat's ankle higher than the roof. Also, you could closely inspect that upper lip, and I'm pretty sure it'll be slightly bent upward where the hinge mounts. With the weight of the hatch, it may not seem like it, but those struts have massive amounts of force, and can cause some crazy stress at their mounting points, as well as the hinges they work with. Have a look at a factory installed set of struts... the mounting points are pretty heavily braced, and so are the hinges (I can show you pics on my Caddy's hood if you want).

Anyway, I hope this is all taken in the light of a helpful opinion, because that's how I mean it! Under normal stresses and circumstances, that glass shouldn't have shattered. I'm pretty certain the fact that it shattered is a big clue to a bigger problem, and just replacing it with Lexan isn't going to fix whatever made it shatter, and could produce worse symptoms later on, like a crack in your fiberglass on the roof or hatch.

That's my opinion, and I'm stickin to it!
Let me know what you think.
-Paul


the upper hinge is renforced with 1/8 plate steel the only way the rear window would be broken out like this is if the hinges where not tightend corectly when the glass was reinstalled after the tint was applied that car has been outside all its life when i built it and never broke a window
IP: Logged
bubbajoexxx
Member
Posts: 1630
From: Ontario Canada
Registered: Aug 2003


Feedback score: N/A
Leave feedback


Total ratings: 112
Rate this member

Report this Post01-05-2009 10:17 PM Click Here to See the Profile for bubbajoexxxClick Here to visit bubbajoexxx's HomePageSend a Private Message to bubbajoexxxEdit/Delete MessageReply w/QuoteDirect Link to This Post

bubbajoexxx

1630 posts
Member since Aug 2003
the starter is from a vw van
and for the window use salty glass and have one cut from clear flat stock for safty the glass needs to be there

[This message has been edited by bubbajoexxx (edited 01-05-2009).]

IP: Logged
Fiero2m8
Member
Posts: 1928
From: Niagara, Ontario, Canada
Registered: Feb 2006


Feedback score:    (10)
Leave feedback

Rate this member

Report this Post01-17-2009 12:51 AM Click Here to See the Profile for Fiero2m8Click Here to visit Fiero2m8's HomePageSend a Private Message to Fiero2m8Edit/Delete MessageReply w/QuoteDirect Link to This Post
Thanks Bubbajoexxx.

jscott1 - I got a local upholstery shop (Streamline Auto Upholstery) in Niagara Falls to quote the Indy seat restoration.

Prices are Cdn funds:

Leather $800 for pair
Leatherette $580 for pair

Includes disassembly, shampoo red material inserts, reuse carpeted back and map pockets, punch speaker holes in new leather and reassemble.
If I could buy the new red material, I would go this route with leather for sure since my seat backs are in excellent shape.
I would go for Indy Clones from Mr. Mikes for $366 U.S. over the leatherette option.
He noticed that drivers side of my driver's seat had already been previously changed to vinyl from the original leather but it ripped too.

Anybody willing to sell the new red Indy material for the seats, or is this a pipe dream?

[This message has been edited by Fiero2m8 (edited 01-25-2009).]

IP: Logged
Fiero2m8
Member
Posts: 1928
From: Niagara, Ontario, Canada
Registered: Feb 2006


Feedback score:    (10)
Leave feedback

Rate this member

Report this Post01-25-2009 08:52 PM Click Here to See the Profile for Fiero2m8Click Here to visit Fiero2m8's HomePageSend a Private Message to Fiero2m8Edit/Delete MessageReply w/QuoteDirect Link to This Post
Update:

Met up with forum member Skoon on Friday night in Lewisburg, Tennessee to pickup the 88 Front Suspension.
Nice to meet another fellow Fiero Fanatic - makes us feel better knowing that we're not alone (or crazy)

Here's a picture of it in the van - I've got a nice winter project now I can work on indoors!


Thanks Skoon - plus rating for you and good luck with the new Indy project!

Ryan
IP: Logged
Fiero2m8
Member
Posts: 1928
From: Niagara, Ontario, Canada
Registered: Feb 2006


Feedback score:    (10)
Leave feedback

Rate this member

Report this Post02-02-2009 07:05 PM Click Here to See the Profile for Fiero2m8Click Here to visit Fiero2m8's HomePageSend a Private Message to Fiero2m8Edit/Delete MessageReply w/QuoteDirect Link to This Post
Well yesterday afternoon, I got the 88 Front suspension disassembled.
I took my time (3 hours) using a lot of PB Blaster and a combination of air and hand tools.
Given that it appeared the shocks as the only things touched over the last 20 years, it went pretty good.

Here is the reference photo I took before starting:


I did snap one of the upper control arm threads but I haven't decided yet whether to reuse them or go with the Held tubular A-arm and coilover setup.
The mounting bolts are 13mm with 18mm nuts inside the crossmember (don't forget to remove the anti-slip plate for the nuts first):


One of the things I like on the 88 is the front sway bar - it's very heavy duty/thick and mounts to the subframe.
The bolts removed easily with no breaking - the 84-87 tend to break of in the spaceframe requiring them to be drilled out.
The rack seems to operate quietly and smoothly, just need to clean it up, replace the tierod ends and get a steering shaft link.
The caliper are complete and look in good shape if anyone wants to buy them BTW:


The underside has the most surface rust, but overall the crossmember is solid and in good condition.
While on this side the bump stops and shock bolts were removed:


Success! The shocks, springs, spindles, upper and lower control arms, steering rack and stabilizer bar removed.
I left the rubber bushings in for now but if I end up reusing the control arms, they would be replaced with polyurethane.
The only other hardware that broke were 3 of the 10mm bolts that hold the rack on as expected, but that will be replaced.
My girlfriend's brother is going to take care of removing the ball joints and sandblasting everything pictured at the Fort Erie Chop Shop.


Here's a good swap writeup thread if others are comtemplating upgrading to an 88 front suspension - be warned it's not a direct bolt in...
//www.fiero.nl/forum/A...041015-2-047764.html


------------------

Indy Northstar-Stretch ~ LT1-NOS Roadster

[This message has been edited by Fiero2m8 (edited 02-02-2009).]

IP: Logged
Fiero2m8
Member
Posts: 1928
From: Niagara, Ontario, Canada
Registered: Feb 2006


Feedback score:    (10)
Leave feedback

Rate this member

Report this Post03-02-2009 12:09 PM Click Here to See the Profile for Fiero2m8Click Here to visit Fiero2m8's HomePageSend a Private Message to Fiero2m8Edit/Delete MessageReply w/QuoteDirect Link to This Post
Not much to report - it's -10 degrees here again today - when is spring coming???
I'm like a squirrel collecting nuts and this arrived the other day:


It's Prothane poly kit for the control arms for the 88 front suspension upgrade.
I'm also going to build a front trunk up there after the new suspension is in.
I've also got to decide on what size A/C condenser to use (Fiero or Mazda or aftermarket).

For those comtemplating longitudinal swaps or stretches, here are a few measurements I took yesterday to answer some PM's...
Northstar adapter plate to axle centreline is 7".
Axle centreline to the firewall bumpout is 36".
(when the tape measure is horizontal from the top of the axle it contacts the bump out that encloses the fuel filler pipe).
Axle to rear bumper frame is 24".
Rear wheel hub to outside of bumper cover at furthest point (centre) is 30".
Northstar valve cover to rear widow clearance is 1-1/2".
Crank pulley clearance to false firewall (checkerplate that covers coolant crossover pipe) is 4".
Crank pulley to Fiero firewall is 7".
Remember that the Fiero firewall is sloped and you need the engine low enough the go under the back window if you want a shorter stretch.
Stock Fiero wheel base is 93.4" - I measured mine hub to hub and got 104.4" or 11" wheel base stretch.

Here's a reference pic if you have any questions:


Ryan

IP: Logged
Fiero2m8
Member
Posts: 1928
From: Niagara, Ontario, Canada
Registered: Feb 2006


Feedback score:    (10)
Leave feedback

Rate this member

Report this Post03-05-2009 12:59 PM Click Here to See the Profile for Fiero2m8Click Here to visit Fiero2m8's HomePageSend a Private Message to Fiero2m8Edit/Delete MessageReply w/QuoteDirect Link to This Post
Looky what arrived today

IP: Logged
Dennis LaGrua
Member
Posts: 15139
From: Hillsborough, NJ U.S.A.
Registered: May 2000


Feedback score:    (13)
Leave feedback


Total ratings: 328
Rate this member

Report this Post03-06-2009 08:47 AM Click Here to See the Profile for Dennis LaGruaSend a Private Message to Dennis LaGruaEdit/Delete MessageReply w/QuoteDirect Link to This Post
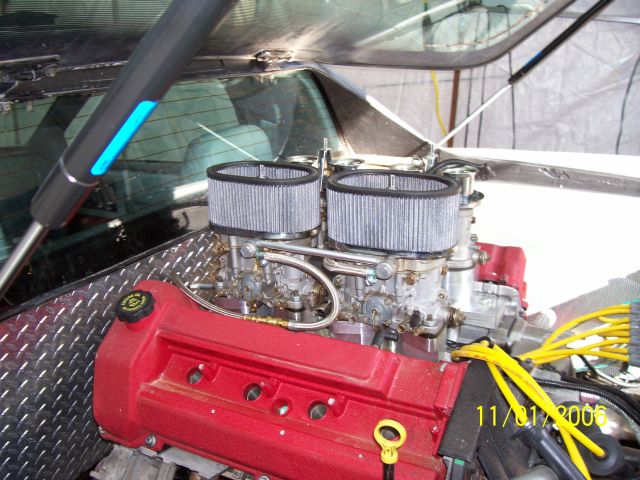
This post started 6 years ago and your creativity is certainly interesting. However after following it we can conclude that you don't build em for their gas mileage ability.
BTW, why do you prefer old technolgy by using carburetors? Is this setup going to pass emissions testing?

------------------
" THE BLACK PARALYZER" -87GT 3800SC Series III engine, 3.4" Pulley, N* TB, LS1 MAF, Flotech Exhaust Autolite 104's Custom CAI 4T65eHD w. custom axles, HP Tuners VCM Suite.
"THE WILDCAT"
87GT - ALL OUT 3.4L Turbocharged engine, Garrett Hybrid Turbo, MSD ign., modified TH125H
" ON THE LOOSE WITHOUT THE JUICE "

IP: Logged
Fiero2m8
Member
Posts: 1928
From: Niagara, Ontario, Canada
Registered: Feb 2006


Feedback score:    (10)
Leave feedback

Rate this member

Report this Post03-07-2009 07:13 PM Click Here to See the Profile for Fiero2m8Click Here to visit Fiero2m8's HomePageSend a Private Message to Fiero2m8Edit/Delete MessageReply w/QuoteDirect Link to This Post
 
quote
Originally posted by Dennis LaGrua:
BTW, why do you prefer old technolgy by using carburetors? Is this setup going to pass emissions testing?


quote
Originally posted by bubbajoexxx:
+I just have to be different, thats why I am using old tech on the setup. Just to see if it can be done there a plenty of us out there who have no use for electronics and like to tune are cars the old fasion way with a screwdriver and a hand full of jets. Also i am using the porsche transaxle - have not broken one yet


There is no emissions testing on vehicles outside 3-20 years old in Ontario, Canada.
IP: Logged
Fiero2m8
Member
Posts: 1928
From: Niagara, Ontario, Canada
Registered: Feb 2006


Feedback score:    (10)
Leave feedback

Rate this member

Report this Post03-14-2009 02:20 PM Click Here to See the Profile for Fiero2m8Click Here to visit Fiero2m8's HomePageSend a Private Message to Fiero2m8Edit/Delete MessageReply w/QuoteDirect Link to This Post
This week I "imported" the Indy clone seat covers from Mr. Mike:

IP: Logged
PFF
System Bot
Fiero2m8
Member
Posts: 1928
From: Niagara, Ontario, Canada
Registered: Feb 2006


Feedback score:    (10)
Leave feedback

Rate this member

Report this Post04-06-2009 02:29 PM Click Here to See the Profile for Fiero2m8Click Here to visit Fiero2m8's HomePageSend a Private Message to Fiero2m8Edit/Delete MessageReply w/QuoteDirect Link to This Post
On the weekend I got started installing the Mr. Mike's INDY clone covers.
I am using heated seat pads I got from a VW/Audi via Bubbajoe.
Here I've attached the leg pad to the foam Mr. Mike provides for the seat bottom:


The underside shows where the wiring will exit:


Here is the finished seat bottom and I'm quite pleased with the resulting look and feel:


IP: Logged
NY_FIERO
Member
Posts: 1554
From: mexico NY
Registered: May 2002


Feedback score: N/A
Leave feedback

Rate this member

Report this Post04-07-2009 01:55 PM Click Here to See the Profile for NY_FIEROClick Here to visit NY_FIERO's HomePageSend a Private Message to NY_FIEROEdit/Delete MessageReply w/QuoteDirect Link to This Post
That's sweet./
IP: Logged
Fiero2m8
Member
Posts: 1928
From: Niagara, Ontario, Canada
Registered: Feb 2006


Feedback score:    (10)
Leave feedback

Rate this member

Report this Post04-11-2009 01:24 PM Click Here to See the Profile for Fiero2m8Click Here to visit Fiero2m8's HomePageSend a Private Message to Fiero2m8Edit/Delete MessageReply w/QuoteDirect Link to This Post
 
quote
Originally posted by NY_FIERO:
That's sweet./


Thanks - here are a few more shots now that they are almost ready to go back in the car:


IP: Logged
Gokart Mozart
Member
Posts: 12143
From: Metro Detroit
Registered: Mar 2003


Feedback score: (1)
Leave feedback


Total ratings: 159
Rate this member

Report this Post04-14-2009 11:50 AM Click Here to See the Profile for Gokart MozartClick Here to visit Gokart Mozart's HomePageSend a Private Message to Gokart MozartEdit/Delete MessageReply w/QuoteDirect Link to This Post
looking good!
IP: Logged
Fiero2m8
Member
Posts: 1928
From: Niagara, Ontario, Canada
Registered: Feb 2006


Feedback score:    (10)
Leave feedback

Rate this member

Report this Post05-12-2009 10:07 PM Click Here to See the Profile for Fiero2m8Click Here to visit Fiero2m8's HomePageSend a Private Message to Fiero2m8Edit/Delete MessageReply w/QuoteDirect Link to This Post
Here's a few more updates:

Corvette hood scoop repaired and primed


Mr. Mikes Indy clones installed featuring new plastic hardware, and heated seat pads


Headliner completed with sunroof latch trim and overhead console for new sunvisors installed

IP: Logged
Fiero2m8
Member
Posts: 1928
From: Niagara, Ontario, Canada
Registered: Feb 2006


Feedback score:    (10)
Leave feedback

Rate this member

Report this Post05-18-2009 09:24 PM Click Here to See the Profile for Fiero2m8Click Here to visit Fiero2m8's HomePageSend a Private Message to Fiero2m8Edit/Delete MessageReply w/QuoteDirect Link to This Post
I forgot to mention that I deleted the "Pontiac" embossed lettering in the headlight door using plastic filler:


Work on finishing the side scoops has finally begun as well:


I also removed the spoiler to strengthen and finish the underside where it was widened.
Now the third mount has been removed with a grinder and the underside piece will be glassed in:


IP: Logged
Titleist75
Member
Posts: 34
From: Binbrook, Ontario, Canada
Registered: May 2009


Feedback score: N/A
Leave feedback

Rate this member

Report this Post05-19-2009 10:25 PM Click Here to See the Profile for Titleist75Send a Private Message to Titleist75Edit/Delete MessageReply w/QuoteDirect Link to This Post
Great work. What Fiero group was that from your pictures of last year at the winery? I am hoping to get my first Fiero in the next few weeks. Awsome car.
IP: Logged
Fiero2m8
Member
Posts: 1928
From: Niagara, Ontario, Canada
Registered: Feb 2006


Feedback score:    (10)
Leave feedback

Rate this member

Report this Post05-20-2009 10:35 PM Click Here to See the Profile for Fiero2m8Click Here to visit Fiero2m8's HomePageSend a Private Message to Fiero2m8Edit/Delete MessageReply w/QuoteDirect Link to This Post
The wine cruise was organized by Forum member OHNIKO and had members from SOFA and the GTA forum.

Today I got the hatch removed so the glass frame can be sanded and painted.
I started by filling the and smoothing around the GTA vents in the decklid.
I used flexible plastic filler since the vents are also flexible:


With the hatch removed, I brought the Fiero to the glass shop to have the rear window removed:


They are not too happy with me as a stock Fiero rear window is difficult enough!
This one is covered with metal and fiberglass at the top and sides making it almost impossible to remove completely:


They are going to remove the inside trim and headliner.
Once all the glass is gone, we can come up with a plan to decide what will be custom installed and how...

IP: Logged
doublec4
Member
Posts: 8289
From: Oakville, Ontario, Canada
Registered: Jun 2003


Feedback score:    (20)
Leave feedback


Total ratings: 150
Rate this member

Report this Post05-20-2009 11:42 PM Click Here to See the Profile for doublec4Send a Private Message to doublec4Edit/Delete MessageReply w/QuoteDirect Link to This Post
Do you plan on using plexi?

------------------

IP: Logged
bubbajoexxx
Member
Posts: 1630
From: Ontario Canada
Registered: Aug 2003


Feedback score: N/A
Leave feedback


Total ratings: 112
Rate this member

Report this Post05-21-2009 01:36 AM Click Here to See the Profile for bubbajoexxxClick Here to visit bubbajoexxx's HomePageSend a Private Message to bubbajoexxxEdit/Delete MessageReply w/QuoteDirect Link to This Post
just remove the bolts and the whole upper panel comes off exposing the rear window
IP: Logged
PFF
System Bot
Fiero2m8
Member
Posts: 1928
From: Niagara, Ontario, Canada
Registered: Feb 2006


Feedback score:    (10)
Leave feedback

Rate this member

Report this Post05-21-2009 06:41 PM Click Here to See the Profile for Fiero2m8Click Here to visit Fiero2m8's HomePageSend a Private Message to Fiero2m8Edit/Delete MessageReply w/QuoteDirect Link to This Post
 
quote
Originally posted by bubbajoexxx:

just remove the bolts and the whole upper panel comes off exposing the rear window


Thanks Joe I'll let them know.

Doublec4 - I'm going to use smoked safetyglass.
IP: Logged
Fiero2m8
Member
Posts: 1928
From: Niagara, Ontario, Canada
Registered: Feb 2006


Feedback score:    (10)
Leave feedback

Rate this member

Report this Post05-23-2009 09:41 PM Click Here to See the Profile for Fiero2m8Click Here to visit Fiero2m8's HomePageSend a Private Message to Fiero2m8Edit/Delete MessageReply w/QuoteDirect Link to This Post
I watched the video on Boomtastic's site on removing the rear clip and am going to attempt that on Monday.

Looks like my steps are:

Side markers
Side mouldings
Gas filler
Wheelwells
Tailights and harness
Rear Bumper
Headliner
Remove ceiling nuts
Remove 1/4 panels
Remove rear screws
Remove inner valance panels?
Lift off with 2 people...
IP: Logged
bubbajoexxx
Member
Posts: 1630
From: Ontario Canada
Registered: Aug 2003


Feedback score: N/A
Leave feedback


Total ratings: 112
Rate this member

Report this Post05-24-2009 11:06 PM Click Here to See the Profile for bubbajoexxxClick Here to visit bubbajoexxx's HomePageSend a Private Message to bubbajoexxxEdit/Delete MessageReply w/QuoteDirect Link to This Post
Remove inner valance panels not needed as they are part of the clip and you need to remove the 4 bolts in the hatch mount you will see the nut with the headliner out and the whole rear clip comes off including the hatch mounting plate and no need to remove rear bumper or side pannels or wheel wells just remove the top screws in the wheel wells

[This message has been edited by bubbajoexxx (edited 05-24-2009).]

IP: Logged
Fiero2m8
Member
Posts: 1928
From: Niagara, Ontario, Canada
Registered: Feb 2006


Feedback score:    (10)
Leave feedback

Rate this member

Report this Post05-25-2009 11:09 PM Click Here to See the Profile for Fiero2m8Click Here to visit Fiero2m8's HomePageSend a Private Message to Fiero2m8Edit/Delete MessageReply w/QuoteDirect Link to This Post
 
quote
Originally posted by bubbajoexxx:

Remove inner valance panels not needed as they are part of the clip and you need to remove the 4 bolts in the hatch mount you will see the nut with the headliner out and the whole rear clip comes off including the hatch mounting plate and no need to remove rear bumper or side pannels or wheel wells just remove the top screws in the wheel wells


Thanks Joe, I didn't see your comments in time but I did notice the inner valance parts were attached.
I did see all the nuts in holding the mounting plate (6) and removed them.
Unfortunately some fiberglass or butyl rope was preventing the hatch mounting plate from coming off with the rear clip so I carefully separated them and removed separately.
I figured out the rear bumper and 1/4 panel side scoops could stay in place while I removed the wheelwells just so I could easily remove the coolant bottle and see everything was free.

I took my time and had everything disassembled, glass removed and all vacuumed up in under 2 hours.
Best part was I learned alot more about how the custom back half of my car goes together now!

Here are some pics from today's progress:


IP: Logged
Fiero2m8
Member
Posts: 1928
From: Niagara, Ontario, Canada
Registered: Feb 2006


Feedback score:    (10)
Leave feedback

Rate this member

Report this Post05-29-2009 02:18 PM Click Here to See the Profile for Fiero2m8Click Here to visit Fiero2m8's HomePageSend a Private Message to Fiero2m8Edit/Delete MessageReply w/QuoteDirect Link to This Post
Ok some updates on the new window build as I spent most of my week as an unpaid employee at the glass shop

My cardboard template of what I wanted (outside is a trace of the stock window and inside is 36"x8").
I came up with this width by sitting in the driver's seat and looking in the rear view mirror and marked the furthest I could see left and right.
The height was determined by measuring the carpet height inside and the hatch hinge mount and allowing clearance so the hatch can't break the window:


I made the rear window frame out of two sheets of 20 guage galvanized sheet metal and urathaned them together:


Next the window was cut out into a 37"x9" piece of smoked laminated safety glass with the corners rounded:


Then the window was uranthaned to the frame:


I wanted the window to be changeable from the outside.
I used 1/4" easyboard to trim cover the frame so the window would appear flush and the moulding would fit right.
The easyboard I used was cut out and prepainted with 1200F high heat paint:


Now it was time to install the premade unit into the car:


Next the project's interior and rear bodywork can be reassembled...
IP: Logged
Fiero2m8
Member
Posts: 1928
From: Niagara, Ontario, Canada
Registered: Feb 2006


Feedback score:    (10)
Leave feedback

Rate this member

Report this Post05-30-2009 02:51 PM Click Here to See the Profile for Fiero2m8Click Here to visit Fiero2m8's HomePageSend a Private Message to Fiero2m8Edit/Delete MessageReply w/QuoteDirect Link to This Post
Here is another rear view with the hatch off and the rear clip on:


While I had the rear wheels off, I removed the coilovers so I could raise the ride height about an inch to match the front and stop scraping the fender wheelwell in big dips.
The springs are 400lb/in so to adjust them up it's easier to remove them although they can be lowered while still bolted in:


Once they are out the collar is loosened and spun along with the spring seat:


Once the springs settle, they will be about a finger space higher than the fronts to the fender lip, although once the hatch and spoiler are re-installed it should be just right:


Now the bodywork and interior are totally reassembled:


Time to get it back home for the fiberglass finish work around the hinges...
I must say I had a good time working at the glass shop with the boys and over 50 people were drawn into the garage to check out and chat about the project this week.

[This message has been edited by Fiero2m8 (edited 05-30-2009).]

IP: Logged
bubbajoexxx
Member
Posts: 1630
From: Ontario Canada
Registered: Aug 2003


Feedback score: N/A
Leave feedback


Total ratings: 112
Rate this member

Report this Post05-31-2009 06:17 PM Click Here to See the Profile for bubbajoexxxClick Here to visit bubbajoexxx's HomePageSend a Private Message to bubbajoexxxEdit/Delete MessageReply w/QuoteDirect Link to This Post
 
quote
Originally posted by Fiero2m8:

Here is another rear view with the hatch off and the rear clip on:


While I had the rear wheels off, I removed the coilovers so I could raise the ride height about an inch to match the front and stop scraping the fender wheelwell in big dips.
The springs are 400lb/in so to adjust them up it's easier to remove them although they can be lowered while still bolted in:


Once they are out the collar is loosened and spun along with the spring seat:


Once the springs settle, they will be about a finger space higher than the fronts to the fender lip, although once the hatch and spoiler are re-installed it should be just right:


Now the bodywork and interior are totally reassembled:


Time to get it back home for the fiberglass finish work around the hinges...
I must say I had a good time working at the glass shop with the boys and over 50 people were drawn into the garage to check out and chat about the project this week.


I told you the rear was completely removable bam nice job on the window
IP: Logged
Fiero2m8
Member
Posts: 1928
From: Niagara, Ontario, Canada
Registered: Feb 2006


Feedback score:    (10)
Leave feedback

Rate this member

Report this Post05-31-2009 11:37 PM Click Here to See the Profile for Fiero2m8Click Here to visit Fiero2m8's HomePageSend a Private Message to Fiero2m8Edit/Delete MessageReply w/QuoteDirect Link to This Post
Thanks, yes all went well and I am even more familiar on how this one goes together

Here's a shot of the fiberglass work from this morning to mold the steel hinge plate back to the bodywork:


Next I'm working on the hatch frame and finishing rear spoiler so it can be reinstalled...
IP: Logged
Fiero2m8
Member
Posts: 1928
From: Niagara, Ontario, Canada
Registered: Feb 2006


Feedback score:    (10)
Leave feedback

Rate this member

Report this Post06-05-2009 06:31 PM Click Here to See the Profile for Fiero2m8Click Here to visit Fiero2m8's HomePageSend a Private Message to Fiero2m8Edit/Delete MessageReply w/QuoteDirect Link to This Post
Well I got it back together and some more bodywork progress on the side scoops, rear decklid and spoilers.
Here's a shot of it at the Mapleview Mall cruise this week - you can also see the new raised rear ride height.


The front is still higher but that will be addressed later when the front suspension gets an upgrade...
IP: Logged
Previous Page | Next Page

This topic is 78 pages long:  1   2   3   4   5   6   7   8   9   10   11   12   13   14   15   16   17   18   19   20   21   22   23   24   25   26   27   28   29   30   31   32   33   34   35   36   37   38   39   40   41   42   43   44   45   46   47   48   49   50   51   52   53   54   55   56   57   58   59   60   61   62   63   64   65   66   67   68   69   70   71   72   73   74   75   76   77   78 
next newest topic | next oldest topic

All times are ET (US)

Post New Topic  Post A Reply
Hop to:

Contact Us | Back To Main Page

Advertizing on PFF | Fiero Parts Vendors
PFF Merchandise | Fiero Gallery | Ogre's Cave
Real-Time Chat | Fiero Related Auctions on eBay


Copyright (c) 1999, C. Pennock