Pennock's Fiero Forum
  The Construction Zone
  newest project (Page 75)

Post New Topic  Post A Reply
Email This Page to Someone! | Printable Version

This topic is 78 pages long:  1   2   3   4   5   6   7   8   9   10   11   12   13   14   15   16   17   18   19   20   21   22   23   24   25   26   27   28   29   30   31   32   33   34   35   36   37   38   39   40   41   42   43   44   45   46   47   48   49   50   51   52   53   54   55   56   57   58   59   60   61   62   63   64   65   66   67   68   69   70   71   72   73   74   75   76   77   78 
Previous Page | Next Page
next newest topic | next oldest topic
newest project by bubbajoexxx
Started on: 09-12-2003 06:18 PM
Replies: 3111 (374102 views)
Last post by: Trinten on 04-23-2023 11:02 PM
fieroguru
Member
Posts: 12128
From: Champaign, IL
Registered: Aug 2003


Feedback score:    (45)
Leave feedback


Total ratings: 258
Rate this member

Report this Post11-15-2012 10:57 AM Click Here to See the Profile for fieroguruSend a Private Message to fieroguruEdit/Delete MessageReply w/QuoteDirect Link to This Post
 
quote
Originally posted by dskebo:

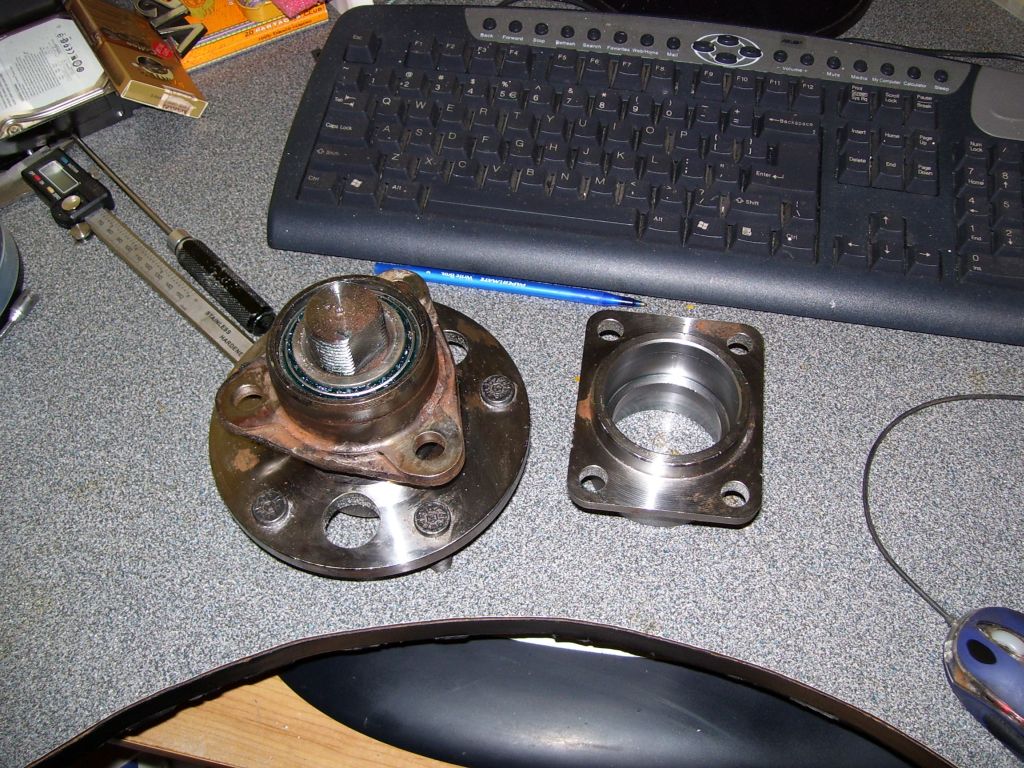
Does anyone know the part number on them bearng he has on the hub . I CANNOT GET ANYONE TO TELL ME ? Is it a BIG secret or am I suposed to know already. Did I miss somthing in some other thread ? Help Im confused.


I am pretty sure he just pressed the outer races from the new housing (they are removable, not part of the machined housing like the 88 fiero is). You can see this step profile in the rectangular bearing housing in this picture, which shows that the original races were removed.


I think all Bubba did was do some minor machining inside the fiero housing (enlarge it a couple of thousands and machine the old curved bearing surface to a 90 degree corner to accept the bearing setup from the rectangular bearing housing). His desk is probably like mine with lots of boxes and parts from multiple projects on there at any given point. So just because there are bearing boxes on the desk doesn't necessarily mean they were used for this bearing mod.

If all else fails, measure the ID of the housing and the OD of the flange setup and find something that is close in the Timken manual.
IP: Logged
RacerX11
Member
Posts: 288
From: Peoria, IL
Registered: Feb 2003


Feedback score: N/A
Leave feedback

Rate this member

Report this Post11-15-2012 06:09 PM Click Here to See the Profile for RacerX11Send a Private Message to RacerX11Edit/Delete MessageReply w/QuoteDirect Link to This Post
Here is some info on the bearings that bubbajoexxx shared with me back in 2010 via private message:

 
quote
bubbajoexxx:all of the good 51309 bearings are bolt together units that use 2 single tappered bearings as any wheel stub would use whitch make for a reliable unit


quote
bubbajoexxx:the bearing im using are the bearings that come with the hubs to start with as well as the seals
they are koyo usa num.LM67048 and race is LM67010 and the stub is made to use this bearing with a pre load of 20 inch pounds on the nut


IP: Logged
dskebo
Member
Posts: 61
From: Bell Buckle Tennessee
Registered: Jan 2012


Feedback score: N/A
Leave feedback

Rate this member

Report this Post11-16-2012 01:36 AM Click Here to See the Profile for dskeboSend a Private Message to dskeboEdit/Delete MessageReply w/QuoteDirect Link to This Post
Thanks Racerx11 that was the set of bearings I came up with had appeared to be exacly the right size took me 2 days to figure this out and I was hoping bubbajoe would help and clear this up. Again Thank you so much.
 
quote
Originally posted by RacerX11:

Here is some info on the bearings that bubbajoexxx shared with me back in 2010 via private message:


IP: Logged
bubbajoexxx
Member
Posts: 1630
From: Ontario Canada
Registered: Aug 2003


Feedback score: N/A
Leave feedback


Total ratings: 112
Rate this member

Report this Post11-16-2012 02:49 PM Click Here to See the Profile for bubbajoexxxClick Here to visit bubbajoexxx's HomePageSend a Private Message to bubbajoexxxEdit/Delete MessageReply w/QuoteDirect Link to This Post
dskebo
sorry guy havenot checked the tread for a while if i had i would have got back to you
IP: Logged
Fiero2m8
Member
Posts: 1928
From: Niagara, Ontario, Canada
Registered: Feb 2006


Feedback score:    (10)
Leave feedback

Rate this member

Report this Post01-06-2013 11:23 PM Click Here to See the Profile for Fiero2m8Click Here to visit Fiero2m8's HomePageSend a Private Message to Fiero2m8Edit/Delete MessageReply w/QuoteDirect Link to This Post
Happy New Year everyone.
Got around to Re/Re of the windshield to install the windshield trim I wanted that wraps around the glass edge.
It's a little wider than the stock molding and covers the roof panel edge nicely.
When the glass was originally installed I had a temp T molding knowing I was removing all the body panels for paint.

Here are the photos:


My thanks to Rick and Larry at Speedy Glass Welland who did a nice job just like we did on the rear window.
IP: Logged
Fiero2m8
Member
Posts: 1928
From: Niagara, Ontario, Canada
Registered: Feb 2006


Feedback score:    (10)
Leave feedback

Rate this member

Report this Post01-07-2013 08:07 PM Click Here to See the Profile for Fiero2m8Click Here to visit Fiero2m8's HomePageSend a Private Message to Fiero2m8Edit/Delete MessageReply w/QuoteDirect Link to This Post
Thought it wouId be a good idea to document my RPO codes for future reference.
My Indy is #1620 of the 2001 produced and one of 160 for the Canadian market (notice the French on the label).
Y82 is the Indy pace car replica package, but when I have time I'll look up the rest of the build sheet codes to see exactly what it came with...


IP: Logged
Fiero2m8
Member
Posts: 1928
From: Niagara, Ontario, Canada
Registered: Feb 2006


Feedback score:    (10)
Leave feedback

Rate this member

Report this Post01-09-2013 12:35 PM Click Here to See the Profile for Fiero2m8Click Here to visit Fiero2m8's HomePageSend a Private Message to Fiero2m8Edit/Delete MessageReply w/QuoteDirect Link to This Post
Here's the RPO codes I could decipher - missing a few though.
If you know what they are please advise.
Fiero2m8

RPO VIN # 1G2AF37R0EP270695
WA-8554-7719 (FISHER White - Medium Gray Metallic (L. Acc-GT)

AAA Coating on the glass
AD3 Window, hinged roof (Sunroof)
AR9 Seat, front bucket, driver, passenger, manual reclining
AU3 Power door locks
A01 Window, deep tinted all, Soft Ray

A31 Window, electric control
A90 Deck lid release, remote control, electric
BC8 Front door map pocket RH and LH (available only w/A31)
B20 Interior, luxury (w/trim codes 662,822)

B34 Floor mats, front, carpeted
B48 Deluxe trunk trim
B83 76 88 Molding, RKR, PNL
CD4 Wiper system, pulse

C49 Defogger, rear window, electric
C60 Air conditioner, front, manual controls
DB4 Sunshade, windshield, with pockets
DG7 Mirror, RH and LH remote contol, electric

D4Q Gear, Speedometer Driven (31 teeth)
D60 Colour and tim incompatibility override (84-87)
D80 Extension, rear end panel (spoiler-rear deck lid)
D9C Driven Gear, Speedometer

E5Z Speedo Gears Less Adapter
F75 Transaxle, final drive, 3.18 ratio
K22 Generator, 94 ampere
K34 Cruise control, electric

LR8 Engine, 2.5L L4
MD9 3-speed automatic transmission (THM125C)
MX1 3-speed automatic transmission
NA5 Emission system, federal requirements

NB1 Emission system, closed loop
NP5 Steering wheel, leather wrapped, 3-spoke (84-88)
N33 Steering column, tilt type
N78 Wheels, Hi-Tech Turbo, aluminum 14 x 6 (req. w/Y99)

PB4 Lock kit, aluminum wheel
PON Pontiac Assembly Plant
QPV P215/60R14 white-lettered, steel belted (84-85, 87)
TR9 Lamp group, courtesy consists of;

UA1 Heavy duty battery
UU6 ETR AM/FM stereo w/clock, cassette, EQ, seek & scan
UW5 Radio, provisions for stereo installation
U25 Rear compartment lamp

U29 Instrument panel, courtesy
VK3 License plate, front mounting package
V53 Luggage carrier, delete (1984)
V73 Vehicle statement

WS6 Performance package, special
WV1 29296 P SGR R Merchandised Pkg PACE CAR #1 406 E 1 E A
W69 SE option "Special Edition"
W82 29765 P Equipment Misc Equip for China PTR (CHINA CONTROLLED) 990304 E 7 7 A

YT9 Fisher Furnished Parts
Y82 Indy Pace Car limited edition (includes AD3,B34,DG7,D80,NP5,UU6 & V53) (1984)
Z49 Export, Canadian modification, mandatory base equipment
13D Indy 500/Sierra leather/Pallex cloth, Lt. Slate Gray

13I Interior trim, Light Smoke Gray
139 Seat Belt Module, Light Slate Gray
18L Medium Gray Metallic, L (lower accent)
40U White, U (upper of two tone)

6MN Left front spring code
7MN Right front spring code
8WY Left rear spring code
9WY Right rear spring code

[This message has been edited by Fiero2m8 (edited 01-14-2013).]

IP: Logged
zefferk
Member
Posts: 1019
From: Gold Canyon, Arizona
Registered: Feb 2010


Feedback score:    (69)
Leave feedback

Rate this member

Report this Post01-09-2013 03:20 PM Click Here to See the Profile for zefferkSend a Private Message to zefferkEdit/Delete MessageReply w/QuoteDirect Link to This Post
WV1 Protective equipment, Canada [probably undercoating]
YT9 Fisher Furnished Parts
139 Seat Belt Module, Light Slate Gray
D4Q Gear, Speedometer Driven (31 teeth)

I couldn't find the W82 or B83, but I'll keep looking

BTW, I used the Option Code list on www.fierosails.com under the parts interchange option for future reference and credit.

Jeff
IP: Logged
bubbajoexxx
Member
Posts: 1630
From: Ontario Canada
Registered: Aug 2003


Feedback score: N/A
Leave feedback


Total ratings: 112
Rate this member

Report this Post01-09-2013 04:54 PM Click Here to See the Profile for bubbajoexxxClick Here to visit bubbajoexxx's HomePageSend a Private Message to bubbajoexxxEdit/Delete MessageReply w/QuoteDirect Link to This Post
WV1 29296 P SGR R MERCHANDISED PKG PACE CAR #1 406 E 1 E A


B82 2549 P ORNAMENTATION EXTR, EMBLEM - DELETE 980618 E 3 E A

W82 29765 P EQUIPMENT MISC EQUIP FOR CHINA PTR (CHINA CONTROLLED) 990304 E 7 7 A

from the gm master list


http://www.crankshaftcoalit...on%29_GM_master_list

[This message has been edited by bubbajoexxx (edited 01-09-2013).]

IP: Logged
Fiero2m8
Member
Posts: 1928
From: Niagara, Ontario, Canada
Registered: Feb 2006


Feedback score:    (10)
Leave feedback

Rate this member

Report this Post01-12-2013 10:03 PM Click Here to See the Profile for Fiero2m8Click Here to visit Fiero2m8's HomePageSend a Private Message to Fiero2m8Edit/Delete MessageReply w/QuoteDirect Link to This Post
Thanks guys, positive ratings given.
Just B83 left to find...
IP: Logged
Danyel
Member
Posts: 6087
From: Lévis, Québec, Canada
Registered: Sep 2008


Feedback score:    (91)
Leave feedback


Total ratings: 171
Rate this member

Report this Post01-13-2013 12:34 AM Click Here to See the Profile for DanyelClick Here to visit Danyel's HomePageSend a Private Message to DanyelEdit/Delete MessageReply w/QuoteDirect Link to This Post
Found this ... maybe the one ..

B83 76 88 MOLDING,RKR PNL GM RPO

------------------

My Build Thread
Tylers Toy

IP: Logged
PFF
System Bot
Fiero2m8
Member
Posts: 1928
From: Niagara, Ontario, Canada
Registered: Feb 2006


Feedback score:    (10)
Leave feedback

Rate this member

Report this Post01-20-2013 03:15 PM Click Here to See the Profile for Fiero2m8Click Here to visit Fiero2m8's HomePageSend a Private Message to Fiero2m8Edit/Delete MessageReply w/QuoteDirect Link to This Post
Spent my Christmas Fiero gift money on a billet Aluminum dress up mount for the Optima Yellow Top:


It fits in the right rear battery tray nicely:


IP: Logged
Fiero2m8
Member
Posts: 1928
From: Niagara, Ontario, Canada
Registered: Feb 2006


Feedback score:    (10)
Leave feedback

Rate this member

Report this Post01-20-2013 03:52 PM Click Here to See the Profile for Fiero2m8Click Here to visit Fiero2m8's HomePageSend a Private Message to Fiero2m8Edit/Delete MessageReply w/QuoteDirect Link to This Post

Fiero2m8

1928 posts
Member since Feb 2006
Started a few winter projects on the newest project.

I had been meaning to build a custom sub box located between the seats.
Since I didn't get a table saw from my Christmas list, I thought it was be a great chance to spend time building it with Grandpa Ray in his workshop.

First I took measurements and made a cardboard template.
I read the specs of my 8" sub woofer and it recommend 0.15-.0.5 cubic feet for a sealed box (mine is 0.25 cu.ft.).
It also recommended MDF and I chose 5/8" 1' X 8' shelf for $5 that was in the required 12" width.
It is glued, screwed, sealed, insulated and weights 9 pounds.
Here are the pictures of assembly:


Now I need to decide what type of finish work to do on the box (fiberglass/paint or cover it with carpet, vinyl, cloth)
Suggestions are always welcome
IP: Logged
RCR
Member
Posts: 4397
From: Shelby Twp Mi
Registered: Sep 2002


Feedback score:    (7)
Leave feedback


Total ratings: 102
Rate this member

Report this Post01-21-2013 12:44 PM Click Here to See the Profile for RCRSend a Private Message to RCREdit/Delete MessageReply w/QuoteDirect Link to This Post
Nice bling with the cover...

Since the console is not connected, I would consider matching the woofer box to the insert behind the seats.

Either way, the box looks good.

Bob
IP: Logged
85SEnochie
Member
Posts: 2081
From: Tri-cities, WA
Registered: Oct 2007


Feedback score: N/A
Leave feedback


Total ratings: 58
Rate this member

Report this Post01-25-2013 12:02 PM Click Here to See the Profile for 85SEnochieSend a Private Message to 85SEnochieEdit/Delete MessageReply w/QuoteDirect Link to This Post
Have you considered going wide body?


Thought I would Hatch it for yah


------------------

Love The Excitement! https://www.fiero.nl/forum/Forum1/HTML/068738.html

[This message has been edited by 85SEnochie (edited 01-25-2013).]

IP: Logged
bubbajoexxx
Member
Posts: 1630
From: Ontario Canada
Registered: Aug 2003


Feedback score: N/A
Leave feedback


Total ratings: 112
Rate this member

Report this Post01-25-2013 02:34 PM Click Here to See the Profile for bubbajoexxxClick Here to visit bubbajoexxx's HomePageSend a Private Message to bubbajoexxxEdit/Delete MessageReply w/QuoteDirect Link to This Post
 
quote
Originally posted by 85SEnochie:

Have you considered going wide body?


Thought I would Hatch it for yah


the car is already 4 inches wider than stock read trough the tread and you will see how it was done
IP: Logged
Fiero2m8
Member
Posts: 1928
From: Niagara, Ontario, Canada
Registered: Feb 2006


Feedback score:    (10)
Leave feedback

Rate this member

Report this Post02-02-2013 08:28 PM Click Here to See the Profile for Fiero2m8Click Here to visit Fiero2m8's HomePageSend a Private Message to Fiero2m8Edit/Delete MessageReply w/QuoteDirect Link to This Post
Another minor winter project I'm working on is porting the intake manifolds to match the heads.
Here are the disassembly pics:


IP: Logged
Fiero2m8
Member
Posts: 1928
From: Niagara, Ontario, Canada
Registered: Feb 2006


Feedback score:    (10)
Leave feedback

Rate this member

Report this Post02-08-2013 03:33 PM Click Here to See the Profile for Fiero2m8Click Here to visit Fiero2m8's HomePageSend a Private Message to Fiero2m8Edit/Delete MessageReply w/QuoteDirect Link to This Post
Progress made on the intake porting:


This is step one using carbide bit and drill.
Step two will be with a stone bit.
Step three will be sanding/honing.
IP: Logged
RCR
Member
Posts: 4397
From: Shelby Twp Mi
Registered: Sep 2002


Feedback score:    (7)
Leave feedback


Total ratings: 102
Rate this member

Report this Post02-08-2013 05:26 PM Click Here to See the Profile for RCRSend a Private Message to RCREdit/Delete MessageReply w/QuoteDirect Link to This Post
Looks good...

I wouldn't bother with the stone. It will just gum up quickly. The sanding rolls will smooth it out nicely. Also, a little roughness breaks up the flow and actually increase flow. Keeps the air from "sticking" to the walls. At least that's how I remember it when porting my TPI intake, plenum, and runners way back when...

Bob
IP: Logged
David Hambleton
Member
Posts: 1581
From: Stoney Creek Ontario Canada
Registered: Nov 2012


Feedback score: N/A
Leave feedback

Rate this member

Report this Post02-18-2013 09:56 PM Click Here to See the Profile for David HambletonSend a Private Message to David HambletonEdit/Delete MessageReply w/QuoteDirect Link to This Post
Is there an engineering concensus regarding surface roughness to obtain optimum turbulence? I think it might vary depending on the different flow velocities at different engine speeds.
IP: Logged
RCR
Member
Posts: 4397
From: Shelby Twp Mi
Registered: Sep 2002


Feedback score:    (7)
Leave feedback


Total ratings: 102
Rate this member

Report this Post02-19-2013 06:45 AM Click Here to See the Profile for RCRSend a Private Message to RCREdit/Delete MessageReply w/QuoteDirect Link to This Post
David, I'm sure there is, and it would make sense about the velocities, but IIRC, you want the intake roughed up a bit (not a lot), and the exaust as smooth as can be.

Bob
IP: Logged
PFF
System Bot
Will
Member
Posts: 14226
From: Where you least expect me
Registered: Jun 2000


Feedback score: (1)
Leave feedback


Total ratings: 237
Rate this member

Report this Post02-19-2013 10:10 AM Click Here to See the Profile for WillSend a Private Message to WillEdit/Delete MessageReply w/QuoteDirect Link to This Post
Wet flow needs a little roughness to make the boundary layer thicker and keep the fuel entrained in the main portion of the flow.
Dry flow should be as smooth as possible to keep the boundary layer thin and keep the effective area of the port as large as possible.

Are you doing anything about the sharp change from the vertical "manifold" to the angled port?
IP: Logged
David Hambleton
Member
Posts: 1581
From: Stoney Creek Ontario Canada
Registered: Nov 2012


Feedback score: N/A
Leave feedback

Rate this member

Report this Post02-19-2013 12:32 PM Click Here to See the Profile for David HambletonSend a Private Message to David HambletonEdit/Delete MessageReply w/QuoteDirect Link to This Post
I wonder if there's an RA surface value to quantify the roughness being discussed. Should airplanes have golf ball skin?
IP: Logged
Will
Member
Posts: 14226
From: Where you least expect me
Registered: Jun 2000


Feedback score: (1)
Leave feedback


Total ratings: 237
Rate this member

Report this Post02-19-2013 02:55 PM Click Here to See the Profile for WillSend a Private Message to WillEdit/Delete MessageReply w/QuoteDirect Link to This Post
Golf balls need golf ball skin because the sphere is actually aerodynamically lousy... The golf ball skin thickens up the boundary layer and causes it to stretch out behind the ball, essentially becoming an airfoil.
IP: Logged
Fiero2m8
Member
Posts: 1928
From: Niagara, Ontario, Canada
Registered: Feb 2006


Feedback score:    (10)
Leave feedback

Rate this member

Report this Post02-19-2013 10:24 PM Click Here to See the Profile for Fiero2m8Click Here to visit Fiero2m8's HomePageSend a Private Message to Fiero2m8Edit/Delete MessageReply w/QuoteDirect Link to This Post
 
quote
Originally posted by Will:

Are you doing anything about the sharp change from the vertical "manifold" to the angled port?


Hi Will,
Yes as you know firsthand, the cylinder head has angled ports (with a textured not smooth walls btw).
A cross ram design would have removed the sharp angle change but it would have been too tall a setup for my application.

Here's my progress to date:


------------------

Indy Northstar-Stretch

IP: Logged
nightonfire
Member
Posts: 1015
From: San Diego, Ca.
Registered: Feb 2004


Feedback score: (5)
Leave feedback

Rate this member

Report this Post02-21-2013 07:44 PM Click Here to See the Profile for nightonfireSend a Private Message to nightonfireEdit/Delete MessageReply w/QuoteDirect Link to This Post
hey Joe,


I sent you a message, can you check your pms.

Thanks
IP: Logged
Fiero2m8
Member
Posts: 1928
From: Niagara, Ontario, Canada
Registered: Feb 2006


Feedback score:    (10)
Leave feedback

Rate this member

Report this Post03-24-2013 08:55 PM Click Here to See the Profile for Fiero2m8Click Here to visit Fiero2m8's HomePageSend a Private Message to Fiero2m8Edit/Delete MessageReply w/QuoteDirect Link to This Post
This weekend I finished up my custom sub box with the charcoal gray carpet ordered to match the firewall:


I'm pleased with the finished product.
IP: Logged
Fiero2m8
Member
Posts: 1928
From: Niagara, Ontario, Canada
Registered: Feb 2006


Feedback score:    (10)
Leave feedback

Rate this member

Report this Post03-30-2013 09:46 AM Click Here to See the Profile for Fiero2m8Click Here to visit Fiero2m8's HomePageSend a Private Message to Fiero2m8Edit/Delete MessageReply w/QuoteDirect Link to This Post
I weighted the completed sub box and it came in at 15lbs with sub (500W 8" speaker is 6lbs 7oz.)
Before installing the sub I used Hush Mat to seal up wire holes and reduce firewall heat behind the speaker location.


Once wired up the box snuggly velcro's in position between the seats:


IP: Logged
Fiero2m8
Member
Posts: 1928
From: Niagara, Ontario, Canada
Registered: Feb 2006


Feedback score:    (10)
Leave feedback

Rate this member

Report this Post03-30-2013 10:09 PM Click Here to See the Profile for Fiero2m8Click Here to visit Fiero2m8's HomePageSend a Private Message to Fiero2m8Edit/Delete MessageReply w/QuoteDirect Link to This Post

Fiero2m8

1928 posts
Member since Feb 2006
The exhaust on the newest project has been an evolution of upgrades.
After ceramic coating the headers, the mufflers were replaced with stainless Flowmasters.
The latest upgrade was building custom mandrel bent exhaust pipes out of stainless tube and flanges.

First step was to build a wood jig so that the existing pipes flange locations and orientation could be matched:


The new set bolts identically to the jig:


Also took the opportunity to get all new stainless hardware and new header collector gaskets:


Here are some photos after I bolted them up today:


The hardware was torqued to 20ft/lbs as recommended for the crush style gaskets:


They fit perfectly - special thanks to my Grandpa who took the time to build the wood jigs for me


Later I'll try polishing the stainless to see how nice they can look, but most importantly I'm eliminating potential rust in plain view of admirers.
As far as performance is concerned, the mandrel bends shouldn't hurt, but time will tell if power goes up after a test and tune.
IP: Logged
doublec4
Member
Posts: 8289
From: Oakville, Ontario, Canada
Registered: Jun 2003


Feedback score:    (20)
Leave feedback


Total ratings: 150
Rate this member

Report this Post03-30-2013 11:05 PM Click Here to See the Profile for doublec4Send a Private Message to doublec4Edit/Delete MessageReply w/QuoteDirect Link to This Post
Nicely done. Always amazes me how almost everything on this car is a one-off custom piece.
IP: Logged
Will
Member
Posts: 14226
From: Where you least expect me
Registered: Jun 2000


Feedback score: (1)
Leave feedback


Total ratings: 237
Rate this member

Report this Post03-31-2013 08:30 AM Click Here to See the Profile for WillSend a Private Message to WillEdit/Delete MessageReply w/QuoteDirect Link to This Post
 
quote
Originally posted by Fiero2m8:
Later I'll try polishing the stainless to see how nice they can look, but most importantly I'm eliminating potential rust in plain view of admirers.


Better take care of the rust on your CV joints, then
IP: Logged
PFF
System Bot
Fiero2m8
Member
Posts: 1928
From: Niagara, Ontario, Canada
Registered: Feb 2006


Feedback score:    (10)
Leave feedback

Rate this member

Report this Post04-06-2013 04:43 PM Click Here to See the Profile for Fiero2m8Click Here to visit Fiero2m8's HomePageSend a Private Message to Fiero2m8Edit/Delete MessageReply w/QuoteDirect Link to This Post
Ok, the intake system is back on the car and I've been able to drive my Fiero this weekend.

The intake manifolds were prepped for reinstallation:


I cut my own gaskets this time:


After dressing the gaskets with RTV, I used the torque wrench to bolt them on and left them 24 hours to cure:


Then I installed new base gaskets and installed the carbs changing any rusty nuts and bolts to stainless hardware as I went:


Next I adjusted the linkage to ensure no binding and that springs snap linkage back to throttle stops:


Then it was a matter of cleaning air filters, adjusting air mixture screws and unisync the 8 carbs to 5.5 airflow.
I tried leaner main jets that eliminated black smoke at full throttle and used the air compressor to blow out the idle jet circuit of the whistling carb.
Lastly I lowered the fuel pressure from 4.5 to 3.5 PSI and tweeked the timing.


Now I can drive it as reward for each time I work on it...

[This message has been edited by Fiero2m8 (edited 04-06-2013).]

IP: Logged
RCR
Member
Posts: 4397
From: Shelby Twp Mi
Registered: Sep 2002


Feedback score:    (7)
Leave feedback


Total ratings: 102
Rate this member

Report this Post04-07-2013 08:37 AM Click Here to See the Profile for RCRSend a Private Message to RCREdit/Delete MessageReply w/QuoteDirect Link to This Post
Looks real good, Ryan.

Bob
IP: Logged
Fiero2m8
Member
Posts: 1928
From: Niagara, Ontario, Canada
Registered: Feb 2006


Feedback score:    (10)
Leave feedback

Rate this member

Report this Post04-24-2013 08:20 PM Click Here to See the Profile for Fiero2m8Click Here to visit Fiero2m8's HomePageSend a Private Message to Fiero2m8Edit/Delete MessageReply w/QuoteDirect Link to This Post
 
quote
Originally posted by RCR:

Looks real good, Ryan.

Bob


Thanks Bob.
I've placed an order from CB Performance to stock up on main, idle and pump jet sizes now that I'm done experimenting with drilling jets.
My current DRLA40 drilled setup is currently approx 60 idle, 145 main, 190 air corrector and 35 pump jet.
This way I will have several extra sizes to trial and error for a test and tune session on my engine builder's chassis dyno.


4- 7348 Jet Doctor Kit - fits 36, 40, 45, & 48mm DRLA Carburetors (one carb)

4- 7211 Dellorto Pump Jet for DRLA and DHLA Dellorto Carbs (specify size) - .40

8- 7210 Dellorto Idle Jet for DRLA and DHLA Dellorto Carbs (specify size) - .60
8- 7210 Dellorto Idle Jet for DRLA and DHLA Dellorto Carbs (specify size) - .62
8- 7210 Dellorto Idle Jet for DRLA and DHLA Dellorto Carbs (specify size) - .65

8- 7209 Dellorto Main Jet for DRLA and DHLA Dellorto Carbs (specify size) - 1.40
8- 7209 Dellorto Main Jet for DRLA and DHLA Dellorto Carbs (specify size) - 1.42
8- 7209 Dellorto Main Jet for DRLA and DHLA Dellorto Carbs (specify size) - 1.45
8- 7209 Dellorto Main Jet for DRLA and DHLA Dellorto Carbs (specify size) - 1.48

I also have unmolested 150 / 160 mains jets and 180 / 205 air correctors at my disposal as well.


IP: Logged
Fiero2m8
Member
Posts: 1928
From: Niagara, Ontario, Canada
Registered: Feb 2006


Feedback score:    (10)
Leave feedback

Rate this member

Report this Post05-01-2013 09:18 PM Click Here to See the Profile for Fiero2m8Click Here to visit Fiero2m8's HomePageSend a Private Message to Fiero2m8Edit/Delete MessageReply w/QuoteDirect Link to This Post
There are those that prefer to paint a Fiero with the panels off the car, while others just repaint with them installed.
A couple weeks ago I decided to be "that guy" that does both (Phase 1 panels off, Phase 2 panels on).
With the amount of custom body mods on the newest project, I decided to redo some blemish areas that weren't at my expectation of "show" quality.
The remaining oil based Shadow Mica will likely be used up in order to address these but I'm optimistic the extra work will be worth it

Here are the pics after body finish work and sanding.

Hood, front bumper cover and apron getting additional TLC:


The rear bumper cover got attention where holes had previously been drilled:


Scratches on the roof, cracks at the hatch hinge and chips on the door panel invited them to the party as well.
Front fenders were fine but didn't want any paint match issues so they are prepped too:


Next it will be masked and painted in the booth.

------------------

Indy Northstar-Stretch

IP: Logged
Fiero2m8
Member
Posts: 1928
From: Niagara, Ontario, Canada
Registered: Feb 2006


Feedback score:    (10)
Leave feedback

Rate this member

Report this Post05-18-2013 09:26 AM Click Here to See the Profile for Fiero2m8Click Here to visit Fiero2m8's HomePageSend a Private Message to Fiero2m8Edit/Delete MessageReply w/QuoteDirect Link to This Post
I polished and waxed the new paint job in time for the Explore Niagara Cally Rally.
This was our third year participating and first with Fiero2m8.
Out of 27 cars, this was our best result:


IP: Logged
Fiero2m8
Member
Posts: 1928
From: Niagara, Ontario, Canada
Registered: Feb 2006


Feedback score:    (10)
Leave feedback

Rate this member

Report this Post05-18-2013 09:44 AM Click Here to See the Profile for Fiero2m8Click Here to visit Fiero2m8's HomePageSend a Private Message to Fiero2m8Edit/Delete MessageReply w/QuoteDirect Link to This Post

Fiero2m8

1928 posts
Member since Feb 2006
Due to changes to ride height front and rear to set the stance, a trip to Ace Alignment was needed.
Darren is well known in Niagara as the go to shop for lowered cars.

I was happy with the results:


The the negative camber and off center steering were addressed and it tracks straight with neutral steering on the highway.
IP: Logged
Fiero2m8
Member
Posts: 1928
From: Niagara, Ontario, Canada
Registered: Feb 2006


Feedback score:    (10)
Leave feedback

Rate this member

Report this Post05-18-2013 09:55 AM Click Here to See the Profile for Fiero2m8Click Here to visit Fiero2m8's HomePageSend a Private Message to Fiero2m8Edit/Delete MessageReply w/QuoteDirect Link to This Post

Fiero2m8

1928 posts
Member since Feb 2006
I even drove it to work one nice day this week (200km / 125miles) round trip with no issues.


However I still decided to get the roadside assistance program upon Hagerty insurance renewal.
I am thinking of driving it to the 30th in Indy this June so peace of mind is worth the $60 in my opinion.
IP: Logged
Fiero2m8
Member
Posts: 1928
From: Niagara, Ontario, Canada
Registered: Feb 2006


Feedback score:    (10)
Leave feedback

Rate this member

Report this Post05-22-2013 09:53 PM Click Here to See the Profile for Fiero2m8Click Here to visit Fiero2m8's HomePageSend a Private Message to Fiero2m8Edit/Delete MessageReply w/QuoteDirect Link to This Post
Well I wasn't so happy with my 4 wheel alignment when the front upper control arm moved under braking!
Bolts weren't tight enough and it moved in the cross member slot to adjust camber.
Sometimes you have to do things yourself or at least check the work of others...

Anyways did get a nice drive in through Port Dalhousie, Niagara-on-the-lake and the falls on holiday monday (Victoria Day).


IP: Logged
Fiero2m8
Member
Posts: 1928
From: Niagara, Ontario, Canada
Registered: Feb 2006


Feedback score:    (10)
Leave feedback

Rate this member

Report this Post05-23-2013 09:10 PM Click Here to See the Profile for Fiero2m8Click Here to visit Fiero2m8's HomePageSend a Private Message to Fiero2m8Edit/Delete MessageReply w/QuoteDirect Link to This Post
I installed the jet doctor kit for my dellortos which are like snorkels for the idle jet air inlets.
This minimizes the chances of plugging the idle jets with dirt.
The existing holes are plugged on the top of the carbs:


The new jets are ready for dyno tuning but in the meantime I've jetted to dellortos factory settings:


IP: Logged
Previous Page | Next Page

This topic is 78 pages long:  1   2   3   4   5   6   7   8   9   10   11   12   13   14   15   16   17   18   19   20   21   22   23   24   25   26   27   28   29   30   31   32   33   34   35   36   37   38   39   40   41   42   43   44   45   46   47   48   49   50   51   52   53   54   55   56   57   58   59   60   61   62   63   64   65   66   67   68   69   70   71   72   73   74   75   76   77   78 
next newest topic | next oldest topic

All times are ET (US)

Post New Topic  Post A Reply
Hop to:

Contact Us | Back To Main Page

Advertizing on PFF | Fiero Parts Vendors
PFF Merchandise | Fiero Gallery | Ogre's Cave
Real-Time Chat | Fiero Related Auctions on eBay


Copyright (c) 1999, C. Pennock