yes as only the radius was removed no material from the sides or depth
quote
Originally posted by bubbajoexxx:
the spindles i use are not ball bearing spindle they are roller bearing spindles I only use the fiero bearing housing so there is no machine work done on the new spindle
and the axle size is 1/14 dia. the fiero is 1 inch in dia.
So it appears it is stronger with the increased shaft diameter and the bearings also being stronger. I am sort of concerned that it might be too strong and won't serve as a fuse of sorts to prevent other suspension components from becoming overloaded
https://www.fiero.nl/forum/Forum2/HTML/108566.html from ebearing ... The engineering guys also wrestle with this question: if we make the bearings so they're not the point of failure, and instead the point of failure becomes the rotor flange or suspension mount, is that a design direction we want to go? The answer, of course, is no.
[This message has been edited by Erik (edited 11-30-2010).]
Originally posted by Erik: So it appears it is stronger with the increased shaft diameter and the bearings also being stronger. I am sort of concerned that it might be too strong and won't serve as a fuse of sorts to prevent other suspension components from becoming overloaded
https://www.fiero.nl/forum/Forum2/HTML/108566.html from ebearing ... The engineering guys also wrestle with this question: if we make the bearings so they're not the point of failure, and instead the point of failure becomes the rotor flange or suspension mount, is that a design direction we want to go? The answer, of course, is no.
there is nothing more disasterous than loosing a wheel flange and wheel as you loose front brakes wheel bearings should not allow a wheel to become separated from the car at any time .
and here is a note this is from a GM retired enginer i spoke with a few months ago about GM and chinesse parts he told me that in 87 GM started importing most of its bearing from china for use in GM cars as a cost savings they where bearings from top manufacturers that moved there plants to china (ie) FAG BORG WARNER SKF
[This message has been edited by bubbajoexxx (edited 11-30-2010).]
there is nothing more disasterous than loosing a wheel flange and wheel as you loose front brakes wheel bearings should not allow a wheel to become separated from the car at any time .
and here is a note this is from a GM retired enginer i spoke with a few months ago about GM and chinesse parts he told me that in 87 GM started importing most of its bearing from china for use in GM cars as a cost savings they where bearings from top manufacturers that moved there plants to china (ie) FAG BORG WARNER SKF
E bearing did mention that the stock wheel bearings usually give you fair warning they are beginning to fail, which serves as a fuse of sorts since the bearing is sacrificing itself to protect other suspension/ brake components . Since your mod appears much stronger I just wonder if loads that exceed the orignal design parameters of the stock suspension/ brake components will appear as cracks or stress risers that may not give any warning at all before failure.
E bearing did mention that the stock wheel bearings usually give you fair warning they are beginning to fail, which serves as a fuse of sorts since the bearing is sacrificing itself to protect other suspension/ brake components . Since your mod appears much stronger I just wonder if loads that exceed the orignal design parameters of the stock suspension/ brake components will appear as cracks or stress risers that may not give any warning at all before failure.
from what i have read the bearing is not what fails its the wheel flang separating from the axle and what i built will fail like any other bearing if not maintained the bearings are the same size as stock just a better bearing not plastic but metal caged
from what i have read the bearing is not what fails its the wheel flang separating from the axle and what i built will fail like any other bearing if not maintained the bearings are the same size as stock just a better bearing not plastic but metal caged
Yeah I plan on using your mod for my N* powered Fiero if you don't mind. What grease are you using for the bearings? Also what torque value on the nut?
[This message has been edited by Erik (edited 11-30-2010).]
Originally posted by RCR: Thanx Ryan, What threw me was my original cradle not having the pin. I didn't realize the chassis had the holes until I crawled under to remove the back cross member. Second question...Back cross member...It doesn't look like anyone puts it back in...I was looking at it and it doesn't seem structural, but as a gaurd for the gas tank. Any concern not having it? thanx again... Bob
Bob, First of all, glad you found the locating pin hole in the frame - should make sense now. Back cross member - stock 88 doesn't have one, probably because crossmember mounts back there instead. The 88 crossmember is beefier and have 8 bolt locations vs. the 84-87 having 4 bolts. Here's a pic of 88 courtesy of LT188GT:
I got the intermediate steering shaft exchanged for the swap: (The 88 is shorter than the 84-87)
Also reinstalled the C3 Corvette master cylinder:
88 Steering rack bolted in with all new premium tierods ends, upper and lower ball joints: Everything torqued to spec and any reused hardware will be detailed later:
Slowly but surely starting to reassemble this Indy...
[This message has been edited by Fiero2m8 (edited 11-30-2010).]
Yeah I plan on using your mod for my N* powered Fiero if you don't mind. What grease are you using for the bearings? Also what torque value on the nut?
castrol heavy duty wheel bearing grease sold in tubs
you dont torque the nut you tighten till snug the turn back 1/4 turn to give you the correct pre load
castrol heavy duty wheel bearing grease sold in tubs
you dont torque the nut you tighten till snug the turn back 1/4 turn to give you the correct pre load
Thanks for the info BubbaJoe, I figured it might be old school ( like on a front spindle of a typical rear drive vehicle) regarding the nut tightness and preload. This looks like a great solution regarding 88 hub replacement.
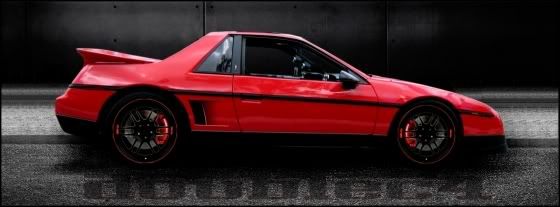
Thanks guys, it's the colour I've been after for a few years now and will be unique on a Fiero. My apologies to the die hard Indy fans, but let's face facts that it's far from original stock. I took a few pictures of what it looks like in natural sunlight.
Bubbajoe - I will drop by this Thursday afternoon if the brackets are going to be ready.
Finished up installing the poly bushings in the C5 rear control arms. They had to be pressed in due to the one piece design. Then the sleeves and washers go in.
Continuing to focus on the front compartment though and I was mocking up where the universal conderser and fan is going to be located. I want to maximize potential storage space now and I have a little extra space since the stock rad was removed.
Next I noticed what a bonehead I can be while test fitting the sway bar:
"How's the zero latch sway bar links gonna reach the UCL... Ah crap, I powder coated the wrong sway bar" That bar was from the rear of the 86 Roadster
Only saving grave was I found the 88 bar in the Fiero room sandblasted and primered. It is the 28mm bar I knew I had so I just decided to paint it instead.
Originally posted by bubbajoexxx: 86 and up caddy rear bearing buick riv olds 88 5X115
BEWARE most GM replacement bearings even oem come from china and you want USA made only
I have a Timken made in USA rear 115mm hub (PN 513018, bucik/riv/olds 88 application), and unfortunately it uses ball bearings like the imports, not rollers. What brand hub assembly did you use?
86 and up caddy rear bearing buick riv olds 88 5X115
BEWARE most GM replacement bearings even oem come from china and you want USA made only
Thank you, sir...Another question... It would appear that your system is now rebuildable, ie, just buy the roller bearings from Timken. If that's so, it seems it would be inexpensive to buy the salvage yard hubs, buy new bearings, and rebuild the Fiero units with the new guts...Thoughts??
Thanks Joe, I'm going to come tomorrow afternoon as I'm working on the project Tuesday evening this week. Then I can have them installed by Wednesday. Ryan
[This message has been edited by Fiero2m8 (edited 12-13-2010).]
O.K. first to install the new lower ball joints I needed to remove the powder coating with a dremel:
Then I used a ball joint press from Parts Source loan a tool program:
I used a 1/2" torque wrench to tighten the c-clamp until the ball joint is fully seated (they made a "pop in" noise and get easier to tighten right before they're home):
I found my 36mm socket the easiest way to push install the new boot:
Now I am ready to install the spindles:
New balljoints torqued to spec:
and Tie-rod ends:
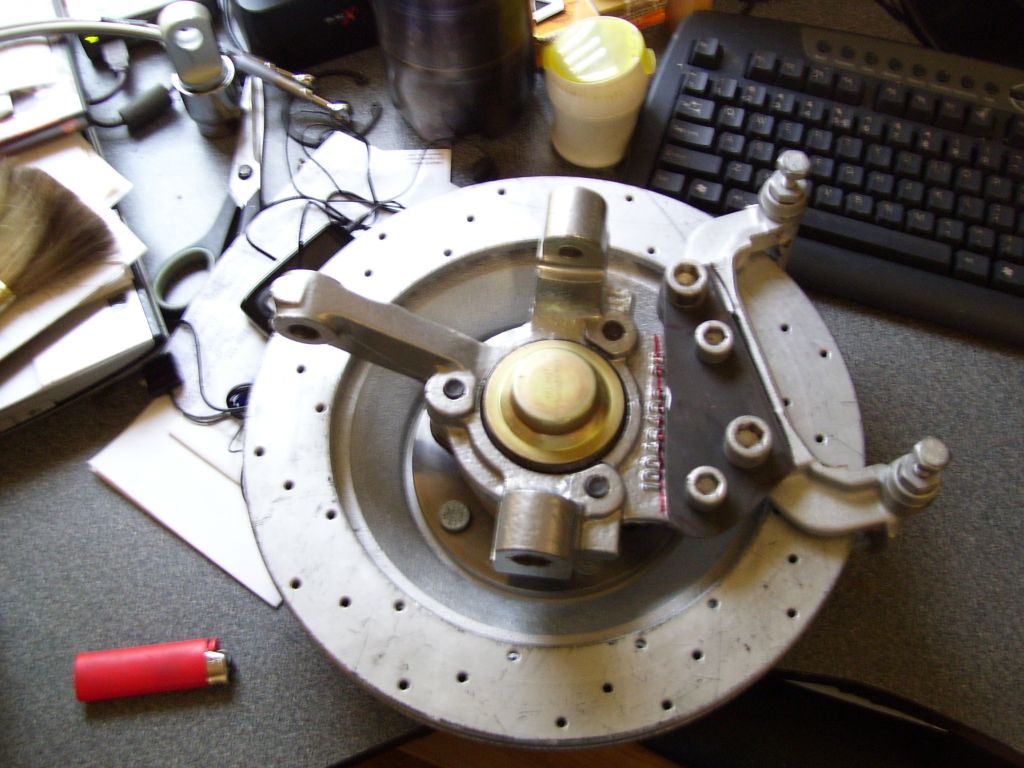
With the 88 spindle, the caliper bracket needed to be notched for clearance - you can omit this step by using 13 inch rotors:
Here is a shot of the new caliper adapter bolted in - (I have now added 12mm hex drive to my tool box):
I used a pair of fender washers between the flat plate adapters and the caliper bracket to perfectly centre the rotor:
Just waiting for my stainless braided flex hoses, new pads on order, a little paint touch up and then they're ready for rims:
For the passenger side lather, rinse and repeat - will the tools out and experience it takes half the time:
The goal of C4 Corvette brakes on an 88 Fiero spindle with wheel bearing hub upgrade and C5 bolt pattern for my 84 Indy is a reality - feels good
Thanks guys, it's the colour I've been after for a few years now and will be unique on a Fiero. My apologies to the die hard Indy fans, but let's face facts that it's far from original stock. I took a few pictures of what it looks like in natural sunlight.
Bubbajoe - I will drop by this Thursday afternoon if the brackets are going to be ready.
I LOVE THAT PAINT! But of course I should because its identical to what's on my Formula ;-) I did a base/clear with jet black base and a pich of gold glass in the clear coat. It looks AMAZING in the sun!
[This message has been edited by fieroguy123 (edited 12-19-2010).]
Originally posted by bubbajoexxx: OK Ryan I want to see more done now Im the slave driver I want to see some pannels applied
Yes I know! Tonight I'm working on the front sway bar install and front trunk. Order of reinstall is: 1. front suspension 2. rear suspension 3. powertrain 4. body 5. interior
Guys if you've never removed a Fiero body before, Boomtastic has a good video here - click on "how to" section:
This was my disassembly order, so my install panel order is roughly the reverse of this - need to pickup the rest of the panels first when I can borrow a pickup truck.
Marker lights Side moldings Wheel well liners Rocker panels Taillights’ Rear hatch Rear bumper cover Front bumper cover Front hood Front fenders Seat belts B-pillar interior trim Headliner accessories Headliner Sail panels Roof Rear quarter panels Rear clip Inner door panels Mirrors Outer door panels
BTW - My goal is to drive the newest project to Watkins Glen racetrack next April 2011 with the SOFA/GTA and Western NY members. If I'm behind schedule, feel free to call me out on that here. I may need to take some vacation time to achieve my goal since I'm working solo on it two evenings a week
Originally posted by fieroguy123: I LOVE THAT PAINT! But of course I should because its identical to what's on my Formula ;-) I did a base/clear with jet black base and a pich of gold glass in the clear coat. It looks AMAZING in the sun!
Yeah the MICA is in the base coat for me but yes it really shows in bright light (sun or flash) as shown here:
Nice to have a fan of it, Cheers Fiero2m8
[This message has been edited by Fiero2m8 (edited 12-21-2010).]
Since I am using the Formula/GT bar (28mm vs. 23mm), I purchased the largest size universal poly bushing (25mm) that comes in the small bracket size for frame clearance. I will have to bore out to 28mm to fit my 1988 Formula/GT sway bar. The 28mm poly comes in a larger size bracket that does not line up with the cradle holes and interferes clearance to the frame rails (no flat side like the stock bracket).
Warning, this is not easy to do without damaging the bushing as there is little room for error - use a lathe or drill press like I did to be successful. Here are the pics:
The plan:
Stock bushings:
Bored Energy Suspension poly bushing:
Side by Side comparison:
This is how I solved getting a universal poly bushing w/bracket to be a bolt on application for a 28mm swaybar.
O.K. the sway bar and Rodney Dickman's zero lash end links are installed:
The bushing brackets bolted right in with no issues:
Next I installed the modified spare tire holder and my drop in trunk fabbed from galvanized sheet metal:
The A/C condenser and fan with mount just in front of it and there is also an upper piece that will separate trunk from headlights once decklid is reinstalled:
Here is where I plan to install my vacuum tank and electric pump for the brakes - easily accessible but out of sight and to maximize useable trunk space:
Happy Holidays everyone. I haven't been able to work the the project much this week (remodelling mainfloor bathroom). I did however get the manifold done - thanks Bubbajoe for the brass
Ryan, BY the looks of these two pics, I'm wondering if there is enough clearance for the coolant tubes. It looks like they may hit the frame rails.. Have you fit them in yet?
Bob
[This message has been edited by RCR (edited 01-01-2011).]
Ryan, BY the looks of these two pics, I'm wondering if there is enough clearance for the coolant tubes. It looks like they may hit the frame rails.. Have you fit them in yet?
Bob
there are none the rads are in the rear side pannels of the car


 can't wait to see the whole car!