Originally posted by Titleist75: Are the cruise nights at Mapleview Mall on Wednesdays? What time...I wouldn't mind checking out some Fiero's and other cars.
Yes, every Wednesday 5-8pm and there are around 200 cars including a dozen Fiero's each week
I finally got around to swapping out the driver's side headlight motor that had the stripped gear in it. First the relay and electrical plug were disconnected and then the four 10mm nuts were removed:
The headlight motor is attached by three 10mm bolts and a 11mm retaining nut on the linkage side. After making sure my spare looked the same and was also for the driver's side I tested it by plugging it in before bolting it up. All good, so the assembly was done in the reverse order:
Make sure you line up the washer marks when putting the nuts back on the headlight bucket so that they lift the doors smoothly. Whole job takes about 15 minutes, so it's faster to swap another motor in than rebuilding the old one. This way the old one can be rebuilt at anytime if needed.
I made it to Welland Friday for the cruise night and left early to watch the Penguins beat the Wings in Game 7 of the Stanley Cup at the bar
I decided to show off the carbs and I polished the velocity tubes for the fans to view under the tinted hatch or through the new cabin window from the interior. I'd like to get some filter caps for the tubes - if anyone knows where to get some, let me know.
Ryan
[This message has been edited by Fiero2m8 (edited 06-16-2009).]
Thanks GoKart - I did some more searching to try and find some for my 2.5" size velocity stacks and I've been referred to Xtreme custom cycle (a local bike shop) so I will check with them.
I also got a couple of paint job quotes but it seems like painter's want to work on this in the fall when they have more time for a special project like this. That's ok with me since I'm cash poor right now.
Went and got a couple more paint job quotes and I've booked it for November over several weeks. The colour choice is a Toyota paint you can find on the 2009 Toyota 4 Runner called Shadow Mica.
One of the issues I noticed lately is that the Trans AM GTA vents warp from engine heat, so I'm going to modify them in some way to address the issue:
Here are a couple pictures taken from the beach recently:
I'm getting around to the audio/video system this week. I investigated the wiring in the dash and found the ignition, power, ground and seat speaker wires no problem. I have the wiring to connect the DVD to the TV/Monitor and it's power source wiring. I also have some new Pioneer 5-1/4" 2 way speakers I wanted to install (probably in the doors since there's no room in the dash for them). What I'm missing is a 4-channel amp since the DVD player only has RCA preouts with no built in amp. I thought about using a 50x4 Pioneer deck I have laying around instead to gain radio and amp but it doesn't have RCA inputs so no luck there. Future plans would include an 8" sub in the console area in a custom box I make, so maybe a 5 channel amp is the best choice? Any suggestions on how to proceed or what to look for?
I decided to proceed with a Alpine 4-channel amp I bought on Kijiji. Using an amp wiring kit, Jordin and I installed the amp behind the passenger seat. Channels 3 and 4 power the seat speakers and 1 and 2 are going to be for door speakers. I still have a center and sub channels available from the DVD player, so I may add another 2 channel amp for those in the future. Now that the DVD and LCD monitor are working with the amp and seat speakers, I can work on installing the door speakers.. Here are a couple pictures of the install:
Yesterday while the interior panels were off, I decided to install the new outer dew wipes from the Fiero Store.
First remove the inner dew wipes and rubber end seals:
Next remove two 10mm nuts holding mirror on the 3 of the 5 accessible screws and pull the old dew wipe off the remaining two:
With the window up (for maximum clearance and so it can't be scratched), use pliers to remove the remaining two screws. Now's your chance to clean the rest of the window where you normally can't reach:
Install the new wipes and omit the two center screws as Jscott recommends (I've never had a problem doing this on my Fiero's)
The other side gets done in half the time
I'm happy with the results - no more window scratches and they look great! BTW - I previously installed GM outer dew wipes on the Roadster. I wanted to report that I have no complaints about the quality of this Fiero Store product. I recommend spending the extra couple bucks getting their outer dew wipes screws as well.
I got the holes made in the Indy door panels that will allow me to retain the map pockets. The clearance is tight to the window tracks but this location will allow installation of 5-1/4" two way speakers:
Here are where the holes in the doors were made. I fed a wire coat hanger through the door rubber wire seal to pull 14 guage speaker wire through. It is ty-rapped following the power door lock wiring.
Once the wirning was completed the door panels are ready to be re-installed:
Speakers installed and keeping an eye out for grills even though they can't be kicked in this position:
I'm happy with the results because it retains the map pockets while still allowing the windows to go down!
[This message has been edited by Fiero2m8 (edited 08-10-2009).]
I decided to add a subwoofer so I traded Eau Rouge my glass sail panels for this:
It's only 2-1/2" deep and can be installed free air or with an enclosure 0.15 cu.ft ~ 0.5 cu.ft I just have to decide where to install it and buld an enclosure for it...
With this sub, I decided to upgrade the Alpine amp setup, so I'm going with these:
The mono amp will power the sub and the 4-channel for the door and seat speakers. I like how compact in size they are and will mount easily behind the passenger seat.
Today I braved the heat and humidity and upgraded the DVD system. The new Alpine amps were great as the 4 channel and mono amps fit side by side low behind the passenger seat without restricting ANY seat movement:
The subwoofer was installed into the center console. I reinforced the back of the fiberglass cover with carpeted MDF. I moved a couple items behind it to get the clearance and volume I wanted (at least 0.15cu.ft spec) There is no ECM in there so it works and sounds great without any unwanted vibrations...
Next I plan to install a center channel speaker in the center of the dash to complete the Dolby 5.1 system. I must say that using the left and right headrest speakers are terrific for rear surround once the DVD sound delays and amps are dialed in. My test DVD's were live concerts like Foo Fighters, Our Lady Peace, DMB and Bob Marley - now I need to add to the collection.
I like the Sub install. How is the base responce at low levels. I was thinking about doing something similar.
Bass response at low frequency is good with no unwanted vibration noise. It isn't as good as the 10" sub in a cubic foot box in my roadster, but I wouldn't want that between the seats (due to size and possible headaches). I'm very happy with the appearance of this subwoofer install and the system will fill the cabin with full range Dolby 5.1 surround. I would recommend you try something similar...
So! I just spent the last.... I dunno... many hours and part of yesterday in the middle of class lectures reading through the thread, looking through the photos. It was like a soap opera. Very amazing. Bubba you're a wondder, I wish I had someone like you around, not to do labor for me, but to pick your brain and learn all the useful things I NEED to know to finish my car. Its a shame not to have someone to help me learn to fiberglass and jazz. I was also pretty amazed at the 2,000 dollar price tag, and went nuts cause I was like... 'where the hell was I??' and anyways, glad to hear someone I had heard of buying the car. Its really just amazing how it all has come together and the turn of events, I hope bubba is doing well, and I needed to post my input here, cause I must have put at least two or three actual hours reading this thread today and like an hour yesterday.
Thanks for your input and comments. Bubbajoexxx is a great guy and wanted the project to live on, which is why he gave his blessing to continue the original build thread.
Unfortunately I'm laid up right now due to knee surgery, so I'm planning all the fall project work that should include the paint job. I just have to decide if I'm done with the body mods or if I'm going ahead with rear fender flairs, new hatch vents and possible sail panel air scoops.
I recently decided that the paint job will be done with the panels off the car. There are a few reasons I've decided to do this:
1. Quality - the panels will be painted similar to the way they were in the factory with no masking and complete coverage 2. Cost - by removing and installing panels myself, I am only paying the painter's time for panel prep, priming and base/clear (and I am supplying the paint) 3. Security - My car is secure and not left in someone else's shop for the winter 4. Restoration - I will have time to address any issues underneath the panels and paint the space frame 5. Convenience - I can work on mechanical upgrades this winter with ease and without fear of damaging the paint.
Here is a video on panel stripping in the "How to" section from Boomtastic's site:
I watched this to make a 15 step cheat sheet of the removal sequence. The only panels I haven't removed before are door skins and they look straightforward.
I met with the painter yesterday to review steps in the process:
1. I will drop off panels as they are removed and any fiberglass work is completed 2. He will do the final prep and prime all panels the same colour. 3. Since I'm using a metallic paint, all panels will be painted on the same day, from the same can and gun. 4. The panels will be painted in the orientation of how they go on the car (horizontal and vertical) 5. He doesn't have to worry about my car taking up space in his shop or any masking/reassembly etc.
I will update with photos of the progress during it's storage season from October-March.
Yesterday Jordin came over and we got the stiffening capacitor installed just prior to the distribution block. I was pleased that the passenger seat still retracts fully to the rear and reclines to the package tray.
Yesterday I got the GM/buddycraigg sunroof mod completed. I was able to easily peel back the sunroof seal further since I'll be replacing it after the paint job.
Here is the info for future reference:
and
Number 86-10-1 Date 1/86
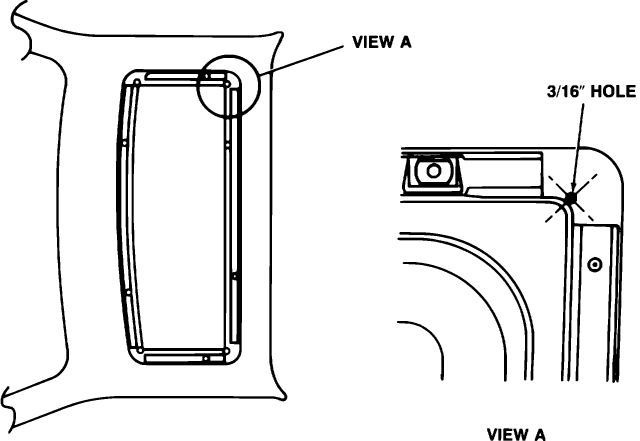
Subject: VISTA VENT WATER LEAKS
1984-86 FIERO (WITH AD3) Conditions, which contribute to water leaks on 1984 to 1986 Fiero vista vents, can be repaired by adding drainage holes to the plastic roof outer panel and replacement of hardware nuts at the hinge and latch locations on the glass panel..
This bulletin contains procedures for the addition of holes to the plastic roof outer panel, description and part numbers of new hardware nuts as well as proper sealing patterns for weatherstrips (if weatherstrip replacement is necessary).
The addition of holes provides a water drain system and are to be drilled through the Plastic Roof Outer Panel Only. The holes are to be located in all four (4) corners of the weatherstrip mounting area. Figure 1 shows the location of the holes with the weatherstrip removed for illustrative purposes.
The recommended procedure for adding holes to the roof outer panel is as follows:
1. Remove the vista vent glass assembly from the vehicle and place on a clean work surface.
2. During the following drilling operations, it will be necessary to hold the weatherstrip out of the way to prevent damage. Using an electric drill motor and 3/16" drill bit, drill one hole (through the plastic roof outer panel only) in each corner of the weatherstrip cavity as shown in Figure 1, view A.
3. Reinstall the vista vent glass assembly to the vehicle and water test to insure an acceptable repair.
4. After water testing, remove the vista vent glass assembly and dry the roof inner panel by blowing compressed air through the holes in the roof outer panel. Apply a small amount of GM P/N 1052856 anti-corrosion compound (or equivalent) through the holes in the roof outer panel to protect the metal roof inner panel from corrosion caused by damage done during drilling operations.
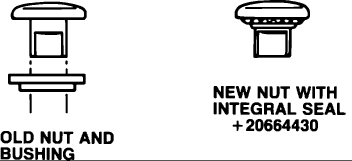
If water leaks are noted at the hinge and latch locations, a new hardware nut is now available and provides improved appearance and sealing. (Refer to Bulletin 86-10-3.) The new hardware nut has an integral seal and no longer requires the use of bushings (Figure 2).
Due to the lower profile and improved appearance, the new nut should be used in all locations (hinges and latches) when service operations on vista vents are performed.
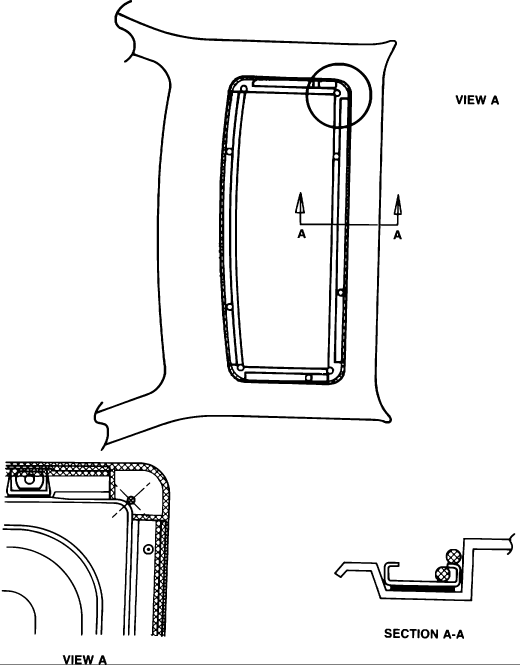
If the vista vent opening weatherstrip is damaged and requires replacement, it is important that the weatherstrip be properly installed and sealed that the weatherstrip be properly installed and sealed to the retainers and body panels.
The shaded areas shown in Figure 3 (view A and section A-A) show the correct locations and sealing patterns to be used when resealing or replacing weatherstrips. Use 3M 08011 weatherstrip adhesive (or equivalent) when resealing or replacing weatherstrips.
I am thinking about an 11" stretch on a Fiero with longitudinal LSx and a Audi/Porsche/Subaru/Quaife/Mendeola transaxle. I have several questions for you and/or Bubbajoe.
1) After you do all that work and end up with a running car how does the car handle? Does it handle better than the original Fiero?
2) When Bubbajoe was building the tube cradle did he do drawings so others could follow in his footsteps? I am looking in the forum for a vendor that builds a stretch cradle (like Dave Held use to build) but I have had no luck yet.
I am very interested in a new project and really like the wide body chopped top look of cars like the ones Archie did for/with Madcurl, I think that widebody design stretched out 11" would give it a very nice look. I have been reading this thread along with the one about Stretched Concepts in Amida's thread and several others in the Contruction Zone. I also really like the Pantera body that opm200 is doing.
Originally posted by jmyokley: Fiero2m8, I am thinking about an 11" stretch on a Fiero with longitudinal LSx and a Audi/Porsche/Subaru/Quaife/Mendeola transaxle. I have several questions for you and/or Bubbajoe. 1) After you do all that work and end up with a running car how does the car handle? Does it handle better than the original Fiero? 2) When Bubbajoe was building the tube cradle did he do drawings so others could follow in his footsteps? I am looking in the forum for a vendor that builds a stretch cradle (like Dave Held use to build) but I have had no luck yet. Comments, John
1a) I believe the best measureable improvement to the project has been in the handling. The wheelbase stretch/rear track widening combined with a light powertrain more forward of the rear axles, makes it the best balanced/cornering car I have ever driven. A little weight added to the nose should make it the best braking car I've owned too - once the 88 front suspension is installed, I'll be ready for the skidpad 1b) YES
2) There is a drawing (not to scale) and photos on the cradle in this thread (check page 55 for the table of contents). That will give you the design - the width is determined by the cradle mounts (same as stock cradle) and the length is determined by how much you stretch the frame.
I'm thinking that if you have the skills to stretch a frame, then you could also build the cradle or stretch the existing cradle, making a market for selling various length stretched cradles slim. Good luck with the project John - If you need any measurements from my chassis, let me know.
Well I confirmed some bad news I'd had a feeling about on the Northstar today. The cylinder that has been low on compression was given a leakdown test. It's losing the compression past the piston rings not a valve as I had hoped. I've read alot of issues regarding N* oil consumption past the rings etc. I had hoped that this being an 01 motor that the lower end would be ok. Anyways, I guess the plan will be to pull the head, drop the pan and remove the piston. Then I can see the condition of that lined cylinder before deciding how to proceed. Alot of mechanics consider Northstar to be disposible engines rather than relining/rebuilding them. I will be at a crossroads of deciding whether I'm going to be one of those guys who sinks money into the Northstar pit
The way I see it I've got 3 options of varying difficulty and cost:
1 - Rebuild it 2 - Swap for another used Northstar (although it might come with it's own problems too) 3 - Abandon the Northstar and go with another powerplant and possibly another transaxle too.
Stuff to lay awake at night and ponder Any suggestions will be considered...
I'm guessing the engine still runs and maybe burns a little oil. A rebuild is probably 2 or 3 thousand. That much money buys a lot of oil. I would run it.
Originally posted by joshua riedl: I'm guessing the engine still runs and maybe burns a little oil. A rebuild is probably 2 or 3 thousand. That much money buys a lot of oil. I would run it.
I have already run it for about a year like this. On my Roadster I always focused on powertrain and never got the body finished, this project is getting painted first. It doesn't burn oil, I get a rich exhaust condition due to the misfire at idle and black smoke (unburnt oil) under heavy load. A local wrecker wants $800 for a 1999 "Y" vin Northstar, so I've got options to consider vs. rebuilding. Anyways, I picked up the car yesterday from the mechanic and have parked it in the garage in preparation for its winter projects...
Updates coming soon, as I'm finally recovered from my ACL knee surgery in August
When stripping the body - staying organized on where the fasteners came from is a good idea:
All the rear panels are removed and ready for prep work then to the painter. There are 3 holes in the bumper cover that I don't want so if anyone local has a spare 87-88 rear bumper shoot me a PM:
Thankfully Bubbajoe had improved the design of the rear decklid from grafting to attaching directly to F-body glass. This allowed removal so I can keep the glass at home and paint the frame while the decklid is modified and then brought to painter:
For the rear vents, you could use the turbo sunbird vents, as they are made out of metal, so you wouldn't have that warping problem. And I know it will probably stay, but in my opinion, that spoiler is too small for the look of the car. The bigger TA spoiler would look better. Overall, I like how the car looks, though.
------------------
[This message has been edited by Fiero_Adam (edited 10-20-2009).]
Bubba, I am going to be in Mississauga Tuesday till around noon and was hoping to drop by in the afternoon with the parts we talked about on the phone.
Not sure if you are still looking for another N*. I ran across this one the other night and posted in in the mall for anyone interested. Don't know how close he is to you but it sounds like it might be a good deal.
I just read this entire thread and until tonight, I did not realize the history of your car. Thanks to Bubba and you for keeping it going.
Thanks Katatak - there a 275HP engine with similar miles a few blocks from my place for same money. Thanks for looking and check back here for updates soon after I first finish all the work on the Jeep Grand Cherokee I recently picked up.
Congrats to everyone who helped on the Tyler's Toy Project I enjoyed following the progress on the live feed and it inspired me to work on the newest project yesterday since I couldn't be there. Here are the pics:
Front crossmember removed in preparation for upgrade to 1988 suspension:
All the bolts came out easily with hand tools, I was surprised the compressor/impact gun wasn't needed at all:
Plastic spare tire liner was removed:
Modifications are underway for a new rectanglar front luggage compartment for Erin
Guys, I'm looking for a place to have my headers and exhaust ceramic coated. Nobody local does it - they want to ship stuff to Toronto and charge $600-$700 The local powdercoater referred Fireball -anyone had experience of their work?
Originally posted by bubbajoexxx: Fireball did the headers for franks car 6 years ago and they still look like the day they where done make sure they are done inside and out
Thanks - that's reassuring, I'll contact them and get things rolling then.
A couple updates...
1. I dropped off the rest of the body panels for paint last week. The painter didn't have room for the big pieces, so the GM dealership a couple blocks away let me put them in their storage shed in the meantime.
2. I also ordered the paint (Toyota code 1F4 - Shadow Mica) from Youngs Auto in Port Colborne.
3. Today I picked up the hub bearing assemblies to use in the 88 front suspension swap. These units will be modded to fit the 1988 Fiero spindles and will also accept the Corvette rotors and bolt pattern. They are AC Delco Hub Bearings from an 85 S10 4X4 - Special thanks to Bubbajoe who is engineering this custom mod.