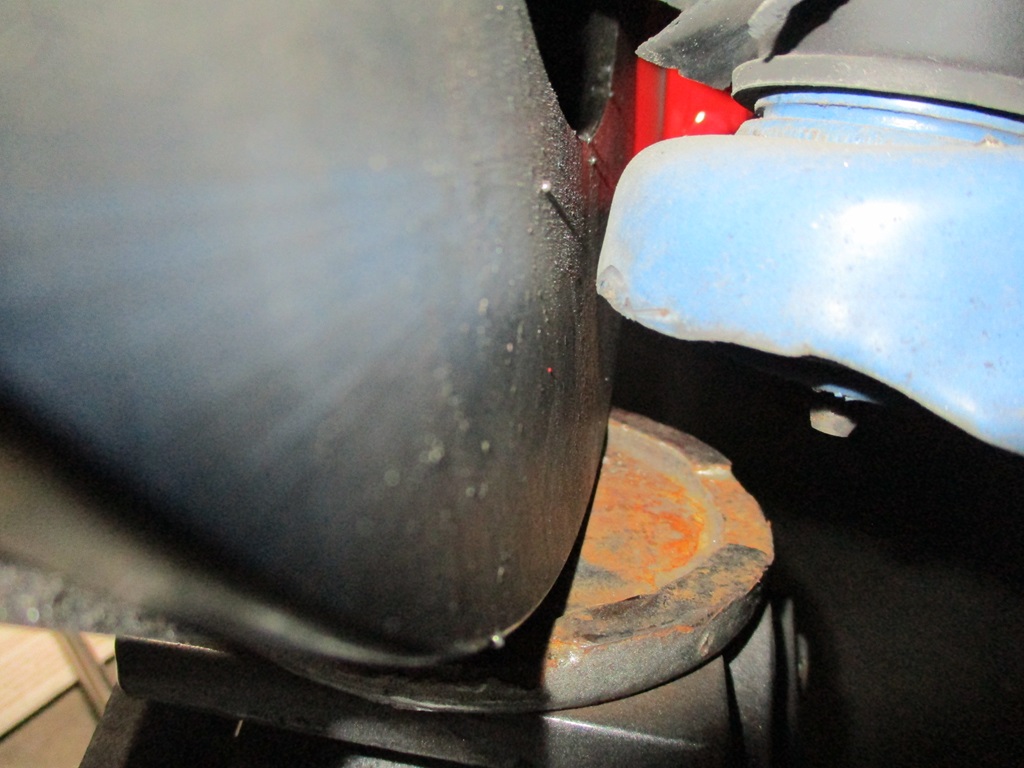
Only got to work on the car today... pulled front passenger wheel and wheel liner to run the fused 8ga amp wire to the battery. The amp battery cable passed from the inside to outside just above the door wiring pass with a new hole and grommet. The cable is ran in split loom and rests on the top of the wheel liner. Before it connects to the battery, an inline fuse holder was added.
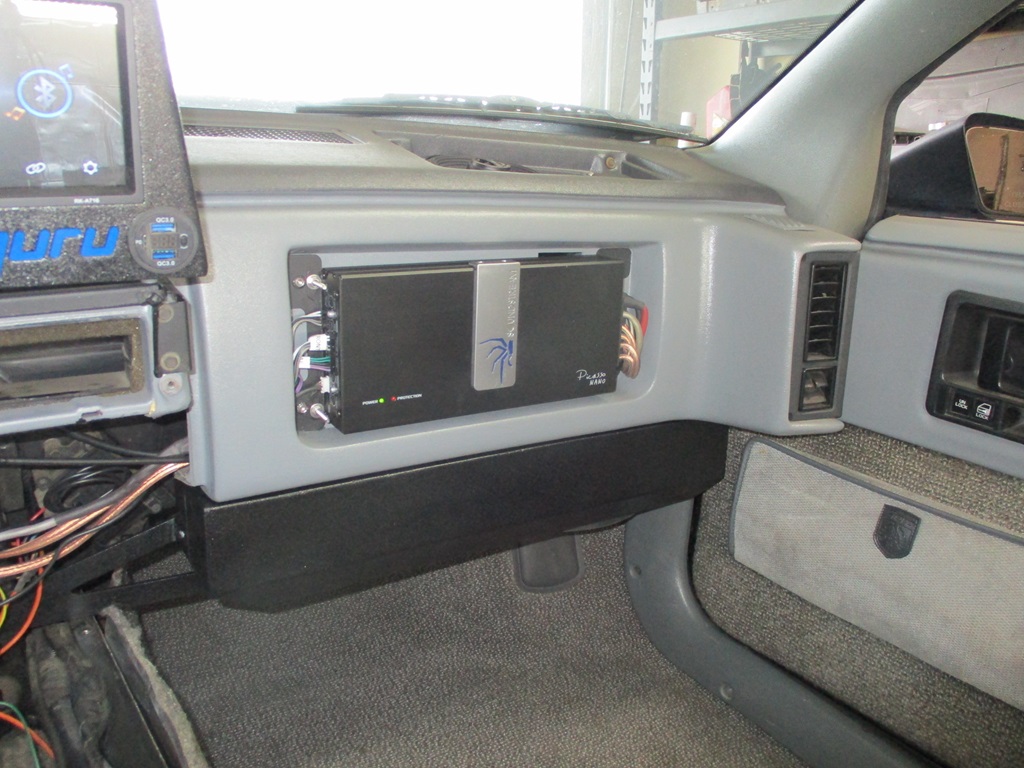
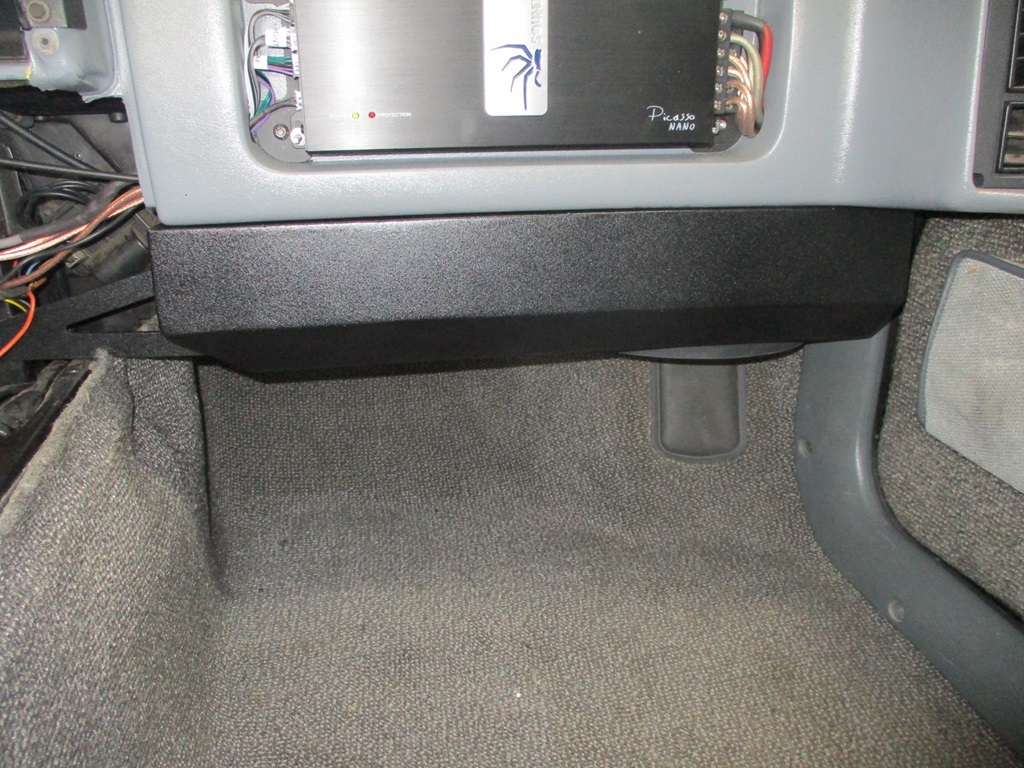
Once the power cable was ran, then it was time to finish installing the dash and sub, wire up the radio and perform the first in car test. I think the finished install looks very good. There is 10" from the carpet to the bottom of the sub box.
Played some AC/DC - Thunderstruck and Back N Black and turned it up. Sub works very well w/o and ringing or resonance. The base hits hard enough to shake the rear view mirror and carries into the house enough to annoy the cats. Overall it is louder than I need it to be and probably has more bass than needed in a Fiero as well. Overall I am super happy with the sound... Now I just need to finish putting the rest of the interior back together.
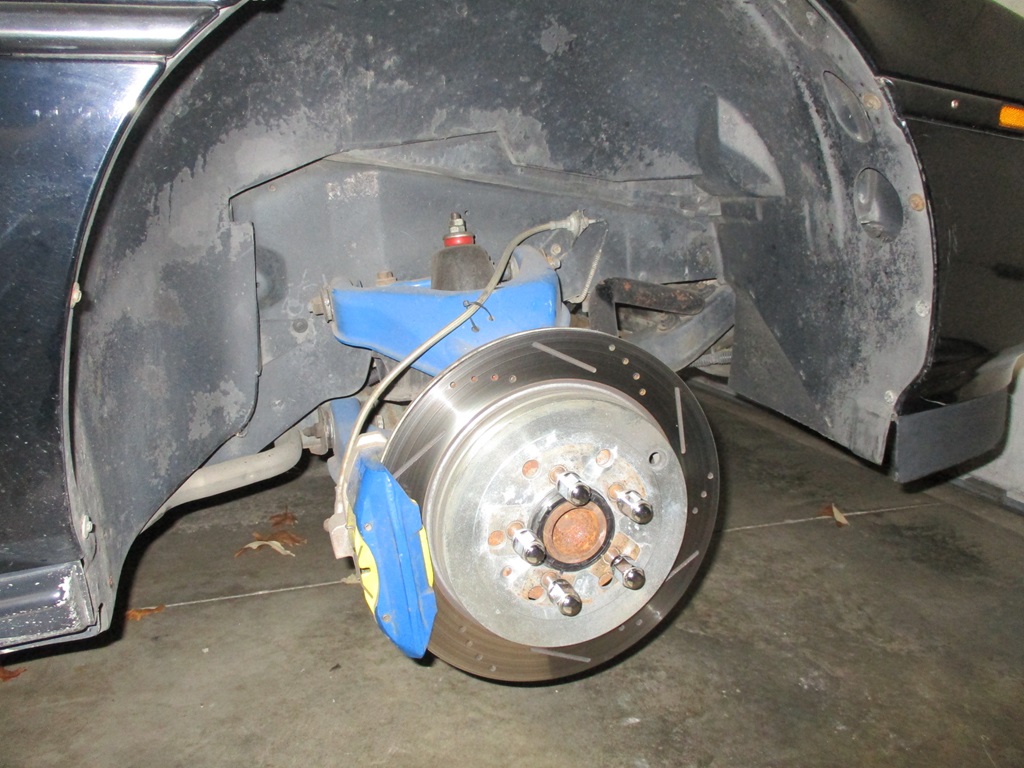
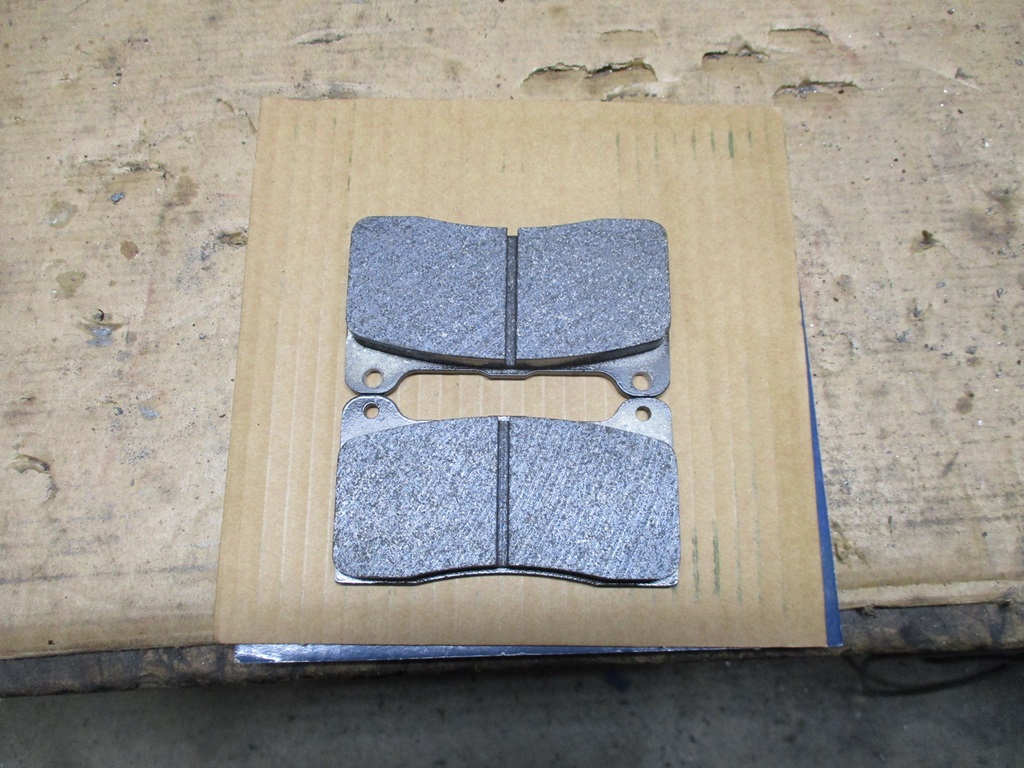
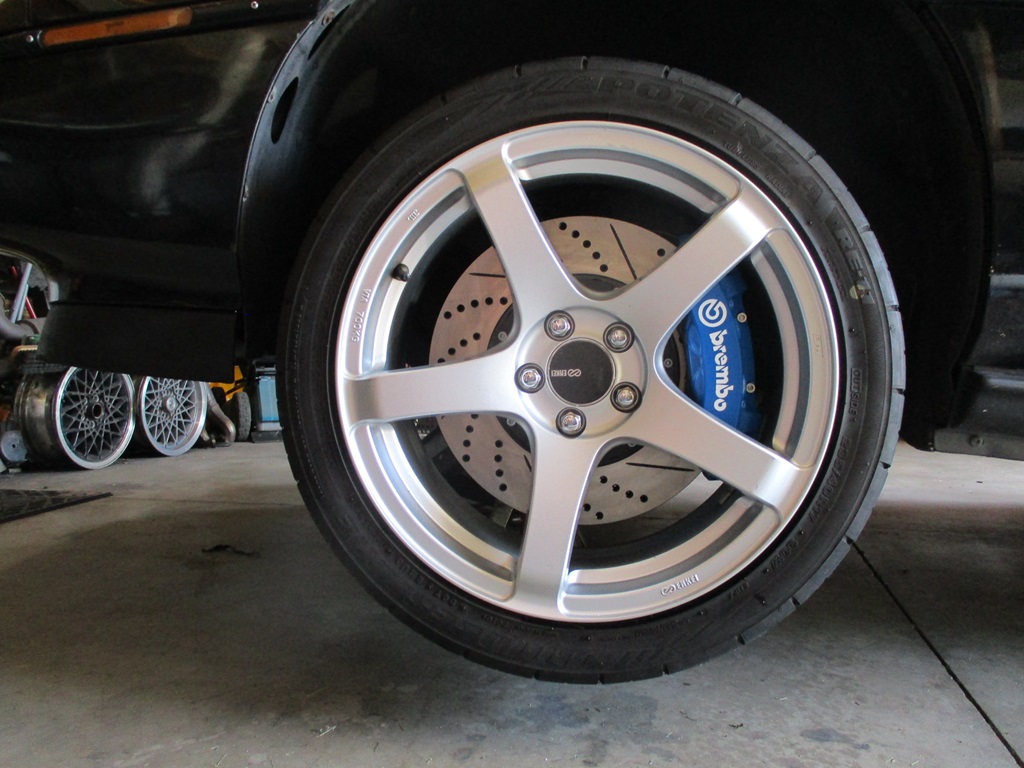
While the front wheel was off I went down a rabbit hole...
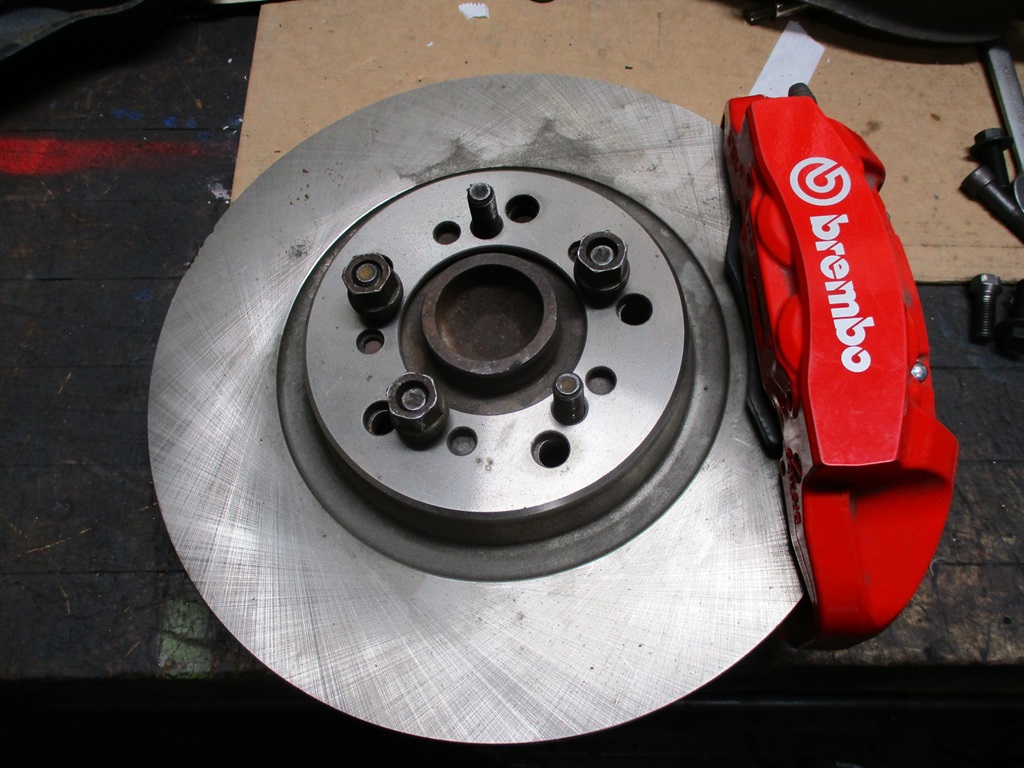
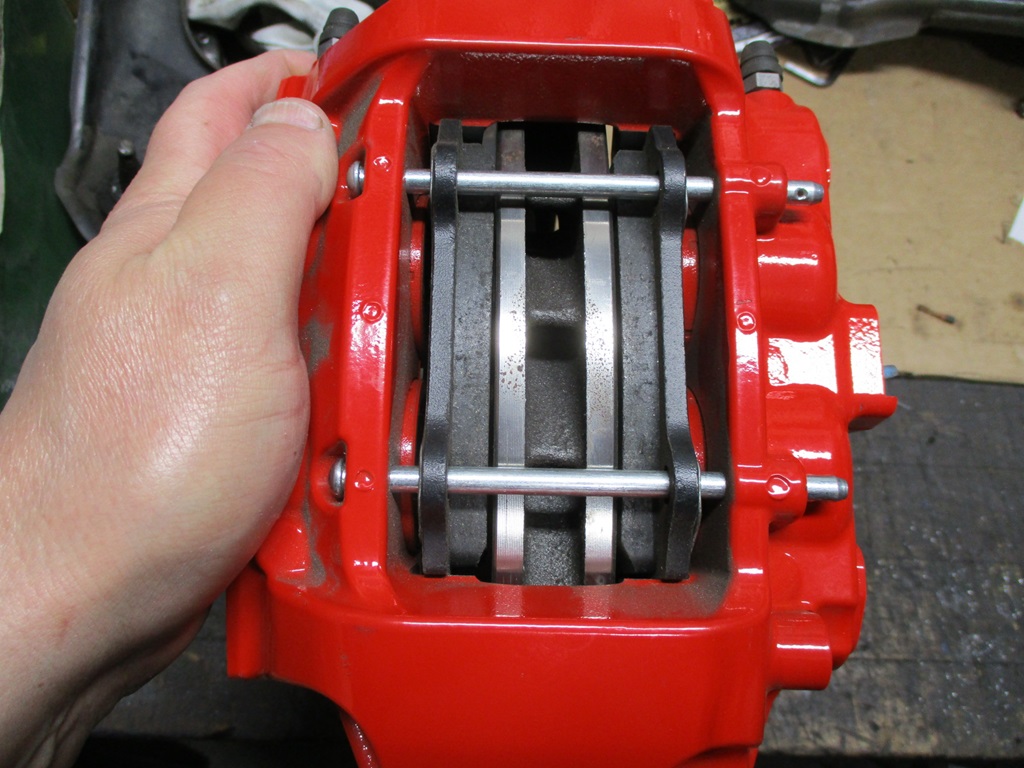
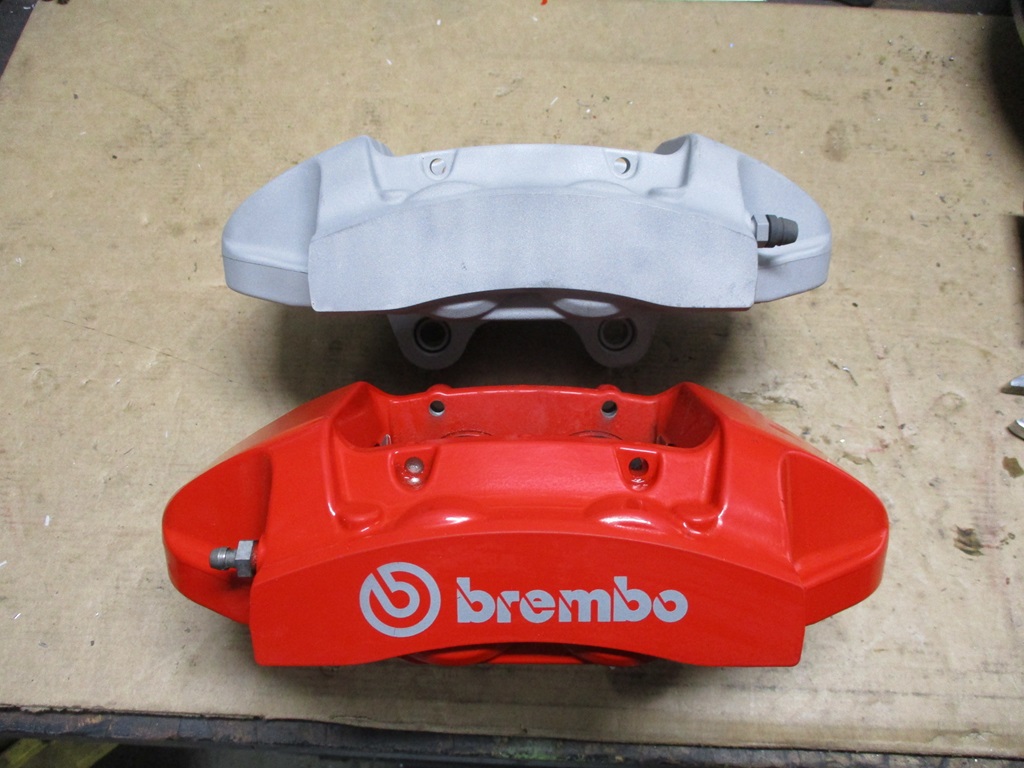
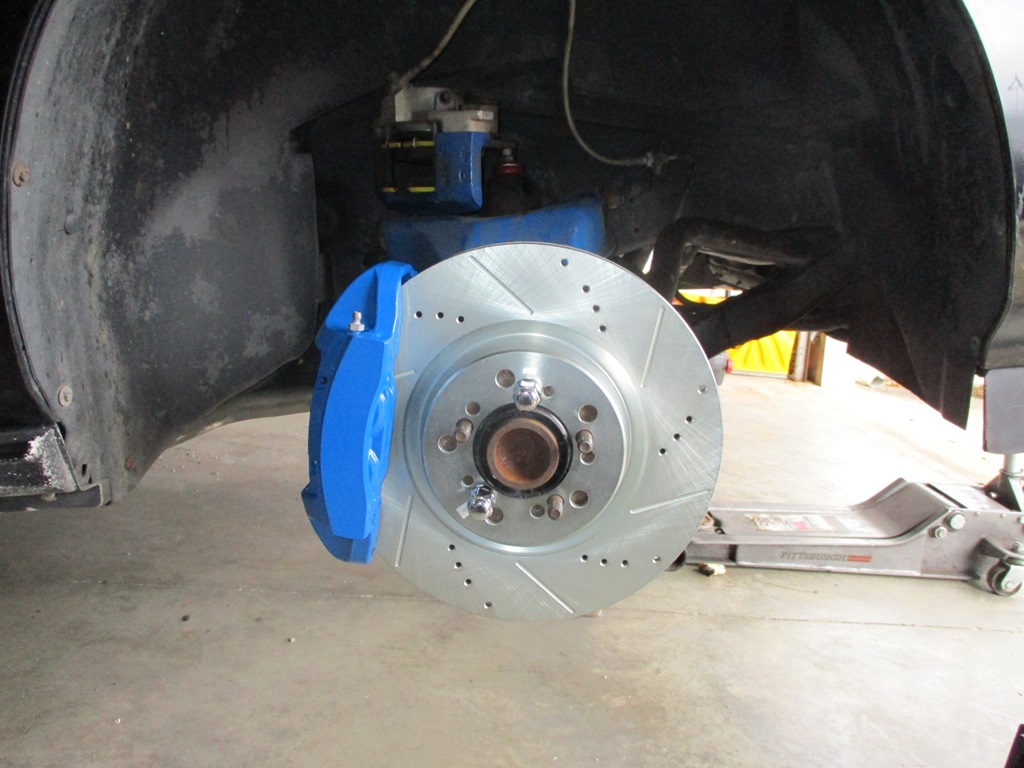
This is the Brembo 4 piston caliper that is a hydraulic match for the 88 Fiero calipers. Hydraulic match means they can be swapped w/o changing clamp load or front/rear bias - which means they can be a front only upgrade while keeping the stock Fiero rear caliper with parking brake.
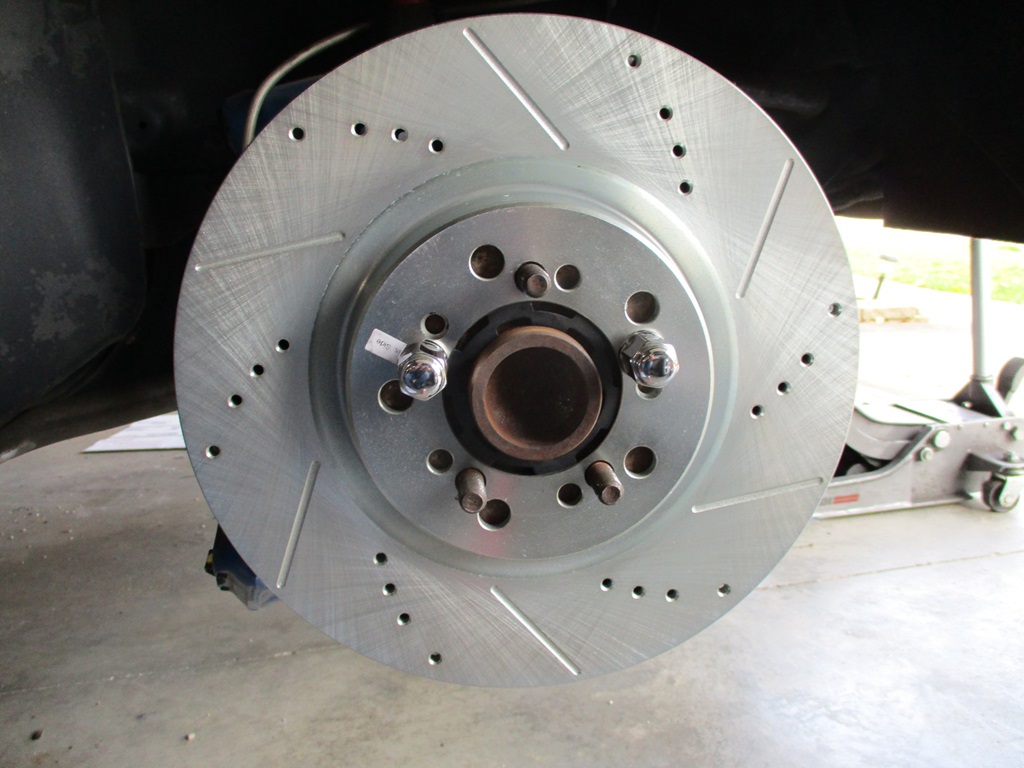
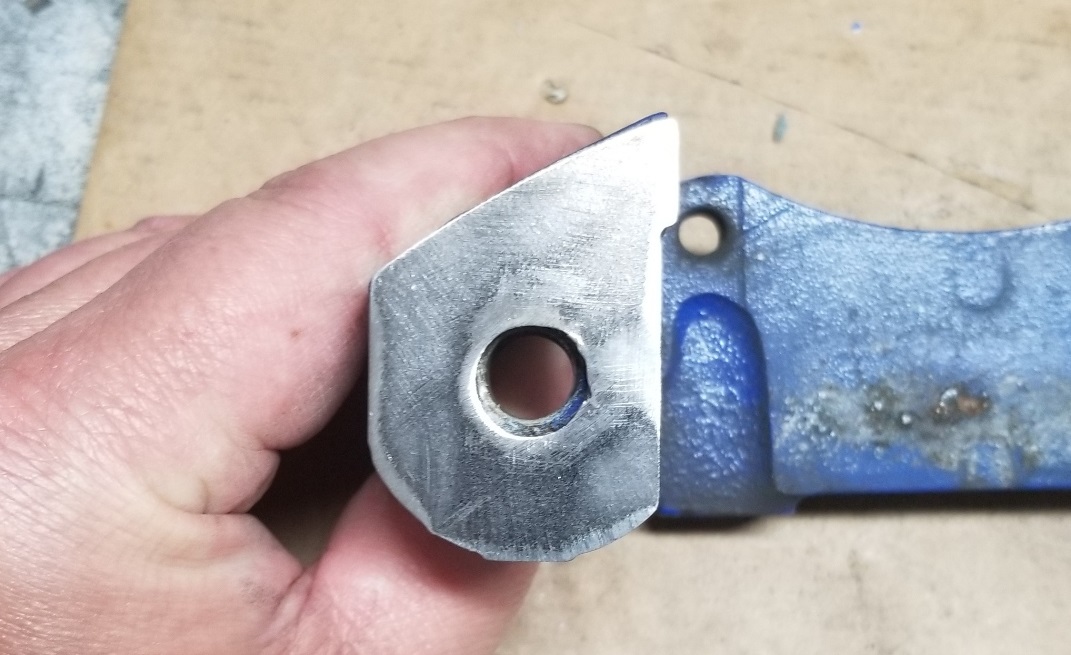
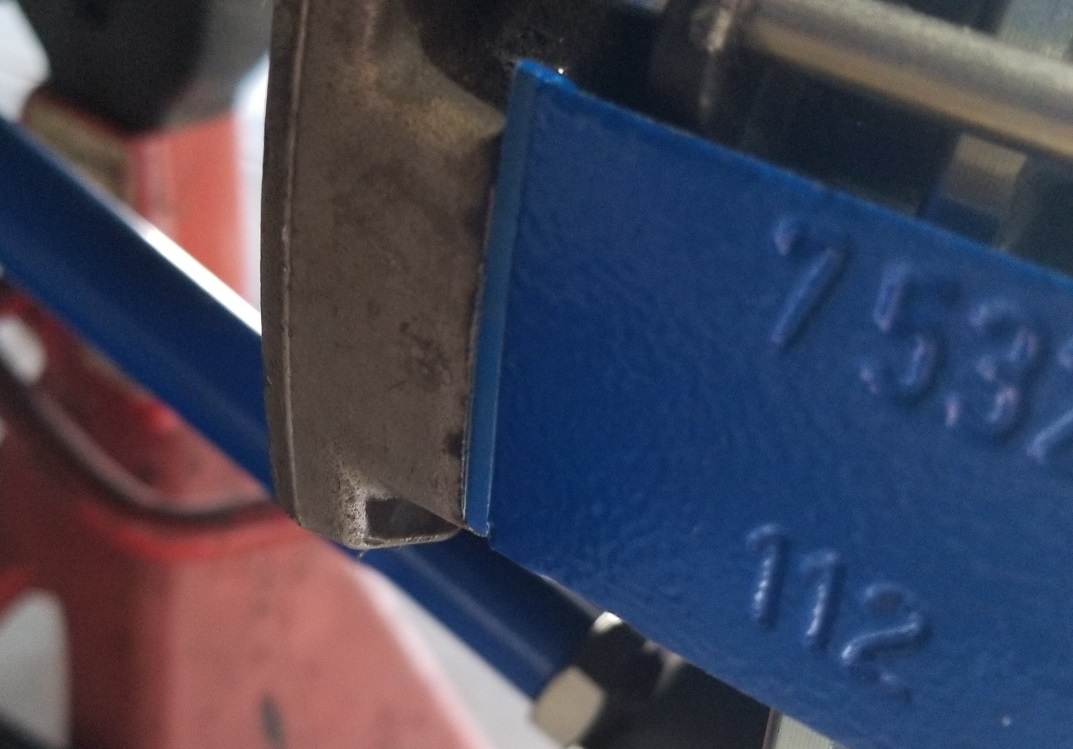
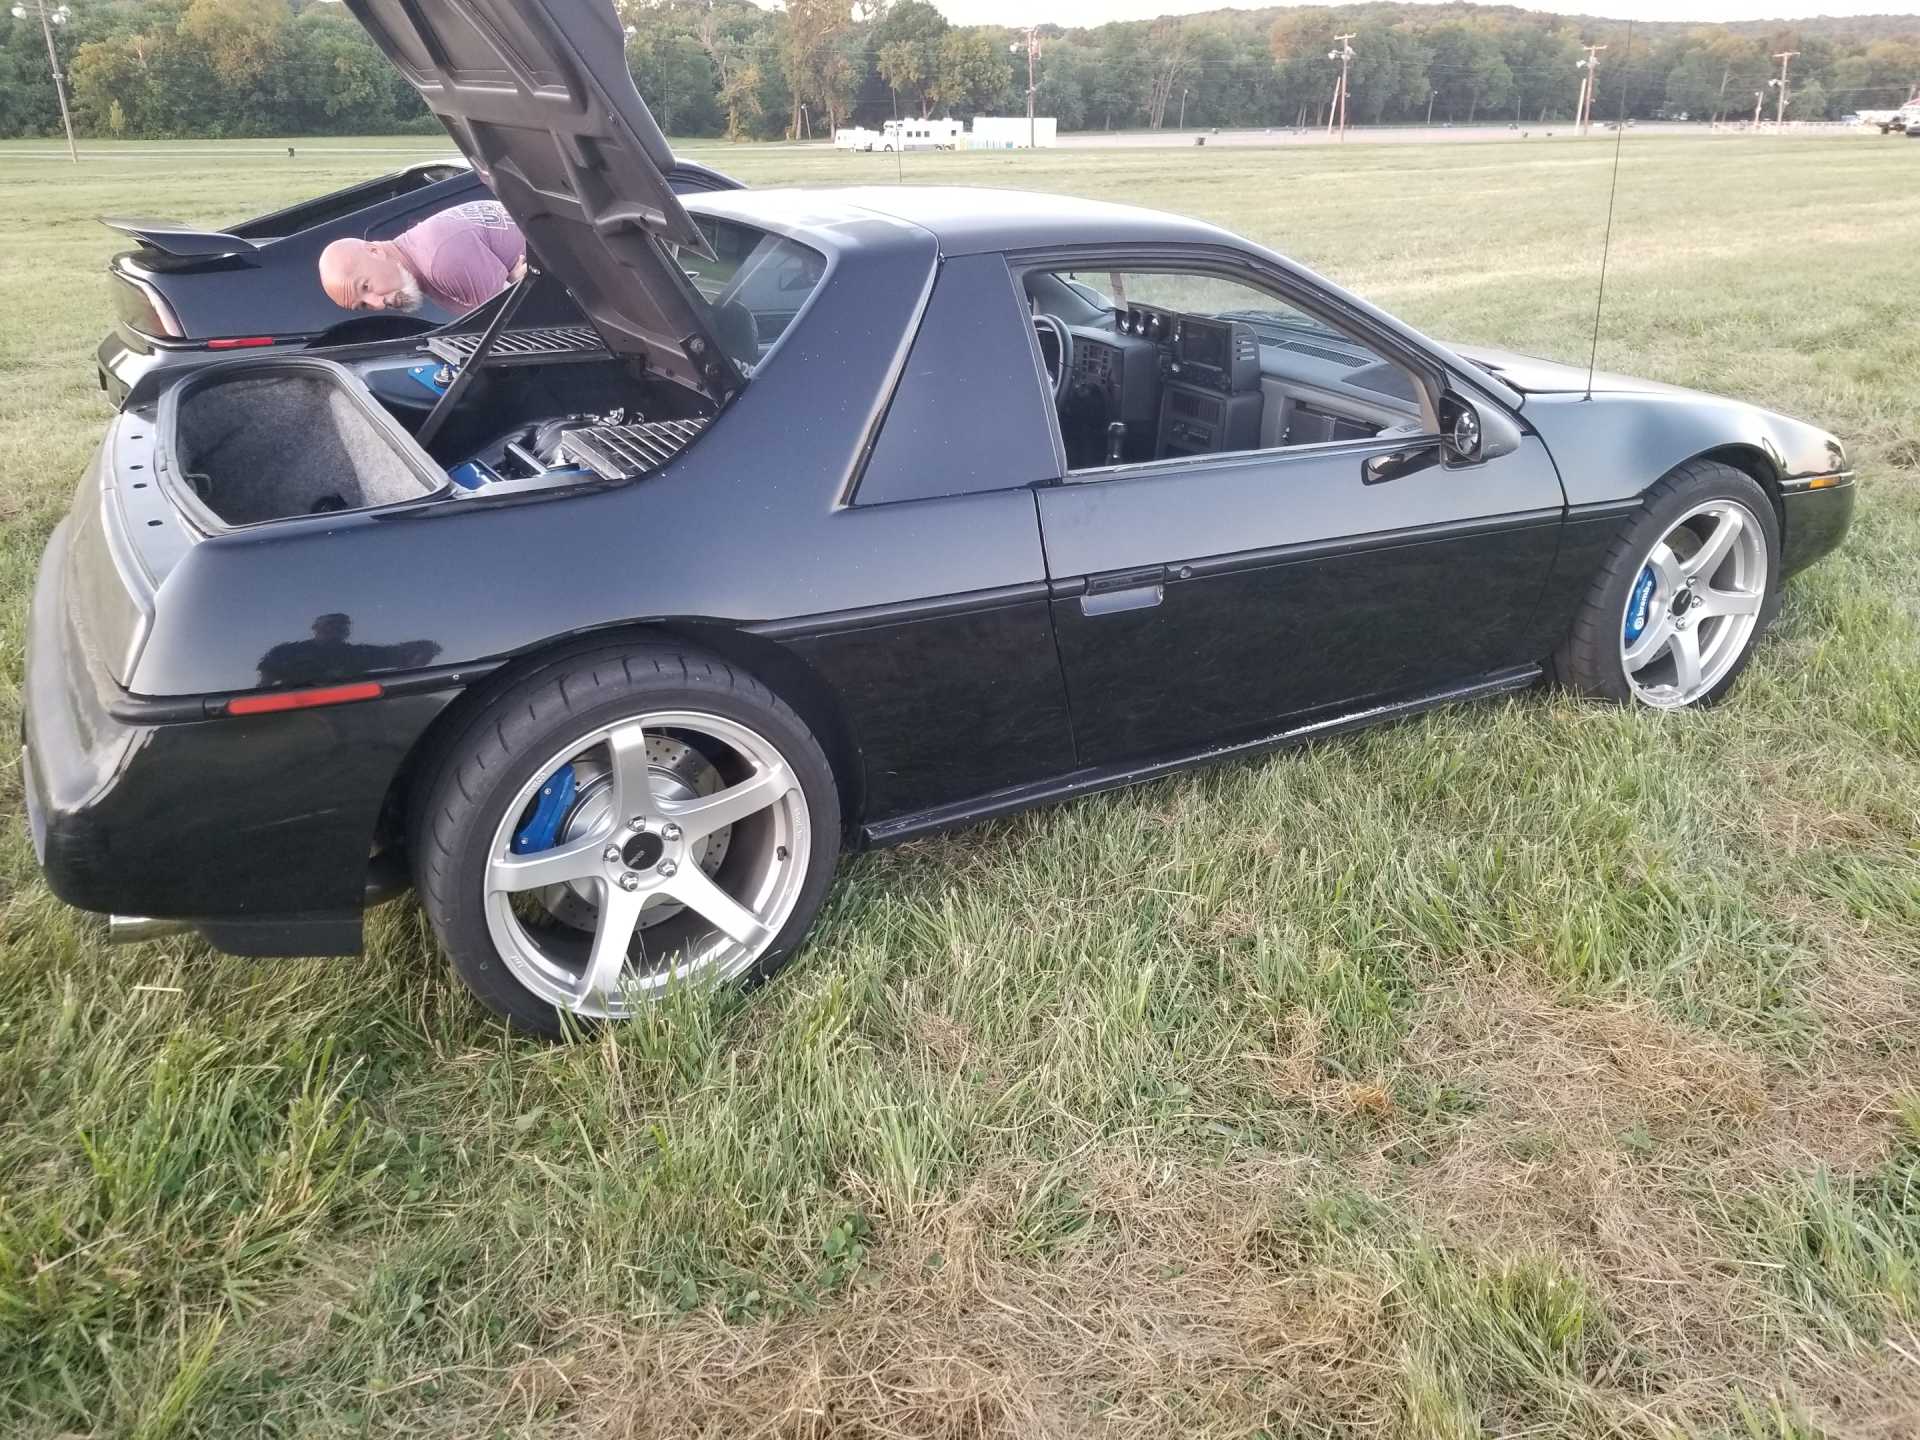
I am planning to use these calipers with my custom 88 front knuckles, but I am still a long ways away from installing those, so I decided to see if I could adapt these Brembo calipers to the stock 88 knuckle. So far so good... it appears the nose of the lower a-arm will clear the back side of the rotor. The caliper has to be rotated around the knuckle to allow for caliper bolt and caliper adapter bolts to coexist. This likely could cause some interference issues with the upper a-arm. If it does, I might try rotating it down vs. up. The rotor is 13" and 1.1" wide with some aggressive vanes for air movement. If everything clears, I will go ahead an install these (once they are painted blue!) in the front on my car. Like I said, they are a hydraulic match, so I can swap these calipers with the 88 front calipers w/o changing brake bias or brake feel.
The rotor is 13" and 1.1" wide with some aggressive vanes for air movement. If everything clears, I will go ahead an install these (once they are painted blue!) in the front on my car. Like I said, they are a hydraulic match, so I can swap these calipers with the 88 front calipers w/o changing brake bias or brake feel.
Any chance you'll offer the brackets and center ring's as a kit w/ part numbers for the rotor/caliper????
Originally posted by qwikgta: Any chance you'll offer the brackets and center ring's as a kit w/ part numbers for the rotor/caliper????
Rob
You are getting way ahead...
First it has to fit w/o interference.
Figure out the concentric ring solution.
Test, Test, Test.
Validate bracket fabrication process
Determine sources for rotors, rings, and calipers - this rotor application already has 2-piece rotor options. Not cheap, but definitely lower weight.
Create caliper fitment templates to allow verification of fitment to various wheels
Run economics to determine pricing
If It makes it through all the steps, then I likely would launch the kit as a front upgrade for current my 13" brake kit with me supplying everything. Eventually I might sell hardware only kits, but from history with my current 13" brake kit, as well as my coil overs, 97+% of the buyers don't want to mess with sourcing parts or assembly and are willing to pay more for less headaches and ease of installation.
Finished with adding the sound deadening to the drivers side, installing both carpets, installing both seats, tightening done the steering wheel and connecting the horn so it works.
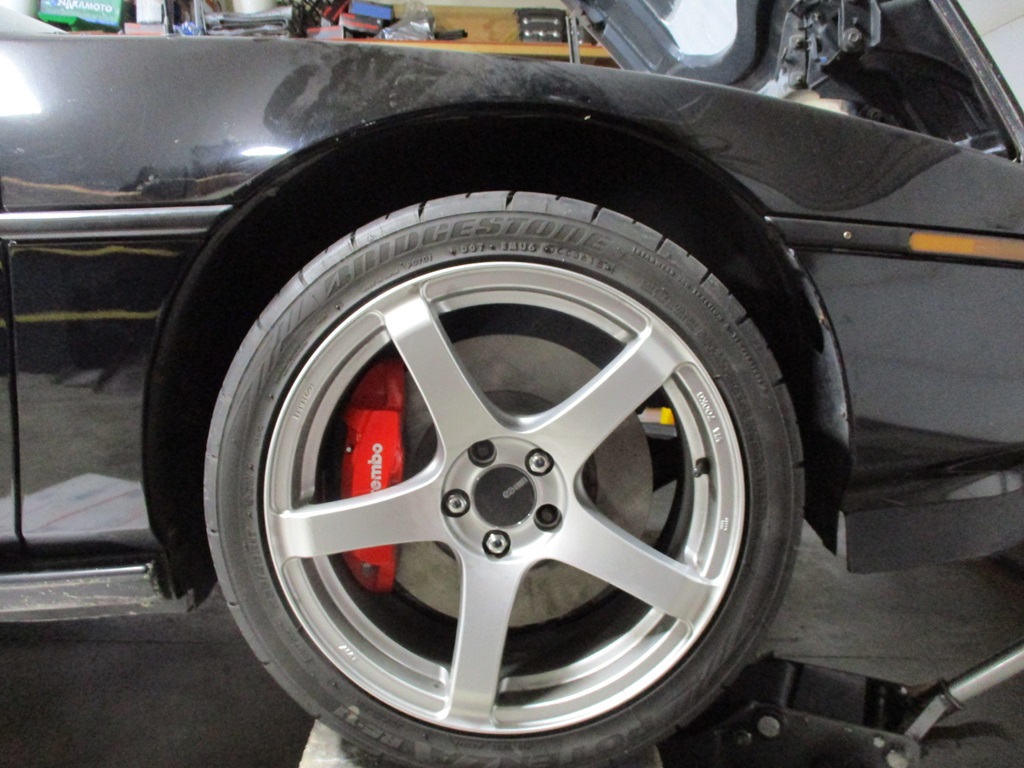
Then I played with the Brembo caliper. Test fit of the rotor on my car and the nose of the a-arm clears the rotor by about 0.10" so that works. Installed the caliper and bracket with the caliper clocked upward and checked clearance to the upper a-arm - everything cleared with over 1/4" of room to spare. Checked clearance between the Brembo caliper and my wheels - cleared by about 3/16".
Started looking for sources of the hub rings, and finding off the shelf ones looks to be a challenge... but I am still looking. I really don't want the added cost or time to make them, but we will see. I did find a place that makes the 2 piece rotor for this application w/o requiring it to go larger diameter. Not cheap (2 rotors are more than the cost of my current 13" brake it with 4 rotors and all hardware), but available. I might call them to see if they will swap out the hat with one that will fit the fiero w/o changing the rotor offset.
[This message has been edited by fieroguru (edited 03-31-2024).]
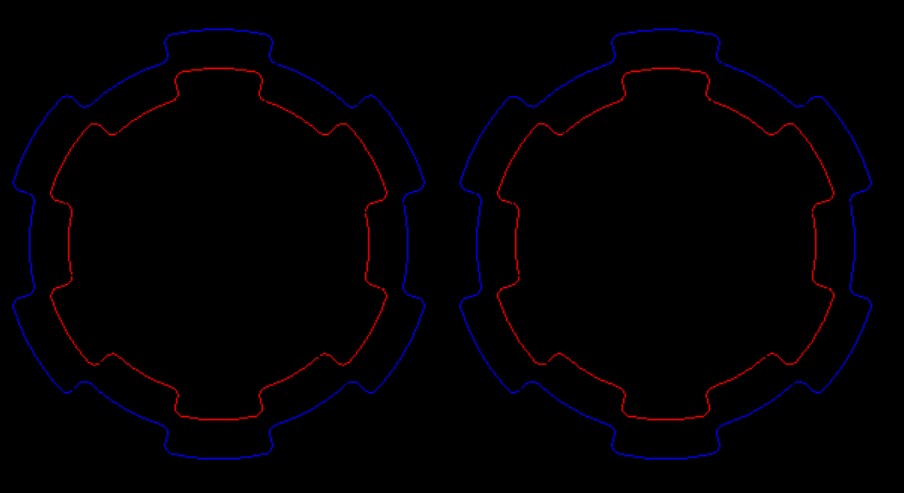
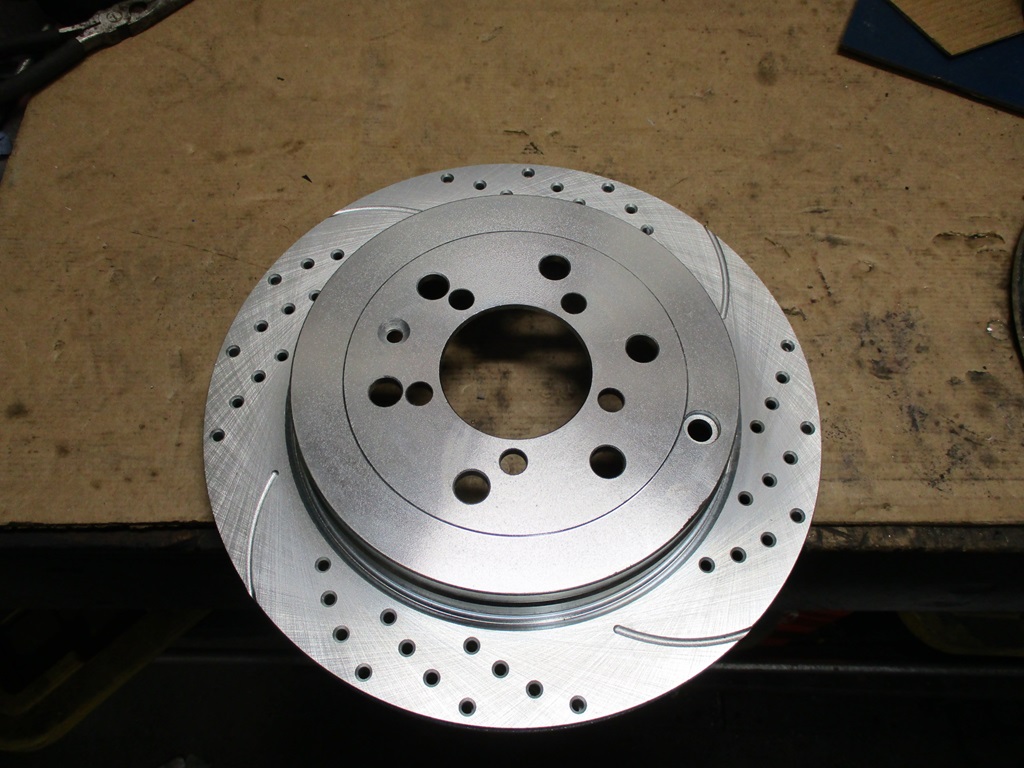
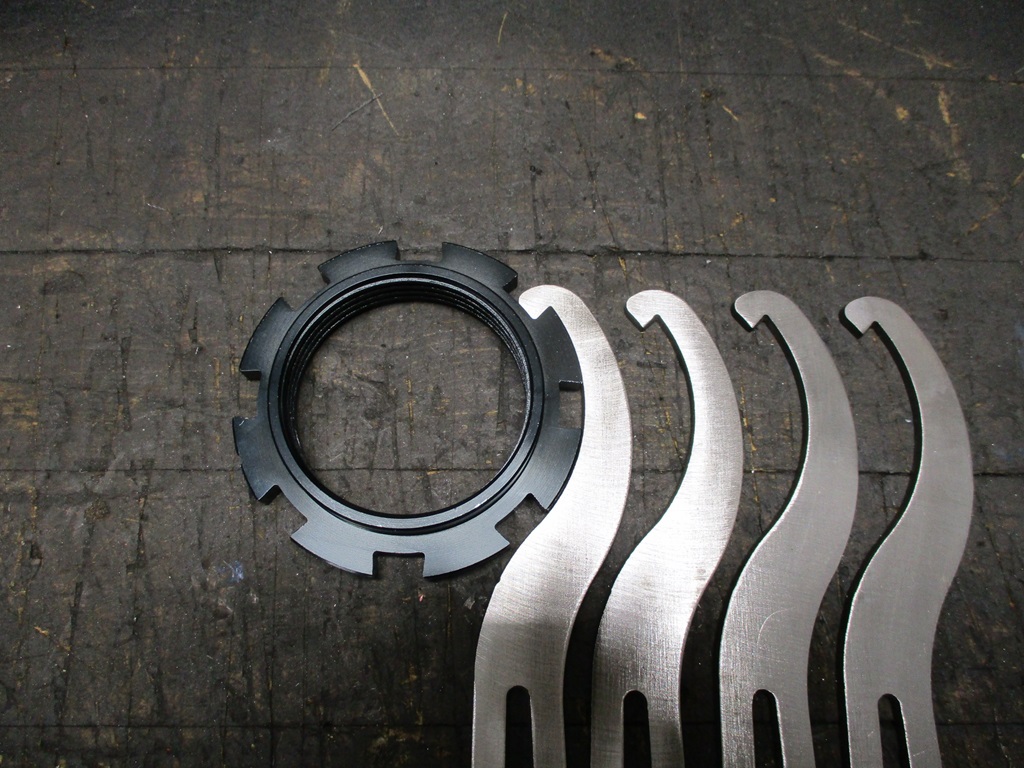
I wasn't having any luck with an off-the-shelf concentric ring, so I made some on the plasma and trued up the ID and OD on the lathe.
I made 4 of them and used 1 for the drill guide for the 5x100 pattern and then drilled the new rotors. In a month I will have the 2 piece rotors - but I want the car back on the road by the end of next weekend. So these will do for now.
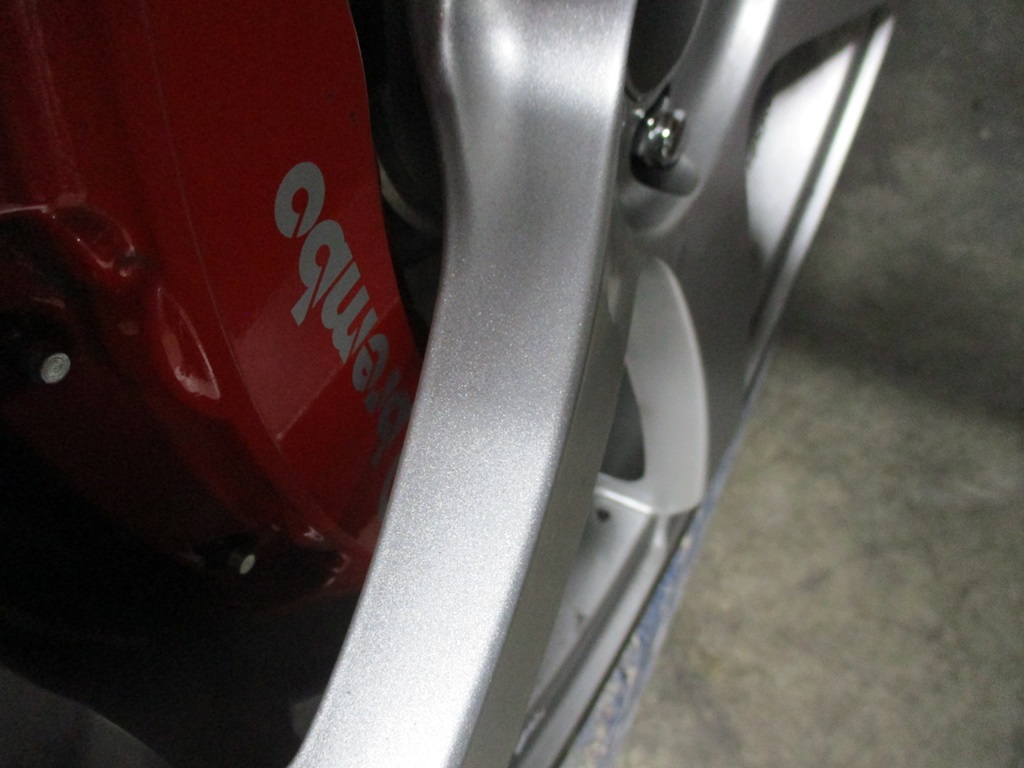
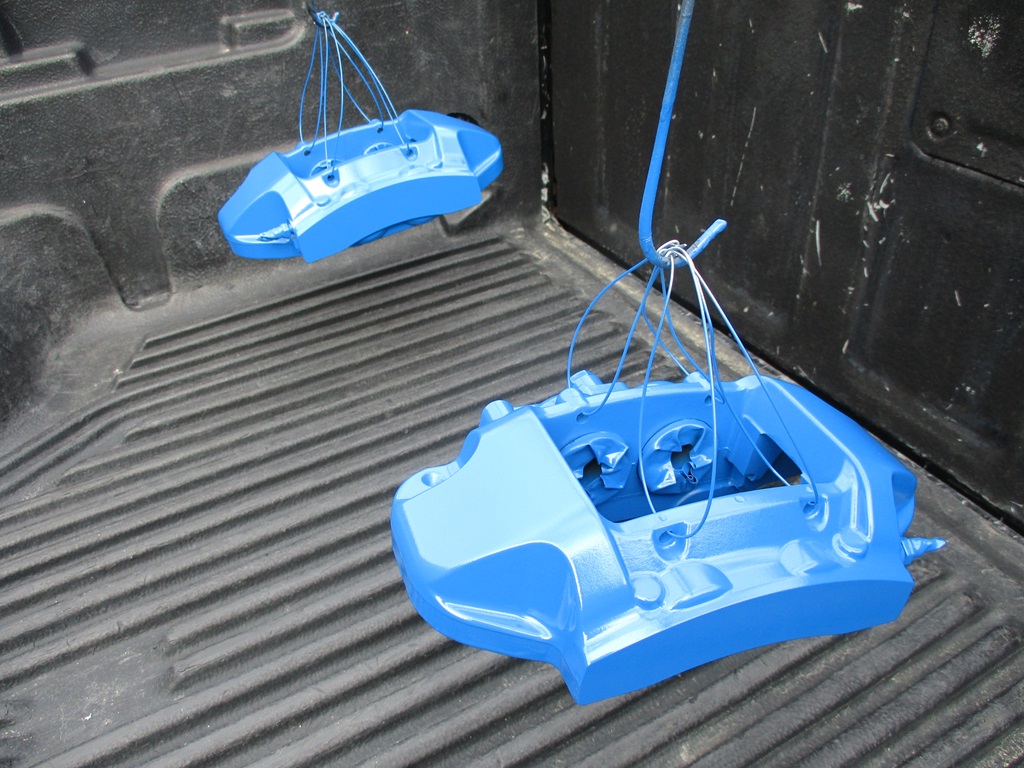
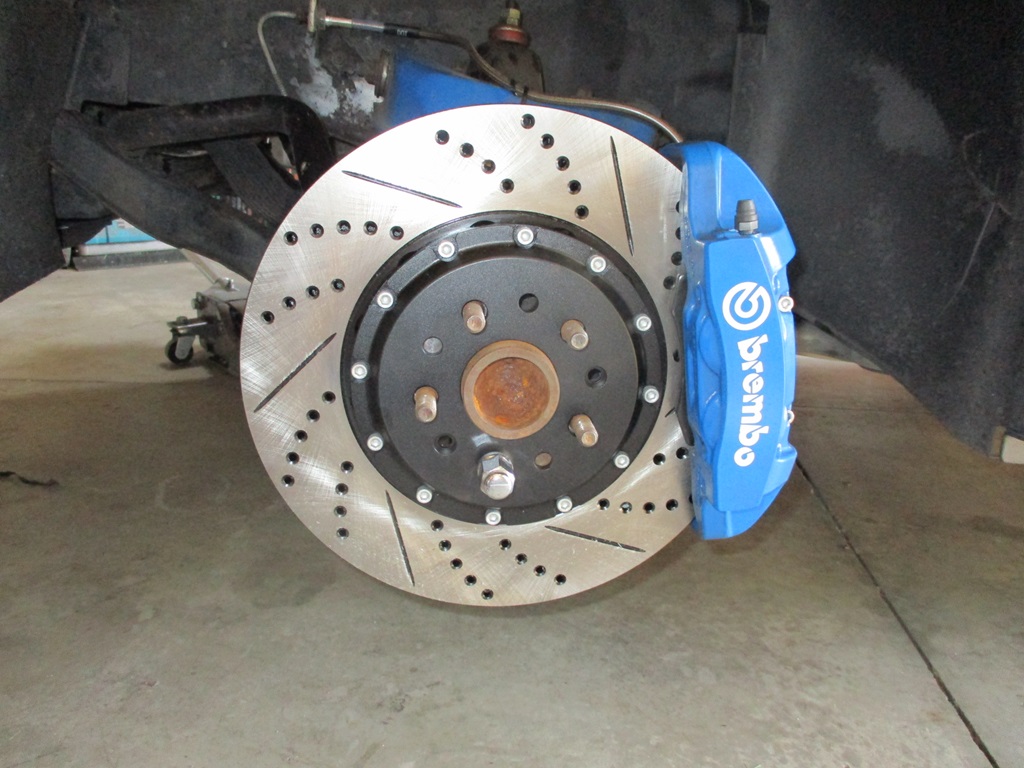
No more red on the Brembos:
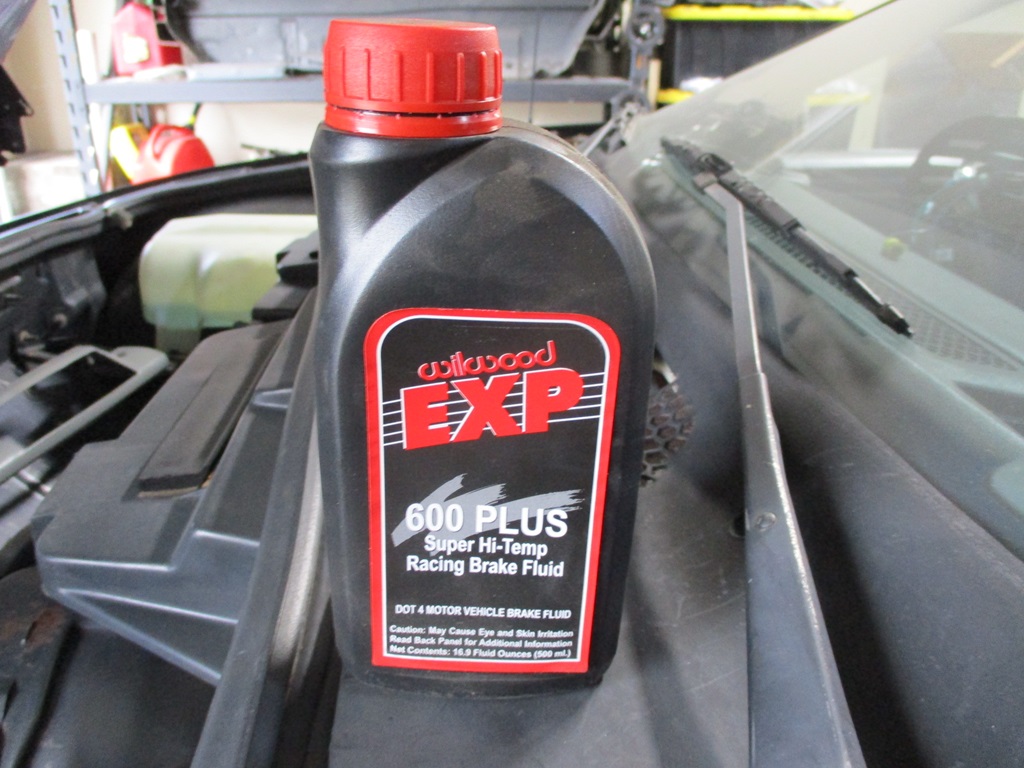
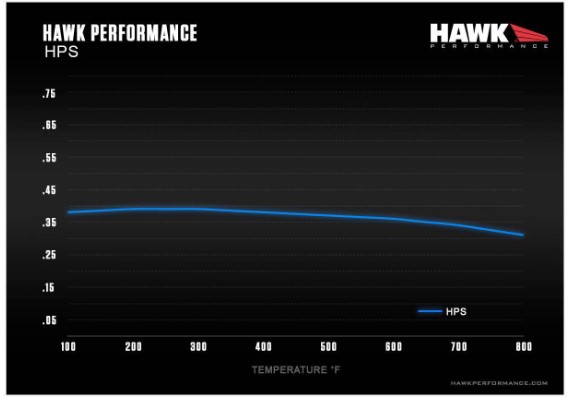
Ordered: Russel DOT brake lines - the ones on the car had been there since 2013. Hawk Performance pads for front and rear. Between the two caliper designs, I was able to find 2 compounds with very similar coefficient graph. The front are also a low dust compound, which would be a nice change.
The car won't be done by next weekend, but I want to start driving it and most of the remaining items are interior related, so I can do them while putting miles on the car.
This weekend was pretty short as we were in Indy to see Hadestown on Saturday and we got back around 10 AM today.
I got the front brakes nearly complete. Trimmed some M6 stainless bolts and lock washers to work for pad pins, pads installed, modified the new brake lines to clock the hose connection so it clears the upper a-arm, flushed the brake fluid, installed the hoses, did a gravity bleed on all 4 bleeders, and installed the Brembo stickers. A final bleed full brake system bleed will be completed once I am done with the rears.
Then I switched my focus to the rears. Jacked the rear of the car up, removed the rear caliper bridges, pads, and rotors and drilled new rotors for 5x100 pattern, and flushed the rear brake system.
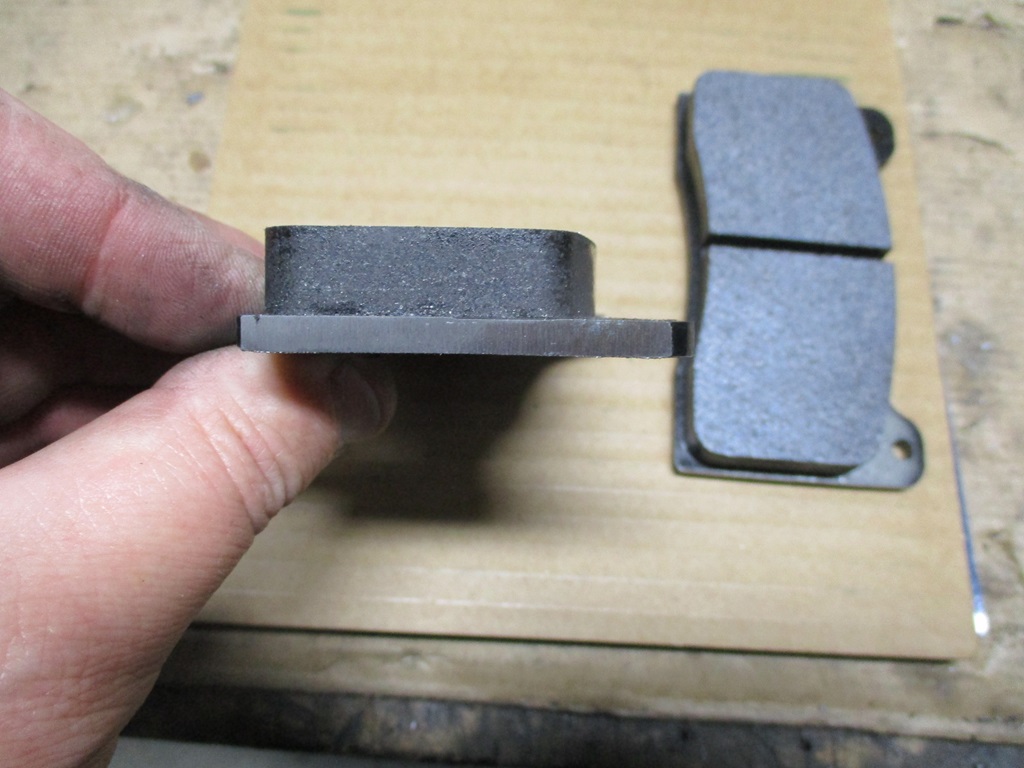
Then I got bogged down making the hawks pads for a Wilwood caliper work with an 88 Fiero caliper. The two mods that are needed are: 1. Use a belt sander on the edges to bring the width down from 100.6mm to 100.0mm. 2. Drill out the holes for the pad retaining pin. Since I will be using 6mm stainless bolts for the pins, I drilled them out to 6mm which is slightly smaller than the split roll pin the 88 Fiero calipers use.
Now I am waiting for the 6mm bolts to arrive (the Fiero calipers need to be 10mm shorter than the Brembos). With the switch to bolts vs. split roll pins, I will be able to install the pad with the bridge installed, so while waiting, I will get the rotor and bridge installed and check to see if I need to make a spacer for the bridge (these pads could be a little too thick).
Started looking for sources of the hub rings, and finding off the shelf ones looks to be a challenge... but I am still looking. I really don't want the added cost or time to make them, but we will see.
This outfit will make custom concentric rings, and has a large selection of "standard" rings, which I think are still made to order. I have their wheel adapters to bolt 5x4.75" Corvette wheels onto 5x115 A-body hubs.
I have been slacking on updates - probably have about 400-500 miles on the car, 160 of them were from a trip I took in it yesterday... just to prove it could do it - cruise wasn't working so I was ranging in speed from 70 to 80 and didn't end up being a good MPG run. I have had a few issues with the calibration being corrupted after a log session and flashing the next iteration. The new one runs rough and the wideband goes to 21 with upshifts (tuning OL VE and I have DFCO turned off). Not sure what is going on, but I normally flash in an older version and fix the issue, but it is aggravating.
Not sure the size of the wastegate spring (supposed to be an 8lb spring), but with exhaust and boost pressure (under the diaphragm) it lifts about 3.7 psi currently w/o using my manual adjuster to limit the boost at the diaphragm. I don't think my 50mm wastegate is large enough to keep it at 3.7 psi as after holding flat for a while, boost increases. I did a pull yesterday in 3rd gear from about 2400 rpm to 5200 rpm. By the time the throttle was 100%, I had 1/2 psi boost. 2.5 psi boost was 1 second, 3.5 psi was 1.5 seconds, and it held 3.7 psi for about 3 seconds then climbed to 6 psi by 5200 rpm. The engine is still 10.0:1 and I am running N/A timing up to the boost transition and the turbo is on the smaller side for LS engines, all these things mean the turbo lights off quick, which works well with a manual.
Past several weeks I have been working through some electrical issues: 2 were issues with bad wiring diagrams, 1 failing part, 1 was on me as I picked the wrong VSS pin.
Fought a ground loop hum at key on with the stereo... The amp harness provided grounds for the speaker level inputs and the instructions said to ground them... that is what caused the hum. Remove them and stereo works w/o issue now. The 8" sub really packs a punch. It has probably been 20 years since one of my cars has music you could "feel".
Cruise wasn't working. I had the clutch switch wired for 12V when pressed (wiring diagrams shows N.O. switch). From others with working E40 cruise it needs to be 12V with the pedal at rest (N.C. switch). Reworked the wires and connector to use the N.C. pins on the same switch. I haven't had an chance to test it again.
Tach was working, just wasn't reading right (tach board starting to go bad), so picked up a new calibratable tach board from phonedawgz. Neighbors were proud of me revving the engine to 5000 rpm and holding it there for about 30 seconds to get the tach dialed in.
Speedo wasn't working either, I had used pin C1-49 VSS to ABS and ended up needing to use C1-21 VSS to BCM, just moved the pin at the connector and then it started working.
In between wiring issues, I also worked on the upgrades for the brakes.
Installed the hawk pads in the rear 88 calipers. Had to modify the pads for the larger pins/bolt as well as clearance for the slider mounts. Also the pads were a smidge too thick, so I made some 88 caliper bridge spacers from some 14ga scrap I had laying around. This will likely be a new product I sell now that I have the CNC plasma program done.
The front Brembo setup and the hawk pads worked very well! The 2 piece rotors also came in, so I installed them. I ordered them with custom hats with the 5x100 pattern and Fiero hub bore. They are 15 lbs 8oz and the 1 piece rotors are 18lbs 10oz. Not sure 3lb 2oz is worth the $800+ upcharge, but if nothing else, they look cool!
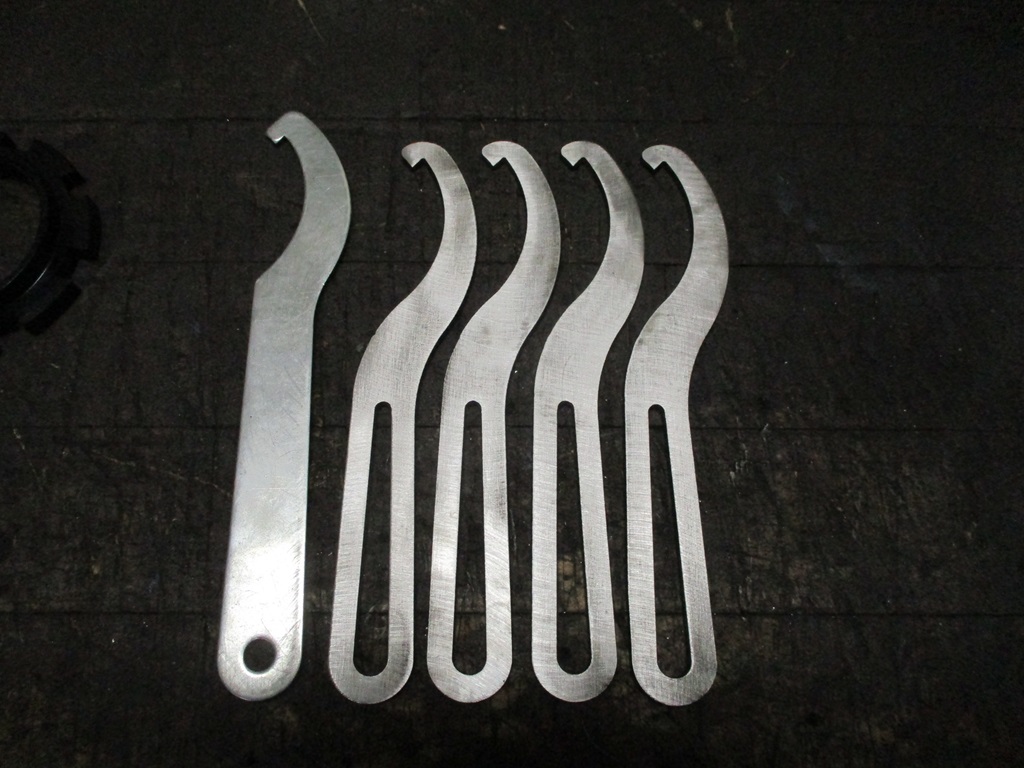
While setting the ride height, I couldn't find my original spanner wrenches, so I decided to make my own. Of course I found one of the old ones after these were done:
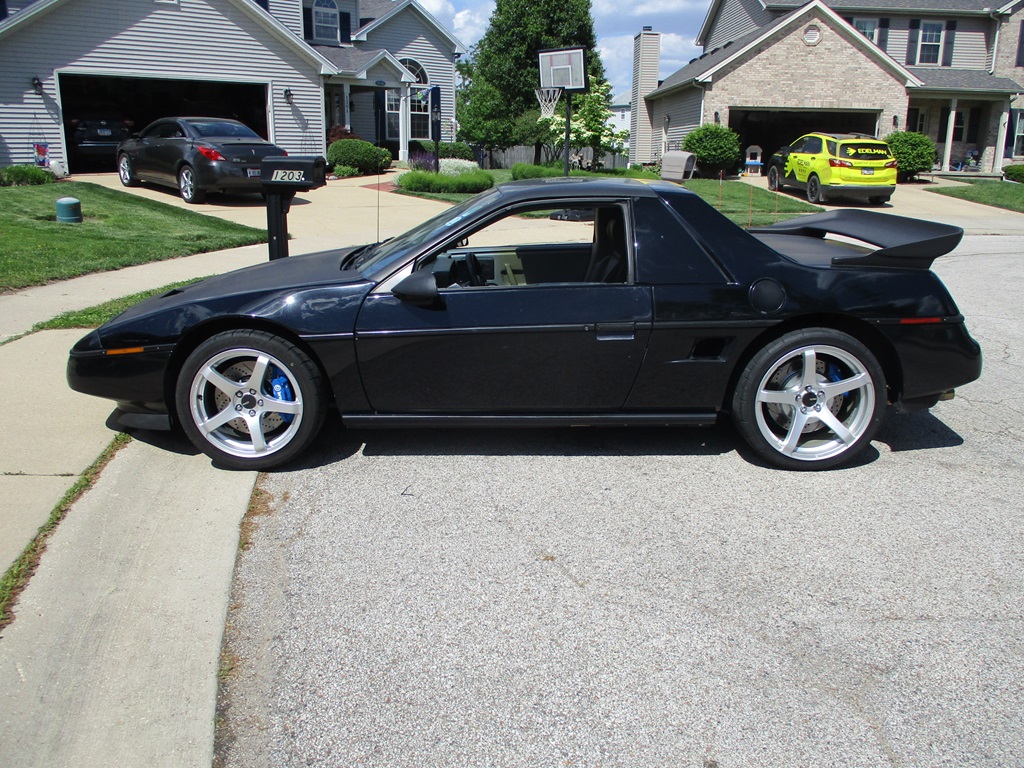
Here is a picture of the car out in front of the house:
Once I verify the cruise is fixed, I can start putting the console area back together. and charge up the AC.
Vince, I wouldn't say the wiring issues were fast to find a fix... but hopefully they are behind me now.
I ran EBC yellow stuff pads before and they work awesome, but dusted like crazy. They supposedly have a coefficient of friction of 0.6, but there is a difference in sharing a single coefficient value vs. showing the coefficient performance graph over temperature, as well as ranking all the typical performance criteria of the brake pad so you can make an informed decision.
The HPS pads are probably middle of the road with regards to the Hawk compounds.
I chose pads with about 0.51 to 0.52 initial bite, and operating range in the 100 to 800 degree range, the fronts were rated as low dust, but the rears were picked to have a similar coefficient curve as the front. Overall I am very pleased with their stopping power, but less dust would be nice. I might try some coating on the wheels to help keep the dust off or to allow it to rinse off.
Thank you! As always you've got the data at your fingertips and are always transparent with it.
There are a few 'ceramic' wheel coatings out there that might help with the brake dust. One I used in the past which was inexpensive and really good was made by Hybrid Solutions. I have another I haven't tried yet made by Gyeon, it was pricier but says it'll last up to 5 years. When I get that on my wheels I'll let you know how it holds up!
There are of course ceramic coatings that apply over paint and/or powder coat. There's also Cerakote MC5100 which can go on bare aluminum.
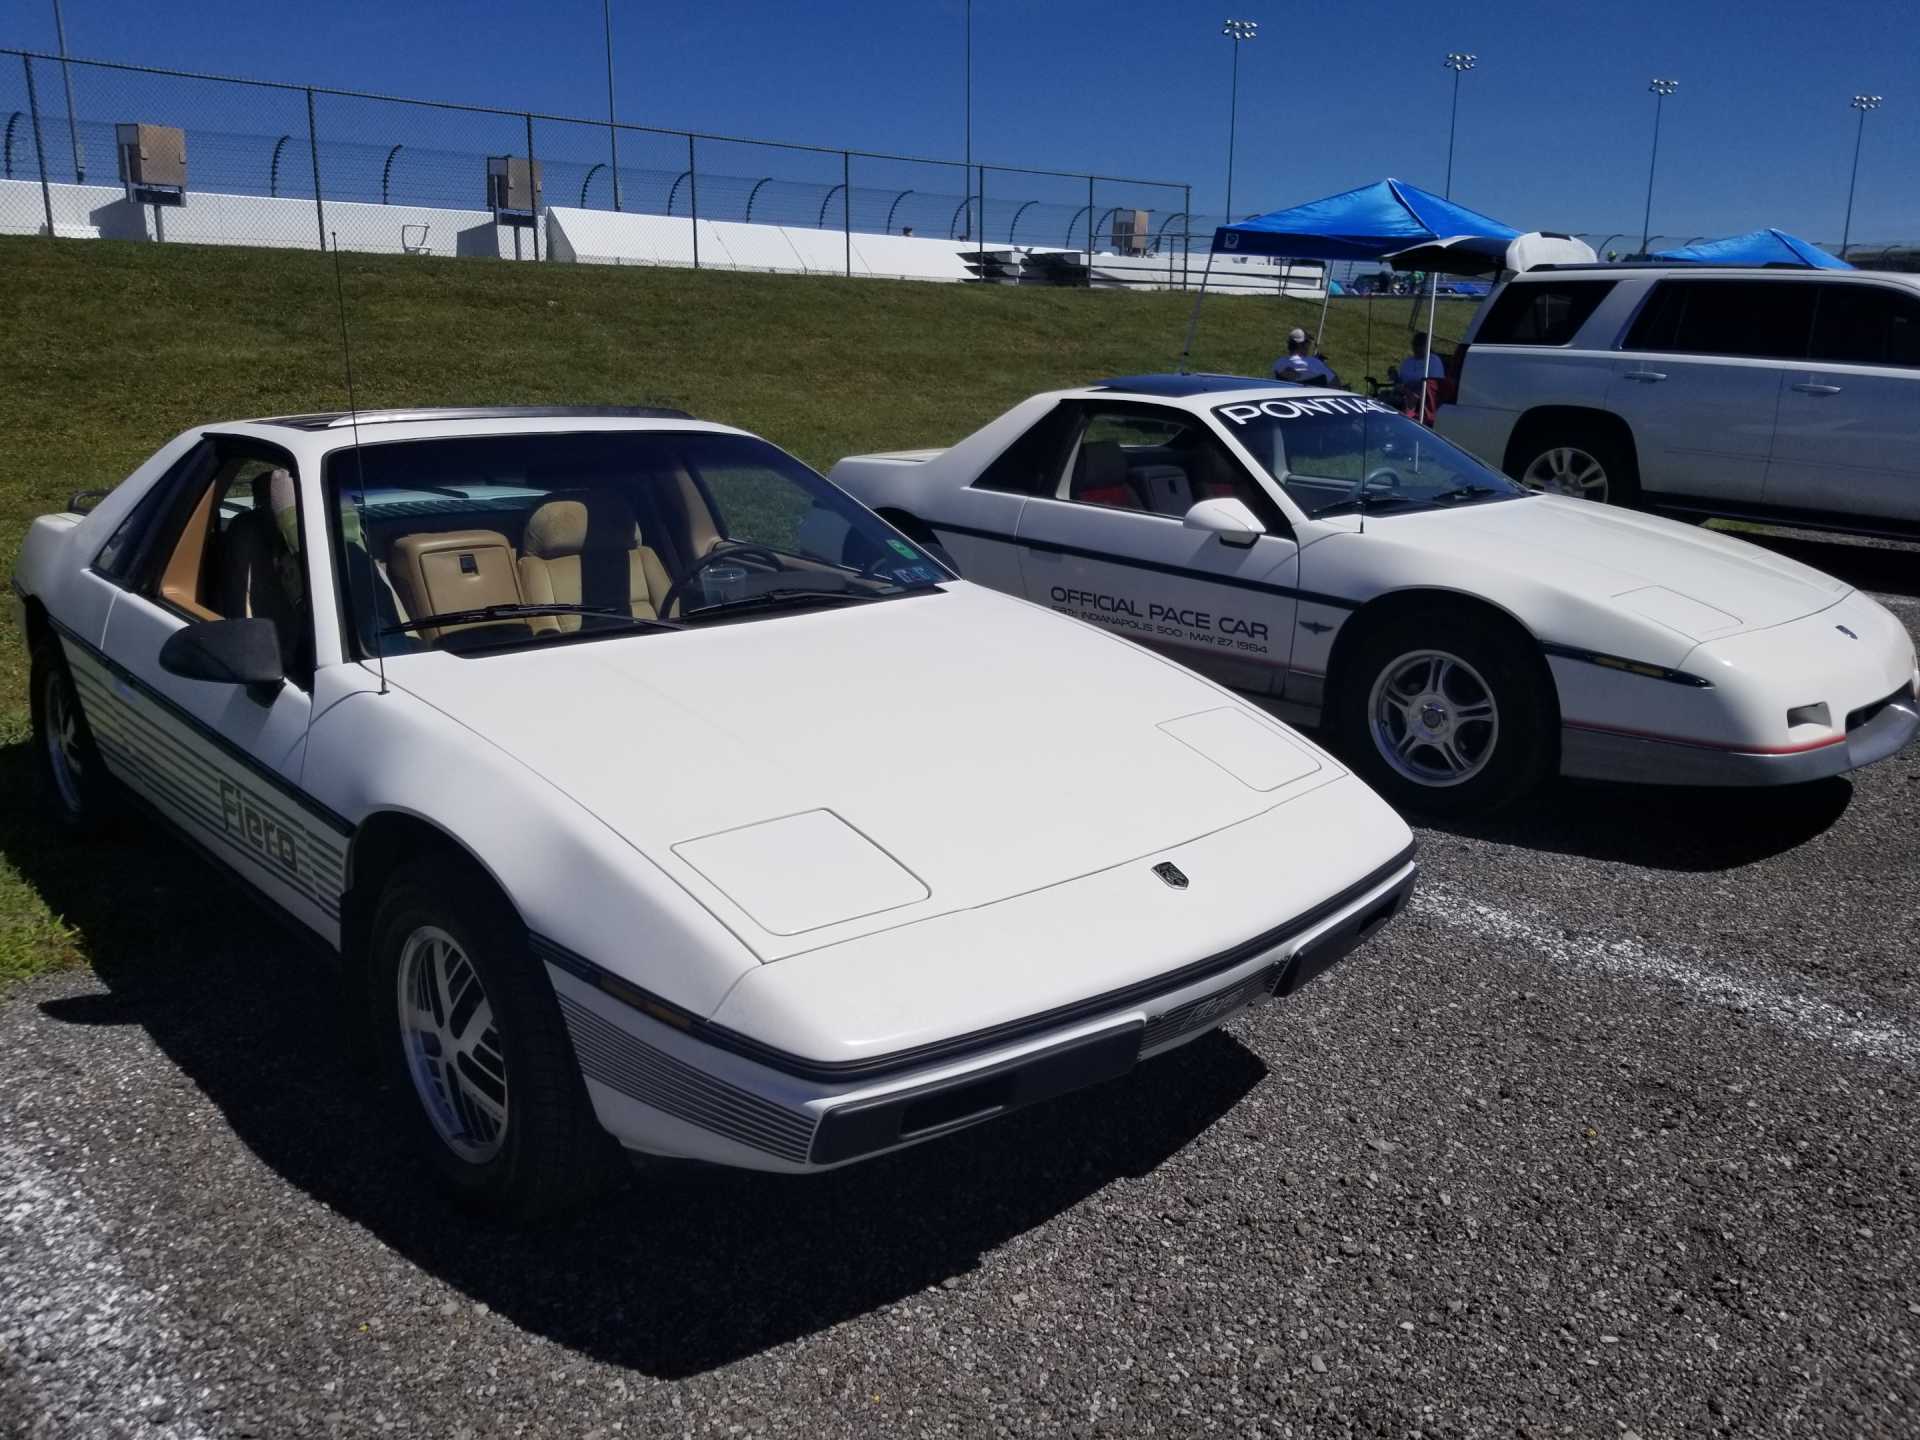
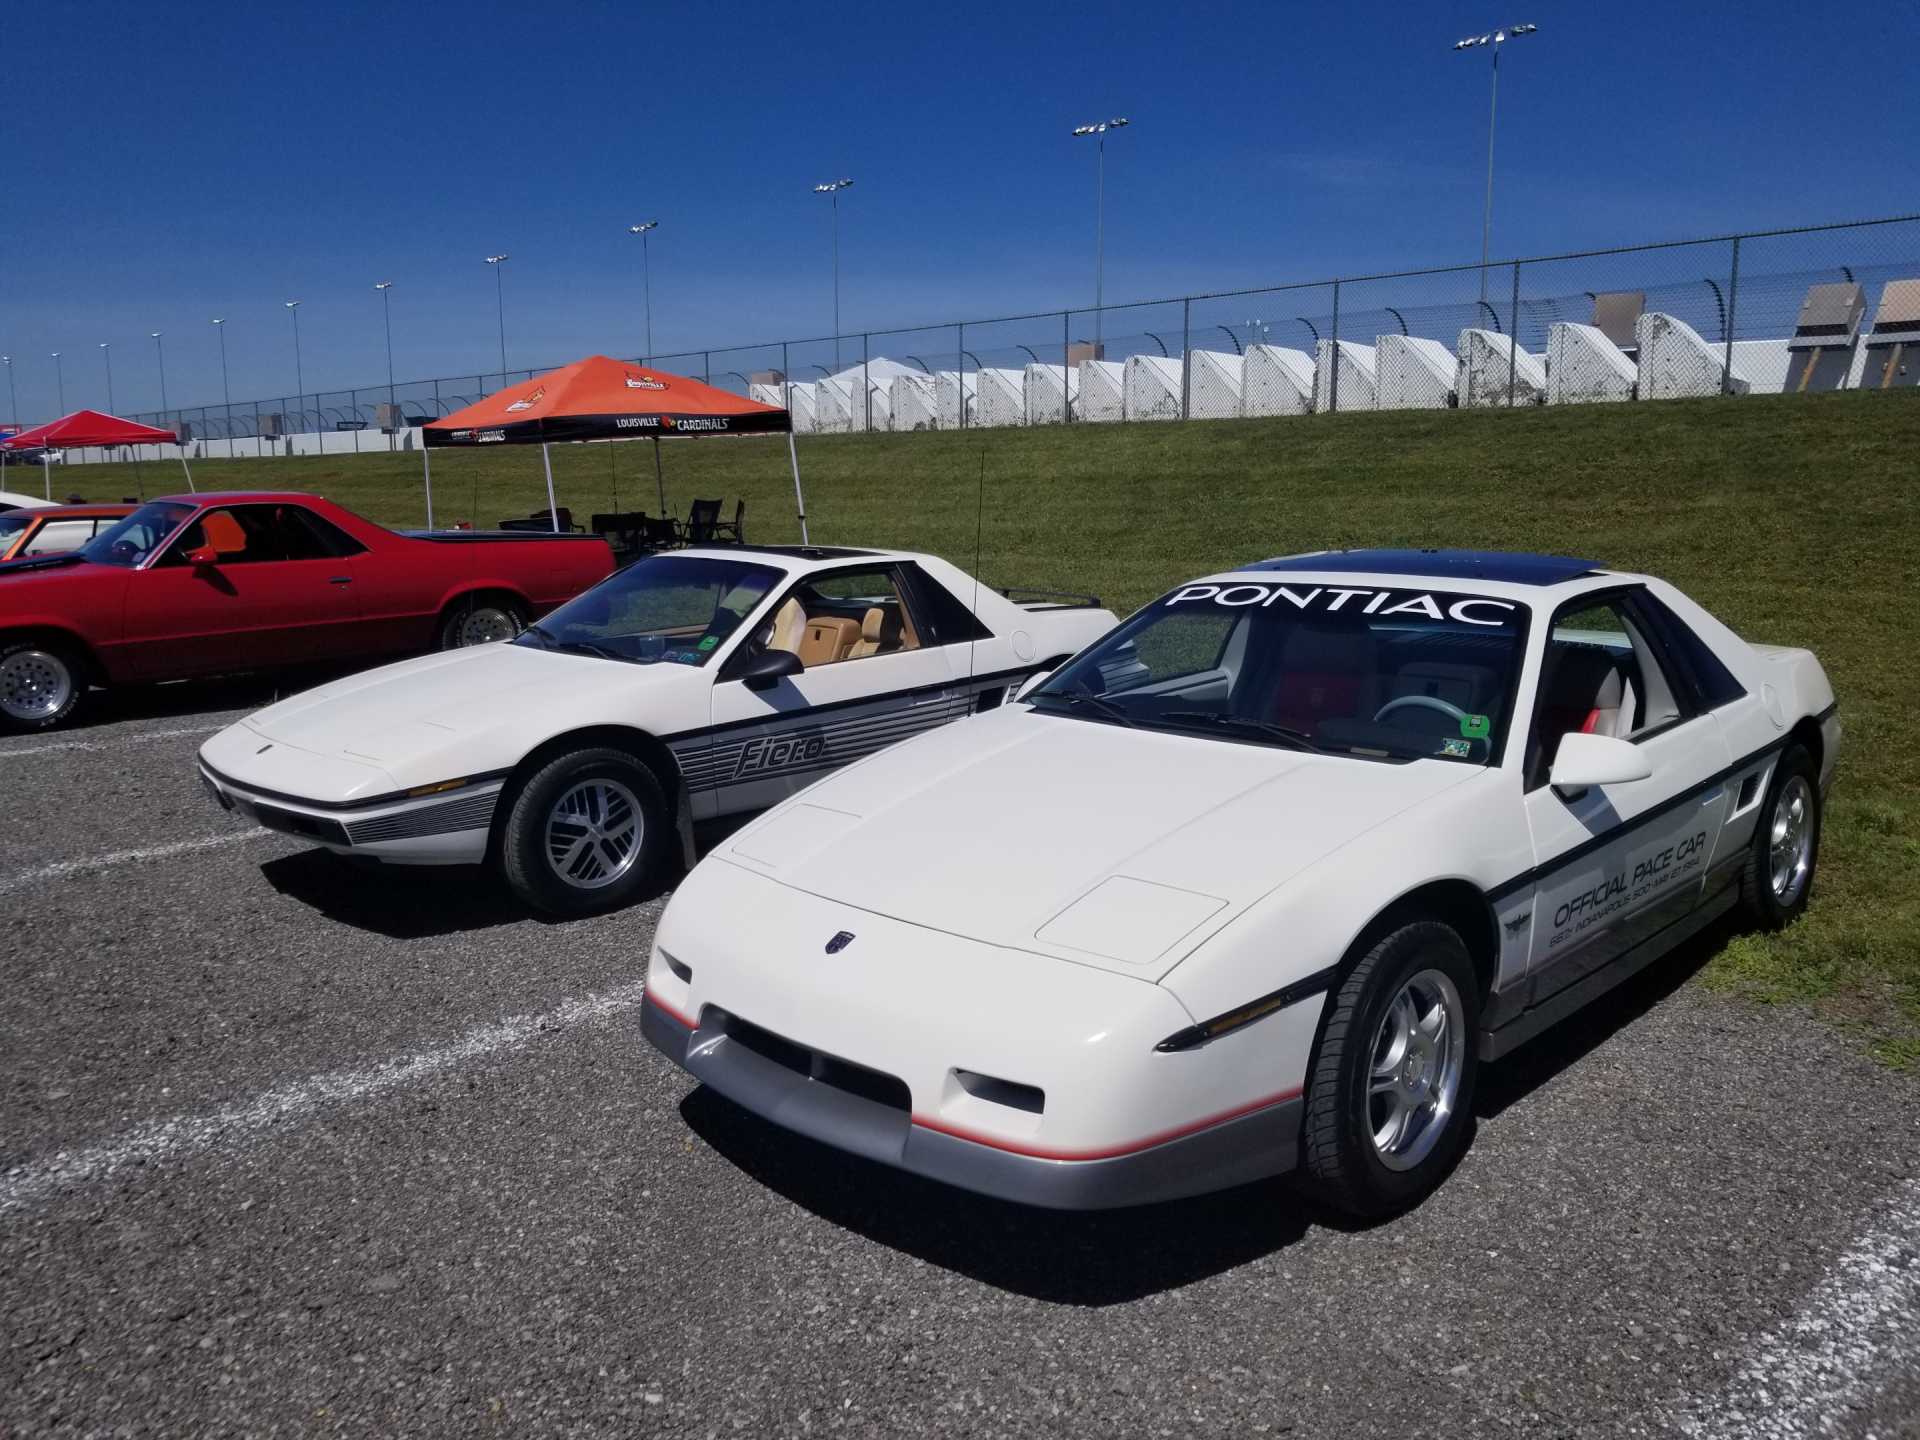
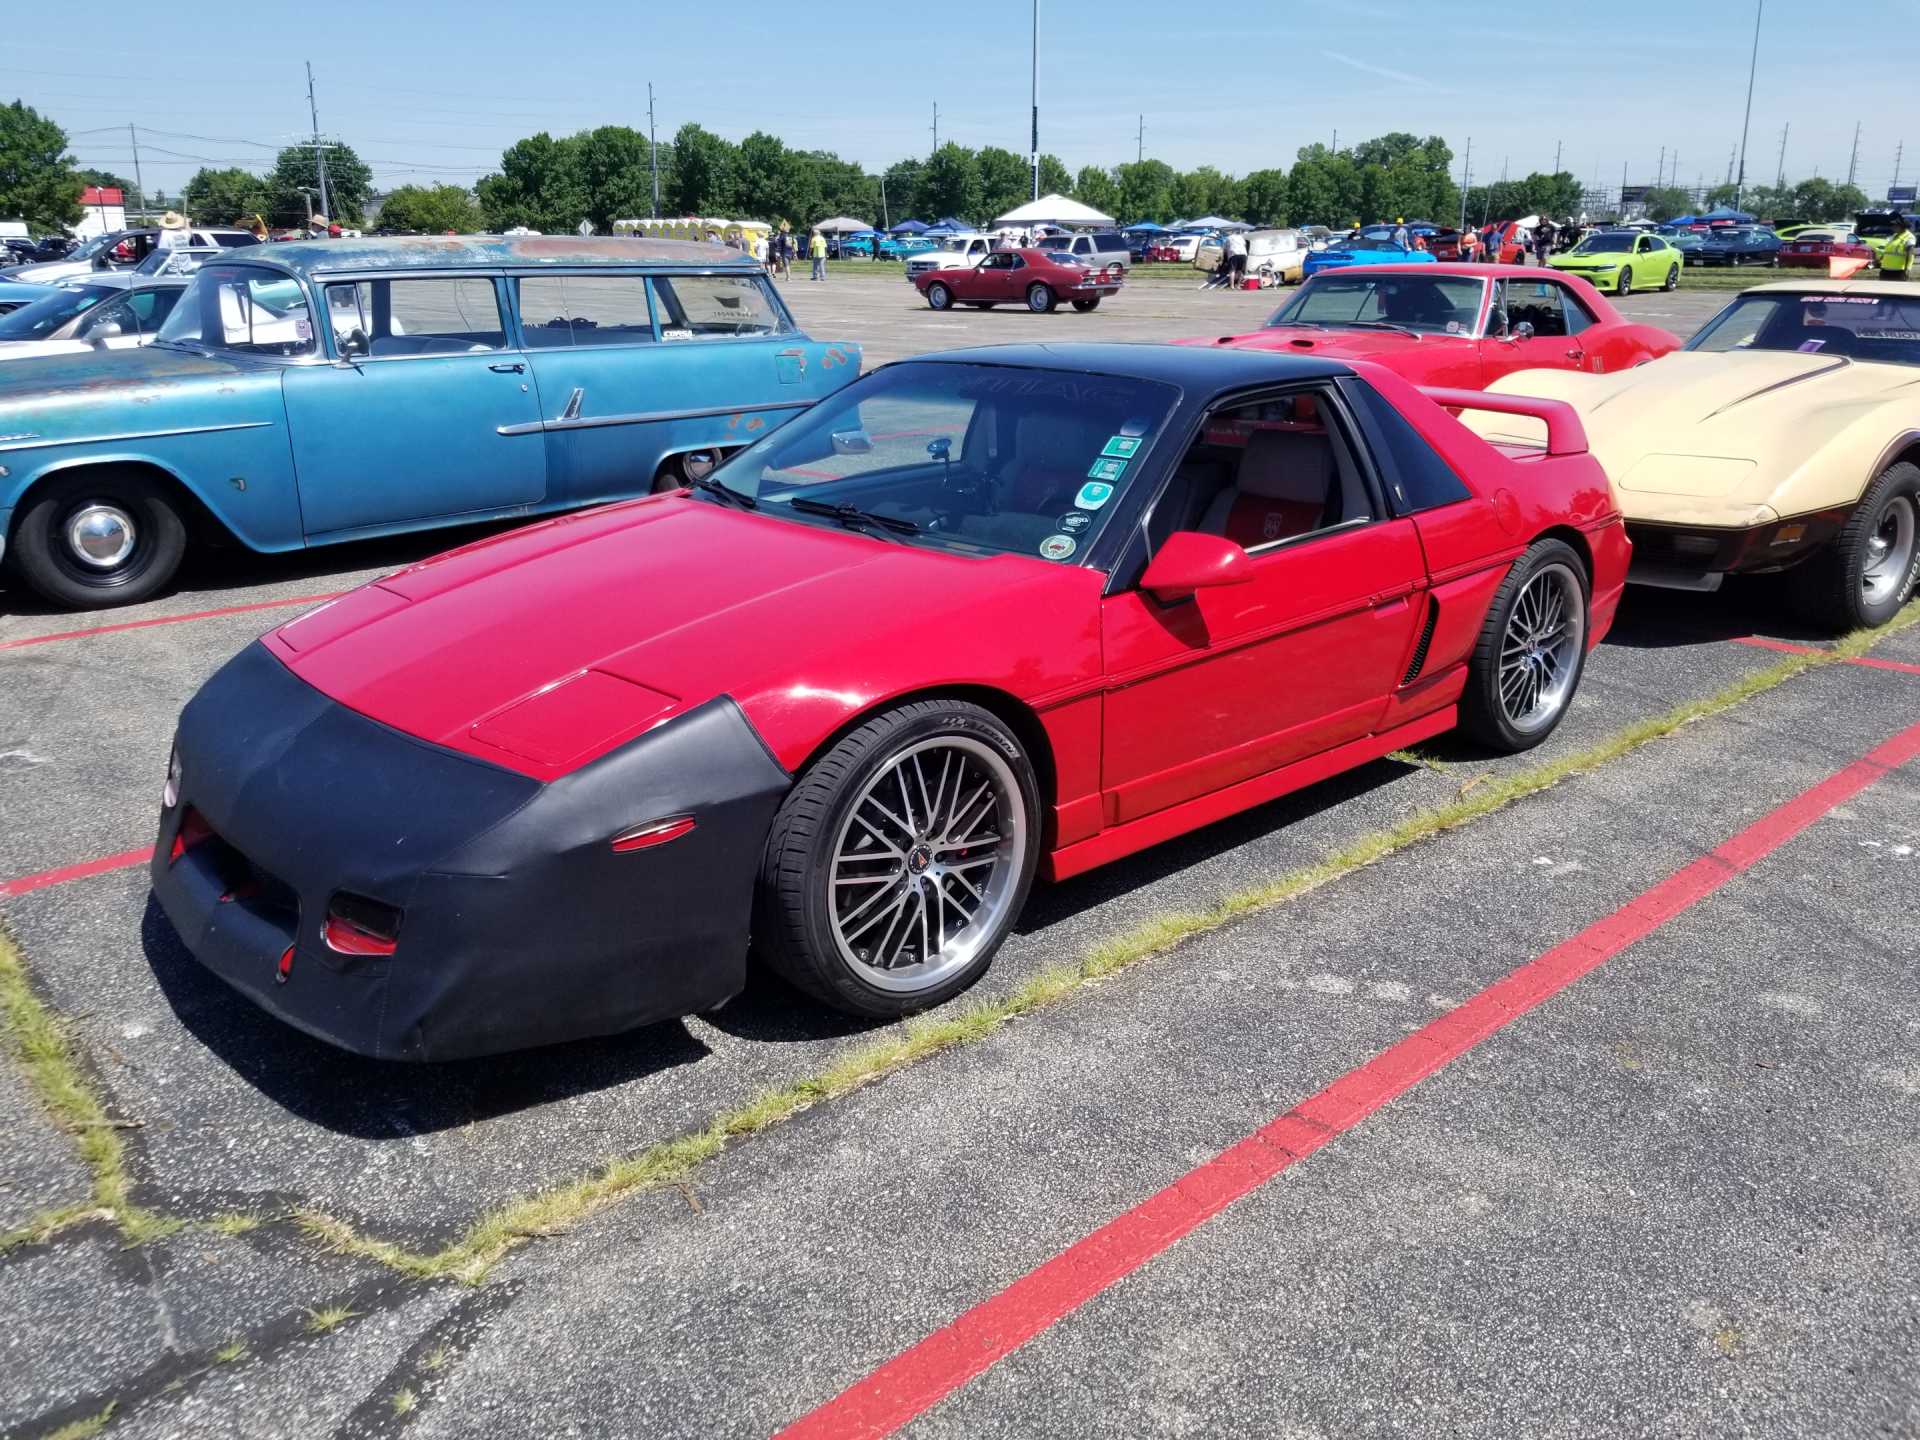
Bowling Green stop was good. 6 Fieros, and I was able to chat with two of the owners.
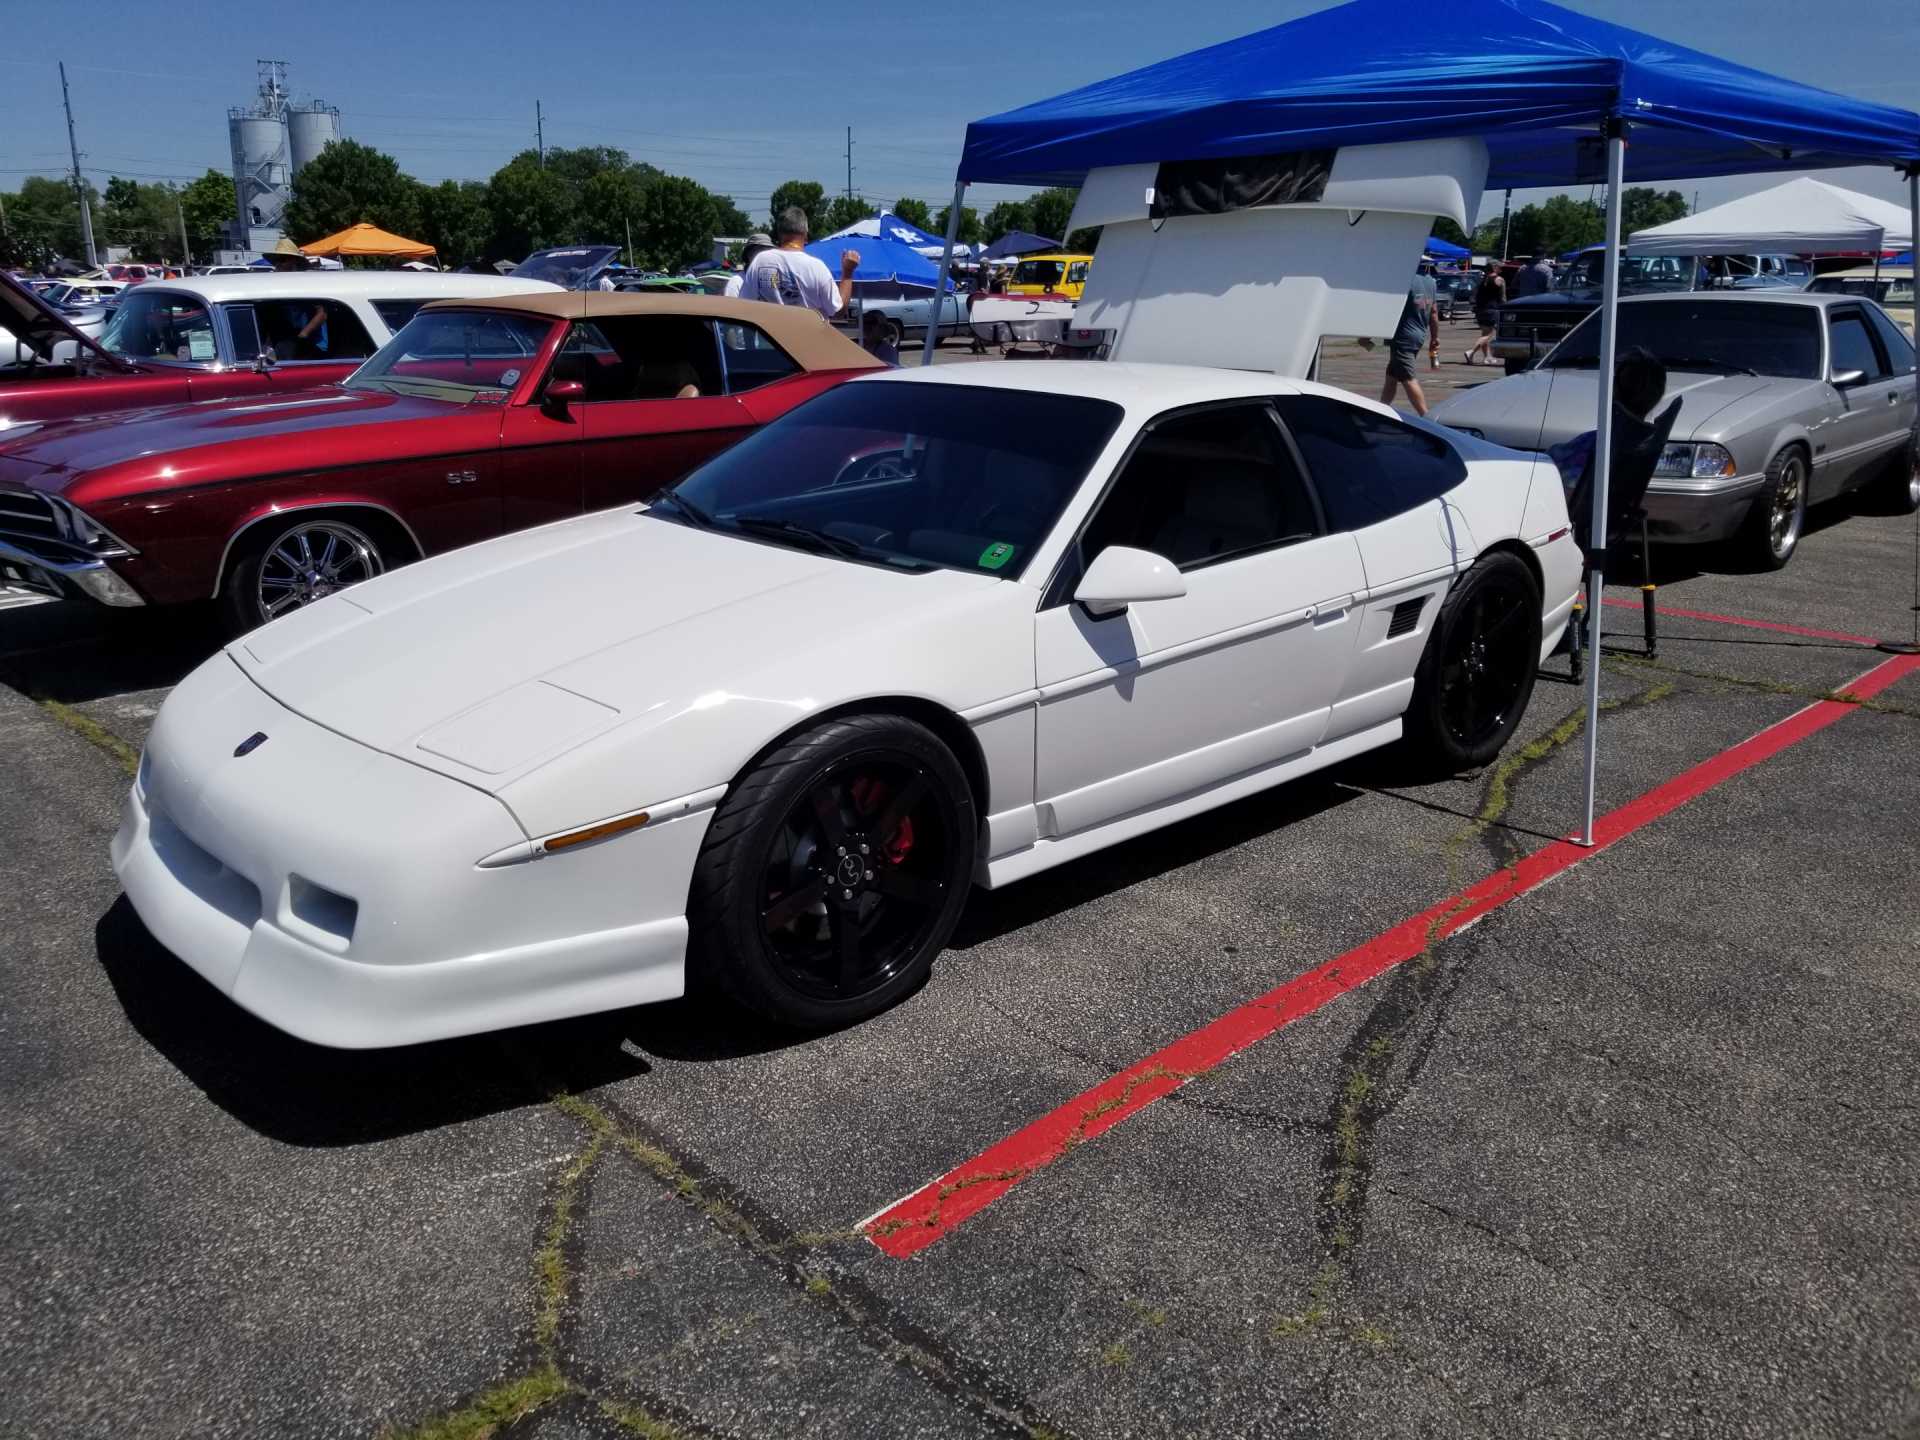
This one is from Indiana:
This one was from Illinois:
Some pics of my Fiero:
These types of events really let you stress test your swap and find areas for improvement.
We sat in stop and go traffic for a few hours. Coolant temps got up to 202 degrees, which isn't bad, but I might still look at making the water pump pulley smaller. Air intake temps got to 150 degrees, so I need to do more shrouding with the air filter and might insulate the intake tube.
The tank of gas with all the stop and go traffic was about 12 mpg!
Driving to Nashville Super Speedway this morning!
[This message has been edited by fieroguru (edited 06-11-2024).]
Need to catch up. Nashville Super Speedway and L&N Federal Credit Union Stadium down w/o any significant issues. Also able to track down and chat with the other Fiero owners on the tour.
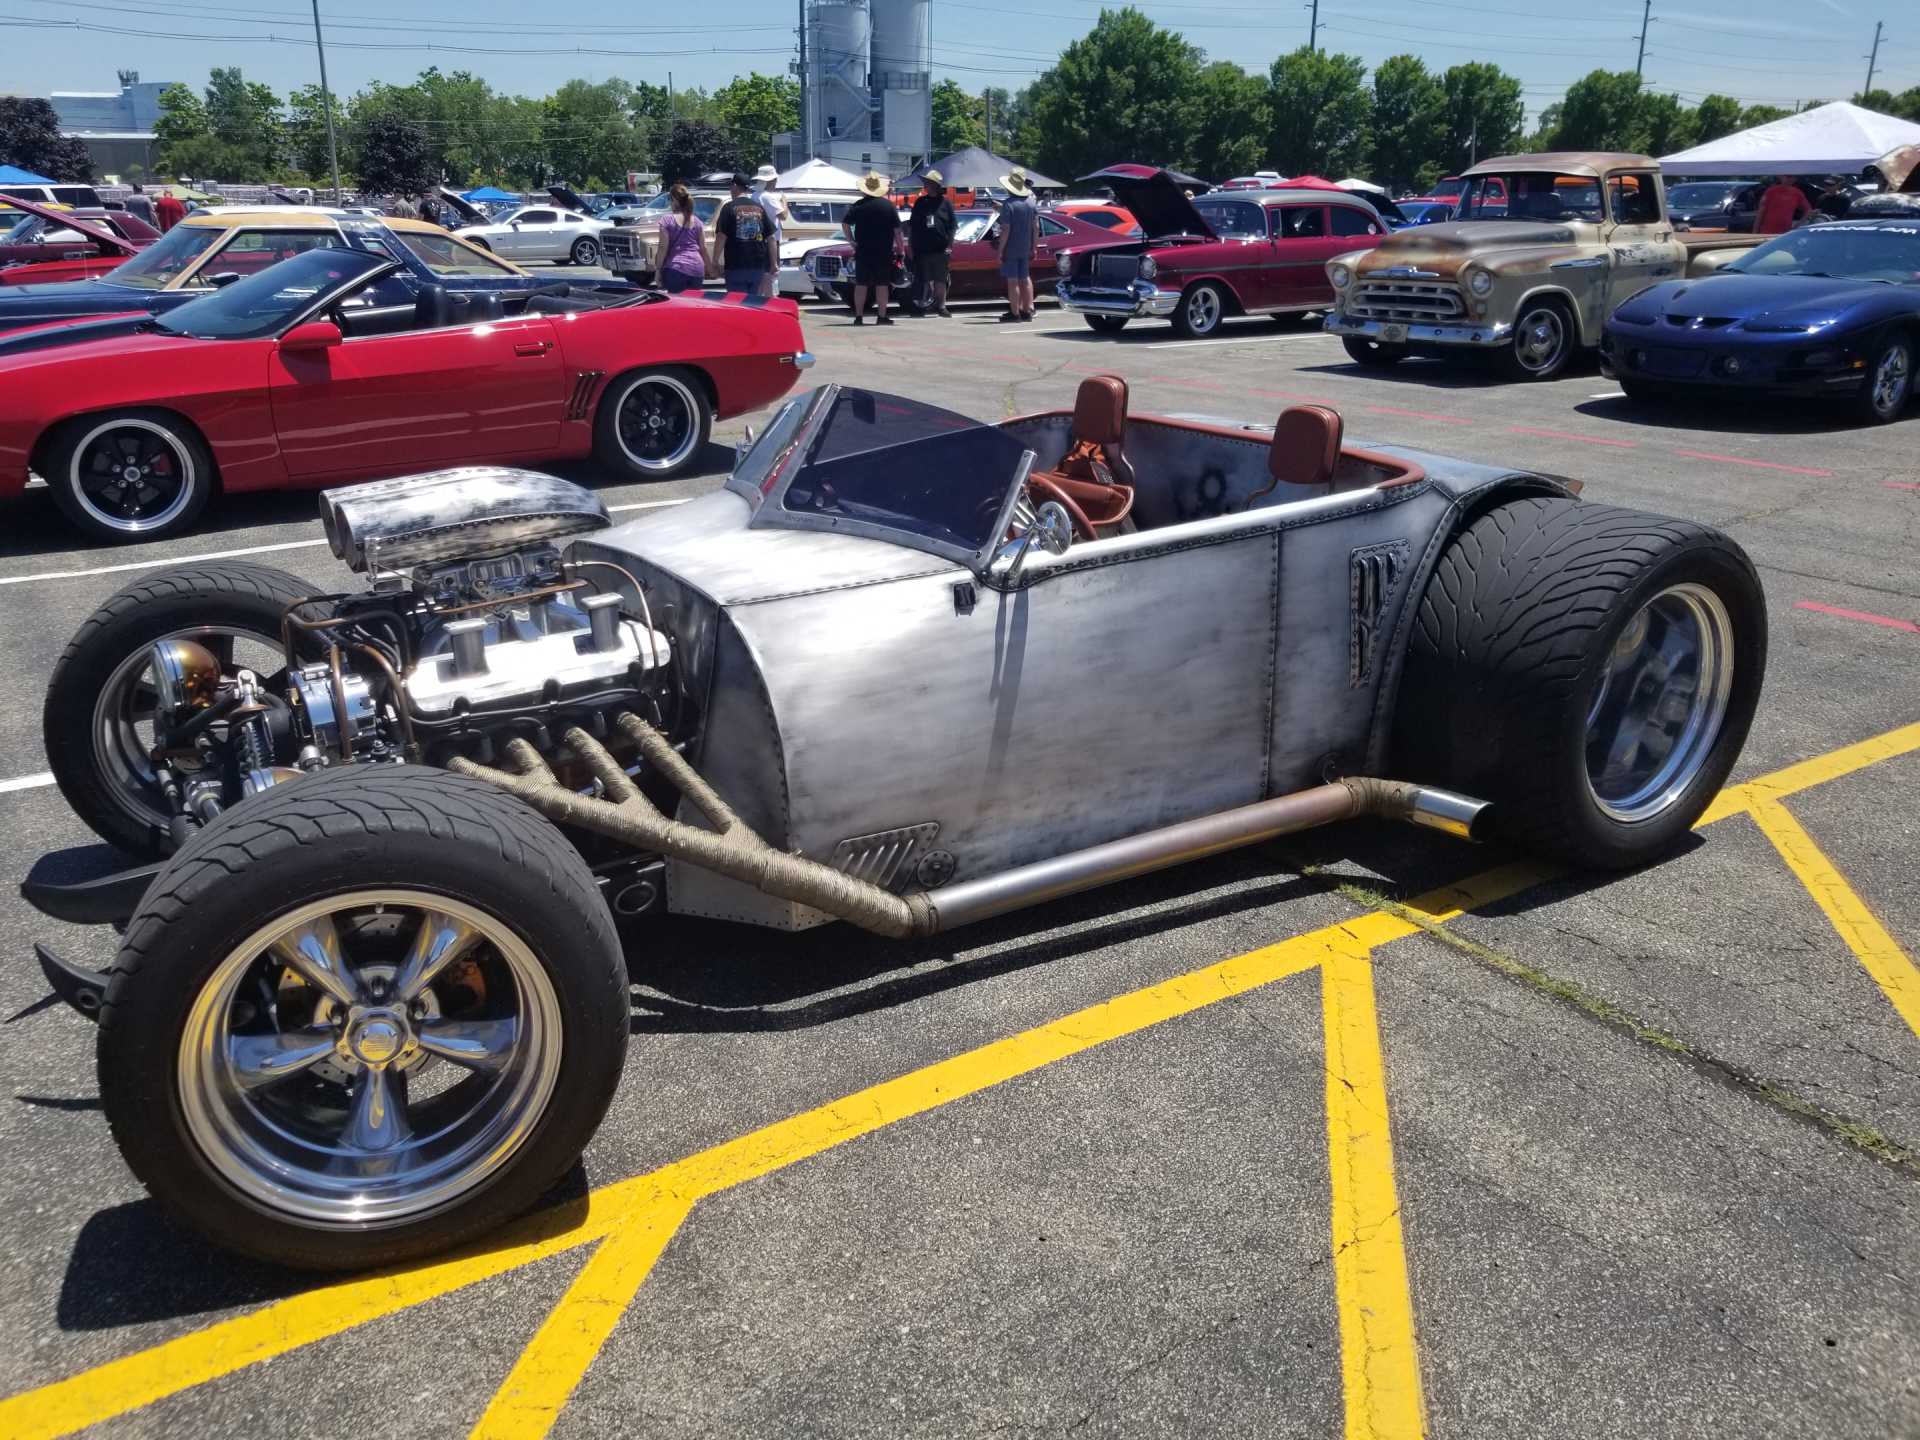
This is probably my favorite car so far:
Heading to Hebron Ohio in the morning.
[This message has been edited by fieroguru (edited 06-12-2024).]
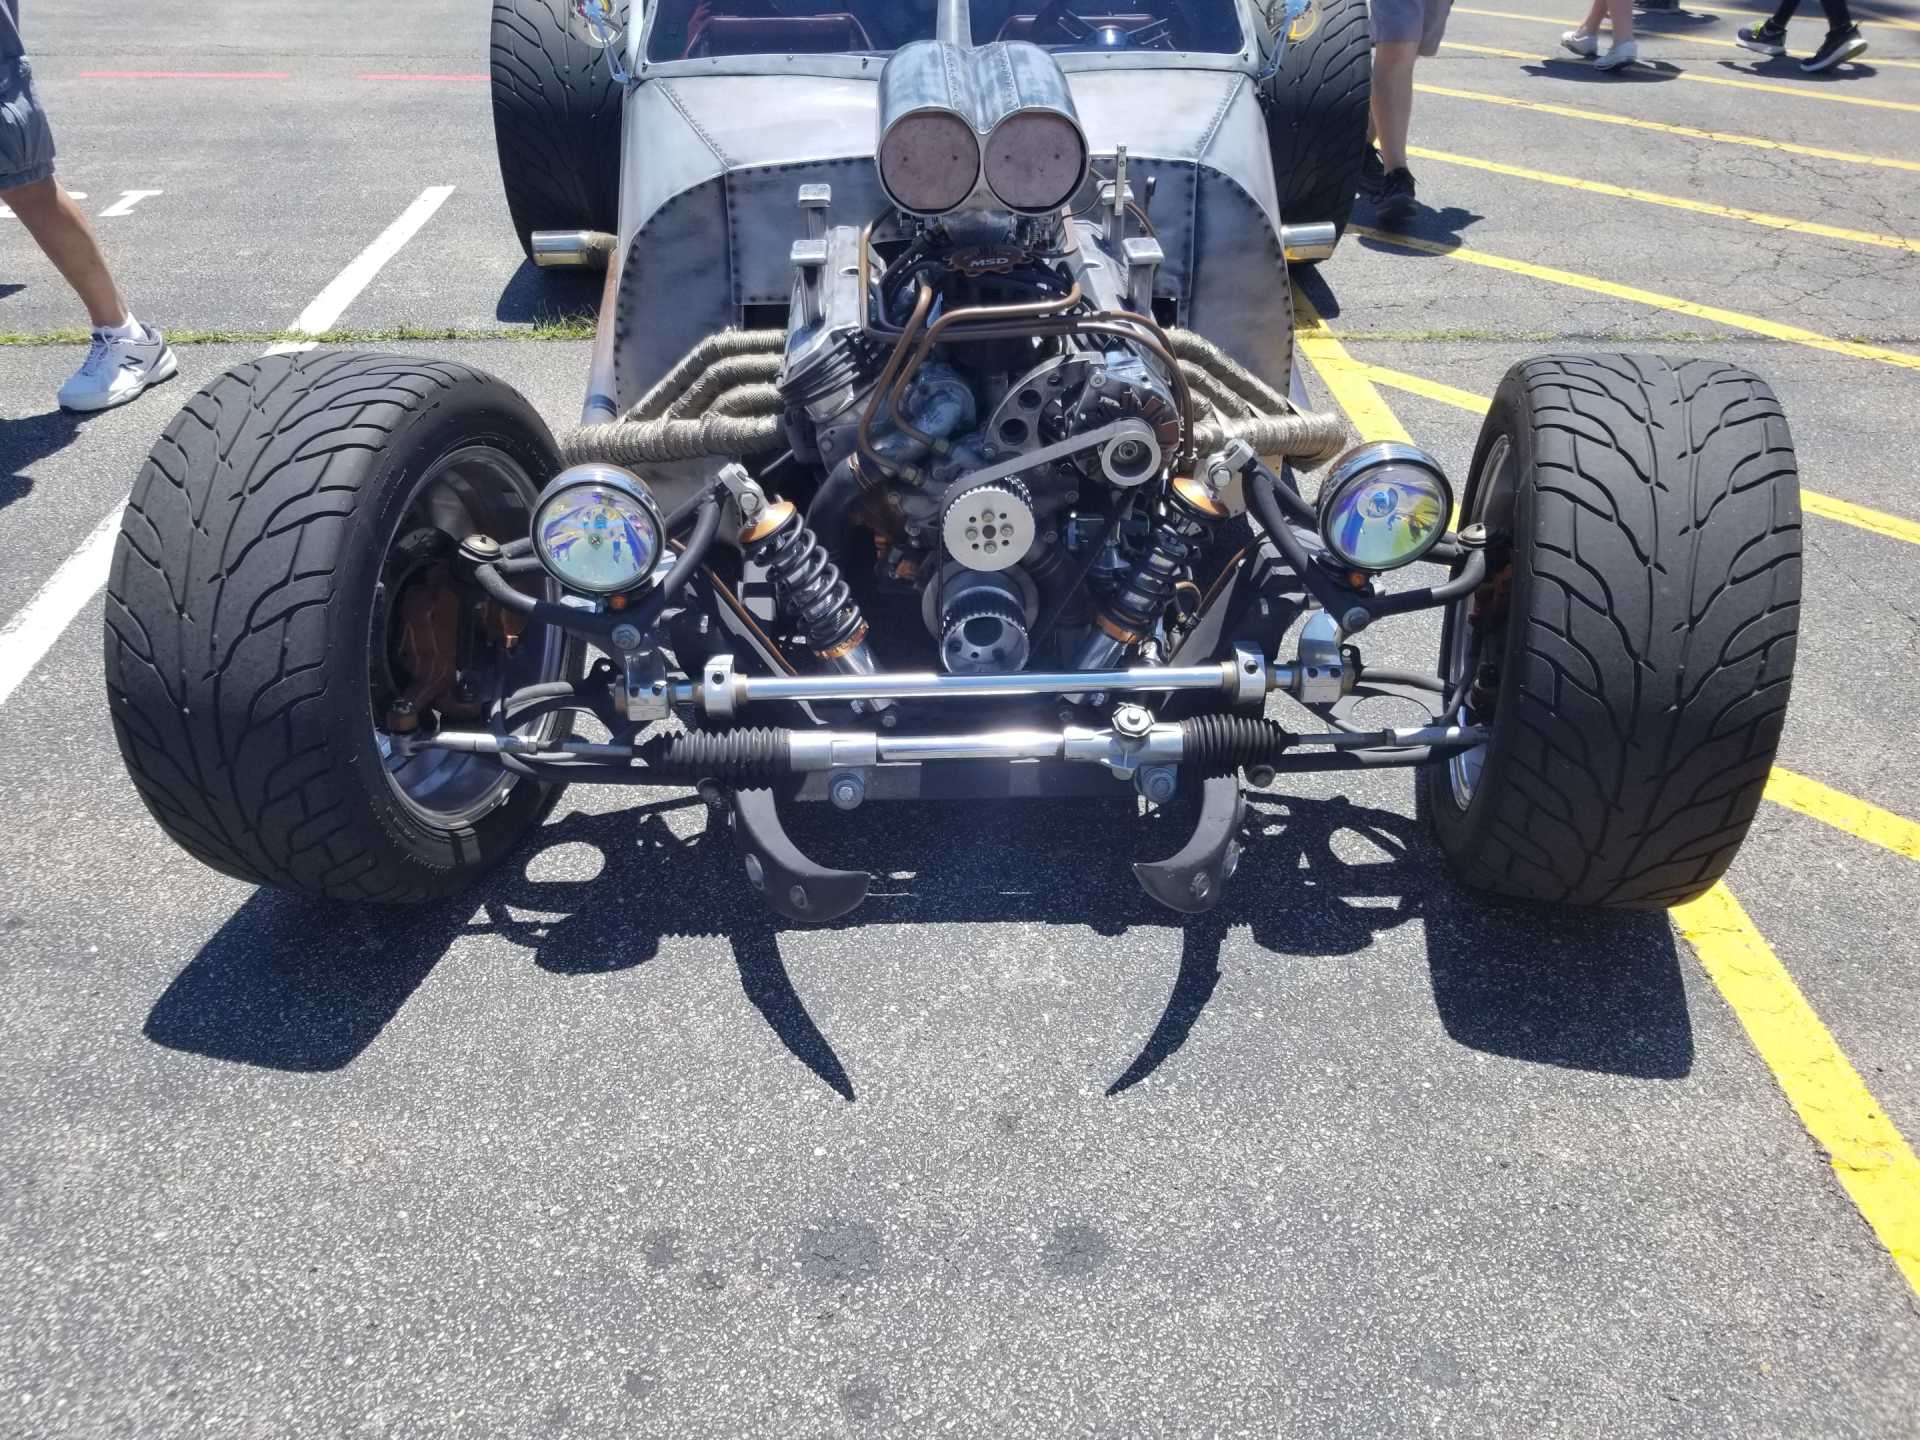
That's awesome you ran into some other Fiero owners. Did all of them have engine swaps, or just that one 3800?
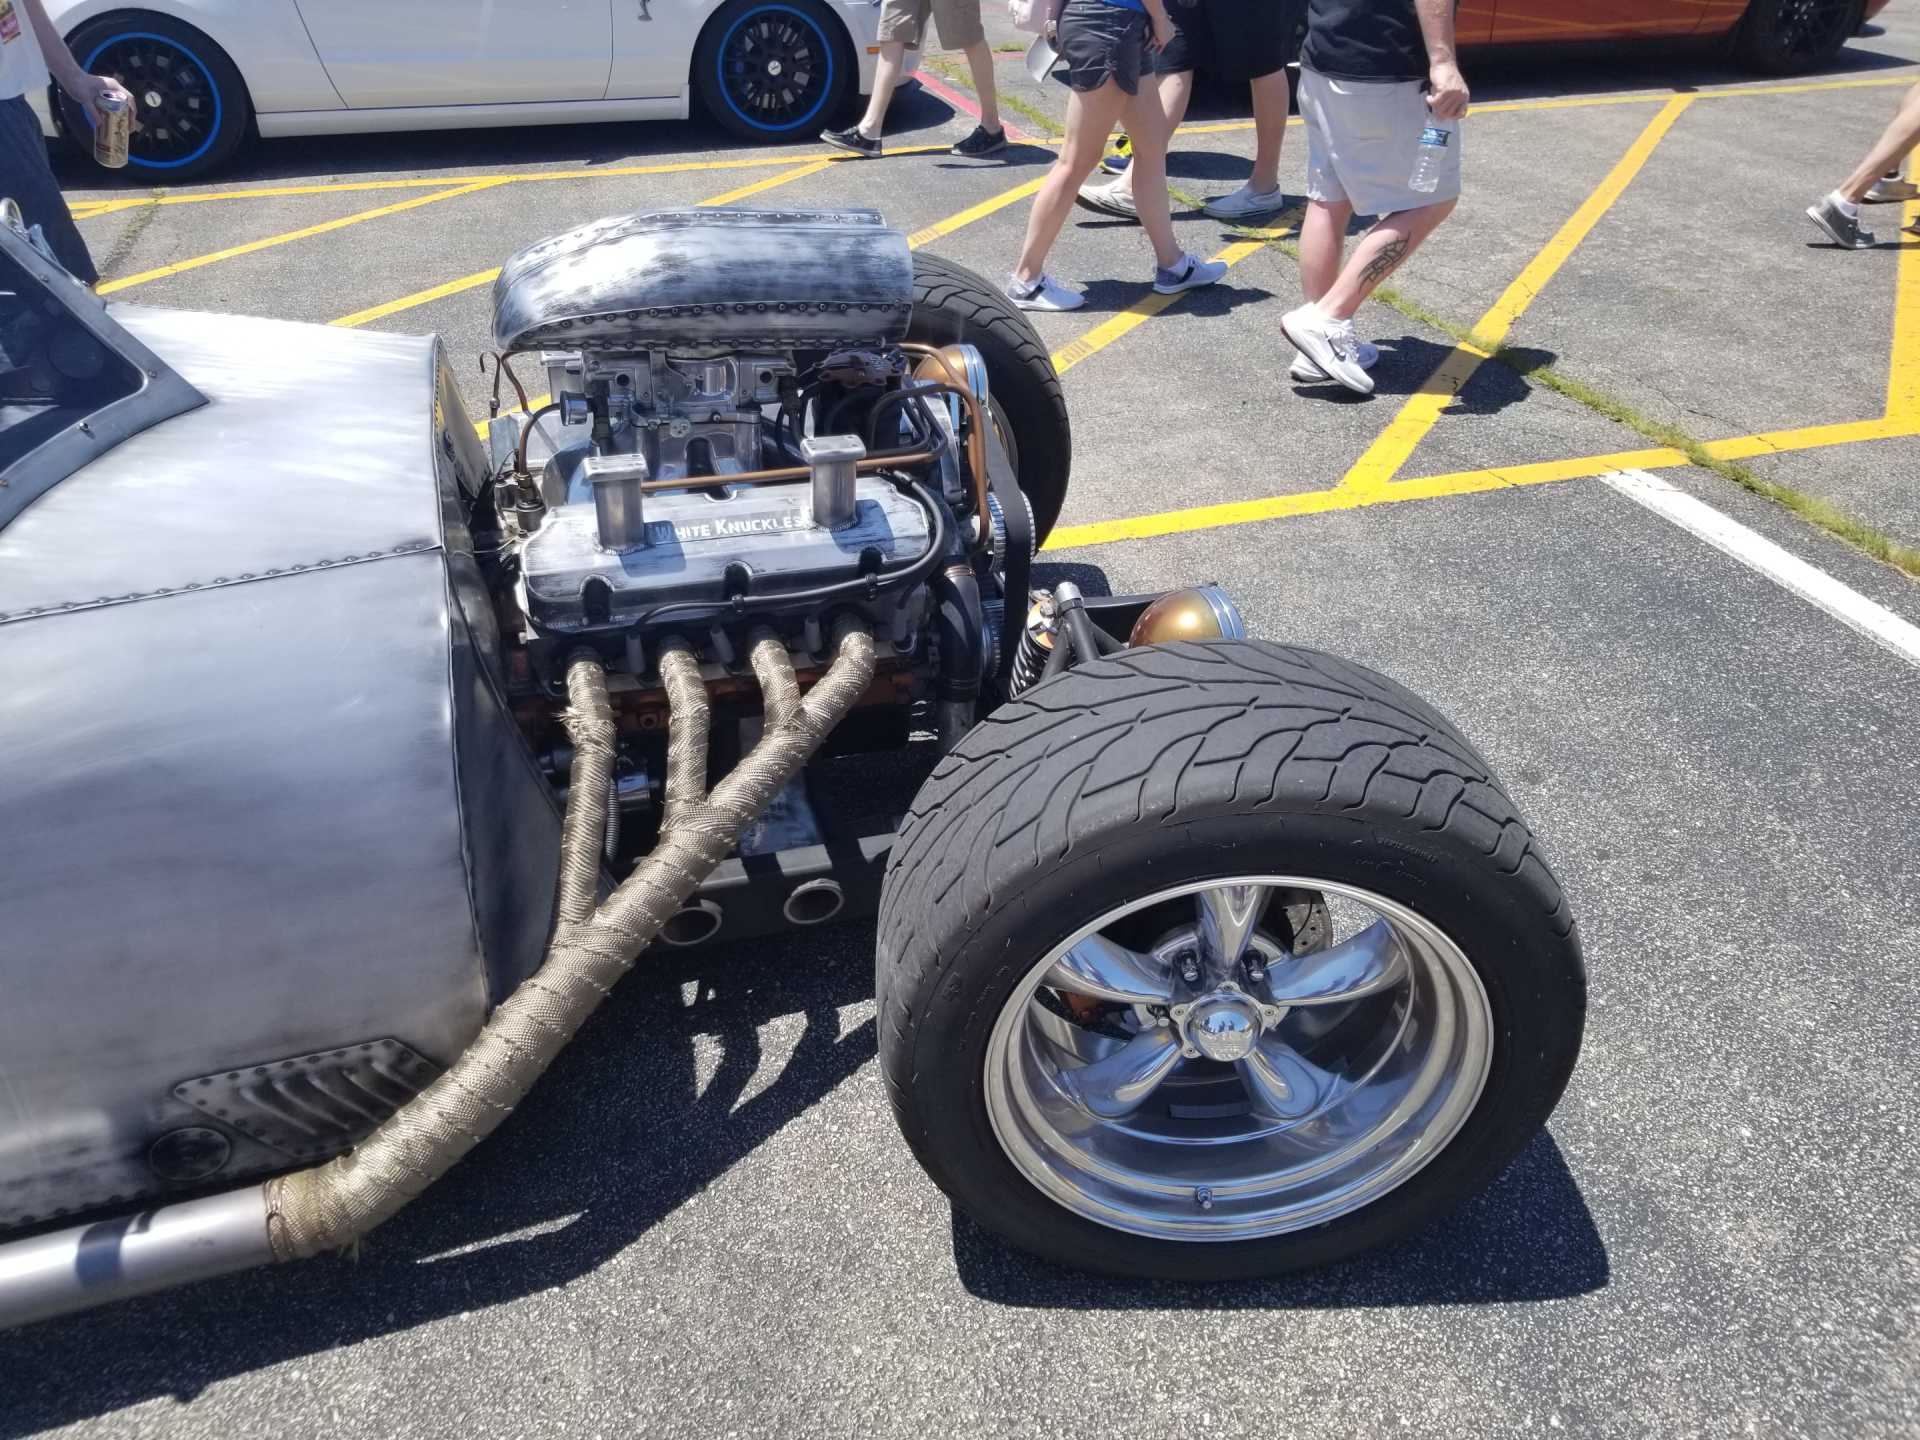
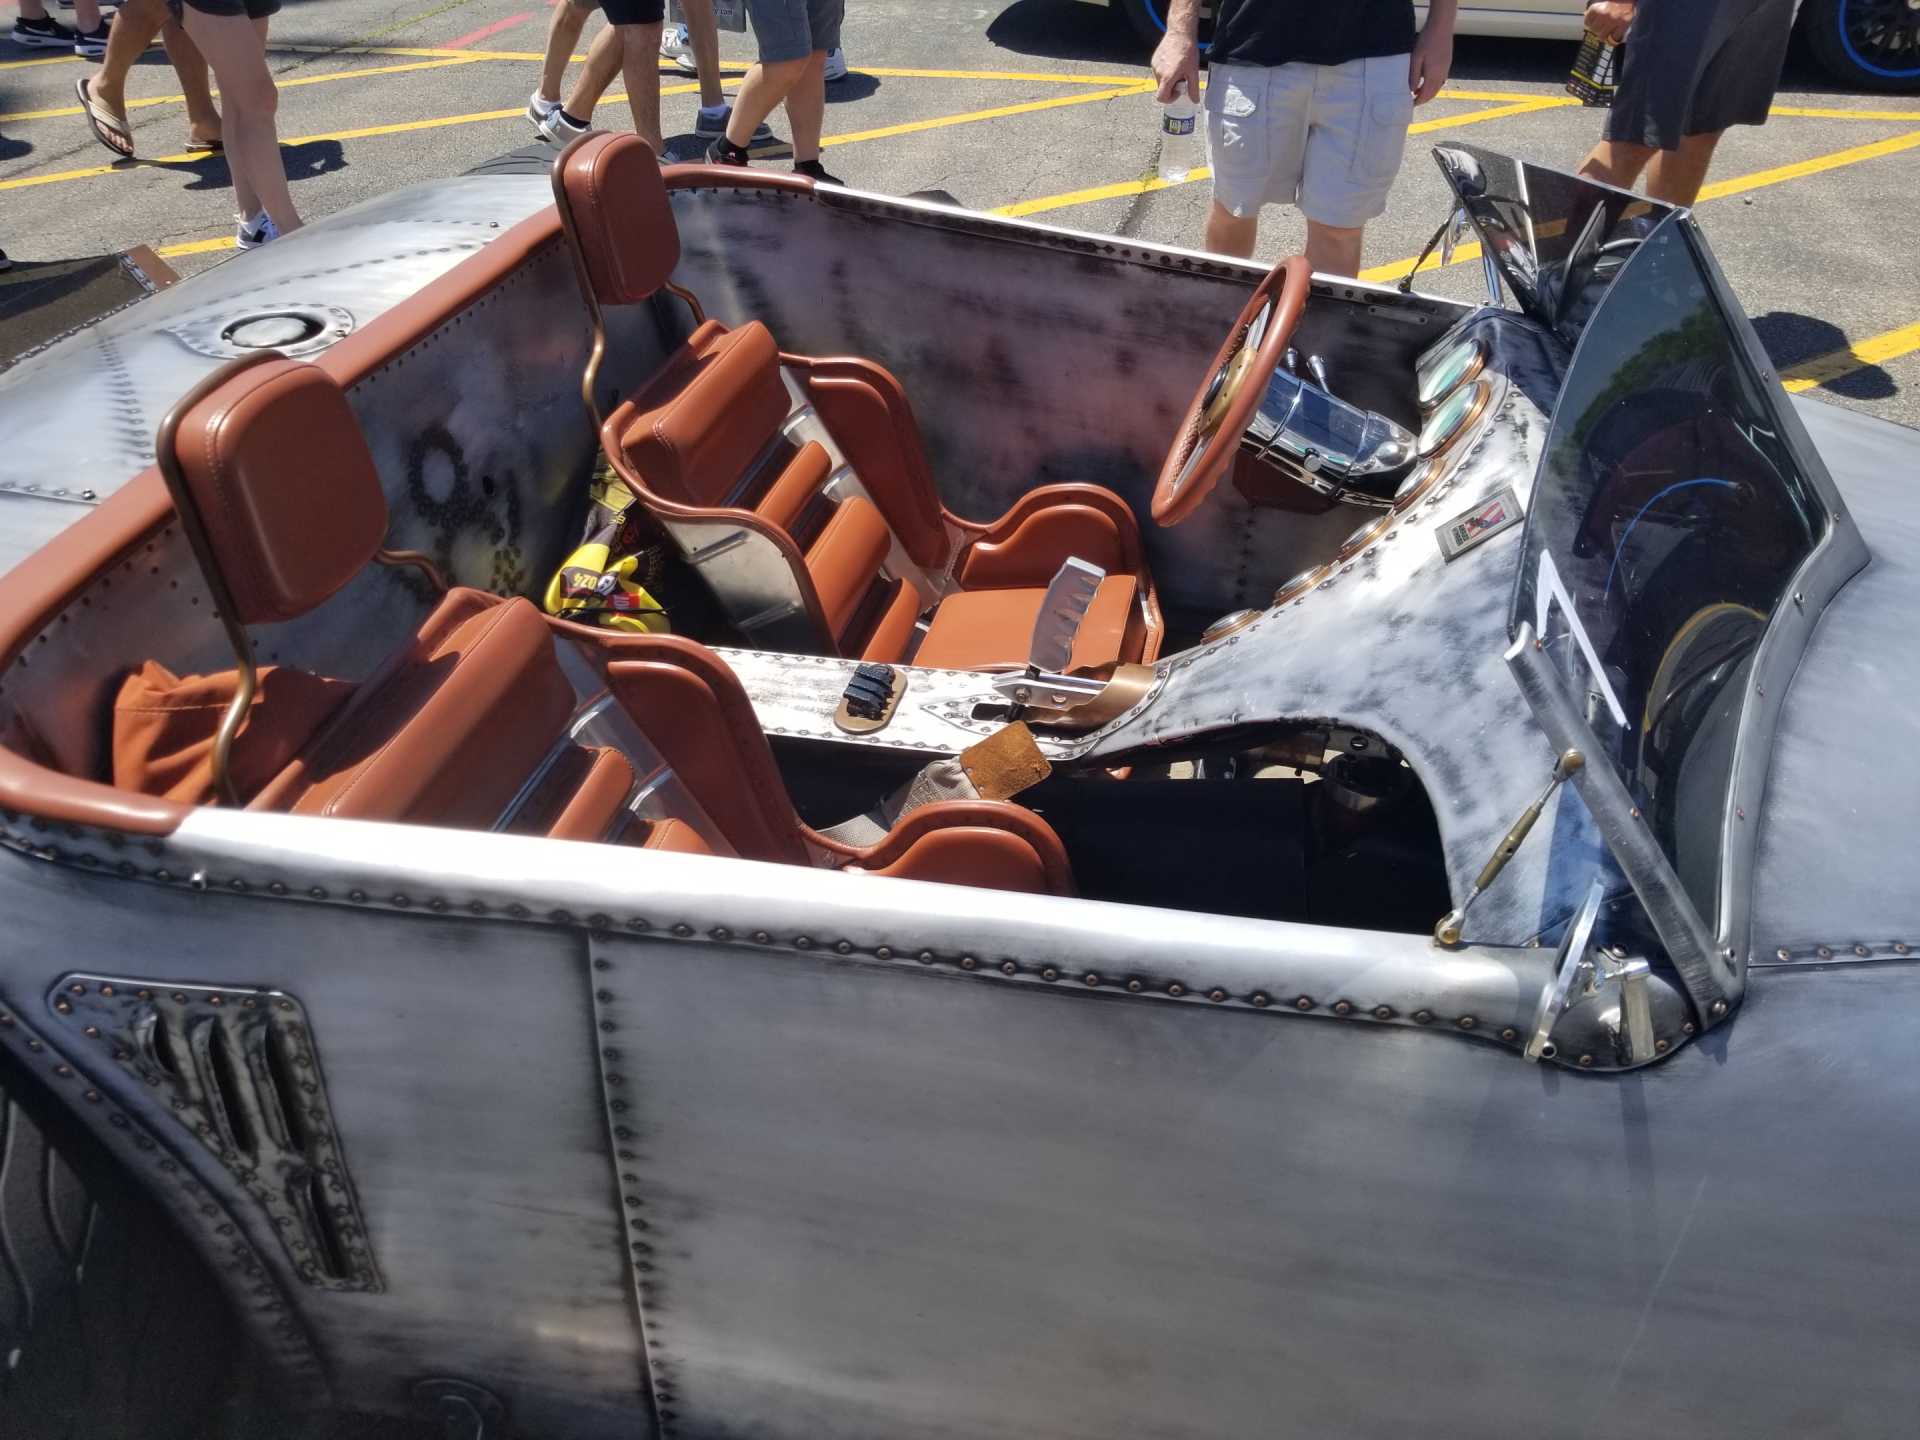
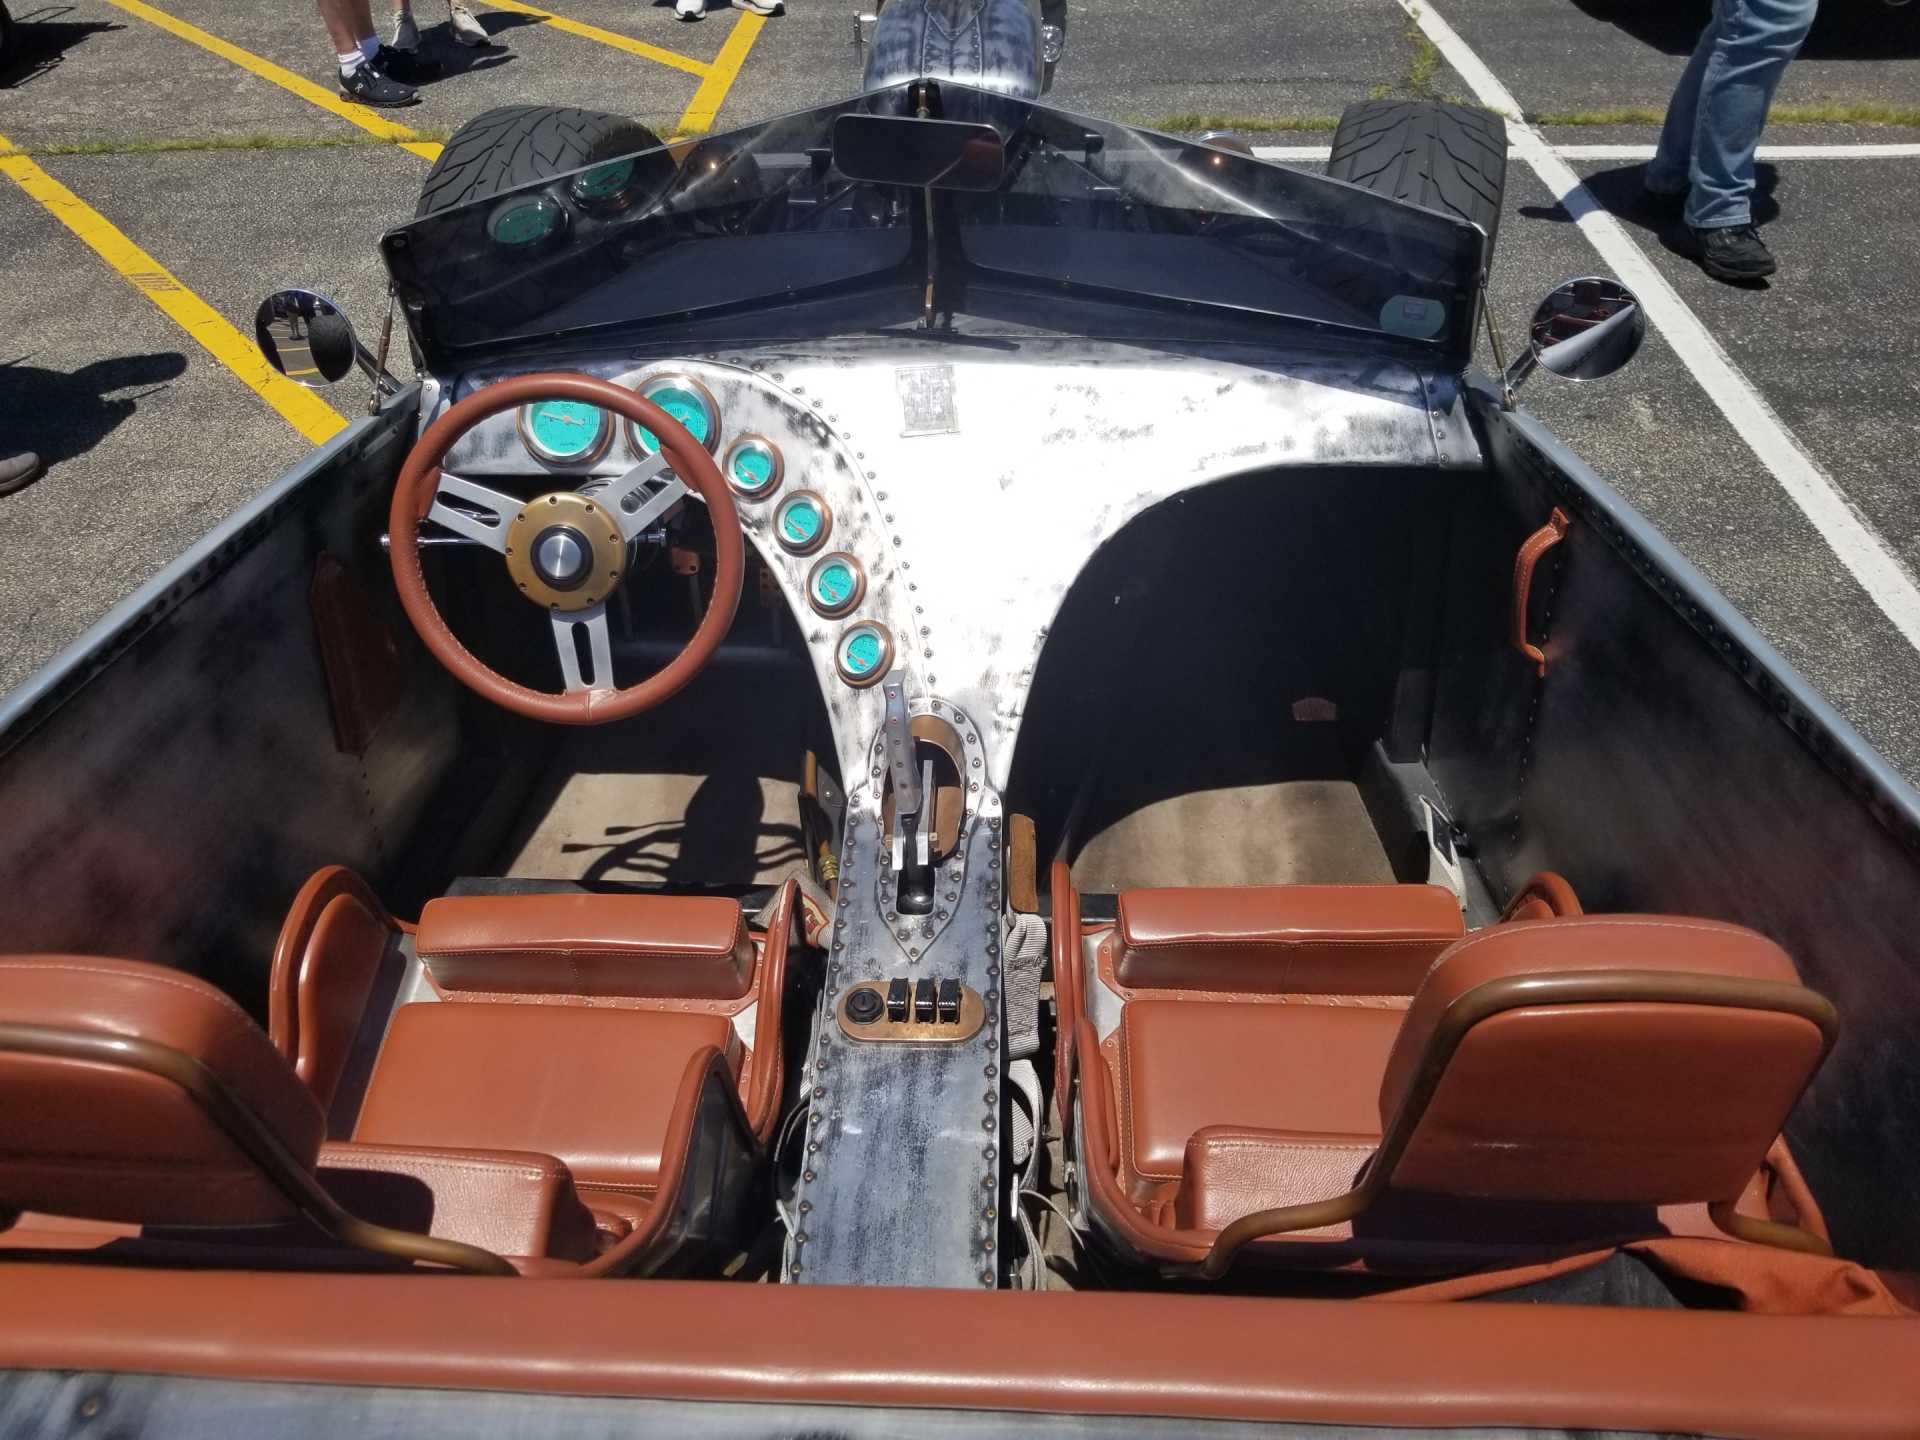
And I agree, that "WW2-esque" hot rod is freaking awesome.
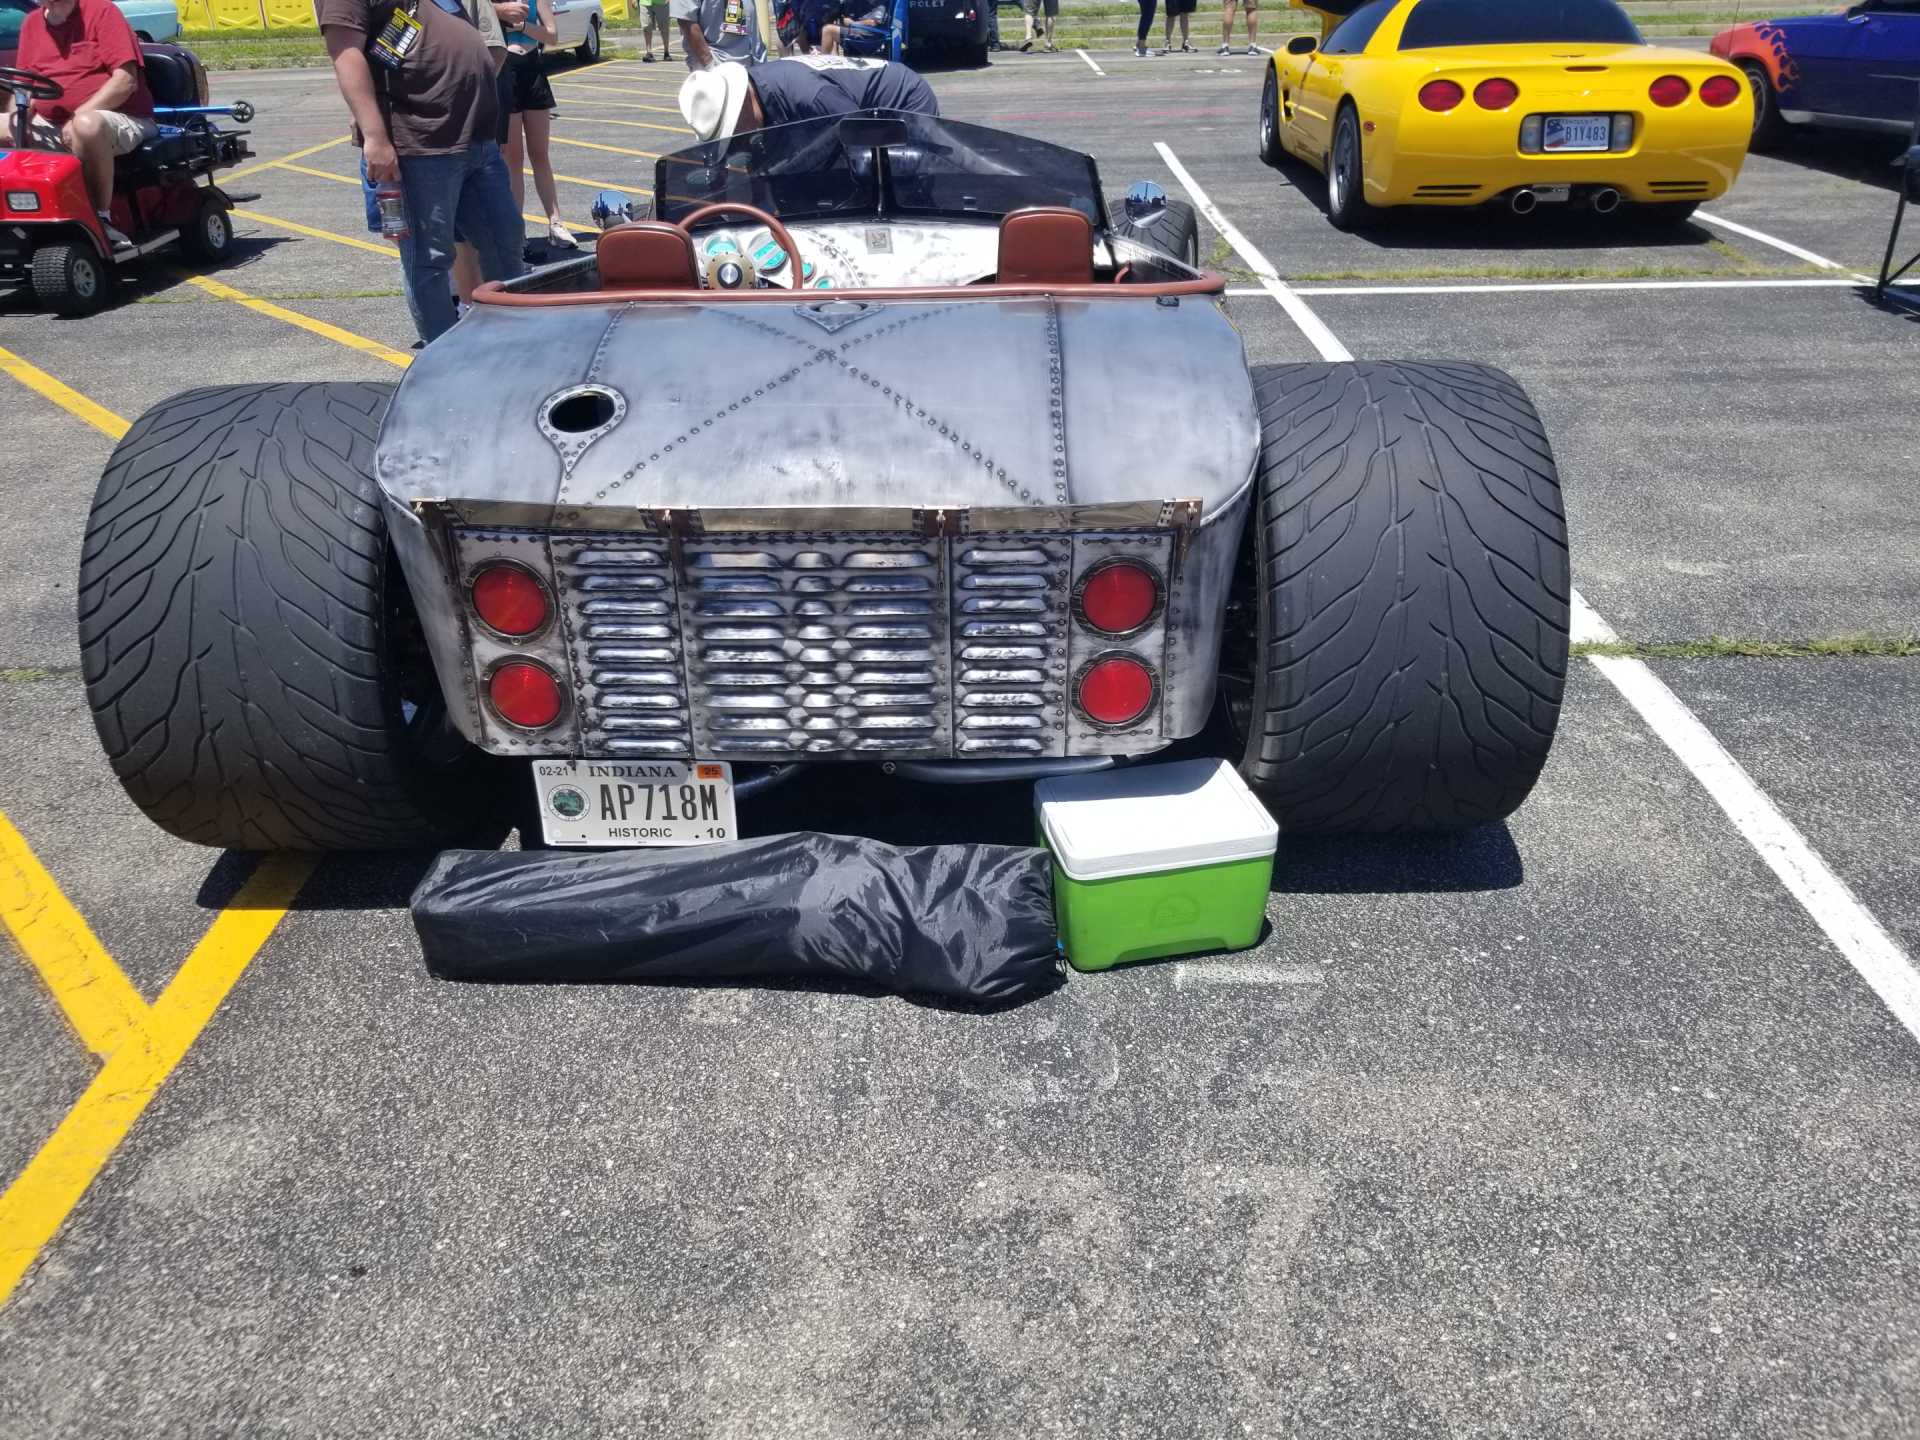
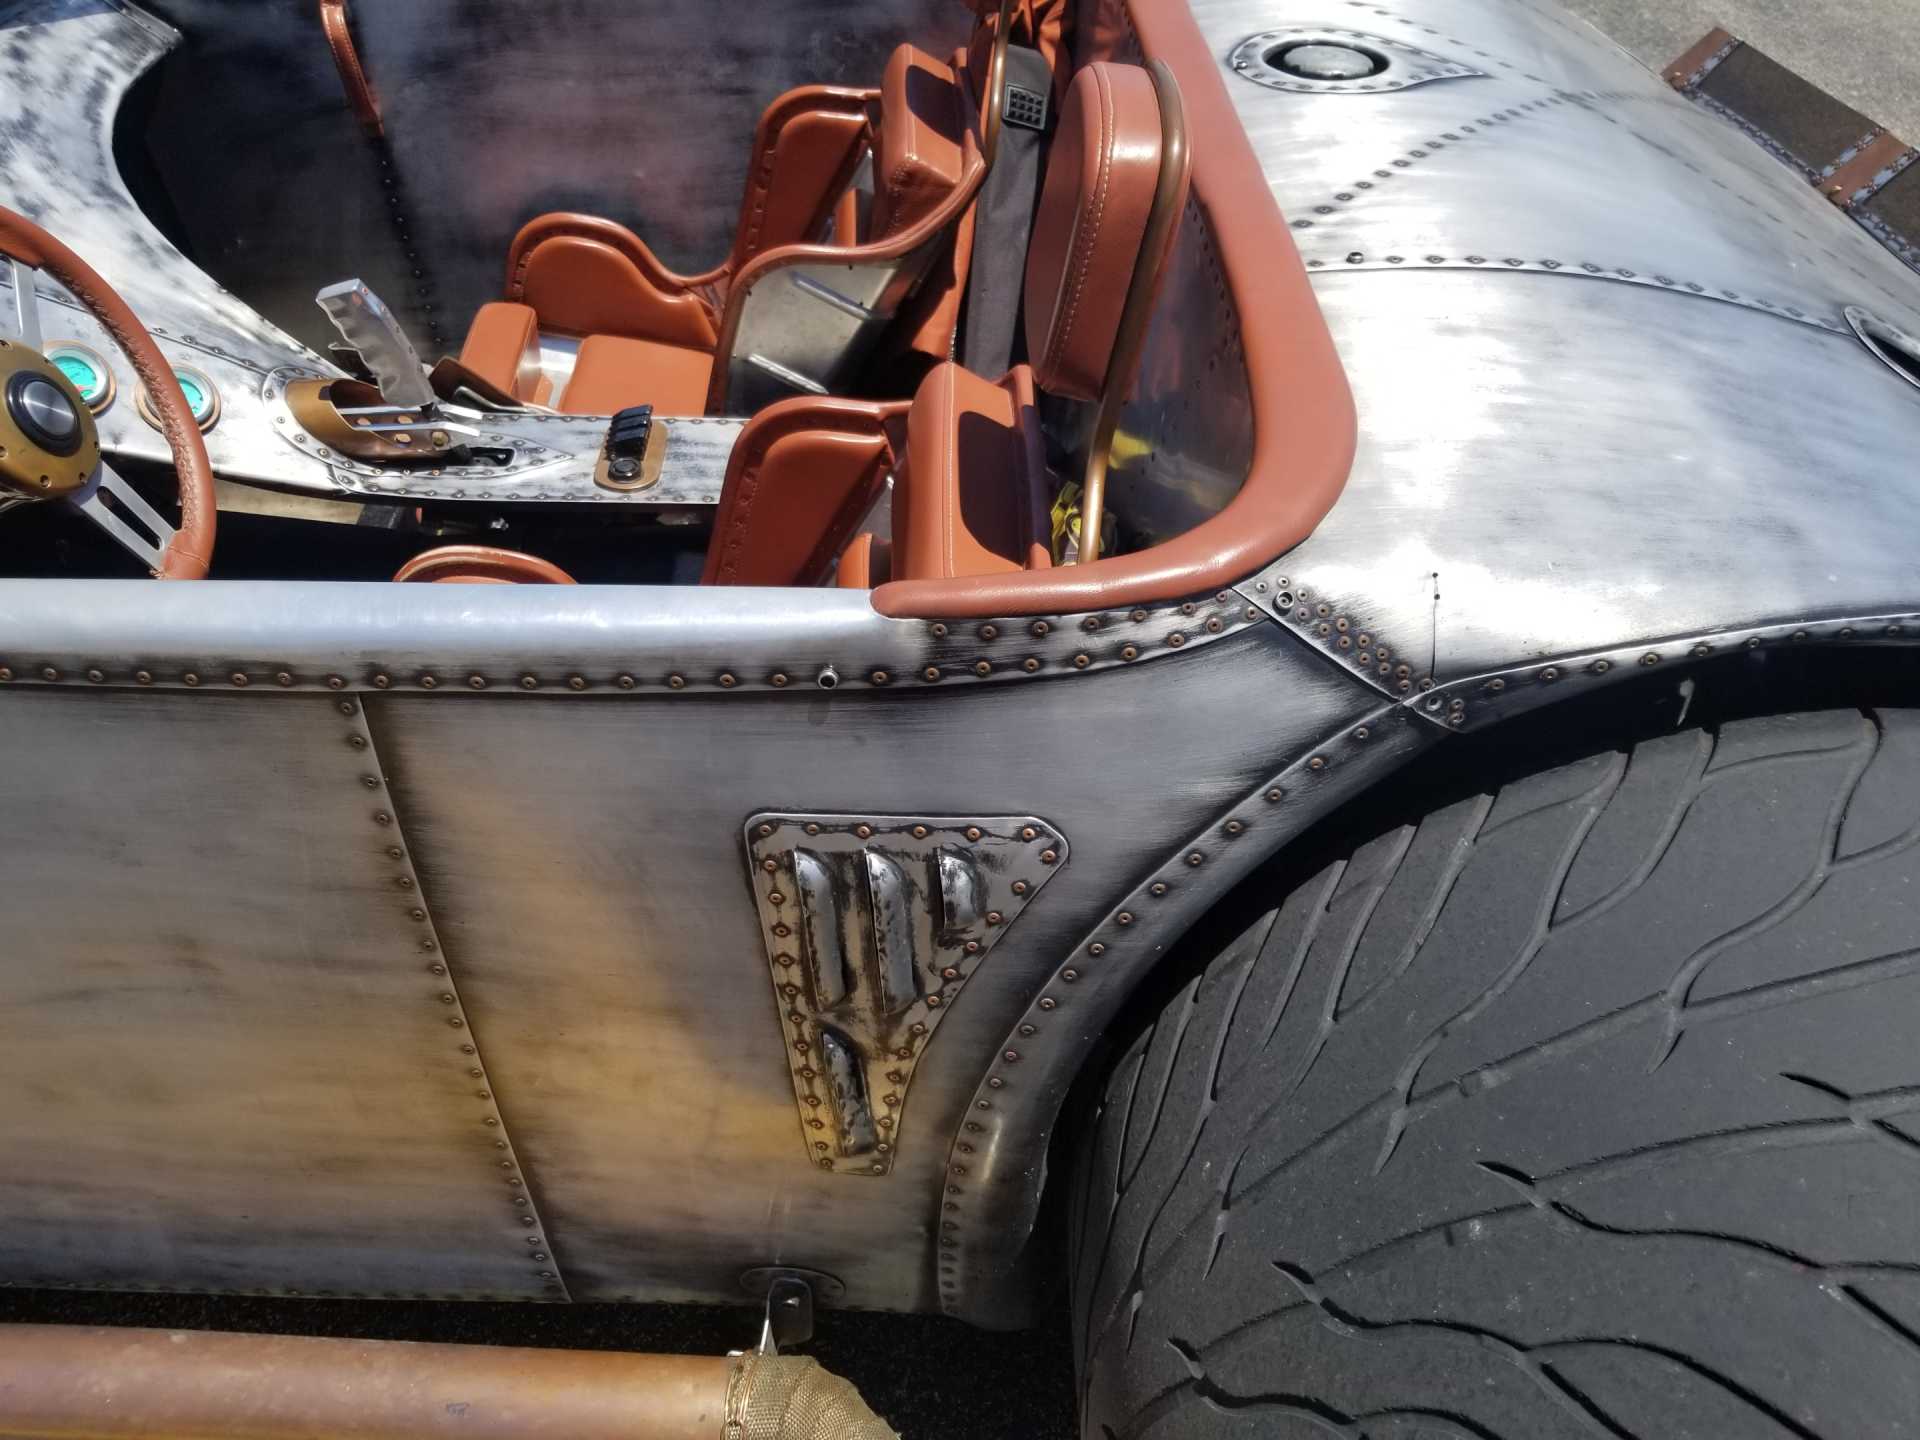
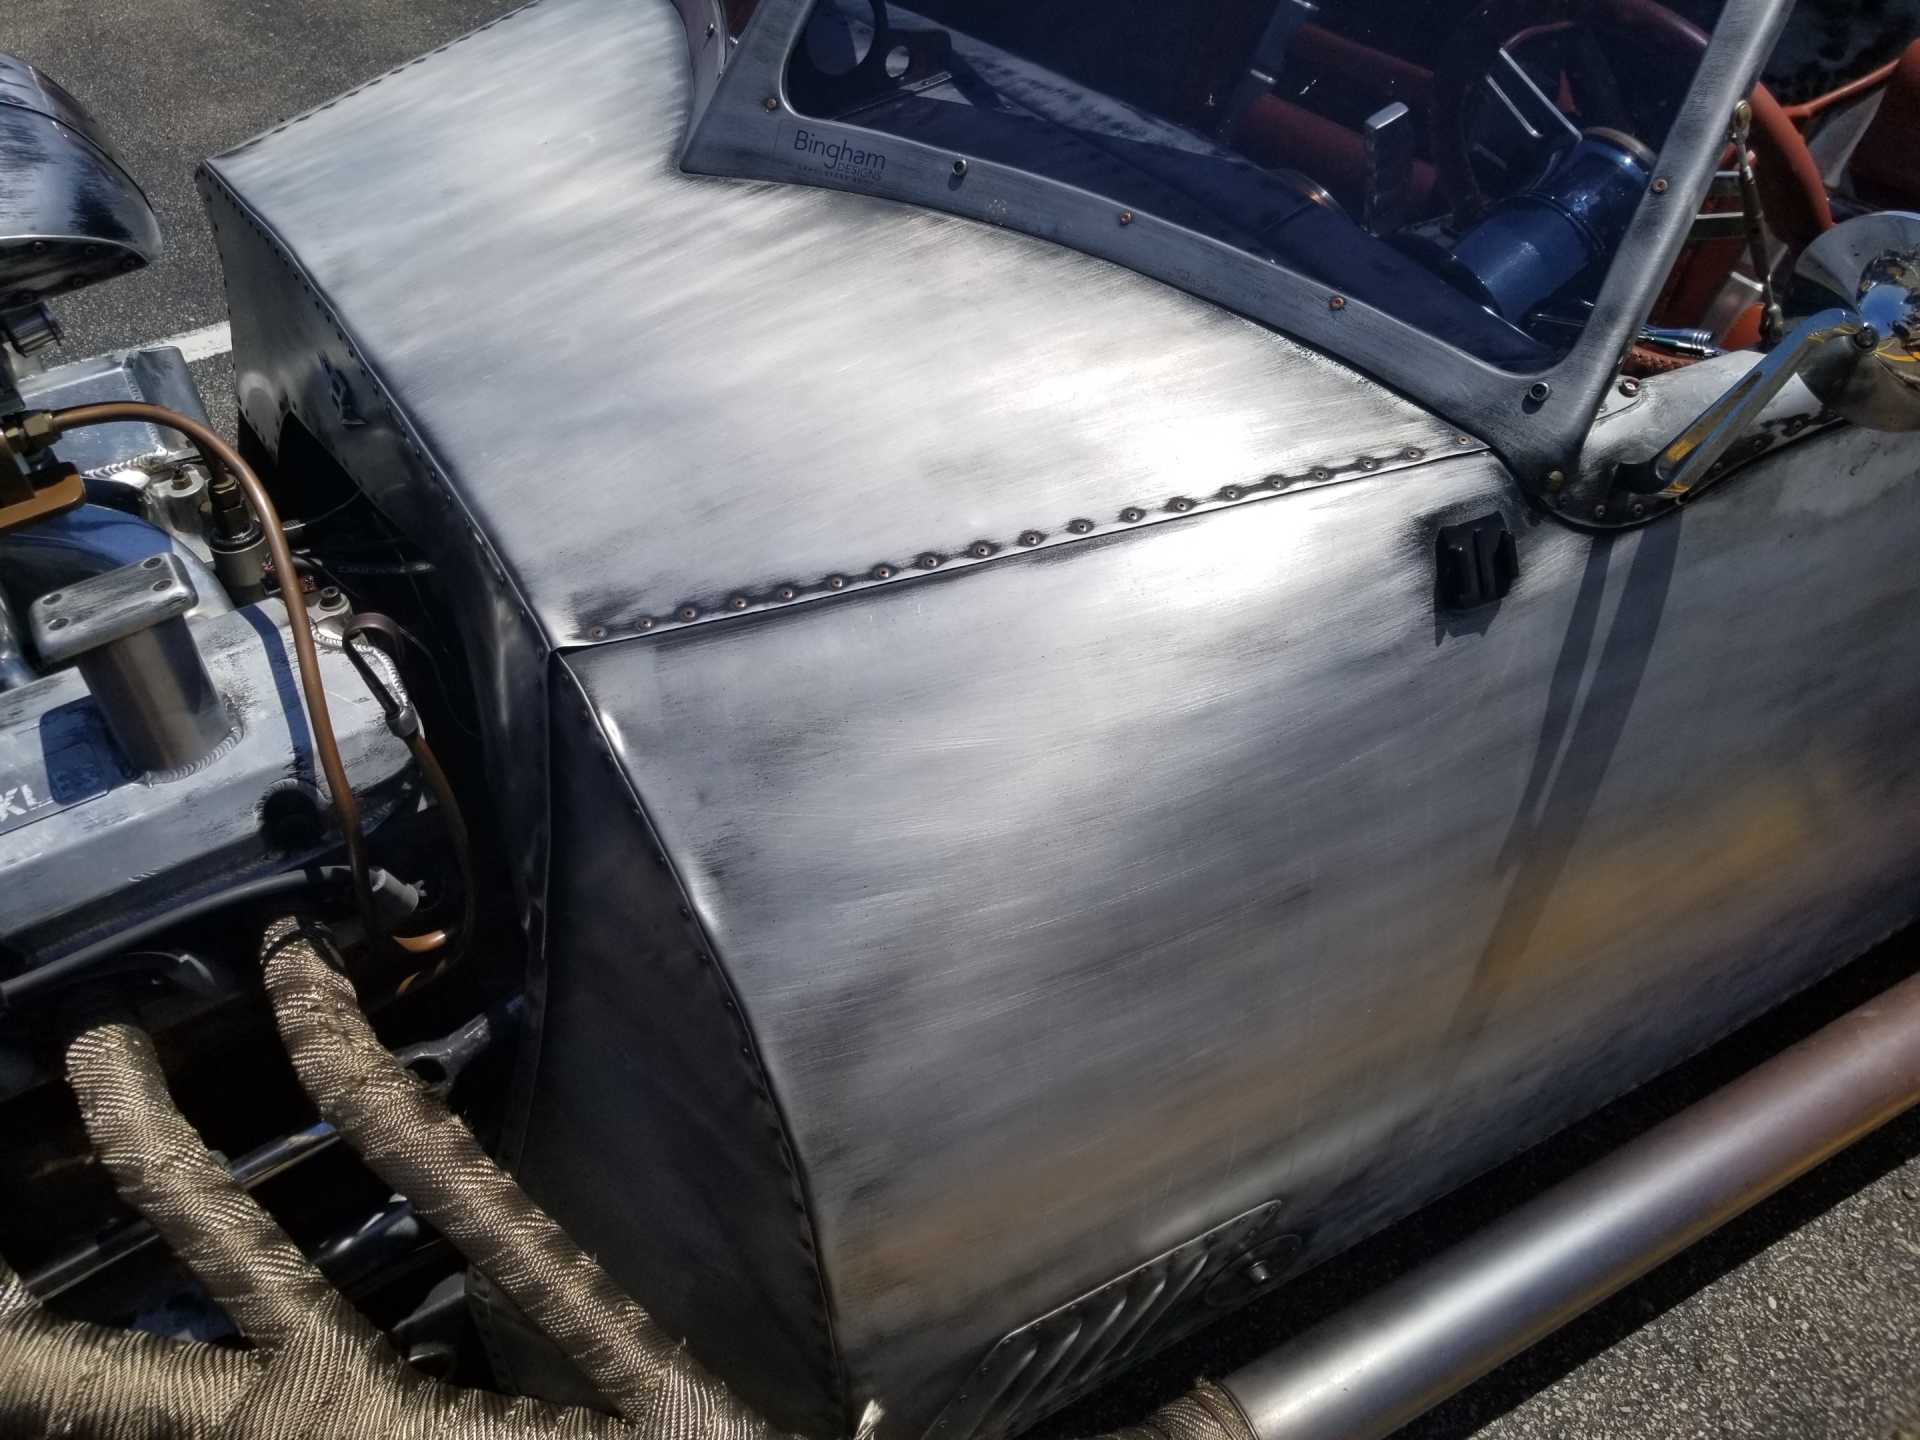
Sage - I'd guess the radiator is in the 'trunk' area with push fans, along with the fuel cell. Given how the trunk area has all of those vents, and smaller intake vents on the sides.
All of that metalwork is gorgeous. I'm guessing it's either stainless or they put clear-coat right over the bare metal? It's gotta be LOUD though, even with those long runner pipes, with no enclosed cabin. My head would be rattling after a long drive.
That's awesome you ran into some other Fiero owners. Did all of them have engine swaps, or just that one 3800?
And I agree, that "WW2-esque" hot rod is freaking awesome.
Sage - I'd guess the radiator is in the 'trunk' area with push fans, along with the fuel cell. Given how the trunk area has all of those vents, and smaller intake vents on the sides.
All of that metalwork is gorgeous. I'm guessing it's either stainless or they put clear-coat right over the bare metal? It's gotta be LOUD though, even with those long runner pipes, with no enclosed cabin. My head would be rattling after a long drive.
That was my guess as well, particularly after noting the vents on the side and rear...that backend is just great!
Originally posted by Sage: "Heading to Hebron Ohio in the morning."
If you're coming up I-77, you will be going right past Marietta.....honk when go over the bridge from WV....I'm about a mile from exit 1!
HAGO!
Where's the radiator on the rod above?
Tedd, we came up I-71 from Louisville, so didn't go past Marietta.
As Vince mentioned, the roadster has the radiator mounted in the rear.
Today we road tripped with Joe Doctor and had 5 Fieros parked in a row at the show... but I didn't get a picture. Here is a picture of 4 of the 5. Shawn joined is after this pic.
Shawn was driving this Fiero and was only here for today.
Had a tank of gas today yield 26.7 mpg, which is promising.
[This message has been edited by fieroguru (edited 06-13-2024).]
I am pretty sure I saw Shawn's Fiero (that one pictured) at the 40th! Or... someone has one in the same color, engine swap, and repurposed grating for the 'grill' of the hood window. lol It's cool you're running into other Fiero folks that you know.
Power Tour is done, and Marty and I are back at home.
Overall, the round trip was about 1100 miles in 6 days and I was very pleased with the car and the stereo sound. Still need to figure out what is causing some tunes to become corrupted, find and fix the AC leak, troubleshoot the cruise, clean up the ground on the brake lights, and replace the cheapo 2DIN head unit - primarily because the touch screen is flakey and sluggish.
At Indy there were two other Fieros:
Ryan's:
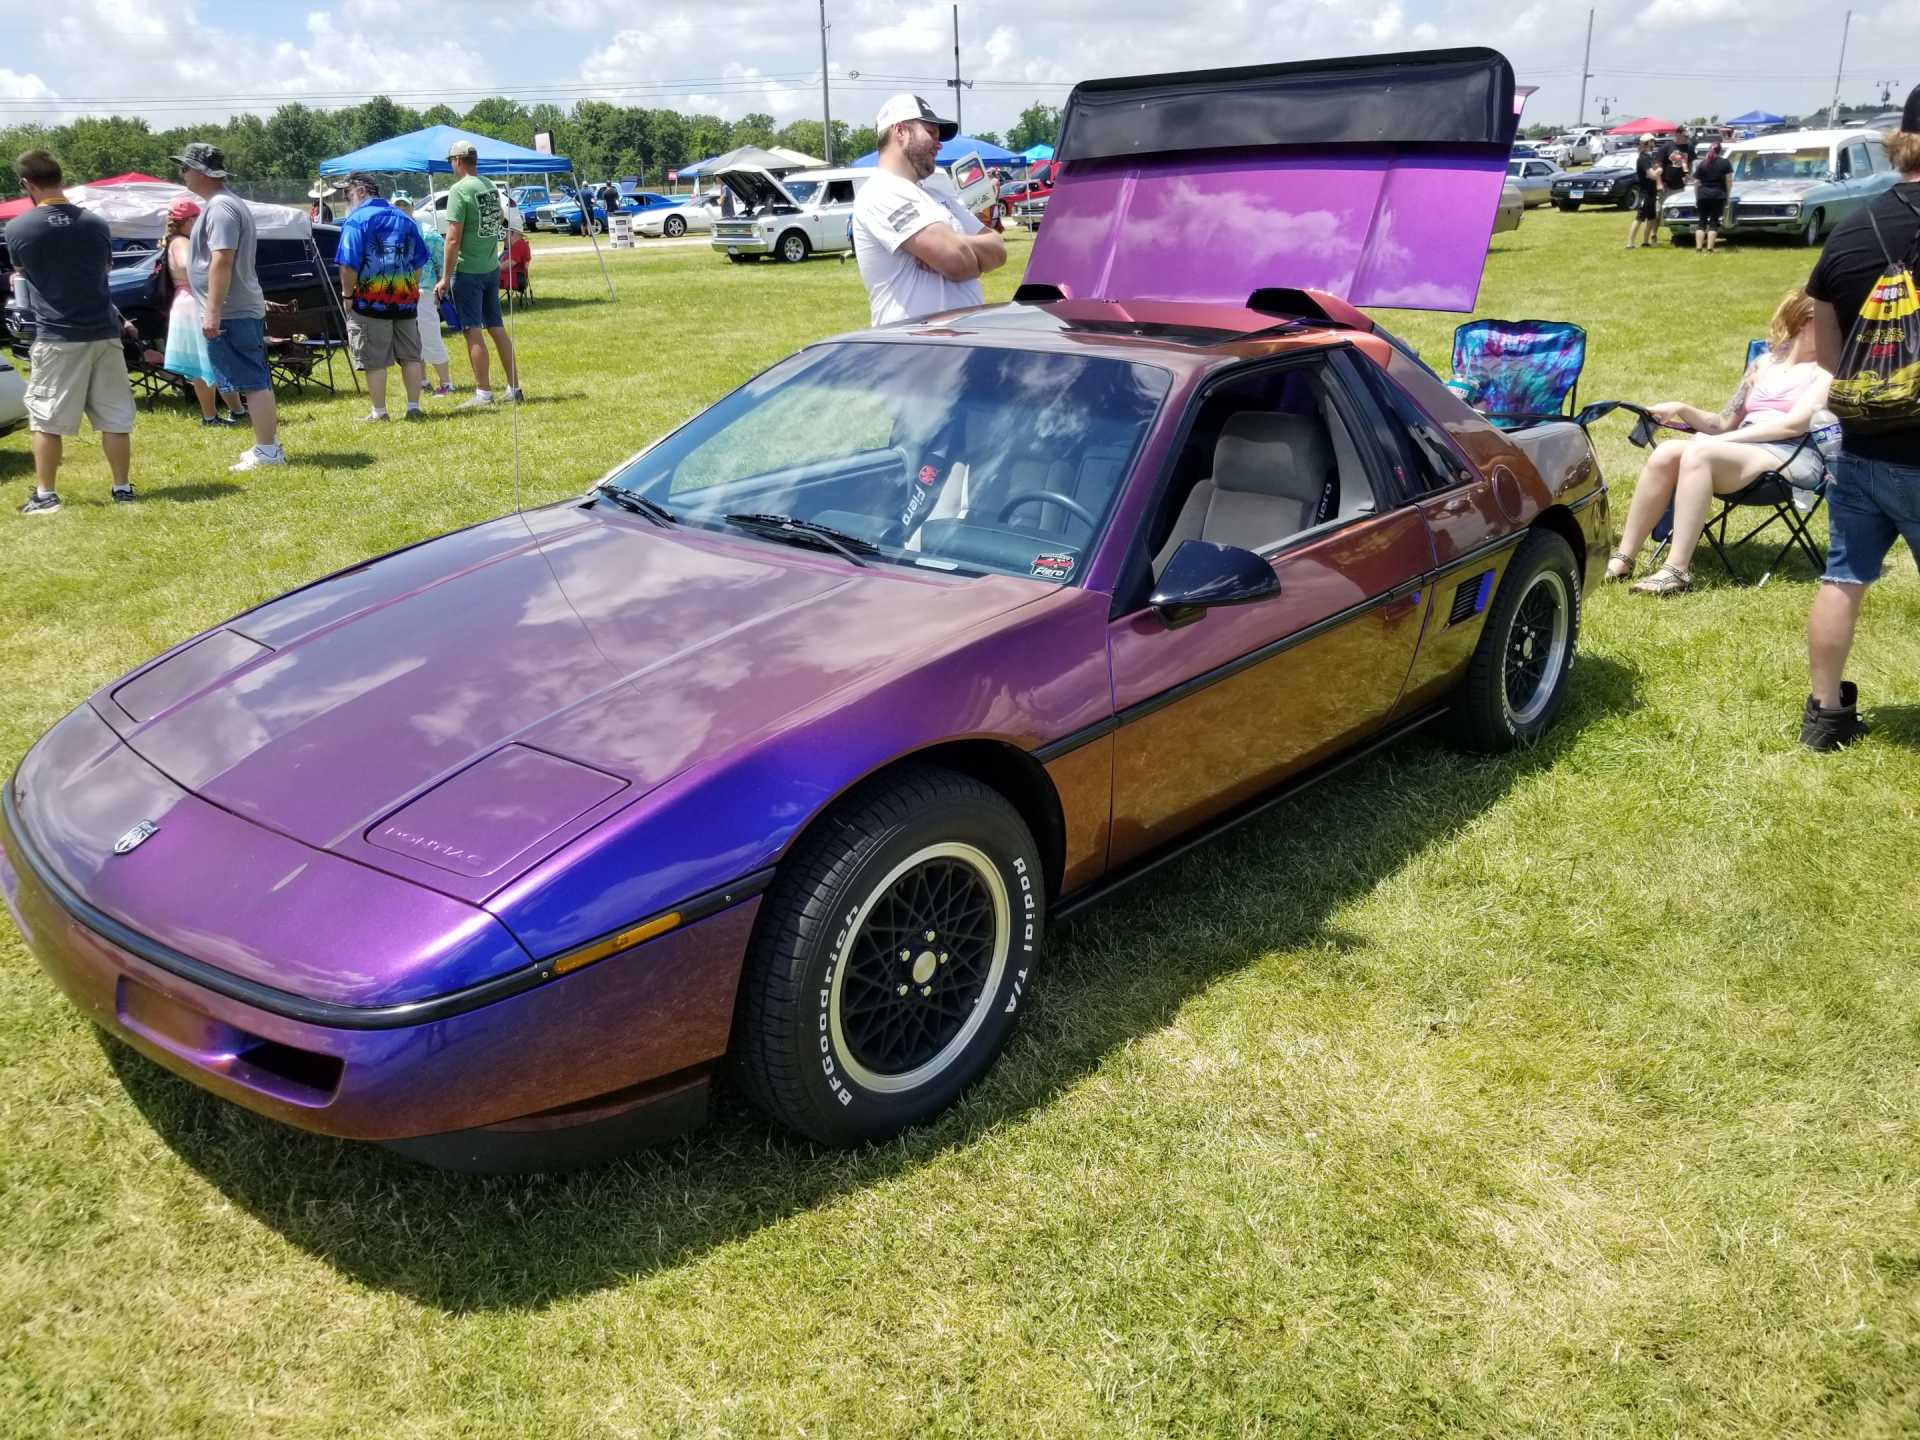
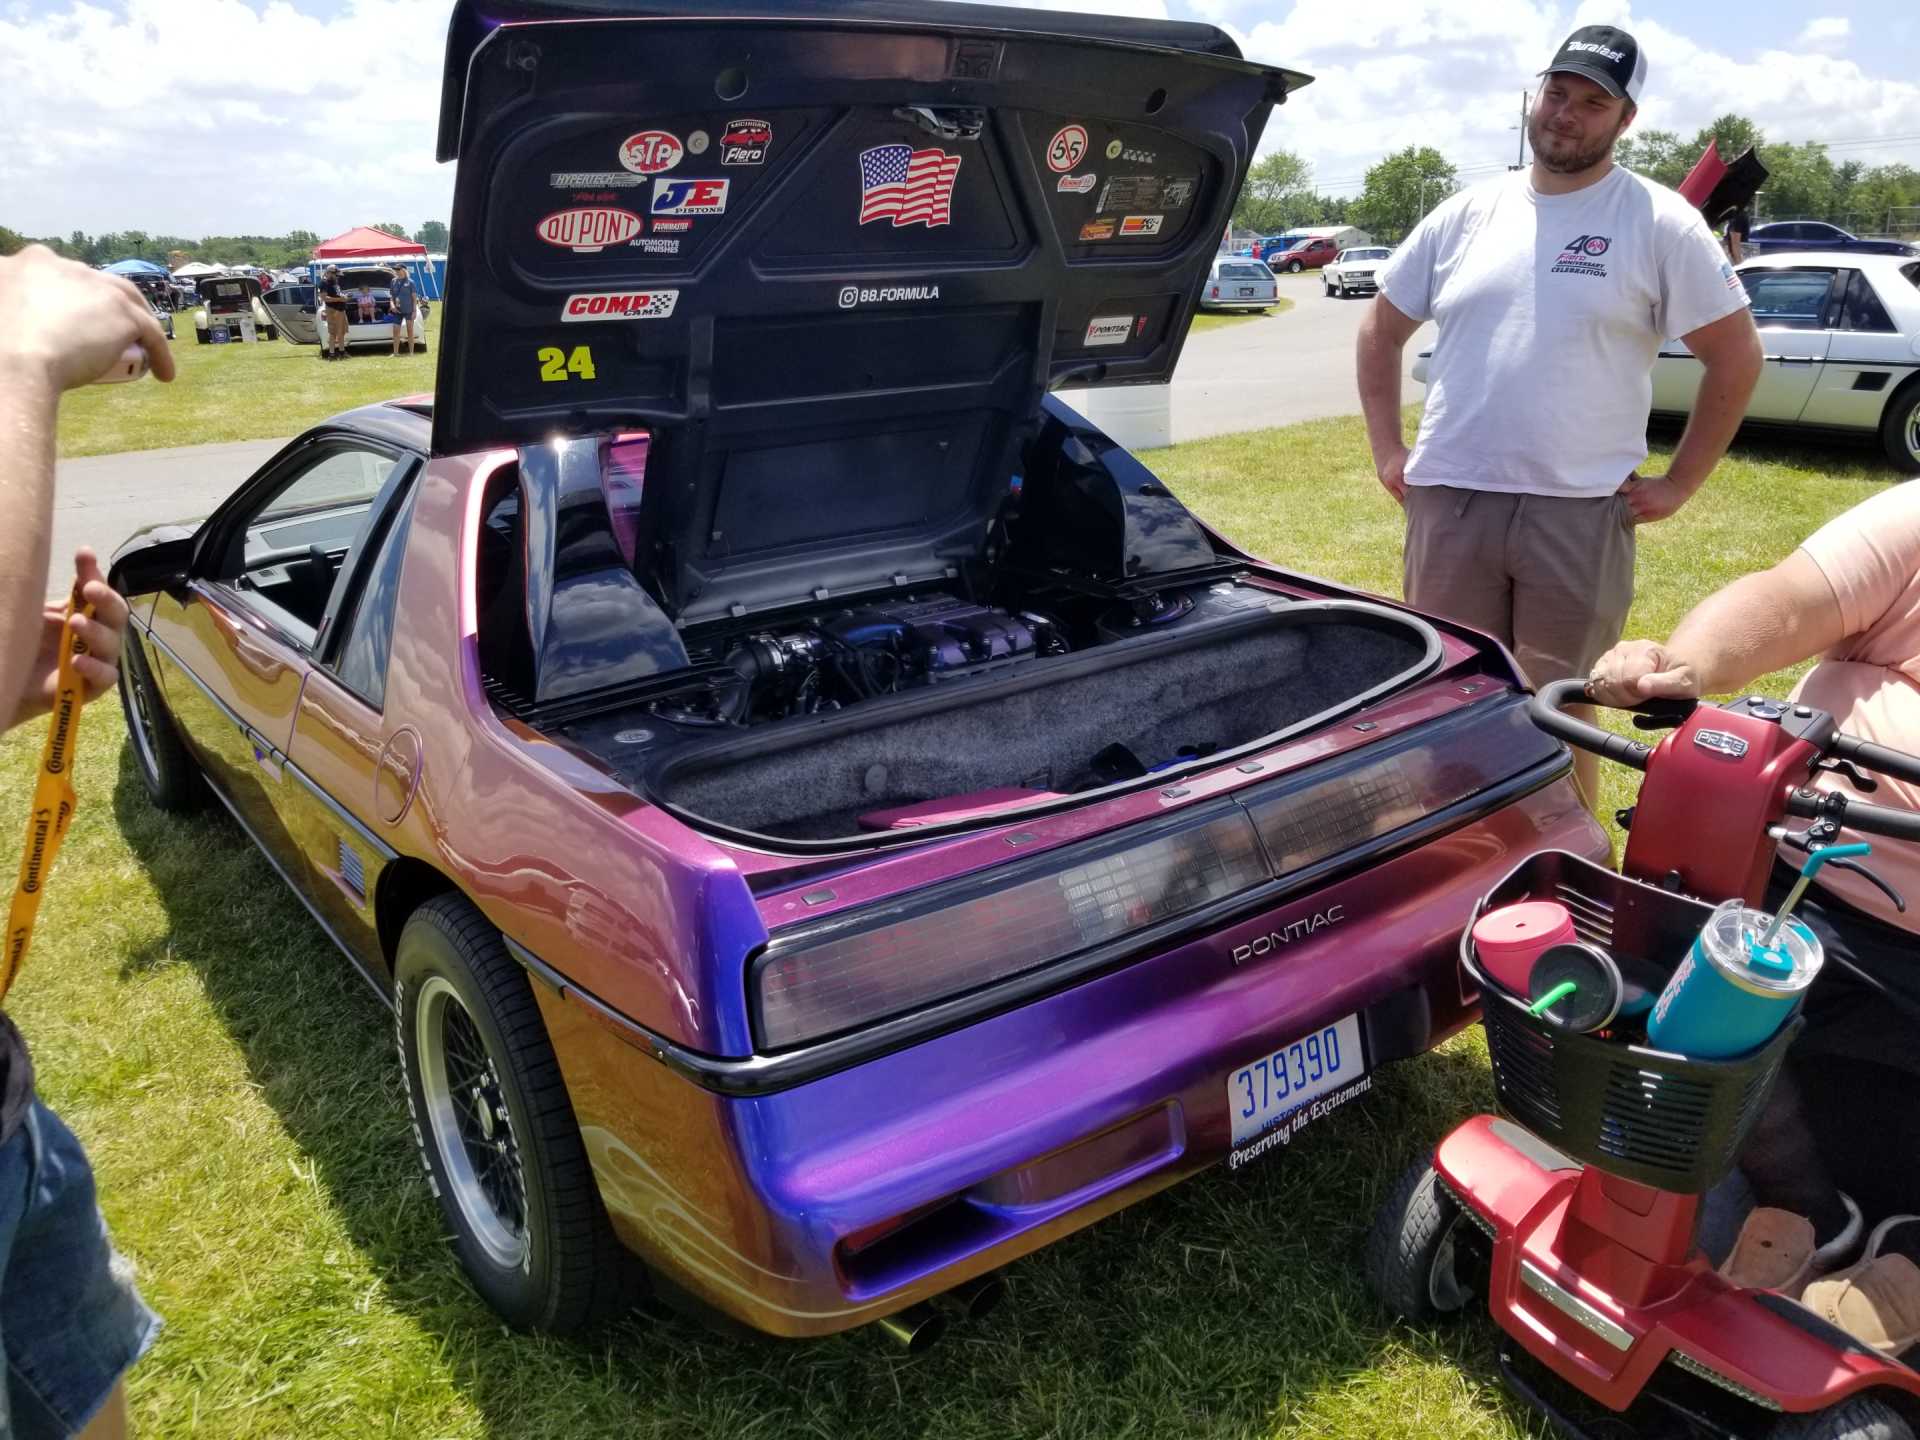
And this one with custom color flipping paint:
[This message has been edited by fieroguru (edited 06-14-2024).]
Here is one of the professional photos of Marty and I rolling into one of the HRPT venues:
Since returning from the HRPT, I have mostly just been driving the car to work and back. Best tank when I did another mileage run was 27 mph, and the daily commute with some tuning runs have been around 20 mpg.
Been slowly working on the minor things the HRPT helped identify. I figured out the issue with the corrupted tunes... operator error. I was disabling the DTC for when I failed the MAF to run speed density. The E40 ECM has to set the DTC to run 100% speed density, and that is what I was running to dial in the VE tables. Once I stopped trying to set P0103 to report no error, the tuning has been much more predictable.
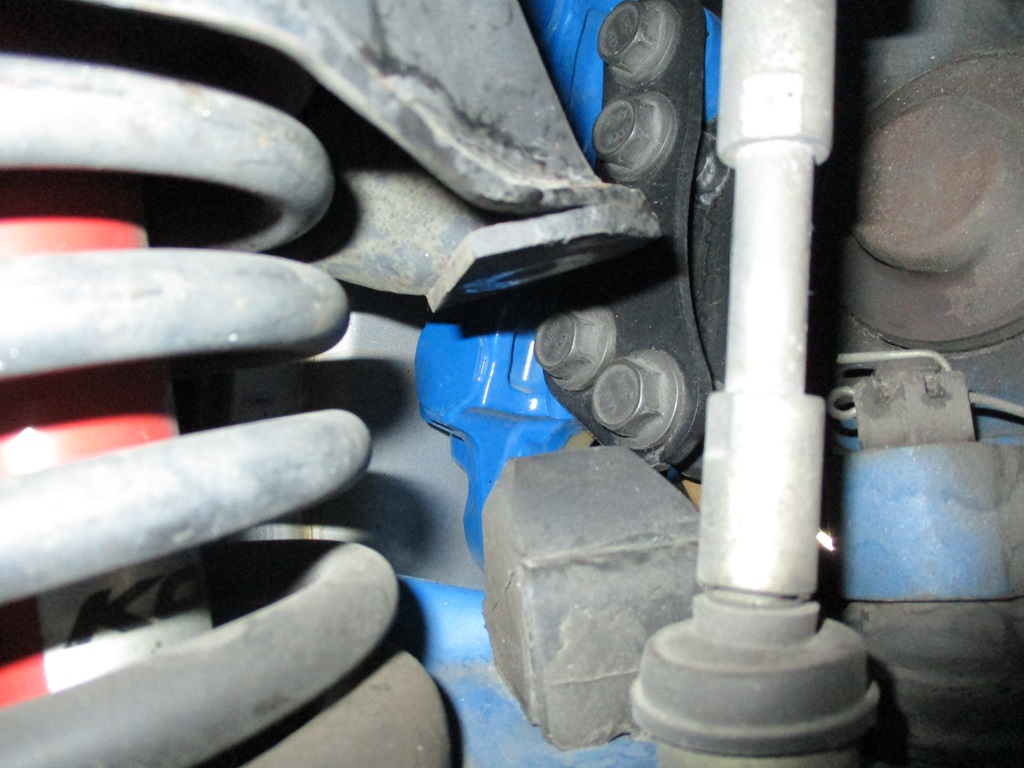
1. Installed shorter/softer bump stops. On the tour we bottomed out the front about 5-6 times on typical public roads. Here is the clearance to the trimmed down bump stops. It was less then this with the car loaded with 2 people and gear for 6 days.
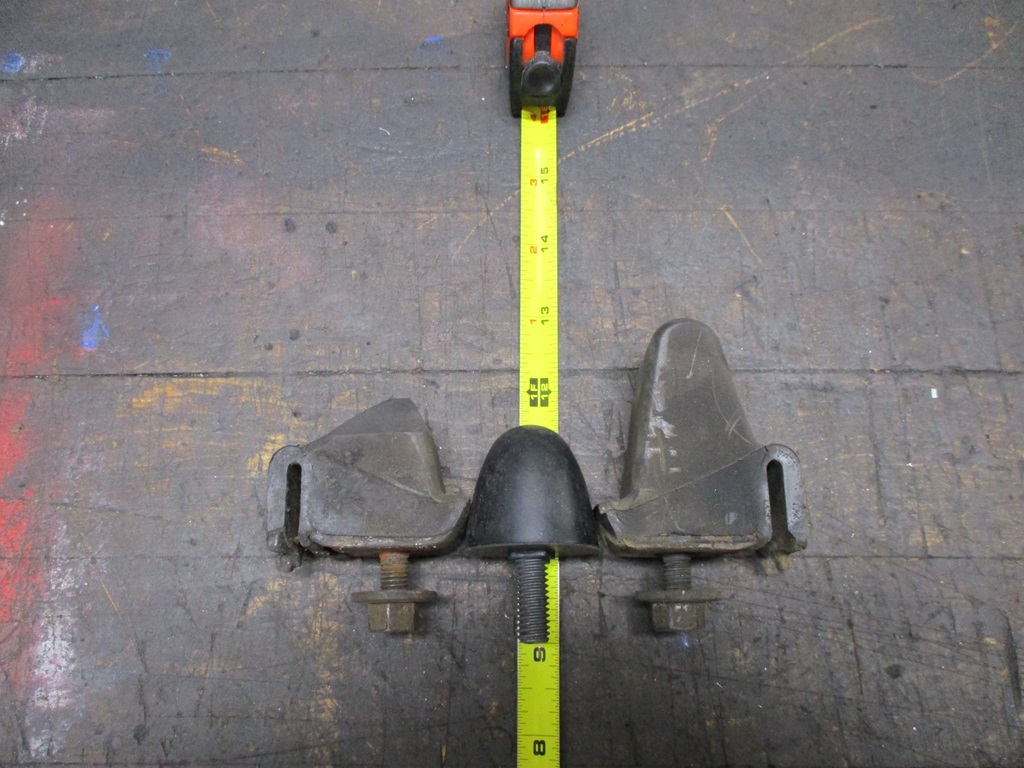
Here is the trimmed bump stop, the new one, and a stock one. To install this one does require drilling out the bump stop hole to 3/8".
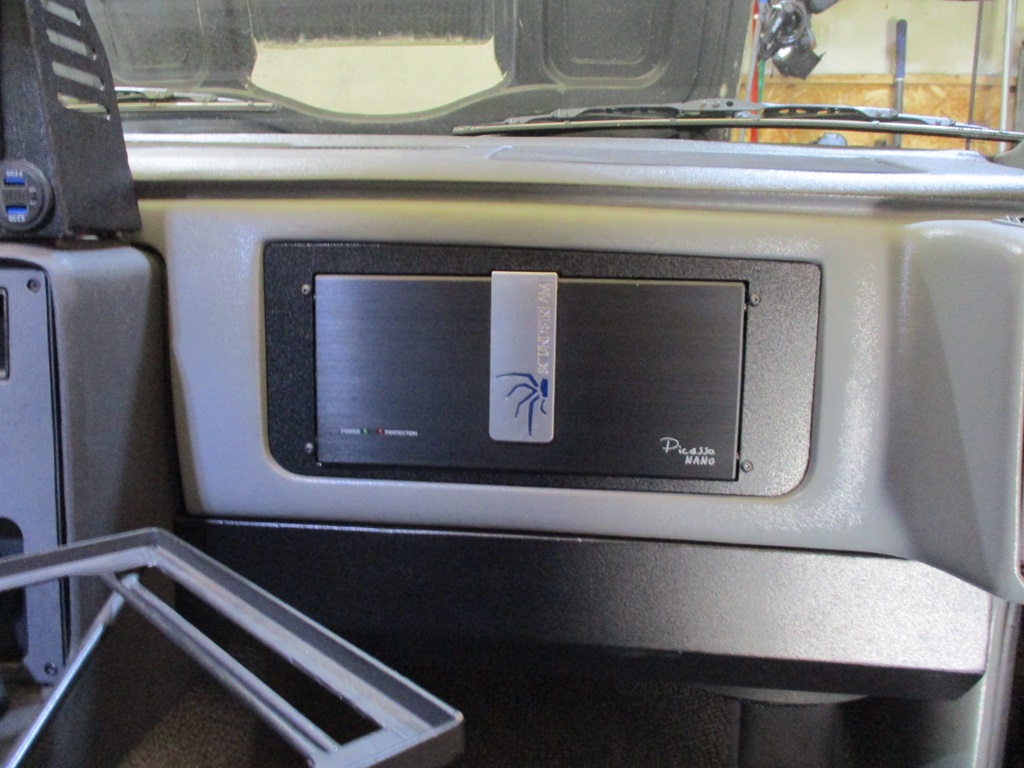
2. Very happy with the amplifier and its performance, so finished up the trim plate to hide all the wires. Given the irregular shape of the opening, I made the first one out of card board, then 2 test plates in 16ga before making the final one.
3. The shifter pleather boot was severely worn and peeling. Picked up another VW shifter, drilled/tapped for M16x1.5mm and installed it. This is also a general over view pic of the interior with the steering wheel, relocated gauges, and the 2DIN radio/NAV unit. The 2DIN head unit will be getting replaced for several reasons, the main one being the touch screen is a little flakey and makes loading map routes challenging.
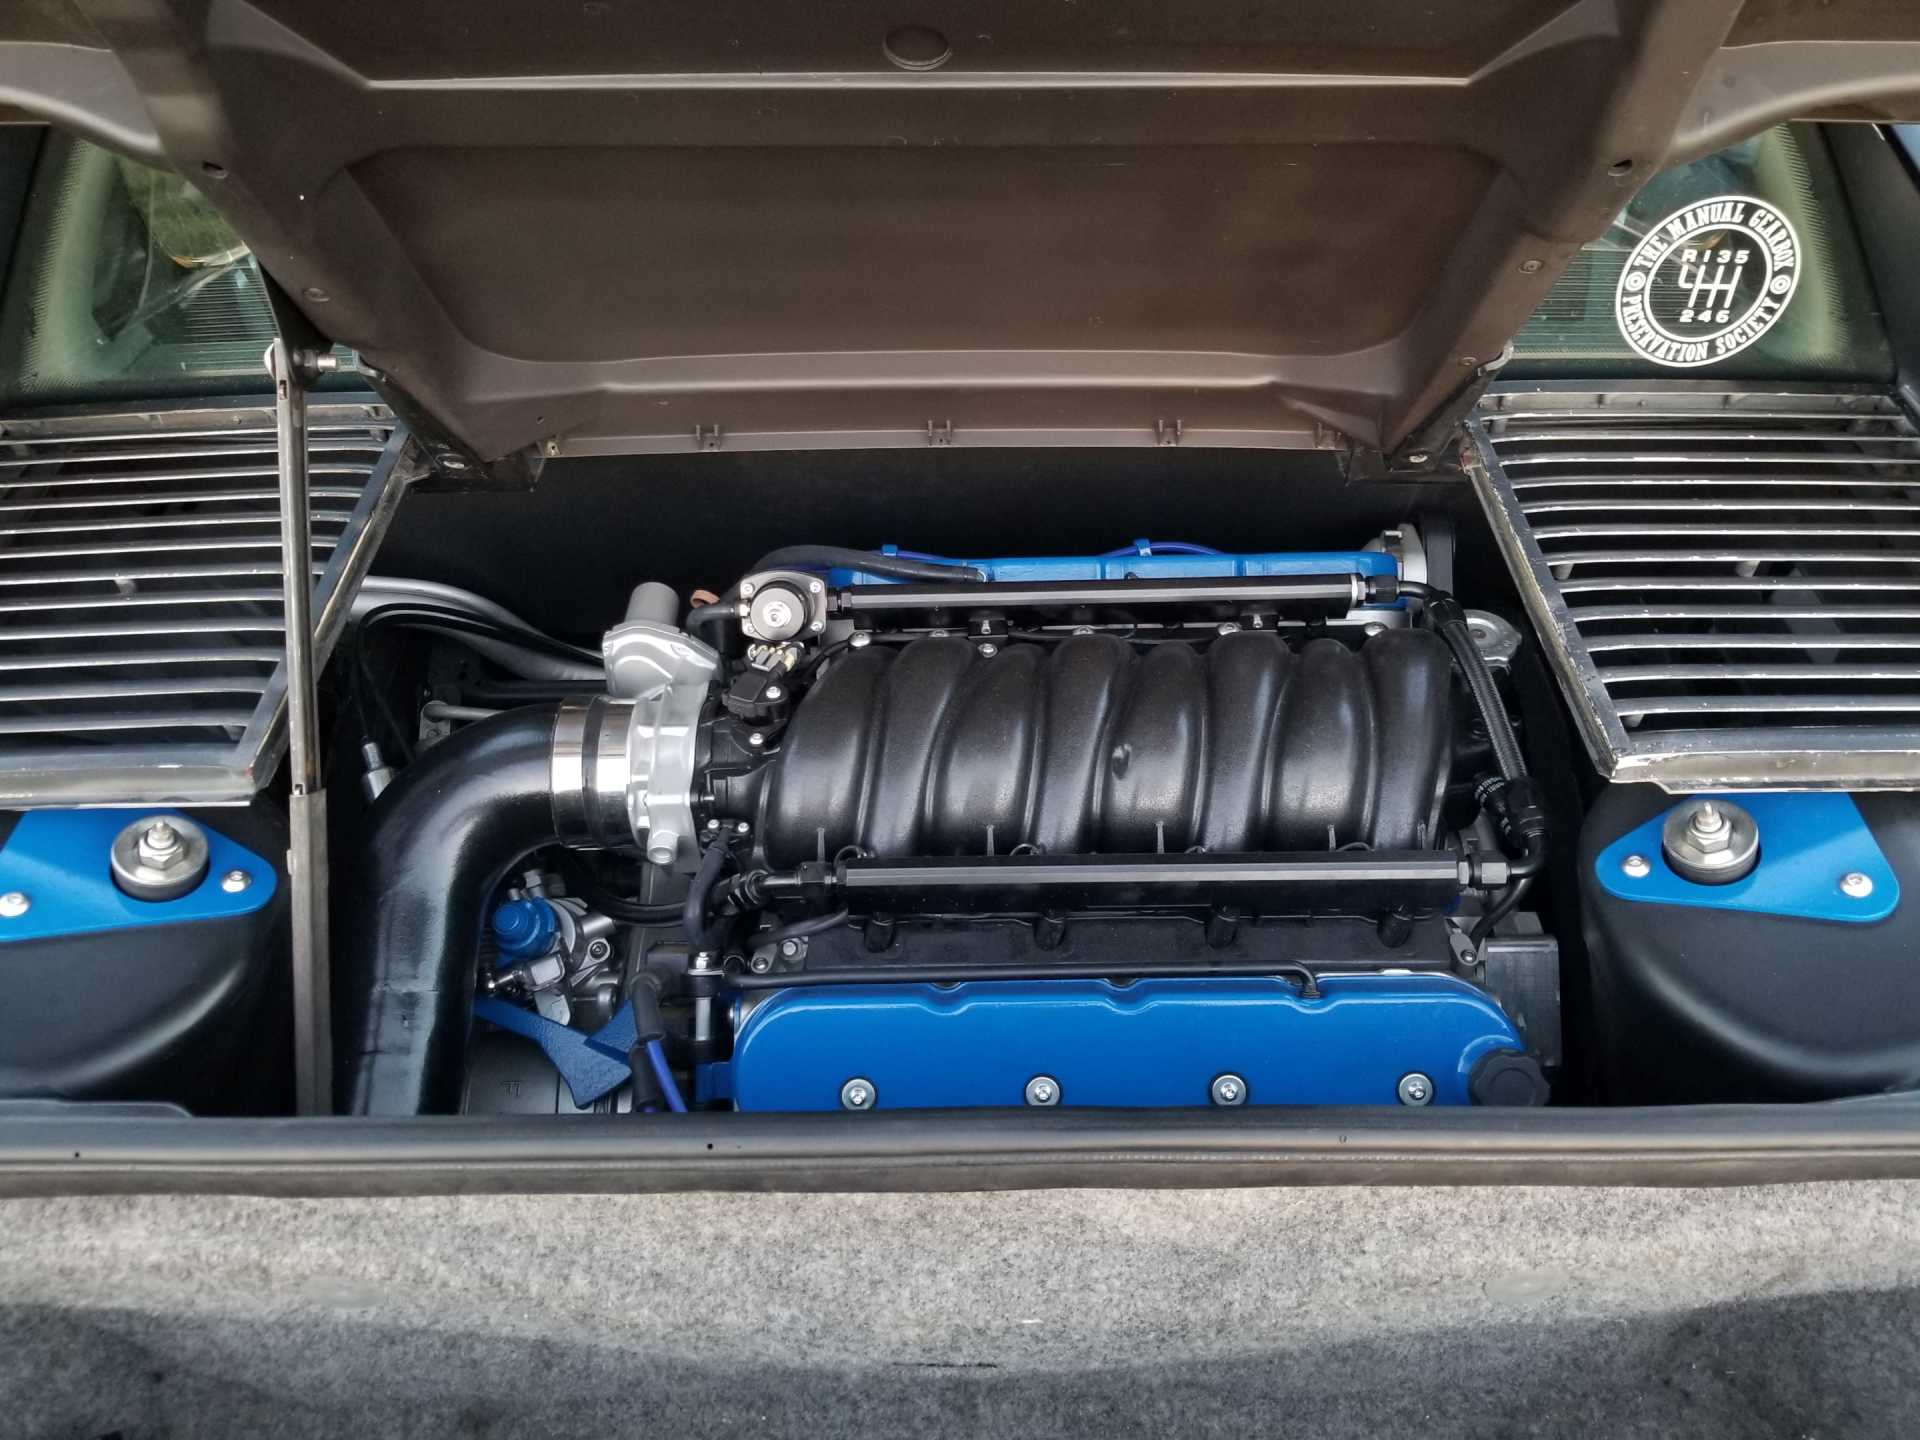
4. Installed new 105/hr @ 43.5 psi injectors. I had been running decapped injectors that flowed about 85 lb/hr @ 58 psi and suspect they were causing some of the idle quality issues with their flow performance no longer patching the specs in the calibration. These new ones come with all the injector specs to change in the tune and should allow the idle to be more consistent. These are also about the largest ones I can install in the E40 without doing a full scale of all air flow tables within the calibration.
5. Fixed the O-ring leak around the base of the F40 shifter on the transmission.
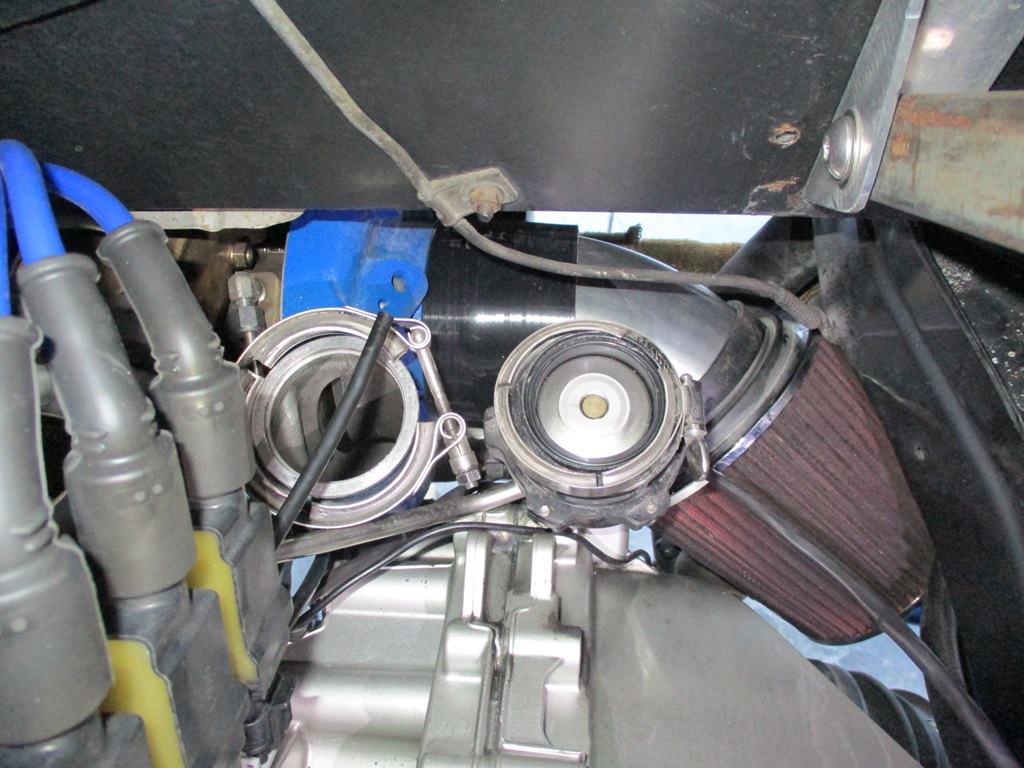
6. Removed and wrapped the warm air intake. Mainly as a test to see if it will lower the normal IAT temps when cruising and driving around time as the engine bay gets quite hot - probably 165 degrees+. Normal IAT temps during cruise on an 80 degree day are about 115 degrees, in town it climbs to ab out 125 degrees, and when in stop and go traffic they go up to 145 degrees. The issue is the engine bay is probably about 165 degrees. Under these conditions, the air is flowing slowly through the tubing and picking up the heat. At WOT, the air flow will increase, so there will be less time in the pipe to raise or lower the temps.
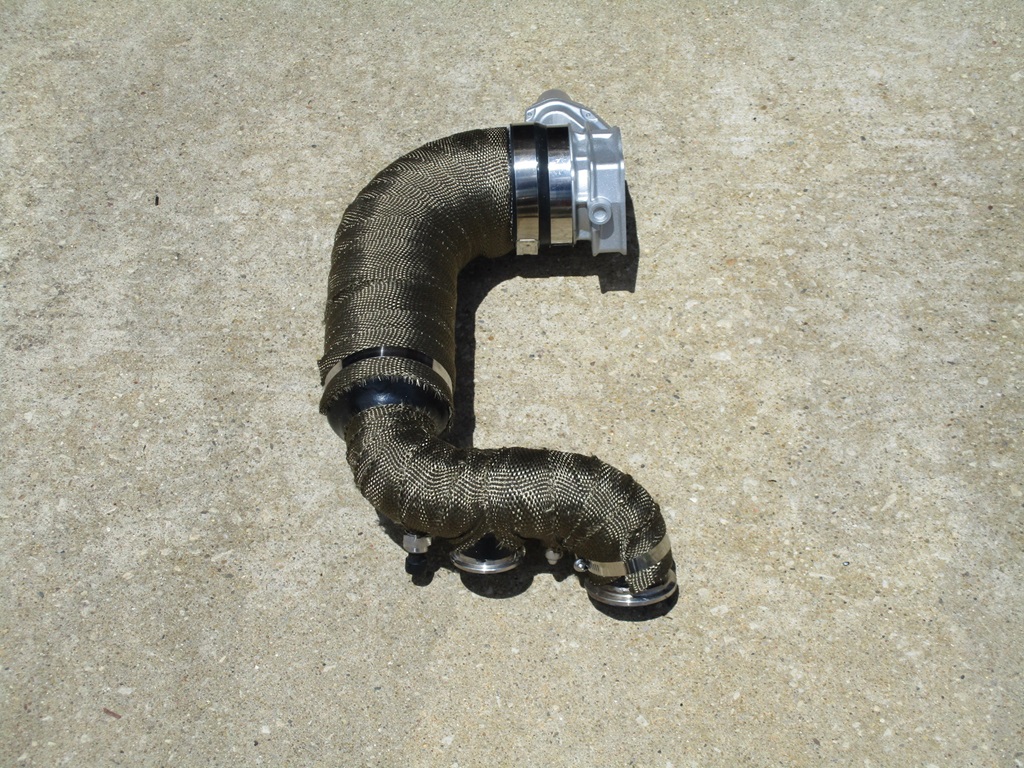
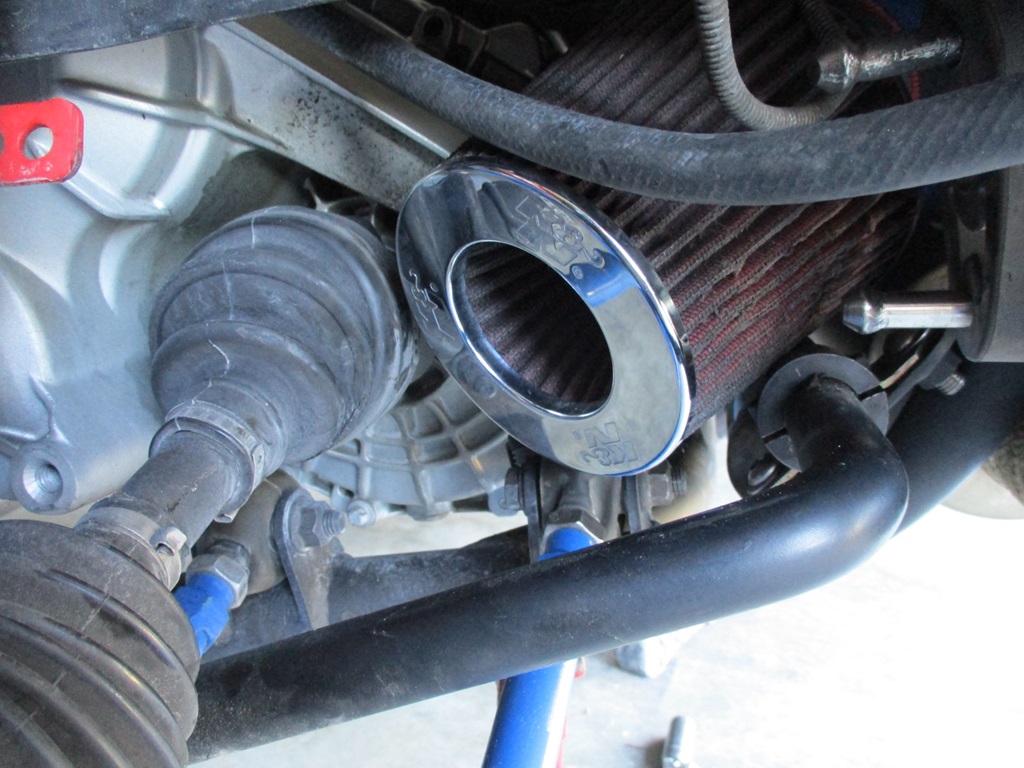
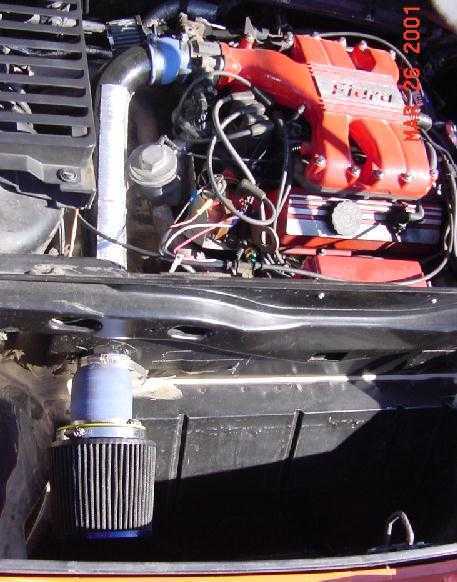
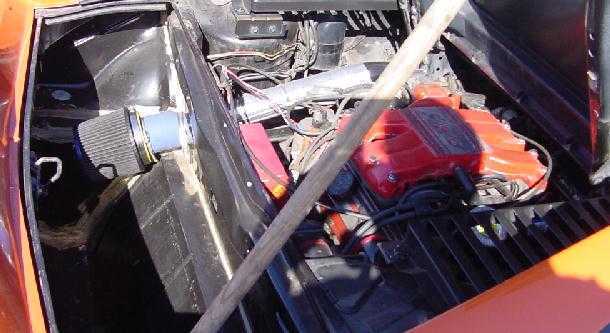
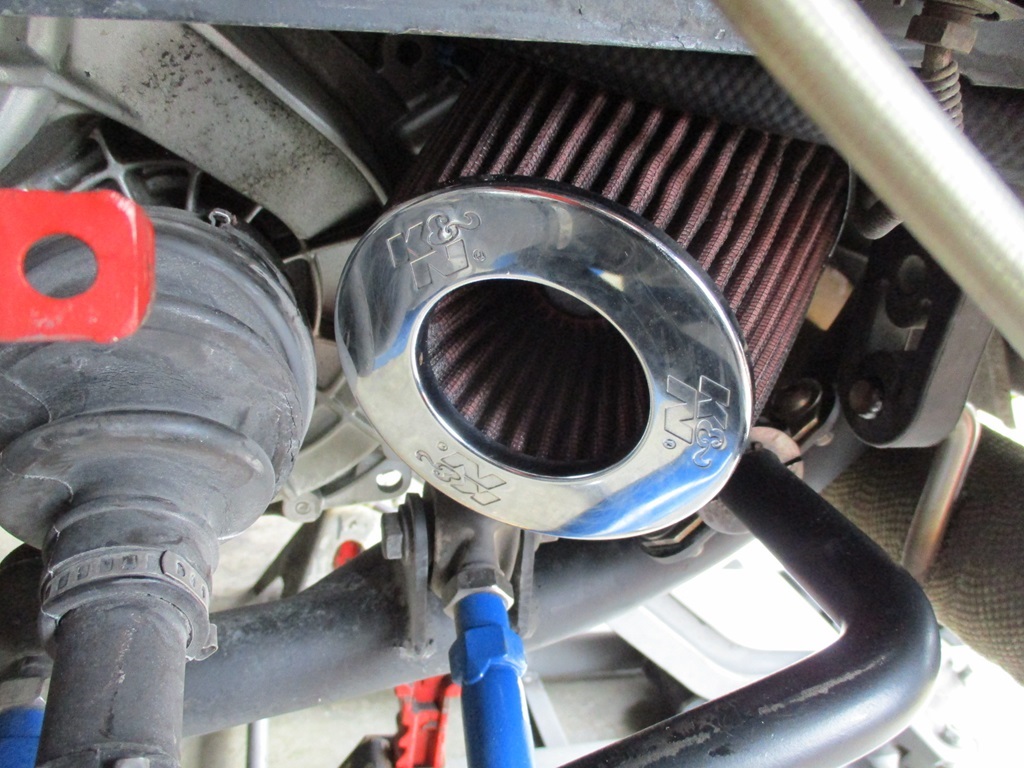
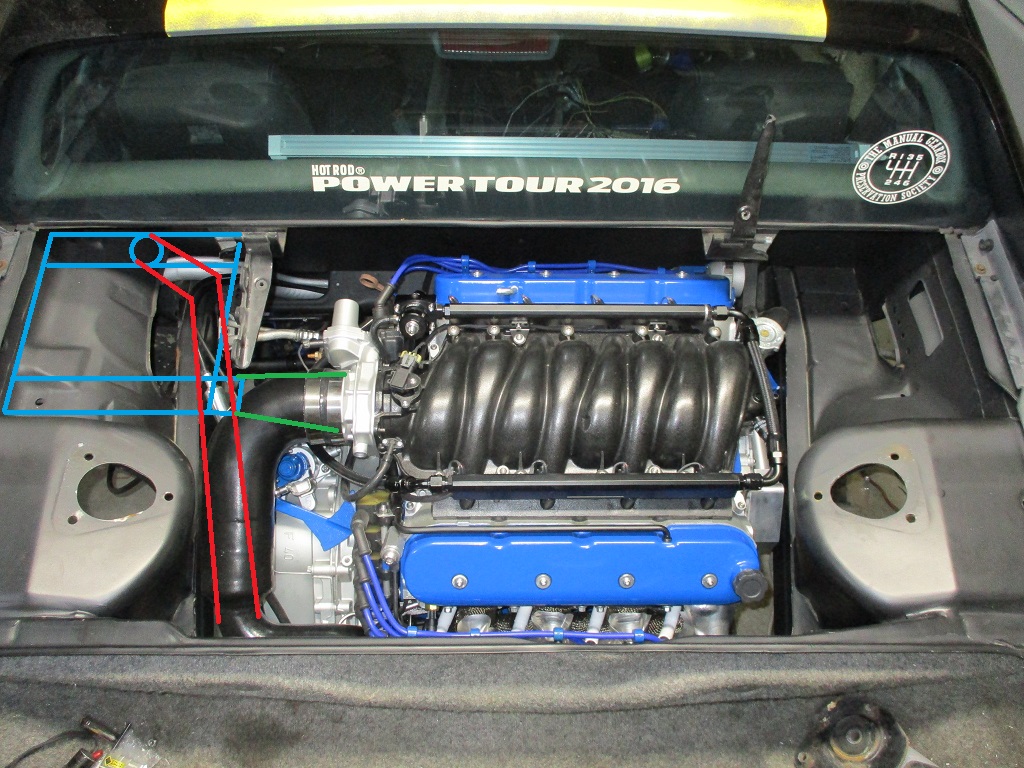
7. Not done yet, but I am also working to relocate my air filter about 6" closer to the rear wheel to get it further from the engine bay and help draw in the coolest air possible. The needed 45 degree 4" tube will be in on Monday.
So you are running speed density which means the mass airflow doesn't work where it's at correct? You are using it simply as an intake temp meter correct? I have my air filter in front of my left rear tire behind the plastic inner liner , works really well. On another note out of all those pics of Fieros yours is by far the best looking.
So you are running speed density which means the mass airflow doesn't work where it's at correct? You are using it simply as an intake temp meter correct? I have my air filter in front of my left rear tire behind the plastic inner liner , works really well. On another note out of all those pics of Fieros yours is by far the best looking.
I have driven the car in both formats 100% MAF and 100% VE, it is all part of the process. To tune Speed Density, you need to turn off the MAF. To tune MAF, you need to turn off Speed Density. I will switch back to running 100% MAF for a while to dial it in. Once both are tuned +/- 1%, then I can choose to run 100% Speed Density, 100% MAF, or Dynamic with a mixture of them both.
The only current issue with the MAF is that I will likely max it out based on the limits of the hard coded limits of the ECM without doing an airflow scale to the tune.
It used to be right off the compressor housing, now it is under the driver side frame rail and more into the wheel well. It barely fits between the frame rail, the transmission, the tripot, the sway bar, the lateral link, and the rear cradle vertical mount. I will likely loosen up the front cradle bolts, remove the rear cradle bolts, and rotate the cradle down so I can better install the clamps and maximize clearance in the area. I might try to add a shield to the top to help ensure the engine bay air has a hard time getting to the filter inlet.
Should be back driving the car this weekend and can run some logs to see if the IATs stay lower during extended idling and while running down the interstate.
Largely just been driving the car to work and back and having fun with it. I had to look back at a picture of the cluster from the 4 years it was off the road: 239,289. It is now at: 242,086 so the new swap has logged 2,797 miles with 1100 of them on the HRPT.
Speed Density tune is really close now, and I did 3 WOT runs in that configuration. I have switched back to 100% MAF and did some tuning on it. I will keep it MAF only for a couple of weeks for my daily commute and tuning runs. Once that is done, then back to closed loop dynamic.
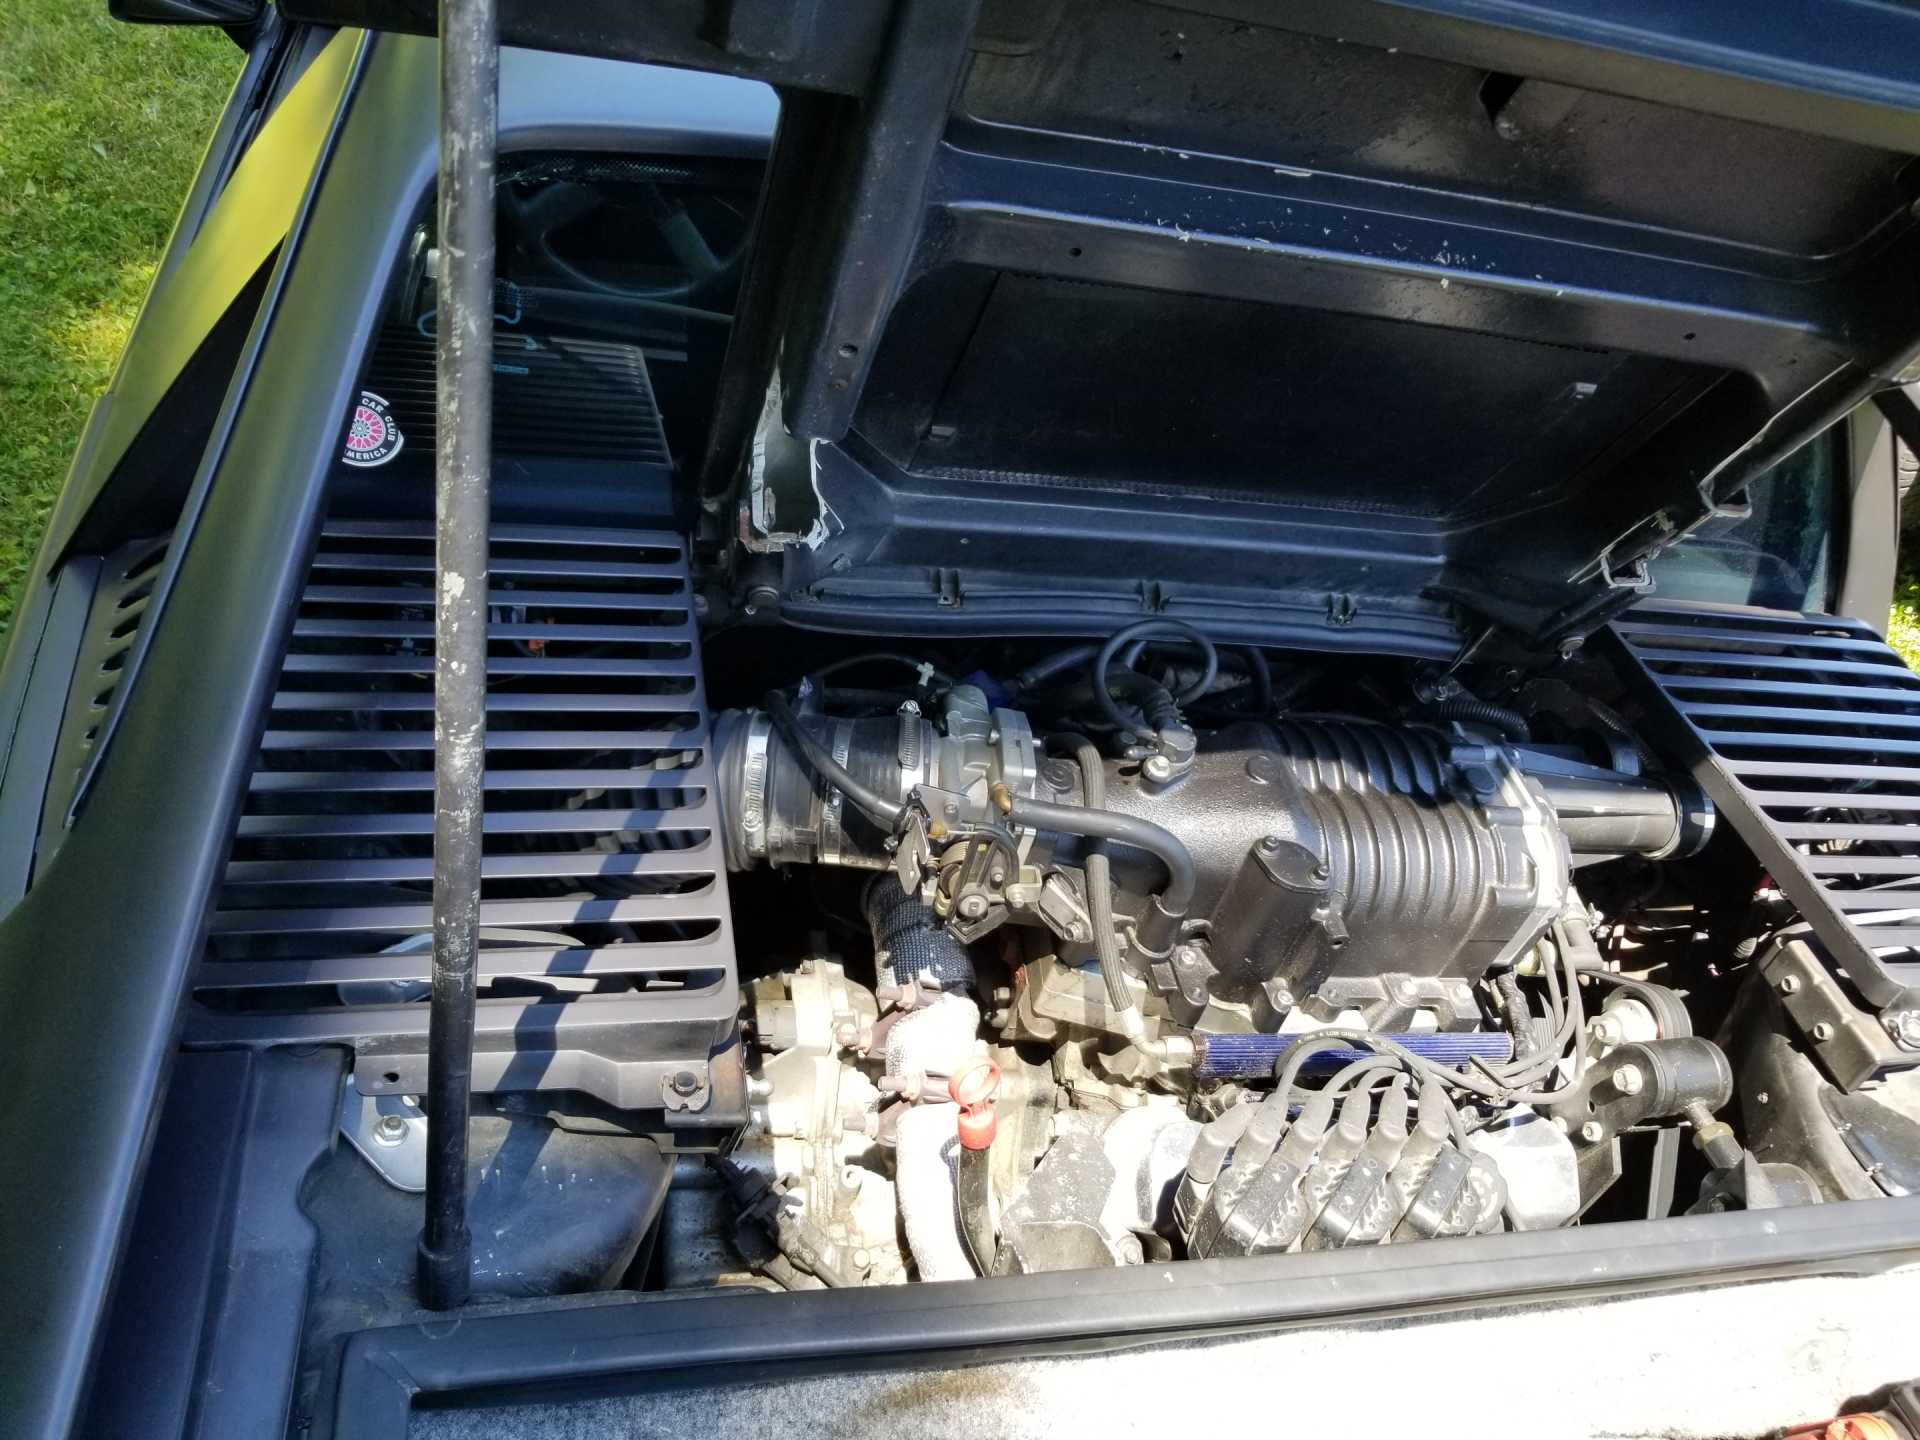
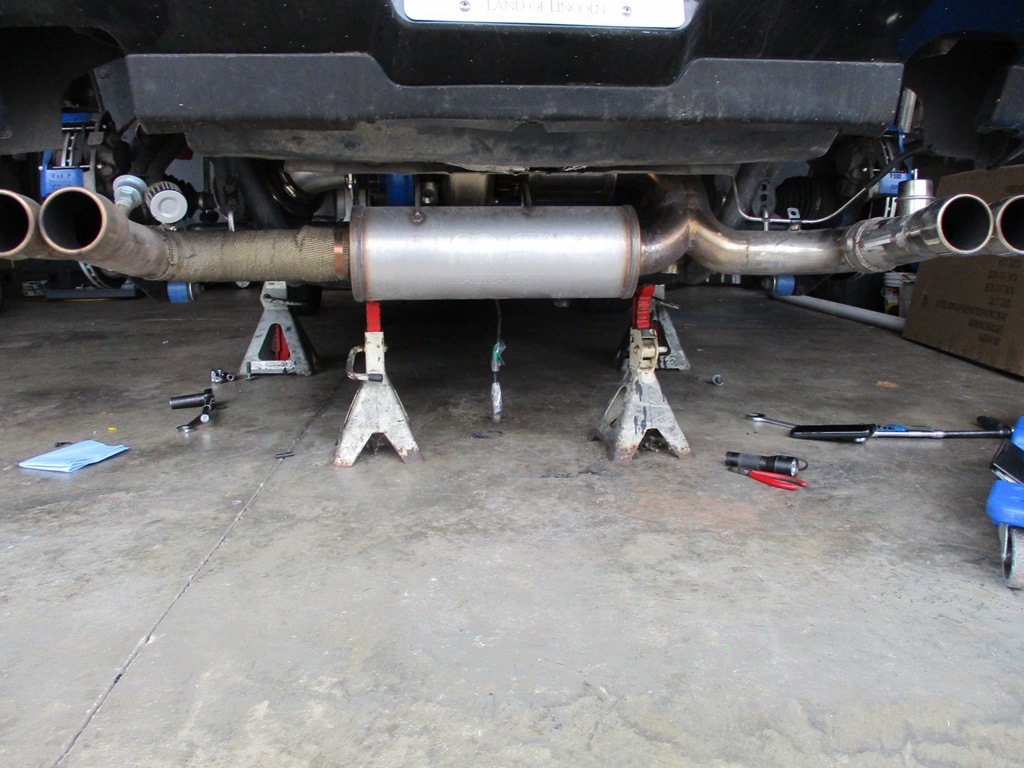
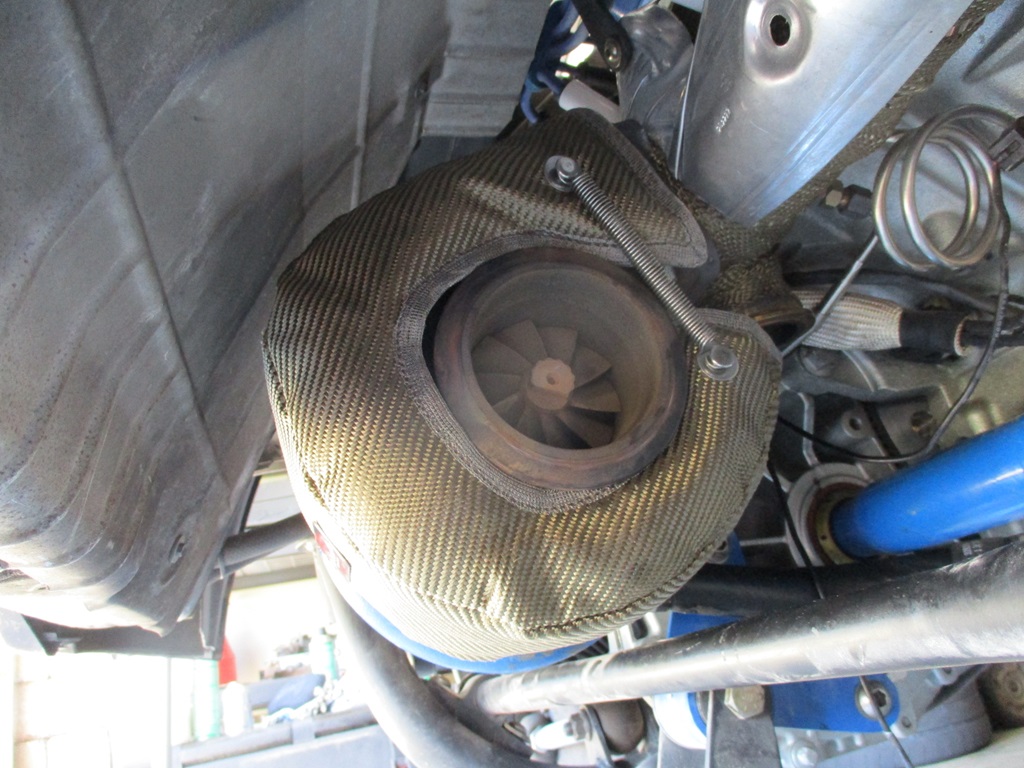
Still on a mission to reduce IAT temps. The next area of focus were the heat shields around the turbo turbine housing. So the car went on jacks stands, and the cradle was rocked back to gain the needed access.
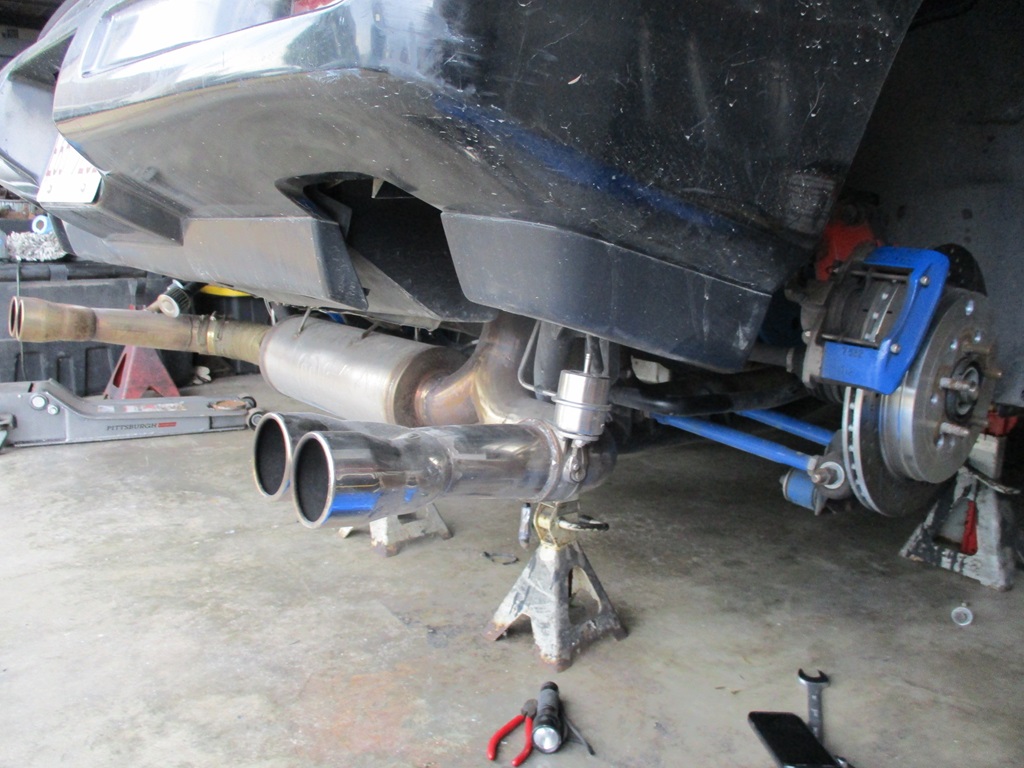
Muffler system out. It is pretty obvious that it has been hot. Some of my tuning runs the EGT reaches 1400 degrees, but quickly drops back down when I get out of it. You can also see where I had previously heat wrapped the tail pipe that is closest to the air filter. You can also see the passenger side tip is rarely used. The cutout opens under boost, so it hasn't seen as many sustained heat runs as the driver side has.
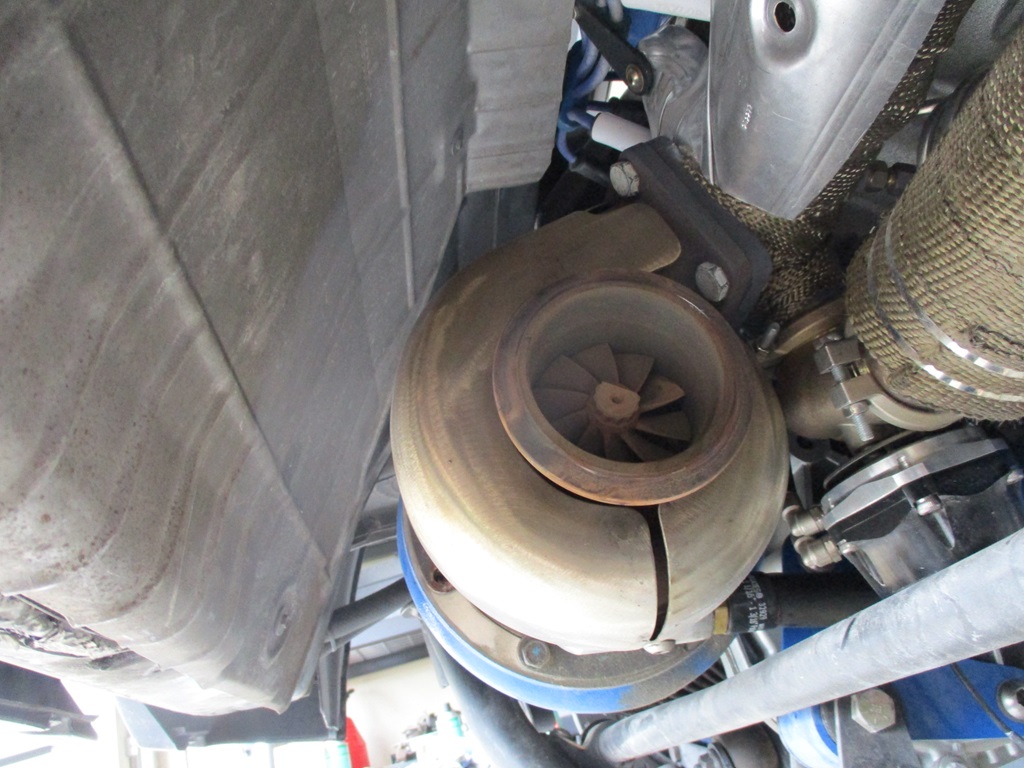
Turbo with the stainless steel heat shields:
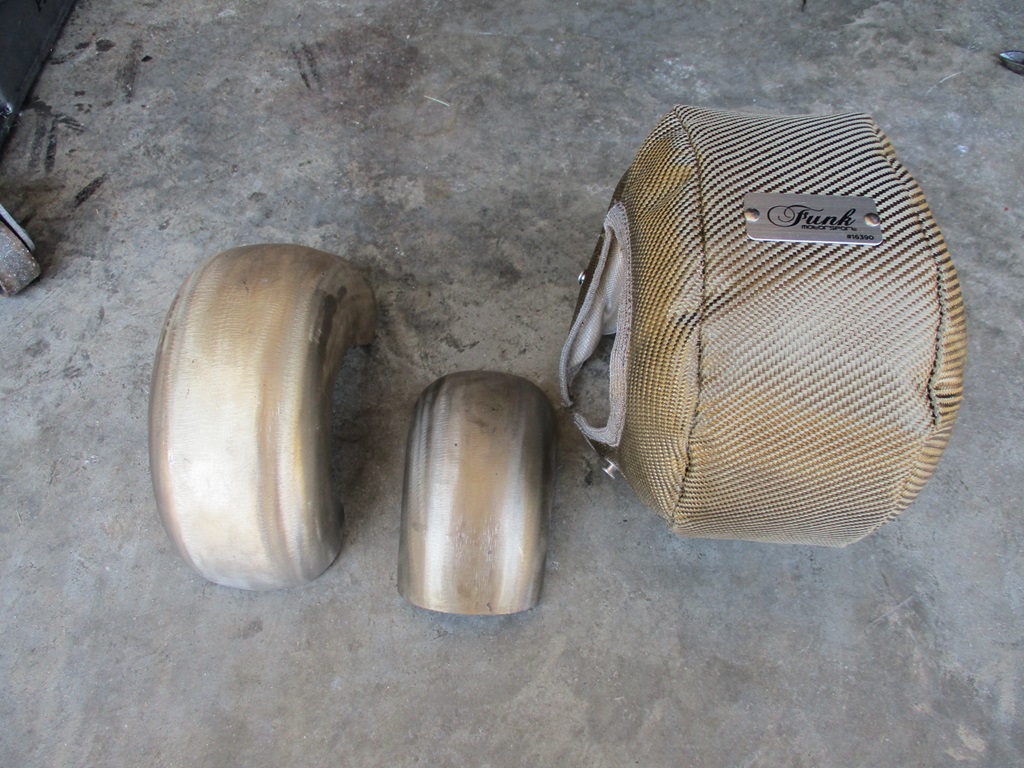
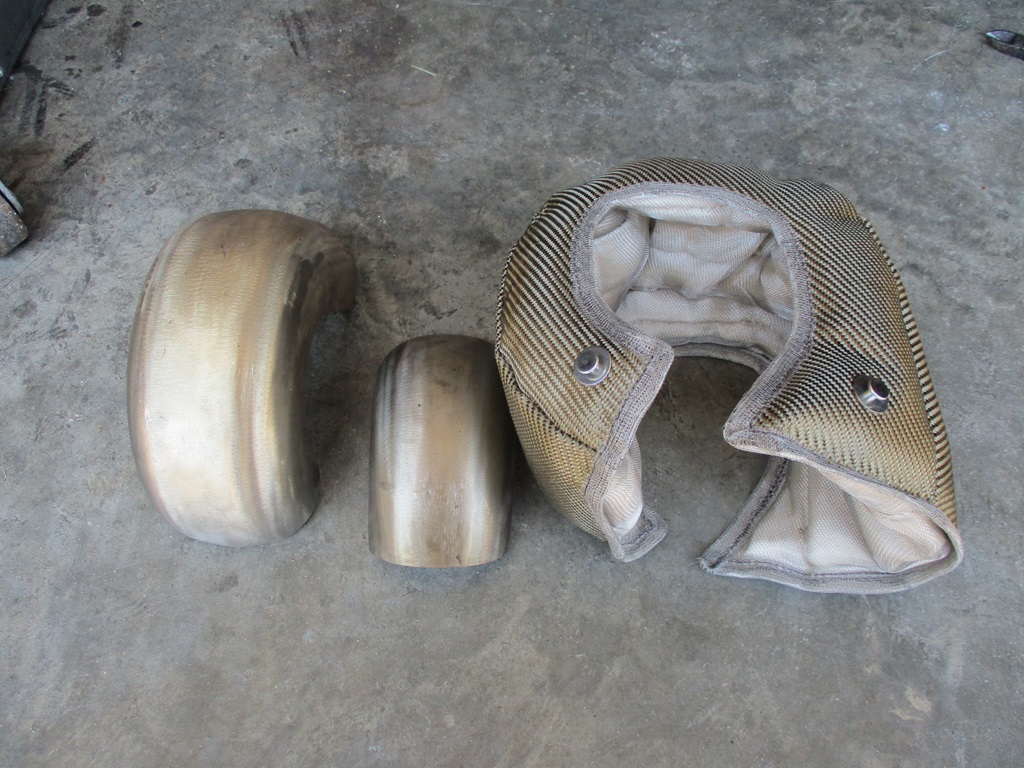
Heat shields removed and next to turbo blanket. The turbo blanket is from Funk Motorsports in the UK. It is about 3 times thicker than the cheap ebay/amazon turbo blankets (and more than 3 times more expensive). You can also see the heat shields had started to discolor, but not near as much as the exhaust pipe.
Turbo blanket installed:
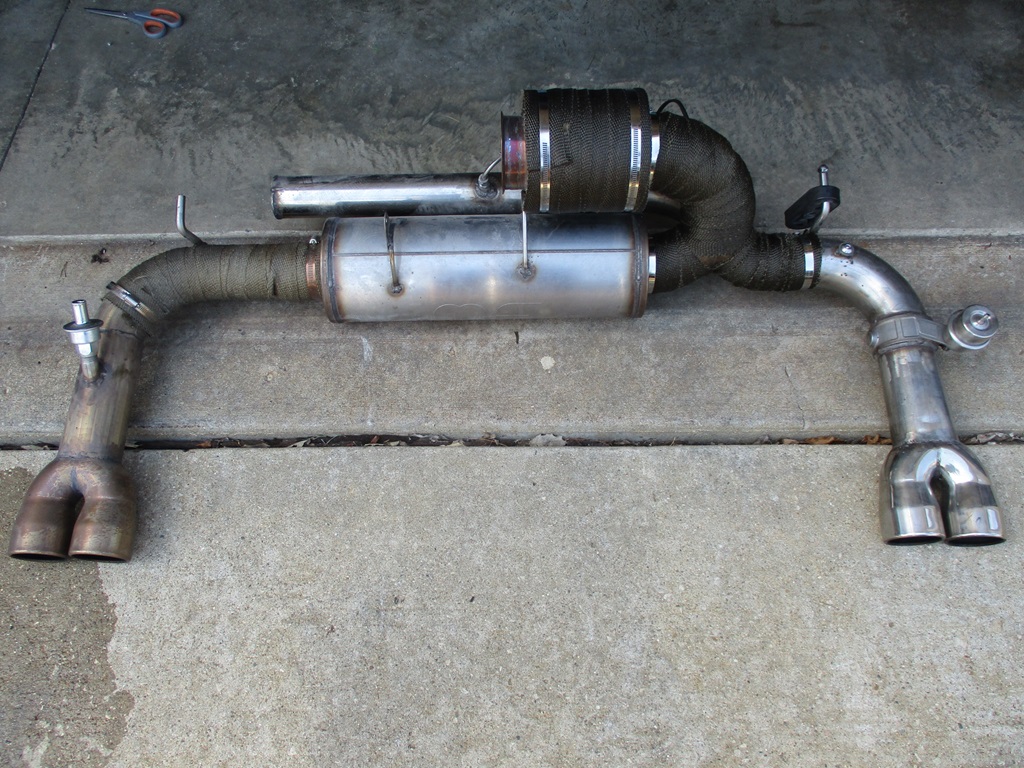
Also went ahead and wrapped the 3.5" muffler, the 3 1/2" down pipe to the 3" Y and to the 3" muffler. The body of the 3" muffler doesn't get that hot, so I left it natural. The new heat wrap is darker because it is still wet. I soaked it in water before wrapping.
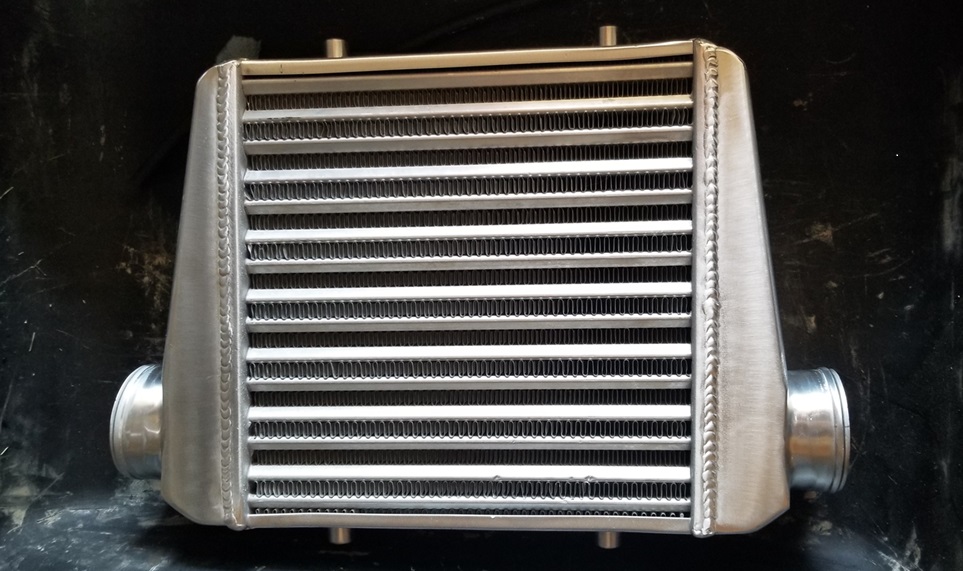
Also picked up a cheap intercooler. The hose nipples need to be cut off and repositioned. Once they are cut off, it will be 15x12x4 and should fit under the driver side decklid vent. Once it is there, I will add a fan plus seal the intercooler from the engine bay. If this works out, I will likely drop the $$$ on a real intercooler core and have it fabricated.
This is the general concept that was discussed several pages back.
Got the car back together with the turbo blanket on Friday and spent the weekend just driving and doing some tuning tweaks.
Messed with the EOIT and it helped off idle torque and should improve fuel economy. I spent a couple of hours rowing through the gears for no reason other than it being fun. I really like the sound of the turbo spooling but not building boost.
I wanted to verify my manual boost pressure gauge matched the boost in the ecm. On prior tuning runs the ECM logged about 9 psi, but I never looked at the gauge to know for sure. I decided to test it while watching the gauge. I was in 4th gear around 2600 rpm and I rolled into the throttle to build boost. Started building boost at 50% throttle and reached about 15 psi on the manual gauge in about 2.25 seconds at 96% throttle (it does go 100% throttle, but wasn't really planning to get on it, just make some boost).
As I saw the boost gauge pass 9 psi, I remembered that I didn't reconnect the boost reference line (oops!), so I got out of it. Now I know the wastegate spring will hold about 15 psi boost at a minimum. The log showed 190 kPa = 27.55 psi, or 12.85 psi, which is close enough. Luckily I have been keeping the boost timing low (single digits) and fueling around 10.8:1, so no harm was done.
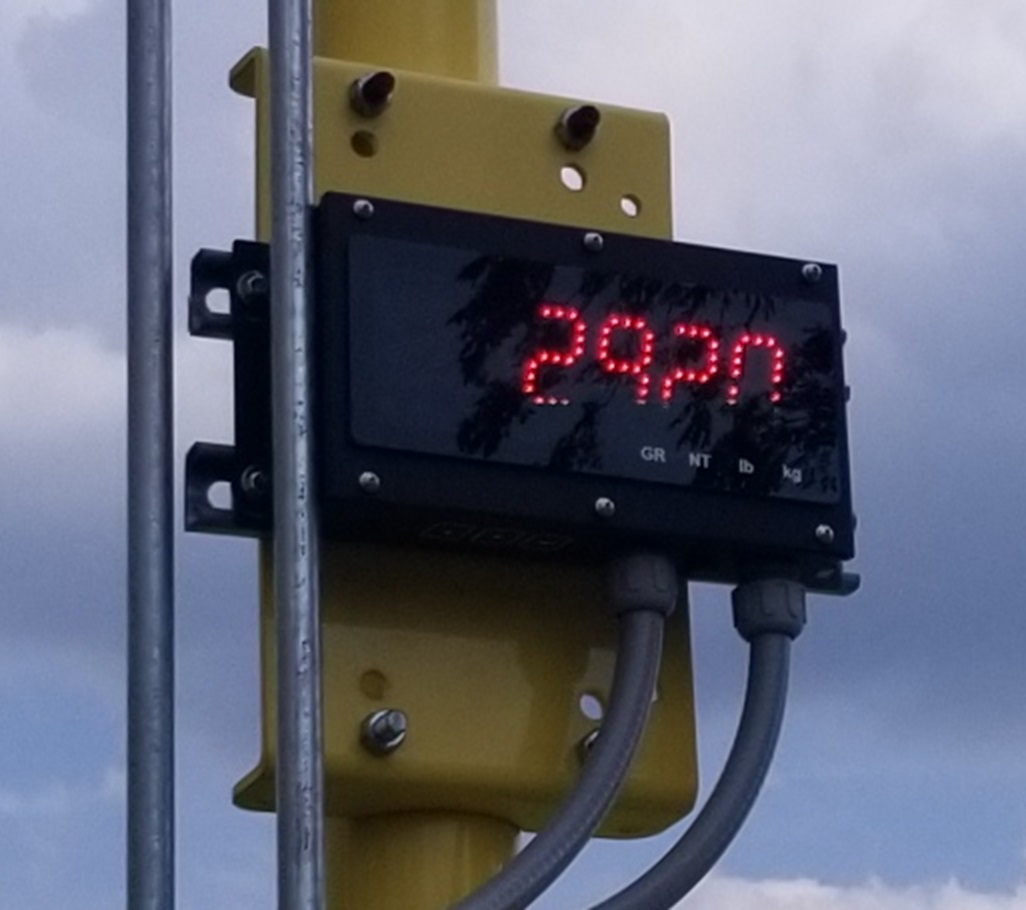
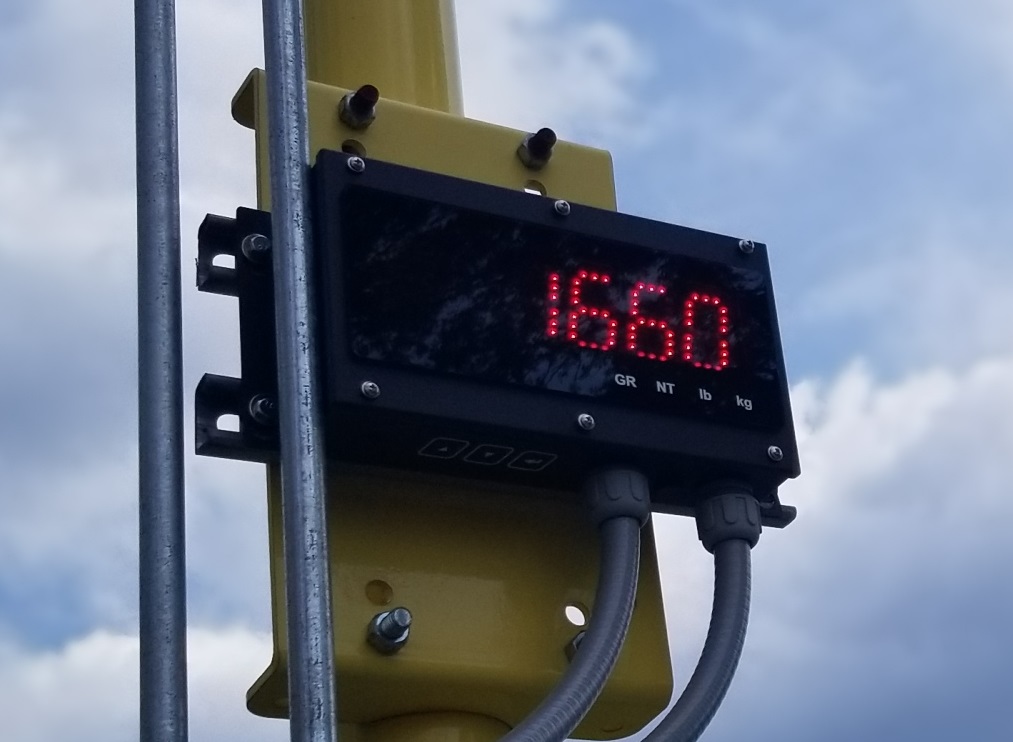
While driving just to enjoy, I stopped by one of the local grain elevators. Without me, the car tipped the scales at 2920 lbs, 1660 lbs on the rear, and 1260 lbs on the front. 43.2% front / 56.8% rear.
Let's go back in time and compare the specs of my previous swaps.
code:
SBC/Getrag:        2960 lbs, 283 rwhp, and 21 mpg.
LS4/F40:           2807 lbs, 382 rwhp, and 29 mpg.
LS4/F40/Turbo:     2920 lbs. ??? rwhp, and 27 mpg so far.
This includes a jack, spare front wheel bearing, and caliper up front (haven't taken them out from the HRPT). It also includes the heavier 17/18 wheel combo I have been running since 2016, the rear wing (2017), the twin disc clutch (2023), the 20 lbs for amp/sub/speaker setup (2024).
This likely means that I have met my goal of the turbo swap adding less than 100 lbs, but I want to do a few more things to reduce the weight. I really would love to have this car in the 28XX lb range with full interior and A/C.
[This message has been edited by fieroguru (edited 07-21-2024).]
The Fiero continued in daily driver status last week and will continue to do so this coming week.
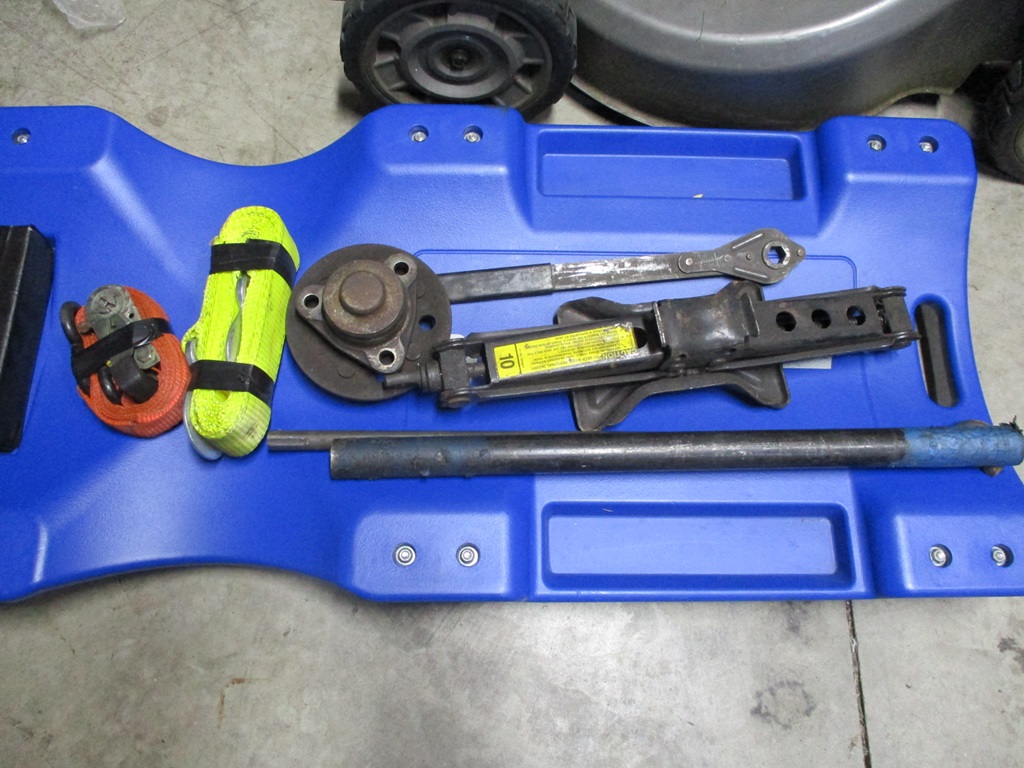
I previously mentioned some junk in the spare tire area. This is everything that was in the front: Overall they weigh 22.5 lbs.
I want to do a couple more things before I put it on the scales again to help get it below 2900 lbs.
This weekend within 12 hours both of our Nissans had different issues in the same town about 10 miles away. Did enough troubleshooting to know what the two issues are, but I didn't want to dedicate the time to mess with them, so both were towed to the dealer... Same tow truck driver for both tows. For the 2nd one I was driving the Fiero, which he was really impressed with. He asked to follow me to the dealer so he could listen to the exhaust.
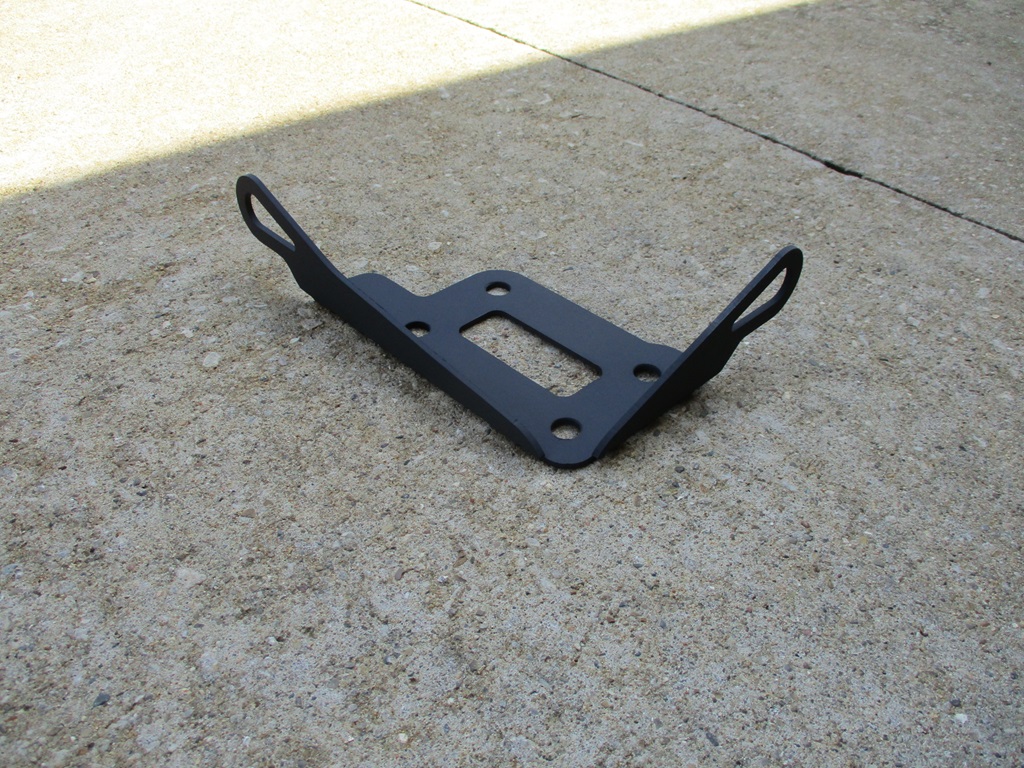
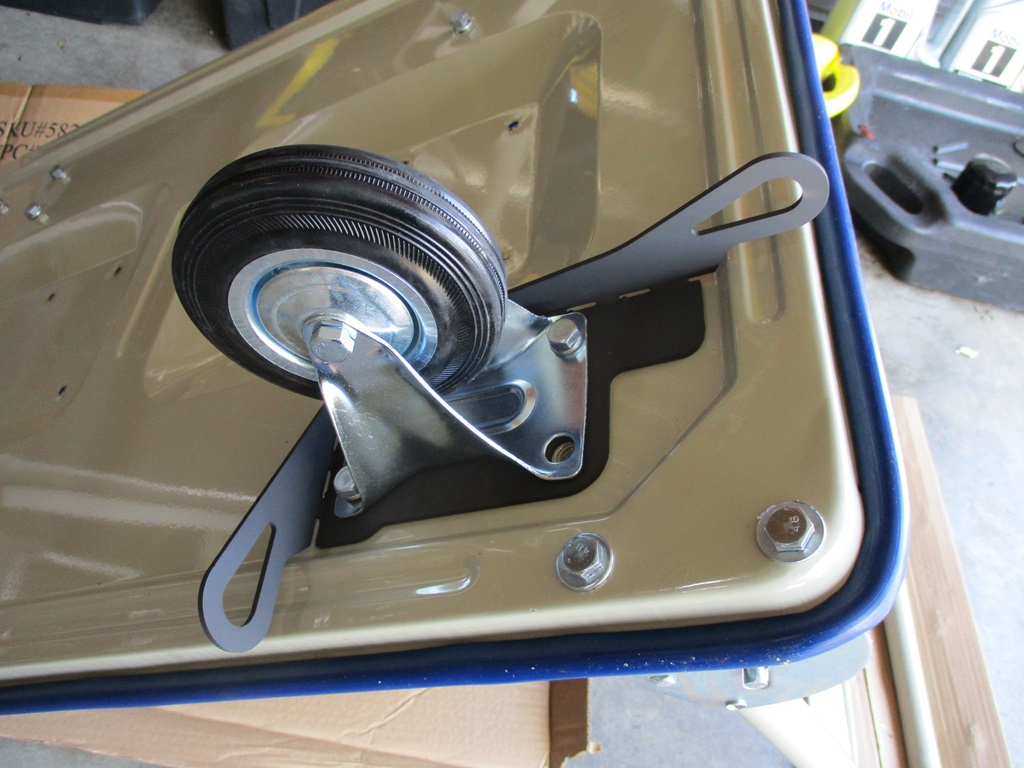
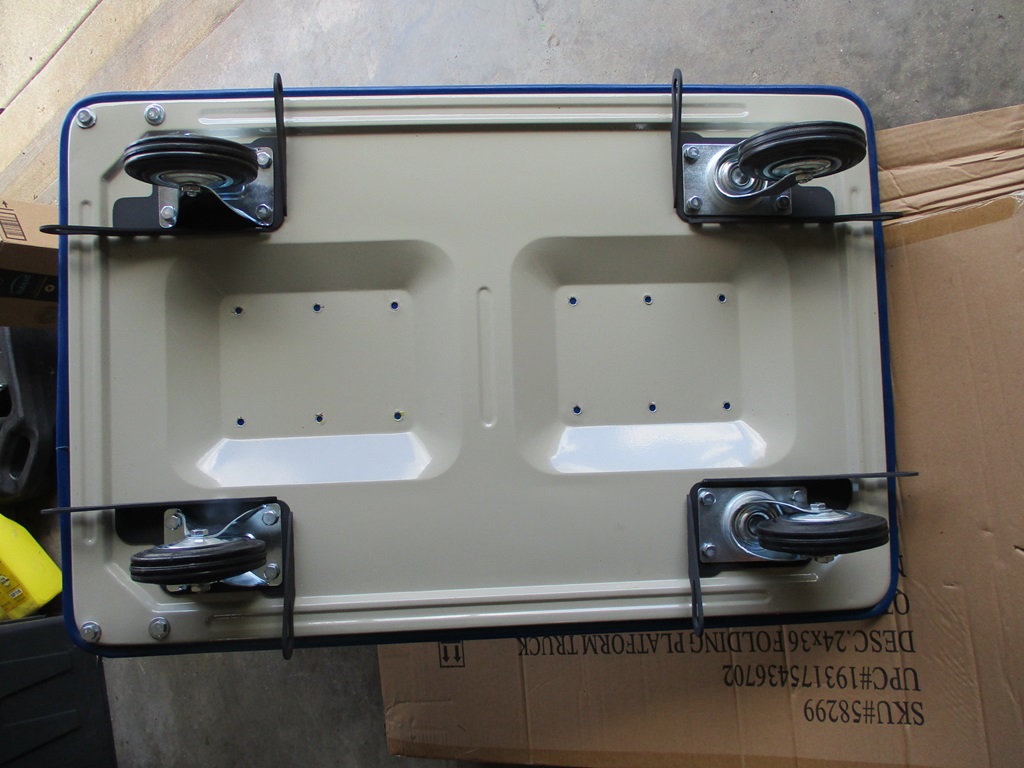
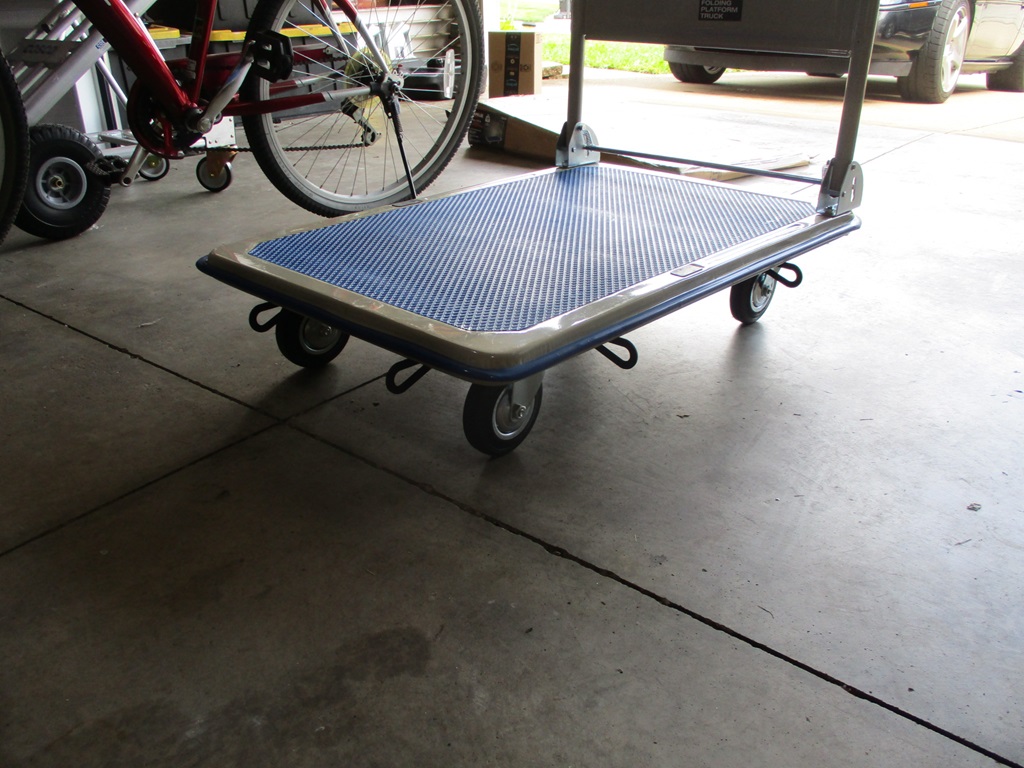
Carson, my oldest, is heading off to college in a few weeks. He is on the 7th floor of the dorm, so we have purchased a dolly as well as a 24x36 rolling cart to help with the move in. The 24x36 cart has a flat bottom and didn't have any good place for straps to attach stuff to it. I know Sara/Carson will likely stack this thing with 6+ feet of stuff to save trips, so it needed tie down locations. I didn't want them to hang out past the side or be mounted on the top and limit the width of stuff that could be put on it. So using the caster mounting locations, designed a plate with 2 tie off points per caster.
Another week of daily driving the Fiero. Best tank for mixed driving on my commute (17 miles each way) was right at 20 mpg. Also did another 140 mile trip for mileage and it was 27.0 mpg as well.
One of the headlights was lazy and only coming up about 3/4 of the way. Since leave the house at 6 AM and the days are getting shorter, and it was raining most of the this week, I needed to fix the lazy eye. Already had a new switch, and it would raise up 100% with the hood up. Went ahead and picked up a set of new motors and installed them. Now both headlights work as they should! https://www.amazon.com/gp/p...o00_s00?ie=UTF8&th=1
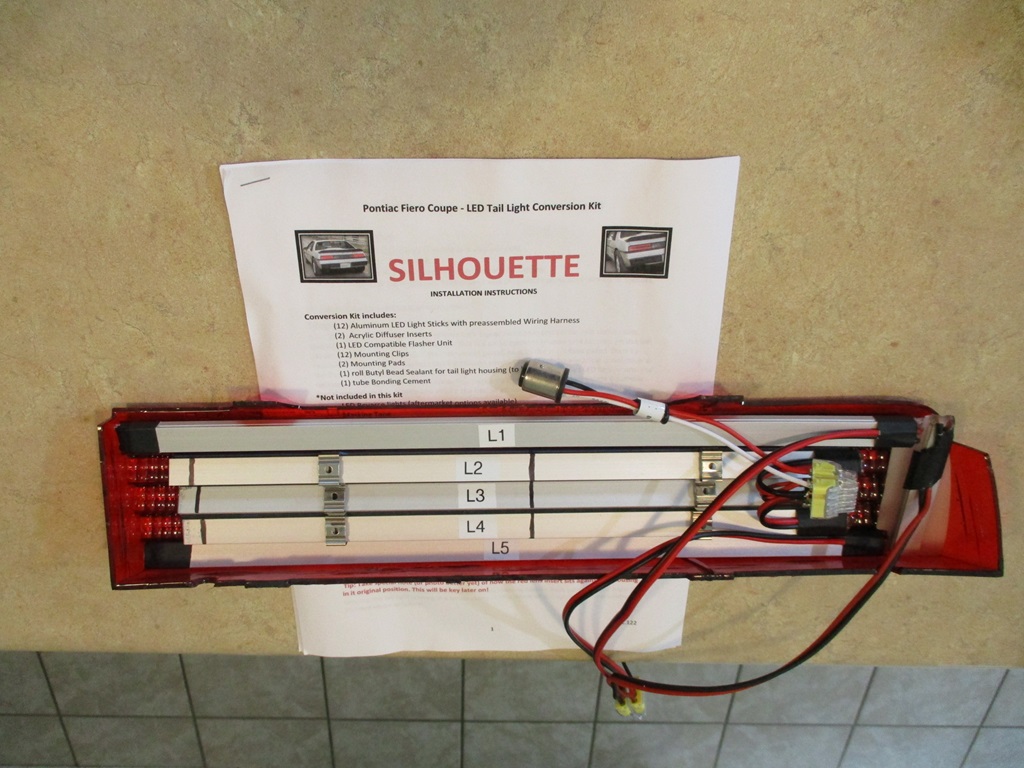
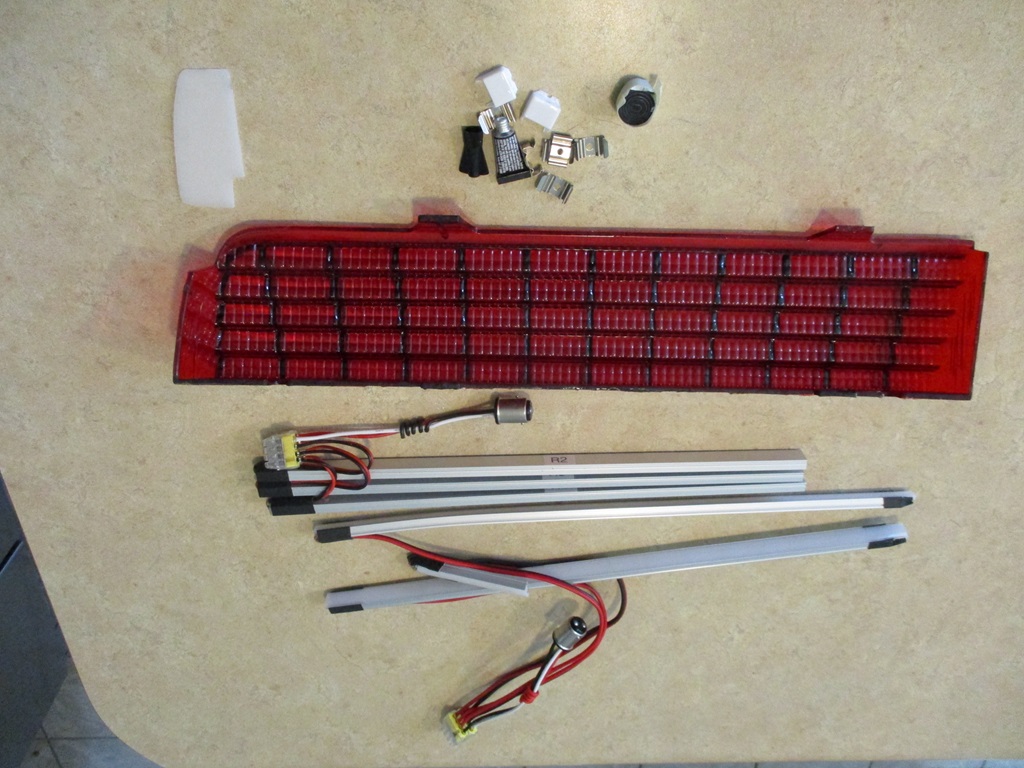
There are lots of upgrade parts in the basement for this car, so decided to bring up the rear taillight LED kit from NSL-Performance that was purchased in Feb 2022. This kit has since been discontinued, but wanted to see how they look. I read the instructions and then did a mock up just to see how things go together. Everything held in place with double sides tape on a single 1/4" surface, which I am not fond of. I will likely use it to get everything placed and positioned. Then measure and cut a couple of metal step rails I can silicone or hot glue in place to lock all the light bars together on both ends and to the red housing. Before I get to that point, I want to pull out some taillight connectors and rig up power so I can check the light pattern while it is being assembled. Here is one side mocked up and the parts for the other side.
I put the NSL kit on a little over a year ago. If memory serves, the plastic parts are held in with some type of glue which was used sparingly. I wasn't too concerns with things moving around because after it was all put together, there wasn't much room for the lights to shift around even if they were loose. My lights still look great. I got the set that continues the surround pattern across the center as well. For whatever reason, one of the strips I had was DOA so good idea to test them ahead of times like you said. The NSL guy sent me a new strip freeof charge, and it worked fine. I like the way they look, but I will likely replace them with a set of the programmable led array that BraveTECH is selling on my next round of upgrades. Which will be when I put in my new Amida dash kit - it's here in storage now - can't want to put that in!
Anyway - I like the NSL lights, and they have kept working for me no problem.
Anyway - I like the NSL lights, and they have kept working for me no problem.
Bob, thanks for the feedback on the NSL lights. I am still looking for a decent set of notchie tail lights to modify so I can get them completed without needing to modify the ones on my car.
Another couple of weeks of daily driving the Fiero. Up to 4,100 miles on the swap now.
This weekend I went to my brother's house to work on my nephews S10 mud truck. I should have taken some pictures.... It is a mid 90s S10 with a 4.8, 5 speed, gear driven transfer case, 3/4" axles with some large tires. It was running rough and I went down to help figure out its issues and do some preliminary tuning. We were able to track down a bad connection to the MAP and the fueling (MAP and MAF) was off between 22 and 15% in the idle and part throttle ranges. Got the truck running much better, but he is going to invest in HP tuners, a wide band, and some street tires do we can do some more part throttle and WOT tuning.
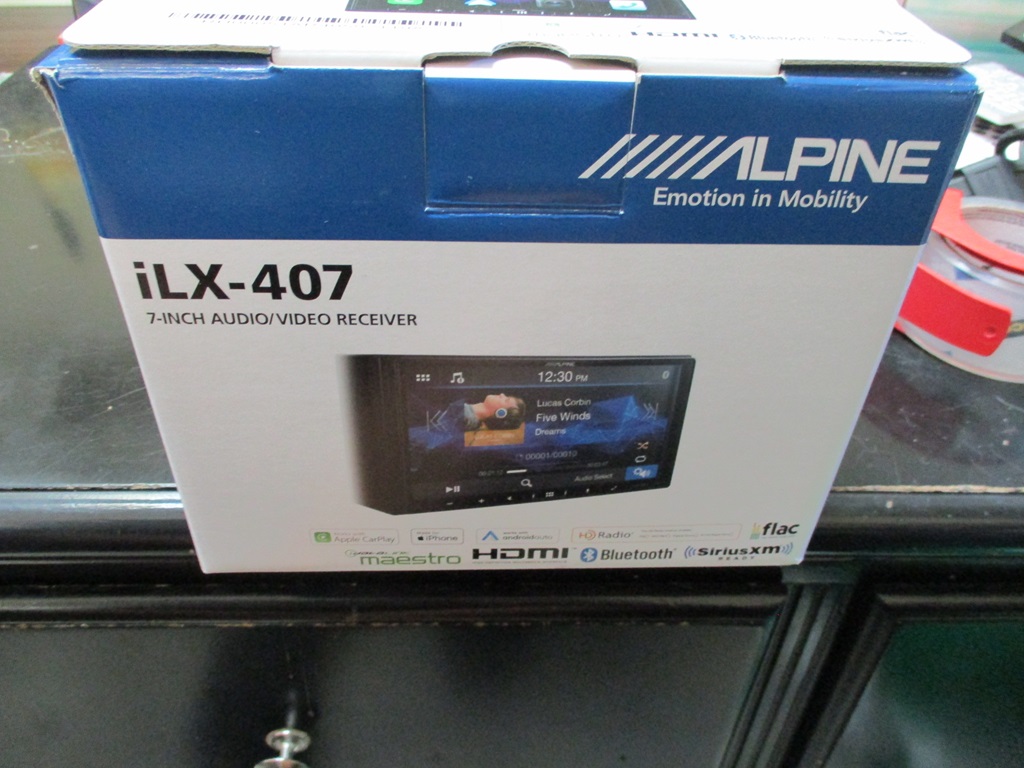
Picked up a new head unit for the Fiero, but haven't started the install.
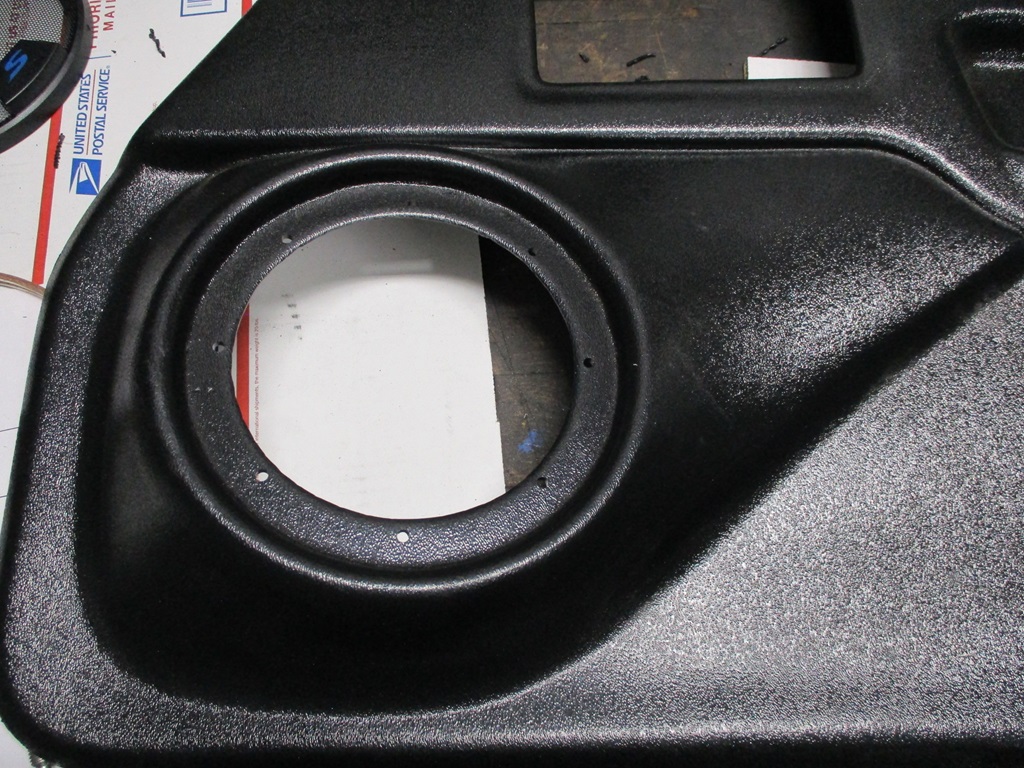
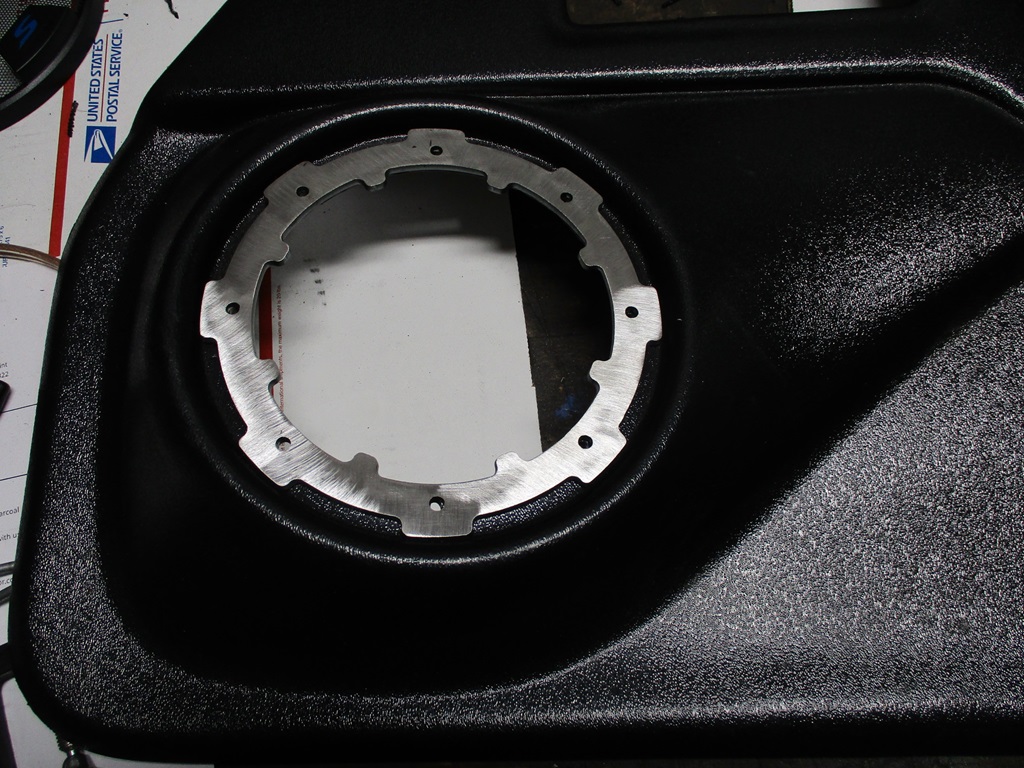
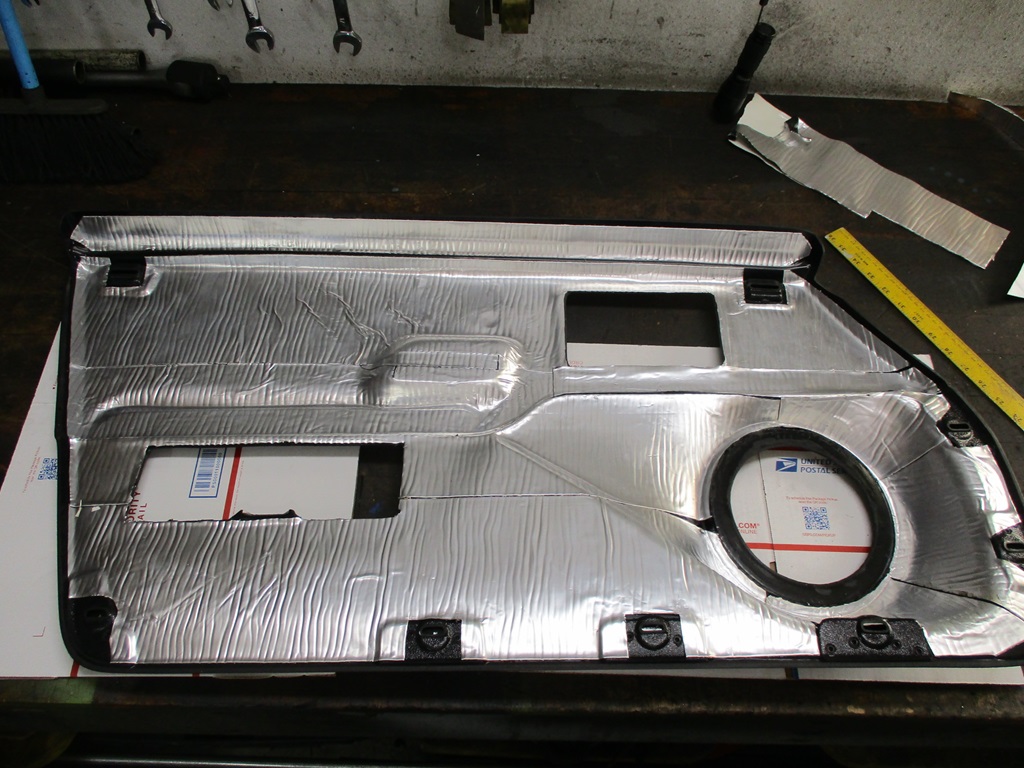
Also started working on the Fiero Store ABS door panels. Overall they should work, but the speaker openings are about 1/2" oversized for the 6.5" speakers. Here you can see the speaker shifted all the way to one side:
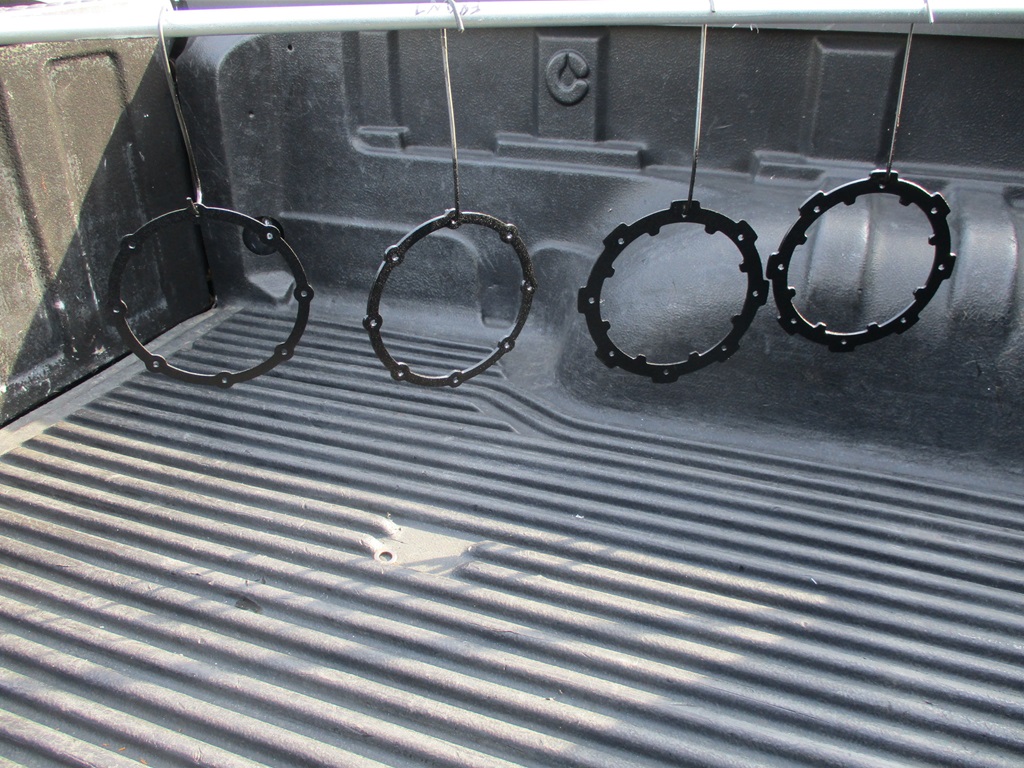
So to make sure the speakers are centered as well as reinforcing the plastic mounting flange, I make a centering ring for the front and a backup ring for the rear. Use the centering ring to locate and drill all 8 mounting holes. Here are the speaker holes in the flange. Notice they are closer to the edge than ideal:
Top centering ring:
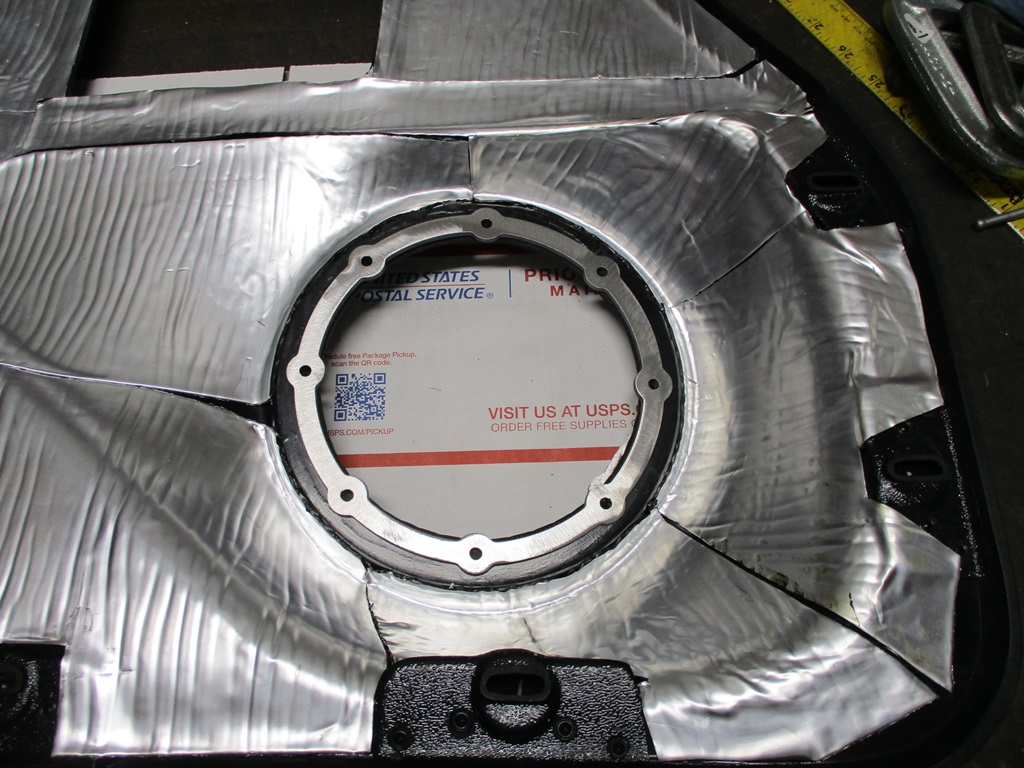
Rear centering ring:
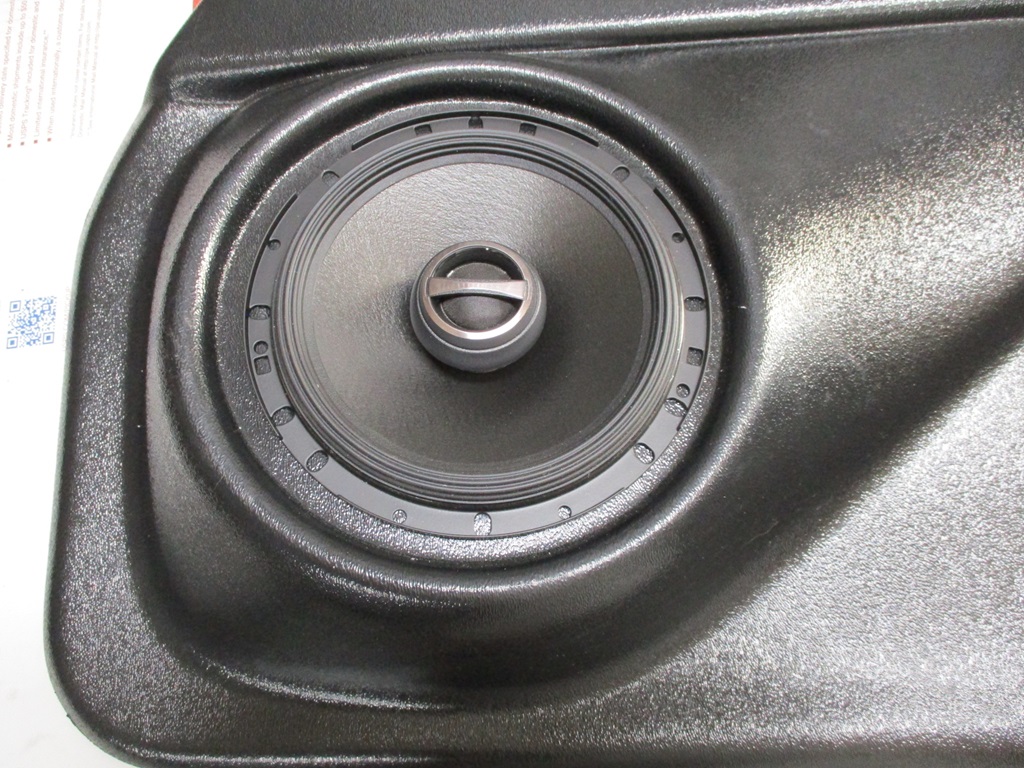
Here is the speaker set in place:
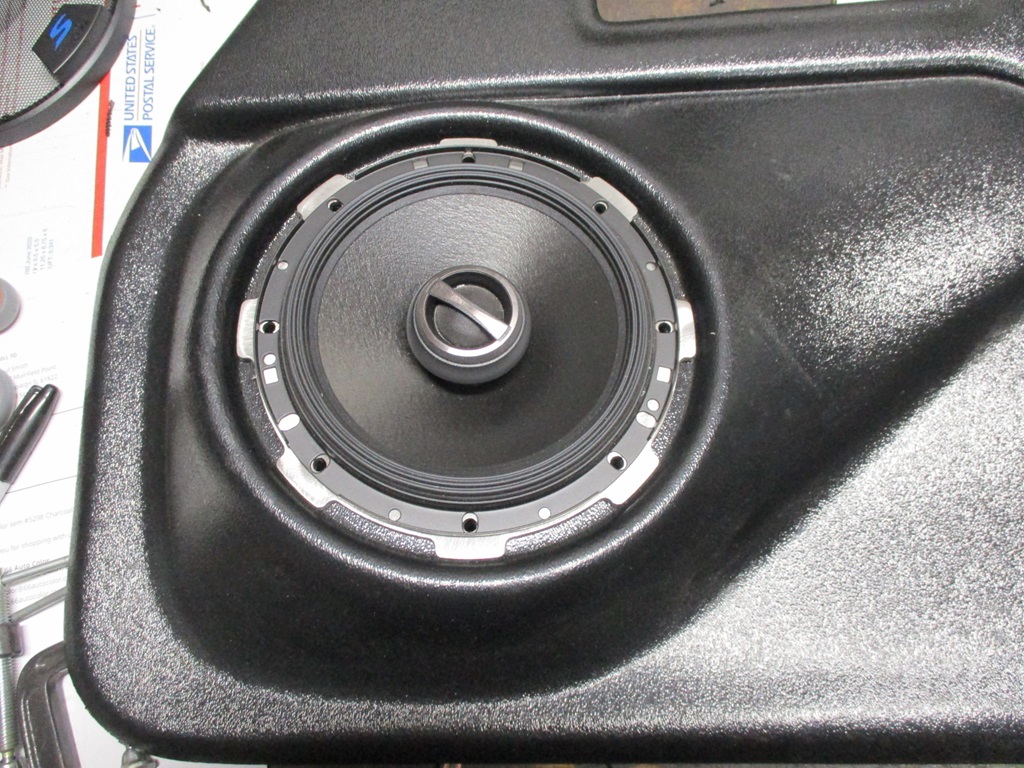
Here is the speaker and grill installed for mockup:
The backside also has sound deadening material:
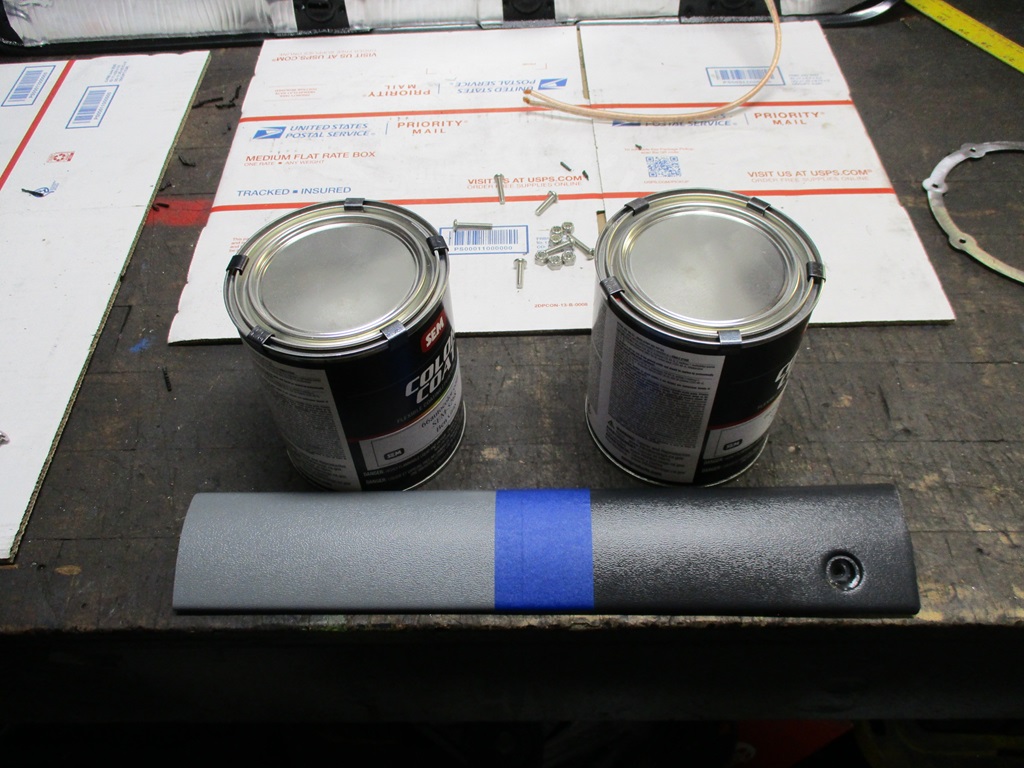
My custom SEM paint for the interior panels has also arrived. I sent them the sample in front of the cans and they found the closest match and tinted them to match. In the coming weeks I will be prepping the door panels, A and B pillars and Fiero Store ABS headliner for painting.
[This message has been edited by fieroguru (edited 08-18-2024).]
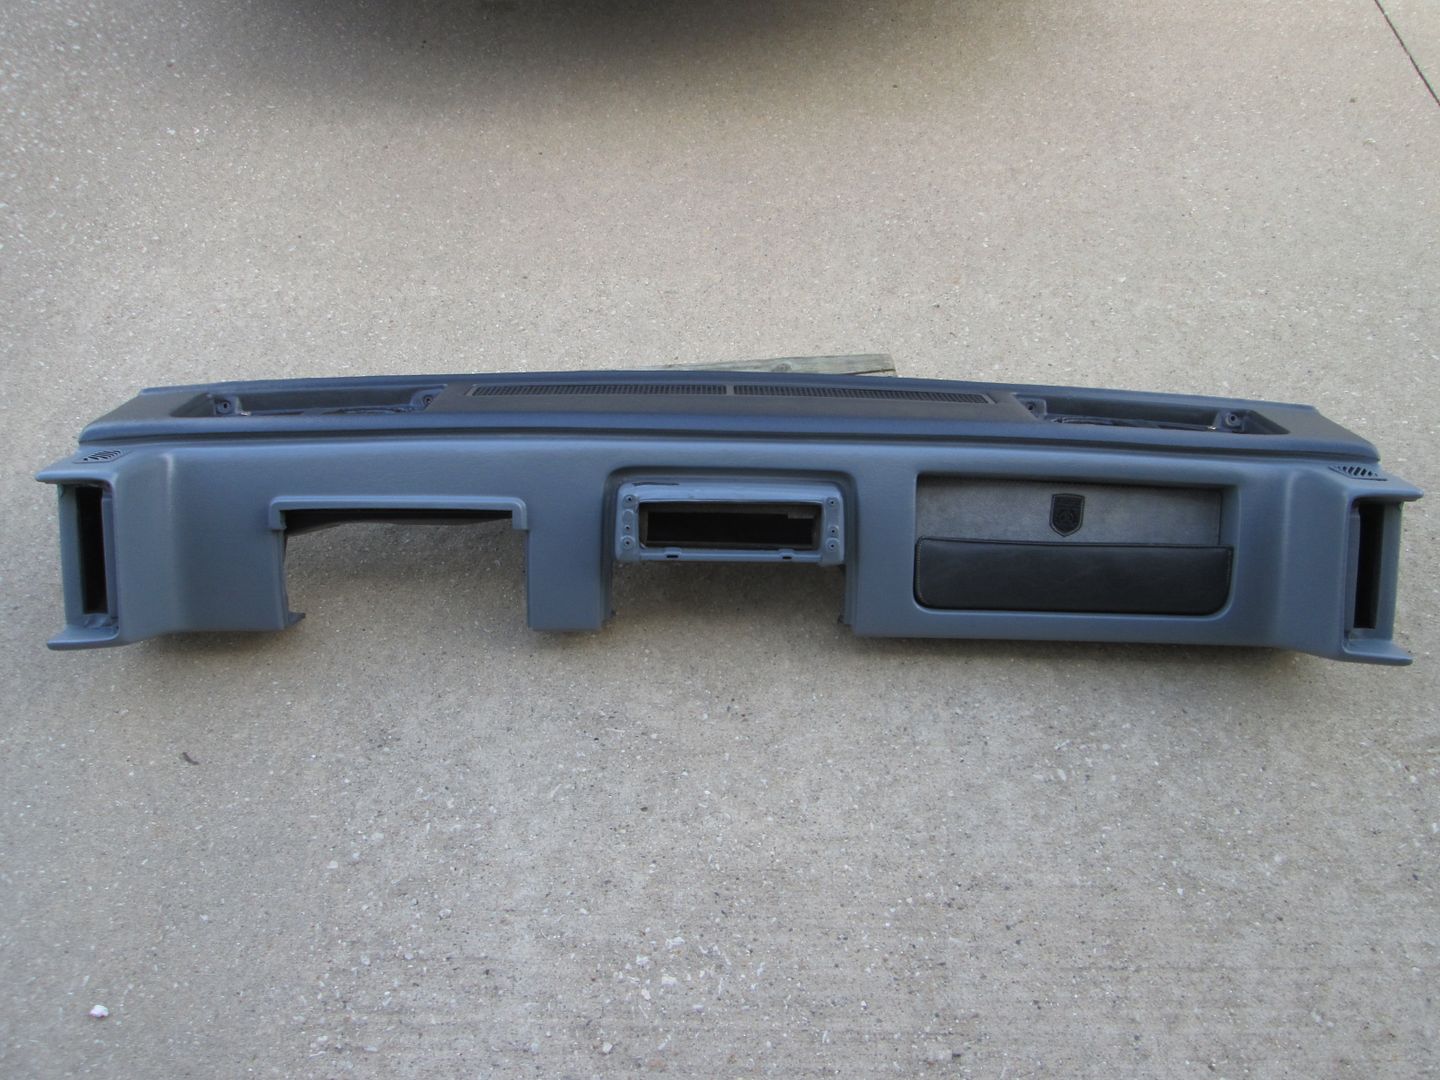
Back in 2006, I refinished the dash, cluster surround HVAC/Radio trim, shifter surround, center console, and the top of the door panels. I also installed new aftermarket sun visors.
quote
Originally posted by fieroguru: Painted the top side of the dash this evening and I think it came out pretty decent!
Then I painted several other parts... this car started out as a $500 purchase and will never be a show car, but I would like it to be less of a disaster from and interior (and eventual exterior) perspective.
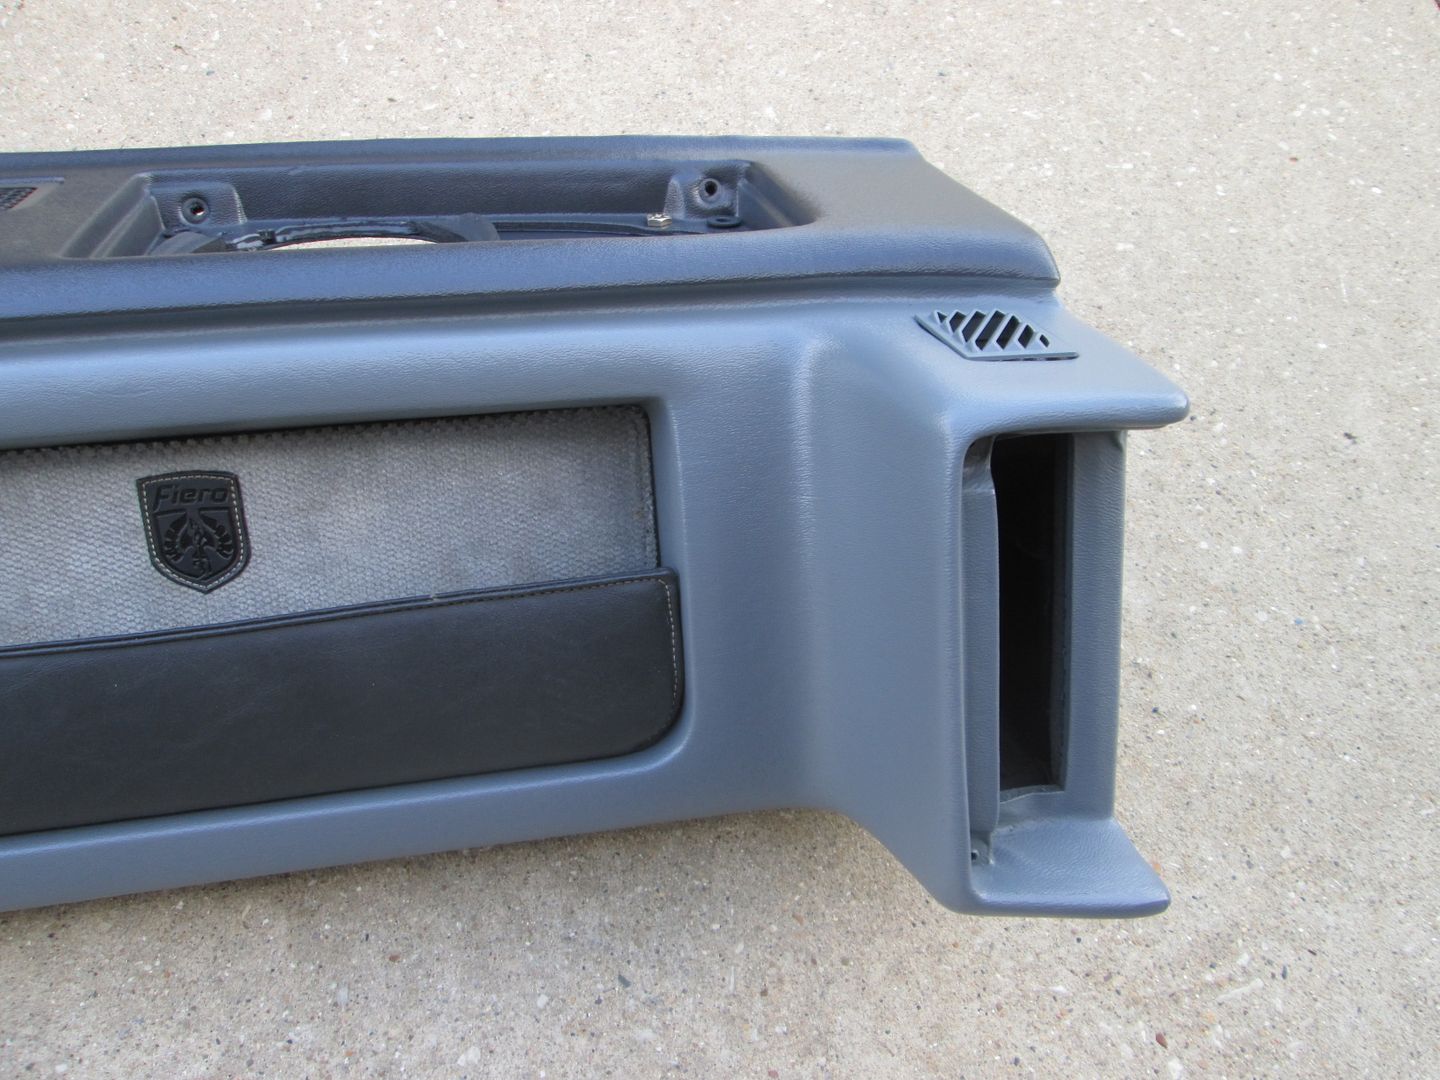
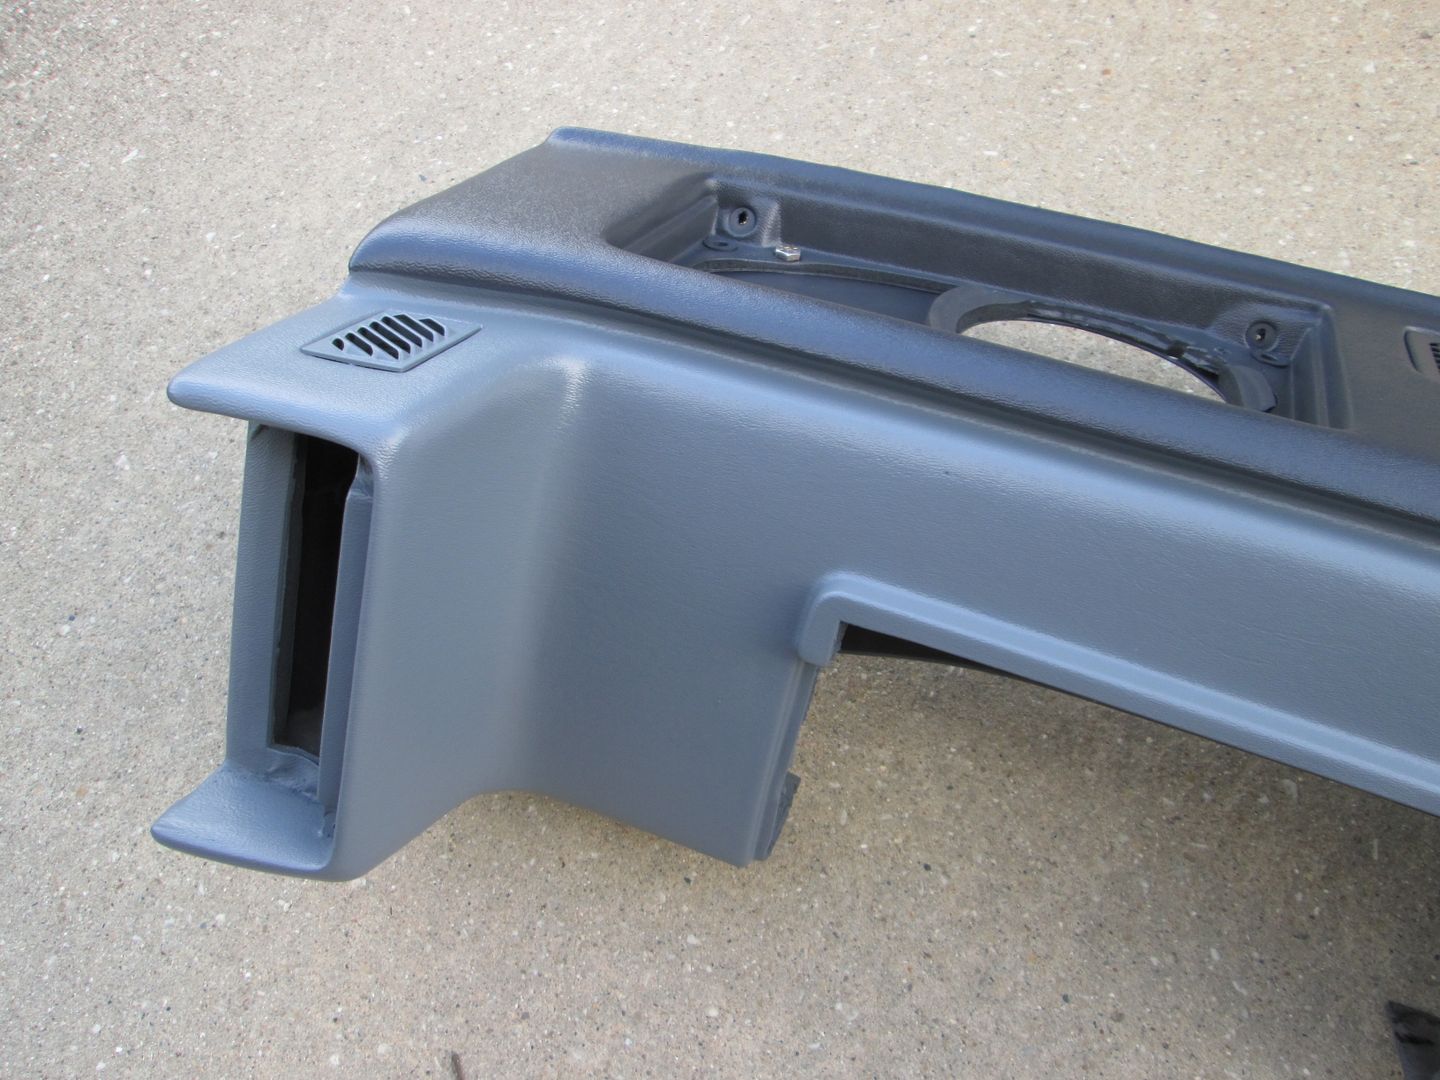
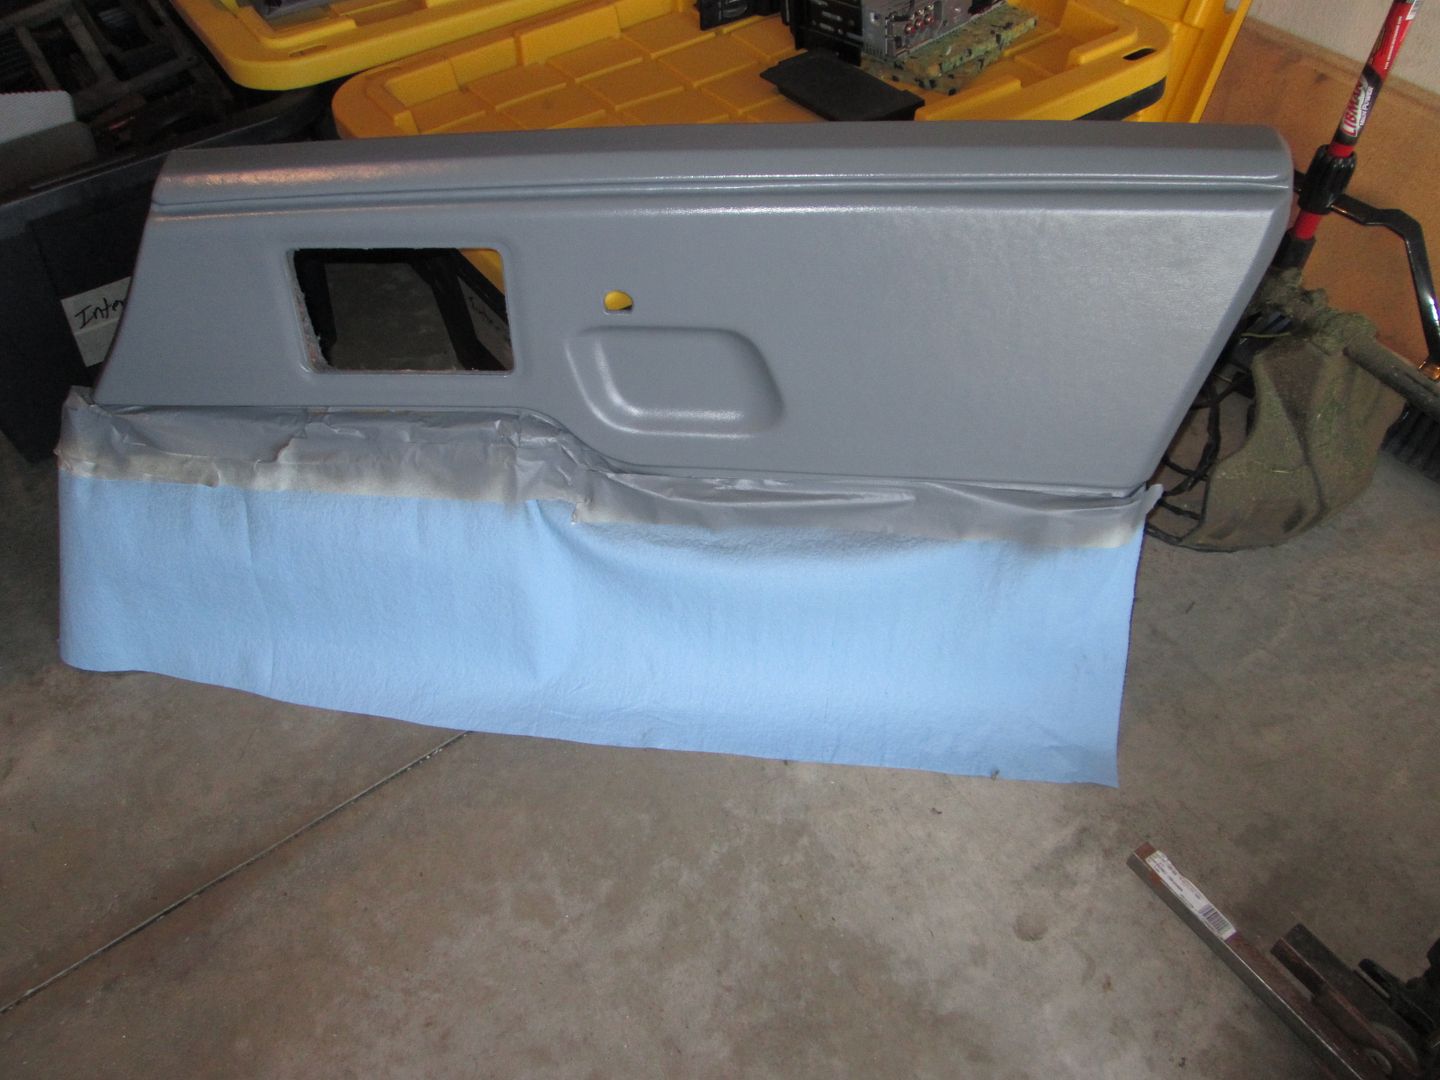
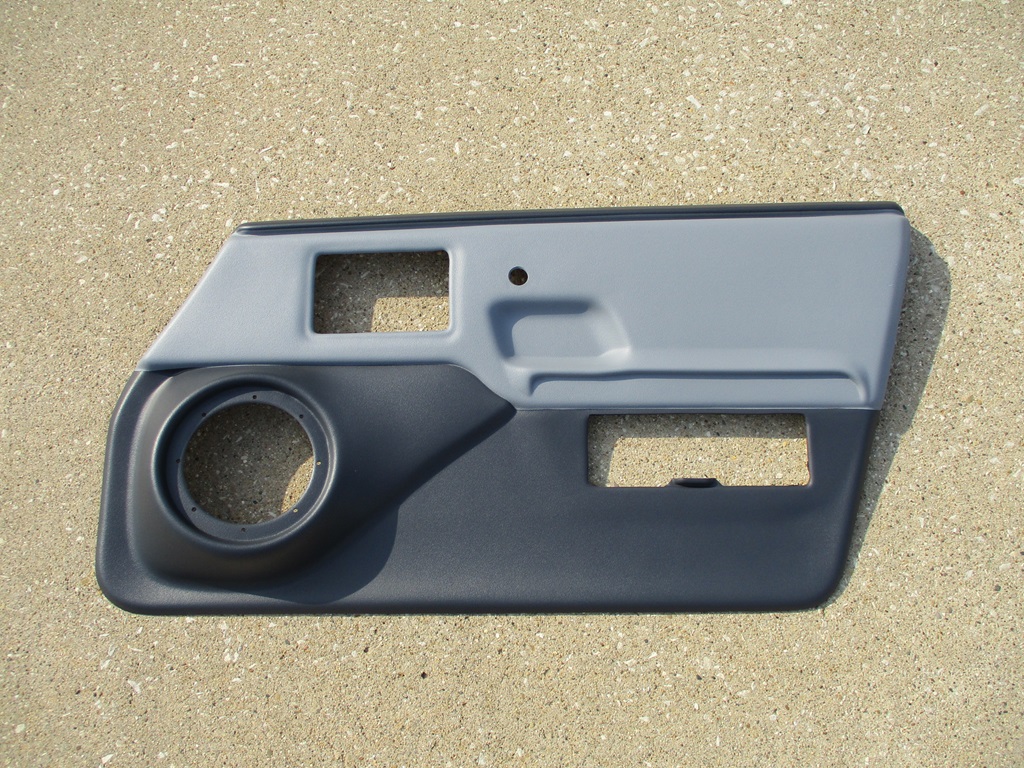
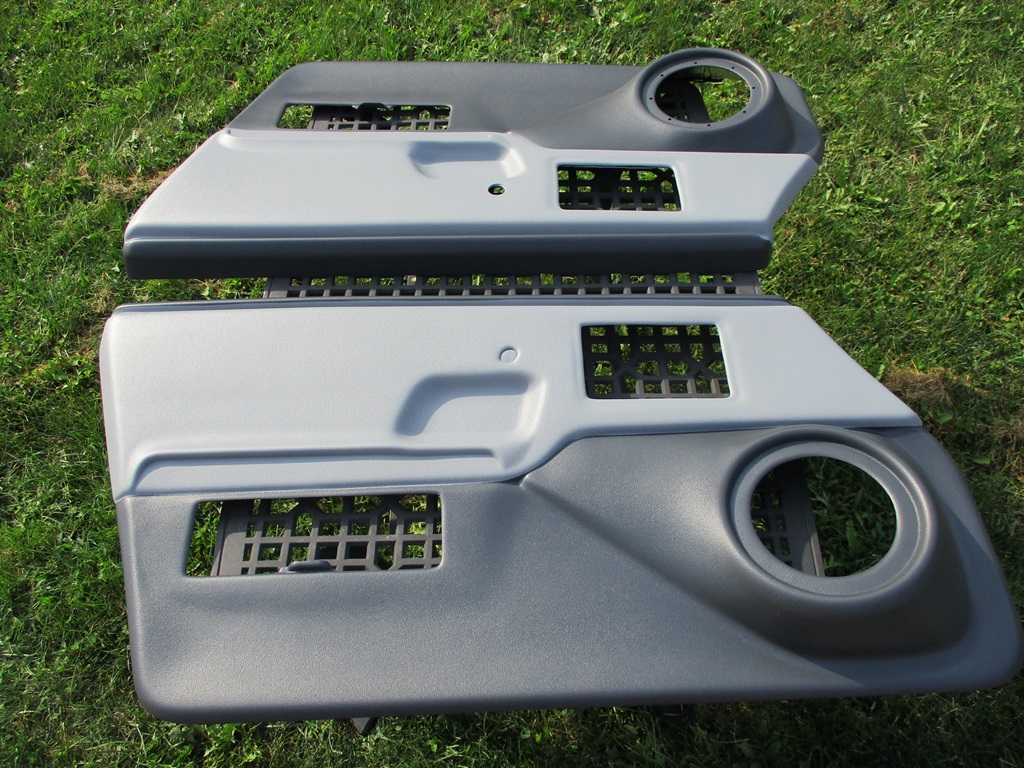
Everything came out looking very good and has held up quite well except for a couple of areas. With the Fiero Store Door Panels, I am going a non-stock color pattern. I am carrying the charcoal color from the top of the dash to the top of the door panels. Reason being is when I rest my sweaty arm on the top of the door panel, the light grey can become a little discolored to the point I notice it. So the darker color will help with this. I am also painting the lower section charcoal as well as there is a very good chance that my size 13s will make contact with them at some point, so the darker color should hide normal wear and tear better:
I will let these bake in the sun for the rest of the day today and likely all day on Sunday
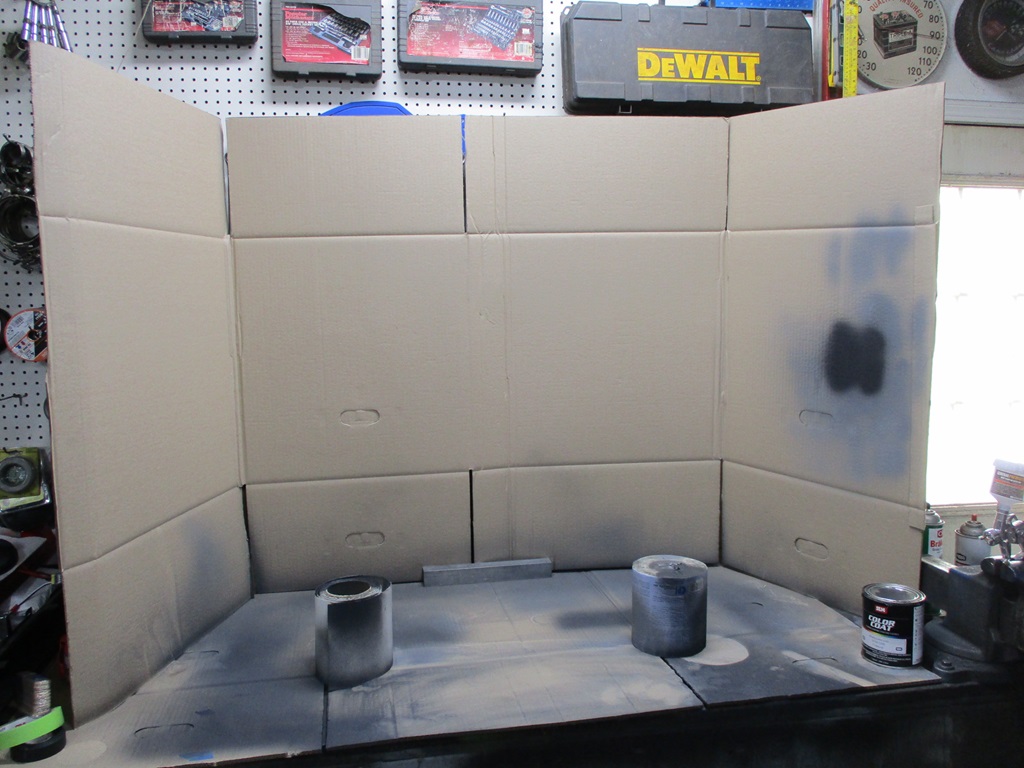
Here is my make shift painting area.
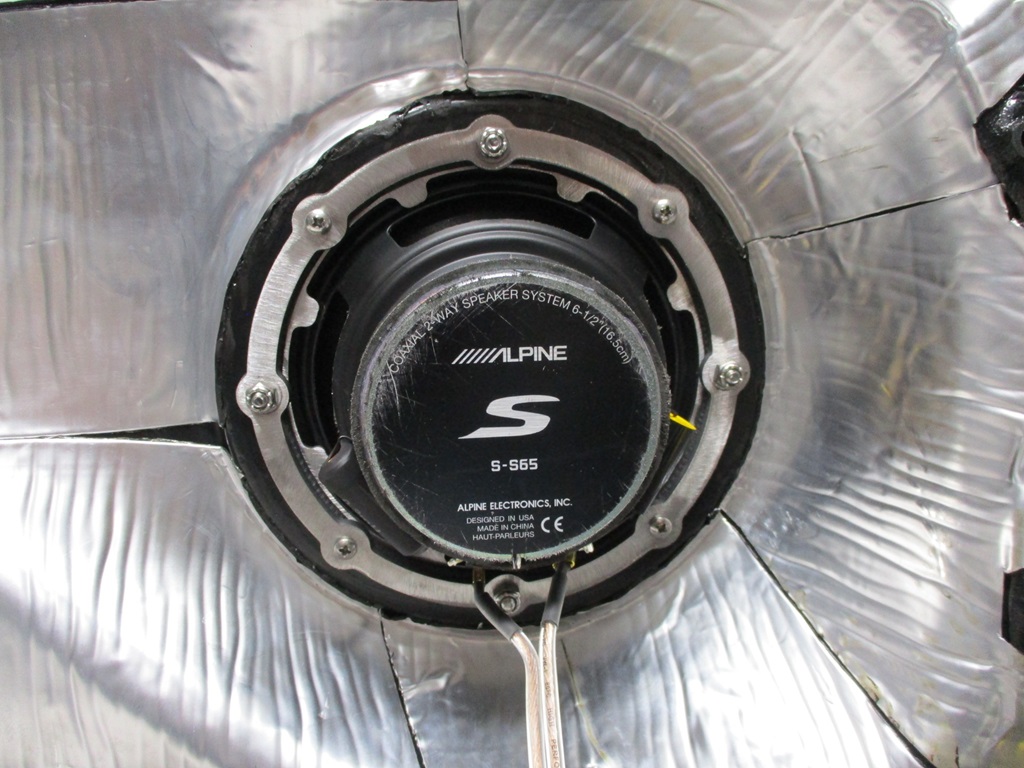
The speaker centering rings and backing plates were treated to a coating of truck bed liner so they have a similar textured surface as the rest of the custom interior parts.
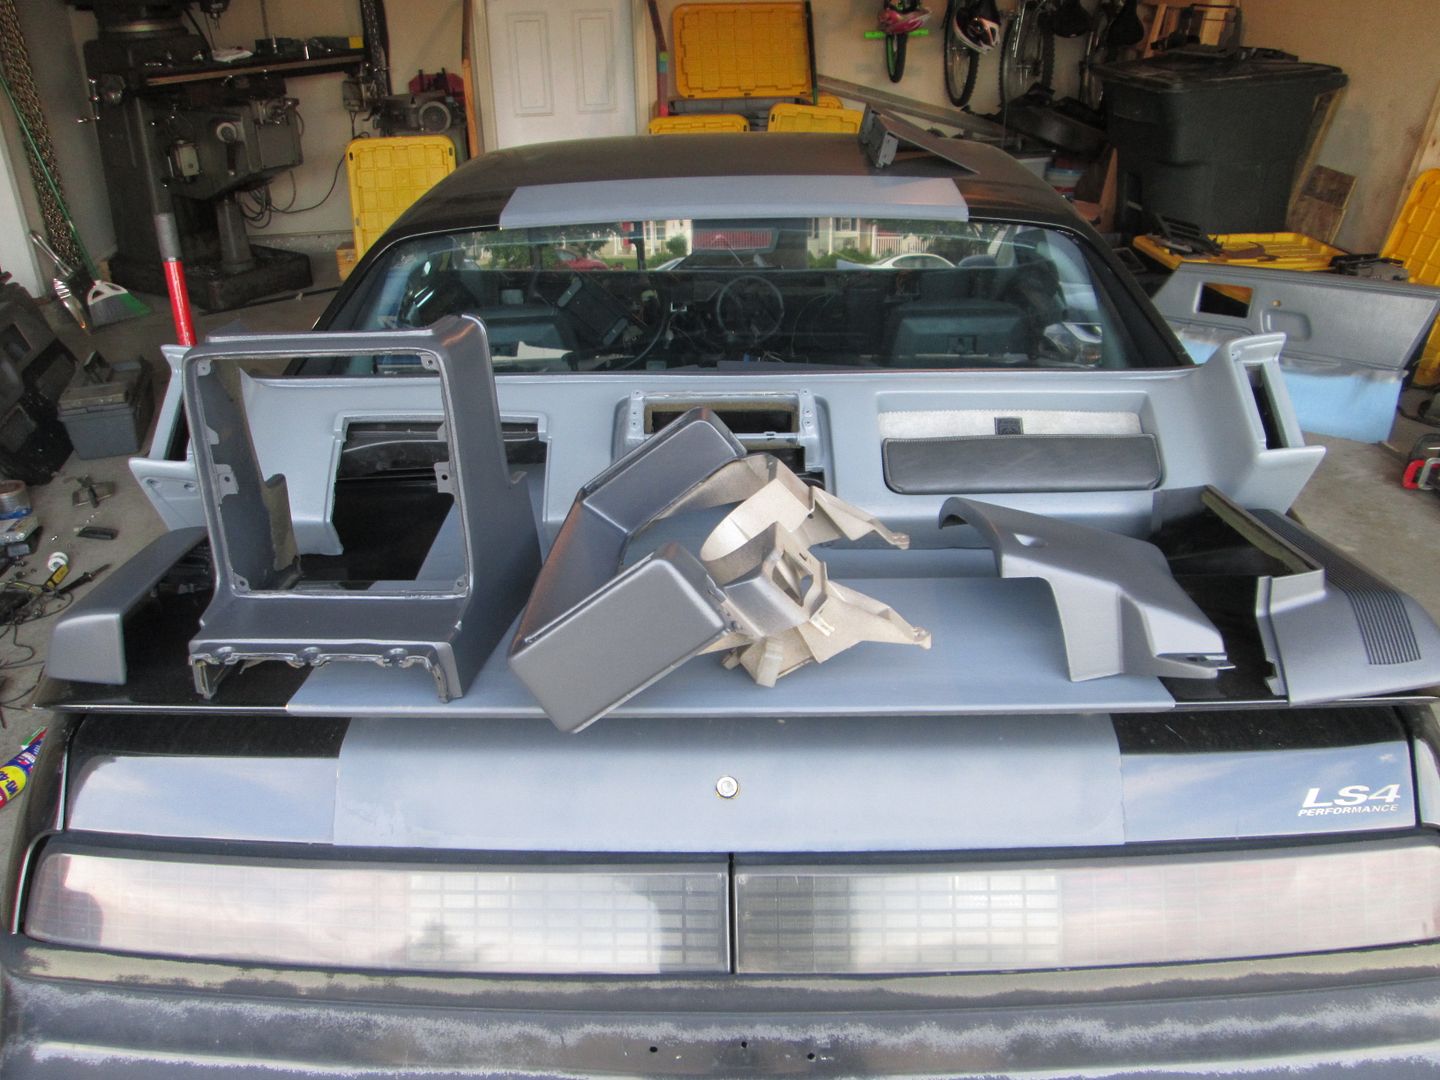
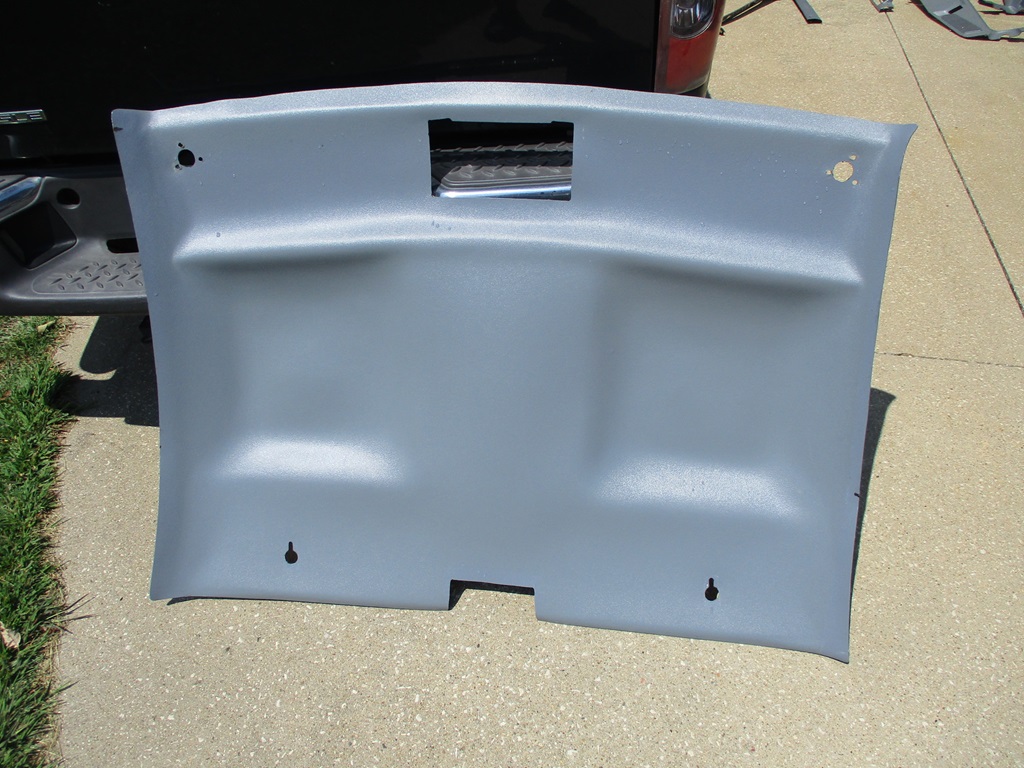
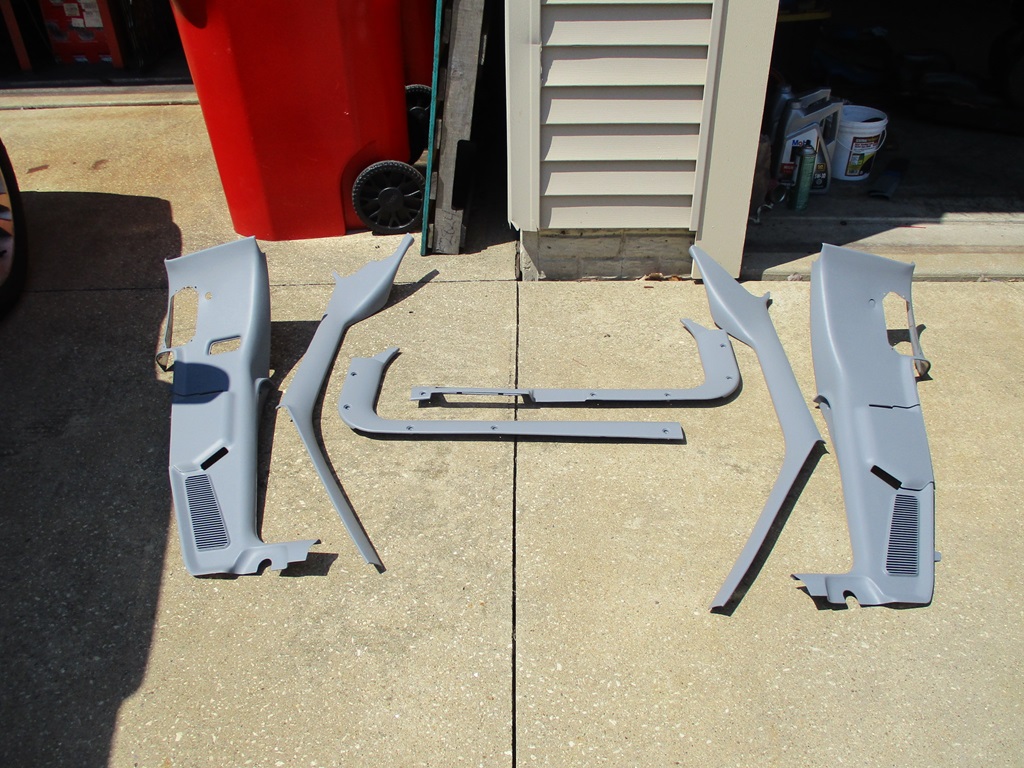
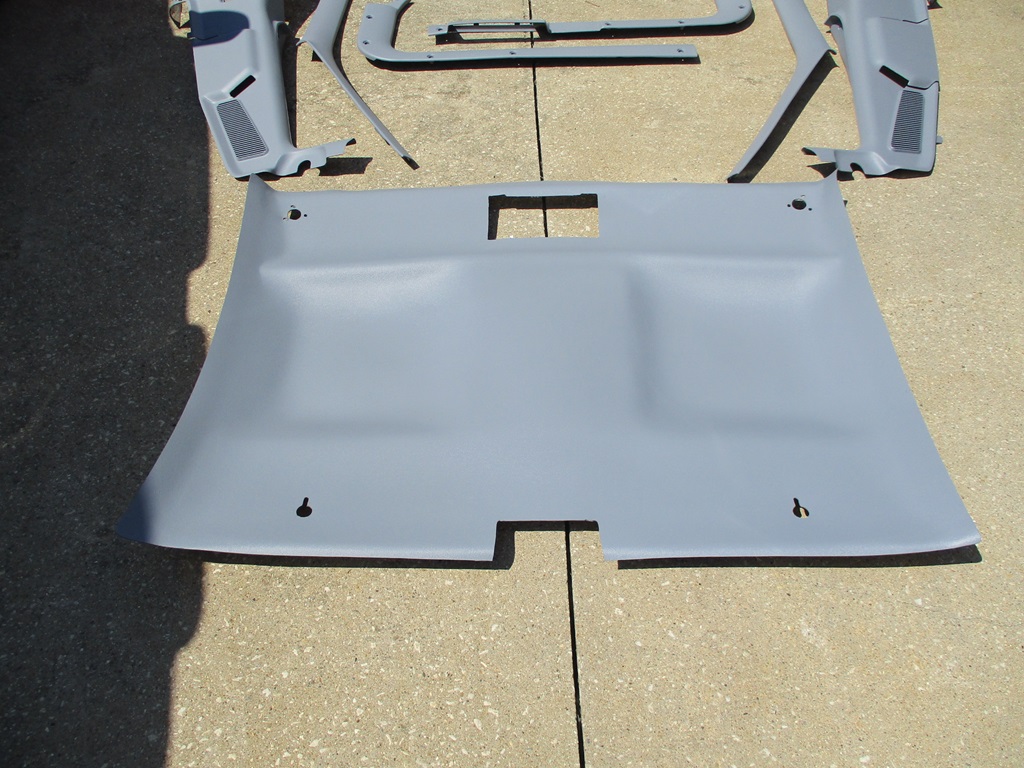
On Sunday I am planning to pull most of the plastic interior from the car. I plan to clean and refinish the A and B pillar trim pieces, the lower door/carpet trim, the Fiero Store ABS headliner, the roof lights, the 3rd break light housing, and the center console. The current plan is for the A & B pillars, floor trim and headliner to be medium grey (stock), the roof light, 3rd brake light, center console to be charcoal. The console is currently light grey and has the same issue with my sweaty arms.
[This message has been edited by fieroguru (edited 08-26-2024).]
The interior panels look GREAT! you are inspiring me to do some of mine.
------------------ Astronomy says we will find a coded signal from outer space. Then we'll KNOW that life exists there, for coded signals aren't by chance.
Biology says there are coded genetic signals in every cell, but we KNOW that no intelligence created life.
I'm the original owner of a white ' 84 2M4 purchased Dec 10, 1983 from Pontiac. Always garaged, no rust, 3800SC, 4-wheel drifts are fun!