Not easily. The F40 uses an input shaft and 2 main shafts. The main shafts BOTH enguage the differential gear (the equivalent of a ring gear in a RWD differential) at all times. To change the final drive ratio, you would have to change the diff gear and both of the shaft gears. 1st gear is part of one of the main shafts, and 2nd gear is part of the other main shaft. So to change the ratio of 1st or second, new shafts would be needed at the very least, and they would be very expensive...if you could even find someone willing to make them?
GM built a version with 3.94 final drive in the 03-04 Saab 9-3's. The 1st and 2nd input gears are integral to the input shaft.
Nope... been busy parting out the 2.8/Getrag for funding and room. I did finish the test fit and put everything back on the cradle fixture to finish all the mount tabs, but haven't touched it in a could of weeks.
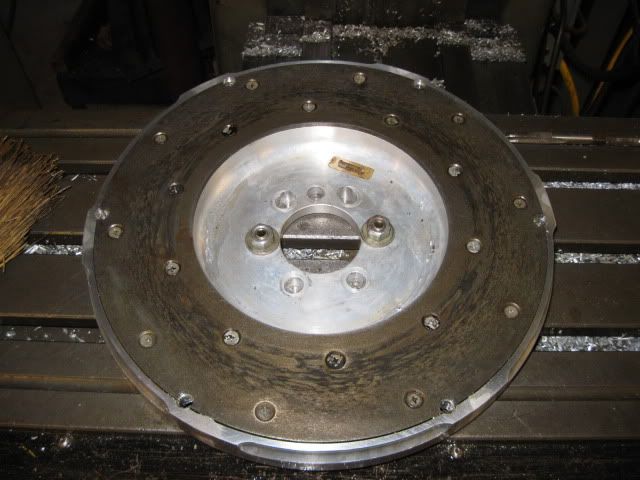
I also spent a couple of days turning down a Spec LS1 168 tooth billet flywheel to accept the 142 tooth ring gear. I am thinking about making one LS4/Getrag (92-94 HTOB) flywheel and starter mount and put it on ebay to help fund the LS4/F40 swap...
[This message has been edited by fieroguru (edited 01-18-2011).]
Any thoughts about making a LS4 to F40 Flywheel? I was going to have SPEC make one for me, but if you have the ability to make one at a reasonable price I would be interested. And it would be nice to help someone out on the forum too.
Any thoughts about making a LS4 to F40 Flywheel? I was going to have SPEC make one for me, but if you have the ability to make one at a reasonable price I would be interested. And it would be nice to help someone out on the forum too.
I have no interest in making more LS4/F40 flywheels... they are just too thick and require to much work. The LS4/Getrag is much simplier and easier to get the needed flywheel to start with.
I have kicked around the idea of having spec make me one... but too cheap...
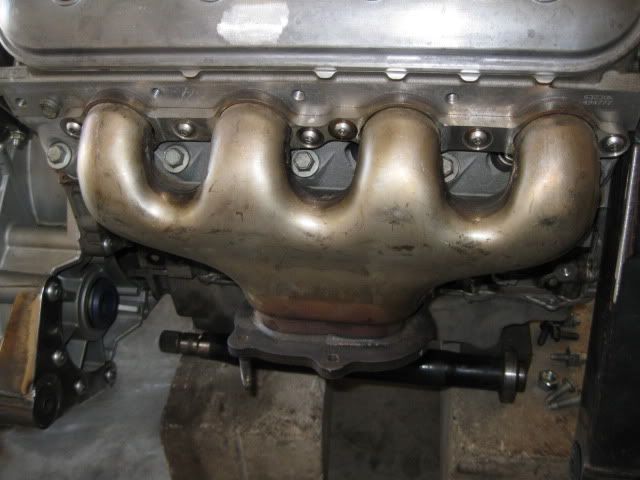
FieroGuru, I have a question about exhaust manifolds, and spacing. The LS4 rear manifold angles way from the engine block, and gives plenty of room for the trans and passenger side axle. Using the LS7 manifold that hugs the block more, is there an issue with interference between the down pipe from the manifold and the passenger axle? I am thinking of using some LS2 manifolds, which would be similar in style, but I have concerns about the down pipe. If you could, please post a picture from the from the passenger side wheel well with the axle installed. Thanks a lot. Mike
FieroGuru, I have a question about exhaust manifolds, and spacing. The LS4 rear manifold angles way from the engine block, and gives plenty of room for the trans and passenger side axle. Using the LS7 manifold that hugs the block more, is there an issue with interference between the down pipe from the manifold and the passenger axle? I am thinking of using some LS2 manifolds, which would be similar in style, but I have concerns about the down pipe. If you could, please post a picture from the from the passenger side wheel well with the axle installed. Thanks a lot. Mike
The LS7 manifolds are similar to most corvette manifolds, they typically do not hug the block at all, just exit straight down from the heads. I do not have any LS2 manifolds to compare them too, but probably the next best would be the 97+ formed stainless manifolds from the Vette and cut the collector bend off of them. They are a formed stainless manifold with integraded heat shields/insulation and are quite compact. Just cut the collector bend off of them and install some band clamps.
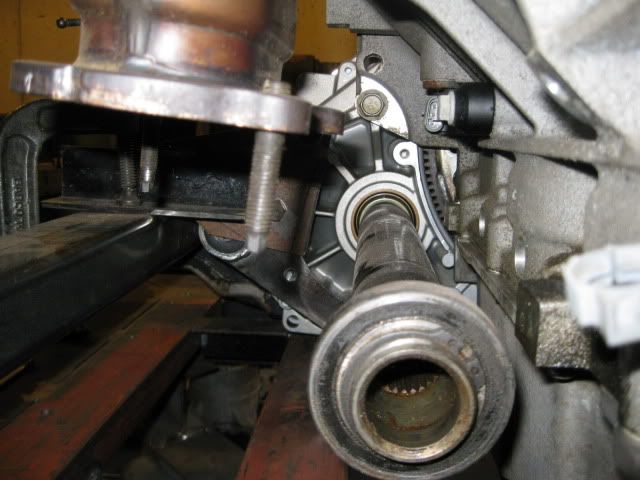
There is about 2" of clearance between the exhaust and the intermediate shaft with the LS7 manifolds. It isn't the easiest to see in this picture, but you can make out the closest edge of the manifold to the intermediate shaft.
[This message has been edited by fieroguru (edited 01-26-2011).]
FieroGuru, I have a question about exhaust manifolds, and spacing. The LS4 rear manifold angles way from the engine block, and gives plenty of room for the trans and passenger side axle. Using the LS7 manifold that hugs the block more, is there an issue with interference between the down pipe from the manifold and the passenger axle? I am thinking of using some LS2 manifolds, which would be similar in style, but I have concerns about the down pipe. If you could, please post a picture from the from the passenger side wheel well with the axle installed. Thanks a lot. Mike
Guru, sorry to crash your thread,
Mwhite, Archie uses stock LS3 mani's for those who don't want to use his headers. I went with the headers and have a set of new, never used LS3 manis (for sale). I'll pass some photos of them. They are the Corvette ones not the Camaro ones, and yes there is a differance.
FieroGuru, I have a question about exhaust manifolds, and spacing. The LS4 rear manifold angles way from the engine block, and gives plenty of room for the trans and passenger side axle. Using the LS7 manifold that hugs the block more, is there an issue with interference between the down pipe from the manifold and the passenger axle? I am thinking of using some LS2 manifolds, which would be similar in style, but I have concerns about the down pipe. If you could, please post a picture from the from the passenger side wheel well with the axle installed. Thanks a lot. Mike
Nothing LS4 related has happened... still collecting cash for my next round of purchases (plug wires, clutch, wide band O2 controller, etc). A friend brought over an 88 formula with a 3800SC/Getrag for me to do some work on, so I will need to finish that up before I can get back to the LS4.
GM built a version with 3.94 final drive in the 03-04 Saab 9-3's. The 1st and 2nd input gears are integral to the input shaft.
REHEHEEALLY...
will, do you think the entire gear assembly could be swapped into the g6 speed casing?
this would make an ideal tranny gearing for high TQ v8 manual tranny swap, such as the LS4, assuming a 2nd gear launch, effectively turning it into 5 speed if you ignore 1st gear. the 3.55:1 final in the f40 is too tall to make 2nd gear launches practical, but a 3.94:1 final would work just fine for that application
I also spent a couple of days turning down a Spec LS1 168 tooth billet flywheel to accept the 142 tooth ring gear. I am thinking about making one LS4/Getrag (92-94 HTOB) flywheel and starter mount and put it on ebay to help fund the LS4/F40 swap...
You still thinking about selling the flywheel and starter mount?
You still thinking about selling the flywheel and starter mount?
Yes, it is still a possibility. The flywheel has been turned down, but still needs the ring gear landing and pressure plate pattern added. Then I need to mock up my 92-94 HTOB getrag transmission with the LS4 for the starter pad.
Been bogged down with lots of other stuff the past month or two, but hopefully I will get back to updating this thread in a week or two.
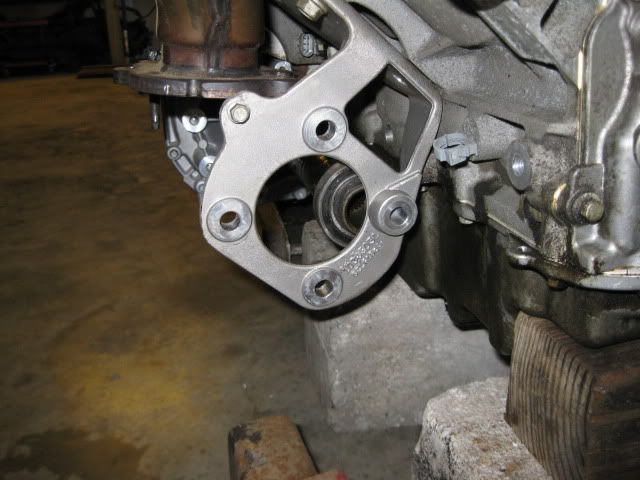
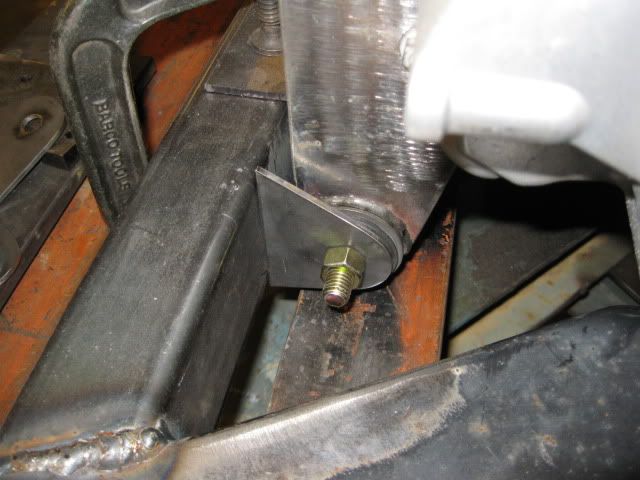
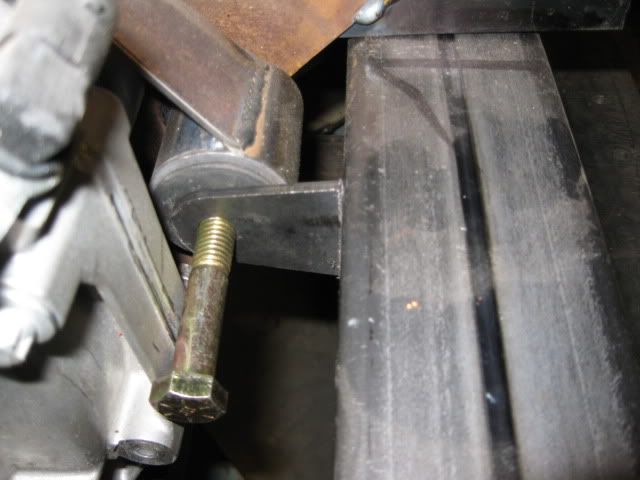
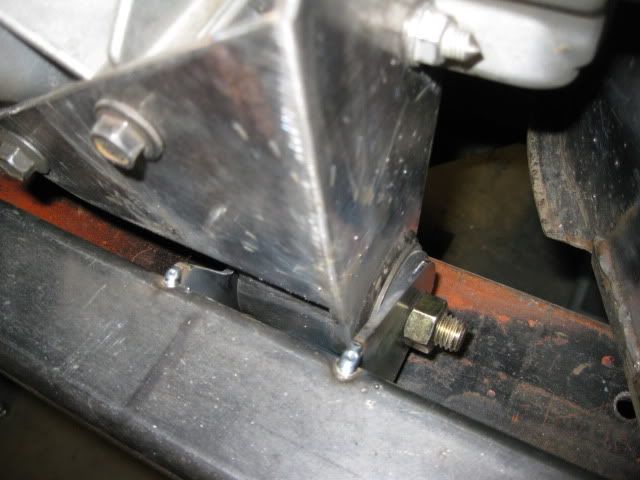
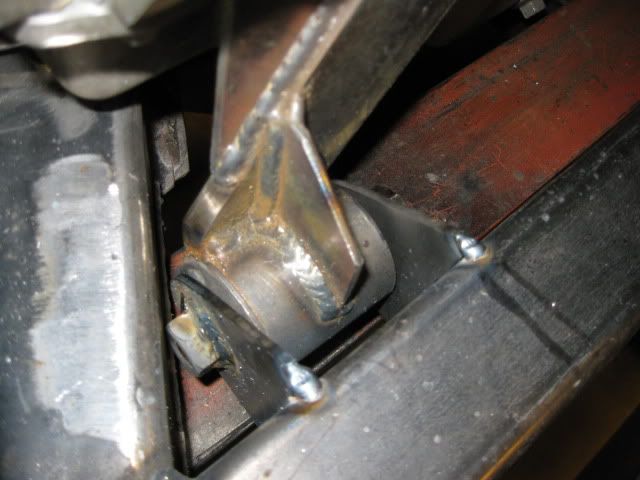
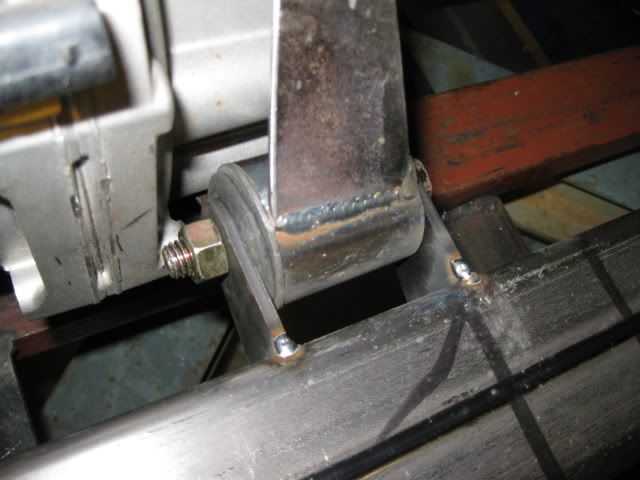
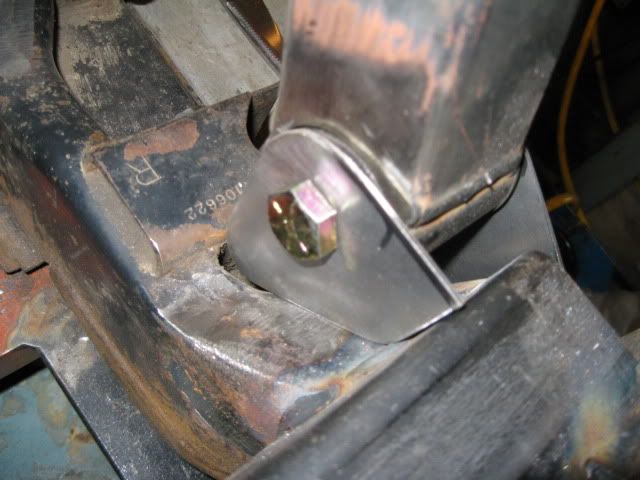
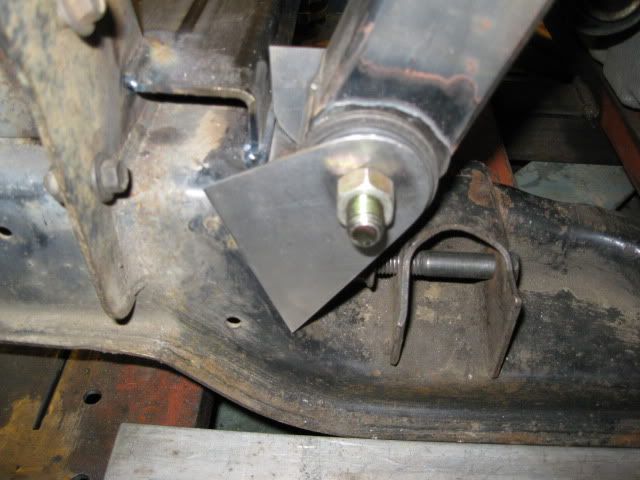
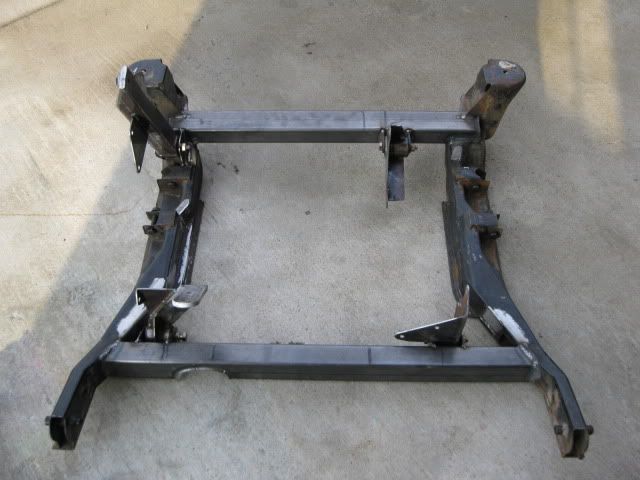
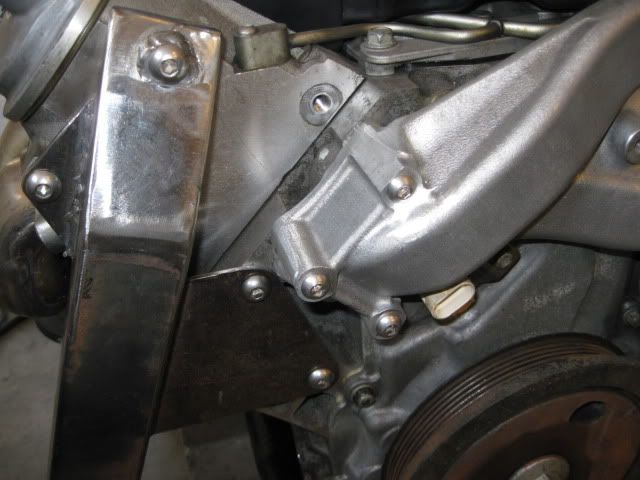
It is nap time, so no cutting/grinding in the basement... but a good time to update. 3 of the 4 mounts are done and the 4th one the templates are made.
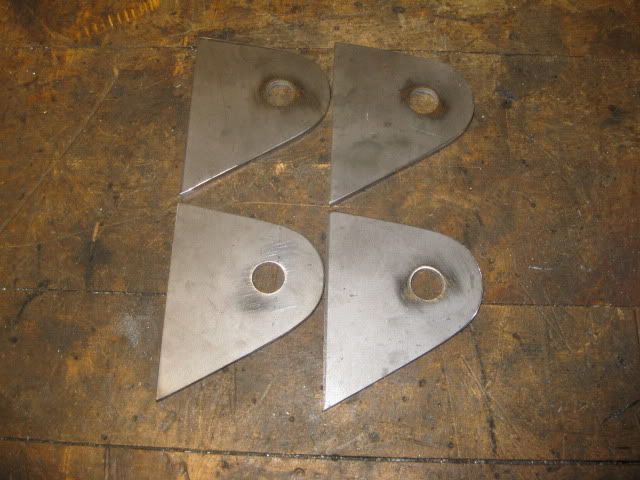
Here are the two templates for the rear engine mount:
Once the girls wake up from nap, I should be able to make the last two tabs and get them tacked to the cradle.
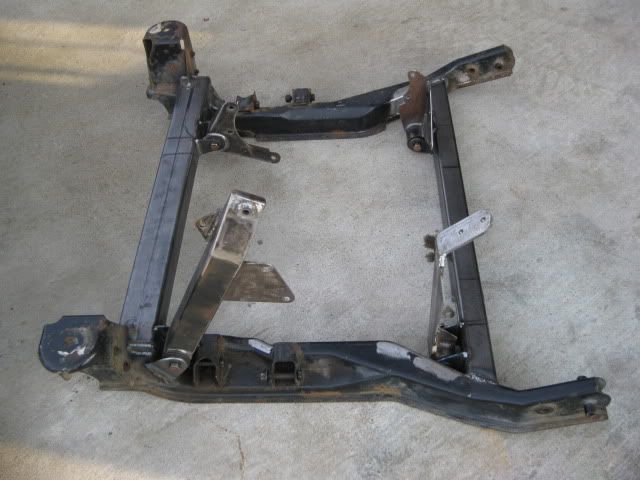
Mounts are done and fully welded. These should hold up to whatever amount of HP I want to throw at them (might run NOS or go turbo at a later date), but are still rubber mounted to reduce shock loading:
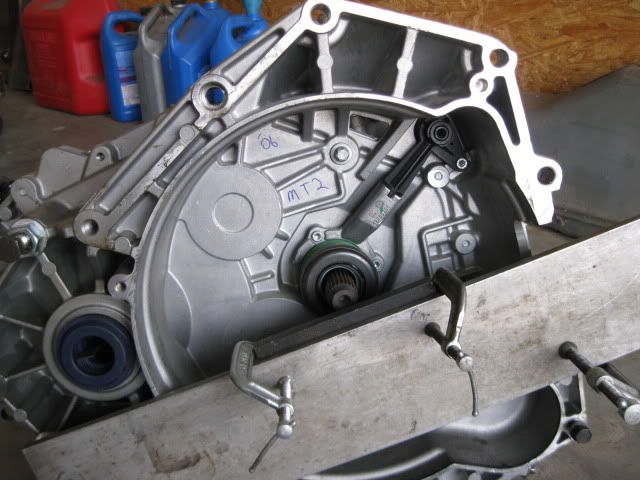
While I had the transmission off, I verified a few other items.
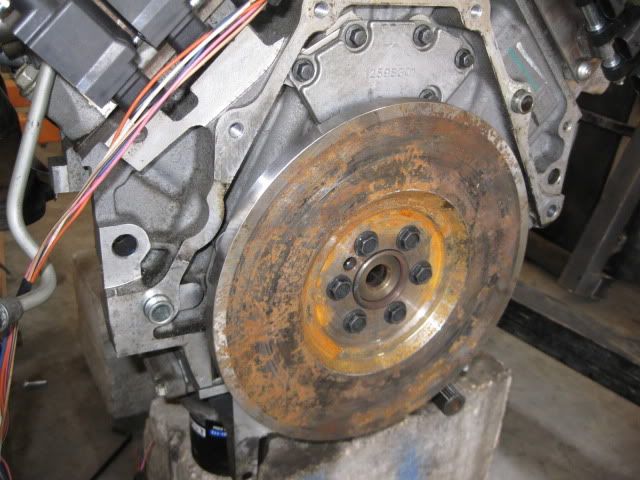
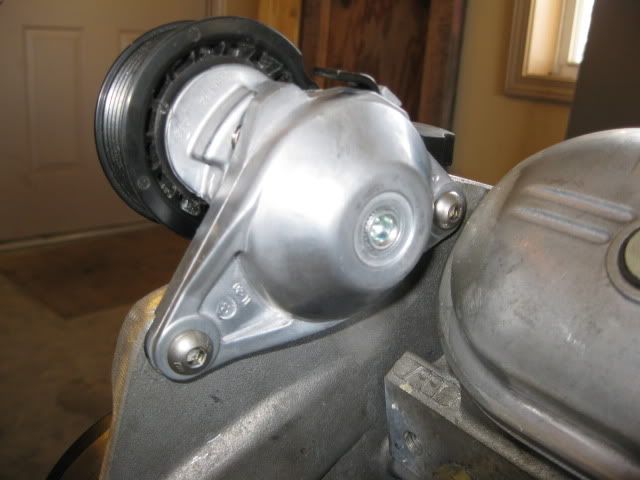
For those of you wanting to run a 92-94 Getrag or the F23 transmission behind an LS4, a stock LS1 168 tooth flywheel is just about perfect from a thickness standpoint, then it is just a matter of turning it down to accept the 142 tooth flywheel and drilling the pressure plate pattern. The one I am modifying for R&D purposes protrudes .818" and has been resurfaced 1 time. This is slightly less protrusion than the stock fiero (.830" was the last one I measured). The LS4 ring gear protrudes .826" from the bellhousing and would probably need to be flush with the face of the flywheel.
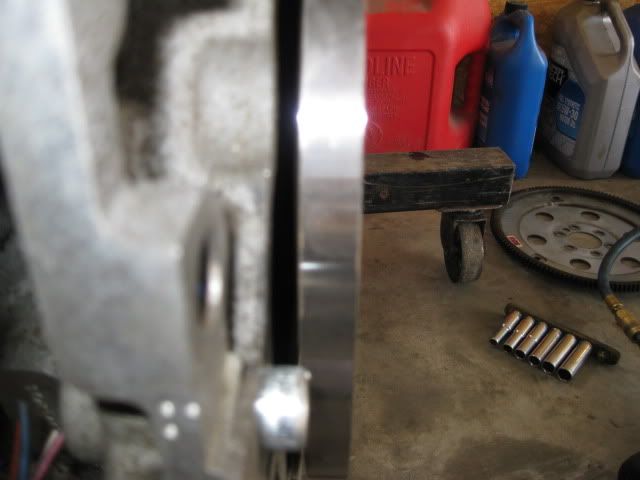
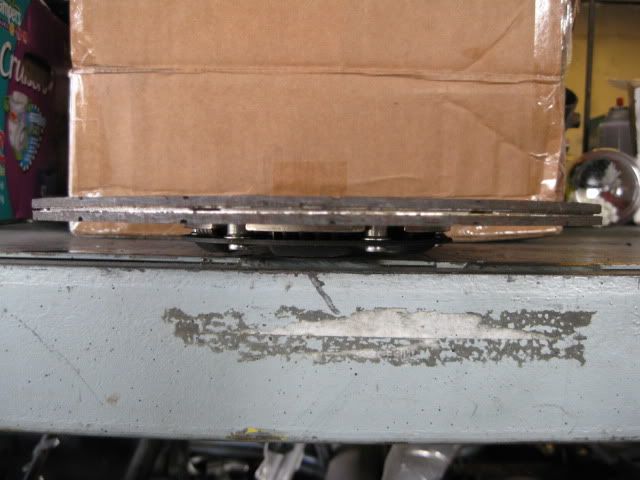
There has been lots of discussions lately about the proper measurement of the range of travel for the F40 HTOB. So here are the following measurements - all measurements are distance from the Bellhousing Flange: End of Input shaft: 1.121" End of Splines: 1.502" HTOB fully extended: 2.675" HTOB fully compressed as delivered: 3.218" HTOB fully compressed with the bleeder screw opened: 3.582
The F40 HTOB has a check valve inside it. So the amount of fluid in the HTOB from the factory is trapped and will not allow the HTOB to fully collapse until the bleeder assembly is installed and the bleeder screw opened. Once you bleed off the factory fill, you get an extra .364" of travel to the back side and the overall range of travel increases to .907" (from .543"). Here is the setup I used to get these measurements with my digital calipers:
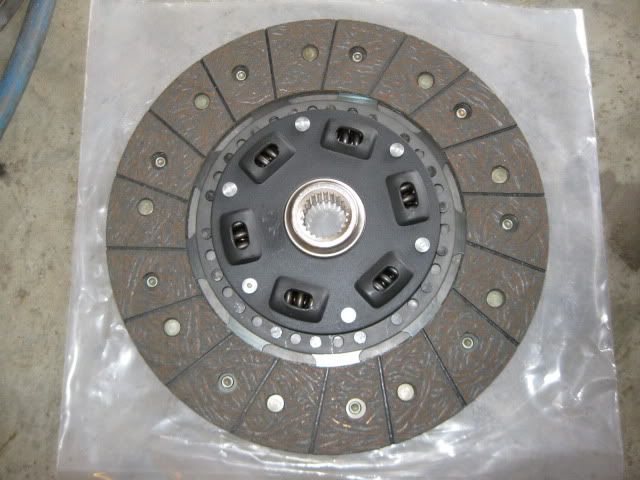
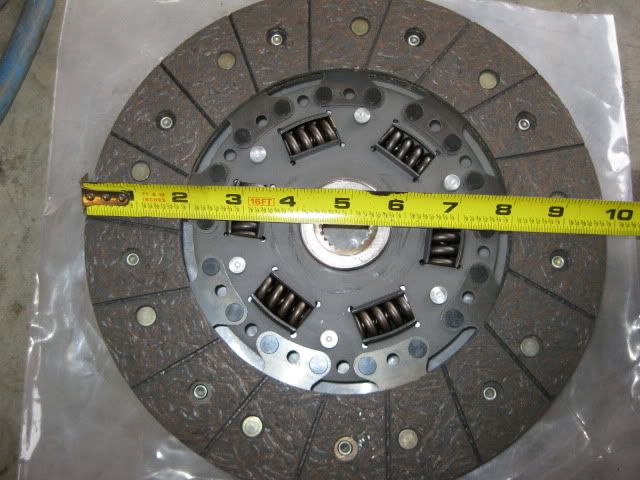
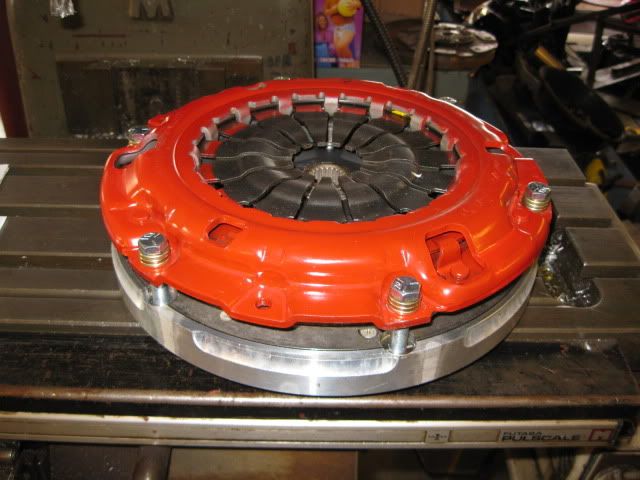
A while back I found a 9 7/8" clutch that "should" fit the F40 application. I wanted to use the largest diameter clutch that will fit to improve overall drivablity while still having a clutch that will hold the power. This particular carbon kevlar clutch is rated (for what it is worth) at 461hp/450lb-ft. The pressure plate pattern is not the same as a stock fiero, but I needed to drill the pattern anyway... The good news is the pressure plate clears the inside of the transmission... I still need to bolt it to the flywheel with the clutch installed to check the stack height.
How would you locate the pressure plate bolt pattern on the new FW? I have a few idea, but my machining experience is limited to brake rotors/drums and flywheel resurfacing.
What is the Clutch and PP from?
Good to see new progress. I'm building stuff vicariously through you right now.
How would you locate the pressure plate bolt pattern on the new FW? I have a few idea, but my machining experience is limited to brake rotors/drums and flywheel resurfacing.
What is the Clutch and PP from?
Good to see new progress. I'm building stuff vicariously through you right now.
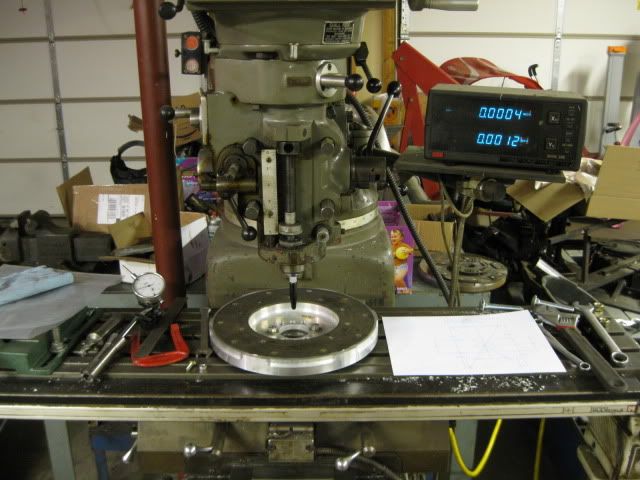
It is just a matter of measuring the pressure plate to get the average center distance between the holes, laying it out in AutoCAD with the x-y coordinate positions based on the crankshaft center, mounting the flywheel on the mill, dial indicate the center bore of the flywheel, reset the DRO, and then drill by numbers... quite simple, just takes time.
I am not sharing the details on the clutch/pressure plate yet. I want to make sure it works first.
so not anything I could do at home. Thanks though. Updates on this thread are always good. I definitely want an LS4 in my future. But i'm still a year out from being stateside. No engine swaps til then.
The more I read about LS motors, the more Impressed I am. I want to get an S10 to do a 5.3/T56 swap. Those guys are pushing 30Mpg in a pickup and still getting 320/320 crank hp/tq.
Awesome work.
[This message has been edited by KissMySSFiero (edited 02-22-2011).]
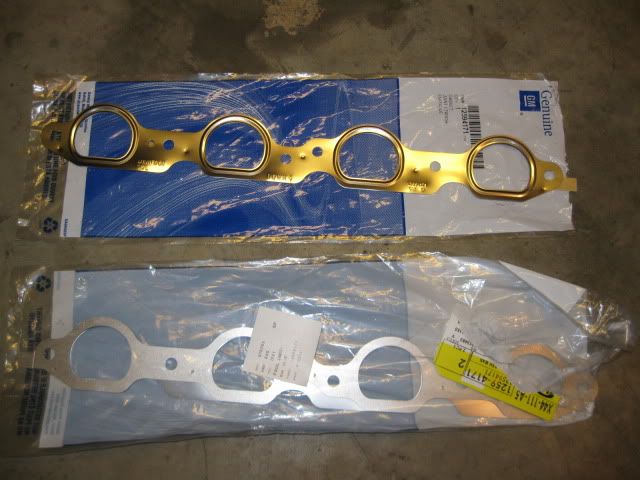
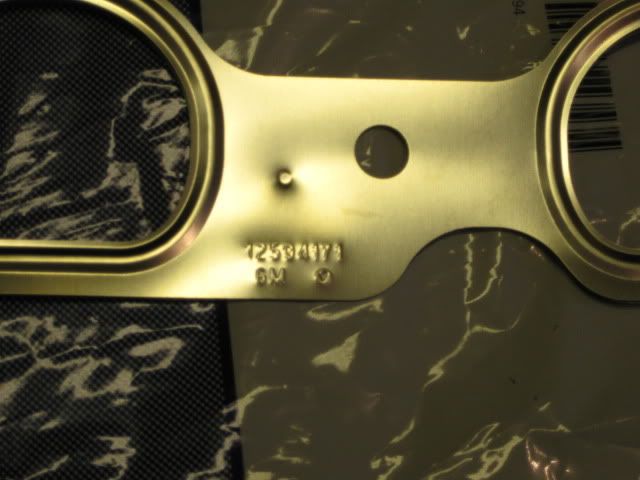
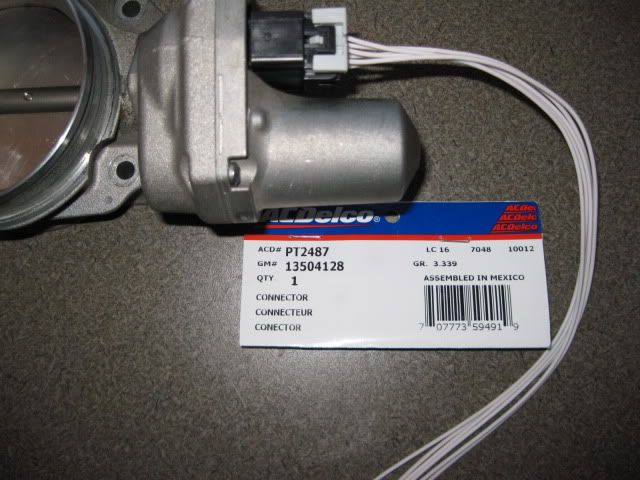
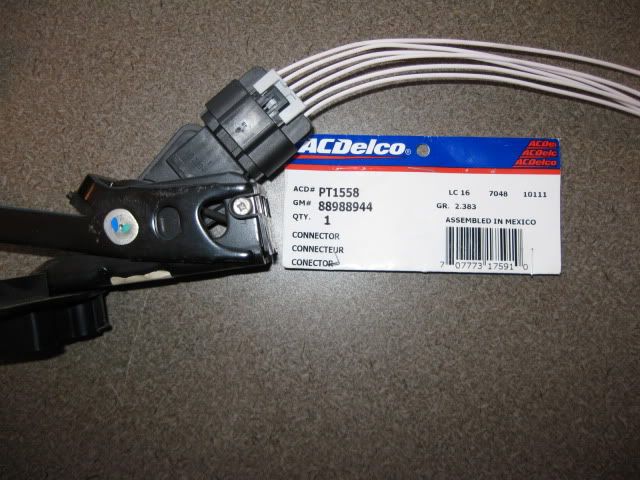
Been tracking down and purchasing some needed odds and ends... LS7 MLS exhaust gaskets (manifold to head) - 2 required: GM# 12594171 Longer crankshaft/flywheel bolts M11 x 1.50 - 6 required: GM# 12563533 LS2 Throttle body 6 pin connector: GM# 13504128 2002 Z06 MAF 5 pin connector: GM# 12167121 - WRONG, WRONG, WRONG.. this number is for a 6 pin connector. I think 15305932 is the correct #, but need to purchase one to confirm. DBW accelerator pedal 6-pin connector: GM# 88988944
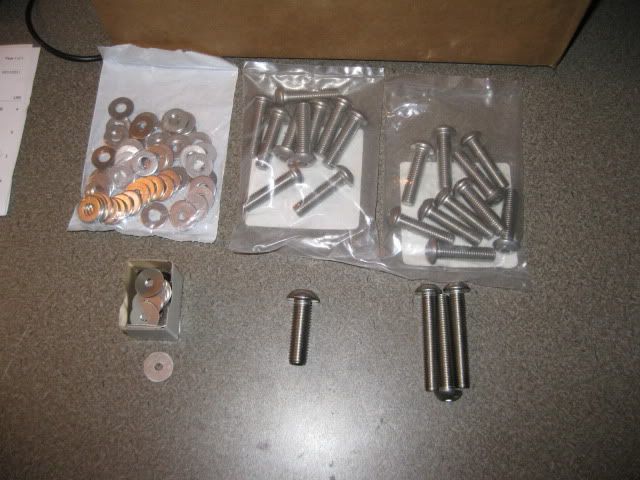
I have a sickness for stainless steel button heads, so I ordered several more... to date I have spent about $165 on my button head madness for this swap.
[This message has been edited by fieroguru (edited 03-02-2011).]
You don't happen to know the part # for the LSx Main Cap Side Bolts (the small ones that go through the outside of the block, to the main caps) do you? I've been searching like crazy for the GM part #, but can't find it anywhere. I think it is the same for all the LS motors.
You don't happen to know the part # for the LSx Main Cap Side Bolts (the small ones that go through the outside of the block, to the main caps) do you? I've been searching like crazy for the GM part #, but can't find it anywhere. I think it is the same for all the LS motors.
I think this is the one you are looking for. #12556127 -Cross Bolts though the block into the side's of the main caps - sold individually
Originally posted by fieroguru: I think this is the one you are looking for. #12556127 -Cross Bolts though the block into the side's of the main caps - sold individually
Ah, thanks! I spent two hours looking for the part, and couldn't find it anywhere. Wish those, I should have everything I need to get my short block back together now, after I finish cutting the bell housing for the starter mount.
The head of the mill was dial indicated to ensure it was perfectly perpendicular (within .001" on a 12" circle to the table), then the flywheel bolted down and dial indicated to find the center within .001" and the DRO zero'd.
I am planning to drill the pattern for my clutch setup (10.8243") as well as the stock fiero pressure plate pattern (10.5550").
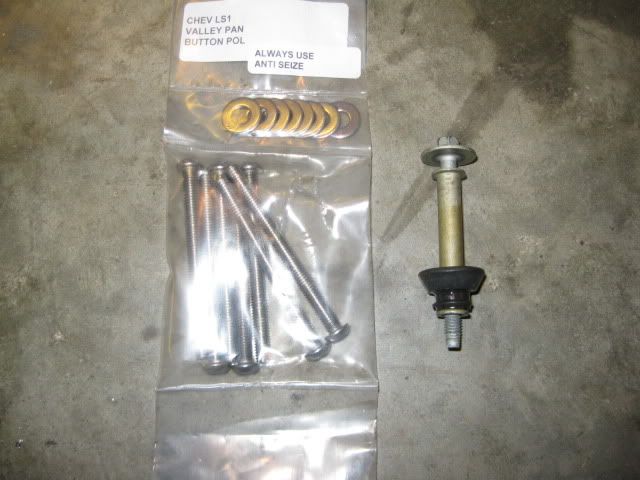
The button heads showed up today, so the madness began:
A couple of my bags were mis-labeled and were 3/8" not M10, so I need to order them again. I still need to replace all the bolts in the valley cover, front timing cover, and all the ones holding the sensors in place... yes it is a sickness.
March 23rd - 31st Sara and the girls will be out of town, so I am targeting that week to paint all the parts for this swap... Then the button heads will really stand out!
[This message has been edited by fieroguru (edited 02-23-2011).]
Originally posted by fieroguru: The button heads showed up today, so the madness began:
A couple of my bags were mis-labeled and were 3/8" not M10, so I need to order them again. I still need to replace all the bolts in the valley cover, front timing cover, and all the ones holding the sensors in place... yes it is a sickness.
March 23rd - 31st Sara and the girls will be out of town, so I am targeting that week to paint all the parts for this swap... Then the button heads will really stand out!
You care enough to change the ones that aren't visible too? I think that is a bit much with the button heads.
What all are you painting on the engine? And what colors?
[This message has been edited by dobey (edited 02-23-2011).]
You care enough to change the ones that aren't visible too? I think that is a bit much with the button heads.
What all are you painting on the engine? And what colors?
Guilty as charged!
I am thinking the block, heads, valley cover, and transmission will be a silver/alumunum color (to keep oxidation down). The Intake, valve covers, timing cover, coil brackets, engine/transmission mounts and transmission shifter bracketts will all be my signature blue. The fuel rail will either be left stock or painted satin black (to help hide the injector harness).
The water pump might end up being satin black so it, the accessory belt and everything on the passenger side of the engine will blend with the engine compartment and keep the intake/valve covers the focal point. Or it will be silver/aluminum... still haven't decided yet.
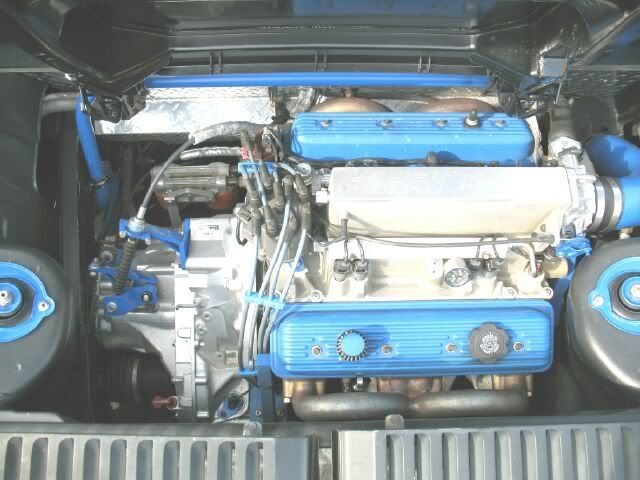
Some what similar to my old setup, but with a colored intake manifold:
[This message has been edited by fieroguru (edited 02-23-2011).]
I test-fitted my LM7 into my S-10, then yanked it for the 350. The 350 fits better, will blaze the tires to illegal speeds, and costs less than a new H3A oilpan to get the LM7 into the S-10. Now back to our regularly scheduled thread.
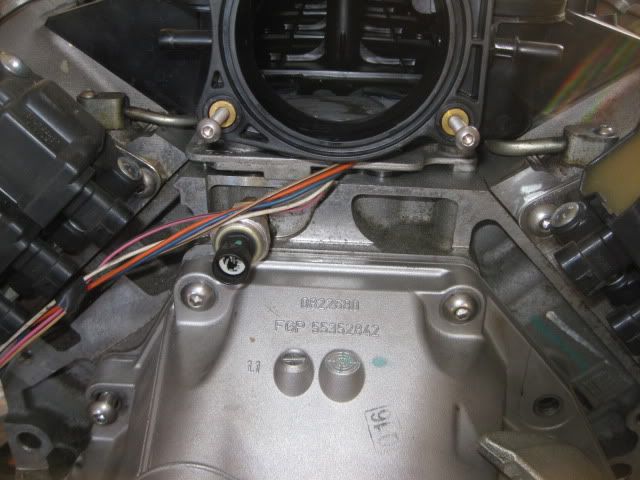
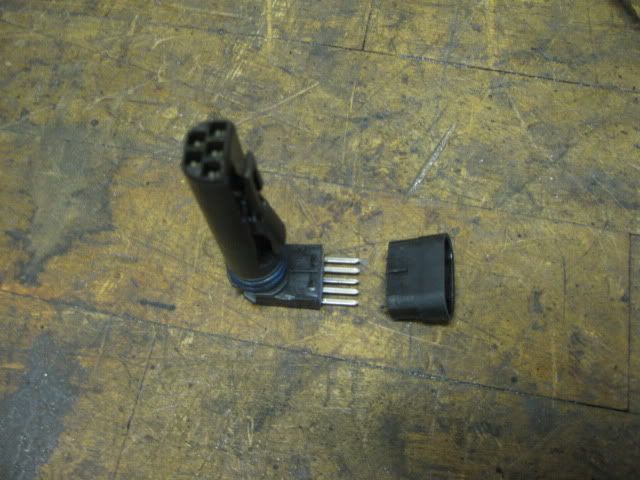
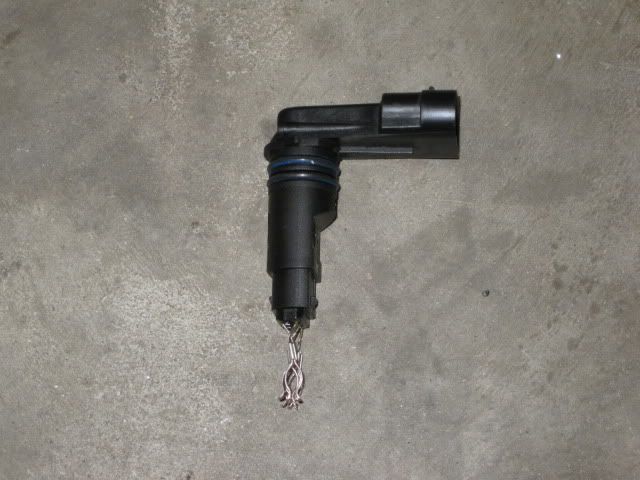
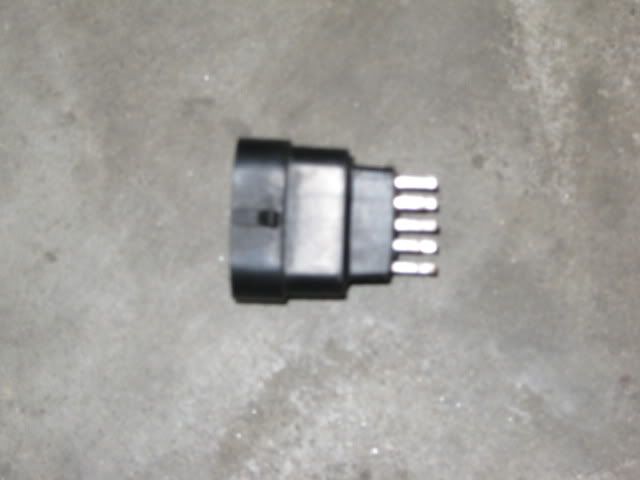
Remember this part: The other half came in today from a guy on LS1 tech. Free since it was broken and I walked the guy through how to remove it. I asked him how much he wanted for the broken one and he just mailed it to me! Pays to be helpful!
So I just had to cut it up to get down to what I need it for.
This end will be attached to the wires from the other half under the intake. This will allow use of the factory connector to this sensor.
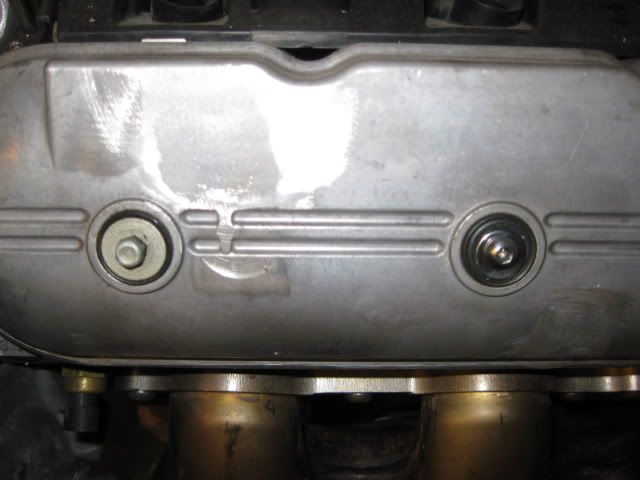
My stainless steel button heads for the valve covers had been MIA for a couple of weeks, but I found them today (in my LS4 parts box of all places). The factory spacer/seal sleeve needed to be retained, so I cut the head off the old valve cover bolt.
When I first checked in these bolts, I noticed the washer wasn't large enough and the center hole had too much slop. After the test fit, the washer needs to be replaced (and I already have other ones on their way). The new ones (still stainless) have the same OD as the stock bolts and are tighter on the ID.
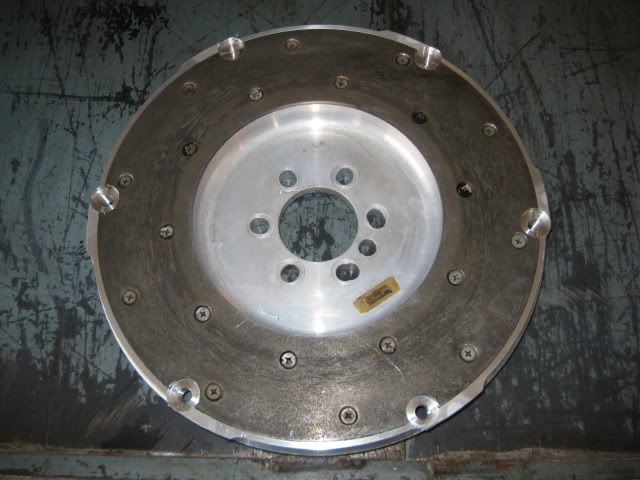
Last thing for tonight was to drill the new pressure plate pattern. My clutch/pressure plate setup is a raised flange style, so I have an OEM flywheel on its way so I can confirm the proper elevation for the standoffs I need. Once I have that height and choose a diameter for them, the bolt holes will be counter bored to place the standoffs on the aluminum sureface below the steel friction surface. Plus I will look at possibilities to make them shorter to further increase the clamp load, but need to make sure the release fingers will not come in contact with the clutch disk. It will probably be a week before all my parts show up to continue on the flywheel...
I purchased a used OEM flywheel for my specific clutch so I could confirm the lenth of the spacers needs for my flywheel setup. To place everything like it was in its original application, the spacers need to be .820" above the clutch face of the flywheel.
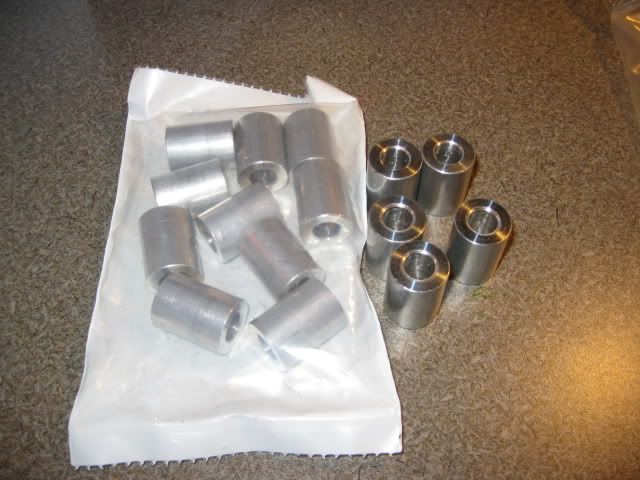
The flywheel was tapped for 3/8-24 bolts and then a 3/4" counter bore was done for all the holes. This will allow the spacers to sit on the aluminum flywheel, not the friction material. McMaster sells 3/4" diameter x 1" long aluminum spacers for 3/8" bolts, so I have those on the way. I am planning to mill them down to have a .750" installed height of the pressure plate. This will increase the pressure plate clamp load slightly and make the overall flywheel/clutch/pressure plate package shorter.
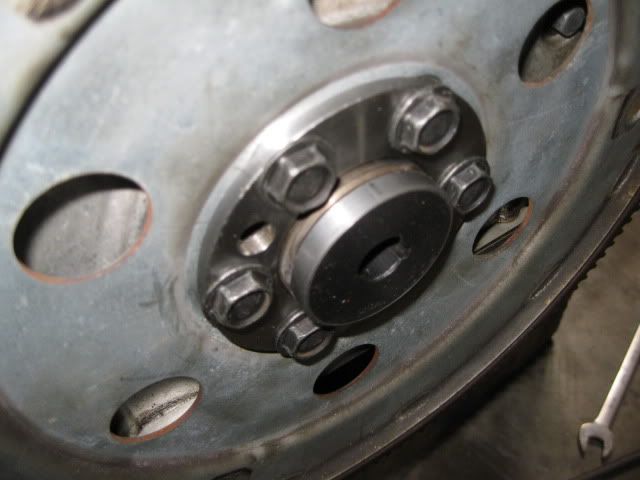
Here is the flywheel with the pressure plate installed at the .820" height:
My particular clutch disk is setup very similar to the G6 with the entire hub offset to the transmission side of the clutch disk. This helps ensure proper spline engagement to the clutch disk.
This pressure plate is thicker than a stock fiero pressure plate, so with the .400" crank spacer the total stack height of the flex plate, .400 spacer, flywheel, clutch, and pressure plate was about .100 too tall to fit inside the transmission. So the .400 crank spacer became a .200" crank spacer:
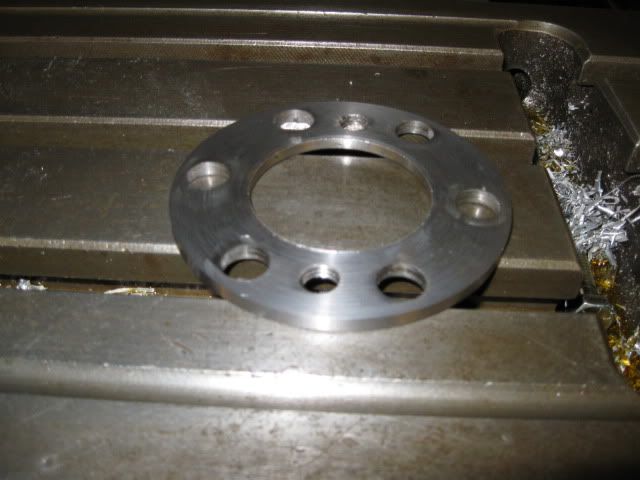
The .400" crank spacer had a boss to support/center the flywheel, but when I made it thinner, the boss went away.
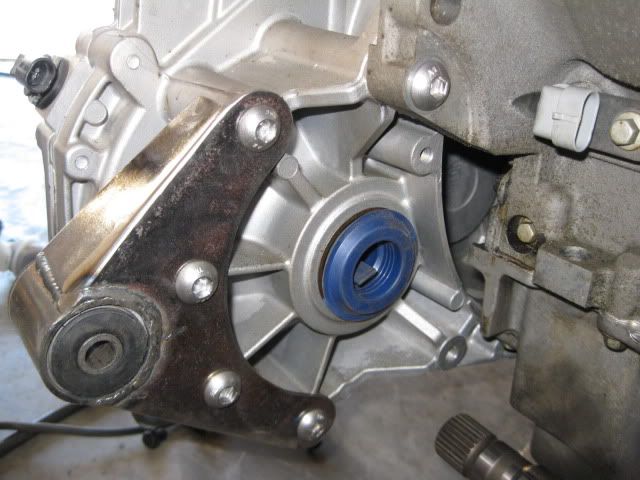
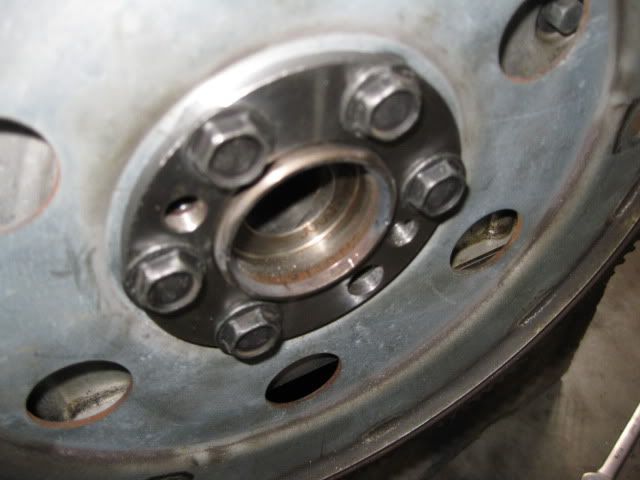
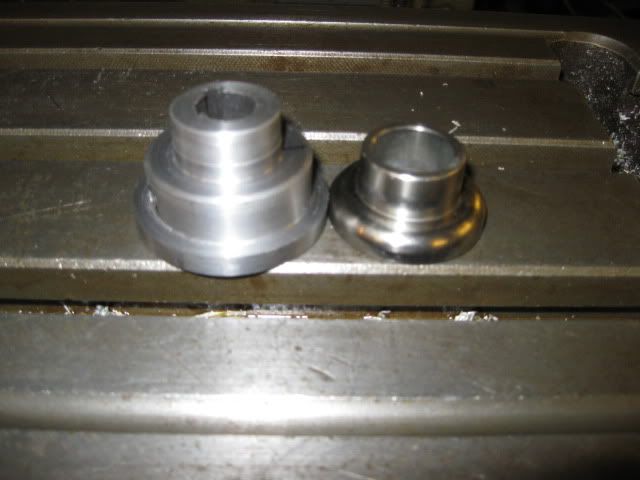
The end of the crankshaft is stepped down as well as the back side of the flywheel, so they no longer had a snug fit to properly center the flywheel, so the cranks flange needed to be extended. The LS4 came with a pilot bushing to support the torque converter, so I removed it and use it to make a new larger pilot bushing to extend the crankshaft flange. The LS4 one is on the right, the one I made on the left:
Then it was pressed into the end of the crankshaft:
The pressure plate spacers and the longer crank bolts should be in sometime this week. Once they are here, I can test fit the assembly and make sure it fits w/o any clearance issues and double check the overall depth of everthing with the range of motion of the HTOB.
"The .400" crank spacer had a boss to support/center the flywheel, but when I made it thinner, the boss went away." I can't believe YOU F'd up so badly. Sooner or later, you WILL be doing it again, and you WILL be milling the OTHER side next time.
I can't believe YOU F'd up so badly. Sooner or later, you WILL be doing it again, and you WILL be milling the OTHER side next time.
You can't mill the crank side. The original spacer has a recessed pocket for the crank flange to slide into, then it steps down to allow for the crankshaft flange extension on the other side. The crank flange is somewhere around .380" deep and the spacer was .417 thick (not counting the flange extension). If you take material off the back side, the crank flange will bottom out before the spacer is seated. Take it off the front side and there will only be a couple of thousandth's of material left...
The use of the pilot bearing based flywheel flange isn't anything new, GM has used them before.
Been tracking down and purchasing some needed odds and ends... LS7 MLS exhaust gaskets (manifold to head) - 2 required: GM# 12594171 Longer crankshaft/flywheel bolts M11 x 1.50 - 6 required: GM# 12563533 LS2 Throttle body 6 pin connector: GM# 13504128 2002 Z06 MAF 5 pin connector: GM# 12167121 DBW accelerator pedal 6-pin connector: GM# 88988944
Everything from the above list is now here, Except the crank bolts. LS7 MLS exhaust gaskets (manifold to head) - 2 required: GM# 12594171
LS2 Throttle body 6 pin connector: GM# 13504128 - Correct!
2002 Z06 MAF 5 pin connector: GM# 12167121 - WRONG... I screwed this up when researching it and found the 6 pin connector. I am pretty sure the right # is 15305932, but I need to order it to confirm.