More than likely. Those border guys love to hang on to stuff.
Ever since 911 shipping anything from the US to anywhere else outside the states has been a major pain in the #$@&*! ^$$. But don't feel bad, my friend has it a hell of a lot worse than you. 80% of all his merchandise comes from the UK, 60% of all sales are back to the UK, you wanna talk about a customs wait and shipping charges, he gets hit twice!
IP: Logged
02:27 PM
Lilchief Member
Posts: 1763 From: Vevay,Indiana Registered: Feb 2004
Francis: Would you PM me those drawings. I was thinking about cutting out the center of a gen3 LIM and welding aluminum 90s to it, maybe closer to 45. Just an idea I been kicking around.
Ever since 911 shipping anything from the US to anywhere else outside the states has been a major pain in the #$@&*! ^$$. But don't feel bad, my friend has it a hell of a lot worse than you. 80% of all his merchandise comes from the UK, 60% of all sales are back to the UK, you wanna talk about a customs wait and shipping charges, he gets hit twice!
IP: Logged
02:03 AM
OH10fiero Member
Posts: 1541 From: struther OH Registered: Jun 2002
I'm thinking about using a thermal shirt under a t shirt under a sweatshirt under a parka. With thermal gloves and 2 pair of jeans. Might keep me warm enough, not too sure. The 'windchill factory' has been ramping up production lately
I'm only concerned about the front manifold removal... I have Rodney's exhaust studs installed, I just hope that removal of the nuts won't be too hard.
Woo!
(I will have pics as the situation develops. Too exciting!)
IP: Logged
10:22 PM
Nov 2nd, 2006
OH10fiero Member
Posts: 1541 From: struther OH Registered: Jun 2002
If you have Rodney's kit already installed on the old exhaust you did yourself a favor and should have no problems getting the old exhaust off. Since you are in a exteam cold situation you may want to check to see if the bolts are torqed down properly for the first few days after you get the hearders on, studs are a different situation than regular exhaust bolts and should be checked because of how the exhaust expands and shrinks due to normal high heat being created. Good luck with the install.
IP: Logged
01:53 AM
The Funkmaster Member
Posts: 1541 From: Chilliwack, B.C., Canada Registered: Oct 2004
I spent 8 hours today working on my car, I still have to wrap it up tomorrow. I'm exhausted (No pun intended )
I have pictures of the install from start to finish, with detailed info that is sure to help you install your shiny new set o' headers! Unfortunately, PIP is not working right now, I think because of the server/hosting swapover type thingy that's going on.
I'll delve into the realm of words for ya, and add pictures asap.
To begin, I started with the easy stuff. I removed the bolts/nuts holding the manifolds to the old y-pipe, and pulled the pipe out. Remember to remove your oxygen sensor before tossing the old pipe. If you plan to use your EGR again, take the opportunity to clean it and make it look nice again. Mine's all rusted, so I won't be using it at all, planning on blocking off the holes.
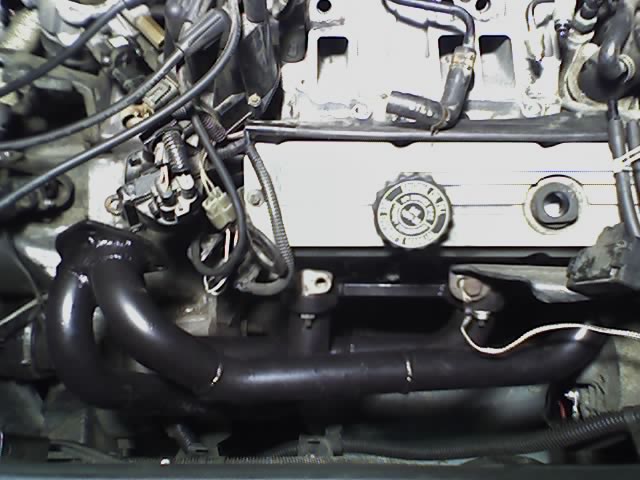
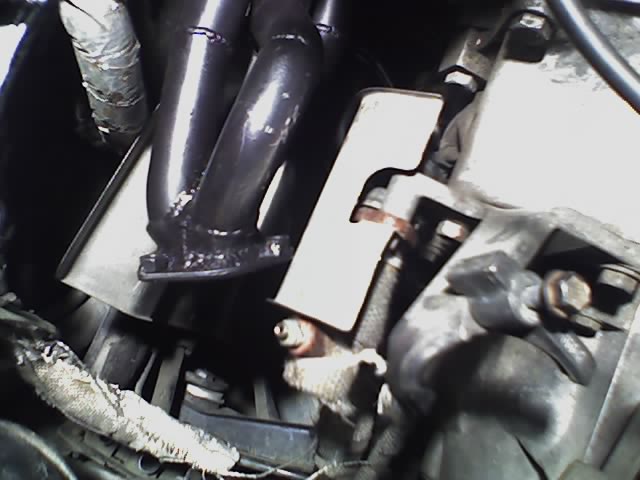
I removed the nuts holding the rear manifold on, (I have exhaust studs, which was a very wise investment!) and popped off the rear manifold. Some carbon buildup was noticed on the inner edge of the manifold, but that's because I've been running it so bloody rich. Hopefully I can get things sorted soon. Installation of the new header went smoothly, though I had to remove the rear firewall heat shield to get the header in there. I haven't tried replacing it, I am sure it will fit, though some modification will be needed. Now is a good time to check for wiring issues - Strap 'em out of the way. Your alternator heat shield may have to go - I haven't tried replacing it yet, but it had to go in order for the old manifold to come off and the new one to go on. I may make a custom new one, as it is a little closer now.
Thinking that this was almost too easy, I began with the hard part: the dreaded front manifold. Since I am installing the new intake as well, I took the liberty of stripping the top half of the engine down to the lower intake manifold. I pulled everything to the side, and could then reach the top manifold nuts. I would honestly recommend removing the intake even if you aren't putting a new one on - This makes it *so* much easier to reach the top nuts. The stupid heat shield came off rather easily, surprisingly. ***At this point, loosen the nut holding your dipstick on the header, near the lifting point bolted onto the head. Pull the dipstick out a little ways, so it's disconnected from the block, but leave it far enough down there so you can reach it from below.***
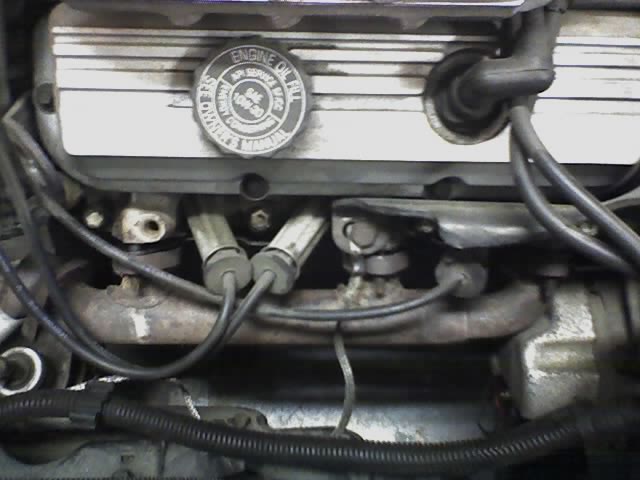
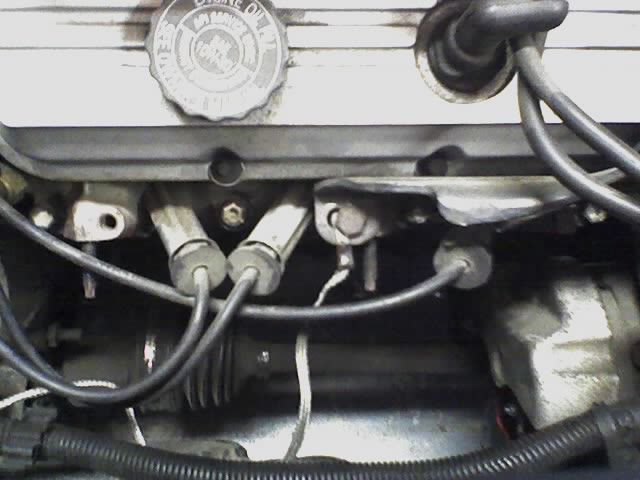
Now is also a good time to move your coil. Troy and Francis provided some materials for raising the coil a little higher, but unfortunately the bolts provided were a little short. They reach, but don't quite thread in. I used my dremel to remove 1/8 from the 2 standoff units they provided, and this made it fit just right. I am not using the EGR, so I did not spin the coil around the other way as I won't need the extra room. Make sure you mount the tach filter far enough away from the exhaust so that it doesn't burn to death.
Original coil position: See how it's really really close to the exhaust?
The new position:
...The bottom half is where the cursing and wrench-throwing began. Jack the back end of the car up, as you will need room to flail about wildly and hurl parts/tools out from under the car. Both sides need to be up in order to work comfortably. I slid in on a creeper (You have one, right? You'll need it, you'll be under there for a while) and realized that because I have studs, the AC system was in the way. Cue deveral minutes of frustration, and the eventual realization that the compressor had to be moved.
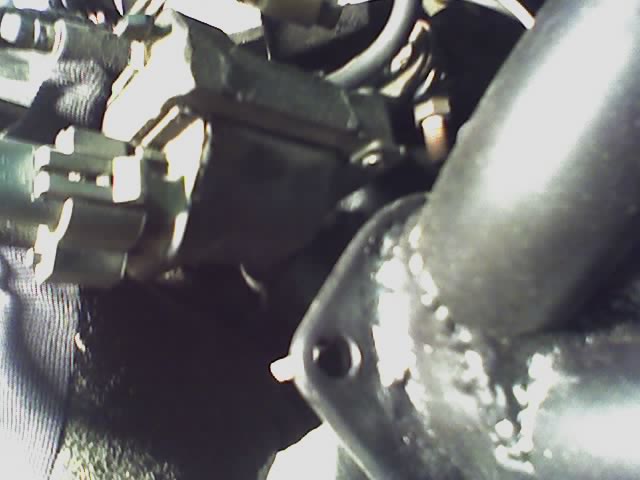
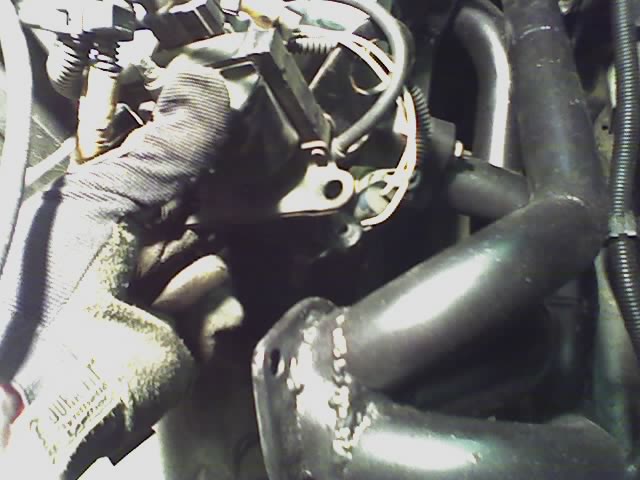
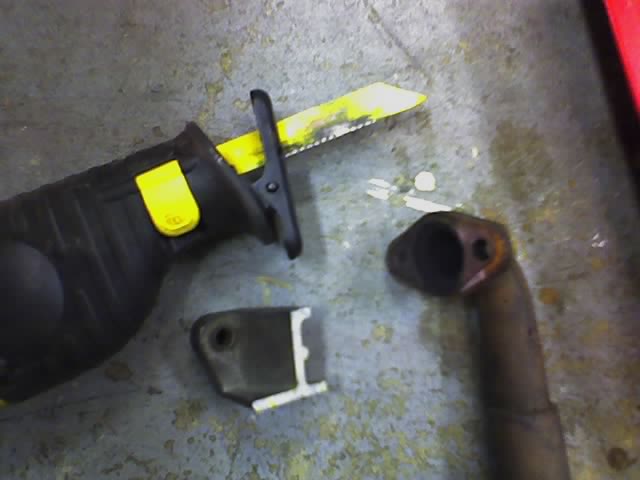
My AC system doesn't work, so I just removed the compressor entirely. No charge in the system, so I wasn't worried. ***DO NOT REMOVE A/C COMPONENTS WHILE THE SYSTEM IS CHARGED.*** I don't want to see anyone hurt. Removing the compressor made things infinitely easier for me, until I realized that the tail end of the AC bracket (The top one) was still in the way. I just grabbed the sawzall and snipped about 1.5 inches off the bracket, enough to make room for the manifold. I believe that if you have AC and want to keep it, you will have to move the compressor out of the way, then replace it after install. Removal of the bracket end was not *neccesary*, though with the exhaust studs, it would have been a HUGE hassle. I do not plan on keeping the AC system in the car anyways.
(-Disclaimer- I don't have any exhaust system in at this point, so I am not sure how the front header install will be with that in place. Probably a lot harder. My advice is to remove the exhaust setup first.) The front header installs rather easily from this point. You may have to remove the secondary wiring from your starter, not a big deal. Replace after install. The small heat shield in the front right hand corner of the cradle has to be removed in order for the header to fit in, basically slide the header in collector first, vertically, then angle it over until in position. Remember how you disconnected the oil dipstick? You have to put it between the little steel beam between the two cylinders and the pipe from the end cylinder. Re-insert it into the block. Bolt down the header, don't forget your new gaskets!
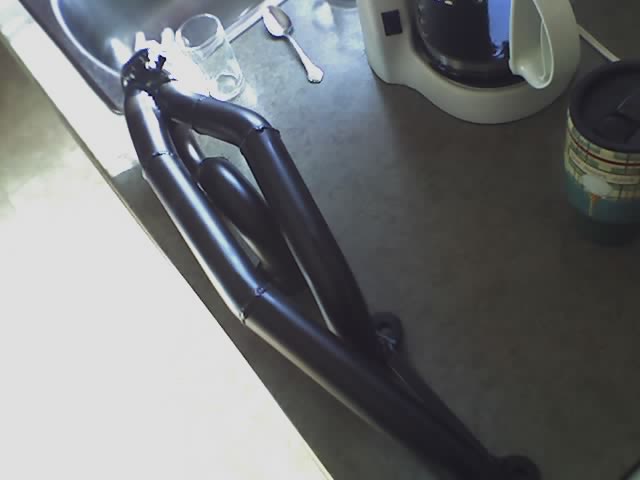
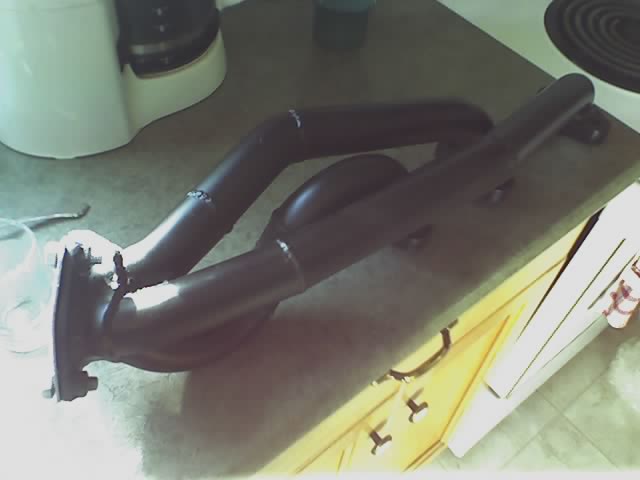
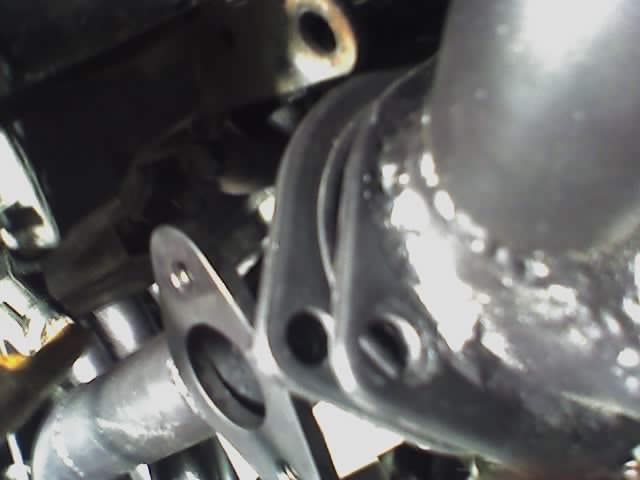
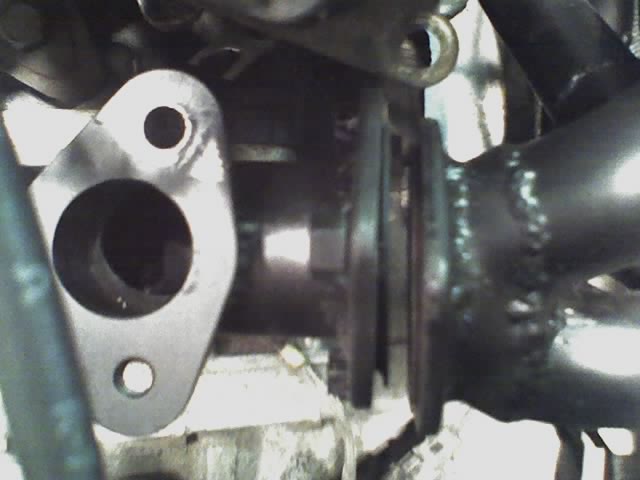
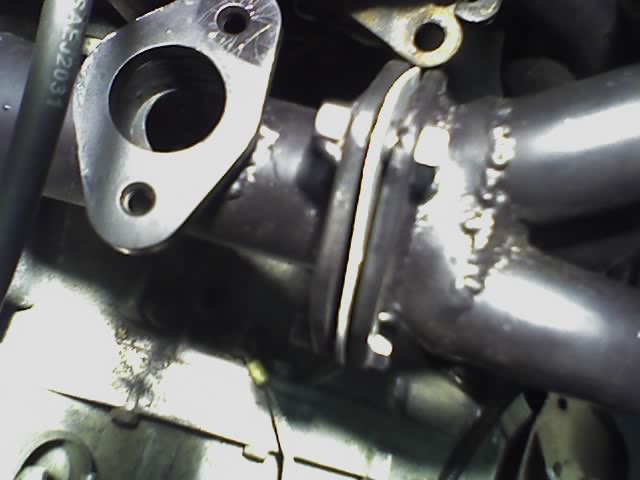
The Y-Pipe goes in easy easy. Make sure your shift cables aren't in the way, and slam 'er in there. Watch your slave cylinder, don't break anything. I had luck bolting the front header on first, handtight. Then position the y-pipe to the rear header and bolt that one on too. I ran into an issue with this, where the y-pipe wasn't quite fitting - There was a 1/2" gap and it was offcenter a little. I used a prybar to correct this, my guess is that a jig was off just a touch. Francis or Troy, please feel free to inform us as to what's going on with this. It was slightly worrysome, and I'm not sure if the heat/expansion will pose an issue with this. The flange on the rear header was also about 2* off, so the lower bolt was just a little too short. I used a pair of vice grips to pull the flanges closer, then bolted them together. The system is bolted together completely now, though I hate 'prybar'ing things into place. Perhaps something that could be corrected for future units. (The pics will show you exactly what I mean.)
These pics shows the system before the prybar was implemented.
Here's the system after the minor adjustments needed:
Now, make sure wiring is nowhere near these new, larger exhaust pipes. Hook up your oxygen sensor again, and re-install the small heat shield you removed down below. Re-install your exhaust system if you have it handy.
*Edit - soon (Like Monday) I'll post up intake installation tips, and how to disconnect all the spark plugs then not know which ones go where again! *
------------------
[This message has been edited by The Funkmaster (edited 11-04-2006).]
IP: Logged
03:46 AM
PFF
System Bot
Francis T Member
Posts: 6620 From: spotsylvania va. usa Registered: Oct 2003
Thanks for all the info. As for that fit problem with the Y pipe? Our gigs are bolted to an engine and I build the headers and Y pipe on the engine and weld most of it up with it all bolted together, save for a few joints that have to be fineshed when we take it off. Seeing how it's much easier for me to bolt it up whereas it.s not it's in car, maybe what seemed like a slightly tite connection was really too much. I'll make sure that they all bolt up real easy (by hand) from now on.
As for the AC, I have a feeling I either did not have an install sheet writen when we shipped yours, or just forgot to includ one. Anyway; the sheet tells you to losen the lower AC bolt and pull the 3 bolts on the front of the engine (the pully side) that hold the compressor bracket so you pull it away from the engine. That makes it lot easier.
On the coil bolts; since I sent yours out, I found slighhtly longer bolts with threads like the stock ones and they fit real nice. Although, I did bolt my coil onto the engien with the bolts I sent you. But again, the engine is not in a car and easier.
IP: Logged
09:34 AM
Francis T Member
Posts: 6620 From: spotsylvania va. usa Registered: Oct 2003
on the intkae, read the installation tips/instructions on our site. Also if you plan to paint your valve covers to match, it's good time pull them now with no intake in your way. However, with our intkae you can pull them anytime as the intake is not in the way.
I spent 8 hours today working on my car, I still have to wrap it up tomorrow. I'm exhausted (No pun intended )
I have pictures of the install from start to finish, with detailed info that is sure to help you install your shiny new set o' headers! Unfortunately, PIP is not working right now, I think because of the server/hosting swapover type thingy that's going on.
I'll delve into the realm of words for ya, and add pictures asap.
To begin, I started with the easy stuff. I removed the bolts/nuts holding the manifolds to the old y-pipe, and pulled the pipe out. Remember to remove your oxygen sensor before tossing the old pipe. If you plan to use your EGR again, take the opportunity to clean it and make it look nice again. Mine's all rusted, so I won't be using it at all, planning on blocking off the holes.
I removed the nuts holding the rear manifold on, (I have exhaust studs, which was a very wise investment!) and popped off the rear manifold. Some carbon buildup was noticed on the inner edge of the manifold, but that's because I've been running it so bloody rich. Hopefully I can get things sorted soon. Installation of the new header went smoothly, though I had to remove the rear firewall heat shield to get the header in there. I haven't tried replacing it, I am sure it will fit, though some modification will be needed. Now is a good time to check for wiring issues - Strap 'em out of the way. Your alternator heat shield may have to go - I haven't tried replacing it yet, but it had to go in order for the old manifold to come off and the new one to go on. I may make a custom new one, as it is a little closer now.
Thinking that this was almost too easy, I began with the hard part: the dreaded front manifold. Since I am installing the new intake as well, I took the liberty of stripping the top half of the engine down to the lower intake manifold. I pulled everything to the side, and could then reach the top manifold nuts. I would honestly recommend removing the intake even if you aren't putting a new one on - This makes it *so* much easier to reach the top nuts. The stupid heat shield came off rather easily, surprisingly. ***At this point, loosen the nut holding your dipstick on the header, near the lifting point bolted onto the head. Pull the dipstick out a little ways, so it's disconnected from the block, but leave it far enough down there so you can reach it from below.***
Now is also a good time to move your coil. Troy and Francis provided some materials for raising the coil a little higher, but unfortunately the bolts provided were a little short. They reach, but don't quite thread in. I used my dremel to remove 1/8 from the 2 standoff units they provided, and this made it fit just right. I am not using the EGR, so I did not spin the coil around the other way as I won't need the extra room. Make sure you mount the tach filter far enough away from the exhaust so that it doesn't burn to death.
The bottom half is where the cursing and wrench-throwing began. Jack the back end of the car up, as you will need room to flail about wildly and hurl parts/tools out from under the car. Both sides need to be up in order to work comfortably. I slid in on a creeper (You have one, right? You'll need it, you'll be under there for a while) and realized that because I have studs, the AC system was in the way. Cue deveral minutes of frustration, and the eventual realization that the compressor had to be moved.
My AC system doesn't work, so I just removed the compressor entirely. No charge in the system, so I wasn't worried. ***DO NOT REMOVE A/C COMPONENTS WHILE THE SYSTEM IS CHARGED.*** I don't want to see anyone hurt. Removing the compressor made things infinitely easier for me, until I realized that the tail end of the AC bracket (The top one) was still in the way. I just grabbed the sawzall and snipped about 1.5 inches off the bracket, enough to make room for the manifold. I believe that if you have AC and want to keep it, you will have to move the compressor out of the way, then replace it after install. Removal of the bracket end was not *neccesary*, though with the exhaust studs, it would have been a HUGE hassle. I do not plan on keeping the AC system in the car anyways.
(-Disclaimer- I don't have any exhaust system in at this point, so I am not sure how the front header install will be with that in place. Probably a lot harder. My advice is to remove the exhaust setup first.) The front header installs rather easily from this point. You may have to remove the secondary wiring from your starter, not a big deal. Replace after install. The small heat shield in the front right hand corner of the cradle has to be removed in order for the header to fit in, basically slide the header in collector first, vertically, then angle it over until in position. Remember how you disconnected the oil dipstick? You have to put it between the little steel beam between the two cylinders and the pipe from the end cylinder. Re-insert it into the block. Bolt down the header, don't forget your new gaskets!
The Y-Pipe goes in easy easy. Make sure your shift cables aren't in the way, and slam 'er in there. Watch your slave cylinder, don't break anything. I had luck bolting the front header on first, handtight. Then position the y-pipe to the rear header and bolt that one on too. I ran into an issue with this, where the y-pipe wasn't quite fitting - There was a 1/2" gap and it was offcenter a little. I used a prybar to correct this, my guess is that a jig was off just a touch. Francis or Troy, please feel free to inform us as to what's going on with this. It was slightly worrysome, and I'm not sure if the heat/expansion will pose an issue with this. The flange on the rear header was also about 2* off, so the lower bolt was just a little too short. I used a pair of vice grips to pull the flanges closer, then bolted them together. The system is bolted together completely now, though I hate 'prybar'ing things into place. Perhaps something that could be corrected for future units. (The pics will show you exactly what I mean.)
Now, make sure wiring is nowhere near these new, larger exhaust pipes. Hook up your oxygen sensor again, and re-install the small heat shield you removed down below. Re-install your exhaust system if you have it handy.
Tomorrow I'll post up intake installation tips!
IP: Logged
09:40 AM
Francis T Member
Posts: 6620 From: spotsylvania va. usa Registered: Oct 2003
See my previous post (Just above) for the edited version with pictures!
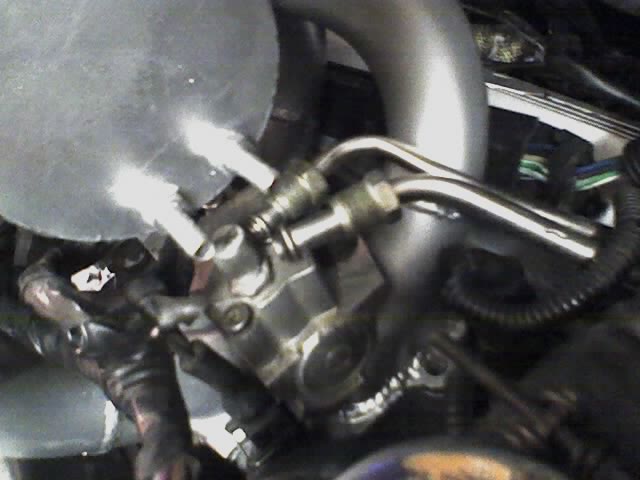
I had one question, Troy, Francis: I have an adjustable fuel pressure regulator, and the requisite gauge. However... the intake is very tight and will not accomodate the gauge. I was wondering if you guys had experienced any luck with an alternate method of installing a fuel pressure gauge? I am contemplating finding a fitting and flexible hose (Fuel rated of course), and installing that on the cold start injector hole. There's a lot more room there.
Anyways, if you could give me any ideas, that would be great! Thanks!
Steve
IP: Logged
04:12 AM
Francis T Member
Posts: 6620 From: spotsylvania va. usa Registered: Oct 2003
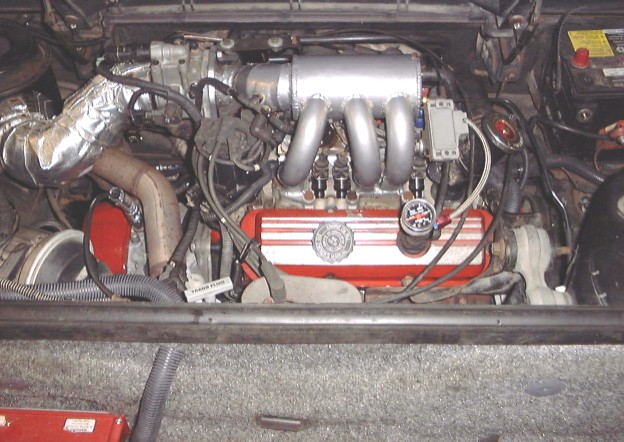
I have a gauge on mine as do others. I have it mounted off the bracket for the MAP sensor and used flexable line with compression fittings. If you look at the picture of my engine on the page before this one (not the close up) you will see the gauge facing you, it's washed out some by the camera flash.
Gee gads, I didnt have cut my bracket to get the header on. But then I pulled my AC away first. I have a guide on our gig to make sure it don't get in the way of that thing and that was the tightest pipe to fit.
IP: Logged
09:15 AM
Lilchief Member
Posts: 1763 From: Vevay,Indiana Registered: Feb 2004
Gee gads, I didnt have cut my bracket to get the header on. But then I pulled my AC away first. I have a guide on our gig to make sure it don't get in the way of that thing and that was the tightest pipe to fit.
Yeah, it would have fit if I had removed the bolts for the AC bracket and then replaced them, but I was not feeling up to that and well, I'm kinda lazy. Plus the exhaust studs excaberated the problem a little. No worries though!
Most people shouldn't have to cut up their cars to get this stuff together. No worries
IP: Logged
11:50 AM
Francis T Member
Posts: 6620 From: spotsylvania va. usa Registered: Oct 2003
Hmm... I guess I'll take the other fuel rail I have lying around down to the local parts place n' see if they have anything lying about as far as fittings go. Cool! Thanks!
On the idea of using AL V-6 heads in the fiero.....Has anyone ever considered attempting to convert to a distributerless ignition or mabey coil on plug? I suppose it could be done if you used a stand alone engine managment....any thoughts?
IP: Logged
11:33 AM
PFF
System Bot
Francis T Member
Posts: 6620 From: spotsylvania va. usa Registered: Oct 2003
When my son was a tuner for Electromotive engine management systems we though about ita nd decided to just build and intake. To go that no-distributor route, you would have to make your own trigger mount and see if there are any trigger wheels for GM engines that could bolt up. If not you would need the have one machined for it. We did a scratch setup like that on my 77 Fiat 124 spider. Mkae all the pieces ourselves and I'm sure I have the only 124 spider anywhere running without a distributor. Such a setup would probably work best if you also managed the injectors with it. You're looking at costly and somewhat complecated project and not likely worth the effort and cost. But thats just my thoughts on it.
It certaintly wouldn't be cheap, thats for sure. Do you know how the AL head V-6 keeps the timing stock? There has to be a cam or crank sensor from the factory. Think you could tap into that and use that instead of building a trigger wheel setup? Tim
IP: Logged
12:06 PM
Francis T Member
Posts: 6620 From: spotsylvania va. usa Registered: Oct 2003
My son is expert on such things and I also dont know much about those heads etc. I guess if the system now has a cam or whatever tigger with a marker for TDC and also is fully degreed, it could be tapped into somehow? The Electromotive system he used on his MR-2 was awesum and very exspense. But it let him do all kinds of things with respect to tuning. We were even able to add a set of secondary richer injectors for higher rpm (6K - 13K) and it would simple switch injectors. If you knew which to use, you could probably take v-6 coil system from another GM engine, put a crank trigger and wheel on yours and match them up. But you would also have to chnage the eprom. Shame it's so completcete, what with the stuff jsut sitting out there in the junk yards doing nothing.
IP: Logged
12:33 PM
The Funkmaster Member
Posts: 1541 From: Chilliwack, B.C., Canada Registered: Oct 2004
I was up from midnight until 6 this morning installing the intake and related things. Got some pics... Need some sleep.
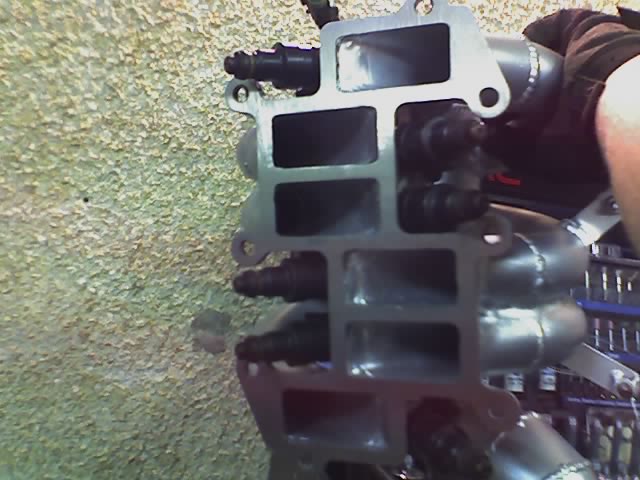
I had a hell of a time with the fuel injectors. I removed the wiring harness and the injectors, got the fuel rail in, then installed the injectors once more and put the wiring harness back on. That alone took close to an hour, tight spaces inside that intake! My adjustable FPR is pretty tight as well, but fits.
I hope there's no problems with my fuel injectors: They are sitting a little higher than they were originally in the old intake. The rubber seals are a little higher, but I think still make a seal. Haven't run it yet, but I'm pretty sure they will work. They are out further though, especially on the front side of the engine.
The fuel return line has to go in before the feed line, and I had to bend it about 15* up in order to make it fit. I have the Fiero Store replacement braided lines, so they are slightly different than stock, but the fitment was a little bit of an issue. A couple minutes with some pliers, and everything slid right in. The feed line has to go in second, and fits nicely.
The throttle body area is AWESOME. More room, easier to run stuff around there, less stuff crammed together... The throttle body installs so easily it's ridiculous! It just pops right on.
Vacuum lines are a pain in the ass - Troy and Francis did a great job with the placement of the fittings though. Looks great, and all of them are easy to get to. I will be making new, better lines out of steel instead of this plastic stuff, which will make it look that much nicer. The intake is shaped so much different than the stock one that most of the vacuum lines can be run outside of the manifolds instead of inside! Much nicer.
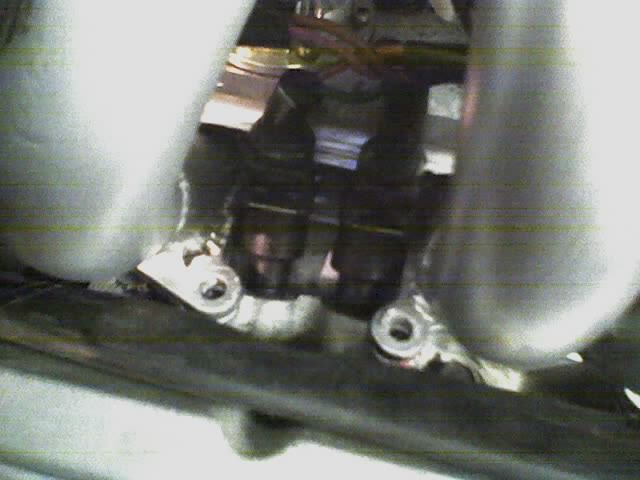
...On a side note, I am not planning on using EGR at all. I made up a small blockoff plate which I will be installing over the hole in the Y-pipe. Perhaps it would be a good idea to include a small plate that could be used as a blockoff, guys? That way all the Y-pipes could be EGR ready and future customers could have the option to run it or not. It's just a small piece of steel with a couple holes in it - I can post a pic if anyone is curious as to what I mean.
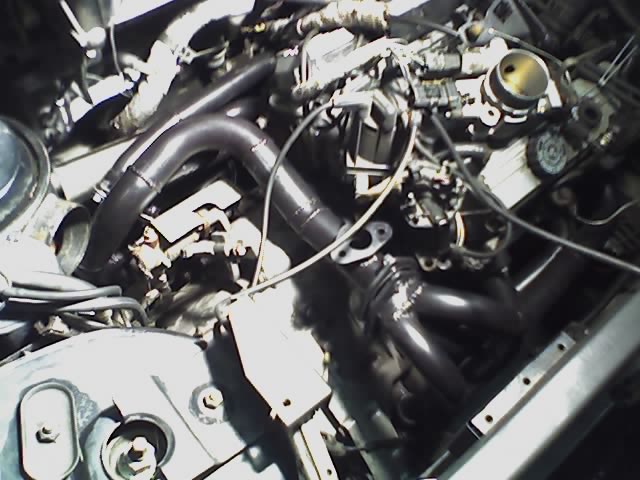
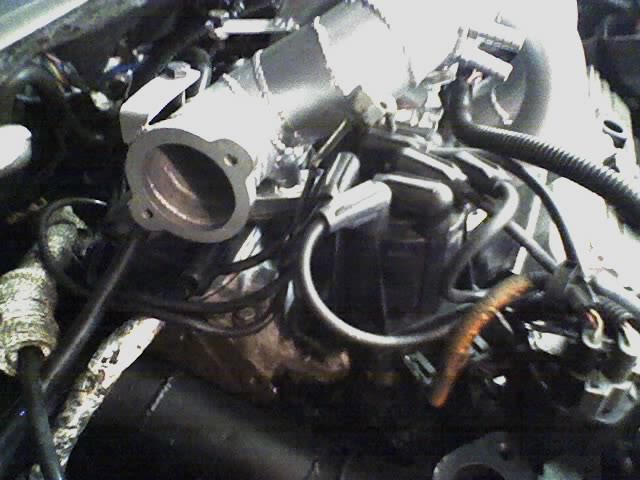
The engine after 6 hours of hard work:
So far, the exhaust and intake has take approximately 11 hours to do. I have about an hour left. So it's not a *really* time consuming project, just a little more than normal. Overall I'd say I'm happy with the products! Fitment and workmanship get a 9/10, and I'd definitely recommend these products to any Fiero enthusiast! I have yet to try the whole 'driving the car' thing, but I hope to on Monday! I will tell you all about 'assometer' power increases then.
IP: Logged
06:20 PM
Francis T Member
Posts: 6620 From: spotsylvania va. usa Registered: Oct 2003
When installing the fuel rail and injectors. I've it's not all that hard if you 1- remove your coolant filler neck (just two bolts) and 2 - remove the fuel block from the rail and put it back on when you have the rail bolted down. Your project seems to be coming along nicely, dont forget to install the chip.
IP: Logged
11:58 PM
Nov 6th, 2006
The Funkmaster Member
Posts: 1541 From: Chilliwack, B.C., Canada Registered: Oct 2004
The coolant fill neck was actually no problem at all I considered removing the block but thought that bending the line would be faster and easier... Either way would work though.
As far as the chips go, do I want to use the lean chip or the not-so-lean chip? I have M06 and M011. I will not be using nitrous quite yet, so the engine will be N/A with .440 lift on both intake and exhaust, with minimal overlap. I really don't know which I should use... Should I just try all three and see which works best?
Steve, Thanks for taking the time to post your progrees and pics, I have a feeling I will be looking at them alot in the future, I`m still waiting to hear from Darrell M. on a t.b. or any other t.b.`s that are larger and would work . I`d be interested in seeing a pic of your egr block off plate when you get a chance....Still a little confused as to how the fuel lines are run in ? Strait fit? Or just fab rubber ones?
IP: Logged
02:28 AM
The Funkmaster Member
Posts: 1541 From: Chilliwack, B.C., Canada Registered: Oct 2004
I'd definitely recommend Darrell's throttle body, I have one and it's absolutely awesome. He does excellent work.
I will snap you a picture of the block off plate as soon as the rain stops here... We're supposed to get 5 inches tonight. The plate itself isn't anything too special, I used an old coil heatshield, cut down to the proper shape. I'm going to get some gasket material tomorrow, and bolt it down. I'm hoping that the metal is thick enough to not flex and leak - Otherwise I'll just have to go buy some 1/8 steel.
As far as the fuel lines go, there's no major modification needed. The lines I'm using right now are the Fiero Store reproduction lines, identical to the stock ones in shape and function, but made of nicer materials. I had to bend the return line a couple degrees up, as the intake runner for cyl#2 is in the way of the path that the line has to take as it goes into the distribution block. (Does that make any sense at all? ) As Francis said, you could alternatively remove the block to install the lines, the bolt it down again - But it's pretty tight inside the intake. There's no need to replace or severly modify the fuel lines.
If there's anything else you need, feel free to ask!
-Steve
------------------
IP: Logged
02:49 AM
Francis T Member
Posts: 6620 From: spotsylvania va. usa Registered: Oct 2003
I think that block-off of yours will be too thin. Get some 1/8" allumimium and make it from that. You can cut that stuff with a sabor saw or whatever. Just put the stock gasket there. As for the chip selection, Troy can only gess at what will work, what with all the mods people do, but he did give you enough to try. The best thing you can do is get an hour or three runs on a dyno and see what the wideband tells you. Not just HP, either. The highest HP may be too lean. And get a data printout. If you dont have a dyno or know where you can get some wideband readouts, or exhaust temp readouts, try all three chips and go with what seems the best and then read your plugs to see what the A/F looks like.


 )
)
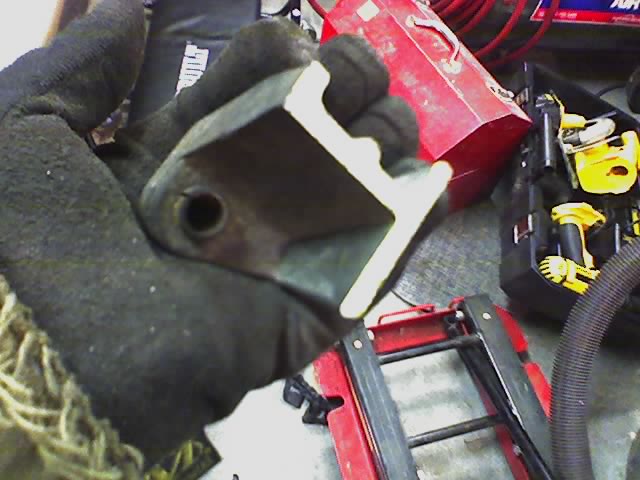
 The plate itself isn't anything too special, I used an old coil heatshield, cut down to the proper shape. I'm going to get some gasket material tomorrow, and bolt it down. I'm hoping that the metal is thick enough to not flex and leak - Otherwise I'll just have to go buy some 1/8 steel.
