Pennock's Fiero Forum
  The Construction Zone
  The Miura project begins (Page 9)

Post New Topic  Post A Reply
Email This Page to Someone! | Printable Version

This topic is 21 pages long:  1   2   3   4   5   6   7   8   9   10   11   12   13   14   15   16   17   18   19   20   21 
Previous Page | Next Page
next newest topic | next oldest topic
The Miura project begins by Archie
Started on: 12-08-2007 07:13 AM
Replies: 834 (215042 views)
Last post by: Archie on 02-03-2023 02:01 PM
30+mpg
Member
Posts: 4049
From: Russellville, AR
Registered: Feb 2002


Feedback score: (2)
Leave feedback


Total ratings: 97
Rate this member

Report this Post05-09-2009 10:49 PM Click Here to See the Profile for 30+mpgSend a Private Message to 30+mpgEdit/Delete MessageReply w/QuoteDirect Link to This Post
kinda of like this?

This images is larger than 153600 bytes. Click to view.
IP: Logged
Archie
Member
Posts: 9436
From: Las Vegas, NV
Registered: Dec 1999


Feedback score:    (12)
Leave feedback


Total ratings: 546
Rate this member

Report this Post05-15-2009 12:38 PM Click Here to See the Profile for ArchieClick Here to visit Archie's HomePageSend a Private Message to ArchieEdit/Delete MessageReply w/QuoteDirect Link to This Post
Here are the headlight covers i mentioned earlier but frgot to post the picture.


Some more sanding & filling & the lights are looking good.


Also working in the trunk area setting up the decklid latch & working on the sheet metal. More pics on this later.


Working our way down the sides of the car we are now working on getting the wheel well openings to match up side to side & to match up with the rocker panels.


Archie
IP: Logged
Erik
Member
Posts: 5625
From: Des Moines, Iowa
Registered: Jul 2002


Feedback score: (3)
Leave feedback


Total ratings: 168
Rate this member

Report this Post05-18-2009 03:37 AM Click Here to See the Profile for ErikSend a Private Message to ErikEdit/Delete MessageReply w/QuoteDirect Link to This Post
 
quote
Originally posted by Archie:

Here are the headlight covers i mentioned earlier but frgot to post the picture.


Some more sanding & filling & the lights are looking good.


Also working in the trunk area setting up the decklid latch & working on the sheet metal. More pics on this later.


Working our way down the sides of the car we are now working on getting the wheel well openings to match up side to side & to match up with the rocker panels.


Archie


it looked perfect along time ago yet you keep making it better ..thanks
IP: Logged
Archie
Member
Posts: 9436
From: Las Vegas, NV
Registered: Dec 1999


Feedback score:    (12)
Leave feedback


Total ratings: 546
Rate this member

Report this Post05-22-2009 12:04 PM Click Here to See the Profile for ArchieClick Here to visit Archie's HomePageSend a Private Message to ArchieEdit/Delete MessageReply w/QuoteDirect Link to This Post
Here's some better pics of the decklid work.


We've been working on the bodywork, front to back.....

Straightening out the hood....


.............
IP: Logged
Archie
Member
Posts: 9436
From: Las Vegas, NV
Registered: Dec 1999


Feedback score:    (12)
Leave feedback


Total ratings: 546
Rate this member

Report this Post05-22-2009 12:45 PM Click Here to See the Profile for ArchieClick Here to visit Archie's HomePageSend a Private Message to ArchieEdit/Delete MessageReply w/QuoteDirect Link to This Post

Archie

9436 posts
Member since Dec 1999
Also working on fitting the windshield.

The windshield opening on the car didn't match the windshield very well so some fitting is needed.

Note that much eralier we built up the area that the windshield will glue to making it wider. Before final mounting of the windshield, we will be trimming the flange to make it just the right width for mounting the windshiled.


In some places we ended up sanding thru the original fiberglass to get the windshield to set in correctly.


The center section of the body will also need a lot of bodywork before we're done. Including fiberglassing in for the above gap. so we took it off to do some of that work. While we have it off we'll be welding in the mounts for the overhead console.


Archie
IP: Logged
Austrian Import
Member
Posts: 3919
From: Monterey, CA
Registered: Feb 2007


Feedback score: N/A
Leave feedback

Rate this member

Report this Post05-26-2009 01:28 AM Click Here to See the Profile for Austrian ImportSend a Private Message to Austrian ImportEdit/Delete MessageReply w/QuoteDirect Link to This Post
Wow! THIS is the engine that should go into the Miura project.

https://www.fiero.nl/forum/Forum2/HTML/100795.html

A true transverse V-12.

yes I know, I'm dreaming , but it's a nice thought, ain't it?

[This message has been edited by Austrian Import (edited 05-26-2009).]

IP: Logged
jbuell
Member
Posts: 13
From: san antonio tx
Registered: May 2007


Feedback score: N/A
Leave feedback

Rate this member

Report this Post06-10-2009 05:05 PM Click Here to See the Profile for jbuellSend a Private Message to jbuellEdit/Delete MessageReply w/QuoteDirect Link to This Post
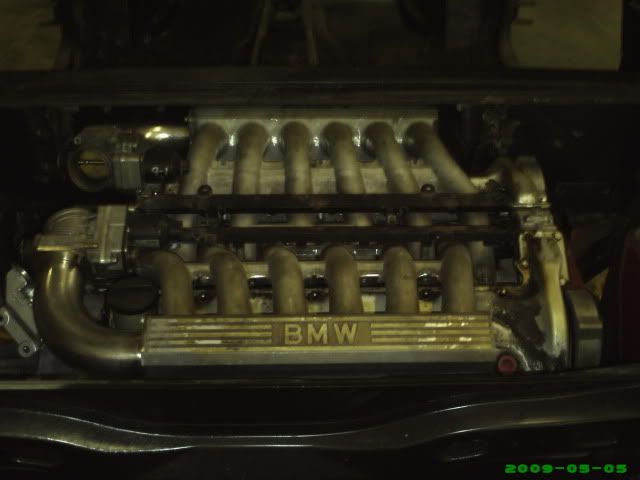
Transplanting a V12 transversly into the Fiero is an impressive feat of creativity and engineering and I applaud his ability to do so. Unfortunately , from what I have seen regarding the tight clearances that already exist for this Miura fiberglass body over the Fiero chassis , I doubt the body could accomodate an additional 2 inches of chassis width and keep the tires inside the wheel wells . In addition , as others have commented , the LS3 provides a higher power to weight ratio than the BMW V12 and certainly benefits from availability of affortable aftermarket performance parts . Neverthelesss , I agree that a transverse V12 in a Fiero should be awarded very high marks for style points and engineering talent. Hope to see more of this amazing project on his thread.
IP: Logged
kevin
Member
Posts: 2722
From: Elk Grove, CA USA
Registered: Jan 2000


Feedback score: N/A
Leave feedback

Rate this member

Report this Post06-12-2009 08:13 PM Click Here to See the Profile for kevinSend a Private Message to kevinEdit/Delete MessageReply w/QuoteDirect Link to This Post
Archie,
I agree with the ideas of the two posts above, concerning the possible V12 in your Muira. If not the BMW variety, perhaps the V12 out of a Jaguar? I do not know if this engine, or one of a different manufacturer, is of a smaller dimension. However, I was just wetting everybodies appetite on the idea we can all agree on. Can you at least consider it?

Cordially,
Kevin
IP: Logged
Archie
Member
Posts: 9436
From: Las Vegas, NV
Registered: Dec 1999


Feedback score:    (12)
Leave feedback


Total ratings: 546
Rate this member

Report this Post06-12-2009 11:48 PM Click Here to See the Profile for ArchieClick Here to visit Archie's HomePageSend a Private Message to ArchieEdit/Delete MessageReply w/QuoteDirect Link to This Post
 
quote
Originally posted by kevin:

Archie,
I agree with the ideas of the two posts above, concerning the possible V12 in your Muira. If not the BMW variety, perhaps the V12 out of a Jaguar? I do not know if this engine, or one of a different manufacturer, is of a smaller dimension. However, I was just wetting everybodies appetite on the idea we can all agree on. Can you at least consider it?

Cordially,
Kevin


I admire people who go outside the box to do something that hasn't been done before, or at least hasn't been done very often. After all, I was there 20 some years ago when I started putting SBC's into the Fiero. Several years ago, I did the same thing with the 6 speed swaps & the LSx swaps.

There is a big difference between building any First Time Swap on your own car, when you get a working knowledge of every inch of the car & can prove out that swap AND Building the same First Time Swap for a customer who expects to take home a package proven thru the years.

I've measured the length & width of a V-12 Jag. engine & it won't even come close to fitting inside the frame rails.

While I enjoy reading about that BMW V-12 built, it's not a commercially viable alternative as yet. In fact as related to that type of installation into a customers' car it is 100% unproven. The development costs of making that V-12 a proven swap to put into a customers' car & work out all the issues that would come up would be much more than the engine that he has already chosen. Also, I don't know what a new BMW V-12 engine would cost but this customer doesn't want a used engine in his car.

I could go on but that should answer your qusetion.

Archie
IP: Logged
Archie
Member
Posts: 9436
From: Las Vegas, NV
Registered: Dec 1999


Feedback score:    (12)
Leave feedback


Total ratings: 546
Rate this member

Report this Post06-22-2009 03:55 PM Click Here to See the Profile for ArchieClick Here to visit Archie's HomePageSend a Private Message to ArchieEdit/Delete MessageReply w/QuoteDirect Link to This Post
Bringing this up to date again.....

With the center body section off of the chassis, Kris set it up between 2 benches to do the bodywork to the rocker panels...


Then getting ready to glass the body back onto the chassis, we mount it onto the chassis for the last time...


And check the gaps to make sure it's positioned in the correct place.


.......
IP: Logged
Archie
Member
Posts: 9436
From: Las Vegas, NV
Registered: Dec 1999


Feedback score:    (12)
Leave feedback


Total ratings: 546
Rate this member

Report this Post06-22-2009 04:25 PM Click Here to See the Profile for ArchieClick Here to visit Archie's HomePageSend a Private Message to ArchieEdit/Delete MessageReply w/QuoteDirect Link to This Post

Archie

9436 posts
Member since Dec 1999
To keep from slopping fiberglass all over ourselves, we tilted the chassis up on the side to do the fiberglassing on the underside of the roof section. This way the glassing materials don't drip in your face while working.....


We have a glue we mix to bond parts together. Everyplace where the steel will be glassed to the body, we have this glue taking up any gaps.


The 1st side has 3 layers of glass on it.....


Tip it up to do the other side the same way....


This is what it looks like before trimming....


Archie
IP: Logged
PFF
System Bot
Archie
Member
Posts: 9436
From: Las Vegas, NV
Registered: Dec 1999


Feedback score:    (12)
Leave feedback


Total ratings: 546
Rate this member

Report this Post06-22-2009 04:55 PM Click Here to See the Profile for ArchieClick Here to visit Archie's HomePageSend a Private Message to ArchieEdit/Delete MessageReply w/QuoteDirect Link to This Post

Archie

9436 posts
Member since Dec 1999
The interior shop that's going to upholster all the interior parts is located in San Antonio, TX.

The 1st group of parts they will upholster are the complete dash & the full console.

We had to test fit all the interior parts again.

We had to make sure that there was a proper gap between the surfaces where the panels came together to allow for the thickness of the material they are going to use.

We also had toplan to make sure that the interior re-assembly could be done with all the panels upholstered.

So, gapping of the panels & planning how it would all go together was on us.


We didn't like how the center console mated up to the center section of the dash so we put a large radius where the walls met.


The interior shop doesn't have Internet at the shop, so I had to write up instructions & print off about 30 pictures to show them how the interior all went together.

........
IP: Logged
Archie
Member
Posts: 9436
From: Las Vegas, NV
Registered: Dec 1999


Feedback score:    (12)
Leave feedback


Total ratings: 546
Rate this member

Report this Post06-22-2009 05:12 PM Click Here to See the Profile for ArchieClick Here to visit Archie's HomePageSend a Private Message to ArchieEdit/Delete MessageReply w/QuoteDirect Link to This Post

Archie

9436 posts
Member since Dec 1999
While we were at this, we held up sending the interior parts out for a couple of days so we could start making the inter panels that would adjoin the parts we were sending out.

Here we made a back panel by making a fiberglass upper half round off of a pc. of 3" exhaust pipe. then we glassed that to some flat fiberglass panels we had made.


We also made some fiberglass panels for the insides & tops of the rockers.


Archie
IP: Logged
Archie
Member
Posts: 9436
From: Las Vegas, NV
Registered: Dec 1999


Feedback score:    (12)
Leave feedback


Total ratings: 546
Rate this member

Report this Post06-22-2009 05:37 PM Click Here to See the Profile for ArchieClick Here to visit Archie's HomePageSend a Private Message to ArchieEdit/Delete MessageReply w/QuoteDirect Link to This Post

Archie

9436 posts
Member since Dec 1999
Last but not least, we had to make some mounting brackets for the seats.

The seats had already been upholstered some time ago. But the mounting brackets that came with them were not going to work because they mounted the seats too high in the car.


We needed to move the rails up as close as we could to the bottom of the seat & reangle the seats to lean back a little more.

So we made new brackets for them.


Now that the 1st set of interior panels are out to get upholstered, we'll try to get most of the bodywork done before they return.

Archie

------------------

Sig by Custom2M4

IP: Logged
Gokart Mozart
Member
Posts: 12143
From: Metro Detroit
Registered: Mar 2003


Feedback score: (1)
Leave feedback


Total ratings: 159
Rate this member

Report this Post06-22-2009 06:13 PM Click Here to See the Profile for Gokart MozartClick Here to visit Gokart Mozart's HomePageSend a Private Message to Gokart MozartEdit/Delete MessageReply w/QuoteDirect Link to This Post
gonna make molds?
IP: Logged
Archie
Member
Posts: 9436
From: Las Vegas, NV
Registered: Dec 1999


Feedback score:    (12)
Leave feedback


Total ratings: 546
Rate this member

Report this Post06-22-2009 08:39 PM Click Here to See the Profile for ArchieClick Here to visit Archie's HomePageSend a Private Message to ArchieEdit/Delete MessageReply w/QuoteDirect Link to This Post
 
quote
Originally posted by Gokart Mozart:

gonna make molds?


Nope
IP: Logged
madcurl
Member
Posts: 21401
From: In a Van down by the Kern River
Registered: Jul 2003


Feedback score: N/A
Leave feedback


Total ratings: 314
Rate this member

Report this Post06-24-2009 09:50 PM Click Here to See the Profile for madcurlSend a Private Message to madcurlEdit/Delete MessageReply w/QuoteDirect Link to This Post
 
quote
Originally posted by Archie:


........


Pardon me, but what are the two opening for?
IP: Logged
Will-Martin
Member
Posts: 1164
From: DFW, TX, USA
Registered: Aug 2002


Feedback score: (1)
Leave feedback


Total ratings: 63
Rate this member

Report this Post06-24-2009 10:08 PM Click Here to See the Profile for Will-MartinClick Here to visit Will-Martin's HomePageSend a Private Message to Will-MartinEdit/Delete MessageReply w/QuoteDirect Link to This Post
 
quote
Originally posted by madcurl:


Pardon me, but what are the two opening for?


Looks like speakers, pretty cool.
IP: Logged
Archie
Member
Posts: 9436
From: Las Vegas, NV
Registered: Dec 1999


Feedback score:    (12)
Leave feedback


Total ratings: 546
Rate this member

Report this Post06-24-2009 10:54 PM Click Here to See the Profile for ArchieClick Here to visit Archie's HomePageSend a Private Message to ArchieEdit/Delete MessageReply w/QuoteDirect Link to This Post
On the real car they have vents in those locations.

We put little speakers in that location to replicate the vents.

Archie
IP: Logged
gt40racer
Member
Posts: 75
From: Abu Dhabi, UAE
Registered: Mar 2002


Feedback score: N/A
Leave feedback

Rate this member

Report this Post08-20-2009 06:37 PM Click Here to See the Profile for gt40racerClick Here to visit gt40racer's HomePageSend a Private Message to gt40racerEdit/Delete MessageReply w/QuoteDirect Link to This Post
any updates?
IP: Logged
Sharkman
Member
Posts: 804
From: Sweden
Registered: May 2004


Feedback score: N/A
Leave feedback

Rate this member

Report this Post08-22-2009 04:05 PM Click Here to See the Profile for SharkmanSend a Private Message to SharkmanEdit/Delete MessageReply w/QuoteDirect Link to This Post
 
quote


That looks like the idé I had for my car with the backseat armrest table from a Saab 9-5
With 2 cupholders coming out the front


------------------
Regards SHARKMAN
Europe # 1 choptop
http://www.fieroforum.se/fo...=1342&st=0&sk=t&sd=a
http://www.fieroforum.se/fo...topic.php?f=10&t=173

[This message has been edited by Sharkman (edited 08-24-2009).]

IP: Logged
PFF
System Bot
fourpoint9
Member
Posts: 1058
From: Long Beach, WA, USA
Registered: Feb 2004


Feedback score: (2)
Leave feedback

Rate this member

Report this Post08-29-2009 12:57 AM Click Here to See the Profile for fourpoint9Click Here to visit fourpoint9's HomePageSend a Private Message to fourpoint9Edit/Delete MessageReply w/QuoteDirect Link to This Post
update please
IP: Logged
yellowstone
Member
Posts: 9299
From: Düsseldorf/Germany
Registered: Jun 2003


Feedback score: N/A
Leave feedback


Total ratings: 250
Rate this member

Report this Post09-09-2009 12:03 PM Click Here to See the Profile for yellowstoneSend a Private Message to yellowstoneEdit/Delete MessageReply w/QuoteDirect Link to This Post
I just read through the whole thread for the first time and I must say that I'm astonished. It's just a thing of beauty to see this project coming together. Congrats, Archie!
IP: Logged
bubbajoexxx
Member
Posts: 1630
From: Ontario Canada
Registered: Aug 2003


Feedback score: N/A
Leave feedback


Total ratings: 112
Rate this member

Report this Post09-16-2009 12:47 PM Click Here to See the Profile for bubbajoexxxClick Here to visit bubbajoexxx's HomePageSend a Private Message to bubbajoexxxEdit/Delete MessageReply w/QuoteDirect Link to This Post
updates we need updates PLEASE
IP: Logged
Sofa King
Member
Posts: 929
From:
Registered: Aug 2008


Feedback score: N/A
Leave feedback

Rate this member

Report this Post09-16-2009 02:17 PM Click Here to See the Profile for Sofa KingSend a Private Message to Sofa KingEdit/Delete MessageReply w/QuoteDirect Link to This Post
Hi A,

What vehicle did you get the armrest? Is is the same width as the Fiero armrest?
IP: Logged
Speedster
Junior Member
Posts: 1
From: France
Registered: Oct 2009


Feedback score: N/A
Leave feedback

Rate this member

Report this Post10-06-2009 04:59 PM Click Here to See the Profile for SpeedsterSend a Private Message to SpeedsterEdit/Delete MessageReply w/QuoteDirect Link to This Post
Hi,
I'm Benoit from France, I follow your post, congratulation for your great work. I think your Miura body kit is derived from a Prova Design Miura kit because it has the same trouble with the windshield installation, it’s strange because Prova Design has molded an original Lamborghini Miura P400 S to make its molds in the 80’s
You may install taillights from a Fiat 850 Spider, they are identical on the Lamborghini Miura P400 & P400 S. These taillights are remanufactured : http://mrfiat.com/

[This message has been edited by Speedster (edited 10-06-2009).]

IP: Logged
Archie
Member
Posts: 9436
From: Las Vegas, NV
Registered: Dec 1999


Feedback score:    (12)
Leave feedback


Total ratings: 546
Rate this member

Report this Post10-13-2009 05:41 PM Click Here to See the Profile for ArchieClick Here to visit Archie's HomePageSend a Private Message to ArchieEdit/Delete MessageReply w/QuoteDirect Link to This Post
We've ben working on a lot of stuff since I posted last.

I'll try to bringit up to date.

In Phase I of getting the upholstery done, a few days after my last post we packed up several of the interior parts to send them out for covering.

As you've seen a lot of these parts were fabricated from scratch. So a photo record & careful handling was in order......


.........
IP: Logged
Archie
Member
Posts: 9436
From: Las Vegas, NV
Registered: Dec 1999


Feedback score:    (12)
Leave feedback


Total ratings: 546
Rate this member

Report this Post10-13-2009 06:06 PM Click Here to See the Profile for ArchieClick Here to visit Archie's HomePageSend a Private Message to ArchieEdit/Delete MessageReply w/QuoteDirect Link to This Post

Archie

9436 posts
Member since Dec 1999
While waiting for the interior parts to return from the upholstery shop, it was back to the body work.

Here we are establishing the edges of the roof...


Here we are building up the flanges around the door openings so we have a flange that we can clip the weatherstripping onto....


The interior side panel of the doors didn't match up to the weather strip flange. For the weatherstrip seals to actually have a chance to work, the front of the insdie door panel had t be moved in 3/4 to 1".


Archie
IP: Logged
Archie
Member
Posts: 9436
From: Las Vegas, NV
Registered: Dec 1999


Feedback score:    (12)
Leave feedback


Total ratings: 546
Rate this member

Report this Post10-14-2009 11:57 AM Click Here to See the Profile for ArchieClick Here to visit Archie's HomePageSend a Private Message to ArchieEdit/Delete MessageReply w/QuoteDirect Link to This Post
continuing......

Then we had to figure out how to get power roll up windows in the doors.

We had to figure out the geometry & hardware to make the windows in the doors roll up & down evenly, securely & reliably.

We needed the window to roll up along a line up the back inside edge of the door. The vertical height of the window opening is only about 2" lower than the vertical height of the body of the door. So we had to come up with window mounting & operating hardware that used as little vertical space as possible.

We decided to use Fiero power window hardware because we were going to have to heavily modify any "Kit" we might have bought & we had plenty of the Fiero parts so we could scrap a few sets of them without any big loss.

Here are a few pics of the mock-up. Locations & angles of the rails that the scissor arms ride in were very important to get the windows to ride up evenly & correctly. All this took time & experimentation. We moved them around quite a bit while we figured out how each changed affected the window movement.


Once we had figures out the details, we glassed in 2 mounting bars inside the door.


then we were able to bolt in the final mounting plates to the bars & make it all operational.


Archie

[This message has been edited by Archie (edited 10-14-2009).]

IP: Logged
Archie
Member
Posts: 9436
From: Las Vegas, NV
Registered: Dec 1999


Feedback score:    (12)
Leave feedback


Total ratings: 546
Rate this member

Report this Post10-14-2009 12:31 PM Click Here to See the Profile for ArchieClick Here to visit Archie's HomePageSend a Private Message to ArchieEdit/Delete MessageReply w/QuoteDirect Link to This Post

Archie

9436 posts
Member since Dec 1999
Then back to more bodywork.....


Working on somefinish work on the trunk/decklid area & establishing a flange for the trunk seal to clip onto....


Archie
IP: Logged
madcurl
Member
Posts: 21401
From: In a Van down by the Kern River
Registered: Jul 2003


Feedback score: N/A
Leave feedback


Total ratings: 314
Rate this member

Report this Post10-14-2009 01:05 PM Click Here to See the Profile for madcurlSend a Private Message to madcurlEdit/Delete MessageReply w/QuoteDirect Link to This Post
Wow! What a build. I like the trunks space and trunk hinges.


IP: Logged
PFF
System Bot
Sofa King
Member
Posts: 929
From:
Registered: Aug 2008


Feedback score: N/A
Leave feedback

Rate this member

Report this Post10-14-2009 02:01 PM Click Here to See the Profile for Sofa KingSend a Private Message to Sofa KingEdit/Delete MessageReply w/QuoteDirect Link to This Post
Me Too! I LOVE THIS BUILD!!!!

Hi Archie, what car did you get the glovebox from? Are the dimensions similar to the original Fiero?
IP: Logged
Archie
Member
Posts: 9436
From: Las Vegas, NV
Registered: Dec 1999


Feedback score:    (12)
Leave feedback


Total ratings: 546
Rate this member

Report this Post10-15-2009 07:59 AM Click Here to See the Profile for ArchieClick Here to visit Archie's HomePageSend a Private Message to ArchieEdit/Delete MessageReply w/QuoteDirect Link to This Post
 
quote
Originally posted by madcurl:

Wow! What a build. I like the trunks space and trunk hinges.


The hinges are from the rear hatch on an old XKE Jag. Coupe.

 
quote
Originally posted by Sofa King:

Me Too! I LOVE THIS BUILD!!!!

Hi Archie, what car did you get the glovebox from? Are the dimensions similar to the original Fiero?


It's wider that the Fiero console is.

It's from the back seat of a new VW, I can't remember exactly which one.

The customer bought it & sent it to me.

It is identified in one of the earlier posts in this thread.

Archie
IP: Logged
Boogaloo
Member
Posts: 422
From: South Miami,Fl
Registered: Sep 2009


Feedback score: (3)
Leave feedback

Rate this member

Report this Post10-15-2009 11:13 AM Click Here to See the Profile for BoogalooSend a Private Message to BoogalooEdit/Delete MessageReply w/QuoteDirect Link to This Post
Archie you and your staff ,never cease to amaze by outdoing your last creation and you are up there with the best of builders,more props to you for the inspiration you have given us thru the years .
IP: Logged
Archie
Member
Posts: 9436
From: Las Vegas, NV
Registered: Dec 1999


Feedback score:    (12)
Leave feedback


Total ratings: 546
Rate this member

Report this Post10-15-2009 11:23 AM Click Here to See the Profile for ArchieClick Here to visit Archie's HomePageSend a Private Message to ArchieEdit/Delete MessageReply w/QuoteDirect Link to This Post
As you can see, I've got a lot to catch up on.

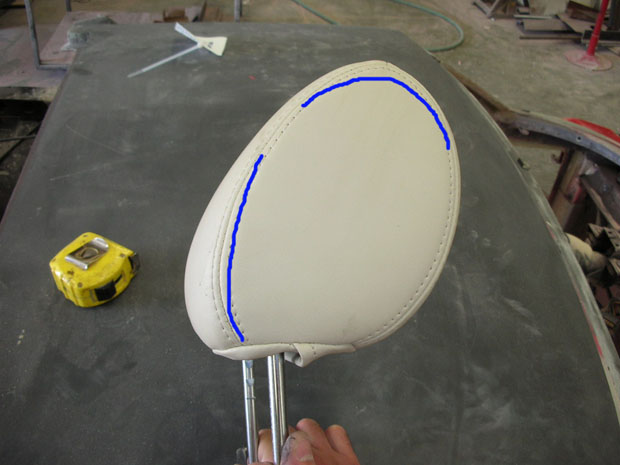
In this view the headrests will mount into the half-round tube just under the rear window opening. The sanding block in the rear window represents the rear window glass. So we'll need headrests that have the mounting posts as far back as we can get.....


The customer bought some new headrests on EBay & had them sent to me.


The color doesn't match perfectly, so we know they'll have to be re-upholstered. We will be reshaping them before we send them out for covering.


Getting an idea if they can be fitted....


They'll have to be cut down a bit, but they'll work. We'll do that later when we fab. & fit the rest of the interior parts


........

[This message has been edited by Archie (edited 10-15-2009).]

IP: Logged
Archie
Member
Posts: 9436
From: Las Vegas, NV
Registered: Dec 1999


Feedback score:    (12)
Leave feedback


Total ratings: 546
Rate this member

Report this Post10-15-2009 12:17 PM Click Here to See the Profile for ArchieClick Here to visit Archie's HomePageSend a Private Message to ArchieEdit/Delete MessageReply w/QuoteDirect Link to This Post

Archie

9436 posts
Member since Dec 1999
Back to the bodywork.

There's always bodywork to fill in between the fun parts of the build.

Here we're working on the rear spoiler to try to make it look correct all the way across.


Archie
IP: Logged
madcurl
Member
Posts: 21401
From: In a Van down by the Kern River
Registered: Jul 2003


Feedback score: N/A
Leave feedback


Total ratings: 314
Rate this member

Report this Post10-15-2009 02:05 PM Click Here to See the Profile for madcurlSend a Private Message to madcurlEdit/Delete MessageReply w/QuoteDirect Link to This Post
IP: Logged
Archie
Member
Posts: 9436
From: Las Vegas, NV
Registered: Dec 1999


Feedback score:    (12)
Leave feedback


Total ratings: 546
Rate this member

Report this Post10-15-2009 05:27 PM Click Here to See the Profile for ArchieClick Here to visit Archie's HomePageSend a Private Message to ArchieEdit/Delete MessageReply w/QuoteDirect Link to This Post
Building inner wheel well liners for the rear clip.

These are built of flat Fiberglass sheet. Then the sheets are trimmed & fitted to the position we need them in. After that they are fiberglassed in place & a layer or 2 are glassed onto the fiberglass sheeting to make them stiffer.


Then it's time to do some bodywork on the rear clip.....


Archie
IP: Logged
kevin
Member
Posts: 2722
From: Elk Grove, CA USA
Registered: Jan 2000


Feedback score: N/A
Leave feedback

Rate this member

Report this Post10-15-2009 06:05 PM Click Here to See the Profile for kevinSend a Private Message to kevinEdit/Delete MessageReply w/QuoteDirect Link to This Post
Simply beautiful Archie and a Please keep it coming...

Cordially,
Kevin

[This message has been edited by kevin (edited 10-15-2009).]

IP: Logged
Archie
Member
Posts: 9436
From: Las Vegas, NV
Registered: Dec 1999


Feedback score:    (12)
Leave feedback


Total ratings: 546
Rate this member

Report this Post10-16-2009 11:45 AM Click Here to See the Profile for ArchieClick Here to visit Archie's HomePageSend a Private Message to ArchieEdit/Delete MessageReply w/QuoteDirect Link to This Post
 
quote
Originally posted by kevin:

Simply beautiful Archie and a Please keep it coming...

Cordially,
Kevin


Thanks, Kris & Rob are the guys making this happen.

Archie
IP: Logged
Previous Page | Next Page

This topic is 21 pages long:  1   2   3   4   5   6   7   8   9   10   11   12   13   14   15   16   17   18   19   20   21 
next newest topic | next oldest topic

All times are ET (US)

Post New Topic  Post A Reply
Hop to:

Contact Us | Back To Main Page

Advertizing on PFF | Fiero Parts Vendors
PFF Merchandise | Fiero Gallery | Ogre's Cave
Real-Time Chat | Fiero Related Auctions on eBay


Copyright (c) 1999, C. Pennock