Pennock's Fiero Forum
  The Construction Zone
  The Miura project begins (Page 15)

Post New Topic  Post A Reply
Email This Page to Someone! | Printable Version

This topic is 21 pages long:  1   2   3   4   5   6   7   8   9   10   11   12   13   14   15   16   17   18   19   20   21 
Previous Page | Next Page
next newest topic | next oldest topic
The Miura project begins by Archie
Started on: 12-08-2007 07:13 AM
Replies: 834 (215024 views)
Last post by: Archie on 02-03-2023 02:01 PM
countach711
Member
Posts: 797
From: Littleton, Colorado
Registered: Sep 2003


Feedback score: N/A
Leave feedback

Rate this member

Report this Post03-16-2010 12:12 PM Click Here to See the Profile for countach711Click Here to visit countach711's HomePageSend a Private Message to countach711Edit/Delete MessageReply w/QuoteDirect Link to This Post
Hi Archie,
I didn't want to start an argument, I am just trying to help. I realize you didn't ask for any, but I think a forum like this is the place for that sort of thing. I did acknowledge that you put a lot of thought into it, but when there's something this important it can't hurt to hear a few more ideas. I have seen tanks, dropped them and replaced pumps. While you've shown that the front filler really wouldn't work, you didn't respond to my suggestion to place it in the back. I'm curious why you wouldn't you do that? I'm sure that you are already planning to put struts on the louvers, so it would be fairly easy access. The only issue is whether there's a trunk that you could place it adjacent to, or build some sort of enclosure for it so that gas isn't spilled on a hot engine, which is obviously not a good situation either. BTW I would have not responded at all had this not been a safety, rather than design issue.
Thanks,
John

[This message has been edited by countach711 (edited 03-16-2010).]

IP: Logged
RUNDLC
Member
Posts: 802
From: Elk Grove, California
Registered: Jul 2005


Feedback score: (2)
Leave feedback

Rate this member

Report this Post03-18-2010 12:31 PM Click Here to See the Profile for RUNDLCSend a Private Message to RUNDLCEdit/Delete MessageReply w/QuoteDirect Link to This Post
OK Archie you are holding out!! What did the owner have to say??? We need updates please.
IP: Logged
Archie
Member
Posts: 9436
From: Las Vegas, NV
Registered: Dec 1999


Feedback score:    (12)
Leave feedback


Total ratings: 546
Rate this member

Report this Post03-19-2010 04:27 PM Click Here to See the Profile for ArchieClick Here to visit Archie's HomePageSend a Private Message to ArchieEdit/Delete MessageReply w/QuoteDirect Link to This Post
The customer came to town as scheduled & we all visited & had a good time.

We inspected the work so far & decided on what future work we needed to do to start finishing it up.

We had mounted most of the interior, the F&R bumpers, the bolt on emblems & a bunch of other stuff. Then we could get a good idea of what the finished car was going to look like.

We got him inside the car so we could check how it fit him & we could determine where we needed to mount the mirrors.

We didn't take too many pics but here are a few.


He really does know his way around these cars & it was real nice meeting him.

He did come up with an idea for lowering the seats even farther. So we dd that work & gained another inch of headroom.

Anyway, we now have a plan for getting it finished & back to him.

Archie
IP: Logged
Sofa King
Member
Posts: 929
From:
Registered: Aug 2008


Feedback score: N/A
Leave feedback

Rate this member

Report this Post03-19-2010 10:23 PM Click Here to See the Profile for Sofa KingSend a Private Message to Sofa KingEdit/Delete MessageReply w/QuoteDirect Link to This Post
 
quote
Originally posted by Archie:

Archie


That's a happy face!
IP: Logged
Jefrysuko
Member
Posts: 3491
From: Oreana IL
Registered: Apr 2000


Feedback score:    (17)
Leave feedback


Total ratings: 108
Rate this member

Report this Post03-19-2010 11:29 PM Click Here to See the Profile for JefrysukoSend a Private Message to JefrysukoEdit/Delete MessageReply w/QuoteDirect Link to This Post
 
quote
Originally posted by Archie:


Hey, that is my Uncle Fred!!!!!

Hey Uncle, About your will and that Muira.......

IP: Logged
diabloscott
Member
Posts: 63
From:
Registered: Jul 2005


Feedback score: N/A
Leave feedback

Rate this member

Report this Post03-19-2010 11:29 PM Click Here to See the Profile for diabloscottSend a Private Message to diabloscottEdit/Delete MessageReply w/QuoteDirect Link to This Post
I have the same spinners. The owner is one lucky guy. Cannot wait to see the car in paint and the glass installed.

[This message has been edited by diabloscott (edited 03-19-2010).]

IP: Logged
exoticse
Member
Posts: 8650
From: Orlando, Fl
Registered: Jun 2003


Feedback score: N/A
Leave feedback


Total ratings: 108
Rate this member

Report this Post03-19-2010 11:49 PM Click Here to See the Profile for exoticseSend a Private Message to exoticseEdit/Delete MessageReply w/QuoteDirect Link to This Post


Archie of all the work you guys have done, this ranks up there as some of the most impressive,...especially with what you guys had to start with !
IP: Logged
Sofa King
Member
Posts: 929
From:
Registered: Aug 2008


Feedback score: N/A
Leave feedback

Rate this member

Report this Post03-19-2010 11:55 PM Click Here to See the Profile for Sofa KingSend a Private Message to Sofa KingEdit/Delete MessageReply w/QuoteDirect Link to This Post
 
quote
Originally posted by diabloscott:

I have the same spinners. The owner is one lucky guy. Cannot wait to see the car in paint and the glass installed.


WHOA!!!! A C2 (62 style) Body on a C3 frame? Is this a kit?
IP: Logged
Archie
Member
Posts: 9436
From: Las Vegas, NV
Registered: Dec 1999


Feedback score:    (12)
Leave feedback


Total ratings: 546
Rate this member

Report this Post03-20-2010 08:44 PM Click Here to See the Profile for ArchieClick Here to visit Archie's HomePageSend a Private Message to ArchieEdit/Delete MessageReply w/QuoteDirect Link to This Post
 
quote
Originally posted by Jefrysuko:


Hey, that is my Uncle Fred!!!!!

Hey Uncle, About your will and that Muira.......


Not so quick there sonny, He said you'd be trying to make claims....... He said to ignore you.

A
IP: Logged
Tony Kania
Member
Posts: 20794
From: The Inland Northwest
Registered: Dec 2008


Feedback score:    (7)
Leave feedback


Total ratings: 305
User Banned

Report this Post03-21-2010 10:05 AM Click Here to See the Profile for Tony KaniaSend a Private Message to Tony KaniaEdit/Delete MessageReply w/QuoteDirect Link to This Post
I agree, a very happy owner! I will always salivate over the Miura.
IP: Logged
whodeanie
Member
Posts: 3819
From: woodstock,Ga.,USA
Registered: Jan 2008


Feedback score:    (14)
Leave feedback


Total ratings: 120
Rate this member

Report this Post03-21-2010 12:23 PM Click Here to See the Profile for whodeanieClick Here to visit whodeanie's HomePageSend a Private Message to whodeanieEdit/Delete MessageReply w/QuoteDirect Link to This Post
Great to see the owner as happy with his car as we all are
IP: Logged
PFF
System Bot
katatak
Member
Posts: 7136
From: Omaha, NE USA
Registered: Apr 2008


Feedback score:    (8)
Leave feedback


Total ratings: 82
Rate this member

Report this Post03-22-2010 08:22 PM Click Here to See the Profile for katatakSend a Private Message to katatakEdit/Delete MessageReply w/QuoteDirect Link to This Post
Glad to see the owner is happy! I am very sad as I know that the end of this thread is near. I am going to miss my daily visit to this thread. I can't wait to see what comes out of Archie's shop next. This one will be tough to top but Archie and crew have what it takes to do it. Thanks Archie for sharing all this excellent work. A lot of us have learned a great deal from this thread.

Pat

IP: Logged
fourpoint9
Member
Posts: 1058
From: Long Beach, WA, USA
Registered: Feb 2004


Feedback score: (2)
Leave feedback

Rate this member

Report this Post03-22-2010 11:36 PM Click Here to See the Profile for fourpoint9Click Here to visit fourpoint9's HomePageSend a Private Message to fourpoint9Edit/Delete MessageReply w/QuoteDirect Link to This Post
IP: Logged
Archie
Member
Posts: 9436
From: Las Vegas, NV
Registered: Dec 1999


Feedback score:    (12)
Leave feedback


Total ratings: 546
Rate this member

Report this Post03-27-2010 11:34 PM Click Here to See the Profile for ArchieClick Here to visit Archie's HomePageSend a Private Message to ArchieEdit/Delete MessageReply w/QuoteDirect Link to This Post
Well how about a little update on the car.

Since the last update, we've taken the interior back out of the car. We also took the metal inside door framework & sent them out for Powdercoating.

I've meda a list of all the items we need to finish the car & all the things we need to do yet..... When we finish something we check it off, when think of something that's not on the list we add it to the list.

All of the parts we need to finish the LS3 6 speed are here & we're working on installing them.

We've finished the plywood pattern for the rear window, I'll drop it off to get an actual window made next week.

Friday, Rob got a lot of the wiring done on the engine & a lot will be going on this next week.

We are pushing to try to get the engine all hooked up & the exhuast on it & try to fire it up by the end of next week.

I expect that I'll be updating this thread everyday next week. By the end of the week I hope to be posting up a U-Tube video of the first starting of the engine.


Rob working on routing the harness.


These harnesses are designed for front engine rear wheel drive cars. So some of the wires need to be re-routed so that it looks good when we're done.


Most of those wires are laying down out of the way in this pic. The electronic gas pedal has been mounted & the ECM will be in the original Fiero location & all the wires from the LS3 harness that needed to be in the interior have been run thru the bulkhead.


We still have to mount the fuse/relay panel, then it'll be time to work what is left of the Fiero harness into this.


Archie
IP: Logged
skuzzbomer
Member
Posts: 7492
From: Nashville
Registered: Sep 2009


Feedback score: (3)
Leave feedback


Total ratings: 92
Rate this member

Report this Post03-28-2010 06:30 PM Click Here to See the Profile for skuzzbomerSend a Private Message to skuzzbomerEdit/Delete MessageReply w/QuoteDirect Link to This Post
I just had an insane thought streak across my mind.... 180 degree headers.

I understand how much room a proper setup like that takes, but I think the sound would be so worth it - especially considering the lengths you've gone already - to make this a brilliant car. Maybe I'm nuts (don't tell me if I am - I'm enjoying myself too much ).

Either way
IP: Logged
Archie
Member
Posts: 9436
From: Las Vegas, NV
Registered: Dec 1999


Feedback score:    (12)
Leave feedback


Total ratings: 546
Rate this member

Report this Post03-31-2010 06:05 PM Click Here to See the Profile for ArchieClick Here to visit Archie's HomePageSend a Private Message to ArchieEdit/Delete MessageReply w/QuoteDirect Link to This Post
Fire in the hole.

LS3 Miura comes to life.
IP: Logged
Archie
Member
Posts: 9436
From: Las Vegas, NV
Registered: Dec 1999


Feedback score:    (12)
Leave feedback


Total ratings: 546
Rate this member

Report this Post03-31-2010 09:06 PM Click Here to See the Profile for ArchieClick Here to visit Archie's HomePageSend a Private Message to ArchieEdit/Delete MessageReply w/QuoteDirect Link to This Post

Archie

9436 posts
Member since Dec 1999
We've spend all of this week so far hooking up the wiring, cooling system, finishing up the fuel fill, building the exhaust & a few other things for the LS3.

Today, just before 5pm, we fired up the engine for the 1st time.

It fired right up & I got video of it.

However, You Tube is out of service right now, so the video will have to wait.

For now, you can look at a picture of Rob & Kris taken right after we started it up.


I'll post the video up as soon as I can.

Archie
IP: Logged
aeffertz
Member
Posts: 798
From: Ladysmith, WI
Registered: Feb 2009


Feedback score:    (6)
Leave feedback

Rate this member

Report this Post03-31-2010 09:23 PM Click Here to See the Profile for aeffertzSend a Private Message to aeffertzEdit/Delete MessageReply w/QuoteDirect Link to This Post
*eagerly awaits the video*
IP: Logged
Archie
Member
Posts: 9436
From: Las Vegas, NV
Registered: Dec 1999


Feedback score:    (12)
Leave feedback


Total ratings: 546
Rate this member

Report this Post03-31-2010 10:00 PM Click Here to See the Profile for ArchieClick Here to visit Archie's HomePageSend a Private Message to ArchieEdit/Delete MessageReply w/QuoteDirect Link to This Post
http://www.youtube.com/watch?v=2PtOpFNAMf4

Next video will be some test driving.

Archie
IP: Logged
Archie
Member
Posts: 9436
From: Las Vegas, NV
Registered: Dec 1999


Feedback score:    (12)
Leave feedback


Total ratings: 546
Rate this member

Report this Post04-01-2010 08:29 PM Click Here to See the Profile for ArchieClick Here to visit Archie's HomePageSend a Private Message to ArchieEdit/Delete MessageReply w/QuoteDirect Link to This Post
IP: Logged
Jim88GT
Member
Posts: 712
From: Portsmouth, Virginia
Registered: Sep 2002


Feedback score: (3)
Leave feedback

Rate this member

Report this Post04-01-2010 09:05 PM Click Here to See the Profile for Jim88GTSend a Private Message to Jim88GTEdit/Delete MessageReply w/QuoteDirect Link to This Post
It's almost getting to be an LS3 assembly line up there! Great work!

Jim
IP: Logged
PFF
System Bot
katatak
Member
Posts: 7136
From: Omaha, NE USA
Registered: Apr 2008


Feedback score:    (8)
Leave feedback


Total ratings: 82
Rate this member

Report this Post04-03-2010 10:47 PM Click Here to See the Profile for katatakSend a Private Message to katatakEdit/Delete MessageReply w/QuoteDirect Link to This Post
Can you see the light at the end of the tunnel yet?

Pat

IP: Logged
whodeanie
Member
Posts: 3819
From: woodstock,Ga.,USA
Registered: Jan 2008


Feedback score:    (14)
Leave feedback


Total ratings: 120
Rate this member

Report this Post04-04-2010 09:35 AM Click Here to See the Profile for whodeanieClick Here to visit whodeanie's HomePageSend a Private Message to whodeanieEdit/Delete MessageReply w/QuoteDirect Link to This Post
 
quote
Originally posted by Archie:

We've spend all of this week so far hooking up the wiring, cooling system, finishing up the fuel fill, building the exhaust & a few other things for the LS3.

Today, just before 5pm, we fired up the engine for the 1st time.

It fired right up & I got video of it.

However, You Tube is out of service right now, so the video will have to wait.

For now, you can look at a picture of Rob & Kris taken right after we started it up.


I'll post the video up as soon as I can.

Archie


Looking great Archie
What did you do to Kris? punch him in the nose? LOL

IP: Logged
Archie
Member
Posts: 9436
From: Las Vegas, NV
Registered: Dec 1999


Feedback score:    (12)
Leave feedback


Total ratings: 546
Rate this member

Report this Post04-04-2010 11:22 AM Click Here to See the Profile for ArchieClick Here to visit Archie's HomePageSend a Private Message to ArchieEdit/Delete MessageReply w/QuoteDirect Link to This Post
 
quote
Originally posted by whodeanie:
Looking great Archie
What did you do to Kris? punch him in the nose? LOL


Dunno, he said something about a tree, a dirt bike & the fact that the dirt bike, with the help of a tree, will stop on a nose.

Archie
IP: Logged
Archie
Member
Posts: 9436
From: Las Vegas, NV
Registered: Dec 1999


Feedback score:    (12)
Leave feedback


Total ratings: 546
Rate this member

Report this Post04-04-2010 11:53 AM Click Here to See the Profile for ArchieClick Here to visit Archie's HomePageSend a Private Message to ArchieEdit/Delete MessageReply w/QuoteDirect Link to This Post

Archie

9436 posts
Member since Dec 1999
 
quote
Originally posted by katatak:

Can you see the light at the end of the tunnel yet?

Pat


YES, the light it a lot brighter after all the stuff we got done last week.

We got all of the driveline in the car this week. It still needs some detailing & a bunch of test driving but the driving will have to wait 'til we get a bunch of smaller things done.

We still have to do the wiring for everything in the interior & all the lights. We've already started wiring up the gages.

We also need to find & mount some struts to aid in opening the front & rear clips. We have to build some wheel well liners to cover a few open areas under the car. We've got to undercoat/insulate the underside of the body with some lizard skin. Mount the mirrors & screens. We have to make some slats to copver the 2 openings in the hood, make a shroud for the radiator, hook up all the door & window hardware we made. We have to modify the seats to try to get them a little lower in the car. We have to make some adapters to mount the spinners to the wheels. We have to mount the exhaust tips we picked out & send the exhaust system out for ceramic coating. I already have the rear window made for the car & we have to mount it. We don't have any OEM windshield rubber , so one of the big things we have to do is mount the windshield.

So it still looks like we have a lot to do but we can see the light.

Archie

[This message has been edited by Archie (edited 04-04-2010).]

IP: Logged
whodeanie
Member
Posts: 3819
From: woodstock,Ga.,USA
Registered: Jan 2008


Feedback score:    (14)
Leave feedback


Total ratings: 120
Rate this member

Report this Post04-05-2010 10:01 AM Click Here to See the Profile for whodeanieClick Here to visit whodeanie's HomePageSend a Private Message to whodeanieEdit/Delete MessageReply w/QuoteDirect Link to This Post
 
quote
Originally posted by Archie:


Dunno, he said something about a tree, a dirt bike & the fact that the dirt bike, with the help of a tree, will stop on a nose.

Archie


LMAO! not recomended. glad he is ok now tell him to get back to work on this car we want to see it done
I can not tell you how much I like this car, one of my all time favorite Lambo's.
D.
IP: Logged
Theo_nr1
Junior Member
Posts: 6
From: Netherlands
Registered: Sep 2008


Feedback score: N/A
Leave feedback

Rate this member

Report this Post04-27-2010 06:21 PM Click Here to See the Profile for Theo_nr1Send a Private Message to Theo_nr1Edit/Delete MessageReply w/QuoteDirect Link to This Post
LOOKING GREAT !!!!!!!!!!!!!!
Wasn't here in a long time, now it's almost finished GREAT !!

hm any idea if there are Fiero V8 conversions running in Netherlands ??
Fiero is a good option to built the Miura on.

Regards, Theo
IP: Logged
clouder
Junior Member
Posts: 3
From: dorset, UK
Registered: Oct 2009


Feedback score: N/A
Leave feedback

Rate this member

Report this Post04-29-2010 02:33 PM Click Here to See the Profile for clouderSend a Private Message to clouderEdit/Delete MessageReply w/QuoteDirect Link to This Post
Archie,

I agree with Theo, a V8 powered, fiero based Miura would be very desirable in Europe, it's a shame you guys aren't going to market it as a kit.

Anyway keep up the good work- waiting desperately for your next installment!

Clouder

IP: Logged
Archie
Member
Posts: 9436
From: Las Vegas, NV
Registered: Dec 1999


Feedback score:    (12)
Leave feedback


Total ratings: 546
Rate this member

Report this Post05-02-2010 11:15 PM Click Here to See the Profile for ArchieClick Here to visit Archie's HomePageSend a Private Message to ArchieEdit/Delete MessageReply w/QuoteDirect Link to This Post
Time for an update...

We spent several days wiring the car to make all the light, instruments, A/C systems operational.

We did a final fit of the exhaust & fitted the tips. The exhaust aill be going out for a Black ceramic coating before final install.


It would be too visible if it was silver.


I'm also working on the strakes for the hood grills, I'll show you that project soon.

We've got the antenna mounted....


Here the exhaust system has been reinstalled after ceramic coating...


Wiring on the interior continued. Here's the overhead console with all the switches hooked up.


Also wiring stuff up behind dash..... all gages, overhead console, front & rear clips will have plug inson their wiring so they can be removed for servicing if needed.


Final prep on headlights....


The rear window has been made & installed.


.........
IP: Logged
Archie
Member
Posts: 9436
From: Las Vegas, NV
Registered: Dec 1999


Feedback score:    (12)
Leave feedback


Total ratings: 546
Rate this member

Report this Post05-03-2010 12:26 AM Click Here to See the Profile for ArchieClick Here to visit Archie's HomePageSend a Private Message to ArchieEdit/Delete MessageReply w/QuoteDirect Link to This Post
We had to mess around to find struts that we could use to help lift the front & rear clips & figure out where we could mount them so they wouldn't be too strong or too weak.

Here are the gas struts mounting on the rear clip.


The underside of the front clip was pretty rough. We are putting on Lizardskin, so we wanted it to look good so we did some sanding & filling to make the surface a little smoother.


Here we're working on connecting the inside door release handle.


The door release handle is on the inside of the window while the bearclaw latch is on the outside of the window. So we needed to use a cable operated setup.


No one makes a cable for this job, so we had to find one that would work & be durable. We ended up buying 2 Lokar Throttle cables & making mountings to make them work.


After the bodywork on the inside of the front clip....


Spraying on the Lizardskin. This stuff is really thick & you have to buy the spray gun kit from the supplier. You'll never put it on with a normal spray system.


We also needed to make some adapters so we could mount the spinners to the wheels & still make it so we couls still get the lugnuts on & off.

Starting with a chunk of 6061


And an old lathe


We also worked on putting Lizardskin inside the trunk, inside the deck lid & on the underside of the rear clip.....


We have the inner wheel wells glassed into the front & rear clips. However, they done't cover everything. So Kris is working on closing off the open areas.


These will be removable if needed for service.


Archie
IP: Logged
Sofa King
Member
Posts: 929
From:
Registered: Aug 2008


Feedback score: N/A
Leave feedback

Rate this member

Report this Post05-03-2010 08:38 AM Click Here to See the Profile for Sofa KingSend a Private Message to Sofa KingEdit/Delete MessageReply w/QuoteDirect Link to This Post
WOW! Great progress! The "knock offs" look fantastic! Can't wait to see the interior finally come together.

Keep up the amazing work!
IP: Logged
PFF
System Bot
whodeanie
Member
Posts: 3819
From: woodstock,Ga.,USA
Registered: Jan 2008


Feedback score:    (14)
Leave feedback


Total ratings: 120
Rate this member

Report this Post05-04-2010 08:25 PM Click Here to See the Profile for whodeanieClick Here to visit whodeanie's HomePageSend a Private Message to whodeanieEdit/Delete MessageReply w/QuoteDirect Link to This Post
Nice work as always guys I can't wait to come up for the Dells and stop by so I can see this car in person.
D.
IP: Logged
Archie
Member
Posts: 9436
From: Las Vegas, NV
Registered: Dec 1999


Feedback score:    (12)
Leave feedback


Total ratings: 546
Rate this member

Report this Post05-07-2010 10:04 PM Click Here to See the Profile for ArchieClick Here to visit Archie's HomePageSend a Private Message to ArchieEdit/Delete MessageReply w/QuoteDirect Link to This Post
Gonna try to bring this thread up to date tonight.....

During the last few weeks we've been working in a lot of areas of this car.

My post a few days ago talked about a few of them.

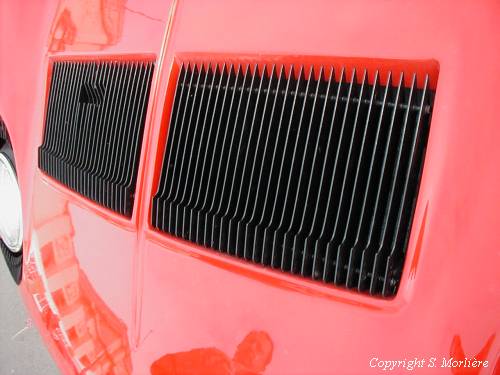
This post is about making the grills on the top of the front clip.

In making the grills for the top of the nose, there are several things to consider..

The back line of the openings are straight & the 2 pins that hold the grills together are parallel to the back line of the opening.

The front line of the opening is at an angle to the back line & is slightly curved.

The breakout line near the front of the slats is parallel to the front line of the opening.

This is what we're trying to duplicate....


We made these out of 1/8" x 1.5" 6061 aluninium bar stock. We needed 27 slats for each side & no 2 of them are exactly the same shape so a CNC made part was out of the question. It would be imposible to make them one at a time so I made them in a block of 27 at a time. Because different features of each part are based on different locations on the part, I needed to use 2 sets of locating (tooling holes). One set of the holes are also going to be the holes that hold them together when assembled. Those holes are the holes we will machine the back end of the parts from. The 2nd set of holes are off the part (will be cut off before the parts are finished) & will be used for cutting all shape of the front of the part & the location of the breakout on the top of the part. There will be one shift of the parts to make the front end of the parts follow the curve of the front line of the opening in the front clip.

The tooling I have for mt Bridgeport is limitedl so this is how I had to do them.


.........
IP: Logged
Archie
Member
Posts: 9436
From: Las Vegas, NV
Registered: Dec 1999


Feedback score:    (12)
Leave feedback


Total ratings: 546
Rate this member

Report this Post05-07-2010 10:18 PM Click Here to See the Profile for ArchieClick Here to visit Archie's HomePageSend a Private Message to ArchieEdit/Delete MessageReply w/QuoteDirect Link to This Post

Archie

9436 posts
Member since Dec 1999


1st test fit, notice the tooling tab still sticking up.


These are put together will threaded rod using .437" aluminium spacers that the customer found on the internet.


Because the surface of the fiberglass, in the windows where these will mount, is uneven, we made mounting pads for the corners of each grill.


When mounted they look pretty good.....


Next week these grills will go out for a Satin black powdercoating.

Archie
IP: Logged
Jim88GT
Member
Posts: 712
From: Portsmouth, Virginia
Registered: Sep 2002


Feedback score: (3)
Leave feedback

Rate this member

Report this Post05-07-2010 10:49 PM Click Here to See the Profile for Jim88GTSend a Private Message to Jim88GTEdit/Delete MessageReply w/QuoteDirect Link to This Post
Nicely done!

Jim
IP: Logged
Archie
Member
Posts: 9436
From: Las Vegas, NV
Registered: Dec 1999


Feedback score:    (12)
Leave feedback


Total ratings: 546
Rate this member

Report this Post05-07-2010 10:52 PM Click Here to See the Profile for ArchieClick Here to visit Archie's HomePageSend a Private Message to ArchieEdit/Delete MessageReply w/QuoteDirect Link to This Post
More stuff that we've been up to.....

At some point after re-assembling the headlight, we noticed that one of the old plastic headlight coversm had a crac in it.


I looked all over the Internet & couldn't find a replacement lense. So we decided to make our own. We used the old cover to make a mold & with body filler & sanding, Rob & Kris came up with this ....


With heat they tried to get the plastic to lkay down in the fixture. it was ok, but to get the plastic to lay down into the form they added a vacuum feature to the form.


Then the question was what to use to create a vacuum...


A hose....


& a Fiero power brake booster hose.....


Good thing it was a high performance V-8 Fiero because the vacuum sucked the vacuum right down into the form.

The cover turned out so nice we made several of them....


Archie

IP: Logged
Archie
Member
Posts: 9436
From: Las Vegas, NV
Registered: Dec 1999


Feedback score:    (12)
Leave feedback


Total ratings: 546
Rate this member

Report this Post05-07-2010 11:33 PM Click Here to See the Profile for ArchieClick Here to visit Archie's HomePageSend a Private Message to ArchieEdit/Delete MessageReply w/QuoteDirect Link to This Post

Archie

9436 posts
Member since Dec 1999
Even more stuff finished this week.....

Earlier in this trhread we showed the seats for the car. they are theplastic racing seats that you can buy from several suppliers. We trial fitted them and build a mounting system for them & the customer had them upholstered.

When he was here several weeks agoto check the car out, we had him try the seats on for size. It was decided to try to modify the seats & mounting system even farther to maximize the headroom.


Rather than experiment with the seats that had already been upholstered, we bought another plastic seat to experiment with.

This week Kris got a chance to do that.


And he made a new mounting plate that would use the same sliders that we had originally used...


We trial fitted it & it looked like we had gained about another 3/4". Once the mods were approved by the customer, we finialized the mounts & they looked like this before painting...


Then we set out to modify the good seats.


Then with the painted mounts on them....


You can compare the seat location in this picture to the 1st pic in this post.


Archie
IP: Logged
katatak
Member
Posts: 7136
From: Omaha, NE USA
Registered: Apr 2008


Feedback score:    (8)
Leave feedback


Total ratings: 82
Rate this member

Report this Post05-07-2010 11:53 PM Click Here to See the Profile for katatakSend a Private Message to katatakEdit/Delete MessageReply w/QuoteDirect Link to This Post
This is a great pic - a Miura - made in America!


Pat

P.S. I love the enginuity and skill that you and your guys show us with every post. The headlight cover is brilliant! If you can't find it, build it - no matter what it is. Absoulutely amazing Archie!

[This message has been edited by katatak (edited 05-08-2010).]

IP: Logged
Archie
Member
Posts: 9436
From: Las Vegas, NV
Registered: Dec 1999


Feedback score:    (12)
Leave feedback


Total ratings: 546
Rate this member

Report this Post05-08-2010 12:01 AM Click Here to See the Profile for ArchieClick Here to visit Archie's HomePageSend a Private Message to ArchieEdit/Delete MessageReply w/QuoteDirect Link to This Post
We also have been working on a few other things.....

Billit Aluminium mounts for the front clip struts.


Final sanding, primer & installation of the rear louvers...


Mounting of the outside mirrors...


The mounts for the rear clip struts have been powdercoated....


Insulation installed in the trunk area.


Upholster is done on the panel behind the seats...


There we go, finally caught up.

Archie
IP: Logged
motoracer838
Member
Posts: 3751
From: Edgewater Co. USofA
Registered: Jan 2006


Feedback score: (2)
Leave feedback


Total ratings: 83
Rate this member

Report this Post05-08-2010 11:10 AM Click Here to See the Profile for motoracer838Send a Private Message to motoracer838Edit/Delete MessageReply w/QuoteDirect Link to This Post
Nice work Archie.

Joe
IP: Logged
Previous Page | Next Page

This topic is 21 pages long:  1   2   3   4   5   6   7   8   9   10   11   12   13   14   15   16   17   18   19   20   21 
next newest topic | next oldest topic

All times are ET (US)

Post New Topic  Post A Reply
Hop to:

Contact Us | Back To Main Page

Advertizing on PFF | Fiero Parts Vendors
PFF Merchandise | Fiero Gallery | Ogre's Cave
Real-Time Chat | Fiero Related Auctions on eBay


Copyright (c) 1999, C. Pennock