Next, the 1st set of parts came back from the upholstery shop.
We started working on fitting them into the car. We had left certain gaps at the edges of the panels to allow for the material to be wrapped around the edges, so fitting them into the car was necessary to make sure they fit right. We also had certain other parts to make & needed these parts in the car so we could make more parts.
Due to the thickness of the wrapped material the center console section wouldn't fit down in there all the way, so we had to modify & move the center dash part forward about 1/4"
We had originally instructed the upholstery shop to wrap the material into the defroster vents but they didn't.
When we got the interior panels back from upholstery, the right upper dach panel had been damaged in shipment & was going to have to be re-upholstered anyway. So we decided to see what was going to have to happen to open up the defroster vents.
When cutting the material, we found that there was not enough material to wrap it around properly & that's why the upholstery shop didn't do it.
After looking for some detail pictures of the defroster vents on the Internet, we found that the original car had flanges around the defroster vents.
Here is how it looked when we cut out the material around the vent.
We went ahead & made custom flanges for each of the defroster vents.
Wow! Incredible stitch work. You should've had Troyboy's interior stitched like that before it leaves the shop. Did you find the shop or did the customer? Locally?
Wow! Incredible stitch work. You should've had Troyboy's interior stitched like that before it leaves the shop. Did you find the shop or did the customer? Locally?
This is a place in the customers hometown that he has worked with before.
Contunuing with Phase II of the interior panel panel making.
We needed to make interior headliner panels.
We decided to make a Left & a Right headliner panel & they'll be seperated by the overhead console.
If you've been following this thread, you'll remember that there is 1" x 2" retangular tubing making up the roof framework.
To maximize headroom, the headliner will have a recess between the tubes above the passengers.
Here Kris is making the Right side headliner out of sheets of flat fiberglass....
To save some time & to make both sides symetrical, Kris then used the completed Right side headliner to make a mold for the Left side headliner. This is the result....
With the Flocking equipment I bought a few years ago, we will be Flocking these parts to match the color of the material we've been using on the other panels.
Once the headliner panels were fabricated, we could start making the "A" pillar covers.
We found one of our Fiberglass molds that could give us a right angle pc. that was long enough to cover the "A" pillar. Then we sectioned it & fiberglassed the backside of it to get & hold the curve we needed. It was a lot more work & planning than you might think.
The top of the "A" pillar cover is ending at the headliner, that's why we needed to finish the headliners 1st.
The bottom end of the "A" pillar covers had to be designed to go up under the ends of the dash.
We really had to plan these covers early on because they had to be removable (there will be wires routed down the "A" pillars from the overhead console). Also they had to be able to be installed AFTER the dash, windshield & headliner. So the fastener type, locations & the direction of attachment had to be figured out ahead of time.
These are some old style interior clips but are still used on some restorations & rods.
Because the ceiling is low we had to cutoff headrest posts to be shorter & the headrests have to be installed before the headliners.
We took a pc. of half round pipe & put holes in it. Then we welded tubes inside the pipe that the posts would fit tightly into. This was all welded to the bulkhead under the fiberglass cover.
This will give a secure & nicely finished look when all of the parts are covered. It will also be easy to assemble & service later if needed.
Then it was time to make the "B" pillar covers. Once again these were all made out of flat fiberglass panels. They were shaped to where they needed to be then a couple of layers of additional fiberglass were added to retain that shape.
The upper "B" pillar covers were made right on the car. Notice the brown tape protecting adjoining surfaces from the fiberglass laying in process.
Wow, I was going to say that with the labour alone you would be able to buy a real version! Til I looked it up... This car will be better then the origional! and less then half the price.. Amazing work Archie and Team!
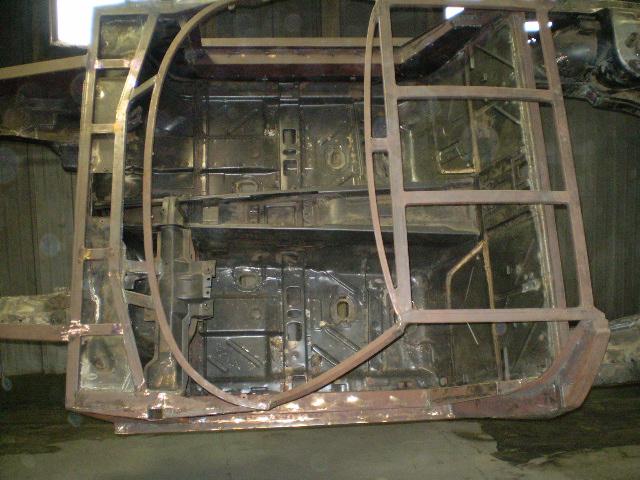
Once the interior parts had been sent out for upholstery, we went back to body stuff.
We still hadn't made inner wheel liners for the front so that was next.
Kris made a big sheet of flat fiberglass sheet a couple of layers thick. This pic was taken after we had cut some parts out of it.
This was curved & shaped to form a wheel well where we wanted it.
While it's still flexable we're using tape hot glue & paint sticks to hold it where we want it. Opening & closing it to make sure it clears the metalwork it will be protecting.
Once we get it to where we wanted it, we removed the clip & sat it on the workbench (business side up). Putting in some small pcs. of fiberglass to blend the wheel well into the underside of the wheel lip.
We also added a little inside wall to the wheel well.
Then we can fiberglass it permanently in place building up the thickness a bit & making it a structural part of the front clip.
Good work pics it's interesting to see the process.
I feel bad for the guys lungs in some of these pics inhaling fiber glass dust isn't very healthy.
Not to worry, 99% of the time the sanding or grinding pics are recreations (without the mask & goggles) because the flash on the camera will light up & show the dust in the air if I take pics when it's actually being done.
Wow! Incredible stitch work. You should've had Troyboy's interior stitched like that before it leaves the shop. Did you find the shop or did the customer? Locally?
Are we looking at the same pictures? Because half those seams aren't even straight.
Are we looking at the same pictures? Because half those seams aren't even straight.
The owner of the car had the parts farmed out by a shop he personally approved of; thus if the owner is okay with the items in question.... why are you so overly concerned?
If he didn't want comments, he wouldn't be posting on a forum.
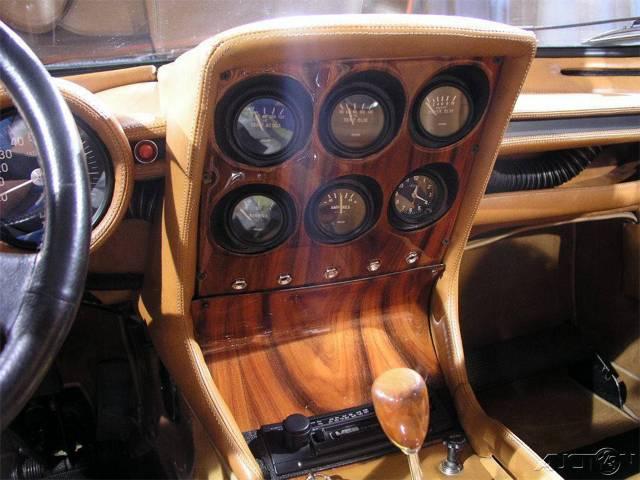
Yes, the seams go all over the place, from a distance that interior looks awesome, but the seams are bad and the edges around the HVAC and Radio need finished. Also the Fiero HVAC controller and mid 90s headunit ruin the look. With that interior its obvious he is trying really hard to look the part, I think they ought to look harder for a better HVAC controller and a vintage headunit.
If it were my car I'd put a mercedes becker mexico radio in it, cheap, easy to find, single DIN, they look the part, and work well. Hell I even have a couple spares from my w123 I might be willing to sell if it were something he'd want. http://cgi.ebay.com/ebaymot...fPartsQ5fAccessories
The owner of the car had the parts farmed out by a shop he personally approved of; thus if the owner is okay with the items in question.... why are you so overly concerned?
"Overly" is a poor choice of words. A single, one-sentence comment is hardly what I'd qualify as "overly concerned." I'd say I'm more concerned about your definition of "incredible."
"Overly" is a poor choice of words. A single, one-sentence comment is hardly what I'd qualify as "overly concerned." I'd say I'm more concerned about your definition of "incredible."
A voyage beyond this point might become overly dangerous for you here.
A voyage beyond this point might become overly dangerous for you here.
Ooooooo, is that a threat? Am I going to get voted off the island if I dare to disagree about the quality of the stitching on a kit car? I would hope the people here are better than that, but just in case, I've got plenty of green in my bar.
Originally posted by Mr.PBody: It's not your car, why are you so overly concerned with defending it.
quote
Originally posted by Fastback 86: Ooooooo, is that a threat? Am I going to get voted off the island if I dare to disagree about the quality of the stitching on a kit car? I would hope the people here are better than that, but just in case, I've got plenty of green in my bar.
You know, you've both said what your opinion is of the interior parts. So be it, you're not the owner of this car & you're on the record as having given your opinion.
This thread has been going on for almost 2 years. The guy who owns this car is also a member on PFF, so the message has gotten thru to him. Why do you want to turn it into the kind of trash you see on RFT?
Both of you do a lot of hating on RFT about PFF & myself. It appears that it entertains you & keeps you off the street. So take it over there.
You've stated your opinion...... I know for a fact that you'll never be within 10 miles of this car & so you'll never have to worry about having your senses insulted by seeing the interior from any closer than that. You see this guy doesn't hang in the same crowds as you do, he's way out of your league.
From the start of this project, he's wanted to share this build with PFF members. Once you've given your opinion, why is it necessary for you guys to ruin the thread with your petty High School bickering?
Not to worry, 99% of the time the sanding or grinding pics are recreations (without the mask & goggles) because the flash on the camera will light up & show the dust in the air if I take pics when it's actually being done.
Archie
Ahh okay that makes sense. Kinda able to give us potential customers a view of whats happening behind the scenes that way.
I enjoy the pics thanks for posting as you progress~
I've said it once I'll say it again... I love this build. I think the interior work is outstanding. I've been inspired to tackle my own interior build as I am sure others have, and that's all that should matter (and the happy customer who will be driving the car). We shouldn't let a few opinions poison an incredible build.
Keep up the great work Archie and keep the pics coming!
I would rather agree about the comment in regards to the stitch-work. It looks to be a little jagged and not perfectly straight. It looks as thought it were something I did myself with a sewing machine. Of course, my opinion is only that, but it doesn't look at as good as I think it should? A a real Lamborghini would have near 100% perfection. I've seen a couple Miura's and their interiors don't have that non-linear stitching.
You know, you've both said what your opinion is of the interior parts. So be it, you're not the owner of this car & you're on the record as having given your opinion.
This thread has been going on for almost 2 years. The guy who owns this car is also a member on PFF, so the message has gotten thru to him. Why do you want to turn it into the kind of trash you see on RFT?
Both of you do a lot of hating on RFT about PFF & myself. It appears that it entertains you & keeps you off the street. So take it over there.
You've stated your opinion...... I know for a fact that you'll never be within 10 miles of this car & so you'll never have to worry about having your senses insulted by seeing the interior from any closer than that. You see this guy doesn't hang in the same crowds as you do, he's way out of your league.
From the start of this project, he's wanted to share this build with PFF members. Once you've given your opinion, why is it necessary for you guys to ruin the thread with your petty High School bickering?
Thanks
Archie
I stated my OPINION, and how my OPINION as to ways to make it look better, just an OPINION, when someone makes suggestions it is constructive criticism. If people never hear constructive criticism, you'll only make what looks right in a narrow scope, and it won't be the best it can be.
He saw my posts? Okay? I also see that this is an open forum, if you and him weren't looking for comments and people seeing the work, and the quality of it, you wouldn't have been posting pics for two years.
I don't hate on you on RFT, I critique some of your work and your poor people skills, which I suppose is what this post is about too. I don't run RFT, I didn't start it, I am not a mod, I am not friends with the people who do, don't make RFT my problem.
Maybe the car will be at a show I am at, you don't know that. I am actually very active the classic car community and go to concours events and high end and classic auctions and shows around the country. I show vintage Porsche and Mercedes. In my circle an 80s GM HVAC controller would stand out like a sore thumb. But thats just my poor white trash circle.
High school bickering? I made a suggestion, then you and madcurl came in here trying to swing the banstick and make threats, I am not bickering. My original post was full of suggestions and links. Congratulations on once again missing the point of constructive criticism, getting defensive, and just being rude.
You know, you've both said what your opinion is of the interior parts. So be it, you're not the owner of this car & you're on the record as having given your opinion.
This thread has been going on for almost 2 years. The guy who owns this car is also a member on PFF, so the message has gotten thru to him. Why do you want to turn it into the kind of trash you see on RFT?
Both of you do a lot of hating on RFT about PFF & myself. It appears that it entertains you & keeps you off the street. So take it over there.
You've stated your opinion...... I know for a fact that you'll never be within 10 miles of this car & so you'll never have to worry about having your senses insulted by seeing the interior from any closer than that. You see this guy doesn't hang in the same crowds as you do, he's way out of your league.
From the start of this project, he's wanted to share this build with PFF members. Once you've given your opinion, why is it necessary for you guys to ruin the thread with your petty High School bickering?
Thanks
Archie
Amusing. Could you try to make it a little more obvious that you don't know me at all? Find all my "hate" on you on RFT. Go ahead, I'll wait. Anything you find will be a stretch. As for where I'll be, what crowds I hang in and what "league" I may be in, you don't know any of that for a fact, so I wouldn't go around making declarations you can't substantiate. I offered a one sentence opinion on the stitch work, which you didn't do and therefore has almost nothing to do with you. Madcurl came out swinging with the ban threats and all that nonsense. If you want to know why there's bickering in this thread, ask him.
If I may make suggestions: * Put an overlay on the Autometer gauges, they stick out like a sore thumb and scream "Autozone". (I'm guessing that's planned down the road anyhow)
* Replace the Fiero HVAC with another unit. (there are a few Kit car units available for Fieros)
* Either go completely modern with the Stereo and install a double DIN 7" LCD deck, or go retro with a Becker, or other retro deck. (which ever suits the owners preference) I'm assuming the current deck is a placeholder anyhow. (no need to let a nice deck get dirty from installation) Add a second color to the interior (preferably darker - see Miura registry). Possibly on the top of the dash. (in case the creme makes reflections/glare on the windshield) Might not be needed. (it's fairly easy to check at this stage of the installation)
I understand that building kit cars is expensive and corners have to be cut somewhere not to let costs spiral out of control. Some of my suggestions may not be financially feasible. (or could be done at a later time)
I agree with others on the stitching. It is crooked. That said. The stitching on ACTUAL Lambirghini's is crooked as well. (especially older ones, before Audi took over the company) - An inside joke by Lambo owners actually relates to the "Italian" stitching.
I understand the desire of the owner to go to a shop of a trusted quality and price, especially a local (to him) shop. In case the owner looks for alternatives: If I may suggest another upholsterer - AMIDA - . He has excellent stitch work and his quality is better than Ferrari OEM. Many people on this forum trust him. I would have him make an interior as well, but that's not feasible for me right now.
Back on topic.... Archie when will this outstanding ride be completed.
We're hoping to have most all of the bodywork done by the end of the month & shoot a coat of primer on it. Then we can see what it would look like all one color (any color ).
I'm also hoping to begin the final installation of the engine in the next couple of weeks. There will be a lot of wiring (& interior assembly) going along with that. It would be nice to fire the engine up by mid-December & maybe be able to move the car under it's own power soon after that.
Still lots to do, but I'm looking forward to 2 things, getting the body all in one color & firing up the engine.
We've got a lot done since the last update, I'll get to work posting some of that up here.
Archie
[This message has been edited by Archie (edited 11-17-2009).]
I agree with others on the stitching. It is crooked. That said. The stitching on ACTUAL Lambirghini's is crooked as well. (especially older ones, before Audi took over the company) - An inside joke by Lambo owners actually relates to the "Italian" stitching.
All that said: Keep the pictures coming!!
Reminds me of an EMail I got from another Miura fan.......
"Funny thing but nobody seems to state the obvious. Hand built cars , even expensive Italian ones , are likely to have some imperfections because they are HANDBUILT! That’s why every piece on a miura is labeled with its personal issue number because the parts were hand crafted and are not interchangeable ."
There are not a lot of good interior pictures where you can see the stiching in a Miura, this is the best one I've found.
I did look at the videos of Jay Leno's 2 Miuras & the seams are not straight on either of his car either. There are a few interior shots as follows
Since the Italian craftsmen who built a bunch of these car over several years couldn't get the stiching perfect, I guess we can't get too worked up blaming the current American upholstery craftsman in his 1st shot at the job.
I'll bet that by the time he gets to the 5th or 6th one, he'll have it better than the original.


_2.JPG)
_1.JPG)
.JPG)
.JPG)
_1.JPG)
_2.JPG)
_1.JPG)
_1.JPG)
_1.JPG)
.JPG)
_1.JPG)
_2.JPG)
_2.JPG)
_1.JPG)
.JPG)
_2.JPG)
_1.JPG)
.JPG)


.JPG)
_1.JPG)
.JPG)
.JPG)
.JPG)
.JPG)
.JPG)
_1.JPG)
_1.JPG)
.JPG)
.JPG)
.JPG)
_(2).JPG)
.JPG)
_1.JPG)
.JPG)
.JPG)
.JPG)
_1.JPG)
.JPG)
.JPG)
_1.JPG)
_1.JPG)
.JPG)
.JPG)
.JPG)
_1.JPG)
.JPG)
_1.JPG)
_1.JPG)
.JPG)
_1.JPG)
.JPG)
.JPG)
.JPG)
.JPG)
_1.JPG)
.JPG)
.JPG)
.JPG)
_1.JPG)
.JPG)
.JPG)
.JPG)
.JPG)
.JPG)
.JPG)
_3.JPG)
_3.JPG)
_4.JPG)
_2.JPG)
_1.JPG)
_1.JPG)
_2.JPG)


_1.JPG)
_1.JPG)
_2.JPG)
_2.JPG)
_2.JPG)
.JPG)
_2.JPG)
_2.JPG)
_1.JPG)
_3.JPG)
_3.JPG)
_3.JPG)
_3.JPG)
_4.JPG)
_1.JPG)
_3.JPG)
_2.JPG)
_3.JPG)
_4.JPG)
_3.JPG)
_1.JPG)
_2.JPG)
_2.JPG)
_1.JPG)
_5.JPG)
_1.JPG)
_3.JPG)
_1.JPG)
_5.JPG)