So what you're saying is, someone else didn't take enough pride in their work to do it right, it's ok that this upholsterer didn't either? Not sure I follow your logic, but if mediocrity is fine with the customer, well, it's his car. I'd send it back, but then I guess I don't think "good enough" is good enough when I'm spending what your customer is on this car.
So what you're saying is, someone else didn't take enough pride in their work to do it right, it's ok that this upholsterer didn't either? Not sure I follow your logic, but if mediocrity is fine with the customer, well, it's his car. I'd send it back, but then I guess I don't think "good enough" is good enough when I'm spending what your customer is on this car.
So what you're saying is, someone else didn't take enough pride in their work to do it right, it's ok that this upholsterer didn't either? Not sure I follow your logic, but if mediocrity is fine with the customer, well, it's his car. I'd send it back, but then I guess I don't think "good enough" is good enough when I'm spending what your customer is on this car.
The reason "why" you didn't follow the Miura's stitch logic is simple- you don't think before you speak." Had you known that the original Miura's featured are known to have this type of flaw (if that' what you want to call it) is viewed as normal. Thus the original owner was just following a known pattern. On the other hand- trying to hen peck anything that Archie is building- now that type of behavior is indeed a character flaw.
It could have ended a week ago, but you brought the stitching back up. I said my peace and left this thread 6 days ago. You came back for more, don't act so surprised that you got it.
The reason "why" you didn't follow the Miura's stitch logic is simple- you don't think before you speak." Had you known that the original Miura's featured are known to have this type of flaw (if that' what you want to call it) is viewed as normal. Thus the original owner was just following a known pattern. On the other hand- trying to hen peck anything that Archie is building- now that type of behavior is indeed a character flaw.
Oh please. This whole "the originals were done poorly so it's ok we do it poorly" excuse showed up almost two weeks after the fact. Read Archie's post again, I'll quote it for you.
quote
Originally posted by V8ArchieSince the Italian craftsmen who built a bunch of these car over several years couldn't get the stiching perfect, I guess we can't get too worked up blaming the current American upholstery craftsman in his 1st shot at the job.
I'll bet that by the time he gets to the 5th or 6th one, he'll have it better than the original.
Shoddy stitching for authenticity's sake wasn't the plan, it's an after-the-fact excuse to excuse the grievance. Not only has it not been presented as an underlying plan, but quite the opposite has been presented instead. It's convenient that the original Miura had poor quality stitching, but one person's poor workmanship doesn't excuse another's, especially not 40+ years after the fact.
[This message has been edited by Fastback 86 (edited 11-18-2009).]
Shoddy stitching for authenticity's sake wasn't the plan, it's an after-the-fact excuse to excuse the grievance. Not only has it not been presented as an underlying plan, but quite the opposite has been presented instead. It's convenient that the original Miura had poor quality stitching, but one person's poor workmanship doesn't excuse another's, especially not 40+ years after the fact.
LOL Grievance by a overly concerned Fiero owner- now that's a new one. I guess you'll be calling Jay Leno telling him (and all others mind you) about the shoddy Italian stitching on real Miuras and how you're an expert as-to how real stitching should be on real Miuras and replicas; after all you own a you own a Fiero, right? Son, you need to sit back, enjoy the show, and don't become overly concerned about a owners approved stitched work.
[This message has been edited by madcurl (edited 11-18-2009).]
I've looked at this thread 50 times, at least, and this is the first time page 8 actually came up - for some reason I was never able to view page 8. I'm not sure why... I'm pouring over all the images and comments to find out how you did all that custom interior work. Which, looks fantastic fully clothed...
Keep up the great work
[This message has been edited by Sofa King (edited 11-19-2009).]
Shoddy stitching for authenticity's sake wasn't the plan, it's an after-the-fact excuse to excuse the grievance. Not only has it not been presented as an underlying plan, but quite the opposite has been presented instead. It's convenient that the original Miura had poor quality stitching, but one person's poor workmanship doesn't excuse another's, especially not 40+ years after the fact.
I find it hard to see why it should bother you about the workmanship of this car when you are not footing the cost of building it ,if the owner is satisfied with it then so be it,Archie is doing a great job that you can't do so until you can do better why not just shut up if you are not going to say some thing positive.
Archie, any updates on this great build? I look forward to updaets on this one like I did on Troys
I was getting online last night to post about 50 pictures as an update to this thread, when I found that I had hurt someone's feelings. All of a sudden I wasn't in the mood to post any of them.
quote
Originally posted by Fastback 86: It could have ended a week ago, but you brought the stitching back up. I said my peace and left this thread 6 days ago. You came back for more, don't act so surprised that you got it.
Just in case you hadn't noticed, I was responding to a statement by another member.
You know, it might make things a lot easier if you'd just post up a list of phrases, words or topics I'm not supposed to use in my thread.
Then you wouldn't be getting your feelings hurt so often & we could continue with this thread without your insults.
Archie
[This message has been edited by Archie (edited 11-18-2009).]
It would be a shame to have you stop posting updates to this thread as it is an excellent build. You guys are doing an outstanding job at solving some pretty unique design and build issues.
Keep it up and keep posting updates regardless of the occasional sidetrack down the odd turkey trail. These are inevitable in a forum setting.....
The Miura has always been one of my very favorite bodies in the automotive world. Thank you for keeping up on this thread for the sole purpose of of our enjoyment.
for pic's........................................ PLEASE!!!!!!
ok, oK, OK
This group of updates is going to be kinda complicated to keep in order.
We've been working on several different related & yet unrelated projects.
We've been working on getting the windows operating in the doors, while doing bodywork on the doors & surrounding areas. Part of getting the windows working is getting dew wipes mounted. We can't complete with windows & dew wipes without finishing up the bodywork on the doors. Can't finalize the doors without getting the door jambs in the right conditon. Can't finish up getting the door jambs done without putting in the gas filler. Can't finish up the door jambs & get the windows finalized without finalizing the rubber weatherstripping seals.......yadda, yadda, yadda....
So we will be jumping around, try to follow along, you'll see.
I don't even know where to start.....
Back on page 9 you'll recall that we were working on the operating system for the windows....
As we got back on the doors this last few weeks, we were establishing the seal areas around the doors & windows & found that it wasn't going to work properly.
We found that the window wasn't going to be in far enough against the seals to seal properly. Because the thickness of the doors gets narrower at the bottom, we couldn't kick the bottom of the window out far enough to bring the top in far enough to deal. Having the window operating hardware on the outside of the window just wasn't going to work for us.
As I said before, there is no aftermarket power window kit that is short enough to operate a 13" tall window in a 15" tall door. So we were going to have to use a modified Fiero operating system. That still is true but now it was going to have to be mounted on the inside of the window.
That is going to require that the inside top of the inside door panel will have to be about 1.5" thicker that the original Miura door panel was.
We were not sure how well all this would work, so we had to prototype it. The best way to do that was to take the parts out of a Fiero door & mock them up.
Here we've cut the whole inside door panel out of a Fiero door.
Don't worry, it looks kinda crude but it's gotta be done.....
Then we took that whole pc. & began to mock it up on the inside of our door....
Add some sheet metal bent on the brake & it's looking kind good so far.....The window deometry isn't going to work on the Miura but once we drill out the rviits attaching it to the Fiero inside panel we can move the elements around to work on the Miura window.
We also had to start thinking about how we were going to mount the dew wipes on the inside & outside of the window while still keeping them serviceable. More on this later.
You can see how the door panel will be out a little on the inside.
Once, we've got the basics figured out, it's time to make a real door panel out of sheet metal.....
Eventually we'll have to make the top part of this panel out of a seperate pc. to make it so we can mount the dew wipes...... but like i said more on that later.
This is what the door panel & window parts looks like off of the door panel.
Here we're working on the plan to make the top part of the door panel a seperate pc.
Here is a picture of the window side of the door panel..... notice that the top part is now a bolt on pc. (again, more on why we're doing that later)
Archie
[This message has been edited by Archie (edited 11-19-2009).]
Here's another shot of the (now twp pc.) inside door panel. Note that I'm calling them inside door panels but they're not in inside interior door panel that will be upholstered. These steel door panels actually carry the window & it's hardware. More on why we did a 2 pc. door panel later.
Here are some more pics of the inner upper door panel bolted to the door...
While this is all going on, some fiberglassing is also going on. We've got to buildup the areas where the seals are going to hit on the doors. Also the outside skins of the doors have big low spots in them 7 we have to build a flat on the inside of the outer door panel to attach the outboard dew wipe to.
Here's just some of the pics of that....
Once the glass had cured, it's sanded & finished for a good seal surface like this around the edges of the door.
We're also working on the gas filler inlet. On the real car it's mounted up front under one of the grills on the front clip. After a lot of deliberation, it was decided that snaking a pipe from that location back to the Fiero gas tank was an unsafe situation. So it was decided to put it in the rear door jamb on the left side.
We made a fibelglass pocket to mount it into...
Next we'll talk about the big deal on mounting the dew wipes & making the inside door panel two pcs.
The inside & outside dew wipes was one of the hardest things to figure out how to mount while still keeping them to where service could still be done inside the door. After all we still are going to have to get insode the doors to hook up the door release hardware & some other things.
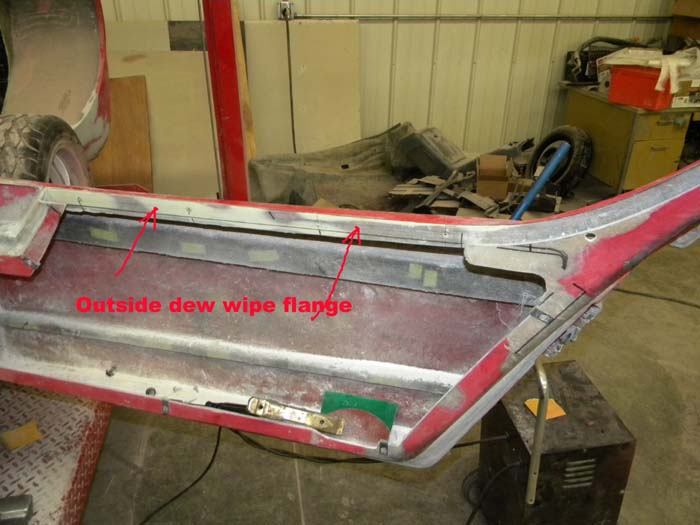
First we had to figure out how to mount the inside & outside dew wipes. On a stock Fiero the outer dew wipe just screws on & the inner one just pops on. We also had to curve the dew wipes to follow the radius up the trailing edge of the door. There was no way we could just abruptly end the dew wipe part way up the radius as it would look funny. Well we found we could build a fiberglass flange on the door skin for the outside dew wipe & attach it with screws. but once that was in place, there was no way to attach the inner one onto a similar flange on the inside of the window opening.
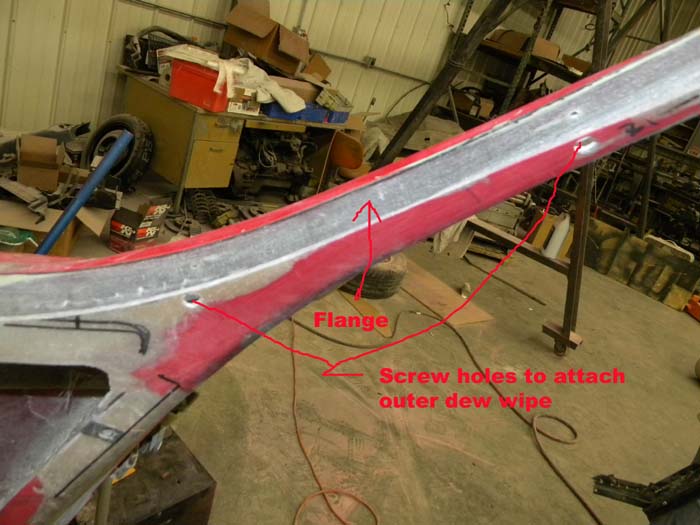
Here's the flange we made on the inside of the outer door skin to attach the outer dew wipe......
Here is a picture of the outer dew wipe curved for going up the radius at the traileing edge of the window opening. Note: the flat steel pc. made to spread the load when it's attached.......
Here it's held in place on the door......
Here it is with the dew wipe attached...
As you think about it, there's no way to attach an inner dew wipe because the window opening would be too small in width to allow you to screw on the inner dew wipe.
The only way to get the inner dew wipe attached was to make the door panel 2 pcs. & attach the dew wipe to the upper section of the door panel.
Here is the inner dew wipe attached to the upper door panel....
Notice the steel reinforcement around the curve. (Ya gotta love the plasma cutter for this kind of work.)
Here the assembly is being held up almost in place. The upper door panel will be heald in with 2 bolts at each end & the dew wipe is held on to it will several fasteners. Then the top of the lower door panel is attached to this pc.
Once it's figured out on one side of the car, it's easier to do the other side of the car.
All the time we've been doing this, Kris has been working on bodywork. That's next.
Archie
[This message has been edited by Archie (edited 11-19-2009).]
In anticipation of putting the engine into the car for the last time, as soon as we can, we've been working at putting back in the gas tank, hyd. lines, A/C lines, coolant pipes, brake lines, master brake cylinder & lines for that.
It's really eye opening the all the little details required to put a car like this together.
Yeah, I know.... everything from engine choice to what type of screw is going to be needed to attach a dew wipe.
It's hard to understand that when building a car like this, you have a lot of details to take care of that no one thinks of when they see the car sitting across the parking lot from them.
"It's just a POS kit car" is what they'll say.
Archie
[This message has been edited by Archie (edited 11-20-2009).]
Isn't this a Prova/Parallel Kit? IIRC Prova was approved by the Lamboghini factory when they first molded this kit. That's about as legit as a kit gets.
Originally posted by Mr.PBody: Isn't this a Prova/Parallel Kit? IIRC Prova was approved by the Lamboghini factory when they first molded this kit. That's about as legit as a kit gets.
That wasn't my point.
It wasn't about a legit kit or not.
My point was that no matter how much work, skills & details you go thru to build a car like this, there's always someone who will be hating on it without even considering what it took to build it.
I'm sure you know what I mean.
If you read the whole thread, you'll see that the stuff we got from the U.K. was just a body with very poor fiberglass that moved all over the place. It is a Prova/Parallel body ...... but I doubt that any factory would have endorsed what we got in our crate.
Archie
[This message has been edited by Archie (edited 11-20-2009).]
WOW! I don't post a lot here anymore, just lurke... but Archie, this is top notch attention to detail... the kind of craftsmanship and detail work that make it a road going replica... not just a kit car.
My point was that no matter how much work, skills & details you go thru to build a car like this, there's always someone who will be hating on it without even considering what it took to build it.
I'm sure you know what I mean.
If you read the whole thread, you'll see that the stuff we got from the U.K. was just a body with very poor fiberglass that moved all over the place. It is a Prova/Parallel body ...... but I doubt that any factory would have endorsed what we got in our crate.
Archie
Are you sure it came from parallel then? I talked to the guy who owns it a long time ago, they had to change the bodywork to get it to pass SVA, so now its some ugly miura based thingy, but the glasswork looks decent. Prova changed hands like 3 times, not sure who may have made that kit. Now you do know the Parallel kit isn't designed to take an original windshield and on their site they show the required glasswork. Btw not trying to hate here, just telling you what I know.
[This message has been edited by Mr.PBody (edited 11-20-2009).]
Are you sure it came from parallel then? I talked to the guy who owns it a long time ago, they had to change the bodywork to get it to pass SVA, so now its some ugly miura based thingy, but the glasswork looks decent. Prova changed hands like 3 times, not sure who may have made that kit. Now you do know the Parallel kit isn't designed to take an original windshield and on their site they show the required glasswork. Btw not trying to hate here, just telling you what I know.
From what I've been told this is the body they had to design to be approved & keep from being sued by Lamborghini.
(see below)
Archie
[This message has been edited by Archie (edited 11-20-2009).]
Thats the Miura Concept from a couple years ago, it may have influence the new parallel body. SVA put restrictions on things like lighting which is where part of the re-design came from.
Years ago Prova was approved by the Lamborghini factory to build repicas, I think the initial approval was over the countach which Parallel does not produce anymore, but the Miura was also part of that approval. Some pretty nasty Essex based Miuras came out of the 80s, the Prova kit was the best I've seen.
Thats the Miura Concept from a couple years ago, it may have influence the new parallel body. SVA put restrictions on things like lighting which is where part of the re-design came from.
That's correct, I pulled up the wrong set of pics in my previous post.
I've removed them.
There is actually some pics from another member who has a Prova ZL earlier in this thread.
We've kept up the build for the last few weeks.....
We began setting up the window operating hardware on the Left side door....
Here we're fiberglassing up the flange to the door for mounting up the outside dew wipe.
Also we're working on the door vents on the R. side door. This stuff wasn't supplied with the kit, so we have to make it up here.....
While doing that, we also are starting to fab up the floor area of the front compartment. The stock Fiero spare tire well is not going to fit into this tubular chassis. The floor we're going to have to make is not going to fit in if it's all one pc., so it will be 2 pieces.
The back part of it will have to fit up to the cowl bulkhead under the A/C componets & heaterbox. So we took a stock Fiero spare tire well & modified it as needed & use that as a mold to make the part we needed.
Here we're laying up fiberglass on it........
We're still working on the door vents....
While we make the next area of fiberglass mounting flanges for the outside dew wipe on the drivers side door....
.........
[This message has been edited by Archie (edited 12-04-2009).]
Back to the door scoops. We put in flat fiberglass pcs. for the strakes. We will have to fiberglass each one of the pockets formed by these strakes. So we hot glue these pcs. in on the bottoms & once we've fiberglassed them from the top we remove the hot glue & glass them from the bottom too.
Fabbing up the metal metal tray that will be the front compartment floor & battery box.
This is the fiberglass tray Rob made to close out the front compartment floor area.
The front compartment floor wouldn't fit in if it was all 1 piece, so it's 2 pcs., Fiberglass just in front of the bulkhead & then steel going forward from there.
Once the battery box is built, this is the front part of the front compartment floor. Since the Chassis is all powdercoated gloss Black, I think I'll send this out for Powdercoating too.
Back to the door vents, Kris has fiberglassed all 4 sides of each of the pockets formed by the strakes in the door vent to make them more ridgid & thicker.
The strakes on the door vent on the real car are metal. We had to make them out of fiberglass because there are no provisions to attach metal parts to the door or to the outside part of the scoop. Considering that the fiberglass "sail panel" part of the door is a lot thicker than the original cars metal door skin, there's just not enough room to the inside of the strakes to accomidate fastenersfor the strakes.
To make them look as close to the original as we can, it will take a some filling, filing & sanding inside of each pocket to get the corners square with a minimal radius inside the pockets.
A little loop to form the door handle.......
And some shaping of the leading edges of the strakes & it's looking pretty good.....
The door scoops lead into the engine compartment, so we had to make a duct scoop for that.
Then we had to make that duct look right on the inside. So we used our Flat Fiberglass stock to make the inside walls for the scoop.
Some sanding, finishing & primer & it looks pretty good.
We've done the upgrades to it that Dave wanted to do. Thay are documanted in the What's up at Archie's thread.
25 Chop Tops have been done since the GBCT was completed. The GBCT now has all the upgrades that have evolved in the last 25 chops. So now it's up to date & ready for paint.
Next, Dave is going to take it to his local painter to make it all one color again.
Archie
quote
Originally posted by exoticse:
Sick ! Great work Archie and crew.
btw,...i spy choptop #13 ? Any new work going on with it ??


 I guess you'll be calling Jay Leno telling him (and all others mind you) about the shoddy Italian stitching on real Miuras and how you're an expert as-to how real stitching should be on real Miuras and replicas; after all you own a you own a Fiero, right?
 Son, you need to sit back, enjoy the show, and don't become overly concerned about a owners approved stitched work.


_1.JPG)
_2.JPG)
_1.JPG)
.JPG)
.JPG)
_1.JPG)
_1.JPG)
_1.JPG)
_1.JPG)
.JPG)
.JPG)
_5.JPG)
_2.JPG)
.JPG)
_2.JPG)
_2.JPG)
_2.JPG)
_2.JPG)
_1.JPG)
_2.JPG)
.JPG)
_2.JPG)
_1.JPG)
.JPG)
_1.JPG)
_1.JPG)
.JPG)
.JPG)
.JPG)
.JPG)
_2.JPG)
.JPG)
_1.JPG)
.JPG)
.JPG)
.JPG)
_2.JPG)
.JPG)
_1.JPG)
_1.JPG)
_1.JPG)
.JPG)
.JPG)
.JPG)
.JPG)
.JPG)
.JPG)
.JPG)
.JPG)
.JPG)
.JPG)
.JPG)
.JPG)
_1.JPG)
_3.JPG)
_1.JPG)
_1.JPG)
_2.JPG)
.JPG)
.JPG)
_1.JPG)


.JPG)
_1.JPG)
.JPG)
_1.JPG)
.JPG)
_1.JPG)
_1.JPG)
.JPG)
_1.JPG)
.JPG)
.JPG)
_1.JPG)
_1.JPG)
.JPG)
_1.JPG)
.JPG)
_1.JPG)
.JPG)
.JPG)
_1.JPG)
.JPG)
_1.JPG)
_1.JPG)
.JPG)
.JPG)
.JPG)
.JPG)

.JPG)
.JPG)
.JPG)
.JPG)
.JPG)
_1.JPG)
.JPG)
_1.JPG)
_1.JPG)
.JPG)
.JPG)
_1.JPG)
.JPG)
.JPG)
.JPG)
.JPG)
.JPG)

.jpg)
.JPG)
.JPG)


