I thought I'd show you what we had to do to mount the gages in the 2 center pods.
The center gage pod lips were larger in Diameter than the big gages we were putting in.
So we had to make them smaller by making a new face inside the pods. The bottom on a 1 gal. mixing cup fit perfect inside the pod & made a perfect buck for making it. Plus the little nub you find in the center of any round bottom plastic cup made the perfect center for the hole saw we would need to cut it out.
That gave up this
The hole saw gave us this
And this
Also, remember the console part we told you to keep an eye on? This is it now....
Archie, I am following your thread very closely. One question, did you lay out the amp, volt, oil gas gauge, etc., in the same placement as Lamborghini did in their original Muira? A small thing I agree. But in observing your dedication to perfection, I thought I would inquire. Oh, I forgot to ask, are you are going to add a radio? As you know, the Muira never came from the factory with a radio.
Kevin
[This message has been edited by kevin (edited 03-01-2009).]
Archie, I am following your thread very closely. One question, did you lay out the amp, volt, oil gas gauge, etc., in the same placement as Lamborghini did in their original Muira? A small thing I agree. But in observing your dedication to perfection, I thought I would inquire. Oh, I forgot to ask, are you are going to add a radio? As you know, the Muira never came from the factory with a radio.
Kevin
Yes & Yes......
The 6 gages are in the correct positions & we are putting in a modern radio.
I have seen some pics of the interiors that show a radio mounted vertically in front of the shifter but we can't do that because of the Fieros' location of the gas tank.
We actually have the radio mounting almost done, we'll be finishing it up tomorrow morning.
Your shop has come a long way with the fiberglassing I'm impressed with the work.. it's very rare to find such custom one off services esepcially in this economy.
I'll have to drop by when spring hits and check out a choptop finally and decide if I can fit or not hehe.
I had the car outside today in the nice weather, so I took a bunch of pics.
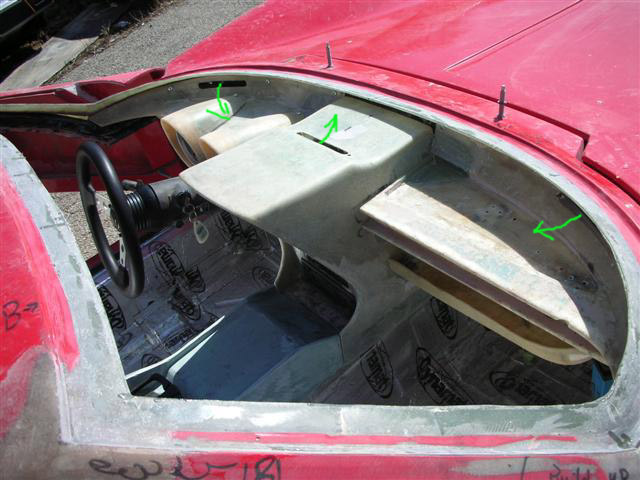
We mounted up the new steering wheel to see what it would look like. Finished glasswork on where the center console meets up with the lower part of the center gage panel.
Things are moving along pretty well with the dash & console.
We don't do upholstery here so we're building up the whole dash & center console so it can be blown apart & sent to a shop in TX. they will upholster it all & return it to us for final assembly.
This requires some planning, we have to assemble the interior in such a way that all the fasteners are located in places so they can be accessed to reassemble it after upholstery.
We still have to build ductwork for the defroster vents & we have to locate & duct the Heat A/C vents.
What's the make and model of that steering wheel? It looks very close to an original Miura steering wheel of that era.
Are you going to modify the HVAC controls to look more authentic Miura? Or are you going to do a more modern approach with Fiero/Ferrari F355 replica HVAC controls? Would a larger stereo than single DIN fit? (i.e. Double DIN - in case the owner ever wants a Navi in the car. Would a flip up screen fit?)
Nice build, love the console. I've always wanted cupholders in my car and this seems like a good way to get them and make them look OEM. If anyone is wondering, this console is from a 2006-2007 Volkswage Passat. It is the rear seat armrest/cupholder.
We are currently working on the ductwork behind the dash for the defroster vents.
While it appears that the fabrication of the dash is about finished, it still has to be functional. that means a lot of work that people wouldn't even think of still has to be done.
When we're done with this, we still have to fabricate, mount up & connect the heater venting system.
This dash has 3 defroster vents as shown here....
We'll be using 1.5" heater ducting hose like we did when we built my GT40.
Behind each one of the vents we have to fabricate a little airbox to attach the air duct tubes to & to direct the defroster air out thru the vents shown above. Each of these airboxes & the tubes running to them has to be built in such a way as t not interfere with anything else we have to have behind the dash.
For the center vent, Rob built a box under the vent.....
And a "lid" for the box that has a 1.5" Dia tube attached to it....
Then he fiberglassed the "lid" onto the vent
For the corner vents, he made & fiberglassed an airbox & tube directly onto the back of the vent....
We were needing to make a cover for the lower part of the driver's side dash & for the right side of the passengers' side dash. We also needed to Fabricate in the Ball Vents for both sides.....
This simple part will turn into a pretty complicated cover. This was made from a pc. of flat sheet metal bent to an angle in our brake. Then we just laid a few layers of fiberglass over the metal.
We then made a pocket for the ball vent.
We needed to cover the exposed underside of the steering column, so we flaired that....
Preparing to fiberglass flats onto the ende of the part.
The end on the inside end is a lip about 1.5" wide to allow this part to be mounted to the left side of the gage cluster console.
The outboard end covers the whole end so you can't see behind the dash when the door is open.
While doing all this, Rob is also making a pc. to do the same job on the right side of the dash.
Here, Rob is building the plumbing manifold that will both to the top of the heater box & will route the tubes to the 3 defroster vents (on the left) & the 2 ball vents (on the right).
With the parts back in the car, it's starting to take shape....
Here we see the feed tubes glassed into the back of the air boxes behind the ball vents....
Here you can see the plumbing manifold bolted onto the top of the heater box in the car. Hard to believe but there is enough room behind this dash to route all 5 feed tubes from this manifold to the defroster & ball vents. (We're looking thru the center gage panel area in these pics)
I did not know they made a targa Miura unless this is a custom. I notice no seals.. Anyway LOVE the interpretation of the real Miura interior
There was only one and it was a one-off custom. Mr Lamborghini did not want his purebred sports car watered down for rich playboys trying to tan while they were driving.
There was only one and it was a one-off custom. Mr Lamborghini did not want his purebred sports car watered down for rich playboys trying to tan while they were driving.
I'm sure if Dean Martin had wanted his son to be darker, it could have been accomplished via Ferruccio's instruction. Enzo would have been pissed
Since the last report, we've been working on several different areas of this car.
We were made aware that on this model of the Miura some cars had a glovebox door.
It was hard to find any real good pics of the door, so we had to come up with our own.
We used plastic tape to tape over the whole glovebox section & then we used that to make a door right off of the glovebox section. One thing for sure, that ensured that the door was going to be an exact fit.
We also built the overhead console. This time we didn't have anything around here that we could use as a starting point for fabricating it. So this one was built from scratch one pc. at a time.
We also are working on the front & rear bumper sections.
Neither one of the fiberglass bumper inserts actually fit into the openings in the body very well.
Also niether one of them was straight or even symetrical. So a lot of reglassing, grinding & shaping had to be done.
The rear bumper insert had to be reworked as noted above.... We also had to come up with a way to bolt it up into the car with hidden fasteners. that way it can be removed for painting etc. & reinstalled.
Also, the nose insert & grill opening had to be completely reworked to fit nicely together.
To mount the parking lights we have, we had to mount them at a bit of an angle.
To do that we had to add some fiberglass to the back side of the bumper to form pockets for the lights.
We use some thin alum. sheet metal formed to the shape we needed. then we hot glued the metal into position then glassed over the metal.
As you can see, that method makes a nice little pocket to mount the light up into.
Then a little trimming off of the back side of the new opening & start fitting the light into the opening. You go to be careful to mount both light in exactly the same angle & location....
I'll show you the mounting brackets we made for the lights & bumper next time.
Wouldn't VDO gauges have fit without the extra labor? I think OEM Lambo gauges were VDO. Although I'm sure with overlays and new needles you could get the same look.
Wouldn't VDO gauges have fit without the extra labor? I think OEM Lambo gauges were VDO. Although I'm sure with overlays and new needles you could get the same look.
Keep the pics coming!!
They would have fit if we were using an OEM dash. If you go back to page 7 you can see the fiberglass pcs. that we were supplied. There were no provisions for mounting any standard size gages, we had to fab all that stuff up on our own.
The original Miura speedometer , tachometer and center console guages were all British made by the Jaeger company. A good source of information comes from a Miura restoration web site. http://www.huskyclub.com/P400partslist.html
We finished up mounting the driving lights & moved on to working on finishing up the areas around the headlights.
The body around the headlight area was very warped out of shape so it took several sesions with fiberglassing & filling & sanding to get them symetrical. We worked the space around the headlight to make it as small as we could & still allow the light assembly to move up & down. We also made a fiberglass cover for the top of the "Stovepipe" looking area on the top of the light behind the lens trim ring.
In previous pictures you can see open void area behind the light when it's in the closed position.
It has that open look on the real car but we couldn't resist finishing that area.
We also have finished up the rear bumper area to make the bumper trim pc. fit into a perfectly shaped opening.
I know this shot looks unfinished but we found pics of a real Miura that looks just like it.


.JPG)
.JPG)
.JPG)


 I think that I may have had an accident in my pants! Please keep posting pics.
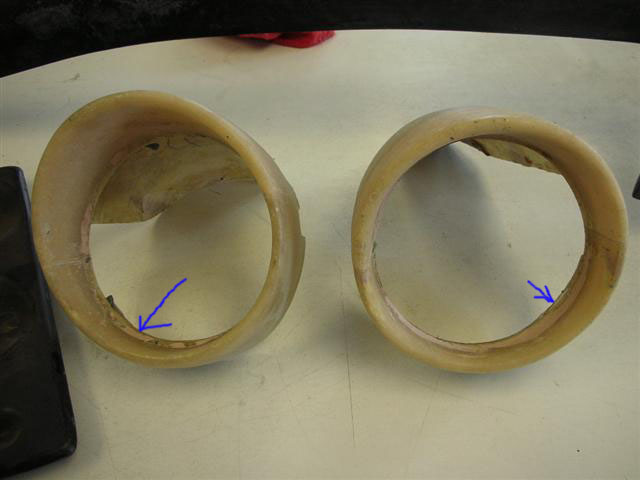
.JPG)
.JPG)
.JPG)
.JPG)
.JPG)
.JPG)
.JPG)
 Oh, I forgot to ask, are you are going to add a radio? As you know, the Muira never came from the factory with a radio.


.JPG)
.JPG)
.JPG)
.JPG)
.JPG)
.JPG)
.JPG)
.JPG)
.JPG)
.JPG)
.JPG)
.JPG)


.JPG)
.JPG)
.JPG)
.JPG)
.JPG)
.JPG)

.JPG)
.JPG)
.JPG)
.JPG)
.JPG)
.JPG)
.JPG)
.JPG)
.JPG)
.JPG)
.JPG)
.JPG)
.JPG)
.JPG)
.JPG)
.JPG)
.JPG)
.JPG)
.JPG)
.JPG)

.JPG)
.JPG)
_2.JPG)
_4.JPG)
_1.JPG)
_3.JPG)
_1.JPG)
_2.JPG)
.JPG)
.JPG)
.JPG)
_1.JPG)
_2.JPG)
_5.JPG)
_1.JPG)
.JPG)
_1.JPG)
_1.JPG)
_2.JPG)
_1.JPG)
_1.JPG)
_3.JPG)
_2.JPG)
_3.JPG)
_3.JPG)
_1.JPG)
_2.JPG)
_2.JPG)
_3.JPG)


 The attention to detail is amazing.
_2.JPG)
_3.JPG)
_3.JPG)
_2.JPG)
_2.JPG)
_1.JPG)
_1.JPG)


_1.JPG)
.JPG)
_1.JPG)
_1.JPG)
_4.JPG)
_1.JPG)
_2.JPG)
_2.JPG)
_1.JPG)
_2.JPG)
_1.JPG)


