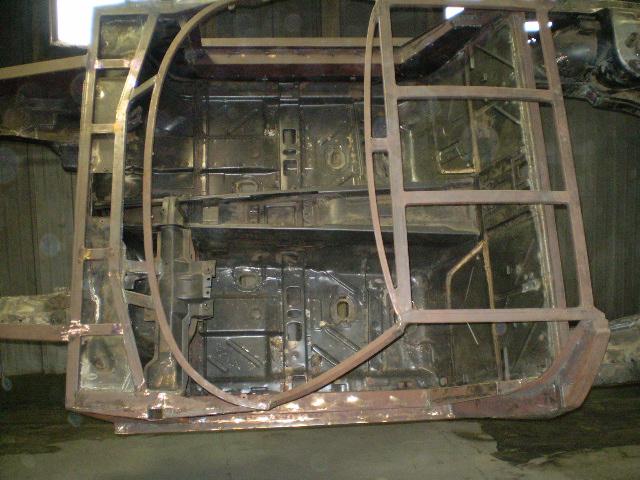
Been following this for a while, cool project. One question though. How does the strength of the front screen/roof area compare to the strength of the original Fiero. Since the A pillars are attached to what appear to be legs pointing rearwards from the frame it just looks (to me anyway) that that whole area would be prone to collapse in a roll over (and having survived one I have a vested interest in car safety!). Not criticizing the work or anything Archie, I'm always impressed by the work you guys turn out, just interested that all.
Been following this for a while, cool project. One question though. How does the strength of the front screen/roof area compare to the strength of the original Fiero. Since the A pillars are attached to what appear to be legs pointing rearwards from the frame it just looks (to me anyway) that that whole area would be prone to collapse in a roll over (and having survived one I have a vested interest in car safety!). Not criticizing the work or anything Archie, I'm always impressed by the work you guys turn out, just interested that all.
Go back to page 4. The short answer is: the owner is fine with it as it is, so don't ask questions.
Even tho the custom was fine with it as has been stated, we did test it.
Before the chassis went to Powdercoating, we put a dial indicator (with magnetic base) in a position 3" inboard of the corners of the bar along the top of the windshield area. Then we loaded it with about 400 lb & had a total deflection of .043".
That's without the windshield or any of the bodywork on it.
I have not had a chance to take the same test on a stock Fiero chassis for comparison but I think the stock chassis would be about the same.
Seems that a lot of "concern" has been brought up about safety. Last time I checked there were LOTS of motorcycles on the road as well, weird that no one seems concerned about their roll-over safety! LOL!!
OK, OK! I did what I shoulda done first and went back over the thread and I now I've seen it again I do remember seeing this question asked before (doh on may part!) so sorry if I upset anyone. I was just curious as to the relative strengths that's all.
It seems to me that the original Fiero structural design achieves some of its rollover safety potential from the rear baskethandle feature which serves partially as a makeshift roll bar .The baskethandle then ties through the roof to the A pillars. But the roof has only 2 lateral sheet metal runners tying it to the A pillars because of the sun roof feature. However , the rear baskethandle "rollbar" while wide is not especially stout in terms of its wall thickness.Nevertheless , tying the rear "rollbar to the A pillars through the roof creates something of a rollcage structure to the original design. Looking at Archies' design on the Miura project , the rear rollbar feature is double reinforced vertically although not as wide as the original design , is composed of square tubing and the roof has 4 square tube runners tying it to the A pillars instead of just 2 lengths of roof metal. So the essential elements of the "rollcage" design are also present and preserved in Archies' Miura design and in some respects structural elements have been strengthened . I feel it is this "rollcage" configuration that is common to both designs that confers the relatively good rollover protection reputation acquired by Fieros and not A pillar thickness per se . No convertible or roadster is safe in a rollover . Therefore many incorporate rollbars as an aftermarket installation. As such I am quite satisfied with the relative degree of safety incorporated into Archies' build and agree with a previous post that a more likely threat will be car jacking .
from: " TARGET=_blank>http://www.rmauctions.com/F...3&SaleCode=MO08"[/B] 385bhp at 7,850 rpm, 3,929 cc transverse mounted alloy V12 quad-cam engine, Weber carburetors, five-speed manual gearbox, independent front and rear suspension with A-arms, coil springs with tubular shocks and anti-roll bars, four-wheel disc brakes. Wheelbase: 98.4"
This was where it all started � the first production automobile to prove itself worthy of the �supercar� tag. Prior to the Lamborghini Miura's arrival in 1967 many sports cars had offered high levels of performance and handling. The Miura however was the first built around the criteria that define our modern concept of the supercar: massive speed and jaw-dropping design coupled with technical innovation; together with a wallet-wilting price tag to which only the wealthiest could aspire.
As legend has it, the founding of Automobili Ferruccio Lamborghini was inspired by Signore Lamborghini�s displeasure with the clutch in his Ferrari, the latest of several that he had owned. As a wealthy industrialist and manufacturer of agricultural machinery, he took his complaint to Signore Enzo Ferrari himself. He may indeed have remained a happy customer after this encounter � if things had gone differently. Instead he felt disrespected, his opinions ignored as those of a simple tractor builder.
Signore Lamborghini became determined at that point to build a better car. He chose the bull as his company�s symbol ostensibly because Taurus was his birth sign but there are many who cannot dismiss the obvious � the bull is a very stubborn animal and more powerful by far than the cavallino (horse). Some might call this hubris, the Italians have another word: vendetta.
Since Signore Lamborghini�s ambitions were large he wanted more than simply to create a beautiful, well-handling sports car � he demanded that the engine be originated by Lamborghini as well. So he enlisted Giotto Bizzarrini � the father of the legendary Ferrari GTO, and one of the engineers driven out of Ferrari during the �palace revolt� of November, 1961, to create an all-new four-cam V-12 engine, initially displacing 3.5 liters. The debut Lamborghini model was the 350GT, featuring an unusual, �bubble top� design with �frog eye� headlights by Carrozzeria Touring. Viewed as an interesting exercise in exotica, it was a remarkably well-balanced package and the engine in particular received accolades from the motoring press.
By 1967 the latest version of this powerplant (by now enlarged to 4.0 litres) was used for an entirely new, even revolutionary new model � the iconic Lamborghini Miura. First shown to a stunned public in March, 1966 at the Geneva Salon, the Miura was the brainchild of seven young engineers working after hours at Lamborghini on this radical new sports car. In fact, credit for the design goes to Marcello Gandini at Bertone, who was only 22 at the time. Under the guidance of New Zealand engineer Bob Wallace, the Miura's chassis was tuned to deliver the handling needed to contain and exploit the prodigious power available. With double wishbone suspension at each corner (in best racing tradition) it was very advanced for a road car. The mid-mounted engine was fitted transversely to allow for a more compact overall stance � an engineering solution inspired by none other than the Austin Mini. The original sketches also called for a glass engine cover and a three-seat layout with the driver in the middle and each of two passengers on either side. Although the latter feature never made it to the production Miuras, it re-emerged on future supercars, most notably on the McLaren F1. The glass cover was also never used but the rear window louvers used in production were an industry first. As the engine was no longer front-mounted but rather �posteriore,� the first generation of Miuras were named P400s. This turned out to be a sensational, trendsetting decision. Almost immediately the young Lamborghini marque leapfrogged to the head of the class, well ahead of both Ferrari and Maserati with this innovative mid-engine configuration.
The specifications are still impressive today: a lightweight frame, all independent suspension, four-wheel disc brakes and a well-proven, wonderful-sounding V12 engine breathing through four triple throat Webers. With 350 brake horsepower on tap, the car was capable of nearly 180 miles per hour in the hands of the brave, which was more than a match for any other road-going production car. Clothed by that unmistakable, heart-stopping shape, formed in aluminum, the Miura was the stuff of dreams.
A process of evolution and improvement was maintained throughout the life of the Miura and in 1968, the �S,� for spinto (or, tuned) version appeared, boasting 370 brake horsepower, updated brakes and numerous other enhancements. Faster, more stable, with better braking and more luxuriously appointed, it was a large step forward from its already magnificent forebear.
Undoubtedly the most accomplished of all Miura variants however was the SV. �S� for spinto, �V� for veloce (fast), it Lamborghini's final evolution of their seminal supercar. Once again launched at the Geneva Salon, in 1971 the SV took a significantly greater stride forward in development terms than the S had been over the original P400. Starting with further development to the chassis, the front and rear suspensions were completely re-engineered to improve handling (most profoundly reducing oversteer). The rear suspension geometry was changed from lower triangles to lower quadrilaterals to handle the much wider, Pirelli Cintauratos on nine-inch Campagnolo wheels. The ventilated disc brakes offered on the later S models became standard. Mechanically, output was increased yet further with the SV pumping out a heart-pounding 385 brake horsepower at 7850rpm.
This was primarily accomplished by enlarged inlet ports, modified cam timing and altered carburetors, while aesthetically Bertone made a number of subtle changes that help differentiate the SV from earlier incarnations. The most striking of these were the now bulging of the rear wheel arches to accommodate the wider wheels, adding a smartly purposeful look to the already distinctive shape. Gandini's distinctive slatted eyelashes were dropped in favor of a smoother, matte black-painted headlight surround and a more integrated front bumper housing larger supplementary lenses. At the rear were revised light clusters which incorporated reverse units for the first time. The cockpit was now fully trimmed in sumptuous leather. During the autumn of 1971, an optional self-blocking ZF differential became available and a dry sump lubrication system was fitted, the latter eliminating the bearing damage that some earlier Miuras had suffered after consistently hard driving. At the end of the day, the Miura SV was the fastest production vehicle on the planet.
Despite the widely held impression that the SV was clearly the best Miura yet, only 150 were built because it was announced alongside Lamborghini's prototype LP500 Countach. Virtually overnight, demand slowed to a mere trickle. Thus, the SV was more or less doomed from the outset which was a great shame as the true potential of this revolutionary car was finally fulfilled. Production ended in early 1973 although it was not until autumn that the last deliveries were made.
�An exercise in automotive art� - Road & Track Magazine, April, 1970
After blasting all the surface rust & dirt are gone & it's looking good already.
After blasting all the dust is blown & washed out of the chassis out of the chassis. After the washing the chassis is put in one of the ovens to dry up any moisture.....
All the treads & holes are plugged prior to doing the Powdercoating processes.....
Next while the chassis is still on the fixture, they phosphate the chassis.
In this picture they are getting ready to transfer the chassis from the rotisserie to the overhead rail system. Tim has an overhead rail system to make it easier to move heavy items from one area of his shop to another area.
Here they're hooking it up to the overhead rail system....connecting hooks from overhead.....
Unbolting from the rotisserie....
Here they're putting on the 1st coat of the powdercoating....
The 1st coat is on......
Here they're putting the chassis in the oven to Flash that 1st coat. Pretty big oven wouldn't you say? One of Tim's clients makes Kit Airplane kits that he sells worldwide. Tim Powdercoats the kit Airplane chassis' for them. In addition to tons of atuomotive parts he Powdercoats, he also has a client who rebuilds used exercize equipment & he Powdercoats a lot of that stuff too.
Notice how the overhead rail system runs right into the oven.
then the chassis is pulled out of the oven.....
After cooling, it's back into the paint booth for the last coat of powdercoating.....
Here the 2nd coat is put on.....
Then back into oven for the final cure....
And here's what it looked like when they were getting ready to bring it back to us....
Next I'll show you pics of what it looked like out in the sunshine after we unloaded it.
The steering wheel looks like a tilt steering wheel. Archie's post on the last page dated 7-09-08 shows some better pictures displaying how the steering wheel relates to the wind shield. Look at pics 3, 4,& 5 and 13, 14 & 15 in that series to get a better look at how the steering wheel will relate to the large curved windshield .
I think I mentioned earlier in this thread, I know for sure that the customer & I have talked about it, that the body panels were of marginal resin rich fiberglass. As such they have been moving around. Now that we have the chassis ready to go, we have to do what it takes to get the body panels in the right shape & get it to stay there.
The biggest problem we expect to have is with the rear clip. The "sideburns" in front of the rear wheel wells have moved in about 12" total. The glass is real resin rich & thick & it's going to take a lot of work to get it in the correct position & even more work to try to get it to stay where we put it.
In these pics, we actually spread the rear clip out by hand as we were closing it.
We went up underneath the rear clip & made some cuts in the fiberglass to try to get it to loosen up a bit. We also put some heat to the fender crowns to try to get it to open up a bit. In some of the pics, you can see wrinkles in the fenders.
This is pretty serious work, this is the heat gun we had to use to heat it up.....
Then Rob hand bent a steel framework to hold the body in shape. This steel & a little more will be glassed in tomorrow.
So far this steel is helping to hold the body shape....
New at the forum here.. just found this thread registred right away. Haven't yet read all about this Miura project will do so soon! I also have a Miura body and also have the Prova chassis with it although I don't think I will be using the chassis. The Miura is stored and will be stored some years before I might start that project. Here a picture how it is stored.
Like the powerplant !!! could be interesting to use it. Just wonder how much this Miura Fiero will weight with all those steel tubes. Looks a bit heavy especially the tubes laminated into the bodywork.. I was more thinking about using some alloy tubes of 8 mm or so.. The original Prova chassis is heavy too.. a bit tooo heavy to my personal liking.. so I might look for other options or built my own!?
I know of about 4 Miura replica owners... all in storage/building phase. Did you get the side windows? I still need those and others too.. Possible the bodywork will not be 100% similar at the windscreen between original Miura and the different body works.. I have the windscreen, the original one, and it fits perfectly but yes I was told too that the body was modified to accept it as the orignal Prova body was no 100% fit.
I have been thinking, couldn't you use a good sized hole saw to lighten up the steel in the body work? It would still be strong enough but it would take some of the weight off of the rear clam shell. It would also allow water to drain instead of collecting inside the tubes and rusting out. I would never drill holes in a support frame but for body work I think it would be strong enough.
Just a thought.
[This message has been edited by Jake_Dragon (edited 09-15-2008).]
I would be interested to see some pics of the chassis that Theo owns that originally came with the Prova body .I heard It had a reputation of having significant amounts of flex and was not stiff enough to take a large torque engine , but I have never seen one. Theo , would you be so kind as to send some pics of the Prova chassis to this thread ? I think comparing it to Archie's modified Fiero chassis would be interesting .
I would be interested to see some pics of the chassis that Theo owns that originally came with the Prova body .I heard It had a reputation of having significant amounts of flex and was not stiff enough to take a large torque engine , but I have never seen one. Theo , would you be so kind as to send some pics of the Prova chassis to this thread ? I think comparing it to Archie's modified Fiero chassis would be interesting .
Engine option Audi V6
Main section.. heavy steel used for front and rear bodywork, alloy would be much nicer
Reinforcement (tunnel) for chassis to minimize flex know from original Prova chassis
Complete chassis
Some parts I don't plan to use... fit the original Miura wheel
Workshop
Cheers, Theo
[This message has been edited by Theo_nr1 (edited 09-23-2008).]
Ok to comment on the Prova chassis once more... It is the same beside some minor details as the one used for the Countach replica of Prova. The flex is in due to mainly the lack of a reinforcement at the middle (missing tunnel which is welded in in mine) of the chassis. At least this is what I heard. Originally it was designed to take donor parts of Renault (V6) and Fiat x1/9 plus Ford Taunus typical English. To my liking the chassis is way tooo heavy as it uses very big steel tubes and also the suspension hasn't been developed real nice. Using a Fiero instead is not a bad idea. The way Archie has done it (now that I have read all and seen all) looks good. Reinforcements are quite heavy I think still but this will do the job for sure... not forgetting there will be serious power this is not a bad thing. These guys have experience so I might be wrong when I think it is a bit too much...
Makes me wonder about the roof section... wonder how it compares to the original Fiero? Is it weaker or similar? If one compares it to other kitcars it is good I recon. A detail picture of the A-pillar would be interesting to me. My daily car is the yellow Matra Murena that can be seen in the workshop picture... it can be compared to a Fiero ahum .. will be interesting to compare roof structure. Don't compare it to my Sylva/Fisher Fury's (the other cars in the workshop) these have totally no steel in the A-pillar.... made to drive, race and not to crash.
My plan's ? no idea.. wait and see... make a new chassis and use suspension parts from other kit/race suppliers.. eg. Tornado sportscars or who knows.. or even get a Fiero or Murena as donor. One thing is clear there should be a decent powerplant fitted to match the looks... weight should be kept to a minimum to get a good power to weight ratio and have the tires screaming!
Most everything we've been working on has to do with getting the body back into the correct shape.
As you saw with the rear clip, It has warped quite a bit.
In the rear we've built most of the trunk area liner. We also determined that the rear facia was warped. So we rigged it up to get it straight & fiberglassed more steel to keep it there...
Here you can see the vertical angle of the rear facia.
On the real car the tail lights appear to point down a little however not as much as they will with the rear facia at this angle. So we're going to have to mount the lights into slight pockets to level them out a little so they don't point down too much.
In the mean time with the rear clip off of the car, we've fiberglassed in the steel that controls the shape of the sideburns on the rear clip.
One of the big problems we had to deal with in the last couple of weeks was that the front clip has warped quite a bit. The nose had curled up under the car. The wheel openings had closed up, like the nose was trying to curl up under the front of the car.
To fix this we had to strap the front clip down to our lift & strap it down into shape.
The we had to hand form steel to fit into the front clip.....
Once we had the front clip nose & fender areas in the position we wanted, the area in the center area near the windshield was bowed a bit. That's the cowl area where the weight is sitting on the hood area in this picture....
So we needed to get that area into the right position & keep it there.
While the front clip was on the car, we used some lumber to build a jig from the tops of the fenders & over the Cowl. We attached this jig to the front clip to hold the cowl in place while we removed the clip & put it in a workbench.
I didn't get a chance to take a picture of the jig before Rob had put the front clip on the workbench, so I'll post a pic of it here before we remove it from the front clip.
Then Rob hand formed metal ribs to hold the cowl where we wanted it.
Then we put several layers of fiberglass over it to keep it in place....
In the meantime, while the fiberglassing is curing, we're working on cutting in & mountings for the tail lights.
This process continues today.
Note: you may notice that the tail lights we are installing are not the same tail lights I had pictured earlier. The owner of the car (who is watching this thread) Had originally sent me 2 different sets of tail lights & PM'ed me that I should be installing the 2nd set of lights that he had sent me.
Looking good... lots of work yes. I just wished I did have a real long holiday to start myself when I see this. Polyester disforming from just laying around hmm I know that yes.. not good.
Pitty from the tail lights.. they are pretty close to originals. Maybe still worth while to search originals.. I bought a complete set for less then $ 200,- and there are more around with a bot of luck and patience. Search for "Fiat 850 spider" ...
maybe here !! posting to Netherlands is sometimes a problem but in US I have seen a few passing on ebay :-( just don't mention / seek for Lamborghini !
Still hoping to find some original cheapisch front head lights.. hm very rare.. Fiat 850 Spider series 1
Still interested in a detailed A-pilar picture ! Can I set in my profile somehow to get automatic message when something is posted here?? ... still new here at the forum.


_1.JPG)
.jpg)
.jpg)
.jpg)
.jpg)
.jpg)
.jpg)
.jpg)
.JPG)

_2.JPG)
.JPG)
_1.JPG)
_1.JPG)
_1.JPG)
.JPG)
.JPG)
_1.JPG)


.JPG)
.JPG)
.JPG)
.JPG)
.JPG)
.JPG)
.JPG)
.JPG)
.JPG)

 couldn't you use a good sized hole saw to lighten up the steel in the body work? It would still be strong enough but it would take some of the weight off of the rear clam shell. It would also allow water to drain instead of collecting inside the tubes and rusting out.


_1.JPG)
.JPG)
.JPG)
.JPG)
_1.JPG)
.JPG)
.JPG)
.JPG)
.JPG)
_1.JPG)
.JPG)
_1.JPG)
.JPG)
_1.JPG)
.JPG)
_1.JPG)
.JPG)
_3.JPG)
_1.JPG)
_1.JPG)
_1.JPG)
_1.JPG)
_1.JPG)
_1.JPG)

.JPG)
_1.JPG)

_1.JPG)
_1.JPG)
_1.JPG)
_1.JPG)
.JPG)
_1.JPG)
.JPG)
.JPG)
_1.JPG)
.JPG)


