Pennock's Fiero Forum
  The Construction Zone
  The Miura project begins (Page 14)

Post New Topic  Post A Reply
Email This Page to Someone! | Printable Version

This topic is 21 pages long:  1   2   3   4   5   6   7   8   9   10   11   12   13   14   15   16   17   18   19   20   21 
Previous Page | Next Page
next newest topic | next oldest topic
The Miura project begins by Archie
Started on: 12-08-2007 07:13 AM
Replies: 834 (215021 views)
Last post by: Archie on 02-03-2023 02:01 PM
madcurl
Member
Posts: 21401
From: In a Van down by the Kern River
Registered: Jul 2003


Feedback score: N/A
Leave feedback


Total ratings: 314
Rate this member

Report this Post02-13-2010 07:43 PM Click Here to See the Profile for madcurlSend a Private Message to madcurlEdit/Delete MessageReply w/QuoteDirect Link to This Post
 
quote
Originally posted by Archie:

There is still some work to do some sanding & edges to finish up but, you can see that this armrest is coming along nicely.


Archie


Nice to see the Crew is (pardon the pun) getting a handle on things

Edit: I own page 14, hehe.

[This message has been edited by madcurl (edited 02-13-2010).]

IP: Logged
fourpoint9
Member
Posts: 1058
From: Long Beach, WA, USA
Registered: Feb 2004


Feedback score: (2)
Leave feedback

Rate this member

Report this Post02-15-2010 05:43 PM Click Here to See the Profile for fourpoint9Click Here to visit fourpoint9's HomePageSend a Private Message to fourpoint9Edit/Delete MessageReply w/QuoteDirect Link to This Post
 
quote
Originally posted by kwagner:


What is going in the gap at the top of the door? On this pic:
http://upload.wikimedia.org...amborghini_Miura.JPG
the 'fins' go to the top of the door, but it looks like the top is a separate piece? Does it attach to the side of the car?


There's some good Miura pics on Adam Carolla's carcast site: http://www.adamcarolla.com/...miura-s-restoration/

IP: Logged
Sofa King
Member
Posts: 929
From:
Registered: Aug 2008


Feedback score: N/A
Leave feedback

Rate this member

Report this Post02-16-2010 10:13 AM Click Here to See the Profile for Sofa KingSend a Private Message to Sofa KingEdit/Delete MessageReply w/QuoteDirect Link to This Post
Hey Archie,

Those detailed pics of the armrest are amazing! THANK YOU! The detail pic of the filler and the hard edges before sanding were perfect - now it all makes sense. I've been unable to do anything because of the cold and I'm getting more antsy everyday! Please keep those pics coming.

Absolutely fantastic work!

[This message has been edited by Sofa King (edited 02-16-2010).]

IP: Logged
Gokart Mozart
Member
Posts: 12143
From: Metro Detroit
Registered: Mar 2003


Feedback score: (1)
Leave feedback


Total ratings: 159
Rate this member

Report this Post02-16-2010 08:19 PM Click Here to See the Profile for Gokart MozartClick Here to visit Gokart Mozart's HomePageSend a Private Message to Gokart MozartEdit/Delete MessageReply w/QuoteDirect Link to This Post
 
quote
Originally posted by Archie:


Yeah, I was surfing & I saw that but I wasn't quick enough. That video showed the hood vents real good. The hood vents are one thing we still have to fabricate & I really don't have any real good pics of them.


Here's a few more
http://www.cartype.com/page...borghini_miura__1967

http://www.lambocars.com/miu/p400i1.php
http://www.lambocars.com/miu/p400si1.php
http://www.lambocars.com/miu/p400sv.htm


http://www.lambocars.com/miu/roadsteri1.htm
IP: Logged
Archie
Member
Posts: 9436
From: Las Vegas, NV
Registered: Dec 1999


Feedback score:    (12)
Leave feedback


Total ratings: 546
Rate this member

Report this Post02-22-2010 11:52 AM Click Here to See the Profile for ArchieClick Here to visit Archie's HomePageSend a Private Message to ArchieEdit/Delete MessageReply w/QuoteDirect Link to This Post
As we continue......

Just let me know, via PM, when you've seen enough of someone making parts &/or fiberglassing.

I think we've gone thru at least one 55 Gal. Drum of resin & 2 or 3 rolls of matt on this car.

Building the Left side inner door panel.


Glassing in the fasteners on the back side of the door panel


Making more flat fiberglass sheet....


Building the vertical part of the door panels


Glassing in the back side of the vertical door panel sections


......

IP: Logged
Archie
Member
Posts: 9436
From: Las Vegas, NV
Registered: Dec 1999


Feedback score:    (12)
Leave feedback


Total ratings: 546
Rate this member

Report this Post02-22-2010 12:14 PM Click Here to See the Profile for ArchieClick Here to visit Archie's HomePageSend a Private Message to ArchieEdit/Delete MessageReply w/QuoteDirect Link to This Post

Archie

9436 posts
Member since Dec 1999
Sanding & filling arm rests & door panels.


Building the "Hump" onto the door panel fwd. of the armrests....


"Hump" glassing....


Archie
IP: Logged
Sofa King
Member
Posts: 929
From:
Registered: Aug 2008


Feedback score: N/A
Leave feedback

Rate this member

Report this Post02-23-2010 12:07 PM Click Here to See the Profile for Sofa KingSend a Private Message to Sofa KingEdit/Delete MessageReply w/QuoteDirect Link to This Post
A,

Love the updates. And no, you can never post too many build pics. If you wouldn't mind, could you post some pics describing and showing the tools used to cut the actual fiberglass shapes from the flat panels before you hot glue and glass them together? I'm trying to absorb as much information as possible. From the pictures it looks like you primarily use mat fiberglass. Do you prefer the mat fiberglass when creating the flat panels?

As always - fantastic work. Buy those guy a beer!

[This message has been edited by Sofa King (edited 02-23-2010).]

IP: Logged
RUNDLC
Member
Posts: 802
From: Elk Grove, California
Registered: Jul 2005


Feedback score: (2)
Leave feedback

Rate this member

Report this Post02-23-2010 03:26 PM Click Here to See the Profile for RUNDLCSend a Private Message to RUNDLCEdit/Delete MessageReply w/QuoteDirect Link to This Post
Beer?? I say give them a raise!
IP: Logged
Archie
Member
Posts: 9436
From: Las Vegas, NV
Registered: Dec 1999


Feedback score:    (12)
Leave feedback


Total ratings: 546
Rate this member

Report this Post02-25-2010 01:19 PM Click Here to See the Profile for ArchieClick Here to visit Archie's HomePageSend a Private Message to ArchieEdit/Delete MessageReply w/QuoteDirect Link to This Post
After building up the "Humps" with some mounting hardware & rounding off the sharp corners & sanding, like we did with the armrests, the door panels are looking good.


The door panels are not yet ready for upholstery. We've now got to work out & mount an inside door release handle & hardware that allows it to actually open the door from the inside.

Now that might not sound like a big deal, however right now the doors have a LOT more stuff mounted inside of them then when they were just the fiberglass shells that came with the kit.


It reminds me of 1990 when I built my Countach 25th Anniversary. I had bought a "complete" kit, which by definition should mean that everything needed was included. None of the stuff that came with the doors wold work or even come close to fitting. Even the hinges were barn door hinges. We spent at least 100 hours & a bunch of $$$$ completing those doors.

This car had no hardware & no instructions or hint as to what the manufacturer used or recommended to build the car. So it's all from scratch on this one.

We also have been working on the louvers that cover the engine area on the rear clip.

That update will be next.

Archie

[This message has been edited by Archie (edited 02-25-2010).]

IP: Logged
Archie
Member
Posts: 9436
From: Las Vegas, NV
Registered: Dec 1999


Feedback score:    (12)
Leave feedback


Total ratings: 546
Rate this member

Report this Post02-26-2010 04:22 PM Click Here to See the Profile for ArchieClick Here to visit Archie's HomePageSend a Private Message to ArchieEdit/Delete MessageReply w/QuoteDirect Link to This Post
Our last major exterior body modification is to build the louvers that cover the engine compartment.

Trying to work out a way to make the engine cover louvers, took a little trial & error.

We already knew that making them out of thin metal was not going to work too well. You can google Miura louvers & see that on many Miuras, the louvers look uneven. We knew that making them out of metal was not going to look good because of sag & misalignment.

the louvers on the real car have a slight arc to them & there's no way 6 thin metal louvers with a perfect arc on them & with the 2 90 degree ends on them & make them look halfway decent.

We decided, to get some repeatability, that they needed to be made out of fiberglass.

We made a tool with an arc in it to duplicate the arc of the roofline, to make our parts on.


Then, with our 1st design in mind, we laid up 2 layers of fiberglass, then put in a 1/4" x 1" pc. of bar stock (bent to the same curve as the tool). Then we laid up 2 more layeds of fiberglass on top of that.


After playing with that one for a little bit, we decided that it had too much deflection or "bounce" in it. The weight of the horizontal part was not helping to keep the arc of the metal from sagging. We needed a way to have the fiberglass become a structural part of the strength of the horizontal part of the louver.

We decided on a "sandwich" of materials which would be glued together right on our tool. We would use the same glue mix that we make to bond hood panels together on the Fino/Finale & other cars. When it cures, that glue sets up very solid & keeps the parts right where you put them. Making a "sandwich" of 2 flat fiberglass sheets with 2 arc'ed pcs. of flat stock. All glued together in the shape we wanted might work.

To that end, once again, we made some more flat fiberglass sheet 2 layers thick....


After the fiberglass sheet was totally cured, we cut 2 pcs. of it for each wing.


We also cut 2 pcs. of flat stock 1/4" thick x 3/4" wide & bent it to the arc.

We laid the 1st pc. of fiberglass sheet onto the tool.


We mixed up a batch of our glue


Using a UPS overnight plastic pack, we then glued the 2 pcs. of flat stock on it....


We put on several more beads of glue.....


Then we carefully laid the 2nd pc. of fiberglass sheet on top of that.


Then we put weights on it to let it setup for a while.


...............
IP: Logged
Archie
Member
Posts: 9436
From: Las Vegas, NV
Registered: Dec 1999


Feedback score:    (12)
Leave feedback


Total ratings: 546
Rate this member

Report this Post02-26-2010 04:45 PM Click Here to See the Profile for ArchieClick Here to visit Archie's HomePageSend a Private Message to ArchieEdit/Delete MessageReply w/QuoteDirect Link to This Post

Archie

9436 posts
Member since Dec 1999
After letting the glue cure completely, the pc. is a laminated part in which the glue has allowed the fiberglass sheets to become a structural part of the louver.


The metal sticking out at the ends gets bent over at a 90* angle as the louver is fitted to it's position on the car.


Then the ends are glassed up...


After some sanding & shaping, it looks pretty good.


With all the stuff to do & only one tool to do it on. With cure time & everything we could only get 2 of them done per day.


Once we have them all done, we will secure them in place while we open the rear clip & build an aluminium frame to tie them all together & make it so they they can be removed for painting etc.

Archie
IP: Logged
PFF
System Bot
katatak
Member
Posts: 7136
From: Omaha, NE USA
Registered: Apr 2008


Feedback score:    (8)
Leave feedback


Total ratings: 82
Rate this member

Report this Post02-26-2010 08:05 PM Click Here to See the Profile for katatakSend a Private Message to katatakEdit/Delete MessageReply w/QuoteDirect Link to This Post
Just when we think it can't get any better......... I love this thread!

I know I've said this before but I'll say it again.

Thanks for sharing all this Archie - so much great info and little tricks. You guys are amazing!

Pat

IP: Logged
Archie
Member
Posts: 9436
From: Las Vegas, NV
Registered: Dec 1999


Feedback score:    (12)
Leave feedback


Total ratings: 546
Rate this member

Report this Post02-26-2010 09:51 PM Click Here to See the Profile for ArchieClick Here to visit Archie's HomePageSend a Private Message to ArchieEdit/Delete MessageReply w/QuoteDirect Link to This Post
Thanks for the kind words.

We got the last 2 louvers setting in the car just before we left tonight.

The bottom 2 still need a little tweeking but I took some pics anyway.


Archie
IP: Logged
FieroDev
Member
Posts: 246
From: Regina, Sask, Canada
Registered: Jan 2010


Feedback score: N/A
Leave feedback

Rate this member

Report this Post02-26-2010 10:08 PM Click Here to See the Profile for FieroDevSend a Private Message to FieroDevEdit/Delete MessageReply w/QuoteDirect Link to This Post
Thats awesome! cant wait to see them painted!
IP: Logged
exoticse
Member
Posts: 8650
From: Orlando, Fl
Registered: Jun 2003


Feedback score: N/A
Leave feedback


Total ratings: 108
Rate this member

Report this Post02-27-2010 12:50 AM Click Here to See the Profile for exoticseSend a Private Message to exoticseEdit/Delete MessageReply w/QuoteDirect Link to This Post


Archie that is phenominal !

It really is amazing watching how you guys come up with ideas to fabricate and create things from scratch !
IP: Logged
Amida
Member
Posts: 2354
From: Seattle, WA. USA
Registered: Jul 2003


Feedback score: (4)
Leave feedback


Total ratings: 63
Rate this member

Report this Post02-27-2010 09:19 AM Click Here to See the Profile for AmidaSend a Private Message to AmidaEdit/Delete MessageReply w/QuoteDirect Link to This Post
 
quote
Originally posted by Archie:


Archie


Beautiful!
IP: Logged
RCR
Member
Posts: 4397
From: Shelby Twp Mi
Registered: Sep 2002


Feedback score:    (7)
Leave feedback


Total ratings: 102
Rate this member

Report this Post02-27-2010 01:37 PM Click Here to See the Profile for RCRSend a Private Message to RCREdit/Delete MessageReply w/QuoteDirect Link to This Post
The build is fantastic, and Archie...Your team is simply amazing.

WOW!!

Bob
IP: Logged
diabloscott
Member
Posts: 63
From:
Registered: Jul 2005


Feedback score: N/A
Leave feedback

Rate this member

Report this Post02-28-2010 10:08 PM Click Here to See the Profile for diabloscottSend a Private Message to diabloscottEdit/Delete MessageReply w/QuoteDirect Link to This Post
This really is impressive. What type of wheel is the owner going to run?

[This message has been edited by diabloscott (edited 02-28-2010).]

IP: Logged
Sofa King
Member
Posts: 929
From:
Registered: Aug 2008


Feedback score: N/A
Leave feedback

Rate this member

Report this Post03-01-2010 10:09 AM Click Here to See the Profile for Sofa KingSend a Private Message to Sofa KingEdit/Delete MessageReply w/QuoteDirect Link to This Post
 
quote
Originally posted by katatak:

Just when we think it can't get any better......... I love this thread!

I know I've said this before but I'll say it again.

Thanks for sharing all this Archie - so much great info and little tricks. You guys are amazing!

Pat


UH-GREED!
IP: Logged
Archie
Member
Posts: 9436
From: Las Vegas, NV
Registered: Dec 1999


Feedback score:    (12)
Leave feedback


Total ratings: 546
Rate this member

Report this Post03-04-2010 09:48 PM Click Here to See the Profile for ArchieClick Here to visit Archie's HomePageSend a Private Message to ArchieEdit/Delete MessageReply w/QuoteDirect Link to This Post
Work continues

While Rob worked on the louvers, Kris was working on placing some inside door handles into the doors.

The front top corner is where it's supposed to be...Here we're test fitting it


Really limited on where we can put it because we have to clear all the window operating hardware on the inside.


We ended up mounting it deeper into the door panel than what you see above. Mostly because we wanted to make a finger pocket around the handle & we didn't want to make the door panel any thicker than it is.

Here's what the pockets look like now...


Then, since a bunch of the parts have been finalized, we decided to dry fit some of the parts to make sure they fit correctly before final fitting.

Tail lights, rear bumper & insert (the insert was powdercoated semi-gloss black)...
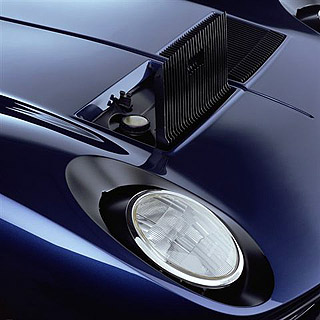


The headlights.....


Also fitted were the finished battery tray parts that I showed you before & a few other things.

like...........

IP: Logged
Archie
Member
Posts: 9436
From: Las Vegas, NV
Registered: Dec 1999


Feedback score:    (12)
Leave feedback


Total ratings: 546
Rate this member

Report this Post03-04-2010 09:58 PM Click Here to See the Profile for ArchieClick Here to visit Archie's HomePageSend a Private Message to ArchieEdit/Delete MessageReply w/QuoteDirect Link to This Post

Archie

9436 posts
Member since Dec 1999
We also installed the engine/transmission into the car for the last time.


Tomorrow, we'll put the rear clip back on & see what the stance is like then.

While we were installing the engine, Rob worked on welding up a framework to hold the louvers together & mount them to the car.


More pics of the detail of putting this together tomorrow.

Archie
IP: Logged
PFF
System Bot
RumbleB
Member
Posts: 341
From: The Great Lakes!
Registered: Aug 2008


Feedback score: N/A
Leave feedback

Rate this member

Report this Post03-04-2010 10:36 PM Click Here to See the Profile for RumbleBSend a Private Message to RumbleBEdit/Delete MessageReply w/QuoteDirect Link to This Post
Archie,

I would just like to say again. Wow the work that you guys go through is amazing. You have given me the guts to do a repair project on a fiberglass cab that goes to a little crane called a Drott 85.
The whole back, left corner was missing. Watching how you make your parts, I am now, able to make a copy of the missing corner and get the cab back in shape and I have never made anything from scratch, with fiberglass before.

Thanks a bunch,

Don Z.

[This message has been edited by RumbleB (edited 03-04-2010).]

IP: Logged
skuzzbomer
Member
Posts: 7492
From: Nashville
Registered: Sep 2009


Feedback score: (3)
Leave feedback


Total ratings: 92
Rate this member

Report this Post03-05-2010 12:28 AM Click Here to See the Profile for skuzzbomerSend a Private Message to skuzzbomerEdit/Delete MessageReply w/QuoteDirect Link to This Post
 
quote
Originally posted by Archie:

We also installed the engine/transmission into the car for the last time.


Archie


So... I guess it's going to be moving under it's own power from here on out?
IP: Logged
Archie
Member
Posts: 9436
From: Las Vegas, NV
Registered: Dec 1999


Feedback score:    (12)
Leave feedback


Total ratings: 546
Rate this member

Report this Post03-05-2010 09:49 PM Click Here to See the Profile for ArchieClick Here to visit Archie's HomePageSend a Private Message to ArchieEdit/Delete MessageReply w/QuoteDirect Link to This Post
 
quote
Originally posted by skuzzbomer:


So... I guess it's going to be moving under it's own power from here on out?


We still have to hook the engine up & rewire the whole car.
IP: Logged
Archie
Member
Posts: 9436
From: Las Vegas, NV
Registered: Dec 1999


Feedback score:    (12)
Leave feedback


Total ratings: 546
Rate this member

Report this Post03-05-2010 10:01 PM Click Here to See the Profile for ArchieClick Here to visit Archie's HomePageSend a Private Message to ArchieEdit/Delete MessageReply w/QuoteDirect Link to This Post

Archie

9436 posts
Member since Dec 1999
The news today, is that the 3 interior parts we had to remake have been upholstered & the customer has picked them up & is sending them to us tomorrow.

Monday, I'll be sending out the door panels so that they can be upholstered.

They'll be heavily insured.

Additionally, here are some pics of the louvers & the framework we made to hold them.


........
IP: Logged
skuzzbomer
Member
Posts: 7492
From: Nashville
Registered: Sep 2009


Feedback score: (3)
Leave feedback


Total ratings: 92
Rate this member

Report this Post03-05-2010 10:06 PM Click Here to See the Profile for skuzzbomerSend a Private Message to skuzzbomerEdit/Delete MessageReply w/QuoteDirect Link to This Post
 
quote
Originally posted by Archie:


We still have to hook the engine up & rewire the whole car.


Yeah... but you don't have to keep dropping it in and out anymore. (message to myself: duh)
IP: Logged
Archie
Member
Posts: 9436
From: Las Vegas, NV
Registered: Dec 1999


Feedback score:    (12)
Leave feedback


Total ratings: 546
Rate this member

Report this Post03-05-2010 10:20 PM Click Here to See the Profile for ArchieClick Here to visit Archie's HomePageSend a Private Message to ArchieEdit/Delete MessageReply w/QuoteDirect Link to This Post
Now that the engine is in the car, we can start looking at the ride height & see what the finished car might look like.


Archie
IP: Logged
steve308
Member
Posts: 3969
From: Stafford VA
Registered: Jan 2008


Feedback score: (2)
Leave feedback


Total ratings: 57
Rate this member

Report this Post03-05-2010 11:05 PM Click Here to See the Profile for steve308Send a Private Message to steve308Edit/Delete MessageReply w/QuoteDirect Link to This Post
WOW - JUST WOW
IP: Logged
Sage
Member
Posts: 2902
From: USA
Registered: Nov 1999


Feedback score:    (14)
Leave feedback


Total ratings: 69
Rate this member

Report this Post03-05-2010 11:23 PM Click Here to See the Profile for SageSend a Private Message to SageEdit/Delete MessageReply w/QuoteDirect Link to This Post
IMHO.........without a doubt another masterpiece by the "Car-tist". This may be your finest work yet! Not to take anything away from those that went before, but this one is truly striking. Your team seves as an inspiration to all do-it-yourselfers!

HAGO!
IP: Logged
bowrapennocks
Member
Posts: 872
From: Seattle WA
Registered: Jun 2008


Feedback score: N/A
Leave feedback

Rate this member

Report this Post03-06-2010 09:47 AM Click Here to See the Profile for bowrapennocksEdit/Delete MessageReply w/QuoteDirect Link to This Post
Truly amazing. A work of art. Archie, how many total labor hours will be invested in the car upon completion?
IP: Logged
Sofa King
Member
Posts: 929
From:
Registered: Aug 2008


Feedback score: N/A
Leave feedback

Rate this member

Report this Post03-08-2010 10:17 AM Click Here to See the Profile for Sofa KingEdit/Delete MessageReply w/QuoteDirect Link to This Post
SPECTACULAR!
IP: Logged
PFF
System Bot
aeffertz
Member
Posts: 798
From: Ladysmith, WI
Registered: Feb 2009


Feedback score:    (6)
Leave feedback

Rate this member

Report this Post03-08-2010 05:58 PM Click Here to See the Profile for aeffertzSend a Private Message to aeffertzEdit/Delete MessageReply w/QuoteDirect Link to This Post
EDIT:
Ahhh, nevermind.

[This message has been edited by aeffertz (edited 03-08-2010).]

IP: Logged
Bridgetown
Member
Posts: 1210
From: Alberta
Registered: Feb 2007


Feedback score: (2)
Leave feedback

Rate this member

Report this Post03-08-2010 08:53 PM Click Here to See the Profile for BridgetownSend a Private Message to BridgetownEdit/Delete MessageReply w/QuoteDirect Link to This Post
Man that is one deadly lookin' car.
IP: Logged
countach711
Member
Posts: 797
From: Littleton, Colorado
Registered: Sep 2003


Feedback score: N/A
Leave feedback

Rate this member

Report this Post03-15-2010 12:03 AM Click Here to See the Profile for countach711Click Here to visit countach711's HomePageSend a Private Message to countach711Edit/Delete MessageReply w/QuoteDirect Link to This Post
 
quote
[B]
We're also working on the gas filler inlet. On the real car it's mounted up front under one of the grills on the front clip. After a lot of deliberation, it was decided that snaking a pipe from that location back to the Fiero gas tank was an unsafe situation. So it was decided to put it in the rear door jamb on the left side.


We made a fibelglass pocket to mount it into...


Hi Archie,
I haven't checked this thread for a while but is one of my top 2 favorites along with Bubbajoecox (sp?) build. I think when you or anyone else for that matter looks back over your life's work that this will stand out as your masterpiece. It is truly a marvel. That being said, when I saw the hole for the gas inlet and realized it was in the door frame it sent up some red flags. I know you wrote that the decision was made after much discussion, but you may want to take another look at it. There are so many things wrong with that location it's scary.

#1. I believe most all fill up locations state to close the door when fueling, and also not to get in and out of the car because you can build up static electricity as I'm sure you already know.
#2 Think of the things that could create a static spark in the interior of the car, possibly setting off fumes on a hot day when the seal isn't quite right because some gas station in the middle of nowhere has let its pumps go into disrepair.
a. A cell phone goes off, either driver's or passenger's.
b. somebody shifts in the passanger seat and creates a spark.
c. the driver forgets or gets careless and sits down while fueling. When he gets back up, he's now charged with electricity again.
d. Any number of interior electronics, faulty or otherwise could possibly set it off, relays, lights,etc..

3. Dripping/spilling fuel on the interior is a distinct possibility while either putting the nozzle in or taking it back out and that isn't good from a purely aesthetic viewpoint plus the odor.

I'm sure you get the idea, but the list goes on. If, God forbid, a spark did ignite the fumes, you now have a fire in the interior of the car, with a possible passenger seated, maybe even belted in. The headliner and the passenger's hair would be the first to go and it could go quickly and spread from there. At least if it's outside the car it could possibly be extinguished before any or little damage was done to the car, not to mention people.

As you, yourself state, you are trying to prevent an unsafe situation. I do agree that running a connection from the front to the back is not a good idea either. I have two possible alternatives:
1. Is there some other place at the rear of the car it could be placed? Now that you made those beautiful louvers they would hide an inlet residing underneath, although honestly I do not know enough about the car's configuration to know if this is feasible.

2. What about creating an inlet at the front of the gas tank and sealing up the rear one? I would think enough room could be made to locate one near the top of the tank at the front and then the stock filler location could still be retained. If you do choose to do this, please have it done by someone who knows how to weld on a gas tank as I've heard a few horror stories about that. Someone on this forum even said that after a tank has been drained and set for a while that fumes can remain in the seams, or something like that.

Anyway, this is just food for thought, again it is an awesome project and a beautiful build. Archie, I hope you know I am only trying to help. Everyone else, flame away!!

IP: Logged
jmbishop
Member
Posts: 4484
From: Probably Texas
Registered: Jul 2006


Feedback score: N/A
Leave feedback


Total ratings: 169
Rate this member

Report this Post03-15-2010 01:19 AM Click Here to See the Profile for jmbishopSend a Private Message to jmbishopEdit/Delete MessageReply w/QuoteDirect Link to This Post
#1. I believe most all fill up locations state to close the door when fueling, and also not to get in and out of the car because you can build up static electricity as I'm sure you already know.
Should be common knowledge

a. A cell phone goes off, either driver's or passenger's.
No, this is a myth and your cell phone will not cause a fire.
b. somebody shifts in the passanger seat and creates a spark.
To far away
c. the driver forgets or gets careless and sits down while fueling. When he gets back up, he's now charged with electricity again.
Not going to happen with the NOZZLE AND HOSE in the way
d. Any number of interior electronics, faulty or otherwise could possibly set it off, relays, lights,etc..
No, they are not close enough, by the time any vapors could reach any of these things they will be dissipated to safe levels.

3. Dripping/spilling fuel on the interior is a distinct possibility while either putting the nozzle in or taking it back out and that isn't good from a purely aesthetic viewpoint plus the odor.
Look at the shape of the jam, and minor dripping and spilling will not make it into the interior of the car.

I don't like the location, but its not going to turn the car into a fireball.

[This message has been edited by jmbishop (edited 03-15-2010).]

IP: Logged
countach711
Member
Posts: 797
From: Littleton, Colorado
Registered: Sep 2003


Feedback score: N/A
Leave feedback

Rate this member

Report this Post03-15-2010 11:04 AM Click Here to See the Profile for countach711Click Here to visit countach711's HomePageSend a Private Message to countach711Edit/Delete MessageReply w/QuoteDirect Link to This Post
#1. I believe most all fill up locations state to close the door when fueling, and also not to get in and out of the car because you can build up static electricity as I'm sure you already know.
Should be common knowledge - >>>Okay so you have no argument for this one, and it is the most dangerous one. There are a lot of Youtube videos showing static caused fires.

a. A cell phone goes off, either driver's or passenger's.
No, this is a myth and your cell phone will not cause a fire. >>> I admit it might be a myth, but here's a few links anyway:
http://www.youtube.com/watch?v=gct1BmKNvU0 I think this is an INDIRECT result of using a cell phone. He probably got a static charge by reaching in his pocket for the phone and not touching anything before the gas handle.

http://www.youtube.com/watch?v=QfcZsML1pr0 this shows a cell phone igniting a fire

http://www.youtube.com/watch?v=xAPvd9atXS4 this one's an an obvious fake, but read the comment by pinheade6 at the bottom, doesn't sound fake to me.

the Myth Busters did a test and they could not get a cell to ignite a fire, but they only tried one phone, not all phones work or are made the same.

b. somebody shifts in the passanger seat and creates a spark.
To far away >>> Unless the driver takes the time to open the passenger door to create air flow (assuming there IS any wind) EVERY time he fills up, fumes could very easily accumulate in the interior

c. the driver forgets or gets careless and sits down while fueling. When he gets back up, he's now charged with electricity again.
Not going to happen with the NOZZLE AND HOSE in the way, >>> Are you going to tell me you've never smelled fumes when gassing up? Granted some times are worse or better than others, but it DOES happen.

d. Any number of interior electronics, faulty or otherwise could possibly set it off, relays, lights,etc..
No, they are not close enough, by the time any vapors could reach any of these things they will be dissipated to safe levels. >> Not true, again, with the pass door closed.

3. Dripping/spilling fuel on the interior is a distinct possibility while either putting the nozzle in or taking it back out and that isn't good from a purely aesthetic viewpoint plus the odor.
Look at the shape of the jam, and minor dripping and spilling will not make it into the interior of the car. >>>In a perfect world, you are right, but every time you're sure? What if he's in a hurry for some reason and pulls the nozzle out too quickly?

I don't like the location, but its not going to turn the car into a fireball. >>>I hope so as well, but more so I hope they just move it. I went out and checked my car for the front of the tank's location and studied the rear engine pics above and I think either suggestion I made is feasible. One unknown is the baffling inside the tank and what effect that might have on a front fill location.

[This message has been edited by countach711 (edited 03-15-2010).]

IP: Logged
ArbinShire
Member
Posts: 90
From: Tallahassee FL
Registered: Nov 2004


Feedback score: N/A
Leave feedback

Rate this member

Report this Post03-15-2010 06:43 PM Click Here to See the Profile for ArbinShireSend a Private Message to ArbinShireEdit/Delete MessageReply w/QuoteDirect Link to This Post
Who cares about the above, *I* wouldn't want the gas that close to the passenger compartment because I'm a klutz and would most probably spill it. Even if I didn't, the fumes will still have easy access to the passenger cabin.
IP: Logged
Archie
Member
Posts: 9436
From: Las Vegas, NV
Registered: Dec 1999


Feedback score:    (12)
Leave feedback


Total ratings: 546
Rate this member

Report this Post03-15-2010 09:50 PM Click Here to See the Profile for ArchieClick Here to visit Archie's HomePageSend a Private Message to ArchieEdit/Delete MessageReply w/QuoteDirect Link to This Post
On a real Miura the fuel inlet is under one of the vents on the hood area of the front clip.


That inlet leads to a fuel tank mounted between the front wheels under the spare.


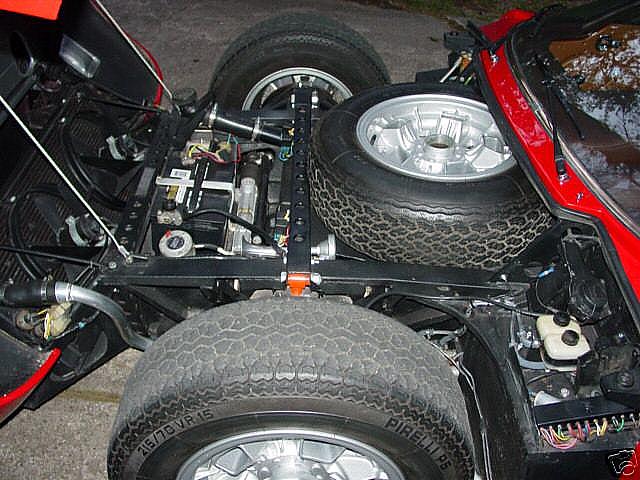
Since we have the A/c hardware, power brake booster, battery & a few other things mounted up front, we wanted to keep the Fiero fuel tank in this car.

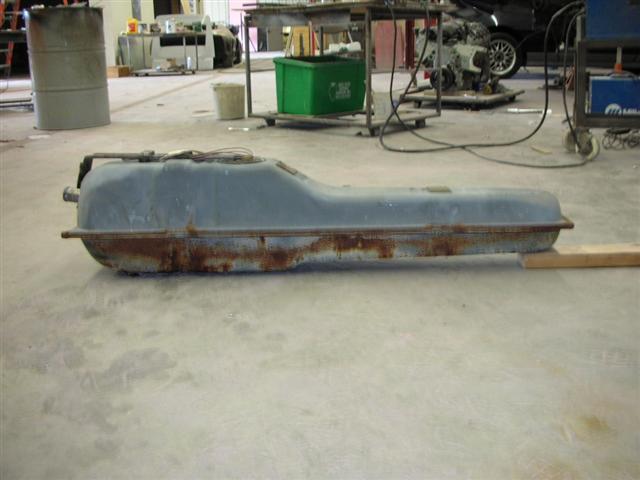
Anyone who knows their way around a Fiero knows that the fuel tank is tall in the back & goes to a bluntly pointed nose.


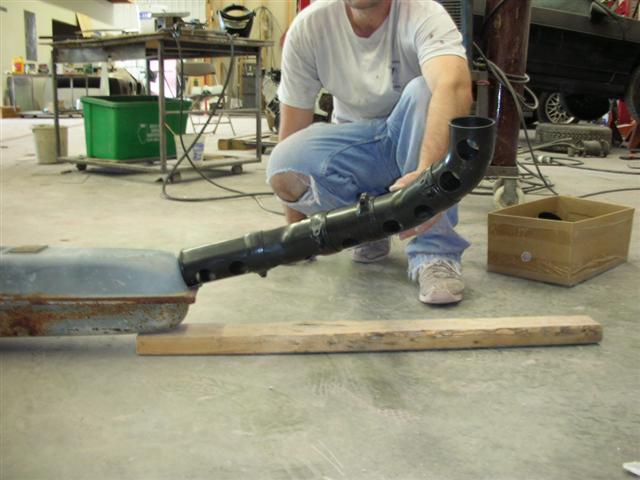
To route a fill tube from the front grill area to the "tall" area of the gas tank, the tube would have to be routed thru the area above the lower part of the tank. That area currectly is occupied by the shifter right now. If you moved the shifter & other things to a different area & allowed say 4" of filler tube to be nearly vertical at the fill end. (so that the gas nozzle could be stuck into it) Then the rest of the tube running back to the "tall" end of the tank would be actually going up hill slightly. Now, if you want to talk about a fire hazard, that would be it.

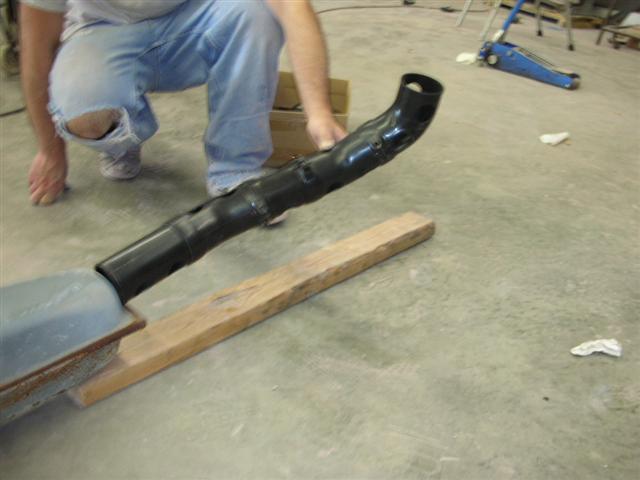
We mocked up routing the fill tube to the nose of the tank with a 15 degree gravity feed to the tank. (see pics below) It this position the inlet end of the fuel pipe would have been 4" above the grill that it's supposed to be located under.


As for fumes inside the car. It just so happens that the Fiero gas cap is non-vented. So they'll be no fumes when the cap is on. If you yank out the fuel hose while it's still pumping, then you've got a problem no matter what you're driving. And if you do that very often, you'll have a hard time geting anyone to sit in your car while you're pumping gas. If you're inclined to spill fuel because you're in a hurry when filling it up, then I'd suggest you wipe it up just as you'd wipe it up when fueling a stock Fiero.

BTW...I've never seen a spark jump from a passenger moving his butt around on a leather seat.

With all the build threads we have on this forum & all the stuff we've built over the years, one would think that people would start to accept that before we make important decisions on how something is done, we actually think it thru.

Thanks

Archie
IP: Logged
Archie
Member
Posts: 9436
From: Las Vegas, NV
Registered: Dec 1999


Feedback score:    (12)
Leave feedback


Total ratings: 546
Rate this member

Report this Post03-15-2010 10:43 PM Click Here to See the Profile for ArchieClick Here to visit Archie's HomePageSend a Private Message to ArchieEdit/Delete MessageReply w/QuoteDirect Link to This Post

Archie

9436 posts
Member since Dec 1999
Tomorrow, the customer is coming in from Texas for a scheduled visit to lay hands the car & make plans for what else we need to do.

Archie
IP: Logged
Sofa King
Member
Posts: 929
From:
Registered: Aug 2008


Feedback score: N/A
Leave feedback

Rate this member

Report this Post03-16-2010 07:34 AM Click Here to See the Profile for Sofa KingSend a Private Message to Sofa KingEdit/Delete MessageReply w/QuoteDirect Link to This Post
 
quote
Originally posted by Archie:

Tomorrow, the customer is coming in from Texas for a scheduled visit to lay hands the car & make plans for what else we need to do.

Archie


He's going to be thrilled!
IP: Logged
Previous Page | Next Page

This topic is 21 pages long:  1   2   3   4   5   6   7   8   9   10   11   12   13   14   15   16   17   18   19   20   21 
next newest topic | next oldest topic

All times are ET (US)

Post New Topic  Post A Reply
Hop to:

Contact Us | Back To Main Page

Advertizing on PFF | Fiero Parts Vendors
PFF Merchandise | Fiero Gallery | Ogre's Cave
Real-Time Chat | Fiero Related Auctions on eBay


Copyright (c) 1999, C. Pennock