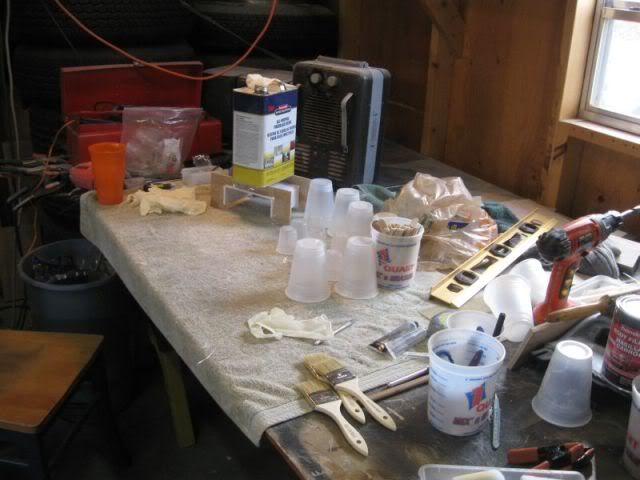
I hope to get the console fitted up this afternoon and start heading toward finishing the thing.....Just cause I want to start another adventure in fiberglass. Heading to the mega pull in 30 minutes to scrounge around. I also need a gas peddle for the Formula.
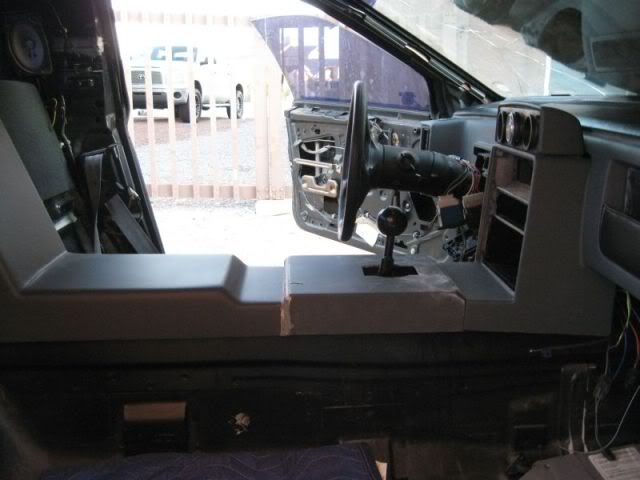
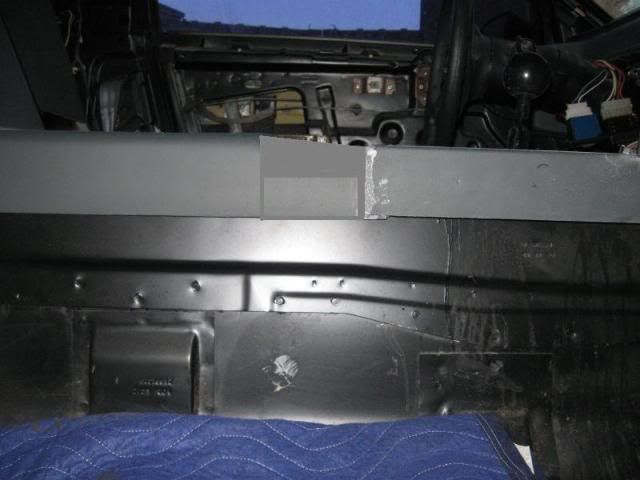
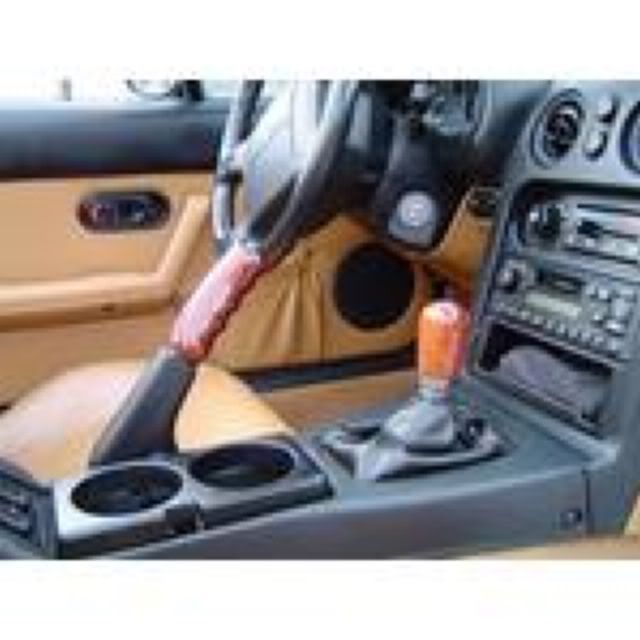
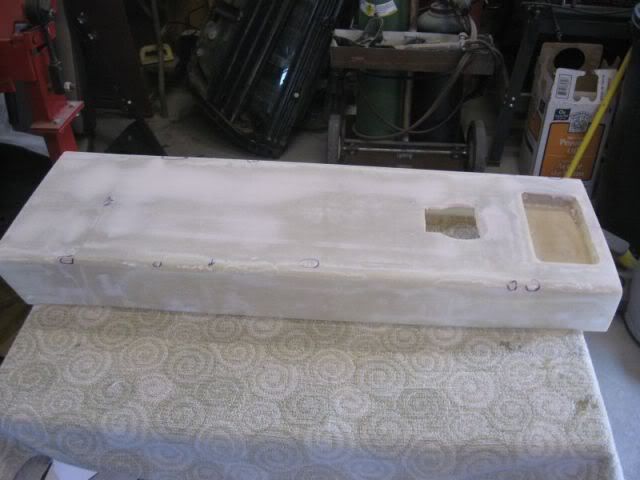
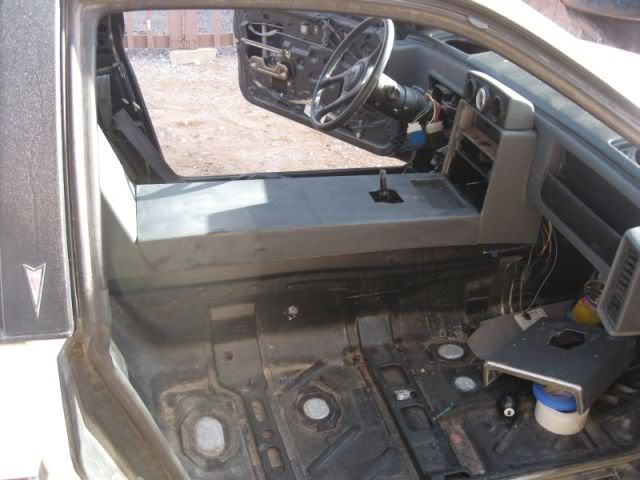
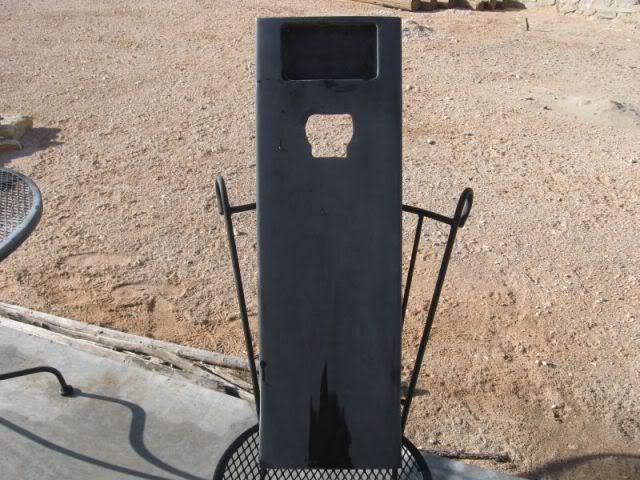
Now for today's action. I installed the shift cover in the car today and I am not real excited about how it is looking.
I think it will look better with some smoothing, rounding and finishing but it still has that "block" look. It is pretty close to what the stock setup looks like though: XTC console: V8 Coupe:
So........ I have a few ideas that I'd like some opinions on.
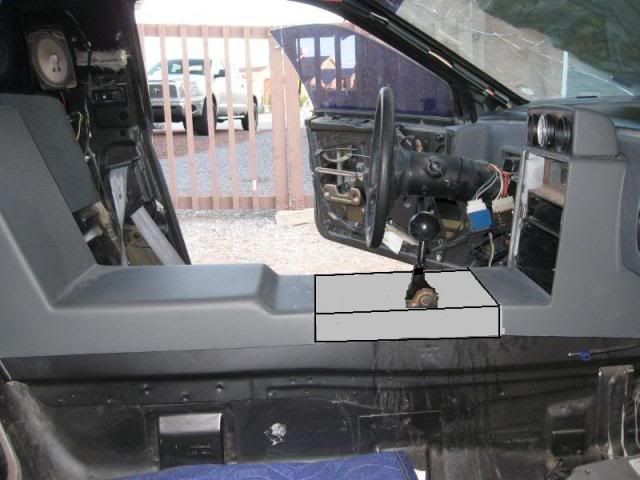
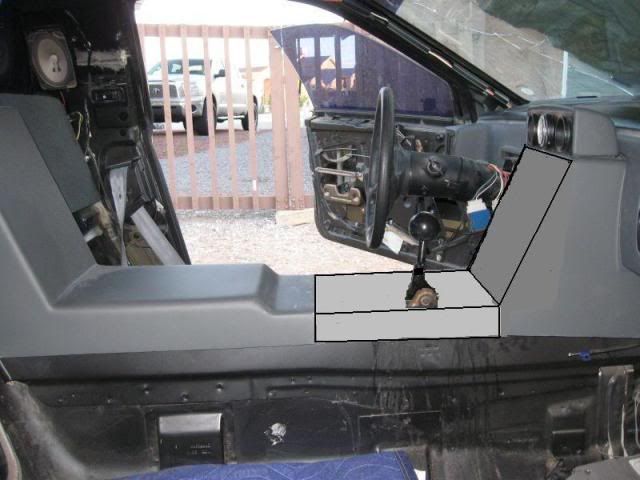
#1: Build in a slope from above the cig lighter position to the shift cover. Not sure how to explain it but it will form a small "covey" between the shift console and the slope in the rear console where the cig lighter was mounted- it will hold a cell phone, etc and keep it form sliding off between the seats.
2: Build a "new" shift cover that fits as close to flush as possible or extend the rear console forward to meet the AC surround.
3: Same as above but add a slope to the AC surround with the same angle as the rear console. Then I could either "stair step" the Stereo/AC control/AC vent or mount them flush in the face of the slope?
Now don't flame me for my artistic skills. I can't draw a straight line with a straight edge andmy comp skills are limited to MS Paint and my crooked eye.
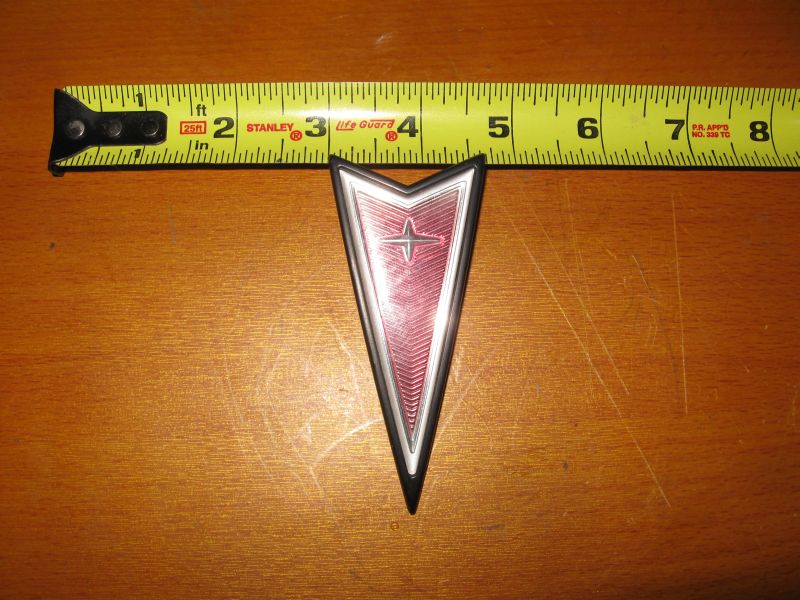
I also went to the Mega Pull today as we needed a new gas peddle for the Formula. I picked up this for my little V8 emblem project. I have an idea to have a plate milled out of aluminum in the shape of the Pontiac "Arrow" with a "8" built in to it. The "Arrow" portion of the plate will be maybe 1/8" larger than this factory emblem. Or with a pocket milled into it that the emblem will sit down inside of to give it some definition. Then I will affix the factory embelm to the milled plate. Hope that makes sense?
Thanks Cliff for moving this to the Construction Zone.
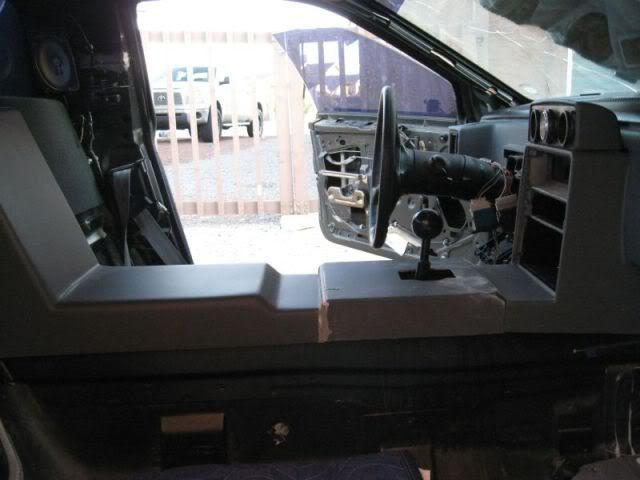
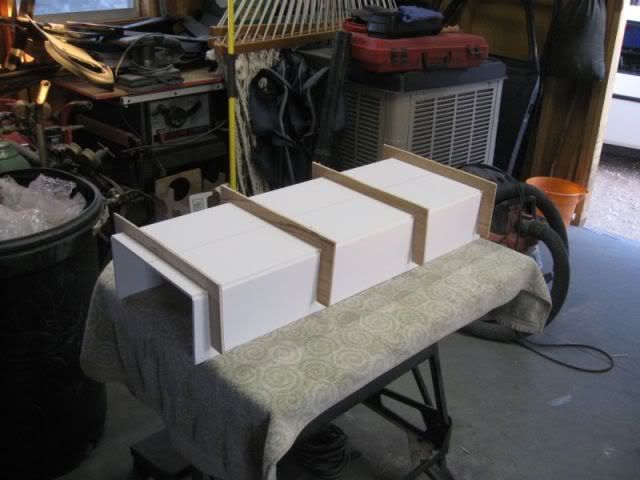
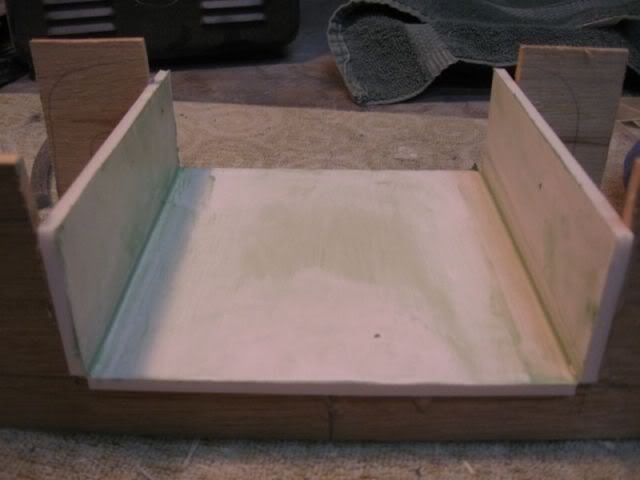
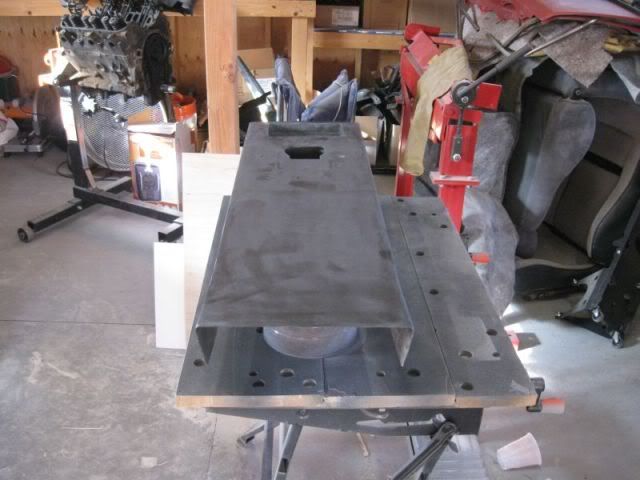
After looking at it a lot more, I am still not crazy about the shift console and the way it fits. So I have desided to try something different. I am going to make a mold for a console piece that will fit over the rear console and the AC surround. I may mold it into the rear console so that it is all one piece. There will be a seam where the rear console and the AC surround come together. There are a few "level" differences but I think I can "chop & channel the cover once I get the basic shape. I spent an hour wandering around the craft store looking for the right stuff to build the tunnel out of. I picked up some foarm board - foam sandwiched between 2 heavy pieces of paper/cardboard. I took about 20 measurement of the console as it sits in the car and came up with a basic shape for the cover. I have no idea if this will work or not but I'm going for it.
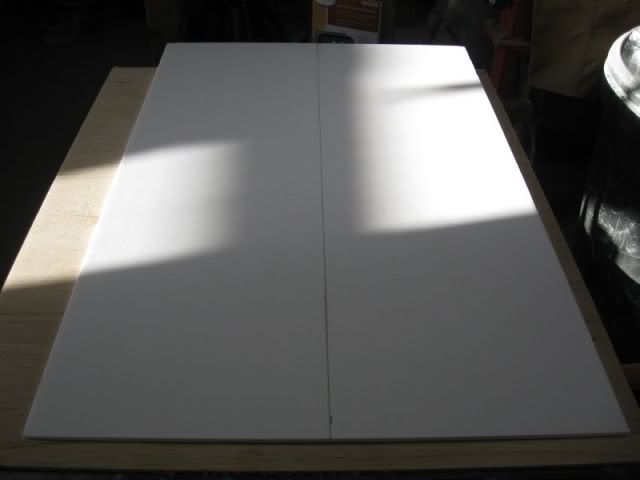
Foam core board - 1.99 a sheet:
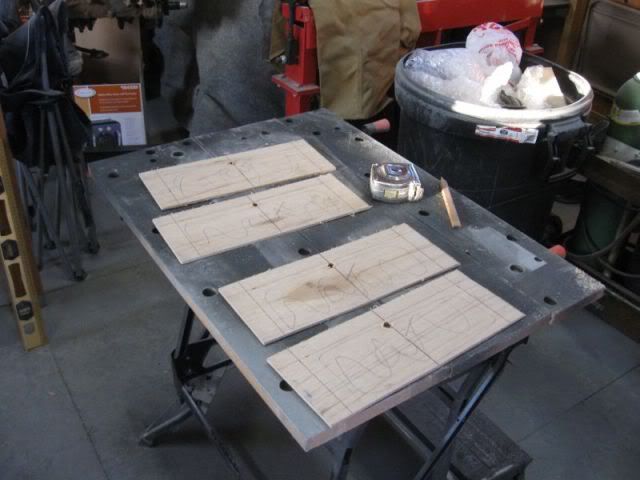
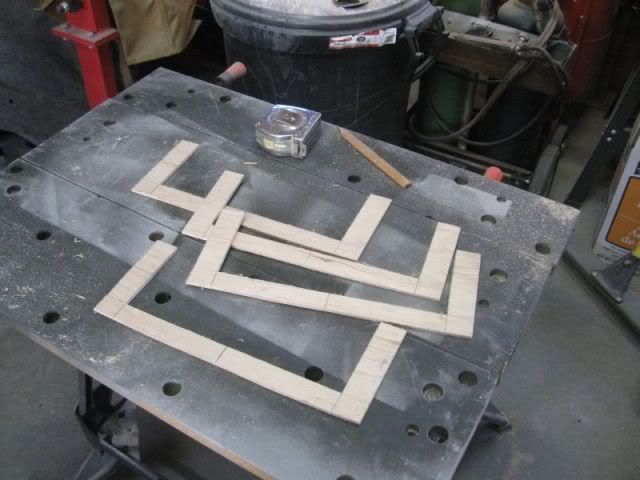
I layed out some "ribs" on some thin ply for added strength and cut them out with the jig saw:
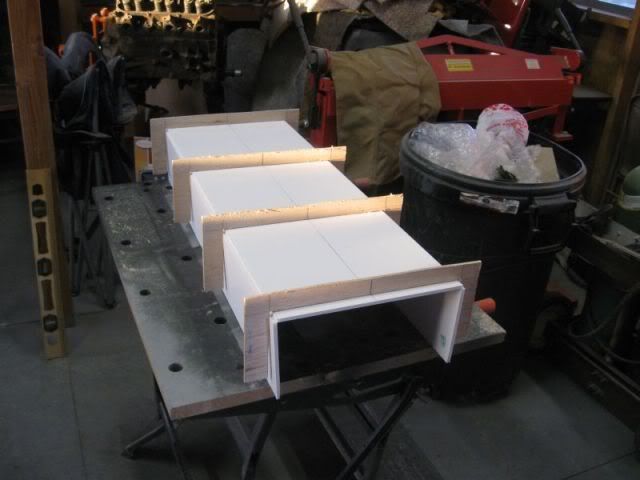
After getting all the lines layed out on the foam board, I made 2 cuts with a razor knife. Not all the way through the board, just the first paper layer and part of the foam. Then I made the bends and set the "ribs" in place. I use a hot glue gun to hold the "ribs" in place:
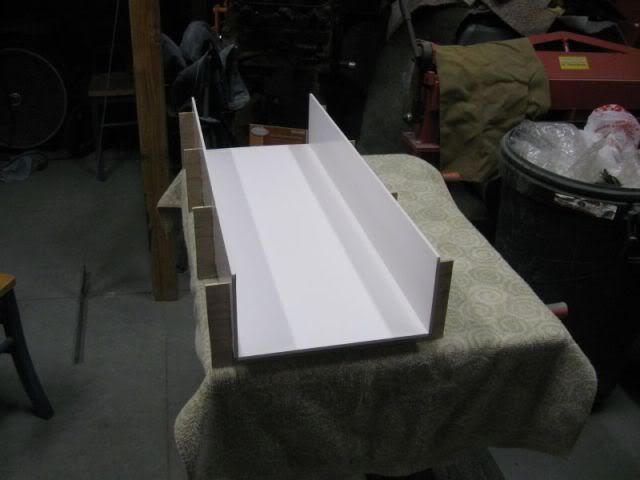
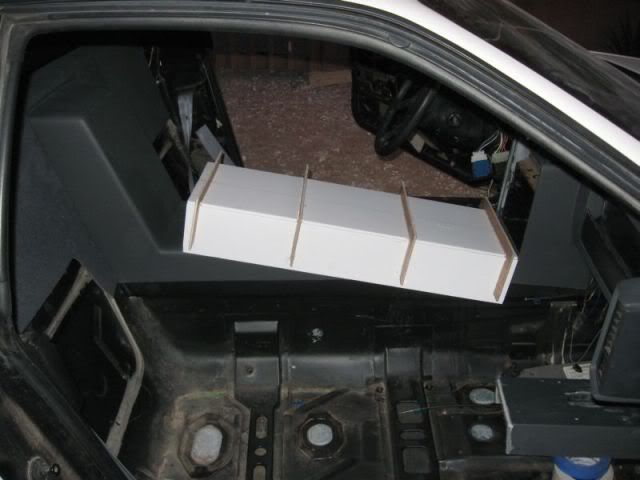
When the hot glue was set, I went for a "test" fit in the car. I am building it a little longer than it needs to be and I made the inside wide enough so that I can lay up 1/8" of glass. I can trim it to fit perfectly. If it works the way I have planned, there will only be one seam at the AC surround. It's a little "narrow" in the rear but it will sit a little further forward once trimmed.
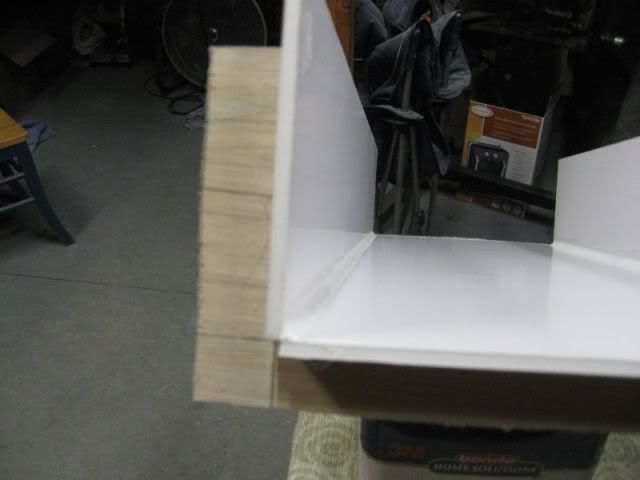
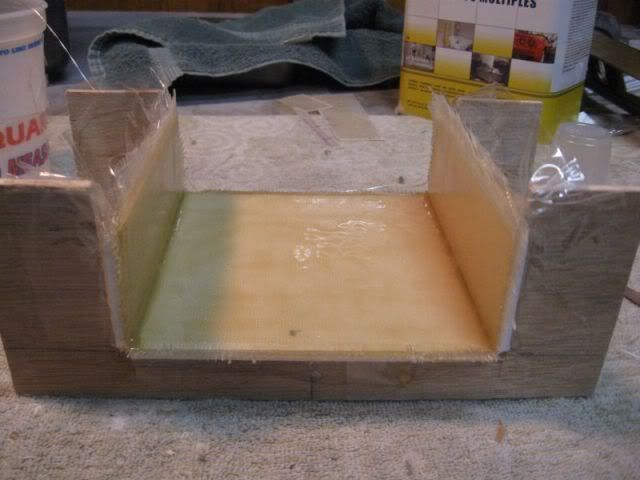
I used some epoxy and "rounded" the inside corners to make it easier to lay in the glass.
I am not sure what I will do for release. I may get some release agent if I can find some here in town or maybe just cover the inside with packing tape and a coat of wax? I'll do some experimenting with a piece of the foam board, some resin and mat. Should be fun!
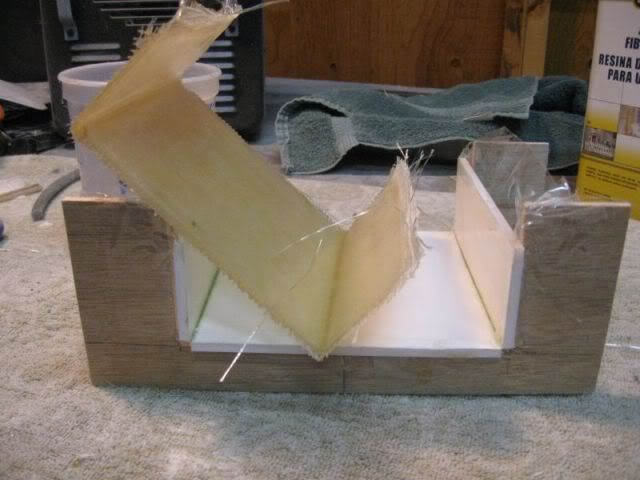
I am tryng a little test piece. We will see if works out. This first test, I waked the insde heavily. Then covered the edges with packing tape. I layed in 3 layers of cloth lust to see if it will release when it's set. I did not radius the corners. Should know in an hour!
Got ropped into a trip to the mountains to hunt for Pine Cones for Xmas decorations! I know, I know - I live in the desert but we go up to a little town in New Mexico called "Cloudcroft". It sits at 8600 feet elevation and is all mountains and pines. It's actually amazing to drive up the road 20 miles from the desert and be in the pines and snow. It was nice but I would have rather worked on my project. I need to keep a little peace in the house - "Tis the Season". There will not be much progress this week as I will be in Denver, Colorado Springs and Pueblo till Thursday am.
I'll take this time to wish everyone a Merry Christmas and a Happy New Year.
Looks like the Short Bus will be sticking around for awhile. Work schedule kinda killed the deal. I finally got a few hours to myself today, and half-assed sorted out the shed. I had no idea of some of the parts I had! Kinda got the itch to build another one....know of any candidates? It kinda depresses me to fire up the Solstice on the first try, everytime! Nothing to tinker with, or repair. I just drive it 250 miles everyday.
Getting some estimates on a new garage this week. Hopefully I can get back into the game then. I need to get that 4.9 into something. Still wanna attempt a chop top, and a few other ideas bangin around upstairs.
You have been busy on that interior! Let me know if you need any scraps or misc pieces. The parts shed doesn't have a lock on it. If you feel like wrestling with two 200+ pound Anatolian Sheppards, you can take what you need.
Looking good! Love the jig! That's actually a really good idea. I've been working with foam core for years and one of the things the foam always does is warp depending on the temperature. Isn't foam core a wonderful thing?
I had no idea the wax would like that - another great find! For someone who is out picking pine cones - you came up with a some great tips and tricks! Now... as always... get back to work!
Looks like the Short Bus will be sticking around for awhile. Work schedule kinda killed the deal. I finally got a few hours to myself today, and half-assed sorted out the shed. I had no idea of some of the parts I had! Kinda got the itch to build another one....know of any candidates? It kinda depresses me to fire up the Solstice on the first try, everytime! Nothing to tinker with, or repair. I just drive it 250 miles everyday.
Getting some estimates on a new garage this week. Hopefully I can get back into the game then. I need to get that 4.9 into something. Still wanna attempt a chop top, and a few other ideas bangin around upstairs.
You have been busy on that interior! Let me know if you need any scraps or misc pieces. The parts shed doesn't have a lock on it. If you feel like wrestling with two 200+ pound Anatolian Sheppards, you can take what you need.
I knew you could not stay away from the Fiero bug for long. It's nice to have a daily dependable driver but after awhile, you miss the tinkering....or you just need a fix for your addiction. If you are going to keep the bus, that 4.9 would go nicely in there. I know where there will be a real nice - clean 88 GT 5spd car coming up for sale soon. South West Car with zero rust and nothing wrong with it. I'll keepo you posted when it's avaiable.
I need to come see you sometime soon. I need to piclk up an 88 rear bumper so I can repair the Formula. My boy is still dinking around so it looks like I'll have to fix it myself. He is getting ready to buy a new Camaro so it looks like I'll get the Formula back........It never ends....
Looking good! Love the jig! That's actually a really good idea. I've been working with foam core for years and one of the things the foam always does is warp depending on the temperature. Isn't foam core a wonderful thing?
I had no idea the wax would like that - another great find! For someone who is out picking pine cones - you came up with a some great tips and tricks! Now... as always... get back to work!
Hey Greg,
This foam core board is very cool. Thanks for the heads up on this stuff. It works great. I figure I can glass the inside of it, then use the glass piece for future molds. I can always build another it was cheap and easy. After reading your thread, I will most likely follow your lead again and fab the complete console to get the look I want then go to glass with it. I don't know why it took you so long to come up with this idea........You could have saved me a lot of bad language..... Won't be getting much done this week. Looks like work is going to get busy just before the Holidays so I'm off bouncing around the country again. Sitting in the airport right now waiting on a plane.......
Originally posted by katatak: I don't know why it took you so long to come up with this idea........You could have saved me a lot of bad language.....
LMAO!!!! I know... I'm a horrible human being. I should be flogged about the head and shoulders... I'm mere caca...
quote
Originally posted by katatak: Won't be getting much done this week. Looks like work is going to get busy just before the Holidays so I'm off bouncing around the country again. Sitting in the airport right now waiting on a plane.......
That sux! Hopefully you'll be home to enjoy family and good holiday cheer! Have a safe flight.
i'll tell you what... finish my V8 Coupe so i can drive it... and i'll put gas in it? ...deal...
You won't like my V8 Coupe once you start drving that new Camaro. Here's an idea, You buy the new Camaro, keep driving the Formula and I will drive the Camaro and put gas in it! ....deal....?
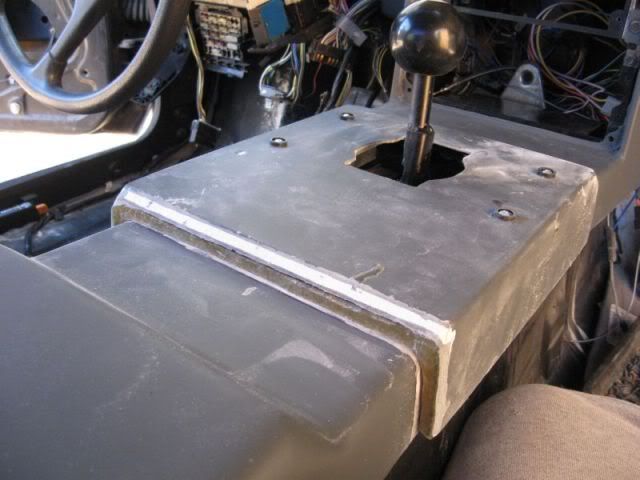
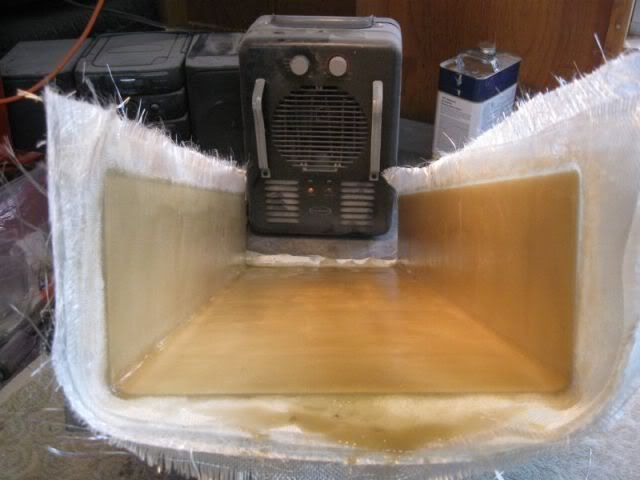
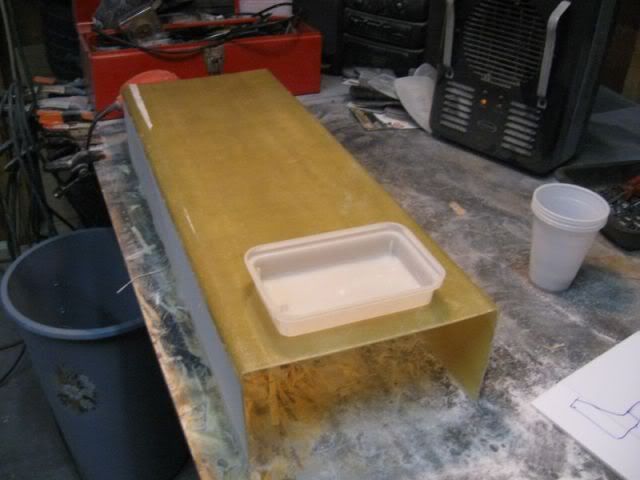
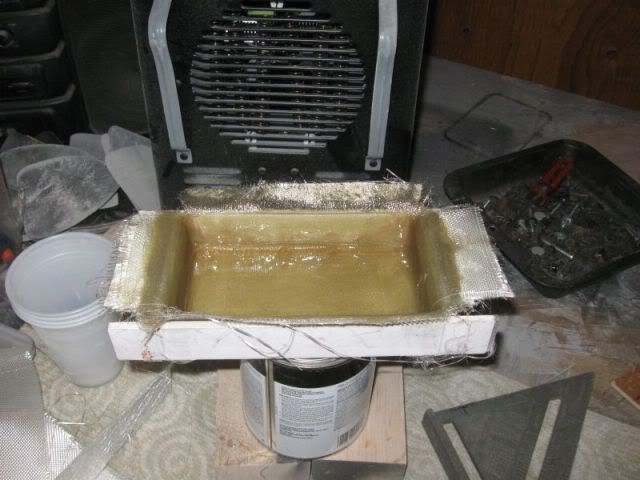
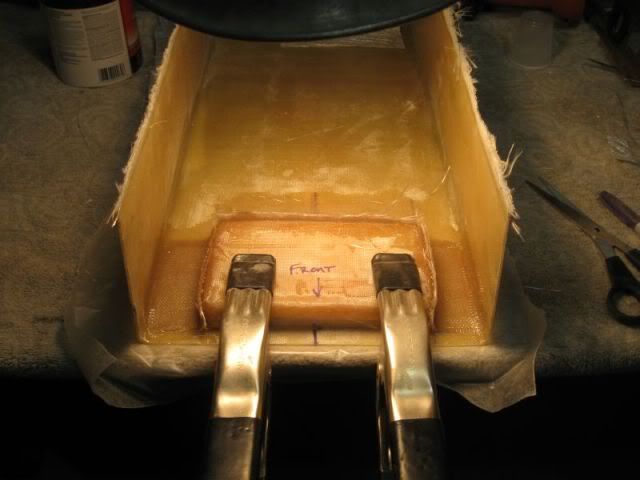
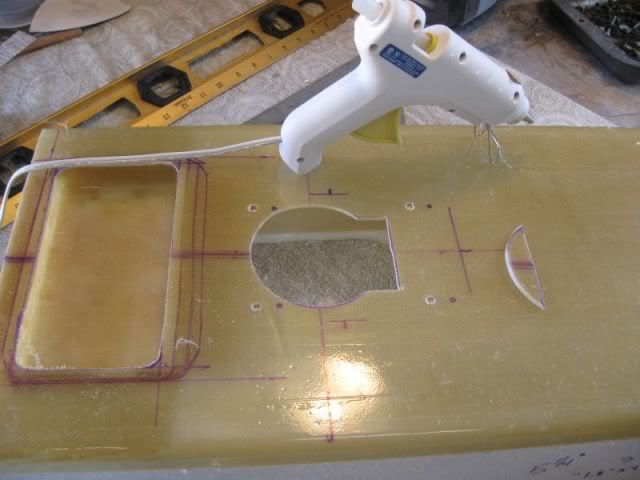
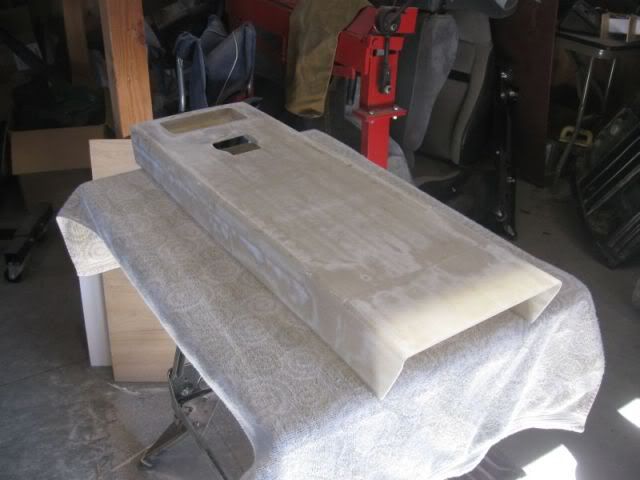
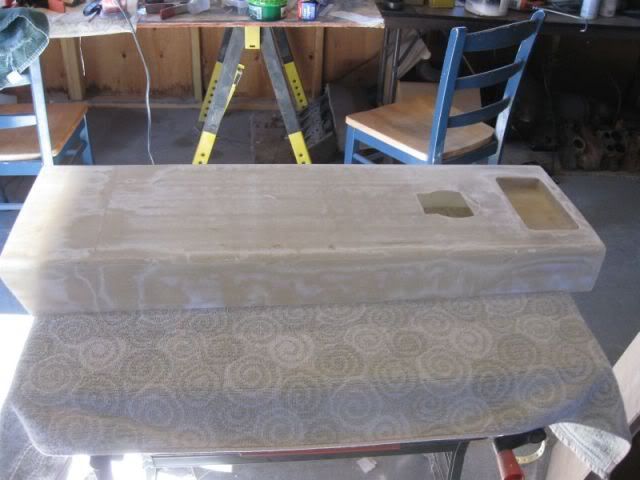
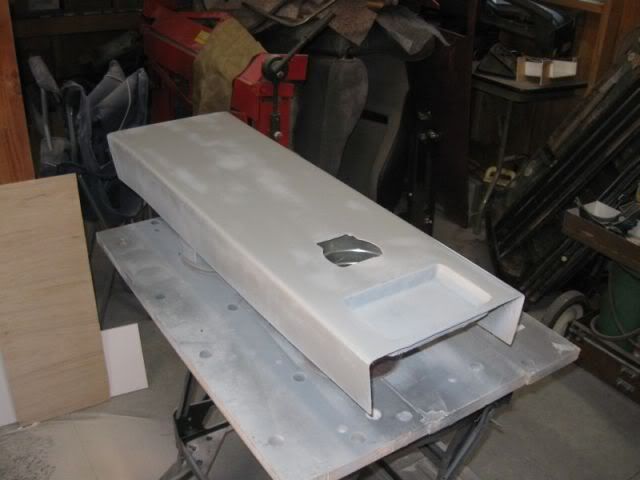
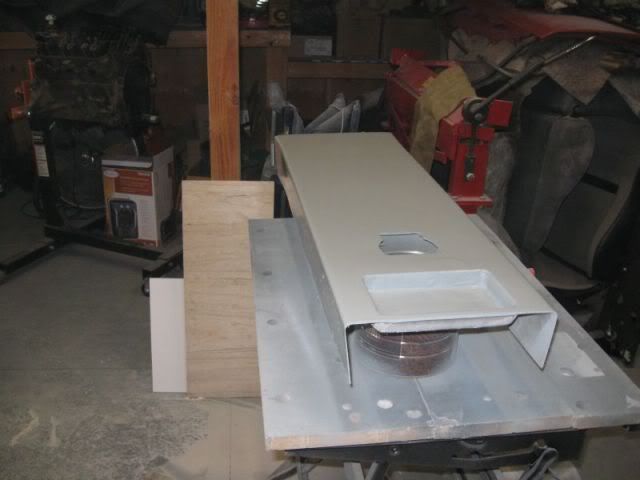
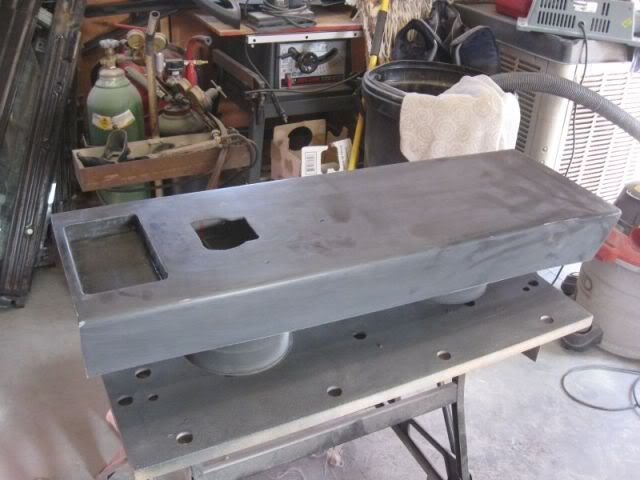
After a brief intermission due to "work", I was able to get back to the console project yesterday afternoon. My plan is to build a new (different) shift cover. This one will be the entire length of the console in an atempt to give it a smooth flat look, My goal all along was to create a console that was smooth and seamless. I am getting closer to that goal. Yesterday, I managed to get the main part of the new cover glassed and started the test fitting last night. As I was test fitting, I noticed that there is an "elevation" change from the arm rest part of the console to the AC surround. I had 2 ideas to make up the difference. One was to cut a "wedge" on each side of the cover and then slope the cover from the high point on the arm rest to the AC surround and the other was to leave it flat and build a "spacer" at the AC surround to help steady the cover. I ended up leaving it flat and at the AC end and I built in a tray to hold things!
First on the agenda was to prep the mold:
This was going to be my largest fiberglass project yet. I cut all the mat and cloth, layed out all my supplies and went to work:
Taking shape - adding some heat to help it cure - it was about 32* and snowing here yesterday:
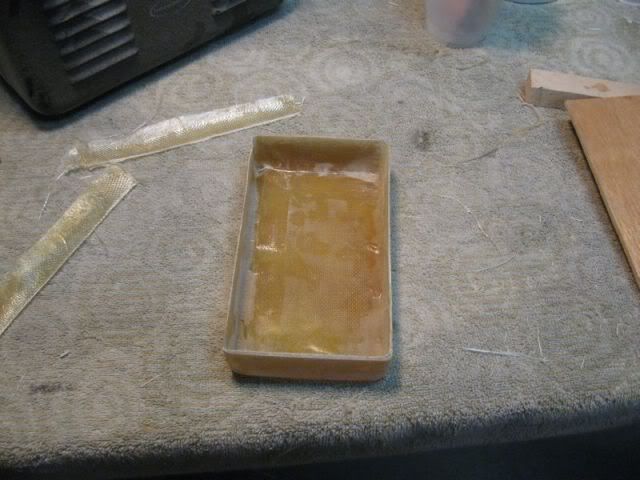
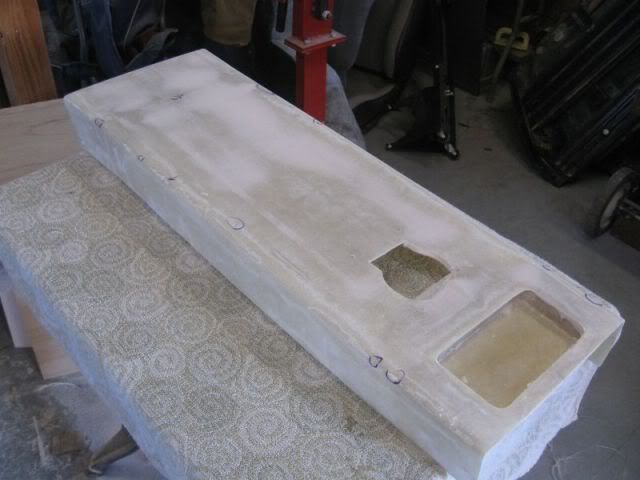
Now here's where I messed up. I got in a rush when I was prepping the mold. I used some epoxy to "round" the corners in the mold. The epoxy I used was old and had been sitting in my shop on the shelf for about 4 years. It was not setting and was still kind of soft. I tried to scrape it off but it was tearing the paper from the foam core. So I decided to just cover over the top with packing tape. I was in such a rush to get the glass work started, I failed to wax the side walls of the mold. Once the glass was cured, I peeled the mold off. Unfortunately, the paper came off with the part. So now I have a lot more sanding to do to get the paper off the mold. I tried a small area with my sander and 50 grit and it just balled up and plugged up he sand paper. I may have to lay another layer of mat over top to cover the paper. Just makes a lot more work but I learned a vaulable lesson. Prep, prep, prep........
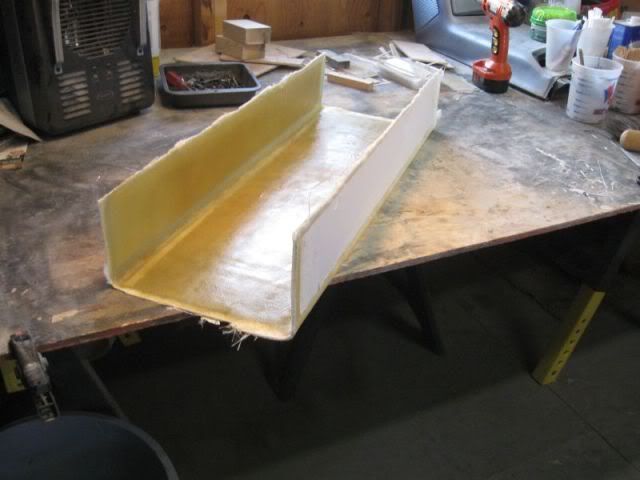
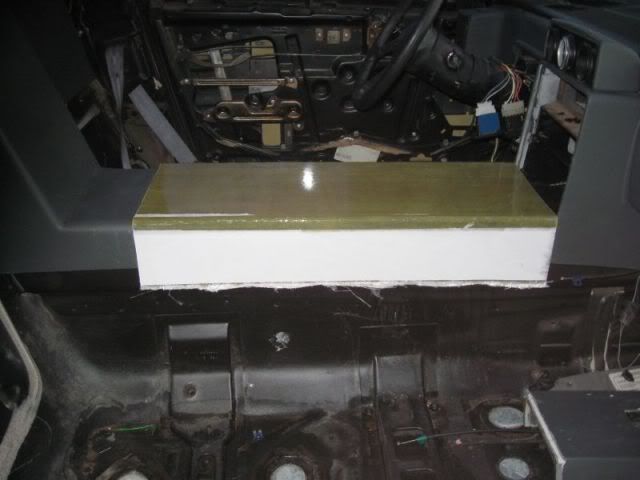
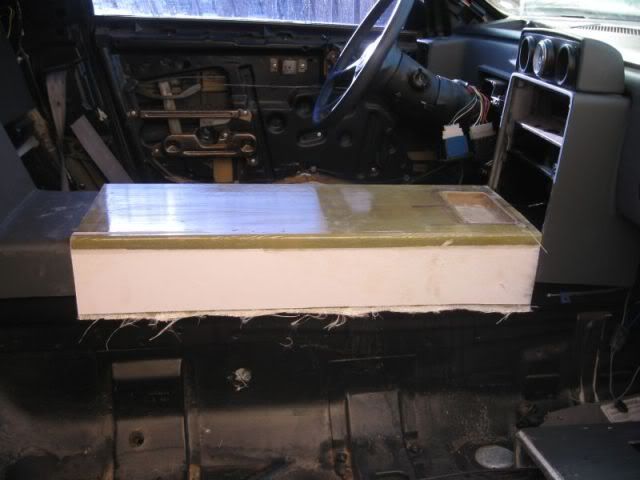
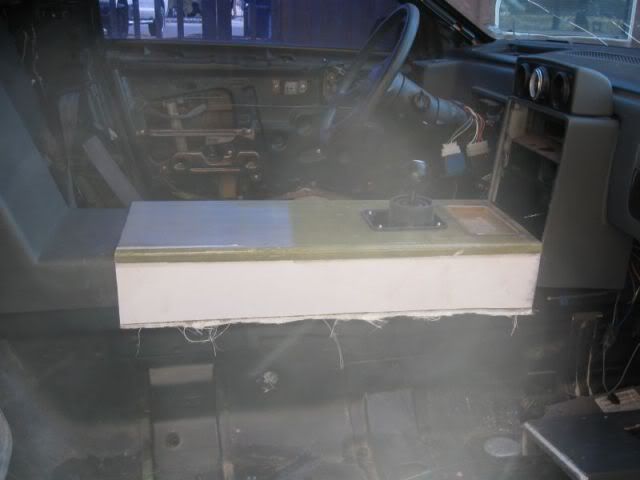
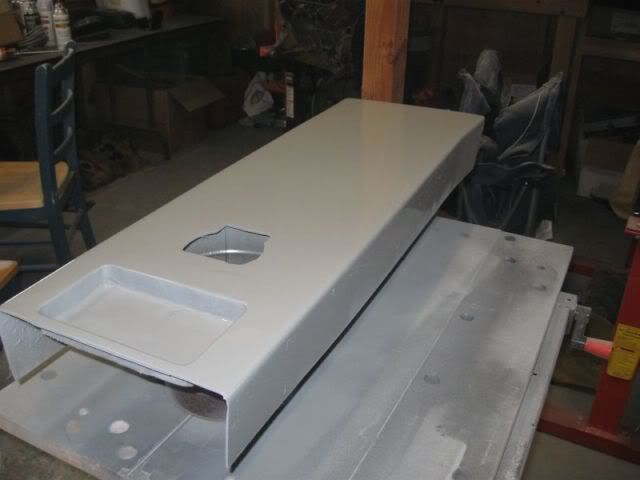
Trimmed and test fitting:
Trimmed some more. Once the cover fits where I want it, I will build a "cover for the rear console that will match up with this cover. Then I will glass the 2 parts together to form one part. The only visible seam will be at the AC surround and I think I can blend that to be nearly invisible.
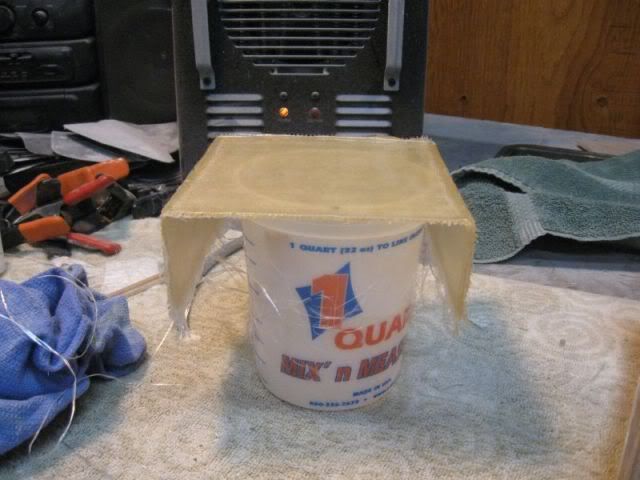
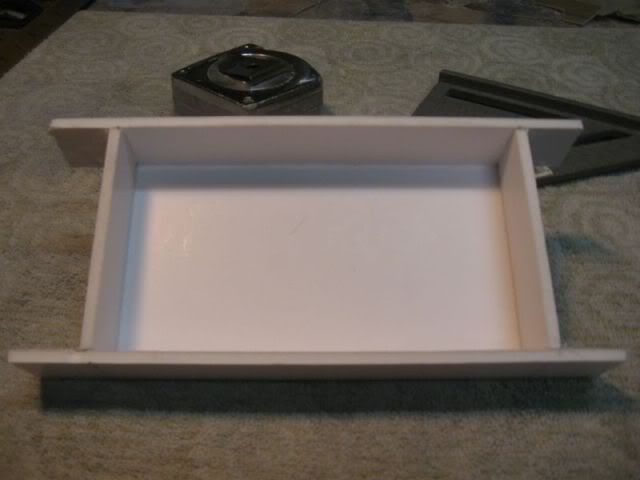
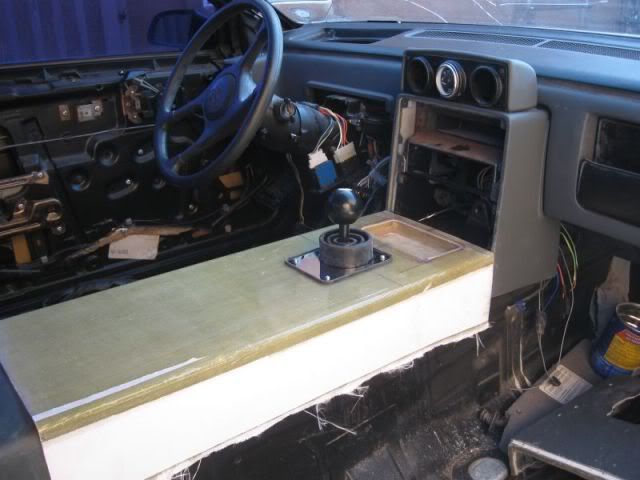
The next step was to build the tray that will set between the shifter and the AC surround. The "lid" off the 1 gallon can of resin was a perfect model - props to Archie for sharing that little tip - look around the shop for something that will work for a mold to make the part - "The Miura Project":
I layed it out to see what I was getting into:
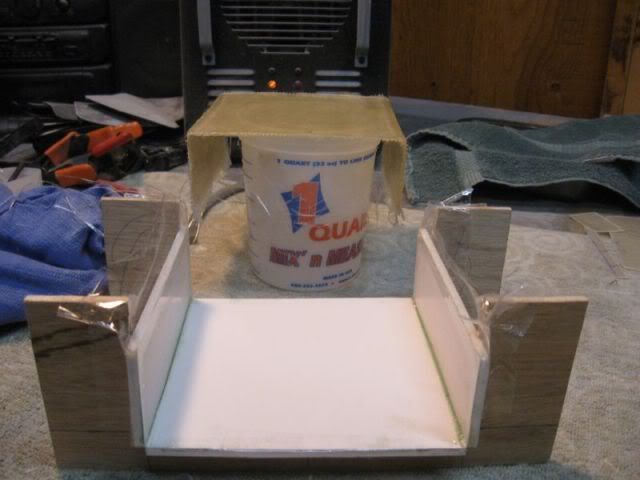
Then I made a mold out of foam core for the tray:
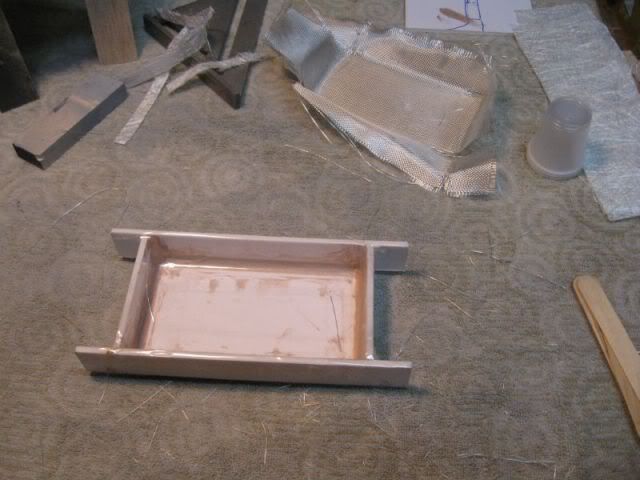
Mixed up some filler to lay in the corners to round them out:
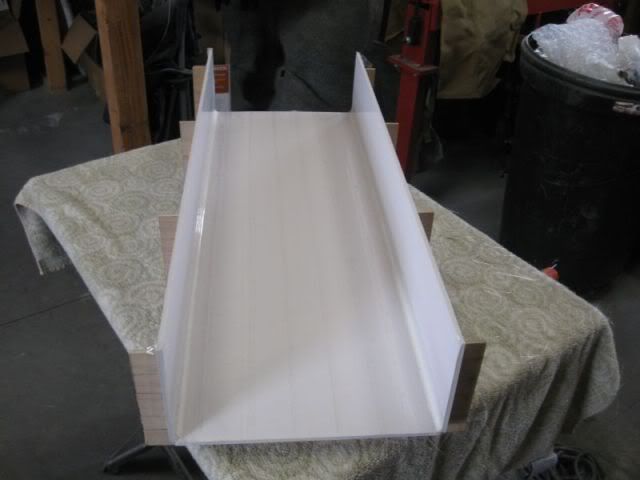
And layed in the glass:
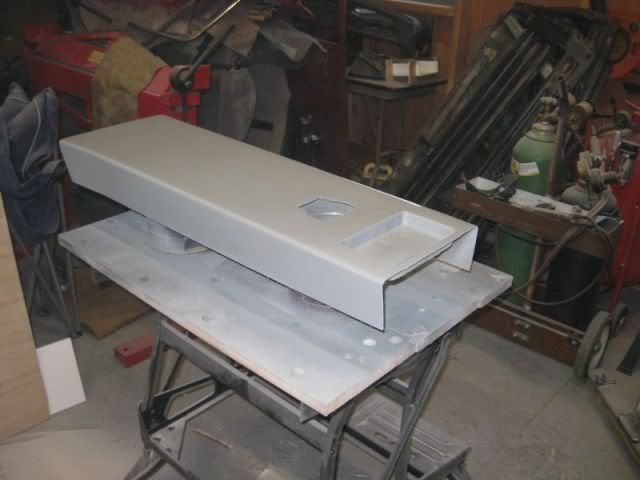
Trimmed up the tray:
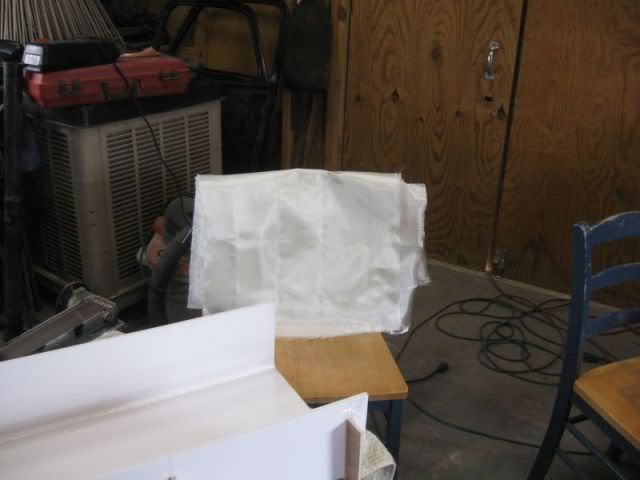
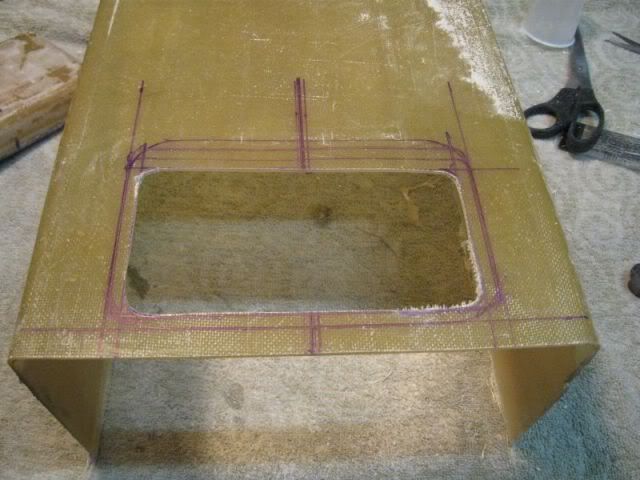
Cut the hole. I cut the hole about 1/4" smaller than the tray. Once it's all one piece, I will snad the lip down so that it matches the inside of the tray and blend it all together:
Now that's funny right there. I was sitting in an airport Tuesday night and I watched a comercial for a cell phone. Now I get it......lol. It only took 3 days for me to get it! I must be getting old!
MXHNY!
[This message has been edited by katatak (edited 12-24-2009).]
Even with a little extra foam core it still looks great! You've got my interest going - where are you headed with the final design? hmmmmm???? The use of the resin lid - brilliant! Archie is good - really good. It sparked ideas for my own armrest and glove box. DANG IT! I want to go out to the garage and work on the console.
Question: Could you have used the plastic lid from the resin instead of creating a new one? Was the lid too big, too wide, etc? It looks really sharp so far!
Merry Christmas, buddy!
[This message has been edited by Sofa King (edited 12-25-2009).]
Even with a little extra foam core it still looks great! You've got my interest going - where are you headed with the final design? hmmmmm???? The use of the resin lid - brilliant! Archie is good - really good. It sparked ideas for my own armrest and glove box. DANG IT! I want to go out to the garage and work on the console.
Question: Could you have used the plastic lid from the resin instead of creating a new one? Was the lid too big, too wide, etc? It looks really sharp so far!
Merry Christmas, buddy!
Thanks Greg........
The lid was the perfect size except it had a couple "steps" in it that would have made it a pain to glass over. The mold I made was a little smaller and more shallow too - better fit. You would not believe all the things I have been "measuring" to use as a mold! I look at things differently now that I am in the middle of a glass project. Got some more stuff cooking - actually curing right now. Whne I finish it this evening, I'll post it up.
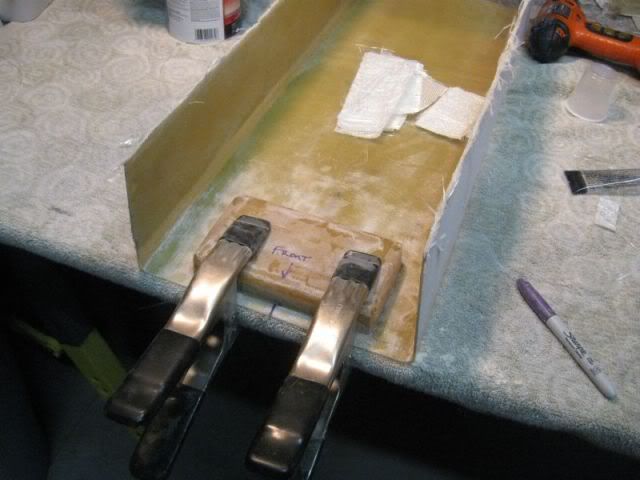
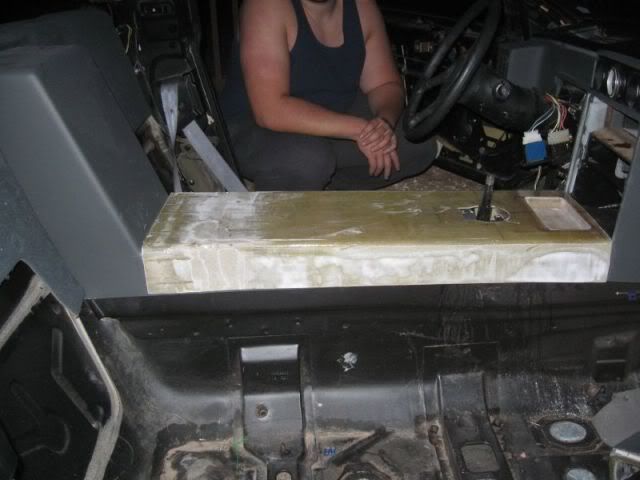
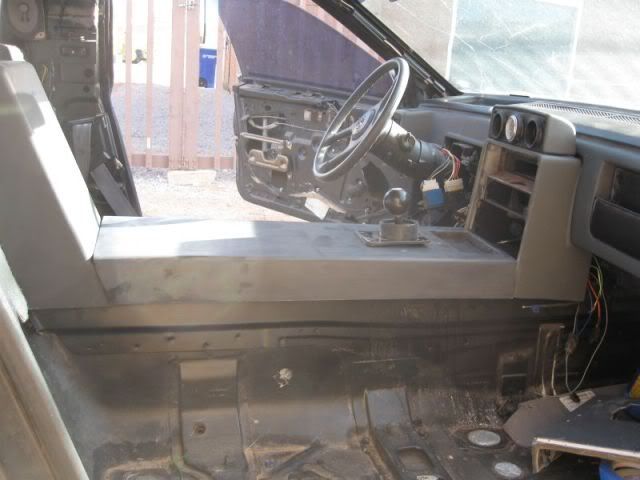
I managed to squeak out some Fiero time the last 2 days. I got a lot done but missed out on some photo ops along the way. My goal was to get the shift cover fitted and the shifter boot installed. I made a big mistake when I measured for the "center" of the shifter hole but I was able to repair my mistake.
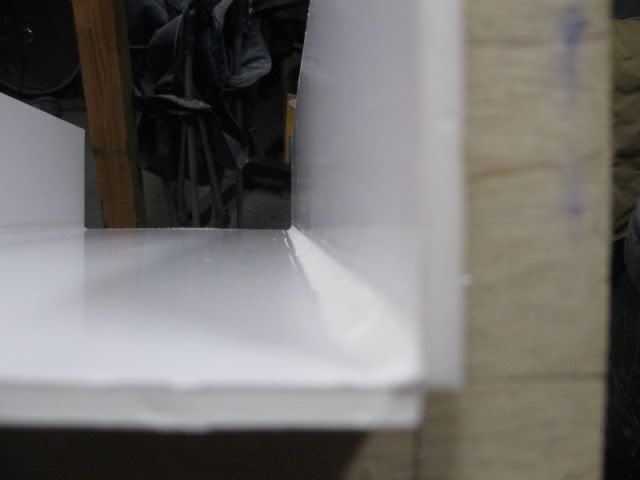
Test fitting - found two issues here. I put the shifter boot about 1/2" too far forward. My original plan was to "blend" the rear of the shift cover into the rear console. I did not like he look of it once it was in the car.
Note the gap between the rear console upright and the shift cover.
Here's the start of my shift boot repair - I just cut a piece off the "hole" I cut out and hot glued it on top then turned it over and layed some glass and resin on the under side:
So here's my fix for the gap. I built another mold out of the foam core. I had to do some real brain work here as there are a few angles to deal with. It's hard to see in the pick but there is a slight taper in the piece from the shift cover end to the back of the rear console. It was a little work but I figured it out. This time, to create the rounded corners, I used silicone sealer and let it set. Then I covered the entire mold with packing tape and then waxed the tape before I started laying the glass:
Under the heat curing:
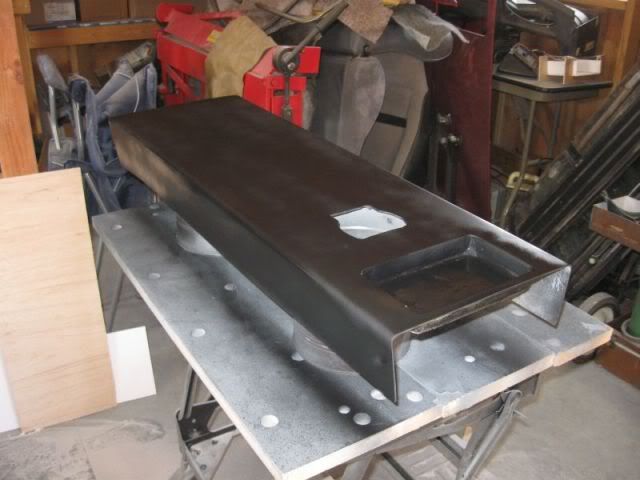
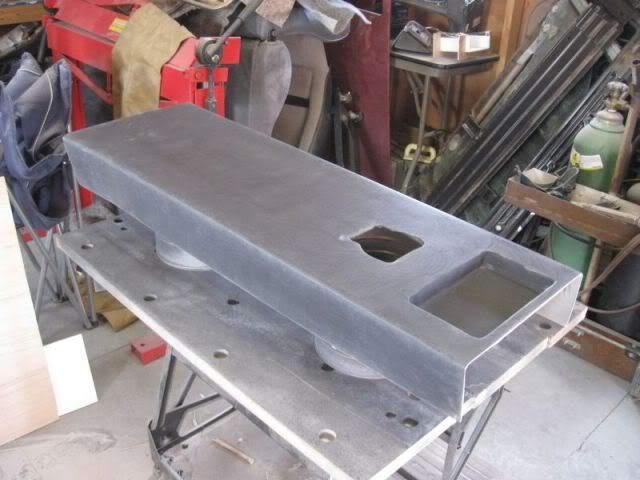
Here's where I failed to get some pics. After a lot of sanding and fitting, I managed to merge the 2 pieces together by laying glass underneath and a single "slurry mix of resin and glass strand on top. Then I sanded the top and sides down to smooth it out. Then set it in the car for a test fit. It's almost there. I have to fab some mount points to fasten the cover to the AC surround and the rear console, reset the shifter boot and then start the finish process:
Now the fun starts - creating huge quantities of fiberglass dust!
"MCaHNY"
Pat
[This message has been edited by katatak (edited 12-26-2009).]
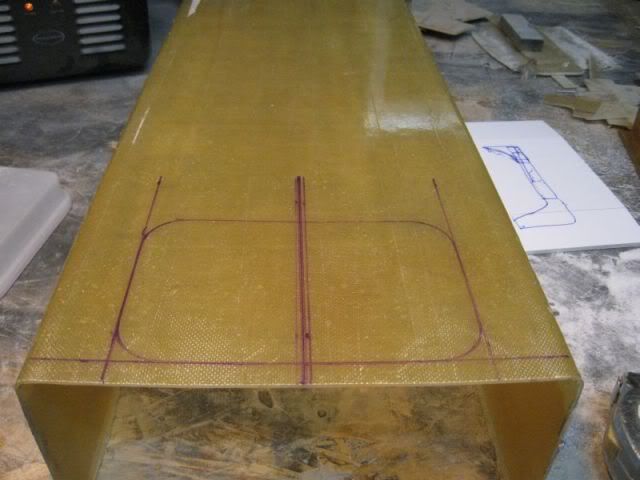
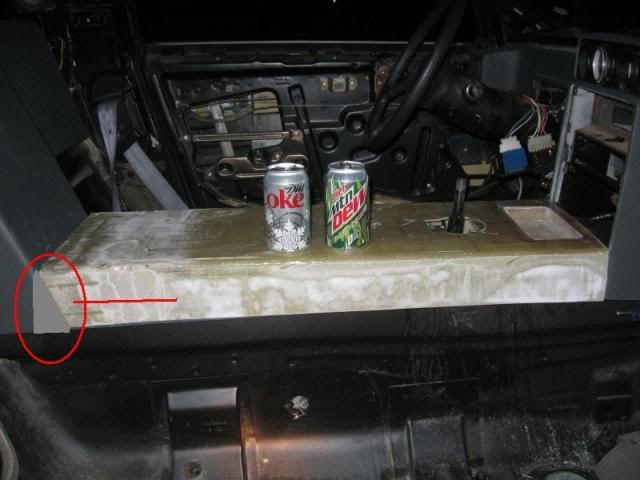
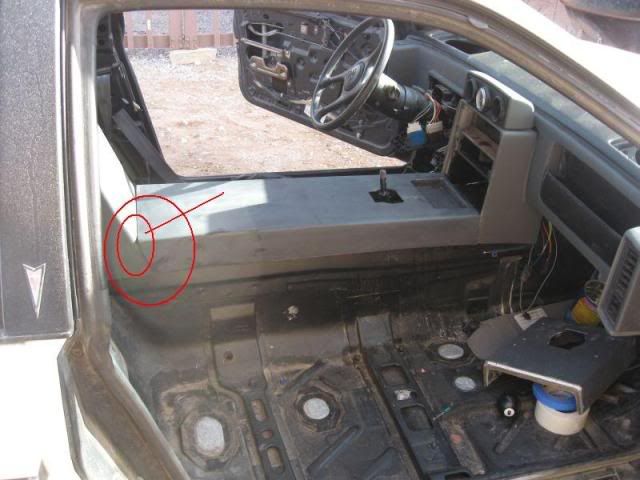
I am thinking that I should trim the rear end of the shift cover at an angle that matches the angle of the rear console (red circle) and I am thinking about cutting in some cup holders on the right side of the shift cover. I think there is enough room so that when shifting, I will not be banging the cans/bottles in the holders? I'll have to measure to see how deep I can recess them. I may not be able to get them deep enough? Give me your thoughts/ideas/comments.
Do the angle cut. You probably won't notice it with the seat in place but it will make you feel better. On the cupholders make sure they hold a "Big Gulp".
I am thinking that I should trim the rear end of the shift cover at an angle that matches the angle of the rear console
P,
GREETINGS from Las Vegas! Hope you had a great Christmas and Santa was good to you? The console is looking really sharp so far! Where are you going with this final design? I think you should go with the angled cut. From a design perspective it works even though you won't see them because of the seats.
quote
Originally posted by katatak:
I am thinking about cutting in some cup holders on the right side of the shift cover. I think there is enough room so that when shifting, I will not be banging the cans/bottles in the holders? I'll have to measure to see how deep I can recess them. I may not be able to get them deep enough? Give me your thoughts/ideas/comments.
Good call - I like cup holders. LOL You might have or want to glass in an existing dual cup holder - I don't think there is enough room under the console? Although your new console did raise it a bit. I would still consider finding a dual holder and working it into the final design - anything to avoid an unnecessary fabricating and sanding. Go to www.thefind.com and type in dual cup holder. I found a few that might work for ya.
DANG IT! I really want to get home and start working!
[This message has been edited by Sofa King (edited 12-26-2009).]
Do the angle cut. You probably won't notice it with the seat in place but it will make you feel better. On the cupholders make sure they hold a "Big Gulp".
Happy Holidays Rick........ After the last few days, it needs to be able to hold a fifth.......This is really turning out to be more work than I wanted....
Who's that spying on you? Is that the shop foreman crackin the whip?
Wow Greg, I never noticed the "wolf" in the backgorund. You are right - she's the boss. She's pretty stealthy. I never knew she was even there!
I got absolutely zip done on the console today. I really wanted to see if the recessed cup holder would work. I got my son new dew outer dew wipes and remote door locks for the XTC for Christmas so today my plan was to get it all installed. No such luck. Lots of little things that heeded fixed once I got the Drivers door apart. Check out the XTC thread for details. Hope you are having a great time in Vegas.
I've been lurking this topic since you started it and I love every step. I didn't know you took such attention to detail. Keep it up.
Thanks for the positive feedback! Everytime I think I'm getting close to the finished project, I see something, read something or find something that changes the course. I'd like to finsh this one so that I can enjoy the car and work on some new ideas without the car being torn apart. What am I saying, it's a Fiero......
Good call - I like cup holders. LOL You might have or want to glass in an existing dual cup holder - I don't think there is enough room under the console? Although your new console did raise it a bit. I would still consider finding a dual holder and working it into the final design - anything to avoid an unnecessary fabricating and sanding. Go to www.thefind.com and type in dual cup holder. I found a few that might work for ya.
DANG IT! I really want to get home and start working!
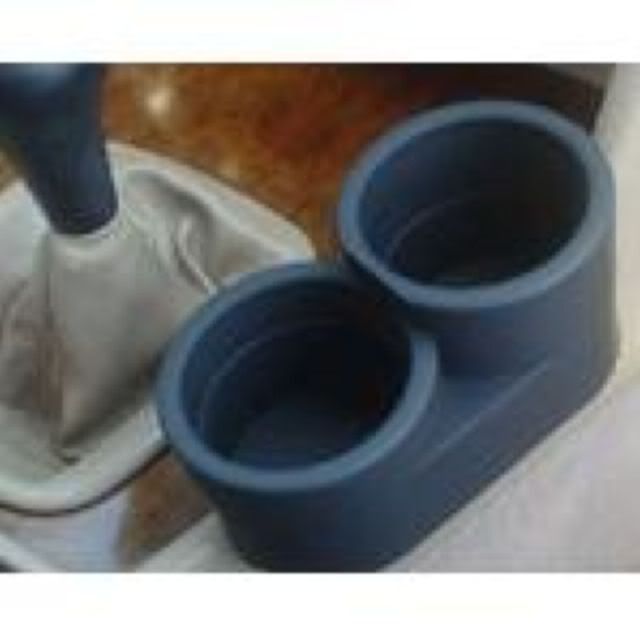
I went to that web site and found a couple that interested me - or at least the concept.
This first one I could recesss it into the side - off center - about 2".
No sure of the depth of this one but I like the look. In fact, I like the look of the entire console. Hmmm.........
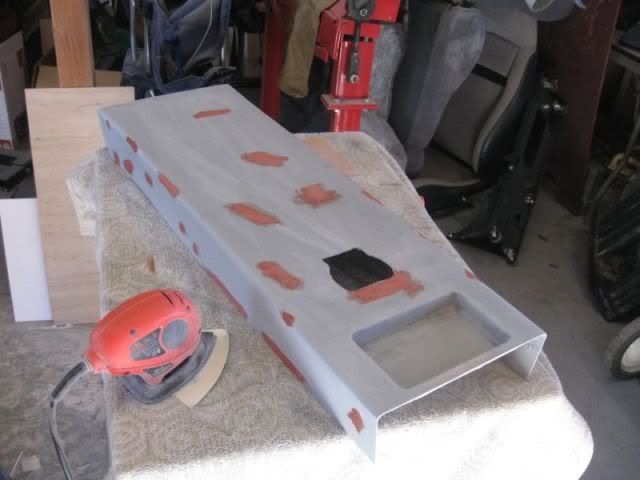
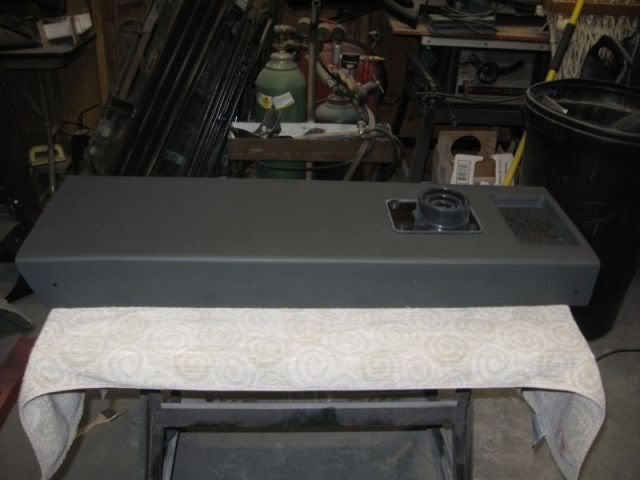
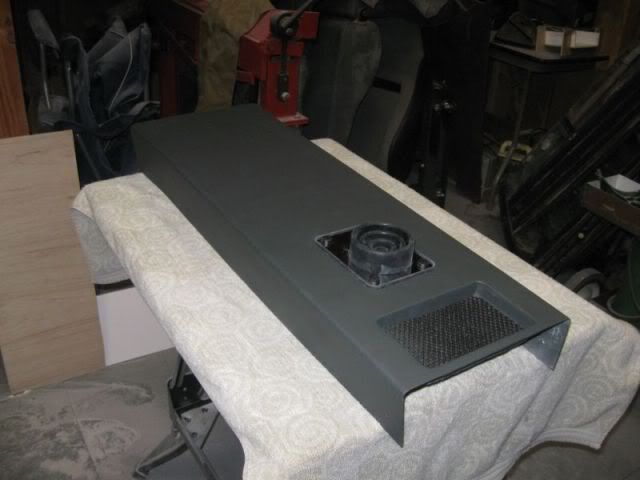
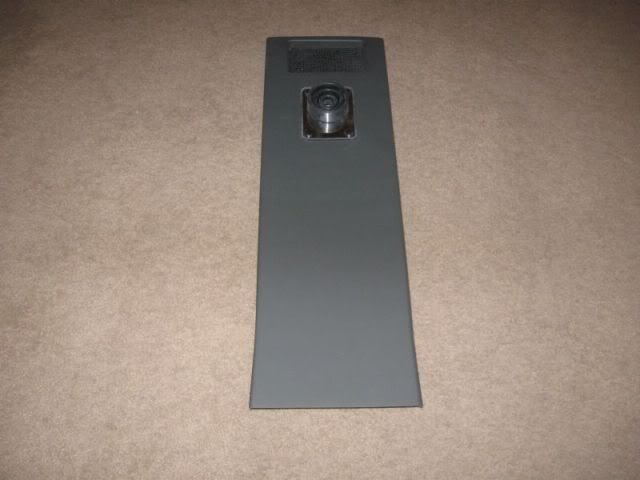
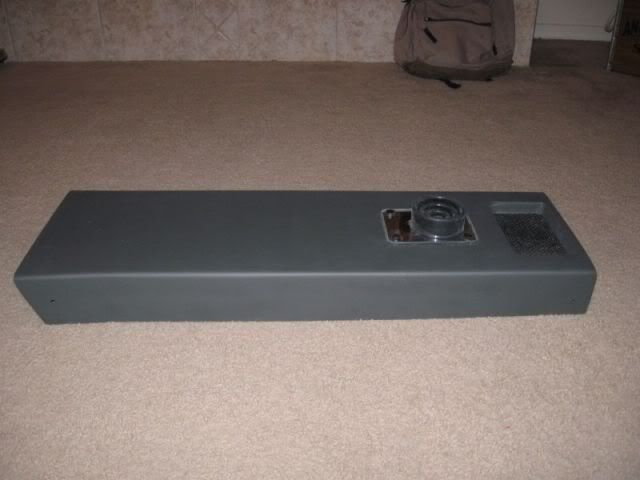
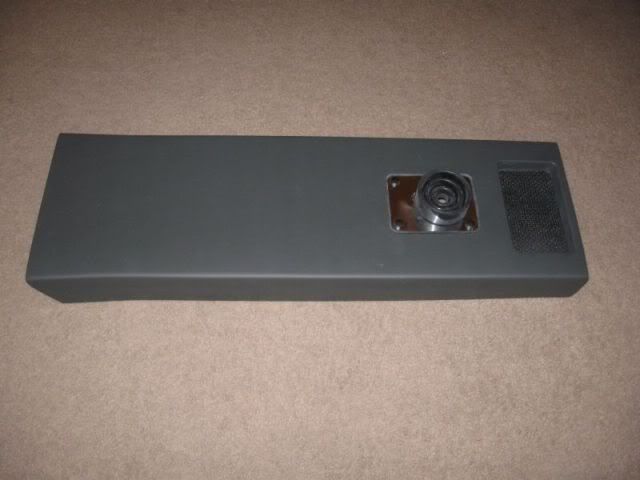
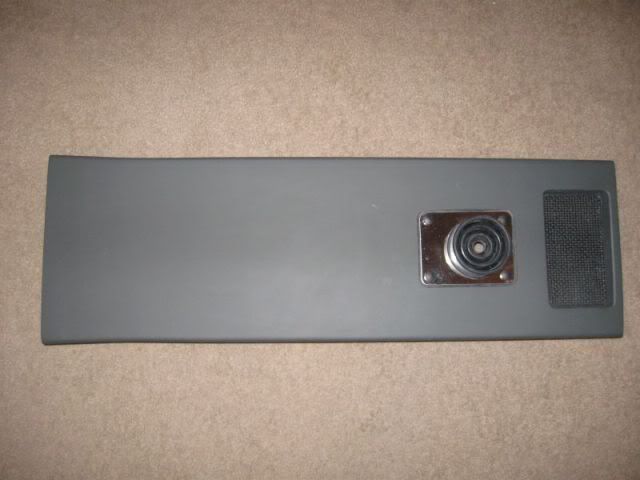
Well after about 5 days, I was able to get back to work on the console. Lots of sanding, filling, priming, sanding, etc. etc. was the norm for the last 2 days. I had a lot more pin holes than I first thought. It's amazing how primer brings out all the little flaws. I was having a problem with static electricity on the part. After I had it all wiped down and ready to prime, as soon as I started laying a coat of primer, the fuzz stuck too it like crazy. I went a picked up some prep cloths by Dupli Color. Don't use these right out of the container - they actually caused my glazing putty to lift out of the pin holes. I found that if I let the cloth sit out and evap some before use, it worked much better. So that cost me double the prep work. I managed to get all the holes filled, everything smoothed out, a couple layers of filler pirmer and a couple layers of regular primer. Then I wet sanded it with 400 and 800.
I got the mounts figured out and mounted the shifter boot. Once I was happy with the fit (not completely but it will do for now) I took it back out of the car and gave it a few finish coats of color. As soon as all the interior is fit up and reassembly is finished, I'll take the rear console, shifter cover and AC surround back out of the car and go over each piece one last time to fix any rough spots and pin holes then I'll wet sand and give it a final coat of color. I am kicking around the idea of covering it with a clear coat but I do not want a "gloss" to it. I may try some of the "satin" clear on a test piece. I'll post up some pics in awhile.
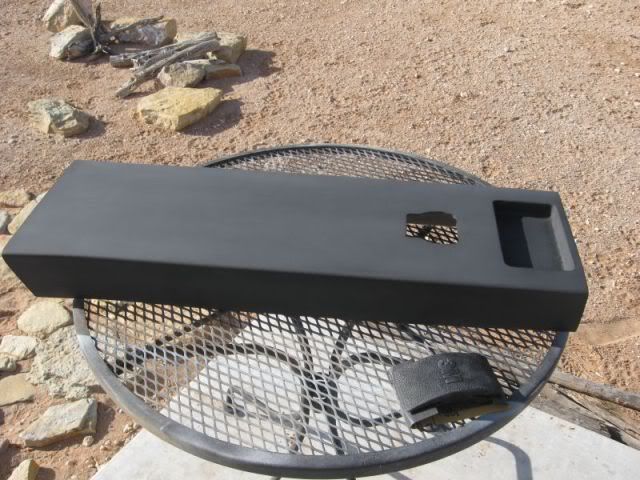
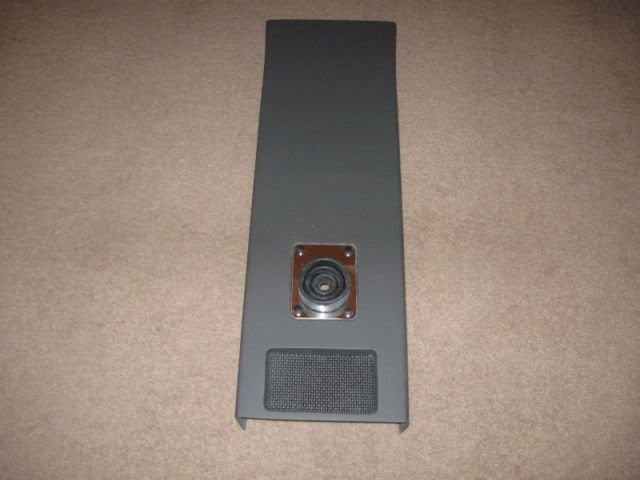
I had to take my work of art in the house. If I do not like it in the car, I will hang it on a wall in the house somewhere:
After looking at these pics, I noticed that the shifter boot is slightly crooked. I can fix that by loosening the screws and giving it a little twist.
I did get the mounts figured out. I basically used a 10-24X9/16" well nuts on each corner on the side of the console. I set the shift cover in place and marked the holes on the rear console and the AC surround then drilled them out for the well nuts. I was thinking that I would need more than the 4 corners to fasten it down but it is very sturdy with just the 4. It maintains the clean smooth look I am after.
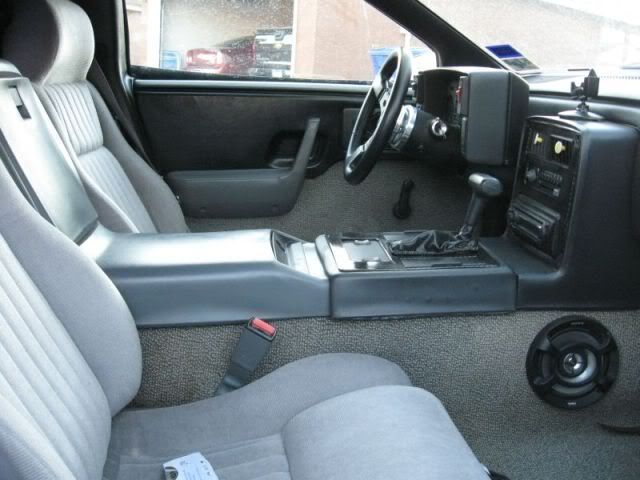
As I said earlier, I am not real pleased with the fit at the rear console/shifter cover (see red circles on the next pic). I have a plan to cure this but I will do that in phase 2 which will be a completely new console/AC surround that I am building a mold for now. This one is basically done so that I can move forward and finish the interior. The last piece of this console is a "arm rest". My plan is to purchase or make a lightly padded cover for the arm rest in grey or black leather. I can't find a pic of it anywhere and I'm not sure what it is called but I have seen these "pads" on other Fieros. I may dabble in a low profile fiberglass arm rest that will bolt to the top of the shift cover. Then I will attempt to cover it with vinyl or leather?
I was given another project today. My oldest son has been driving my 88 Formula for the last 7 months. Today he bought a 2010 Mustang so I got my 88 back. It is in need of some work as it was not very well cared for - teenagers! I will be using the Formula as my daily driver so there are some things I need to fix on it before I will be happy. Until I get it back in shape, everything else is on hold. It won;t take long. Some of you will remember that he was ran into a few months back so I will have to get the rear facia fixed and the interior needs a good cleaning plus the headliner is trashed. I found out today that he attempted to haul a 46" flat screen in the front seat and basically put a 10" rip in the headliner doing that. The car had 65k on it when I turned it over to him 7 months ago. It now has 75k! Looks like I will be rebuilding the door hinges and doing a brake job too.