Pennock's Fiero Forum
  The Construction Zone
  Another Katatak Fiero Adventure! (Page 13)

Post New Topic  Post A Reply
Email This Page to Someone! | Printable Version

This topic is 18 pages long:  1   2   3   4   5   6   7   8   9   10   11   12   13   14   15   16   17   18 
Previous Page | Next Page
next newest topic | next oldest topic
Another Katatak Fiero Adventure! by katatak
Started on: 10-18-2009 03:09 PM
Replies: 717 (24329 views)
Last post by: fieroguru on 02-26-2017 10:02 AM
katatak
Member
Posts: 7136
From: Omaha, NE USA
Registered: Apr 2008


Feedback score:    (8)
Leave feedback


Total ratings: 82
Rate this member

Report this Post12-07-2010 08:18 PM Click Here to See the Profile for katatakSend a Private Message to katatakEdit/Delete MessageReply w/QuoteDirect Link to This Post
 
quote
Originally posted by josef644:


That'ed be great Pat. I will be happy to pay for the trouble. I have been sorta wondering the best way to cover that danged hole up.
Joe


No charge for you Joe. I'll get the pattern made tomorrow and send some dimensions along with what I did to get it all to fit. I'll have it in the mail by Thursday / Friday.

Pat
IP: Logged
josef644
Member
Posts: 6939
From: Dickinson, Texas USA
Registered: Nov 2006


Feedback score:    (71)
Leave feedback


Total ratings: 103
Rate this member

Report this Post12-09-2010 08:35 PM Click Here to See the Profile for josef644Send a Private Message to josef644Edit/Delete MessageReply w/QuoteDirect Link to This Post
Pat can you PM me a telephone number so I can give you a call please. I need to ask you a question or two.
IP: Logged
Sofa King
Member
Posts: 929
From:
Registered: Aug 2008


Feedback score: N/A
Leave feedback

Rate this member

Report this Post12-10-2010 01:03 PM Click Here to See the Profile for Sofa KingSend a Private Message to Sofa KingEdit/Delete MessageReply w/QuoteDirect Link to This Post
 
quote
Originally posted by katatak:

And a cool looking Far West Texas sunset!


Pat


FANTASTIC PICS! Taking the time to enjoy the free and little things in life...
IP: Logged
katatak
Member
Posts: 7136
From: Omaha, NE USA
Registered: Apr 2008


Feedback score:    (8)
Leave feedback


Total ratings: 82
Rate this member

Report this Post12-10-2010 06:46 PM Click Here to See the Profile for katatakSend a Private Message to katatakEdit/Delete MessageReply w/QuoteDirect Link to This Post
 
quote
Originally posted by Sofa King:


FANTASTIC PICS! Taking the time to enjoy the free and little things in life...


Once in awhile I look up from my Fiero wrenching and see something that needs to be admired. Great sunsets are few and far between out here in the sandbox.
IP: Logged
katatak
Member
Posts: 7136
From: Omaha, NE USA
Registered: Apr 2008


Feedback score:    (8)
Leave feedback


Total ratings: 82
Rate this member

Report this Post12-10-2010 06:48 PM Click Here to See the Profile for katatakSend a Private Message to katatakEdit/Delete MessageReply w/QuoteDirect Link to This Post

katatak

7136 posts
Member since Apr 2008
 
quote
Originally posted by josef644:

Pat can you PM me a telephone number so I can give you a call please. I need to ask you a question or two.


PM sent Joe!
IP: Logged
katatak
Member
Posts: 7136
From: Omaha, NE USA
Registered: Apr 2008


Feedback score:    (8)
Leave feedback


Total ratings: 82
Rate this member

Report this Post12-10-2010 07:15 PM Click Here to See the Profile for katatakSend a Private Message to katatakEdit/Delete MessageReply w/QuoteDirect Link to This Post

katatak

7136 posts
Member since Apr 2008
Update!

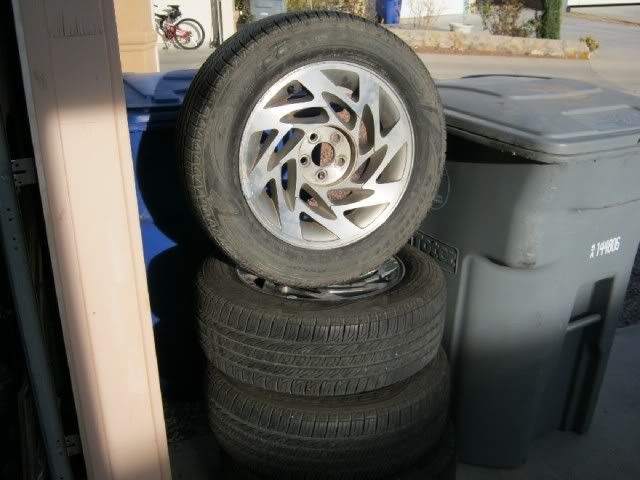
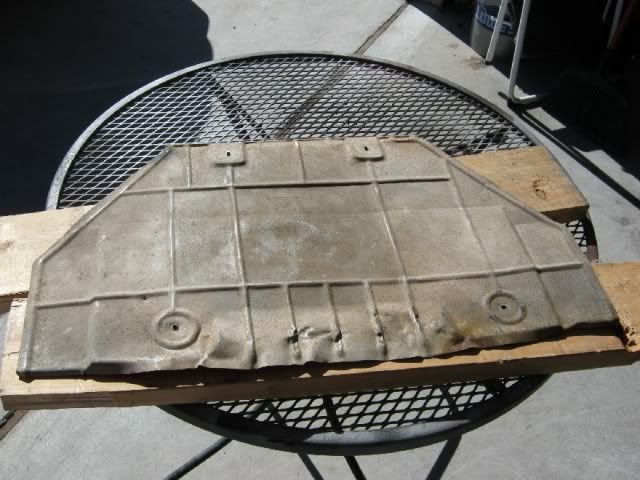
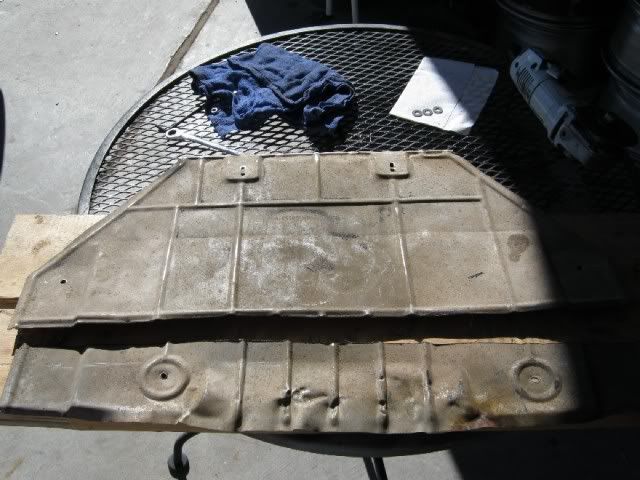
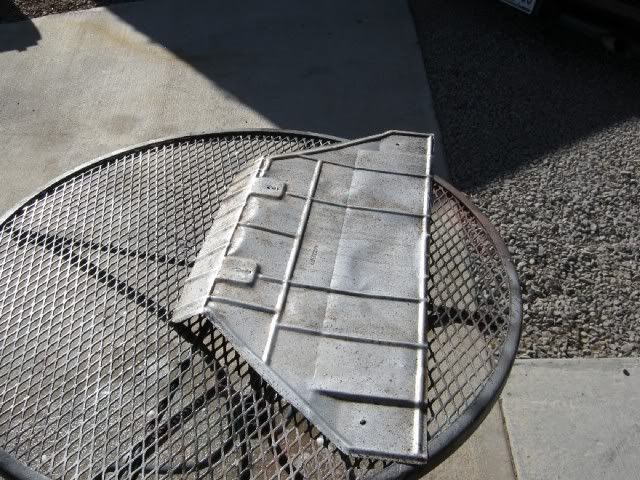
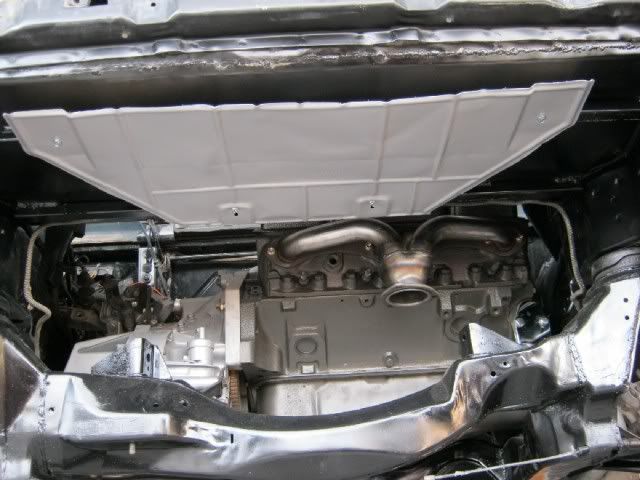
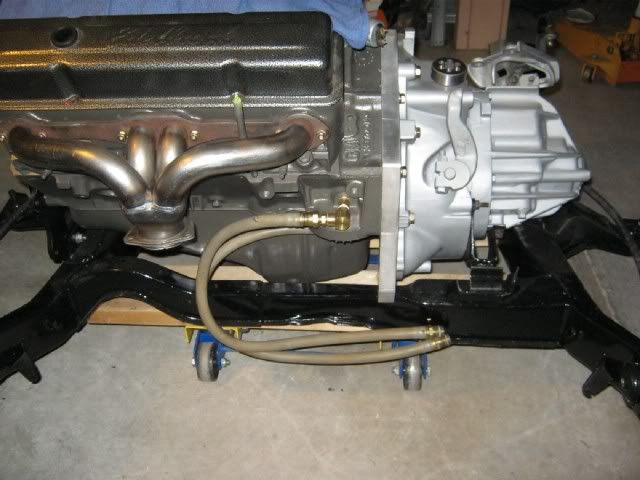
Made some good progress today. Awhile back I bought some Camaro wheels and tires for my Monte. Mainly because the tires were brand new 16" Goodyear Assurance (stock tires for the Camaro is think). Anyway the tires/wheels were take offs and I got them for 100.00 so I could not pass thme up. Sometime after that, I picked up a set of 16" Z34 Baretta wheels and my plan was to swap the Camaro tires over onto the Baretta wheels and put them on the V8 Coupe. A co-worker called me yesterday needing a set of 16" wheels for his Camaro so I loaded up all the wheels and tires and headed for the tire shop. I got the tires swapped from the Camaro wheels to the Baretta wheels, new valve stems and balanced for 40.00 then sold the Camaro rims for 100.00. That ate up a couple hours. I also put the motor back in the car for a "final" test fit to check clearances, re routed and mounted the brake line and installed a heat shield to the bottom of the "new" trunk pan.

After getting the motor back in, I found that I need to do a little more clearance work on the passenger frame rail - the damper is just too close for my liking. Some of the reinforcement work I did is sticking out about 1/4" and it just barely makes contact with the damper. I'll have to drop the motor one more time to get at it. The motor is ready to run with the exception of the remote filter adapter - waiting on some seals for that. Then I can install it and the starter and it will be ready to fire up. I was hoping to have her running this weekend but it's looking more like next weekend now. It's always the "little" things that cause the biggest delays!

Here's my "new" tires and wheels for the V8 Coupe:


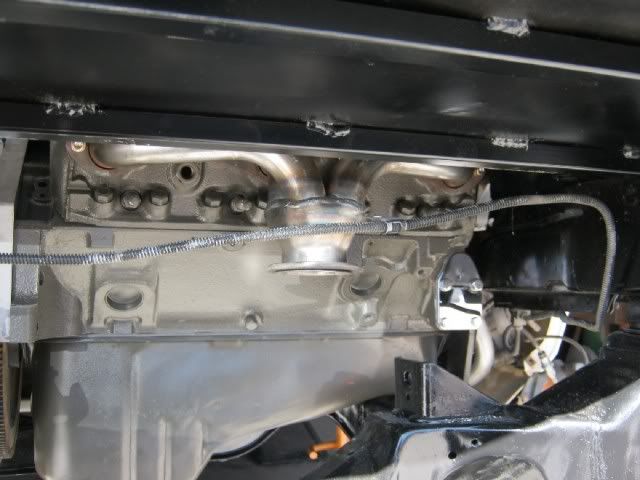
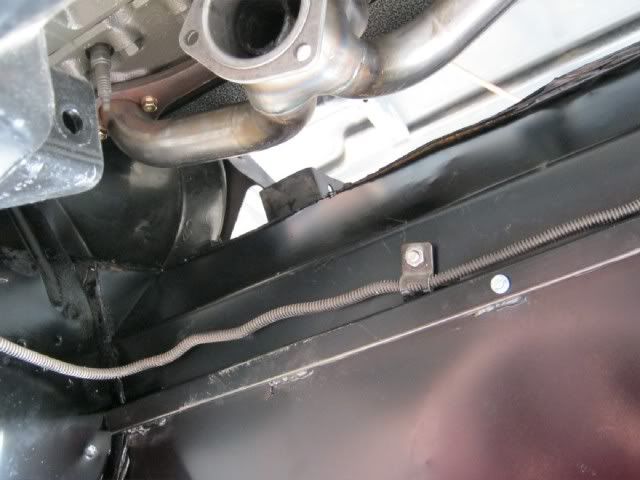
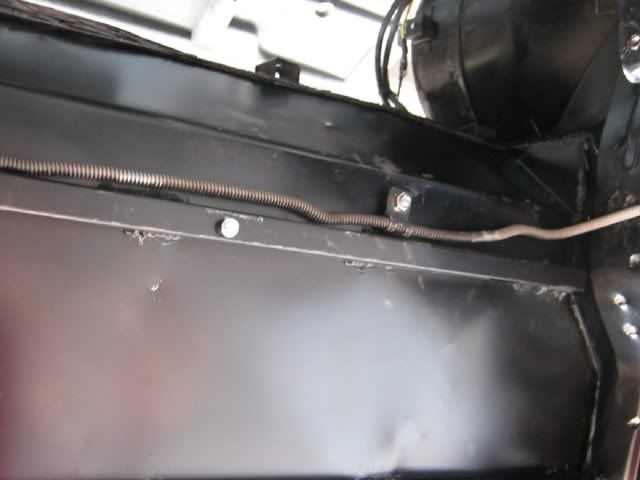
Brake line relocation:


Used some stainless cap screws/nuts to bolt the brake line to the bottom of the new trunk pan:


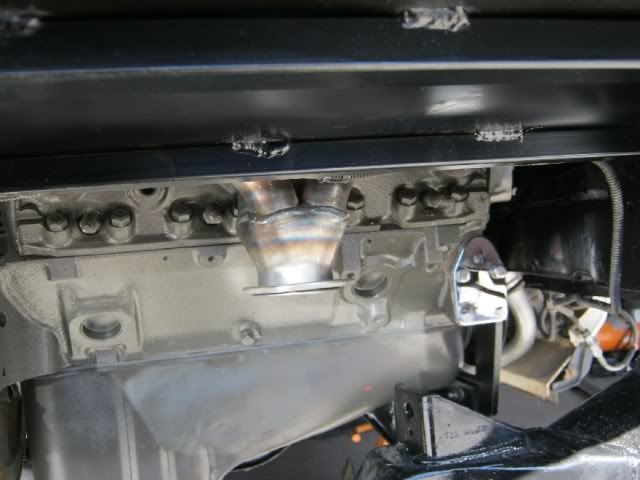
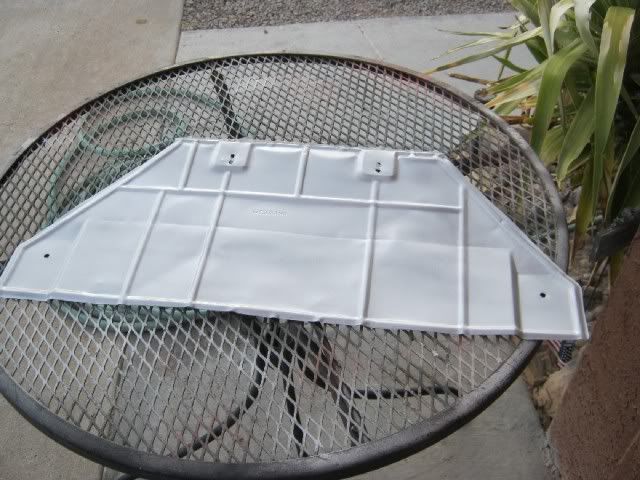
Then I had to do some work on the heat shield. I used the stock trunk heat shield and had to trim off the "bottom" and bend the "top" the opposite way.

It was bent up pretty bad so I had to "adjust" it a little:


Then trimmed it to size:


Cleaned and scrubbed:


Gave it a couple of coats of high heat paint:


Installed:


More later!

Pat
IP: Logged
Rick 88
Member
Posts: 3914
From: El Paso, TX.
Registered: Aug 2001


Feedback score: (5)
Leave feedback

Rate this member

Report this Post12-11-2010 12:27 PM Click Here to See the Profile for Rick 88Send a Private Message to Rick 88Edit/Delete MessageReply w/QuoteDirect Link to This Post
Nice work Pat.
IP: Logged
katatak
Member
Posts: 7136
From: Omaha, NE USA
Registered: Apr 2008


Feedback score:    (8)
Leave feedback


Total ratings: 82
Rate this member

Report this Post12-11-2010 10:48 PM Click Here to See the Profile for katatakSend a Private Message to katatakEdit/Delete MessageReply w/QuoteDirect Link to This Post
 
quote
Originally posted by Rick 88:

Nice work Pat.


Thanks Rick!

Did not get anything done today on the Coupe! After lunch, we were going to go to the Mega U Pull and do some exploring but never made it to the yard. Plan is for after noon/lunch tomorrow. Come and go with us! You never know what treasures you will find.
IP: Logged
josef644
Member
Posts: 6939
From: Dickinson, Texas USA
Registered: Nov 2006


Feedback score:    (71)
Leave feedback


Total ratings: 103
Rate this member

Report this Post12-12-2010 11:55 AM Click Here to See the Profile for josef644Send a Private Message to josef644Edit/Delete MessageReply w/QuoteDirect Link to This Post
Pat, You Da Man!
IP: Logged
katatak
Member
Posts: 7136
From: Omaha, NE USA
Registered: Apr 2008


Feedback score:    (8)
Leave feedback


Total ratings: 82
Rate this member

Report this Post12-12-2010 10:51 PM Click Here to See the Profile for katatakSend a Private Message to katatakEdit/Delete MessageReply w/QuoteDirect Link to This Post
 
quote
Originally posted by josef644:

Pat, You Da Man!


Thanks Joe! Hope your harness is working out! I was "Cell phoneless" all day - I felt lost!

I spent about an hour this morning looking at the wiring in the Coupe - It really heeds to be cleaned up so that will be my project this week. That's about all I did on the Coupe - I did spend some time working on the XTC - got a proto type shift mechanizim installed and cleaned the K&N airfilter. Testing of the shift mech will be conducted this week!

More later!

Pat
IP: Logged
josef644
Member
Posts: 6939
From: Dickinson, Texas USA
Registered: Nov 2006


Feedback score:    (71)
Leave feedback


Total ratings: 103
Rate this member

Report this Post12-13-2010 06:04 PM Click Here to See the Profile for josef644Send a Private Message to josef644Edit/Delete MessageReply w/QuoteDirect Link to This Post
Pat I got the pattern in todays mail. Thanks
Joe
IP: Logged
PFF
System Bot
katatak
Member
Posts: 7136
From: Omaha, NE USA
Registered: Apr 2008


Feedback score:    (8)
Leave feedback


Total ratings: 82
Rate this member

Report this Post12-13-2010 07:35 PM Click Here to See the Profile for katatakSend a Private Message to katatakEdit/Delete MessageReply w/QuoteDirect Link to This Post
 
quote
Originally posted by josef644:

Pat I got the pattern in todays mail. Thanks
Joe


Anytime Joe! Hope it works for you.

Pat
IP: Logged
katatak
Member
Posts: 7136
From: Omaha, NE USA
Registered: Apr 2008


Feedback score:    (8)
Leave feedback


Total ratings: 82
Rate this member

Report this Post12-14-2010 08:37 PM Click Here to See the Profile for katatakSend a Private Message to katatakEdit/Delete MessageReply w/QuoteDirect Link to This Post
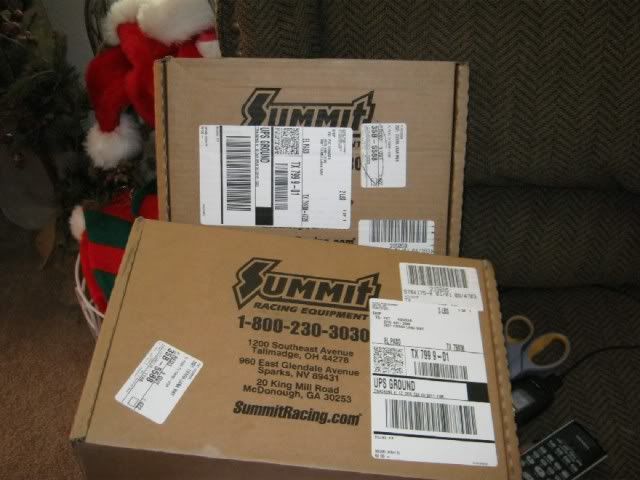
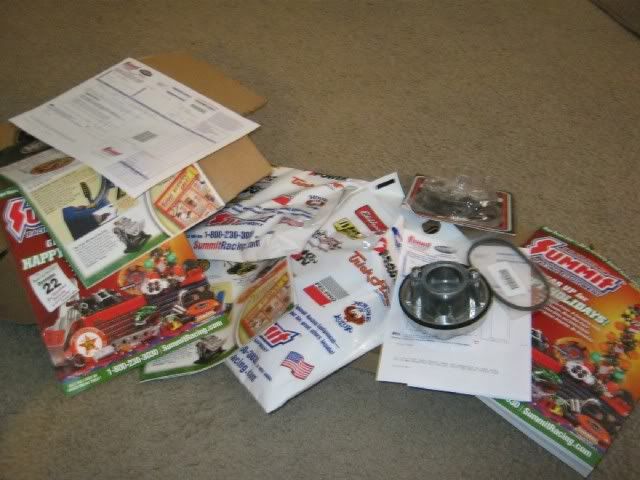
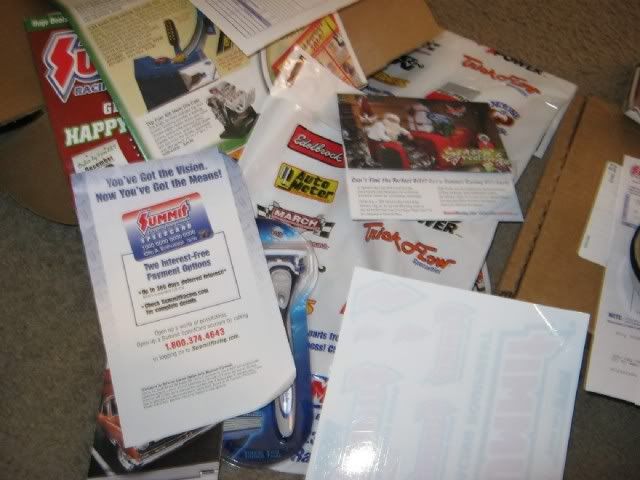
Got a couple packages from my favorite store this afternoon. It's been awhile since I ordered anything from Summit! I was surprised to see that there were 2 boxes for a single order? Aparrently they ship from several locations now - which ever location has the part in stock ships first. Personaly I find no problem with this but from a business view point, they are sending out double everything. In each box was a "swag" bag loaded with several couplns and flyers along with a new Shick 5 blade razor, a new catalog and a Xmas flyer! Not complaining as I got double the goodies but you would think that they would check the shipping address and regulate the extra goodies to one per address. Anyway, I got my new remote oil filter adapter and gaskets and got it and the lines installed this afternoon. I believe it will be running on Friday!

2 boxes for one order. One came from AZ and the other from GA


Each box had one part and all this "swag"


And the adapter and lines installed:


More later!

Pat
IP: Logged
katatak
Member
Posts: 7136
From: Omaha, NE USA
Registered: Apr 2008


Feedback score:    (8)
Leave feedback


Total ratings: 82
Rate this member

Report this Post12-16-2010 12:22 AM Click Here to See the Profile for katatakSend a Private Message to katatakEdit/Delete MessageReply w/QuoteDirect Link to This Post
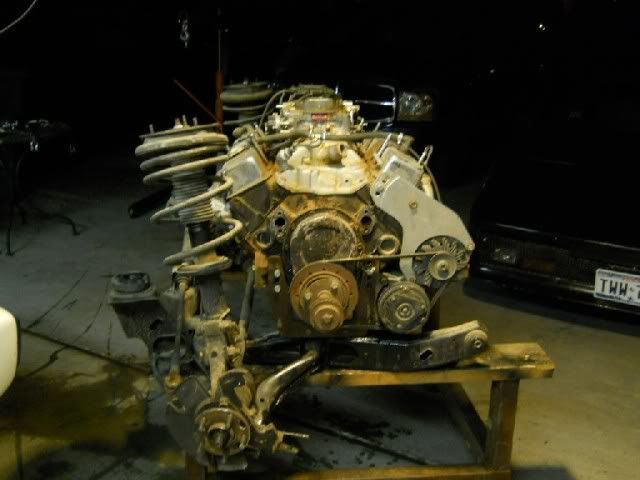
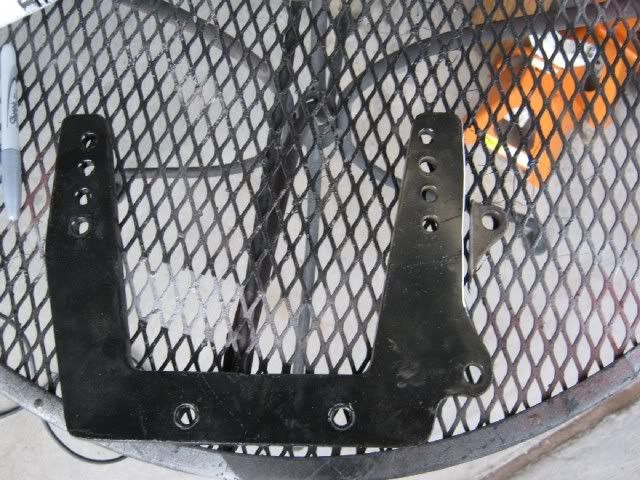
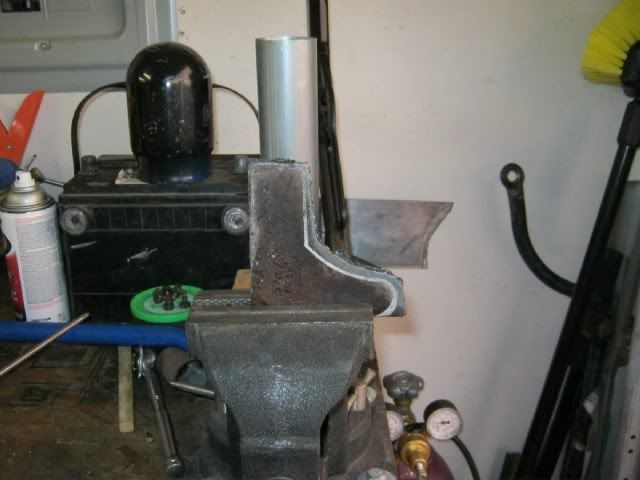
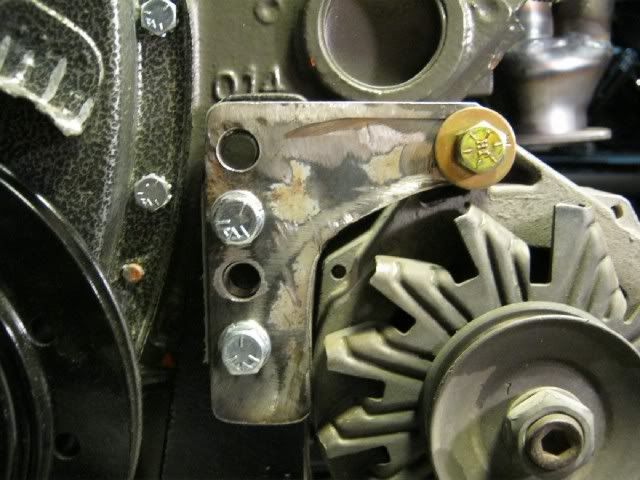
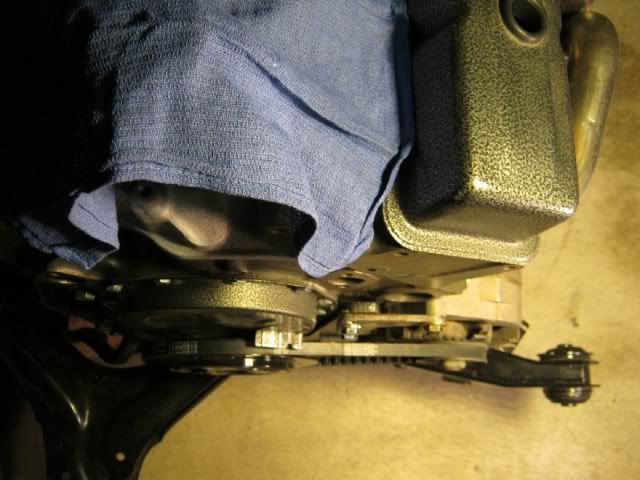
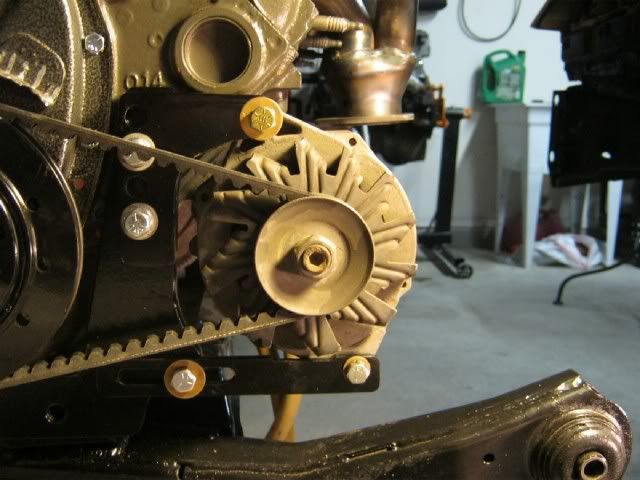
Well I tackled a little project that I have been putting off. As I posted earlier, the alternator was hitting the number one spark plug and I wanted to do a little adjustment to the Archie alternator bracket to drop the alternator down a little. I bolted the whole thing up in it's original location this afternoon to take a look. My neighbor Nathan stopped by and after bouncing it back and forth between the 2 of us, I jumped into fabbing a new bracket for the alternator. Being how I am not going to have AC on this car, I decided to drop the alternator down into the AC position.

Here's what it looked like:


First off, I had to remove the Archie motor mount because I had to cut off one of the AC mount ears:


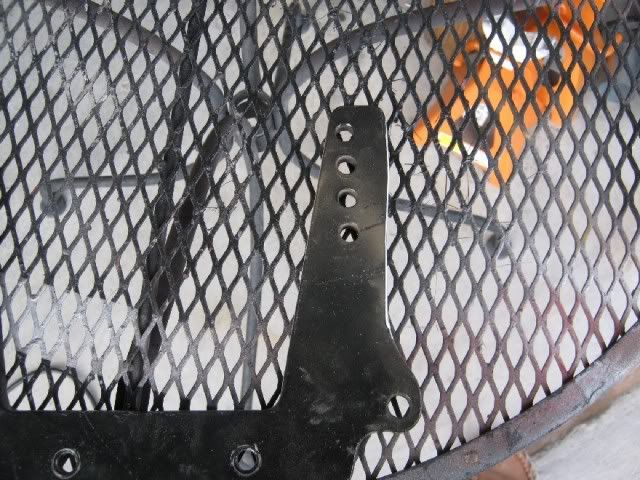
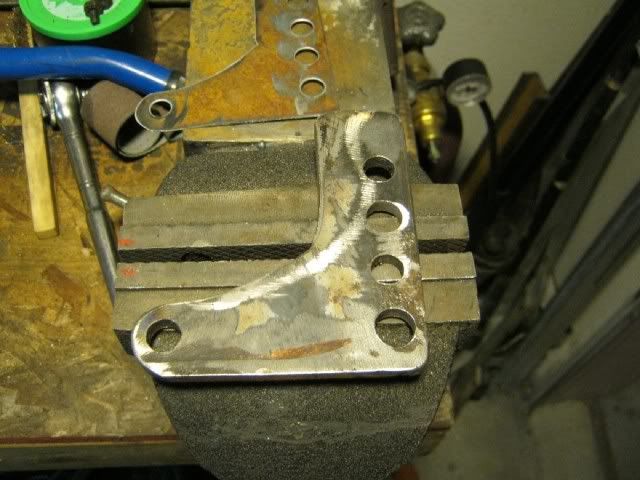
Then I made a template for the new top bracket out of sheet metal:


Two of these bolt holes will bolt through to the block and the other two holes in the mount plate I threaded so I could bolt it to the mount plate.


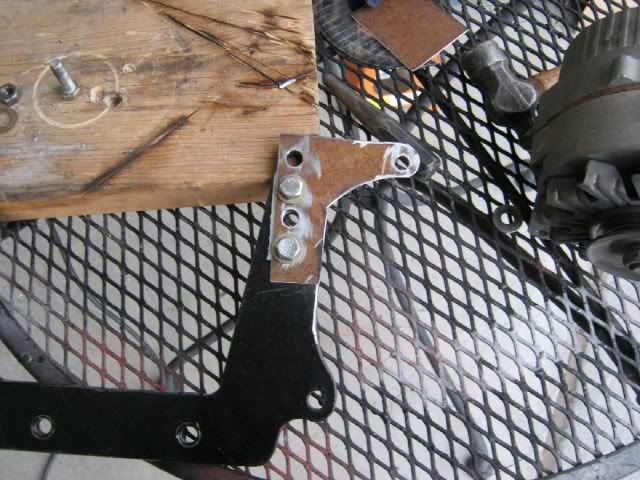
Then I transferred the template to a piece of 1/4" plate and rough torched it out (Nathan offered to do it with his Plasma but I got in a hurry and hacked it out the old fashioned way). Once I had it roughed out, I took the grinder to it and got it into the shape I wanted.


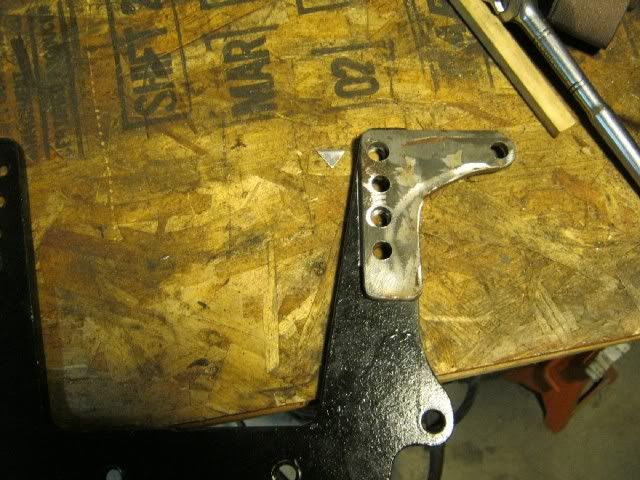
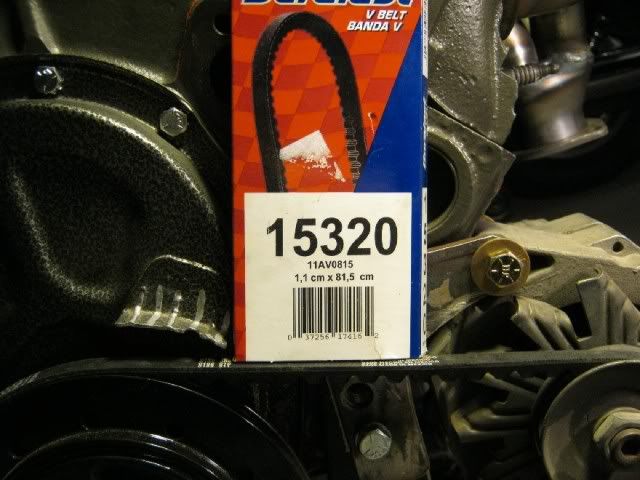
Then I bolted it back on the motor and set the Alt in place. I had to go to AZ and get a couple belts so I could get the right length:


and for posterity - here's the belt number:


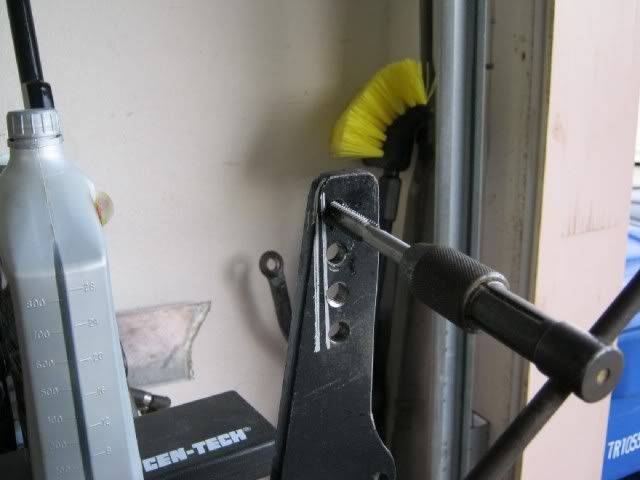
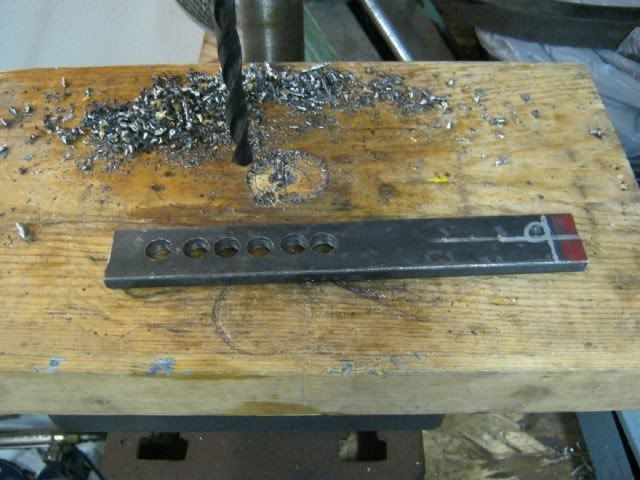
Once the belt was right, I had to fab an "adjustment" bar. Nothing fancy here, drill several holes in a row and used the cutt off disk on the 4" grinder to cut and slot it. Then used the dremel and a small stone to smooth out the inside of the slot:


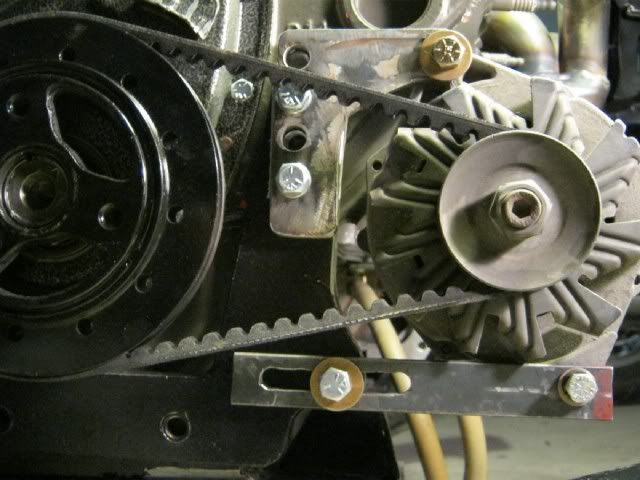
Mounted in place with the belt tight. I still have to do a little "clean" up of the new brackets and paint them.


I need to put a little tweak in the upper bracket to get the alignment just right:


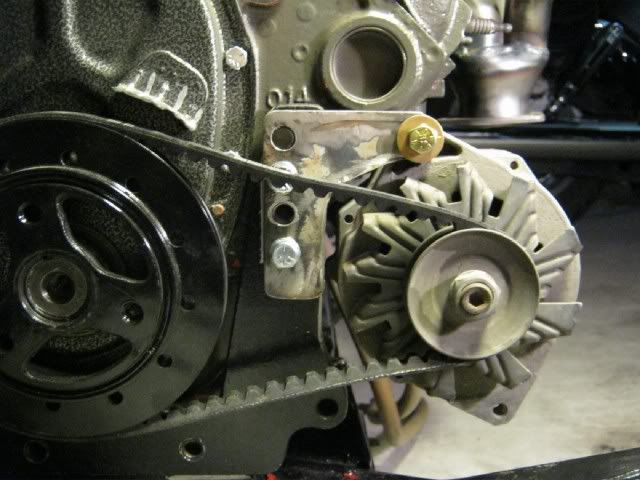
I spent a couple hours on it but I think it will be perfect. The alternator is now down and away from the header and the spark plug on number one.

More later!

Pat
IP: Logged
Rick 88
Member
Posts: 3914
From: El Paso, TX.
Registered: Aug 2001


Feedback score: (5)
Leave feedback

Rate this member

Report this Post12-16-2010 03:55 PM Click Here to See the Profile for Rick 88Send a Private Message to Rick 88Edit/Delete MessageReply w/QuoteDirect Link to This Post
Good thinking Pat. Maybe you should offer a kit!
IP: Logged
katatak
Member
Posts: 7136
From: Omaha, NE USA
Registered: Apr 2008


Feedback score:    (8)
Leave feedback


Total ratings: 82
Rate this member

Report this Post12-16-2010 11:17 PM Click Here to See the Profile for katatakSend a Private Message to katatakEdit/Delete MessageReply w/QuoteDirect Link to This Post
 
quote
Originally posted by Rick 88:

Good thinking Pat. Maybe you should offer a kit!


It's too much work!
IP: Logged
katatak
Member
Posts: 7136
From: Omaha, NE USA
Registered: Apr 2008


Feedback score:    (8)
Leave feedback


Total ratings: 82
Rate this member

Report this Post12-16-2010 11:26 PM Click Here to See the Profile for katatakSend a Private Message to katatakEdit/Delete MessageReply w/QuoteDirect Link to This Post

katatak

7136 posts
Member since Apr 2008
Not much happening today! I did remove the alternator and did some clean up/painting on the new brackets. Got it mounted back up. I also got the rest of the oil filter relocation kit installed and got the starter back on. I must have made 10 trips to Lowes in the last 2 days for bolts! All that is left is to double check the valve adjustment and lock down the poly locks, install the valve covers and install the motor one last time (I hope!). Once the motor is in, I have to mount the water pump then I am going to redo the wiring and builf the exhaust. DOes not sound like much but I am not moving too fast these days. I loose interest pretty quickly. Hope to have it on the road before the new year!

Alternator fini!


Oil filter relocation complete - Starter installed!


More later!

Pat
IP: Logged
katatak
Member
Posts: 7136
From: Omaha, NE USA
Registered: Apr 2008


Feedback score:    (8)
Leave feedback


Total ratings: 82
Rate this member

Report this Post12-24-2010 02:00 AM Click Here to See the Profile for katatakSend a Private Message to katatakEdit/Delete MessageReply w/QuoteDirect Link to This Post
Nothing new to update! Ordered a remote electric water pump and am just waiting for it to show up. Still have to paint and wrap the headers. I may do that tomorrow! Hope to have it running next week?????

More later!

Pat
IP: Logged
jmbishop
Member
Posts: 4484
From: Probably Texas
Registered: Jul 2006


Feedback score: N/A
Leave feedback


Total ratings: 169
Rate this member

Report this Post12-24-2010 03:18 PM Click Here to See the Profile for jmbishopSend a Private Message to jmbishopEdit/Delete MessageReply w/QuoteDirect Link to This Post
What pump did you order?
IP: Logged
katatak
Member
Posts: 7136
From: Omaha, NE USA
Registered: Apr 2008


Feedback score:    (8)
Leave feedback


Total ratings: 82
Rate this member

Report this Post12-24-2010 09:43 PM Click Here to See the Profile for katatakSend a Private Message to katatakEdit/Delete MessageReply w/QuoteDirect Link to This Post
 
quote
Originally posted by jmbishop:

What pump did you order?


Hey Jim,

Here's the one I ordered - suggested by Archie!
http://www.summitracing.com/parts/MEZ-WP116SHD/

And these parts to go with it - From Archies post in this thread:

//www.fiero.nl/forum/Forum2/HTML/113263.html

"Also note: on the CSI pumps, you also will need to buy a CSI fitting, pn CSI-908 to connect the return hose to the pump. For the Meziere pump you will need to buy 3 special fittings from them to hook it up to your cooling system."

Happy Holidays Jim!


IP: Logged
fieroguru
Member
Posts: 12128
From: Champaign, IL
Registered: Aug 2003


Feedback score:    (45)
Leave feedback


Total ratings: 258
Rate this member

Report this Post12-25-2010 12:49 PM Click Here to See the Profile for fieroguruSend a Private Message to fieroguruEdit/Delete MessageReply w/QuoteDirect Link to This Post
 
quote
Originally posted by katatak:

Starter installed!


Pat


A lot of people rag on Archies starter setup saying it is difficult to adjust and I am curious how many of these people were not the original purchasers of the kit and did not have the instructions...
You just skipped a very important assemply step... Install the starter before the transmission. Extend the bendix gear and adjust position for proper mesh. If you do this in this order, you will have very little starter issues. I am pretty sure this is part of the Instructions in a Archie kit...

The only additional step I would suggest is once the final starter position is set, drill two 1/8" holes through the adapter plate and into the starter face and install two roll pins. Then if the starter ever goes bad, you can swap this face plate with the new starter, line up the roll pins and reinstall without worry of starter alignment.

If push comes to shove, you can also check the starter mesh from the bottom side, but you will need to take your shim rod and make it look like an "L" and tape the long end to a screw driver. This way can be a pain, but it is better than dropping the cradle to pull the tranny.
IP: Logged
PFF
System Bot
katatak
Member
Posts: 7136
From: Omaha, NE USA
Registered: Apr 2008


Feedback score:    (8)
Leave feedback


Total ratings: 82
Rate this member

Report this Post12-26-2010 01:53 PM Click Here to See the Profile for katatakSend a Private Message to katatakEdit/Delete MessageReply w/QuoteDirect Link to This Post
 
quote
Originally posted by fieroguru:


A lot of people rag on Archies starter setup saying it is difficult to adjust and I am curious how many of these people were not the original purchasers of the kit and did not have the instructions...
You just skipped a very important assemply step... Install the starter before the transmission. Extend the bendix gear and adjust position for proper mesh. If you do this in this order, you will have very little starter issues. I am pretty sure this is part of the Instructions in a Archie kit...

The only additional step I would suggest is once the final starter position is set, drill two 1/8" holes through the adapter plate and into the starter face and install two roll pins. Then if the starter ever goes bad, you can swap this face plate with the new starter, line up the roll pins and reinstall without worry of starter alignment.

If push comes to shove, you can also check the starter mesh from the bottom side, but you will need to take your shim rod and make it look like an "L" and tape the long end to a screw driver. This way can be a pain, but it is better than dropping the cradle to pull the tranny.


Thanks Guru for the starter tips. I actually got lucky on this one - it is drilled with 2 spring/roll pins - the starter went back in the same place it came off. I thought it was the way the kit came from Archie and I was wondering why others were having issues with thier starters - whoever built this one, did a few things right I guess.

Pat

IP: Logged
katatak
Member
Posts: 7136
From: Omaha, NE USA
Registered: Apr 2008


Feedback score:    (8)
Leave feedback


Total ratings: 82
Rate this member

Report this Post12-31-2010 08:35 PM Click Here to See the Profile for katatakSend a Private Message to katatakEdit/Delete MessageReply w/QuoteDirect Link to This Post
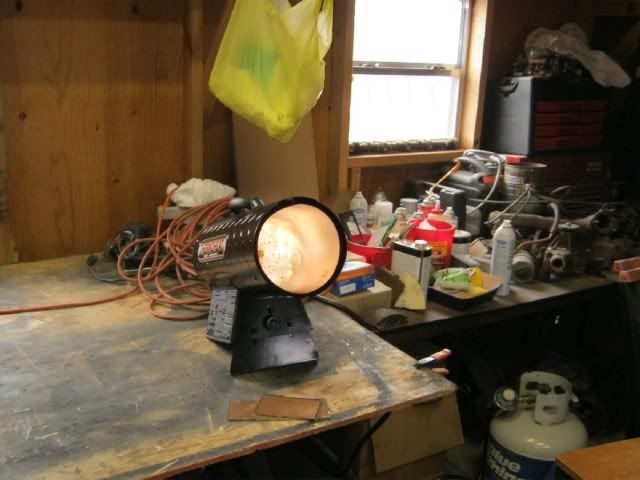
My big plans to get the V8 Coupe running this week went by the wayside as I ended up working due to some personnel problems. My new water pump arrived Wenesday and I was going to "work" on it today but it was just too cold in the garage. I got a 100.00 gift certificate to Lowe's for Christmas so after lunch with a few FIero guys, I wandered into Lowes and bought a new shop heater. Propane unit - 30 to 60k BTU - self igniting yada yada. I was a little worried that it would be too small. No worries now, after one hour, my shop out back was 80*. I turned it off and it took a couple hours to drop below 60* - it's 30* outside so I think it will be fine.

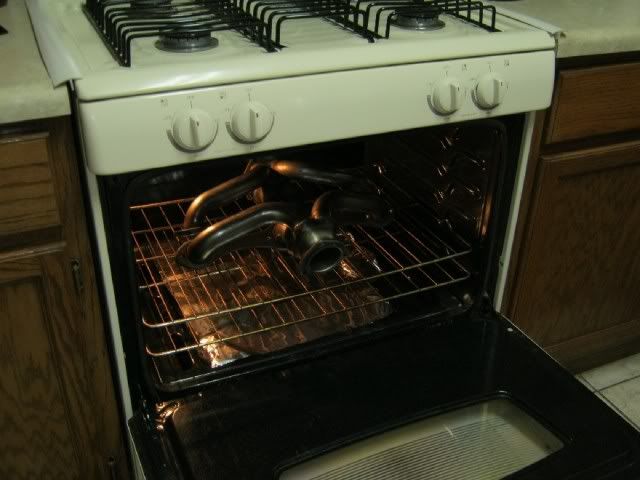
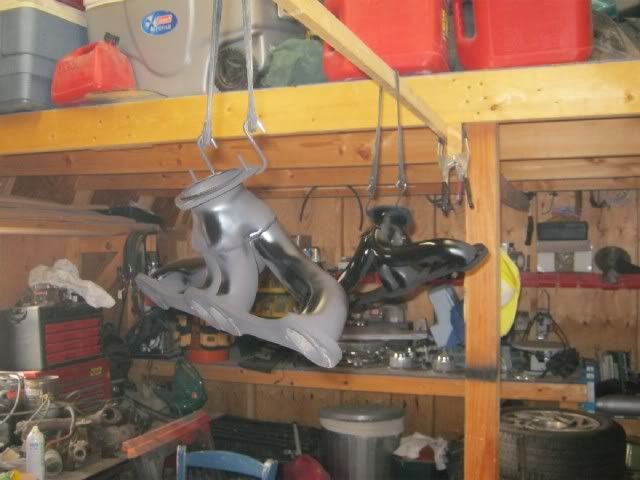
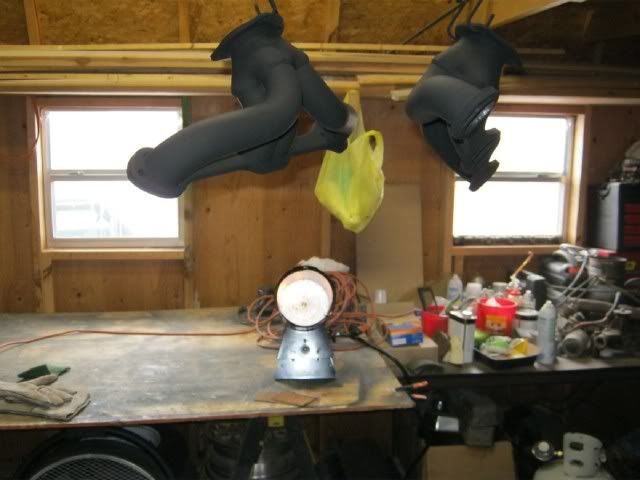
I needed to get the headers high heat painted and then heat treated before I wrap them in header wrap. So I pulled the m off the motor and put them in the oven to "burn" off any oils, etc. Then I took them out to the shop and buffed them with a scotch brite pad then wiped them down with degreaser. Before I started spraying on the VHT, I turned the new heater off - don't want to create a small explosion - then precedded to give the headers a coat of VHT. Once the first coat was on, I ventilated the shop then turned the heater back on. Let them get nice and toasty for an hour, then went through the process all over again. Once I got 3 coats on the headers, and after sitting in the "heated" shop, I moved them inside for the oven heat treatment. Unfortunatley, I was "vetoed" from puting them in the oven due to the "baking" of New Years" goodies. Maybe I'll cook them in the AM?

Burning off the Oil


Ready for paint


First coat


Can you feel the heat?


Ooooooo - Fire!


More tomorrow!

Pat
IP: Logged
jmbishop
Member
Posts: 4484
From: Probably Texas
Registered: Jul 2006


Feedback score: N/A
Leave feedback


Total ratings: 169
Rate this member

Report this Post12-31-2010 11:41 PM Click Here to See the Profile for jmbishopSend a Private Message to jmbishopEdit/Delete MessageReply w/QuoteDirect Link to This Post
I always get in trouble for putting valve covers in the dishwasher and curing painted engine parts in the over, I normally wait till no one is home.
IP: Logged
RCR
Member
Posts: 4397
From: Shelby Twp Mi
Registered: Sep 2002


Feedback score:    (7)
Leave feedback


Total ratings: 102
Rate this member

Report this Post01-01-2011 09:46 AM Click Here to See the Profile for RCRSend a Private Message to RCREdit/Delete MessageReply w/QuoteDirect Link to This Post
 
quote
Originally posted by jmbishop:

I always get in trouble for putting valve covers in the dishwasher and curing painted engine parts in the over, I normally wait till no one is home.


I got myself a spare oven and put it in the garage. No worries of dinners that taste like oil or powder coat.

Bob
IP: Logged
katatak
Member
Posts: 7136
From: Omaha, NE USA
Registered: Apr 2008


Feedback score:    (8)
Leave feedback


Total ratings: 82
Rate this member

Report this Post01-01-2011 01:28 PM Click Here to See the Profile for katatakSend a Private Message to katatakEdit/Delete MessageReply w/QuoteDirect Link to This Post
 
quote
Originally posted by jmbishop:

I always get in trouble for putting valve covers in the dishwasher and curing painted engine parts in the over, I normally wait till no one is home.


I have the same problem here Jim. I have to wait till the better half goes out! Then I go for it - sometimes I get caught! As I write this, I have the coated headers in the oven for heat treating - the wife is out shopping - hope I can get it done before she gets home!
IP: Logged
katatak
Member
Posts: 7136
From: Omaha, NE USA
Registered: Apr 2008


Feedback score:    (8)
Leave feedback


Total ratings: 82
Rate this member

Report this Post01-01-2011 01:29 PM Click Here to See the Profile for katatakSend a Private Message to katatakEdit/Delete MessageReply w/QuoteDirect Link to This Post

katatak

7136 posts
Member since Apr 2008
 
quote
Originally posted by RCR:


I got myself a spare oven and put it in the garage. No worries of dinners that taste like oil or powder coat.

Bob


I think I need to follow your lead - would make life a lot easier!

[This message has been edited by katatak (edited 01-02-2011).]

IP: Logged
katatak
Member
Posts: 7136
From: Omaha, NE USA
Registered: Apr 2008


Feedback score:    (8)
Leave feedback


Total ratings: 82
Rate this member

Report this Post01-02-2011 06:36 PM Click Here to See the Profile for katatakSend a Private Message to katatakEdit/Delete MessageReply w/QuoteDirect Link to This Post
Another day of big plans fizzled out. I got my new Meziere pump last week from Summit but I was out of town all week. Went out this morning to get the pump installed and plumbed, finish up some little odds and ends on the motor and get it stuffed in - I was even hoping on starting it this afternoon. Like a kid at Christmas, I tore open my Summit box and was surprised to find it was the wrong pump! After mumbling a little, I did some checking and found that in my "haste" to order the pump, I transposed a few numbers and ended up getting a pump for some "import" car. So now I have to send it back and get the right one sent out! CRAP!

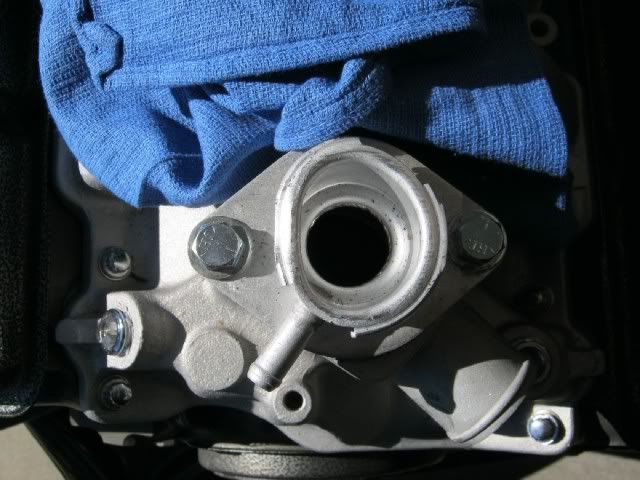
The day was not wasted though as I had plenty of little things left to do before I stuff the motor in for the last time. Another disapointment I ran into today was that the new Moroso T Stat housing was bent??? I do not have a clue how it happened other than maybe it got caught while shoving the motor under the car so many times over the last few weeks? So now I have to pick up another top piece unless someone has an idea how to straighten this one. I'm nor sure it would ever get straight enough for the cap to seal?

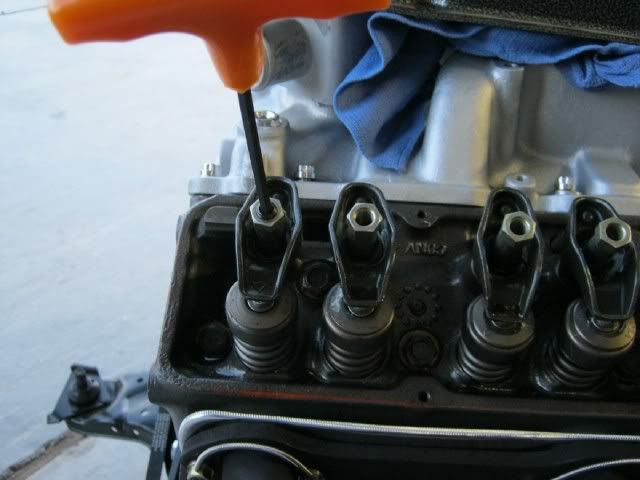
To finish up the motor, I needed to recheck the valve lash and then finish the poly locks, install the valve covers with gaskets, etc. Plug the 2 water posts on each side of the block, Install the headers and gaskets with locking bolts and double check the starter alignment (Guru has me rethinking my alignment).

My bent fill/T Stat housing!


Finishing up the valve adjustment:


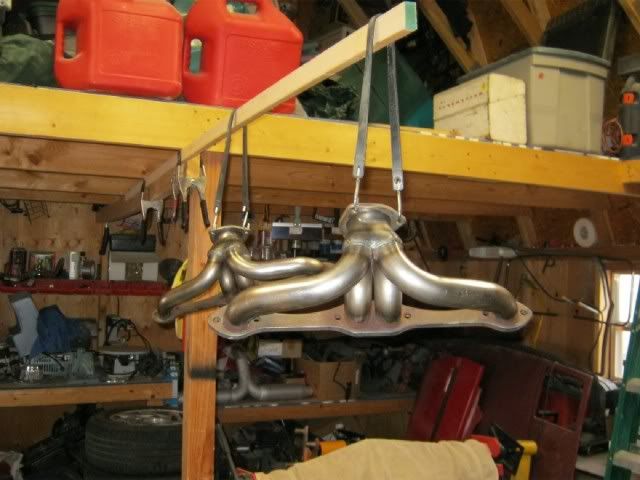
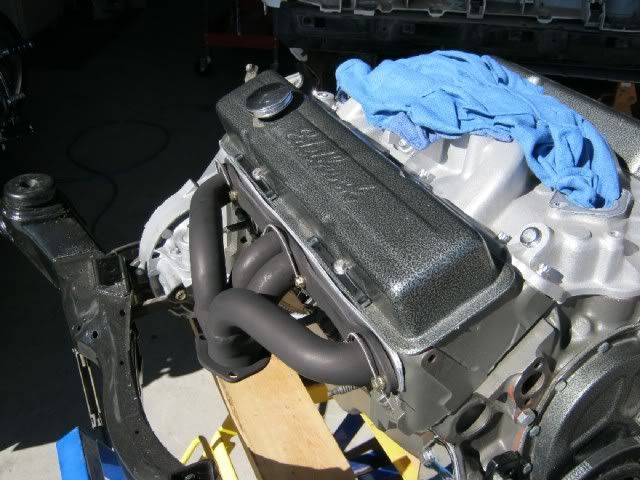
Headers on and valve covers sealed:


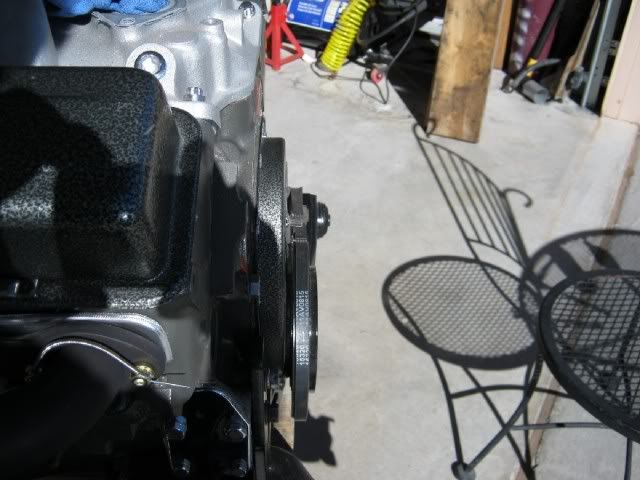
In this pick, you can see that I needed to shim the alternator out about 1/8"

I made a shim out of flat stock and installed it behind the alt mount - all is good now with the Alternator!

I really wanted to get the motor in today. It's amazing all the little things that change your course of direction. This has been a challenging project - you would think it would be easy seeing how it already had a sbc installed. It's been almost like starting from scratch! Maybe it will be done before the end of January?

More later!

Pat

IP: Logged
Rick 88
Member
Posts: 3914
From: El Paso, TX.
Registered: Aug 2001


Feedback score: (5)
Leave feedback

Rate this member

Report this Post01-04-2011 08:17 PM Click Here to See the Profile for Rick 88Send a Private Message to Rick 88Edit/Delete MessageReply w/QuoteDirect Link to This Post
Looking good Pat! I am sure everything will work out fine. Usually the more of a pain you have with the build, the better it ends up running.
IP: Logged
Tony Kania
Member
Posts: 20794
From: The Inland Northwest
Registered: Dec 2008


Feedback score:    (7)
Leave feedback


Total ratings: 305
User Banned

Report this Post01-05-2011 12:19 PM Click Here to See the Profile for Tony KaniaSend a Private Message to Tony KaniaEdit/Delete MessageReply w/QuoteDirect Link to This Post
 
quote
Originally posted by katatak:

I really wanted to get the motor in today. It's amazing all the little things that change your course of direction. This has been a challenging project - you would think it would be easy seeing how it already had a sbc installed. It's been almost like starting from scratch! Maybe it will be done before the end of January?

More later!

Pat


Really? Taking a long time? Man Pat, as you absolutely fly through this build, it makes me sad that I haven't done anything to my GT other than install the upgraded TLG headlights 3 months back. I have been a bit busy with the little mirror image of myself though. Ahh yes, excuses.

Looking great!

IP: Logged
katatak
Member
Posts: 7136
From: Omaha, NE USA
Registered: Apr 2008


Feedback score:    (8)
Leave feedback


Total ratings: 82
Rate this member

Report this Post01-05-2011 08:06 PM Click Here to See the Profile for katatakSend a Private Message to katatakEdit/Delete MessageReply w/QuoteDirect Link to This Post
Not much progress this week - work is crazy! I did knock off an hour early today as I had to have some Fiero therapy! Had a few little things to finish up in the engine compartment. Got that done and then started looking at the wiring harness - I really need to thin it out. I really do not need all these wires just hanging around. I will strip it down and eliminate any wires that are not absolutely needed. After staring at it for awhile, I gave up. I need to get some schematics and figure out which is which. Just more things to do before I can finish it. Work will have me out of town for the next few weeks so it will be February before it's done now.

More Later!

Pat

IP: Logged
PFF
System Bot
katatak
Member
Posts: 7136
From: Omaha, NE USA
Registered: Apr 2008


Feedback score:    (8)
Leave feedback


Total ratings: 82
Rate this member

Report this Post01-05-2011 08:10 PM Click Here to See the Profile for katatakSend a Private Message to katatakEdit/Delete MessageReply w/QuoteDirect Link to This Post

katatak

7136 posts
Member since Apr 2008
 
quote
Originally posted by Tony Kania:


Really? Taking a long time? Man Pat, as you absolutely fly through this build, it makes me sad that I haven't done anything to my GT other than install the upgraded TLG headlights 3 months back. I have been a bit busy with the little mirror image of myself though. Ahh yes, excuses.

Looking great!


Hey Tony - Hope you are feeling better!

I hear ya on the "mirror image". Fortunately for me - my "mirror" images are all grown up and heading out on thier own so I have some extra time to spend on my addiction. Thye grow up fast!

Pat
IP: Logged
fierogt28
Member
Posts: 2937
From: New-Brunswick, Canada.
Registered: Feb 2005


Feedback score:    (14)
Leave feedback

Rate this member

Report this Post01-05-2011 10:45 PM Click Here to See the Profile for fierogt28Send a Private Message to fierogt28Edit/Delete MessageReply w/QuoteDirect Link to This Post
Nice work Pat !!

------------------
fierogt28

88 GT, Loaded, 5-speed.
88 GT, 5-speed. All original.

IP: Logged
Jake_Dragon
Member
Posts: 32849
From: USA
Registered: Jan 2001


Feedback score: (5)
Leave feedback


Total ratings: 403
Rate this member

Report this Post01-07-2011 07:46 PM Click Here to See the Profile for Jake_DragonSend a Private Message to Jake_DragonEdit/Delete MessageReply w/QuoteDirect Link to This Post
After spending 3 days under my car looking at my ALT I was thinking about moving mine as well.
Going to use a turn buckle on the bottom bolt so I can tighten the belt with a wrench.
IP: Logged
katatak
Member
Posts: 7136
From: Omaha, NE USA
Registered: Apr 2008


Feedback score:    (8)
Leave feedback


Total ratings: 82
Rate this member

Report this Post01-08-2011 12:16 AM Click Here to See the Profile for katatakSend a Private Message to katatakEdit/Delete MessageReply w/QuoteDirect Link to This Post
 
quote
Originally posted by fierogt28:

Nice work Pat !!


Thanks for the reply!
IP: Logged
katatak
Member
Posts: 7136
From: Omaha, NE USA
Registered: Apr 2008


Feedback score:    (8)
Leave feedback


Total ratings: 82
Rate this member

Report this Post01-08-2011 12:17 AM Click Here to See the Profile for katatakSend a Private Message to katatakEdit/Delete MessageReply w/QuoteDirect Link to This Post

katatak

7136 posts
Member since Apr 2008
 
quote
Originally posted by Jake_Dragon:

After spending 3 days under my car looking at my ALT I was thinking about moving mine as well.
Going to use a turn buckle on the bottom bolt so I can tighten the belt with a wrench.


That's an excellent idea Jake! Now I have another little project to do!
IP: Logged
Jake_Dragon
Member
Posts: 32849
From: USA
Registered: Jan 2001


Feedback score: (5)
Leave feedback


Total ratings: 403
Rate this member

Report this Post01-08-2011 10:00 AM Click Here to See the Profile for Jake_DragonSend a Private Message to Jake_DragonEdit/Delete MessageReply w/QuoteDirect Link to This Post
 
quote
Originally posted by katatak:


That's an excellent idea Jake! Now I have another little project to do!


No thank you for paving the way

I was looking at Summit and got the idea from one of these

[This message has been edited by Jake_Dragon (edited 01-09-2011).]

IP: Logged
jmbishop
Member
Posts: 4484
From: Probably Texas
Registered: Jul 2006


Feedback score: N/A
Leave feedback


Total ratings: 169
Rate this member

Report this Post01-08-2011 08:36 PM Click Here to See the Profile for jmbishopSend a Private Message to jmbishopEdit/Delete MessageReply w/QuoteDirect Link to This Post
How's the water pump coming? What do you plan on putting in the stock water pump location?

I am using one of THESE and I really like the profile of it but I have yet to do any plumbing and mounting for my remote pump.
IP: Logged
katatak
Member
Posts: 7136
From: Omaha, NE USA
Registered: Apr 2008


Feedback score:    (8)
Leave feedback


Total ratings: 82
Rate this member

Report this Post01-08-2011 09:40 PM Click Here to See the Profile for katatakSend a Private Message to katatakEdit/Delete MessageReply w/QuoteDirect Link to This Post
 
quote
Originally posted by jmbishop:

How's the water pump coming? What do you plan on putting in the stock water pump location?

I am using one of THESE and I really like the profile of it but I have yet to do any plumbing and mounting for my remote pump.


Hey Jim,

Well I made mistake when I ordered the pump - tranposed a couple numbers and ended up getting a 29 GPM pump for an import! So I had to send the pump back and the right one should be here - I was hoping it would have showed up today. I like that Dedenbear manifold. Saxman has the CSR pump and the Dedenbear manifold in the Mall and I am tempted to buy the pump/manifold just to have them. Does it have an outlet at each end? I'm assuming it does - just can't see it in the pics, As for the block, I got the Meziere port adapters that fit the block then take a 3/4" NPT to 3/4" barbed fitting so I can run 2 hoses from the block to the pump. Archie posted some pics of how he mounts the CSR/Meziere pumps and the plumbing in this thread:
//www.fiero.nl/forum/Forum2/HTML/113263.html

Here's all the goodies I bought!
http://www.summitracing.com/parts/MEZ-WP116SHD/
http://www.summitracing.com/parts/MEZ-WP1150B/
2 of these:
http://www.summitracing.com/parts/MEZ-WP12034B/
2 of these:
http://www.summitracing.com/parts/FRA-484012/
And this port adapter set - no pics but if you go to Meziere's site, you can see what they look like.
http://www.summitracing.com/parts/MEZ-WP81B/

Spendy but I think it will be well worth it in the long run!
IP: Logged
jmbishop
Member
Posts: 4484
From: Probably Texas
Registered: Jul 2006


Feedback score: N/A
Leave feedback


Total ratings: 169
Rate this member

Report this Post01-10-2011 10:10 AM Click Here to See the Profile for jmbishopSend a Private Message to jmbishopEdit/Delete MessageReply w/QuoteDirect Link to This Post
Spendy is right, my build is on a pretty tight budget. I could easily pay more for water pump stuff than I have paid for the rest of the car. So far I'm only in about $150 for my water header and retrofit electric water pump kit. When payday comes I am going to order another pump and everything else I think I'll need to go with it.

I plan on mounting my water pump under the front hood.
IP: Logged
Previous Page | Next Page

This topic is 18 pages long:  1   2   3   4   5   6   7   8   9   10   11   12   13   14   15   16   17   18 
next newest topic | next oldest topic

All times are ET (US)

Post New Topic  Post A Reply
Hop to:

Contact Us | Back To Main Page

Advertizing on PFF | Fiero Parts Vendors
PFF Merchandise | Fiero Gallery | Ogre's Cave
Real-Time Chat | Fiero Related Auctions on eBay


Copyright (c) 1999, C. Pennock