Thanks Will, once we were under the car we spotted where it it could run, and worked out nicely.
Page 15 of the build thread, November 2021 It's been a while since I've done an update. I think that's because we're getting down to some of the stuff that is a little time consuming. And by we, I mean Mike. I often play go-fer. Though Mike has (reluctantly) said that a few of my ideas were really good. And only reluctantly because "why didn't I think of that!"
Anyhow - I mentioned before about modifying the radiator a bit more for the coolant piping to/from the water pump. Mike then tackled starting to run the transmission cooler lines. In my previous post I think I showed a pic of that getting started, and he finished it up (at least going back to the rear bulkhead, more on that later).
We did have to pull the radiator again, which lead to a good, but unexpected, test of how well it could go in/out around the transmission lines. It requires lifting the driver side first, but then it slides out without an issue. Could probably be done by one person, though two is definitely better (at least with the hood on).
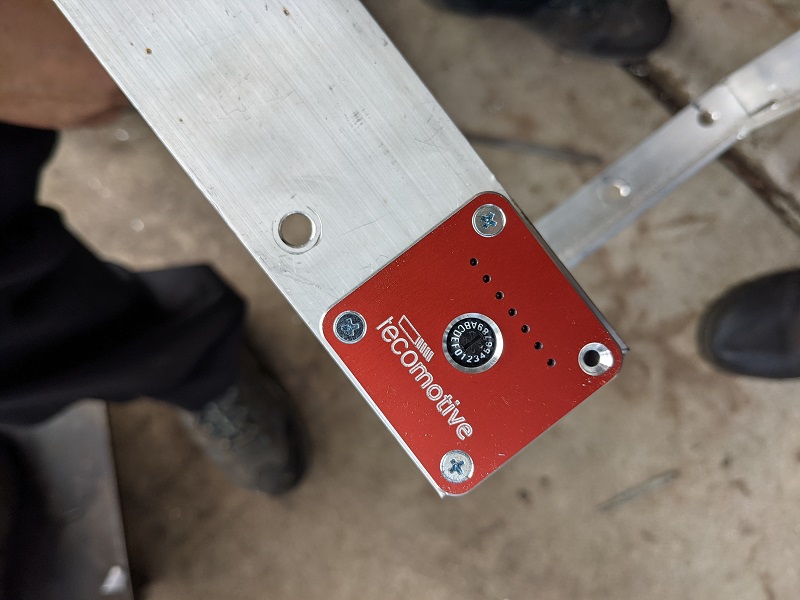
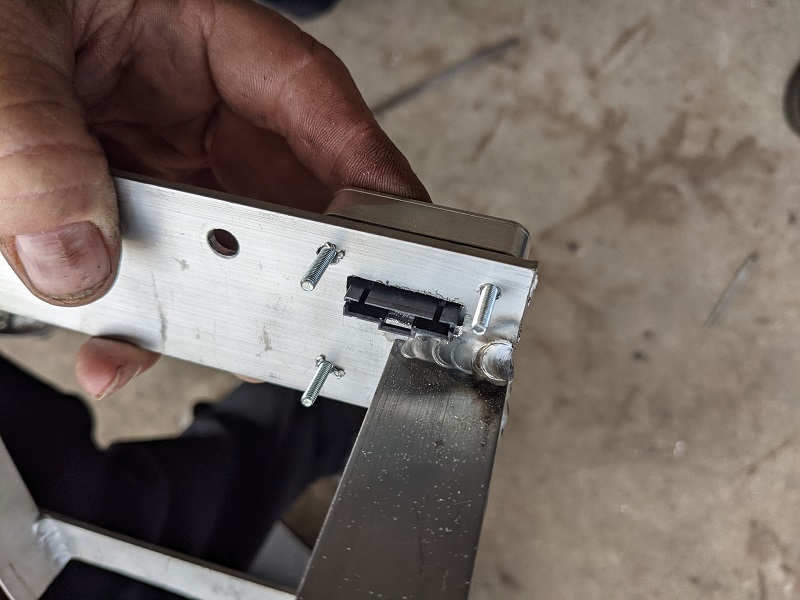
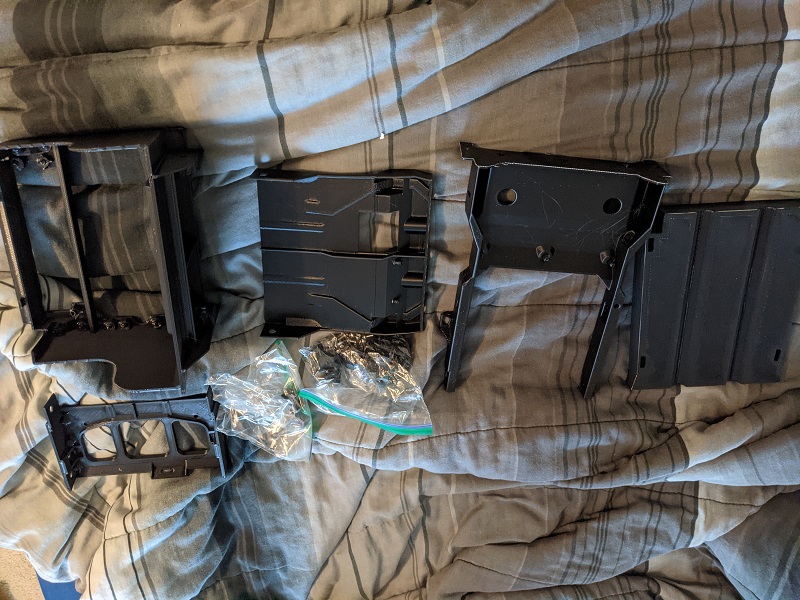
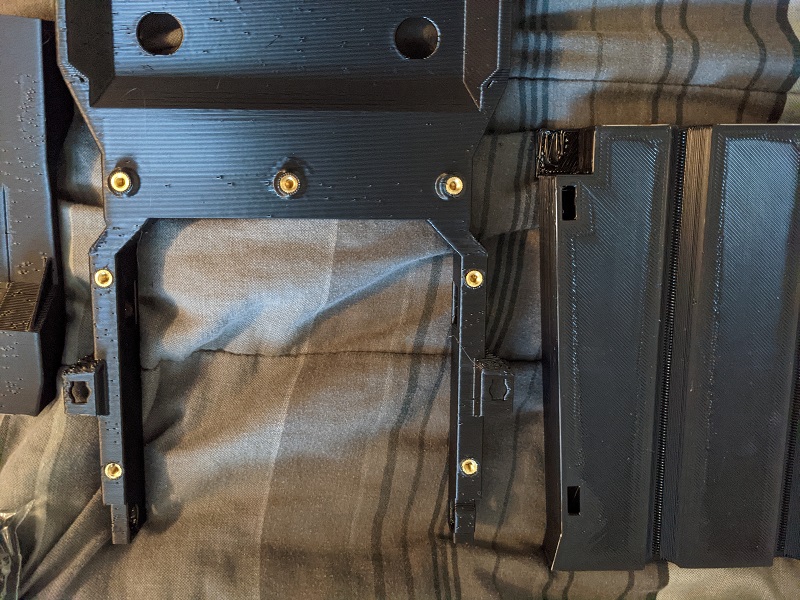
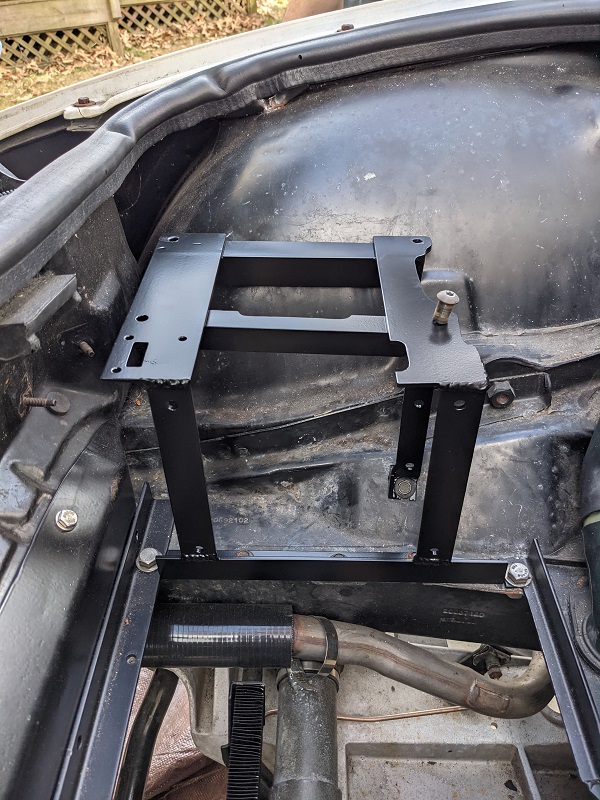
We also took apart the bracket setup for the FAST so we could mount the TecMotive pump control on it. Check out the cool little connector channel! This thing is way smaller than I expected. At least it makes it super easy to package!
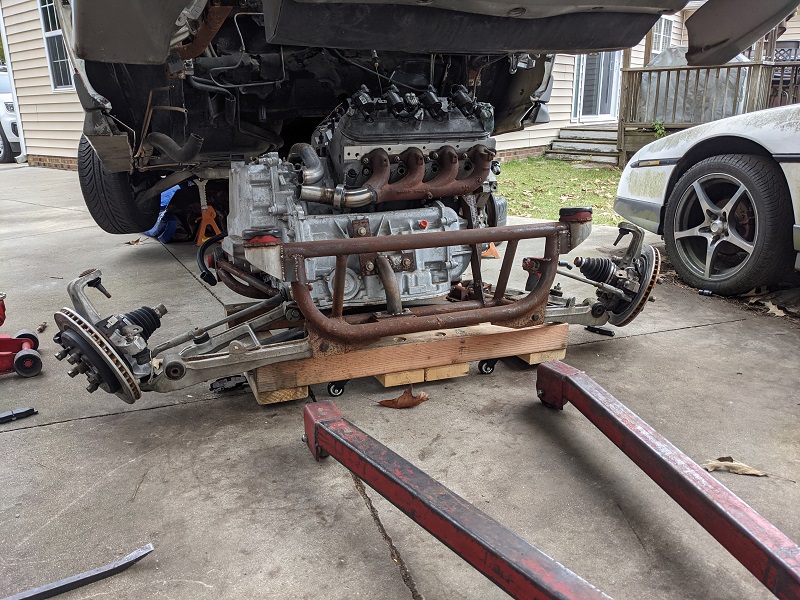
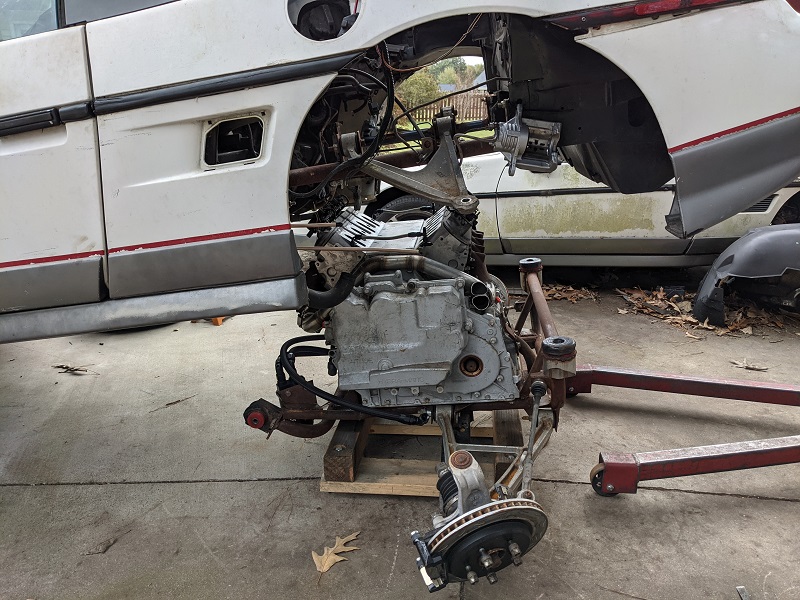
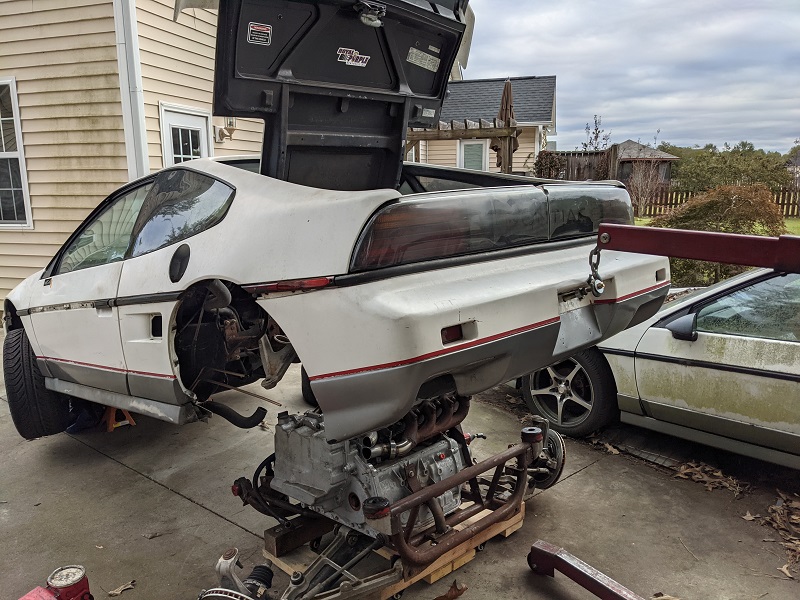
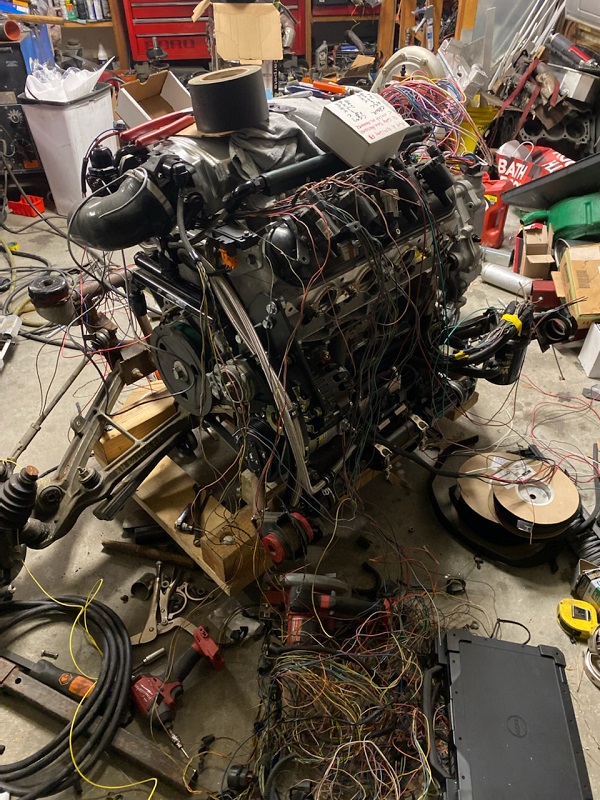
Okay so now onto the stuff I'm really excited about. We slide my drivetrain skid under the cradle, unbolted the engine, and the skid worked exactly as intended, supporting the cradle, engine, transmission AND the A-Arms, so they didn't drag. We unbolted the upper control arm... then used the neat new lift point Mike put in before to life up the body of the car!
This also worked as planned, the cherry picker legs stayed clear of the skid/cradle. Now that he knows it works, he'll make the final version of the bolt that screws into the reinforced mounting point.
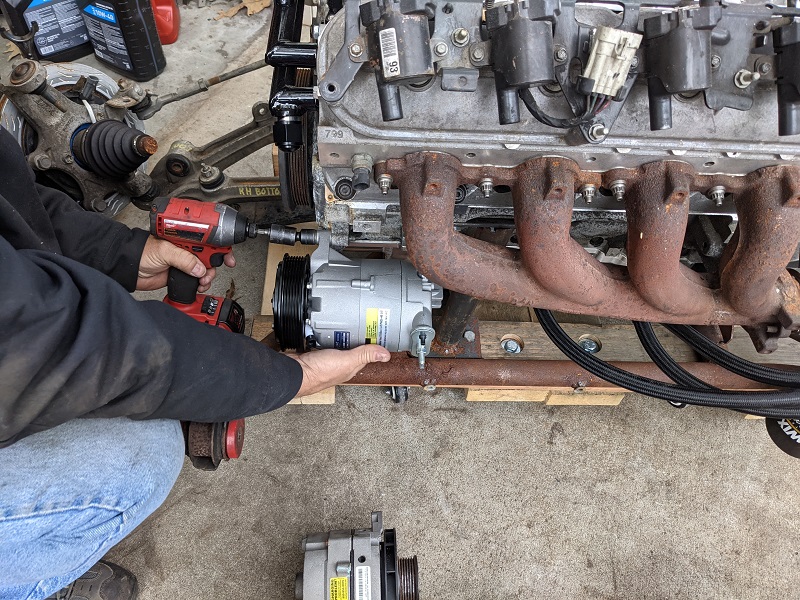
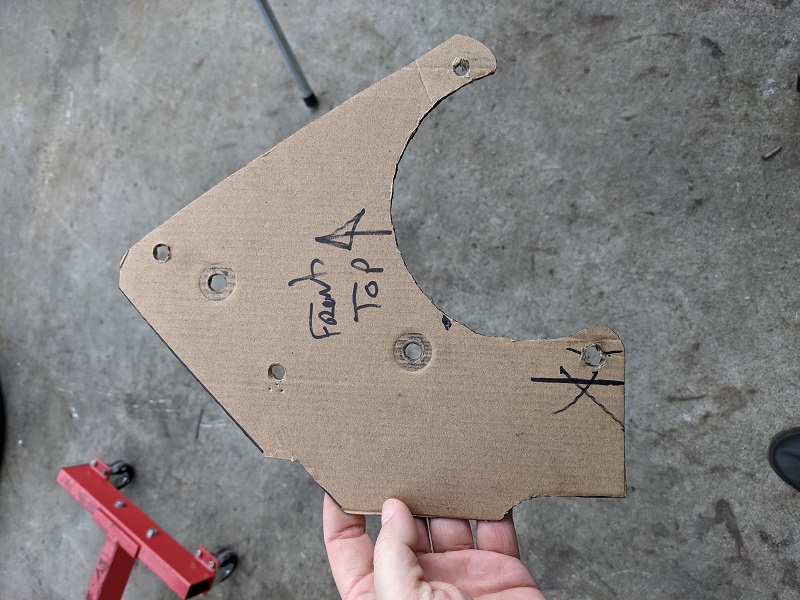
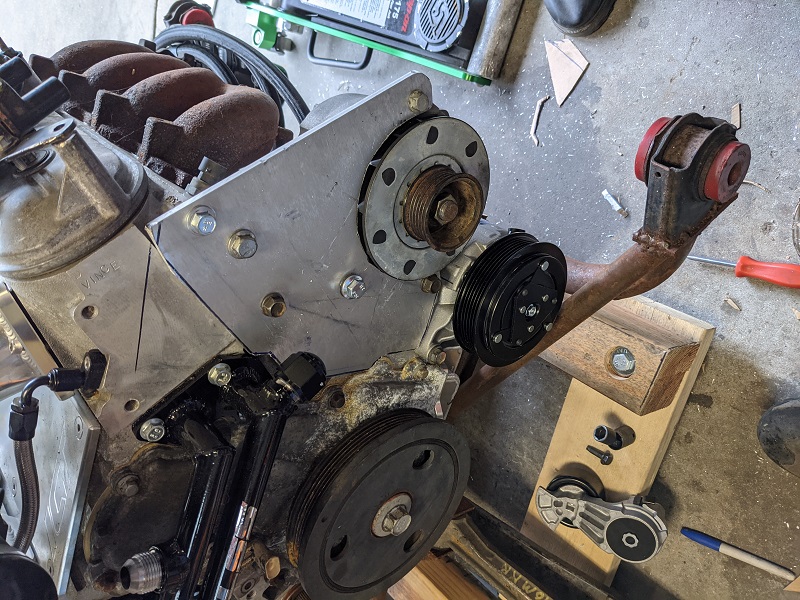
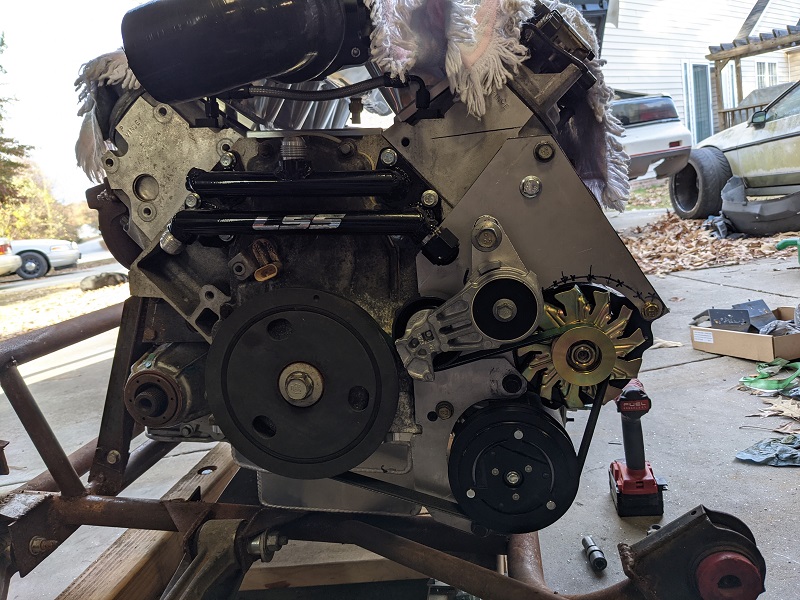
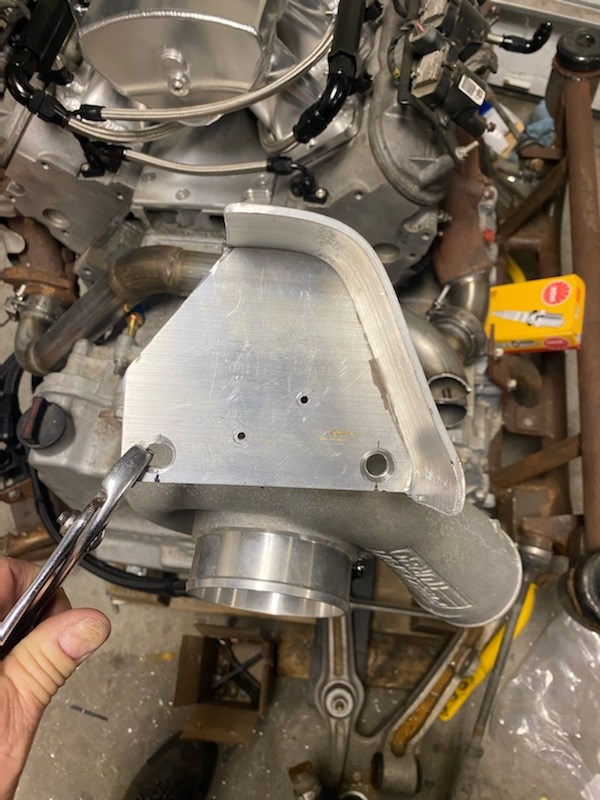
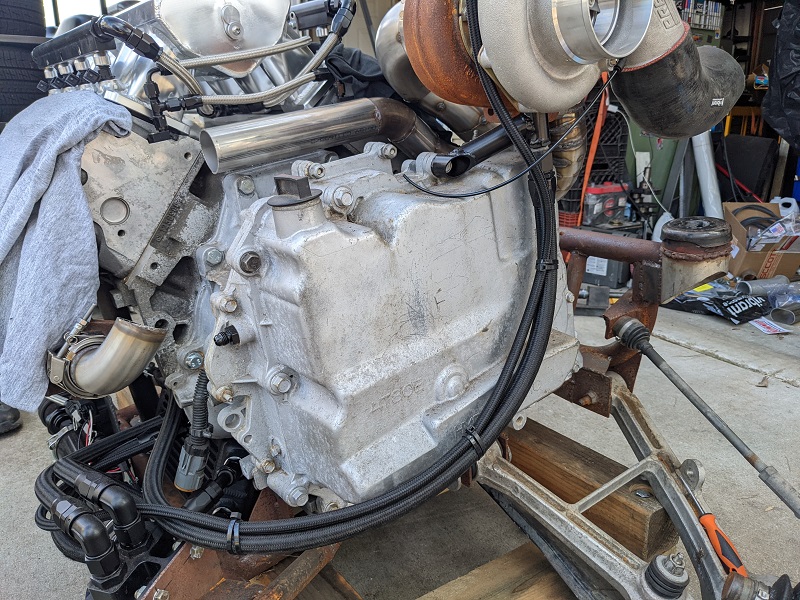
Once the drivetrain was out, we rolled it into the garage so Mike could start working on packaging accessories. The AC Compressor will use one of the original mounting points. Then he used some cardboard to start working out the template for the alternator, going as far as even bolting it up to the block, and I would hold the altnerator as he checked things out.
This bracket will be spaced out from the block to get the alternator pulley into alignment, with it sitting as test fitted, it is backspaced about .75". It's made from .25" 6061 aluminum. The spacers will be made from the same.
I'll be using a CS130 alternator from Power Master. I've used their alternators in the past and have had great luck with them, plus their tech support and pre-sales guys have always been great. Also, the last two alternators I got from them had higher than advertised amperage. They (used to) do a bench test and have a tag attached to it with the exact amps that unit put it out. The alternator in the mockup is an SI12 case, which has the same mounting hole distance and orientation as the unit I ordered.
Solid color wire from ADI shipped out this week - well, most of the colors, a few were on backorder. We're also still waiting on the metal pieces for Mike to start mocking up the gas tank.
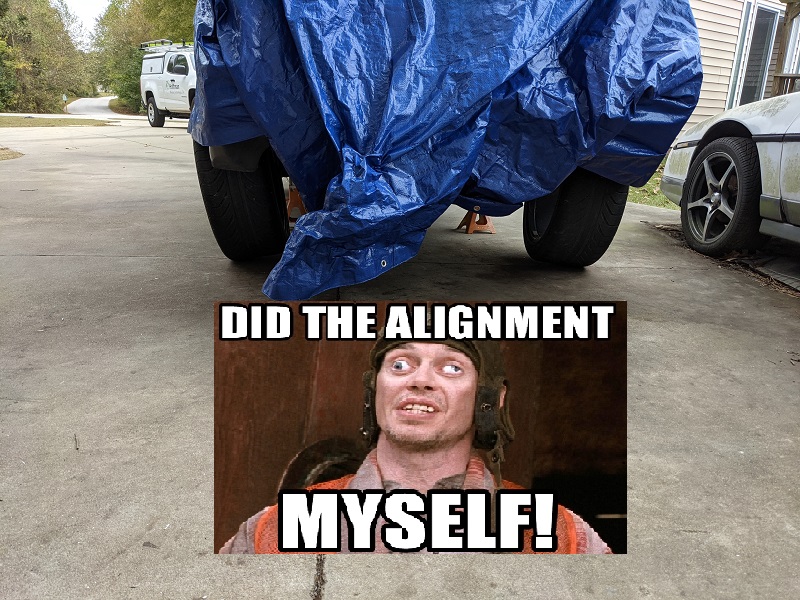
And this was just a funny picture after we put the wheels back under the car without the drivetrain.
[This message has been edited by Trinten (edited 03-26-2023).]
You may recall from the last update that we dropped the cradle (using my spiffy skid and the spiffy lift point Mike made) so we could work on the accessory location and bracket(s). And by we, I mean Mike. But hey, I'm always there for moral support, and to take pictures. And gofer. And now and then I have a good idea.
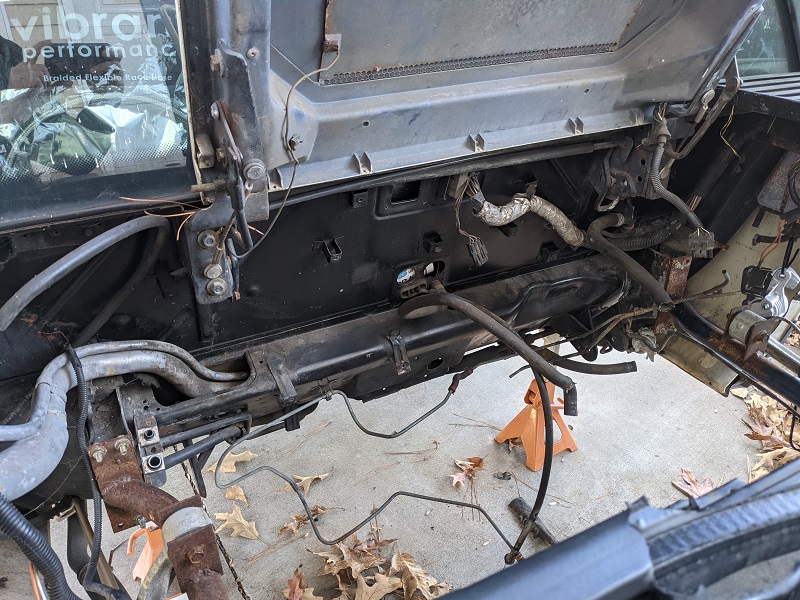
This time out, while Mike started working on the accessory brackets, I cleared out what was left of the old nasty insulation in the Fiero engine compartment.
I will be replacing it with Thermo-Tec insulation, part 13590. I emailed them describing where it was going to be used, and this is what they suggested, so, we'll give it a shot! We'll also be putting back in the super-awesome Decklid brackets that FieroGuru made for my last Fiero, which will require us to fabricate the spreader bar that went in above the 'lip' (there are square holes cut out in there already) to help offer support. I'm going to go back in this thread and find that section to make sure I have the information handy for Mike. We'll also be reinstalling the super nice heatshield/smoothplate he made, which means I'll be taking off all those little stands off the bulkhead.
I also have some TechFlex SRF28.0SV material that we'll be using in other temp critical places, like on the manifold shields (definitely the inside of them). This stuff is crazy expensive, but that's partially because you can normally only get it in giant rolls. Thankfully a seller on eBay sells it in 2" cuts. I think this stuff is literally something used by NASA. If it's good enough for things being shot into space, it's good enough for me!
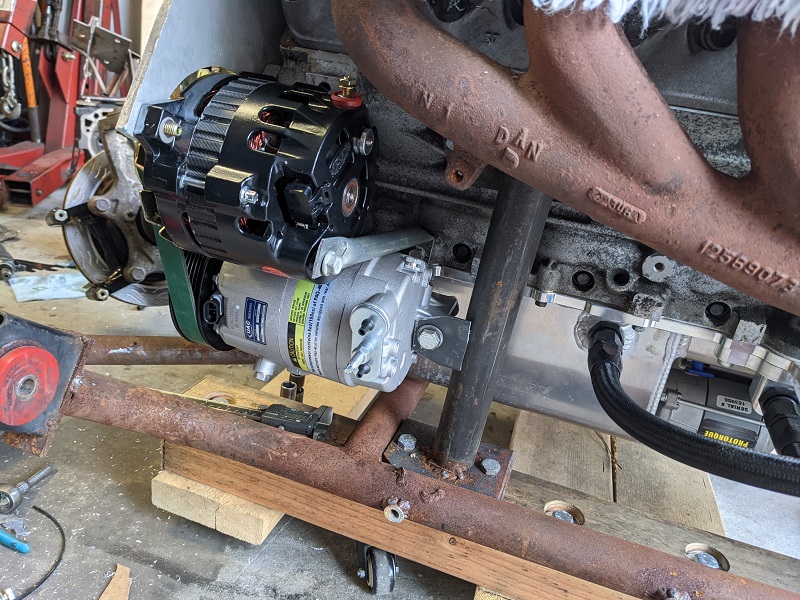
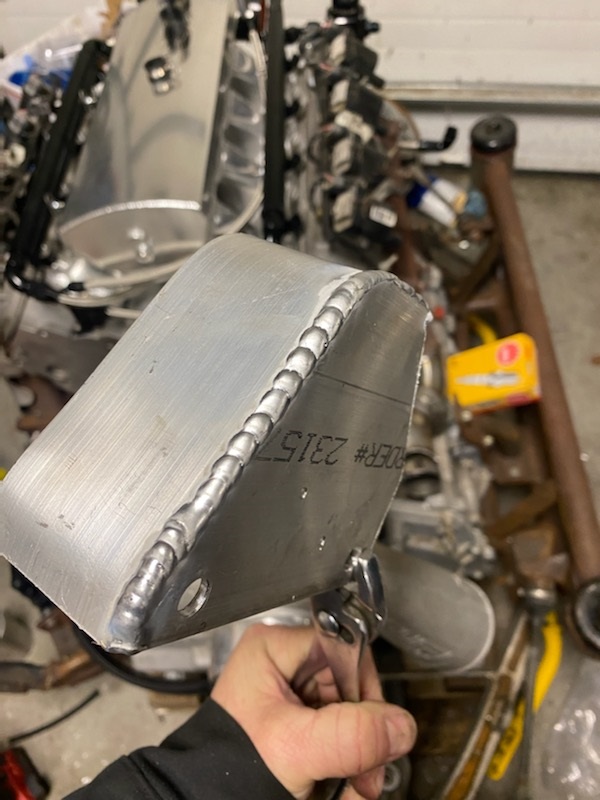
Mike wanted to create a second bracket that would also wrap down to give the A/C Compressor some additional rigidity. This bracket means he has to rework one of the arms on the cradle a little, you can see where he cut through the spot weld, and the arm is kind of dangling there. Yes, the cradle has held the drivetrain for well over a year with just spot welds. Including while the car was bouncing along on a trailer to PA, and us lowering lifting it, rocking and rolling it. Crazy!
He also trimmed a bit of the 'lip' off the belt tensioner pulley. It wasn't coming into contact with the crank pulley, but it was so close that you'd be lucky if a piece of paper could slip between the space. Mike felt trimming of a bit of the lip was better than worrying about the lip scraping the pulley during movement with vibration.
He also rigged up some extra brackets for the back of the alternator and the compressor. On the compressor there is this little 'U'. So you can see that tab in a mock up position that will weld to the upright support on the cradle, and the bolt will fit snugly into that U. There is also more clearance between the alternator and the manifold that that angle would make you think.
So I had to buy a bunch of proper length bolts to put all this together, along with some sensors and other adapters for the transmission (ICT Billet makes coolant fittings for this transmission that go directly to AN, versus whatever the factory connection is, eliminating a potential leak point).
I also bought heavier-duty casters for my Skid. What I didn't consider, and which did happen, is what happens when the drivetrain does not come down onto the skid evenly? Well, then it's likely a wheel's load rating will be exceeded. That happened, so one of the wheels acts a little wonky now. Fixed that by getting casters that are each rated in excess of the drive trains weight.
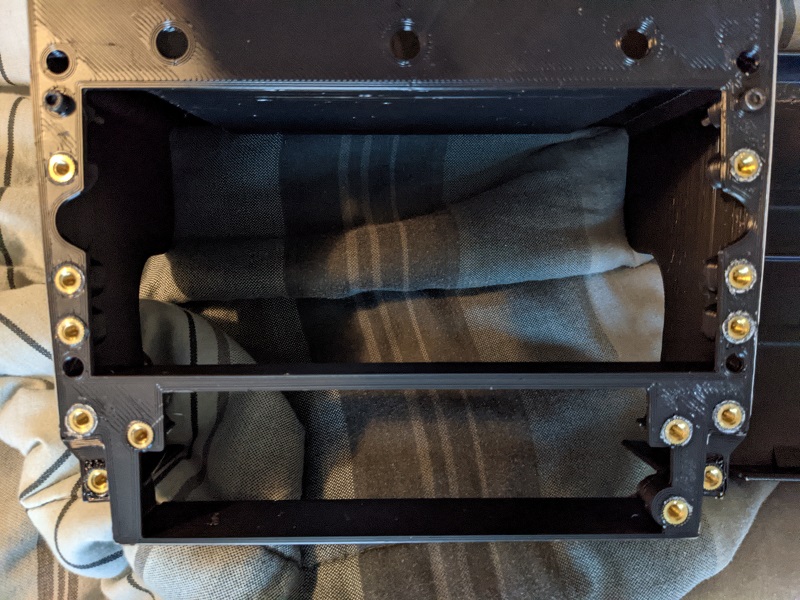
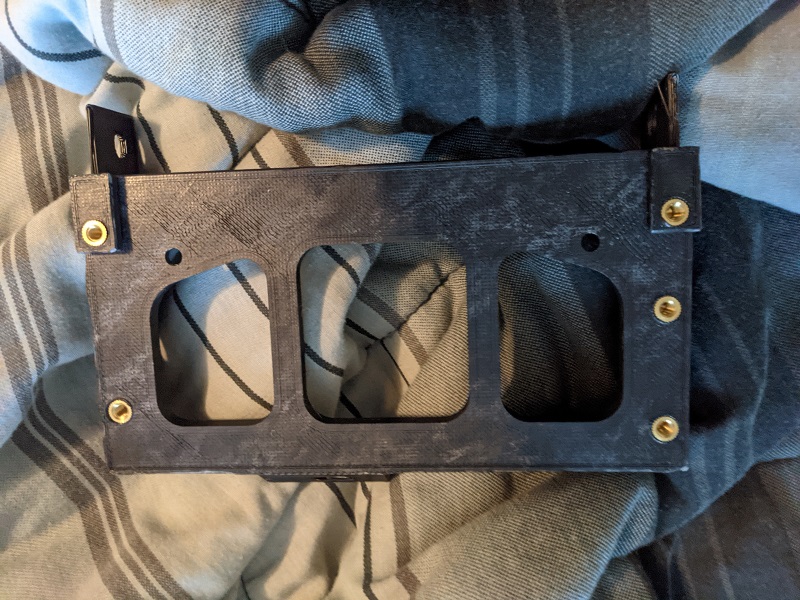
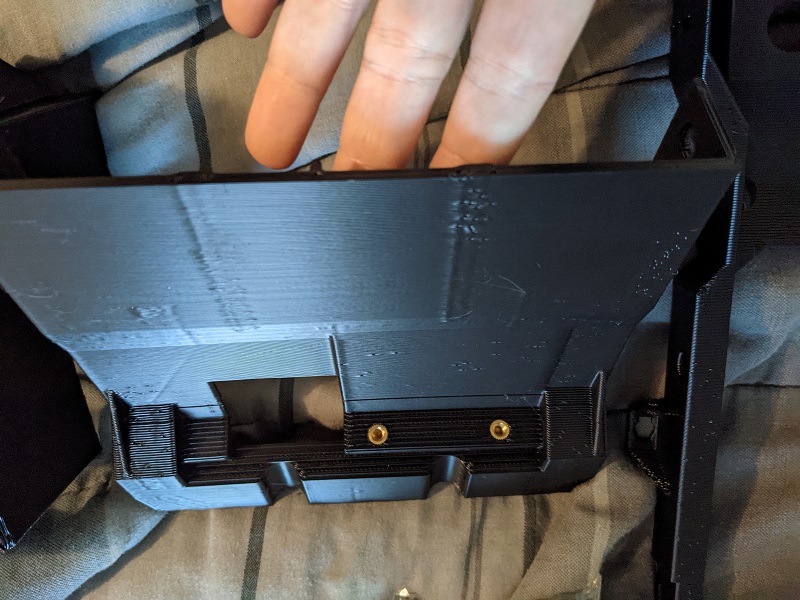
I scored a pristine, no cracks, center console skeleton from the junkyard. Mike got the tail lights (notchie), we picked up some other odds and ends. But I won't be using that. Instead, I'll be using one of the fantastic 3D printed units from PFF's very own mmeyer86gt/gtp!
It showed up in a very compact box, very well packaged (each piece was wrapped in bubble wrap). Looks pretty spiffy!!
I also took advantage of the Discount Tire black Friday sale and bought new tires for the stock coupe Corvette wheels I have on there, so those will go on this Saturday. The tires that are on there now are pretty well cracked, and these have the same ratio number, so the car will have a very slight rake and the rear tire will fill up the wheel well a little better. I'll post up pictures of those once the wheels are back on the car. Fronts are 255/40 R17, and the back are 275/40 R18. With the discounts, I effectively got a free tire.
[This message has been edited by Trinten (edited 03-26-2023).]
I scored a pristine, no cracks, center console skeleton from the junkyard. Mike got the tail lights (notchie), we picked up some other odds and ends. But I won't be using that. Instead, I'll be using one of the fantastic 3D printed units from PFF's very own mmeyer86gt/gtp!
It showed up in a very compact box, very well packaged (each piece was wrapped in bubble wrap). Looks pretty spiffy!!
I will be replacing it with Thermo-Tec insulation, part 13590. I emailed them describing where it was going to be used, and this is what they suggested, so, we'll give it a shot!
I also have some TechFlex SRF28.0SV material that we'll be using in other temp critical places, like on the manifold shields (definitely the inside of them).
Thanks for sharing the specific products you're using!
Last weekend I did not get to doing the engine bay stuff. Mike had other people dropping by, and I took a detour to get the new tires put on my stock Vette wheels. Sometime in the future I will need to budget to either replace these or get them stripped and re-chromed, it's bubbling up in more places. Doesn't look bad, but they're showing their age. I didn't bother with pics of those.
So what did get done, you ask? Well, Mike had finished up the mods to the engine cradle to allow safe clearance for the belt. So accessories are finalized.
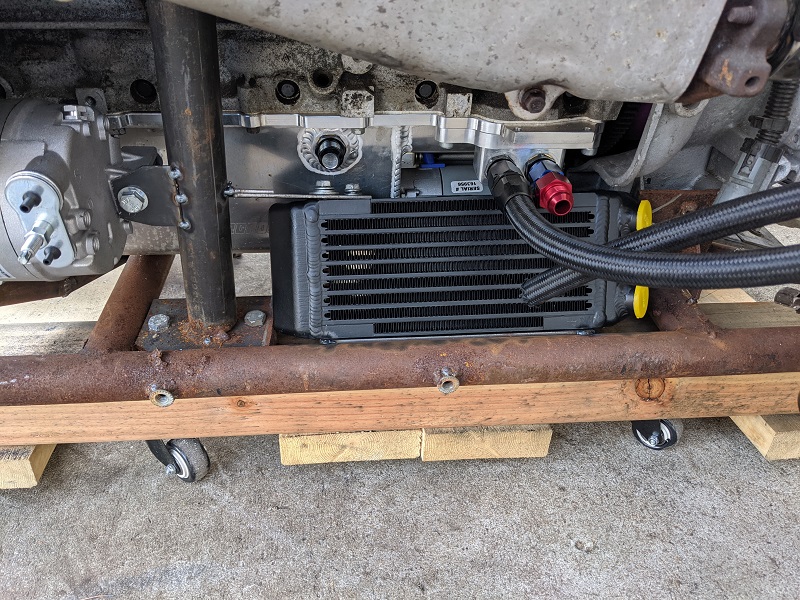
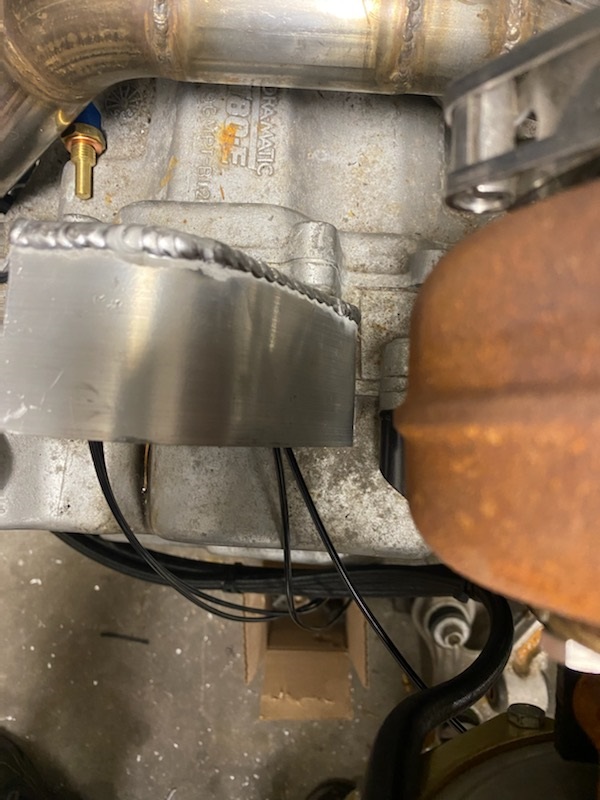
He also tacked in the mounting points for the oil cooler. Even though it doesn't appear there will be much air flow there, Mike says it'll be okay and he's going to be putting some scoop/ducting under there at some point. And even ambient cooling is going to help a little. The red/blue AN fitting is for mock-up, a black one was delivered, it also has the port on there for the turbo-oil feed.
I had gotten some fittings to replace the stock coolant fittings on the 4T80 with ones that had AN connections, discovered one of them had this weird little tube on it. ICT made ones for the 4L80. We hoped they would be the same... they are a touch different. Thankfully we know someone with a lathe! So it'll be turned down a little.
Mike gave me a list of other fittings to get so he can finish the oil and fuel line connections, including the connection for the flex fuel sensor. ICT had some really nice ones that I liked, but didn't have the right AN size on them. I didn't want to put in size reducers if I didn't need them, so I got others from Earl's. Hopefully they'll work just as well!
We also hunted for the parts to get the rear corvette sway bar tacked/mocked up... but they were displaced. Replacements are easy to get, Mike (correctly) says they should be around there somewhere, and not to order them yet. He's going to try to find them. This is one of the rare instances where I couldn't put my hands on one of the parts within a few minutes.
Once all the remaining hoses are made, and rear sway bar mock up is done, drivetrain will go back into the car for a test fit. If there are no issues, it'll come back out, drivetrain comes off, final welding, and off it goes for powder coating!
Excluding A/C hose, that'll be almost last - I need to get another Fiero A/C hose and a GXP LS4 hose and take them to the hydraulic hose shop that has done other things for me, ask them to work their magic on those once we know the hose length.
Once it's back, we need to take measurements for axles and get those ordered. All the new rear suspension components will go on then. Then it's wiring! So. Much. Wiring.
Oh, and I'm still waiting on a back-ordered hose to connect all the A2W intercooler components (heat exchanger, tank, pump, actual intercooler). That should be here by the end of the month. If it isn't, I'll cancel the order and chase it down someplace else.
Sadly, the delays in getting things done are making me worried about having the car ready to go to Pisa in time for all of the body mods and paint. I really wanted that to be done in 2022, so the car would be "Show & Go" ready for the 40th. Right now, it looks like it'll be more that SNL skit from the 80s, where it showed a car that was just totally terrible on the outside to deter thieves, but had awesome performance and interior. ... I probably won't put the awesome interior in until the body is done. Just doesn't seem right.
Speaking of interior parts. I had a facepalm moment. Three trips to the junkyard to get things off the Fieros, and I never considered the big seals that go around the door opening to seal around the door/door-glass. So that is on my go back and check out, see if it's still in good shape and get that off the cars. If anyone has ever removed that seal and can give any tips on how to do it without tearing it, I would appreciate it. Is it just glued in? Do I just use body panel tools and a lot of patience?
And lastly, I got stuff from Rodney to rebuild a few sets of the 87-88 headlight motors! Though the gears looked good in the two I took apart, I went ahead and got a set of Rodney's metal gears, along with a few sets of the delrin pins and gaskets and ball bearings. Better to have extras, right?
[This message has been edited by Trinten (edited 03-26-2023).]
Speaking of interior parts. I had a facepalm moment. Three trips to the junkyard to get things off the Fieros, and I never considered the big seals that go around the door opening to seal around the door/door-glass. So that is on my go back and check out, see if it's still in good shape and get that off the cars. If anyone has ever removed that seal and can give any tips on how to do it without tearing it, I would appreciate it. Is it just glued in? Do I just use body panel tools and a lot of patience?
I'm not sure they're even glued in... just grip the pinch weld around the door. The Fiero Store used to have door weatherstrip, but I don't see it on their website now.
Yeah it's one of those "wish I would have bought it when...." items. I even found the GM part number for it and googled it. It came up on a bunch of those "GM Direct" sites (which a lot of them are actually the same company, just different DBAs). So of course it was "sold out" / "discontinued" everywhere I looked so far.
If anyone had a new set they would be willing to part with, I would definitely make sure they made a profit on it! Last time I posted about it in the mall, I didn't have any luck with any that were in better shape than mine.
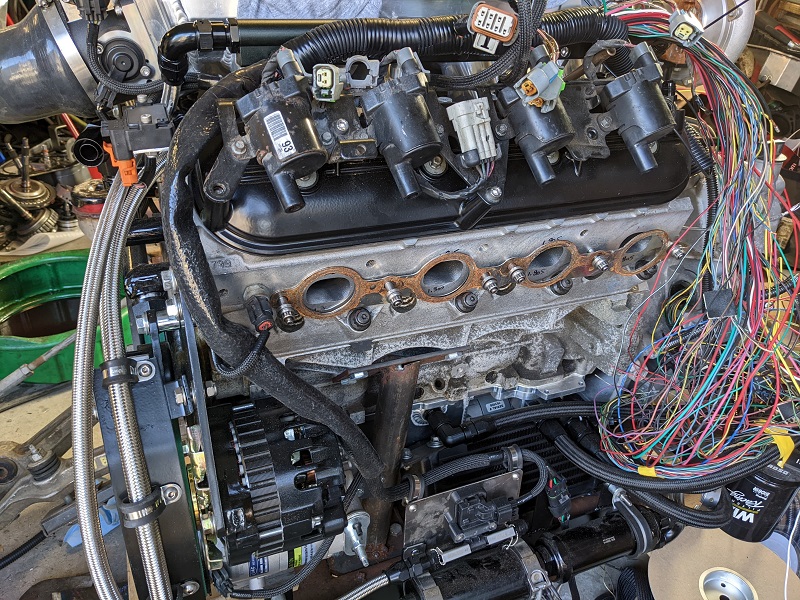
So we are getting to some of the smaller and time consuming stuff, where we realize we need a particular fitting after figuring out the best way to route something.
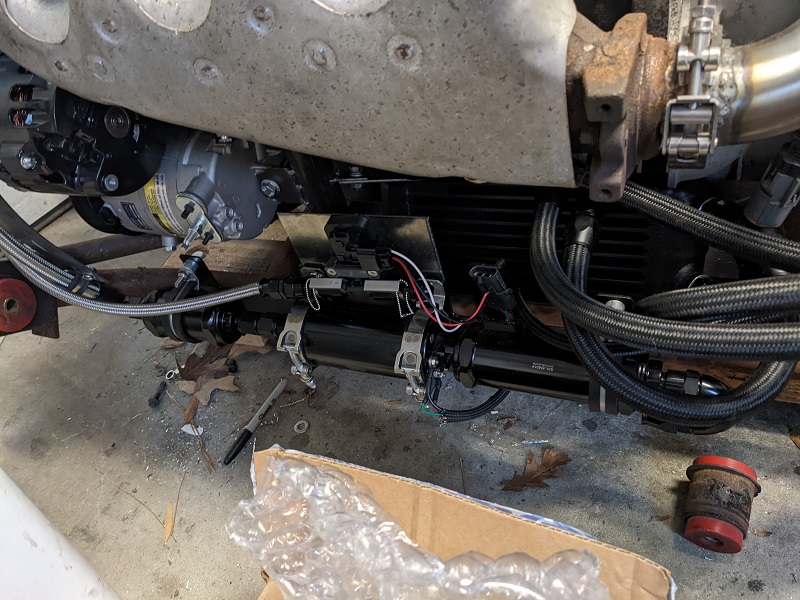
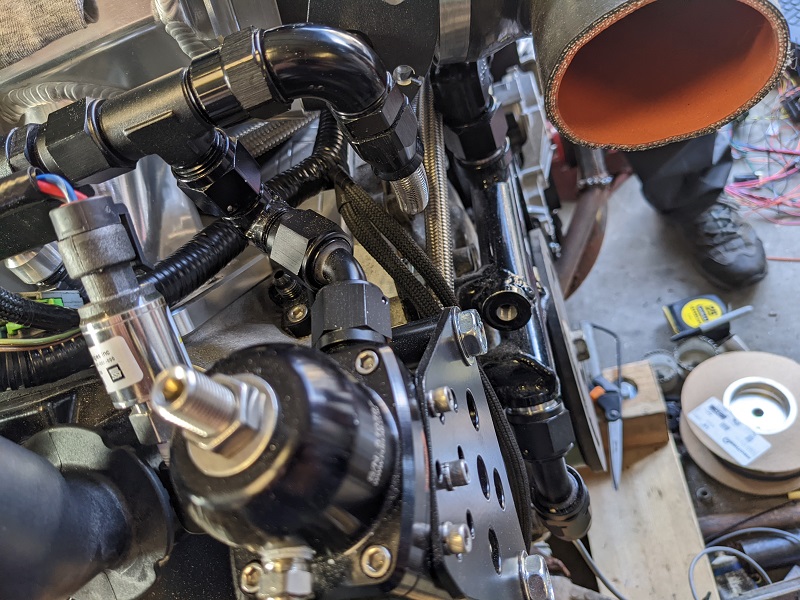
The oil hoses is now all buttoned up.
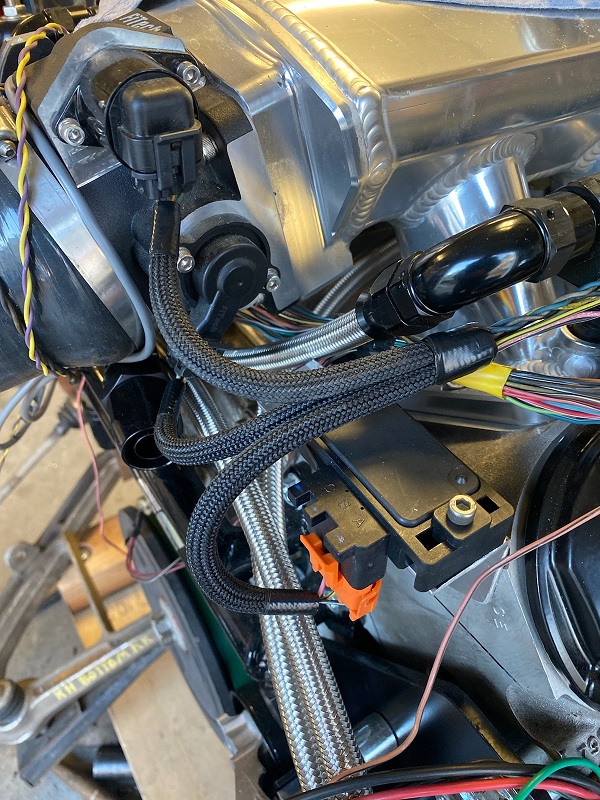
The steamvent kit I got from TrickFlow is nice, and modular (it uses AN fittings), which is great because Mike wasn't completely happy with it (and the fittings let others adjust things to deal with clearance issues). It's mostly done but I have a few more fittings on the way.
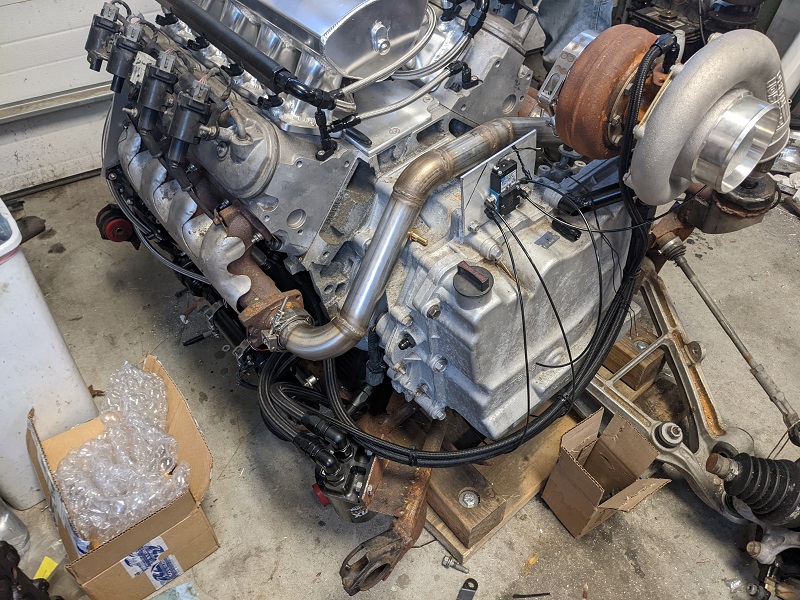
Mike has the MAC Turbo solenoid mounted and made a neat shield for it to help protect it from heat. This will be in addition to getting the turbo housing coated and slapping a turbo blanket on it.
He also made a shield that will protect the fuel line from the belt, in both unexpected movement/contact abbrassion, or catastrophic belt failure (though with that greenstripe belt, it's not supposed to do that). I thought I took a picture of that mounted, but... I didn't? So I'll have to add that one later.
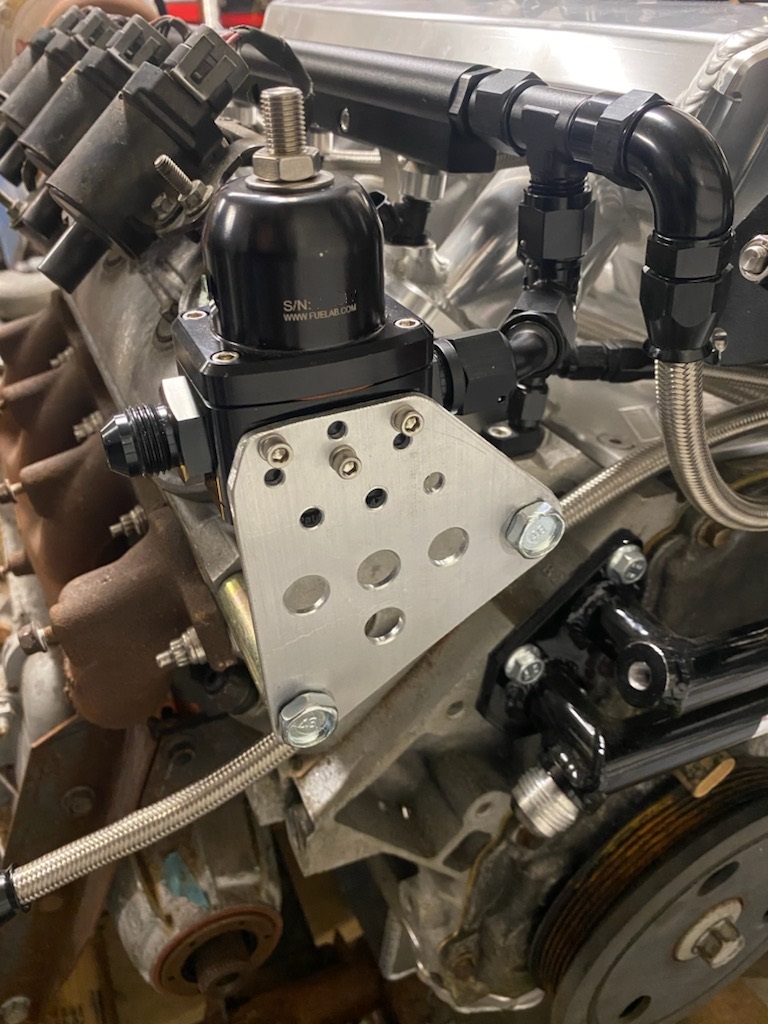
The fueling hoses are 99% routed and buttoned up. Fuel pressure regulator mounting bracket is done!
Smaller bit of flair, the ECU mounting bracket was powdercoated
Lastly, I took advantage of a sale that Discount Tire had going on. So I bought my Michelin's for the daily-driver wheels and got those mounted and balanced. One of the wheels required a fair amount of balancing weights. Sadly with the big spaces between spokes, it's easy to spot if the wheel is in the 4ish-to-8ish position.
I also made sure these tires had the same ratio for the front and back, making the outside diameter of the back wheels a little bigger, helps give the car a tiny bit of rake, which I like.
When I go to put tires on the z06 wheels, the backs will get DOT slicks, since those will be for the track, but still stand up to being (carefully) driven on roads so I don't need to trailer the car there or back.
Transmission note: Brandon Furches told me that I should make sure the piston was flipped around on the 2-3 shift. I emailed Dave at Triple Edge Performance. He couldn't remember if he had done this on my transmission. Brandon said it was the only thing that failed on his first 4T80E transmission, and he hasn't any any issues since doing that mode on bone-stock transmissions, so Mike and I will be opening the transmission up to get to that. I've bought the J-Kent parts to put the 4T80E in an tramission stand. Which requires two parts.
More fittings and sensors have been ordered. Mike wants to start mocking up the engine harness, starting by using the stock engine harness. Then once all the lengths and modifications are figured out, he'll use the new wiring to make a spiffy new harness.
Pretty soon the drivetrain will come off the cradle, final welds will be done on it, and then it'll go off for powdercoating.
[This message has been edited by Trinten (edited 03-26-2023).]
This weekend we put heavier duty wheels on my drive train skid.
We got a few more fittings for hoses and finished buttoning up the fuel system, including getting the fuel pressure transducer in the circuit. All of the steam vents are setup, and the port for it's tank is ready to go. The tank needs to be fabricated, we are running out of real estate, Mike has an idea of where he'll put it and how it'll be shaped.
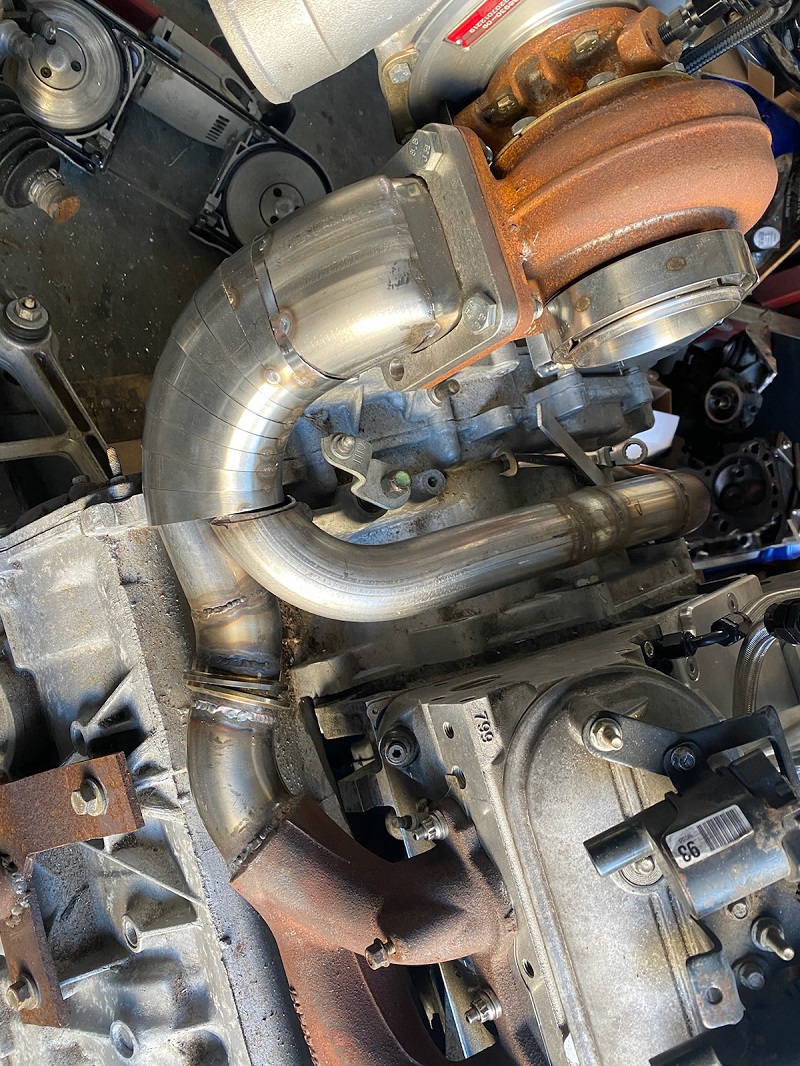
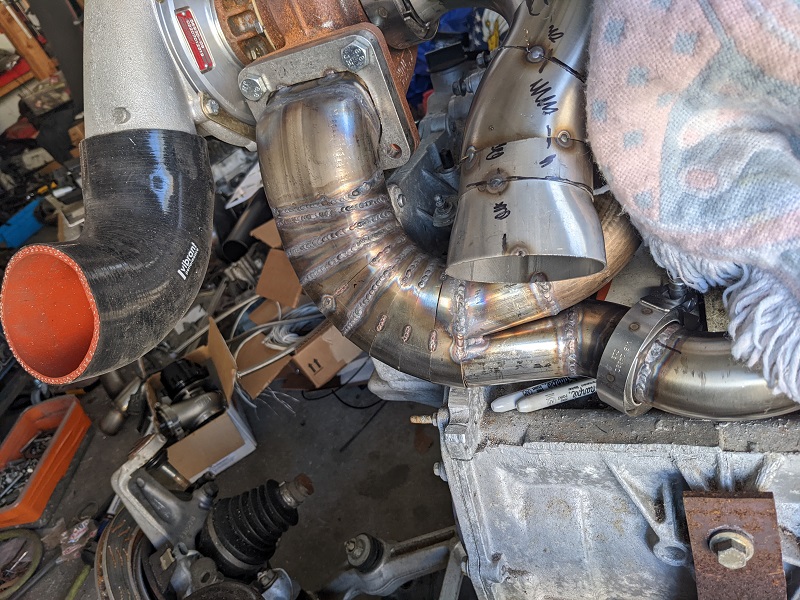
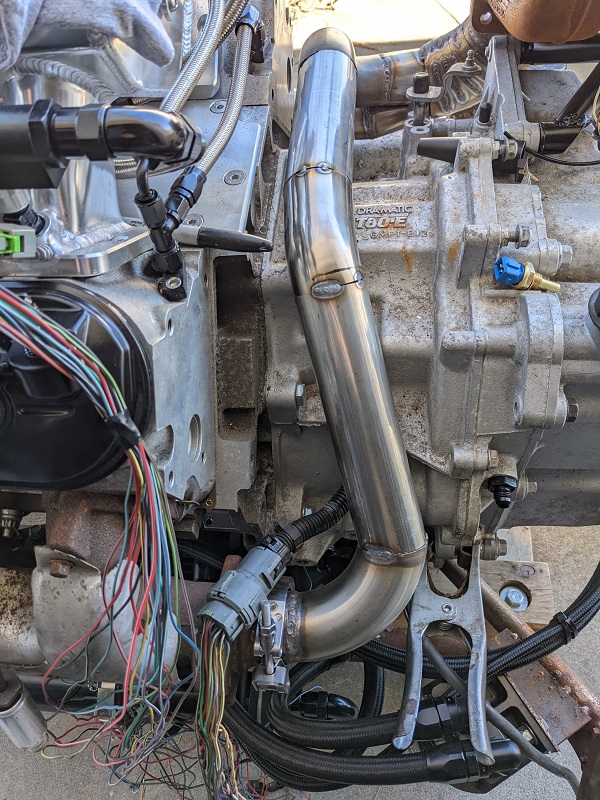
He started doing the mock-up spot welds for the chargepipe and getting other elements of the exhaust.
A bunch of the stuff that was done is off for powdercoating now, including the valve covers. We were also going to measure for the pushrods, but we misplaced the tool I got to do it. The one Mike has doesn't have the right range. So that'll be on my task list to find next time. I checked the rolling tool cart that I saw it on a few months ago, no luck.
So here is mock-up progress.
[This message has been edited by Trinten (edited 03-26-2023).]
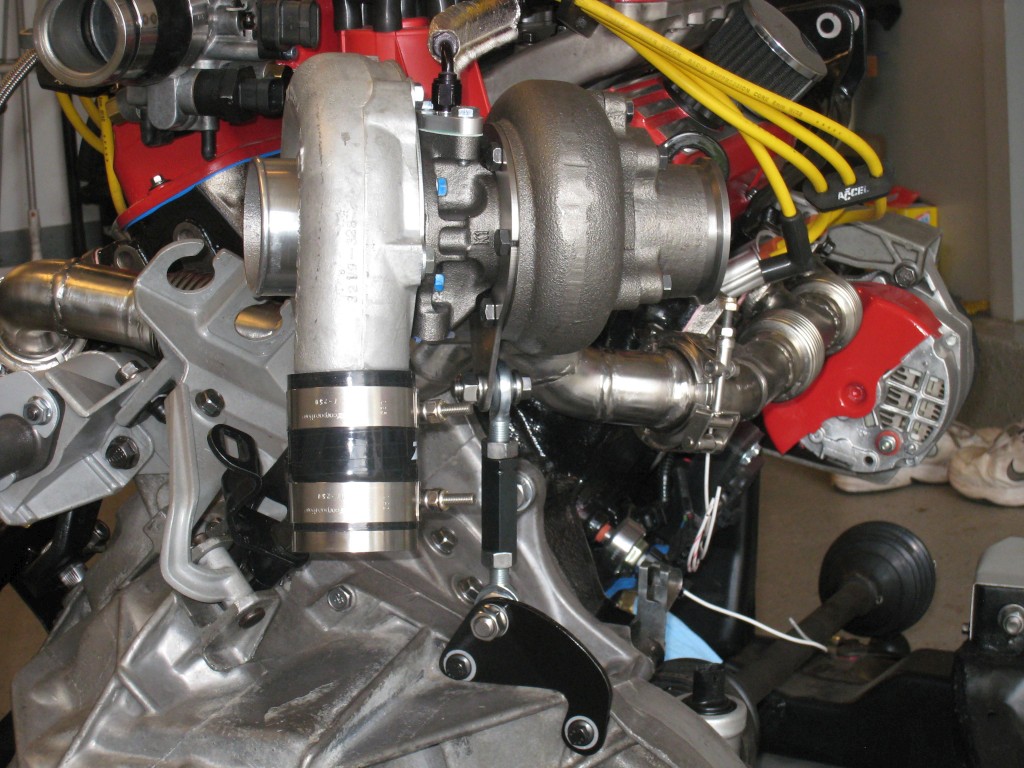
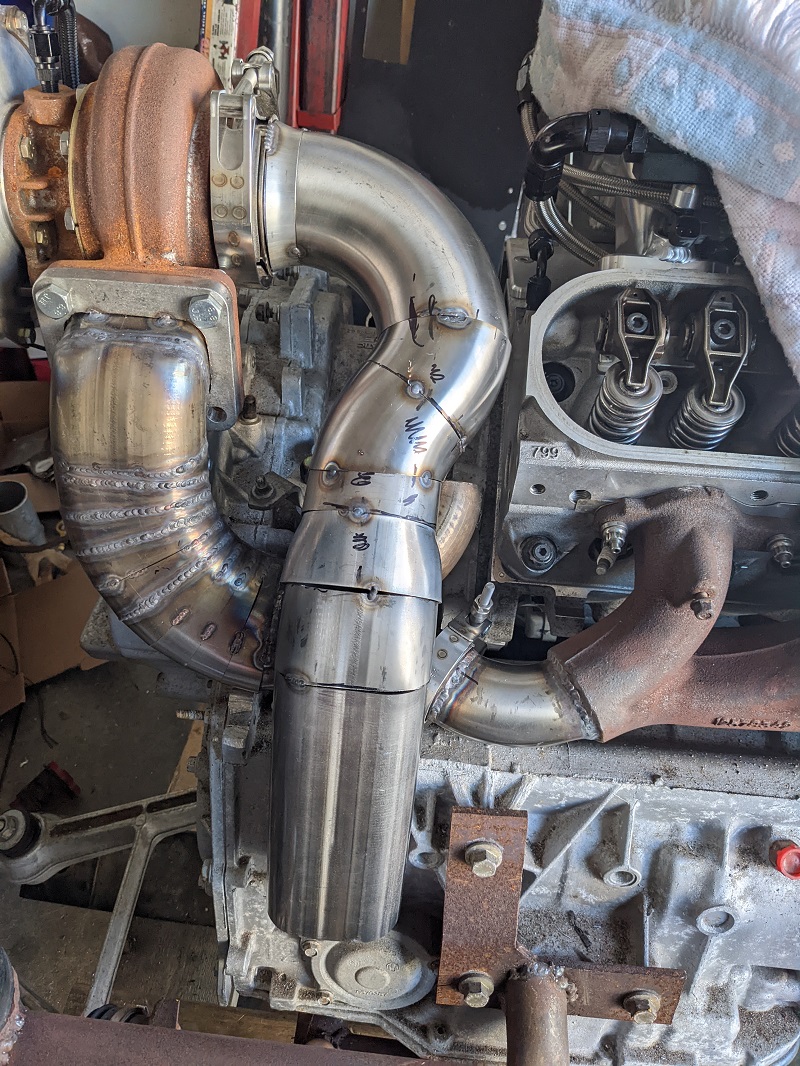
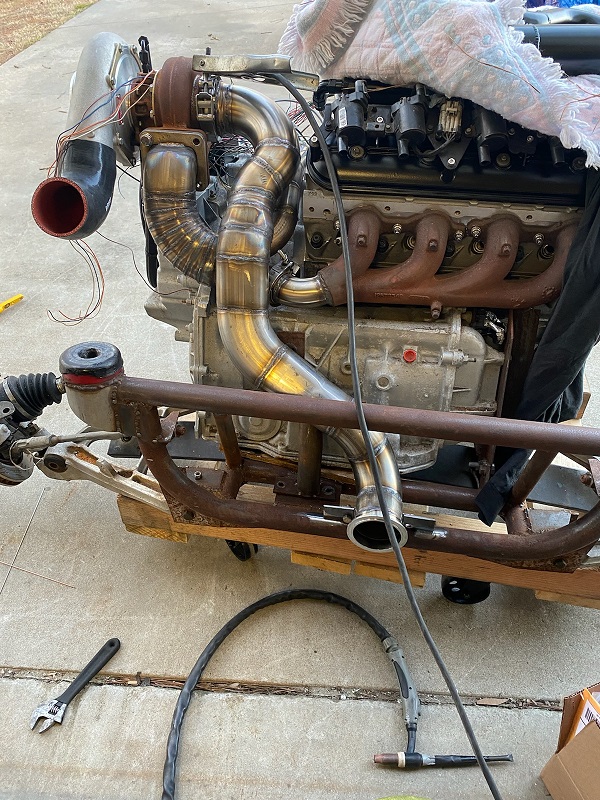
There is already a support system in place, it's also where the turbo drain is tied in. If you look at the first picture from my post on Jan. 25th, you can see just a hint of the black tube going up on an angle under the turbo. That's one of the support legs.
It's been mounted for a while, when the engine was in the car still. Here's an earlier pic where you can see the turbo 'floating', it's just obscuring it's legs. They run down and bolt to the transmission housing.
Here the turbo support is installed. Its function is to support the weight of the turbo, to take the weight off the crossover pipe.
I'm using a RH-LH pair of 7/16"-20 rod ends threaded into a hex rod. Since the crossover pipe sags by 0.008" under the weight of the turbo, I simply crank up the rod-end assembly to raise the turbo's position by 0.008". The idea is to put the crossover pipe into its "zero-stress" position.
I was inspired by seeing many 80s turbo Formula 1 engines having this kind of setup.
That's a pretty neat idea. Mike figured out placement and made the turbo mount before he started finalizing any of the "Duct work", so the weight of the turbo won't pull down on anything. Pmbrunelle's setup is definitely more polished than what we came up with. We used chrome moly tubing, cut off a piece to turn 90 degrees, welded to the 'leg' (cutting an arc into the leg so it fit flush with the 'foot'), welded on a cap to the 'foot', drilled through the cap for the bolt hole. So the feet line up with the two bolts on the transmission, and the bolt goes through the open end of the foot. ...
I hope that made sense. When the turbo is mounted again, I'll take pictures of it.
Things that change in temperature by 1000 degrees during operation are going to move around due to thermal expansion... That's why F1 teams started with the flexible turbo supports... so that they wouldn't be imparting stresses to the hot header tubes because of a rigid turbo support. Food for thought.
When temperatures have cooperated, Mike has been busy with mocking up, measuring, and (re)modifying the exhaust plans. Still a lot left to weld, but he is happy with the progress so far, and is trying to take into account spacing, serviceability, hoses, wiring, and of course thermal control.
He's very focused on the details. At one point he had another piece welded into place, and it was not quite parallel to the cross member of the cradle. And I mean, I didn't see it until he busted out a measuring tape, but he saw it without that. So I asked:
"Is that going to cause a problem?" "Yeah." he replied "What?" "It's going to annoy me." was his answer. So he then went about fixing it.
He had been sending me pictures of his different mock-ups, but I wanted to wait because I knew things would change. You can see in one of the pictures all of the magic marker "line-up" marks from the current and previous fits.
I'll hold off on talking more about the plans for the exhaust until they come to fruition. That way I have something to go with the pictures.
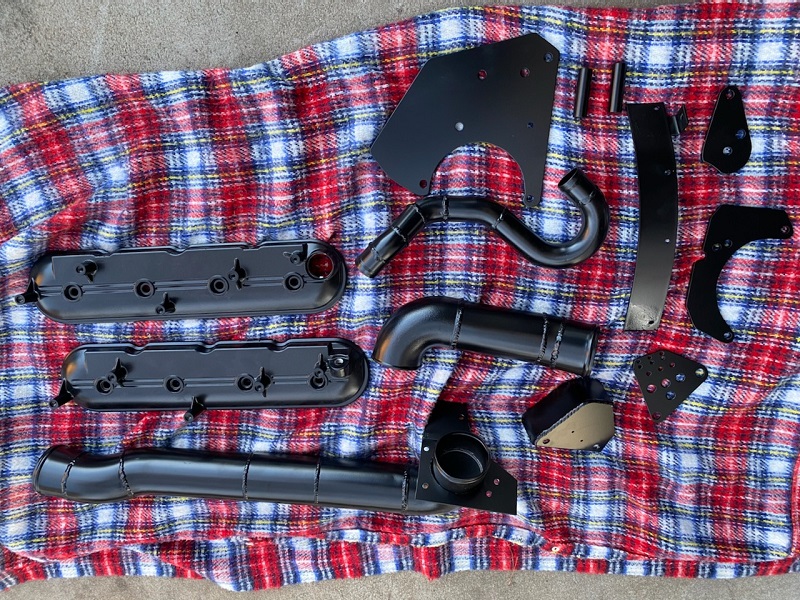
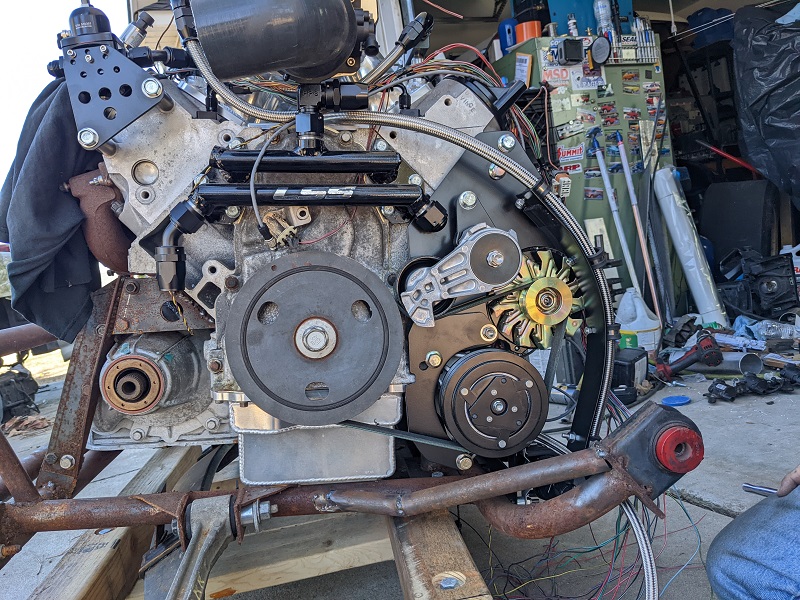
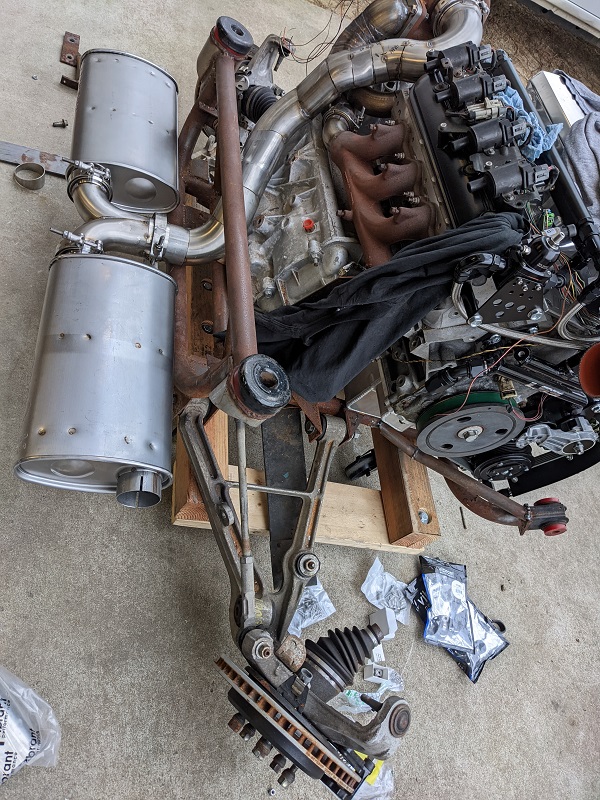
The next wave of things came back from powdercoating!
That is all of the current brackets to fit the accessories and such to the engine, plus the valve covers, of course. I wanted a few of them done in silver as accent pieces, but the powdercoating guy was being a bit of a jerk to Mike over the pricing (almost doubling the price, even though everything would go in the oven at the same time). Mike made an executive decision to just do it all in black.
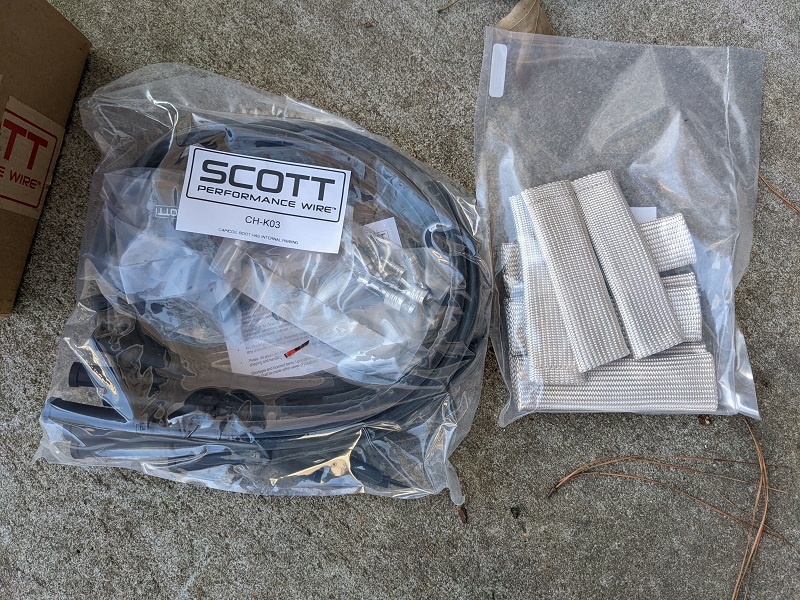
I also had a heck of a time getting the Taylor wires I wanted. TWO orders from two different vendors who said they had them in stock cancelled the order because "Oops, by in stock, we really meant they'll ship from the manufacturer, and they don't have any...."
So after much Googling and reading up on wires used by other guys putting down big enough power that they were having spark issues with OEM wires, I found Scott Performance wires, right here in N.C. Apparently they also make wiring sets for stock car teams?
I called and spoke to them, explained what I wanted, and they were really great about it. Gave me a quote, and I received the wires on time. Mike said that visually they look good, they have a double sleeve, plus I got the thermal socks for them.
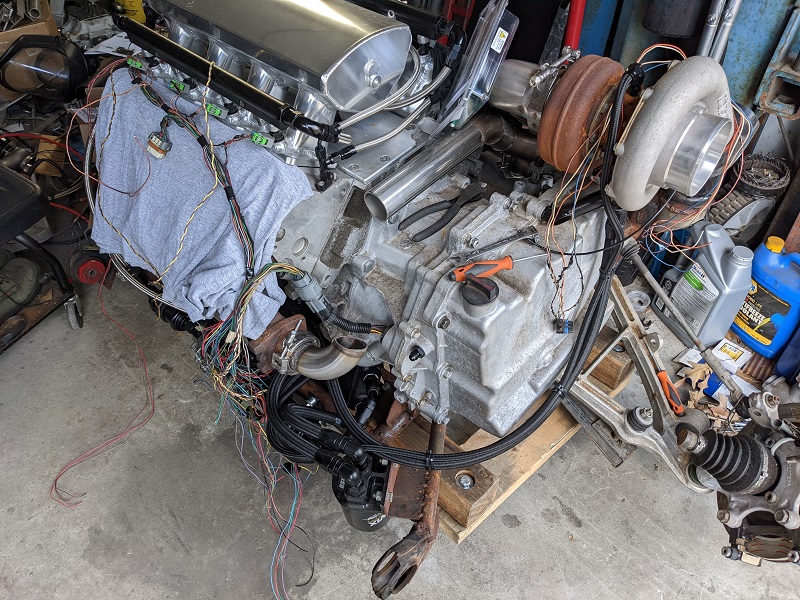
And since we are now waiting on more material to come in to do the exhaust, Mike switched gears to wiring for the moment. He started breaking down the stock harness and fitting it, taking out things we don't need. This will become our prototype wiring harness to run and do testing with. And then it will go in a box as an emergency backup.
Once that is done and all is working, the prototype harness will come out and we'll be using all that wire I bought to make a new engine harness, along with all the spiffy various-degrees-of-shielding loom. I learned about https://lswiring.com/ from reaching out to EFIConnection (they own LSwiring.com as well?). I wanted to find an easy source to get bare connectors. They have a nice system were you can search by engine and it'll give a list of all the connectors they have for it.
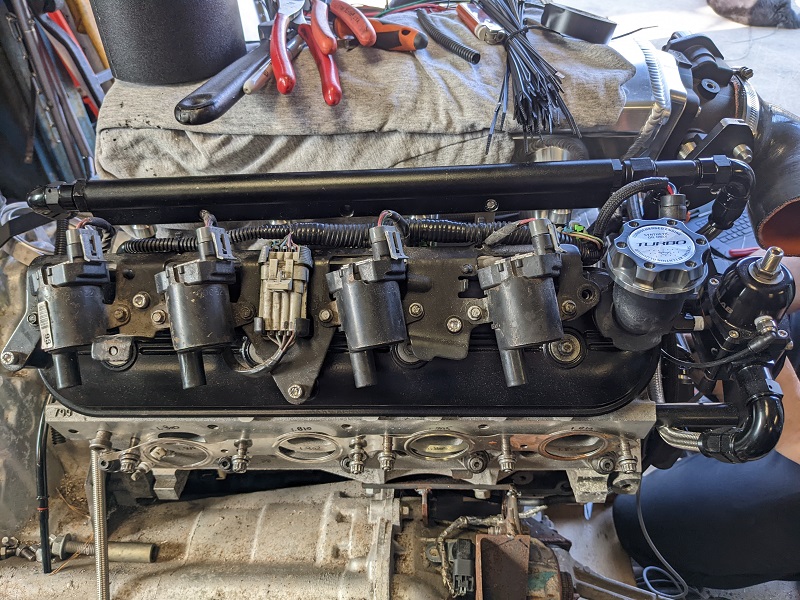
We did find the pushrod length measuring tool. We marked the top (nose?) of the valves, and he put a breaker bar on the crankshaft to rotate the engine assembly a few times to see where the marking would be rubbed off by the tappets. Stock LS4 pushrods are 7.4", the ones I have arriving are 7.475".
[This message has been edited by Trinten (edited 03-26-2023).]
So some of the exhaust materials that Mike needed were coming from a place in Washington state, so unfortunately it didn't reach him by the weekend. Other parts were coming from Summit and one piece of 0.064" t-6061 aluminum from Amazon. With the stuff that did show up, he was able to mock up one more part of the exhaust. The downpipe and the rest needs to wait until the rest shows up this week.
With what did show up, we were able to make the single piece shims. Mike cut them to fit the rocker stand. The holes were chamfered. When those were installed and pushrods put in, he marked the nose of the valve and rotated the engine to make sure all the geometry landed where he wanted it, and it did.
You can see the powdercoated parts were also on. The big bolts for all of the accessories were figured out a while back, with washers so the powdercoating can't be dug/twisted when we torqued down the bolts.
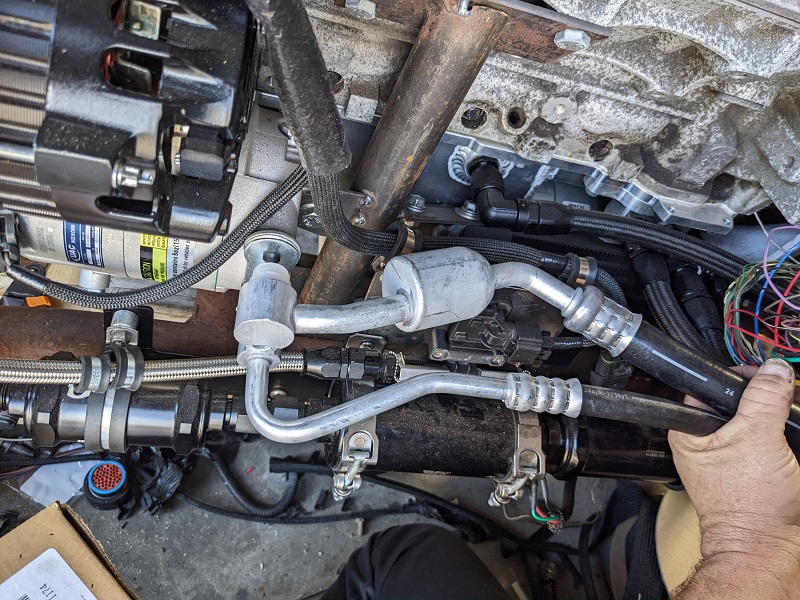
The local Ace Hardware did not have the stainless hardware we wanted for all the p-clamps for the hose and other things, so McMaster-Carr has an order from me for screws, nuts, and washers.
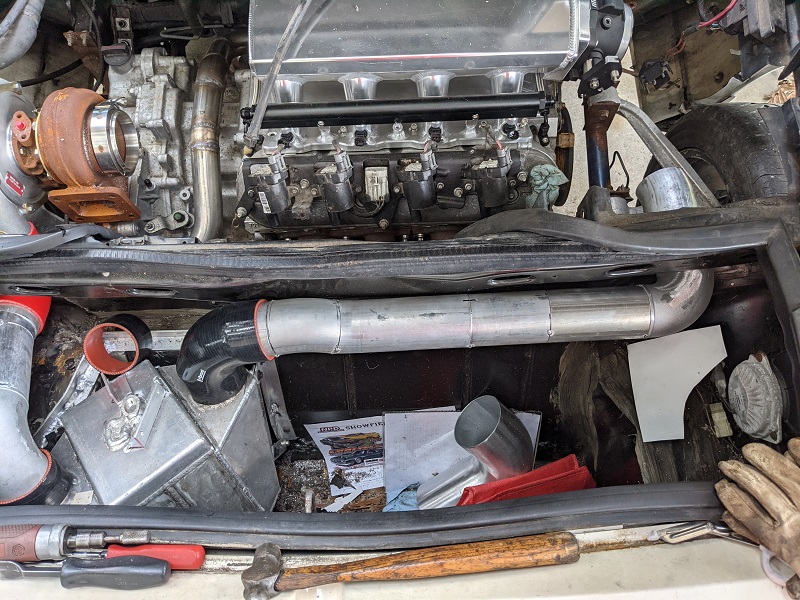
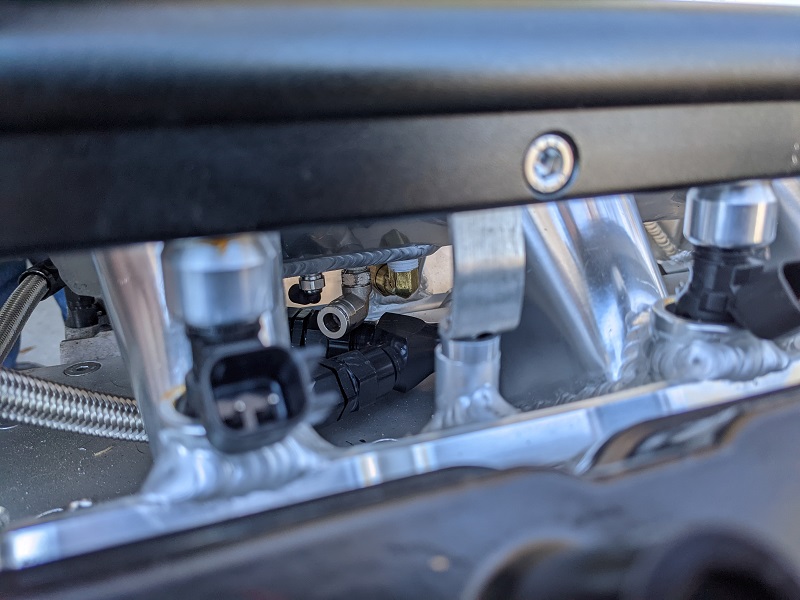
Here is a shot of under the intake where we started plumbing in hardware. The vacuum tube will be using a length of hard tube that will extend out just a little past the intake, and the hose will fit to it there.
Mike really wants to get the exhaust done by the end of next weekend, so I can take that to Jet Hot, and he can take the drivetrain off the cradle to finish the welding on that, and then it goes off for powdercoating.
[This message has been edited by Trinten (edited 03-26-2023).]
Yesterday was 99% watching Mike measure, cut, spot weld, repeat!
I did a little work, replacing some of the p-clamp fasteners with 316 stainless ones, but that's boring stuff, and you guys are here for the cool stuff!
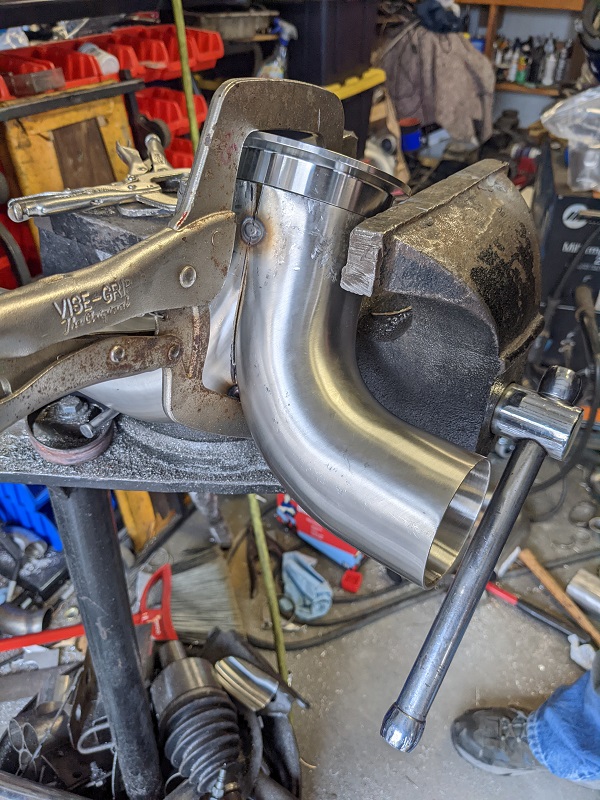
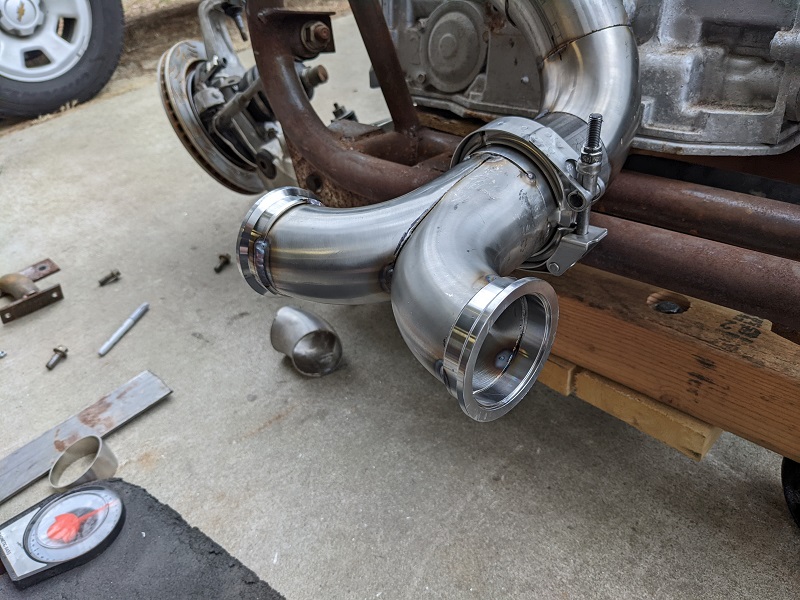
One of the things I failed to find was a smooth transition 90 degree Y-pipe, that was 3" and dual 2.5" out. I could find them in aluminum all day long, but since the exhaust, save for the manifolds, is all stainless, I wanted tobe consistent.
Magnaflow made one, but it's in 409 stainless, which is apparently lousy. So Mike had me get him two 2.5" tight radius 90s in 304, and he made the Y pipe that he wanted.
He said it was a little tricky, since stainless doesn't have the ductability that aluminum does, so you need to be careful about how much you bend it and where, or else it'll either fail right then, or fail in the future (especially with exhaust stuff, if it's close to the manifolds, or is the manifolds!)
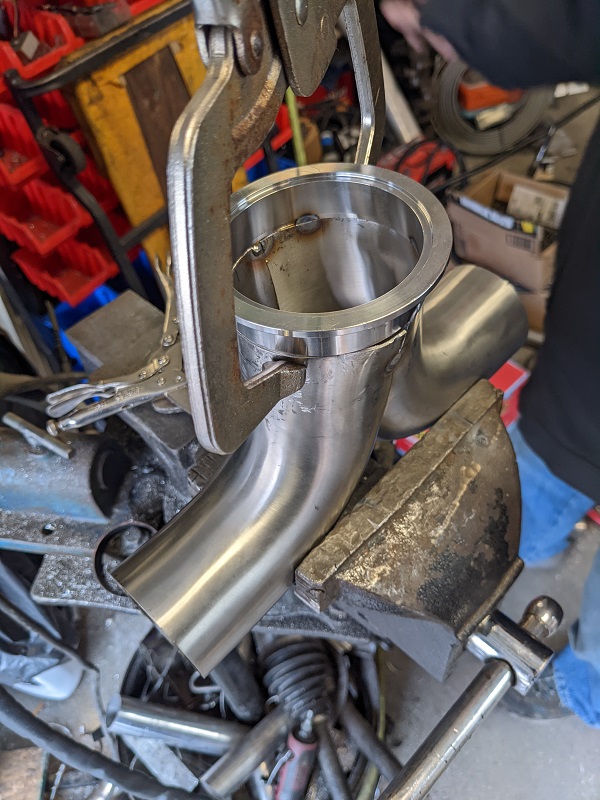
Here are some shots as Mike made the Y-pipe, clamping, squishing, checking, etc. I only took a few pics, but this was a time consuming project.
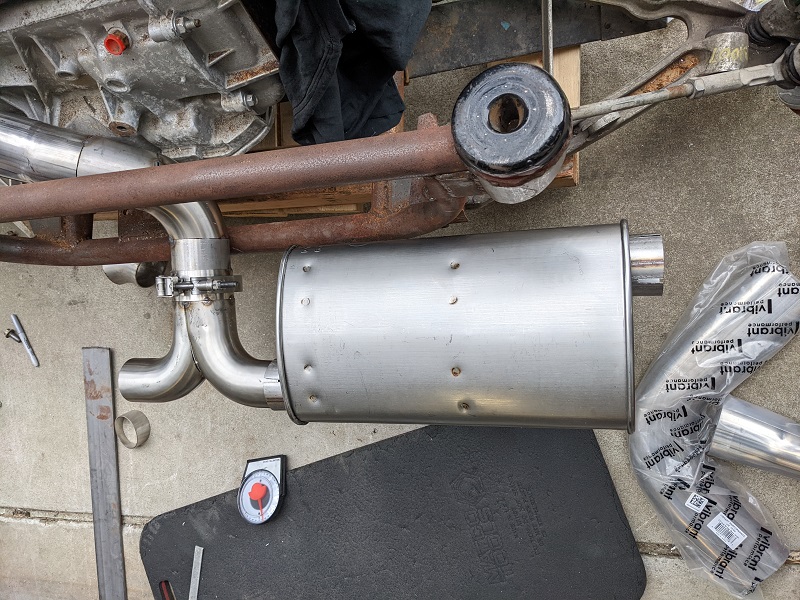
Then once the Y was spot welded, we did some test fits and measurements. We found with the muffler I picked, we had to extend the downpipe out a little more.
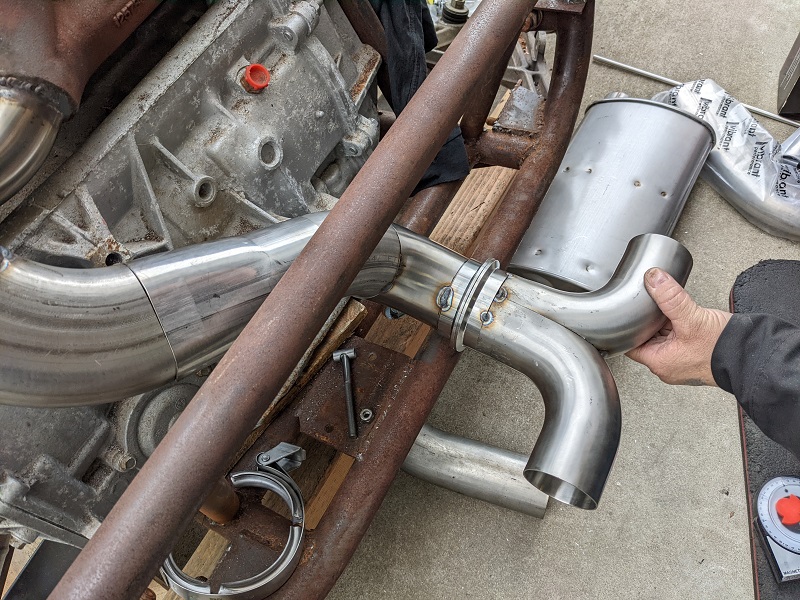
After the downpipe was modified again, we put the v-band on the Y and test fit the mufflers
The mufflers will also be modified for V bands as well. This way it'll be easy in the future to make adjustments, I can pop off the mufflers easily, either for the track or for other mufflers. And the downpipe can be lengthened/shortened now too (if future muffler selection demands it), only requring another v band to be welded on.
This way I can try to find mufflers that will keep the car quiet enough for me to enjoy, but not strangle the engine, and hopefully not anger my neighbors.
Everything will be hung/mounted from the cradle, making it an easy package to drop out once all hoses/wiring is disconnected.
Mike estimated another 10 hours to do the finish welding on all of the exhaust now. Once that's done, that'll be off to Jet Hot, engine and transmission will be put on stands, cradle will be finished welding and off to powdercoating.
[This message has been edited by Trinten (edited 03-26-2023).]
Mike has finished welding up all the exhaust stuff. I didn't get a picture after he put on the wastegate connection. But once everything gets back from Jet Hot, I'll put up more pictures.
Currently all the pieces are on their way to the Colorado facility for their 2500 coating. They couldn't do it in their local facility because the application method is different.
With that on it's way (and about a month turn around time, plus shipping time), Mike has gotten back to the engine harness. He is still working on the prototype one, using the original harness as much as possible.
He is still putting all of the many... many feet of high temp wire loom to work, to make things look as slick as possible, since this will likely be the one in the car for Carlisle.
That last pic is of a mounting bracket he made for the P-clamps to keep the wiring neat.
We talked about doing the wiring in the hyper-hidden slick way that FieroGuru does (and got me top marks when I had that setup at AutoFair in a car judgement stuff).
Mike doesn't want to go that route, so in case anything needs to be fixed or replaced, it'll be easier to troubleshoot and, well, fix or replace it!
There's still a lot to do. This weekend we plan on using the plasma cutter to finish cleaning up the cuts from when we took out the strut towers, take out the dog bone bracket, and start cleaning up the bulkhead.
[This message has been edited by Trinten (edited 03-26-2023).]
We talked about doing the wiring in the hyper-hidden slick way that FieroGuru does (and got me top marks when I had that setup at AutoFair in a car judgement stuff).
Mike doesn't want to go that route, so in case anything needs to be fixed or replaced, it'll be easier to troubleshoot and, well, fix or replace it!
After building things that are in orbit and seeing plenty of aircraft wiring harnesses, I have to say I appreciate an visible and obviously obsessed-on harness over a tuck job. A tuck is certainly a lot of work, but boils down to repeatedly asking the question "Where can I hide this?" Serious harness workmanship is, well, serious, and should be shown off. NASA harness requirements are informed by millions of dollars of testing, inspection, and yes, failures and losses as well.
I'd rather see a harness presented such that it's painfully obvious to everyone that the builder really knew his **** than... not see a harness at all.
[This message has been edited by Will (edited 03-21-2022).]
I really hope you can make it to Carlisle. I've told Mike about your work on your build, I think you guys would have some awesome conversations that I would not understand.
I still need to get the pictures off of my phone, but this weekend we did not get to doing the engine compartment as planned. The day was spent on doing wiring work, and we ran out of Deutsch pins. So I ordered like... 80 of them from Summit in the size Mike told me to get, and got those going to his place by 2 day air. He wants to finish getting the engine harness plugged into the bulkhead connector before the weekend.
Currently having an issue with getting the custom axles manufactured in a timely manner. G-Force says they are at least 10 weeks out, maybe longer due to supply issues. DSS (who I was reluctant to contact due to another member recently having an issue) hasn't gotten back to me at all. I did hear from another company called CVJ who says they do have 4340 bar in stock. Though for custom axles there is a lot of 'you send us this or that', and they make the bar to your specs, assembly it with the other parts you supply, and send them to you. So I'm making sure I understand their process exactly and may go with them unless I turn up multiple reasons why I shouldn't use them.
Jet Hot confirmed they received my materials today, so I paid that invoice. They currently expect to ship it back to me on April 25th.
You're Welcome!
Ehh... my car's ugly and will still be ugly right after I get it running. I expect that after I get it running there will be a shakedown period as well. I'm going to take it to a very reputable tuner to have the tune smoothed. Since I don't have the car running yet, I haven't reached out to schedule, but I'm sure he has a back log as well.
I haven't dealt with DSS myself, but their custom axle service that just requires a flange-to-flange distance sounds good on paper. ...As long as you have inner and outer flanges. You have Corvette hub carriers, so you should be able to order DSS Corvette hub flanges. There are still a very few of the GM racing 4T65 output flanges in the supply chain. I have a pair, and may still have the info to get you to the guy that has more.
[This message has been edited by Will (edited 03-22-2022).]
I haven't dealt with DSS myself, but their custom axle service that just requires a flange-to-flange distance sounds good on paper. ...As long as you have inner and outer flanges. You have Corvette hub carriers, so you should be able to order DSS Corvette hub flanges. There are still a very few of the GM racing 4T65 output flanges in the supply chain. I have a pair, and may still have the info to get you to the guy that has more.
Yes, I have a set of the corvette axles, though we did cut them to bolt the outer stub into the wheel hub so the wheels would stay on securely. So the output flange is the housing for the inner tripod? The 4T65 uses the same size and spline count that (some) 4T80s and the C5 vette differential used? If yes, then that's awesome and I'd be glad to try to get a pair of them.
GForce also makes billet flanges (they call them stubs - or I'm confusing the part you're talking about with a different part). Though their outer one may only come in a beefier 33 spline, which would mean buy another new set of wheel hubs.
And hey, my car is going to be ugly as sin too. I'll keep my fingers crossed that your tuning and shakedown goes smoothly.
They fit the 4T65E-HD, but if swapped left for right, they also work with a Getrag or F23 and intermediate shaft. I *think* the 4T80E uses the same inner CV joints as the 4T65E-HD, so these should work with your 4T80E. If you have both the output flanges and hub flanges, then just measure between them and send the measurements to DSS (or GForce?) and they'll build you a set of axles to connect the flanges.
[This message has been edited by Will (edited 03-22-2022).]
The spline count on what they call the inboard side (which on their site is the side closest to the transmission/differential because the inboard fitting is listed as female, and that lines up with the test axle I bought) is 34 splines
The 4T80 that I have and the C5 Vette are 41 splines.
Some earlier 4T80s, such as the 1995 Deville, had 35 splines.
[This message has been edited by Trinten (edited 03-22-2022).]
It's okay! It's always good to explore new options!
GForce will sell their billet drive and output flanges separately, and will cut the splines either to the stock or to other sizes.
I've made progress during lunch today and finding someone who has 300M bar stock handy and has a 4-5 week turn around time for cutting them to the length and spline count I want.
The thing I'm struggling with now is finding measurements and drawing information on the CV joints I wanted to buy (or even info on the stock CV Joints), so I can figure out if they'll fit/bolt into the Vette's drive flange.
So far, most of my searches for "C5 Vette" "CV joint" turns up complete replacement axles.
I think this weekend, after we take measurements, I'll need to disassemble the drive flange and take a bunch of measurements and pictures of the CV joint that is in there.
I suppose it's possible that the Corvette guys are only shredding splines in wheel hubs and output flanges, and the CV Joints themselves are holding up just fine.
As I mentioned earlier today in another post, Mike has been working on the engine harness, but we had to stop because we ran out of pins!
I also repalced the blower motor for the HVAC, vacuuming out the air box and cleaning the cage while I was at it. When I got done Mike looked at it and said "It looks brand new!" and I said "thanks, no sense putting a dirty part in there, especially if it's pushing air into the car." and he said "Too bad no one will ever see it."
That wasn't meant as a knock, it's a little bit of an inside joke, he has done a lot of things that are really clever or very precise, that we both know that no one will ever see.
So for this prototype, we are using what we can out of the loom that I bought, but in a few spots Mike used the more traditional split loom, usually because I didn't have all the sizes of wire loom we needed.
I also bought some very high end thermal protection sleeving that goes on over the normal loom. It's meant to be a little baggy. Mike used the cool self-fusing tape I bought to close off the ends of it.
Lastly, he did a quick test fit of the LS4 A/C hose to make sure it would clear everthing.
After he held it up and saw it would clear the fuel system and his brackets, he gave me a good natured eff-u, again cursing my 'luck' with how well stuff has worked out on this car, and commenting about how the smallest customization on his Grand National always lead to a domino effect of additional changes.
I just turned it around and complimented him on his craftsmanship and fore thought.
I also shot FieroGuru a question about the spread bar reinforcements for the decklid hinges he made for me (I lost them), thankfully it's an off the shelf piece, he told me the dimensions I needed, so need to get some of that.
For those that don't want to read it, basically a guy was building a kit car and wanted to find axles without getting custom ones made. He went to O'Reilly and they had a full catalog of A1 Cardone parts, laid out with columns like the oil filter lookup books are, and was able to find axles that were off the shelf and fit his kit car, despite the output flange and drive flange being from different cars.
This doesn't seem to exist online (outside of the typical make/model searches), so I sent Cardone an email asking them where I can download or buy such a catalog.
If I can find some off the shelf axles to use as daily drivers until I get my heavy duty axles, I'll do that. Plus gives me a spare set!
[This message has been edited by Trinten (edited 03-26-2023).]
GForce is one of the people I've been talking to. While they don't list separate components on their site, I know they will sell at least a few parts individually (I asked and got pricing). They will sell their billet output and drive flanges.
I'm also talking with another shop that does custom axle shafts, and sends the shaft along with some additional parts (boots, grease) for the end user to assemble. They do ask that the flanges be sent to them so they can ensure proper fit and what not. They are currently the way I'm looking to go. Other places I've reached out to haven't gotten back to me, or don't have the center shaft material in stock.
Today we got out the plasma cutter and took off the dogbone mount to get it out of the way, and did a little trimming on the 'box' for the decklid hinge on the passenger side. It'll eventually come off completely for FieroGuru's cool hinges to go back on, but for now just needed to notch it a little to give clearance for the coil pack bracket.
With the engine back in, Mike took apart the inner side of the cv axle, and we put the output flanges in so we could take some measurements for the custom axles. Mike wasn't happy with the amount of wiggle on the output flange on the passenger side, so when everything comes back out again, he wants to dig into the transmission and make sure everything is okay over there. This is the still-unused transmission I got from Triple Edge Performance, so I really hope this is just fluke of some kind.
He jiggled the one on the driver side and then the passenger side so I could see the difference, and I took some video of it.
We also mocked up things for the A/C hose and marked them, so I can get the Fiero body-side hose ends put on the LS4 hose.
With the measurements in hand, and worried about time constraints, Mike suggested something I hadn't thought to investigate, he suggested I call around to race shops that have machine shops (like the place that did my engine) and ask them if they can cut down my existing Corvette axles and respline the ends. We won't be able to beat on them, but it should let us drive the car and get it dyno tuned. Then the car can move under it's own power while we wait for the heavy duty axles to show up.
That's the best part. The output flange for the C5 Corvette is the same as that found on late model cars that came with the 4T80E. For example if you look on some Cadillacs that came out in 2000 (such as the DTS), it's output flange (what they call the inboard) is 41 splines female. Same as the C5 Vett.
For comparison: GM8248 - Caddy part number ( O'Reilly auto ) GM8214 - Corvette part number ( O'Reilly auto )
When we mocked everything up, we had in the flanges from the Vette on one side, and the Cadillac on the other.
That's pretty awesome! I wonder if the same applies to the current 6T70/75/80 transmissions...
At first glance it doesn't seem to be that way. I pulled up a CV axle for a 2010 Buick Enclave (which should have the 6T75). The output flange (inner) is 27 splines. It appears there were two different generations of 4T80, earlier ones had a different spline count, so it could be the same with 6T75s, a more thorough check across their estate would be needed.
I would guess instead that the mathematical factors that the mech. engineers cranked out all were met by the axles (or at least output flange?) of cars that used the 6T70 transmission, so they reused in places?
Like I had found an article on a Bonneville forum were a guy discovered that the same tripod and drive flanges (he called them 'tulips') were found on another car, which made it better for them versus hunting down the "Rare" SSEI axles. So I think GM just has some master database on parts like this, and they can drop in various forces or factors, and the spreadsheet goes "oh yeah, you guys made a few things that meets all these requirements..."
I just wish us plebes could get access to that!! --- assuming such a thing exists.