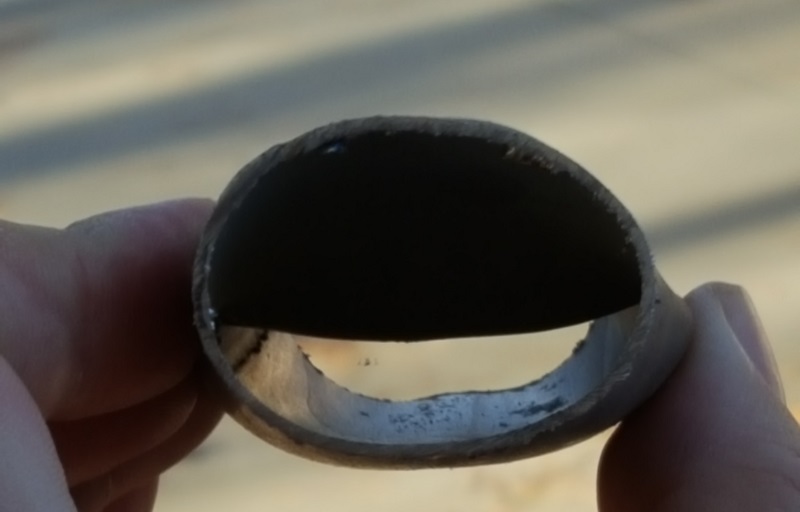
The gas tank was in good shape (unlike mine, which was looking rough), but that expansion tank is no good. So that's going on the list of things to buy!
Start of Page 12 of the build thread. August 4th 2019
Another update already? Why yes!
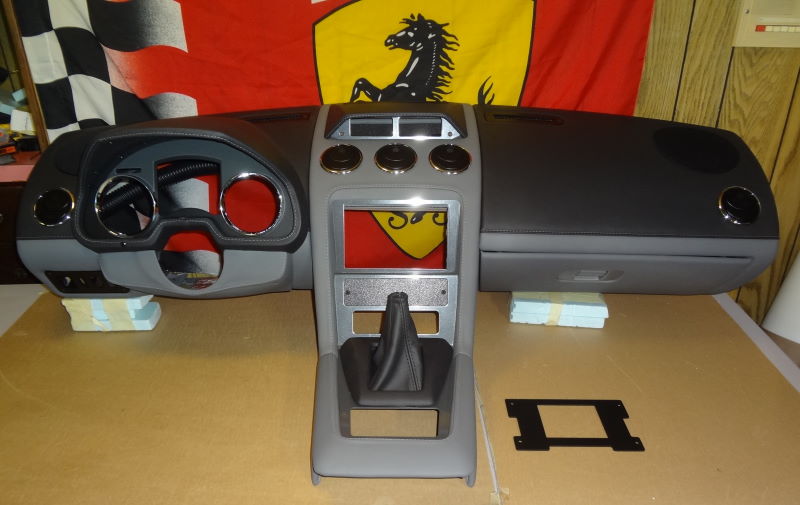
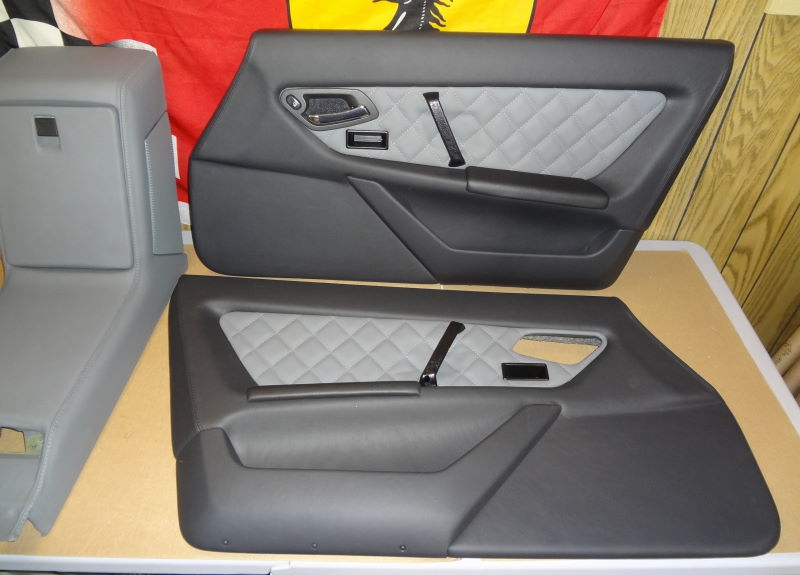
This one is about one of the other fun things I ordered... my interior.
As we all (should) know, Amida has cooked up some Amazing stuff for our cars interior and exterior. When I decided to pull the trigger on the rebuild, I decided I was getting said interior. Long ago, in a galaxy far away, I really loved his F355 interior. Ultimately I went with the G1 Interior mainly because of the double-din space, where I can put my Pumpkin headunit.
Amida was great to work with. He sent me a really well laid out "order sheet", and was great about asking follow up questions and sending me pictures and examples. He was super patient. He was also kind enough to send me out a nice little leather sample set, with notes on the back of each one. Sadly... I somehow lost said sample set. Amida didn't chew me out about it. I did offer to pay him for the replacement of it (offer still stands!)
It shouldn't surprise anyone, but I checked pretty much all the boxes. I got the leather upgrades, because screw vinyl. He did put an extra pad on the arm rests to reduce wear on the leather.
He's been great about sending me pictures with updates as the work progressed.
Just a few little updates for now. Mostly stuff that has arrived or will be shipped. Unrelated note for folks that don't know, Synchrony bank bought Paypal earlier this year, and I've had some really bizarre issues with them lately, and LOTS of finger pointing between parties. Personally I think it's more a technical issue someplace, but anyhow... just an FYI for folks.
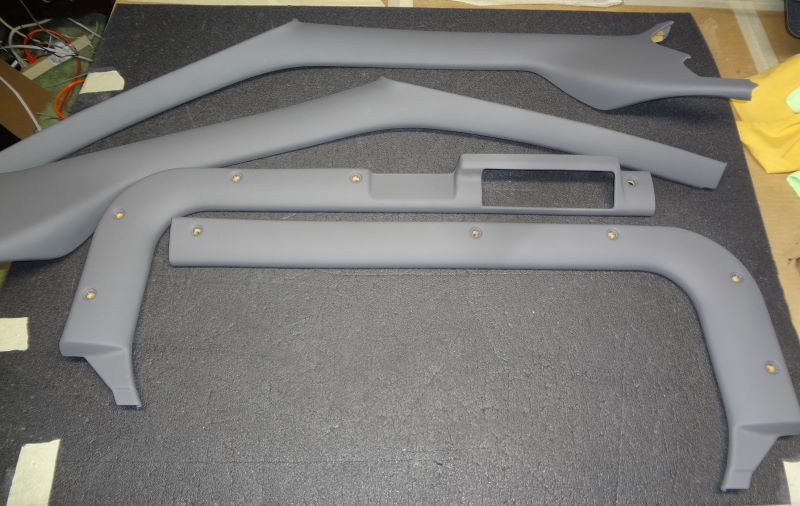
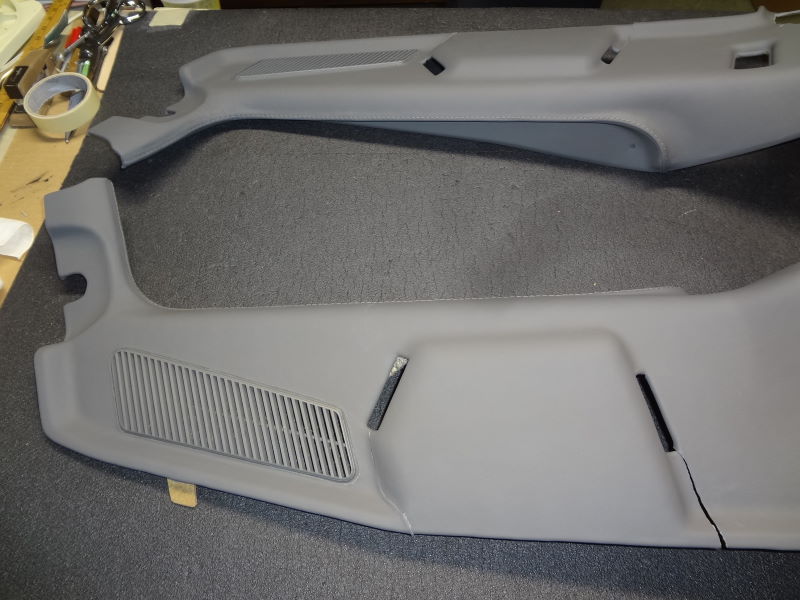
So first up, Amida has sent me pics of the pillars that are all done in their gorgeous new leather wrap! He was also kind enough to repair the clips that broke off, the best that he could. At least the ones I had to send to him. So we'll have to make sure that when we get to putting this part in... it has no reason to ever come back out. Unless I ever get my hands on pristine pillars, then I'll send those to Amida to wrap, and I will carefully store them, coated in leather preserving goodness and wrapped in plastic until they are needed. lol
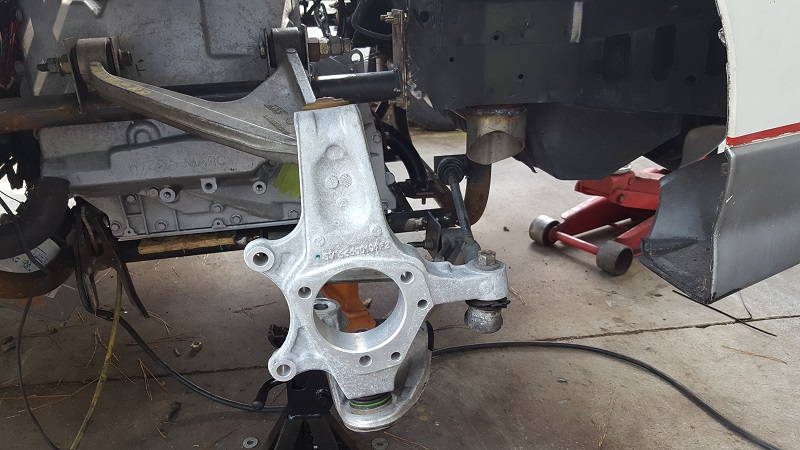
So Mike has been super busy getting the geometry right for the rear suspension. Before he was traveling, he was putting in a lot of weekday hours pinning this down. A vexing item was that the Vette rear suspension mounting points aren't level, they are angled, the front of the mount is lower than the back of the mount. So the end of the lower control arm is "clocked" to be level with this canted setup. This meant he had to find a way to closely replicate that in the space we have, without having to worry about binding up the ball joint, and still being able to build secure mounting points.
He is finally happy with the outcome, and after slapping on (one of the old tie rods that will be replaced), was even happier, there was only one point where the wheel 'twitched' along the path of travel from his first tie rod placement, and he wants to get rid of that, effectively eliminating bump steer.
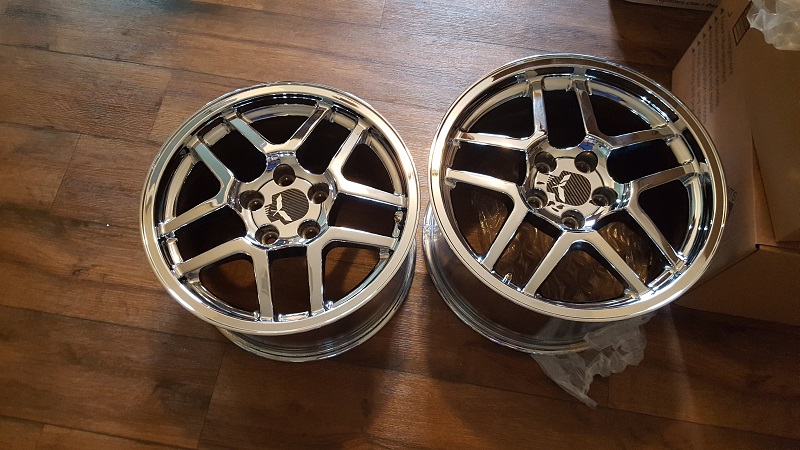
Rewinding to July, we had a little Fiero get together out here (I have pics, but have not posted them on the invite thread we had here), only three Fieros, my Town Car, a Typhoon, and Mikes Grand National. The point of the story is, Mike was talking about the project, and mentioned he wanted to get fatter tires under the car. The wheels that came with all the suspensions stuff we bought are 17x8.5 and 18x9.5. So where do you go from there? Z06, of course.
I spent... way too much time... reading on the Vette forums, finding wheel weights, seeing what fit (yes I know, other applications, might not apply here, etc etc), and seeing what style I liked. I *ALMOST* bought some C7 Z06s that were for sale in a Vette forum super cheap... and wondered why they weren't gone... then googled and saw there was talk of Vette owners doing a class action because those wheels were failing all over the place.
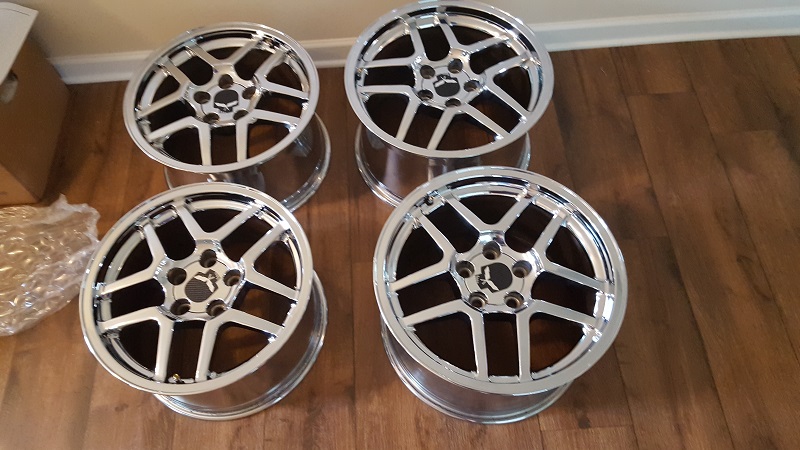
So as I narrowed down my list, I found a set I liked the look of, and are super light. 2001 Z06 wheels. The guy had them for a number of years sitting in his basement, he had put HREs on his Vette. The price I got for these was awesome. There were single wheels, in much worse condition, selling for more than the relative price per wheel I paid. Anyhow, here they are! Mike said he wants to get them to fit... if we can't, I know I can resell them and make a profit. 17x9.5 and 18x10.5s
If we can get them to fit and clear, I'll be wrapping them in Continental ExtremeContact Sport tires. Found multiple articles where this tire placed first or second in tire shootouts, and others that seemed to like them alot. On the Vette boards a lot of the guys seem to be using NItto, so that's another one I will check into.
Oh! So going back to a much older conversation Mike and I had... he said "How loud do you want this to be?" to which I said "I want it to be as quiet as possibly without it seriously impacting performance." "So like my Grand National?" "Exactly." which sounds nice, but isn't obnoxious until you jam on it. Basically the history here is, when I first got my last Fiero with the V8... there was no exhaust system. At all. Effectively straight pipes. So it was horribly loud and headaches ensued with even short drives at low speeds.
When I had the new engine put in, and later the EFI stuff done, upgrades were done to add beefier exhaust components (that's why the last one lost the 'suitcase wedge' in the trunk). It was better, but a few hours at high way speeds was still headache inducing, and there wasn't even any resonance, so no drone, just noise.
Anyhow! Mike said okay, and told me he'd send me a list of stuff to start buying... and part of my new exhaust system has shown up. He swears it'll make the engine noise a little quieter, but this is the strangest muffler I've ever seen!
If we can get them to fit and clear, I'll be wrapping them in Continental ExtremeContact Sport tires. Found multiple articles where this tire placed first or second in tire shootouts, and others that seemed to like them alot. On the Vette boards a lot of the guys seem to be using NItto, so that's another one I will check into.
I'm guessing since those are chromed that they're repros rather than originals... the original sizes are 17x9.5 and 18x10.5. Just hoping to save you some pain when you're ready to order tires.
I would go with a bigger front-to-rear stagger than the 'Vette had...
[This message has been edited by Will (edited 08-29-2019).]
No, these are the originals. I very well could have mistyped up the sizes, I was going by memory on the diameter. I verified the casting marks (and yes, there are forgers out there that try to do casting marks, but they don't do them well). I will go back and edit my post appropriately!
I've already priced out the tires. I do my homework
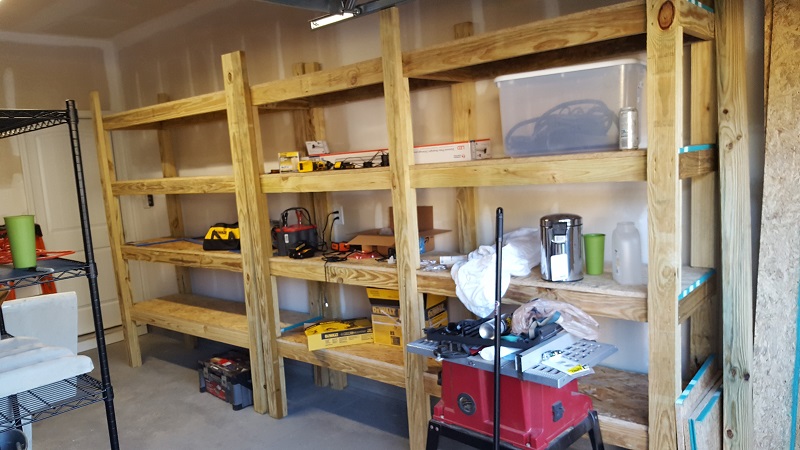
I know I haven't done some updates in a while. As you might recall, Mike had a pretty busy month mostly out of state last month. And this month we had the fun hurricane (I was fine, in-state enough where we just had some rain on Friday). A great friend drove 6 hours from his off-site job to hang out and help me build the first waves of shelves in the garage. These shelves are heavy duty. Pressure treated wood, 3/4 inch OSB plywood, and intermediate pressure treated wood, so all of the weight sits on the 2x4, not on the screws (we went through 4 lbs of steel screws. Everything was cross secured). I can park my car on these things! Now to finish organizing my garage! Since then I've painted the decks (top and bottom) with a good oil based primer to protect them from moisture, leaky chems, whatever. In a year I'll paint the uprights. (Thanks again Chug!)
Now onto car stuff!
So I mentioned Mike is happy with all the positioning of the suspension on the driver side. He's going to do some careful work and framing so he can duplicate it exactly on the passenger side. The new tie rod ends and hubs are sitting for final assembly (after powdercoating).
Now with that done, Mike slapped the wheel on, so we can see what the 9.5" wheels will look like on the back.
At some point I'll go out there with a front and rear of the Z06 wheels, and a few rolls of bubble wrap to "build up" the wheel and mimic the dimensions of the tire to get an idea of fitment. That's entirely my idea. I haven't asked Mike on that one yet. Figured it'd be easier than finding some "good used" wheels to wrap on a couple of them for testing, then if it does work (or doesn't!) deal with the wrapper again.
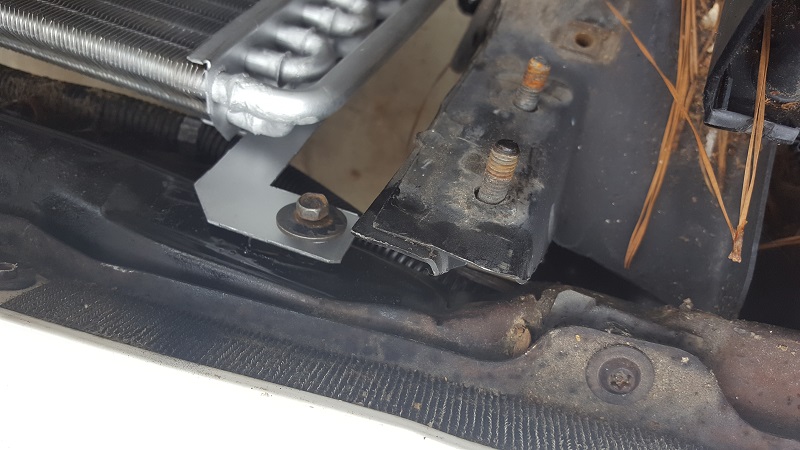
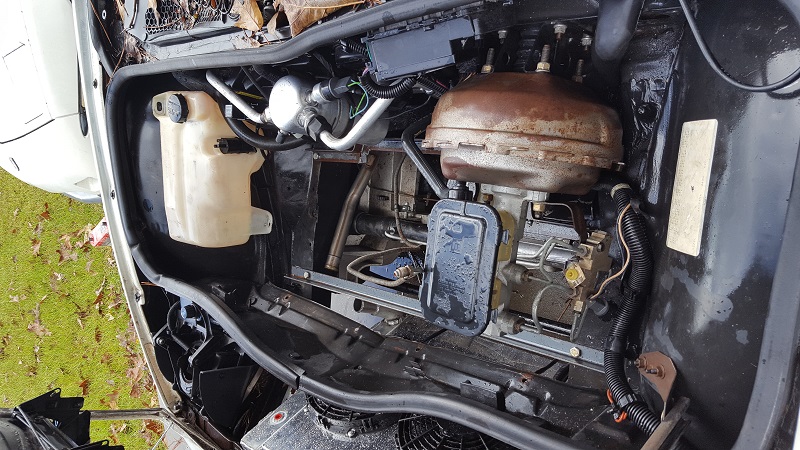
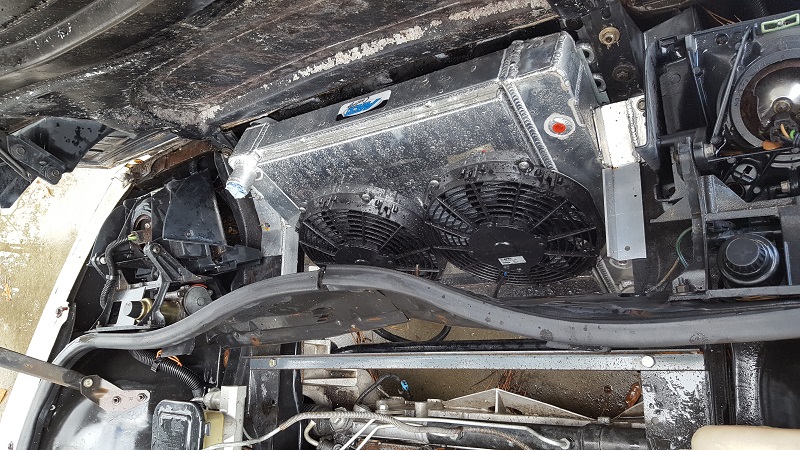
Mike has gotten the radiator to a place where he's happy. The new build car didn't have a condenser in it, thankfully I had a new one sitting in a box over there (I've had it for a few years, because of course I did).
Now as some might know (I didn't! Mike educated me), the condensor mounts by screwing into these rubber mount things. Which were just wrecked. So Mike made a small cut so he could put in a J-hook. I think I asked about vibration. I don't remember what Mike said, so not going to put words in his mouth. But he's building my car with the same care and eye to dependability that he's put into his prize Grand National, so I'm comfortable with whatever he said.
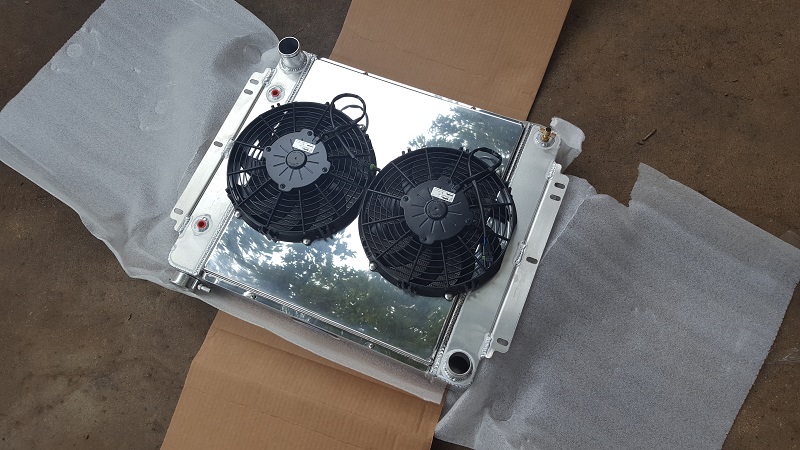
The Afco radiator came with mounts designed to go into a completely different car. Mike felt bad about slicing into a pristine unit, but with the mounting brackets it had, it was about a half-inch too wide. Mike had a better idea for mounting it anyway, so off they went!
Brand new.
Mounts and a shot underneath
I also asked Mike if he can build a skid plate with support bars going to the frame, to protect the radiator from dips, speed bumps, etc and help with ducting, he said yes. He wanted to put more weight up front anyway... so this helps!
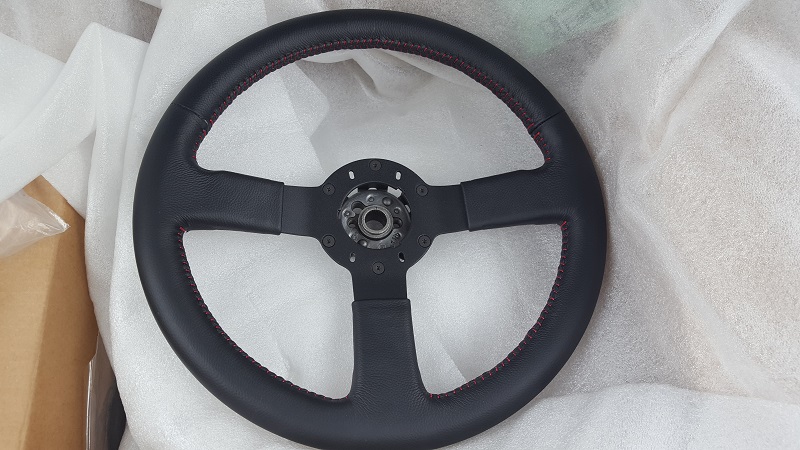
I also sent off five (in total) GT steering wheels to be restored and re-wrapped with leather. One of them was done up in stock Indy colors for Mike's Indy build he's prepping for. Another is for a friend of a friend in the community. The remaining two spares... I don't know what I'll do with them. Probably coat one in a good leather protector and put it in a bag and keep it in the house where it's temp controlled. Maybe years down the road, when these are hens-teeth rare, I'll be tempted to sell one.
Here's a pic of one of mine.
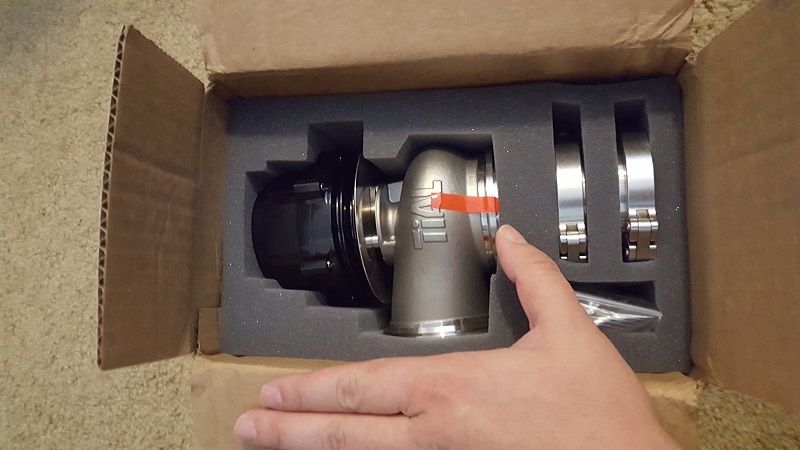
My TIAL wastegate also showed up. It's a 60mm. Mike wanted me to get a 50, but they don't make a 50, it was 44 or 60. Since my turbo has an anti-surge cover, the 60 should be okay. At worst, I'll sell this one and get their V44.
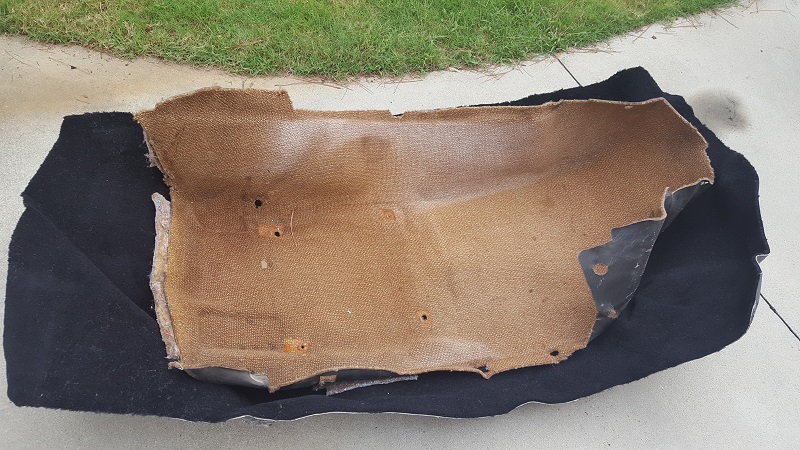
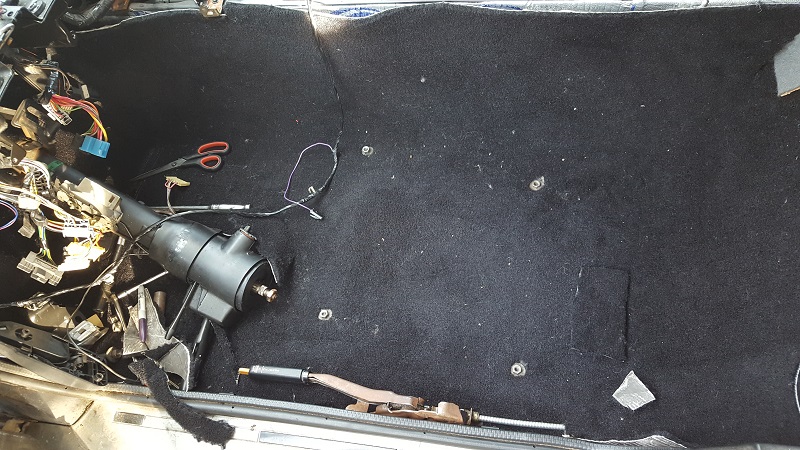
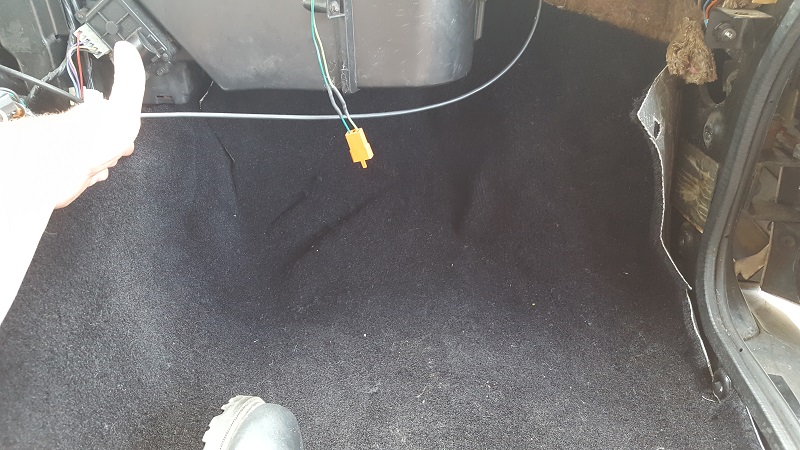
Now for the low of the recent efforts. I bought the replacement carpet for the car from ACC. Keep in mind the interior has been out of this car for a long time, and I made the mistake of assuming the carpet that Mike pulled out hadn't been tampered with by the previous-previous owner. In hindsight, I realized they would have during their misguided subwoofer escapades. Anyhow, I used the old carpet to try to template the new carpet. I'll chalk it up to exhaustion that I didn't stop to question why the new carpet was so much longer... *sigh*. Anyhow, Mike says we can fix it, and no one will notice.
SNAFU aside, I was also disappointed that the new carpet was not better molded to fit the dips and risers of the floorplan. After the carpet was put in, when you would push in certain places, the carpet would shift and not lay nicely. Granted, this is mostly by the firewall, so it's not likely to be found by accident.
Anyhow, onto some of the pics of my first attempt at carpet replacement... I'm debating on if I want to buy another set and try again. I will wait and see if we can fix it, and I'll contact ACC to see if I can buy some panels of the carpet for repair if needed.
I have three major big boxes there with my awesome new interior stuff from Amida!! We did not open the boxes yet. I also need to contact the Fiero Store, my new headliner has not shown up yet.
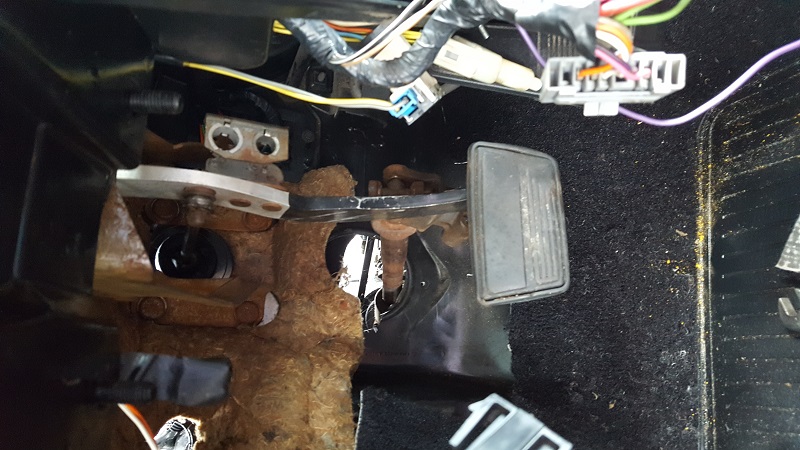
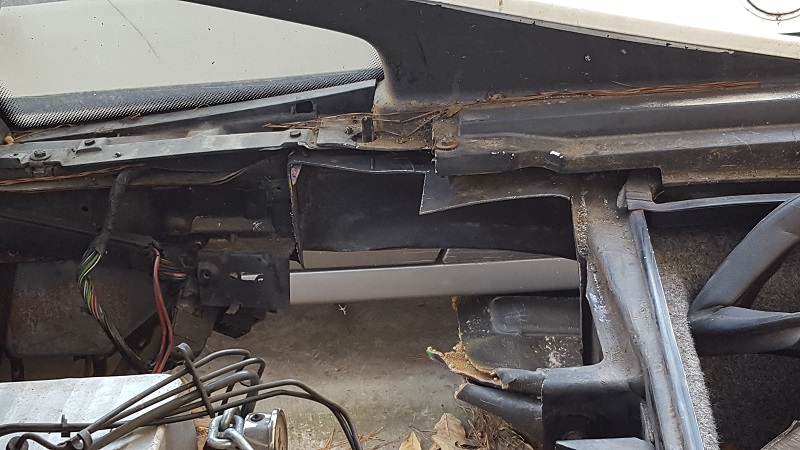
We also tried taking the manual pedal assembly out... and discovered that a major wiring harness blocks it from coming free. So if anyone knows a trick to getting it out so we can put in the automatic pedal assembly... without doing a bunch of wiring, please let me know!
Last update for right now. Some years ago, IMSA GT was making some cool carbon fiber custom badges. So I put in my order. Black and red carbon fiber and pearl paint, with my original Fiero's name, and the (much niftier) Pegasus profile. Life happens, so it's taken some time for it to get done. I'm very happy with the outcome!
[This message has been edited by Trinten (edited 06-04-2024).]
Originally posted by Trinten: So I mentioned Mike is happy with all the positioning of the suspension on the driver side. He's going to do some careful work and framing so he can duplicate it exactly on the passenger side. The new tie rod ends and hubs are sitting for final assembly (after powdercoating).
We also tried taking the manual pedal assembly out... and discovered that a major wiring harness blocks it from coming free. So if anyone knows a trick to getting it out so we can put in the automatic pedal assembly... without doing a bunch of wiring, please let me know!
Oh, that's the orientation of the parking brake on Covettes.
I've done two auto to stick swaps and had that problem. There's a gusset you can cut with (I think) tin snips, then bend it aside. Once done that allows you to move the harness (just barely) out of the way of the pedal box.
[This message has been edited by Will (edited 09-17-2019).]
Very very cool! Im sure the turbo will be fun, good call on the interior- looks great! I got some carpet for mine off of ebay for $30, fit pretty good. I used some of the foil insulation from home depot underneath.
Trinten, you know of those wheels don't fit your car I know a certain Blazer that they would look really good on I'm glad those shelves are going to get some use for "What's in the Box" mysteries!!! Let me know when you are ready for the next set. Maybe you won't get a wonky set this time!
When Chug was here and we were moving stuff around to clear the area for the shelves, there were numerous Rockauto boxes... some still sealed. A few, I could tell by weight/size what was in them. But some had been there for so long, I didn't know anymore. It became a joke, at first he would say "What's in this box?" and it was a fairly serious question, gradually his inflection changed and the intensity of the question spiked, to "Se7en" levels. It was funny.
As I've been putting my new shelving to use... I have found the following.
1. An extra refurbished Fiero A/C compressor (another one is already at Mikes).
2. A brand new roll of the same 1/4 inch sound deadener that I just recently used (paperwork was still in the box. I bought that about 6 years ago. Originally bought two rolls. A partial roll was left in there, too.
3. Eight feet of 2.5 inch stainless steel tube, left over from the exhaust work done around 2012.
4. Two complete sets of spark plugs for my Town Car (it looks like it was on closeouts... I bought a lot of Town Car stuff that was on closeout, ball joints, brake pads, main bearings, gaskets galore, crankshaft seal, valve stem seals, spark plug boots.... I have enough to just about rebuild the engine in that car).
5. 4 NGK Iridium zfr6fix-11 6441 spark plugs... I looked these up on Summit, no car I've ever owned took these. I remember once someone giving me a box of odds-and-ends car stuff. This must have been in there.
6. A remanf. stock Fiero Alternator ( I think).
7. My holley carb that was on the original V8 engine in my Fiero.
Anyhow. The upside is - excluding some moving boxes which I'm relatively certain what's in those, I've unpacked (or at least identified) what's in all the various boxes in my garage, and have consolidated the bulk of it to the plastic bins.
I need to buy more bins.
Going to put up some odds and ends in the mall soon, and on craigslist. lol
[This message has been edited by Trinten (edited 09-22-2019).]
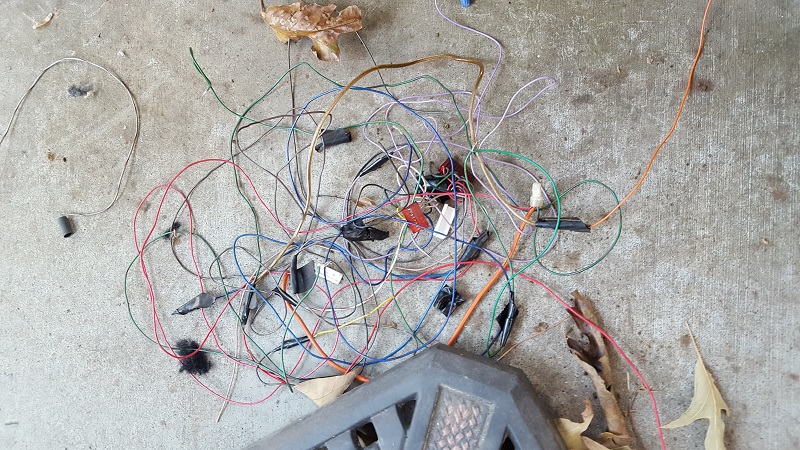
The easy stuff first. As Mike dug into the wiring (messy crap from the aftermarket stereo and speakers, radio harness), I traced and removed the wiring that was left from the aftermarket alarm system. It was pretty amateur. Twisted together and bound with electrical tape. Nothing was even soldered. Mike said that some shops will even do crap installs like that because it's fast.
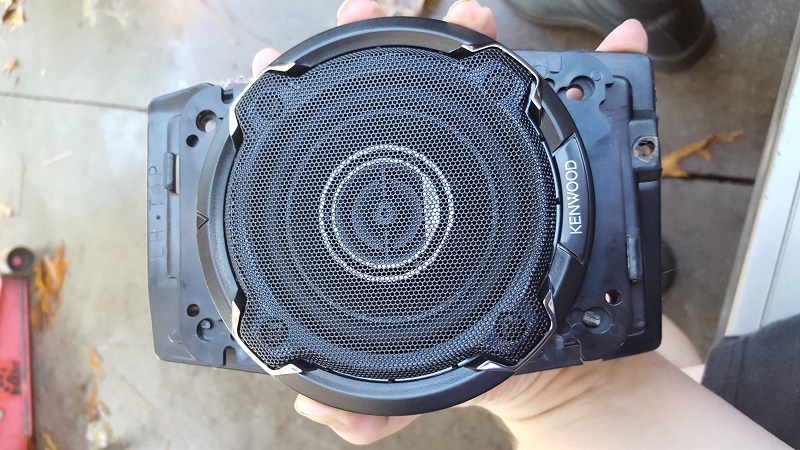
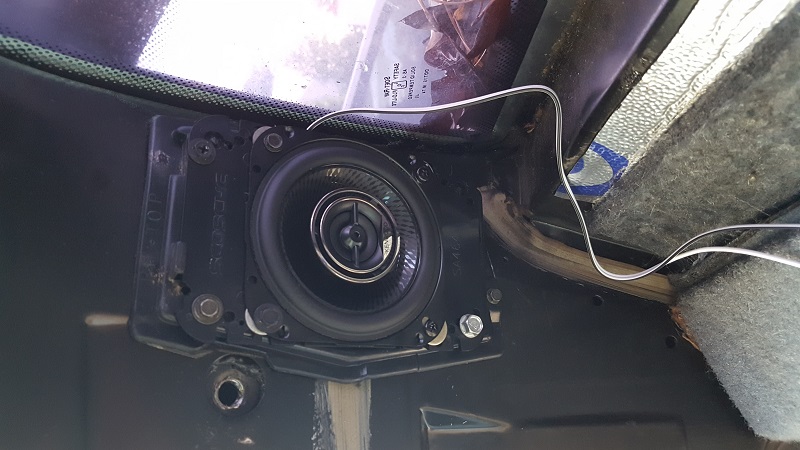
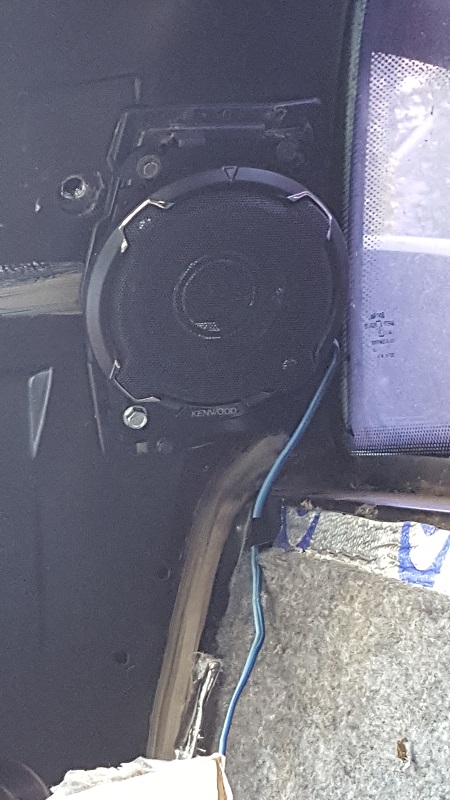
While on the topic of speakers - I went to put in the new 5.25" speakers that Crutchfield said would fit the B-Pillars, they even recommended a set of adapters. The adapters didn't quite work as intended. Some of the holes are cut almost like they're for keyholes, but not orientated right. This is NOT the final setup. I'll try to find a screw with a 'shoulder' so I can get rid of the washer, or trim it down, on the side with the shroud.
My question is... does anyone know if the B Pillar cover will fit properly over the speaker if I leave it's shroud on like this???
With that shroud, I'm guessing it adds almost 2 inches to the width. Because it extends past the adapter, I'm guessing it won't fit under the pillar. Thoughts?
On the other side, I removed the shroud... admittedly by dropping the speaker when trying to get it out of the plastic. It looks like it fits better. BUT I had to put washers between the back of the speaker and the adapter plate, or the adapter flexed and wouldn't mount flush to the b-pillar!!
Should I (more carefully) remove the shroud on the first one and set it up like this?
Onto other things!
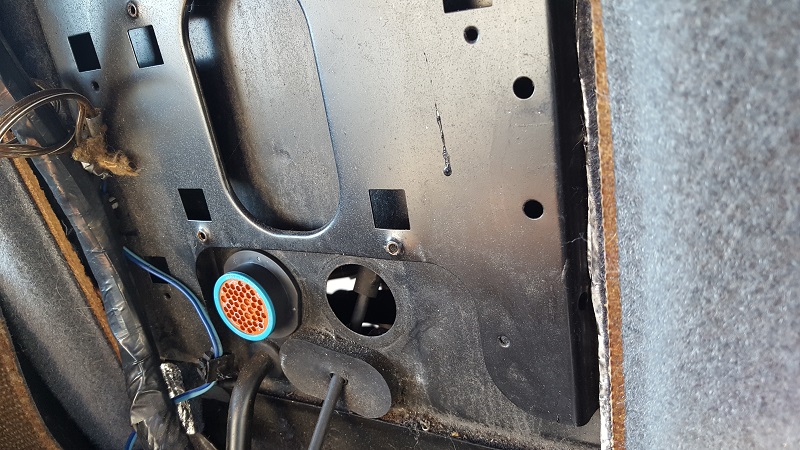
Mike had me get a particular type of wiring harness connector - two sets of them, one for the front firewall and the back. They are pretty nifty, you pin them, wire them, and they press together and have a screw-down sleeve. Plus, they fit almost perfectly int his space! With a rubber grommet, they'll be snug.
I also pulled out the brake pedal from one of Mike's other Fiero's and installed it in mine, and put back the S10 brake booster.
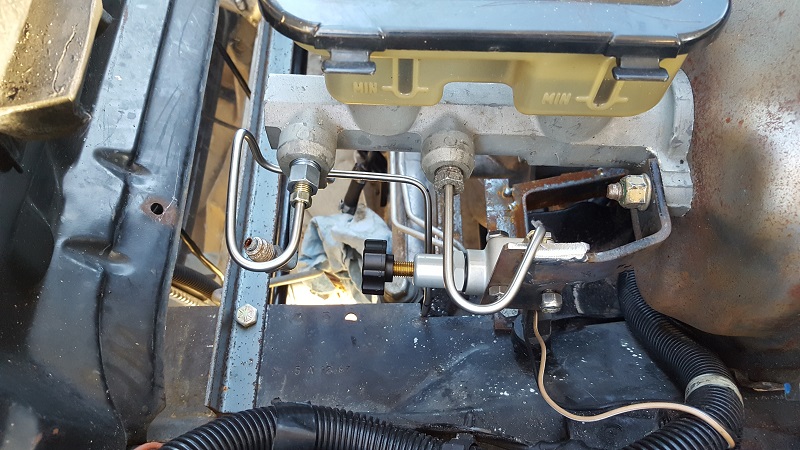
Mike has been busy doing mock-ups and modifying things. My awesome new radiator had to be tweaked, and will require one more tweak. The filler cap made it SLIGHTLY too tall, and it wouldn't clear the hood. He had a small piece of aluminum that was the right thickness, but had two small holes in it. He filled in those holes, removed the filler cap, and welded it over. He also modified the lower tube to clear the sway bar so it can connect up easily.
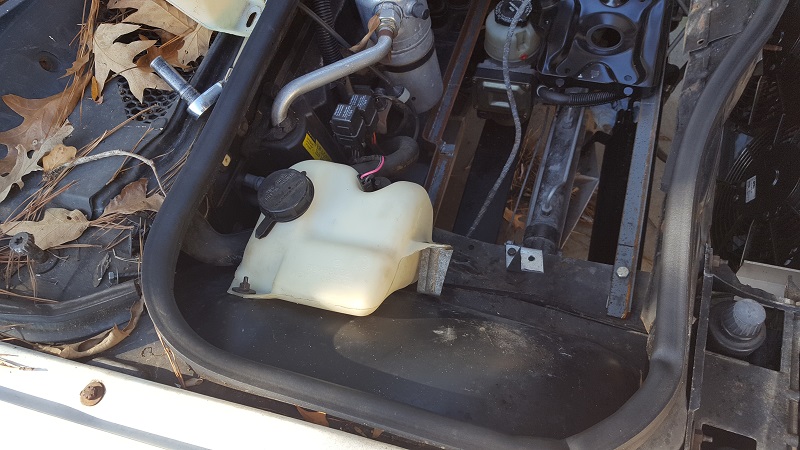
We also discovered that the windshield washer tank on the 84s are smaller than the 87. I might get one of these to buy us a little more space.
Mike has planned out where the EHPS pump will go (he used my idea of bracketing it to the steering rack and having the reservoir come up through the new "floor" he's making). Where the battery will go (we're forgoing the under-the-passenger-light idea). And roughly how big the water tank for the intercooler will be.
I also found I need to get some more of this foam stuff to go around the vents before the new dash goes in --- anyone have any suggestions on where I can get this?
And lastly... the darn carpet!! I tried to make "relief cuts" so it would fit flush/better around the compound curves and such... I'm just really not happy with it. The passenger side is not nearly as bad as the driver side. I'm trying to find an auto-interior place that will come out to the car and either fix my mess, or just install a new set of carpet. I'm leaning towards a new set. I'm also sad that the molding on the floor was not as good as the pictures on ACC's website.
[This message has been edited by Trinten (edited 06-04-2024).]
Thanks Amida! I did try using jute from the old carpet to 'bolster up' the dips in the floor pan... the results were so-so.
I ultimately decided that it was insane to put all this effort and top-quality parts into a Fiero with a carpet that didn't look it's best. To that end, I asked Mike if we could arrange our attack plan in the following order:
1. Finish up the stuff under the hood (updates on that below with pictures! And maybe some jokes! Maybe not! I haven't typed it up yet!) 2. Finish the rear suspension so the car can sit on it's wheels and be rolled around. 2a. Maybe also finish wiring repairs and modifications now, too. 4. We'll trailer the car to a professional auto-upholstery place and have them put in a new carpet. I have found one and let them know I'd like them to do it same day, so we'll coordinate with them. 5. Start finish mechanical work in engine compartment 6. Awesome new interior goes in last (less risk of any damage or staining to the leather this way).
With the weather getting colder, and days getting shorter, working in Mike's driveway is gonna be tougher. So next weekend he is planning on finishing up another customers GNX clone (he was waiting on axles to show up), so that can be rolled out of that garage bay, and we can move my car in there. His garage has a heater and ample lighting, so it'll make working on it easier.
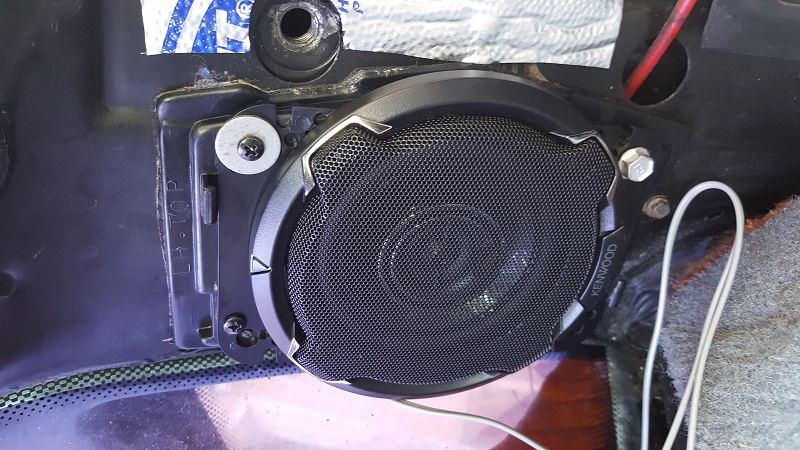
Recently Mike has been focusing on stuff under the hood and coolant tubes running under the car, while I finished goofing around with the new B-Pillar speakers.
I grabbed a stock B pillar and fit it in the car, and checked around on all sides, (and through the glass in the back), and it appears it'll clear around the speaker with it's "shroud" in place. When we go to put the interior in and get to the B-Pillars, we'll use this stocker as our test fit, as I don't want to risk damaging any clips on my leather-wrapped ones with a test fit that might need to come back out.
So here is what the new speakers look like:
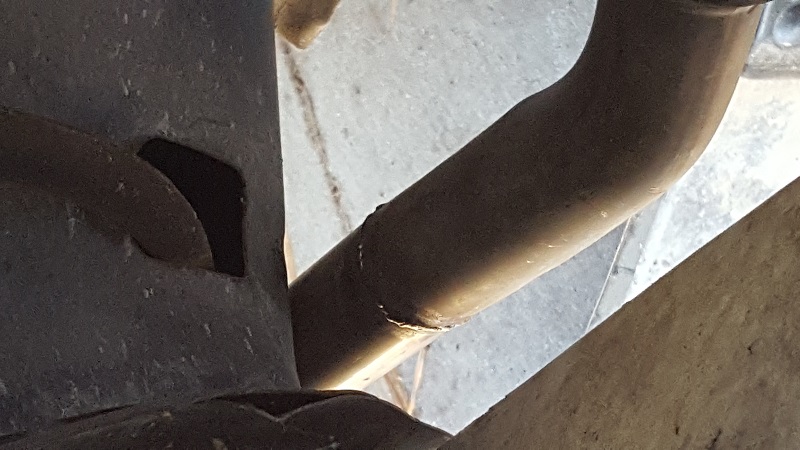
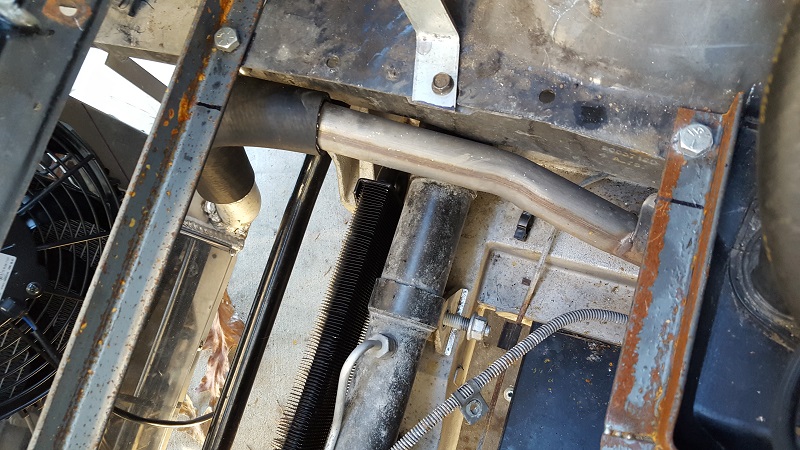
Mike discovered that the coolant tube on the driver side had been crushed (we all know how that happened). Since these tubs have been empty for so long, he wormed the coolant tube out, cut out the crushed portion, had some aluminum of the right wall thickness and I.D., and welded it in place.
Mike is a master fabricator, so the weld bead was awesomely done, and not all "globbed" inside of the tube. I couldn't get a good picture.
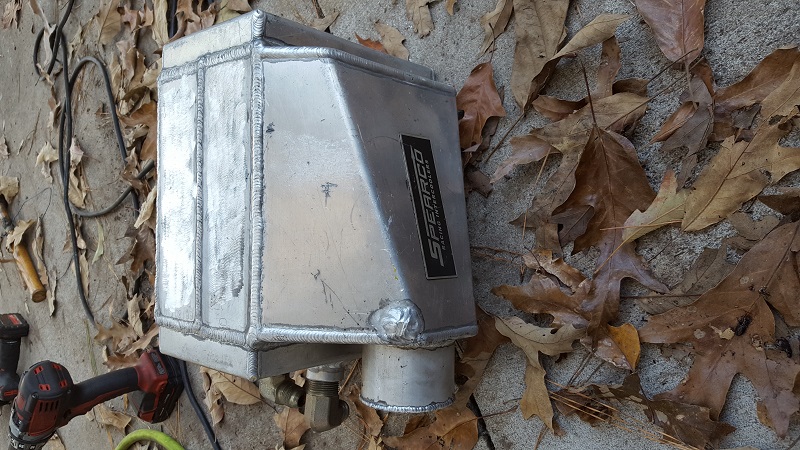
On the topic of cooling... he is selling me one of his old air-to-water intercoolers. It's a Spearco unit.
This thing is a monster. I want to say it was around 12x12x6. The reservoir he's going to put up front is going to hold around 4-5 gallons of water, and have a big enough neck to drop ice into.
He's still thinking about a solution for the tubs to go from the intercooler to it's reservoir. his first one was a double-box tube - super resistant to damage, but have to powdercoat it to protect against rust, and heat transfer from the tubes being side-to-side.
For transmission coolant lines,he had me buy copper-nickel tubing, so I'd never (reasonably) need to worry about rust.
We did finish mocking up the radiator hoses. I apparently only took a picture of the lower side test fit.
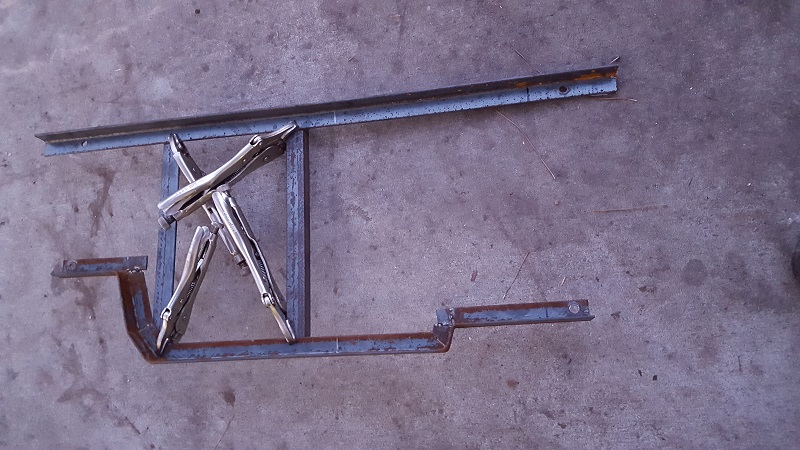
"Do you know what tool a fabricator can never have too many of?" "No?" "Vice grips."
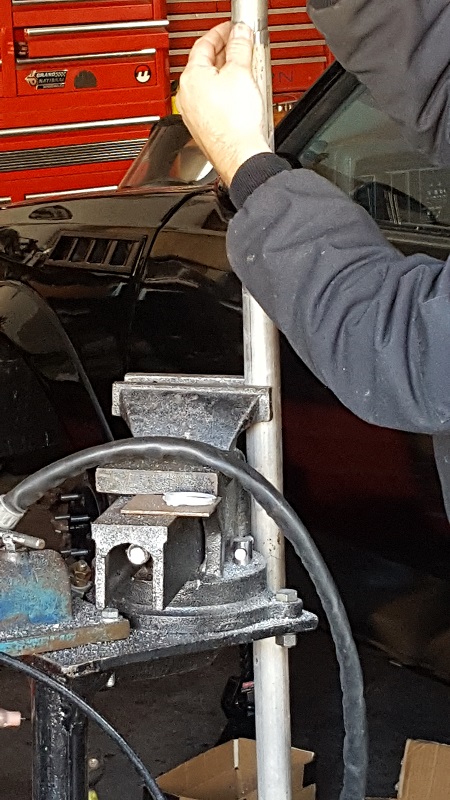
That above picture is the frame to the "removable floorpan" that'll be under the hood. It will bolt in place. That box with all the vice grips is where the battery tray will be attached. You can see the outside part of that frame in other pictures, as it's been installed for test fitting things for a while.
Speaking of test fitting! We connected the Z06 power steering cooler to the EHPS pump. The hose that came with the cooler was the correct size for that return connection. Originally, that connection was turned about 45 degrees to the left. Mike loosened the metal band (screw/worm style), and after making sure the reservoir for the power steering unit wasn't "keyed", he very carefully clocked it to where he wanted it, with the comment of "You are so lucky. Usually when people get into doing crazy mods like this, there's a lot more obstacles. The way this is all going together, it's almost like it was made for it."
He was commenting not just on the clockable part, but that the mounting points of the pump lined up with mounting points on the power steering rack, and cleared my brake booster!
When the "floor" up there goes in, it will have a cut-out that the reservoir will peek up partially through it, to allow easy checking and filling if necessary.
Mike also had me get a brake proportioning valve. Since we were doing brake lines up front, I brought over an unopened 25' spool of stainless steel 3/16ths brake line, and a partial spool of it. I've had this since 2008, when the hard line on my '94 town car blew out, and the auto shop had to hand bend/fabricate new brake lines, because prefabs weren't available anymore.
One of the original pieces we actually were able to reuse, but it looked so lousy next to the really nice new stainless, that Mike fabbed up a replacement.
Testing fitting the bracket for the valve and one of the lines:
And it's "final" assembly:
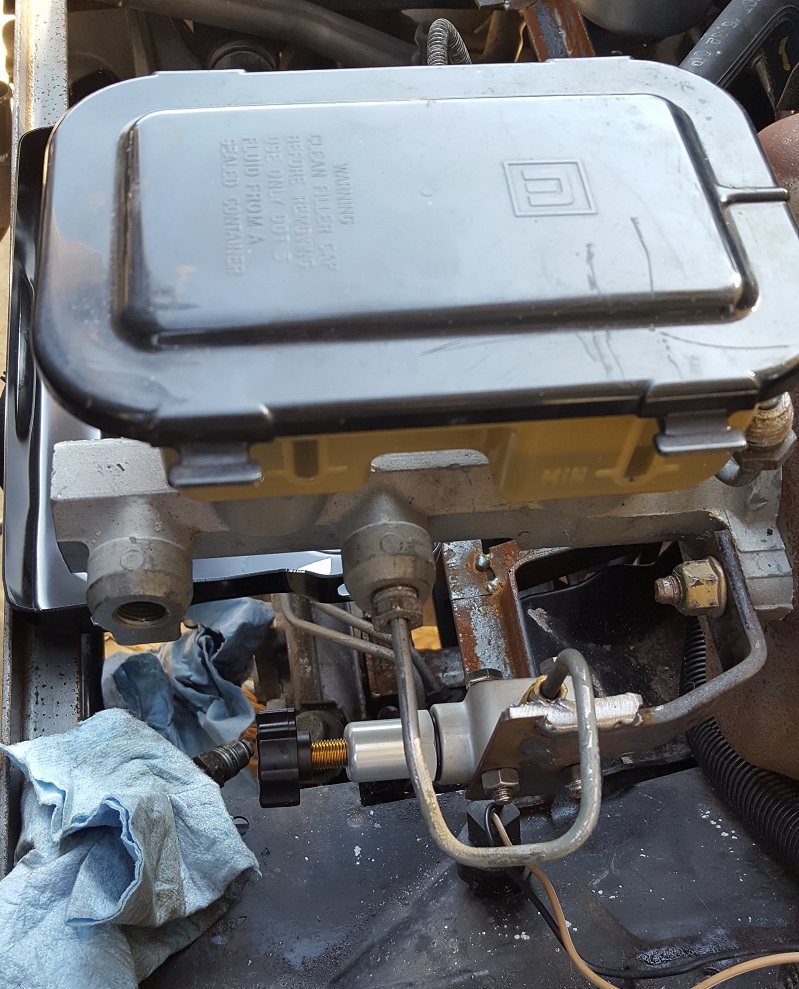
I also did manage to get an '84 Windshield washer fluid tank super cheap on ebay, so took out the higher capacity one and put this one in for now. This is to give more room for the intercooler water tank up front.
And lastly, in the back Mike finished removing the rest of the unneeded strut towers! There is SO MUCH MORE ROOM back there now! Mounting the turbo and other things don't seem to pose any problems now (it was possible before, but would have made some repairs/maintenance a pain in the butt -- and I'd like things to be accessible for just those reasons.)
I also ordered an LT1 Cruise control unit, so servo driven but doesn't need all the other inputs and such that came on some LS cruise control systems. This will be a "simple" matter of extending and matching up wires, and tapping a 4000 PPM feed to the unit (either from the speedometer or from my 0411 PCM).
Right now I'm chasing down cables and such to connect the automatic shifter to the 4T80 transmission (I started another thread on that, because I was having some trouble finding the info I needed. Thankfully a member here replied with the majority of the info I needed!).
[This message has been edited by Trinten (edited 06-04-2024).]
I also did manage to get an '84 Windshield washer fluid tank super cheap on ebay, so took out the higher capacity one and put this one in for now. This is to give more room for the intercooler water tank up front.
Great find! Thanks for the info. Do you have a part number handy?
I've been thinking of ducting the radiator outflow through that area and out fender vents just in front of the doors, but the later windshield washer reservoir was in the way. A smaller one may allow that idea to work.
quote
Originally posted by Trinten: I also ordered an LT1 Cruise control unit, so servo driven but doesn't need all the other inputs and such that came on some LS cruise control systems. This will be a "simple" matter of extending and matching up wires, and tapping a 4000 PPM feed to the unit (either from the speedometer or from my 0411 PCM).
The '09 Trailblazer OS (58x trigger wheel) allows the cruise control stalk switches to be directly wired to the PCM. Since that app uses a drive by wire throttle, that completely eliminates any need for a cruise servo.
I'll check it out... and then send it to Mike to let me know how he wants to execute it. lol
And yes! The part number is 22039456. Above that on the tank it says 22048531 / ASM.
Strangely, when searching for that I was still getting some "full sized" washer tanks, but it's pretty easy to spot which one it is if there is a picture.
I'll check it out... and then send it to Mike to let me know how he wants to execute it. lol
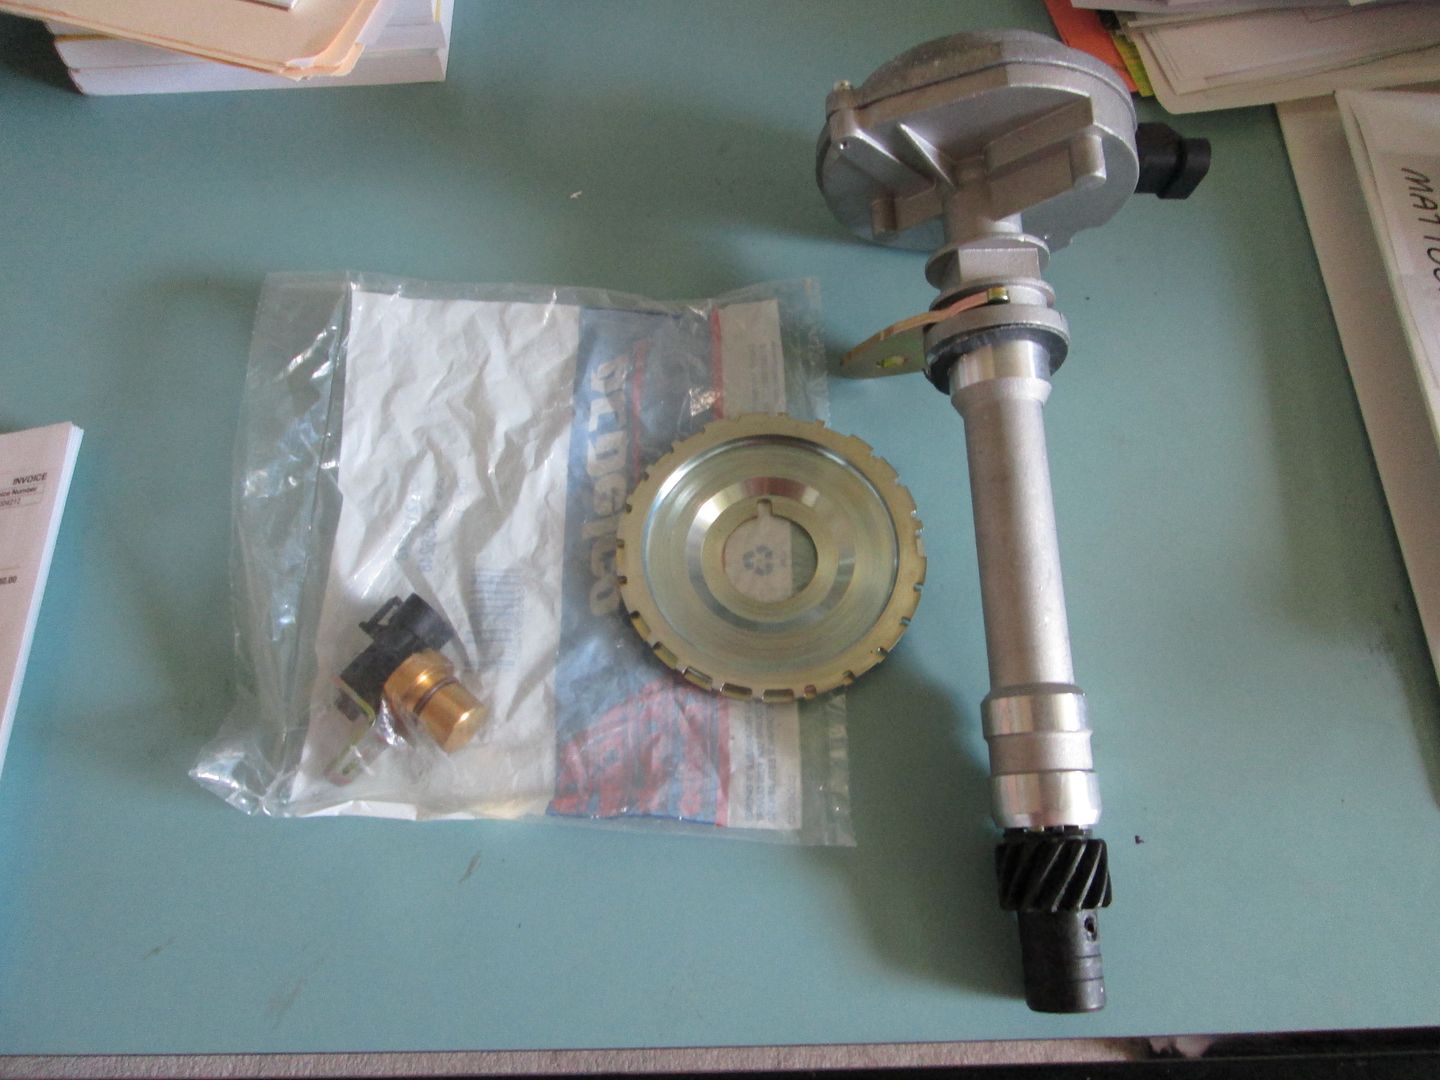
You're using an 0411 PCM with LS coils on a traditional small block. Looks like you're using the Vortec timing cover with internal trigger wheel, with some type of cam-synch only distributor. You *should* just have to swap from a 24x trigger to a 58x trigger, and maybe a cam sensor change to be able to use the 58x PCMs. Those are more advanced than the 24x PCMs.
In your shoes, I'd definitely want a 58x PCM, The 4L80E & 4L85E (and for that matter the 4T80E) were used into the 58x era, so there are 58x computers that control 4 speed auto transmissions. It's likely just a setting in software. The Buick Lucerne used the 4T80E through 2011, so the software to control it is out there.
quote
Originally posted by Trinten: And yes! The part number is 22039456. Above that on the tank it says 22048531 / ASM.
Strangely, when searching for that I was still getting some "full sized" washer tanks, but it's pretty easy to spot which one it is if there is a picture.
I'll have to check with FieroGuru on his selection of parts. I'm sure at one point he told me (when he was working on it, he was awesome about sending super detailed PMs with pictures and stuff, above and beyond what he put in the thread). I want to understand why he went with these parts to start with, so when I pass all this info along to Mike, he knows why things were done originally.
Oh! I did start doing some research on the issue you were warning me about with 2nd gear starts on the 4T80. There are two solutions, once involves programming, and the other involves some tweaking of the wiring that I don't fully understand - it talked about how the ABS/TCS would send a ground to one of the solenoids to cause the 2nd gear shifts, and explained how to adjust the wiring so that never happens. Thank you for warning me about it!
Vince, you should give them a call and let them know you already have the 24X kit and ask what it would take to upgrade to the 58X. The reluctor wheel should be a simple swap, the critical part would be the timing/trigger point for the 1X cam sensor. If the 1X timing point is in the same spot, then you are likely good. If it changes between the 24X and 58X then you would have to be very careful and likely rework the bracket locking down the distributor position. There isn't much room for the distributor housing to rotate and clear the relocated IAC... everything under the TB is very, very tight.
I'll have to check with FieroGuru on his selection of parts. I'm sure at one point he told me (when he was working on it, he was awesome about sending super detailed PMs with pictures and stuff, above and beyond what he put in the thread). I want to understand why he went with these parts to start with, so when I pass all this info along to Mike, he knows why things were done originally.
Oh! I did start doing some research on the issue you were warning me about with 2nd gear starts on the 4T80. There are two solutions, once involves programming, and the other involves some tweaking of the wiring that I don't fully understand - it talked about how the ABS/TCS would send a ground to one of the solenoids to cause the 2nd gear shifts, and explained how to adjust the wiring so that never happens. Thank you for warning me about it!
The 2nd gear starts are an issue unique to the Cadillac PCM when it's removed from the Cadillac... you shouldn't need to worry about that with the 0411
Okay. I'll talk it over with Mike. DBW also means swapping out the gas pedal, some other wiring, and finding a newer style cruise control unit.
quote
Originally posted by ericjon262:
actually, you wire brake switch and cruise signals direct to the PCM and it does the rest for you, no module required.
Exactly... that's why DBW is such a game changer for engine swaps, as well as why OEMs use it.
Yes, you have to install a pedal sensor and wire it up.
But then you do NOT have to: -Run/adapt a throttle cable (which may be the wrong length or have inconvenient routing, not have a clean attachment to the throttle cam, etc.) -Have (find, adapt, mount, wire) a cruise servo -Have (find, adapt, mount, plumb, wire) an IAC
So overall the system is simpler with DBW. The cruise also works MUCH better with DBW, as there's no delay waiting for the cruise servo to take tension on the throttle mechanism and the pedal doesn't move while the cruise adjusts the throttle.
There ARE dual round and oval mono-blade DBW throttles that bolt up in place of LT1 and TPI throttles.
However, you do need to select your OS carefully in order to reap these benefits. MOST 58x OS's get cruise data from the BCM. However, the '09 Trailblazer (dunno why it's just this app, but whatevs) has the cruise switches wired directly to the ECM instead of the BCM. This is the one to use.
ALSO, the 58x system splits the PCM into separate ECM and TCM... Running the 4T80E may be as simple as wiring up a 4T80E TCM (Buick Lucerne as mentioned above) to your 58x ECM of choice, then tuning the shift points in software.
[This message has been edited by Will (edited 11-13-2019).]
It's been quiet because Mike's garage was occupied through the colder months with another customers car. It's out now, and once he has the rear suspension built up on the passenger side, we'll be rolling it into the garage.
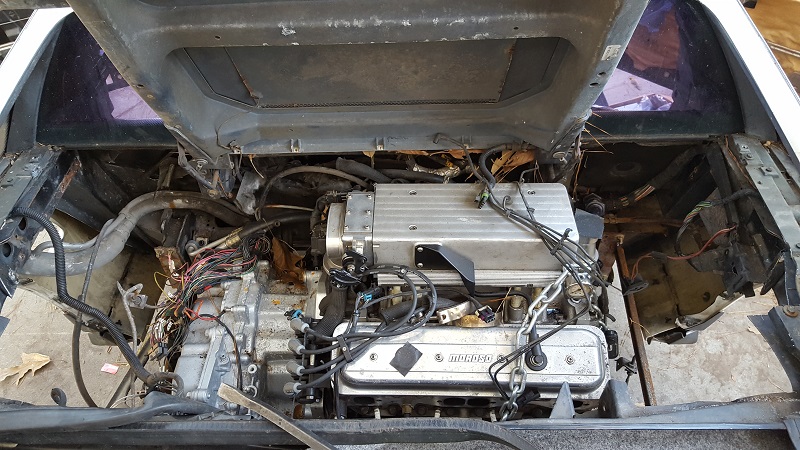
We've also been debating on a few things. The turbo I bought is... well, capable of far more power than my block can handle. The rotating assembly (from the great folks at Ohio Crank), was made to support ~600 on nitrous (original projections were for 450 naturally aspirated and 150 shot of nitrous). Nitrous does hit much harder on internals, so even if you figure that rounds up to ~700 naturally aspirated... this turbo will do more than that.
So I started pricing out a Dart block and an improved rotating assembly from Ohio crank. And because I like safety margins, it was for about 25-30% than I think I'd put down, even at max of the turbo. ( side note: great pre-sales support from both those companies!). The heads and intake would be reused, as would my cam, lifters, and rocker arms. The price on the new block, rotating assembly, ARP gear, stud girdle, gaskets, injectors, etc... It was a little over 5K. It would be a combo that would hold up to ~1300 HP and Torque. Overkill, just how I like it. And I didn't mind spending the money.
Discussing this with Mike, he said "Maybe at this point, you should consider an LS4."
Now, my faith in Mike is pretty deep. So... I spent a week of evenings reading... and asking FieroGuru questions (Thanks again!!). Incredibly, I discovered Brandon Furches. He has an LS4, bolted up to the 4T80E, and currently has the "Fastest Monte Carlo in the world", pushing around 800 HP and Torque. And had to stop there because he hit the limits on the injectors he was running.
More reading! Found Brandon's build list, which gave me a starting point. So fired up a new excel spreadsheet and started looking things up. Which was not easy because of the LS interchange is not consistent (it's heavily consistent in pockets, but not universally). And Summit Racing doesn't seem to have a way to shave down to a particular LS Platform in their search criteria. So that made searching slow.
Ultimately, I can effectively replicate Brandon's build... with a few tweaks (like starting off with bigger injectors), getting the block/heads refreshed, and it's cheaper than building up the SBC. I found a complete LS4 on Craigslist... and I mean complete. Transmission, accessories, engine, ecu, pedal, etc, for a song. The car had a rear end accident. Mike checked it out, gave me the thumbs up. So, for the moment, it looks like Mike will be modifying the cradle (when it's out again) to change the engine mounts to match the LS4 (sorry Mike!)
If I can get the same horsepower goals, keep a V8 platform, cost me less, and it be recommended by people I trust (Mike and FieroGuru). Then yup! That's what we're doing.
Mike is thinking it'll work out better anyway, he likes the headers on the LS4, and they point in the direction where he was going to put the turbo anyway, so he said it saved me a good chunk of change (he was going to have headers fabricated by a metal shop, with crazy-thick flanges, to fight off exhaust leaks that tend to form on turbo SBC). He also thinks he can continue to use my 0411pcm. Some reading on HPTuners and turned up some folks running crazy stuff on 0411s.
And, though I know many would disagree with this, I am going to stick with a drive-by-cable setup if I can. I have this irrational fear of a short stranding me. Or making the car surge before I can cut the key. I've already found some LS throttle bodies that are cable driven and have the IAC and TPS.
Also, the alignment tool I wanted to buy had gone on sale last month, it does caster, camber, and toe. So Mike is interested to see how well it works.
This does set back when I can get all the body work done, though. And Mike said he'd hate to see me put in my awesome new interior into a car that would be exposed to fiberglass dust and tools-in-pockets, etc. This means we might just "rat rod" the interior for now. Get basic gauges and minimal pieces in place, to make it driveable.
Plans is to have V8 Archie's shop modify their GT Wide Body kit for me (the one that gets rid of the 'ribs' at the mid-point).
[This message has been edited by Trinten (edited 03-24-2023).]
I don't know yet. It's got less than 20k miles on it. I could sell it and probably make around half of what it cost to build. Maybe a little more. So that's an option. I suppose if any of my future project cars are going to stay in the LS world, it doesn't make much sense for me to keep it, even if I want to build it up (or not) to put into another car someday.
So if anyone is looking for a really stout SBC, let me know!
Here's the highlights:
4 bolt main SBC, bored to 355. AFR 195 race heads Ultra Pro Magnum 1.6 chrome moly rocker arms CompCams XFI 230/236 Hydraulic Roller cam (it has an aggressive ramp rate, this thing revs up quick) Hydraulic lifters 1 pc hardened pushrods AFR 8019 Valve Springs JE Flattop forged pistons Ohio Crank forged connecting rods (I don't recall if they are I or H right now) Ohio Crank crankshaft (I thought it was cast, Scott, the engine builder, thinks it was forged. He's looking for my old build paperwork). Holley Stealth Ram intake Bosch Design III 36lb injectors
There is still a sale, but it's not as deep of a discount as I got it for last month. Mike said the biggest catch with this type of alignment system is that the surface the vehicle is sitting on has to be spot-on-level, or it can throw things off. We'll see how well it works! He wants to dial it in with this tool, and then take it to an alignment shop and see what it turns out.
Mike has done some little stuff, and I have some pictures, but nothing critical yet. Mike had been busy wrapping up some other projects. In the meantime, I've been continuing to educate myself on LS stuff, and buying parts.
This should shock no one --- I went overboard. Yes, I learned that the LS engines, including the LS4, can get into some crazy horsepower before they're at risk (Brandon Furches has a near stock rotating assembly, just aftermarket pistons. Other stuff too, but stock rods, crank, heads - excluding valvetrain).
So, when a guy that is competitively racing with his LS4, and has dyno'd out over 800 HP, is running on stock internals... why didn't I?
The simple answer is, I am more than happy to throw money at the engine to help reduce the chance of it grenading. I don't have the tools, skill, or knowledge of people like FieroGuru, Mike, CowsPatoot, Chug, Will... the list goes on. And as interested as I am in cars and like to learn, I have limited free time. So if something on this car goes sideways, I want it to be something that even a novice like me can look at it and go "Oh. That's broken!" bust out my impact and other hand tools, take it off, order a new one, and put it on.
Which means the engine has to be fairly bullet proof. Not only for the hassle of taking it out, but diagnosing it, tearing it down, fixing it, etc.
So, here is what I bought for the LS4
A NOS 24x crankshaft (I managed to track one down after MUCH googling and emailing). Forged 6.125 connecting rods (yes, they are a touch longer, Mike said that even that tiny bit of extra length is worth it) D.S.S FX-Series forged pistons (yes, I bought the right ones to compensate for the longer rods -- I did my homework!) CompCams 232/234 duration @ .050" and .595/.598 lift with LSA of 112 Appropriate dual springs with tool steel retainers with a max lift of 0.675 LS7 Hydraulic rollers DOD Delete stuff Mahle and Calico bearings, all coated with a variety of stuff depending on which bearing it is. Katech C5-R single roller chain Chain dampener (the chain tensioner that was in the engine was in pieces. Apparently that's a hit or miss thing.) Melling high pressure, standard flow oil pump New oil pickup tube girdle (the two bolt style) ARP bolts as far as the eye can see.... I scored on a "inexpensive" set of D585 coils. All the gaskets, of course... but that's normal stuff.
I think I bought more stuff for the engine, but I can't think of what right now. What I still need to buy is the push-rods, we need to get things together and take measurements so we can get those. And then settle on an intake. I've already sourced the injectors, but they are out of stock of the size I want.
OH! That brings me to something awesome Mike did on his Grand National and that he's going to do on the Fiero. He went and found a flex fuel sensor, put it in his Grand National, tuned it (he's running FAST XFI)... and it now runs like a flex fuel vehicle. Since that Brandon guy was running E85 when he put down his 840 HP, I figured flex fuel was the right way to go for me, too. So Mike agreed. So I have a NIB flex fuel sensor and a metal bracket for it. The 0411 PCM has all of the PIDs for Flex fuel, and other folks have turned the feature on.
Today Mike dropped off the heads, block, and rotating assembly to a machine shop for them to balance the rotating assembly, hot tank and magnaflux the block, hot tank the heads, install the springs and hardware, do a valve job on the heads, maybe some light portwork, and clean all the boltholes/threads. A couple other little things.
[This message has been edited by Trinten (edited 03-24-2023).]
I'd go the other direction... is there a high volume pump? LS's are pretty scienced out in terms of what works, though.
My take is that you're going to have a turbo with dedicated high pressure oil and a lot of heat in the engine bay. You will probably want a higher volume pump to keep the hot idle oil pressure above 15 psi. Also, are you running an oil cooler?
Thanks for the feedback and question. In my reading, some LS guys with turbos were having issues with high volume pumps... I don't recall enough details right now to repeat what the issues were with confidence. That was the reason for the high pressure, standard volume though. Mike didn't check me when I told him which oil pump I bought, I will double check with him on it. Rockauto is really good about doing exchanges for stuff, especially if the box hasn't even been opened.
We do want to run an oil cooler. And to help reduce engine bay temps, I want to modify one of the decklid vents to mount a fan to it, to help get that air out of there.
The way Melling listed them was as x% higher pressure over stock, normal volume (The one I got). The other was x% higher pressure over stock, and y% higher volume. So I'm guessing they were comparing those numbers to what came in the LS4 to begin with?
I did some googling to try to educate myself! And yes, for those who are wondering, because of the AFM, the LS4 oil pump was a higher volume pump. So I guess it's good (?) that it's a higher volume pump, and that I didn't get the one that went even higher than that!
Nearly all the aftermarket suppliers forget about the LS4, so my guess is everything melling is quoting is based on the LS1/LS6.LS2 as they were the first few on the scene that hot rodders were focused on. It used to be pretty common for turbo builds to switch to the LS4 oil pump for the increased flow. The pressure is pretty high as well (hot idle with 5w30 is 35 to 40 psi, 70+ psi as the RPMs climb) . Now with all the AFM/DoD LS engines, there are a lot of stock parts that are better and will be more reliable than aftermarket "upgrades".
I think that camshaft is more than a smidge too big for a 5.3L unless you are looking for a drag race only build. It is an aggressive cam for a 5.7 or larger engine, probably a little too much for the smaller 5.3. I am going to be running Tick Stage 2 Turbo camshaft for the 4.8/5.3L engines, 219/223 .617/.595 LSA114+3
Ohh. That makes sense. I'll have to email the manufacturer and see if they'll tell me, or if their site has measured flow numbers, versus only percentage over stock.
Depending on their answer, I might wing up sending this one back for the high pressure + high volume pump. I'll also go through my browse history, see if I can find the thread(s) where someone had issues with the volume being too high, so I can be more articulate.
An unrestricted -6 line is generally too much oil for a turbo. The turbo oil feed usually needs a restrictor from -6 line.
And just get the block sleeved out to 4.125"... then it'll be 6,345 cc's with the 92mm crank... Voila! The cam gets smaller.
I typically see -4 line used for turbo feeds, and then the drains as large as packaging allows.
------------------ "I am not what you so glibly call to be a civilized man. I have broken with society for reasons which I alone am able to appreciate. I am therefore not subject to it's stupid laws, and I ask you to never allude to them in my presence again."