They are 6.125". Stock LS4 Rods are 6.098". I asked Mike if he wanted the longer or shorter ones. He said get the longer ones! They are 4340 Forged H-Beams.
They are 6.125". Stock LS4 Rods are 6.098". I asked Mike if he wanted the longer or shorter ones. He said get the longer ones! They are 4340 Forged H-Beams.
Ok nice! If I was building your engine I would have opted for the shorter rods, specially being turbocharged.
Page 14 of the build thread. Mid April 2021 Yes, I know it's been a while since I've done a proper update. Mike has been busy with other projects, and now that race season has started here again, he's also been busy working on a pit crew now and then.
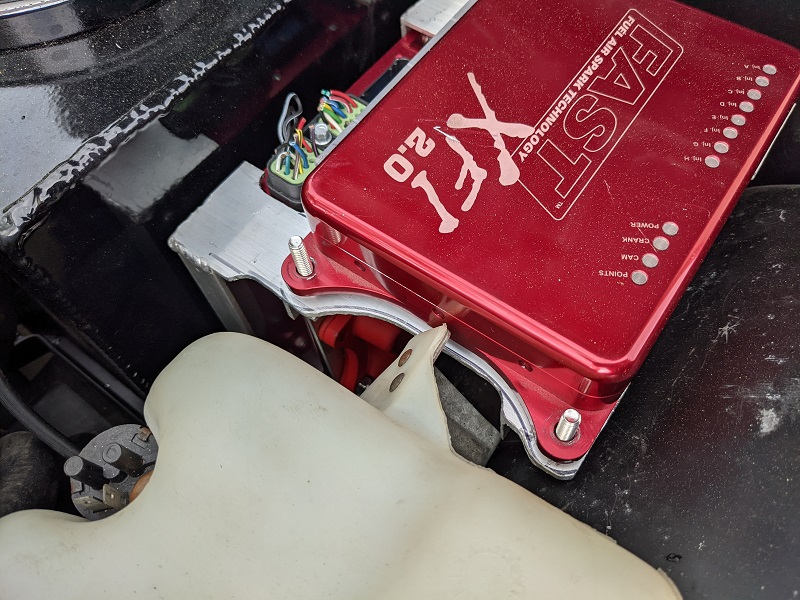
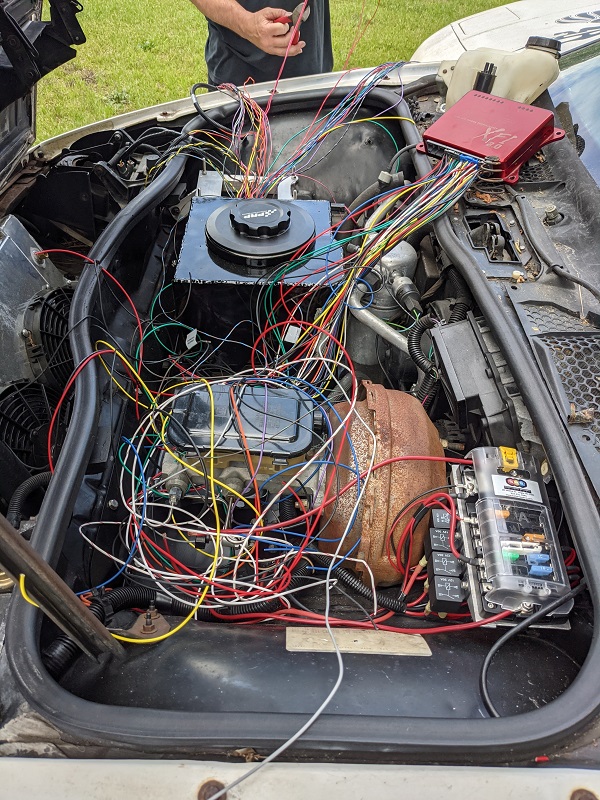
Mike really enjoys doing electrical stuff. So he had me buy everything we'll need to wire up the FAST modules and the rest of the car (theoretically at least): 40 feet each of 9 different colors of high quality automotive wire, Deutsch connectors for the bulkheads (he dislikes the term 'firewall', from back when he was an engineer), terminators, some spiffy wire sleeving, etc etc.
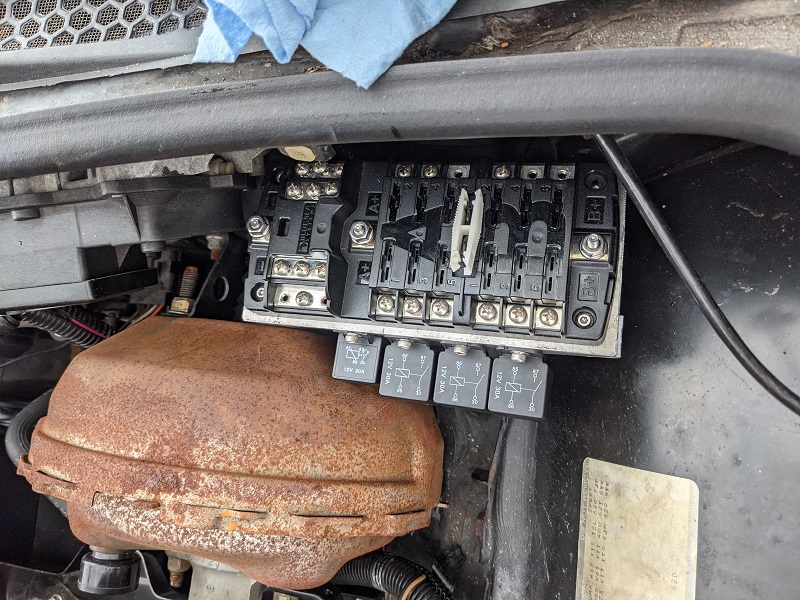
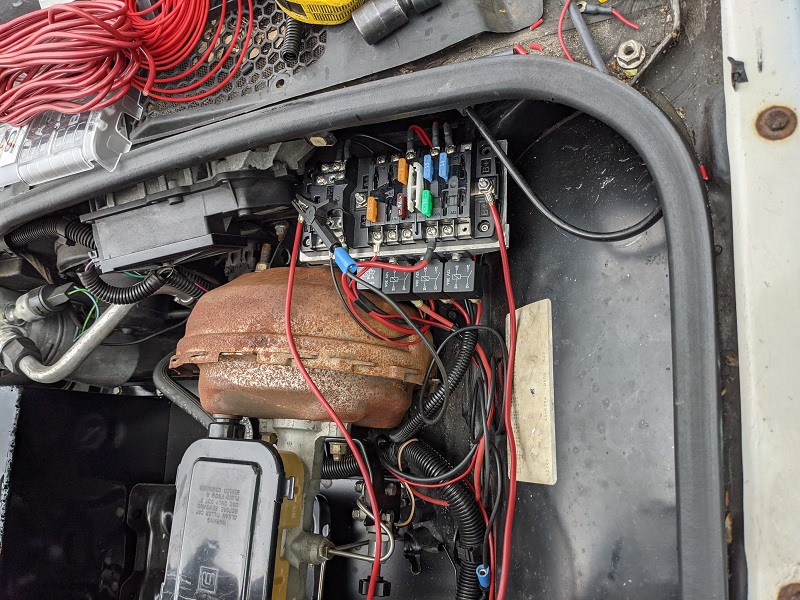
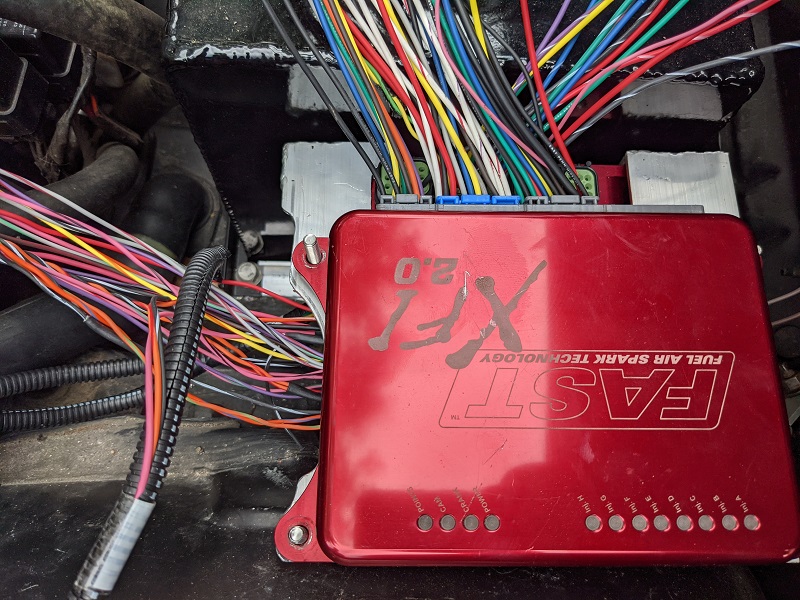
So the last few weeks was him building a bracket for FAST modules, and the fuse/relay box for the intercooler water pump, fans, the FAST and the EHPS pump. Ironically, the auto parts store only had three of the 'standard' automotive relays on the shelf, so we had to get one 'micro' relay. As you'll see, it actually worked out for mockup. The normal sized one wouldn't have cleared the booster.
We tested the radiator fans and power steering pump, all worked. We were both very happy with the assist in steering from the EHPS. Once a little more wiring is done (one of us had to stand there jumping a connection for the power to get to the fusebox), I'll get a video of it working.
Speaking of the FAST modules, Mike came up with a really clever 'container' for all the fast components to fit into! There are three units here, the XFI, XIM, and TCU. Can you spot them all? Serviceability is something Mike has tried to keep in mind, so though it's tightly packaged; breaking it down to get to any one of the modules is straight forward. Hopefully that won't need to happy anytime soon though.
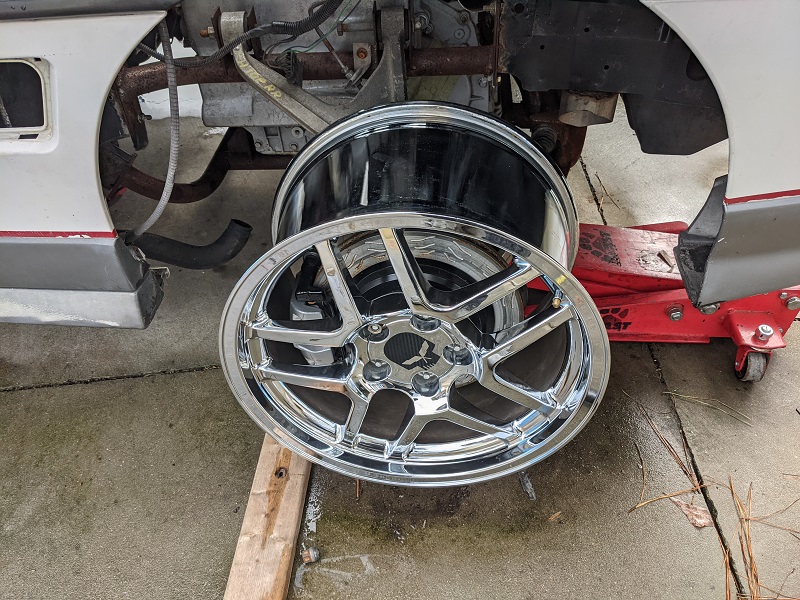
I also brought out one of my Z06 wheels for a test fit and visual check. In theory, we both knew it would fit since the suspension setup with the control arms is mimicing the C5, but it was good to test. With the arms fully dropped, there was still clearance between the upper control arm and the wheel. Same with it raised up to what should be it's maximum height.
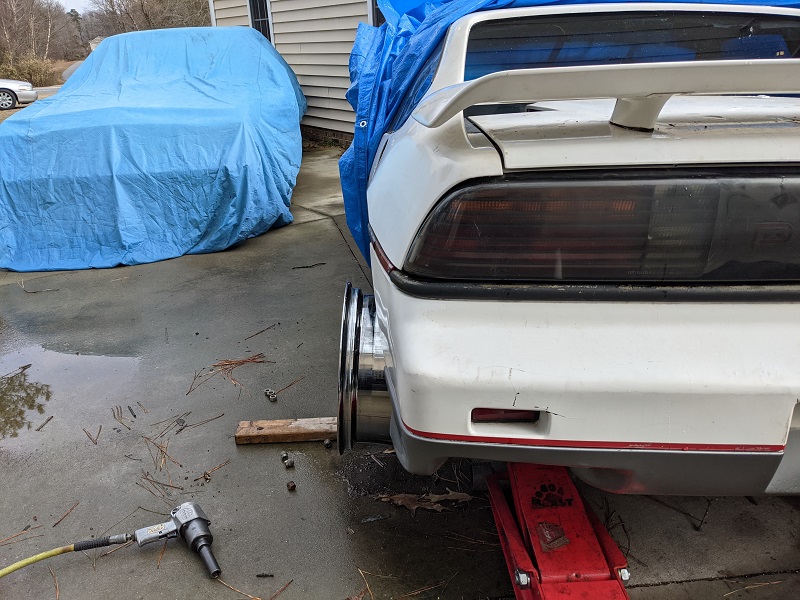
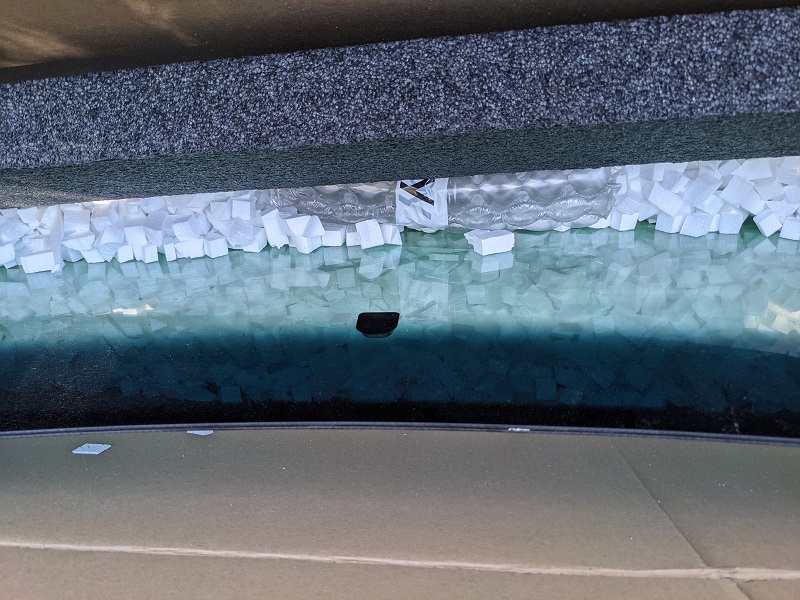
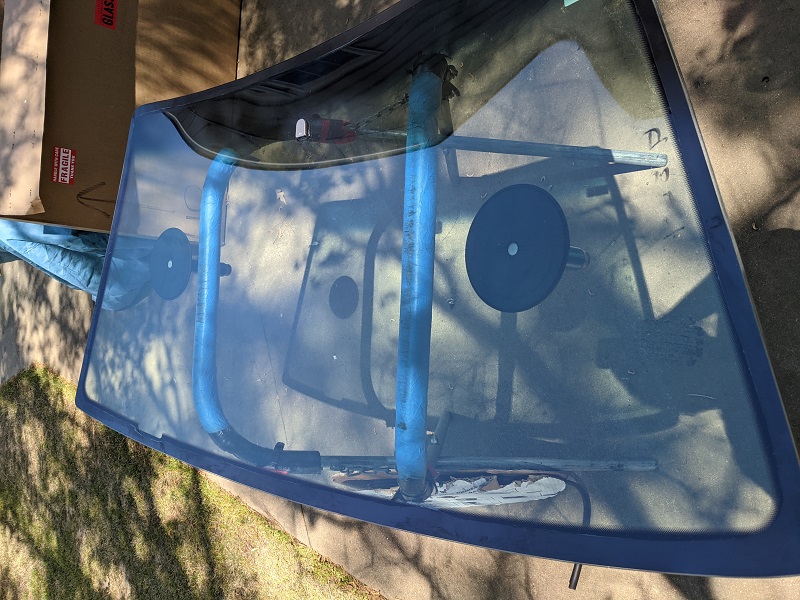
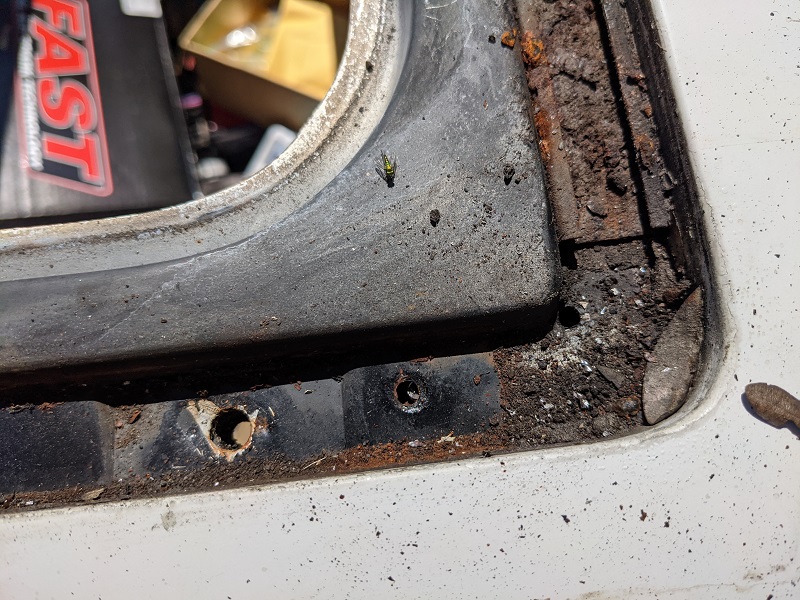
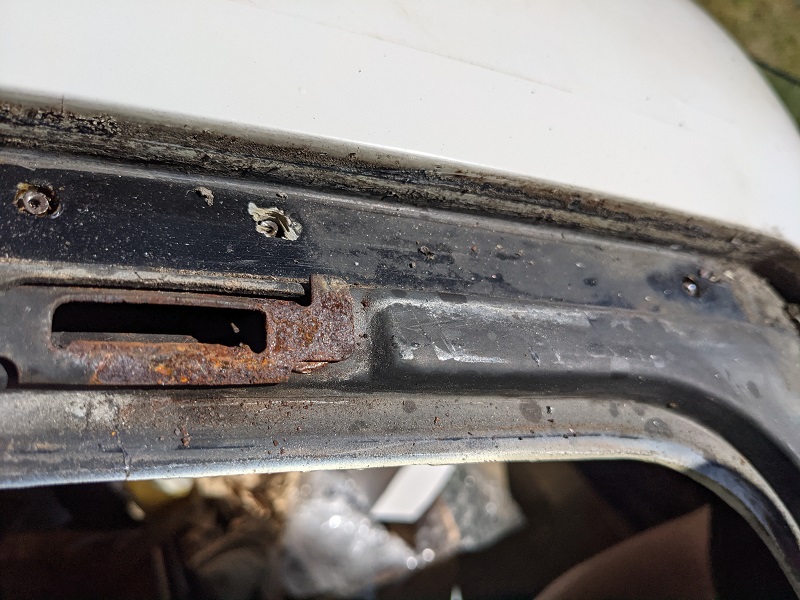
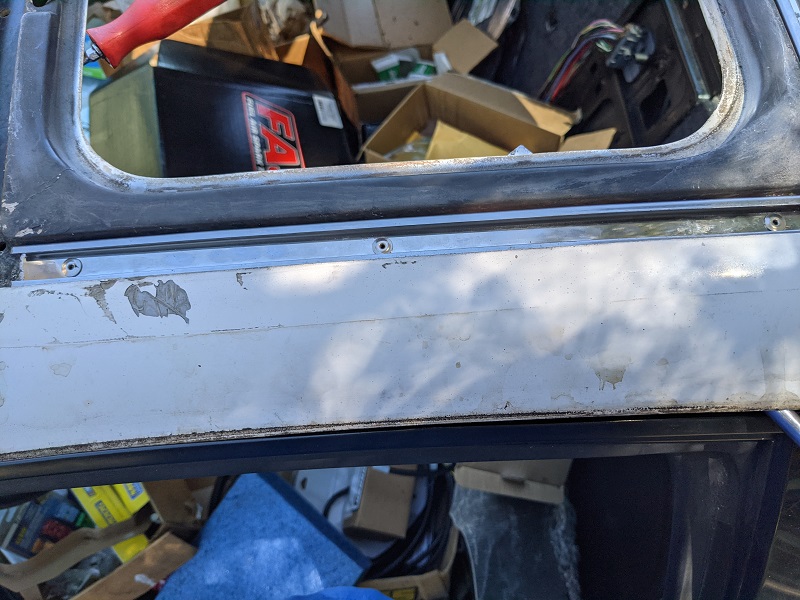
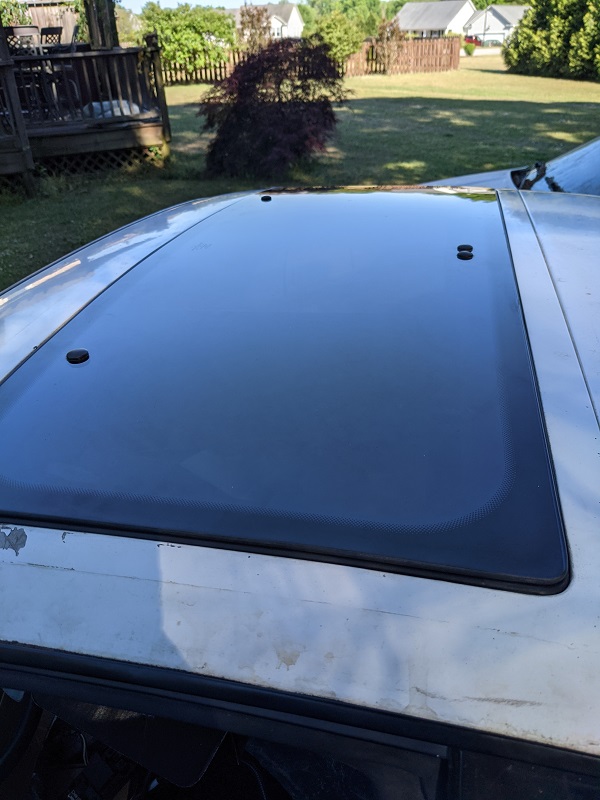
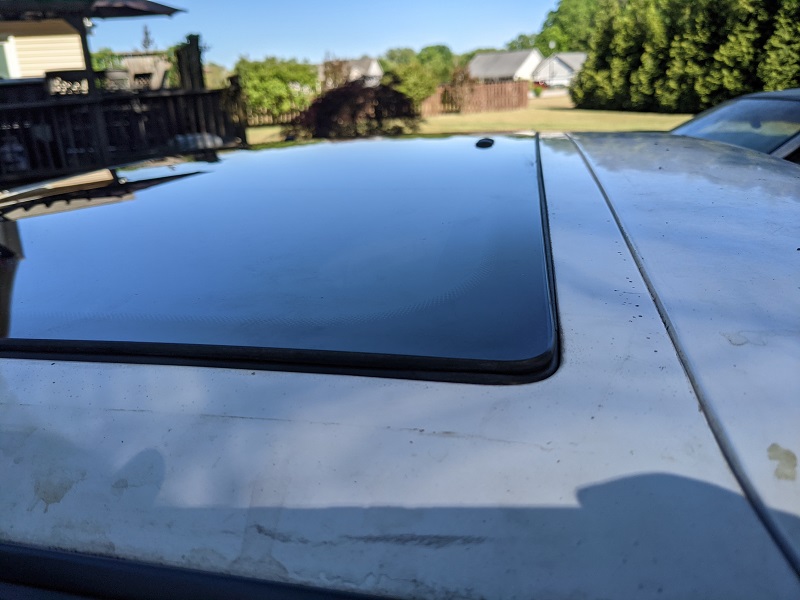
Last update for now GLASS!! I did manage to find a company that has some PGW Fiero Windshields left, they bought what they could back when PGW told them production was going to stop. They also have door glass, in bronze/smoke and OEM green. I bought a set of the bronze. Once I get another windshield and set of glass (or two), I'll post up where I got them from and the prices.
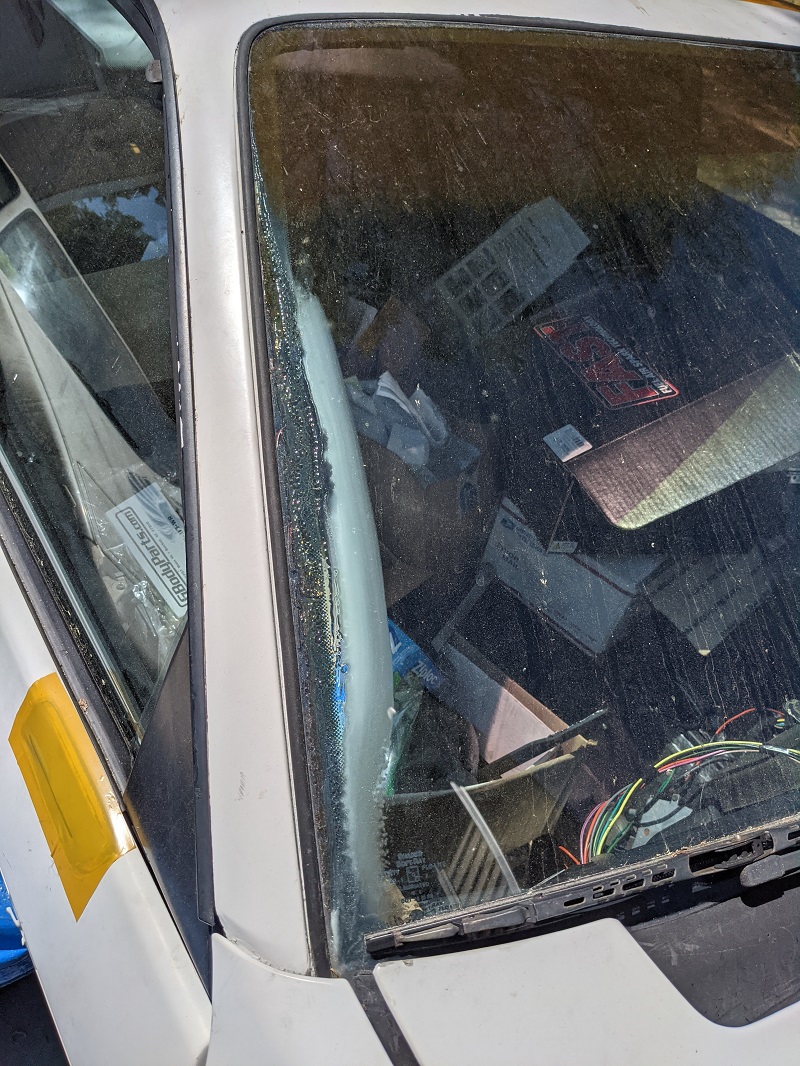
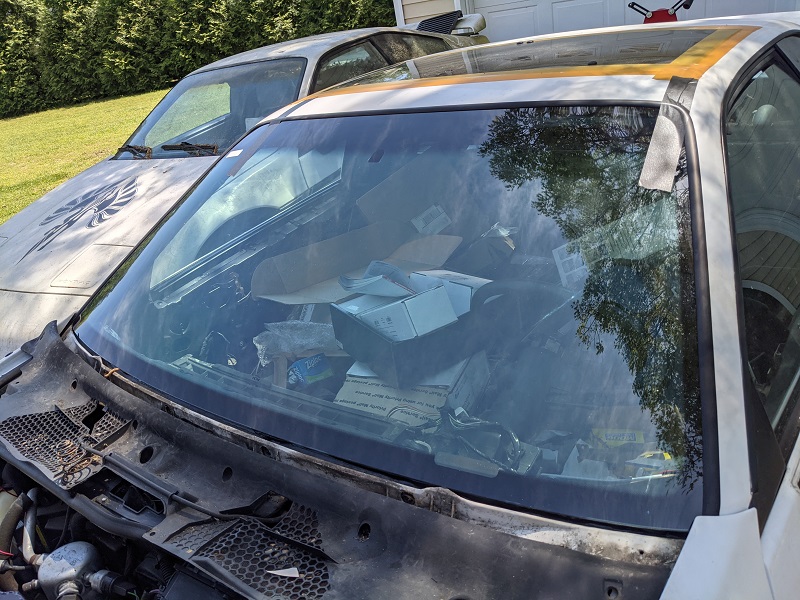
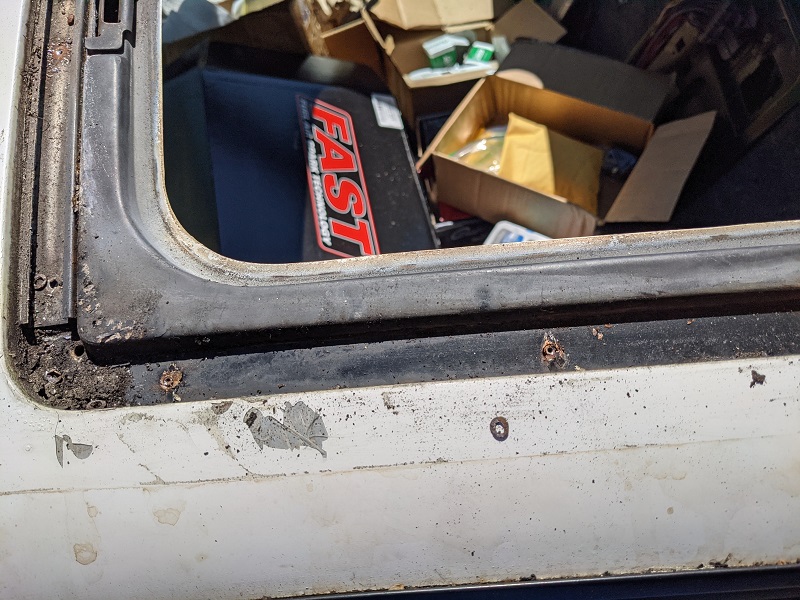
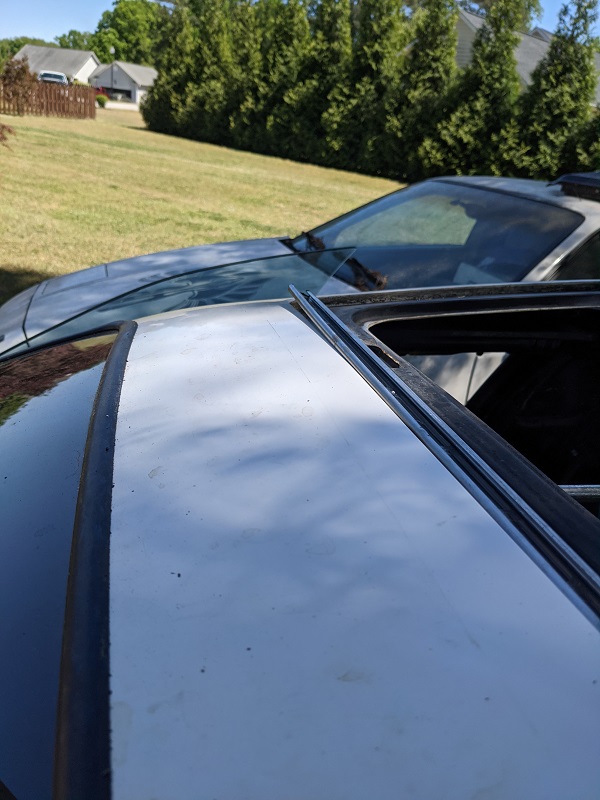
A few people said I should hold off on the windshield until I had the body work done, the problem is the glass that was in there was looking AWFUL. I mean, look at this!
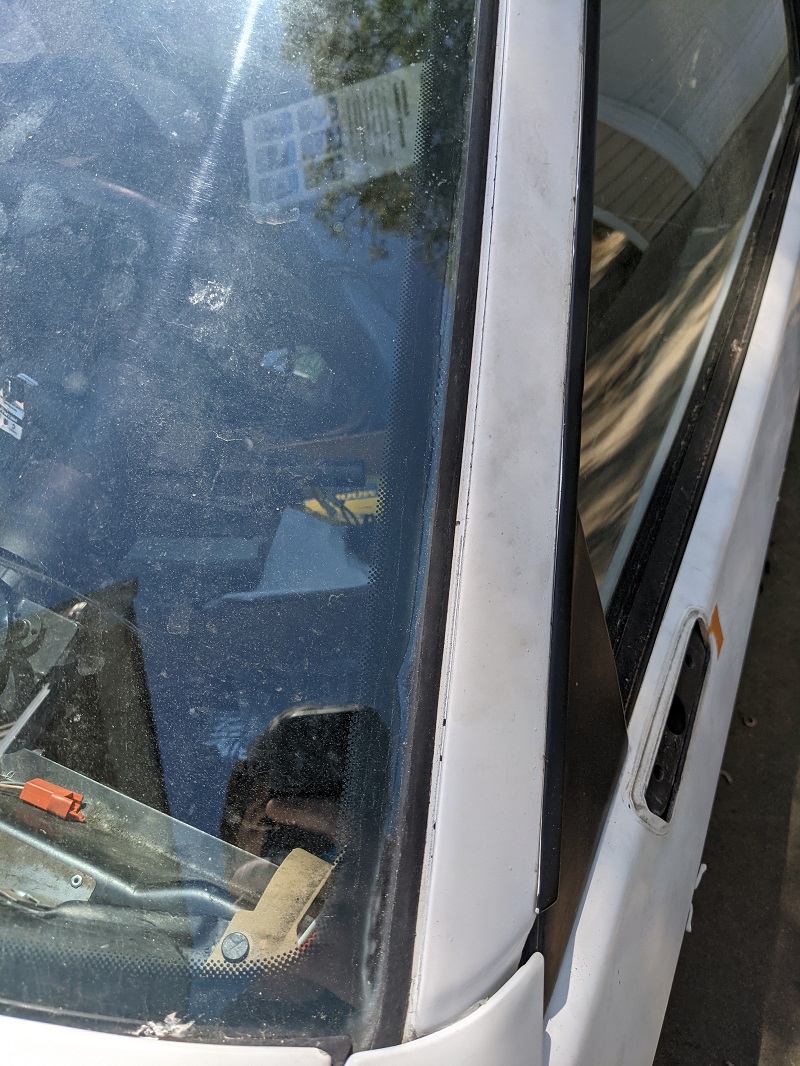
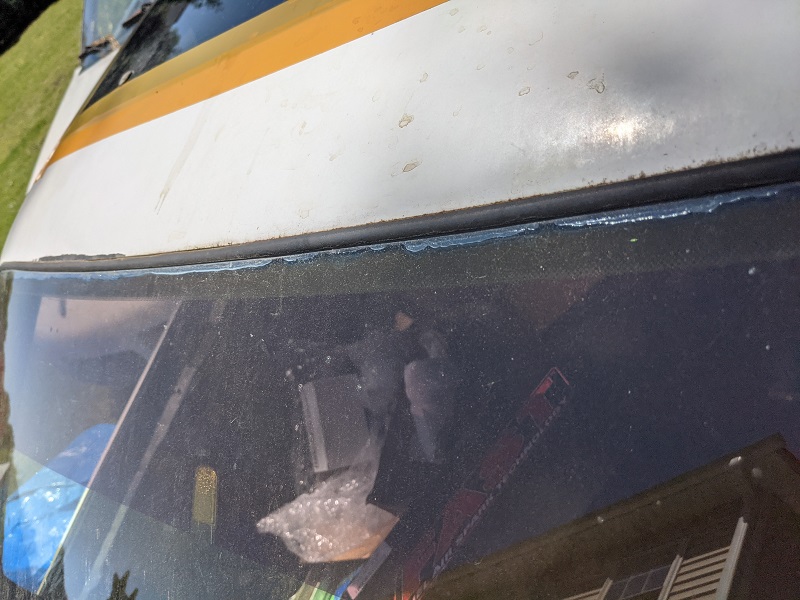
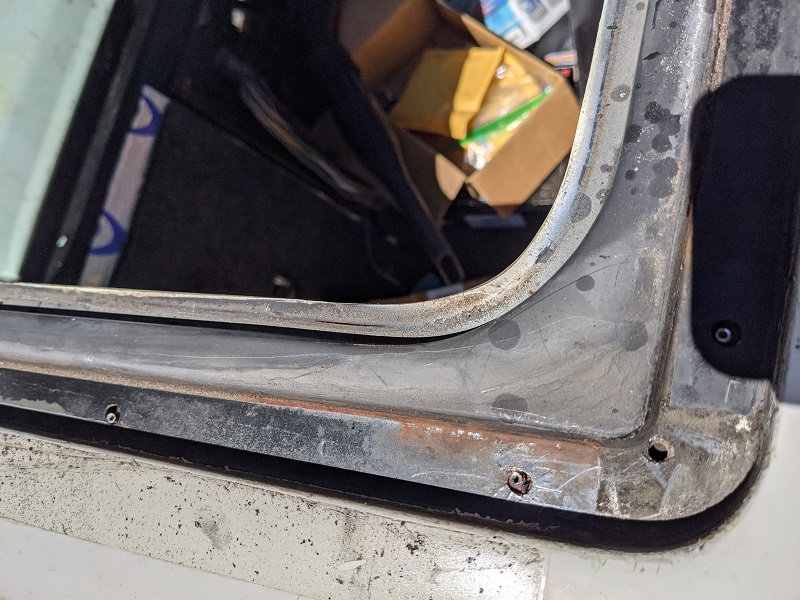
So I couldn't wait. I figure the car will on the road for a while before it goes down for bodywork, and that lousy glass was going to bug the heck out of me. So here's some shots of the new glass!
The door glass will go in later, before the door interiors are reassembled. Semi-related. I'm looking at this "smart tint" stuff for the door glass. They have a 'test kit' for 100 bucks, I think I'm going to get it and play with it. If I don't go with that, I'll get the Suntek Carbon XP 80 put on the glass. I had it on my Town Car, great stuff, very low 'tint' factor, but blocks 99% UV, so still helps keep the temp down and from the UVs baking the interior.
[This message has been edited by Trinten (edited 06-05-2024).]
This weekend my plan is to take inventory (see: find) all the sunroof parts I've bought over the last 18 months. A lot of it came in one large order from FieroStore, though I didn't seem to order the new gasket from them. Just the 3M goop and all the other hardware they had. I have a set of the stainless steel rails from 'silver 85 sc'.
Since it's going to be roughly a year (at best) before the car goes in for all the body work, and the sunroof leaks, I'm going to take care of it sooner than later. Plus, it gives me something to do when Mike doesn't need me go-fering. We thought we found the leak and sealed it up with a little goop, but didn't fix it. So we used a really wide roll of some sort of vinyl 'crash tape' that Mike had, and that's kept it water free, but just is one degree to close to 'redneck' for me to keep once the car is on the road. lol.
To prep for this, I've read about 5 threads on PFF about replacing the seals and rails, and two of them had links to two external pages. I consolidated ALL of it into a word document (pictures and all).
I did find I need to get one more thing from them. FS part number 88200 (84-88 Sunroof Track Bolts). These seem to be the part mentioned in the Fiero TSB - GM nut 20664430. Which other places charge crazy money for -- like around 11 bucks each! Crazy.
So here is what I know I have purchased (just need to find it all....) Original order from 2019: Stainless steel rails (99% sure I know right where this is at) 3M Super Weatherstrip Adhesive 84-88 Interior Sunroof Molding ( WHERE DOES THIS GO?! On the headliner?? It might be obvious once I find it and look at it and compare it to what's in the car) 84-88 Sunroof Hardware Kit
Ordered today: The gasket thing The aforementioned GM nut set
Besides info in Silver 85 SCs thread, here are a few of the other references I've read to educate myself, in case anyone else finds them useful:
Am I missing anything? Besides possibly rivets? (some folks have mentioned just using the weatherstrip adhesive, making sure to plug up the rivet holes on the front side. I also will make sure the 3/8th inch holes are drilled in the corners, too.
[This message has been edited by Trinten (edited 03-26-2023).]
So we started wiring up terminals/connectors. I emailed a few wiring places to ask about them doing stripes/spiral colors and find out minimums I need to buy. We're trying to make the wiring harnesses as close to matching the FAST wiring diagram to make any future troubleshooting easier, and they have 5 white-with-stripe wires in one of the harnesses.
AND!! I got the fiberglass cowls from Pisa!
Yes, I did say cowls (I am aware I sometimes have typos or leave out words when I'm trying to quickly punch out a post late at night). I got two of them. The second is a combo "just in case" / "might give it to a friend in need as a gift if they need it" situation. If it becomes the latter, I'll probably get another to go back into the "just in case" category.
I did read that some folks had good luck taking their old cowls and using wood blocks, clamps, etc. in conjunction with a heatgun to reshape them. I might try that with mind as it isn't damaged, just warped.
Next Sunday Mike is delivering another customers Grand National, and he's got one other one he's been working on as well. Once that one is done, he said he will not be taking any other jobs (I suspect he means big, whole day/multi-day stuff) until my car is running. Having those two Grand Nationals done should also let us move the Fiero into a garage bay to work on it, since he's focusing on wiring right now, and that will let us continue to work even when the weather isn't cooperating.
I also started bringing home some of the stuff that's been taking up room there that we don't need for a while. I feel bad that I'm taking up a lot of room at his place with a variety of parts and pieces.
[This message has been edited by Trinten (edited 06-05-2024).]
So one of the issues we needed to address was the oil pressure sensor, which comes off of the valley pan right by the throttle body. I saw in another thread where FieroGuru (and others) make an adapter that goes on by the oil filter of the LS4, that allows you to relocate this sensor (and gives you turbo-feeding options).
I reached out to ICT Billet about a valley cover they have, which is not drilled yet for the sensor, and setup for DOD Delete, to make sure it was the right one and would work on my LS4.
The response was: "With the LS4 front sump pans we would not recommend relocating the oil pressure sensor port next to the oil filter. This is due to the port giving a false/inaccurate reading of oil pressure in these pans."
Has anyone investigated this? Is it a consistent false reading, such as 10psi lower (or higher)?
I called them today and ordered their last set of smoked door glass and two more sets of the green tinted door glass. I asked if they had anymore PGW Windshields, they did not, unfortunately. They do have other Fiero Windshields - Tri-Valve - which is the brand name of Pilkington Classics, they've never had any issues with them. They believe the glass is produced in China, but held to a higher Q.C., since Pilkington has a reputation to protect.
Kool Katz is FLAT RATE for shipping. It cost me $513 per pair of door glass, shipped. I don't think it's on their website yet. They do have the windshield prices there.
I buy American when I can, one common misconception is that "everything from China is garbage". The trick is that they only make it to the tolerances/QC the client is willing to pay. And in the US, a lot of retailers want to win your business, and find that 'sweet spot' between some 'bad product noise' and maximum profits. I don't agree with it, but that's how it works out. And of course there are standard deviations, so as you go one way on the scale, you get companies that pay for the better QC, and charge appropriately (and/or might have narrower profit margins), and then you have the "milk 'em and vanish" companies on the other side, that don't care if the reputation goes down the tube, they're in for a quick cash grab.
I learned that when reading up on manufacturers that make suspension parts, and found a massive amount (for many, many companies, of all sorts of reputations) are all sourced from one company. Read up on them... and then read more in general, and sure enough, tolerances and QC was the biggest factor in the production price per unit!
Anyhow! Kool Katz has been great to deal with. Get your new glass while you can! Or before I buy more
[This message has been edited by Trinten (edited 03-26-2023).]
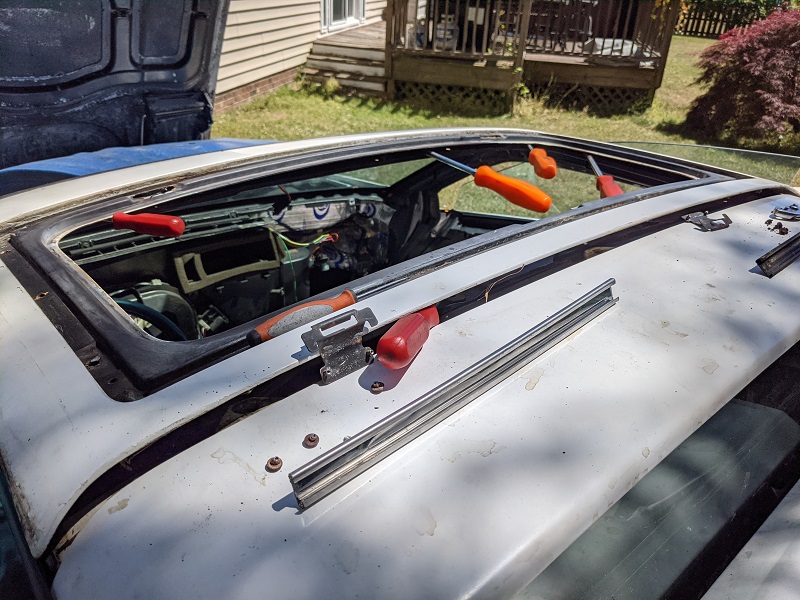
Sunroof rebuild! May 2021 Okay! So the sunroof replacement went okay. It was still very time consuming because of some obstacles!
That really nice sealing crash tape we used to keep water out? Yeeeaaaah. Also likes to take paint up when you peel it off! LOL, thankfully the car will be repainted. I guess I'll get some brush on "touch up" paint for now. Any recommendations on which white is the right one? Brand/part numbers appreciated!
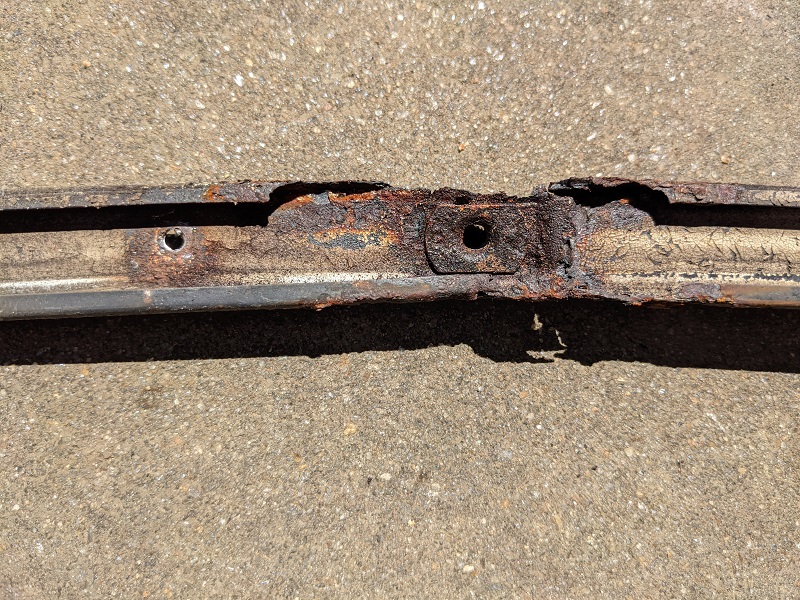
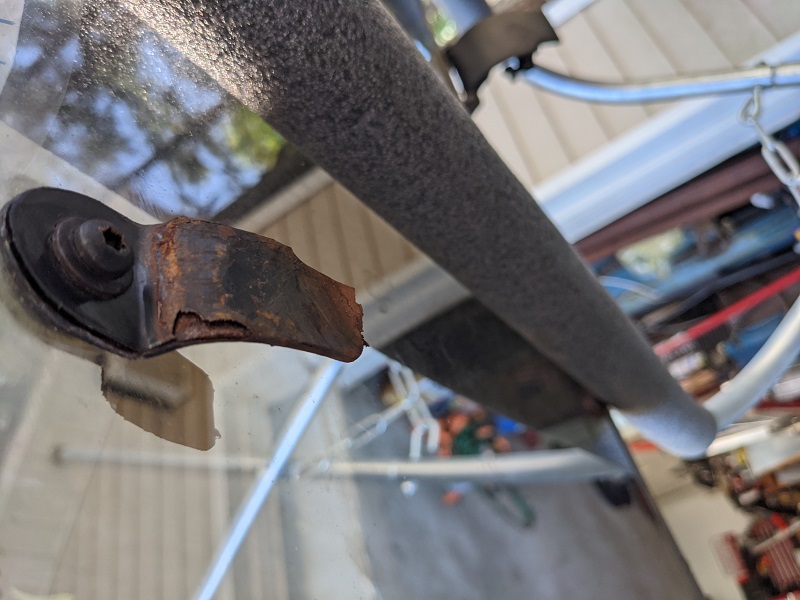
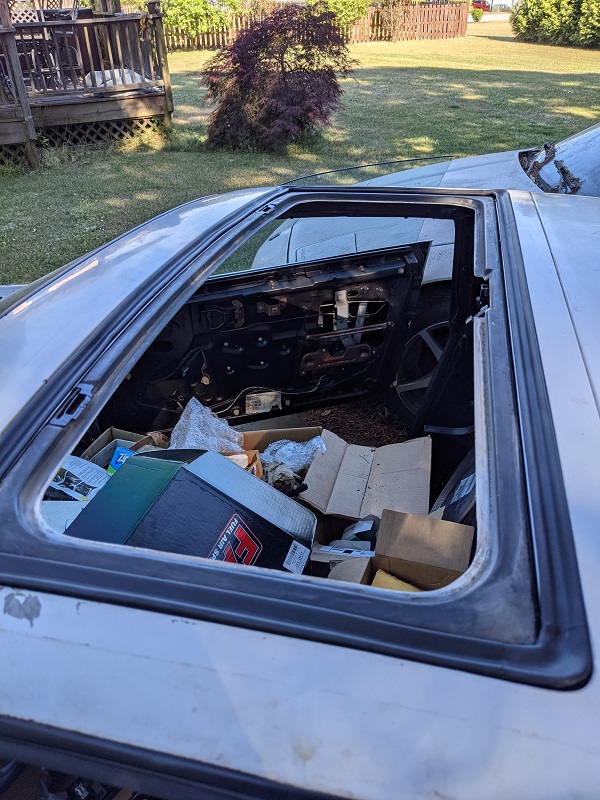
The sunroof was removed. Look at all that dirt! And that dried out seal! The drain holes were there. Thankfully.
Next was finding a way to get the old rivets out. I even put in a call to CowsPatoot, who said he didn't know of a way shy of taking the roof panel off!!
Well, that gave Mike an idea. Since the interior was all out of the car anway, he did this (very slowly and carefully)
This let us fish the base of the rivets out, and get the clips that hold the sunroof tabs out, so they could be cleaned up.
Mike hit them with the wirewheel and then used the epoxy etching primer on them. I didn't get a picture of it, when riveting those back into place, he used a curved pick to hold the tabs up with enough pressure to get the rivet through the tab and held in place while starting the rivet. We wasted a rivet before thinking of it.
Looks like we found part of the reason for the leak!
Okay, all rivets out, all seal and that OEM double sided tape stuff and everything else we could reasonably clean out is gone!
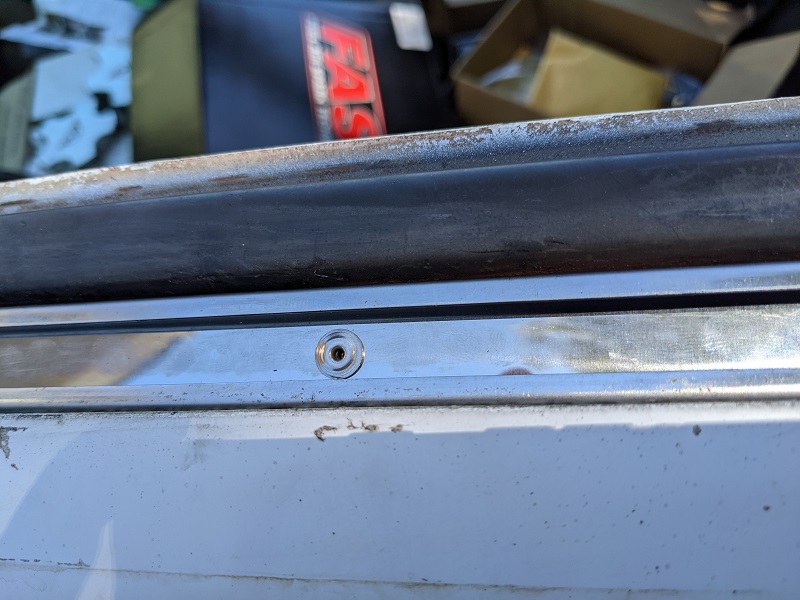
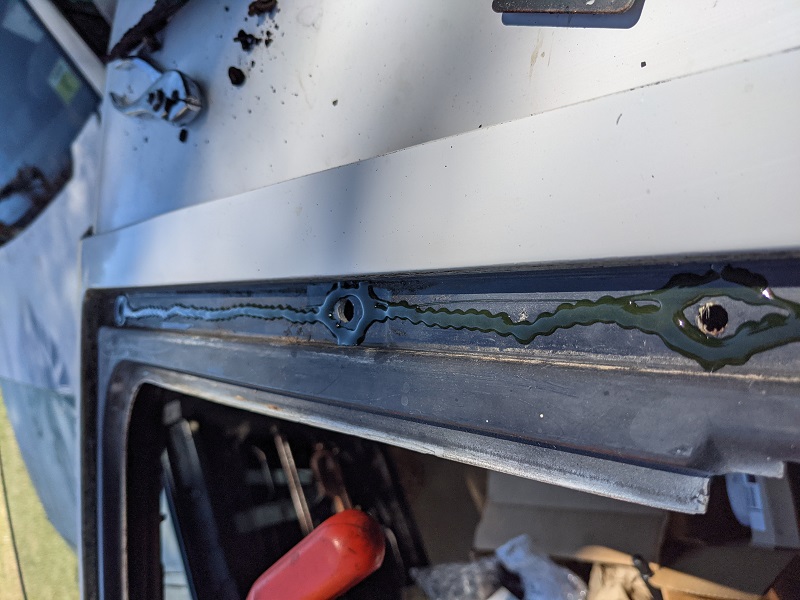
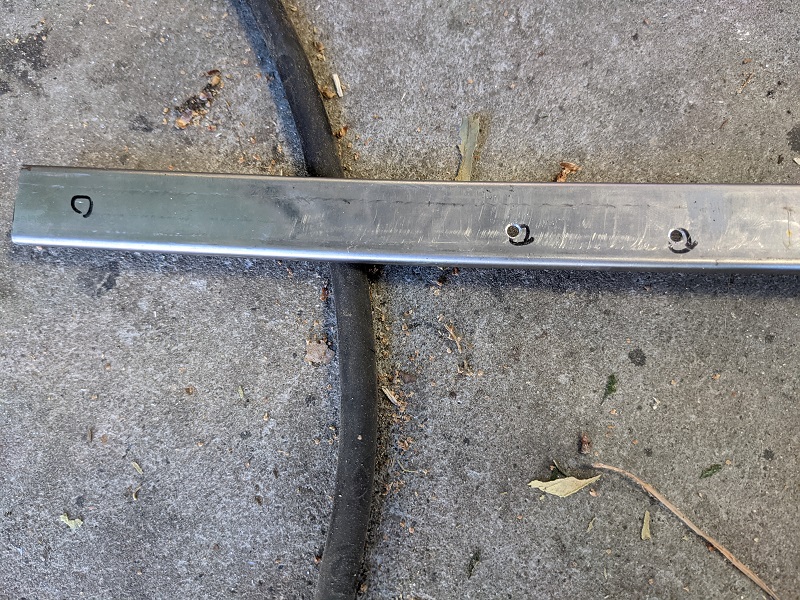
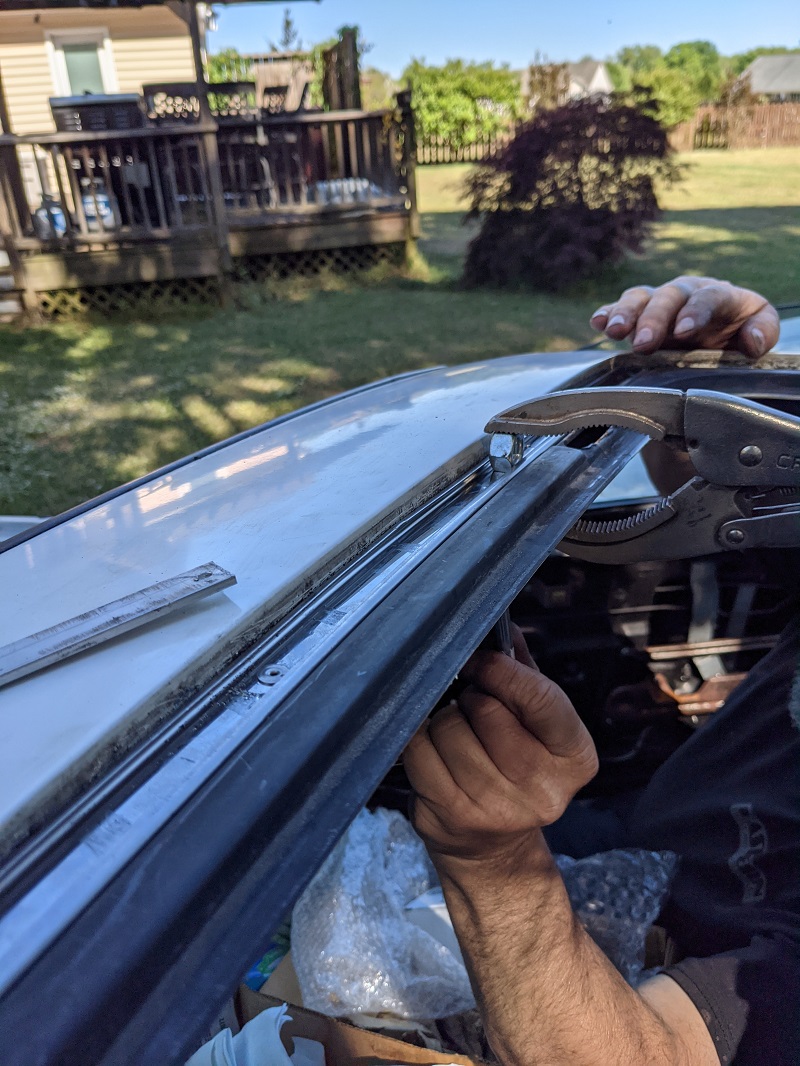
All of the new stainless steel rails needed a little massaging to meet the curve of the roof. Obviously the driver and passenger side ones were a little easier, since they are a shorter distance and only curved up/down. Mike was careful, using wood blocks and a rubber mallet, lightly tapping the rails.
We used the 3M Super Weatherstrip sealant, one of the many things I got from the FieroStore for this. I got this shot after Mike laid the bead down for the rear rail.
The rear rail took a little more gentle work to meet the curve as close as we could. I think Mike was happy after the 3rd adjustment.
The front rail was the most challenging. Mike asked me if I had started marking anything, I said no. There were sharpie marks on the bottom of the rail that were very close to where his drill marks were on the top of the rail. He noticed them when he flipped it over after drilling a few of the holes.
The misfit you see up there was much worse at first. That was after the first or second adjustment. Thankfully Mike had the tools/technique to improve the front-to-back curve as well as the up/down curve. It was a slow process. I don't know if this is a rail that was returned when the PO realized how bad the fit was and returned them, then Rich accidently put them in the wrong bin or what. We made them work, that is the important part!
When putting the nuts on the rails, because of the adjustments in the bends, Mike came up with the solution of using vice grips and a large nut to make sure the rail was sitting flush before putting on the fastener. This was to limit the stress on the threads, as well as have confidence it was seated fully.
Last was getting the new 'tabs' on the sunroof itself. Unfortunately, the screw started to spin with the fastener after a half turn. Mike worked his magic, using a lot of tape, a blanket, and a grinding disk, to get the head off the old screws.
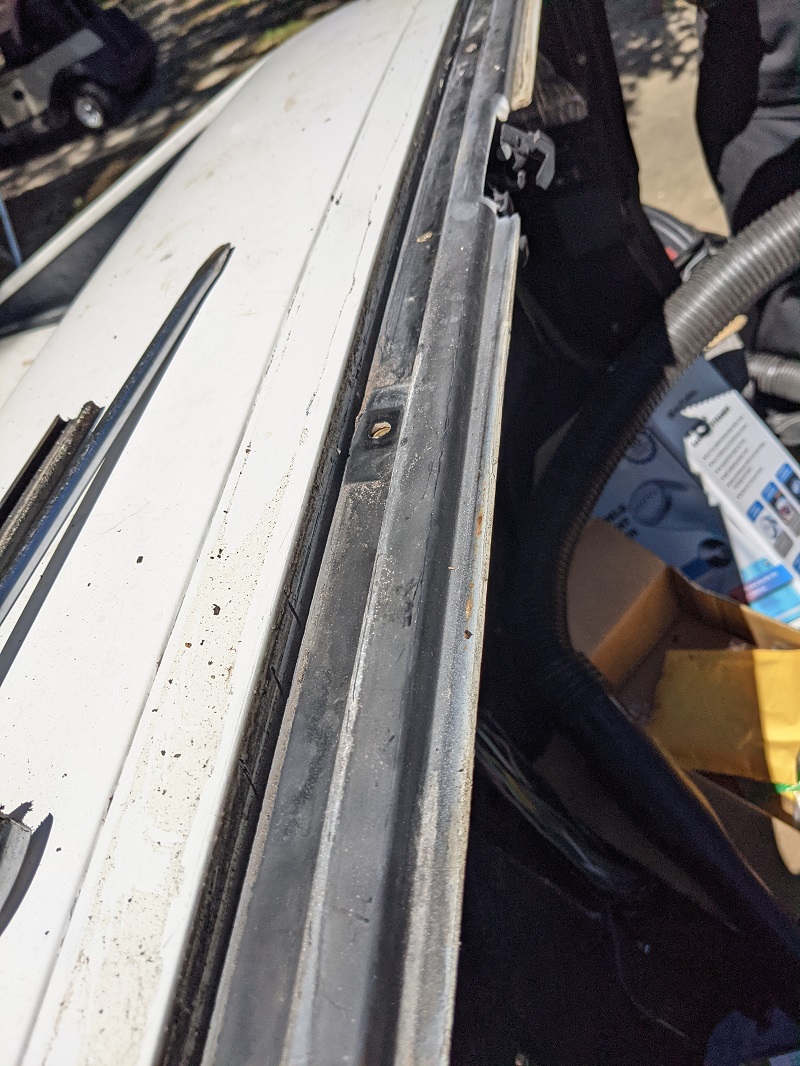
New sunroof hardware installed, you can see there is a gap there at the moment. The pieces are made to slip into one-another for a watertight fit. The powdercoating on the tabs made it a little too tight here (the plastic was deforming). Mike used a hand file to lightly clean things up, and it all fit together snugly - we still had to do some gentle persuasion.
Finally, Mike got out the soft/rounded plastic tools for installing the new gasket. Unsurprisingly, in the time it took him to do as much as he could reach, I was just finishing up the short side on my end.
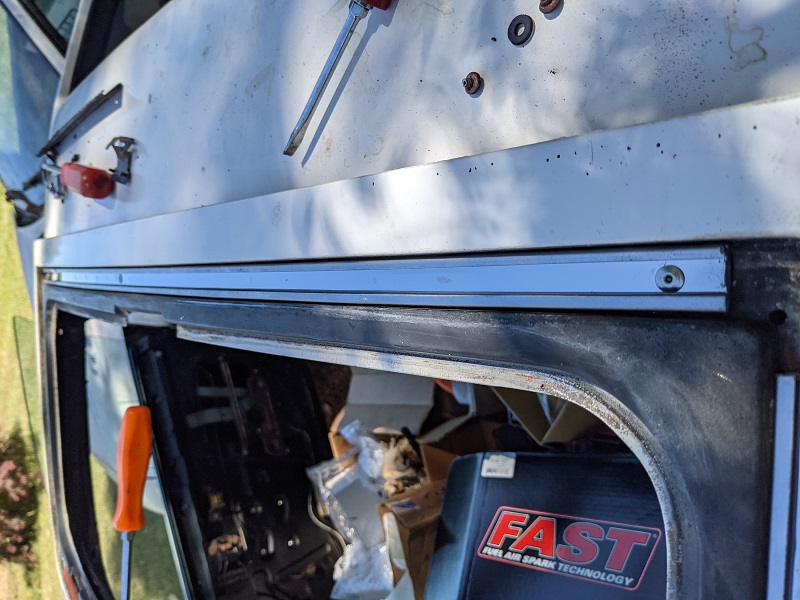
Glass is back in! We had to nudge it back and forth a little to get it centered and clamped down.
[This message has been edited by Trinten (edited 06-05-2024).]
Someone else had that issue when they used Chrome, but it showed up correctly in Firefox. Interestingly, Chrome on mobile device shows up too. So it seems to be related to something the browser itself is doing.
(Update from 2024 -- I changed hosts and moved all the pictures to PFF's hosting. I've gone back and updated all the links to point to the native local hosting)
[This message has been edited by Trinten (edited 06-05-2024).]
I wonder ... if because I'm hot-linking the image, if those guys have aggressive pop-up or ad-blocking software, and they see the 3rd party domain/hot-link as an "ad" and are blocking them!
Which browser and OS are you using? Do you have any add-ons / plugins (like adblock) running?
I have a good deal of pictures since Page 11, moving them over to PIP and updating all the posts will be... time consuming. I'd like to troubleshoot with someone else first and try to find the root cause and see if I can solve it. Feel free to PM me!
My host may not have an updated SSL certificate installed. Google, in their infinite wisdom, has decided for you that if your site doesn't have an SSL, it won't show hotlinked images! Why? "Because reasons!" (there actually is a reason, it's just not a great one).
So the issue will happen for ALL Chrome users until I can find out if my host can/will install/update the SSL on the site.
If you right click on the broken link copy image link location, and paste it into a new tab, it will open.
The hosting company said that at worst, I'll need to go back through and reset the hotlinks with https (versus just http as they are now), but when I tested it in my Chrome browser, pictures are now loading!
The hosting company said that at worst, I'll need to go back through and reset the hotlinks with https (versus just http as they are now), but when I tested it in my Chrome browser, pictures are now loading!
I've got the turbo Sunbird cluster, there are two users that I've found that have installed this, one (reportedly) is Tom. The other is FieroGuy123. I've reached out to the latter to see if he did a build thread on how he installed it.
Now this means that when I put in my Amida interior, I'll need to create a new bezel. Not worried about that.
Since the Sunbird cluster has voltage and oil pressure (and boost), it leaves open the spots where the GT Pod gauges go.
In the short term, I'm going to mess around with an extra GT Pod I have. I took measurements of the bezel opening (roughly 3.225" x 1.724" viewable), and measurements of the space the gauges take up behind the bezel in the pot housing.
I'm likely going to put in a Transmission temp readout, and for the other space, a wideband sensor readout.
I looked at Speedhut ditigal gauges for transmission temps, and I bought one, unfortunately now(March 2023) the link to it seems to be dead. The part number for it - GL-DG-TRNS-01 doesn't come up on their site.
The measurements look like I can take off the outer bezel, maybe modify the housing a bit, but should be able to center the actual display part in the center of the GT Pod! I hope.
So ordering that one today to experiment with. If it works out, I'll make my final choice on the other one, find one the same size, and do the same thing.
Since I have leather wrapped A and B pillars, I don't want to put the A-pillar gauge pods on it. Amida's center console section also has a 'blank space' with a cover panel, We're going to mount some USB ports there (one to go to the FAST, one for charging). In the future I'll have to take some measurements of the spacing behind it, maybe I can squeeze another gauge back there, opening up the cover panel for it's face as well.
[This message has been edited by Trinten (edited 03-26-2023).]
Super quick up date for some continuity because I haven't gotten the pics off and fixed up yet.
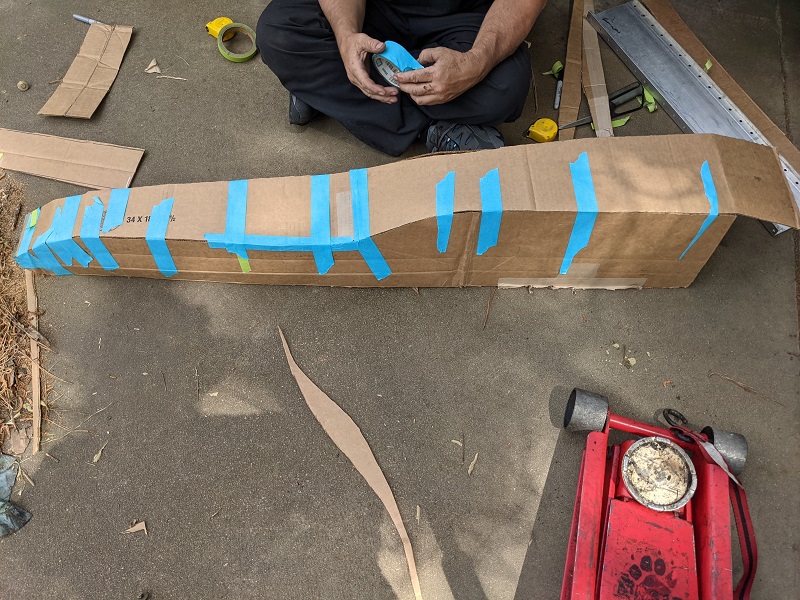
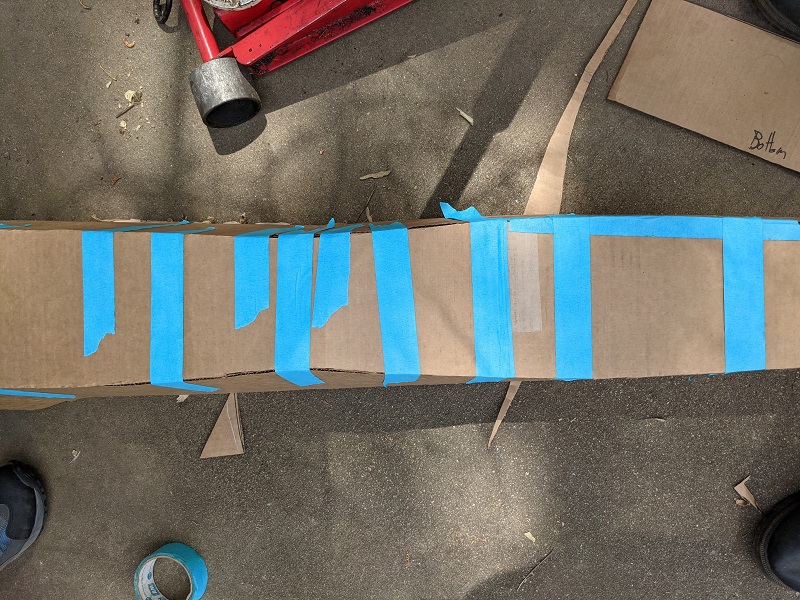
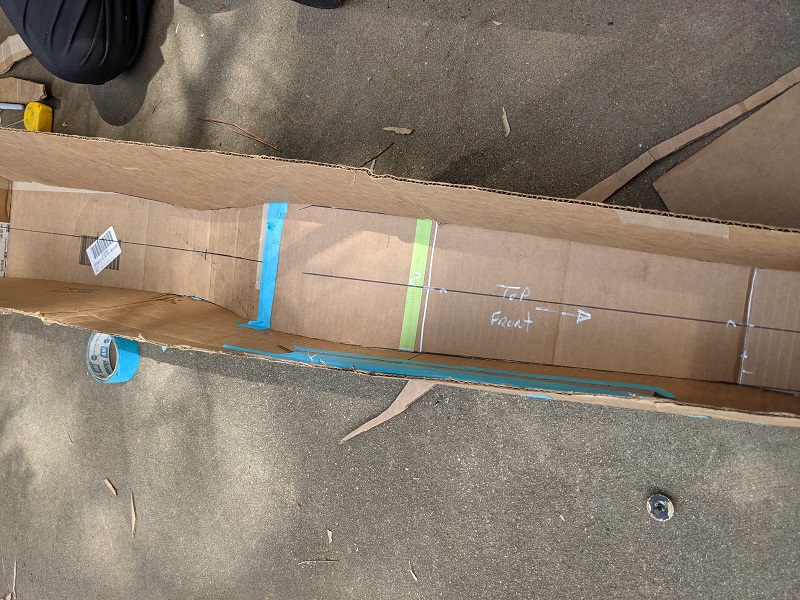
Mike decided instead of trying to edit the fuel tank drawings that are floating around, he was going to come up with his own and maximize our available space. When he got under the car, he says "I see why FieroGuru cut a tunnel out of a Fiero. This shape is ridiculous."
He then started working on a mock-up out of cardboard, hugging the tunnel as much as possible and maximizing our space at the end. He had a concern about how far back the tank could go, namely in order for us to have room to get the hose clamps on. I recommended cutting up that metal thing at the back of the tunnel, but he didn't want to do that (more on that in a minute). So he goes "Might have to cut it back to closer to stock tank length."
I say "What about quick disconnects." he pauses (and some other guys were hanging out), and says to them "Watch this. I've learned not to say something doesn't exist with this guy around."
He gets under the car with a tape measure. "Okay, if you can find stainless steel quick disconnects with an OD of half-inch and 1.5", we can investigate that.
Took me about five minutes to find them from about three different sources. So I ordered a few for us to play with.
He has the mockup at a big metal work and fabrication shop that he does business with, asked them to make a rough-up of his mockup, since it'll likely get beat up, bent, cut, etc. Then we'll deliver that to have the final version made.
His reason for wanting to leave the tunnel and 'hose holder' in place? Because he reminded me I wanted to investigate how much it'll be to have these tanks made and where the price breaks would be, both in stainless and aluminum.
When I get the prices, I'll post them up if anyone is interested! I know folks like Rodney had investigated it but had to walk away. Hopefully I can provide a 'small batch' channel for this. I'm sure shipping is going to be expensive.
The metal shop anticipates having the alpha tank back to Mike sometime next week. So hopefully about mid june we'll have the modified/tweaked alpha back to them to create the beta, and then the production unit!
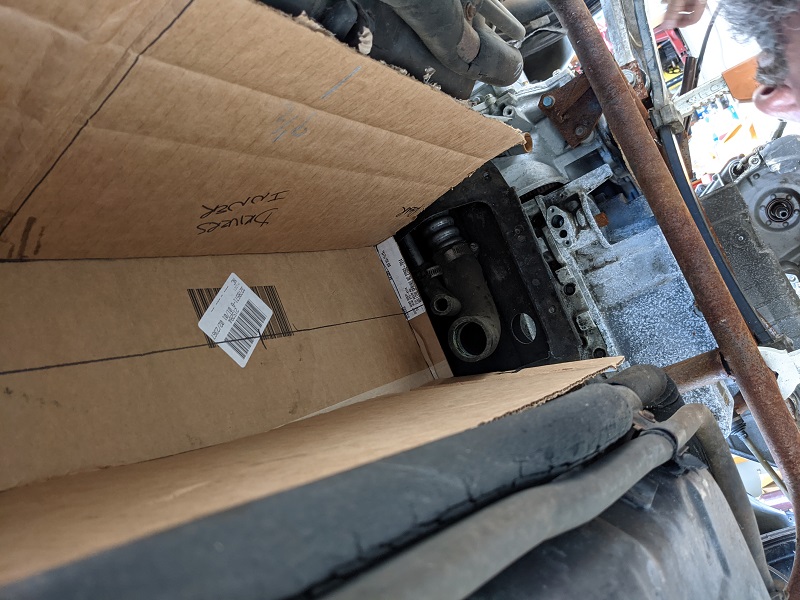
First up is some of the pictures I took when Mike was measuring, cutting, and test fitting for his gas tank mockup.
We're still thinking about hookups to the two stock lines (filler neck and expansion tank). He's trying to maximize all the space he can, without cutting up that metal piece the two hoses come though. I've suggested different quick disconnect and push to connect solutions.
The hard part is finding a solution that will work with OEM fiero stuff without taking up the room to get a hand/pliers in there to put on hose clamps. The lines going from the tank to the fuel pump and so on will be much easier.
Still waiting for the metal shop to get the pieces back to Mike for next phase of mockups. This was expected, Mike did tell them it was a low priority job.
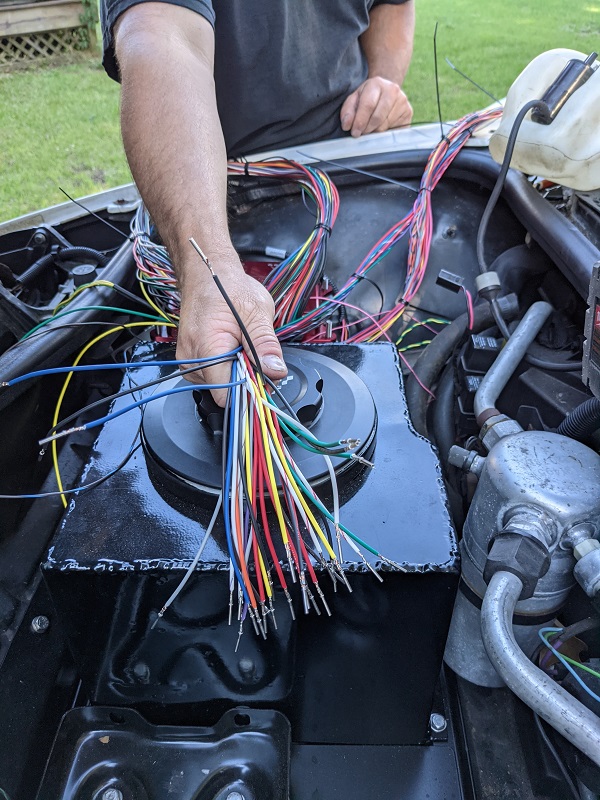
So this past weekend the focus was on wiring! Lots... and lots of wiring.
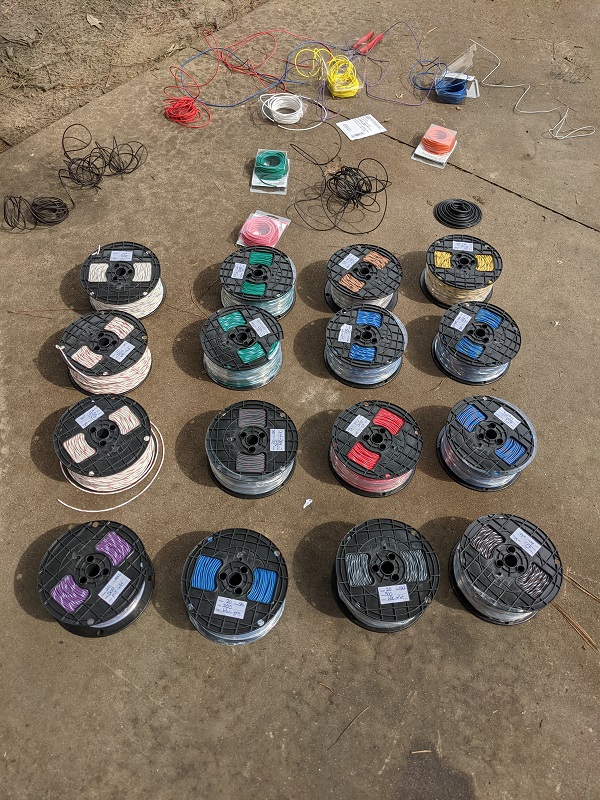
Because I went with FAST, and we were putting the modules up front, we knew we'd need to cut the wires and extend the harnesses. To make sure all the wiring was the same for any future troubleshooting, I called up FAST and asked if I could buy wire in the appropriate colors... they said no.
Well, if they don't want my money, someone else would! I went through the XFI and XIM wiring diagrams for LS, and wrote down every striped color combo... and found a great company to work with. Adiwire.com was happy to fill the order, and though the minimum was 500' per color, the cost per foot was about half if I would have been able to find and buy that much in the smaller spools.
You'll see I had a few small spools of solid color. 20Ga SXL copper strand wire. I foolishly underestimated how much wire we'd need, so I'll be ordering spools of the solid colors from ADI tomorrow.
My collection of wiring, so far!
Yes, this looks crazy. But Mike actually laid it all out that way to make it easy to group it.
After finishing making the bundles.
Not quite done (need more solid color wire), but mostly done with the wiring up front.
To protect all of it, I got some high quality fiberglass high-temp loom from a company called Insultherm. I got it in three different sizes. It's nice, can be cut with scissors, flexible, and highly abrasion resistent.
I have other stuff for the really high temp areas in the engine compartment.
The wiring cout up front does mean we won't be able to use just the one Deustch connector we got, I'll need to get a second one. The space Mike was planning for it will still work.
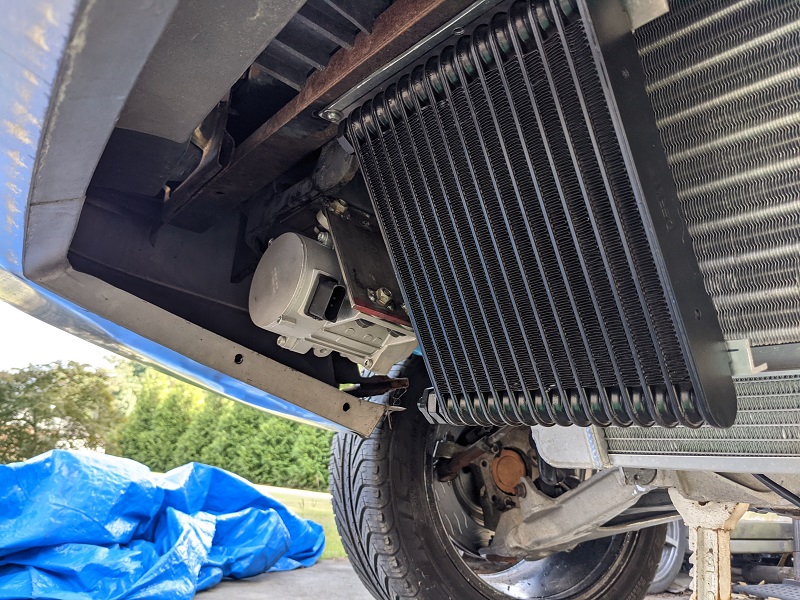
A shot of the Derale transmission cooler is mounted! I got the wrong fittings though, so need to fix that.
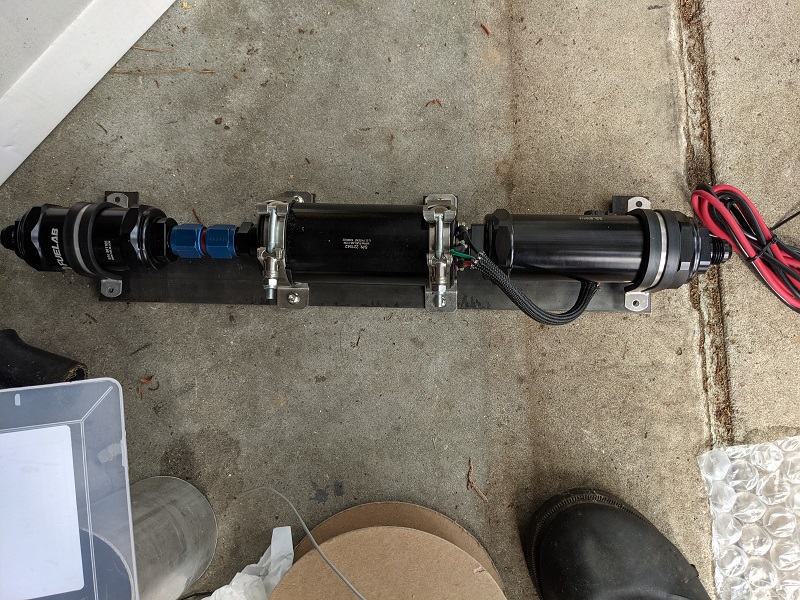
And lastly, the mounted test setup for the pre- and post- pump fuel filters, and the pump itself. Once everything is mounted and finalized, the mounting will go off for powdercoating.
[This message has been edited by Trinten (edited 03-26-2023).]
So not a huge update, just some little stuff, some of it starting from late June (weekend before Carlisle).
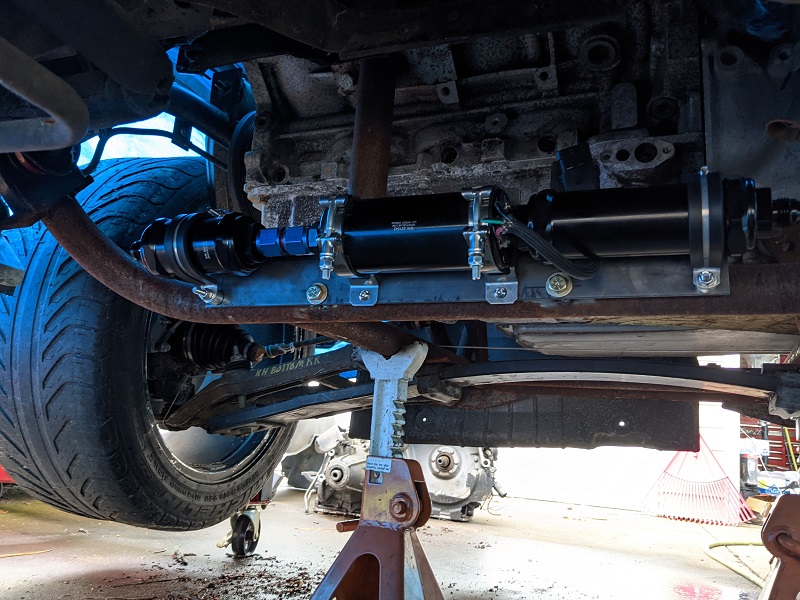
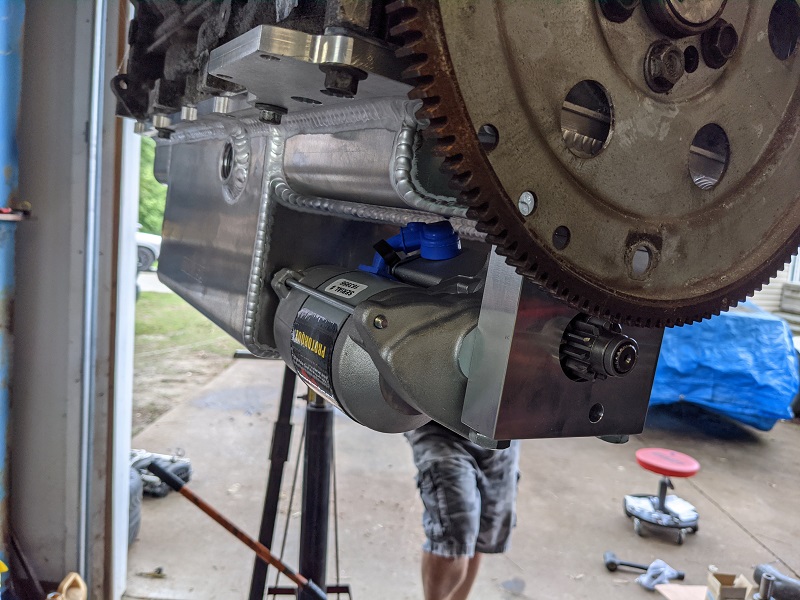
Mike and I got the cradle and drive train out, and he had split them apart. He made some final adjustments on the cradle and did most of the primary welding, compared to the spot welds that had been in place. It was smart that he did that, he did discover he had to shift the drivetrain back and up a little (less than an inch in both directions). And while it was out we swapped over to the Moroso Oil pan (and modified pickup tube) and installed the starter. Also have a pic of the beta-assembly for the fuel system mounted to the cradle.
The aforementioned fueling setup. The pre-pump filter, pump, and post-pump filter. All FueLabs stuff. They have great pre-sales support, talked with them about power goals, fuel type (flex fuel) etc, and they were great about giving me options and the pros/cons between them.
This is the LS4 / 4T80 Oil pan and it's accompanying CVR starter. It's a nice piece!
I also worked with ADIWire to get a bunch of solid colors. Realized it was going to be way more cost effective to do that than keep buying smaller rolls. Plus, when it's a solid color, they don't have a minimum-length like they do with spiral-colored wire, just the less you by it changes your cost per foot. I got enough of each of the solid colors that my cost per foot didn't increase, and because there was no spiraling involved, there was no setup fee... so it was VERY affordable.
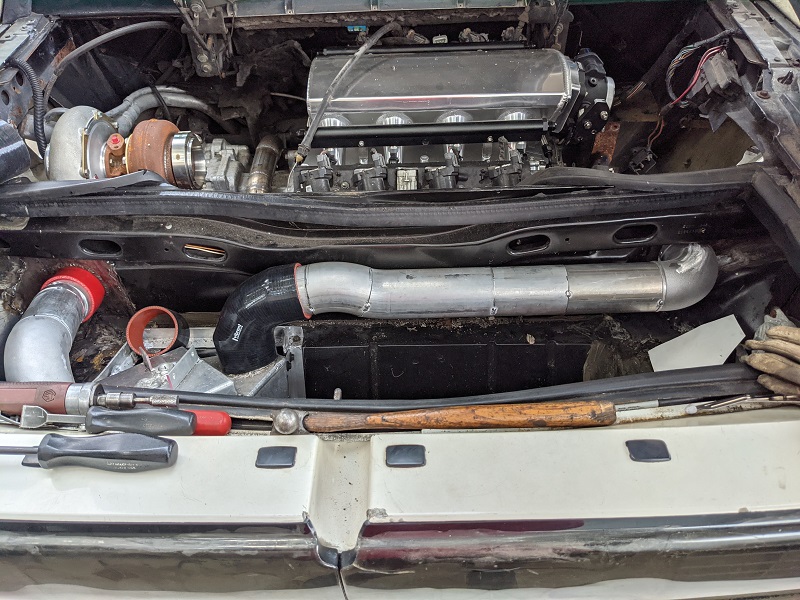
There's been more work (and pictures) since these were taken, of course. But not enough for it all to make sense in context, and I'd rather wait and get more pictures to do a more coherent story. The last few weekends Mike has been working on exhaust stuff, getting more of it mocked up, and working on the intake plumbing.
We did realize there simply wasn't enough room to go with our original 'packaging' idea, so we're going to flip the intake back around to face the passenger side. Which also means we'll need to take the torsion rods off, as they won't clear the throttle body. So that's on the agenda soon. Also means Mike needs to cook up a mounting point for the gas-strut that I kept from my Rodney Dickman setup from the last Fiero. Or another mounting solution and just need to find a gas-strut that's the right length.
We did do some of the fabrication work that I'm really excited to show off once it's finished (want the rest of the pics when it's set up for context and a clear view). I think it's going to look pretty cool, and be functional!!
[This message has been edited by Trinten (edited 03-26-2023).]
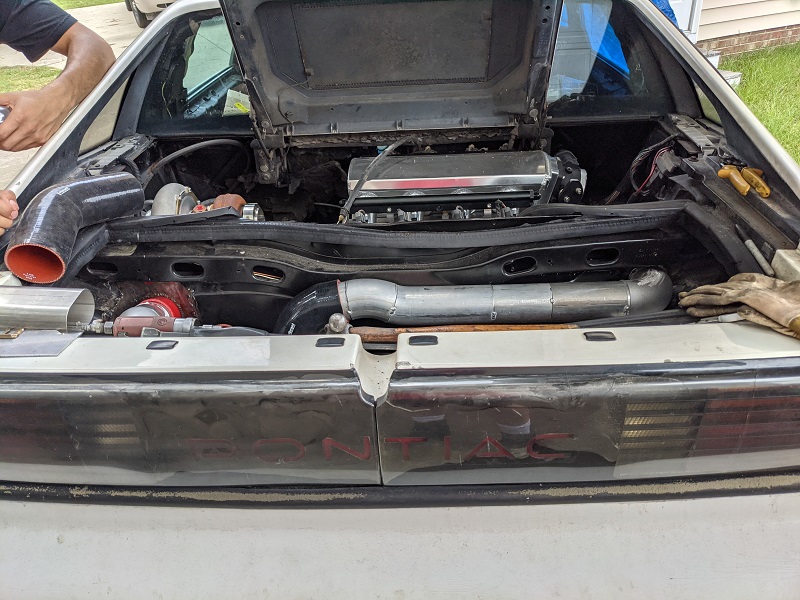
Intercooler intstallation Okay so Mike did some cool stuff this weekend.
I mentioned before that trying to package all of the plumbing with the intake facing the transmission side was getting tight and while possible, wasn't ideal. So the intake was going to be spun around. This still left having to modify the intake plans.
Since the intercooler was already going to occupy the trunk, Mike decided to route the intake tube through there, too.
Originally he was going to use some of the oval tube I bought, and tuck it in right below that 'bracing' point in the trunk. However making fittings to go from round to oval at both ends was going to take up more room and diminish the advantage. So he just used regular 3" tubing.
Onto the pictures!
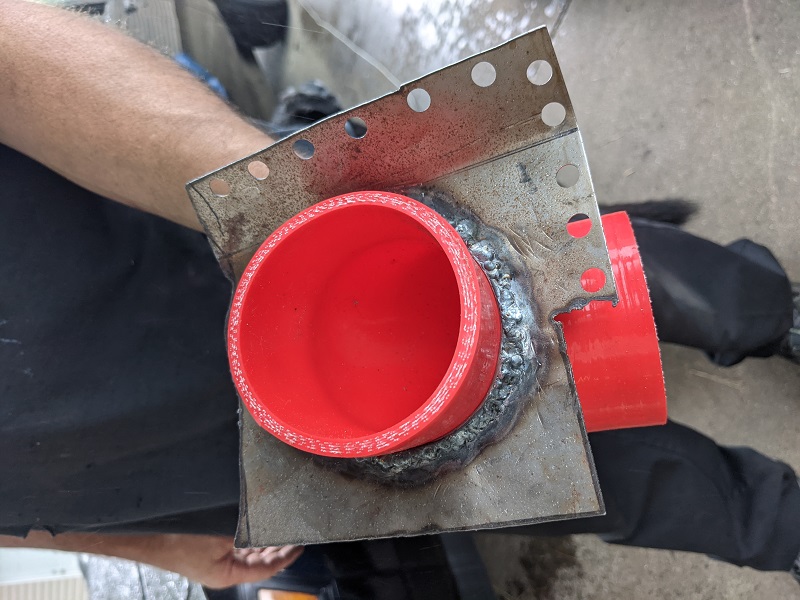
As always, Mike is methodical and likes to make fittings as clean as possible. He also wanted to make as much of the 'run' level as possible, instead of being at an 'easy way out' angle. Everything was tacked into place. Once it's all welded up, it'll be going off to the powder coaters.
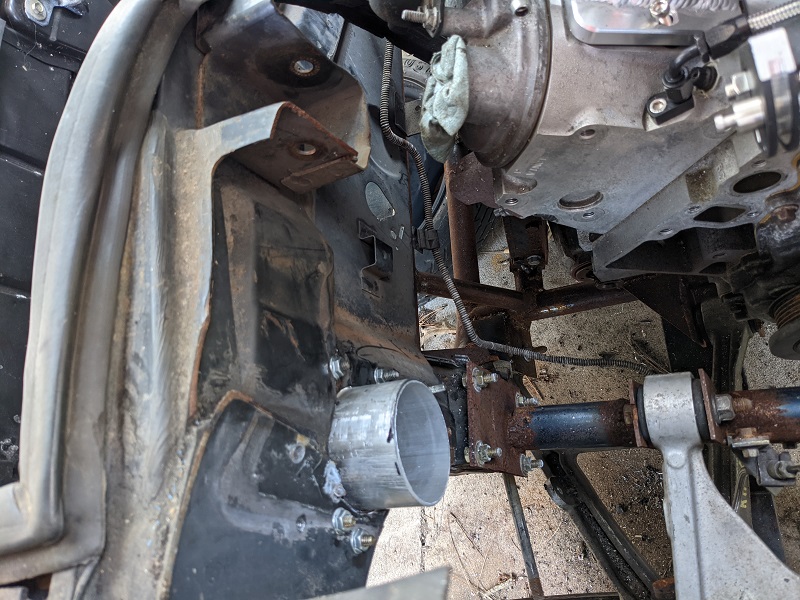
Mike cut out a place following the existing seems in the car to make room for the tube and plate to pass through. On one side, he used 1/8" wire, wrapping it around a metal 3" tube to form a ring, and then welded that onto the plate he formed. He made punches to create spot weld points and final welding, which we can then grind smooth and hit with self-etching primer.
This method worked out great, with the silicone elbow fed through, it was very snug, we can feel the ring pressing slightly all the way around, making it water tight.
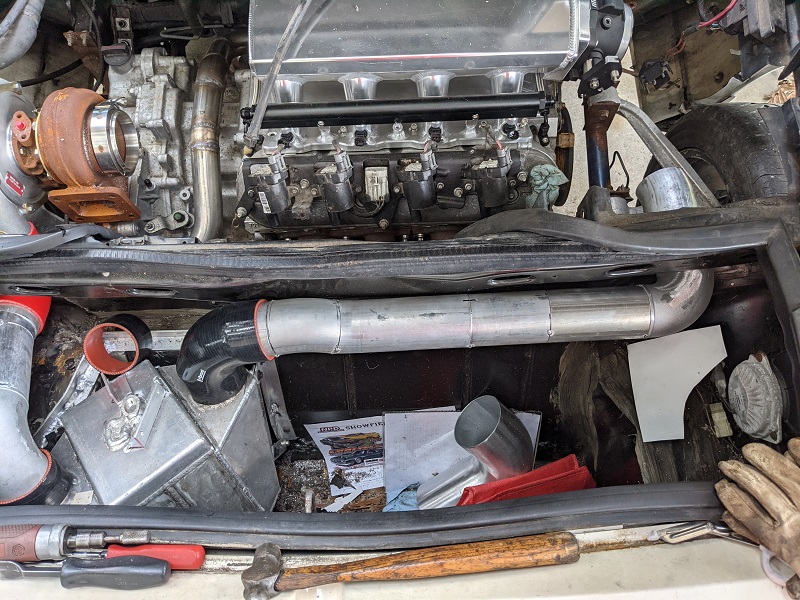
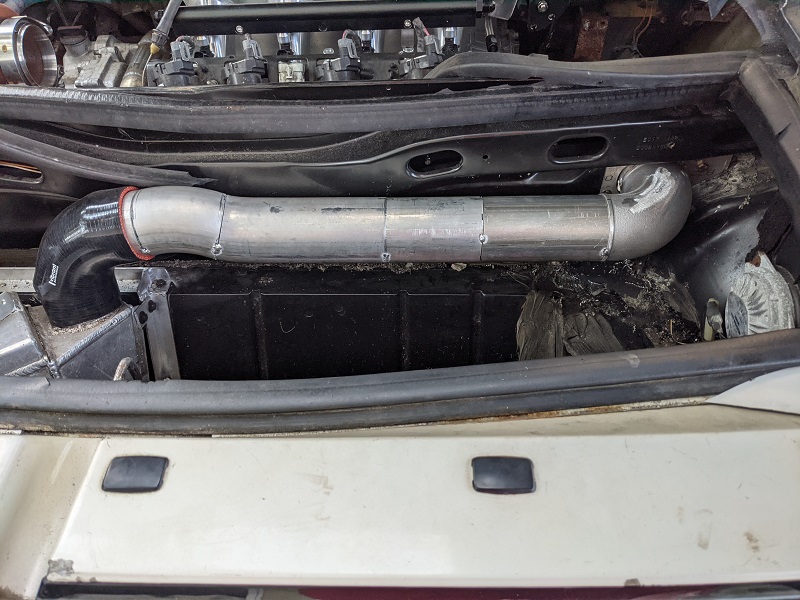
We used silicone hose in two places on the driver side, to be able to get the portion of tube off easily, in case we ever need to remove the intercooler. With the length of pipe going to the passenger side, the panel on that side has been stepped and formed flush to the trunk and will be bolted into place. We'll put a little sealant of some kind around there.
Here's a picture of the passenger side pass through, still not 'finished'.
Here's a view from a little further back. The intake is not bolted down yet, since we haven't removed the torsion bar or setup for the gas strut. So right now, we're just turning the intake around each time.
A little more of a close up. Yes, this does block the current placement of the trunk light. Mike suggested we get a LED strip and mount it on the rear passenger side of the trunk (to the right of the trunk catch, and relocate the wiring. So if anyone has any suggestions for a low profile COB style LED strip that would be good for lighting up a trunk and be easy to mount (probably bolted into place instead of just sheet metal screws), I'd appreciate it!
[This message has been edited by Trinten (edited 03-26-2023).]
Does the Moroso pan have that ridiculous protruding drain plug that they showed on the prototype?
If Mike is cutting & welding, he could fix that...
You know... I don't remember off the top of my head. I looked through the pics I snapped with the oil pan and I didn't capture it. I know when we looked it over we didn't have any major issues with it. I'll check it out when I'm out there next Saturday!
It might not be clear in that picture, there is a section earlier in the thread that talks about that. In hindsight of those posts, I realized I never did a 'here is the near-final setup'.
That chrome moly tube you see holding the upper a-arm IS the frame rail. The 4130 we used has a wall thickness designed for structural support. It's the same stuff he's used to build tubular chassis'. It will remain a bolted in piece, which will allow for most major maintenance items without having to drop the drive train. When it does need to be dropped, that rail-segment can be removed to make it easier to slide the drivetrain out the side, which has a lower height requirement that trying to slide it out the back (and less complications).
If you mean the additional stiffness that the strut towers provided to hold the trunk up, I can't say for sure what Mike has in mind. The cleanup and any necessary reinforcement of that part hasn't been planned out yet. Mike wanted to work from the 'inside out', where possible, to make sure we didn't box ourselves in (literally) with anything that needed to be done for the drivetrain.
One of the things I've mentioned to Mike, to make it even easier to get the drivetrain out when needed, was to rig up a rolling 'skid' with pockets in the right place for the cradle to rest in and keep everything stable while pushing/pulling the setup.
I was at Mike's on the 31st, I won't be out there again until the 28th of August. I thought I took some more pictures of this little update, but I guess I didn't like them? I couldn't find them on my phone. I'll have to scroll through the pics slower next time, beside the one I am posting that was from under the car, there was another I took through the wheel well.
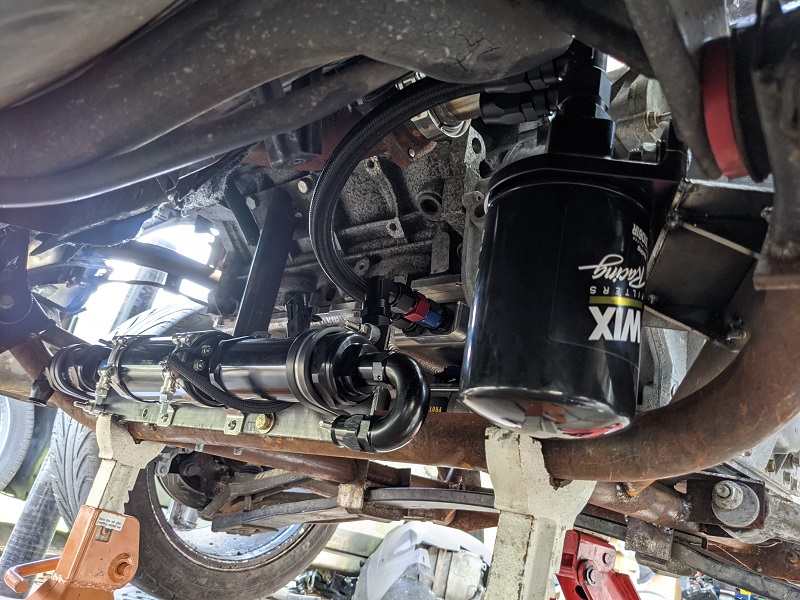
Anyway, Mike spent time fabricating the mount for the remote oil filter. He wanted to make sure it was going to be mounted 'level', so he took out this magnetic-mount angle gauge thing, measuring the angle of the tubing he was going to mount it to, then the angle of the cradle since it was jacked up in the air. He then fabricated up the bracket, and had me tack it in place with his welder through the wheel well while he held it from under the car. I didn't do a great job, but third time it stuck well enough for him to finish it up after he made a line and checked to make sure the routing for the oil to everything was going to work, and there would be no interference.
The filter doesn't come down below the cradle.And that wix filter is a chunky, so not worried about any future filters if I ever have to stop using that one.
When Cowspatoot was up here last, he left his Fiero over at Mike's to fabricate a few things. I asked Mike if he could turn his attention to that since I wouldn't be up a few weeks, assuming his own plans and other jobs allowed it. So I'm not expecting much to get done on my car while I'm not there, but Mike has definitely surprised me in the past!
Look for my next update near the end of the month/start of September.
[This message has been edited by Trinten (edited 03-26-2023).]
Injector Upgrade and misc. I was there on August 28th. Mike was busy with the exhaust system. I had bought two segments of oval stainless with 90 degree bends, one piece had the bend 'the easy way', and the other was bent 'the hard way'. (basically bent along the wider part of the oval or the narrower part of the oval).
I had also bought a bunch of oval stainless pie-cuts. Mike was spending a lot of time with the pie cuts, working on making a collector for the exhaust manifolds to get it buckled up to the turbo. There were a lot of pieces but I figured it'd look a lot better when it's a little more assembled.
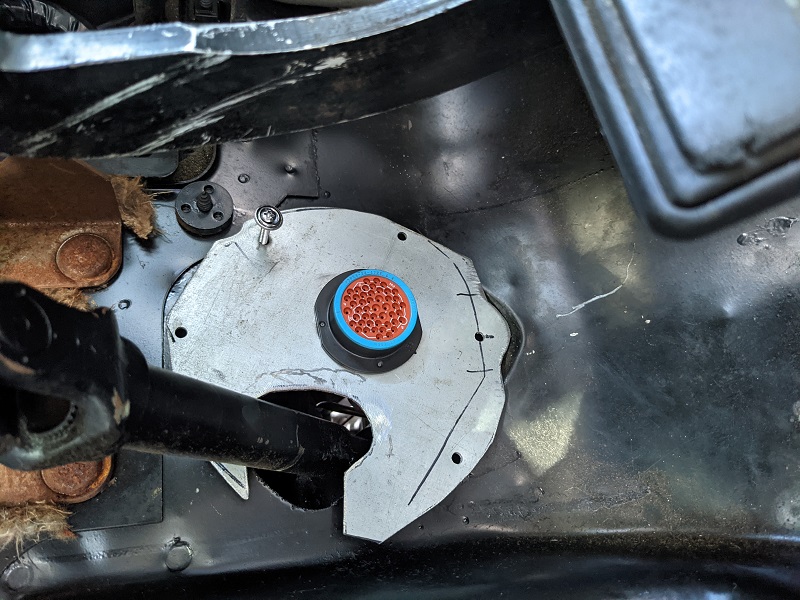
Mike also made the first fitting of the cover plate that will cover the steering column opening where we had to modify it a little to accommodate the connection to the C5 steering rack. This is also where we're going to have the wiring from all the FAST components coming in. Not sure what Mike has in mind for routing the wiring to the rear bulkhead where we will have another connector there as well. I suspect it's going to move from the steering column area and and snaking through the armrest area with all that other wiring.
I'm going to look into some rubber sheet or something to make a 'cone' from the metal plate to the steering shaft, to help keep water from getting in.
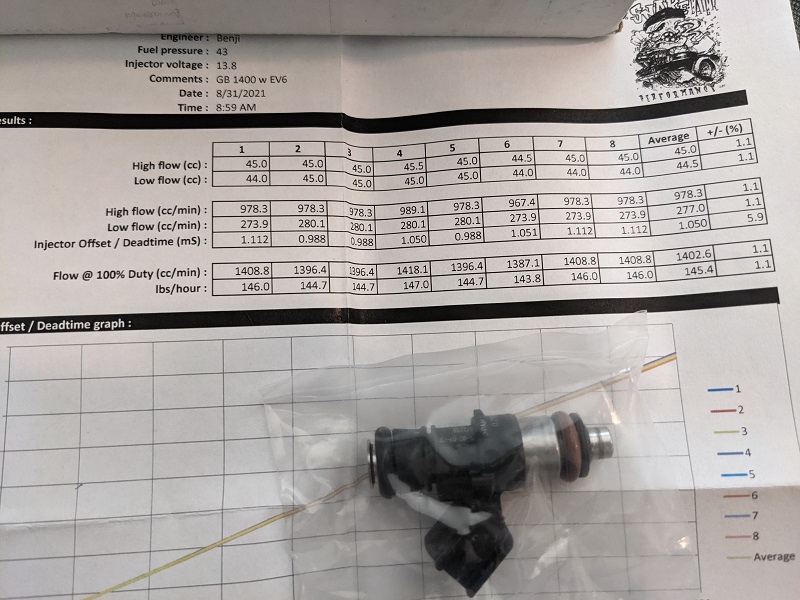
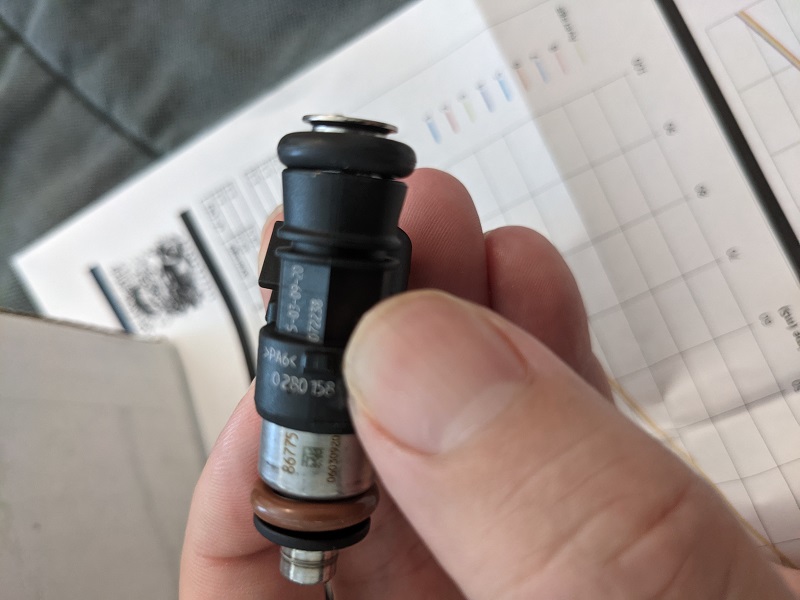
Now here is a cool thing -- I had bought my 1500cc injectors from Snake Eater Performance about a year ago. A few months ago, they publish a big update that they contracted with BOSCH to produce two more injector lines for them!! The Bosch 1400cc are made in the German plant, the 210/hr injectors are made at one of Bosch's other plants.
A few weeks ago, they sent an email to all their customers asking for product feedback. I admitted I couldn't give product feedback, but gave feedback on the pre-and-post sales support, and admitted I was kicking myself for jumping on the 1500cc injectors so early (they usually sold out fast).
The owner of the company emailed me back, thanking me for the feedback, and said if no fuel had passed through the injectors, they would offer me FULL CREDIT to exchange them towards the Bosch's!! I let them know that I had installed them so we knew what size adapters to get for the fuel rails... they said that was fine!
So I put in the order and shipped them back. They were so cool about it that when I sent them the USPS tracking number and thanked them again, they even sent out my Bosch's before my return got there.
So that's my big news for right now, and these are the higher end ones made with stainless steel components, not the (almost) all plastic ones that are floating around out there! And just like their other injectors, SEP does flow testing to make sure everything has a tight tolerance, marks the numbers on each injector, and sends you the flow sheets.
[This message has been edited by Trinten (edited 03-26-2023).]
Saturday was an productive, with one facepalm moment.
Facepalm first. Mike wanted to start working on the extension of wiring that would run through the cabin, from all the FAST stuff up front, to the engine compartment. Cool. So we get our length of 'measurement wire', he gets out the FAST wiring diagram for the colors, and he starts rattling them off, I cut them, he puts on the terminators, and starts putting them into the Deutsch connectors...
He gets about 6 wires in.. and I go "oh hell." and he stops. "What? Cut something the wrong length?" "No... we forgot about the sleeve I bought for the interior." "Oh no."
So I get the sleeving, he gets out his Deutsch connector pin disconnect tool. Unfortunately, here's where my desire to get high-quality stuff causes an issue. All the wiring I bought is SXL, so it has a slightly thicker insulation to make it more resistant to abrasion and what not. It also prevents it from slipping into the channel on his disconnect tool. Sigh.
He pointed out that inside the cabin it's not going to run into a lot of stressors, I just wanted something a little cleaner looking then using zip ties or reusable "christmas tree" ties. He's going to talk to his tool guy at work and see if they have something with slightly bigger channels.
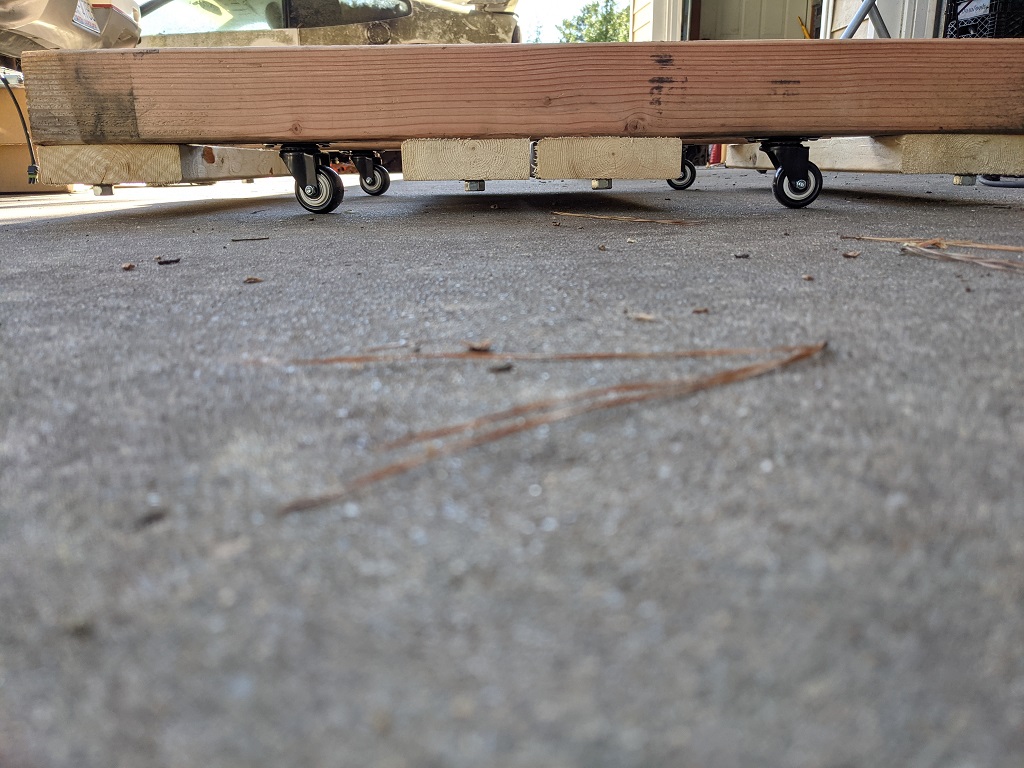
Onto other things where I have some pictures! So when dropping the cradle, we've been using two car-dollies (the ones you put under the tire and can push the car around, sideways and whatnot). It's a little wobbly, and usually an a-arm winds up dragging, but it functions. We are going to work on building a 'sled' for the cradle with caster wheels. I took measurements for that.
The next issue is lifting the car up. We didn't like doing lifting the car up by the trunk latch, which is common but always makes me cringe. Without strut towers, we couldn't do it some of the other cool ways people like FieroGuru have come up with. The secondary problem with this method is the legs of the cherry picker get in the way of the cradle, requiring a lot more wibbly-wobbly to slide the cradle/drivetrain out.
Mike had a solution for that, which we did this Saturday. Testing is planned for next Saturday (though that might change. He's doing a little work for CowsPatoot, and CP will be down here in early October, so I'm going to ask Mike to put my car on the backburner so he has plenty of time to finish up CP's stuff).
"So what did Mike think of?!" I know you're all excitedly asking....
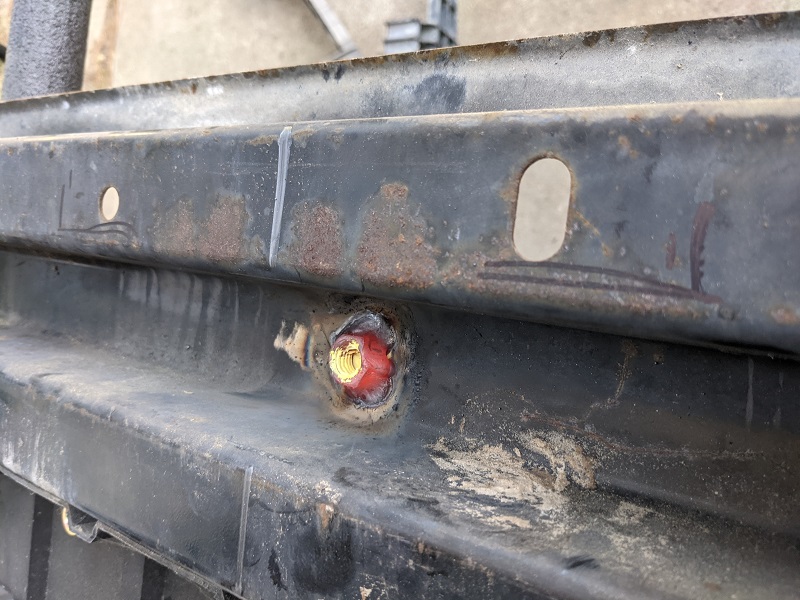
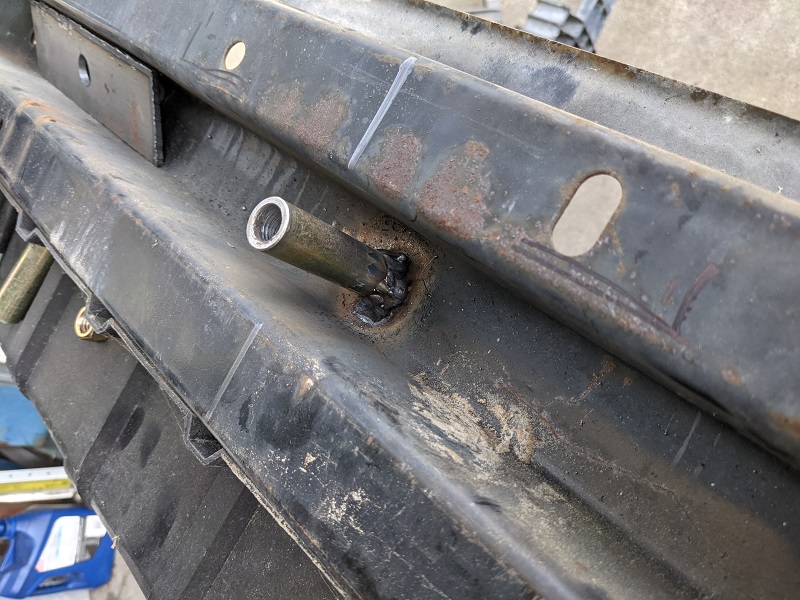
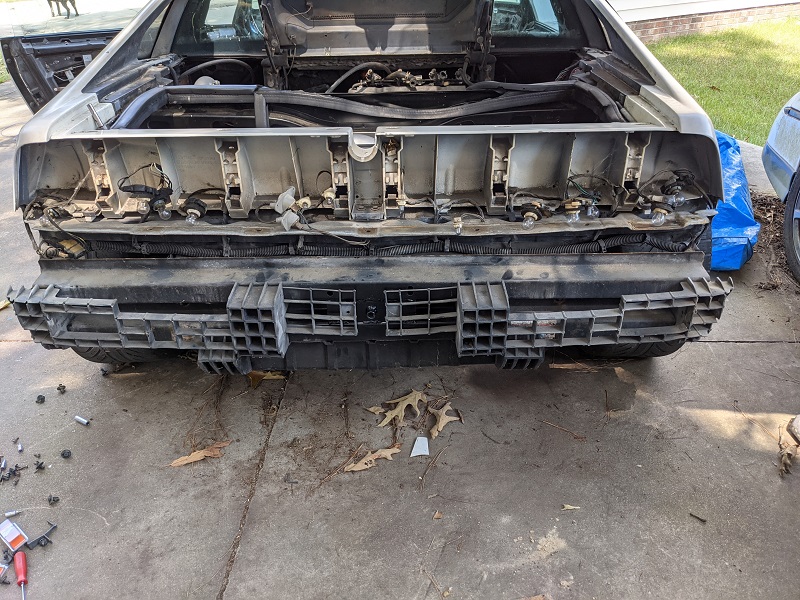
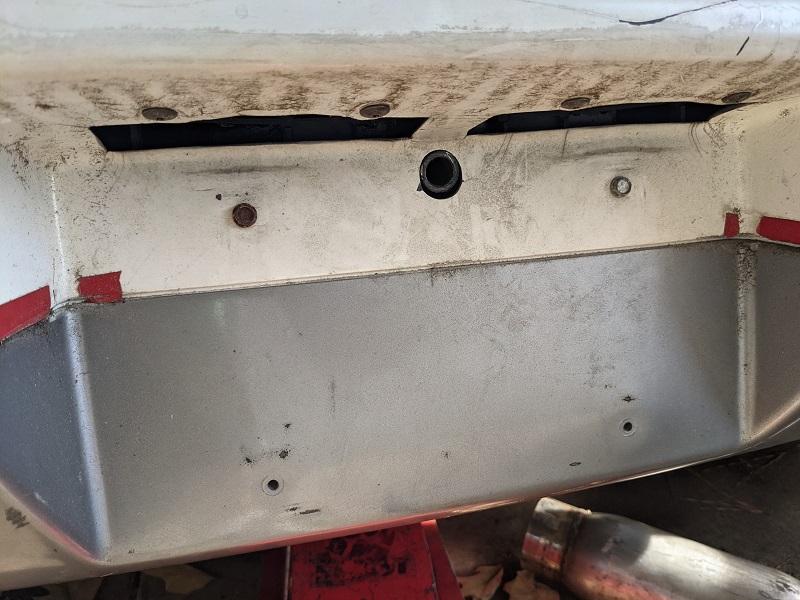
Well, it required me taking the bumper cover and bumper off... and started off with...
I didn't get my phone out fast enough to take a picture when it was glowing red hot, and the zinc coating that was in the threads was glowing gold-green.
Next up is this nifty thick-walled heavy duty tube, welded to the nut. Yes, it's a little 'bubble-gummy', but welding in a recess doesn't give you much options.
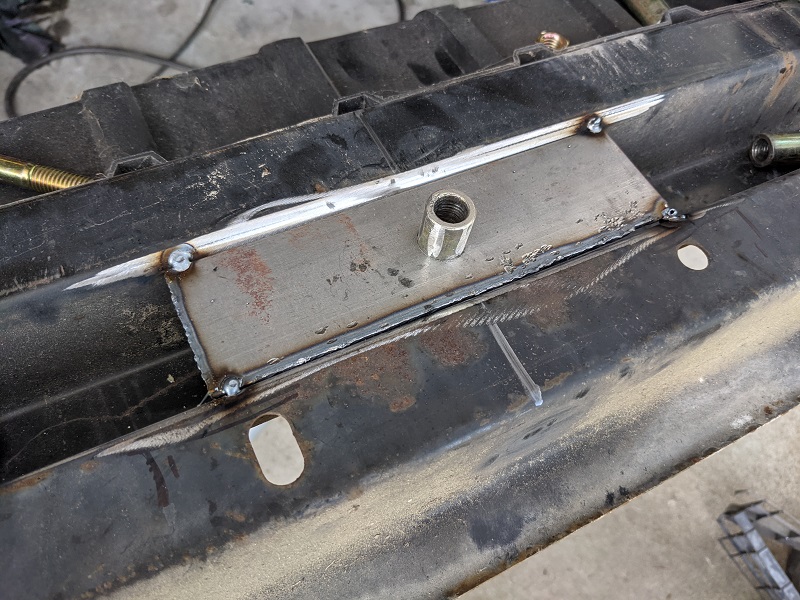
Next, boxing it in to add some strength and spread out the load....
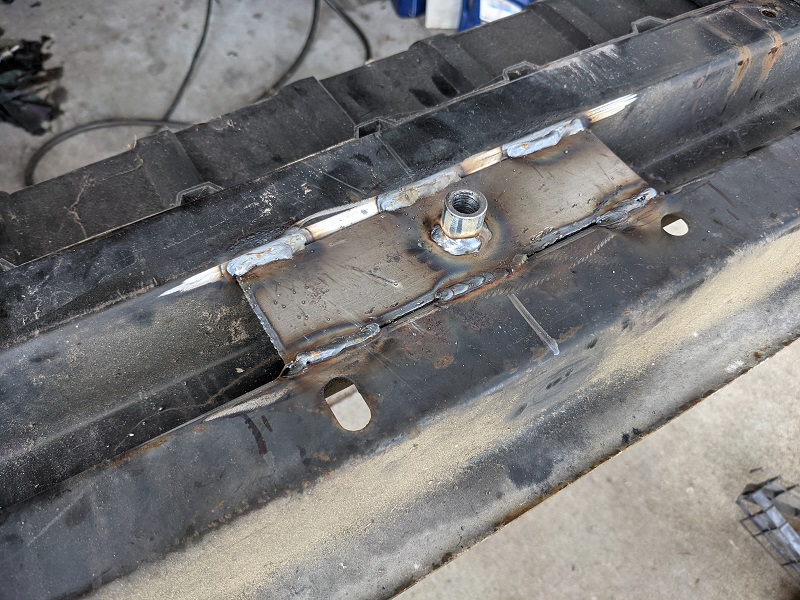
Finished up with that boxing in.
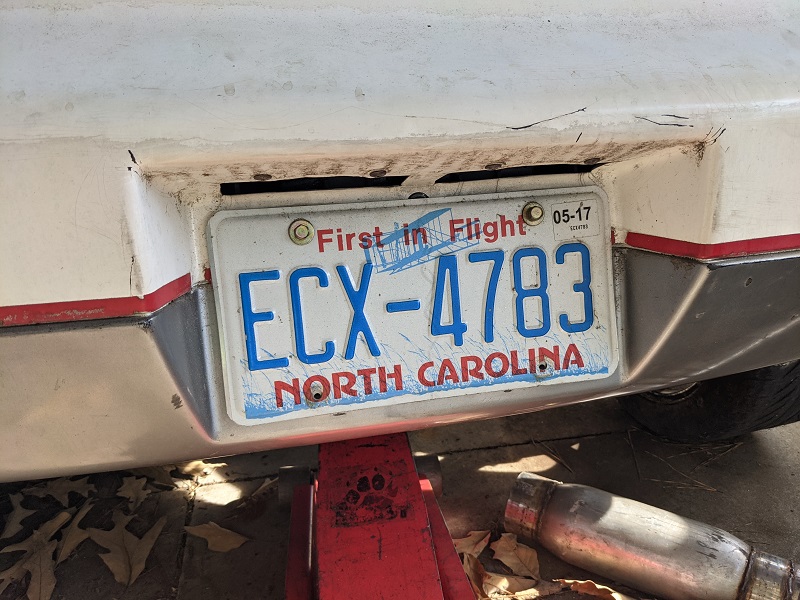
Bumper is back on the car! Now here is where I goofed and forgot to take a picture. After Mike modified the bumper cover (don't worry, it was a repop, and so the actual bumper. Apparently the car had gotten into a rear-end collision, but not bad enough to damage the frame). So the bumper cover now has this quarter-sized hole in it, that'll be hidden by the license plate. And for what??
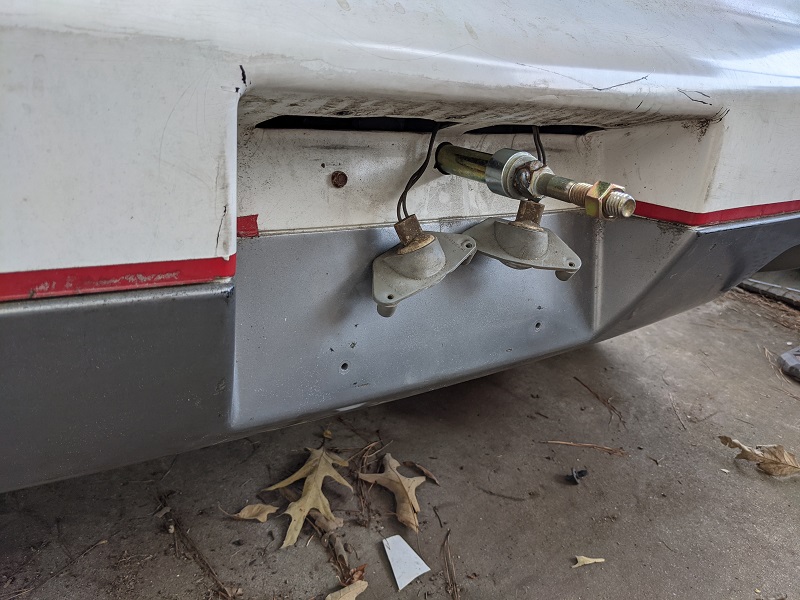
For this! This is the first draft (for length measurement) of the anchor that will screw into the nut in the first picture, and the cherry picker (or a come-along hook) can be connected to. So now we can lift the car up higher without using the trunk latch and not have the legs of it get in the way. And if the car slides off the track at VIR, or needs to be pulled up onto a trailer, that's where the hook will connect.
It's not designed to lift up the car with the drive-train in it. It is for towing and drive-train-dropped lifting only.
[This message has been edited by Trinten (edited 03-26-2023).]
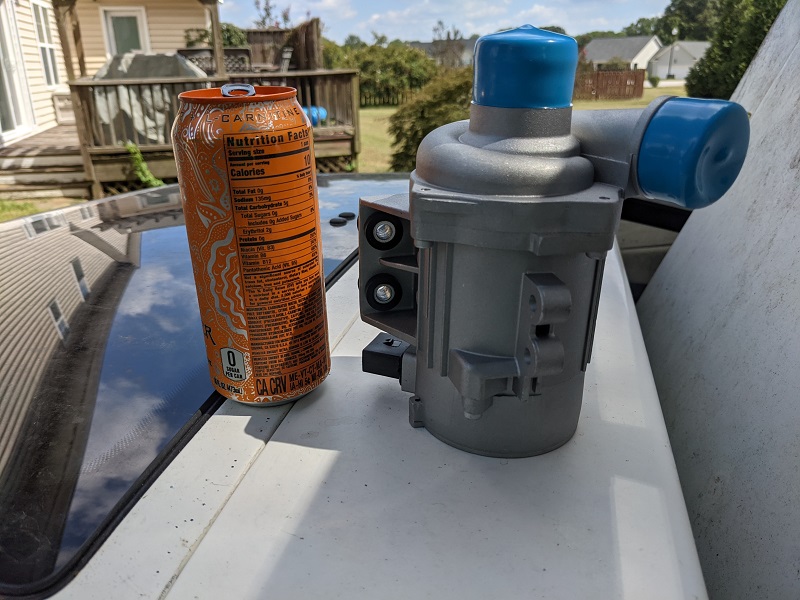
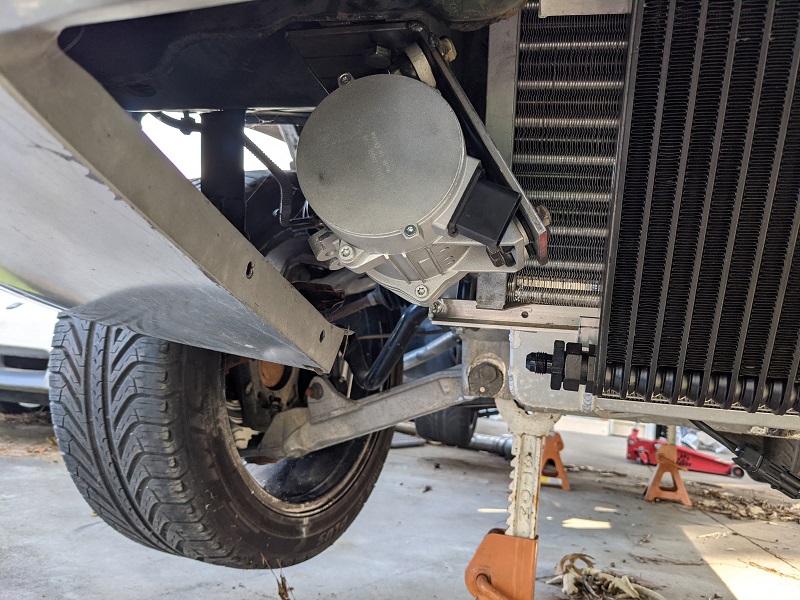
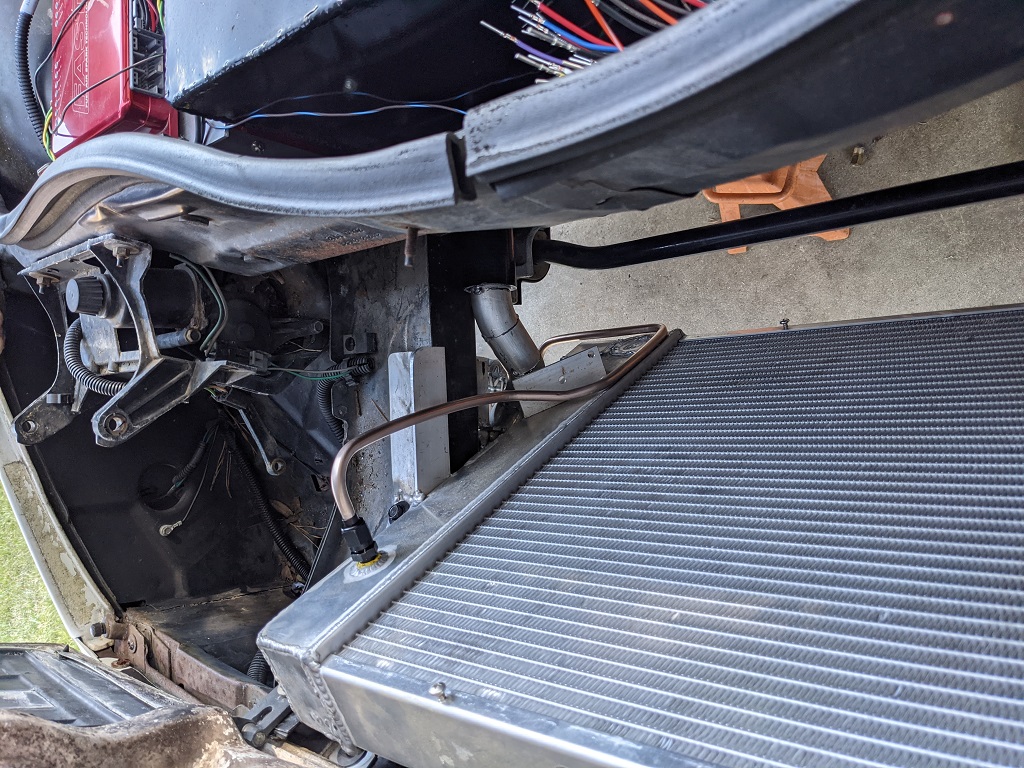
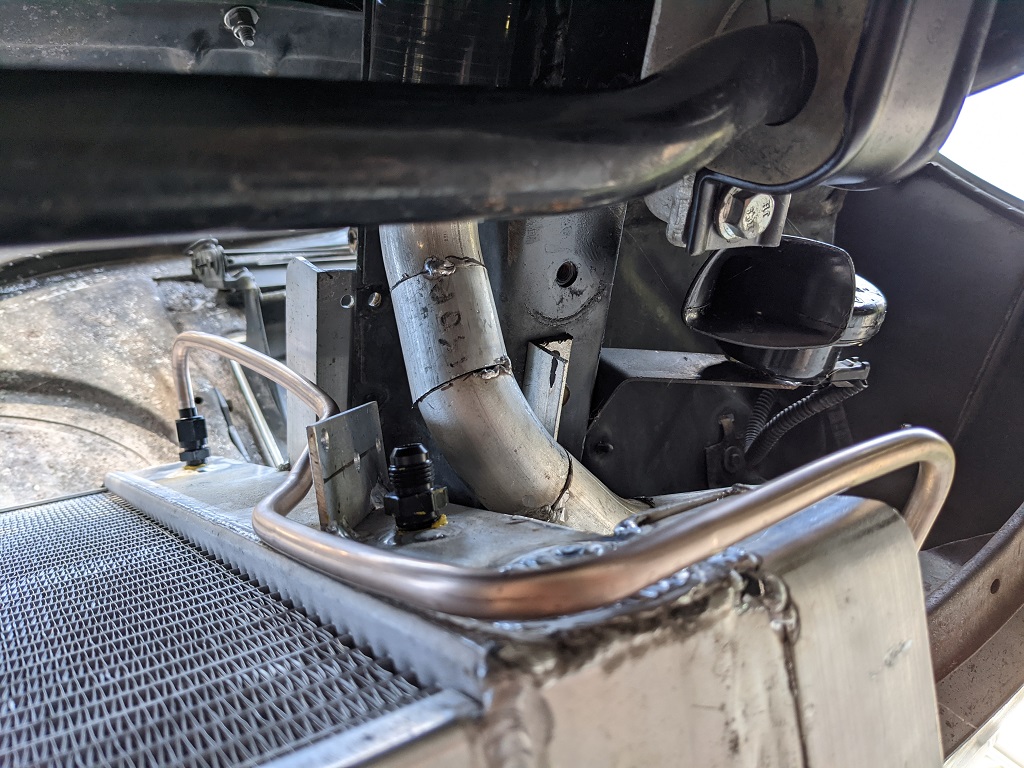
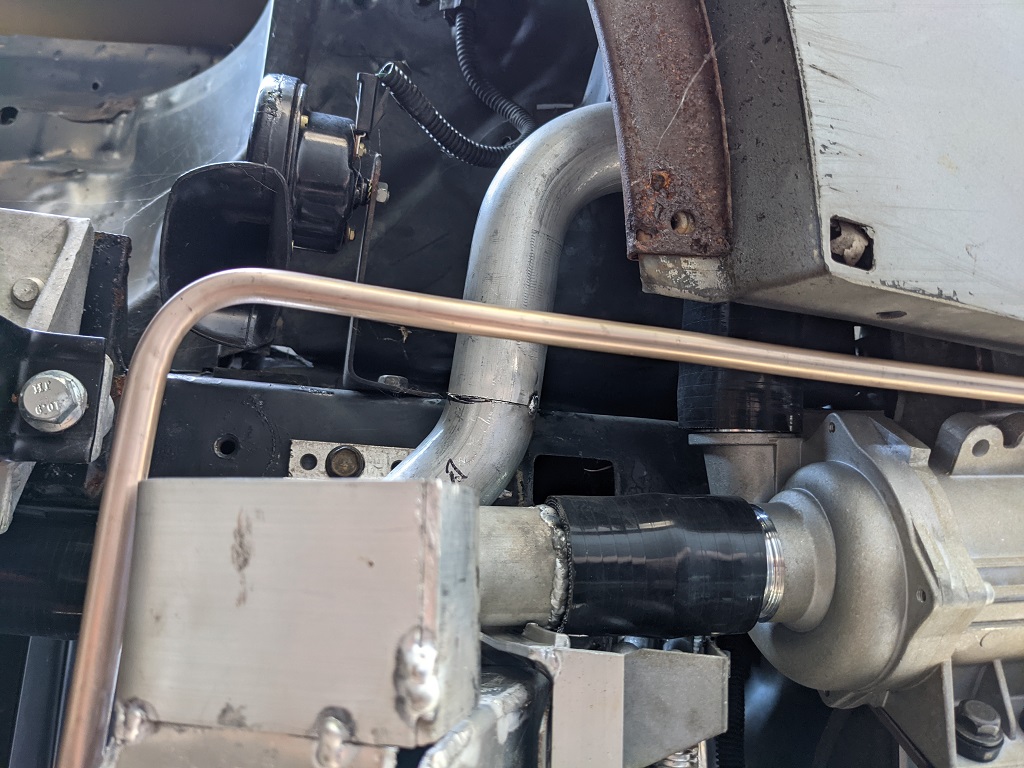
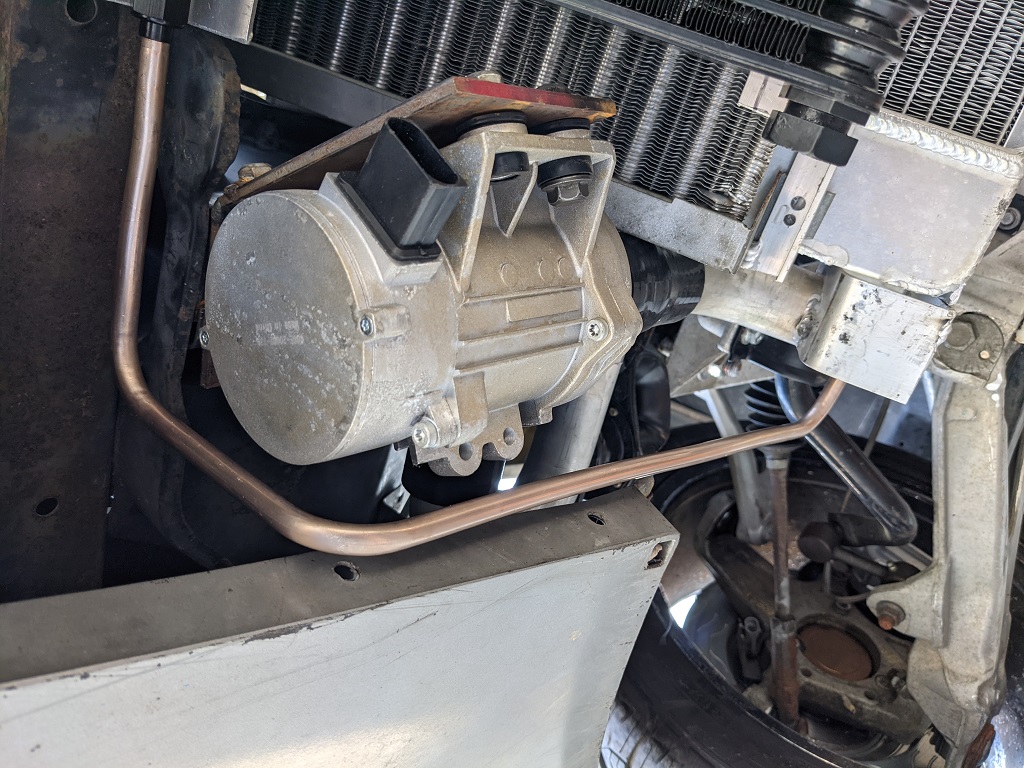
Another productive day at Mike's. FieroGuru had posted up some stuff in his thread on water pumps, including the cool stuff that Davies Craig makes. It was on my list, and then I ran across a thread where La Fiera posted up about the BMW pump he uses (CWA200, with an aftermarket controller). That pump has been used on BMW engines (v6 and v8), included mounted in some places where they take a lot of thermal abuse.
La Fiera has been running this pump without any issues. So I figured, hey, this is an off the shelf pump I can get (somewhat) easily if I had to replace it on the side of the road. And we are mounting it up front (though not the same way La Fiera did), so it'd be away from all the engine heat. A phone call later, and viola, we went to a local store and picked up the pump. Mike isn't sure if XFI will be able to do a PWM to control this pump, so I'm going to get the controller for now -- and yes, I'll pick up a backup at some point to throw in the trunk on long trips, just in case.
So let's start with some pics of that!
Here is the pump next to an energy drink for reference. When the guy at the parts store pulled up the image of it on his computer to see if they had one, he commented it was the strangest water pump he'd ever seen. The top of it looks like a little turbocharger.
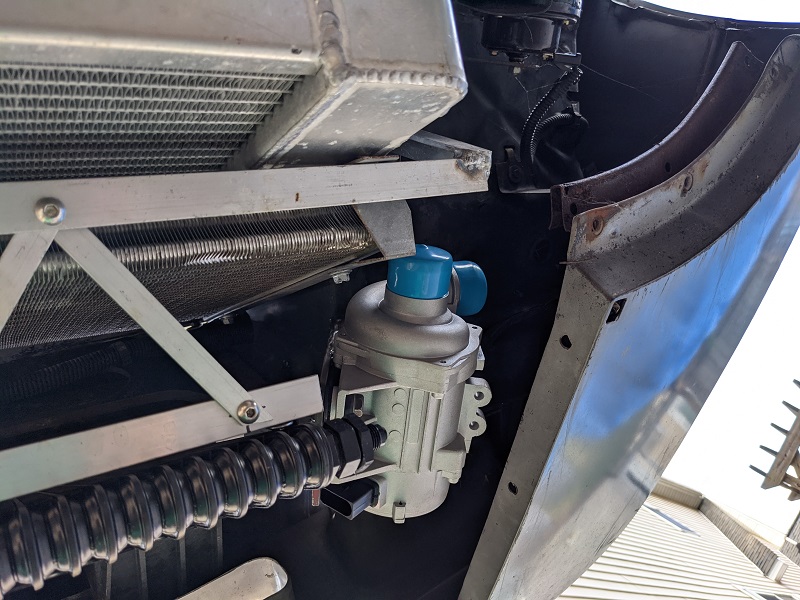
Mike made a bracket after figuring out a good place to mount it up front where it wouldn't be in the way of things. Plus with the fuse block he put up front, we'll have power for it and the controller up there already too, so this works out well.
I went with the LS Simple water manifold. It fit on very well, we just had to rotate the cam sensor 180 degrees, so the plug cleared the lower tube. It's very close to the block, so maximizes space! Mike penned out how to hook in the steam ports for the heads, so he's going to make a radiator overflow tank that will mount in the engine bay, so air will bleed out of the steam vents and into the tank at the top, and we'll have a return hose at the bottom. He'll be fabbing up that tank.
This was one of the few times I came up with an idea he liked. Originally he wanted to make a surge tank, but didn't like that the routing could have trapped air in the steam vents.
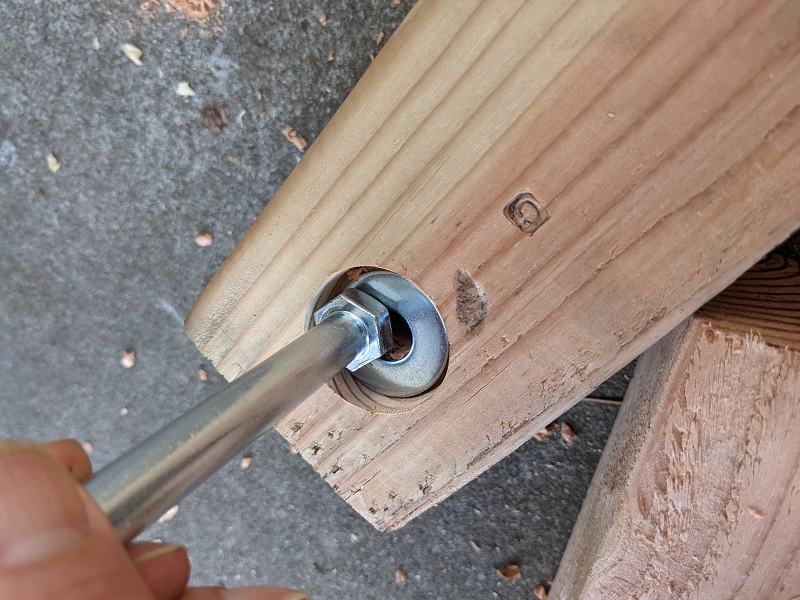
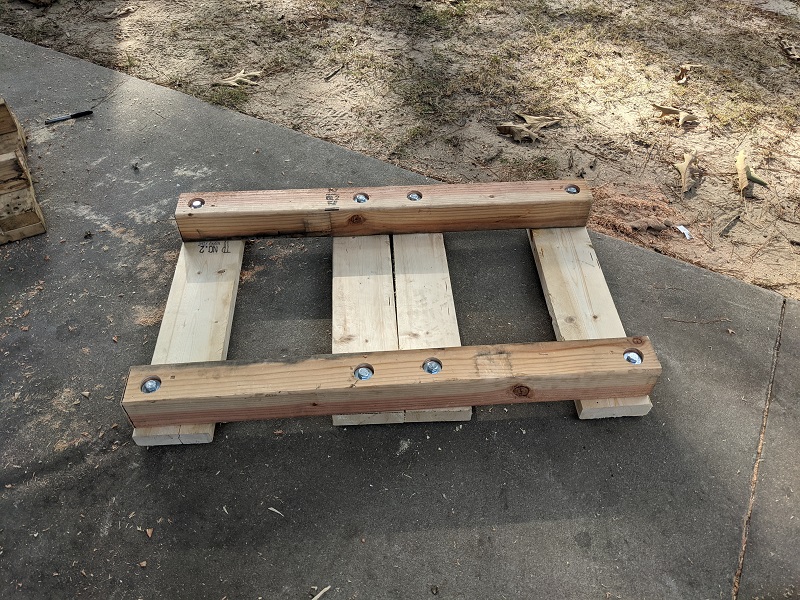
While we ran out to get the water pump, we also stopped by the local big box hardware store and picked up the lumber and hardware for my engine cradle sled. The casters I had ordered last week didn't show up (fast refund from Amazon) but I could still make the rest of the sled. Replacement casters will be here this week and go on this weekend.
I used a routing bit (I think that's what it's called) to make sure the head of the bolts would be sunk to just below the surface of the wood. I didn't want to risk them scratching up the cradle after it's powdercoated.
I know it looks like an upside down skid, and it sort of is. It will be orientated that way, so main weight bearing parts of the cradle will be supported evenly on those 4x4s, and it will sit at the right width so the smaller 'cross arms' in the A-arms will be supported on the back 4x4, lifting the suspension up a little bit closer to 'neutral' like when the car is sitting on the wheels.
The casters will in the wide space between the 2x6s. I'll probably take the skid to go get powdercoated before I put the wheels on.
Lastly, two pictures I forgot to take last weekend of the car-lift mod without the test 'hook' in, and with a plate on.
(okay, how many of you actually caught that I said I was going to take wood to get powdercoated, and of those that noticed, how many of you were getting ready to say something before you read this? )
[This message has been edited by Trinten (edited 03-26-2023).]
That looks very clean Vince! The pump controller will do an awesome job that can't be matched by any programing from any ECU manufactures unless they are willing to spend the lots of time on the R&D. The Ecomotive guys are not garage mechanics, they are engineers that took their time to make a product perform 200%. I've seen many shade tree tuners tryng to tune with their AEMs at no avail! You won't be dissapointed.
Mike has had to redo a lot in the radiator area to accommodate my new water pump, including some additional modification of the radiator itself. In the end, the connections from the pump and radiator to the radiator pipes going to the back of the car are going to be closed off with short heavy duty silicone hoses, and all-stainless t-clamps.
Mike also started running the lines for the transmission cooler. Here's some pictures of all that stuff!
And also here is a picture of my drivetrain skid with teh wheels on there. Just enough clearance. Haven't had a chance to test it yet. Thankfully it was cheap to make, so easy to build another one and improve it if necessary.
Lastly, does anyone have any good "long shots" of how the transmission cooler lines are run a stock automatic Fiero? This car was manual, so nothing to go by. I've found a website where they are selling new transmission cooling lines, but they are so "twisty" it's tough to figure out where they're going. I know Mike would like to route them as close to 'stock' as possible.
When we drop the drivetrain we'll be working on accessory setup. Mike said the OEM alternator is not going to play nice with where he wants to put things, he's looking to use one that GM used very widely, including in pretty much every G-Body.
We also have pushrod measuring tool on standby, so I can make sure we get the exact-right length pushrods. So that'll be happening when we drop the drivetrain, too.
[This message has been edited by Trinten (edited 03-26-2023).]
Lastly, does anyone have any good "long shots" of how the transmission cooler lines are run a stock automatic Fiero? This car was manual, so nothing to go by. I've found a website where they are selling new transmission cooling lines, but they are so "twisty" it's tough to figure out where they're going. I know Mike would like to route them as close to 'stock' as possible.
When we drop the drivetrain we'll be working on accessory setup. Mike said the OEM alternator is not going to play nice with where he wants to put things, he's looking to use one that GM used very widely, including in pretty much every G-Body.
We also have pushrod measuring tool on standby, so I can make sure we get the exact-right length pushrods. So that'll be happening when we drop the drivetrain, too.
No photos, but IIRC, the auto trans cooler lines follow essentially the same path as the clutch line in a manual trans car.