Pennock's Fiero Forum
  The Construction Zone
  #\ *doublec4* /# Official Build Thread (Page 19)

Post New Topic  Post A Reply
Email This Page to Someone! | Printable Version

This topic is 22 pages long:  1   2   3   4   5   6   7   8   9   10   11   12   13   14   15   16   17   18   19   20   21   22 
Previous Page | Next Page
next newest topic | next oldest topic
#\ *doublec4* /# Official Build Thread by doublec4
Started on: 02-26-2009 06:22 PM
Replies: 863 (69683 views)
Last post by: doublec4 on 12-31-2020 04:32 PM
doublec4
Member
Posts: 8289
From: Oakville, Ontario, Canada
Registered: Jun 2003


Feedback score:    (20)
Leave feedback


Total ratings: 150
Rate this member

Report this Post04-07-2013 10:14 PM Click Here to See the Profile for doublec4Send a Private Message to doublec4Edit/Delete MessageReply w/QuoteDirect Link to This Post
 
quote
Originally posted by RCR:

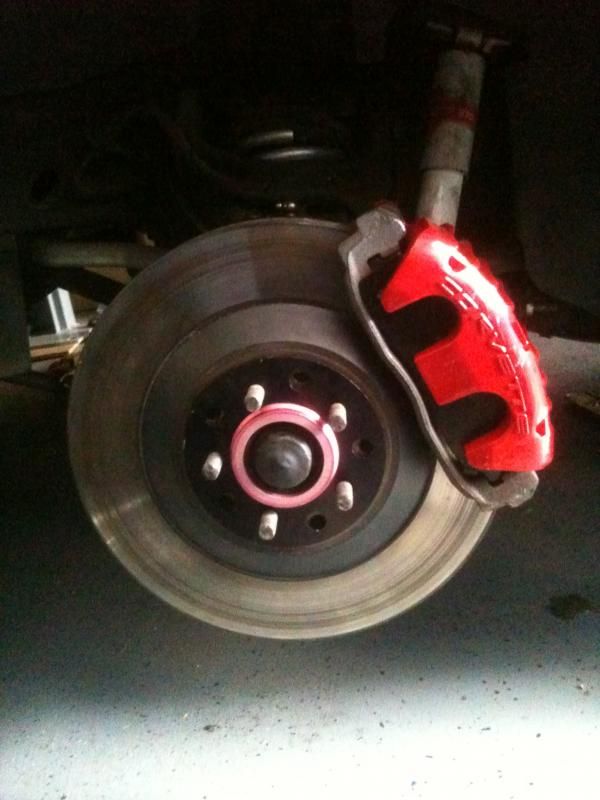
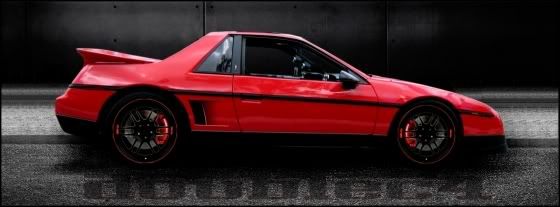
It's an 84, with 88 front suspension. As it turns out, my calipers need to be tucked in closer to the hub. I'll have to remake my brackets and add about an 1/8" spacer to the wheel hub.

Bob


Sounds good, I saw your post about your brakes in the general section. They look great!

This is where I got to today:


Test fit with the wheels on as well and they clear now. I also turned lock to lock and there is no contact. All in all a great success. Just need to bleed them!
IP: Logged
RCR
Member
Posts: 4397
From: Shelby Twp Mi
Registered: Sep 2002


Feedback score:    (7)
Leave feedback


Total ratings: 102
Rate this member

Report this Post04-08-2013 07:54 AM Click Here to See the Profile for RCRSend a Private Message to RCREdit/Delete MessageReply w/QuoteDirect Link to This Post
Look pretty good, and thanx for the comments.

What size wheels will you be using?

Bob

[This message has been edited by RCR (edited 04-08-2013).]

IP: Logged
doublec4
Member
Posts: 8289
From: Oakville, Ontario, Canada
Registered: Jun 2003


Feedback score:    (20)
Leave feedback


Total ratings: 150
Rate this member

Report this Post04-08-2013 06:16 PM Click Here to See the Profile for doublec4Send a Private Message to doublec4Edit/Delete MessageReply w/QuoteDirect Link to This Post
 
quote
Originally posted by RCR:

Look pretty good, and thanx for the comments.

What size wheels will you be using?

Bob


17" Enkei RPF1 replicas

IP: Logged
doublec4
Member
Posts: 8289
From: Oakville, Ontario, Canada
Registered: Jun 2003


Feedback score:    (20)
Leave feedback


Total ratings: 150
Rate this member

Report this Post04-14-2013 08:32 PM Click Here to See the Profile for doublec4Send a Private Message to doublec4Edit/Delete MessageReply w/QuoteDirect Link to This Post
Bled the brakes today, bled the clutch, and started it up for the first time this season. If you haven't been using speed bleeder screws to bleed your brakes you've been missing out. Unfortunately my speed bleeder screw for the slave is still on it's way from Rodney, but I'm sure it won't be the last time I have to bleed that clutch!

New brakes look awesome. Can't wait to take it out for an actual run this week.

[This message has been edited by doublec4 (edited 04-14-2013).]

IP: Logged
jb1
Member
Posts: 2146
From: Tullahoma, Tennessee
Registered: May 2003


Feedback score: (3)
Leave feedback

Rate this member

Report this Post04-15-2013 01:41 AM Click Here to See the Profile for jb1Send a Private Message to jb1Edit/Delete MessageReply w/QuoteDirect Link to This Post
Looks great !! What are you doing for the rear brakes?

------------------


87 GT
series 1 3800sc (7.597 @88.53 1.579 60ft)
(series II swap in progress)
85GT Northstar
86GT 3800 n/a

IP: Logged
doublec4
Member
Posts: 8289
From: Oakville, Ontario, Canada
Registered: Jun 2003


Feedback score:    (20)
Leave feedback


Total ratings: 150
Rate this member

Report this Post04-15-2013 05:53 AM Click Here to See the Profile for doublec4Send a Private Message to doublec4Edit/Delete MessageReply w/QuoteDirect Link to This Post
 
quote
Originally posted by jb1:

Looks great !! What are you doing for the rear brakes?


Thank you,

I originally had the Lebaron 11.25" swap all around, so I took the front brakes and moved them to the back. They were the calipers from an 85 camaro I believe and came with the slightly bigger piston than the rears (85 seville).

They should be a good match compared to the front calipers in terms of balance. Unfortunately they do not have any mechanism for an e-brake but mine never worked anyways. I'm going to look into potentially using a spot caliper.

IP: Logged
RCR
Member
Posts: 4397
From: Shelby Twp Mi
Registered: Sep 2002


Feedback score:    (7)
Leave feedback


Total ratings: 102
Rate this member

Report this Post04-15-2013 06:49 AM Click Here to See the Profile for RCRSend a Private Message to RCREdit/Delete MessageReply w/QuoteDirect Link to This Post


Bob
IP: Logged
unboundmo
Member
Posts: 2242
From: California
Registered: Sep 2006


Feedback score: N/A
Leave feedback

Rate this member

Report this Post05-05-2013 02:09 AM Click Here to See the Profile for unboundmoSend a Private Message to unboundmoEdit/Delete MessageReply w/QuoteDirect Link to This Post
 
quote
Originally posted by doublec4:

Updates are few and far between, but I try and make them worth it!

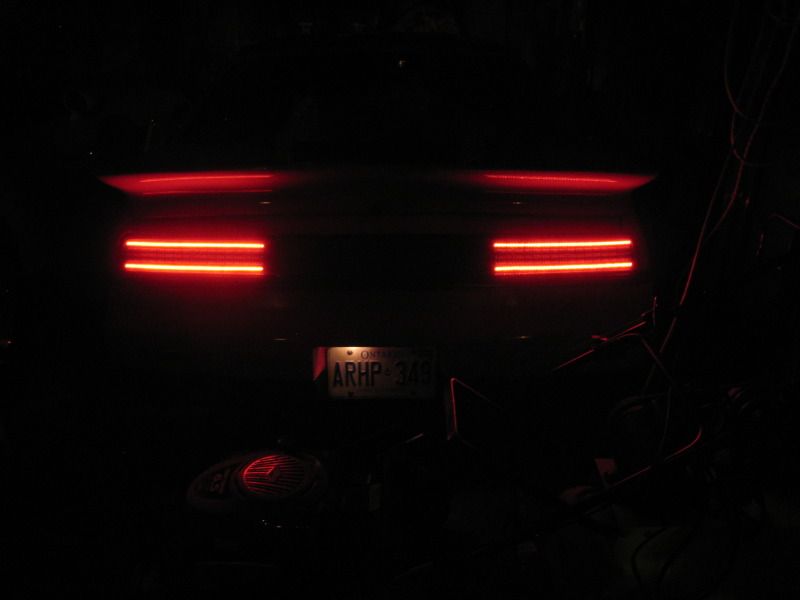
LED tail lights for the notchback with strobe function activated by remote for the parking lights:


They look tinted with the lights off:


Strobing video:


They will be for sale on the forum here with my headlight kits, as well as on my website


DUDE!!! What tF.. All I can say is SICK... How did you do those? The look of them looks great! I don't need all the show.. Just the look
What's the website?

[This message has been edited by unboundmo (edited 05-05-2013).]

IP: Logged
doublec4
Member
Posts: 8289
From: Oakville, Ontario, Canada
Registered: Jun 2003


Feedback score:    (20)
Leave feedback


Total ratings: 150
Rate this member

Report this Post05-05-2013 08:23 PM Click Here to See the Profile for doublec4Send a Private Message to doublec4Edit/Delete MessageReply w/QuoteDirect Link to This Post
 
quote
Originally posted by unboundmo:
DUDE!!! What tF.. All I can say is SICK... How did you do those? The look of them looks great! I don't need all the show.. Just the look
What's the website?


Thanks!

Basically I cut a new red lens and have an LED panel behind it. The website is www.embraceracing.com

I have them listed on the website but they're not for sale yet. I'm actually going to be changing them up a little bit and offering them as a DIY kit. All you would need to know how to do is solder. Pretty simple! Plus it will keep the price really low for everyone interested.

Stay tuned
IP: Logged
doublec4
Member
Posts: 8289
From: Oakville, Ontario, Canada
Registered: Jun 2003


Feedback score:    (20)
Leave feedback


Total ratings: 150
Rate this member

Report this Post05-16-2013 11:10 PM Click Here to See the Profile for doublec4Send a Private Message to doublec4Edit/Delete MessageReply w/QuoteDirect Link to This Post


SPEC 3+ clutch...

Getrag F23 swap happening this weekend by DARN cars (FIEROFLYER)

Can't wait! Picked up the transmission tonight, even has an LSD installed in it.

------------------

Check out my build and my website!
//www.fiero.nl/forum/Forum3/HTML/000100.html
Embrace Racing

IP: Logged
doublec4
Member
Posts: 8289
From: Oakville, Ontario, Canada
Registered: Jun 2003


Feedback score:    (20)
Leave feedback


Total ratings: 150
Rate this member

Report this Post06-01-2013 04:32 PM Click Here to See the Profile for doublec4Send a Private Message to doublec4Edit/Delete MessageReply w/QuoteDirect Link to This Post
F23 Getrag now in and it drives great!

Can't wait for the clutch break in period to end so I can test out the LSD

------------------

Check out my build and my website!
//www.fiero.nl/forum/Forum3/HTML/000100.html
Embrace Racing

IP: Logged
PFF
System Bot
Rare87GT
Member
Posts: 5044
From: Wichita, KS USA
Registered: Oct 2001


Feedback score:    (7)
Leave feedback


Total ratings: 173
Rate this member

Report this Post06-02-2013 02:18 AM Click Here to See the Profile for Rare87GTSend a Private Message to Rare87GTEdit/Delete MessageReply w/QuoteDirect Link to This Post
Did anyone get around to painting the headlights you make so we could see what it looks like with the same color as the body?

------------------

IP: Logged
doublec4
Member
Posts: 8289
From: Oakville, Ontario, Canada
Registered: Jun 2003


Feedback score:    (20)
Leave feedback


Total ratings: 150
Rate this member

Report this Post06-02-2013 09:15 AM Click Here to See the Profile for doublec4Send a Private Message to doublec4Edit/Delete MessageReply w/QuoteDirect Link to This Post
 
quote
Originally posted by Rare87GT:

Did anyone get around to painting the headlights you make so we could see what it looks like with the same color as the body?


Not that I'm aware of. I have to rework my molds and I will be making my headlights again very soon, maybe somebody in the next batch will!
IP: Logged
Rare87GT
Member
Posts: 5044
From: Wichita, KS USA
Registered: Oct 2001


Feedback score:    (7)
Leave feedback


Total ratings: 173
Rate this member

Report this Post06-02-2013 12:12 PM Click Here to See the Profile for Rare87GTSend a Private Message to Rare87GTEdit/Delete MessageReply w/QuoteDirect Link to This Post
 
quote
Originally posted by doublec4:


Not that I'm aware of. I have to rework my molds and I will be making my headlights again very soon, maybe somebody in the next batch will!

What happens if you leave the entire molded piece all clear instead of painting them at all? Can that be done or is it tacky with wiring, etc behind the projector? I just don't know if I like the painted look. Might look into your headlight kit, I'm just so partial to the completely flush look. Your care is amazing though, looks really good man. Just went through the entire build.
IP: Logged
jb1
Member
Posts: 2146
From: Tullahoma, Tennessee
Registered: May 2003


Feedback score: (3)
Leave feedback

Rate this member

Report this Post06-03-2013 01:38 AM Click Here to See the Profile for jb1Send a Private Message to jb1Edit/Delete MessageReply w/QuoteDirect Link to This Post
DoubleC4, I was looking at my headlight lens today and had a question, how hard and is there enough room to mold the outer edges down around the metal housing and help fill the gap around the headlight and the hood? Or would that require to much?
I still need new set of lens when available..

------------------


87 GT
series 1 3800sc (7.597 @88.53 1.579 60ft)
(series II swap in progress)
85GT Northstar
86GT 3800 n/a

IP: Logged
jb1
Member
Posts: 2146
From: Tullahoma, Tennessee
Registered: May 2003


Feedback score: (3)
Leave feedback

Rate this member

Report this Post06-03-2013 01:42 AM Click Here to See the Profile for jb1Send a Private Message to jb1Edit/Delete MessageReply w/QuoteDirect Link to This Post

jb1

2146 posts
Member since May 2003
 
quote
Originally posted by Rare87GT:

What happens if you leave the entire molded piece all clear instead of painting them at all? Can that be done or is it tacky with wiring, etc behind the projector? I just don't know if I like the painted look. Might look into your headlight kit, I'm just so partial to the completely flush look. Your care is amazing though, looks really good man. Just went through the entire build.


you would see the wiring and the edges of the enclosure....
I am very excited about installing mine until I messed up lens painting them.... next set will be painted by someone else that knows what they are doing...

------------------


87 GT
series 1 3800sc (7.597 @88.53 1.579 60ft)
(series II swap in progress)
85GT Northstar
86GT 3800 n/a

IP: Logged
doublec4
Member
Posts: 8289
From: Oakville, Ontario, Canada
Registered: Jun 2003


Feedback score:    (20)
Leave feedback


Total ratings: 150
Rate this member

Report this Post06-04-2013 06:44 PM Click Here to See the Profile for doublec4Send a Private Message to doublec4Edit/Delete MessageReply w/QuoteDirect Link to This Post
I would definitely paint the lenses. Leaving them unpainted would expose the wiring and the back of the projectors.

The problem with forming the lenses down around the edges is that the plastic I use is quite thick. When you try and crease it, it leaves a very distorted looking edge. It doesn't remain optically clear and looks questionable. The other problem is that I use my CNC machine to trim the lenses. It would be impossible to trim them sideways with the CNC router.

I will have more lenses ready soon. It has taken a lot longer than expected, but I'm looking into better options that will improve quality (aluminum molds). Don't worry, I won't leave you guys stranded!
IP: Logged
NUC19882M6
Member
Posts: 22
From: Southern Maryland
Registered: May 2012


Feedback score: (1)
Leave feedback

Rate this member

Report this Post06-04-2013 07:00 PM Click Here to See the Profile for NUC19882M6Send a Private Message to NUC19882M6Edit/Delete MessageReply w/QuoteDirect Link to This Post
Might I recommend Plasti-Dip.
IP: Logged
doublec4
Member
Posts: 8289
From: Oakville, Ontario, Canada
Registered: Jun 2003


Feedback score:    (20)
Leave feedback


Total ratings: 150
Rate this member

Report this Post06-06-2013 09:08 PM Click Here to See the Profile for doublec4Send a Private Message to doublec4Edit/Delete MessageReply w/QuoteDirect Link to This Post
 
quote
Originally posted by NUC19882M6:

Might I recommend Plasti-Dip.


That's actually a good idea unless you go to remove the velcro. It will peel off the plasti-dip paint unfortunately.
IP: Logged
doublec4
Member
Posts: 8289
From: Oakville, Ontario, Canada
Registered: Jun 2003


Feedback score:    (20)
Leave feedback


Total ratings: 150
Rate this member

Report this Post06-15-2013 09:53 PM Click Here to See the Profile for doublec4Send a Private Message to doublec4Edit/Delete MessageReply w/QuoteDirect Link to This Post
Latest pictures

Parking lights:


Brake/Turn:


------------------

Check out my build and my website!
//www.fiero.nl/forum/Forum3/HTML/000100.html
Embrace Racing

IP: Logged
Amida
Member
Posts: 2349
From: Seattle, WA. USA
Registered: Jul 2003


Feedback score: (4)
Leave feedback


Total ratings: 63
Rate this member

Report this Post06-18-2013 09:59 PM Click Here to See the Profile for AmidaSend a Private Message to AmidaEdit/Delete MessageReply w/QuoteDirect Link to This Post
That's cool.
IP: Logged
PFF
System Bot
doublec4
Member
Posts: 8289
From: Oakville, Ontario, Canada
Registered: Jun 2003


Feedback score:    (20)
Leave feedback


Total ratings: 150
Rate this member

Report this Post06-20-2013 12:09 PM Click Here to See the Profile for doublec4Send a Private Message to doublec4Edit/Delete MessageReply w/QuoteDirect Link to This Post
 
quote
Originally posted by Amida:

That's cool.


Thank you!

I will be making them available to purchase soon
IP: Logged
IVANNATINKLE
Member
Posts: 913
From: Kansas United states
Registered: Jun 2009


Feedback score: (1)
Leave feedback

Rate this member

Report this Post06-20-2013 05:56 PM Click Here to See the Profile for IVANNATINKLESend a Private Message to IVANNATINKLEEdit/Delete MessageReply w/QuoteDirect Link to This Post
You have made some crazy stuff for fieros very inventive!!
IP: Logged
doublec4
Member
Posts: 8289
From: Oakville, Ontario, Canada
Registered: Jun 2003


Feedback score:    (20)
Leave feedback


Total ratings: 150
Rate this member

Report this Post08-20-2013 07:43 PM Click Here to See the Profile for doublec4Send a Private Message to doublec4Edit/Delete MessageReply w/QuoteDirect Link to This Post
 
quote
Originally posted by IVANNATINKLE:

You have made some crazy stuff for fieros very inventive!!


Thanks!

So I recently put red LED's in my instrument panel... now all of my gauges are red


I also got a speeding ticket, yay! and a new camera


IP: Logged
GADJet
Member
Posts: 1466
From: Star City, AR, USA
Registered: Sep 2010


Feedback score: (1)
Leave feedback

Rate this member

Report this Post08-21-2013 11:51 PM Click Here to See the Profile for GADJetSend a Private Message to GADJetEdit/Delete MessageReply w/QuoteDirect Link to This Post
flows very well with your car brother...
IP: Logged
Doober
Member
Posts: 445
From: Oro Valley, AZ/Swartz Creek, MI USA
Registered: Nov 2006


Feedback score: N/A
Leave feedback

Rate this member

Report this Post09-18-2013 09:39 PM Click Here to See the Profile for DooberSend a Private Message to DooberEdit/Delete MessageReply w/QuoteDirect Link to This Post
Went back through and did some more reading... looks great I was wondering how body color would look myself, considering your headlights in the future, body color for mine, maybe throw the original 'Pontiac' name/script on the left housing.
IP: Logged
doublec4
Member
Posts: 8289
From: Oakville, Ontario, Canada
Registered: Jun 2003


Feedback score:    (20)
Leave feedback


Total ratings: 150
Rate this member

Report this Post09-19-2013 09:11 PM Click Here to See the Profile for doublec4Send a Private Message to doublec4Edit/Delete MessageReply w/QuoteDirect Link to This Post
Thanks for the comments guys!

I would really love to see a set of the lights painted body color, so if you're interested in ordering we'll be in touch!

Lately, I've done a few more things to the car...

I got the rear decklid and wing repainted. I also painted the rear engine vents myself:


I also had the front lip patched back up, and I painted that too:


I've also been putting together a more finalized version of my headlight kit for myself since I've had my prototype set installed for a long time now. The prototype set was a little rough around the edges and I wanted to do a set properly for myself.

First, I had all of the sheet metal pieces powder coated in black. I would highly recommend powder coating for anyone who buys a kit. Find a local guy to do it for you and it shouldn't cost that much.


I also ripped out all of the old wiring since it was a bit of a rats nest. I originally threw together a harness quickly because I was excited to get the lights working. This time I'm going to do things right. I started off by making a bracket to which all of the ballasts and relay harnesses will mount to.


This is as far as I got today. I'm waiting for a few other electrical connectors to arrive, and I have to make / paint a new set of lenses for myself. My original prototype lenses were hand cut, where as the new ones are CNC cut.

Thanks for looking!
------------------

Check out my build and my website!
//www.fiero.nl/forum/Forum3/HTML/000100.html
Embrace Racing

[This message has been edited by doublec4 (edited 09-19-2013).]

IP: Logged
doublec4
Member
Posts: 8289
From: Oakville, Ontario, Canada
Registered: Jun 2003


Feedback score:    (20)
Leave feedback


Total ratings: 150
Rate this member

Report this Post10-16-2013 11:14 PM Click Here to See the Profile for doublec4Send a Private Message to doublec4Edit/Delete MessageReply w/QuoteDirect Link to This Post
Got the headlights back in, wiring is much cleaner than last time, however, it could still be better. I still haven't made myself new lenses, so the old lenses are being used.

Also fixed my steering wheel, it had never been perfectly straight when the car was tracking straight. Annoyed me for the longest time and I finally got around to fixing that.


IP: Logged
doublec4
Member
Posts: 8289
From: Oakville, Ontario, Canada
Registered: Jun 2003


Feedback score:    (20)
Leave feedback


Total ratings: 150
Rate this member

Report this Post11-03-2013 11:46 AM Click Here to See the Profile for doublec4Send a Private Message to doublec4Edit/Delete MessageReply w/QuoteDirect Link to This Post
A while back I made some LED tail lights for my Fiero. I posted some pictures in a thread and they seemed to be well received. I thought they turned out pretty well too and I was going to start selling them if people wanted.

Then I had a few requests from members to make a sequential set up for the LED tail lights. I ended up delaying the release of the lights, and taking on this new challenge. I also wanted to make the whole package more professional looking so I designed some boards and had them made. I recently received the boards for the sequential controller and soldered them up. They work great! I also have some custom boards I designed coming for the LED panels too.

Take a look:


Here's a video with an explanation/demonstration:


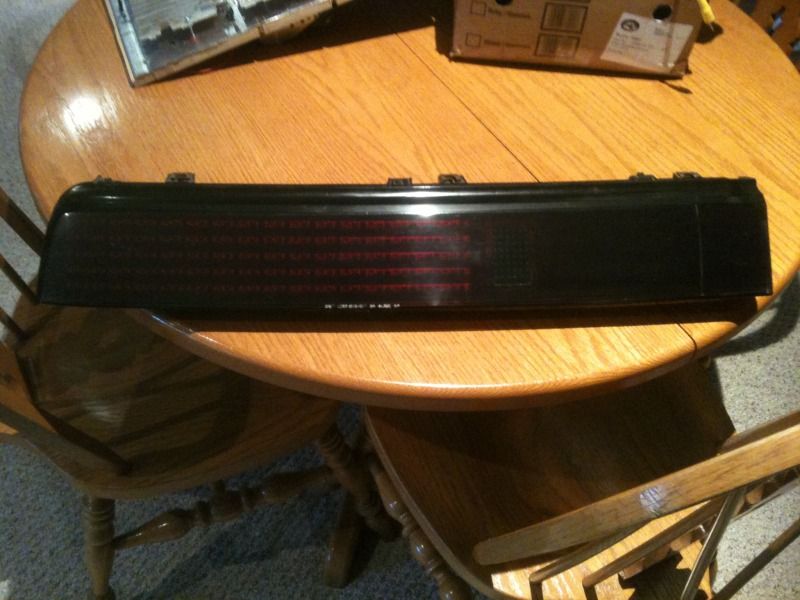
This board is for the notchback lights (brake/turn combined into one LED panel)

I also have boards designed for the GT lights and they're coming soon!

The whole process takes a while, but I'm happy with how everything is turning out so far and how these lights have evolved.

If you have any questions, let me know
------------------

Check out my build and my website!
//www.fiero.nl/forum/Forum3/HTML/000100.html
Embrace Racing
IP: Logged
NetCam
Member
Posts: 1490
From: Milton, Ontario, Canada
Registered: Mar 2012


Feedback score: N/A
Leave feedback

Rate this member

Report this Post11-05-2013 08:42 PM Click Here to See the Profile for NetCamClick Here to visit NetCam's HomePageSend a Private Message to NetCamEdit/Delete MessageReply w/QuoteDirect Link to This Post
Can't wait to see how they come out, keep the pictures coming!
IP: Logged
Custom2M4
Member
Posts: 4414
From: Winnipeg, Manitoba Canada
Registered: Sep 2004


Feedback score: (3)
Leave feedback


Total ratings: 114
Rate this member

Report this Post11-16-2013 08:59 PM Click Here to See the Profile for Custom2M4Send a Private Message to Custom2M4Edit/Delete MessageReply w/QuoteDirect Link to This Post
Cant wait to see how the lights are done and installed on a gt. definitely on my wish list.

------------------

IP: Logged
PFF
System Bot
doublec4
Member
Posts: 8289
From: Oakville, Ontario, Canada
Registered: Jun 2003


Feedback score:    (20)
Leave feedback


Total ratings: 150
Rate this member

Report this Post11-25-2013 10:33 PM Click Here to See the Profile for doublec4Send a Private Message to doublec4Edit/Delete MessageReply w/QuoteDirect Link to This Post
Thanks guys, I posted some more progress and pictures about a week ago in my thread in the general section. I thought I should add them here for the records:

I managed to finish the brake/turn section of the notch back panel (prototype). The LEDs used for this prototype are generic piranha superflux. They are not the brand name, higher quality LEDs that I will be using for all of the kits. I just didn't want to waste them on a prototype if I didn't have too. Turns out these ones look extremely bright even behind very hazy tail light lenses that I use for prototyping.

Take a look:


I am using secondary optics to enhance the appearance and size of the LEDs. It definitely makes the lights appear larger.

The controller board fits nice and snug behind the panel and out of sight:


You can see a lot of wires that I had to run for the prototype. The actual production versions will have a PCB panel for the brake/turn lights and a ribbon cable will be run to the terminals for clean wiring.

Since I didn't get the parking lights done on this set, you can see what they look like on the last set I made. They will remain identical:


Video:


If you see any "skips" in the LED sequence, it's because I'm connecting and disconnecting the circuit by hand. When your flasher does it, obviously it will work flawlessly.


IP: Logged
DeLorean00
Member
Posts: 4251
From: Sacramento, CA / Reno, NV
Registered: Aug 2005


Feedback score: (2)
Leave feedback


Total ratings: 100
Rate this member

Report this Post11-26-2013 06:01 PM Click Here to See the Profile for DeLorean00Send a Private Message to DeLorean00Edit/Delete MessageReply w/QuoteDirect Link to This Post
That is amazing work! You are a genius. I love to see all your fabrication skills, I wish I could have hired you to help me build my AD355. Can I ask what you do for a living? Because its clear that you are extremely talented in technology and engineering.

------------------

IP: Logged
doublec4
Member
Posts: 8289
From: Oakville, Ontario, Canada
Registered: Jun 2003


Feedback score:    (20)
Leave feedback


Total ratings: 150
Rate this member

Report this Post11-26-2013 07:59 PM Click Here to See the Profile for doublec4Send a Private Message to doublec4Edit/Delete MessageReply w/QuoteDirect Link to This Post
 
quote
Originally posted by DeLorean00:

That is amazing work! You are a genius. I love to see all your fabrication skills, I wish I could have hired you to help me build my AD355. Can I ask what you do for a living? Because its clear that you are extremely talented in technology and engineering.


Thanks, that's a great compliment!

I'm actually an engineer. I took automotive engineering in school and I design industrial machinery at the moment. I'm always trying to learn something new and expand my skill set
IP: Logged
DeLorean00
Member
Posts: 4251
From: Sacramento, CA / Reno, NV
Registered: Aug 2005


Feedback score: (2)
Leave feedback


Total ratings: 100
Rate this member

Report this Post11-27-2013 05:46 PM Click Here to See the Profile for DeLorean00Send a Private Message to DeLorean00Edit/Delete MessageReply w/QuoteDirect Link to This Post
 
quote
Originally posted by doublec4:


Thanks, that's a great compliment!

I'm actually an engineer. I took automotive engineering in school and I design industrial machinery at the moment. I'm always trying to learn something new and expand my skill set


You're welcome! I enjoy your projects.


I am glad to here you are working in your field. Too many talented people end up not using their skills.

[This message has been edited by DeLorean00 (edited 11-27-2013).]

IP: Logged
Luke
Member
Posts: 467
From: Toronto, Ontario, Canada
Registered: Nov 2005


Feedback score:    (11)
Leave feedback

Rate this member

Report this Post01-05-2014 12:33 PM Click Here to See the Profile for LukeClick Here to visit Luke's HomePageSend a Private Message to LukeEdit/Delete MessageReply w/QuoteDirect Link to This Post
Love the projects always a good read.

Also glad someone finally made something hubcentric(for the wheel) for pre 87 cars with brake upgrades. I had a similar idea but the white adapter and hubcentric ring were all 1 piece. Never built it because I got into 88s. My dads has an 87 that I'll be upgrading. Any interest in making a 1piece part?

How are you liking the f23 compared to the non htob fiero trans? I drove Pete's and the clutch pedal feel was 1000x better. Trying to decide whether to hurry with the swap or wait till my 282 blows
IP: Logged
IVANNATINKLE
Member
Posts: 913
From: Kansas United states
Registered: Jun 2009


Feedback score: (1)
Leave feedback

Rate this member

Report this Post01-05-2014 03:24 PM Click Here to See the Profile for IVANNATINKLESend a Private Message to IVANNATINKLEEdit/Delete MessageReply w/QuoteDirect Link to This Post
Ever think of making the headlights for a mk2 mr2
IP: Logged
doublec4
Member
Posts: 8289
From: Oakville, Ontario, Canada
Registered: Jun 2003


Feedback score:    (20)
Leave feedback


Total ratings: 150
Rate this member

Report this Post01-05-2014 05:06 PM Click Here to See the Profile for doublec4Send a Private Message to doublec4Edit/Delete MessageReply w/QuoteDirect Link to This Post
 
quote
Originally posted by Luke:

Love the projects always a good read.

Also glad someone finally made something hubcentric(for the wheel) for pre 87 cars with brake upgrades. I had a similar idea but the white adapter and hubcentric ring were all 1 piece. Never built it because I got into 88s. My dads has an 87 that I'll be upgrading. Any interest in making a 1piece part?

How are you liking the f23 compared to the non htob fiero trans? I drove Pete's and the clutch pedal feel was 1000x better. Trying to decide whether to hurry with the swap or wait till my 282 blows


I should be able to make a 1 piece part soon (in any size required for any custom set up). Let me know if you need something specific and I can make it.

The F23 is amazing compared to the stock 4 spd. I wish I would have done this right from the start. Much smoother shifting, and no grinding when shifting into reverse.


quote
Originally posted by IVANNATINKLE:

Ever think of making the headlights for a mk2 mr2


Thought about it many, many times. I just need a car to use to mock things up with. I'm sure I could come up with something!

I also have more good news to report about the notchback LED tail lights.

The LED boards for the notchback came in and they look great! I was able to solder one today and hook it up to the sequential controller and they work very nicely.

These are the LEDs on the board:


Then with the reflectors pressed into place:


This is what it looks like on the front side connected to the main panel:


This is the back side:


I've also been using my spare time to solder up the controller boards so they'll be ready when I put the kits up for sale:


I should be ordering the GT LED boards soon as well.


------------------

Check out my build and my website!
//www.fiero.nl/forum/Forum3/HTML/000100.html
Embrace Racing
IP: Logged
doublec4
Member
Posts: 8289
From: Oakville, Ontario, Canada
Registered: Jun 2003


Feedback score:    (20)
Leave feedback


Total ratings: 150
Rate this member

Report this Post01-06-2014 11:08 PM Click Here to See the Profile for doublec4Send a Private Message to doublec4Edit/Delete MessageReply w/QuoteDirect Link to This Post
A few more pictures


Video:


Keep in mind that it looks much more "crisp" in person. The video is over exposed and washed out. In real life the LEDs don't bleed into one another like in the video. I'll have to see if I can capture it better with another camera.

In the second part of the video, you'll notice the parking light cancellation feature. Basically, when the brake lights or turn signal are activated, the parking lights will be automatically deactivated for the duration of the brake/turn signal. They will automatically resume once the brake/turn signal is off. This feature will be included on all of the controller boards but you do not have to use it. You can bypass it if you like the traditional look of the parking lights remaining on.

Thanks for looking!
IP: Logged
Zeak
Member
Posts: 108
From: Lake of the ozarks MO
Registered: Dec 2013


Feedback score: N/A
Leave feedback

Rate this member

Report this Post01-08-2014 02:09 PM Click Here to See the Profile for ZeakSend a Private Message to ZeakEdit/Delete MessageReply w/QuoteDirect Link to This Post
Very slick LED's and you cars overall look is great.
IP: Logged
Previous Page | Next Page

This topic is 22 pages long:  1   2   3   4   5   6   7   8   9   10   11   12   13   14   15   16   17   18   19   20   21   22 
next newest topic | next oldest topic

All times are ET (US)

Post New Topic  Post A Reply
Hop to:

Contact Us | Back To Main Page

Advertizing on PFF | Fiero Parts Vendors
PFF Merchandise | Fiero Gallery | Ogre's Cave
Real-Time Chat | Fiero Related Auctions on eBay


Copyright (c) 1999, C. Pennock