Pennock's Fiero Forum
  General Fiero Chat
  NEW Headlight Option In The Works! Gauging Interest... (Page 9)

Post New Topic  Post A Reply
Email This Page to Someone! | Printable Version

This topic is 12 pages long:  1   2   3   4   5   6   7   8   9   10   11   12 
Previous Page | Next Page
next newest topic | next oldest topic
NEW Headlight Option In The Works! Gauging Interest... by doublec4
Started on: 11-08-2011 10:16 PM
Replies: 476 (31775 views)
Last post by: Will on 03-01-2018 07:52 PM
exoticse
Member
Posts: 8650
From: Orlando, Fl
Registered: Jun 2003


Feedback score: N/A
Leave feedback


Total ratings: 108
Rate this member

Report this Post05-28-2012 12:53 AM Click Here to See the Profile for exoticseSend a Private Message to exoticseEdit/Delete MessageReply w/QuoteDirect Link to This Post
Doublec those are wicked.

i think you need to reiterate the price again for those interested. i believe it was $400 ??

How much of a deposit are you asking for ?

I was just about to rebuild both my headlight motors and convert them to the 88 style,..good timing.

[This message has been edited by exoticse (edited 06-04-2012).]

IP: Logged
Racer_JT
Member
Posts: 1419
From: Lynchburg, Virginia, USA
Registered: Apr 2002


Feedback score: N/A
Leave feedback

Rate this member

Report this Post05-28-2012 07:23 AM Click Here to See the Profile for Racer_JTSend a Private Message to Racer_JTEdit/Delete MessageReply w/QuoteDirect Link to This Post
Yes please tell us where you think you are in price? Also an ETA on when you think you will be ready to start shipping?
Thanks
IP: Logged
zmcdonal
Member
Posts: 1676
From: NW, Indiana
Registered: Oct 2005


Feedback score:    (9)
Leave feedback

Rate this member

Report this Post05-28-2012 02:04 PM Click Here to See the Profile for zmcdonalSend a Private Message to zmcdonalEdit/Delete MessageReply w/QuoteDirect Link to This Post
 
quote
Originally posted by doublec4:


NICE WORK!! Those look really sweet! I've definitely been keeping an eye on this thread, they would look pretty sweet on my 86 GT project.
IP: Logged
Shill
Member
Posts: 2166
From: Spokane, WA
Registered: Apr 2009


Feedback score: N/A
Leave feedback

Rate this member

Report this Post05-28-2012 02:39 PM Click Here to See the Profile for ShillSend a Private Message to ShillEdit/Delete MessageReply w/QuoteDirect Link to This Post
IP: Logged
wee twisted
Member
Posts: 206
From:
Registered: Mar 2011


Feedback score: (3)
Leave feedback

Rate this member

Report this Post05-28-2012 03:38 PM Click Here to See the Profile for wee twistedSend a Private Message to wee twistedEdit/Delete MessageReply w/QuoteDirect Link to This Post
those look great and thank you for taking your time to come up with something as awesome as this.... so hurry up and sell to me already....lol just kidding.. take your time quality first
IP: Logged
Stevenr
Member
Posts: 56
From: Langley, BC, Canada
Registered: Feb 2012


Feedback score: N/A
Leave feedback

Rate this member

Report this Post05-28-2012 08:19 PM Click Here to See the Profile for StevenrSend a Private Message to StevenrEdit/Delete MessageReply w/QuoteDirect Link to This Post
I've been watching this from the beginning, and will be grabbing a set.

Still trying to figure out a total cost, though. It seems HID kits and all the bulb's/ballasts vary quite alot.

How much did you spend for the bulbs/etc on top of the 400$?
IP: Logged
doublec4
Member
Posts: 8289
From: Oakville, Ontario, Canada
Registered: Jun 2003


Feedback score:    (20)
Leave feedback


Total ratings: 150
Rate this member

Report this Post05-28-2012 08:29 PM Click Here to See the Profile for doublec4Send a Private Message to doublec4Edit/Delete MessageReply w/QuoteDirect Link to This Post
Thank you again everyone.

I'm setting the price around $400, I still need to tally up all of my costs exactly.

You would receive:

- 2 lenses
- 2 buckets
- 2 aiming brackets
- 2 mounting brackets
- All hardware
- 4 Bixenon projectors
- Instructions

The kit comes unpainted and you would need to supply your own HID kits. It's a time consuming process to make these so I really cannot offer to paint them for you, etc. They're not overly difficult to install. If you can turn a wrench you can install them. No cutting necessary, bolt in and if you don't like them, bolt out.

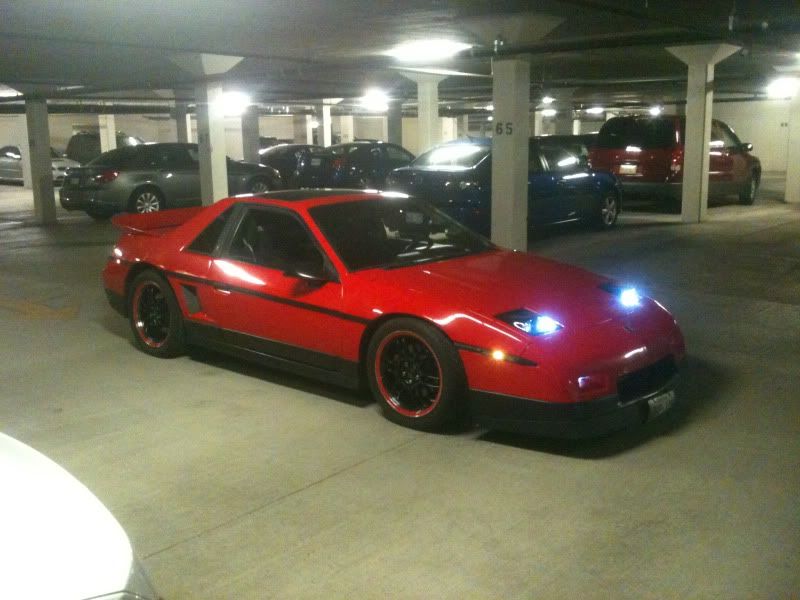
Just a couple more pictures:


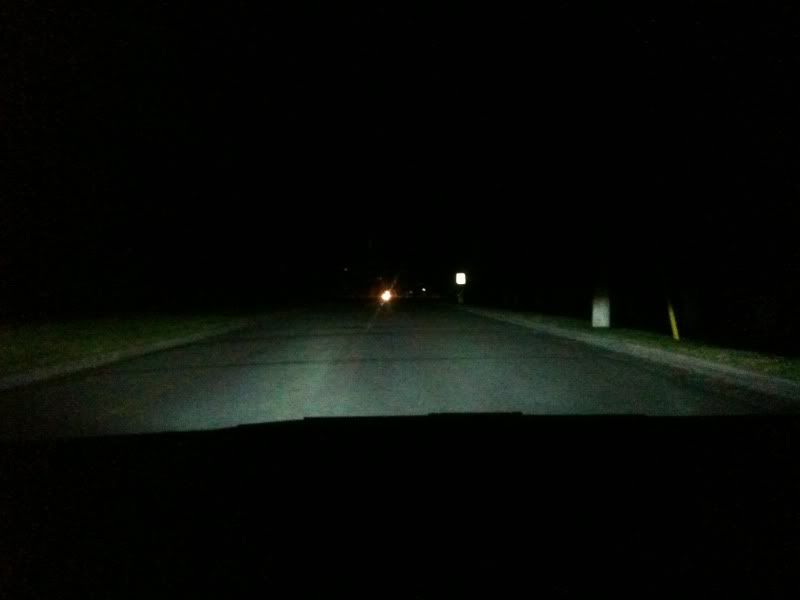
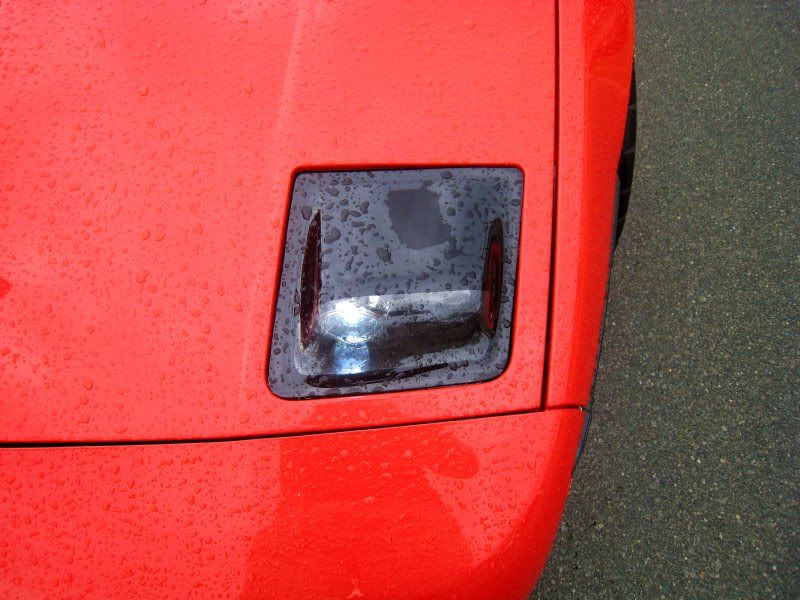
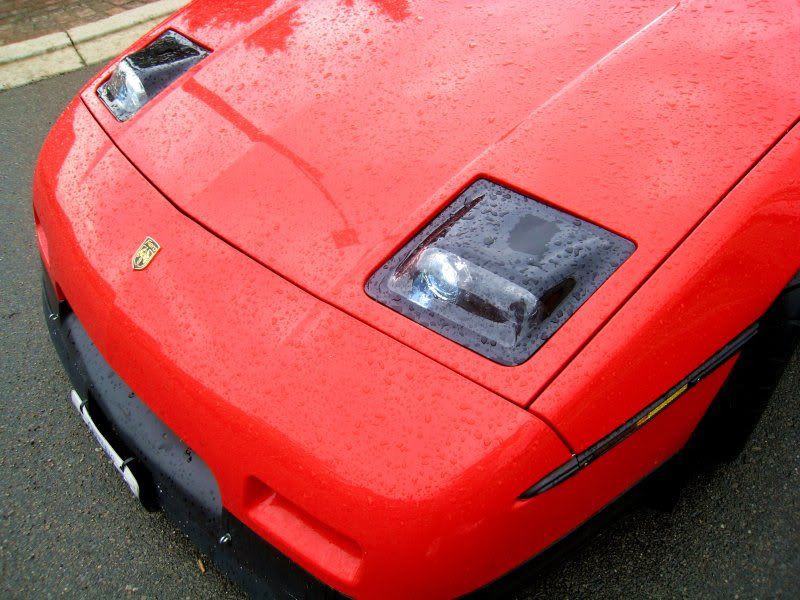
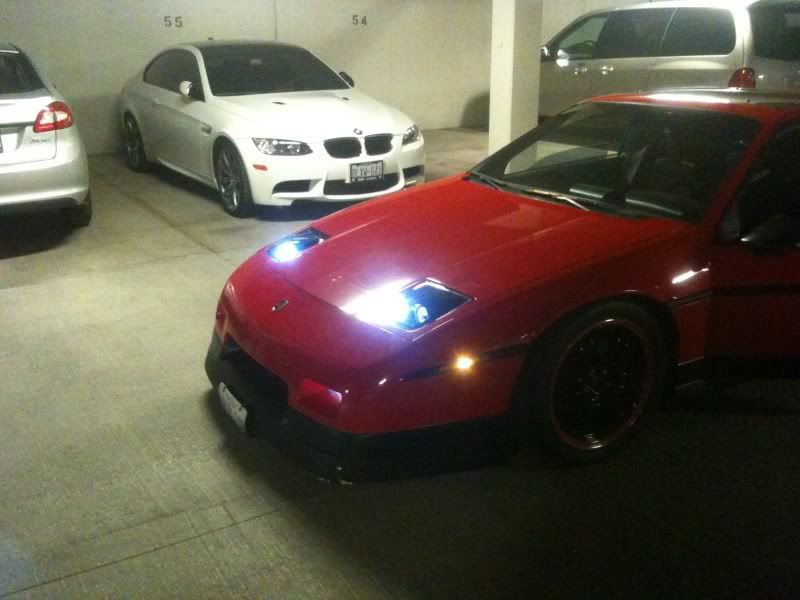
I need a better camera to capture the light output. Its very nice. The last picture is of just the out board lights on (3000K temp). They need to be aimed ever so slightly higher and away from the middle of the car. The inside lights (8000K temp) are completely off right now. Need to correct that in the next couple of days.
IP: Logged
doublec4
Member
Posts: 8289
From: Oakville, Ontario, Canada
Registered: Jun 2003


Feedback score:    (20)
Leave feedback


Total ratings: 150
Rate this member

Report this Post05-28-2012 08:32 PM Click Here to See the Profile for doublec4Send a Private Message to doublec4Edit/Delete MessageReply w/QuoteDirect Link to This Post

doublec4

8289 posts
Member since Jun 2003
 
quote
Originally posted by Stevenr:

I've been watching this from the beginning, and will be grabbing a set.

Still trying to figure out a total cost, though. It seems HID kits and all the bulb's/ballasts vary quite alot.

How much did you spend for the bulbs/etc on top of the 400$?


I found ballasts on ebay for roughly $10 a pair, and a pair of hid bulbs for $10 a pair. You need H1 bulbs with these projectors.

So in total, another $40 worth of stuff... These ballasts and bulbs are from China and I had to wait 3 weeks for them to come in. I'd say 99% of the HID kits are made in China anyways so if you're looking to do it on the cheap, look at ebay.
IP: Logged
Stevenr
Member
Posts: 56
From: Langley, BC, Canada
Registered: Feb 2012


Feedback score: N/A
Leave feedback

Rate this member

Report this Post05-28-2012 08:37 PM Click Here to See the Profile for StevenrSend a Private Message to StevenrEdit/Delete MessageReply w/QuoteDirect Link to This Post
Awesome, thanks for the timely response.

I still can't believe how beautiful these are; they look identical to the Photoshop you first did on page 1.
IP: Logged
fierofool
Member
Posts: 12810
From: Auburn, Georgia USA
Registered: Jan 2002


Feedback score:    (13)
Leave feedback


Total ratings: 154
Rate this member

Report this Post05-28-2012 09:46 PM Click Here to See the Profile for fierofoolClick Here to visit fierofool's HomePageSend a Private Message to fierofoolEdit/Delete MessageReply w/QuoteDirect Link to This Post
I have a set of flushmounts in one of my cars and they are essentially useless except for looks at a car show. The bulbs are set back so far that they don't light up the roadway immediately in front of you and side vision is virtually nil. There is only an up-down and a left-right adjustment. The high and low beams can't be adjusted individually, so that when you get the low beam low enough to not blind oncoming traffic, the high beam could be used for possum hunting.

Moving the lenses forward is the key to good flushmount lights on the Fiero. Great looking and functional. Would it be possible to design a similar bucket for the quad rectangular headlamps?
IP: Logged
LeviM
Member
Posts: 169
From: Liberty University
Registered: Apr 2006


Feedback score: N/A
Leave feedback

Rate this member

Report this Post05-29-2012 01:55 AM Click Here to See the Profile for LeviMSend a Private Message to LeviMEdit/Delete MessageReply w/QuoteDirect Link to This Post
Best looking bubble lights I have seen so far. I am looking at a possible complete overhaul towards the end of the summer. These will definitely be a part of it. Very nice!
IP: Logged
PFF
System Bot
ConvictedRedneck
Member
Posts: 1034
From: Easton, PA - USA
Registered: Nov 2005


Feedback score:    (7)
Leave feedback

Rate this member

Report this Post05-29-2012 06:08 PM Click Here to See the Profile for ConvictedRedneckSend a Private Message to ConvictedRedneckEdit/Delete MessageReply w/QuoteDirect Link to This Post
Unfortunately not in the financial situation to consider purchasing, but just wanted to drop in and say AWESOME work. If my career takes off, I hope to become a customer. It's great to see someone actually come through with the design and completion of a product like you have. Congrats sir, with the dedication and skill you've shown in this project, I'm sure you'll be successful in whatever "real life" career endeavors you pursue.
IP: Logged
doublec4
Member
Posts: 8289
From: Oakville, Ontario, Canada
Registered: Jun 2003


Feedback score:    (20)
Leave feedback


Total ratings: 150
Rate this member

Report this Post05-29-2012 10:26 PM Click Here to See the Profile for doublec4Send a Private Message to doublec4Edit/Delete MessageReply w/QuoteDirect Link to This Post
Thank you again everyone.

I definitely had function in mind, not just form. I'm happy they turned out to be both beautiful and useful. I have to make some slight modifications to the design to accomodate the rotational adjustment of the projectors. Thats happening this week.

Having the projectors pushed forward in the "bubble" is key to their function of a decent light spread both sideways and towards the ground in front of the car.

I'll be sure to post an update in the next day or two. I may even offer the first 5 kits at a slight discount for those who are comfortable drilling a few holes. I had 5 sets of aiming brackets made because I have to get everything done in batches. In order to rotate the lights properly so that the light cutoff is perfectly horizontal, a few new holes must be drilled. I'd rather not see these brackets go to waste as they cost me quite a bit of money. So for those who can use a drill and want a slight discount, let me know. It will have no effect on what you can see, or anything at all. You do not see the aiming bracket at all.

[This message has been edited by doublec4 (edited 05-29-2012).]

IP: Logged
Sourmug
Member
Posts: 4538
From: Calgary, Alberta, Canada
Registered: Sep 2002


Feedback score:    (29)
Leave feedback


Total ratings: 144
Rate this member

Report this Post05-29-2012 10:58 PM Click Here to See the Profile for SourmugSend a Private Message to SourmugEdit/Delete MessageReply w/QuoteDirect Link to This Post
Can we see pictures of the mounting etc?

Thanks
Nolan
IP: Logged
doublec4
Member
Posts: 8289
From: Oakville, Ontario, Canada
Registered: Jun 2003


Feedback score:    (20)
Leave feedback


Total ratings: 150
Rate this member

Report this Post05-29-2012 11:11 PM Click Here to See the Profile for doublec4Send a Private Message to doublec4Edit/Delete MessageReply w/QuoteDirect Link to This Post
 
quote
Originally posted by Sourmug:

Can we see pictures of the mounting etc?

Thanks
Nolan


I'll snap a couple of pictures for you tomorrow or see what I can find here. I just need to get some sleep, work comes around in a few hours!

IP: Logged
ace5514
Member
Posts: 692
From: west long branch, nj, usa
Registered: Nov 2008


Feedback score:    (8)
Leave feedback

Rate this member

Report this Post05-30-2012 01:06 AM Click Here to See the Profile for ace5514Send a Private Message to ace5514Edit/Delete MessageReply w/QuoteDirect Link to This Post
Now those are nice looking. They look like they belong there...like factory.
nice work!
IP: Logged
Macs86GT
Member
Posts: 2276
From: hagerstown Maryland
Registered: Apr 2008


Feedback score:    (6)
Leave feedback

Rate this member

Report this Post05-30-2012 06:46 AM Click Here to See the Profile for Macs86GTSend a Private Message to Macs86GTEdit/Delete MessageReply w/QuoteDirect Link to This Post
Looks really good, and just like the initial photo shop too. Would it be possible to get a spare set of lenses? I would like to do a set painted like some of the corvettes do and keep a set clear. Just to switch things up now and again.
IP: Logged
MinnGreenGT
Member
Posts: 11545
From: Lakeville, MN 55044
Registered: Jul 2001


Feedback score: (1)
Leave feedback


Total ratings: 274
Rate this member

Report this Post05-30-2012 08:46 AM Click Here to See the Profile for MinnGreenGTClick Here to visit MinnGreenGT's HomePageSend a Private Message to MinnGreenGTEdit/Delete MessageReply w/QuoteDirect Link to This Post
 
quote
Originally posted by doublec4:

I'll be sure to post an update in the next day or two. I may even offer the first 5 kits at a slight discount for those who are comfortable drilling a few holes. I had 5 sets of aiming brackets made because I have to get everything done in batches. In order to rotate the lights properly so that the light cutoff is perfectly horizontal, a few new holes must be drilled. I'd rather not see these brackets go to waste as they cost me quite a bit of money. So for those who can use a drill and want a slight discount, let me know. It will have no effect on what you can see, or anything at all. You do not see the aiming bracket at all.


Tell me more of this "discount" of which you speak! I'm not afraid of a drill...

------------------

Looking for Fiero posters?

IP: Logged
Fiero2m8
Member
Posts: 1928
From: Niagara, Ontario, Canada
Registered: Feb 2006


Feedback score:    (10)
Leave feedback

Rate this member

Report this Post05-30-2012 04:57 PM Click Here to See the Profile for Fiero2m8Click Here to visit Fiero2m8's HomePageSend a Private Message to Fiero2m8Edit/Delete MessageReply w/QuoteDirect Link to This Post
These might be a good solution for the newest project.
PM and let me know when I can see your setup in person, so I can decide for sure.

Fiero2m8

------------------

Indy Northstar-Stretch

IP: Logged
doublec4
Member
Posts: 8289
From: Oakville, Ontario, Canada
Registered: Jun 2003


Feedback score:    (20)
Leave feedback


Total ratings: 150
Rate this member

Report this Post05-31-2012 12:03 AM Click Here to See the Profile for doublec4Send a Private Message to doublec4Edit/Delete MessageReply w/QuoteDirect Link to This Post
 
quote
Originally posted by Macs86GT:

Looks really good, and just like the initial photo shop too. Would it be possible to get a spare set of lenses? I would like to do a set painted like some of the corvettes do and keep a set clear. Just to switch things up now and again.


Thank you. I can do spare sets of lenses, or single replacements if by a freak accident, one breaks. I wouldn't suggest leaving the entire lens clear though... maybe I'm just not understanding what you're saying... but if you leave it all clear, you will be able to see the mounting brackets, wiring, etc.

 
quote
Originally posted by MinnGreenGT:

Tell me more of this "discount" of which you speak! I'm not afraid of a drill...


I haven't decided on dollar value for the discount yet. But hopefully it would be enough to entice 5 people who are handy enough to use a drill to drill some new holes. I can even provide a template to make things very easy.

At the end of this post, I'm going to post a picture of the "aiming bracket." You'll see the holes made for the aiming screws. You'd just need to line up the template I would provide, and then rotate it a few degrees to relocate the holes. I overlooked the side to side angle that the projectors sit. It needs to be compensated for by rotating them such that the cut off line is horizontal/parallel to the ground.

 
quote
Originally posted by Fiero2m8:

These might be a good solution for the newest project.
PM and let me know when I can see your setup in person, so I can decide for sure.

Fiero2m8


What shows will you be attending this summer? I'm currently living in London so I'm kind of far from Niagara. Although I do head back to the GTA on some weekends. How often are you in the Mississauga / Oakville area on weekends?


And lastly, the pictures of the mounting/aiming brackets for Sourmug:


Uses an aiming screw / jam nut system to adjust. 3 aiming screws per projector. Each projector can be individually aimed as you desire. The next version of these brackets will have the holes for the aiming screws slotted in an arc so that the projector can also be rotated. I have 5 sets of lights without the slotted aiming brackets and these will be sold at a discount for people who don't mind drilling some new holes with a template I can provide.

EDIT: Not sure why that picture is now upside down after I uploaded it... hopefully its still clear enough.

[This message has been edited by doublec4 (edited 05-31-2012).]

IP: Logged
MinnGreenGT
Member
Posts: 11545
From: Lakeville, MN 55044
Registered: Jul 2001


Feedback score: (1)
Leave feedback


Total ratings: 274
Rate this member

Report this Post05-31-2012 12:19 AM Click Here to See the Profile for MinnGreenGTClick Here to visit MinnGreenGT's HomePageSend a Private Message to MinnGreenGTEdit/Delete MessageReply w/QuoteDirect Link to This Post
 
quote
Originally posted by doublec4:

I haven't decided on dollar value for the discount yet. But hopefully it would be enough to entice 5 people who are handy enough to use a drill to drill some new holes. I can even provide a template to make things very easy.

At the end of this post, I'm going to post a picture of the "aiming bracket." You'll see the holes made for the aiming screws. You'd just need to line up the template I would provide, and then rotate it a few degrees to relocate the holes. I overlooked the side to side angle that the projectors sit. It needs to be compensated for by rotating them such that the cut off line is horizontal/parallel to the ground.


Well - consider me seriously interested. Feel free to PM me if you would rather discuss the discount a little ...more quietly.
IP: Logged
PFF
System Bot
Fiero42
Member
Posts: 120
From: Chicago
Registered: Feb 2012


Feedback score: N/A
Leave feedback

Rate this member

Report this Post05-31-2012 12:36 AM Click Here to See the Profile for Fiero42Send a Private Message to Fiero42Edit/Delete MessageReply w/QuoteDirect Link to This Post
Very, very cool. I was just about to rebuild two motors again. I think they'd look great in my 86GT.

Put me down for a pair of bold-ons when you're ready with instructions. I'm technical (A pc technician) not mechanical, so I'd be a great beta tester. I can send you back any revisions to the instructions for the skill-less if that helps. Also I can take some promo photos.

Sorry I'm about to read the rest of the thread, but do they have a "Brights" option?


[This message has been edited by Fiero42 (edited 05-31-2012).]

IP: Logged
Sourmug
Member
Posts: 4538
From: Calgary, Alberta, Canada
Registered: Sep 2002


Feedback score:    (29)
Leave feedback


Total ratings: 144
Rate this member

Report this Post05-31-2012 04:29 PM Click Here to See the Profile for SourmugSend a Private Message to SourmugEdit/Delete MessageReply w/QuoteDirect Link to This Post
Thanks for the picture.

Nolan
IP: Logged
Macs86GT
Member
Posts: 2276
From: hagerstown Maryland
Registered: Apr 2008


Feedback score:    (6)
Leave feedback

Rate this member

Report this Post05-31-2012 08:34 PM Click Here to See the Profile for Macs86GTSend a Private Message to Macs86GTEdit/Delete MessageReply w/QuoteDirect Link to This Post
Sorry for the confusion double4c, i was going to see if i could do some finishing work such as a cover for the back of the lights and some fiberglass work to cover over the top of the bracket where it shows through, and make a tube to cover from behind the lights to adjuster bracket. its probabbly better to paint it though and easier. I think painted is the way to go though after seeing the pics you posted on the previous page. It gives it a sinister look.

[This message has been edited by Macs86GT (edited 05-31-2012).]

IP: Logged
nightonfire
Member
Posts: 1015
From: San Diego, Ca.
Registered: Feb 2004


Feedback score: (5)
Leave feedback

Rate this member

Report this Post05-31-2012 08:40 PM Click Here to See the Profile for nightonfireSend a Private Message to nightonfireEdit/Delete MessageReply w/QuoteDirect Link to This Post
 
quote
Originally posted by doublec4:


.


Hi Nolan,

I noticed in this last photo, that the light look like it has a yellowish tint to it. Is this due to the camera, is this the type of bulb you chose, or is this the yellowish color inherent regardless of the bulb chosen?

Also, please PM me regarding those discounted unit prices : )
IP: Logged
FieroMaster88
Member
Posts: 7680
From: Mattawan, MI
Registered: Nov 2000


Feedback score:    (43)
Leave feedback


Total ratings: 168
Rate this member

Report this Post05-31-2012 10:26 PM Click Here to See the Profile for FieroMaster88Send a Private Message to FieroMaster88Edit/Delete MessageReply w/QuoteDirect Link to This Post
I'd be interested in discounted parts too. I'm well trained in using a drill.

------------------

88 Coupe: 2.0L Turbo 4 Cylinder
84 Indy #64: Restoration Project!

IP: Logged
skuzzbomer
Member
Posts: 7492
From: Nashville
Registered: Sep 2009


Feedback score: (3)
Leave feedback


Total ratings: 92
Rate this member

Report this Post05-31-2012 10:27 PM Click Here to See the Profile for skuzzbomerSend a Private Message to skuzzbomerEdit/Delete MessageReply w/QuoteDirect Link to This Post
 
quote
Originally posted by nightonfire:


Hi Nolan,

I noticed in this last photo, that the light look like it has a yellowish tint to it. Is this due to the camera, is this the type of bulb you chose, or is this the yellowish color inherent regardless of the bulb chosen?

Also, please PM me regarding those discounted unit prices : )


The lights used burn at 3000k


Good colour for fog lights.

[This message has been edited by skuzzbomer (edited 05-31-2012).]

IP: Logged
Sourmug
Member
Posts: 4538
From: Calgary, Alberta, Canada
Registered: Sep 2002


Feedback score:    (29)
Leave feedback


Total ratings: 144
Rate this member

Report this Post05-31-2012 11:24 PM Click Here to See the Profile for SourmugSend a Private Message to SourmugEdit/Delete MessageReply w/QuoteDirect Link to This Post
I'm not the one selling the kits.

Nolan
IP: Logged
doublec4
Member
Posts: 8289
From: Oakville, Ontario, Canada
Registered: Jun 2003


Feedback score:    (20)
Leave feedback


Total ratings: 150
Rate this member

Report this Post06-01-2012 12:13 AM Click Here to See the Profile for doublec4Send a Private Message to doublec4Edit/Delete MessageReply w/QuoteDirect Link to This Post
Thank you again for the responses guys.

I sent out pms to those asking about the discounted sets. I'd like to get a feel for what drilling some holes is worth to you guys. I'm really not making much off of these lights, so it would be impossible to offer a crazy discount. But the modification is so simple that it would take maybe an extra half hour worth of install time to complete. I modified my brackets tonight with a round metal file. I only had to elongate the holes to allow the projectors to rotate a few degrees. You could get away with doing the same thing, not even having to break out the drill.

So long story short, a friend and I were able to successfully aim the headlights. With the proper aiming, I cannot believe how AWESOME they work! The light spread is VERY even and it reaches way out to the sides of the car. The cut off is still very decent with the lenses on, and the light output is WAY better than stock. I'm also extremely pleased to say that there is virtually no "shadow" or dead zone of light in front of the car as many other flushmount kits produce. I can attribute that to being able to push the projector lights much farther forward due to the lens design. The body only casts a shadow a few feet in front of the car (maybe 3 feet) so when you're sitting the driver seat, there is absolutely no way you can see that area with no light.

These results are also with using just two lights. If you choose to run all 4 lights at once... then I can only imagine how much it will light up the road. I haven't tried it yet because I don't have them wired for that at this point. I'm very excited to do so.

I will borrow a decent camera and get some pictures that do these things justice. Hopefully this weekend or even tomorrow night I can do that for you guys.

IP: Logged
fierofool
Member
Posts: 12810
From: Auburn, Georgia USA
Registered: Jan 2002


Feedback score:    (13)
Leave feedback


Total ratings: 154
Rate this member

Report this Post06-01-2012 08:27 AM Click Here to See the Profile for fierofoolClick Here to visit fierofool's HomePageSend a Private Message to fierofoolEdit/Delete MessageReply w/QuoteDirect Link to This Post
Again, I'll ask...Would it be possible that you might modify this design to accommodate the quad rectangular bulbs moved forward in the same manner?
IP: Logged
doublec4
Member
Posts: 8289
From: Oakville, Ontario, Canada
Registered: Jun 2003


Feedback score:    (20)
Leave feedback


Total ratings: 150
Rate this member

Report this Post06-01-2012 03:22 PM Click Here to See the Profile for doublec4Send a Private Message to doublec4Edit/Delete MessageReply w/QuoteDirect Link to This Post
 
quote
Originally posted by fierofool:

Again, I'll ask...Would it be possible that you might modify this design to accommodate the quad rectangular bulbs moved forward in the same manner?


Sorry I forgot to answer your question the first time.

Which rectangular bulbs/housings are you using? Unfortunately it would be a ton of work to redesign, recut the moulds, and then go through the R&D process for fitting in rectangular lights (regarding the lenses). It would also be expensive.

If you wanted to use the same lenses and buckets, but come up with your own mounting solution for rectangular lights, I'd be happy to sell you just the buckets / brackets / lenses without the actual lights or aiming brackets for the lights. Obviously we could negotiate a price for that.

Let me know what you think

IP: Logged
PFF
System Bot
fierofool
Member
Posts: 12810
From: Auburn, Georgia USA
Registered: Jan 2002


Feedback score:    (13)
Leave feedback


Total ratings: 154
Rate this member

Report this Post06-01-2012 08:14 PM Click Here to See the Profile for fierofoolClick Here to visit fierofool's HomePageSend a Private Message to fierofoolEdit/Delete MessageReply w/QuoteDirect Link to This Post
Thank you. The bulbs are probably Camaro, from what I've read in other threads. They use replaceable Halogen bulbs. The only identifiers I can find without removing the whole assembly is Guide Halogen on the lens and they're about 2.5" by 5 or 6". I understand that moving them forward would require reshaping the cover to have a raised area all the way across its width, instead of the bubbles like the projectors. That might even be done by reshaping the existing clear covers many of us already have. The main thing is the mount and adjuster for the bulbs.

Edit to say that I'd like to do away with everything except the bulbs and just mount them similar to what you're doing with the projectors.

[This message has been edited by fierofool (edited 06-01-2012).]

IP: Logged
doublec4
Member
Posts: 8289
From: Oakville, Ontario, Canada
Registered: Jun 2003


Feedback score:    (20)
Leave feedback


Total ratings: 150
Rate this member

Report this Post06-01-2012 08:33 PM Click Here to See the Profile for doublec4Send a Private Message to doublec4Edit/Delete MessageReply w/QuoteDirect Link to This Post
Reshaping the lens is a lot more difficult than it sounds. Just out of curiosity, is there a particular reason why you would rather keep the rectangular reflectors over the round projectors? IMO the projectors have superior light output.

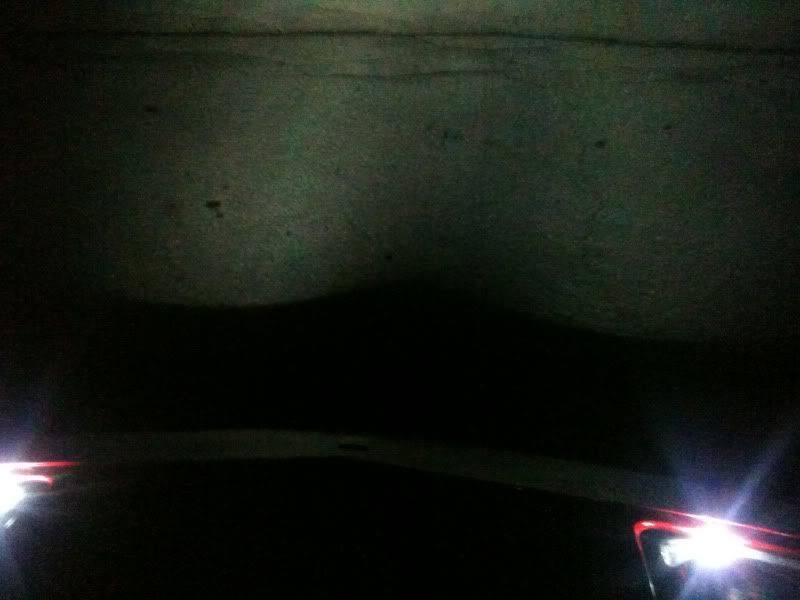
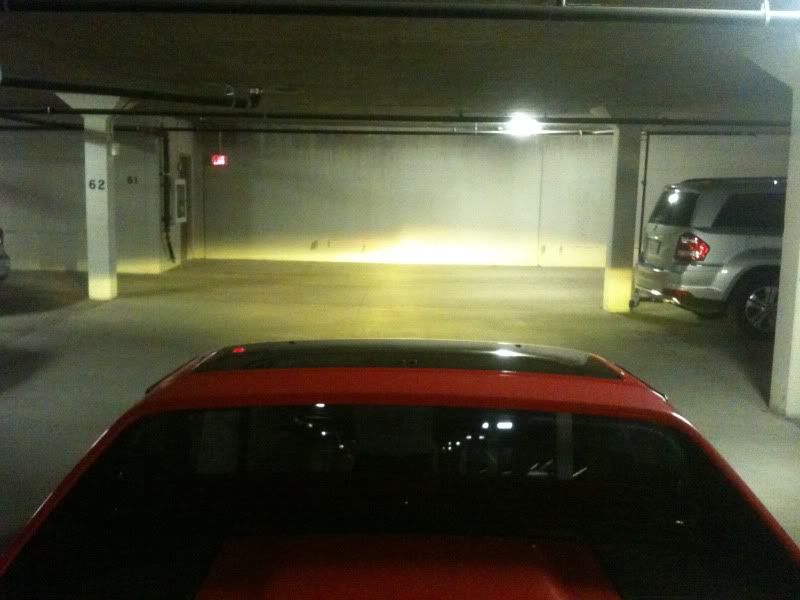
This is just an example of low beam function with only 2 projectors. The pictures just don't do it justice. I can't stress that enough. Even my friend said the same thing to me. I need a better camera to really capture the light output (maybe my GoPro will do better)


Here is the area of unlit space in front of the car:


As you can see, the "shadow" that the body casts is maybe only 2 or 3 feet in front of the car. From the driver seat, its all lit up and you cannot see this dark area anyways. I will get more pictures and I really hope everyone is happy with how these do not produce a huge blind area. I was very impressed, I know that much.
IP: Logged
fierofool
Member
Posts: 12810
From: Auburn, Georgia USA
Registered: Jan 2002


Feedback score:    (13)
Leave feedback


Total ratings: 154
Rate this member

Report this Post06-01-2012 09:23 PM Click Here to See the Profile for fierofoolClick Here to visit fierofool's HomePageSend a Private Message to fierofoolEdit/Delete MessageReply w/QuoteDirect Link to This Post
The reason for keeping the rectangular is cost, and I actually like the looks better than projectors. I'm not a big fan of the blue or white lights coming at me, looking like aircraft landing lights. It would also be a good conversion for others with the rectangular bulbs. I can't be the only one that can't see with these darned things. I have no idea who made them since they were on the car when I got it.

Didn't mean to hijack, but keep this in the back of your mind as a possible modification-new product to what you're doing. Great work.
IP: Logged
donnie072003
Member
Posts: 1956
From: LaSalle, IL.
Registered: Feb 2010


Feedback score:    (12)
Leave feedback

Rate this member

Report this Post06-01-2012 11:18 PM Click Here to See the Profile for donnie072003Click Here to visit donnie072003's HomePageSend a Private Message to donnie072003Edit/Delete MessageReply w/QuoteDirect Link to This Post
PM sent
IP: Logged
doublec4
Member
Posts: 8289
From: Oakville, Ontario, Canada
Registered: Jun 2003


Feedback score:    (20)
Leave feedback


Total ratings: 150
Rate this member

Report this Post06-02-2012 04:52 PM Click Here to See the Profile for doublec4Send a Private Message to doublec4Edit/Delete MessageReply w/QuoteDirect Link to This Post
 
quote
Originally posted by fierofool:

The reason for keeping the rectangular is cost, and I actually like the looks better than projectors. I'm not a big fan of the blue or white lights coming at me, looking like aircraft landing lights. It would also be a good conversion for others with the rectangular bulbs. I can't be the only one that can't see with these darned things. I have no idea who made them since they were on the car when I got it.

Didn't mean to hijack, but keep this in the back of your mind as a possible modification-new product to what you're doing. Great work.


No problem, everyone has different taste. Unfortunately, I feel that I would have to redesign the entire package to be backward compatible with the rectangular reflector headlights and it just isn't feasible for two reasons. Time and cost. It would take a really long time, and another large investment to do so, and I may only get a few sales out of it. Offering these round projectors and the entire kit for around $400 is already a steal for the Fiero community. I just can't afford to invest an equal amount into something that I won't possibly break even on. I'm hoping to at least break even with the lights I've just designed. It would be thrilling for me to see others install and enjoy something I made from scratch
IP: Logged
Asterix
Member
Posts: 81
From: uSA
Registered: Feb 2006


Feedback score: N/A
Leave feedback

Rate this member

Report this Post06-06-2012 09:34 PM Click Here to See the Profile for AsterixClick Here to visit Asterix's HomePageSend a Private Message to AsterixEdit/Delete MessageReply w/QuoteDirect Link to This Post
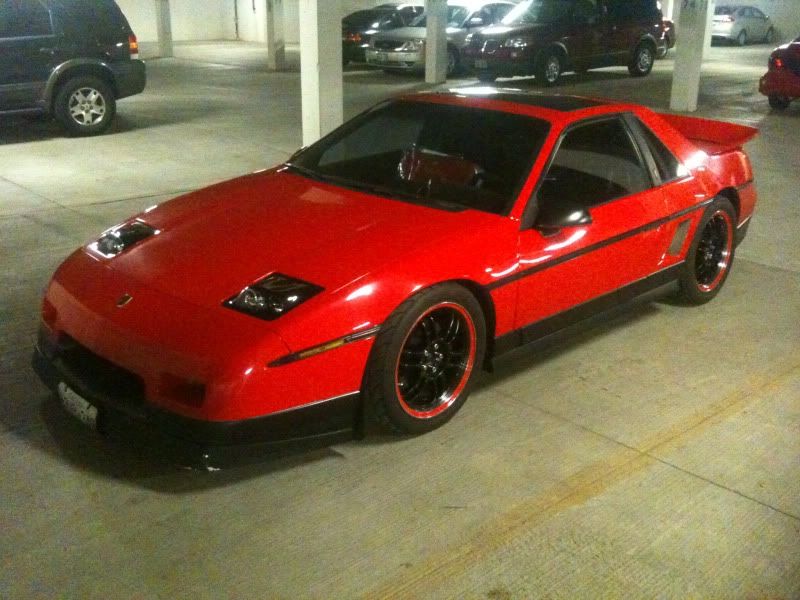
In my quest for quad HID lighting on my '86 GT, I've followed a variety of HID-upgrade threads on the forum for several years. In October 2011 I got a Projector Retrofit set and in March 2012 upgraded the motors to Gen2. I have to say I consider that setup to be the best solution as the Gen2 motors work perfectly and reliably and the quad HID lights are an order of magnitude better than stock.
IP: Logged
doublec4
Member
Posts: 8289
From: Oakville, Ontario, Canada
Registered: Jun 2003


Feedback score:    (20)
Leave feedback


Total ratings: 150
Rate this member

Report this Post06-09-2012 03:56 PM Click Here to See the Profile for doublec4Send a Private Message to doublec4Edit/Delete MessageReply w/QuoteDirect Link to This Post
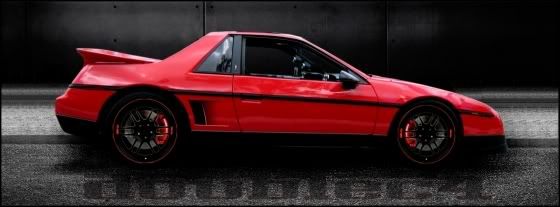
Doesn't get much better than HID projectors with today's technology.

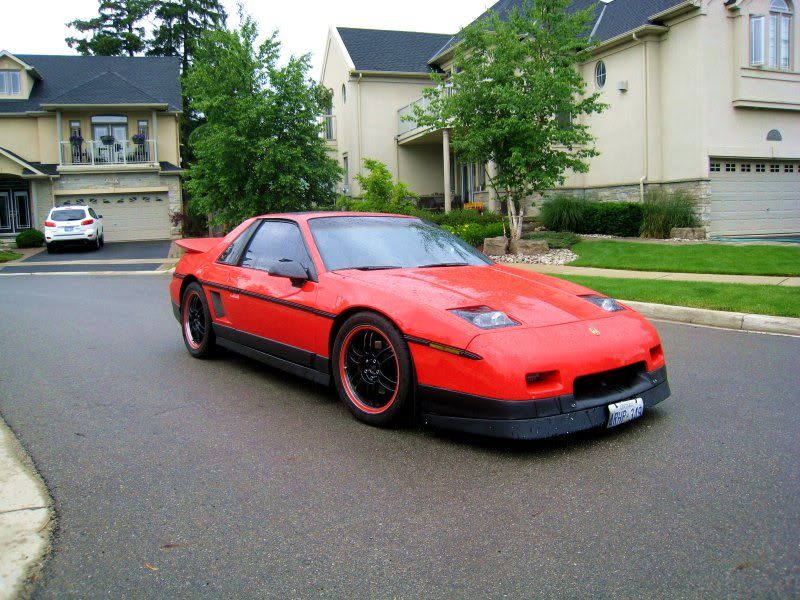
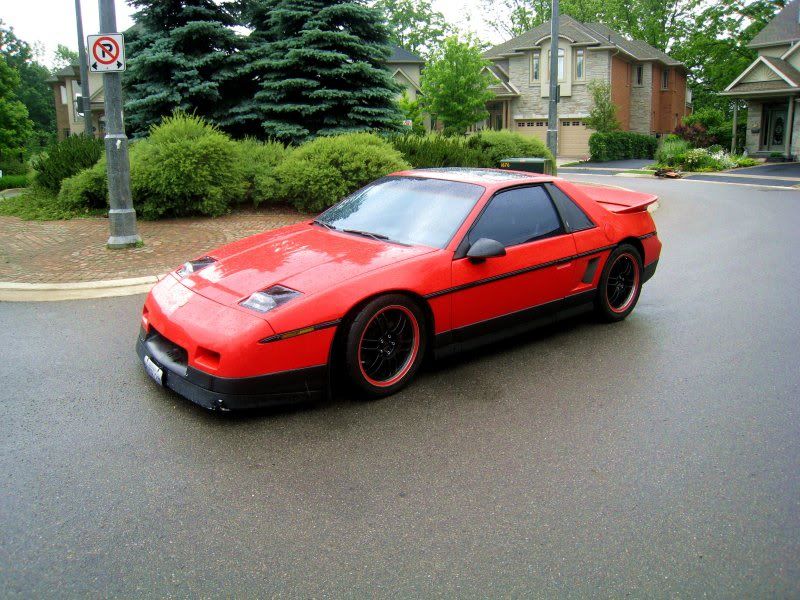
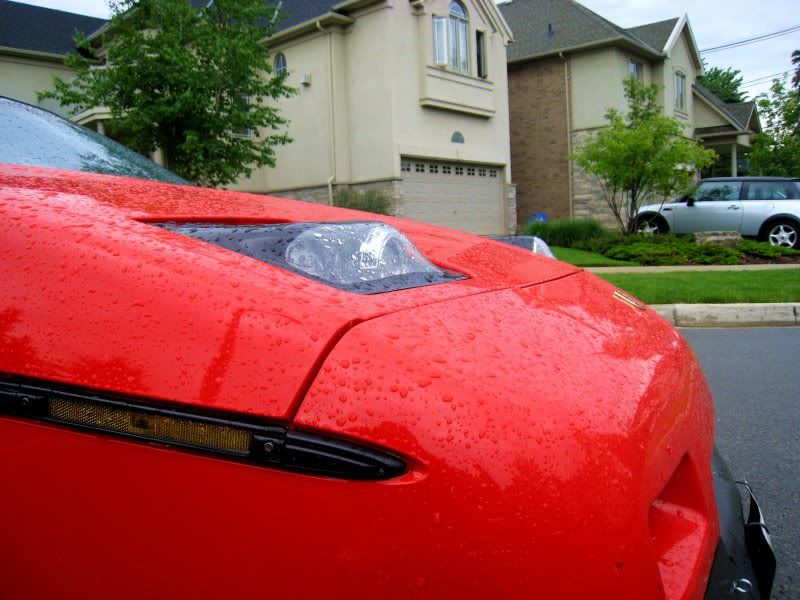
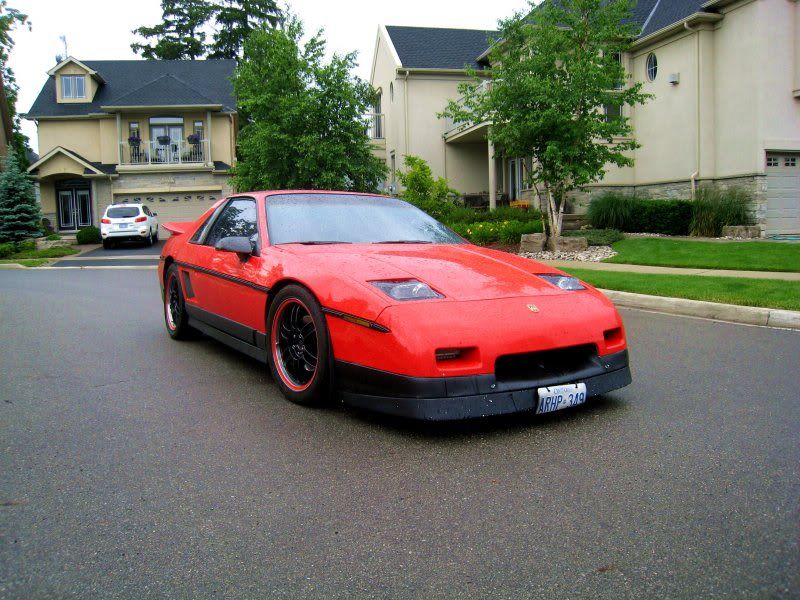
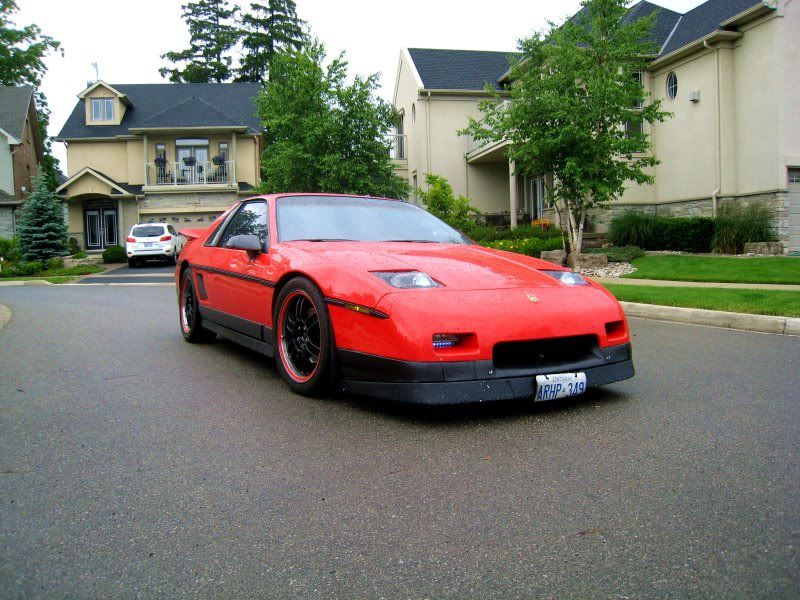
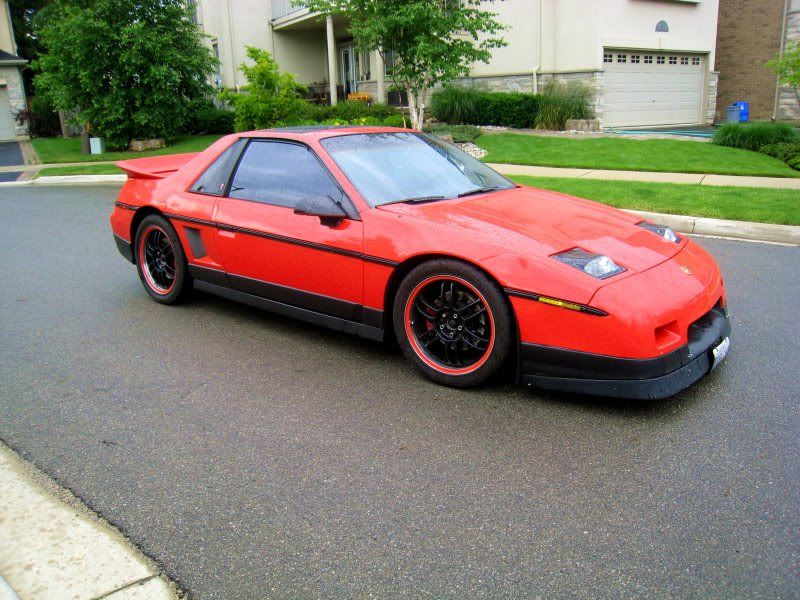
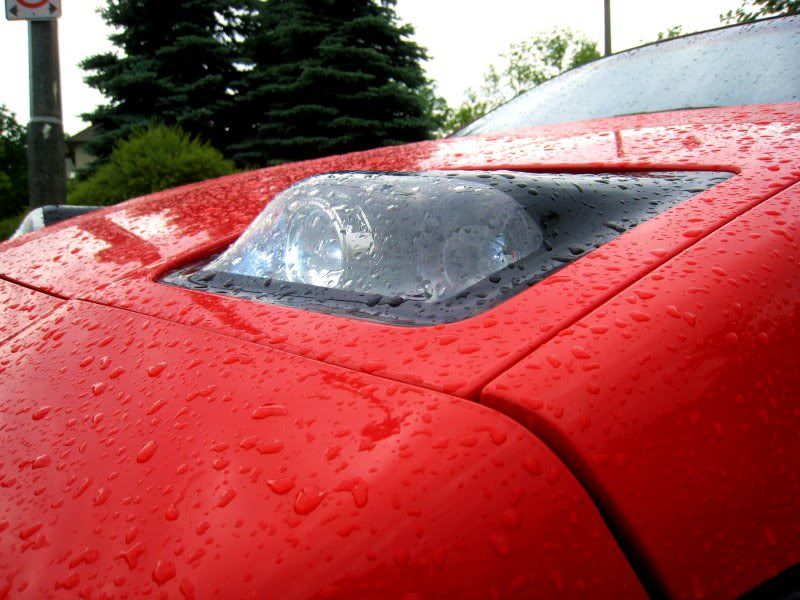
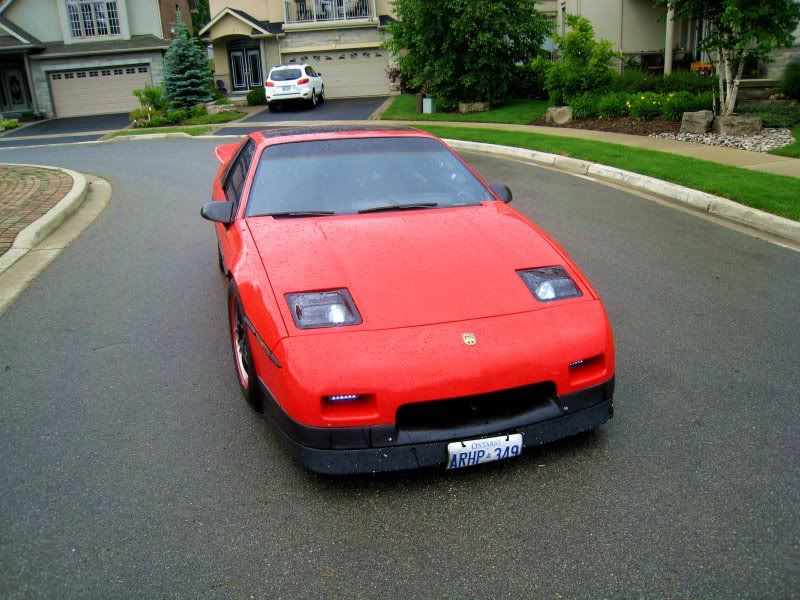
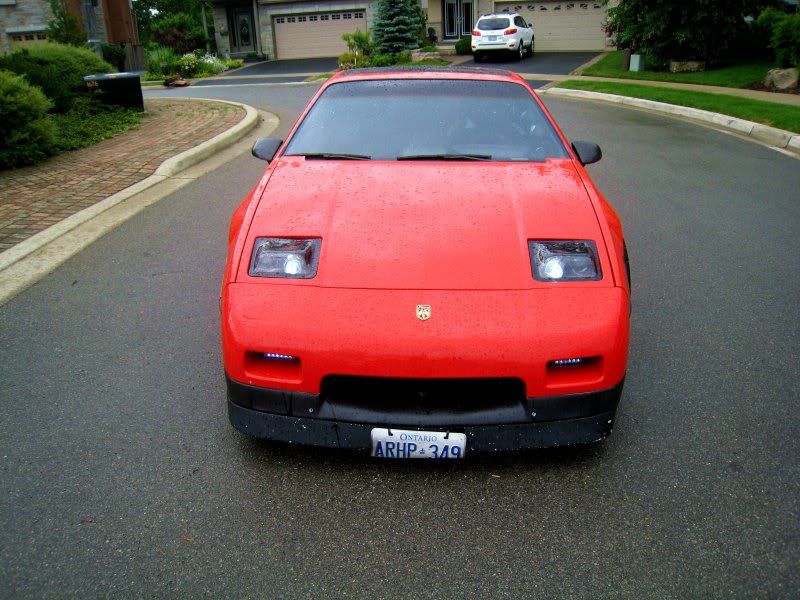
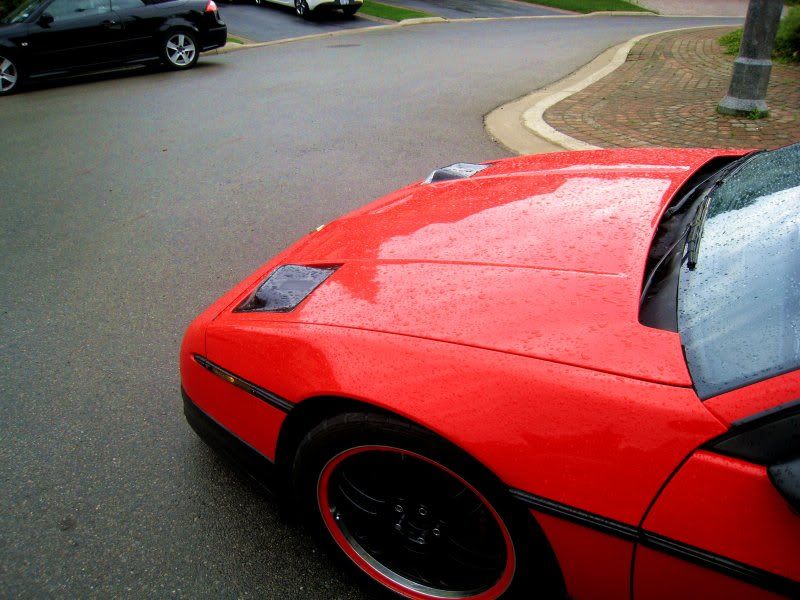
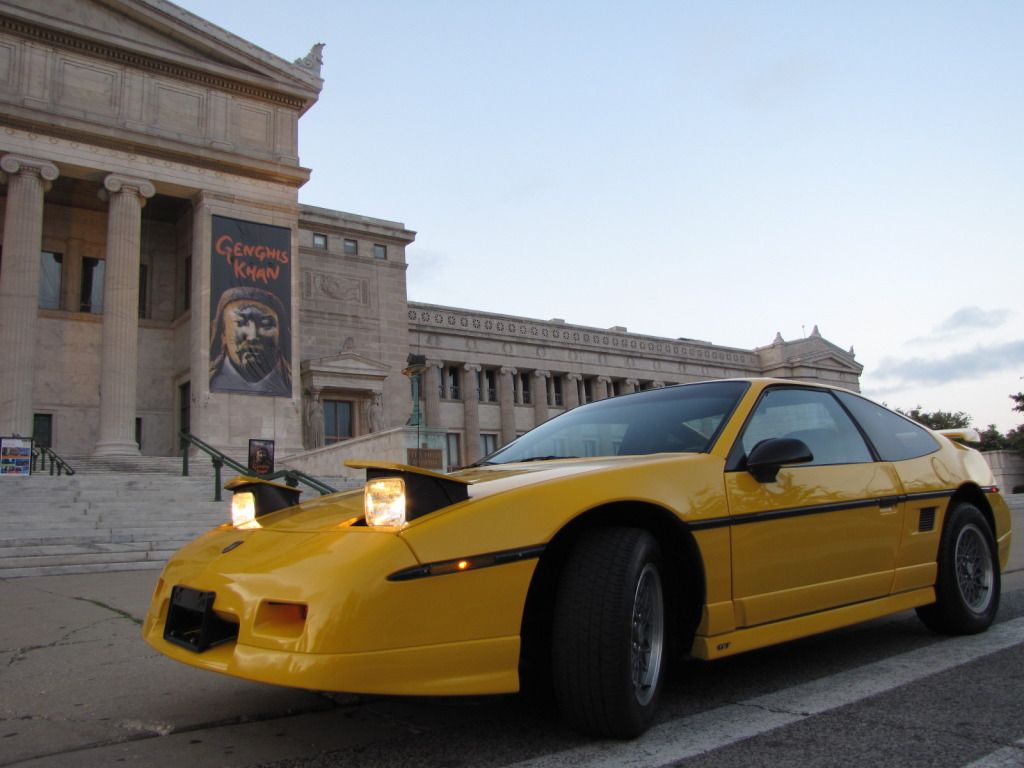
I got my hands on a slightly better camera. Here are some nicer shots of the lights out in the rain (excuse the dirty car, it just won't stop raining around here) I have to get some low light pictures / video using my gopro. That would really show how well these lights work at night.


Enjoy! I'll be setting a final price tomorrow and accepting deposits next week!

Thank you everyone!

------------------

Check out my build and my website!
//www.fiero.nl/forum/Forum3/HTML/000100.html
Embrace Racing

[This message has been edited by doublec4 (edited 06-09-2012).]

IP: Logged
Fiero2m8
Member
Posts: 1928
From: Niagara, Ontario, Canada
Registered: Feb 2006


Feedback score:    (10)
Leave feedback

Rate this member

Report this Post06-09-2012 09:28 PM Click Here to See the Profile for Fiero2m8Click Here to visit Fiero2m8's HomePageSend a Private Message to Fiero2m8Edit/Delete MessageReply w/QuoteDirect Link to This Post
Thanks for the daytime outdoor pics as requested.
I decided to go for a set so PM me your Paypal info when your ready for the deposit.
You have had a nice influence in the design evolution of the newest project, so it would be fitting to add your light mod to the design.

Cheers,
Fiero2m8

------------------

Indy Northstar-Stretch

IP: Logged
pegasus1848
Member
Posts: 118
From: Dubuque, Iowa, USA
Registered: Jun 2006


Feedback score: (1)
Leave feedback

Rate this member

Report this Post06-10-2012 12:58 AM Click Here to See the Profile for pegasus1848Send a Private Message to pegasus1848Edit/Delete MessageReply w/QuoteDirect Link to This Post
Please pm me your pay pal info and the amount you need as soon as you are ready, because I am so ready for a set.
IP: Logged
Previous Page | Next Page

This topic is 12 pages long:  1   2   3   4   5   6   7   8   9   10   11   12 
next newest topic | next oldest topic

All times are ET (US)

Post New Topic  Post A Reply
Hop to:

Contact Us | Back To Main Page

Advertizing on PFF | Fiero Parts Vendors
PFF Merchandise | Fiero Gallery | Ogre's Cave
Real-Time Chat | Fiero Related Auctions on eBay


Copyright (c) 1999, C. Pennock