Pennock's Fiero Forum
  General Fiero Chat - Archive
  Designing a new dash need a few ideas (Page 20)

T H I S   I S   A N   A R C H I V E D   T O P I C
  

Email This Page to Someone! | Printable Version

This topic is 26 pages long:  1   2   3   4   5   6   7   8   9   10   11   12   13   14   15   16   17   18   19   20   21   22   23   24   25   26 
Previous Page | Next Page
Designing a new dash need a few ideas by OH10fiero
Started on: 11-01-2002 11:37 AM
Replies: 1031
Last post by: IMSA GT on 09-20-2010 01:12 PM
Jefrysuko
Member
Posts: 3491
From: Oreana IL
Registered: Apr 2000


Feedback score:    (17)
Leave feedback


Total ratings: 108
Rate this member

Report this Post10-25-2006 09:50 PM Click Here to See the Profile for JefrysukoSend a Private Message to JefrysukoDirect Link to This Post
Thought that I would share some pictures as I am a little excited to get started on this project.

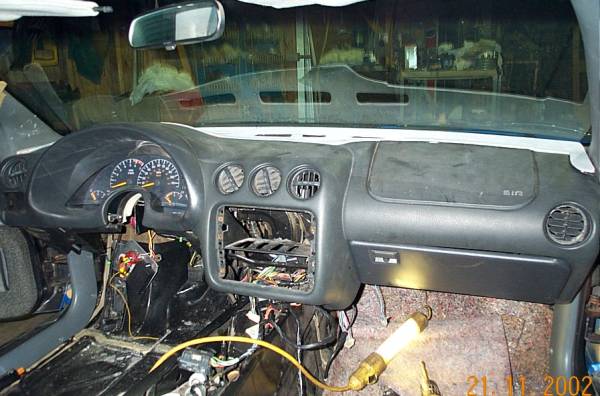
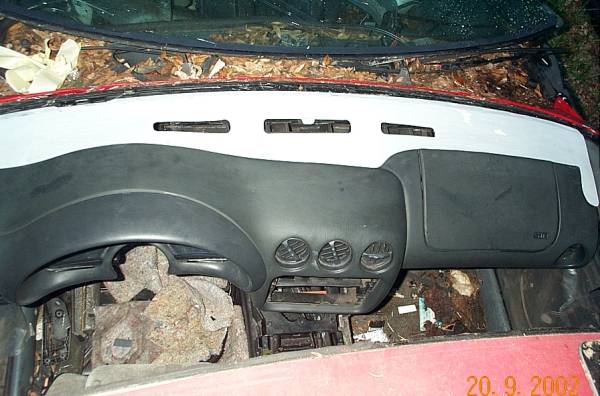
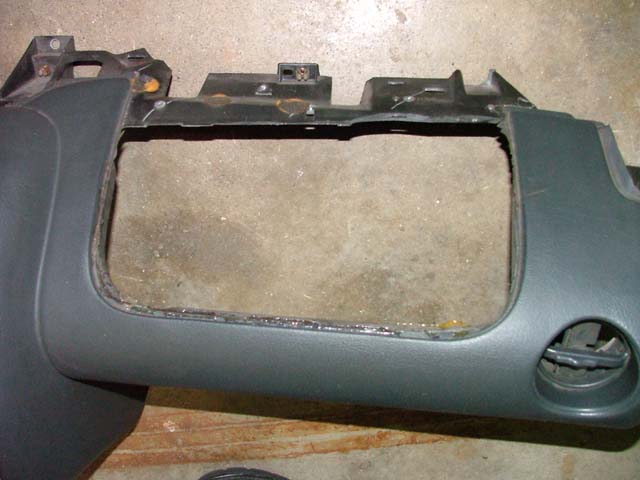
Dash is completely striped down so that I can repair a few cracks in the fiberglass structure.

Unfortunately the right upper mounting point is gone as well.

You can also see the glue that was used on the air bag cover to make it look like the air bag wasn't blown.
IP: Logged
never2old
Member
Posts: 1854
From: Wyoming, Michigan USA
Registered: Dec 2005


Feedback score:    (20)
Leave feedback


Total ratings: 68
Rate this member

Report this Post10-25-2006 11:06 PM Click Here to See the Profile for never2oldSend a Private Message to never2oldDirect Link to This Post
I know each one of us has our own talent. {still searching}
But you people amaze me with your electronic knowledge.
IP: Logged
OH10fiero
Member
Posts: 1540
From: struther OH
Registered: Jun 2002


Feedback score: N/A
Leave feedback

Rate this member

Report this Post10-26-2006 12:35 AM Click Here to See the Profile for OH10fieroSend a Private Message to OH10fieroDirect Link to This Post
 
quote
Originally posted by never2old:

I know each one of us has our own talent. {still searching}
But you people amaze me with your electronic knowledge.


I can turn a wrench and make things happen with an engine, give me a wireing diagram and I am lost. I'm just glad I am not the only one.
IP: Logged
jscott1
Member
Posts: 21676
From: Houston, TX , USA
Registered: Dec 2001


Feedback score:    (15)
Leave feedback


Total ratings: 415
Rate this member

Report this Post10-26-2006 07:19 AM Click Here to See the Profile for jscott1Send a Private Message to jscott1Direct Link to This Post
It's a good thing different people have different strengths. I can wire things up electrically all day long, but I suck at fiberglass.

Those mounting points on the firebird dash are very brittle. I found if you just pull on it too hard it will crack. So it might be a good idea to reinforce them even if they don't appear to be broken.
IP: Logged
Mickey_Moose
Member
Posts: 7497
From: Edmonton, AB, Canada
Registered: May 2001


Feedback score: (3)
Leave feedback


Total ratings: 143
Rate this member

Report this Post10-26-2006 12:17 PM Click Here to See the Profile for Mickey_MooseClick Here to visit Mickey_Moose's HomePageSend a Private Message to Mickey_MooseDirect Link to This Post
 
quote
Originally posted by jscott1:

It's a good thing different people have different strengths. I can wire things up electrically all day long, but I suck at fiberglass.


Looks like both of us are in the same boat (as long as it's not a fiberglass one that I made)

The mounting tabs, you can rivit some sheet metal to the broken areas - just use rivits with small shafts and large heads and washers on the backside. Ok that sounds a bit odd

Tim

[This message has been edited by Mickey_Moose (edited 10-26-2006).]

IP: Logged
jscott1
Member
Posts: 21676
From: Houston, TX , USA
Registered: Dec 2001


Feedback score:    (15)
Leave feedback


Total ratings: 415
Rate this member

Report this Post10-26-2006 12:40 PM Click Here to See the Profile for jscott1Send a Private Message to jscott1Direct Link to This Post
 
quote
Originally posted by RCR:

I finished up the mode select today. There were a couple small issues with the original circuit I came up with. I needed an extra diode to block feedback current in the re-circ circuit and I found that I can't drive two modes at the same time, thus I no longer have a feet/def function. I'll post a new schematic once I can update it at work.

Bob


I'm finally devoting some brain energy to the all electric firebird HVAC controller. The reason why I used relays is one, because I'm a mechanical engineer and I can understand relays because they are mechanical, and two, the current drop through the diodes is too much to be able to drive the motors, or at least two at once.
IP: Logged
1986GTV8
Member
Posts: 1259
From: Orlando,FL,USA
Registered: Mar 2002


Feedback score: N/A
Leave feedback

Rate this member

Report this Post11-03-2006 01:06 PM Click Here to See the Profile for 1986GTV8Send a Private Message to 1986GTV8Direct Link to This Post
Anyone have this fit problem? http://www.images.fieroforum.com/pffimages2/99_fit_problem.jpg

In the red circle I can not get the dash to slide into the A pillar. It wants to crack the AC vent if I try to force it in.

My digitak camera is MIA so I used a pic from J Scott to explain.

Thanks.

John
IP: Logged
jscott1
Member
Posts: 21676
From: Houston, TX , USA
Registered: Dec 2001


Feedback score:    (15)
Leave feedback


Total ratings: 415
Rate this member

Report this Post11-03-2006 01:20 PM Click Here to See the Profile for jscott1Send a Private Message to jscott1Direct Link to This Post
The pic I posted was from an electrical test of my harness. That dash is no where near as far back (towards the lower edge of the windshield) as it needs to be. As the A-pillars get wider at the bottom, the fit improves the further back you get the dash.

Still the left hand side is where you are going to have the most fittment issues. To get the dash in right there you probably have to squeeze in the dash to make room. It should not be wanting to crack the a/c vent though.

Make sure you remove the bezel from the gauges so that the dash is real flexible while you are getting it into position. Like I said the more the dash is pushed back the more room you have to work with from side to side.

Good luck.
IP: Logged
1986GTV8
Member
Posts: 1259
From: Orlando,FL,USA
Registered: Mar 2002


Feedback score: N/A
Leave feedback

Rate this member

Report this Post11-03-2006 02:42 PM Click Here to See the Profile for 1986GTV8Send a Private Message to 1986GTV8Direct Link to This Post
Thanks, perhaps if I start the drivers side in first then try the pass side it may work better as there is more meat there to take the pressure.

I was not aware that you gain room as the dash goes in further.

As always, great info here.

John
IP: Logged
Amida
Member
Posts: 2354
From: Seattle, WA. USA
Registered: Jul 2003


Feedback score: (4)
Leave feedback


Total ratings: 63
Rate this member

Report this Post11-03-2006 03:11 PM Click Here to See the Profile for AmidaSend a Private Message to AmidaDirect Link to This Post
 
quote
Originally posted by jscott1:
As a side note, the Fiero cluster does not have a "hot at all time" power connection to it. When I build my harnesses I add that. I never knew of a good reason for doing that before I just did it because that's what the drawing called for.


The stock Fiero rally gauge pod has an oil pressure gauge with a built in red warning light. In my 355 swap, I hooked up a new VDO pressure gauge with sender & I have a separate warning light in the main gauge panel. How does the Fiero warning light work? Will I have to hook up a dedicated sending unit to light up my dummy light?

Thanks,
Rob
FieroInteriors@Juno.com


IP: Logged
jscott1
Member
Posts: 21676
From: Houston, TX , USA
Registered: Dec 2001


Feedback score:    (15)
Leave feedback


Total ratings: 415
Rate this member

Report this Post11-03-2006 11:38 PM Click Here to See the Profile for jscott1Send a Private Message to jscott1Direct Link to This Post
 
quote
Originally posted by Amida:

How does the Fiero warning light work? Will I have to hook up a dedicated sending unit to light up my dummy light?


The red warning light in the stock rally gauge pod simply illuminates when the pressure drops below a certain value. It's not hooked to any pressure switch or anything like that.

[This message has been edited by jscott1 (edited 11-03-2006).]

IP: Logged
PFF
System Bot
Amida
Member
Posts: 2354
From: Seattle, WA. USA
Registered: Jul 2003


Feedback score: (4)
Leave feedback


Total ratings: 63
Rate this member

Report this Post11-03-2006 11:43 PM Click Here to See the Profile for AmidaSend a Private Message to AmidaDirect Link to This Post
I see, thanks for the info. I'll have to then install a dummy light sender on the engine somewhere, maybe use a "T" with the existing unit.

Rob
FieroInteriors@Juno.com
IP: Logged
1986GTV8
Member
Posts: 1259
From: Orlando,FL,USA
Registered: Mar 2002


Feedback score: N/A
Leave feedback

Rate this member

Report this Post11-04-2006 01:30 PM Click Here to See the Profile for 1986GTV8Send a Private Message to 1986GTV8Direct Link to This Post
I got it to fit!

Removed both A pillars & opened both doors.

Must have been the passanger side door panel creating the pressure on the dash.

Now to mount it & fill inbetween thr windshield & dash.

Still can not decide if I should keep the original HAVC or use the Firebirds.

Guess it depends on weahter or not I can find a plug & play option for it.

Huge HINT J Scott.

I put on my steel ballls & used my circular saw witha metal cutting blade to slice off the steering mount.

No going back now. But it made a HUGE diffrence as to where the dash sits. I would not do id any other way.


GREAT thread!


John
IP: Logged
jscott1
Member
Posts: 21676
From: Houston, TX , USA
Registered: Dec 2001


Feedback score:    (15)
Leave feedback


Total ratings: 415
Rate this member

Report this Post11-04-2006 03:54 PM Click Here to See the Profile for jscott1Send a Private Message to jscott1Direct Link to This Post
 
quote
Originally posted by 1986GTV8:

Still can not decide if I should keep the original HAVC or use the Firebirds.

Guess it depends on weahter or not I can find a plug & play option for it.

Huge HINT J Scott.


John


There are some nice cars out there with totally custom dashes that still use the Fiero HVAC. But for me that ruins the whole effect and reminds you of the 20 something year old dash.

I'm making progress in this area, I should have enough progress to post in a few days. As soon as all the parts I ordered arrive, I'll be building a prototype.

IP: Logged
1986GTV8
Member
Posts: 1259
From: Orlando,FL,USA
Registered: Mar 2002


Feedback score: N/A
Leave feedback

Rate this member

Report this Post11-07-2006 08:49 PM Click Here to See the Profile for 1986GTV8Send a Private Message to 1986GTV8Direct Link to This Post
Intersting thought (or so I think). What if I use the original Fiero dash part that goes form the windshield to the Firebird dash?

The fit from the windshield & defroster vents would be a perfict fit. Obviously I would have to stop/ modify where the dash curves up at the steeringwheel, but would give me a gerat fit at the windshield.

Thoughts?

John
IP: Logged
jscott1
Member
Posts: 21676
From: Houston, TX , USA
Registered: Dec 2001


Feedback score:    (15)
Leave feedback


Total ratings: 415
Rate this member

Report this Post11-07-2006 09:46 PM Click Here to See the Profile for jscott1Send a Private Message to jscott1Direct Link to This Post
Regarding the filler piece between the dash and the windshield, the best fit that I have seen was with Roy's piece because it was custom made to fit in that spot and it fit perfectly.

1) If you use the Firebird part it will fit good at the dash, but then you will have to cut it to match the windshield.

2) If you use the Fiero dash top it will fit at the windshield, but it won't fit the dash, not even close. And the Fiero dash is all one piece, you would have to cut off the top and then try to clean up the edge that you just cut to match the firebird dash.

3) If you try and morph the two together it's going to be a mess.


By far the simplest of the three is option 1. The Firebird filler panel is some type of thin plastic. You can easily cut it to match the contour of the windshield. Then the only issue is the small corners where the A-pillar trim meets the dash. There will be small gaps there. Most people just glue down a little patch there or some little tweeters to cover it up.

I tried to morph the firebird panel with hand laid fiberglass and bondo and it delaminated and cracked all to pieces. If I could do it all over again I would just do #1 like everyone else.

[This message has been edited by jscott1 (edited 11-07-2006).]

IP: Logged
1986GTV8
Member
Posts: 1259
From: Orlando,FL,USA
Registered: Mar 2002


Feedback score: N/A
Leave feedback

Rate this member

Report this Post11-07-2006 10:33 PM Click Here to See the Profile for 1986GTV8Send a Private Message to 1986GTV8Direct Link to This Post
Can you post a pic of a shot through the windshield to show the filled space?

Obviously since your project is (DONE ?), it will give me an idea of how high up the dash sits & where the fill peice fits.

If I had my windshield out I would ASSume that this part of the project would be much easier....

Alas, it will have to wait untill' after Thanks Giving.

Thank you for your input to help a New Bee !

John
IP: Logged
jscott1
Member
Posts: 21676
From: Houston, TX , USA
Registered: Dec 2001


Feedback score:    (15)
Leave feedback


Total ratings: 415
Rate this member

Report this Post11-08-2006 12:04 AM Click Here to See the Profile for jscott1Send a Private Message to jscott1Direct Link to This Post
 
quote
Originally posted by 1986GTV8:

Can you post a pic of a shot through the windshield to show the filled space?

Obviously since your project is (DONE ?), it will give me an idea of how high up the dash sits & where the fill peice fits.
John


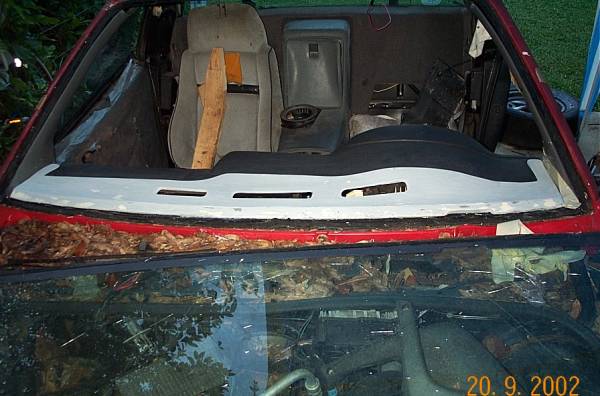
This is how it looked shortly after I "completed" my filler panel.


I don't really have a picture through the glass but the fill piece fits at the same height as the dash, which should be level with where the stock dash is.

If you look at Roy's setup it gives you a better idea.


IP: Logged
mrfixit58
Member
Posts: 3330
From: Seffner, Fl, USA
Registered: Jul 99


Feedback score: N/A
Leave feedback


Total ratings: 113
Rate this member

Report this Post11-08-2006 06:05 PM Click Here to See the Profile for mrfixit58Send a Private Message to mrfixit58Direct Link to This Post
Wow... Do those pictures bring back cold chills. The filler piece I made was not really that hard to duplicate if you've working with a donor car or the windshield is out of your's. If you look back at my build-up I think I go into pretty good detail on how it was made. But the Reader's Digest version is as follows:

- Cut 1" off of the front of the old dash and screw it into place along the windshield lip.
- Mount the dash.
- Make a masking tape dam filling the gap between the old dash piece and the Firebird dash.
- Apply the fiberglass (one or two layers) hint remove the screws from the old section of dash before it sets firm).
- Once set, remove the new piece, peel the masking tap and trim the fuzzys around the edges.
- Slip the piece back into place and, from the top, mark the defroster vent holes using a Sharpie. Because the fiberglass is transparent, it will show you where you need to cut after you finish the next step.
- Cover the Firebird dash and set the new piece into place.
- Apply a liberal amount of fiberglass reinforced filler (like MarGlass) to add depth and strength and let it set up firm.
- Remove the filler cut the defroster vent holes
- Finish the piece using Bondo.
- To get a really nice seal and fit, I speared filler all around the edges and set the dash back into place while it set up.
- Remove the piece, finish sand and paint to match.

It's not hard but does take a little patience.

------------------
Roy

double-click on this link to follow my interior build-up https://www.fiero.nl/forum/Forum1/HTML/023174.html

Blue 87 GT w/ 4th generation Firebird interior.
Suncoast Fieros

Judged "Best Custom Interior" at the 20th Anniversary Show @ Pontiac, Mich - 7/2003
Judged "Best Custom Interior" at the 8th Annual Fiero Fun Weekend @ Daytona - 3/2004
Judged "Best Custom Interior" at the 9th Annual Fiero Fun Weekend @ Daytona - 3/2005

IP: Logged
Mickey_Moose
Member
Posts: 7497
From: Edmonton, AB, Canada
Registered: May 2001


Feedback score: (3)
Leave feedback


Total ratings: 143
Rate this member

Report this Post11-09-2006 02:40 PM Click Here to See the Profile for Mickey_MooseClick Here to visit Mickey_Moose's HomePageSend a Private Message to Mickey_MooseDirect Link to This Post
Original Firebird filler cut to fit (I transfered the shape along the windshield from the original dash). Cut some small shapes from the left overs from the firebird dash for the corners. The small parts where also heated with a heat gun and bent to match the curve of the dash. Note: you need to trim out a notch for the VIN tag:


through the windshield, kind of hard with the reflections:

[This message has been edited by Mickey_Moose (edited 11-09-2006).]

IP: Logged
jscott1
Member
Posts: 21676
From: Houston, TX , USA
Registered: Dec 2001


Feedback score:    (15)
Leave feedback


Total ratings: 415
Rate this member

Report this Post11-09-2006 05:11 PM Click Here to See the Profile for jscott1Send a Private Message to jscott1Direct Link to This Post
That looks awesome! Good job.
IP: Logged
PFF
System Bot
1986GTV8
Member
Posts: 1259
From: Orlando,FL,USA
Registered: Mar 2002


Feedback score: N/A
Leave feedback

Rate this member

Report this Post11-11-2006 09:18 AM Click Here to See the Profile for 1986GTV8Send a Private Message to 1986GTV8Direct Link to This Post
Great!

Thanks for the pics!

John
IP: Logged
88White3.4GT
Member
Posts: 1604
From: Hayward, CA
Registered: Dec 2003


Feedback score: N/A
Leave feedback

Rate this member

Report this Post11-11-2006 12:41 PM Click Here to See the Profile for 88White3.4GTSend a Private Message to 88White3.4GTDirect Link to This Post
nice work
IP: Logged
BullRider
Member
Posts: 108
From: Victoria, BC, Canada
Registered: Sep 2006


Feedback score: N/A
Leave feedback

Rate this member

Report this Post12-18-2006 05:29 PM Click Here to See the Profile for BullRiderClick Here to visit BullRider's HomePageSend a Private Message to BullRiderDirect Link to This Post
I thought that I'd throw in a few shots of my dash conversion project. The car is an '84 Fiero that is currently in the last throes of conversion to a 25th Anniversary Countach. The car came with a crappy, half-assed Countach replica dashboard. I could have lived with it except that the previous owner had plumbed the defrost vents into the fresh air intake... turn on the defroster and it would have sucked everything into the dashboard! I quickly pulled and scrapped the POS. I was seriously thinking about making up my own custom dash, but a trip to the junkyard yielded a nice '97 Grand Am dash in perfect shape for $90 CAD. I couldn't turn it down. Here are some shots to show you what I'm up to:

The car:
This images is larger than 100K. Click to view.

This images is larger than 100K. Click to view.


The old dashboard:


And what I'm working with:


These are aftermarket VDO gauges put in place in a cutout that fits perfectly in the Grand Am gauge opening:


This images is larger than 100K. Click to view.


I need a place to mount my battery power gauge and I also need to fab up a filler plate, as you can see I've got quite the gap to fill up:


If anyone has any ideas on where to mount the last gauge, tips for running the HVAC ducting, or any other constructive critisism, be sure to let me know.
More info and pictures of the project can be found on my site at http://www.rc-sub.com/lamborghini.html.
IP: Logged
jscott1
Member
Posts: 21676
From: Houston, TX , USA
Registered: Dec 2001


Feedback score:    (15)
Leave feedback


Total ratings: 415
Rate this member

Report this Post12-18-2006 06:56 PM Click Here to See the Profile for jscott1Send a Private Message to jscott1Direct Link to This Post
Nice work! I love the 25th Anniversary Countach.

For the ducts, there are some small ducts that are used to install aftermarket air-conditioning, they are the best. A distant second would be dryer ducting, or the flexible ducting you get at home depot.
IP: Logged
RCR
Member
Posts: 4397
From: Shelby Twp Mi
Registered: Sep 2002


Feedback score:    (7)
Leave feedback


Total ratings: 102
Rate this member

Report this Post12-19-2006 07:24 AM Click Here to See the Profile for RCRSend a Private Message to RCRDirect Link to This Post
For the defrost vents, I used 1 1/2" vacuum cleaner hose I bought at Home Depot. For the larger side vents, I used 3" RV hose I picked up at Walmart.

Bob
IP: Logged
Sharkman
Member
Posts: 804
From: Sweden
Registered: May 2004


Feedback score: N/A
Leave feedback

Rate this member

Report this Post12-27-2006 07:38 AM Click Here to See the Profile for SharkmanSend a Private Message to SharkmanDirect Link to This Post
Started my Trans Am / Firebird interior build yesterday. Will post pics later this week. Not easy with the low windscreen in the choptop...
IP: Logged
Mickey_Moose
Member
Posts: 7497
From: Edmonton, AB, Canada
Registered: May 2001


Feedback score: (3)
Leave feedback


Total ratings: 143
Rate this member

Report this Post12-27-2006 01:07 PM Click Here to See the Profile for Mickey_MooseClick Here to visit Mickey_Moose's HomePageSend a Private Message to Mickey_MooseDirect Link to This Post
 
quote
Originally posted by Sharkman:

Started my Trans Am / Firebird interior build yesterday. Will post pics later this week. Not easy with the low windscreen in the choptop...


There are times I wanted to remove the windscreen in my standard car - so I can imagine what fun it would be in a car with a chop top.

Anyways, like to see what you come up with - I am always looking for improvements
IP: Logged
Sharkman
Member
Posts: 804
From: Sweden
Registered: May 2004


Feedback score: N/A
Leave feedback

Rate this member

Report this Post12-28-2006 01:44 AM Click Here to See the Profile for SharkmanSend a Private Message to SharkmanDirect Link to This Post
Some pics


Next step is too cut this.


Must go more forward.


Could not place the door skins yesterday because of my small garage.
But I did get the firebird handles and drilled away the original.
IP: Logged
jscott1
Member
Posts: 21676
From: Houston, TX , USA
Registered: Dec 2001


Feedback score:    (15)
Leave feedback


Total ratings: 415
Rate this member

Report this Post12-28-2006 01:49 AM Click Here to See the Profile for jscott1Send a Private Message to jscott1Direct Link to This Post
 
quote
Originally posted by Mickey_Moose:


There are times I wanted to remove the windscreen in my standard car - so I can imagine what fun it would be in a car with a chop top.


Not that I've done it, but my windshield has been removed three times since it left Archie's shop after being chopped. Less than a week after I picked it up the new windshield Archie put in there got broken. I had it replaced at a local glass shop and I didn't like the quality of the glass. (the extreme angle will magnify any flaws). The guy removed it and replaced it with another at no charge. After I had the car painted the first time the shop destroyed the molding around the windshield and I had my glass guy remove the windshield and reinstall new molding. He never complained about it being harder than a normal windshield. I only hope I don't have to do that again after the latest paint job.


IP: Logged
Sharkman
Member
Posts: 804
From: Sweden
Registered: May 2004


Feedback score: N/A
Leave feedback

Rate this member

Report this Post12-28-2006 02:02 AM Click Here to See the Profile for SharkmanSend a Private Message to SharkmanDirect Link to This Post
A question. Do any of you have pics of how you cut up for the firebird door handle. I have only seen the pic from Jscott where the handle are in place. Also, did you get rid of all mounting points that are placed on the door? (The ones you could drill away?)
Could not open the door that mush yesterday soo I could not try the door skin on there. Have too move the car or start cuting...
IP: Logged
PFF
System Bot
jscott1
Member
Posts: 21676
From: Houston, TX , USA
Registered: Dec 2001


Feedback score:    (15)
Leave feedback


Total ratings: 415
Rate this member

Report this Post12-28-2006 02:08 AM Click Here to See the Profile for jscott1Send a Private Message to jscott1Direct Link to This Post
I removed the stock Fiero Door handle (which was one or two rivets) along with the mounting bracket for the stock door handle...then I made a small hole with some tin shears and drilled a new hole, (or two) for the firebird handle. The picture earlier in the thread shows my dimensions, (in inches) from some landmarks on the door.
IP: Logged
BobadooFunk
Member
Posts: 5436
From: Pittsburgh PA
Registered: Jun 2003


Feedback score: N/A
Leave feedback


Total ratings: 128
Rate this member

Report this Post12-28-2006 02:12 AM Click Here to See the Profile for BobadooFunkClick Here to visit BobadooFunk's HomePageSend a Private Message to BobadooFunkDirect Link to This Post
 
quote
Originally posted by BullRider:

The car is an '84 Fiero that is currently in the last throes of conversion to a 25th Anniversary Countach.
blah blah blah!


TELL me you have a build thread! i cant wait to see that thing done

IP: Logged
Sharkman
Member
Posts: 804
From: Sweden
Registered: May 2004


Feedback score: N/A
Leave feedback

Rate this member

Report this Post12-28-2006 02:13 AM Click Here to See the Profile for SharkmanSend a Private Message to SharkmanDirect Link to This Post
Thanks!
IP: Logged
Mickey_Moose
Member
Posts: 7497
From: Edmonton, AB, Canada
Registered: May 2001


Feedback score: (3)
Leave feedback


Total ratings: 143
Rate this member

Report this Post12-28-2006 10:51 AM Click Here to See the Profile for Mickey_MooseClick Here to visit Mickey_Moose's HomePageSend a Private Message to Mickey_MooseDirect Link to This Post
Jonathan >> did you get me email about the seat parts??

Sharkman, what I have for pictures (opposite doors). Also I am making custom doors for mine so the placement might be different when using the original Firebird panels. The rods for both the handle and the door lock have been modified to fit (cut and welded back together for the shorter length). You can sort of see the weld in the rod for the door lock in both pictures right after the 2nd bend (from the visable end).

new hole cut for the firbird handle (original hole is the left one):


mounting plate made from some sheet metal and riveted to the door. The new handle location was in the valley of the door and it needed to come out.


Here is an earlier picture of my door panel progress, test fitting the original Firebird (simulated) 'leather' - too small, had to buy some new vinyl - sorry I don't have a current picture (the panel is all cover in tape right now so you can't see too much. This is turning into a year long project (and that is just the one side)

[This message has been edited by Mickey_Moose (edited 12-28-2006).]

IP: Logged
never2old
Member
Posts: 1854
From: Wyoming, Michigan USA
Registered: Dec 2005


Feedback score:    (20)
Leave feedback


Total ratings: 68
Rate this member

Report this Post12-28-2006 07:52 PM Click Here to See the Profile for never2oldSend a Private Message to never2oldDirect Link to This Post
Oh my God..........The talent on this forum.
IP: Logged
Sharkman
Member
Posts: 804
From: Sweden
Registered: May 2004


Feedback score: N/A
Leave feedback

Rate this member

Report this Post12-29-2006 05:13 PM Click Here to See the Profile for SharkmanSend a Private Message to SharkmanDirect Link to This Post
Had too clear my head soo I took some beer and went out too the car. Will post measure ments later.
I used the measurement from Jscott1 too start with.


Made a paper model too mark where I should cut.


Just need some fine adjustment. But I can open the door now.
IP: Logged
Mickey_Moose
Member
Posts: 7497
From: Edmonton, AB, Canada
Registered: May 2001


Feedback score: (3)
Leave feedback


Total ratings: 143
Rate this member

Report this Post01-02-2007 03:07 PM Click Here to See the Profile for Mickey_MooseClick Here to visit Mickey_Moose's HomePageSend a Private Message to Mickey_MooseDirect Link to This Post
just a quick picture of one of my more or less completed doors - looks like I have a color issue that I will have to take care of...anyways:

[This message has been edited by Mickey_Moose (edited 03-17-2007).]

IP: Logged
Midshipman Easy
Member
Posts: 198
From: San Antonio TX
Registered: Dec 2003


Feedback score: N/A
Leave feedback

Rate this member

Report this Post01-02-2007 04:24 PM Click Here to See the Profile for Midshipman EasySend a Private Message to Midshipman EasyDirect Link to This Post
Looks awesome !


Ken

IP: Logged
BullRider
Member
Posts: 108
From: Victoria, BC, Canada
Registered: Sep 2006


Feedback score: N/A
Leave feedback

Rate this member

Report this Post01-02-2007 04:41 PM Click Here to See the Profile for BullRiderClick Here to visit BullRider's HomePageSend a Private Message to BullRiderDirect Link to This Post
 
quote
Originally posted by BobadooFunk:


TELL me you have a build thread! i cant wait to see that thing done


Lots of pics on my site at www.rc-sub.com/lamborghini.html. Feel free to stop in and take a look around.
IP: Logged
Previous Page | Next Page

This topic is 26 pages long:  1   2   3   4   5   6   7   8   9   10   11   12   13   14   15   16   17   18   19   20   21   22   23   24   25   26 


All times are ET (US)

T H I S   I S   A N   A R C H I V E D   T O P I C
  

Contact Us | Back To Main Page

Advertizing on PFF | Fiero Parts Vendors
PFF Merchandise | Fiero Gallery | Ogre's Cave
Real-Time Chat | Fiero Related Auctions on eBay


Copyright (c) 1999, C. Pennock