I still have the break-in oil and dissolved assembly lube in the engine. Sometime soon I'm going to need to change that out (all 7 quarts of it), clean out the Pure Power oil filter and use the 2nd half of my 5 gallon bucket of Shell Rotella T CI-4 10W30.
Cometic has recommended that I retorque the head studs following the initial thermal cycles. Joy. I *think* I can do that with the cradle fully bolted for the rear bank and only have to drop the rear of the cradle (with weight on wheels) to do the front bank. I think.
[This message has been edited by Will (edited 10-04-2010).]
Disconnect C203; Probe both sides of pins B & L (ALDL pin G should have same readings as engine side of C203-L)
DVM indicates:
C203-B body side to ground: OPEN (expected) C203-L body side to ground: 3.1 Ohm (expected; Fuel Pump motor) C203-B engine side to ground: -6 Ohm (Yes, MINUS six ohms) C203-L engine side to ground: 40 k-Ohm (undesirable but harmless)
Step next: DISCONNECT NEGATIVE BATTERY CABLE YOU IDIOT Disconnect Fuel Pump Relay and reprobe body side of B & L C203-B engine side to ground: 0.2 Ohm (Ground fault) C203-L engine side to ground: 40 k-Ohm
Step after: Disconnect oil pressure sender and reprobe C203-B engine side to ground: OPEN C203-L engine side to ground: 40 k-Ohm
Then: Reinstall fuel pump relay C203-B engine side to ground: 3.5 Ohm C203-L engine side to ground: 40 k-Ohm
Huh?: Disconnect fuel pump relay C203-B engine side to ground: 10 Ohm (also reflected on Fuel Pump Relay pin D) C203-L engine side to ground: 40 k-Ohm Meter indicates relay has correct continuity and isolation.
Assume: Relay is ok and reading going from 3.5 Ohm to 10 Ohm is the result of manipulating harness with wiring fault.
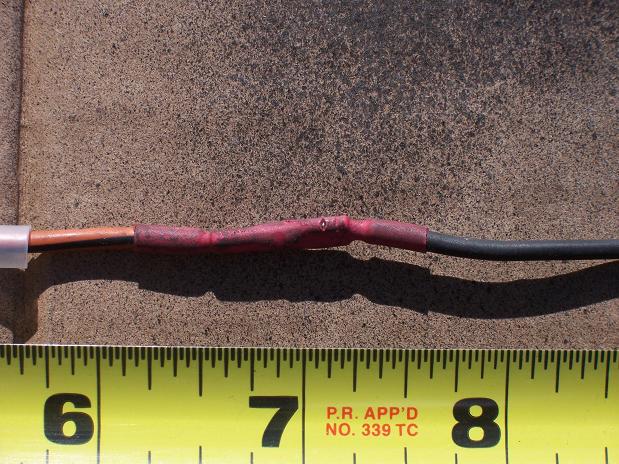
Great. I have a serious wiring fault on ckt 440.
[This message has been edited by Will (edited 10-03-2010).]
Cometic has recommended that I retorque the head studs following the initial thermal cycles.
How do you plan to do that? Loosen them all back off and start with the four step process all over again (22 lbft/60*/60*/60*)? That could get fun... NOT!
Originally posted by Bloozberry: How do you plan to do that? Loosen them all back off and start with the four step process all over again (22 lbft/60*/60*/60*)? That could get fun... NOT!
On Alan Johnson's recommendation, I torqued the studs to 70 ftlbs. With plenty of ARP moly assembly lube under the nuts and on the upper threads, that should be fine. To retorque, I'll just break them loose one at a time and bring them back up to 70 ftlbs. I'll probably add a little more assembly lube to the nuts.
The GM torque sequence does not apply to MLS gaskets because they don't compress the same as GM's composition head gaskets do.
[This message has been edited by Will (edited 10-03-2010).]
Well that should be a lot easier. I can't imagine trying to use the angle meter successfully on the front head bolts with it facing the other way. You'd need a mirror and then lefty-loosey-righty-tighty gets all jumbled up.
I though retorque meant to torque the bolts in sequence to the recommended final spec to take up any slack due to streching, not to loosen & retighten. That how I did Fiat & Lancia heads.
Congrats on getting it running. When was the previous time under power, 7 years ago?
I though retorque meant to torque the bolts in sequence to the recommended final spec to take up any slack due to streching, not to loosen & retighten.
That's how it's done on many engines, but the standard Northstar head bolt tightening sequence goes like this:
First tighten all bolts to 22 lbft, then go over them a second time at the same torque setting Second, turn each bolt (in the proper sequence) an additional 60 degrees; Third, turn each bolt again an additional 60 degrees; and Finally, turn each bolt yet again an additional 60 degrees.
So in the end, you're not torquing to a value you can set on your torque wrench, but rather a specific number of degrees of rotation after the nominal 22 lbft is achieved. This makes retorquing the head bolts not as straight forward as just dialing up the wrench and retightening them to the original torque value. With the exception of Will's case, retorquing the headbolts on a typical Northstar would involve loosening them all, and running through the entire sequence all over again.
I though retorque meant to torque the bolts in sequence to the recommended final spec to take up any slack due to streching, not to loosen & retighten. That how I did Fiat & Lancia heads.
A head bolt shouldn't permanently deform. However, since those are Italian cars and Ducati had to develop desmodromic valve actuation because they couldn't get good spring steel...
Loosening the bolt first is the best practice. Because the coefficient of moving friction is lower than the coefficient of static friction... if the bolt/nut is turning when the torque wrench clicks, then less of the torque is mitigated by friction and more is applied to pulling the bolt/stud (and sealing the head gasket).
I was at the junk yard *ALL* day today getting parts for the Eagle, so I didn't get the wiring problem sorted.
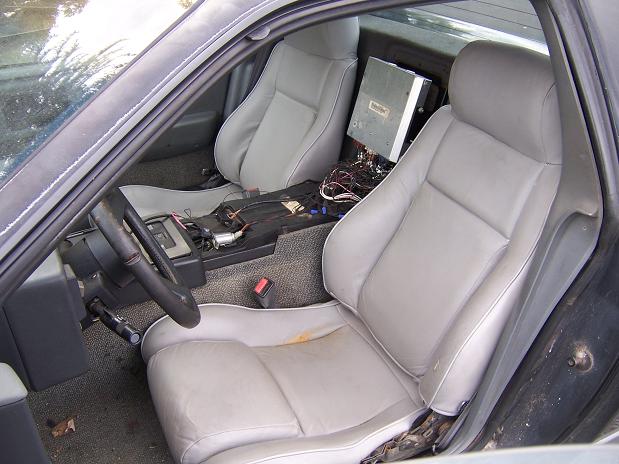
However, I *DID* find an '87 4 cyl 5 speed in the crush row that had *beautiful* grey leather seats, probably Mister Mike's seat covers, and in *excellent* condition. The yard gave me the seats for free with all the other stuff my dad and I bought. Sweet.
Although I didn't get The Mule going, I did grab a Dana 44 with 3.54 gears for my '85 AMC Eagle wagon.
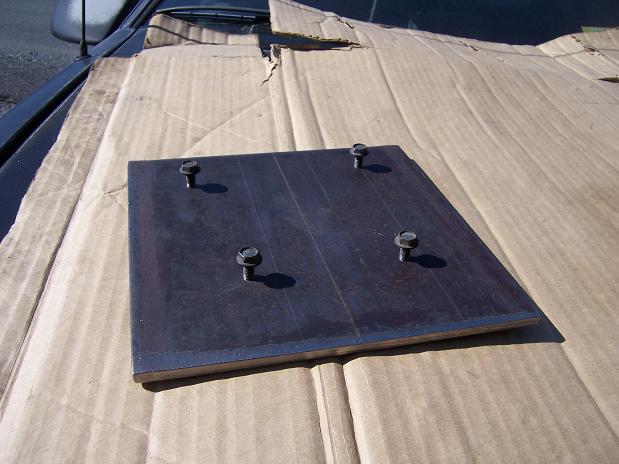
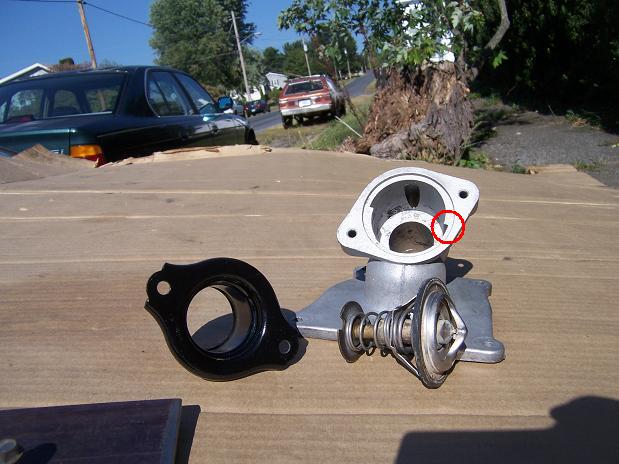
This is my pressure test plate for Northstar thermostat housings
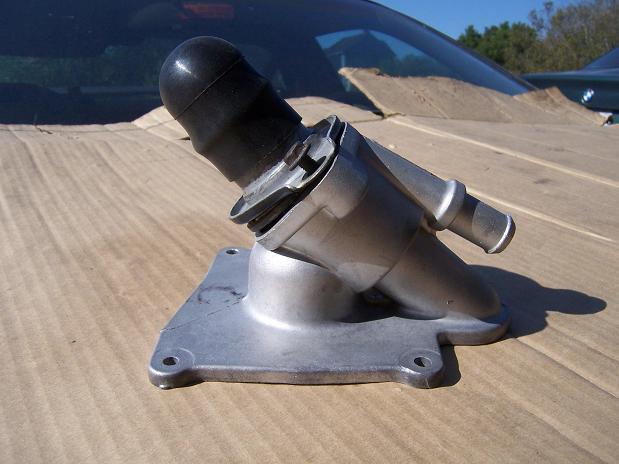
This is a Northstar thermostat housing with the hose connection capped off
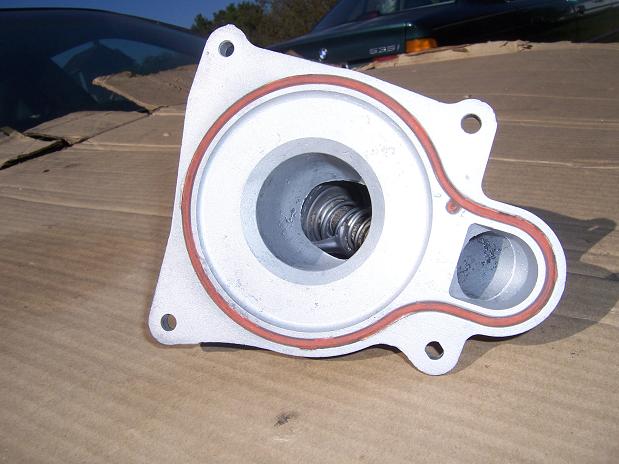
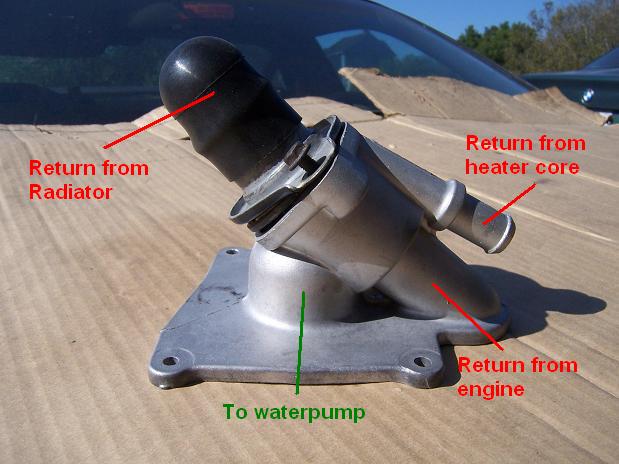
This is the inside of the T-stat housing. The center hole goes to the waterpump inlet. The waterpump pushes water into the block. The water returns from the heads to the water manifold and can go to the heater core, the radiator or back to the offset opening in this picture. -If it goes to the heater core, it comes back to the smaller uncapped connection in the picture above, goes around the thermostat and straight into the waterpump inlet. -If it goes to the radiator, it comes back to the capped connection in the picture above and is metered by the thermostat into the waterpump inlet -If it goes straight back to the thermostat housing, it goes through the recirculation valve portion of the thermostat and back into the waterpump inlet. -If the thermostat is closed, then the pressure at the offset inlet below lifts the recirculation valve (which is only spring loaded, not temp controlled) and goes back into the waterpump -If the thermostat is open, then the water coming back from the radiator can go through the T-stat to the waterpump inlet. Since there is less recirculation flow from the engine, there is less pressure holding the recirc valve open and the spring force closes it.
This is the disassembled t-stat housing. The red circle highlights a feature of the housing that requires preferential orientation of the T-stat itself
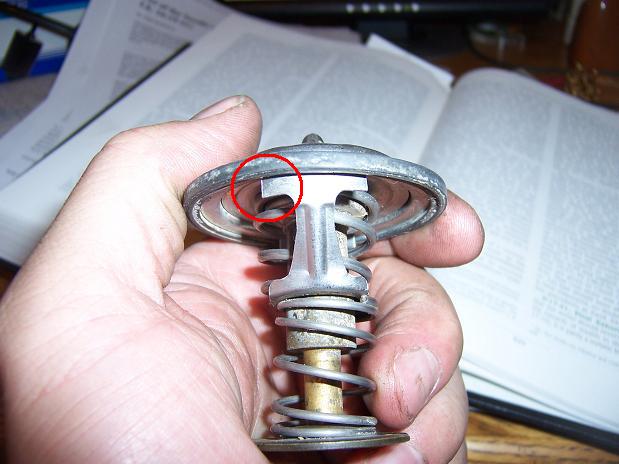
This is the Northstar thermostat. The red circle highlights the part of the T-stat that interacts with the highlighted feature of the housing to require a preferential orientation. WTF? Why, GM, why?
[This message has been edited by Will (edited 10-24-2010).]
After typing out the big block of text above, I decided that a picture was worth a thousand words and explained it graphically. The recirculating nature of the thermostat balances flow from all these inputs to keep water temp constant.
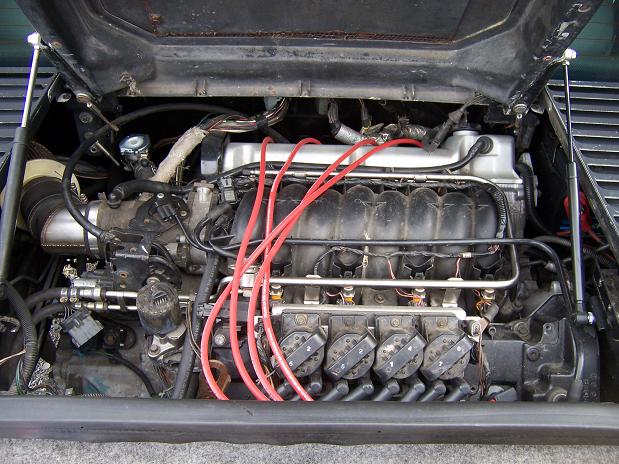
Here's a pic of my engine compartment with the shiny SS fuel rail, orange top injectors and F@#$ING RED, BITCHES!!!1! plug wires:
Here's a pic of my FREE Mr. Mike's seats. They're not pristine, but they're awesome for the price! There's a tiny bit of wear on the driver's outer bolster, but other than that they just need a tiny bit of cleaning.
Hmmm... now I'll have to go and double check my thermostat to see if I installed it right. I'm still not 100% clear on the orientation of the Tstat though. It might help if you could describe where the semi-circular notch in the lowest part of the Tstat goes in relation to some part of the housing.
Edit: Nice score on the seats!
[This message has been edited by Bloozberry (edited 10-24-2010).]
The half-circle notches in the bottom flange of the thermostat don't care where they go. That flange is the recirculation valve. The only things that establish the preferential orientation are the two features I circled above. You can't assemble it wrong, as the hose connection won't screw all the way down if it's not installed the right way. HOWEVER, installing it the right way when it's on the car and pointing away from you is difficult.
Got the car back on the road today. I probably covered about 60 miles. It still freaking loud. It's still freaking visceral. My memories from back in the day don't have it coming up on the cam quite as aggressively as it does now, but it has been a while since I drove it regularly.
I wouldn't have expected the increase in compression, improvement in quench, or other tweaks to the short block to have a significant effect on the shape of the power curve.
The trumpeting exhaust note is fantastic.
I did quite a few more break-in runs on the highway on the way out past the next town. The temperature stayed MUCH more stable his time than it did the first time around. This is classic Northstar Fiero behavior, as it usually takes two thermal cycles to fully purge the cooling sytem.
I turned around at the foot of the mountain as before and headed back, driving like a sane person. I turned off the highway and went the drop by one of my dad's coworkers. He lives about 3/8 mile off the highway on the other side from where I'd been doing my break in runs. After a couple of hard revs in his driveway, he came out to look. I asked him if he'd heard anything in the last few minutes. He said that he'd heard someone who sounded like they were on the speedway (on the gas, off the gas, on the gas, etc) and he said it kinda sounded like a sportbike. He liked the car, is a machinist and has built quite a few really hard running engines and a few drag cars in his time.
I drove over the mountain to my friend's gas station. I forgot how sticky the tires I have on this car are. It has tremendous grip and with the stiff suspension handles very well. Of course New Market mountain isn't a very demanding road, but still amusing.
I left the rear sway-bar off when I put the car back together. I felt that it oversteered too much with the sway-bar on the rear. I'm going to see if I can get it to work well without. Based on just this initial drive, I think it's better without the rear bar.
Pulling out of my dad's coworker's drive, I nailed it in first. It felt like it broke loose in 1st, which would be the first time it's EVER done that. I grabbed 2nd pretty quickly, but not as hard as I could. The Spec Stage 3 did NOT come down very hard. I shifted to third and ran that gear out, then shifted to fifth and slowed for normal driving. I smelled clutch, about which I was not pleased. Grrr....
There's still a LONG way to go in terms of TLC to make the car a nice daily driver, but I can take care of all that if I get to drive it every day and work on the small things.
It needs all four marker light lenses, which I have. It needs new fenders and nose, which I have. It has a front main seal leak, which will be a PITA to fix. It needs catalysts in the exhaust. I have the cats and will have a shop build up a quick/dirty catalyzed 2.5" dual exhaust to use to get the car inspected. It needs a cold air intake, for which I have the parts, including a 3.5" exhaust donut. It needs a rack bushing, which I have. It currently has an RCC bump steer kit. I need to either go back to stock tie rods or completely re-engineer this kit, as it is utter crap.
I have headers, an 80 series flow master (which was fine on a 3800SC; but we have two more cylinders), and two tips that I made out of a cherry bomb cut in half and welded to two muffler tips. The N* auto swap I'm working on now with my son is going to get the trunk cut out with a big high flow truck muffler.
Congrats Will!! glad to see you finally got that thing back on the road. it sounds like it was worth all the trials and tribulations you went through to get there however .
I saw where you mentioned that Cometic recomended to you that their headgaskets be re-torqued after a few heat cycles. were they sugesting that you do that with the standard head bolts as well???? or just when using studs? also, did you use the .061 gaskets or the thinner ones? I recently became aware that they make them in several different thickness, for what reason I do not know.
Since the Cometics don't compress the way the stock composition gaskets do, the stock T+A (hehe ) procedure can no longer be used.
At Alan Johnson's advice, I torqued the studs to 70 ftlbs. For a retorque, I'd just go through and break each one loose, then bring it back up to 70. At this time of year, to do that I'd have to take the car to the plant where my dad works and let it sit indoors overnight to make sure that the metal was at ~70 degrees.
I'm pretty sure I can do it with the engine in the car, however.
Found a tiny leak at the heater hose connection at the back end of the water manifold. The hose clamp was a little loose.
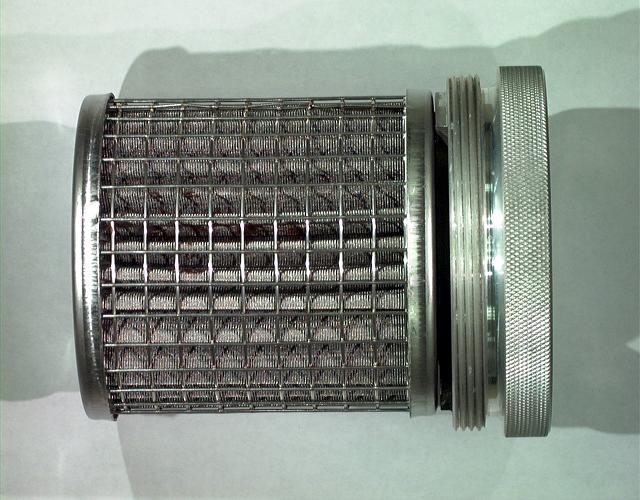
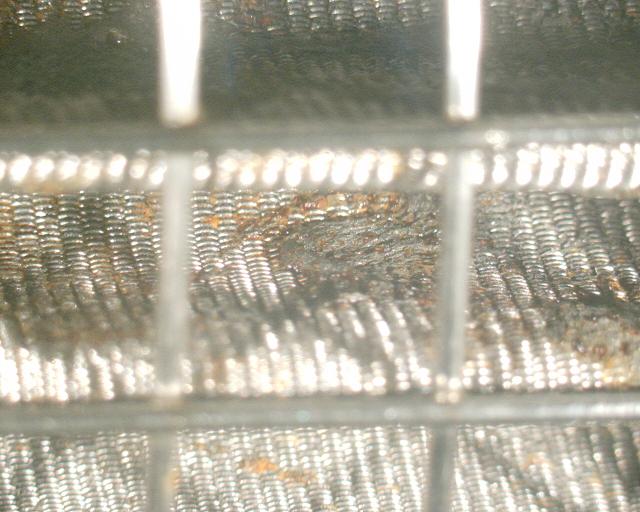
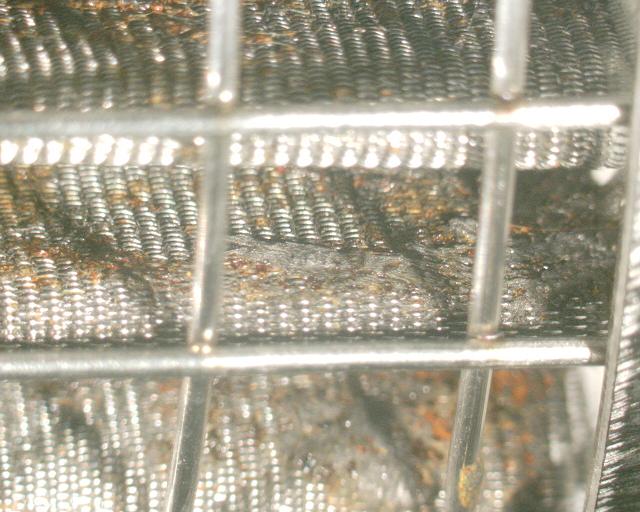
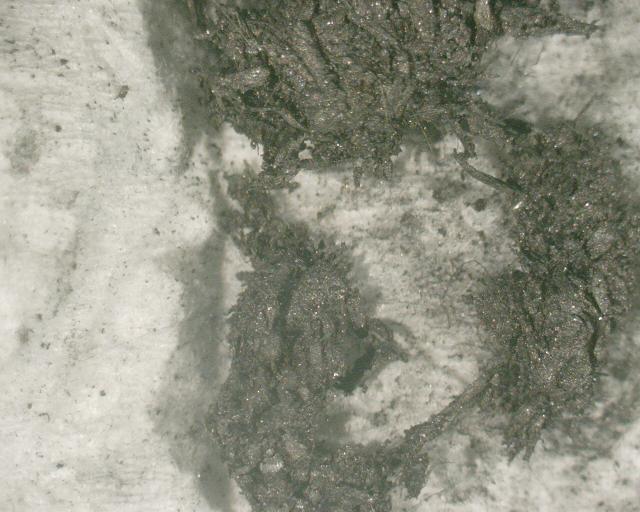
I took the car out last night, warmed it, ran it up to 120 then brought it back and drained the break-in oil. It's pretty nasty, thick and full of moly disulfide. There are shiny particles in the PurePower oil filter. I'm going to wash the filter out with lacquer thinner and try to capture them in a paint filter. I may be able to take said filter to the reliability lab at work and get micrographs of it.
Since the Cometics don't compress the way the stock composition gaskets do, the stock T+A (hehe ) procedure can no longer be used.
At Alan Johnson's advice, I torqued the studs to 70 ftlbs. For a retorque, I'd just go through and break each one loose, then bring it back up to 70. At this time of year, to do that I'd have to take the car to the plant where my dad works and let it sit indoors overnight to make sure that the metal was at ~70 degrees.
I'm pretty sure I can do it with the engine in the car, however.
Found a tiny leak at the heater hose connection at the back end of the water manifold. The hose clamp was a little loose.
I took the car out last night, warmed it, ran it up to 120 then brought it back and drained the break-in oil. It's pretty nasty, thick and full of moly disulfide. There are shiny particles in the PurePower oil filter. I'm going to wash the filter out with lacquer thinner and try to capture them in a paint filter. I may be able to take said filter to the reliability lab at work and get micrographs of it.
How do you plan to get the water pump drive pulley and valve cover removed with the engine still in the car? I gota see the video of that little trick. Shiny stuff in the oil isn't generally a good thing. hope it all turns out ok for you.
How do you plan to get the water pump drive pulley and valve cover removed with the engine still in the car? I gota see the video of that little trick. Shiny stuff in the oil isn't generally a good thing. hope it all turns out ok for you.
Cheers, Russ
It's break-in debris. I expected some of it (more than usual) since I did a hard break-in. We'll see how it turns out.
How do you plan to get the water pump drive pulley and valve cover removed with the engine still in the car? I gota see the video of that little trick. Shiny stuff in the oil isn't generally a good thing. hope it all turns out ok for you.
Cheers, Russ
Oh yeah... Waterpump drive. The pulley can come off in the car, then I unbolt the shaft seal from the cam cover. The hole under the shaft seal is large enough to give MUCH more latitude in removing the cam cover than if the seal is left in place. I'm not 100% sure it can be done, but I'm confident.
Oh yeah... Waterpump drive. The pulley can come off in the car, then I unbolt the shaft seal from the cam cover. The hole under the shaft seal is large enough to give MUCH more latitude in removing the cam cover than if the seal is left in place. I'm not 100% sure it can be done, but I'm confident.
I'm somewhat familar with the procedure .
as you know, even with the shaft seal removed, the other end of the cover has to be lifted fairly high to slide it off the end of the cam. I'm dubious if this can be done in the car, but I do look forward to the video . I wish I had your patience to do all that you've done to your engine so far. You've done a great job!! I've found that one year is about my absolute max from the time I pull a car into my garage until the time I drive it out with modifications compleated. ohh to be young again GGGGG.
Cheers, Russ
[This message has been edited by Russ544 (edited 11-28-2010).]
Hey! Your thread finally found a new home in the Construction Zone! Long overdue if you ask me. As for the oil filter, maybe I'll wait until my birthday... (cough, cough) they're nice but they're aweful pricey! I noticed when they say they'll pay for themselves, they specifically don't mention over what period of time! How did you find cleaning it? Easy?
Originally posted by Bloozberry: Hey! Your thread finally found a new home in the Construction Zone! Long overdue if you ask me
Glad I could help. For now, the threads need to be 'nominated' and worthy of the section for Cliff to move them here, as described at the top of the forum. So if you see a good build thread that isn't here yet, send a simple PM and it'll probably be moved.
Now that Will's car is (finally!) running (again!) and mine is almost complete (until the next mod gets installed anyway) and soon to be back home from the Haus of Guru, it's time to think about vids of mountain runs. I just need to throw together a solid camera mount for MIDTRBO.
------------------ '88 Fiero GT - Project MIDTRBO '10 Camaro LT/RS There's no replacement for turbo placement
Mountain runs need to wait until the weather warms up.
I put the oil filter back on and took the car for a spin Sunday night. I went down to a shopping center in the next town and turned around. As I was getting back on the highway, I was behind some WWD Ford thing. I moved over to the right lane and punched it in 2nd and it broke loose. Caveats: very cold pavement, salt on the road, yadda yadda... but it *DID* break loose from a roll in 2nd
The prescribed method of cleaning the filter is to spray brake cleaner from the inside out.
When I changed the break-in oil, I found the moly disulfide grease shown above in the oil filter. I tried lacquer thinner, brake cleaner and a trip through the dishwasher, but those methods were not effective. I finally scrubbed it with dish soap, hot water and a tooth brush to remove enough that I was comfortable reinstalling the filter. Brake cleaner may be good for later oil changes, but maybe not so much for the first when the oil is full of assembly lube.
I also replaced the front main seal, which was leaking between the seal OD and the front cover. I permatex'd the OD of the new seal. It hasn't yet accumulated enough run time to check that again. Obviously for the front main to be replaced, the balancer must be removed. I reinstalled the balancer and tightened to the torque spec from the '97 manual that I have: 37 ftlbs + 120 degrees. For '95 or '96 the balancer bolt was reduced from 18 mm to 14 mm. The torque spec only changed from 43 ftlbs + 120 to 37 ftlbs. This seemed a little weird to me, but 'tev. The balancer clamps a sleeve that drives the oil pump. The sleeve has flats that provide a positive drive for the oil pump, but the crank only drives the sleeve via the clamp load from the balancer.
I was concerned that something was screwed up when I tried to restart the engine. I unplugged power to the coil pack and cranked. I cranked for a series of intervals which eventually led to the audible slowing of cranking speed, but did not result in an oil pressure indication. I put the battery on the charger for a few hours, came back and tried again. I crank continuously and after what seemed like an eternity, it did build oil pressure. I started it up and the oil pressure was fine. It was actually a bit higher than it had been before the oil change, indicating to me that the filter had been a bit clogged with break in debris and assembly lube. That's why I paid so much for the dern filter! Keep the crap out, yet still flow enough to allow me to run the engine hard without lifting the bypass valve.
Cliff Notes: in the bitter cold after sitting with an empty sump for 3 or more weeks, it can be hard to prime a Northstar.
[This message has been edited by Will (edited 12-21-2010).]
Not much else going on. I've been working toward getting the car ready for VA inspection, which includes replacing fenders, fender liners and nose so that I can use the correct smooth trim marker light lenses to have all my marker lights work.
I'll also need to build a catalyzed exhaust for it. The current exhaust is dual 2" straight pipes. I'm going to upgrade to 2.5" and install catalysts. I'm in the process of getting the later model dual wall manifolds modified for the task.
After that there are a bunch of little things it needs... quarter windows, dew wipes, steering wheel re-skin, telescoping column conversion and some interesting suspension work.
Ever since I got it running in November of last year, it hasn't had a speedometer. That is because the transmission has the magnetic reluctor on the diff and the corresponding VSS installed. My harness still had the gear driven VSS electrical connector on it and I didn't have the harness connector for the mag/rel VSS.
I noticed today that the Getrag 284 I have on the shelf had the mag/rel VSS with the correct electrical connector just stuck in it, no wires or pins. Not sure how that happened when I pulled that trans, but there it was.
I installed it into The Mule and drove across the street to get gas. I hit 80 mph in less than a block in 1st gear. This new engine never ceases to impress The gas station across the street is also half a mile away, by the odometer.
Obviously the reluctor wheel has WAY more teeth than the pulses per rev that the gear driven VSS makes. Back in the days of mechanical speedometers, GM geared their speedometer cable drives for 1000 RPM at 60 mph. Since it takes 1 minute to go a mile at 60 mph, this is 1000 revolutions per mile. The gear driver VSS's generated 2 pulses per revolution, so when GM switched from cable driven speedometers to electronic speedometers with gear driven VSS's, the electrical standard became 2000 pulses per mile. At some point this was doubled to 4000 pulses per mile. I'm not sure why.
The FIero electrical system routes the analog VSS signal to the speedometer buffer in the speedometer. This buffer drives the speedometer, as well as cutting the frequency in half and outputting a 5V square wave to the ECM for its road speed knowledge.
The Cadillac (and other modern PCM's until the 58x reluctor came out) route the analog VSS straight to the ECM, which then creates multiple 5V 4000 ppm signals for the speedometer, traction control, overspeed warning module, road sensing suspension, etc.
I reworked my harness to do exactly that and went for a test drive with my amputated Caddy instrument panel plugged in to monitor the PCM data stream. I ran it up to an indicated 2500 RPM in 5th, which should be 55 mph, taking into account the 25% error that's crept into the tach. The Caddy IPC indicated 55, so it's getting the correct vehicle speed. The speedometer did not register. I assume that the 5V output of the ECM isn't enough to trigger the input that's designed for the gear driven VSS.
Any idea how to overcome the voltage mis-match?
I wonder if DFCO and PCM cruise control will work now... maybe the BLM's will even be unlocked? This is the first time this ECM has *EVER* had valid VSS data.
I probably could wire the VSS to *BOTH* the ECM and the speedometer buffer, and build the "standard" Quad 4 speedometer circuit on the Speedo buffer leg of that circuit.
The car's been having an idle issue for quite a while. It had an idle surge when I was driving it in P'cola so many years ago. It still develops that surge when warm, BUT it also has "ignition drops" in which the tach flickers and the engine nearly stalls. Once warm, it actually does stall about 50% of the time it experiences a drop.
I was getting ready to change out the coil pack as a trial, when last weekend I noticed that the volt meter flickers when the tach does. Low damping analog gauges are good like that. In looking through the manual, the ignition supply circuit and volt meter have limited interaction... I might be losing a fusible link, but I'm OK with that, since it's an opportunity to replace that stupid link with a real fuse.


 .
.