Hmm... not too many people worried about that, I guess.
Was rained out at the strip last weekend. Going to try to hit it again this weekend. Forecast looks like it'll be fantastic weather for power and traction... Now I just have to perfect my launch technique with the SPEC clutch.
Hmm... not too many people worried about that, I guess.
Was rained out at the strip last weekend. Going to try to hit it again this weekend. Forecast looks like it'll be fantastic weather for power and traction... Now I just have to perfect my launch technique with the SPEC clutch.
Just curious, are those numbers not ok? My engine should be close to that before drive train losses so I was thinking you were in the ballpark anyway.
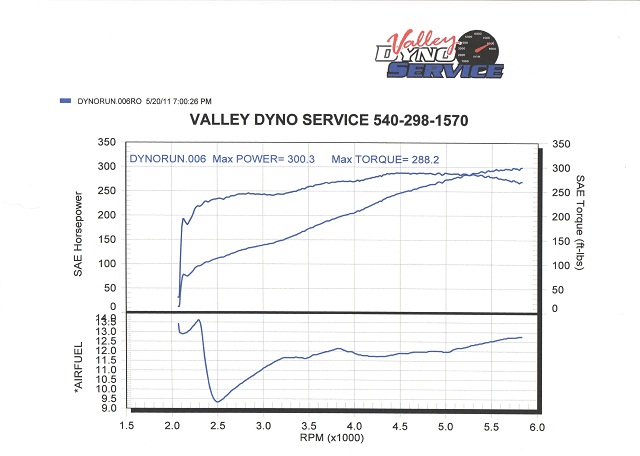
My dyno numbers? I think they're ok. The chart above was recorded at the wheels.
As I mentioned in the LS1 PCM thread, the built short block exceeded my wildest expectations. +45 HP and +20 ftlbs peak with +45 ftlbs at 5800 RPM. It's a monster.
Peak power went from 5200 RPM on the stock shortblock to 5800 RPM on the new shortblock... *just* from changing the shortblock. Everything else is the same.
I hit the speed limiter in 4th or it would have gone to 6400. If I'm on the dyno again with this ECM, I'll unplug the VSS so I can go all the way to the rev limiter.
[This message has been edited by Will (edited 06-03-2011).]
at the wheels? I'd say this is pretty amazing. I especially admire the very smooth torque curve, which would be important in a mid-engined car. I have really enjoyed this thread, and abandoned any hope of ever being able to build a performance motor myself - and I have no clue how I'd ever find a shop to build a Northstar motor for my own use.
I may have missed this in a page or comment I skipped over too quickly, but this seems perfectly matched to the six-speed manual's abilities to handle power.
Will, what do you attribute the additonal HP to regarding the before block and after rebuilt block? You have an additional 40HP don't you?
My lifter is starting to make a louder noise on Bank number 2. I'm going to have to stop driving it and put some new ones in to get that single lifter quiet. Drives me whacko.
By the way, my speck clutch is holding up quite well. But then, I'm 40 HP below you.
I tried to find my previous dyno graph here on the forum. I know I've posted it, but I wasn't finding it via the search.
There are two things going on.
First is that up to peak torque RPM (4500) and a little beyond, the new block is up 20 ftlbs on the old block. I think this is due to the combination of increased compression, ceramic piston crown coating and better ring seal. The ported bay-to-bay breathing windows may have a small effect, but I would not expect that mod to operate significantly at low RPM. There may be a tiny effect from the lightened rotating assembly, but the acceleration rate on the dyno is fairly low and I would not expect to see much from that.
Second is that beyond peak torque RPM, the new block stays relatively flat, while the old block fell off dramatically. The old block's peak power RPM was 5200, while the new block's is 5800. The new block is up by 45 ftlbs at 5800 RPM. If I had been able to rev it to the 6400 RPM rev limiter, the difference would have been even more dramatic. Obviously the factors of the first effect still apply, but in addition--and I think this is the primary reason for the difference above peak torque RPM--the new block should have vastly reduced ring flutter. This is also the RPM range in which the ported bay-to-bay breathing windows would show gains due to reduced pumping losses for the air in the crankcase.
I'm learning more about the meaning of the phrase "turn up and make power" applied to a built engine... the gains from improved efficiency at high RPM really compound.
What really blows me away is that I gained 45 HP with ZERO "normal" mods... The new engine has the EXACT SAME intake pipe, throttle, intake manifold, heads, cams, exhaust manifolds, exhaust pipes and tune as the old engine, yet beats it significantly at every single RPM point and blows it out of the water on the top end.
[This message has been edited by Will (edited 06-19-2011).]
This is nice to know. Most people do something to the engine durring a rebuild, like cams or something. My build is quite similar to yours, different engine but pretty much the same little touches. Makes me happy to see you gained that much with no major mechanical changes.
Originally posted by AJxtcman: The Head bolts pull the treads out of the block-- time serts only work some times in these blocks --- the threads need to be cleaned and inspected completely-- inspect for pitting after cleaning out the thread locker--- if any pitting is found in the thread area it usually means that the block will not hold a time sert--- when drilling out the block if the material is grey and or powdery the factory time sert will not hold-- Either the thread locker has broke down the blocks or the aluminum quality was not that good---- old thread locker will bind up the threads and break then out--- I would say 50% of the blocks can not use TIMESERT time serts. GM has short blocks available for this problem or use NS300L inserts
I know this is an old quote, but I've done head gaskets in 6 of these engines to date. Used timeserts in every headbolt hole of every engine (120 timeserts) never had an issue with a single one.
I know this is an old quote, but I've done head gaskets in 6 of these engines to date. Used timeserts in every headbolt hole of every engine (120 timeserts) never had an issue with a single one.
My engine's built in a '93 block (has block drains) and I had zero problems with timeserts.
In addition to getting started on the 2.5" stainless X-pipe exhaust that I realized I could fit, I swapped out a couple of coil packs.
The "ignition drops" I've mentioned before were getting pretty bad. The car was difficult to drive in higher gears below 2000 RPM under load and pretty much wouldn't pull cleanly from 1000 RPM in 4th or 5th.
I swapped out one of the two coil packs I had out in the shed. It was worse. In addition to ignition drops being at least as bad as the original coil pack, it also had a bad coil and dead miss. Bleh.
The second swapped pack was much better than either original or the first swapped pack in terms of ignition drops and did NOT have a miss. I left it installed. It seems to have ignition drops based more on time than anything. When I was out for the test drive, sometimes it would pull cleanly from 1000 RPM in 5th uphill and not have any problems until it had a cluster of 3 or 4 drops at 1800, then keep pulling. Sometimes it would have 2 or 3 drops at 1200, then keep going. Sometimes it would be clean all the way from 1000 to more than 2000. The original coil pack wouldn't allow the engine to idle for more than a few seconds before an ignition drop stalled it. The current coil pack allowed the engine to idle for more than a minute when I got back from my test drive. During that period, it experienced a couple of ignition drops, but none of them stalled the engine.
I've never seen the ignition drops happen above 2000 RPM. An ignition drop, if you remember from earlier in this thread, is a momentary loss of ignition. I can be seen by a flicking of the tach, heard in the exhaust note and felt via a split-second power interruption. Since the power delivery is actually interrupted and the tach flickers, the problem must be either in the trigger signal path or power. The trigger signal starts at the crank sensors then goes to the coil pack (ICM) to be translated into something the ECM can understand as well as driving the ICM's tach output, which goes to the tach. Somewhere in that path is the problem.
I guess it *could* be something esoteric with the ECM, causing it to drop the coil trigger signal while keeping the bypass line active. Not sure how the ICM would react to that. I suspect that's a long shot because the tach is showing signs and it is driven by the ICM using crank sensor signals, not by the ECM.
I scoped the crank sensor and ICM signals. The crank sensors are constant through the drops, but the ICM 4x and 24x appear to drop out during the ignition drops.
I was told on RFT that this is a known failure mode of the ICM's.
I'll do some more scope work today to try to confirm.
Are you sure this can't be a tuning issue? I had a similar problem after a cam swap and tuned it out in the AE vs AE pulse table. It seems plausible to me that if the car is going lean and the engine struggles, rpm's drop along with voltage until it recovers with an increase in blm's. I can't see your car so you obviously know more than me but reading your posts really seems like what I had going on.
My engine occasionally stops firing for 1 to 2 seconds and then runs normally again. Since I mostly idle the engine that is when I notice it the most. It happens rarely but when it does it lasts just long enough for me to think it will stall but it has not done that yet. Is this similar to what you are experiencing Will? My engine has new ignition components but it is using the 950 for fuel and spark management.
Should handle engine oil flow. The second also has a secondary cooler which can be used for the Getrag (or F40) transmission fluid.
The line drawings are a little deceptive, as the oil section of the dual cooler is essentially the same as the entire single cooler.
I have a horizontal tubing run across the forward cradle crossmember from the right coolant pipe to the thermostat connection into which the dual cooler can be substituted, as well as the vertical run from the left coolant pipe to the upper coolant connection on the waterpump into which the shorter cooler can be added.
I need two of these because the largest connection I can get is 1/2" NPT. 1/2" NPT hose barb fittings tend to have about 5/8" ID. Alan Johnson has said that no restriction in the external oil system should be smaller than the ports on the side of the block... which are 3/4" ID ( ! ). Two 0.625 ID orifi have greater area than one 0.750 orifice, so the pair of coolers will work just fine.
Also, the ben radii available for 3/4" hoses and fittings is significantly larger than that available for 5/8" hoses and fittings, making the whole setup easier to package under the car.
And I'll have to figure out where to put my Accusump...
[This message has been edited by Will (edited 12-12-2011).]
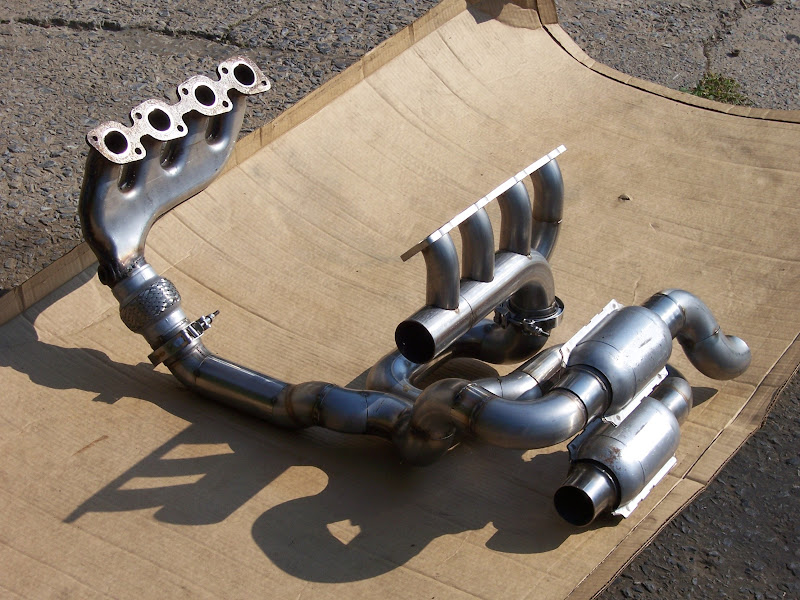
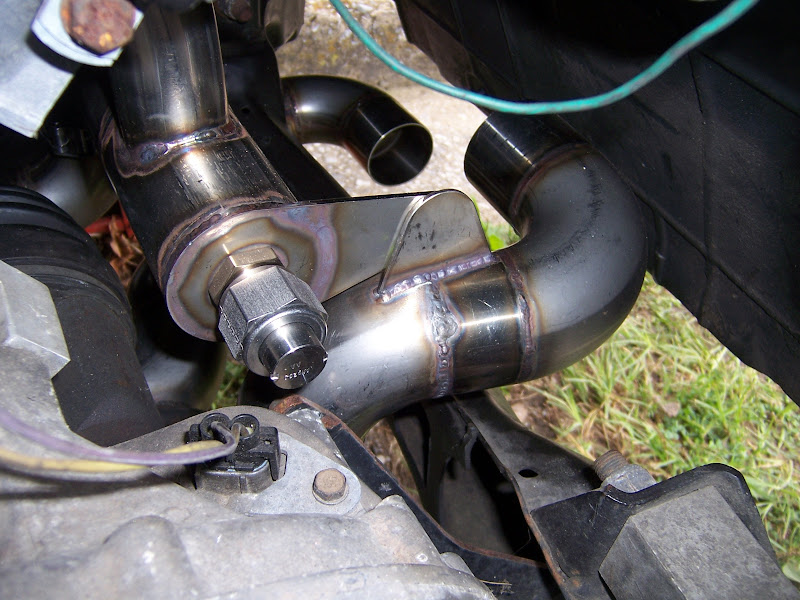
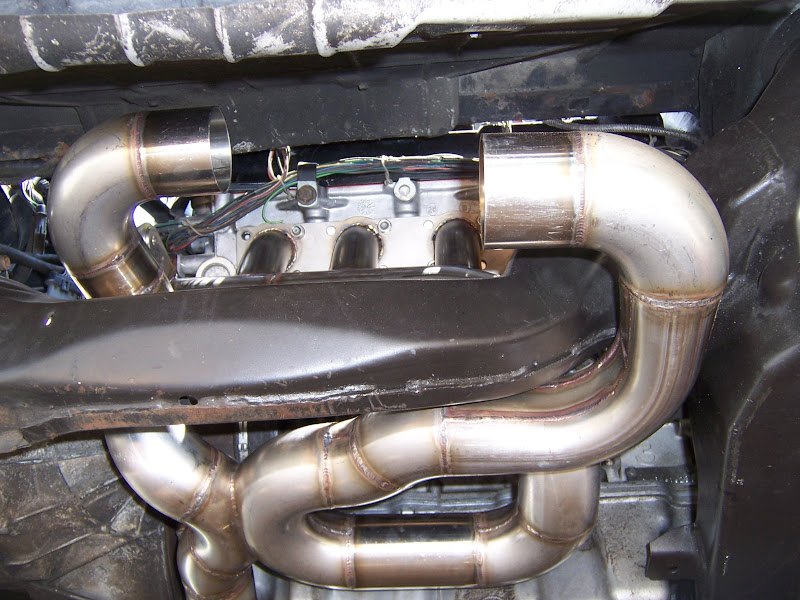
1. On the side where you fabricated the header from tubing (rear bank), would it have been possible to use a second OEM front bank manifold? Did you even consider it, and if you did, did you drop the idea because the collector angle was wrong or did you simply not have an extra front OEM front manifold at your disposal?
2. From the pictures, it's hard to tell if your front and rear bank pipes are siamesed (crossed-over) at the point they meet, or whether they are just really close to each other.
3. Are you planning to use a muffler or are you going to let the cats do double duty for noise attenuation as well? (They do muffle noise by about 75%)
It's a nice system... Over $1000 in parts. Custom waterjet cut 3/8" flange for the fabricated manifold. 304 Stainless 2.5" tubing. All the bends except the manifold log are built from donuts. The system uses FOUR donuts and less than 36" of straight tubing. It fits WITHOUT cutting the trunk. Also note that the leg going from the X to the lower catalyst has one oval section bend in it... I had to do that for clearance to the stock pass-under in the rear cradle rail.
The OE front manifold was not workable in the rear. I tried cutting up an extra dual wall manifold in multiple ways and couldn't get anything satisfactory.
There's an X-pipe in the system. It's actually equally distant from each "collector" in pipe length.
I'm planning to have a company (probably SpinTech) build a pair of custom mufflers to use the volume between the rear impact beam and wheel well liner outboard of the frame rail. Until those get built, I'll be running tails off the cats.
[This message has been edited by Will (edited 07-17-2012).]
Am I overlooking a v-band connection? From what I am seeing, the pipes that lead into the cats, the DS one goes over the cradle and the PS on under with both sides welded at the X and the cats stacked in the rear. How does this setup slide around the rear cradle crossmember?
I replaced the ignition module in the coil pack with a NOS Delco unit I bought on ebay. There was no heat sink compound between the module and the baseplate... Not sure why. I used electrically conductive heat sink compound from Galco on it when I reassembled. The torque spec for the 4mm bolts that secure the coils and module to the base plate is 30 inlbs.
Since it had sat for months, I poured a cap full of ATF into each cylinder. That sat for a couple of hours as I got everything back together. I left the coil pack power connector unplugged and cranked it until the starter was hot several times and did not build any oil pressure. I plugged the coil pack power in, fired the engine and had oil pressure within 1 second. Weird.
I left the cats off so that it could burn off the ATF and blow out any junk that had accumulated in the ports, manifolds and pipes. It was loud, but didn't quite sound the same... I guess I'll see what the X-pipe does when I actually drive it.
It still had the ignition drops. The next thing I'll hit up will be the crank sensors.
The clutch hyds need to be either bled or replaced... I guess I'll bleed them tomorrow and then determine if they need to be replaced. The master cylinder is a fairly new steel unit.
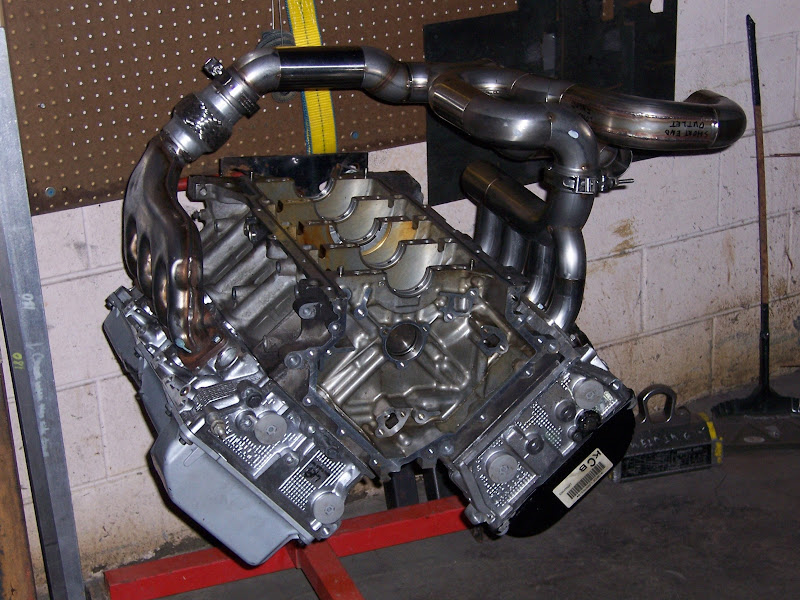
Friday afternoon the welder finished up the V-band flanges and making welding the tabe to the X-pipe which will pick up a tab on the manifold end-cap to help support the X-pipe. There will be one on the other run also, but I need to figure out exactly what it will look like. Now that I have the tab and the V-band to locate the X-pipe relative to the rear manifold, I can remove both in order to do more work on them. This is relatively easy. Removing the front manifold is a giant pain in the ass. The extremely tight packaging of *EVERYTHING* around the front manifold is one of the reasons I kept the stock manifold and didn't try to fab one for the front... just yet.
Have the cats and rough temporary tailpipes installed. It's a LOT quieter.
Just need to reinstall the rear fascia and marker lights to get it inspected. I'm going to plant rivnuts in the fascia support in lieu of the crappy plastic push fasteners that GM used.
Have the cats and rough temporary tailpipes installed. It's a LOT quieter.
Just need to reinstall the rear fascia and marker lights to get it inspected. I'm going to plant rivnuts in the fascia support in lieu of the crappy plastic push fasteners that GM used.
How does it sound with that x? BTW the exhaust is a work of art.
Most of this thread is WAY over my head in terms of technicality, but that exhaust setup looks great.
Can't wait to see it installed in the engine bay!
Thanks! Err... You can't really *see* it in the engine bay... The Northstar is like that. I do have some shots from under the car, but nothing with the system fully assembled. I was working late Sunday at my parents' place and had to get back to NoVA for work Monday morning. I'm a bit hesitant to post pics of the tailpipes. As I said, they are pretty rough.
quote
Originally posted by IXSLR8:
Nice, nice, nice!
Thanks!
quote
Originally posted by Erik:
How does it sound with that x? BTW the exhaust is a work of art.
Thanks! It sounds good, but drones below 2000 RPM. I'm reserving final judgement until I get the custom mufflers built/installed, as that will change the resonant lengths of the tailpipes. I haven't hammered on it much yet to get a good assessment of sound quality... I was still mostly in the shakedown phase for the limited distance I drove it Sunday.
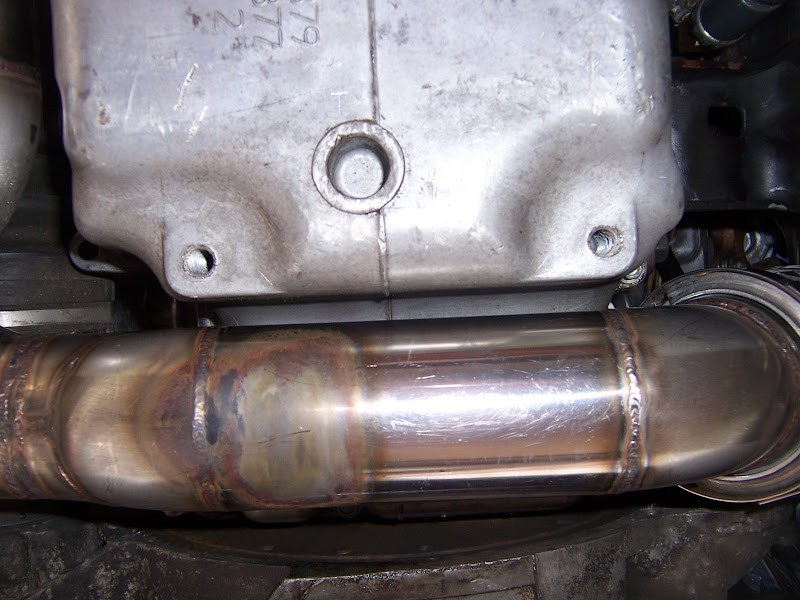
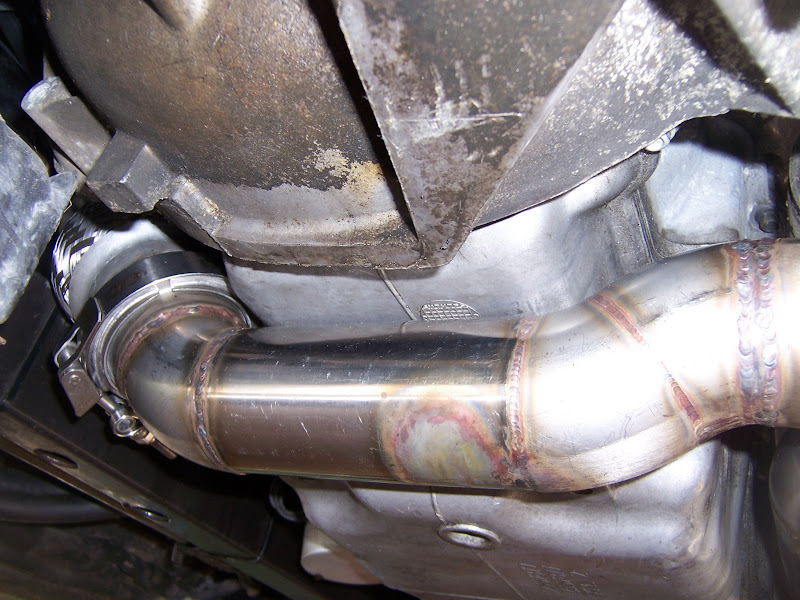
Excellent set of photos... and finally a good view of the crossover area Is the bottom of your oil pan higher, lower, or level with the cradle bottom? WIth the larger diameter piping, is the portion that passes under the oil pan lower than the bottom of the oil pan?
Oil pan is co-elevation with the bottom of the cradle. The pipe does hang below the bottom of the pan... that's why it offsets back up to mate to the X-pipe.
[This message has been edited by Will (edited 07-25-2012).]
That looks superbly executed. Have you made much consideration to the heat of the stainless crossover to the aluminum oil pan. I'd be slightly concered about cooking the oil once the car is parked and shutdown, since the pipe will retain heat for some time, and the pan will easily transfer heat to your oil. personally, I would use a piece of adhesive heat shield on the pan near the pipe.
That looks superbly executed. Have you made much consideration to the heat of the stainless crossover to the aluminum oil pan. I'd be slightly concered about cooking the oil once the car is parked and shutdown, since the pipe will retain heat for some time, and the pan will easily transfer heat to your oil. personally, I would use a piece of adhesive heat shield on the pan near the pipe.
Thanks!
Actually, it's the other way around. The pipe will cool off far faster than the pan and oil. The pipe is comparatively thin and light relative to the pan and oil. Despite being at a high temperature during operation, it cools quickly. You can try this yourself on your own car... After a drive, your pipe will be cool to the touch well before your oil pan and the oil within.
The car will get an oil/water heat exchanger.
While I also intend to produce heat shields for use in specific locations, I'm far more concerned about the CV joint boot and grease taking on excess heat during operation. I'll be switching to an intermediate shaft axle to move the CV joint out of the high heat area.
[This message has been edited by Will (edited 07-25-2012).]
Will, what the hell are you doing?! You can't fit all those pipes in there! Especially without hacking up the trunk! Double especially without it looking like crap! You better obey the laws of physics and pull all of that artwork out of there right now before someone thinks that it's actually possible!