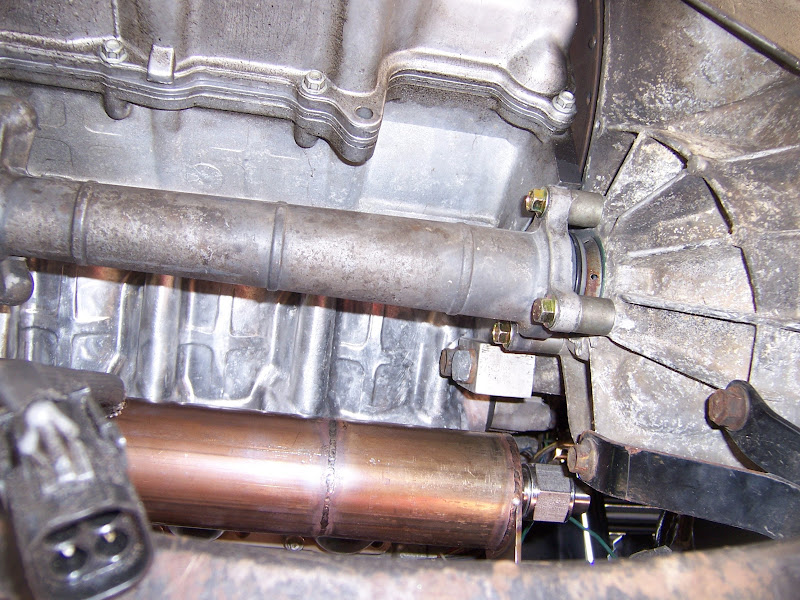
Looks awesome Will! I too was a little concerned about the oval pipe to oil pan clearance so I had that part of my exhaust jet-hot coated just to be sure. The X-connection is very cool...
In retrospect, I could have used an oval pipe to pass under the pan, but there's *VERY* limited space for the round/oval transitions... I was just barely able to pull it off for the cradle pass-under.
[This message has been edited by Will (edited 07-25-2012).]
Actually, it's the other way around. The pipe will cool off far faster than the pan and oil. The pipe is comparatively thin and light relative to the pan and oil. Despite being at a high temperature during operation, it cools quickly. You can try this yourself on your own car... After a drive, your pipe will be cool to the touch well before your oil pan and the oil within.
The car will get an oil/water heat exchanger.
While I also intend to produce heat shields for use in specific locations, I'm far more concerned about the CV joint boot and grease taking on excess heat during operation. I'll be switching to an intermediate shaft axle to move the CV joint out of the high heat area.
Well, to counter, the Chinese 16Ga. long tubes on my GTO would stay hot for quite some time after shutdown, heatsoaking the cramped compartment before I wrapped them.
I didnt see how close toe the CV boot you were until just now, I agree a shield is needed there. Hopefully they don't swell at high speed!
Will, what the hell are you doing?! You can't fit all those pipes in there! Especially without hacking up the trunk! Double especially without it looking like crap! You better obey the laws of physics and pull all of that artwork out of there right now before someone thinks that it's actually possible!
Well, to counter, the Chinese 16Ga. long tubes on my GTO would stay hot for quite some time after shutdown, heatsoaking the cramped compartment before I wrapped them.
I didnt see how close toe the CV boot you were until just now, I agree a shield is needed there. Hopefully they don't swell at high speed!
Think about it... The exhaust tubing may operate at 1000 degrees, but weighs maybe as much as 20 lbs.
The engine operates at 200 degrees, but weighs 400 lbs or more.
The amount of heat (in terms of Joules) that is held by the exhaust is tiny compared to the heat held in the engine.
Fair enough. So long as your comfortable with it, thats all that truely matters.
I wouldnt think the heat of the exhaust would destroy anything in the vicinity, your are right on a specific heat basis the engine wins. But I was only considering the localized heat that the exhaust tubing might have on the oil pan, and the film of oil in the near vicinity of the pipe for the small 2 minutes or so it would take to transfer the heat away from the pipe if you were to park it somehow with the pipe at say, 600F just after flogging it. Not enough to ruin anything except maybe soften a seal or boil out some aromatics in the oil. The thoughts in my head were: There is limited air flow when parked, so maybe 8% of the heat from that area is being purely radiated into the oil pan the rest to free convection and conduction to the rest of the system (which isnt that large really so its all around 600F at the time), the oilpan is aluminum, and relative to the steel and oil, it could perhaps be seen only as a transport medium, so imediatly at the pan, it may reach 300 degrees for a small amount of time until the exhaust in free-er air pulls more heat away, so oil right at the base of the corner of the pan by the exhaust may get overheated slightly. Will it hurt the engine probably not, never thought it would. Could the oil life be shortened ever so much, maybe? Im only speculating, your engineering this system, not me. Back to your build. Again, Im impressed and jealous.
[This message has been edited by FieroWannaBe (edited 07-25-2012).]
I have been considering a heat shield for the pan, as well as the CV joint. I'll likely go to an intermediate shaft axle instead of building a heat shield for the CV joint... avoid the problem entirely instead of mitigating it. A heat shield for the pan will be simple enough, but will need to be very precisely made.
I think the circulation will avoid problems with the oil while the engine's running and I don't think the heat post-shutdown will be a big deal, but obviously less heat into the oil means less heat I have to dump into the cooling system which means less heat I have to get rid of through the stock V6 manual trans radiator, which is a good thing.
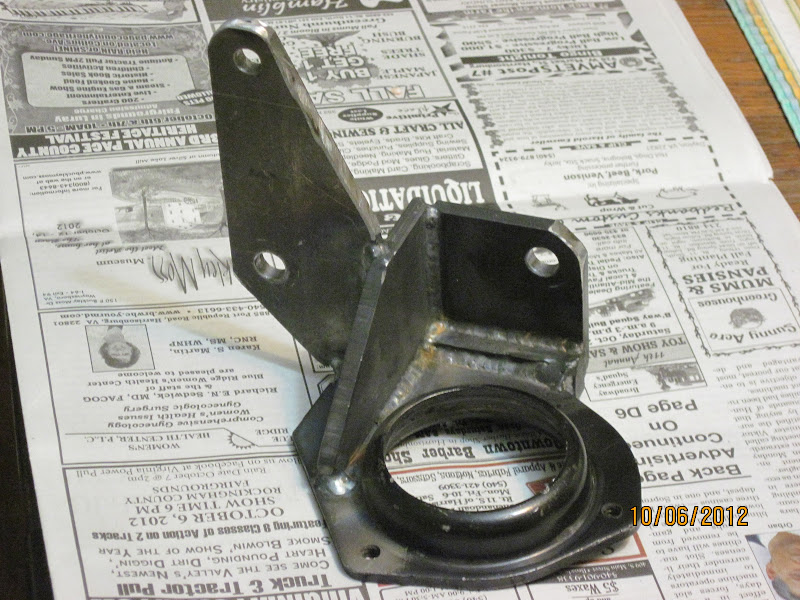
Heat shield for the pan is in progress, as is a bracket to support the housing for an intermediate shaft axle.
I've been driving the car daily. It was doing fine, but gradually became harder to get the initial turn over when starting. The charge voltage from the alternator had gradually gone down. The car runs fine, but the alt doesn't quite charge the battery to a high enough voltage to be able to start it.
I've parked it for the last week while dealing with a family medical problem.
[This message has been edited by Will (edited 08-25-2012).]
I was wondering how to deal with this. Unfortunately the welder is on vacation, so I couldn't consult him about reworking the location of the v-band clamp. I know it would be a huge PITA no matter what... I would have just asked his advice on how to do it most easily.
However, as I was cleaning a giant load of scrap (old Northstar parts, old TDC parts, old Muncie parts) out of the shed out back, I noticed that I had two Type II IMS's on the shelf. Interesting. I knew that there were two different types of IMS's, but I'd forgotten I had two of the Type II's. I had @$$umed that the Type I and II shafts would be the same length and use the same CV axle assembly. On a whim I grabbed one of the Type II's and compared it to the shaft from the Type I. The Type II is noticeably longer. I pulled the Type I housing out and installed the Type II with the target CV joint tulip and the tulip cleared the V-band clamp. :-D
Installing the Type I would have required removing the axle seal. Even though axle seals are cheap and I bought a spare, I hadn't popped the seal out because I considered that "committing" to a course of action. Since I didn't have a good idea of how I'd make the Type I IMS work, I had not yet done that. The Type II shaft uses the same axle seal as the stock axle, so to install the Type II shaft, I do not have to remove the axle seal. I feel modestly vindicated.
However, I *STILL* have to remove the axle seal. The Type II shaft requires a different bracket than the Type I. Because the bracket for the Type II provides *ALL* of the support for the "remote" bearing, the Type II bracket must not only be much stronger than the Type I bracket, it must be able to locate the bearing fairly precisely in order to avoid wear on the differential side gear and IMS splines due to misalignment. I will have to fully develop my Type I IMS bracket in order to properly establish the relationship between the centerline of the IMS and the bosses on the Northstar block. THEN, knowing that relationship, I will have to *RE*design the bracket to work with the Type II IMS.
PITA, but I now know the path forward.
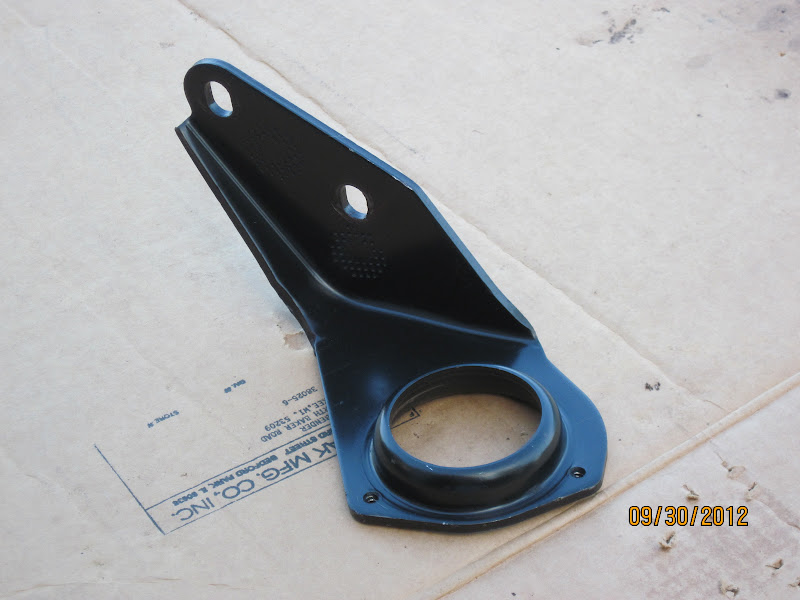
Rev 0 of the Type I IMS bracket:
[This message has been edited by Will (edited 09-13-2012).]
If anyone cares, Will drove my stock '12 Camaro SS manual (LS3) the other day (including 0-120+mph twice). He said that his N* Fiero does feel a bit stronger throughout, which is what I expected considering the weight/power ratios. Unfortunately his car was down for the above mentioned so I didn't get to drive it, but soon, hopefully! We'd like to take them both to the strip soon. I'm not expecting to break any records with the SS, but it should run easy 12's (unfortunately my 11-second AWD Talon ruined me, anything that can't launch as hard and runs slower than 11's while still being able to handle with the better-of-them is, honestly, a bit of a disappointment).
The N* Fiero is pretty darn quick if it's faster than an LS3 SS, and he's not even close to being done with the mods.
are the IMS's specific to the transmission they are bolted to? ie: could I use an IMS like yours on an F23 or a Muncie?
The Type I IMS with the cast aluminum housing is specific to the 282. The Type II IMS (not pictured) can be used with any transmission that uses the Fiero right side axle.
However, the Type II needs a much more robust support bracket bolted to the side of the engine than the Type I.
[This message has been edited by Will (edited 09-13-2012).]
The Type I IMS with the cast aluminum housing is specific to the 282. The Type II IMS (not pictured) can be used with any transmission that uses the Fiero right side axle.
However, the Type II needs a much more robust support bracket bolted to the side of the engine than the Type I.
Thanks for the info, any other reasons you are installing one other than to get the C/V tulip out of the heat?
Thanks for the info, any other reasons you are installing one other than to get the C/V tulip out of the heat?
1. The heat 2. There's a boss on the side of the block that's used to secure the original under/over pipe from the front bank exhaust. This boss rubs the CV joint boot and eventually rubs through and causes it to fail and sling grease everywhere. I didn't feel like cutting this boss off.
1. The heat 2. There's a boss on the side of the block that's used to secure the original under/over pipe from the front bank exhaust. This boss rubs the CV joint boot and eventually rubs through and causes it to fail and sling grease everywhere. I didn't feel like cutting this boss off.
Will, did you have that happen? I have just under 1/4" clearance there and I am concerned about the tripot boot expanding at speed or flexing enough to rub on that boss with my Isuzu setup. Was your clearance similar, just enough to think it might work?
Will, did you have that happen? I have just under 1/4" clearance there and I am concerned about the tripot boot expanding at speed or flexing enough to rub on that boss with my Isuzu setup. Was your clearance similar, just enough to think it might work?
Charlie
The 282 and Isuzu may put their axles in slightly different places, as mine has much less than 1/4" of clearance, although it doesn't appear to touch when stationary.
[This message has been edited by Will (edited 09-15-2012).]
The Fiero manual trans right side axle, when fitted with the large pattern (27 spline) outer CV joint has an collapsed length of 39 1/4".
The following combination: -Type II IMS -*Left* inner CV tulip (female spline) from Pontiac 6000 (or other A-body) with 4 speed automatic -*Right* side tripod, axle shaft, 27 spline outer CV from Pontiac 6000 (or other A-body) with 4 speed automatic and HD brakes
has a collapsed length of 39 3/8"
Score. Axle problem solved.
[This message has been edited by Will (edited 09-17-2012).]
I'll use it with the parts washer to push solvent through my PurePower filter backwards in order to clean it more quickly and efficiently than I was able to the first time.
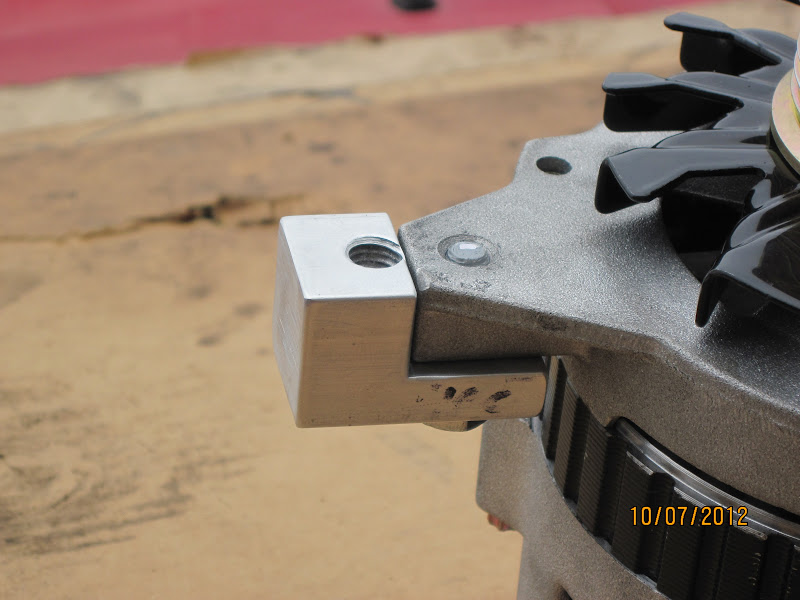
I removed my CS144 alternator and will be replacing it with a CS130D or AD130, both of which have much smaller cases. This will make R&R *MUCH* easier as well as allowing greater air circulation around the unit.
[This message has been edited by Will (edited 09-30-2012).]
Continuing development of the Type II IMS axle bracket, as well as a pic of the final assembly of bracket, alxe, seal retainer, etc. Installed pic will have to wait for another day.
Size difference between the CS144 and CS130 alternators. To fix the accidental mounting center mismatch between new and old, I took a page from my own book, borrowing from the installation of a 282 to the Northstar and how to deal with the mismatched bellhousing bolt.
The car is back on the road as of last night. I was not able to make any progress on the heater lines, but they seem to be holding water for now. I dug through my stash of coolant and heater pipes and was able to find what I think is the engine bay section of the '86 heater return pipe, but I was not able to find the right side '86 coolant pipe or the full set of '86 heater pipes.
I also did some work on the pan to X-pipe heat shield, but no pics yet.
Have you made much consideration to the heat of the stainless crossover to the aluminum oil pan. I'd be slightly concered about cooking the oil once the car is parked and shutdown, since the pipe will retain heat for some time, and the pan will easily transfer heat to your oil. personally, I would use a piece of adhesive heat shield on the pan near the pipe.
I am working on a heat shield... I have it such that it will bolt to the pan, but I'd like to extend the other end in order to pick up one of the dust shield bolts on the Getrag bellhousing.
Shutdown isn't a problem, as we discussed above. What I see happening is that the temps (oil temp inferred from idle oil pressure) stay fine for highway drives, but it doesn't take long for the oil to heat soak and idle oil pressure to drop once the car is in stop and go traffic. Coolant temp also comes up a bit, but stays controlled.
Did you notice any improvments using this oil filter in your application?
I bought it to reduce the risk of blowing the engine up during a hard break-in. Hard break-in is the best for the engine because it results in the best wear-in among the rings, grooves and bores. However, due to the high RPM involves, the engine oil pump is at its maximum flow rate. Paper and cotton filters can't keep up without experiencing excessive pressure drop and opening the bypass valve. The open bypass valve *could* allow break-in debris from the ring grooves, rings or bores to be pumped directly into the main bearings and cause problems. The stainless steel mesh filters do not filter as finely as the paper/cotton filters, but DO have the flow capacity to handle the Northstar's 12 gallons per minute of oil flow without lifting the bypass valve.
Soo... My engine didn't blow up during break-in, and I have confidence that it's capable of running for extended periods at high RPM... I like it.
However, it *DOES* need to be cleaned with each oil change. That's a PITA... I'm setting up for a quick/easy way of doing that, but not quite there yet.
I blew up an axle at the drag strip Thursday evening, or else I'd be working on the filter today.
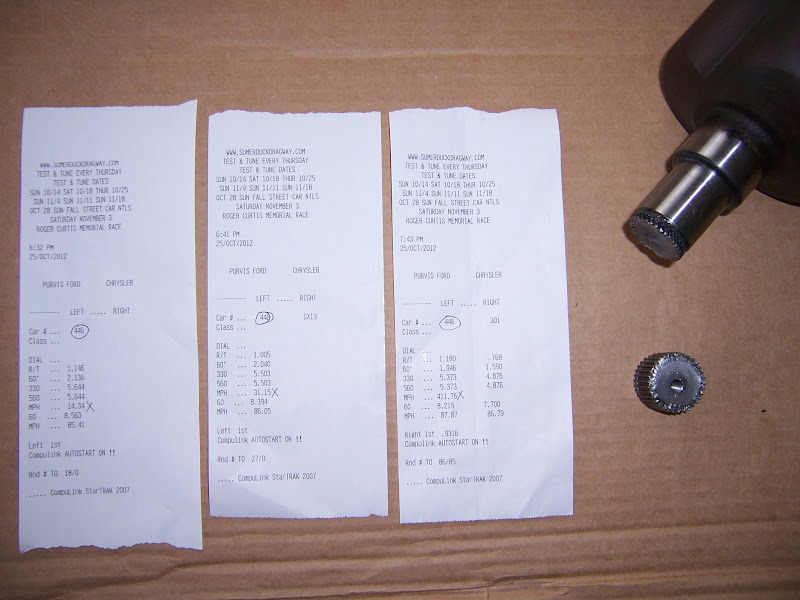
The track prep was very good. One of the first guys I talked to before I made my first run said that traction was good.
There were only a couple of other street cars there... Two Hondas running in the 10.2 range. I was the fastest real street car there, although a couple of the obviously dedicated drag cars that showed up on trailers had plates. I think the fastest time I saw on the board was 5.0xx, but I only watched a fraction of the passes that evening.
I was working on both my launch technique and my clean-off spin technique. I overdid the clean off spins and had some minor wheel hop. That may have contributed to the CV spline failure. I had the clean off spin perfected for the 4th pass..., just the right RPM and clutch slip to get 1-2 full revolutions of the tires with no wheel hop.
By the time I made my 4th run, both tires and pavement were nice and sticky. I was getting used to the clutch and felt that I had the RPM and slip figured out to cut at least a 1.8 short time if not a 1.7. Obviously, there were other circumstances of which I was not aware. If I'd done the 1.7, I definitely would have gotten a 7.9.
[This message has been edited by Will (edited 10-30-2012).]
Obviously, I took it easy on the launch so I didn't break an axle twice as far from home base as I was at Sumerduck. +6 MPH vs. the first engine's best trap speed... power's definitely there. I think some of that comes from the 1.02 vs. 0.94 fourth gear, as I wouldn't have expected a <2 mph advantage at the 1/8 to turn into a 6 mph advantage in the 1/4.
MIR was bat **** insane Sunday... There was a swap meet as well as one of the last test/tune days of the season. I didn't make it there as early as I would have liked. I only made two runs, but missed 2nd gear in my second run, so it wasn't any good. If I had gotten there right as the gates opened and gotten set up, I could have had 3 runs by mid-afternoon... but missed the first two sessions in which the groups were not as heavily populated as they were later.
Tech initially gave me guff about my cracked 1/4 windows, so I had to rip those off before they'd let me run. I need to remove them anyway in order to install the replacements, so I don't consider it a big deal. I'm not sure if the car looks more or less ghetto now.
There was a blown nitro funny car that made a couple of runs... 6.20 @ 234 was the faster of the two. If you've never seen A blown nitro car run, go see one. It's a rare treat, like seeing an F-14 do an aerobatic display at an air show... And like the F-14, the nitro car makes the ground shake.
Been driving and enjoying the car... getting together materials and info to build the wiring harness adapter which will let me switch over to the Shelby PCM.
I have everything I need but time.
I have an EP LSD built in the later model larger 282 diff. It's been on the shelf for a while. I shipped it back to Jeff for disassembly.
I'll be sending the components off for cryo and WPC (micro shot-peen/micro-polish) treatment along with my 3.94 R&P and a couple of extra IMS's and male CV joint cups and a new crankshaft for the Northstar. Once the driveline components have been cryo'd and WPC'd, and the crank cryo'd, melonited, journals cut and micropolished, I'll pull the car down to swap out the crank, install the 3.94 FD and diff and a few other things. One of the other things will be to remove the chassis side dogbone mount stamping from my wrecked blue '87 GT and install it in The Mule. I had pre-emptively cut The Mule's for clearance to the Northstar cam cover, but once the engine was installed, found that it would have cleared with only minor trimming. I will build a rod-end dogbone from the chassis side mount to a bracket I will build from the Northstar PS pump bracket. I'm thinking that the "springiness" of my urethane powertrain mounts is a contributing factor to the wheel hop that killed my CV joint.
[This message has been edited by Will (edited 12-19-2012).]
Been driving and enjoying the car... getting together materials and info to build the wiring harness adapter which will let me switch over to the Shelby PCM.
I haven't read your thread beginning to end but I have skimmed here and there. I assume from what I have quoted here that someone actually has a workable Shelby ECM my question is, c an it be made to run 2k+ motor with coil on plug? I'm at the very early stages of attempting to reassemble a very low mileage N* that had some piston damage due to poor tuning on a Microsquirt and high revving. I would love t eventually get it running its COP setup.
I haven't read your thread beginning to end but I have skimmed here and there. I assume from what I have quoted here that someone actually has a workable Shelby ECM my question is, c an it be made to run 2k+ motor with coil on plug? I'm at the very early stages of attempting to reassemble a very low mileage N* that had some piston damage due to poor tuning on a Microsquirt and high revving. I would love t eventually get it running its COP setup.
DF
I'm the test case. I've been working with Sinister to develop the tune and get the wiring info.
The Shelby computer will not control the Y2K Northstar, as it depends on the DIS brick for the 24x and 4x signals.
There really isn't much you can do for the engine management of the '00-'04 engines... Tuning is actually a serious handicap for those engines. My advice--especially considering you're just getting started--is to get an '05+ engine. The '05+ *should* be compatible with a WIDE variety of computers, as it used a 58x trigger wheel.
The '93-'99 engines have multiple engine management options are available, but they REQUIRE timeserting the head bolt threads in order to be reliable. That's $500 between the gaskets and the time sert kit... just to put it back to stock. My understanding is that the '05+ engine are more reliable in that regard, as GM made changes to the depth and pitch of the head bolt threads in those engines. They also have larger exhaust valves than the '00-'04 engines and breathe a little better.
www.car-parts.com shows that Standard Auto Wreckers in Ontario has about 5 '06-'08 engines for $1K each. There's an LKQ yard in London that has one for $900. Diamond Auto Parts in Mississauga has an '05 VIN 9 for $900.
Edit: After looking at a map, I see you're not far from Detroit... you shouldn't have ANY problem finding an '05+ Northstar for cheap.
[This message has been edited by Will (edited 12-20-2012).]
I'm not sure what search criteria you're using Will but when I search for *engine 2005-2008 Cadillac Seville* I get a half dozen N* in Michigan all for $1500.00