Well Will. Despite what I know to be very good advice I am going to stick with motor I've got. I figure the rebuild will be at least half the fun and a source of pride. I already have a Timesert kit borrowed but I do need some inserts. Can you tell me I could get some? As far as engine management, I guess I'll go back to the Megasquirt which is not a problem if it's tuned properly. Hopefully in time I can get the COP working. I've heard that Megasquirt is working on something along those lines. Anyway, wish me luck. . . .
Well Will. Despite what I know to be very good advice I am going to stick with motor I've got. I figure the rebuild will be at least half the fun and a source of pride. I already have a Timesert kit borrowed but I do need some inserts. Can you tell me I could get some? As far as engine management, I guess I'll go back to the Megasquirt which is not a problem if it's tuned properly. Hopefully in time I can get the COP working. I've heard that Megasquirt is working on something along those lines. Anyway, wish me luck. . . .
DF
I'm tickled to death with how well my built engine performs. It certainly is gratifying to have gone through all the crap I've gone through to learn about building a Northstar and have the end result turn out as well as it has. I hope it works out well for you. I ordered my inserts directly from www.timesert.com IIRC, they were about $1 each. When I 'serted my main bolt holes, I did it on a mill and only needed the installation mandrel, not the whole kit. I bought the mandrel by itself and it was around $80. The money's in the tooling for the timeserts.
Levi (CRZYONE) used a Big Stuff 3 to run his Y2K Northstar, so it is possible, but that's an expensive computer. Megasquirt should be adaptable to the job, but the '00-'04 Northstars have a reluctor wheel pattern that is, AFAIK, unique to those engines.
[This message has been edited by Will (edited 12-26-2012).]
Are the reluctors pressed on to the crank or are they machined on it? joseph upson ran into a similar problem on his 3900 build, and had a new wheel machined to replace the 3900 wheel. It may be an option for you N* guys.
------------------ there's a Group on 60degreeV6.com for us 660 Fiero owners!
I'm tickled to death with how well my built engine performs. It certainly is gratifying to have gone through all the crap I've gone through to learn about building a Northstar and have the end result turn out as well as it has. I hope it works out well for you. I ordered my inserts directly from www.timesert.com IIRC, they were about $1 each. When I 'serted my main bolt holes, I did it on a mill and only needed the installation mandrel, not the whole kit. I bought the mandrel by itself and it was around $80. The money's in the tooling for the timeserts.
Levi (CRZYONE) used a Big Stuff 3 to run his Y2K Northstar, so it is possible, but that's an expensive computer. Megasquirt should be adaptable to the job, but the '00-'04 Northstars have a reluctor wheel pattern that is, AFAIK, unique to those engines.
OK thanks for the info Will. This motor did run on the MSquirt but we had to use a trigger wheel bolted on to the harmonic balancer and a Ford ignition system. I think I asked you once before but I can't remember what you said. Can I use pre Y2k cam covers on this motor? At least that way I should be able to make it look nicer than it did with plug wires running into cam covers that are designed to have COP. I guess I should have tried timesert first. I bought some on fleabay and paid $67.00 for 20 inserts. Oops
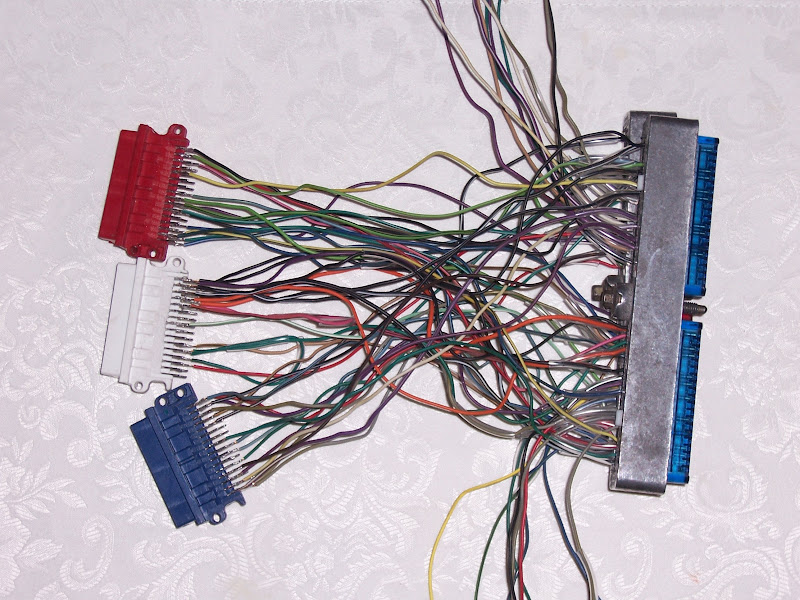
I was able to take a few hours yesterday and today to do the majority of the work on the wiring harness adapter for the Shelby PCM.
Remaining to be done: -Populate a 3 or more pin Molex which carries a clutch switch wire, and +12V/GND for the MAF sensor from the interior body harness. Theoretically, I could have brought them off the backs of the adapter connectors, but space is at a premium when soldering to those pins, and the existing power/ground wires are 18 ga rather than 22. There just wasn't space to get everything in and allow room for the shrink tube which will be needed to assure isolation. -Build an additional pigtail for the MAF and connect it to the aforementioned Molex as well as the signal pin on the Shelby connectors. -Provide for a connection to the IAC, either by building an adapter to go from the ISM to the IAC or by running a dedicated pigtail similar to that which I will have to build for the MAF sensor. The ISM to IAC adapter is complicated by the fact that one of the ISM wires goes directly to ground, so I have to run one wire the entire length ANYWAY... might as well run three more and have one less connector to worry about. -Obtain and wire in an OBDII DLC.
Once I do those things, the car will be ready for swapping the throttle to an OBDII unit and trying the Shelby PCM.
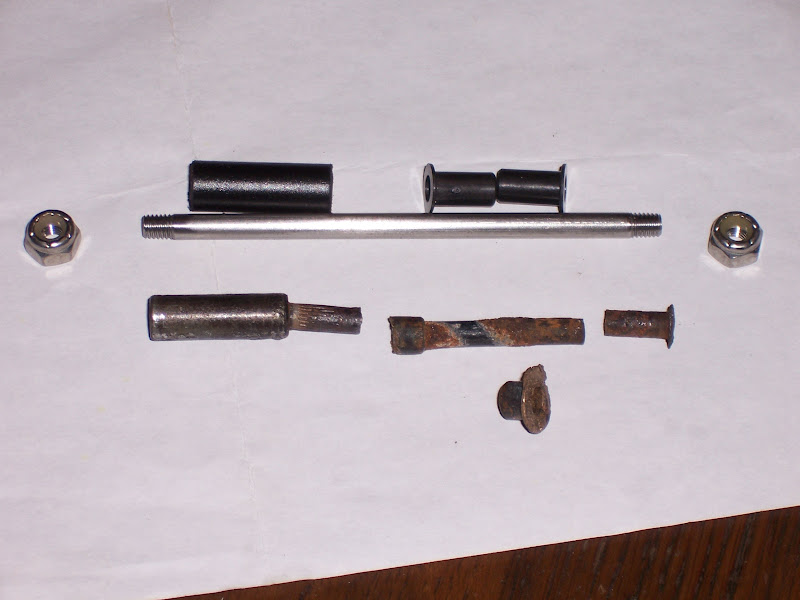
Also, the left decklid hinge pin broke, so I had to develop a replacement:
[This message has been edited by Will (edited 01-01-2013).]
OK thanks for the info Will. This motor did run on the MSquirt but we had to use a trigger wheel bolted on to the harmonic balancer and a Ford ignition system. I think I asked you once before but I can't remember what you said. Can I use pre Y2k cam covers on this motor? At least that way I should be able to make it look nicer than it did with plug wires running into cam covers that are designed to have COP. I guess I should have tried timesert first. I bought some on fleabay and paid $67.00 for 20 inserts. Oops
DF
The inserts might have been $3 each... been a while since I bought them. You can buy them direct easily enough.
The Y2K covers will not fit the earlier heads. The outline and plug well angles are different.
10-4, another thought, it may be possible to have the ring turned down, and then a new ring machined to fit.
It's in the middle of the engine, so the new wheel would have to pass over counterweights in order to be installed... The current wheel is close to the OD of the counterweights... I'd have to do some measuring to figure out if it's possible.
I @$$ume that most engine computers are flexible enough in crankshaft offset angle to allow pretty much any offset.
10-4 I haven't played with tuning much, I was just spit-balling ideas out there.
Yeah, the flexibility of the 58x PCM would be nice... mostly for throttle by wire. My 1992 (!) BMW 535i had throttle by wire and it completely transformed cruise control.
OTOH, I was thrashing a Caddy CTS rental through the hills and canyons of SoCal a couple of years ago and managed to get the TBW so confused it gave up and closed for a couple of seconds before responding again.
Me personally, I don't like DBW, it feels more disconnected than a cable throttle, but my understanding is that most of that feeling can be eliminated through tuning.
------------------ there's a Group on 60degreeV6.com for us 660 Fiero owners!
Me personally, I don't like DBW, it feels more disconnected than a cable throttle, but my understanding is that most of that feeling can be eliminated through tuning.
I really don't know how modern OEM's screw up TBW so badly. I drove my friend's '06 Tacoma with TBW and manual transmission. I felt like I was 16 again and didn't know how to time clutch and throttle. I find it incomprehensible how a modern Toyota can be *THAT* bad at tracking my pedal inputs, when BMW/Bosch did it so well 20 years ago.
My '92 BMW's throttle was indistiguishable from a mechanical linkage until I broke traction. One thing that electronic throttle does allow you to do is ditch the separate cruise module. The other thing my BMW had was *PERFECT* cruise control: instantaneous pickup and +/- 1 mph speed control, made possible by the electronic throttle.
[This message has been edited by Will (edited 01-07-2013).]
My old 2010 LLT (3.6 DI) Camaro and my current 2012 LS3 Camaro were and are indistinguishable from a cable throttle... except when I *try* to confuse the LS3's DBW. If I pulse the throttle from not to WOT multiple times, it will get more and more delayed, to the point that punching it takes around a 1/2 second to respond. That's ridiculous, but at least it only does it when I try. In all other conditions it's pretty much instant, as was the LLT's DBW. Traction control and cruise control are amazingly accurate.
The '09 Malibus I test drove when they were new had a painfully pathetic delay *all the time*. The 4 cylinder was worse than the V6, but both were bad. That's the primary reason we went with an '09 Civic instead (which, btw, is also DBW and doesn't have any delay).
I don't know what was wrong with GM, but hopefully they're all fixed now. If my Camaros had had that delay, I wouldn't have bought them either.
[This message has been edited by ALLTRBO (edited 01-07-2013).]
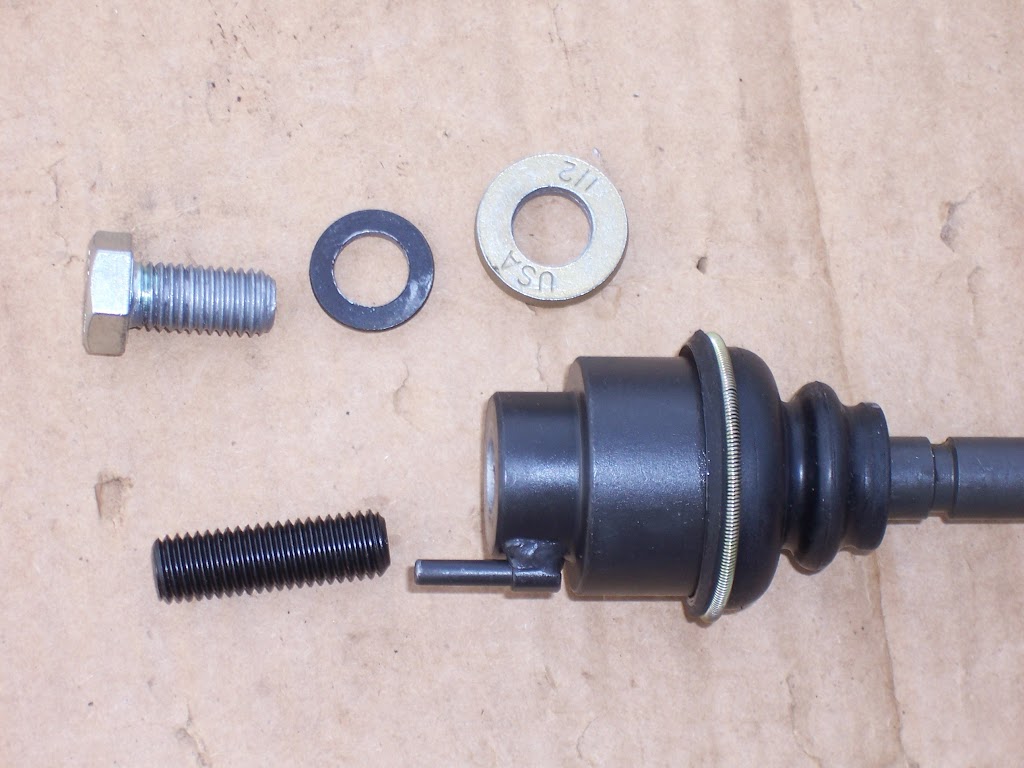
Did finally get the horrible RCC bump steer kit replaced with stock tie rods.
I bought the inners from the FieroStore. They came with the 12x1.75 set screw, but no mounting nut. I used a 12x1.75x25 bolt and a couple of thick washers instead of a nut with the set screw used as a stud.
The rear end is somewhat more stable, but I think I still have some looseness that I need to track down.
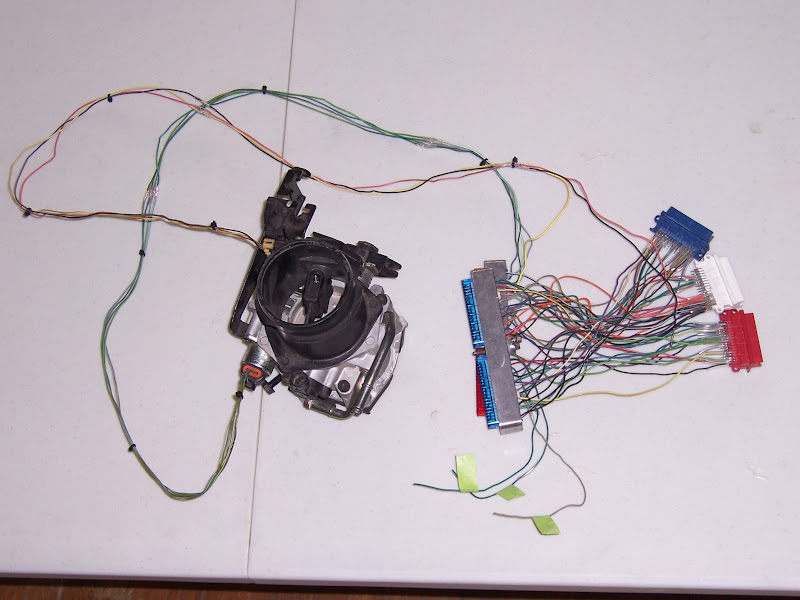
Finished the runs to the MAF and IAC... only have two A/C wires and clutch switch left to deal with.
[This message has been edited by Will (edited 01-21-2013).]
I was wondering if the RCC kit was worth anything performance wise. it's really hard to tell what works and what doesn't on this forum because of the pack mentality that goes on, if one person says something works, then by god it's the best thing since sliced bread!
------------------ #1 hater! also the aluminum head 60V6 troll.
I know these lines Look crooked on paper, but I swear I've got them straight in my head.
The engineering on the RCC kit is weird and the original rod-ends used at the inner pivots were $10 chinese junk. I replaced the rod-ends with decent parts, but the kit's still junk. I bought it used, so it wasn't a big loss.
The stancion that pushes the inner pivot out from the stock cradle mount is a fabricated aluminum piece. The "stud" at the end is really a bolt that is dropped into the aluminum fabrication before it's welded up. It's odd. Pushing the inner pivot out from the stock mount like that gives the fore/aft and vertical forces acting on the inner pivot additional leverage against the stock mount tab. This makes the entire toe link "flexible" and doesn't do anything to help driver confidence.
I have no idea if it gets the geometry right--even in the "ideal" circumstance in which the previously noted shortcomings do not apply--or not... I highly doubt it.
[This message has been edited by Will (edited 01-21-2013).]
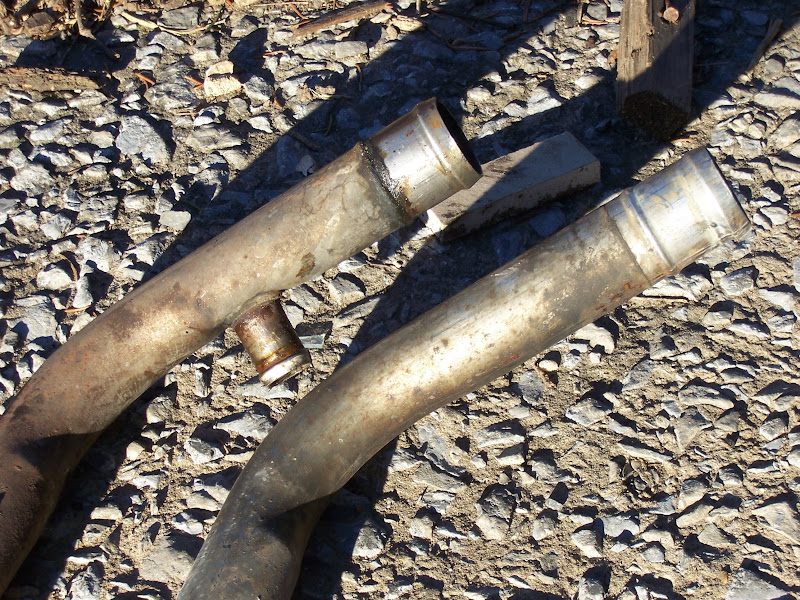
The important difference between the '87 coolant pipe (left) and '86 coolant pipe:
'87 heater pipes (top) vs. '86 heater pipes:
And the real distinction between the two:
I installed the '86 right coolant pipe in the car. I fastened the '86 heater pipes with the two small screws to the two bosses in the fuel tank tunnel, but didn't get to the heavier clamps at the ends yet. The forward ends of the pipes are the same, of course. The '87 hoses are nicer than the '86 hoses (1 piece vs. 2), so I kept the '87 parts. The '87 supply has a quick-connect fitting and an elbow that fits between the right forward cradle mount ears. I had run a hose from the Northstar heater supply connection at the left rear corner of the engine bay around the engine bay clockwise and connected to this elbow at that location. The '87 return T's into the side of the coolant pipe. The engine compartment ends are just about perfect for the Northstar... They come up just to the left of the alternator and allow me to run the heater hoses along the "shelf" at the bottom of the firewall panel. Both heater hoses will run along the shelf and circle around the left end of the engine bay to mate to the previously mentioned heater supply and the heater circuit return on the thermostat housing at the left front corner of the engine.
Once the original coolant circulation is restored, I'll have heat more quickly on cold mornings. The engine may even warm up more quickly also. I have drill this coming weekend, so I won't be able to work on the car again until the 2nd. At that time, I'll finish replumbing the heater circuit and will replace the damaged coolant hose from the thermostat to the cross-cradle pipe. Some time soon, I'll also replace the cross-cradle pipe with one of these: http://www.partman.com/cool...quot-x-1-2-quot.html or one of these: http://www.partman.com/cool...oil-16-1-2-quot.html
I also *FINALLY* have my anti-dive spacers machined, so I'll be able to install those soon.
I also drilled and tapped the splined ends of 3 CV joint cups and BOTH ends of my spare IMS with 10/32 holes for easy extraction of broken ends, when I break another axle. Those should go to Liberty this week along with the 3.94 FD and diff components.
[This message has been edited by Will (edited 01-26-2013).]
Cool find, I've been keeping my eye out for a cooler like that. Thanks for posting.
I am also interested in your anti-dive brackets. I remember reading about your idea a while back. I have some ideas of my own to try on my chump car. I'm interested to see how yours looks when complete. I need to get around to plugging some dimensions into the Lotus Suspension Analyzer program. (If you have any, I can run them for you)
[This message has been edited by FieroWannaBe (edited 01-22-2013).]
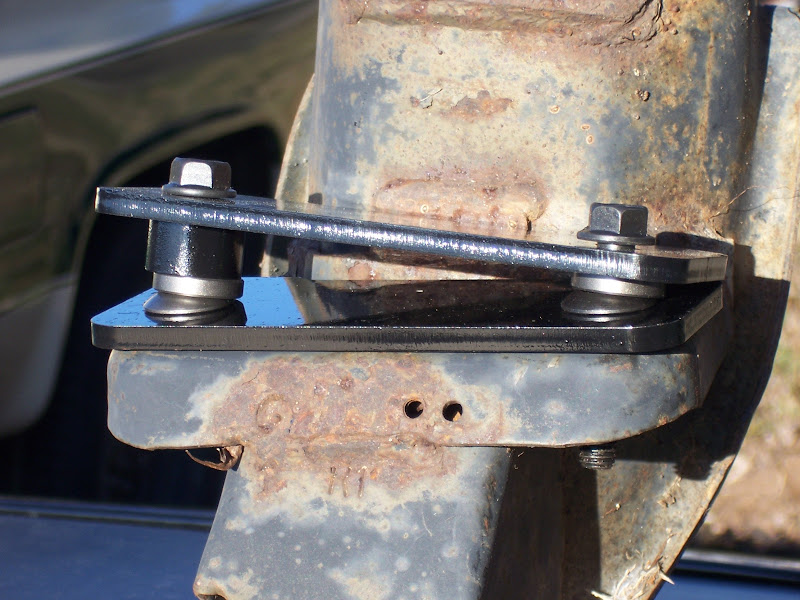
-Upper and lower reinforcement plates which will be placed directly against the body and crossmember. -Spherical washer pairs which will take up the angle difference. These will go above the lower reinforcement plate on the crossmember and below the crossmember itself. -Spacers. The spacers are a different thickness at each of the four mount locations per side. They will go between the spherical washer pair and the upper reinforcement plate.
The spacers are cut to give me a 1.092 lowering of the axle CL relative to the body (yes, this will raise the front end of the car by just over 1"). This makes the spacer thickness at the rear crossmember mount location zero. That doesn't mean that mount point is directly against the body... There will still be both upper and lower reinforcement plates and a spherical washer pair between the rear crossmember mount points and the body.
Edit: A picture is worth 1000 words, so I'll post when I get everything set up and organized.
[This message has been edited by Will (edited 01-23-2013).]
The Mule is back on the road as of last night. As I was burping the cooling system yesterday, I didn't really have a good way to judge heater performance. This morning is was about 20 degrees out, and I started to get heat about 1/3 of the way to the point where I previously started to feel heat... so the heater pipe reroute is a success.
I also redid the thermostat hose. The old configuration was a CarQuest 20982 hose with a 1.5" nipple 3" long connecting it to a generic 45 degree 1.5" hose elbow. That was reduced to 1.25 for the cross-cradle pipe with a hose reducer bushing. There was a 17" flex hose from the cross-cradle pipe to the right coolant pipe.
The new configuration is a 1.5 x 1.25 flex hose 20" long from the thermostat housing to the cross-cradle pipe and a 20" 1.25" flex hose from the cross-cradle pipe to the coolant pipe. So I eliminated two clamped connections and a reducer bushing.
Originally posted by fierogt28: Will, I checked in my 86 FSM and the torque calls for 21-34 ft/lbs. (3C-2 front suspension)
I also checked in the fiero Haynes manual. The "caliper mounting bolts" are 40 ft/lbs. For "caliper mounting knuckle assembly bolt" is 35ft/lbs.
Hope this helps, but I assume you talking about the 2 caliper bolts that mount to the steering knuckle, right? (The Torx style bolts size T-50)
The listing on 3C-2 is for the caliper to bracket bolts (the T-50 Torx bolts). I'm looking for the bracket to knuckle bolts.
I believe I had seen the 35 ftlbs number previously, BUT I think I tightened these bolts to that number before and they backed off. This time I tightened to 83 ftlbs per the post I linked above... We'll see what happens. Note that once the photos load, the screen is no longer on post #7... look at post #7 for info on the front brakes.
[This message has been edited by Will (edited 02-19-2013).]
I broke one of the crossmember bolts removing the crossmember the weekend of 2/9.
Got the bolt removed over the weekend. I had drilled it at an incorrect angle and ended up taking out some of the threads in the nut plate. My dad's friend the welder was able to get to the bolt with a TIG torch and weld a 1/4-20 bolt to it. Since I had drilled away the threads about 1/3 of the way around the bolt, it just unscrewed once the 1/4-20 bolt was welded to it.
I essentially only took the threads off the inside of the hole in the nut plate. We were able to use a drill guide bushing to drill the hole for a helicoil centered and at the correct angle. Helicoiled it and it seems to be doing fine. I had to increase the bolt length to 75mm for the forward bolts and 60mm for the rear bolts. I was only able to find 8.8 and 10.9 bolts locally. The manual calls for 52 ftlbs--quite a bit for 10mm bolts--and specifies to use new bolts every time. I'll order some 12.9's so I don't have to replace them every time.
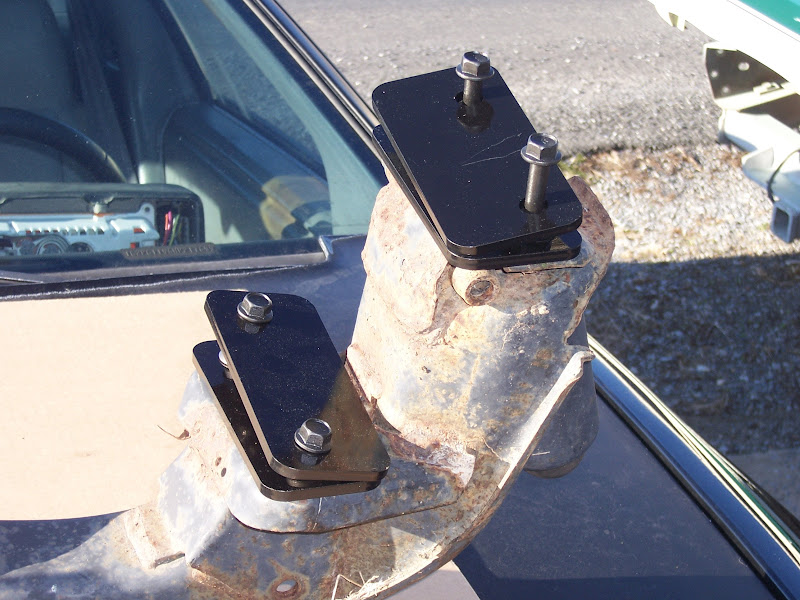
Now, on to the anti-dive block installation:
IT'S ****ING AWESOME!!!!
I should have done this YEARS ago. Brake dive is reduced to almost nothing. When I hit the brakes, it FEELS like a supercar for the first time EVER. I haven't been able to hammer the downhill side of the mountain yet, but I'm REALLY looking forward to trying that once the weather warms up.
Pics of the parts:
I slotted the bolt holes slightly in the vertical axis in the LCA rear pivots. The fore aft position was a little bit off, but they went back together with an about average amount of "persuasion" considering that this is still the 84-87 suspension that doesn't go back together cleanly even with stock parts.
The steering shaft coupling did not go all the way onto the steering shaft on the rack, BUT it went on far enough to engage the pinch bolt.
The diagonal braces that go forward fron the cross member to pick up the rear bolts of the lower radiator support needed to have the holes slotted at both ends.
The caliper bracket bolts I had previously tightened to 35 ftlbs (I think) worked loose. I tightened to 83 ftlbs this time. They're 12mm bolts... they can take it.
The upper shock mounts needed a little more effort to get bolted back in than usual. I hadn't realized that lowering the crossmember would put the shock closer to its droop limit. This means that the suspension doesn't have as much droop travel as it did stock. It also means that the shock's bump travel will not be fully exploited. This would actually be a good thing for cars running lowering springs.
The car also sits 1" higher in the front than previously. This will be rectified soon when I install my Street Dreams aluminum 2" lowering knuckles.
It also needs an alignment.
[This message has been edited by Will (edited 02-19-2013).]
Will, its sounds like your brake set-up isn't stock. This is what I want to know.
The 84-87 calipers bolt directly to the knuckle with two Torx-50 bolts.
Those pics with the brackets are bolted from the knuckle (the old caliper mounting points) and the caliper is bolted on the bracket. You won't find any spec in the FSM for a modified set-up.
Nobody can actually give you a torque reading unless you use the torque spec use to bolt the caliper to the knuckle.
I owned an 86GT years ago, and there is no caliper brackets what-so-ever. The caliper bolts to the knuckle.
------------------ fierogt28
88 GT, Loaded, 5-speed. 88 GT, 5-speed. All original.
The 84-87 calipers bolt directly to the knuckle with two Torx-50 bolts.
This is not correct. The calipers bolt to cast or forged brackets which bolt to the knuckles. The Torx bolts attach the caliper to the bracket. There are two conventional hex bolts with 12mm threads that bolt the bracket to the knuckle.
This is not correct. The calipers bolt to cast or forged brackets which bolt to the knuckles. The Torx bolts attach the caliper to the bracket. There are two conventional hex bolts with 12mm threads that bolt the bracket to the knuckle.
Last weekend I got the FINAL wires hooked up for the Shelby harness adapter.
The Shelby A/C request signal from the HVAC panel is analogous to the Fiero A/C on signal. The Shelby computer reads ground via the pressure cycling switch and operates the compressor 100% via software. I grounded the Shelby pressure cycling switch wire. This *should* cause the Shelby PCM to keep the compressor on at all times except over 86% throttle or above ~4000 RPM. Meanwhile, the Fiero A/C system will continue to work as it currently does.
My alternative was: In the Fiero, the pressure cycling switch has switched +12V from the HVAC panel on one side and the A/C comp relay primary on the other side. To make the Shelby setup work, I'd have had to take the +12V side of the PCS and ground it, then redirect the relay primary high side wire to the PCM instead. I'd then have to pull relay primary power from the PCM power supply. Making those mods to the car didn't give me the reversibility I was looking for, which is the whole reason I'm building the harness adapter instead of modifying the harness right away.
I spliced the OBDII port into the harness adapter. I squeezed the two ground wires from it, the pressure cycling switch wire and the MAF ground wire--all 20 ga--into one 16-18 splice with one 18 ga wire on the other side, so I can ground them all with one lug. I added the A/C request wire from the C203 to the Caddy PCM connector. The Caddy system did NOT originally have an A/C Request line because the PCM received A/C comp instructions from the HVAC panel via the data bus. The HVAC panel monitored the functions of the A/C system. I also added a clutch switch wire from the C203 (would be the TCC brake switch in an auto trans car) to the Caddy PCM cruise brake switch pin.
I ALSO finally ran the clutch switch wire from the clutch switch to the chassis side of the C203. It wasn't as much of a PITA to fish it through the console as I thought it would be, but it works now.
I'm flying out for two weeks with the Navy on Saturday, so I won't be able to work on this again until 3/23 at the EARLIEST, as I may have an additional 2 weeks taking me through 4/6 or so. My girlfriend is having knee surgery on 4/8, so I'll won't be able to to work on the car much while she's recovering from that.
What remains to do for the Shelby computer is to swap the OBDI throttle to the OBDII throttle--which appears to be a PITA because the throttle has to be disassembled and reassembled on the manifold vice just bolting on--then install the harness adapter and computer.
In addition to getting laid off on Monday, I also hit some expressway debris which flattened my rear tire. I already needed front tires, so I just had to order 4. Feh.
Bad alignment sent my front tires to an early grave. I hit some road debris Monday that did the same to one of my rears... So now I get to buy an entire set of tires. And I have to limit myself to the cheapos, too, because of the layoff.
The shop that mounted and balanced attempted to align and found that the UHMW Polyethylene bushings I'd made years and years ago were worn. I guess it's time for spherical bearings now. I had originally gone with UHMW PE on the assumption that spherical bearings would be "too harsh" for a street car. Having driven the UHMW bushings, I think that's bunk. To me, they are barely worse than rubber.
And weld them into the control arms. The only ticklish part will be tacking them in place to make sure that they're positioned correctly so that they bolt in without any axial preload on the spherical bearings. Then I'll have serviceable spherical bearings for the rear control arms and front lowers... probably easiest pushing changes possible in a Fiero.