Doesn't look like an original bolt to me. They should all be the same. I've got extras if you need some.
I located a spare in my bolt box, but thanks.
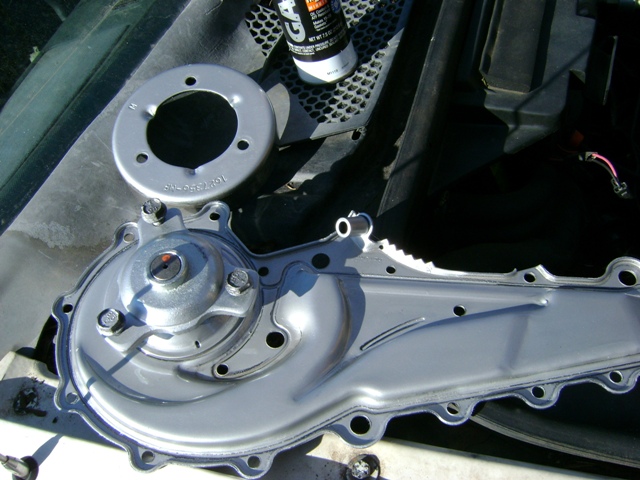
I painted the water pump and it's pulley this morning after looking for a new bolt. I want to add two coats of clear on top of the silver and let it dry good before install this afternoon.
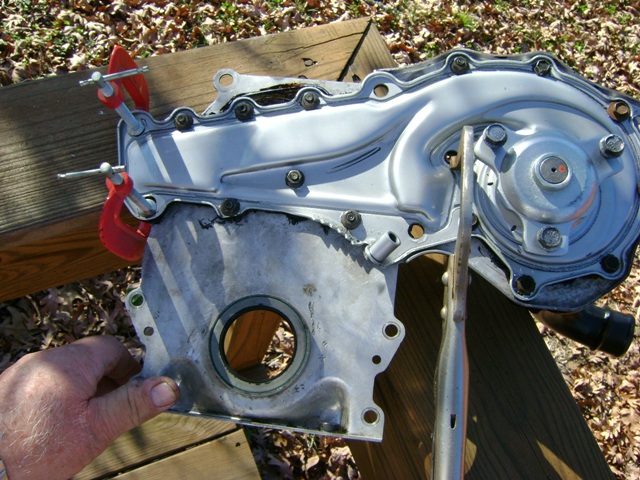
I laid the gaskets out so they can flatten out. The timing cover plate to block gasket looks like it will go on either way, but try it both ways before you do the install as one way is incorrect, and will cause a big time oil leak. Look where the squiggly line is on the right side. The gasket is curved there, and straight on the opposite side. I marked the gasket 'block' on the surface that meets the block. Once I get this gasket on the engine I will add some RTV. I want to get this all installed and tightened down good before the RTV starts to set up.
[This message has been edited by josef644 (edited 01-12-2010).]
Put an extra bead on RTV on the bottom part of the timing cover where the oil pan bolts on. There tends to be some oil seepage that comes from that area. According to the FSM you use a 1/4" bead.
Put an extra bead on RTV on the bottom part of the timing cover where the oil pan bolts on. There tends to be some oil seepage that comes from that area. According to the FSM you use a 1/4" bead.
Yeah I know. There was a set of instructions in the gasket set box specific to a 4.9. But thanks anyways Joe
Edited to add: Here it is all put together and ready to go back on the engine. All 10mm headed fasteners torqued to 62 inch lbs.
I started the fasteners in the water pump inlet as the bolts create the threads in all seven holes. I then removed the bolts. Then I installed the water pump and it's gasket. Lastly the water pump inlet and gasket on the back side of the timing cover.
This way I only had to deal with one gasket at a time instead of three items, two gaskets and 14 fasteners all at the same time.
The vice grip holder is holding the water pump against the timing cover until the sealer dries
[This message has been edited by josef644 (edited 01-12-2010).]
Thanks for info on the K-frame weak area-checked out mine & I see where the passenger side maybe could stand a little extra weld also, which I'll do-just for peace of mind?!? Question: Is the F-40 tranny a 6 speed automatic that is also manually shifted?? Our 08 Torrent GXP has a 6 spd like this. THANKS
Thanks for info on the K-frame weak area-checked out mine & I see where the passenger side maybe could stand a little extra weld also, which I'll do-just for peace of mind?!? Question: Is the F-40 tranny a 6 speed automatic that is also manually shifted?? Our 08 Torrent GXP has a 6 spd like this. THANKS
I don't know anything about the F-40 transmission. Sorry. Maybe someone else can tell you the answer.
The F40 is a 6 speed manual trans. The auto your referring to is a completely different trans. I know very little about auto's so I can't really elaborate.
Looking good Joe! Thanks for the concentration test! Your absolutely right... I couldn't concentrate at all!
[This message has been edited by Fieroseverywhere (edited 01-13-2010).]
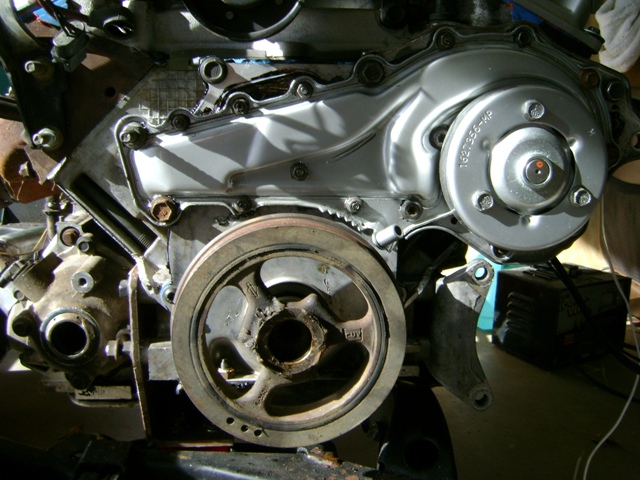
I installed the timing cover and water pump back on the engine today. Everything torqued to specs
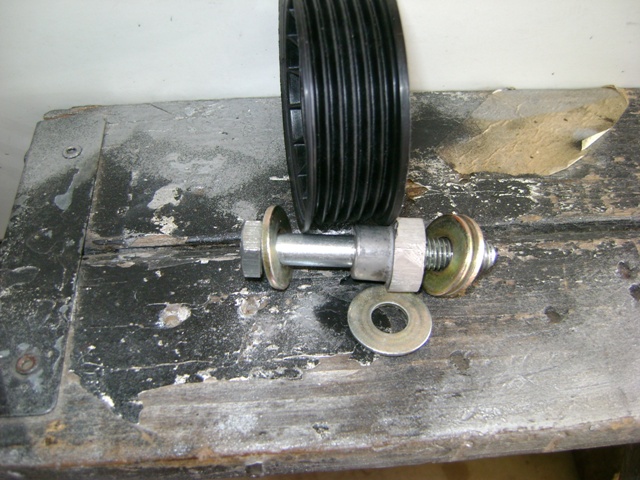
I am going to have to get a big bolt and nut to run this balancer back in the crankshaft. It is not long enough to reach threads with the washer behind the bolt head. I don't have any big enough in my bolts and nuts box
[This message has been edited by josef644 (edited 01-13-2010).]
I usually just toss a small wood block on there and tap with a hammer. Rubber mallet works also. Its a tight fit but it'll move.
Hmm. When I was finally able to focus long enough to follow the ball I found the test to be accurate (read covered bottom half of test with hand ). So all those times I got it wrong had to be from lack of concentration. Good show!
You can borrow a real HB installer from Autozone of O'Reilly. You can use the big hammer approach, but you risk screwing up the thrust bearing in the engine... does a 4.9 even have a thrust bearing??? I would not recommend using the crank snout bolt to pull it on either. Too easy to strip the threads.
ANY slack in the chain, @/or check the teeth on gears for wear-the amount of chain slack will sorta match the amount of gear wear. If the motor ran before a tear down-did it crank hard, run rough, not start or back fire? lots of miles could be an indicator also.
I'll give that a try. Do you use the block to move it all the way, or just far enough to engage the crank bolt?
Just enough to get the bolt started a couple threads is fine. The more the better though. The crank and bolt are hardened but the bolt "could" still be stripped. I use an impact gun after that. I've never had a problem and I've removed and installed this pully 6 times on my engine.
[This message has been edited by Fieroseverywhere (edited 01-15-2010).]
You can borrow a real HB installer from Autozone of O'Reilly. You can use the big hammer approach, but you risk screwing up the thrust bearing in the engine... does a 4.9 even have a thrust bearing??? I would not recommend using the crank snout bolt to pull it on either. Too easy to strip the threads.
Yes, it has a thrust bearing. No you do not need a BFH to do it. A smaller hammer works just fine. Its more the vibration that moves it then the force of a big blow. The wood block spreads out the force and keeps the pully perpendicular to the crank which aids it going on. The thrust bearings purpose is to absorb the movement of the crank. The force of the hammer is less then what the crank sees during normal use.
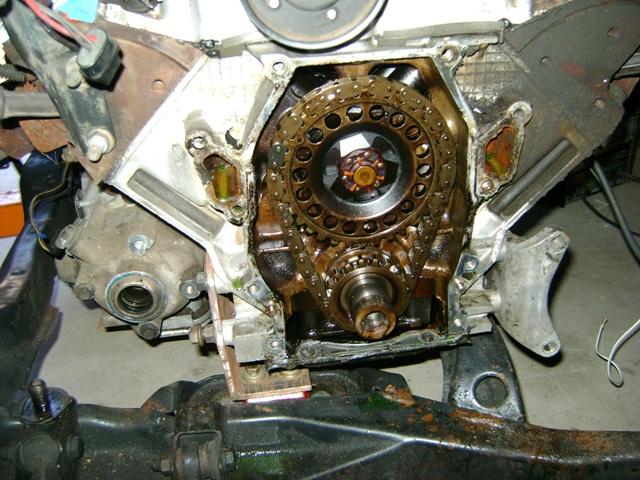
I wonder if any of the bolts go thru to the water jacket? When I changed the pump on this 4.9 the bolts all had sealant on them?
No, they don't. The sealant was probably just there from someone going overboard puting it on. The pump itself has only 4 bolts that even go into the block. All the others just secure it to the timing cover or screw into the inlet on the backside.
EDIT: This pic pretty much summs it up...
[This message has been edited by Fieroseverywhere (edited 01-15-2010).]
Vibrations eh. I guess I can use the air chisel to vibrate it back on the crankshaft. I'll try this today. Might just be an ideal way to get these back on.
The Haynes book I have says on 91's up to just use the crank bolt to pull it back on the crankshaft nose. I would think after it was on enough to engage some threads it will be fine.
I was a little concerned about about hammering against the thrust washer, but I had forgotten all about the " hits" it is taking while going down the road at 70 MPH
I wonder if any of the bolts go thru to the water jacket? When I changed the pump on this 4.9 the bolts all had sealant on them?
Rick I read the instruction on installing the water pump at AllDta.com, and from my Haynes. Hayne says "use sealant on the bolts immediatly next to the water passages on the block"
[This message has been edited by josef644 (edited 01-15-2010).]
Yes, it has a thrust bearing. No you do not need a BFH to do it. A smaller hammer works just fine. Its more the vibration that moves it then the force of a big blow. The wood block spreads out the force and keeps the pully perpendicular to the crank which aids it going on. The thrust bearings purpose is to absorb the movement of the crank. The force of the hammer is less then what the crank sees during normal use.
I did not say it couldn't be done successfully with a hammer or the snout screw, I was mearly pointing out the potential risks of each method. There are better ways to do this job with the right tools. And the right tool is available for loan at most major auto parts stores, so it costs nothing more than a trip down there to pick it up.
And to be absolutely clear of the thrust bearing purpose... yes it does control thrust movement of the crank. But like all the sleeve bearings in the engine, it is not designed to operate when there is no oil pressure. It is the presurized oil film between the bearing surfaces that keeps the parts from physically touching. There are precise tolerences in the bearing clearance that must be adhered to. If you deform or flatten the soft metal bearing even a couple thousanths of an inch when you beat on the HB with a hammer, then you may no longer be in tolerence. Yes the engine may run just fine, but longevity may be compromised.
It was only 45* in the garage. I left the HB in the oven at 145* for an hour. I used a 2X4 and a claw hammer. It went on real easy. I didn't have to hit it real hard at all. Supprised the ship out of me.
There are better ways to do this job with the right tools.
Agreed. There are some jobs that are just not worth the time involved in finding/renting/borring the tools. IMO this happens to be one of them. Thats all I was saying.
quote
Originally posted by josef644:
It was only 45* in the garage. I left the HB in the oven at 145* for an hour. I used a 2X4 and a claw hammer. It went on real easy. I didn't have to hit it real hard at all. Supprised the ship out of me.
Next
I've never heated one before. Bet that worked really well. One step closer Joe...
You know how hard it is to get a oil pick up tube started into an oil pump? I did this the same way. I made a black marker mark on the pipe end and the right spot on the oil pump. The oil pump in the oven for an hour at 180*. I left the pick up pipe in the freezer over night. Next morning I had the son-in-law hold the oil pump steady and line up the black marks. I steaked the pipe in with two hits of the hammer.
Make sure your wife is not home. When she comes home and asks "whats that smell" ya gotta say "I don't smell anything". Leave the room before she gets demanding.
Joe
[This message has been edited by josef644 (edited 01-15-2010).]
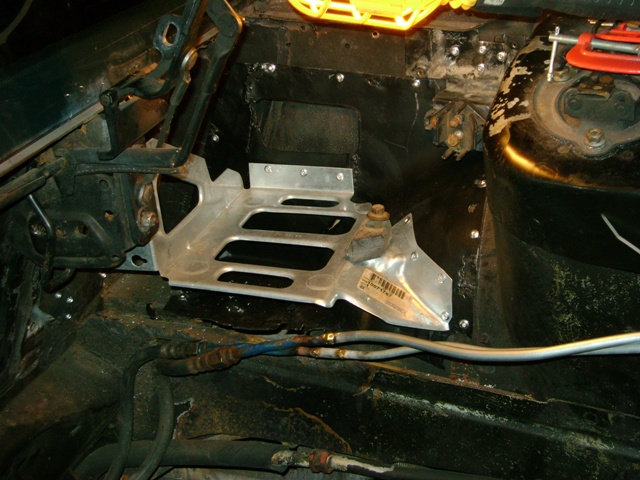
I installed the battery support and the black piece of metal that is underneath, and behind it today. These are two items much easier to install with the engine out of the bay:
[This message has been edited by josef644 (edited 01-25-2010).]
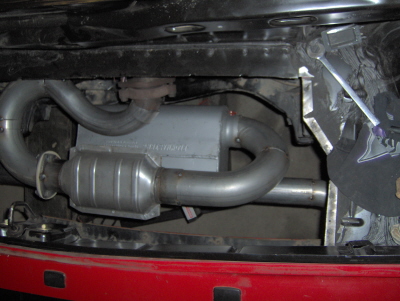
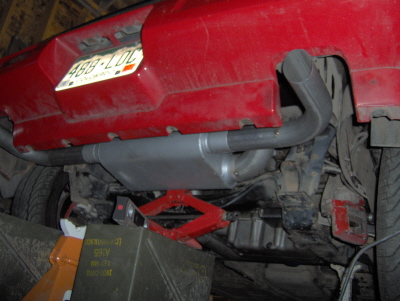
Uh....patiently waiting for some progress....... Where did you order the pipe from? I'm going to have to start thinking about exhaust for the XTC swap in a few weeks.
Uh....patiently waiting for some progress....... Where did you order the pipe from? I'm going to have to start thinking about exhaust for the XTC swap in a few weeks.
I got my mandrel bends, seat skin, cradle bolts, battery tray and my exhaust hangers in the mail and on the UPS truck yesterday.
Happy days are here again. I should be able to start getting some things done on this again. Money has been tight here, as it is at your homes too I would imagine. Money has bit us all on the butt
[This message has been edited by josef644 (edited 02-19-2010).]
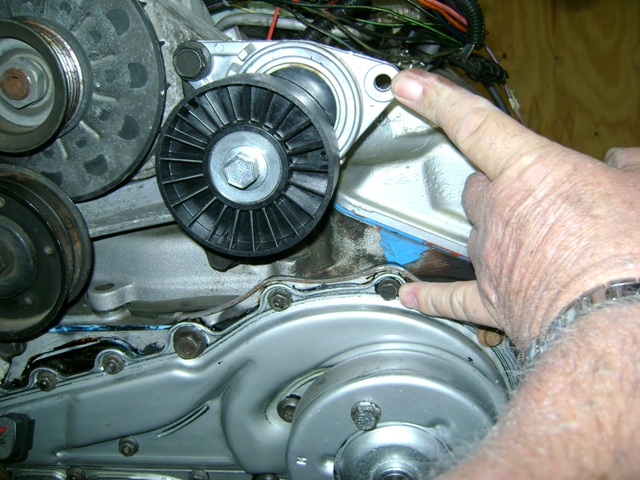
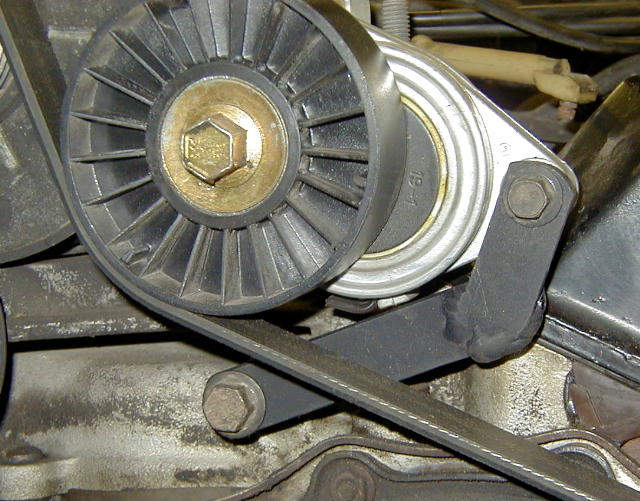
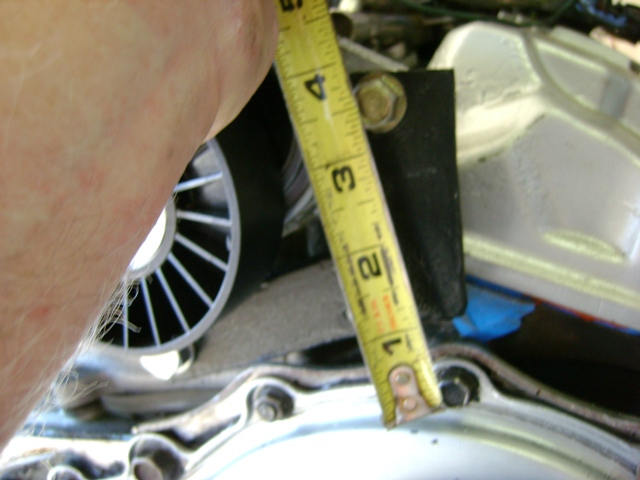
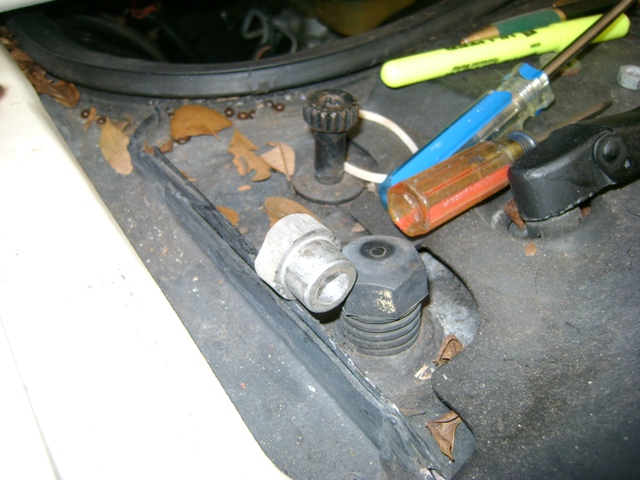
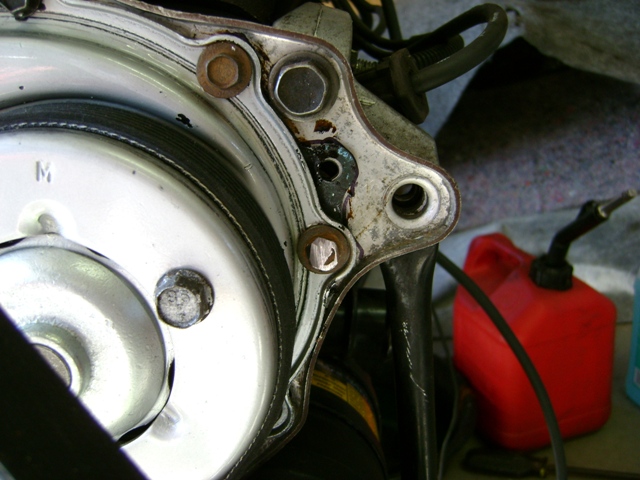
Anybody have the measurement between these two points? I tried to put a 79.5" belt from AutoZone on today. It was to small. I will replace it with a 80.2" belt tomorrow and see what happens with it. AutoZone offers a 79.8" belt also
I built my bracket leg just like this one OldBob built and used:
I was able to get some little things done in the garage today. I am debating on wheather or not to get some Dynamat to do the firewall with. Thats expensive stuff!!!!!
[This message has been edited by josef644 (edited 02-28-2010).]
80 1/8" belt was to large. I exchanged it for a 798K6 from AutoZone. This belt is between 79 1/2" and 80 1/8", or the neighborhood of 79 3/4". It is the perfect size.
[This message has been edited by josef644 (edited 03-02-2010).]
I went to both autozone and advance auto parts to find the right size belt. Each store carried different sizes.
I was using NAPA and A Zone. The belts run around $16.99 at A Zone, They were much more expensive at NAPA. I had ordered the 80 1/8" form NAPA, when I picked it up this afternoon they wanted $48.00 fo it. I think the gal ringing me up did something wrong. I told her no thanks, and drove 15 miles' to A Zoneand ended up using the 798K6 belt.
I left the tenisioner brace with my welder friend so he can weld it up tomorrow. After I paint it and install it, I'll pake a picture of it installed and give the measurement so it becomes easier to duplicate.
I was able to get some little things done in the garage today. I am debating on wheather or not to get some Dynamat to do the firewall with. Thats expensive stuff!!!!!
You can do it with stuff that's almost identical for under $30
Anybody have the measurement between these two points? I tried to put a 79.5" belt from AutoZone on today. It was to small. I will replace it with a 80.2" belt tomorrow and see what happens with it. AutoZone offers a 79.8" belt also
I built my bracket leg just like this one OldBob built and used:
I was able to get some little things done in the garage today. I am debating on whether or not to get some Dynamat to do the firewall with. Thats expensive stuff!!!!!
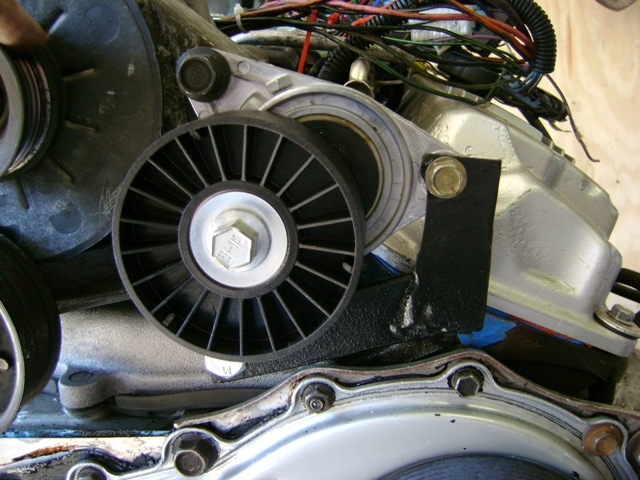
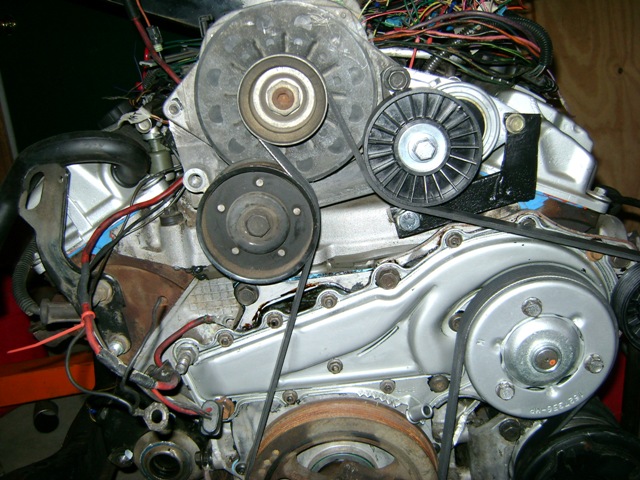
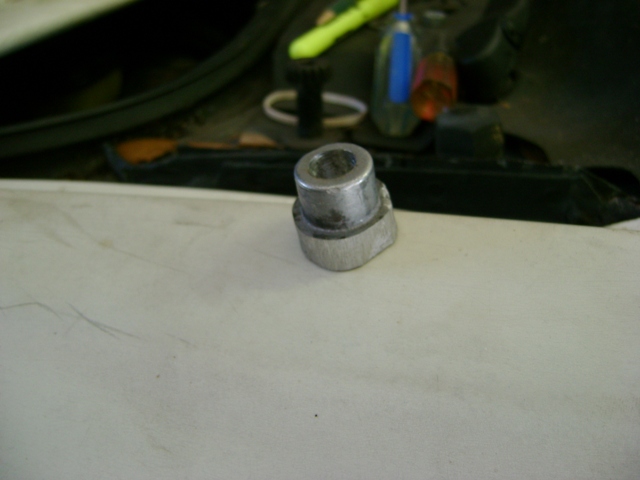
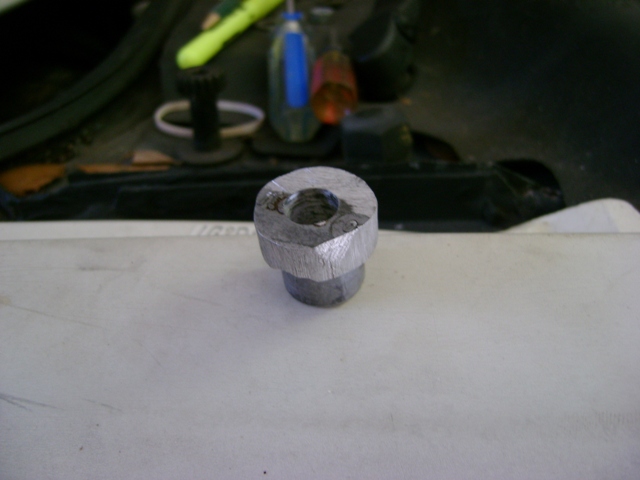
Pat, On the home made bracket the longer leg was 4 1/2" long X 1 1'2" wide, the short piece was 2 1/2 long X 1 1/2" wide. Both pieces were 3/16" thick. The measurement from the tenisoner to the water pump bolt was 3 1/2". There was an upright metal bracket that goes between the intake and the altenator mount. I kept it in the mix. I figured if it wasn't needed, GM would not have put it there in the first place. My Homemade bracket , copied from OldBob: I used a brass bushing that I had modified to 15/16" and put between the bracket and the intake manifold: Shot from underneath Everything tightened down and the belt mounted
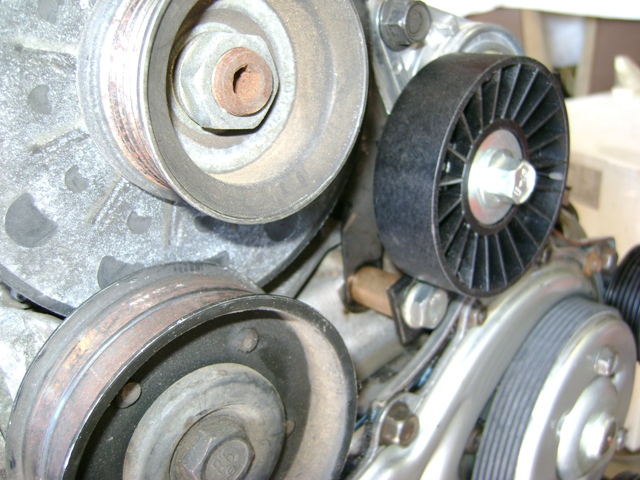
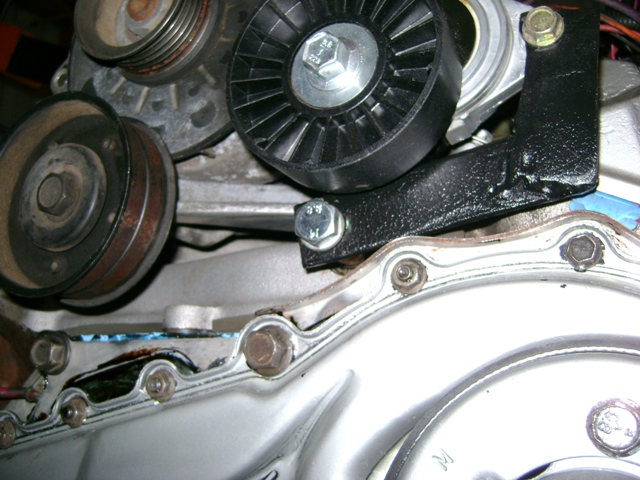
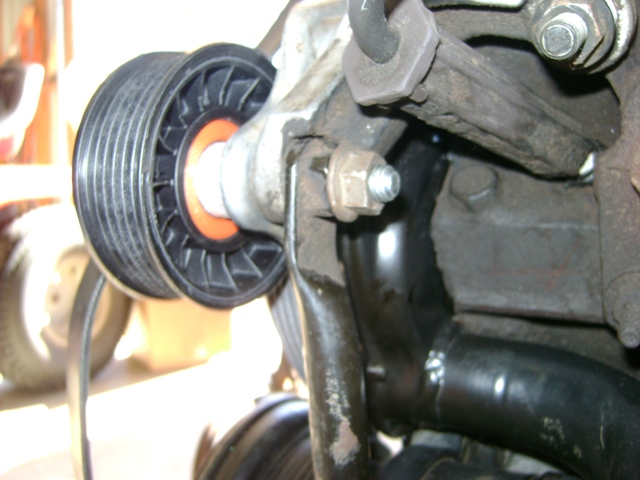
EDITED TO ADD: Some one was asking about how to mount the idler pulley for the belt. I sent him these instructions on how I did this, and have cut and pasted it here from his thread. I removed the mount for the idler pulley from the Cadillac belt tensioner with a hack saw. The stub is the correct dimension for the new idler pulley mounting hole. I drilled out the stub so a 10mm bolt would go threw the center. This was just short of 1/2". Some one here posted the space behind the pulley was about 1/2". Measuring the base of the stub, I added two flat washers behind it to make up 1/2". This bolt threads into the upright brace behind the water pump housing etc, while the lower end of the brace mounted to the AC compressor. Notice that I had to remove a bit off of one water pump bolt Jam nut on the back so the bolt doesn't back out and get loose
I had noticed that the off set wasn't the same on both sides of the pulley, one way was just a bit different. You might need to try both ways to see which way is best for your set up.
[This message has been edited by josef644 (edited 03-13-2010).]


 One step closer Joe...