I like the way you have it indexed. It was the same way I had planned on marking it up for welding.
No work on the Coupe today. Real job gets in the way sometimes !!! Might be Wednesday before I can venture in the garage. If I get a rain day I will spend it on the Coupe.
[This message has been edited by josef644 (edited 09-18-2009).]
Ordered a new VATS bypass from Baker Electrinix this am. I have one here, but be danged if I can locate it. If it comes up later I can sell it in the mall. $31.00 more on the list.
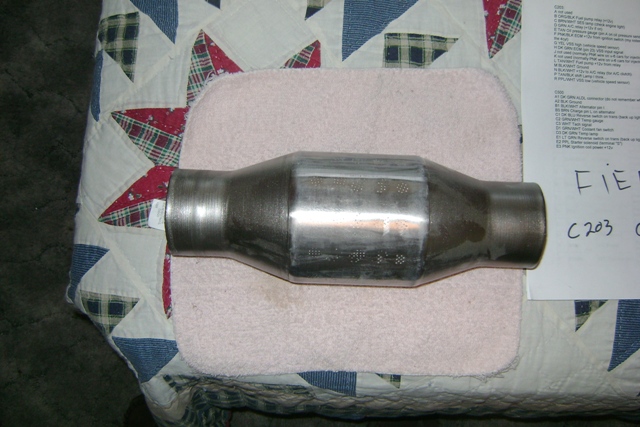
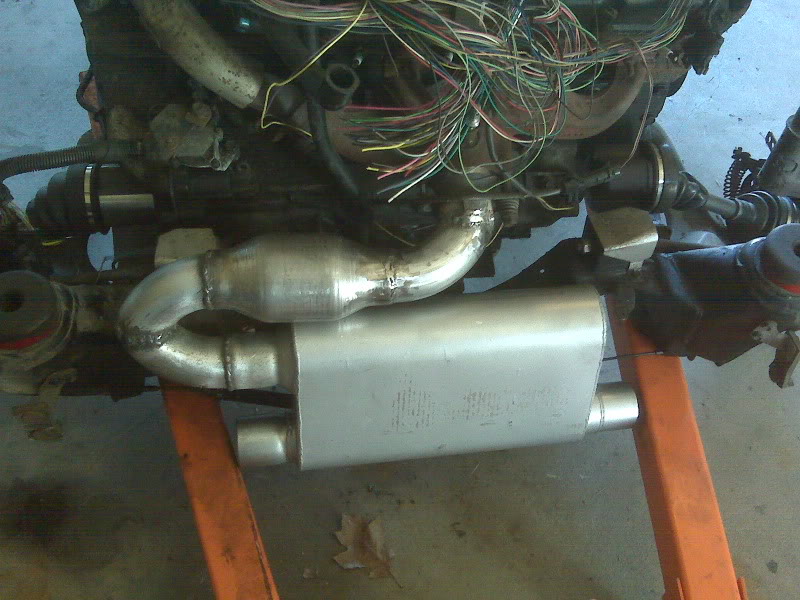
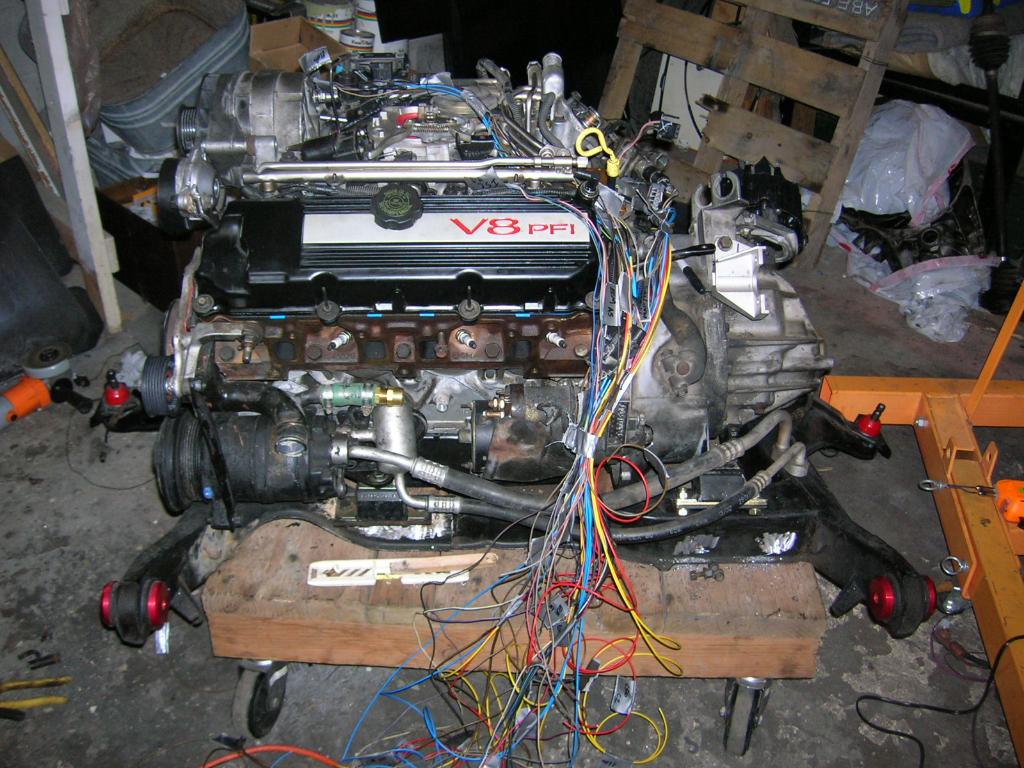
VATS by pass will be here today or tomorrow. I ordered for my exhaust a small round catalitic convereter today, $65.00 delivered. This one has the metalic insides. 2.5" Thunderbolt Metallic Catalytic Converter #415250. It is for up to 5.9L engines. http://performance-curve.com/ I will be copying this photos exhaust system, dont remember who I stold this picture from: I also ordered the two connectors that connect the tach and ingnition to the distributor. Got these at: http://www.repairconnector....subcatid/0/id/293731 Carrluvr had reccommended them . We have no wrecking yards here. I am 1 1/2 hrs away for any around where I live. Easier for me to order new ones, than drive 3 hrs and get filthy scrounging parts. Less than $20.00 delivered.
Raining here today, so I am gonna get to work in the garage. I will post any progress this afternoon.
[This message has been edited by josef644 (edited 09-24-2009).]
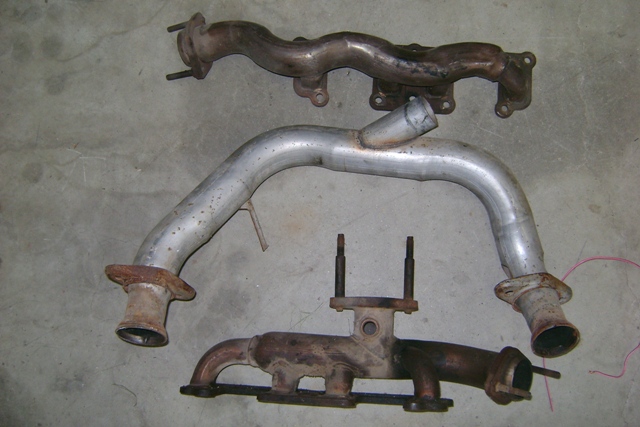
I purchaseda set of these exhaust manifolds and the crossover pipe back in March expecting to use them on my 4.9 swap: I tried to clean a spot and they clean up real nice with the air die grinder with a wire brush head insert. Mounted on FEW's engine I think:
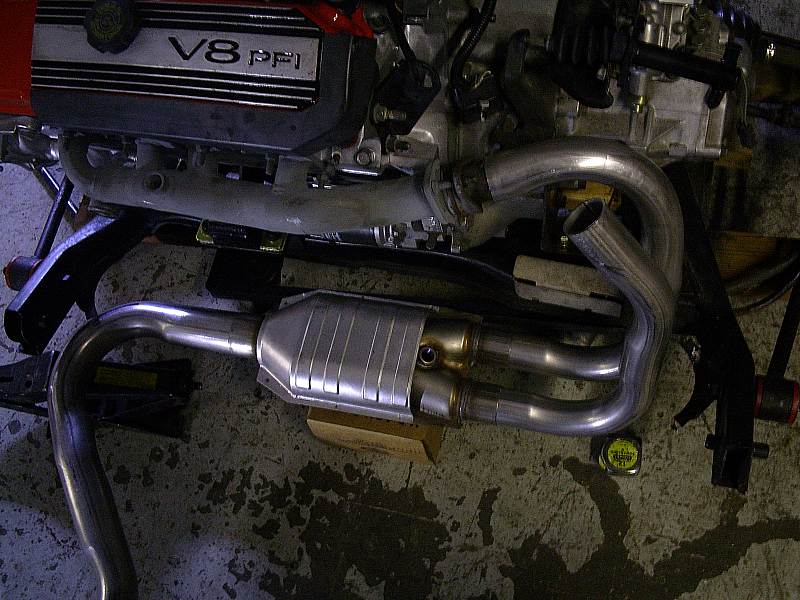
Are there any advanatages to using these other than loosing about 15lbs of cast iron off each head? I would think that the cast iron ones hold in the heat better than the stainless steel tubular ones. I am planning on using the Fiero AC hoses, and they pass right underneath the manifolds. A auto parts shop I go to said he can remove the round muffler can part on the Fiero AC hoses while replacing the soft part of these ac lines: and as seen in Dizzixx's pic this would be pretty close to the manifold. :
[This message has been edited by josef644 (edited 09-24-2009).]
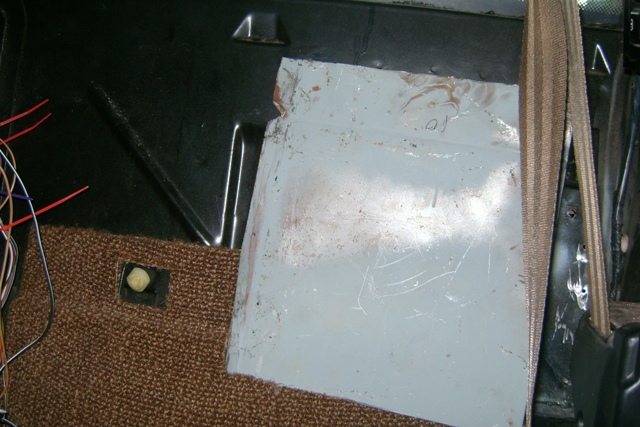
The PO had installed 6" round spearers in this huge hole. And yes that is the fuel neck hose you are looking at from inside the car. You can also see the transmission pan: An hour later I had this removed from the engine bay side: There is one on the passenger side also. I am gonna have to drop the engine to remove it as it's against the waterpump belt pulley. No wiggle room what so ever.
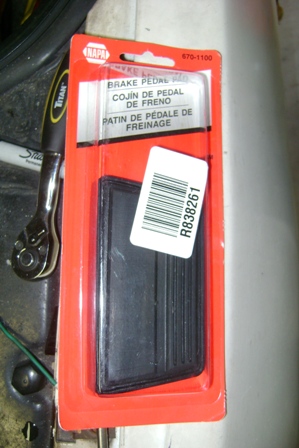
Got a call from NAPA, and this came in today on their truck. NAPA number 610-1100, $3.88 Cheapest part I had to buy yet:
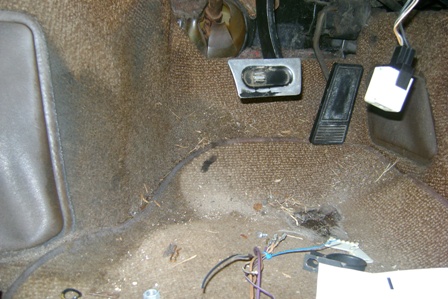
Before:
After:
[This message has been edited by josef644 (edited 09-24-2009).]
That is indeed a pic of my motor while I was building the exhaust. There are only a few advantages to the stainless manifolds over the iron ones. First, obviously, they're stainless. They just look better and have less rust over time. The second advantage (and the reason I chose them) is they are much easier to weld then the cast iron ones. For my install I wanted to route the exhaust in the factory place. This meant removing the center outlet in the one manifold. Simply capping the outlet wasn't good enough. The stainless just worked better for this. Third. If you plan on doing headers they are a great place to start. The flanges can be cut off easily and would make a great base for headers.
I don't see how either choice would be much better then the other given how your doing your exhaust. For your AC just make up a good heat shield to protect the hoses. I'd also wrap the AC hoses in fiberglass or equivelant tape for added protection. The iron manifolds do come with a small shield but its not enough. Make sure you use something in the area the small shield goes though. It protects your fuel pump connector on the firewall. Go ahead... Ask me how I know.
[This message has been edited by Fieroseverywhere (edited 09-24-2009).]
The PO had installed 6" round spearers in this huge hole. And yes that is the fuel neck hose you are looking at from inside the car. You can also see the transmission pan:
I thought my car was the only one. I guess I got lucky afterall. I only had 4" holes in my firewall... course it looked like mine was done with a chisel. Did they cut out the mount for the fuel pump and Ac relay on yours also?
[This message has been edited by Fieroseverywhere (edited 09-24-2009).]
Are there any advanatages to using these other than loosing about 15lbs of cast iron off each head? I would think that the cast iron ones hold in the heat better than the stainless steel tubular ones.
As stated above, the stainless steel manifolds would be a good base for some custom headers and that is probably the most significant benefit.
The cast iron manifolds are some of the lightest I have come across. The rear facing cast iron manifold I could easily weigh was only 6.5lbs... so using the stainless manifolds might save a total of 5 lbs. vs the 30 you were thinking about.
I think I'll just keep the cast iron manifolds and put these in the mall. Thanks to you both. Joe
Sold them already
[This message has been edited by josef644 (edited 09-26-2009).]
: Did they cut out the mount for the fuel pump and Ac relay on yours also?
Yep it's gone. I have spare metal now to replace it. I will use screws or pop rivets to mount it though, dont want to weld next to that rear glass. Joe
Then two connectors for the distributor came in the mail today. Catalitic converter I ordered will be here Wednesday or Thursday.
Edited to add:
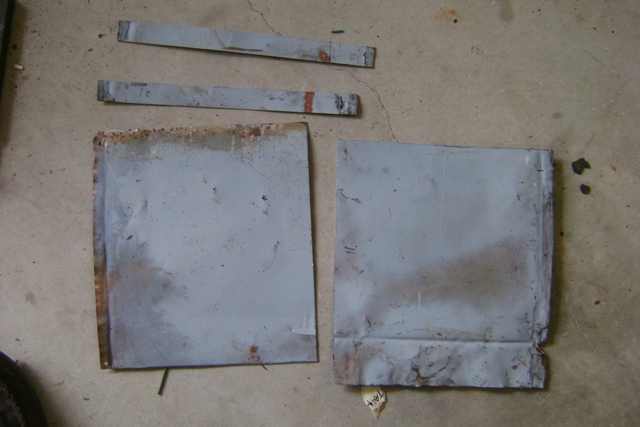
Spent an hour removing the second metal speaker box enclosure from the engine bay. What fun this was. Some one needs to be shot. This is the same shot as I used above , but lets you know what I am speaking of:
[This message has been edited by josef644 (edited 09-26-2009).]
1 new distributor cap from the local NAPA store. $12.00 more into the pot, or in then trash as my wife says. I thought it was supposed to be expensive because it fits a Caddie.
The SBC one was a buck cheeper. Didnt even have to mod this one to fit.
Installed the new gray Dist cap, coil, coil cover and added the new 'Tach' lead and 'Ign' leads before screwing it all down. I purchase a new rotor in the next few days.
[This message has been edited by josef644 (edited 11-03-2009).]
Today I made some progress on the harness. I had run and put all of the C203 wires where they needed to go and put a tie strap on them. Today I went back and added the C203 'J' & "K' wires and ran them out to the injector part of the harness. Started going down the list, B, C, D, E etc soldering them and heat shrinkng as I went. C203 'F' ( ECM ingnition) I also soldered to the powersteering input lead 'C'-09 so the Caddie ECM thinks the PS pump is working.
I havent wired C203 'G' in yet as I need or need to build a speedo filter. Will ground 'R' for speedo
Mowing day tomorrow as the rain is due back sometime Friday. I want to finish up the ALDL wiring tomrrow. I have it all laid out and tie strapped togeather. I want to get the ALDL finished up tomorrow.
If I stay away for a few days I forget what I was focused on when I quit. Takes a while to get back in the swing of things. C500 is all that is left to do of the wiring.
I need to think about dropping the gas tank to add the V6 fuel pump. I hate dropping Fiero tanks. I did it twice on my 86 coupe. Once for the pump, then a second time for a fuel guage sending unit repair.
[This message has been edited by josef644 (edited 10-01-2009).]
I havent wired C203 'G' in yet as I need or need to build a speedo filter. Will ground 'R' for speedo
I mailed this thing out last week. I wonder what the holdup is? The good news is the 4.9 doesn't need it to run properly. Just make sure you have the wires from the VSS connected to the PCM. The PCM cuts power output of the motor when it doesn't get a speed signal.
Might have been routed threw Canada with their Canadian Postal Service. Fatest route to Texas is threw Onterio from Oregon. If it doesn't show soon I will go to Radio Shack and score some parts. Thanks for sending it though.
Joe keep up the good work. I know what you mean when you say to have to catch up after being away. I have been very close to a test startup since mid august but other things take priority and then you have to figure out where you left off. My wiring is done with the exception of the a/c. I'll address that when I know the engine is running correctly. I had to order a new waterpump inlet housing as mine had a pin hole in the top of the return pipe. I am picking it up tomorrow and then reassembling the front cover water pump and lastly putting the belt on before a test fire hopefully by Monday. If you need any help feel free to bend my ear. Although there are many here who can lend a hand.
Wired in the ALDL this morning. I have 'M' position and 'E' position connected togeather so I can see if my Dodgerunner cable will run my TunnerPro software with my laptop. Ran the grounds from The ECM to the engine bay for a grounding eye.
There are two battery +12 Volt hot all the time ECM wires ( C16 & B1) that need to be connected. Where is the best place to connect these? Maybe the cigarette lighter wire? Hot all the time? Maybe not when the switch is in the start position. Might have to run a dedicated fused wire to the battery junction block beside the C500.
[This message has been edited by josef644 (edited 10-02-2009).]
Wired in the ALDL this morning. I have 'M' position and 'E' position connected togeather so I can see if my Dodgerunner cable will run my TunnerPro software with my laptop. Ran the grounds from The ECM to the engine bay for a grounding eye.
There are two battery +12 Volt hot all the time ECM wires ( C16 & B1) that need to be connected. Where is the best place to connect these? Maybe the cigarette lighter wire? Hot all the time? Maybe not when the switch is in the start position. Might have to run a dedicated fused wire to the battery junction block beside the C500.
Joe on the my GT there was an orange cable with a fusible link that connected to the Post below the c500 that originally fed the V6 ECU. I used this to connect to both 12+ connectors to the caddy's. I am doing an auto tranny. i am running into issues with the cable bracket and linkage. I bought the setup from Rockcrawl but it wont clear the exhaust xover and the plastic cable wont stay connected to the post.
I wonder if I need to add a fuseable link set up or if a fuse protected dedicated wire?
I connected a +12 volt battery lead to the PW switch ,(pink wire), and lowered the driver side window. It was sort of slow the last few inches. I ran it back up, and lowered it a few times. It was a little bit faster after the second cycle. I Had no movenent from the passenger side at all. I printed a troubleshooting guide from the 88 FSM to try to figure out what the problem is. I jammed a flat screw driver in the connector for teh pink wire and connected a setr of jumper cables to the frame and the screw driver. I wanted to be able to give it plenty of current to see how quick the windows moved up and down, and the headlight motors speed.
I was also able to check out the headlight motors. Both worked good, and were much faster than the ones in my old 86 coupe.
[This message has been edited by josef644 (edited 09-28-2010).]
Joe on the my GT there was an orange cable with a fusible link that connected to the Post below the c500 that originally fed the V6 ECU. I used this to connect to both 12+ connectors to the caddy's. I am doing an auto tranny. i am running into issues with the cable bracket and linkage. I bought the setup from Rockcrawl but it wont clear the exhaust xover and the plastic cable wont stay connected to the post.
That was it. I found the fuseable link and the weather pack connector still connected to the 2.5 ECM connector. It shares a common connector eye with the Alt and its fuseable link. Orange wire as you said, and it splits into two leads. I just need to route it into the cabin for the ECM +12 Bat feeds. Ya just got a + from me.
Big Help Thanks Joe
Spent the last hour finding all of the fuseable links that go to the junction block by the battery. I will now be able to power up the whole car at the same time now, or power up some and disconnect the others as I wish. Gonna be able to get some real work done now.
[This message has been edited by josef644 (edited 10-04-2009).]
It will be well worth it! Work has to take precedent though over the car
Looking good. Can't wait to see the final job.
That might be a while. I am planning on removing all body panels for painting. I will not remove any of the body untill I have the engine and transmissionn running like I want it.
CenTex in this picture you posted it appears that you have connected fuel lines with brass connectors. DId you cut off the ends and use ferrels, or are those GM flare adaptors? If they are adapters where did you score them? Or did you do something else I cant see from these photos? This looks like a good cheap simple solution for fuel line connections. Joe
[This message has been edited by josef644 (edited 10-06-2009).]
I was looking for ways to make the AC work in my swap. I wanted to have a good working AC in this Coupe after the swap was finished. I went to: http://www.acsource.com/ and found they sell GM compressor horizontal exit compressor hose blocks: and a high pressure retro fit kit:
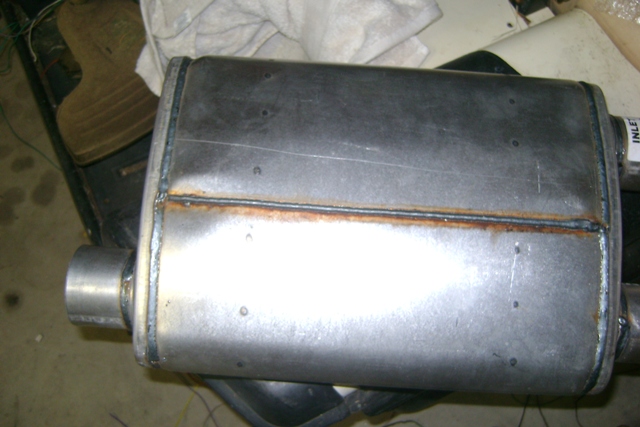
Problem: My car was a 2.5 so it had the high and low pressure swirches in the rear of the compressor. Problem number two is that the Caddilac hose set will not work in the Fiero engine bay. When we try to use the Fiero hose set on the rear of the Cadillac compressor it gets VERY close to the front side exhaust mainifold. Picture borrowed from Dizzixx's thread. You can see that his manifolds aren't even on the engine. The muffler is close to the manifold area:
Not good. The muffler on the Fiero hose set is in the wrong place also. The Cadillac compressor has no provisions for HI/Low switches on or in the compressor. So I need external Hi/Low controls.
Fix I can run the wire that goes to the rear of the car to the spare tire area and connect to the high/low switches in there. The accumulator has a port for the normally open low pressure /compressor control valve. The V6 cars do this already. The 2.5 accumulators have a place for this on them that is unused now. First connection. Wire in series. Second connection would be threw this always closed high pressure switch attached to the 134A high port fitting. Then return this wire line to the place it was cut from originally. Then to the rear so does what it was supposed to do, activate the compressor control relay position 'A'. This is the way it is wired in the 2.5's now with the V5 compressors. All 86-88's 2.5's. Just the switches in front now instead of the engine compartment. I will need to attach the hose block to the compressor. Also the metal part of the Fiero AC hose , the part that connects to the body lines. Then just get a measurement between the two. Send them my old hose metal end part. They will make my hose to fit between the lines and the compressor, and send it back to me free shipping.
Any thoughts?
Just went to RockAuto and looked up the Cadillac compressor. It is a HR6. I know some 88 V6's used the HR6
[This message has been edited by josef644 (edited 10-06-2009).]
Today I flattened out the Ex speaker boxes from above and took them to a friend of mine that has a sheetmetal shear. He cut the metal for me so it is nice and straight. I am gonna cover the two speaker holes with this metal. He also cut me some 1" strips so I can make some 'stand off'' s for mounting up things. The replacement piece just sitting over the hole not attached yet. This is good thick 55 Chevy fender thick stuff.
[This message has been edited by josef644 (edited 10-07-2009).]
I put a 5 spd drivers side CV axle in the transmission and hub on the right side of my car this morning. I left the axle nut loose with about 1/2" slack. I jacked up the hub a bit at a time and checked for 1/2" movement. After the cradle raised off of the jackstands I had a friend sit on the rear above the strus and bounce. I could not get the axle to bind. I tightened the axle nut and tried to dislodge the shaft from the tripod. Couldn't do it. I am wondering why folks are reccommending using a 90's GM minivan axle for this with the Fiero stick shift outer end installed.
Rockcrawl says for a 4T60E: "and a left axle for a manual Fiero on the right side. Some people have reported having problems with the Fiero axle on the right side, but they have always worked well for me."
What type problems? I read here where a swapper had axel bind and ruined a transmission. I could not make it bind. This axel seems to work just fine in there. I don't mind buying a different axle if it is needed, but if it isn't why waste $90.00. The minivan axle was $43.00+ tax and $40.00 core charge at my local NAPA.
[This message has been edited by josef644 (edited 10-08-2009).]
There can be alot of variations in engine placement side to side, front to back and elevation along with engine/transmission mounts and their allowable movement and overall suspension ride height. These all come into play in varying degrees with axle selection and provide opportunities for people to have different results in what worked or didn't work for them.
Another factor that comes into play is that some axles issues only arise when the car is being driven and experiences full droop or full compression. Depending on driving style, you can drive for an extended period of time w/o having any issues and think your axles are just fine. Then one day botttom out hard going over some tracks or catch some air over a road bump and end up with something breaking.
I always check for axle binding on my swaps. With the engine/tranny/cradle in the chassis with the springs removed from the struts and the rear hubs very close to proper alignment, cycle the suspension from full droop to full compression while spinning the hub by hand. It should spin freely and not have any binding... if it binds, find out why and work to fix the issue before you break something.
I didn't remove the springs, but used instead my neighbors big butt sitting on the strut tower to compress the spring,(250 lbs), and a floor jack to raise it as high as I could get it. I still had close to 1/2" play in and out with the splined end of the CV shaft all the way up and down. No binding at any time. While checking it again this evening my inner boot let loose while I was turning the wheel by hand. The wheel end was all the way down. So, I gotta replace the inner boot next week.
Thanks for the reply Joe
[This message has been edited by josef644 (edited 10-08-2009).]
Got some wiring finished up today. I was able to figure out the wiring of the fuel pump relay. No big deal ya say? 2 wires from the ECM, 2 from the C203, 5 from the relay, 1 from the ALDL and 3 from the oil pressure switch. 13 They gotta be correct or no go with fuel. The fact that the wires switch colors sometimes didn't help. Tan and wt at times, gray others. Four of these all join hands in harmony, solder and heat shrink, the ALDL G, C203 L, OP sw, and relay feed 'B'.
What did help was identifying the wires pin positions on the relays, OP sw connector, ECM plug, ALDL connector and the C203. I did all splices inside the cabin if at all posible so the joint wasn't exposed to under the hood conditions. Connectors C203, C 502,C500 etc are not always identified in wiring diagrams.
I think I was sort of putting off finishing up my harness because I was not understanding how to join these up correctly. I spent an hour yesterday evening just looking and reading diagrams. I was comfortable with joining them togeather today. Glad this part is over. I'll do the AC relay Sunday morning. Ruckus day is tomorrow, so no working on the Coupe. Chat ya Sunday. Later Joe Crawford
Thanks Joe. I'm glad I could help. I just got my new water inlet in the mail and got the whole timing cover/waterpump/inlet assembly back in place. This weekend I will be test firing the car for the first time. I wish I would have known you needed a battery tray. I cut mine out because I relocated my battery to the front. It sits in a box of scrap metal right now. No rust at all.
[This message has been edited by Carrluvr (edited 10-09-2009).]
Got my CV inner boot and the CV band pliers today so I can swap out the boot I busted this morning checking for axle binding. I removed the strut spring and put it back togeather. OH, and no binding. Just a busted inner rubber boot. $30.00 more in the trash can. I am gonna keep the CV boot band pliars this time. I got a new set, they are only $16.00 at A-Zone. I also get to replace the strut spring too!!!! I just love this. Joe
Thanks Joe. I'm glad I could help. I just got my new water inlet in the mail and got the whole timing cover/waterpump/inlet assembly back in place. This weekend I will be test firing the car for the first time. I wish I would have known you needed a battery tray. I cut mine out because I relocated my battery to the front. It sits in a box of scrap metal right now. No rust at all.
Do you still have the top part, battery tray? The piecs that the battery sits on? Not the battery support, thats the piece spot welded in the engine bay. I need the top piece. Sometimes it has been riveted to the support. They are $33.00 new at TFS. Picture lifted from The Fiero Store: Tray Support Joe
[This message has been edited by josef644 (edited 10-09-2009).]
I really wish I knew you were doing this swap before I left the country. You could have taken my 4.9 and used it to mock up parts from and/or as a reference for needed parts and ideas. Ed Parks did the swap on mine so I feel good about the workmanship. I would recommend two things though while you have it out....new tranny gasket and oilpan gasket...they are going to be a bear to change out and mine have slight leaks...cork...go figure. I plan on getting and installing the type that you cannot overtighten.
Do you still have the top part, battery tray? The piecs that the battery sits on? Not the battery support, thats the piece spot welded in the engine bay. I need the top piece. Sometimes it has been riveted to the support. They are $33.00 new at TFS. Picture lifted from The Fiero Store: Tray Support Joe
Yeah I believe I do let me look to see what it looks like for you.


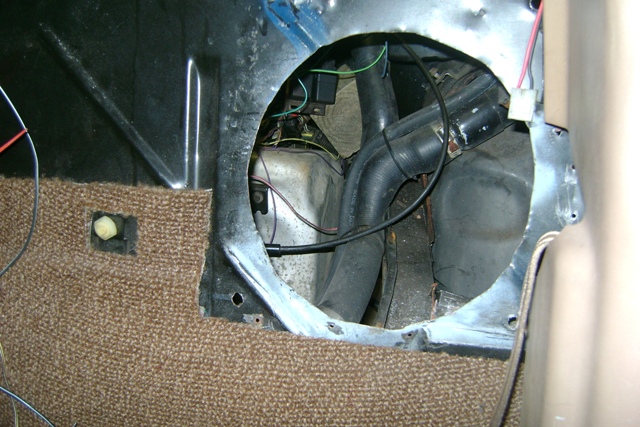


 Did they cut out the mount for the fuel pump and Ac relay on yours also?