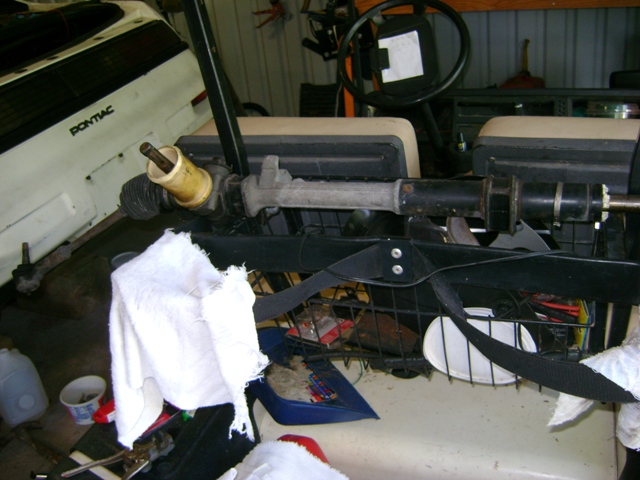
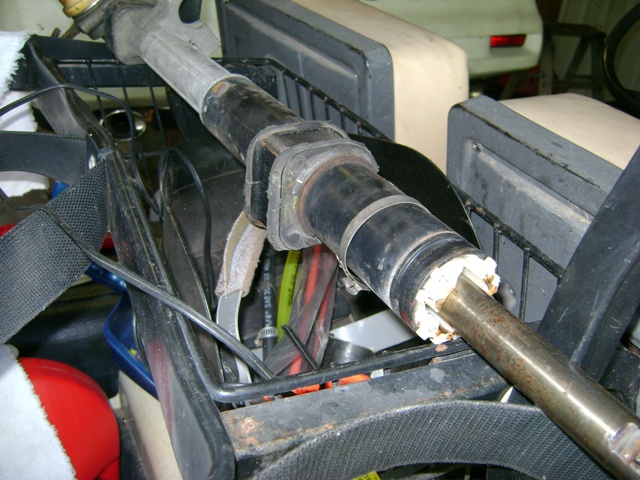
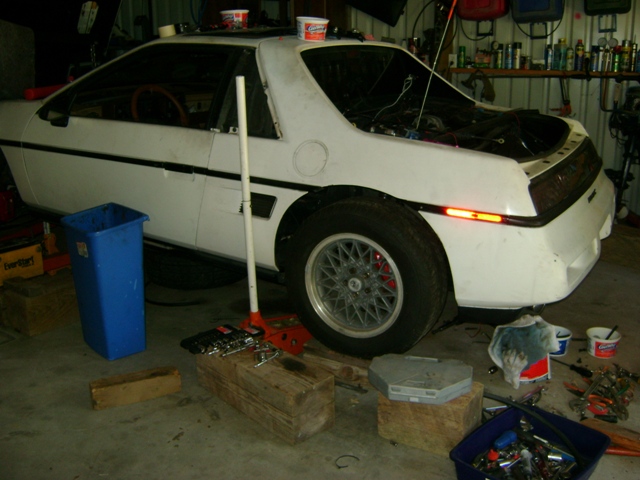
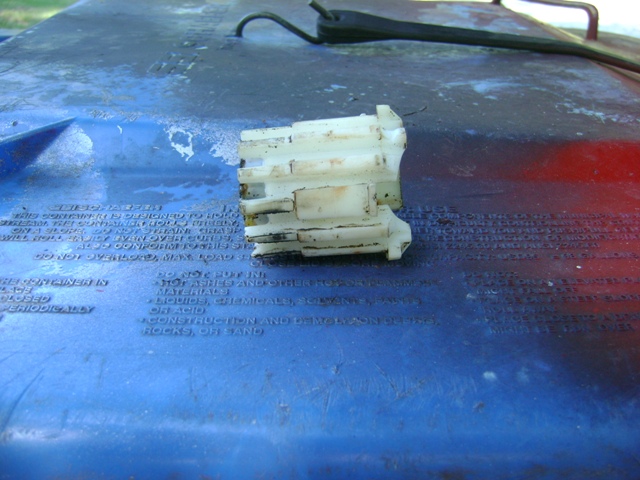
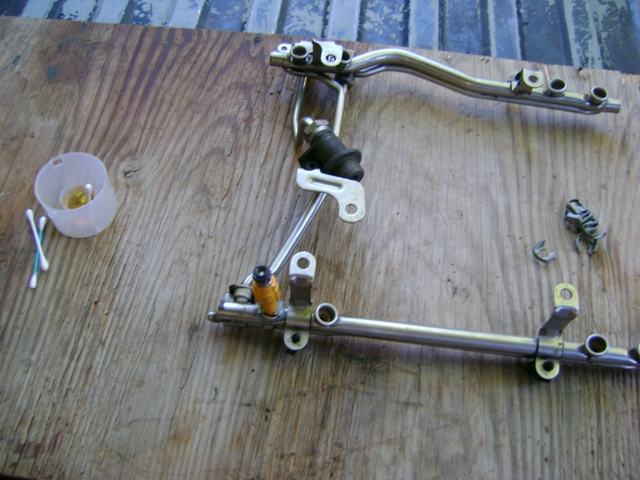
Removed the rack from the car this morning. It was a piece of cake. Removed the two mounting bolts I had left in place. Loosened and opened the coupler and moved the rack forward to un couple. Removed the brake line fastener that lives under neath the brake master cylinder. I had some slack in the lines. Removed the one brake line fastener on the passenger side. Mover the rack to the passenger side to get the outer tie rod clear, raised it upwards . Then just lifted it out on the driver side. About 10 minuets total. I used a small hammer to re seat the plastic bushing. Wish I hadn't. Now it is seated in there and I'll have to play with it to get it out of there.
I'll be ordering my rack bushing from Rodney Dickman Tuesday.
My back is giving me fits again today. I didn't sleep to good last night.
Maybe some more later.
Lowered the rear of the car to where the trailing arm mount was on wooden blocks 12" high. One 10 X 10, and one 2X4. Tomorrow I am gonna use a level to get the camber set pretty close by the bubble and tighten it down. This will get the rear tires pretty flat and square on the ground. Then the rear wheels will go back on.
Went outside after supper and used the level on the rear rotors to square the camber. Tightened everything down.
Wheels go on in the mroning.
[This message has been edited by josef644 (edited 07-26-2010).]
Decided to just leave the car on jack stands and wooden blocks until I get the rack back in the car. It is so easy to get underneath there right now why change it? Got the wheels and tires uncovered with junk and out of the back of the garage. Ready to go back on the car.
Walked around the car one more time with the vacuum bleeder to make sure all was well.
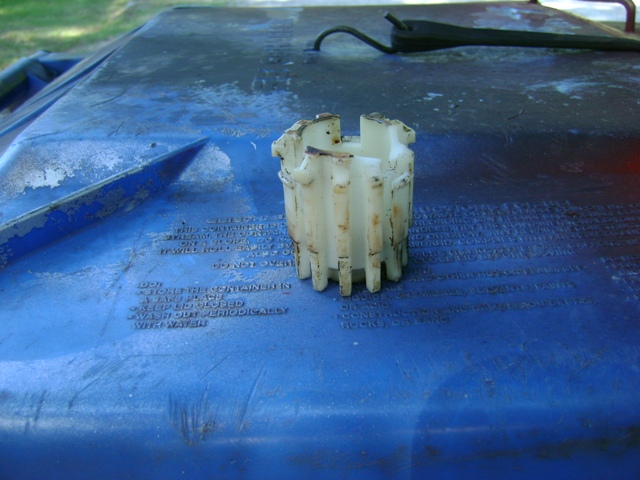
Used three small flat blade screw drivers to lift the locking tabs on the old rack bushing. I got it out enough to drive it out of the tube.
Ordered the bushing from Rodney Dickman this afternoon
Bushing shipped Wednesday morning.
[This message has been edited by josef644 (edited 07-28-2010).]
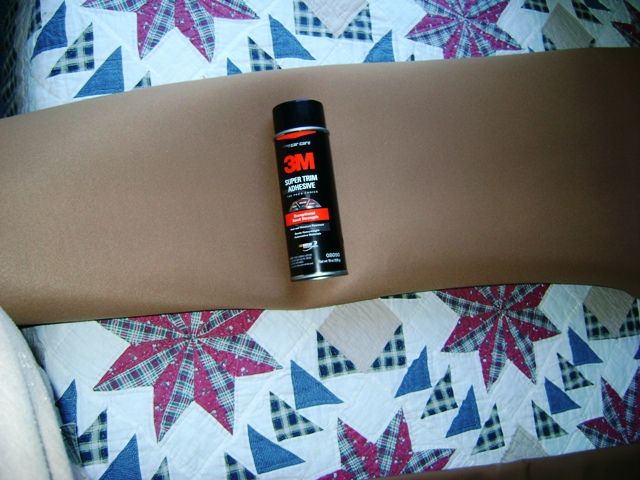
I got a 4 foot piece of beechwood headliner fabric, 3 foot of the same color vinyl as my seats, and a can of 3M Super Trim Adhesive. The 3M stuff is $20.00 a can now. I am gonna cover the firewall cover I got from MstangsBware on the end of June. It is in real good shape, just dirty and nasty looking.
and
I put the rear wheels on the car this morning. Looks more like a car now than a swap in progress.
After installing the vinyl on the firewall cover I am not happy with the 'Plastic' look, and have trashed it in the can. I prefer the one in the car now.
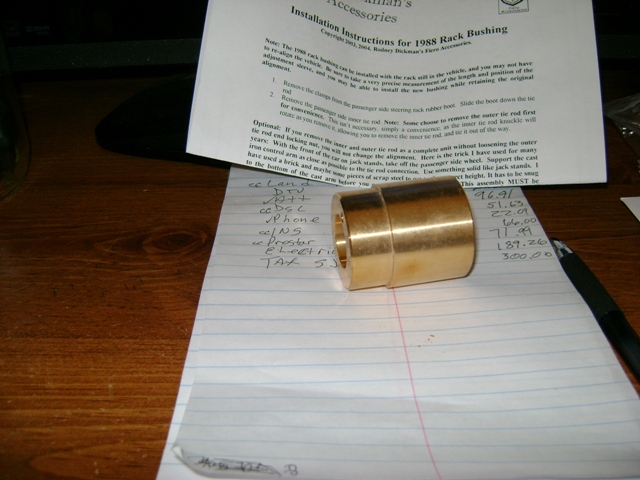
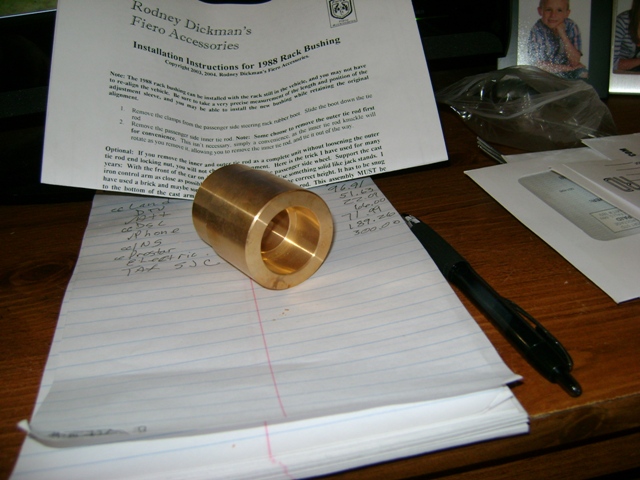
Got this in today's mail: and
Nice instructions, and appears to be well made. I will photograph the install and post them up for prosperity. I am gonna try to do this Sunday morning.
[This message has been edited by josef644 (edited 07-30-2010).]
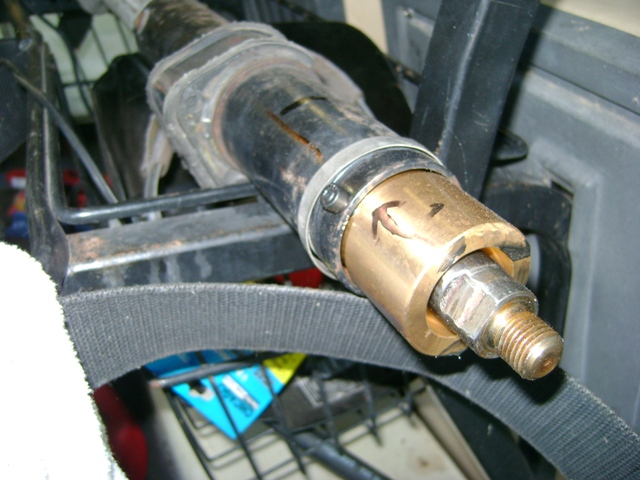
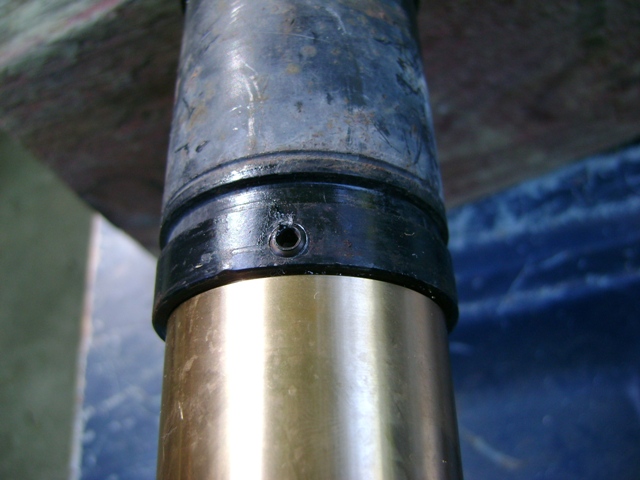
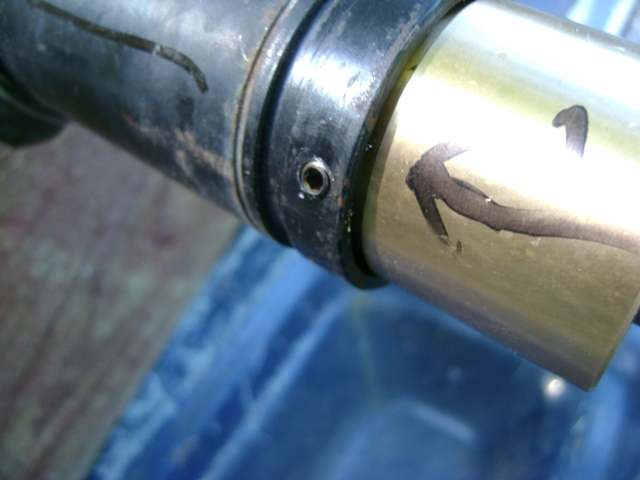
I installed the rack bushing this morning. At first I used a 10-24 Allen head screw to hold it in the rack tube. But ran into a fit trying to get the bellows boot over the heads Old one out and drilled the first hole and threaded the hole. Installed the first Allen screw. Removed the Allen screws and installed two Allen set screws until flush with the outside of the tube. other side too
I am out of Loctite, and will have to get some and use it before staking these. I want to install the rack back in the car in the AM
This rack issue was just a pain in the rear end, but wasn't hard to do as Fiero repairs go at times.
Even though it was pain Joe, you will really like how "tight" the steering wil be.
Pat
Pat I have never driven this car, so any feeling transmitted threw the steering wheel, will be 'tight'. No problems tomorrow and I'll get to change that soon.
I finished up the rack this morning, and installed it on the car. The coupler is a 'HOE". there is no other word for it. After fighting it for a while, I remembered someone said to take it off of the steering column and put it on the rack, then put it back on the steering column. So that's where I am at now. Both front wheels are back on the car. Made a quick look underneath the car to look for any thing hanging down or loose before lowering it down all the way.
Stay tuned.
Got all 4 wheels on the ground, started it up, I now have a Service Engine Soon light on all the time. Also the Temperature light comes on as soon as I started the engine. Great time for the batteries to die on my AutoXrtay 5000. Switched those batteries out. Couldn't find the battery hold down bolt, used a substitute. Backed the car back out of the garage the first time. I have a nice 'Reverse' engagement , and it lunges forward a bit when I put the shifter in Drive. This is our only automatic car. Checked the transmission fluid. It needed a quart to reach the full marks. Torqued all 20 lug nuts to 100 Ft lbs.
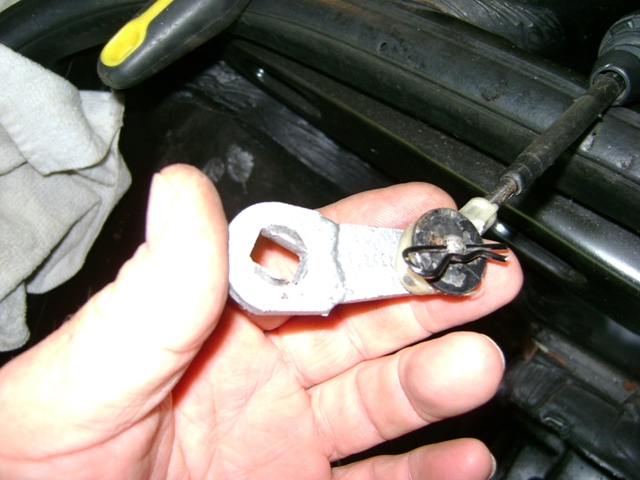
Backed out of the garage in to my street. The shift cable came off of the stud. Cant get the transmission in "Drive". Great parking brake, while I went back in the garage for a long screw driver . The cross over pipe is very warm by now.
Drove 1/2 mile around my block, then back in the garage. I had loosened the lower radiator hose to move the clamp out of the way when I was removing the rack. Nice little leak there now. Tightened that down good. By now the temperature light is just flickering on and off. I am just gonna un plug that thing. I don't want to have to look at it.
Drove around my 1/2 mile block three times. Looks like the speedo is working OK. It agrees with the speed on the scanner unit pretty well. I have 1st and 2nd gear, I will have to fix the shift cable coming off problem before I will get it on the County Road to check for 3rd and 4th gear shifts.
I have nice brakes. Something positive!!!!!!!!
The exhaust is a bit louder than I was hoping for. It sounded pretty good when I got down in it once for just a second or so.
So I now have about 2 1/2 miles on my Fiero.
To hot in the garage now, heat index is supposed to be 108* here today. 4 1/2 hours in the garage this morning, and I am soaked all over. Time for a good shower.
Driving this car was neat !!!!!!!!!!
Backing out reminded me why I love power steering.
All four on the ground.
[This message has been edited by josef644 (edited 08-02-2010).]
Sounds alot like my first drive. Its the time when alot of problems come to the surface. Dial her in a bit more and go for that second drive. I'm pretty sure my 3rd drive was the best. Congrats Joe!!
I had a huge constant smile for a week after that first drive! WOO HOO!!!!
[This message has been edited by Fieroseverywhere (edited 08-03-2010).]
Sounds alot like my first drive. Its the time when alot of problems come to the surface. Dial her in a bit more and go for that second drive. I'm pretty sure my 3rd drive was the best. Congrats Joe!!
I had a huge constant smile for a week after that first drive! WOO HOO!!!!
Sounds alot like my first drive. Its the time when alot of problems come to the surface. Dial her in a bit more and go for that second drive. I'm pretty sure my 3rd drive was the best. Congrats Joe!!
I had a huge constant smile for a week after that first drive! WOO HOO!!!!
Yep I gotta big smile this morning. Drove it about 4 miles in my neighbor hood. Temperature is hovering around 198*. Its 91* outside at 9:30 am. I might need a jacket.
FEW what does BLM mean exactly? I read once where you said it should be around 125. Mine is just 25.
Just found this on the net:
quote
The BLM is a long term adjustment , which is stored pretty much permanently (unless you disconnect power to the ECM), to the fuel delivery calibration that results from the ECM "learning" the values while you are driving around. 128 is the ideal value, because it is the center point of the range 0-255. Above 128, and the ECM is adding fuel to compensate for a lean condition at a particular load and RPM. Below 128, and it represents a correction for a rich condition."
I got fast enough today to see my 3rd gear engagement on my scanner. Gonna try for 4th gear this evening on the County rd .
Done some little stuff to the car and cleaned up the garage some.
Shift cable modification:
Today is a milestone with this car. I rolled it in the garage and started raising it up one year ago tomorrow.
[This message has been edited by josef644 (edited 08-03-2010).]
That quote pretty much covers it. The PCM need a bit of driving to fully calibrate the fuel delivery system. The calibrations are stored in the PCM in BLM "cells". There are several different settings depending on RPM's and air flow.. I'll have to double check the service manual tonight for the best explaination. Raydar is WAY more farmiliar with this stuff then I am at the moment. You might want to PM him as he can probably give a better explaination.
I usually look at the fuel intergrator (INT) as a more "real time" look as fuel compensation. This is the fuel trim values based on the stored data in the BLM's as the starting point for fine adjustments. Same as the BLM values, 128 is the mid point for INT. Higher then 128 fuel is being added. Lower = subtracted. This may help also... http://wiki.3400z24.com/ECM_tuning#BLM_Cells
When you can, you need to get the car out for a real drive so it can properly learn the full range. My 4.9 seems to run best when the battery has not been disconnected recently. That usually clears all this stored data and it takes a little bit to fully rebuild these cells with new data. When new, this PCM was very advanced for its time. These engines and fuel delivery systems were considered to be the "high technology" of the time.
EDIT: Just double checked my scanner. On these auto-x-ray scanners they show up as...
Left & right intergrator. (fuel intergrator or INT) Left & right block learn. (BLM's) Block learn cell. (cell number for stored data)
BLM's and INT should stay at 128 until the car reaches "closed loop". In order to reach closed loop coolant temp must be 180 degrees or higher, a 60 second time delay must have passed, and the O2 sensor much show enough movement. Only then with the PCM command closed loop. Then it will start adjusting fuel trim with BLM and INT values.
[This message has been edited by Fieroseverywhere (edited 08-03-2010).]
Texas has a "de-lemon" law for registering an out of state car for the road. I got this car in Florida. I can title the car in my name with out passing a safety inspection. I have to drive it to an inspection station, to get a form there, to take to the court house for license plates. Drive it down the road with out plates and inspection sticker is illegal. You can't pass inspection with a Service engine soon light on. I have one, but it is just ECM memory, battery has been disconnected one. I have to let it run or drive it for the ECM to clear the code. I have had my Texas Title for 10 months or so.
Contradictions
Looks like I will be doing some 'illegal' driving around dusk or so to get my ECM happy. Back roads here I come. I Want to see how the temperature runs with the car doing 50 MPH anyway. I found an entry on the scanner this morning that says open loop, and the fuel was rich. I'll have to look for the 'INT" messages
Thanks for the information.
Joe
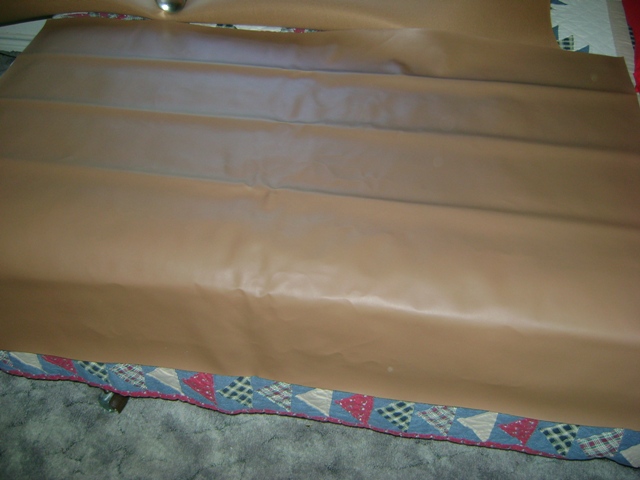
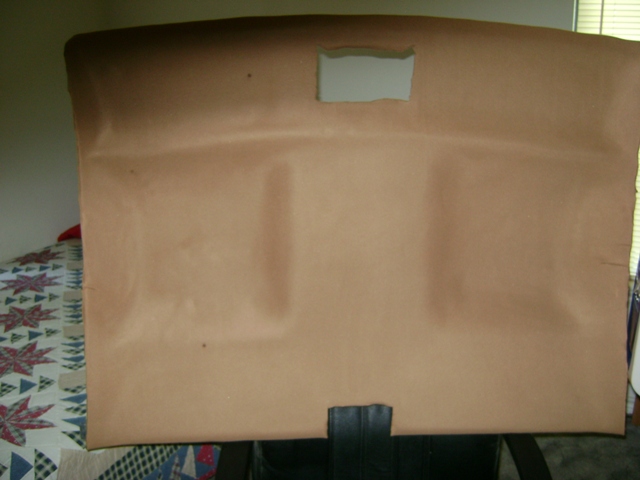
I thought I would try to get something done on the back porch before it got up to 98*. I covered the head liner with some beachwood fabric. The can says to wait about 2 minuets before putting the pieces together. WRONG. when it's 95* ya gotta hustle. The adhesive looses its 'sticky' faster than when its only 80* or so. I have put these on before, and did one half at a time. About a quarter at a time is what I recommend on real hot days like today.
The two spots are sweat drops and are gone by now I hope. Yes, I see the 'Boo-Boo' right over the drivers door.
[This message has been edited by josef644 (edited 08-03-2010).]
The "keep alive memory reset" will not keep the check engine light on. It is a code that is stored but does not light the dash light. If your light is on full time you have another issue. On my scanner I think I have to arrow right to see the rests of the codes. Can't remember right now and don't have any codes to check to verify.
Also, you do not have to wait for the PCM to clear the codes. You can do it right from your scanner. With the exception of the memory reset code that is. I can't clear that one no matter what I try. Try clearing them first and see if your dash light doesn't turn off. If its an issue it will come back on in a few second to a minute depending on the problem. Here is a list of codes for the 4.x engines... http://www.cadillacforums.c...des-4-x-engines.html If the #52 is the first one that pops up then your other code must be higher like #53-#98. Those higher number ones tend to be intermittant codes and may have already been fixed.
Come to think of it, Does your light ever turn off? It should come on for a few seconds when the key is turned on. Then it should go off. It will do the same after startup also.
The "loop status" line on the scanner that says "open loop" will change to "closed loop" when the proper conditions have been met. You can pretty much bet it will run rich in open loop because the PCM is working off a preset fuel/timing table at that point.
[This message has been edited by Fieroseverywhere (edited 08-03-2010).]
I will try the code scroll thing right now . Be right back.
Ok I have a codes 53 and 65 also, E65 - Cruise Servo Position Sensor Signal Problem. I don't know if that is the one that is throwing the light or not. I don't have cruise on my car. But I know the Caddie did.
I unplugged my head temp sensor. My temperature light is out now. I am gonna cut and re connect the two wires and see if that corrects the problem.
[This message has been edited by josef644 (edited 08-03-2010).]
I will try the code scroll thing right now . Be right back.
Ok I have a codes 53 and 65 also, E65 - Cruise Servo Position Sensor Signal Problem. I don't know if that is the one that is throwing the light or not. I don't have cruise on my car. But I know the Caddie did.
I unplugged my head temp sensor. My temperature light is out now. I am gonna cut and re connect the two wires and see if that corrects the problem.
I'm not sure if the cruise code will keep the light on either. I've never had cruise with mine. Chip programming turned off the codes for cruise entirely. Looking at the diagrams here you may be able to jumper PCM pins B3 & B4 to fool the PCM into thinking the servo is fine. I can't be positive so you may want to check with some people that have solved this problem before trying.
#53 will deffinately set the light. Once the signal is reconnected this code should move to memory turning off the light. Try clearing it and see if it comes back. If it does you have an issue with either the distributor connector or one of those 5 wires at the PCM. If it doesn't come back you probably already fixed it. Probably just a loose wire if anything.
Head temp sensor could be wired backwards. Sounds like your thinking that also. When the temp is high enough it should ground out D3 of the c500 lighting the dash light. If you have done the temp gauge/light fix listed on fierosails.com D3 may or may not be the right pin depending on how you did the fix. When I did mine I switched C2 & D3 at the C500, then switched the 2 pins at the gauge cluster. If you switched at the sender instead of the c500 yours may be slightly different.
Found the other codes!! One step closer Joe.
[This message has been edited by Fieroseverywhere (edited 08-04-2010).]
Oops, I wrote 53, it was supposed to be E52. So just forget the 53. I know all about the 52. I lost it once after I let the car idle for about 20 minutes in the garage.
When I did my temperature gauge pegging fix I did it at the ingition switch connector, and the speedo connector as described by "TinMan" at the Michigan Fiero Club.
One year ago today my 88 Coupe was pushed into the garage to start on its engine swap. Today I can back it out under its own power.
5:00pm and it's 104* on my back porch, no idea what the heat index is
[This message has been edited by josef644 (edited 08-04-2010).]
According to the service manual E65 should NOT set a light. Are you sure there are no other codes?
Per the service manual regarding E65 specifically...
Circuit Description: Code E65 will detect a cruise control servo position sensor shorted to ground. The cruise position sensor is a variable inductance sensor whose inductance changes with servo position. Code E65sets when the PCM detects a low voltage indicating a short to ground in the cruise servo position sensor circuit.
Test Conditions: Tested continuously.
Failure Condition: Servo position 6.3% or less for 1 second. (I'm guessing compared to VSS signal)
Actions taken: Disable cuise control. No service telltale.
If you need I can scan these 2 pages in tomorrow for you to look at yourself. There is a long diagnostic checklist but they are a PITA to read because we don't use the onboard scanning system. I've had some practice so I can figure it out. In a fiero wihtout cruise we have to check PCM B3 & B4 with a multimeter. B4 should provide the 5V signal and B3 accepts it (minus changes from servo coil for cars with cruise).
To me it sounds like the PCM is looking for a 5V signal at those wires (B3 & B4). Should be able to loop these wires together and eliminate your code. The PCM is assuming there is a short to ground because it is not seeing voltage on B3.
[This message has been edited by Fieroseverywhere (edited 08-04-2010).]
Excellant. Well this should eliminate your E65. E52 will go away on its own. If your light is still on you may want to double check the wiring for the SES light. PCM A10 should connect to C203 pin "C". The PCM grounds A10 to turn on the light. If its grounded anywhere else your light wont turn off. Good luck Joe. Hopefully you get this sorted soon so you can enjoy your car. Later.
Oh. I was wrong about E53. Apparently that won't set a light either. Not that it matters much for you but I wanted to correct that anyway. I'm going to scan the error code page in tomorrow. There is a bunch of good info on it.
[This message has been edited by Fieroseverywhere (edited 08-04-2010).]
I drove the car out on the back road this morning after adding 2 gallons of 'Super' unleaded fuel. 3rd and 4th gear solenoids are engaging just fine. I am not sure if the torque converter is going into lock up yet. I need to get it on a smooth road to get it upto about 60 or so and wait for the 'lock up' feel. I have no tags on the car yet, so that is sorta risky.
I am gonna start on switching out the injectors in the morning early. The car runs real good and has almost 80 LBs of oil pressure driving down the road. Battery is charging just over 13 volts. Temperature was just 189.5* while playing up and down the highway.
I still am confused about the SES light staying on. If I unplug the scanner and start the car the SES light comes on. plug in the scanner and after a boot, scan and display the codes, it just has a 52, and a 65. Neither should make the light come and stay on.
[This message has been edited by josef644 (edited 08-07-2010).]
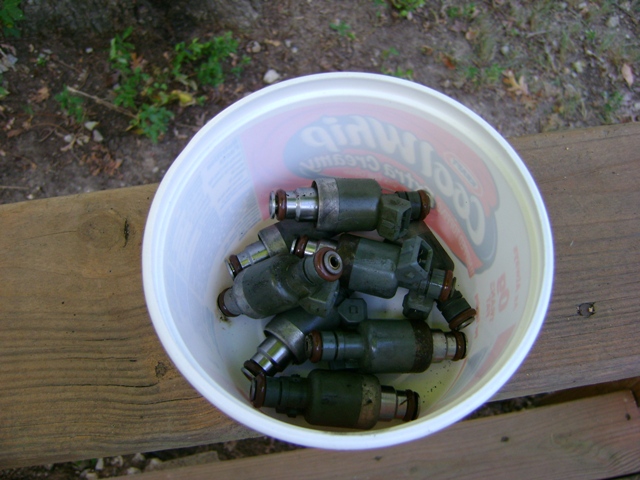
I went out at 8Am and removed the fuel rails and the old injectors.
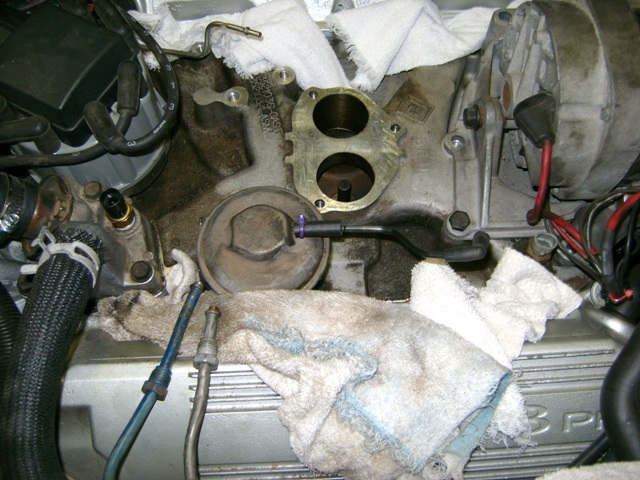
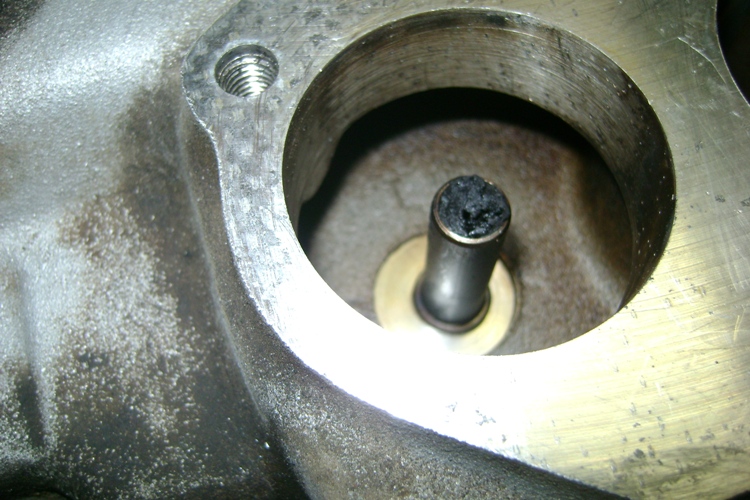
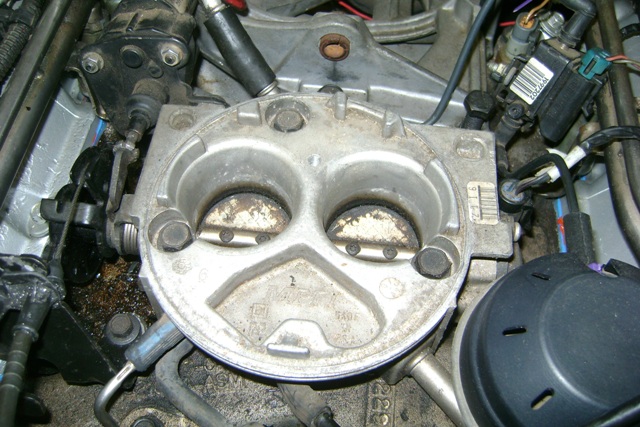
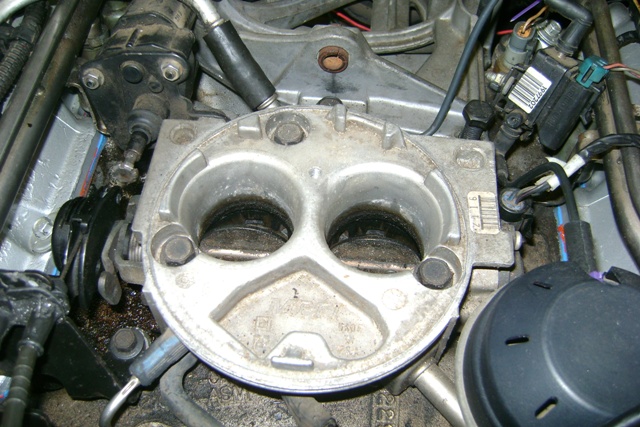
Underneath the throttle plates:
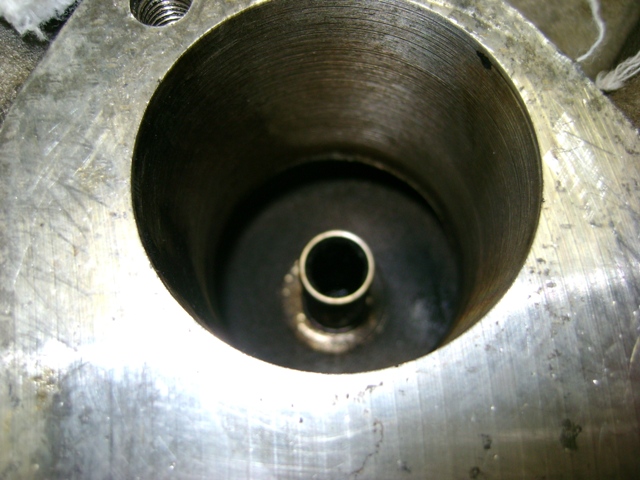
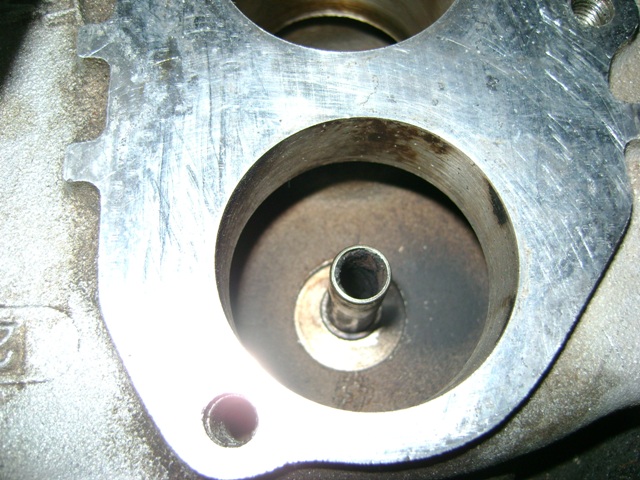
I used a 1/4" drill bit with my fingers and removed that crud. I then used a shop vac to suck out the pieces. If you do this and decide to blow air threw there, some of the stuff will come out of the forward hole, so watch out to keep it out of your eyes. Ask me how I know:
I removed the EGR valve. I used compressed air and the air comes out threw the rectangle hole. This was easy. I should have done this the first time I had the throttle body off of the car. Just knock the crud loose with a drill bit, then blow and clean it out with air, and a shop vacuum. When I used air in the rectangle hole it came out of both of the two holes in the center of the throttle bores. The rectangle hole is on the drivers side of the engine.
[This message has been edited by josef644 (edited 08-08-2010).]
I used a 1/4" drill bit with my fingers and removed that crud. I then used a shop vac to suck out the pieces. If you do this and decide to blow air threw there, some of the stuff will come out of the forward hole, so watch out to keep it out of your eyes. Ask me how I know:
Ugh. Been there myself. That stuff stings too!!
I'm a bit confused about your light also. I want to check the diagrams again and see if I can see a solution.
[This message has been edited by Fieroseverywhere (edited 08-09-2010).]
Finished up installing the new injectors this morning. I went to NAPA to get a new EGR gasket to have all of that finished before installing the rails and injectors.
Going on the rails.
Back on the engine:
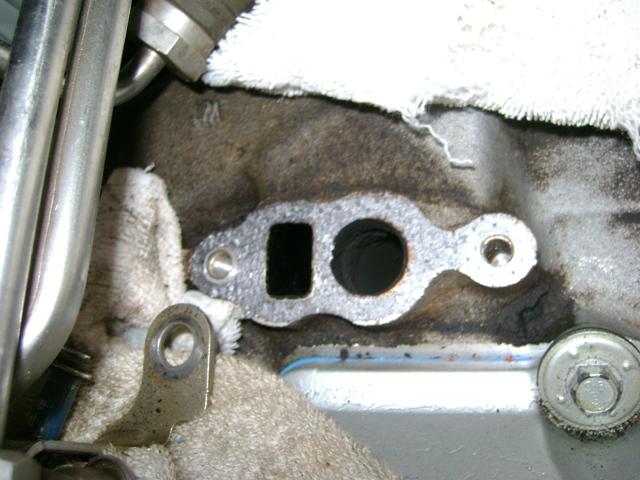
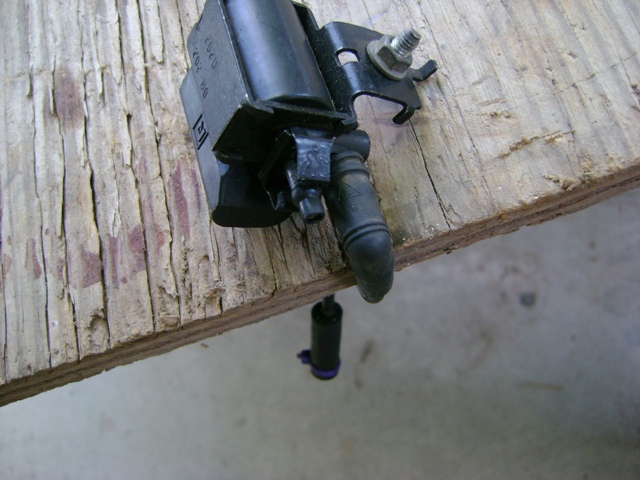
Here is a shot of the EGR solenoid, There are two outs for plugging the EGR. One has the metal retainer , and the other doesn't. I forgot which one is supposed to connect to the EGR.
Anybody know if it makes any difference , and do I need to block the other one off or something?
I gotta say that my miss is gone and this engine runs fantastic. The car idles a few hundred RPM higher than it used to. The exhaust smell is different also. That was the fisrt thing I noticed after I started it up in the garage. I took it for a quick 2 mile trip in the neighborhood. It's like it has a V8 in it now, and not just a V6. The difference is amazing.
I GOT the 'GRINNS' now. When the wife gets home she's gonna ask me what I'm smillin about. Ain't gonna tell her !!!!
Did I say this is NEEEEET ?
[This message has been edited by josef644 (edited 08-09-2010).]
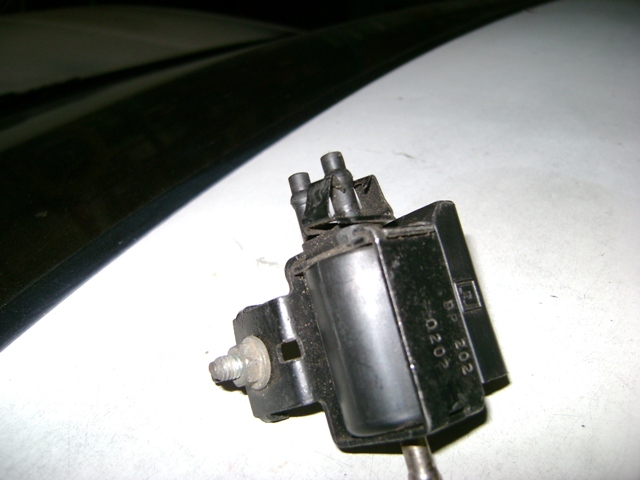
I started going threw my old photos I had posted in this thread, and found this one. It told me most of what I needed to know. I am still not sure what the second nipple is for.
I think the second one is for cruise. Can't remember now. I use the same one for EGR and have the second one capped. Be sure to use a silicone cap. Rubber didn't last long for me.
I've been driving mine a bunch lately. Today it felt like the clutch finallly fully seated in. What a difference. I've got the same grin again!
[This message has been edited by Fieroseverywhere (edited 08-10-2010).]
I think the second one is for cruise. Can't remember now. I use the same one for EGR and have the second one capped. Be sure to use a silicone cap. Rubber didn't last long for me.
I've been driving mine a bunch lately. Today it felt like the clutch finallly fully seated in. What a difference. I've got the same grin again!
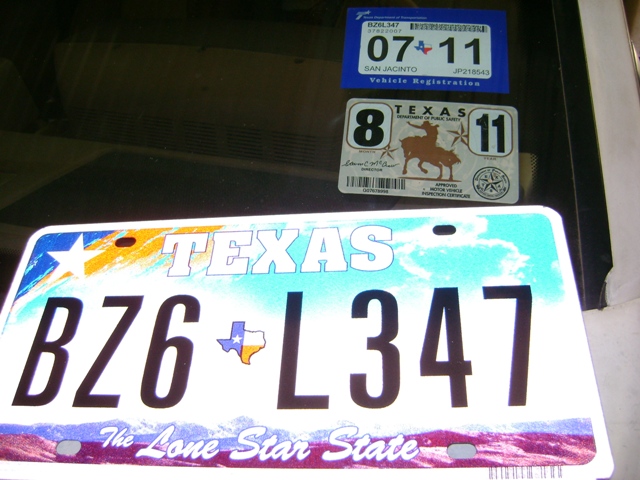
I installed new bulbs in all of the parking light sockets for new illumination and function. I now have all of the parking lamps, turn signals, headlights, wipers, horn and license plate bulbs working. I am gonna get me a One Day License Tag for a trip to the inspection station one day this next week. $5.00 for one day.
[This message has been edited by josef644 (edited 08-12-2010).]
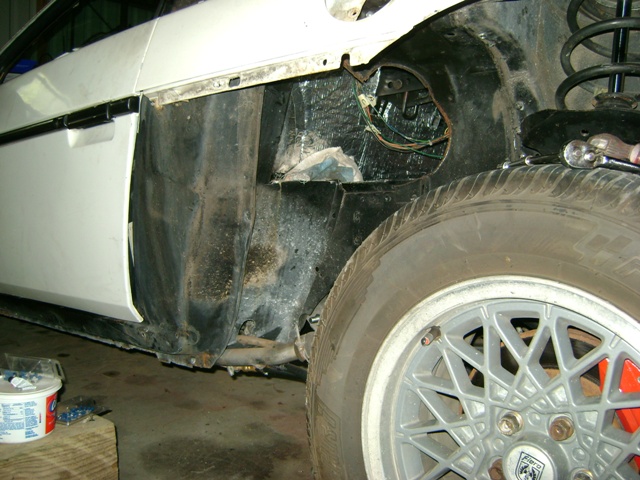
I removed the passenger side rocker moulding and quarter panel this morning. I was trying to get access to the expansion tank. I can't see any mounting bolts. I am thinking that I am gonna have to remove the rear section to replace this tank. I wanted to hook it back up to the car. It's just wasting space the way it is now. That would also be a good time to repaint the rear roof section.
I removed the driver side quarter panel .
Gonna repaint the two quarter panels before putting them back on the car.
[This message has been edited by josef644 (edited 08-19-2010).]
To me it sounds like the PCM is looking for a 5V signal at those wires (B3 & B4). Should be able to loop these wires together and eliminate your code. The PCM is assuming there is a short to ground because it is not seeing voltage on B3.
I connected B3 and B4 as FEW suggested. I have no codes with just a quick scan without the engine running just now. I will put it back on the ground and see what happens here some time this week.
102* outside I have no idea what the heat index is.
Got home late . I got all of the parts I need to use to put the expansion tank back in operation. I have all of the V6 air breather set up. I also acquired a nice set of 88 Formula rims, a nice parking brake handle and the forward parking brake cable. A few assorted screws and plastic trim pieces. I have lots of things to do today.
Later
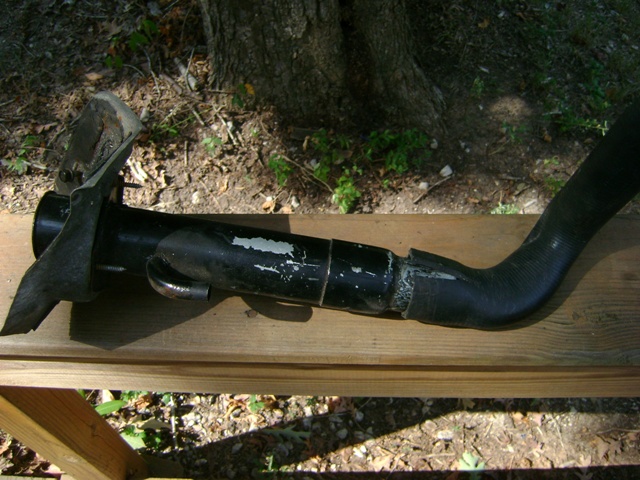
My car, as most all do , has the V6 air filter mounting standoffs on the driver side metal wheel wells . I just went out to install the V6 air can mounting bracket. A PO has butchered up the fuel filler pipe and it's hoses. The hose and pipes are radiator hose and exhaust pipes. This com blob er ation is smack dab in the air filter mountings way. I have contacted a friend to see about getting a factory 88 style setup he has on a parts car. I will make a temporary mount so I can go ahead and get the air breather mounted and working today.
Went and picked up a filter for the new breather can. Cleaned it all up and painted it a gloss black I am thinking the paint is for sheets, as my one coat paint job is still wet two hours later. I am wondering how long I have had this can of paint in the garage? 20 Years should still be OK !!!!!!!!
Went to the Tax office and got me a 15 day permit.
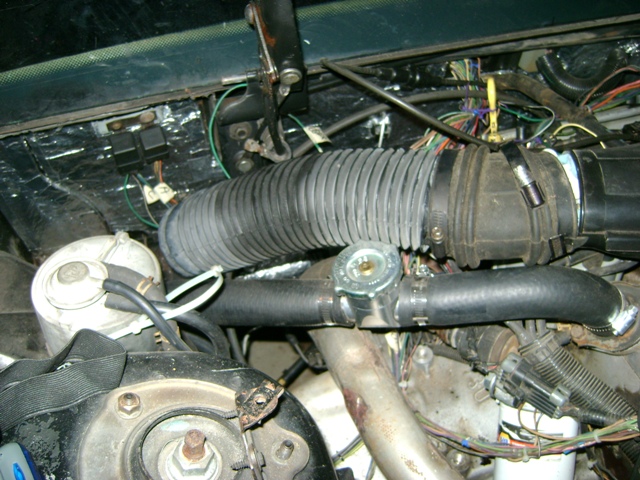
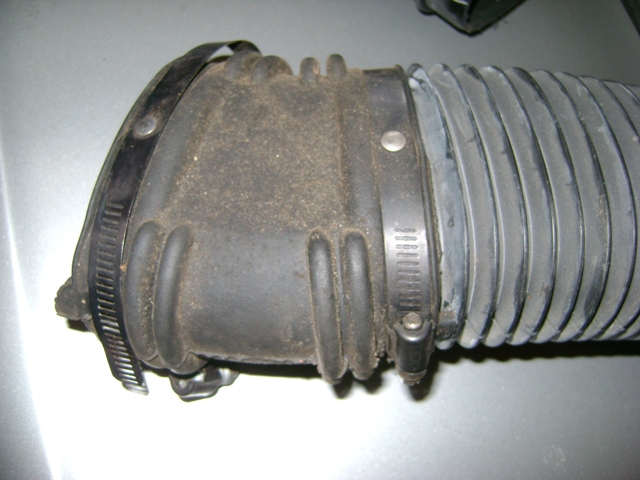
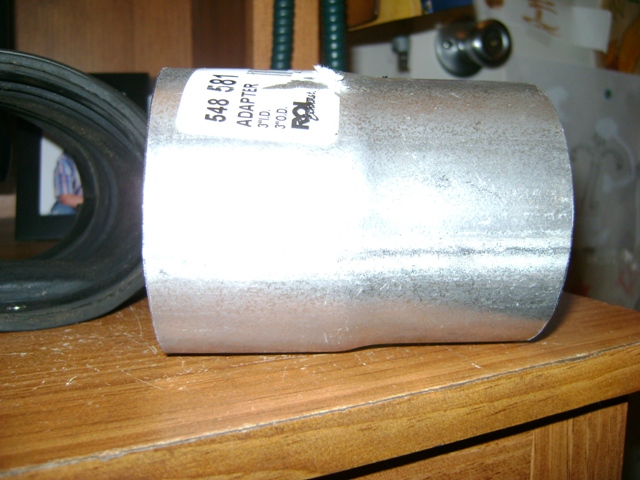
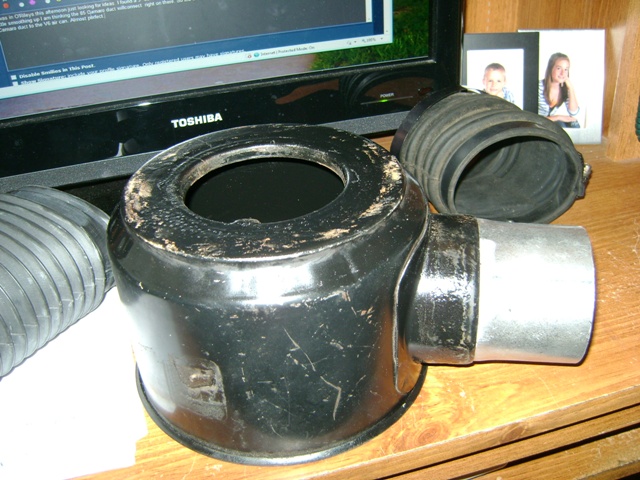
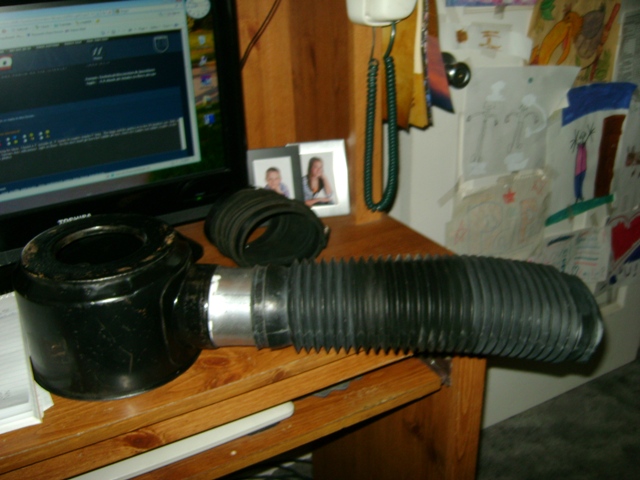
I was in O'Rileys this afternoon just looking for ideas. I found a 3" outside id, 3" inside id coupler maybe 5" long.. $3.00. The large end fits perfect in to the V6 breather can. With a little smoothing up I am thinking the 85 Camaro duct will connect on the small end. So the duct would go from the Caddie air horn, threw the Caddie oval rubber coupler, to the Camaro duct to the V6 air can. Almost perfect. Caddie Oval to the Camaro duct: Three inch coupler: Large end in the breather can: All connected up:
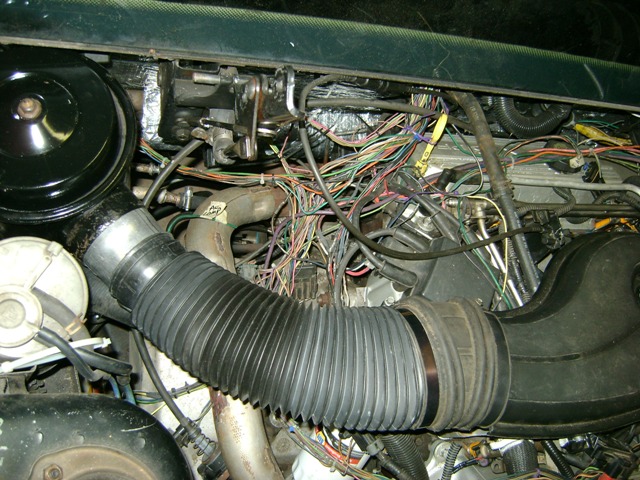
I think this will work out. The local muffler shop here is closed for a hot summer vacation, If they were open I could get anything I wanted made up from them, maybe a small upwards bend etc. 33 miles to the next closest muffler shop. Add some black 3M trim adhesive, three pop rivets and a little black paint. You would never see it as added into the equation. I'll set it on the engine and take a picture in the morning after I am finished mowing.
[This message has been edited by josef644 (edited 08-26-2010).]
I drove around my neighbor hood a few times this morning to get the engine up to 195*. I was then gonna get my safety inspection over with and ran into a snag. I got out of the cat to untangle the shoulder belt and smelled gas. I have a fuel line leaking. It is just a slow drip but I don't want to drive it like this. The drip is over the rear exhaust manifold. I will try and fix the leak in the morning. Already 96* here.
I had a code 47 today. Serial Data communication issue. I took Fieroseverywhere's advise and tied E3 and E5 together . Codes gone. I have a code 65 for the Cruise control . I tied B3 and B4 together. Code is still there, and I am not able to clear it with my scanner. I am gonna disconnect the battery and see if it comes back after a few minuets.
Disconnecting the battery didn't stop the code 65.
Fixed fuel leak.
I am still having my SES light come and go off at it's own pace. I have been watching when it comes on and out. If I do a scan with the engine running, then put my scanner on 'monitor' the light goes out, and it will show just a code 65
[This message has been edited by josef644 (edited 08-27-2010).]
A big fire Friday night a block away from me burned down the telephone lines. So no internet for a few days. Going for my State Inspection Monday morning.
[This message has been edited by josef644 (edited 08-29-2010).]
I removed the old expansion tank, and got new 1/4" and 5/16" hose for adding in the metal lines.
I had my wife hold the passenger window button down, and I pushed down on the glass. We were able to get it all the way down. I am gonna start on changing out the window motor pretty quick
[This message has been edited by josef644 (edited 09-06-2010).]
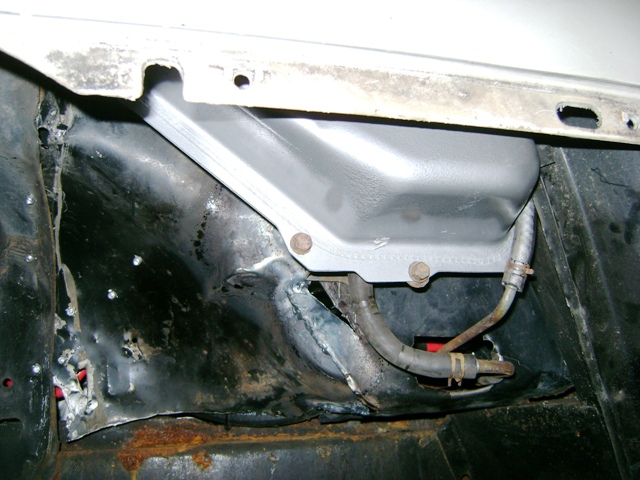
Removed the old home designed fuel filler hose and pipes Mounted the expansion tank. Removed the butchered metal line that goes to the charcoal canister from the car. Removed the battery so I can see behind and below it while I am installing the expansion tank hose and lines.
I removed my tires from the two rear 87 GT wheels to swap out with Poe next Wednesday. Removed the old fuel vapor lines from my car. Cut the hole in to the metal below the battery tray area. I had used metal from an 84 car to replace the butchered pieces from the speaker box install. The expansion tank metal lines will pass threw that area now.
Ran the line form the expansion tank to the charcoal canister and remounted the canister to the shock tower. I painted these parts a few days ago with semi gloss black. Ran the metal line from the expansion tank to the fuel tank. I am all good to go here now. I just need the 88 fuel filler pipe and hoses.
Expansion tank painted. Hung up to dry overnight.
[This message has been edited by josef644 (edited 09-05-2010).]
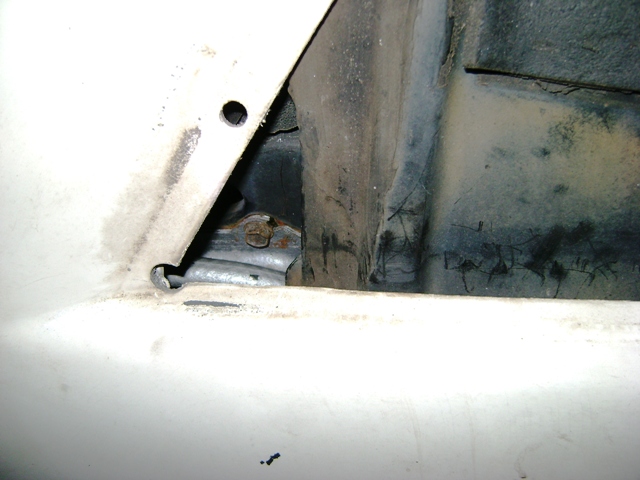
Looking good joe. That upper mount bolt on the expansion tank is a fun one huh! I had to tackle that one on the XTC when i first got it. I still have scars to show for it (mostly mental scars) - lol. I like the cold air setup too. I did not realize how much difference fresh air makes till I changed over to the decklid scoop/intake on the XTC. It runs so much better and the fuel mileage is up as well. Keep up the great work.