Pennock's Fiero Forum
  General Fiero Chat
  RCR's body mods... (Page 16)

Post New Topic  Post A Reply
Email This Page to Someone! | Printable Version

This topic is 17 pages long:  1   2   3   4   5   6   7   8   9   10   11   12   13   14   15   16   17 
Previous Page | Next Page
next newest topic | next oldest topic
RCR's body mods... by RCR
Started on: 06-15-2009 07:28 PM
Replies: 657 (38267 views)
Last post by: RCR on 11-17-2023 07:56 AM
dobie1
Member
Posts: 453
From: BC, Canada
Registered: Jun 2005


Feedback score: N/A
Leave feedback

Rate this member

Report this Post09-01-2020 12:02 AM Click Here to See the Profile for dobie1Send a Private Message to dobie1Edit/Delete MessageReply w/QuoteDirect Link to This Post
Moving along nicely Bob! ):
interesting cooler mounting ,will you have a ram effect ?

Wayne
IP: Logged
RCR
Member
Posts: 4397
From: Shelby Twp Mi
Registered: Sep 2002


Feedback score:    (7)
Leave feedback


Total ratings: 102
Rate this member

Report this Post09-01-2020 07:23 PM Click Here to See the Profile for RCRSend a Private Message to RCREdit/Delete MessageReply w/QuoteDirect Link to This Post
 
quote
Originally posted by dobie1:

Moving along nicely Bob! ):
interesting cooler mounting ,will you have a ram effect ?

Wayne


Hey Wayne,

Not really counting on a ram effect there. Just some air flow for the coolers. I may put a fan behind them eventually.

It's kind of a cramped space. need somewhere for the air to flow out. Might go out the rear vents (Hmm?)

Should be better than what I had.

take care

Bob
IP: Logged
RCR
Member
Posts: 4397
From: Shelby Twp Mi
Registered: Sep 2002


Feedback score:    (7)
Leave feedback


Total ratings: 102
Rate this member

Report this Post09-07-2020 03:15 PM Click Here to See the Profile for RCRSend a Private Message to RCREdit/Delete MessageReply w/QuoteDirect Link to This Post
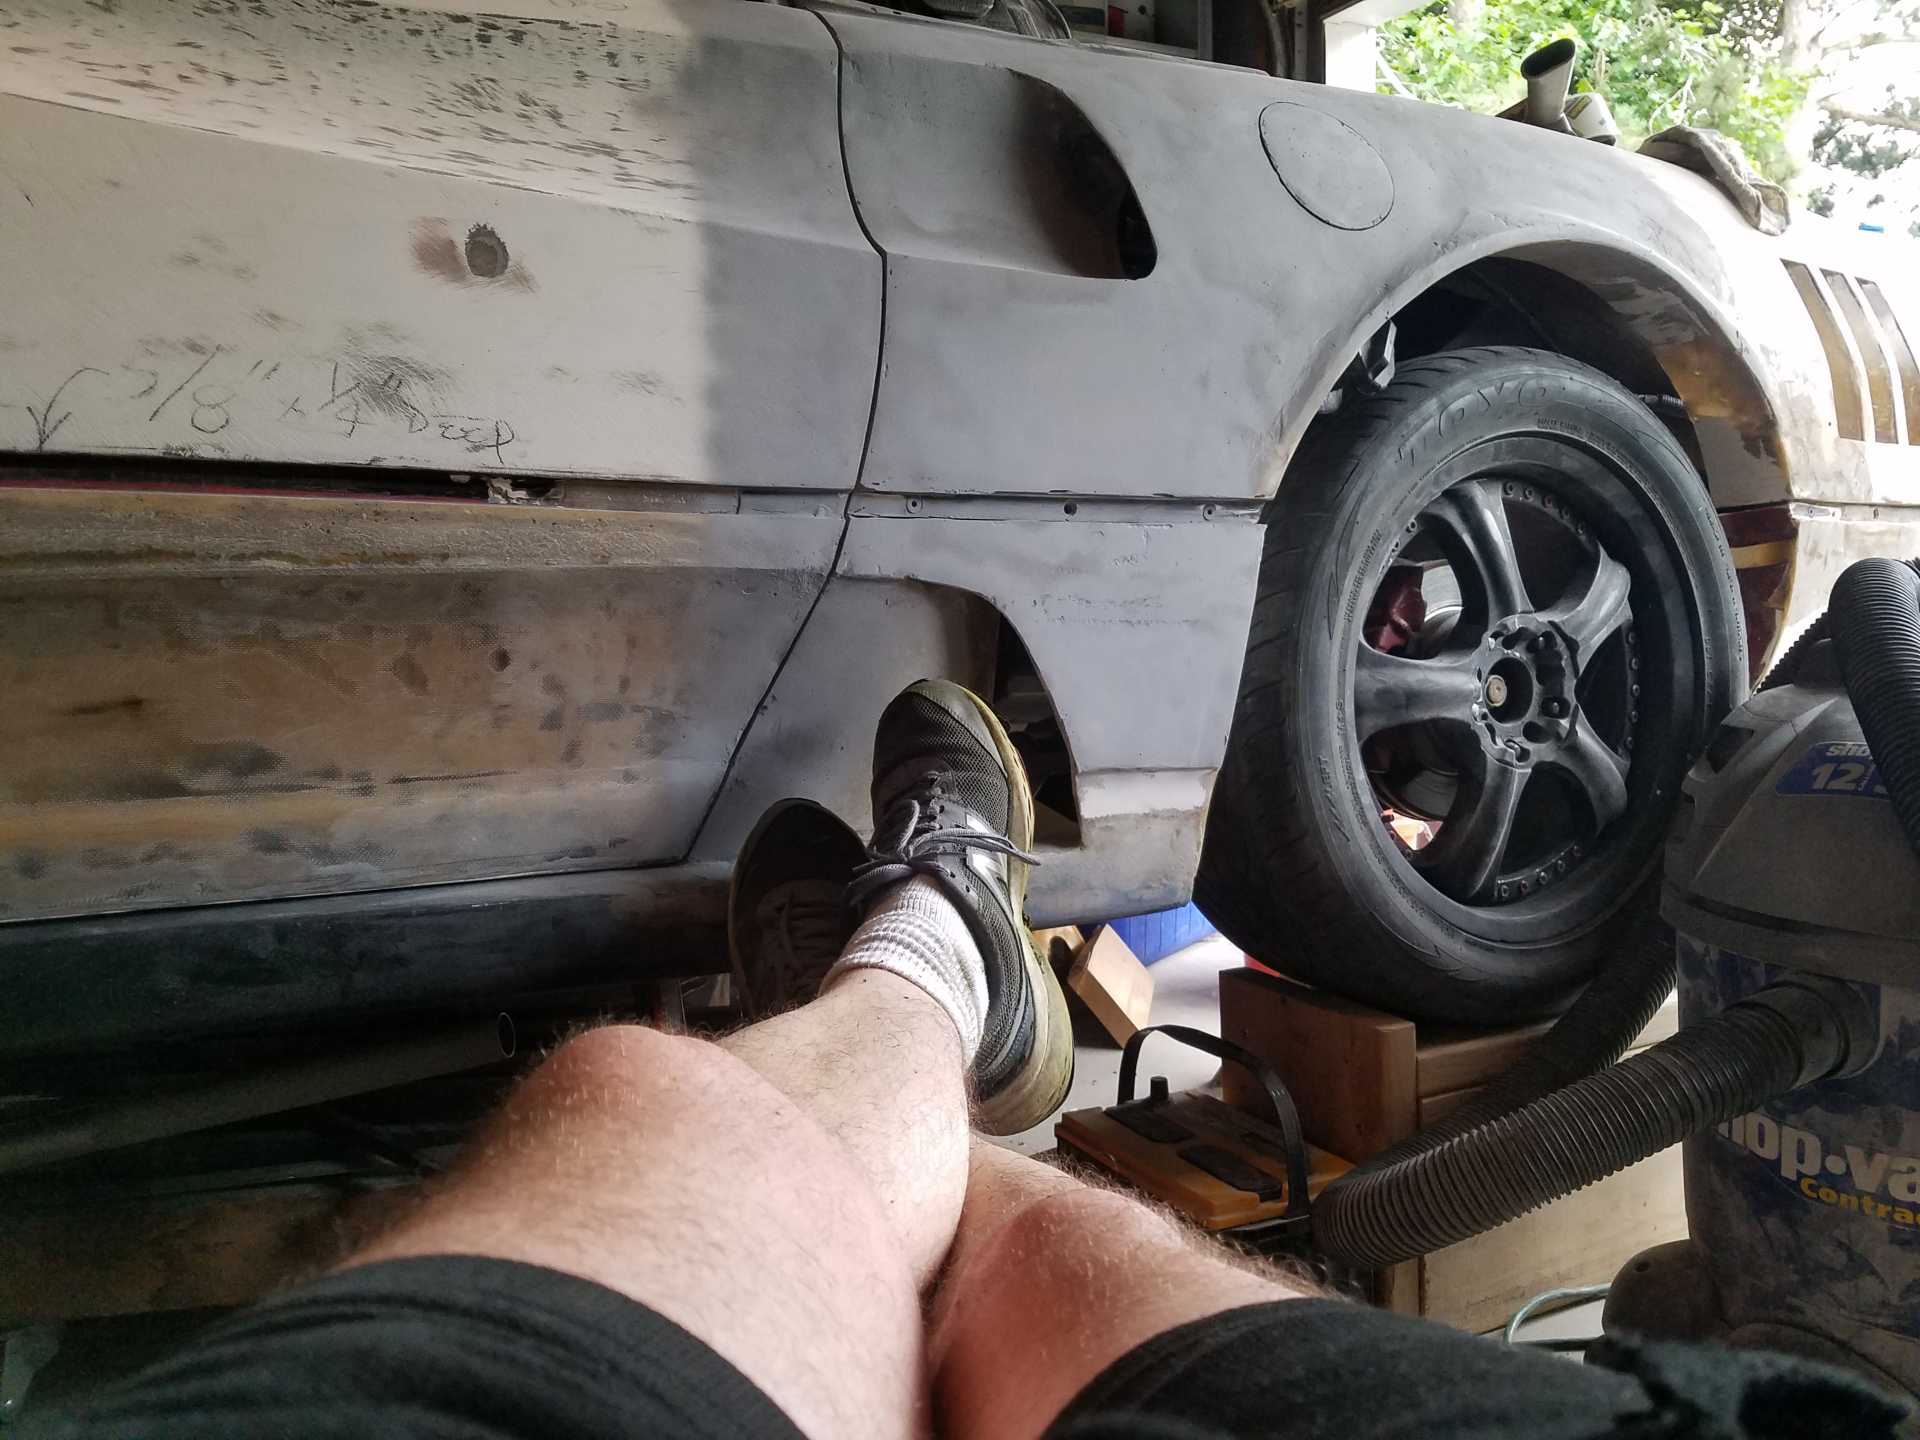
The long weekend afforded a lot of time for the car, so I continued with the rocker build.

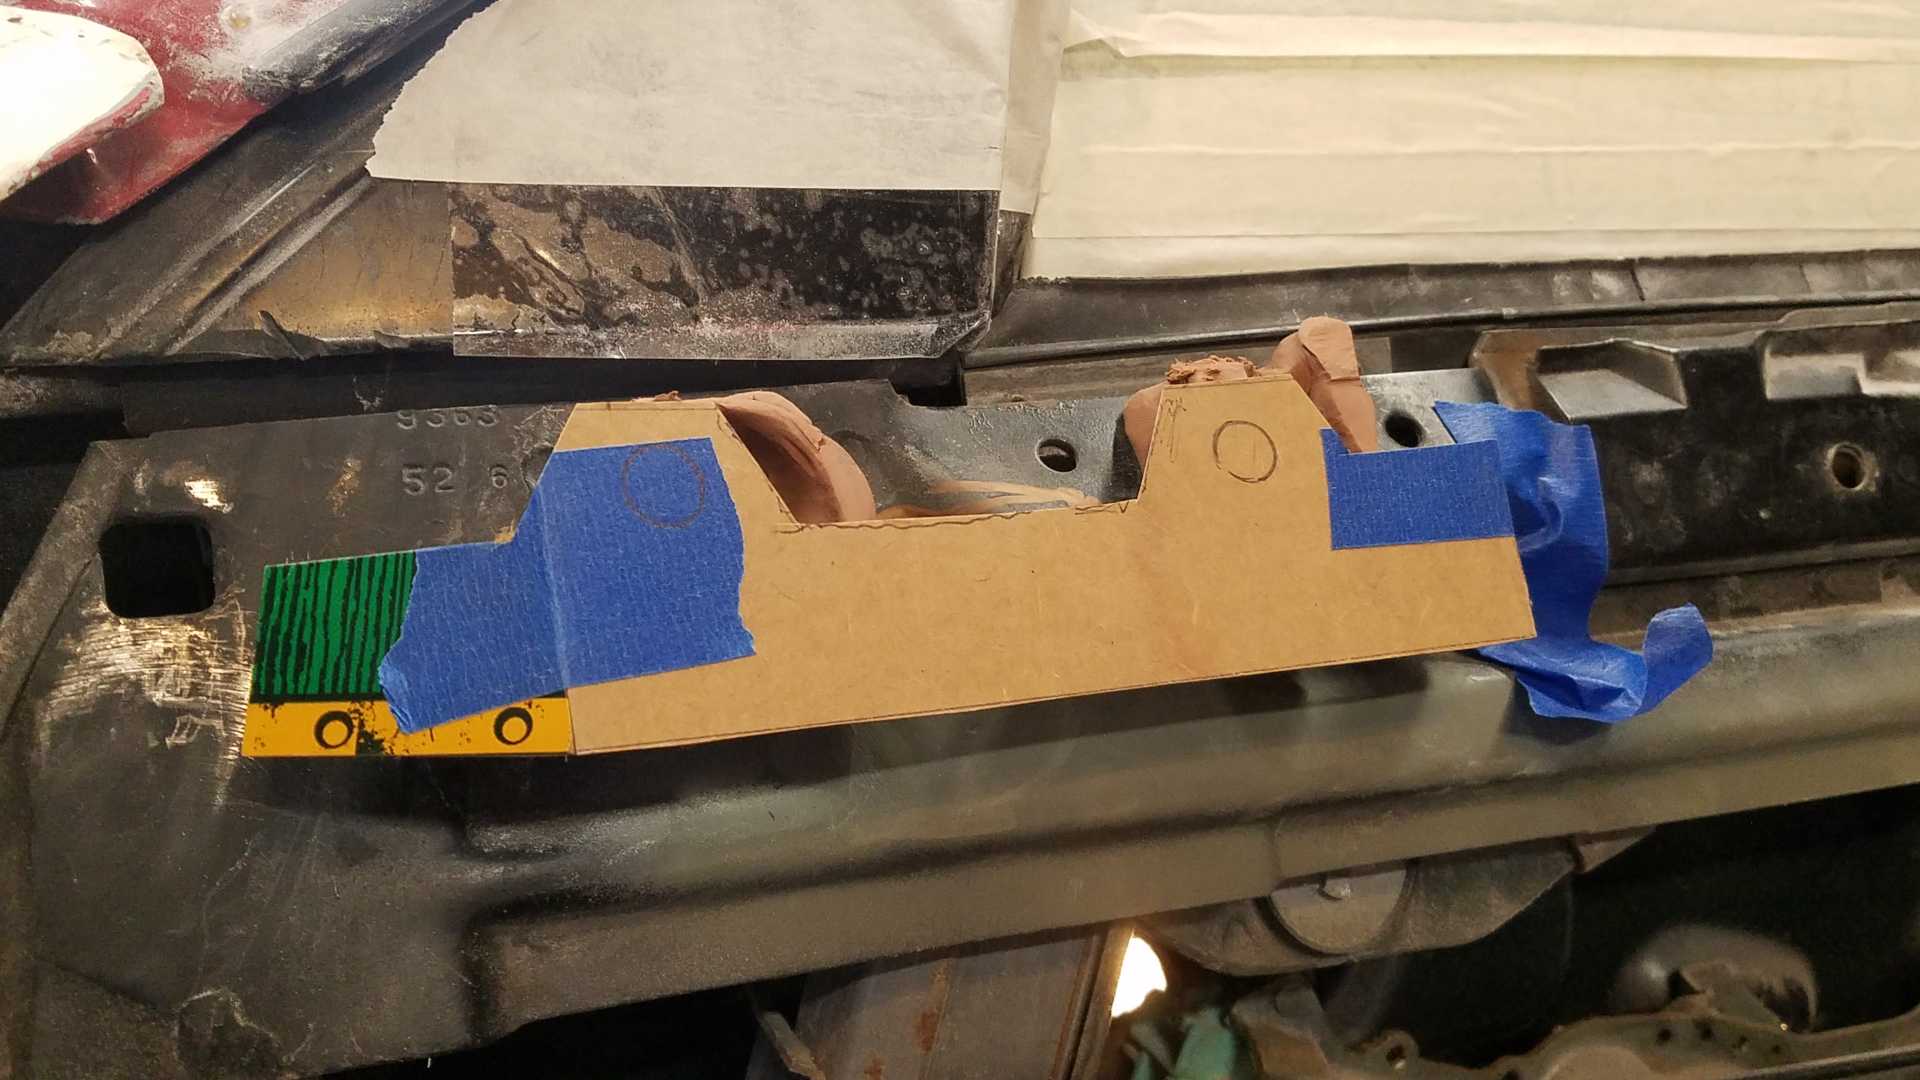
First, break out the cardboard and make templates.


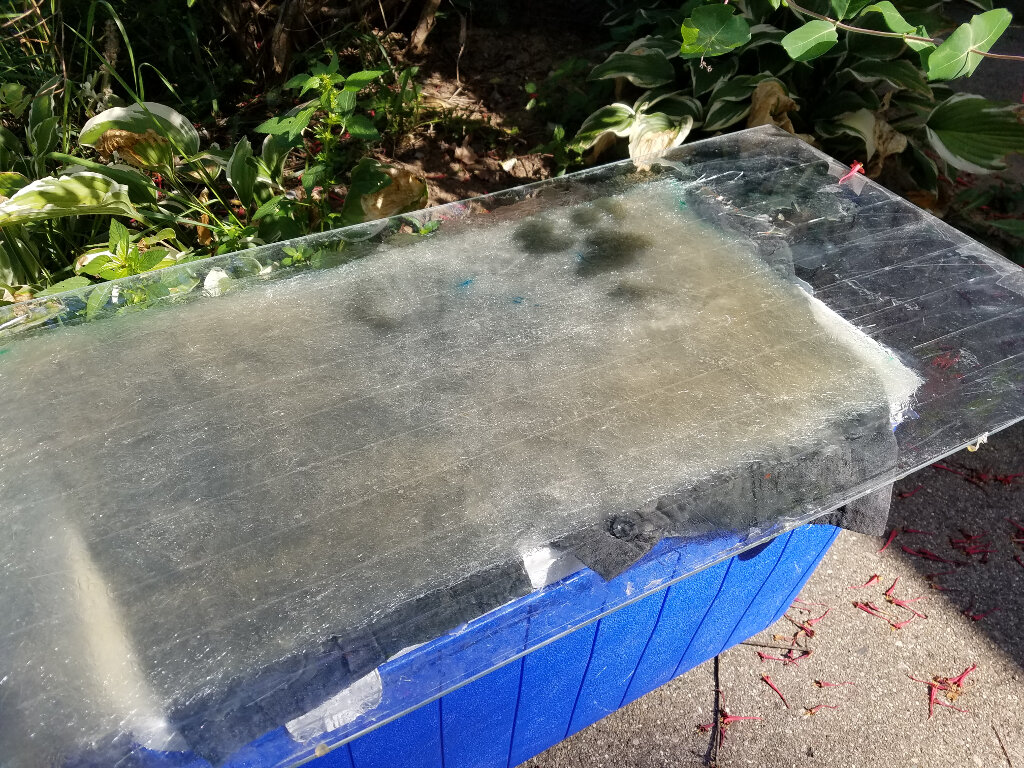
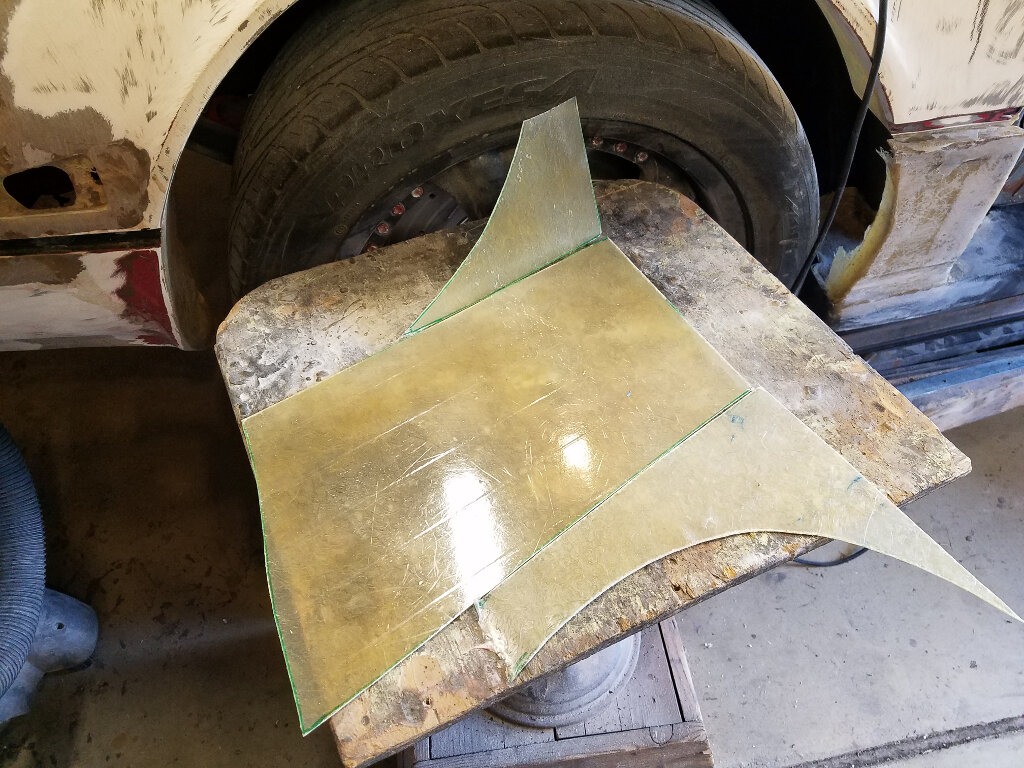
Make a glass panel (on glass)


Cut out the pieces.


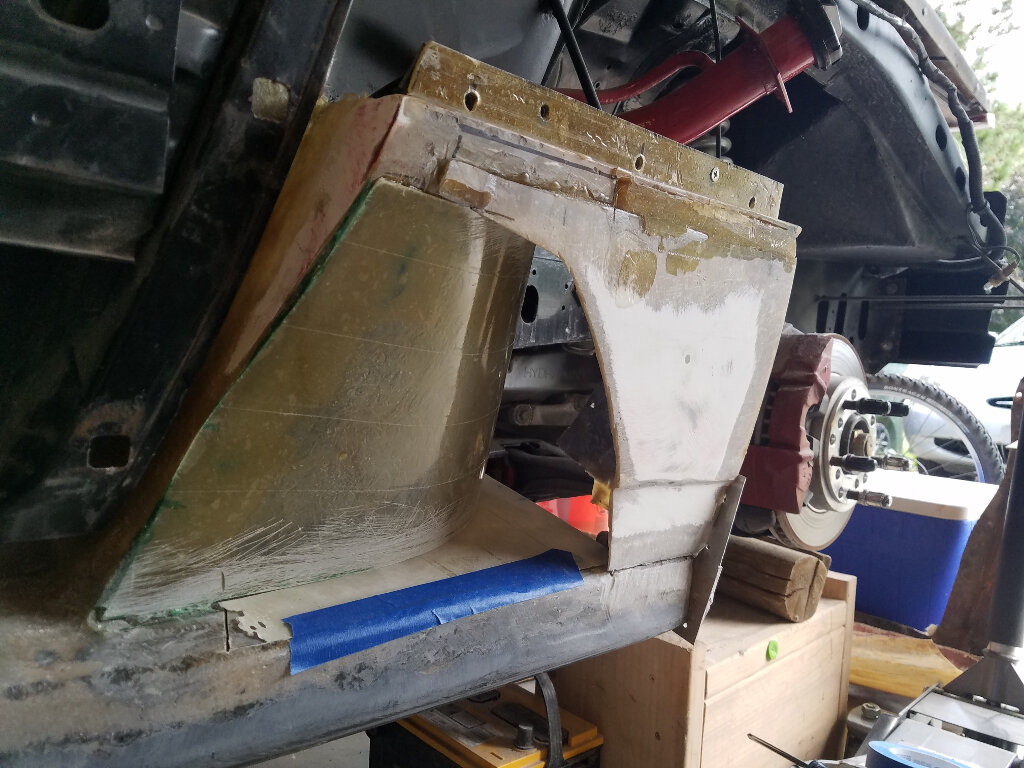
Doesn't show here, but I glassed the leading edge first, then started fitting it together.


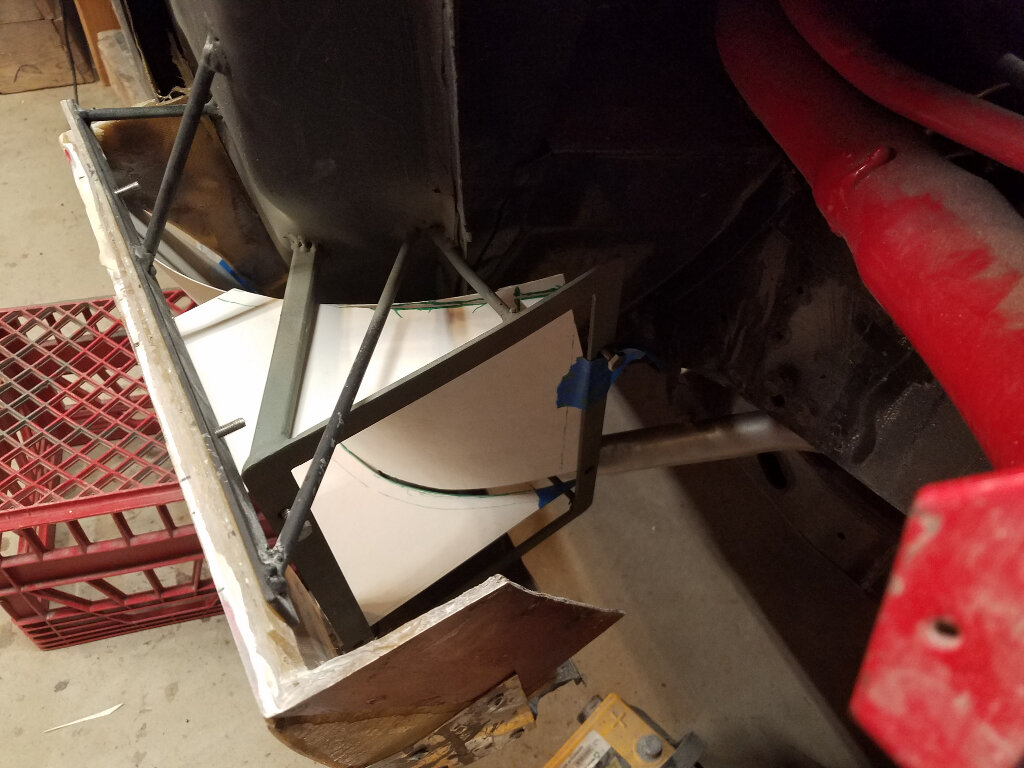
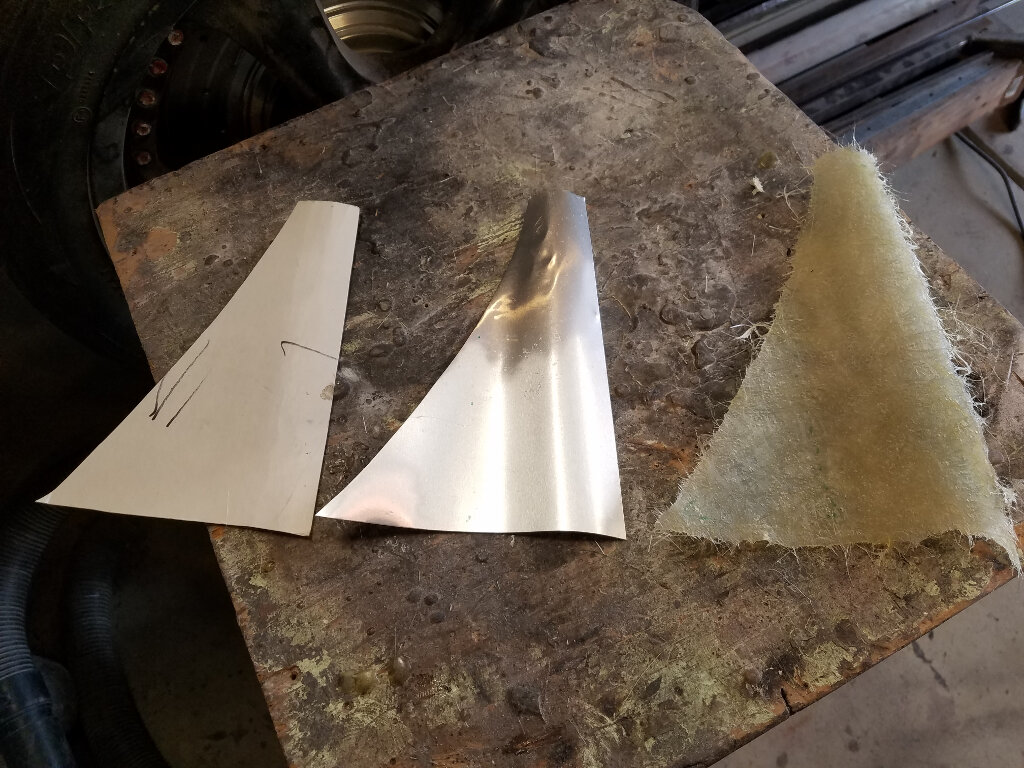
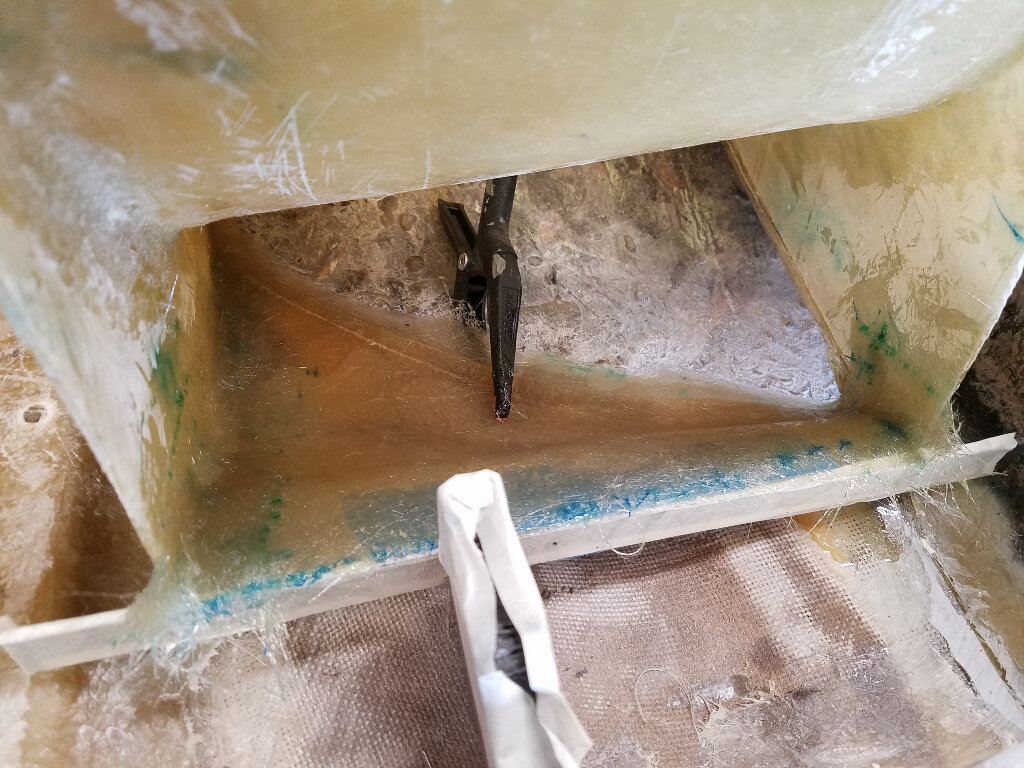
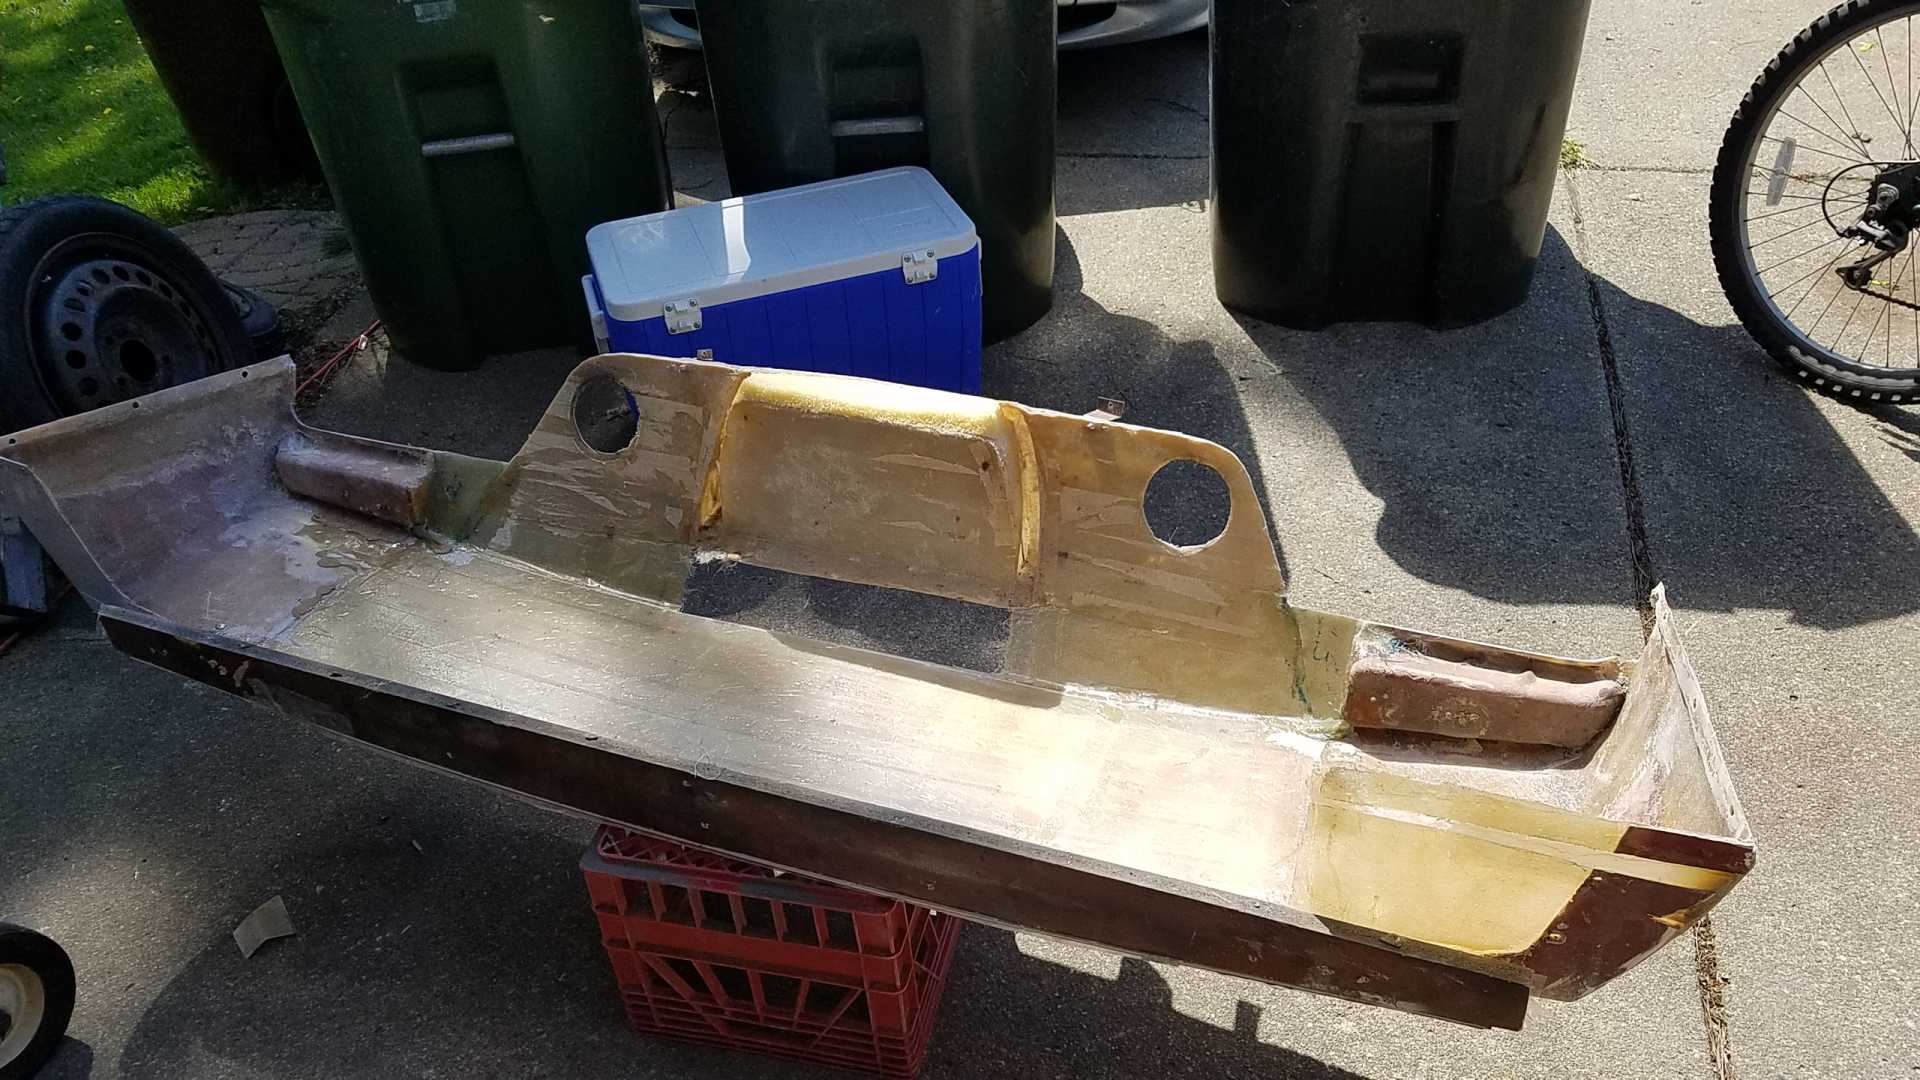
3 sides glassed together, now for the side that runs on the inside of the scoop outer panel.
This piece has a s shape to it, so I made a cardboard template, transfered that to aluminum, then formed the s-bend.
A layer of glass later...


Here, the piece is being glassed into the vent.


Once tied together, 2 more layers added behind to strengthen everything up


Then...
IP: Logged
RCR
Member
Posts: 4397
From: Shelby Twp Mi
Registered: Sep 2002


Feedback score:    (7)
Leave feedback


Total ratings: 102
Rate this member

Report this Post09-07-2020 03:22 PM Click Here to See the Profile for RCRSend a Private Message to RCREdit/Delete MessageReply w/QuoteDirect Link to This Post

RCR

4397 posts
Member since Sep 2002
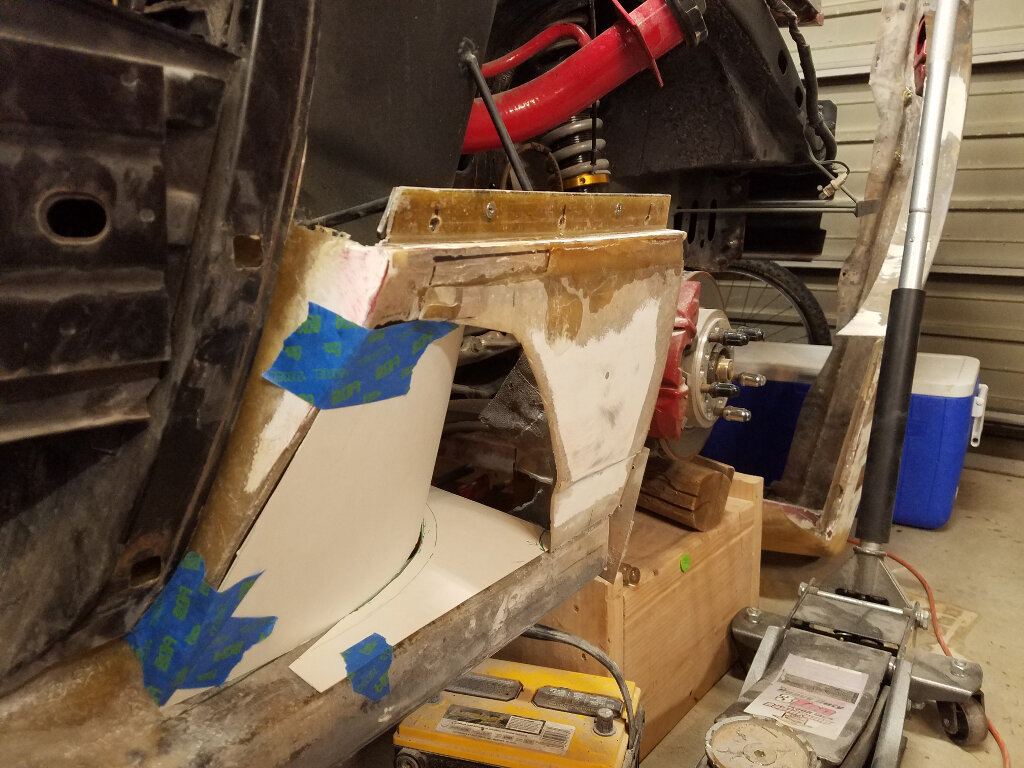
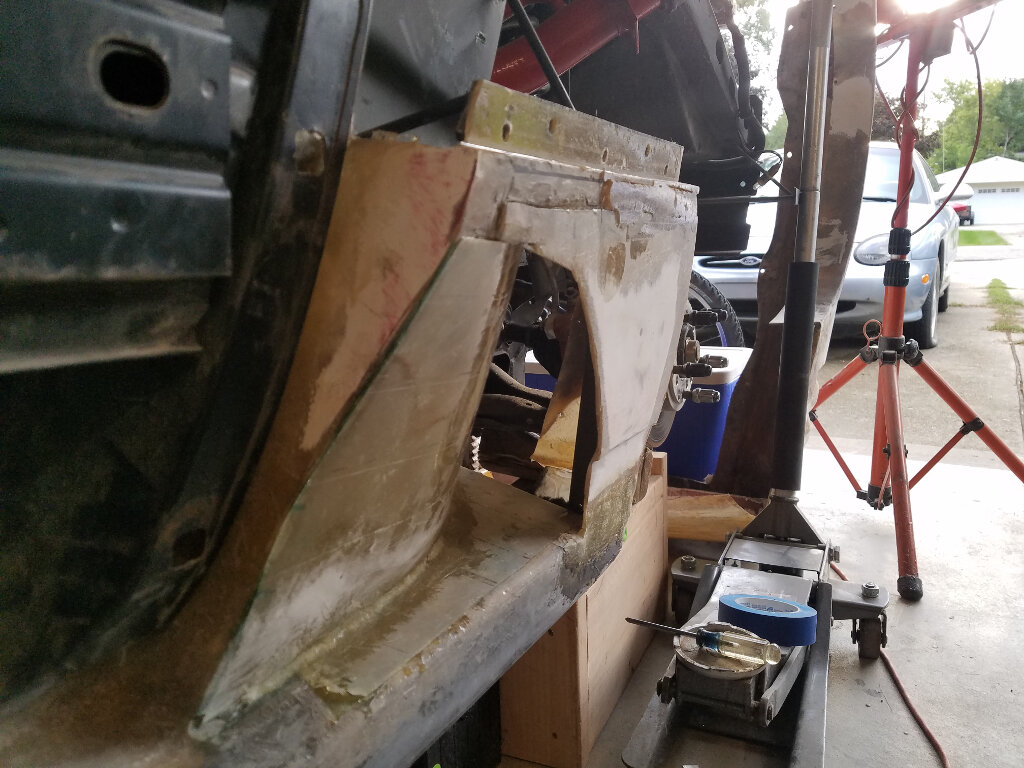
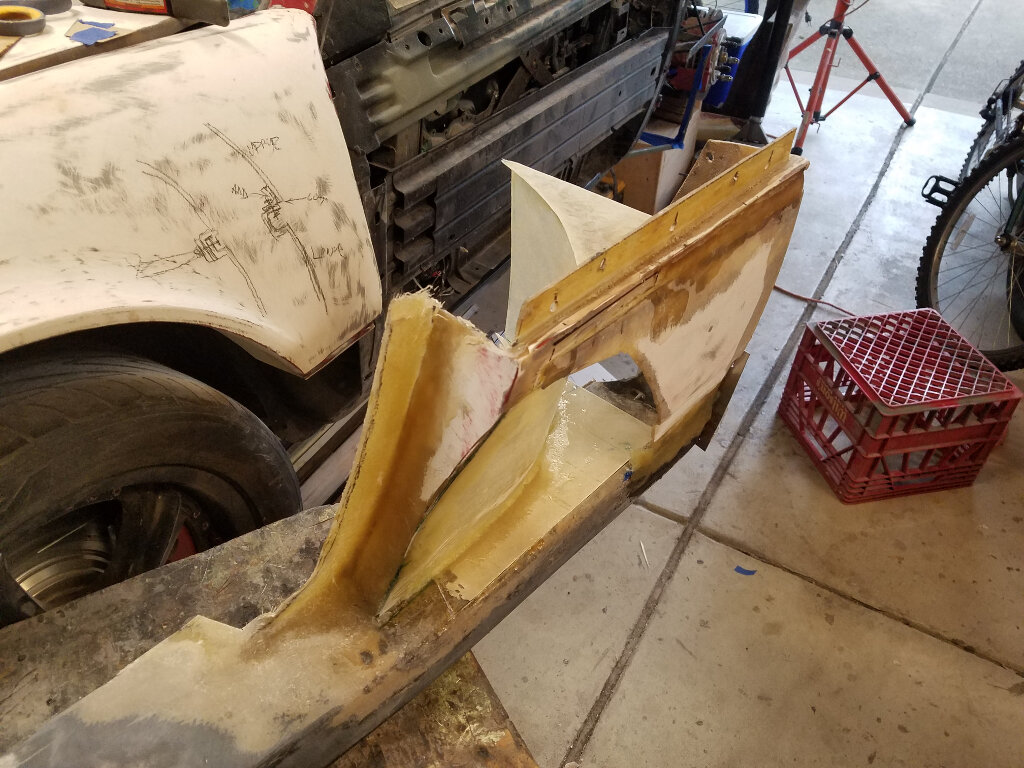
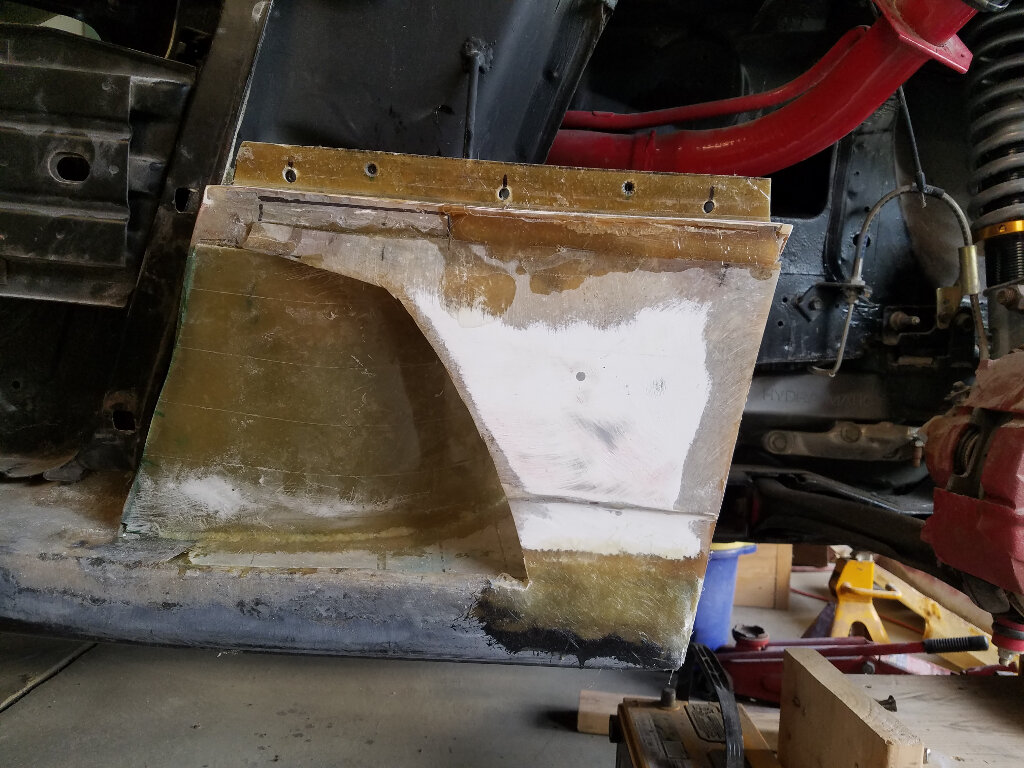
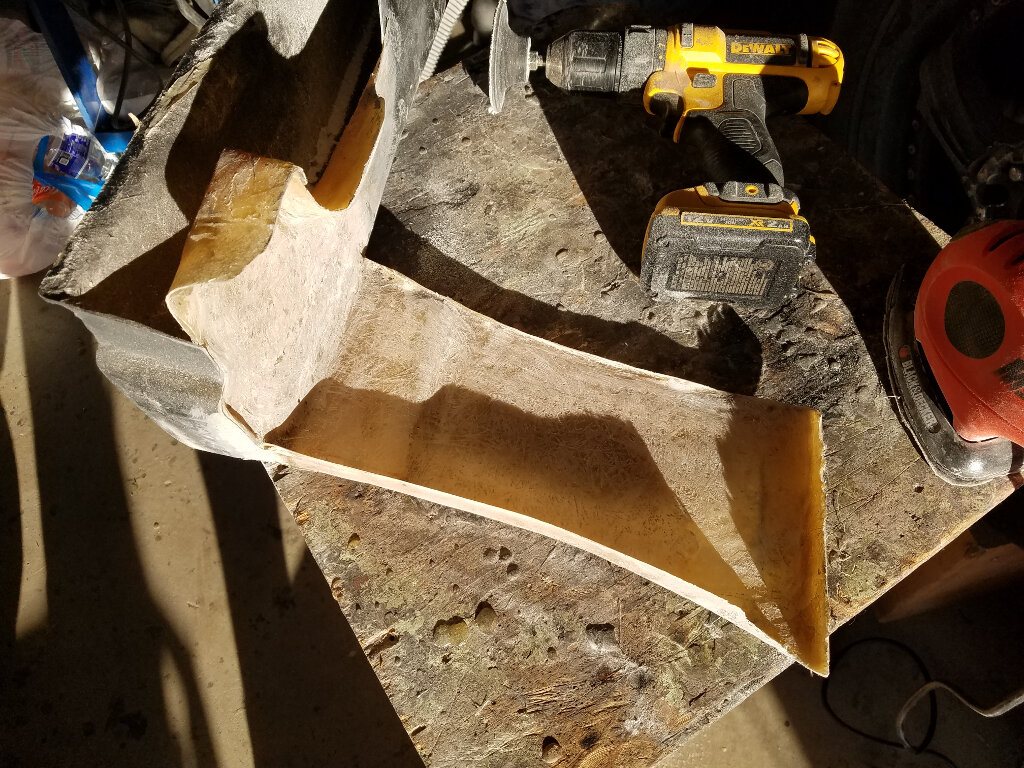
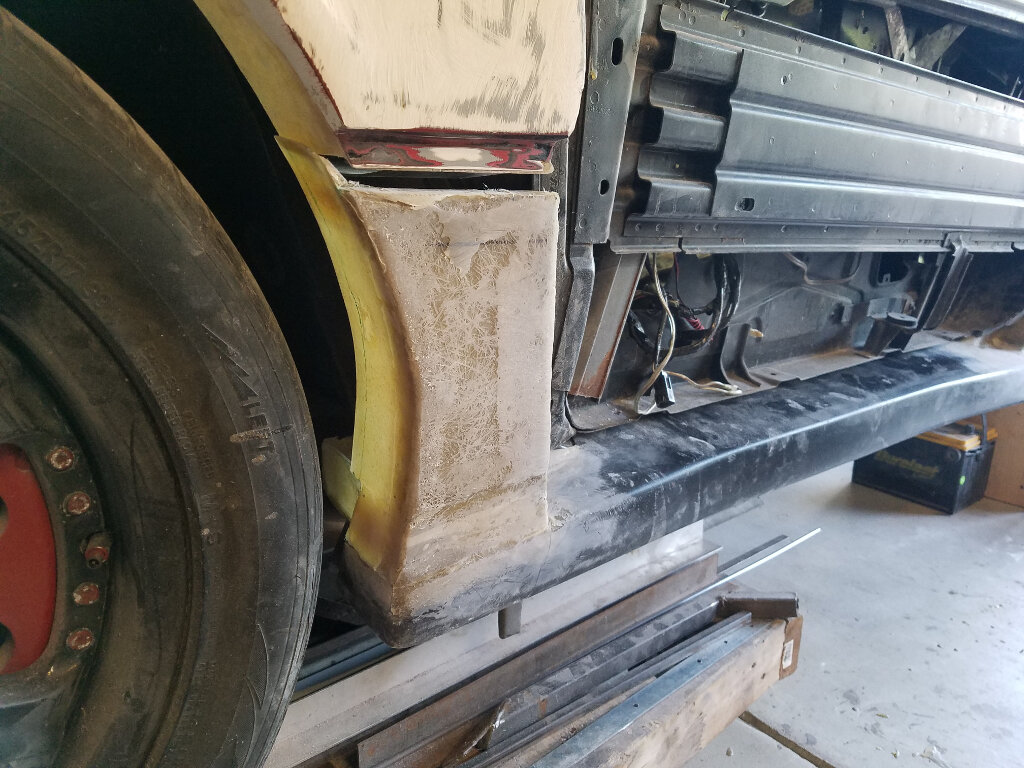
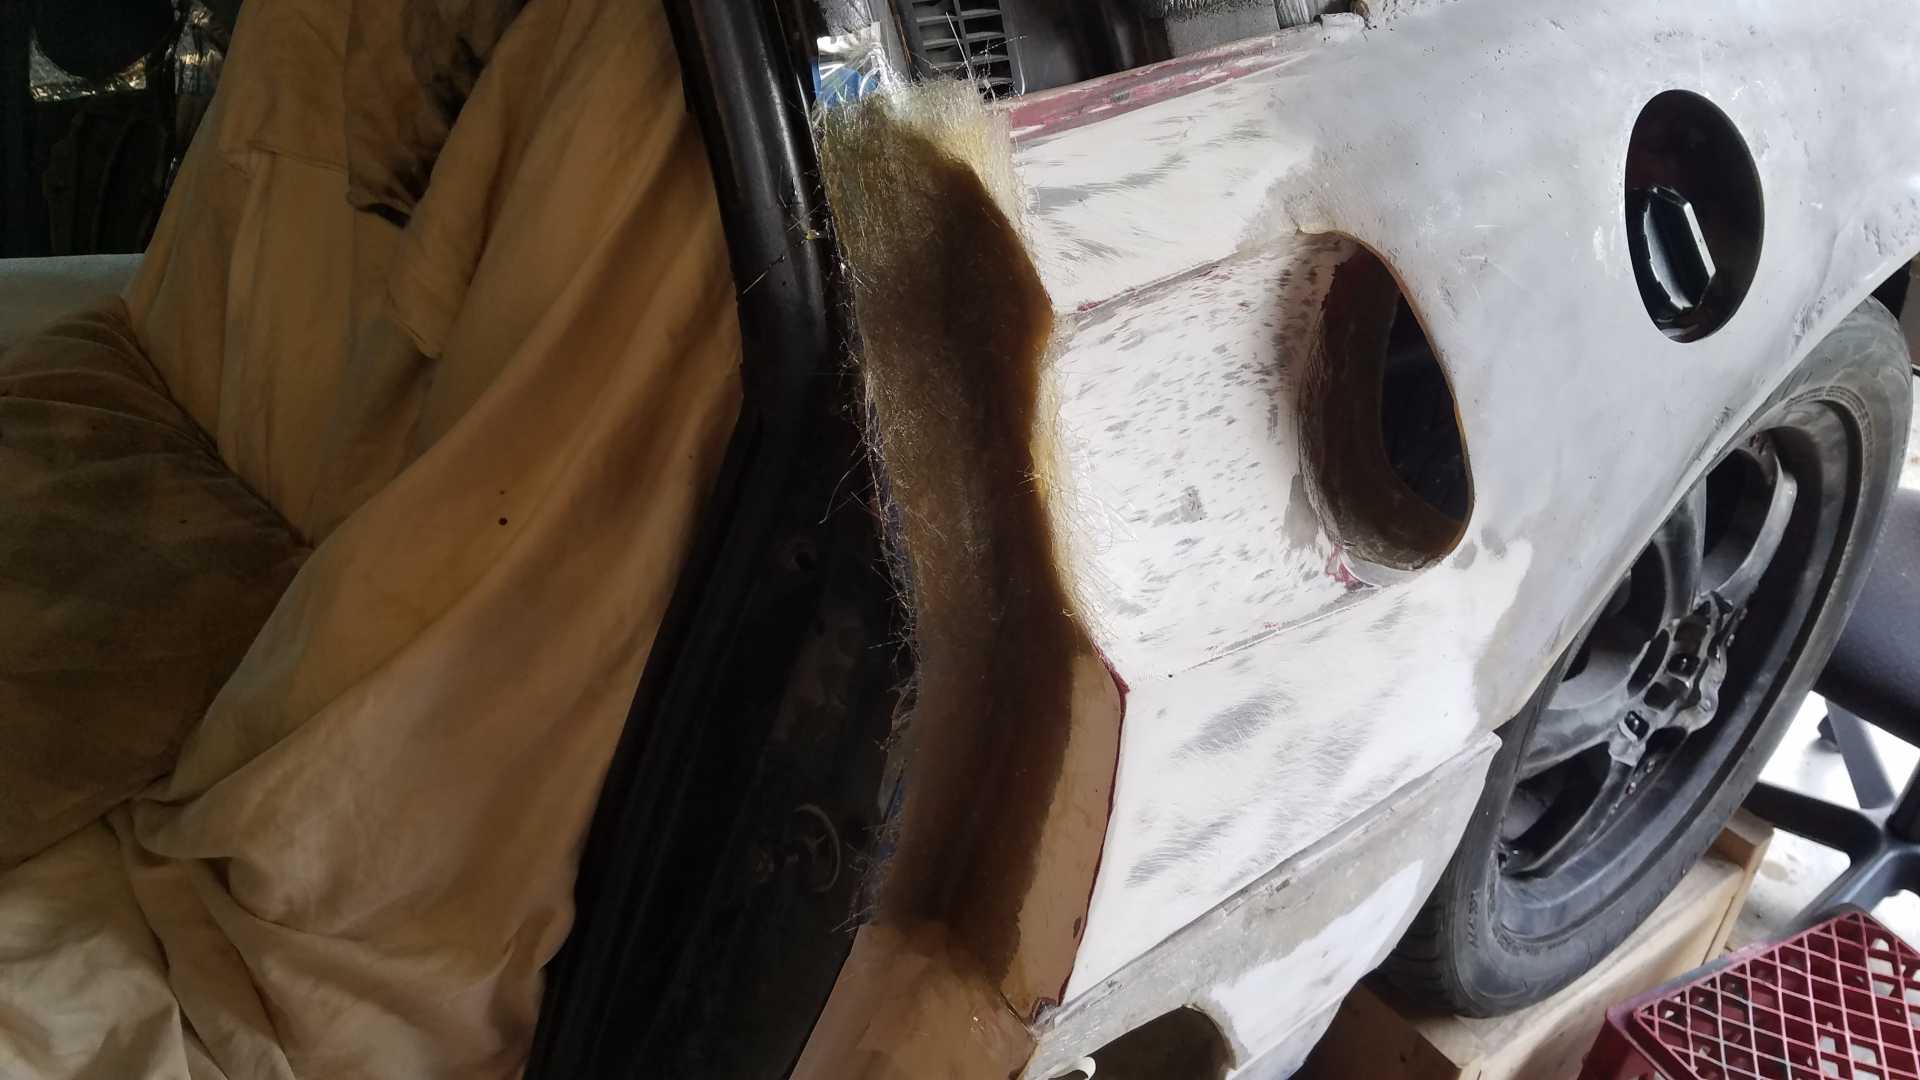
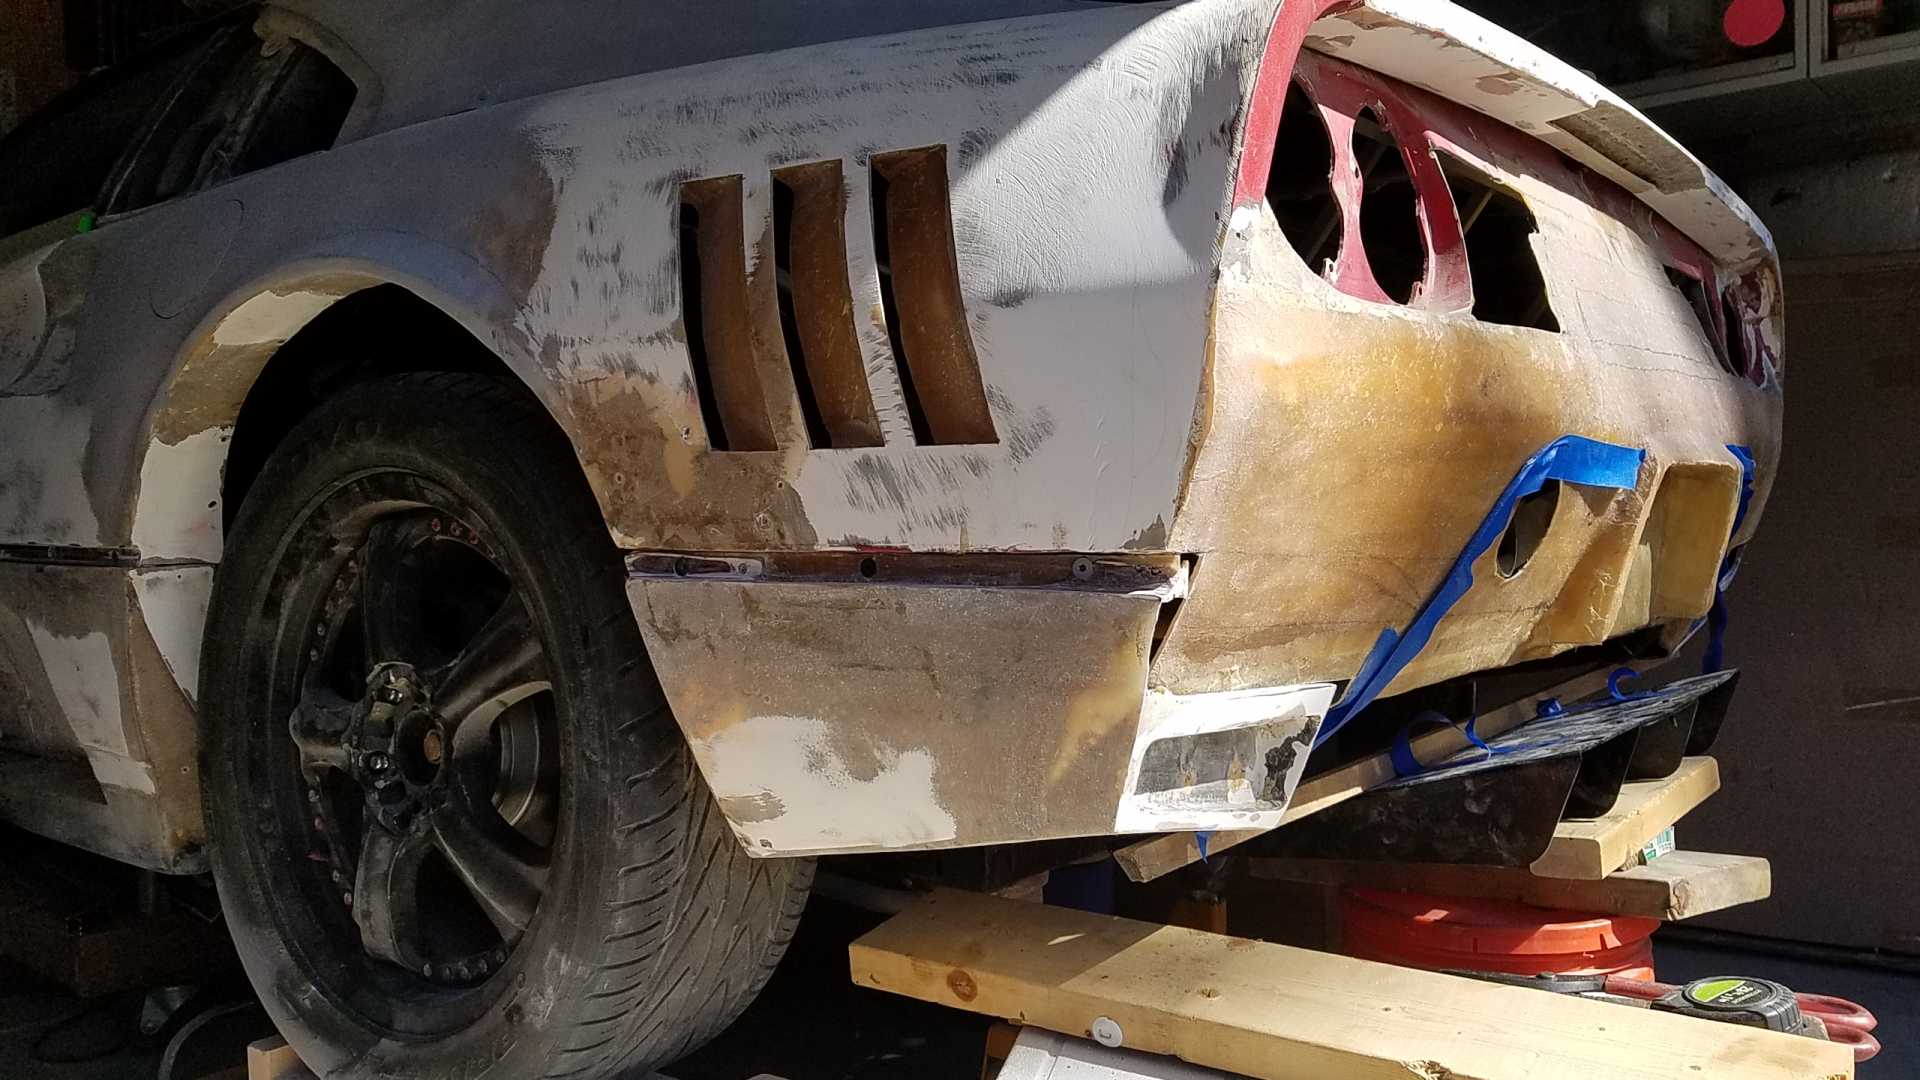
... I started back up on the front of the rocker. This piece has always been rough, since I made it from scratch after losing the original lower fender piece.
I cleand it up with the grinder, then started adding some layers, including the wheel well flange.


I boogered up the mounting flange, so i'm in the process of redoing that.

alarm going off for the grill, til later.

Bob
IP: Logged
sourmash
Member
Posts: 4558
From:
Registered: Jul 2016


Feedback score: N/A
Leave feedback


Total ratings: 50
User Banned

Report this Post09-07-2020 05:55 PM Click Here to See the Profile for sourmashSend a Private Message to sourmashEdit/Delete MessageReply w/QuoteDirect Link to This Post
 
quote
Originally posted by RCR:
alarm going off for the grill, til later.

Bob


The roof, the roof, the roof is on fire?
IP: Logged
355Fiero
Member
Posts: 548
From: Victoria, BC Canada
Registered: Dec 2004


Feedback score: (2)
Leave feedback

Rate this member

Report this Post09-26-2020 04:17 PM Click Here to See the Profile for 355FieroSend a Private Message to 355FieroEdit/Delete MessageReply w/QuoteDirect Link to This Post
Looking really good Bob;

Keep it up. You will get there.

Cheers
Don
IP: Logged
RCR
Member
Posts: 4397
From: Shelby Twp Mi
Registered: Sep 2002


Feedback score:    (7)
Leave feedback


Total ratings: 102
Rate this member

Report this Post09-26-2020 08:08 PM Click Here to See the Profile for RCRSend a Private Message to RCREdit/Delete MessageReply w/QuoteDirect Link to This Post
Thanx Don. Appreciate you stopping by.

Lots of stuff since last update. I'll have to upload the pics.
Worked on the door and door gap, fixed the flange. Glassed in the driver side scoop on the rear fender, And I did a pretty sound job realigning the front end, caster, camber, toe. All good stuff.

Today, on the other hand was a downer. I was following up on some suggestions on why my front is so high, I found a contributing factor.
The frame notch I did to fit the 88 front suspension was inadequate. I need to verify, but it sure looks like the lower control arm is hitting the frame.

So, I went to finish the fuel fill lines, and suffice to say, it doesn't line up.

Tomorrow is another day.

Later friends

Bob

[This message has been edited by RCR (edited 09-26-2020).]

IP: Logged
Australian
Member
Posts: 4701
From: Sydney Australia
Registered: Sep 2004


Feedback score: (3)
Leave feedback

Rate this member

Report this Post09-28-2020 09:41 AM Click Here to See the Profile for AustralianClick Here to visit Australian's HomePageSend a Private Message to AustralianEdit/Delete MessageReply w/QuoteDirect Link to This Post
More pats on the back so inspiring.
IP: Logged
dobie1
Member
Posts: 453
From: BC, Canada
Registered: Jun 2005


Feedback score: N/A
Leave feedback

Rate this member

Report this Post10-09-2020 11:45 PM Click Here to See the Profile for dobie1Send a Private Message to dobie1Edit/Delete MessageReply w/QuoteDirect Link to This Post
Waiting for pics Bob😁
IP: Logged
Dennis LaGrua
Member
Posts: 15145
From: Hillsborough, NJ U.S.A.
Registered: May 2000


Feedback score:    (13)
Leave feedback


Total ratings: 328
Rate this member

Report this Post12-27-2020 06:11 PM Click Here to See the Profile for Dennis LaGruaSend a Private Message to Dennis LaGruaEdit/Delete MessageReply w/QuoteDirect Link to This Post
It's been 11 years and counting. In that time we have learned that you are an excellent fiberglass man but the question; it is realized that everything has time limits?
IP: Logged
RCR
Member
Posts: 4397
From: Shelby Twp Mi
Registered: Sep 2002


Feedback score:    (7)
Leave feedback


Total ratings: 102
Rate this member

Report this Post01-01-2021 11:05 AM Click Here to See the Profile for RCRSend a Private Message to RCREdit/Delete MessageReply w/QuoteDirect Link to This Post
 
quote
Originally posted by Dennis LaGrua:

It's been 11 years and counting. In that time we have learned that you are an excellent fiberglass man but the question; it is realized that everything has time limits?


Hi Dennis, 11 years has been a long time. Sounds like you're suggesting I quit... Probably the smart thing to do. But, I enjoy being able to tinker on it. Maybe it will never drive again, but as long as I'm having fun, and maybe along the way, teach someone a skill, then I'm good with that.

Thanx for dropping by.

And, to all my fellow Fiero brethren, past and present... Have a great (and safe) New Year.

Bob
IP: Logged
PFF
System Bot
Dennis LaGrua
Member
Posts: 15145
From: Hillsborough, NJ U.S.A.
Registered: May 2000


Feedback score:    (13)
Leave feedback


Total ratings: 328
Rate this member

Report this Post01-10-2021 06:09 PM Click Here to See the Profile for Dennis LaGruaSend a Private Message to Dennis LaGruaEdit/Delete MessageReply w/QuoteDirect Link to This Post
[/b]
 
quote
[B]Originally posted by RCR:


Hi Dennis, 11 years has been a long time. Sounds like you're suggesting I quit... Probably the smart thing to do. But, I enjoy being able to tinker on it. Maybe it will never drive again, but as long as I'm having fun, and maybe along the way, teach someone a skill, then I'm good with that.

Thanx for dropping by.

And, to all my fellow Fiero brethren, past and present... Have a great (and safe) New Year.

Bob

Bob, I fully support your project and recognize your fiberglass skill level as being better than mine, but on this end getting to drive them is the pinnacle of a restoration achievement. I know many Fiero owners here in NJ that own garage queens but I could never relate to that. Not trying to be critical of your project but a completion date where you can show your nice creation may prove fun and provide satisfaction. Whichever way you decide to go, thanks for sharing this interesting project with us.

------------------
" THE BLACK PARALYZER" -87GT 3800SC Series III engine, custom ZZP /Frozen Boost Intercooler setup, 3.4" Pulley, Northstar TB, LS1 MAF, 3" Spintech/Hedman Exhaust, P-log Manifold, Autolite 104's, MSD wires, Custom CAI, 4T65eHD w. custom axles, Champion Radiator, S10 Brake Booster, HP Tuners VCM Suite.
"THE COLUSSUS"
87GT - ALL OUT 3.4L Turbocharged engine, Garrett Hybrid Turbo, MSD ign., modified TH125H
" ON THE LOOSE WITHOUT THE JUICE "

IP: Logged
RCR
Member
Posts: 4397
From: Shelby Twp Mi
Registered: Sep 2002


Feedback score:    (7)
Leave feedback


Total ratings: 102
Rate this member

Report this Post01-17-2021 11:18 AM Click Here to See the Profile for RCRSend a Private Message to RCREdit/Delete MessageReply w/QuoteDirect Link to This Post
 
quote
Originally posted by Dennis LaGrua:

[b][/b]Bob, I fully support your project and recognize your fiberglass skill level as being better than mine, but on this end getting to drive them is the pinnacle of a restoration achievement. I know many Fiero owners here in NJ that own garage queens but I could never relate to that. Not trying to be critical of your project but a completion date where you can show your nice creation may prove fun and provide satisfaction. Whichever way you decide to go, thanks for sharing this interesting project with us.


I appreciate the feedback, Dennis. Thank you. The car has been fun, and a distraction from everyday life. But it has only been a distraction, not priority. I've curbed my need for zipping around with an assortment of Mazda 3s over the years. The Mazda is gone, now, so the Fiero gets more love.

This year should see more body work completion. Connect up the oil coolers. I'm looking for a more appropriate dash (come to dislike the GA dash).

I have the beginning parts for the rear diffuser, and sound matt for the interior.

So, if life lets me, a lot more should get done.


Like the Detroit Lions, Maybe next year.

Bob
IP: Logged
dobie1
Member
Posts: 453
From: BC, Canada
Registered: Jun 2005


Feedback score: N/A
Leave feedback

Rate this member

Report this Post02-15-2021 08:17 PM Click Here to See the Profile for dobie1Send a Private Message to dobie1Edit/Delete MessageReply w/QuoteDirect Link to This Post
Bob what’s happening, we need a update on all your progress. You can’t let off the pedal we all need our fix on this custom build!!!

Stay safe my friend
Wayne
IP: Logged
RCR
Member
Posts: 4397
From: Shelby Twp Mi
Registered: Sep 2002


Feedback score:    (7)
Leave feedback


Total ratings: 102
Rate this member

Report this Post02-16-2021 08:21 PM Click Here to See the Profile for RCRSend a Private Message to RCREdit/Delete MessageReply w/QuoteDirect Link to This Post
 
quote
Originally posted by dobie1:

Bob what’s happening, we need a update on all your progress. You can’t let off the pedal we all need our fix on this custom build!!!

Stay safe my friend
Wayne


It's been a little colder here in the Enchanted Mitten than over in BC. It's been about 15*ish F for the last two weeks.

Eager to get out there, though. Plans include a possible dash swap and some interior work. Fixing the front suspension. And of course, more body work. The first two should occur before it warms up enough to do the body work.

Take care, bud...

Bob
IP: Logged
dobie1
Member
Posts: 453
From: BC, Canada
Registered: Jun 2005


Feedback score: N/A
Leave feedback

Rate this member

Report this Post02-18-2021 11:55 AM Click Here to See the Profile for dobie1Send a Private Message to dobie1Edit/Delete MessageReply w/QuoteDirect Link to This Post
Hea Bob
Looking forward to the dash swap!!
It’s been pretty cold up here as well and we got about 15” of snow on top of -5 Celsius so having to use heaters to heat up the shop before I do any fiberglassing. Hoping to have my back half of the car all completed this week.

Stay safe my friend.
Wayne
IP: Logged
RCR
Member
Posts: 4397
From: Shelby Twp Mi
Registered: Sep 2002


Feedback score:    (7)
Leave feedback


Total ratings: 102
Rate this member

Report this Post03-13-2021 05:58 PM Click Here to See the Profile for RCRSend a Private Message to RCREdit/Delete MessageReply w/QuoteDirect Link to This Post
Not body mod related, but after having to redo the brackets for the driver's side seat (third time). It now has functioning power for fore-aft and up -down for the knees (don't know what else to call it). I'll start the rewiring tomorrow (probably).

peace out..

Bob
IP: Logged
RCR
Member
Posts: 4397
From: Shelby Twp Mi
Registered: Sep 2002


Feedback score:    (7)
Leave feedback


Total ratings: 102
Rate this member

Report this Post03-13-2021 06:02 PM Click Here to See the Profile for RCRSend a Private Message to RCREdit/Delete MessageReply w/QuoteDirect Link to This Post

RCR

4397 posts
Member since Sep 2002
 
quote
Originally posted by dobie1:

Hea Bob
Looking forward to the dash swap!!
It’s been pretty cold up here as well and we got about 15” of snow on top of -5 Celsius so having to use heaters to heat up the shop before I do any fiberglassing. Hoping to have my back half of the car all completed this week.

Stay safe my friend.
Wayne


Hi Wayne,
Still have not found one I like. Looking for something that looks "right" with this build. The Grand Am dash does NOT look right. If I still had the Fiero dash, I might consider putting that back in and modifying it.

No hurry...

later..

Bob
IP: Logged
RCR
Member
Posts: 4397
From: Shelby Twp Mi
Registered: Sep 2002


Feedback score:    (7)
Leave feedback


Total ratings: 102
Rate this member

Report this Post03-15-2021 07:31 AM Click Here to See the Profile for RCRSend a Private Message to RCREdit/Delete MessageReply w/QuoteDirect Link to This Post
 
quote
Originally posted by RCR:

Not body mod related, but after having to redo the brackets for the driver's side seat (third time). It now has functioning power for fore-aft and up -down for the knees (don't know what else to call it). I'll start the rewiring tomorrow (probably).

peace out..

Bob


Wiring of the seat is complete. I have full articulation minus up/down. The seat covers are also installed. I'll need to figure out where the controls will go. Thinking somewhere near the fuel tank tunnel.

Next up is cleanup of the floor and sound deadener and finish up the passenger side seat.

I do need some pics (because it's not real without pics)

Bob
IP: Logged
infinitewill
Member
Posts: 2327
From: Overland Park, KS U.S.A.
Registered: Mar 2009


Feedback score:    (55)
Leave feedback


Total ratings: 85
Rate this member

Report this Post03-15-2021 09:06 AM Click Here to See the Profile for infinitewillSend a Private Message to infinitewillEdit/Delete MessageReply w/QuoteDirect Link to This Post
Bob,

Your dedication to this project is astonishing. I have thrown in the towel on my builds so many times it looks like a laundry mat after a flood. Although I rarely post I still lurk, glad to see you are still at it!

Dr. \/\/
IP: Logged
RCR
Member
Posts: 4397
From: Shelby Twp Mi
Registered: Sep 2002


Feedback score:    (7)
Leave feedback


Total ratings: 102
Rate this member

Report this Post03-16-2021 06:39 AM Click Here to See the Profile for RCRSend a Private Message to RCREdit/Delete MessageReply w/QuoteDirect Link to This Post
 
quote
Originally posted by infinitewill:

Bob,

Your dedication to this project is astonishing. I have thrown in the towel on my builds so many times it looks like a laundry mat after a flood. Although I rarely post I still lurk, glad to see you are still at it!

Dr. \/\/


Hey Will,
Thanx for dropping by. It's good to hear from you.
If it weren't for this project, I'd have to spend more time worrying about my health, my kids, my wife, work, bills, etc. It's good therapy.

Bob
IP: Logged
PFF
System Bot
RCR
Member
Posts: 4397
From: Shelby Twp Mi
Registered: Sep 2002


Feedback score:    (7)
Leave feedback


Total ratings: 102
Rate this member

Report this Post03-20-2021 11:55 AM Click Here to See the Profile for RCRSend a Private Message to RCREdit/Delete MessageReply w/QuoteDirect Link to This Post
Edit: I updated the actual interior thread. HERE

Bob

[This message has been edited by RCR (edited 03-29-2021).]

IP: Logged
yourfriendethan
Member
Posts: 18
From: Indiana
Registered: Sep 2020


Feedback score: N/A
Leave feedback

Rate this member

Report this Post04-02-2021 09:48 AM Click Here to See the Profile for yourfriendethanSend a Private Message to yourfriendethanEdit/Delete MessageReply w/QuoteDirect Link to This Post
anyone else not seeing images, just seeing little missing image icons? super bummed about it..
IP: Logged
RCR
Member
Posts: 4397
From: Shelby Twp Mi
Registered: Sep 2002


Feedback score:    (7)
Leave feedback


Total ratings: 102
Rate this member

Report this Post04-04-2021 08:44 PM Click Here to See the Profile for RCRSend a Private Message to RCREdit/Delete MessageReply w/QuoteDirect Link to This Post
 
quote
Originally posted by yourfriendethan:

anyone else not seeing images, just seeing little missing image icons? super bummed about it..


Images work. There's a thread about it. Need to change security setting.

Worked on the car ab it. Phone full of pics, but that doesn't help when I'm on the PC.

Anyway, beside sound deadener, I rebuilt the bracket for the mirror mount on the driver's door. Very solid now.

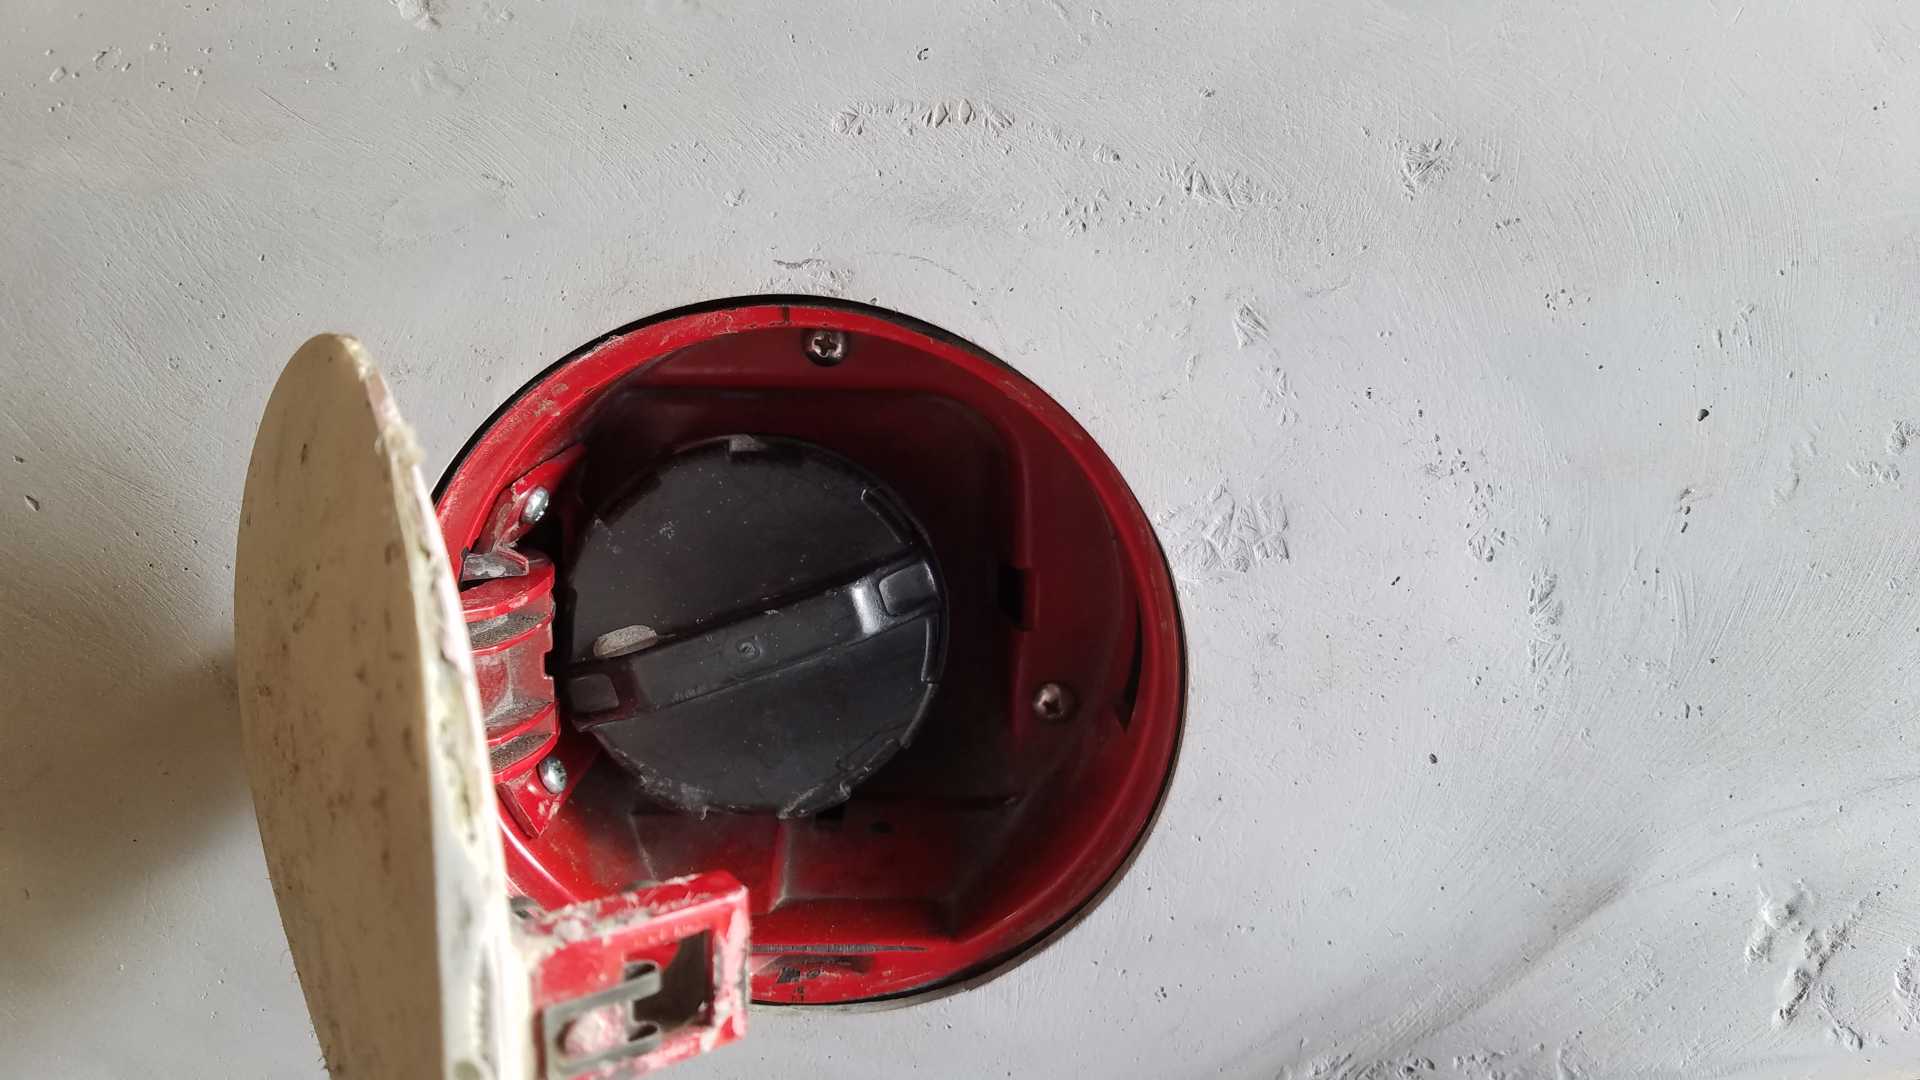
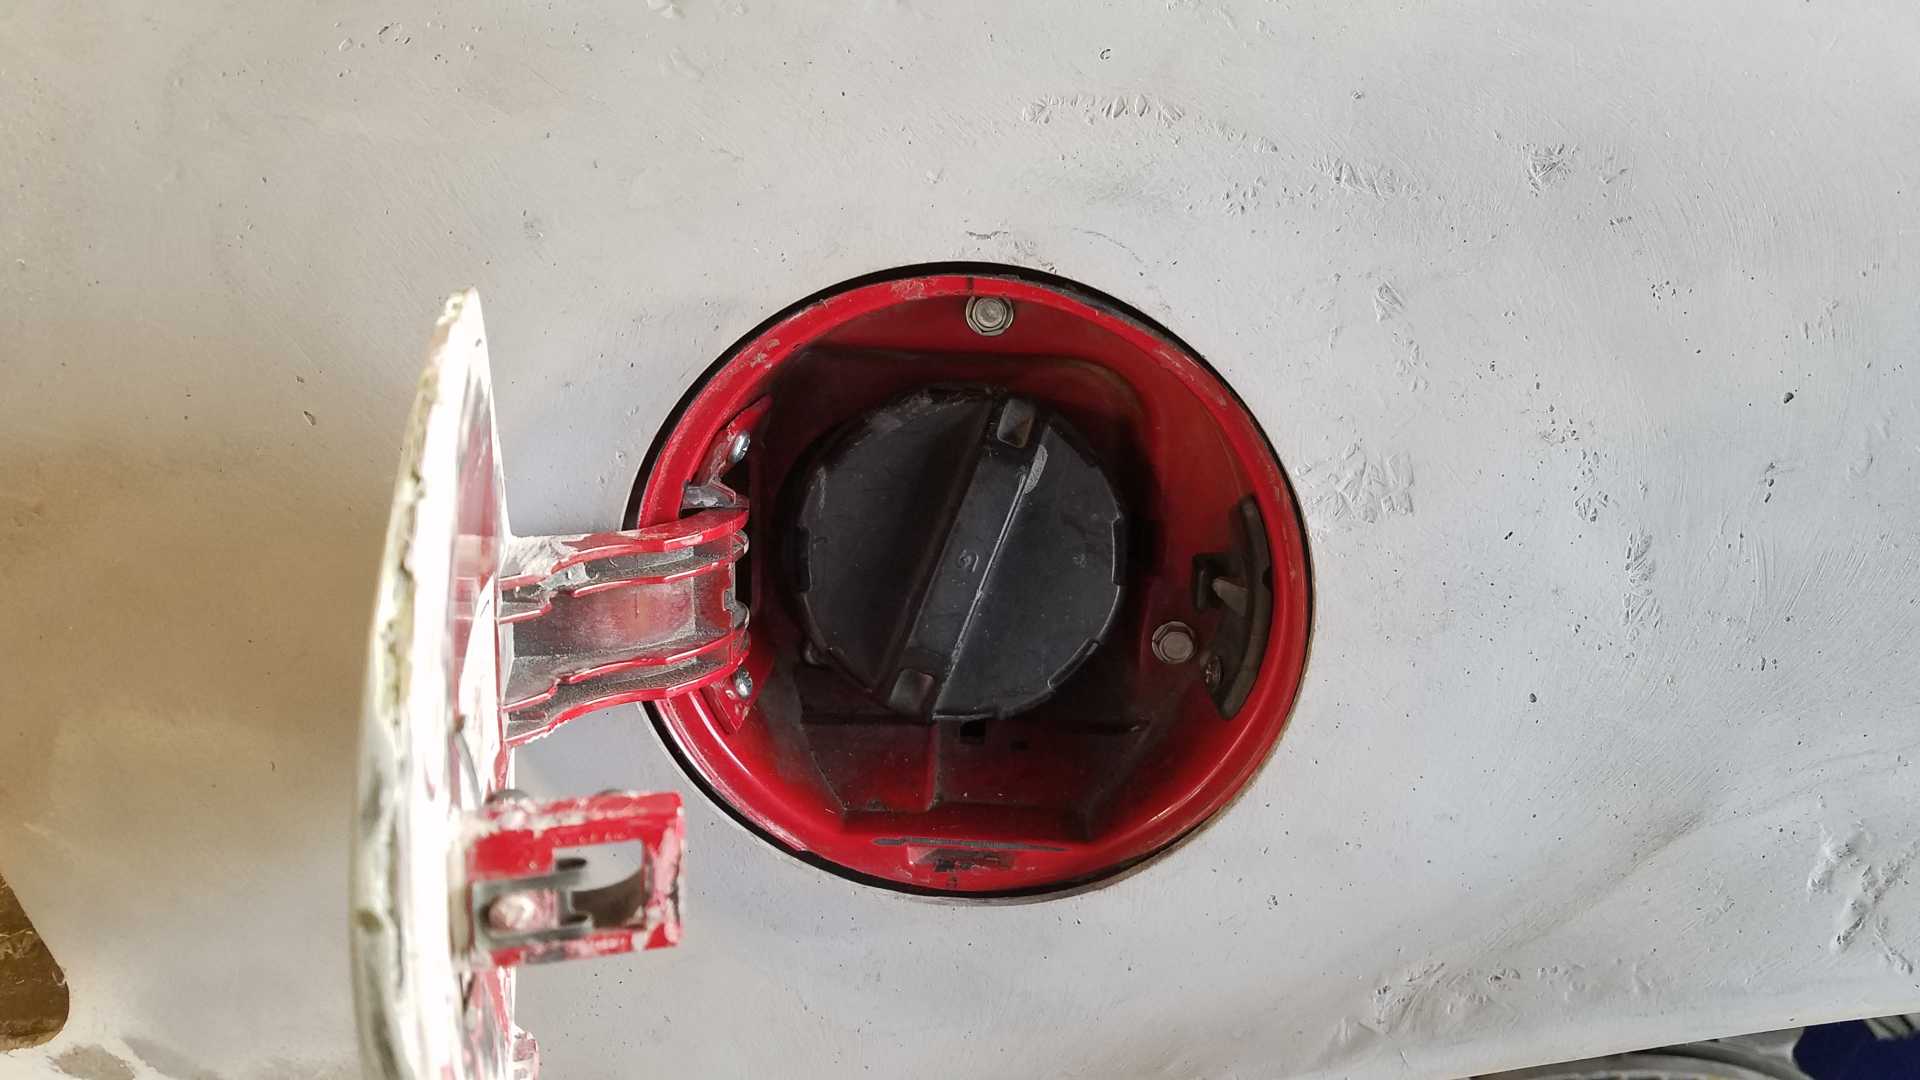
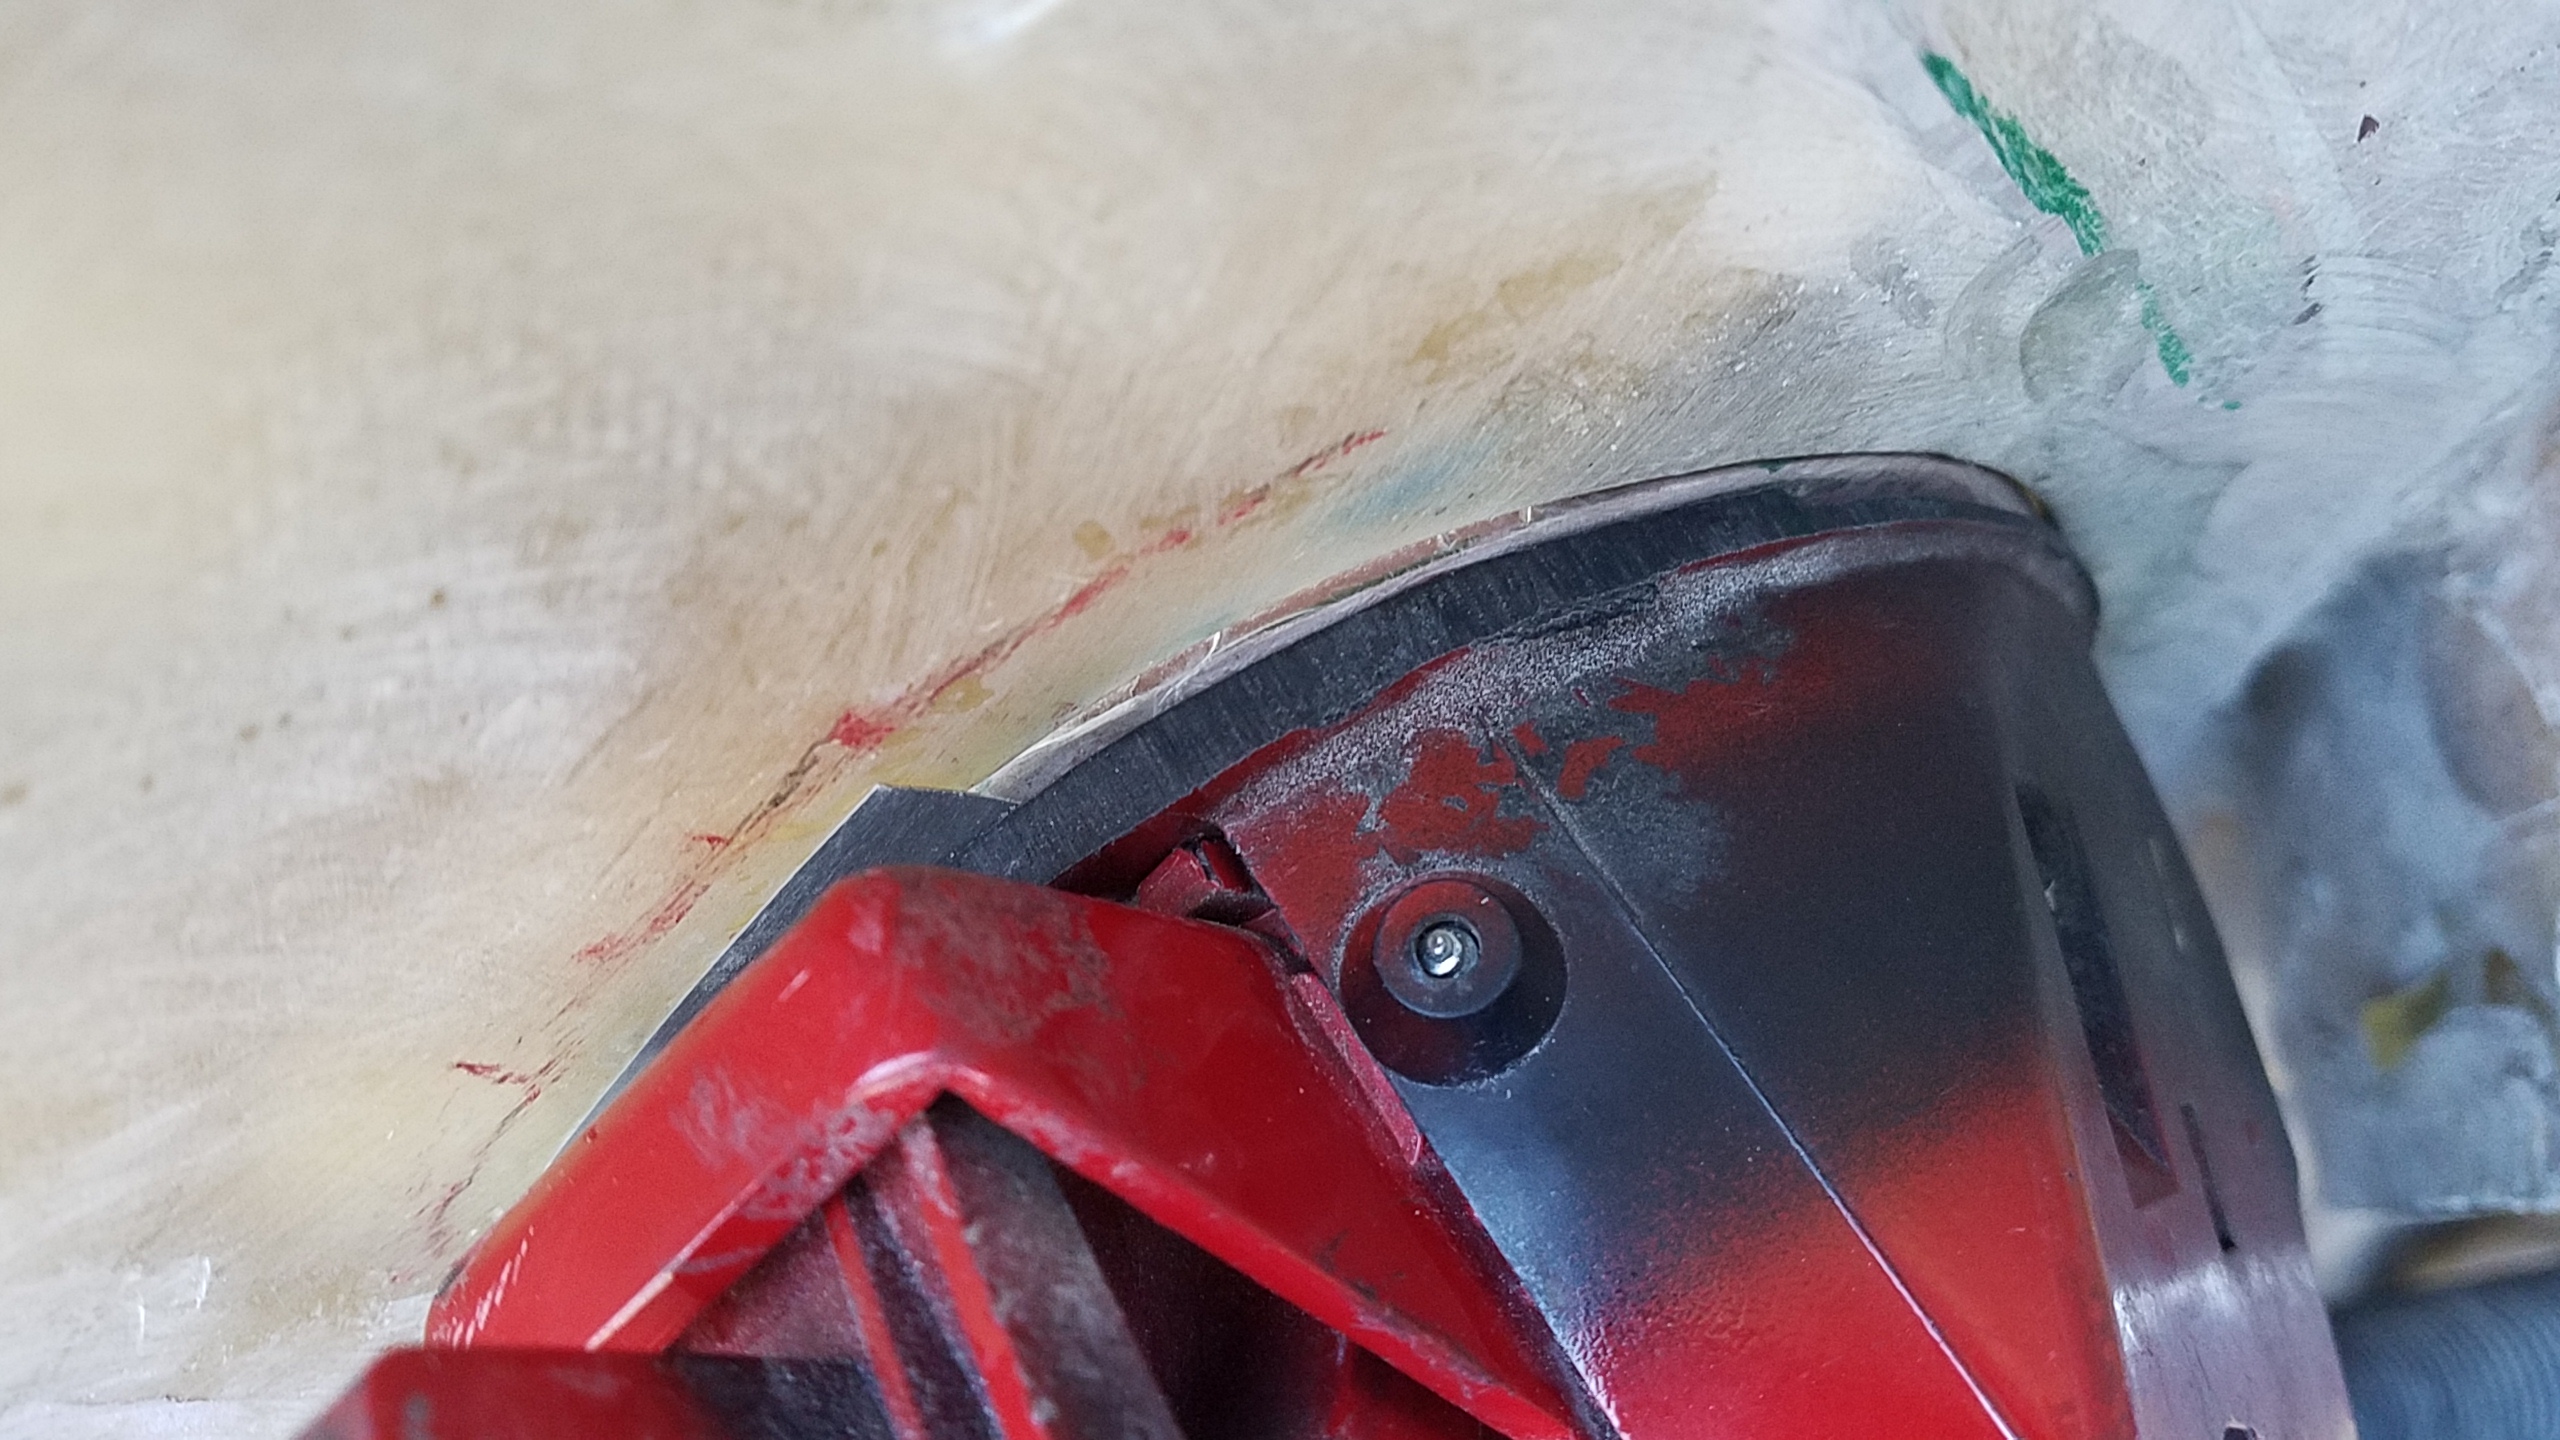
Today, I tackled that pesky fuel line. The way I left it last fall, nothing lined up. Months of thinking about it, and a spare Fiero in the local yard in case I buggered it up, I went at it.

I ended up chopping the bracket that mounts the tube to the filler door. Cut a crescent shape out to readjust the angle. Welded it all back up. Couple coats of paint. Good as new.

And the tubes line up now. Pictures are worth a thousand words, so I'll get them up soon.

Happy Easter,

Bob

IP: Logged
IMSA GT
Member
Posts: 10268
From: California
Registered: Aug 2007


Feedback score:    (8)
Leave feedback


Total ratings: 251
Rate this member

Report this Post04-04-2021 10:27 PM Click Here to See the Profile for IMSA GTSend a Private Message to IMSA GTEdit/Delete MessageReply w/QuoteDirect Link to This Post
 
quote
Originally posted by yourfriendethan:

anyone else not seeing images, just seeing little missing image icons? super bummed about it..


Cliff already fixed the issue on the 3rd so there shouldn't be any other issues.
IP: Logged
RCR
Member
Posts: 4397
From: Shelby Twp Mi
Registered: Sep 2002


Feedback score:    (7)
Leave feedback


Total ratings: 102
Rate this member

Report this Post04-11-2021 01:29 PM Click Here to See the Profile for RCRSend a Private Message to RCREdit/Delete MessageReply w/QuoteDirect Link to This Post
The pics...


edit: placed in Interior thread

And the gas door... Probably still going to tweek it...

This is the before, when the door hit the cap.


This is after some clearance cuts were made to move the neck over.


Also started working on the flange for the rear clamshell to b-pillar and the door gap.


see ya...
Bob

[This message has been edited by RCR (edited 04-15-2021).]

IP: Logged
lesleyharrell742
Junior Member
Posts: 1
From: Canada
Registered: Apr 2021


Feedback score: N/A
Leave feedback

Rate this member

Report this Post04-15-2021 06:31 AM Click Here to See the Profile for lesleyharrell742Send a Private Message to lesleyharrell742Edit/Delete MessageReply w/QuoteDirect Link to This Post
Lights look like a great choice to me. Anxious to see how they work out.
Also looking forward to seeing your car come together.

------------------
"Instant gratification takes too long."
https://www.worktime.com/

IP: Logged
RCR
Member
Posts: 4397
From: Shelby Twp Mi
Registered: Sep 2002


Feedback score:    (7)
Leave feedback


Total ratings: 102
Rate this member

Report this Post04-15-2021 06:56 AM Click Here to See the Profile for RCRSend a Private Message to RCREdit/Delete MessageReply w/QuoteDirect Link to This Post
 
quote
Originally posted by lesleyharrell742:

Lights look like a great choice to me. Anxious to see how they work out.
Also looking forward to seeing your car come together.


Thanx Lesley. Welcome to the forum and thanx for stopping by.

Bob
IP: Logged
Trinten
Member
Posts: 1352
From: Mebane, N.C.
Registered: Sep 2008


Feedback score:    (8)
Leave feedback

Rate this member

Report this Post04-15-2021 09:05 AM Click Here to See the Profile for TrintenSend a Private Message to TrintenEdit/Delete MessageReply w/QuoteDirect Link to This Post
So much awesome stuff!

Really clean work on relocating the fuel cover! (yes, I know, out of all the cool stuff you did, that's the thing I opened with. I had to pick SOMETHING to start with, and there was too many options!) I really like the lines of your build, that 3/4 view on the last page from the front looks sharp. This is a super slick. And I agree on your headlight setup, I think that's going to look very "natural".

I have a question! With the "reverse decklid" (again, really slick engineering/fab work there!) how will you do maintenance? If you talked about this and I missed it, I apologize.

I'm assuming the decklid assembly will come off "easily" (relative to the current decklid anyway), by just one person and go back on "easily"? Just seems like it will be tough to lean over the "swoop/fastback" to do stuff around the decklid and increase risk of flex/crack/scratch damage to the body/paint.

IP: Logged
RCR
Member
Posts: 4397
From: Shelby Twp Mi
Registered: Sep 2002


Feedback score:    (7)
Leave feedback


Total ratings: 102
Rate this member

Report this Post04-15-2021 04:31 PM Click Here to See the Profile for RCRSend a Private Message to RCREdit/Delete MessageReply w/QuoteDirect Link to This Post
 
quote
Originally posted by Trinten:

So much awesome stuff!

Really clean work on relocating the fuel cover! (yes, I know, out of all the cool stuff you did, that's the thing I opened with. I had to pick SOMETHING to start with, and there was too many options!) I really like the lines of your build, that 3/4 view on the last page from the front looks sharp. This is a super slick. And I agree on your headlight setup, I think that's going to look very "natural".

I have a question! With the "reverse decklid" (again, really slick engineering/fab work there!) how will you do maintenance? If you talked about this and I missed it, I apologize.

I'm assuming the decklid assembly will come off "easily" (relative to the current decklid anyway), by just one person and go back on "easily"? Just seems like it will be tough to lean over the "swoop/fastback" to do stuff around the decklid and increase risk of flex/crack/scratch damage to the body/paint.


Hey Trinten, thanx for dropping by.

Maintenance shouldn't be too bad. It's not bad now and it's 11" off the ground. Really the only issue I see now is the coolant bottle is under the sail panel. Makes access "interesting".

I haven't done it yet, but I think I'm going to move the air filter to the other sail panel. Maybe block it off and use the To Be Made louvre as the intake vent.

later

Bob
IP: Logged
RCR
Member
Posts: 4397
From: Shelby Twp Mi
Registered: Sep 2002


Feedback score:    (7)
Leave feedback


Total ratings: 102
Rate this member

Report this Post04-25-2021 07:40 PM Click Here to See the Profile for RCRSend a Private Message to RCREdit/Delete MessageReply w/QuoteDirect Link to This Post
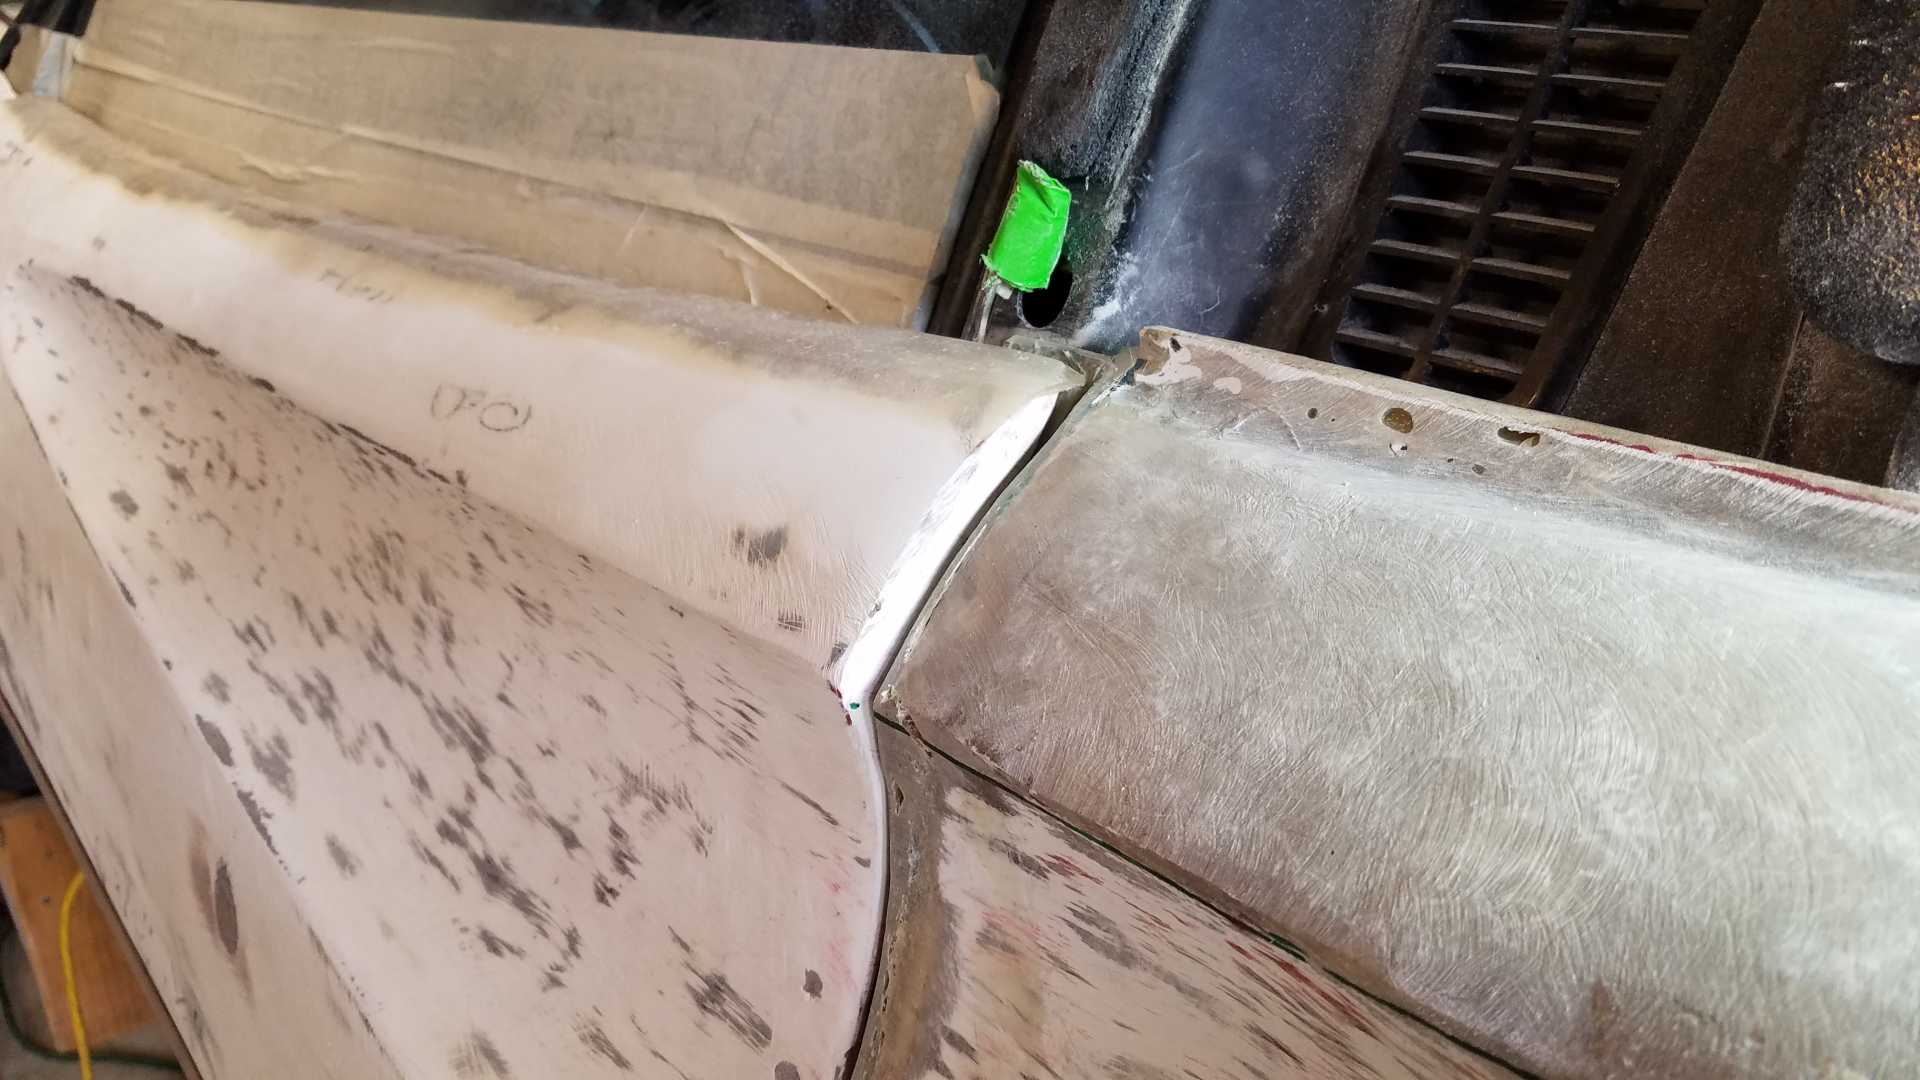
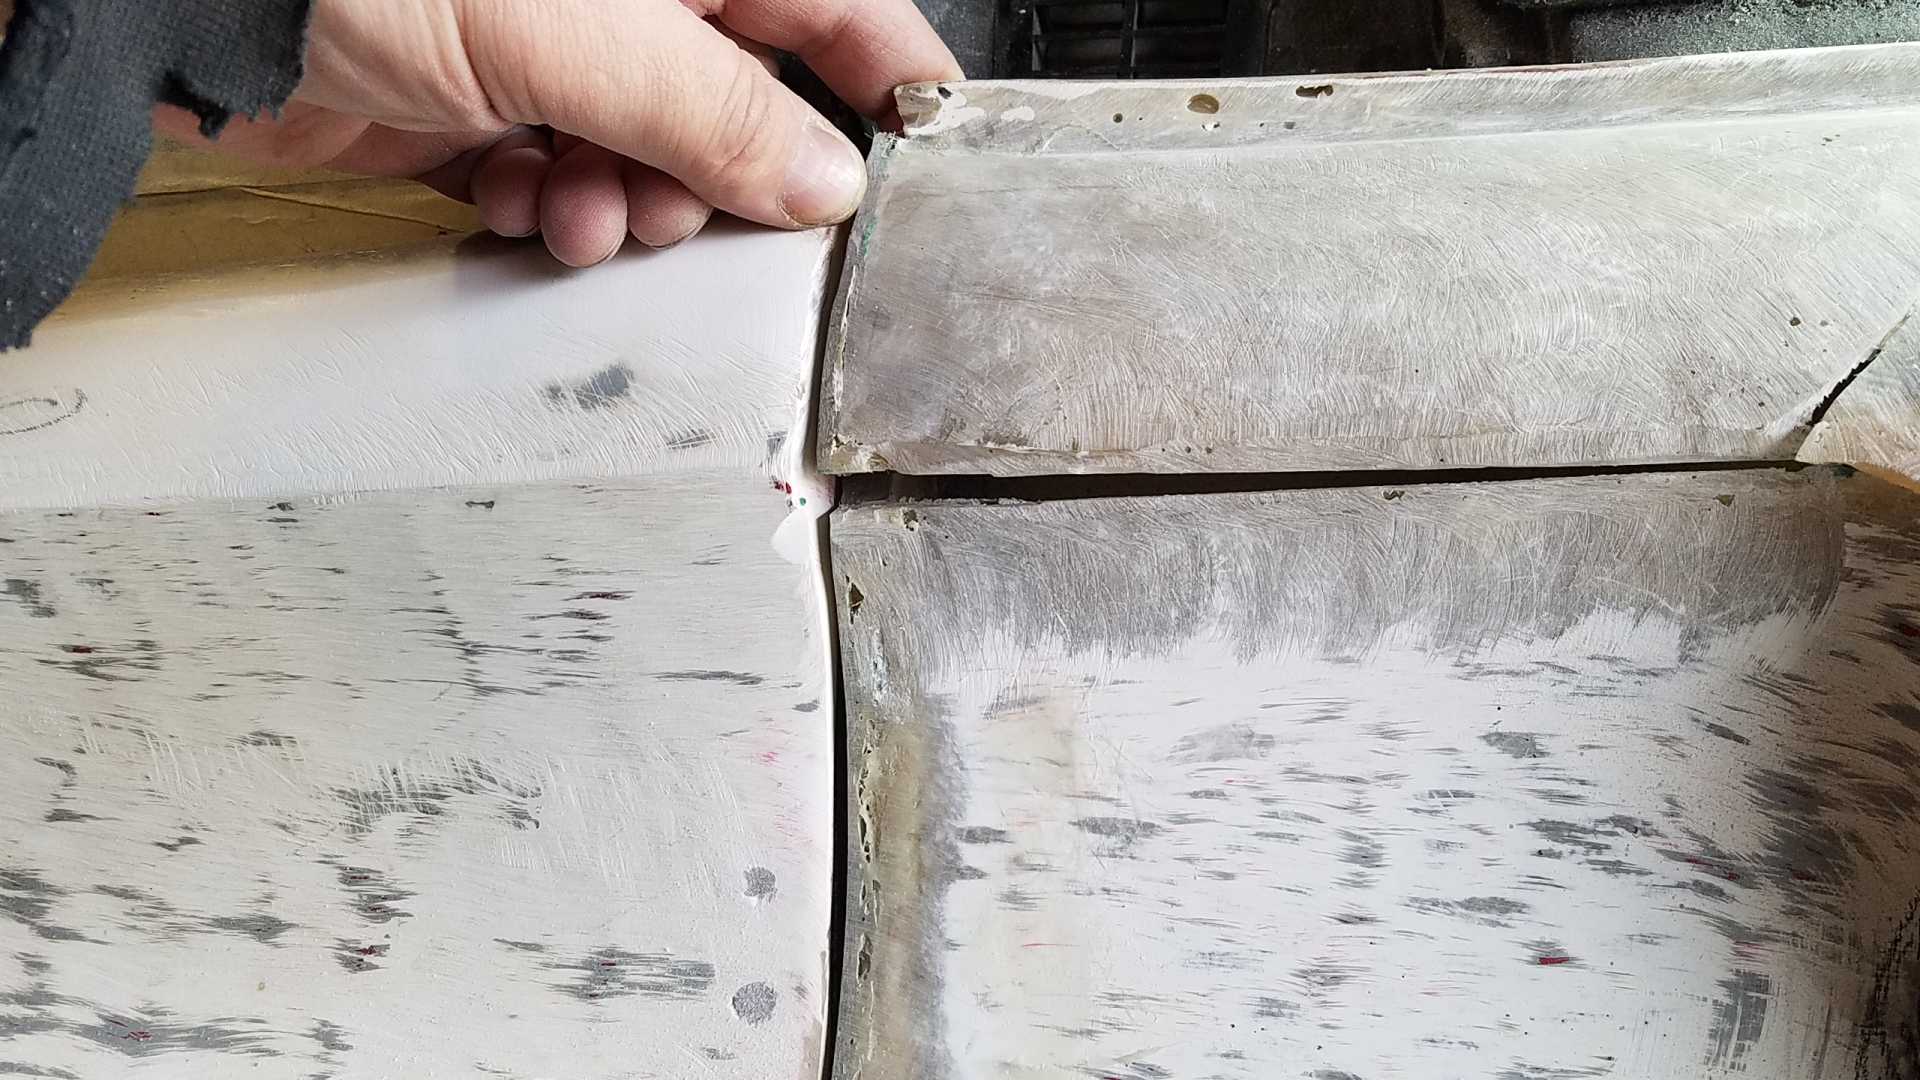
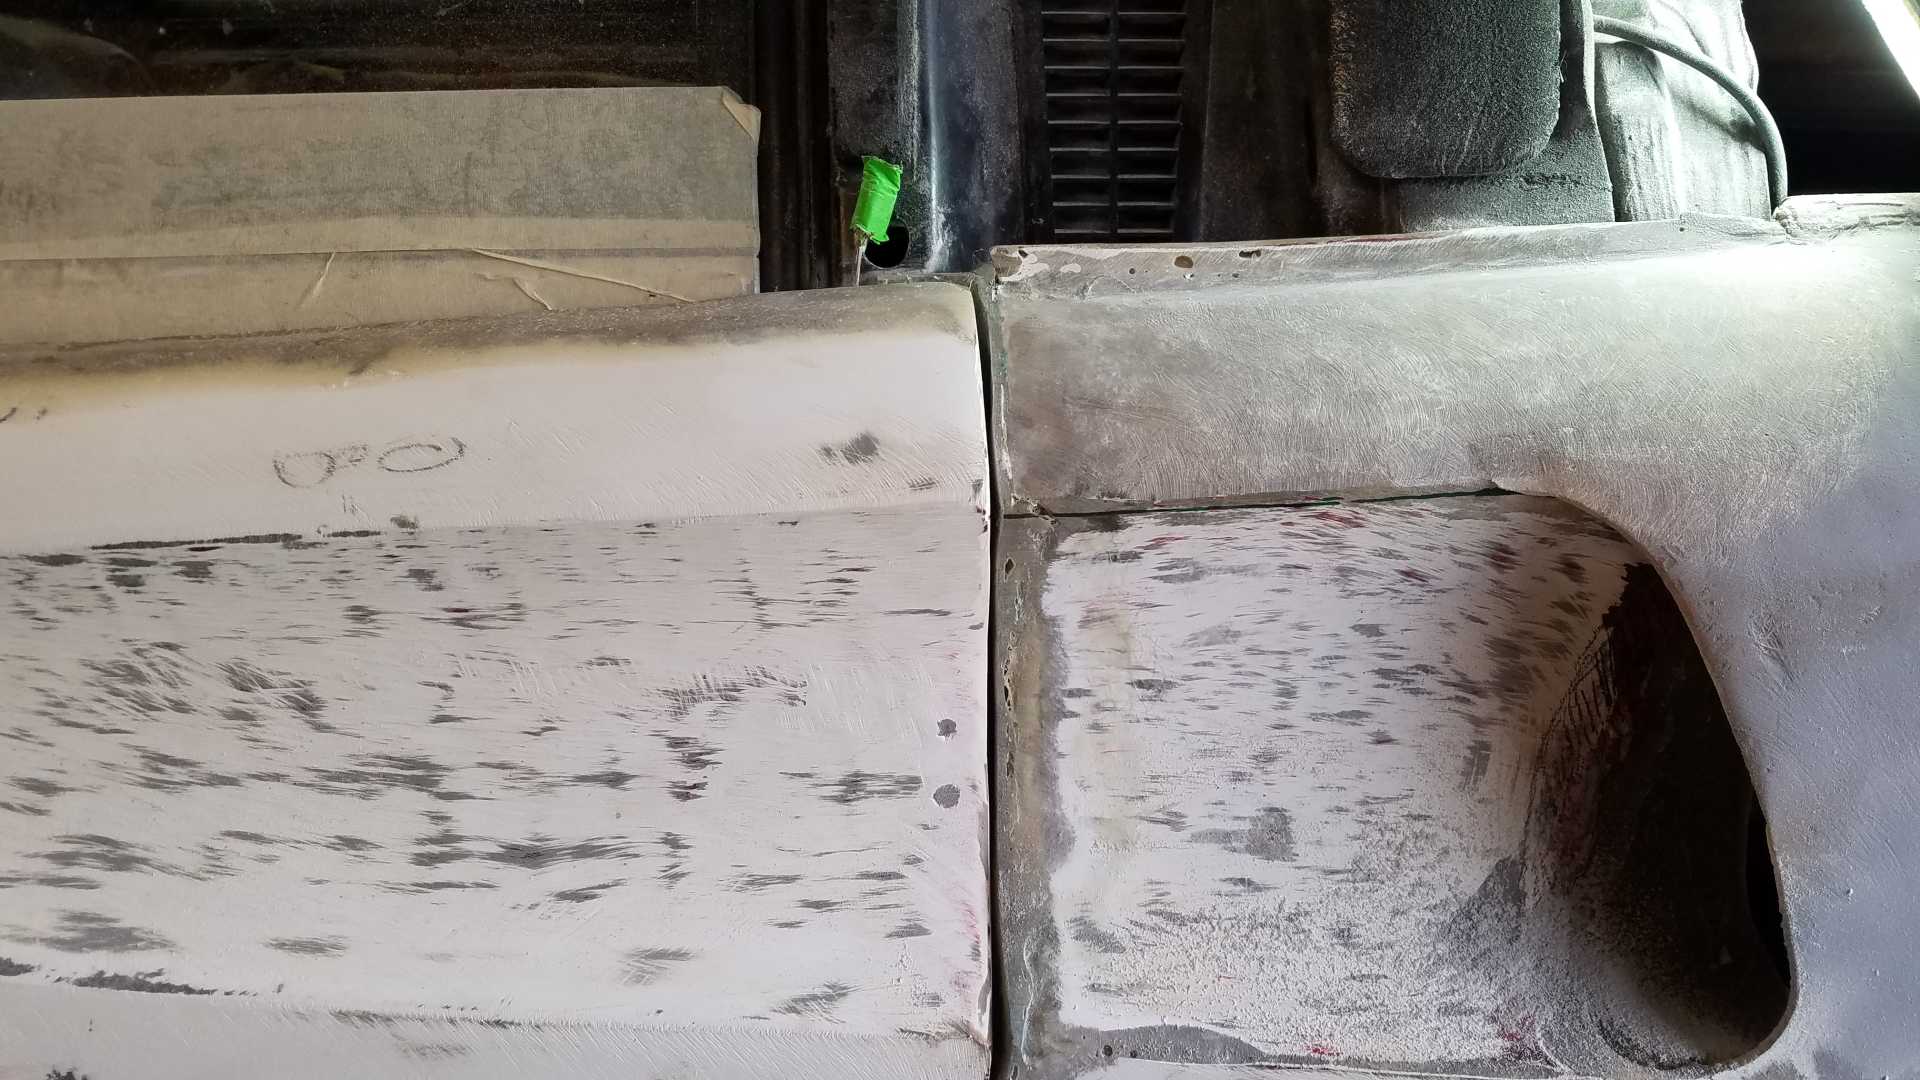
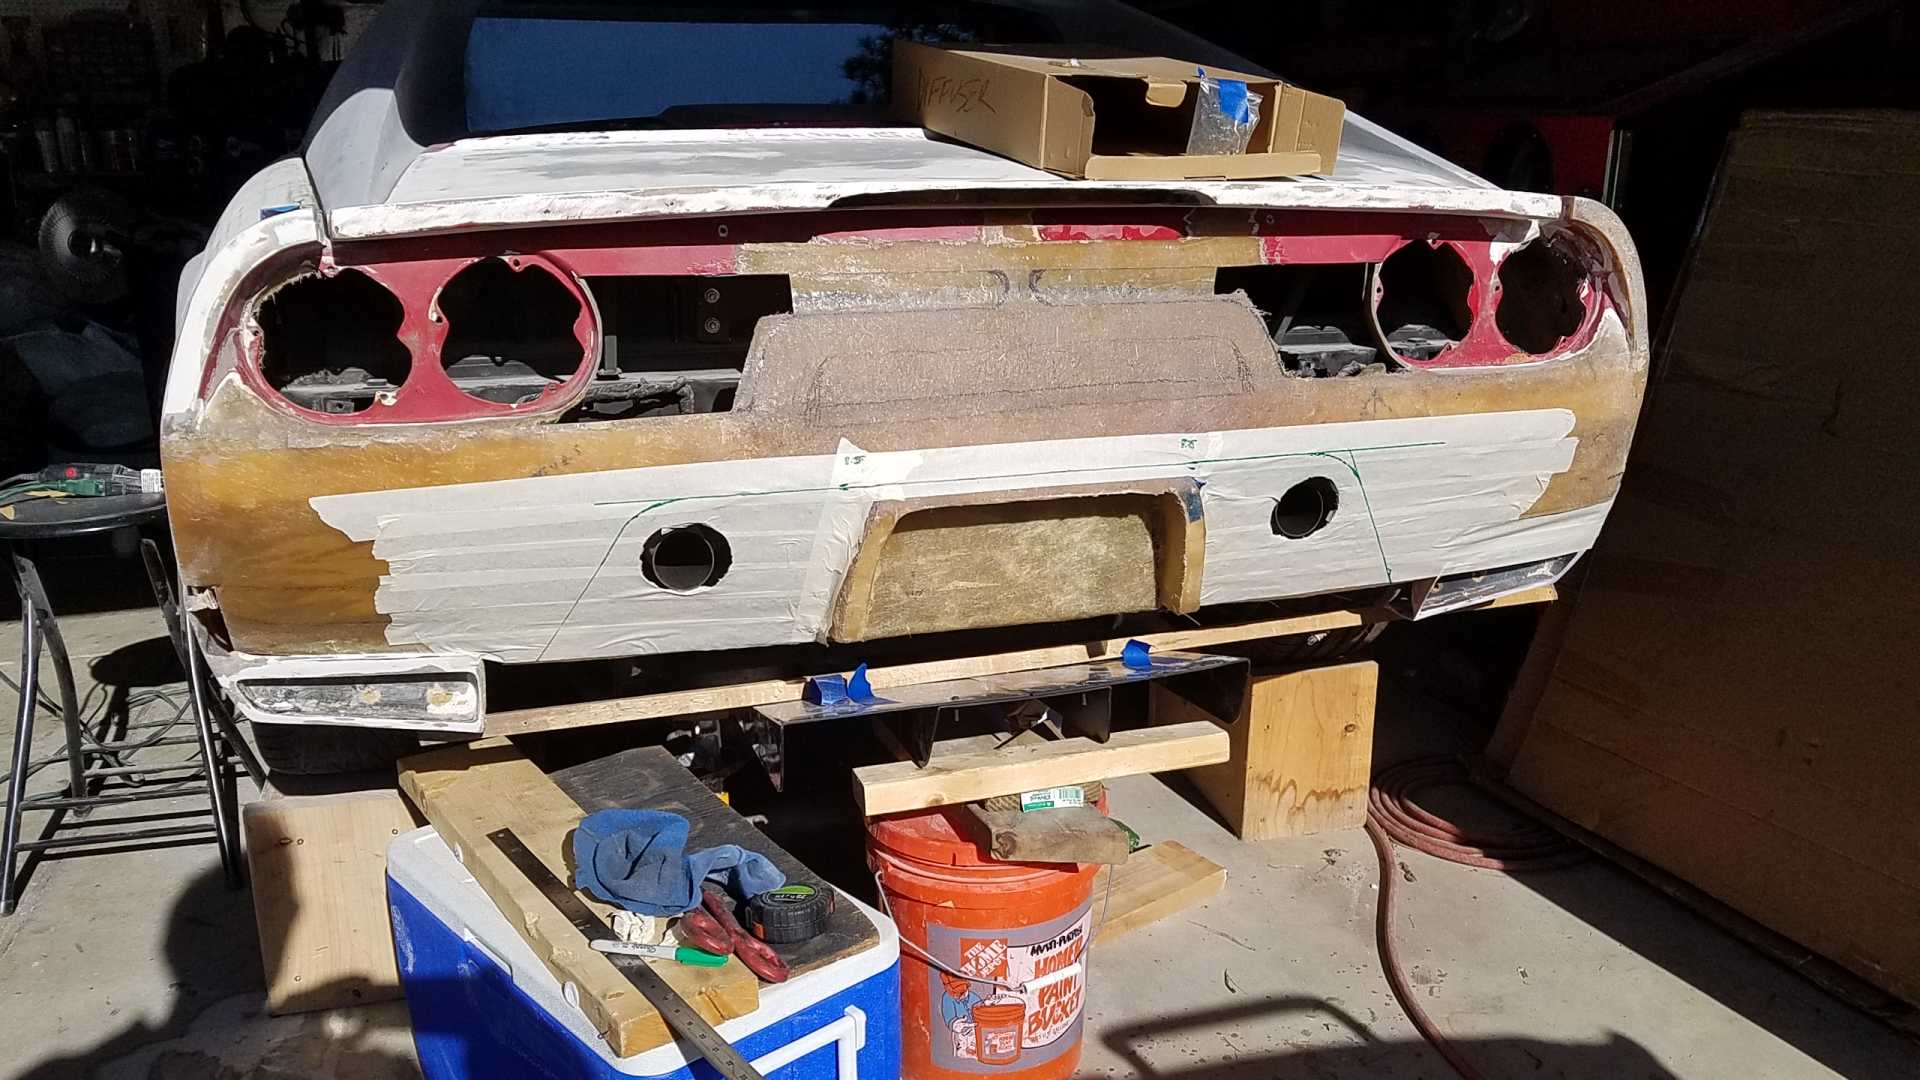
Been working on a few things. Lots to show...
Last post I started working on the door gap. I found that when the rear qtr was in place, I ended up with a large space between the door and the qtr. Out came the Dremel...


And the glass... All back together.


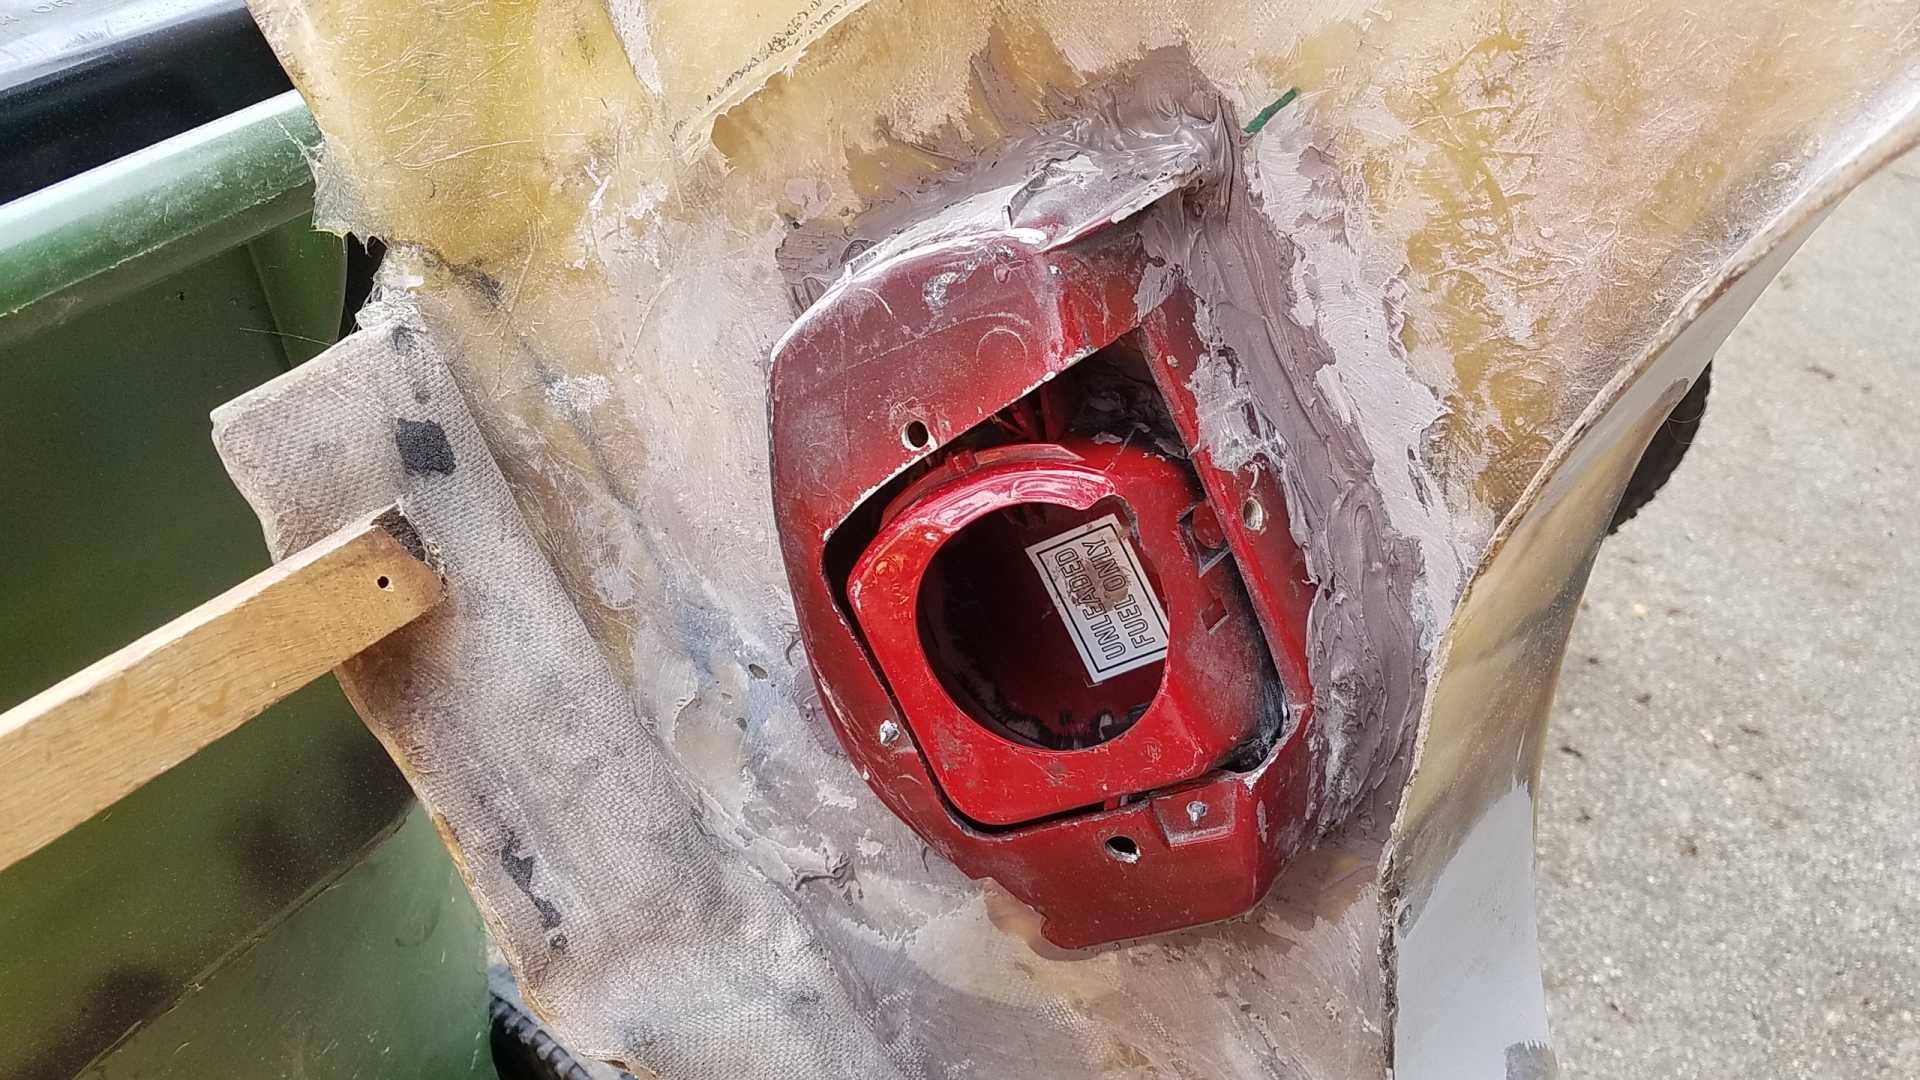
I also did some work on the gas door again. Although I was happy with the way it came together, I was unhappy that it installed like the Fiero parts, which resulted in a gap between the body and the inner filler piece.
So, out came the Dremel.

I basically ended cutting everything off and starting over. I ended up bonding the filler piece directly to the body. Took four attempts to get the door to line up properly.
Everything mounts from the inside, using all of the stock pieces. The trick was to drill some access holes to allow installing the bolts that hold the filler neck in.


more to come...

IP: Logged
PFF
System Bot
RCR
Member
Posts: 4397
From: Shelby Twp Mi
Registered: Sep 2002


Feedback score:    (7)
Leave feedback


Total ratings: 102
Rate this member

Report this Post04-25-2021 07:50 PM Click Here to See the Profile for RCRSend a Private Message to RCREdit/Delete MessageReply w/QuoteDirect Link to This Post

RCR

4397 posts
Member since Sep 2002
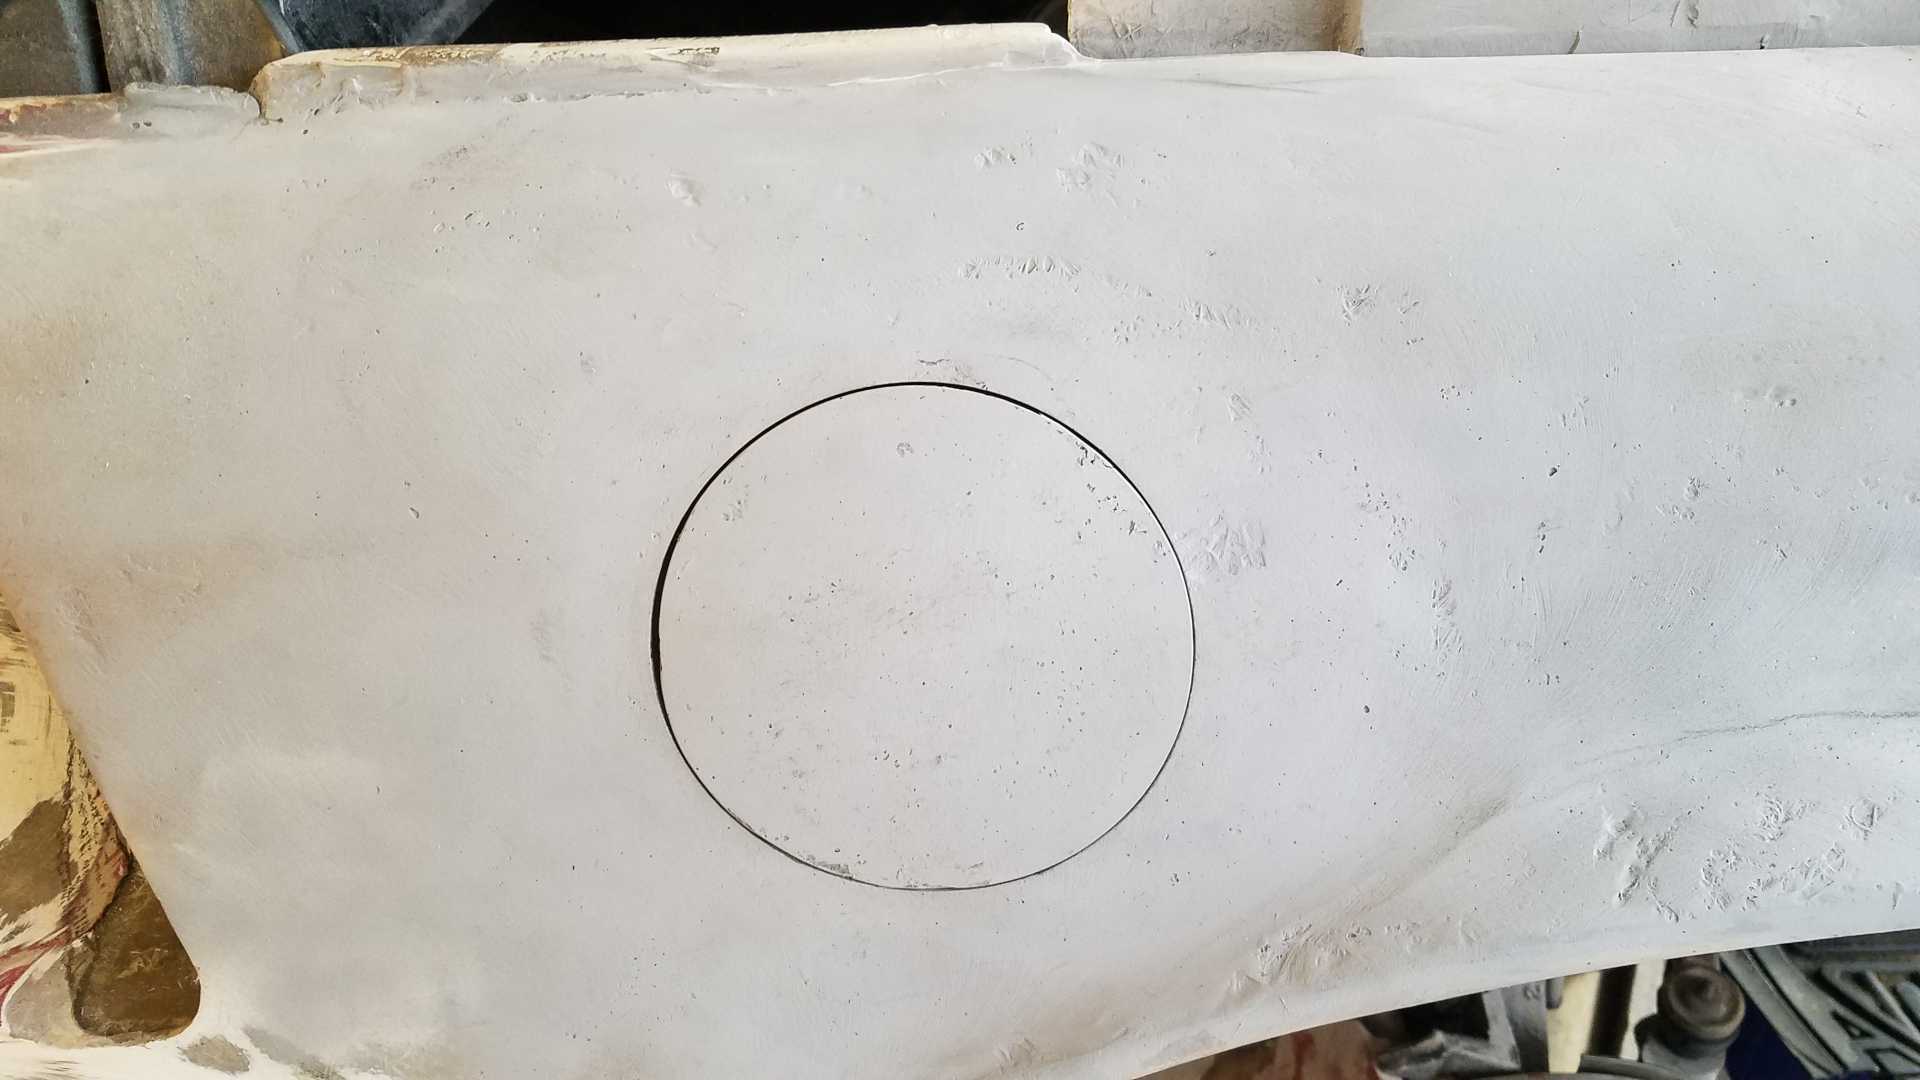
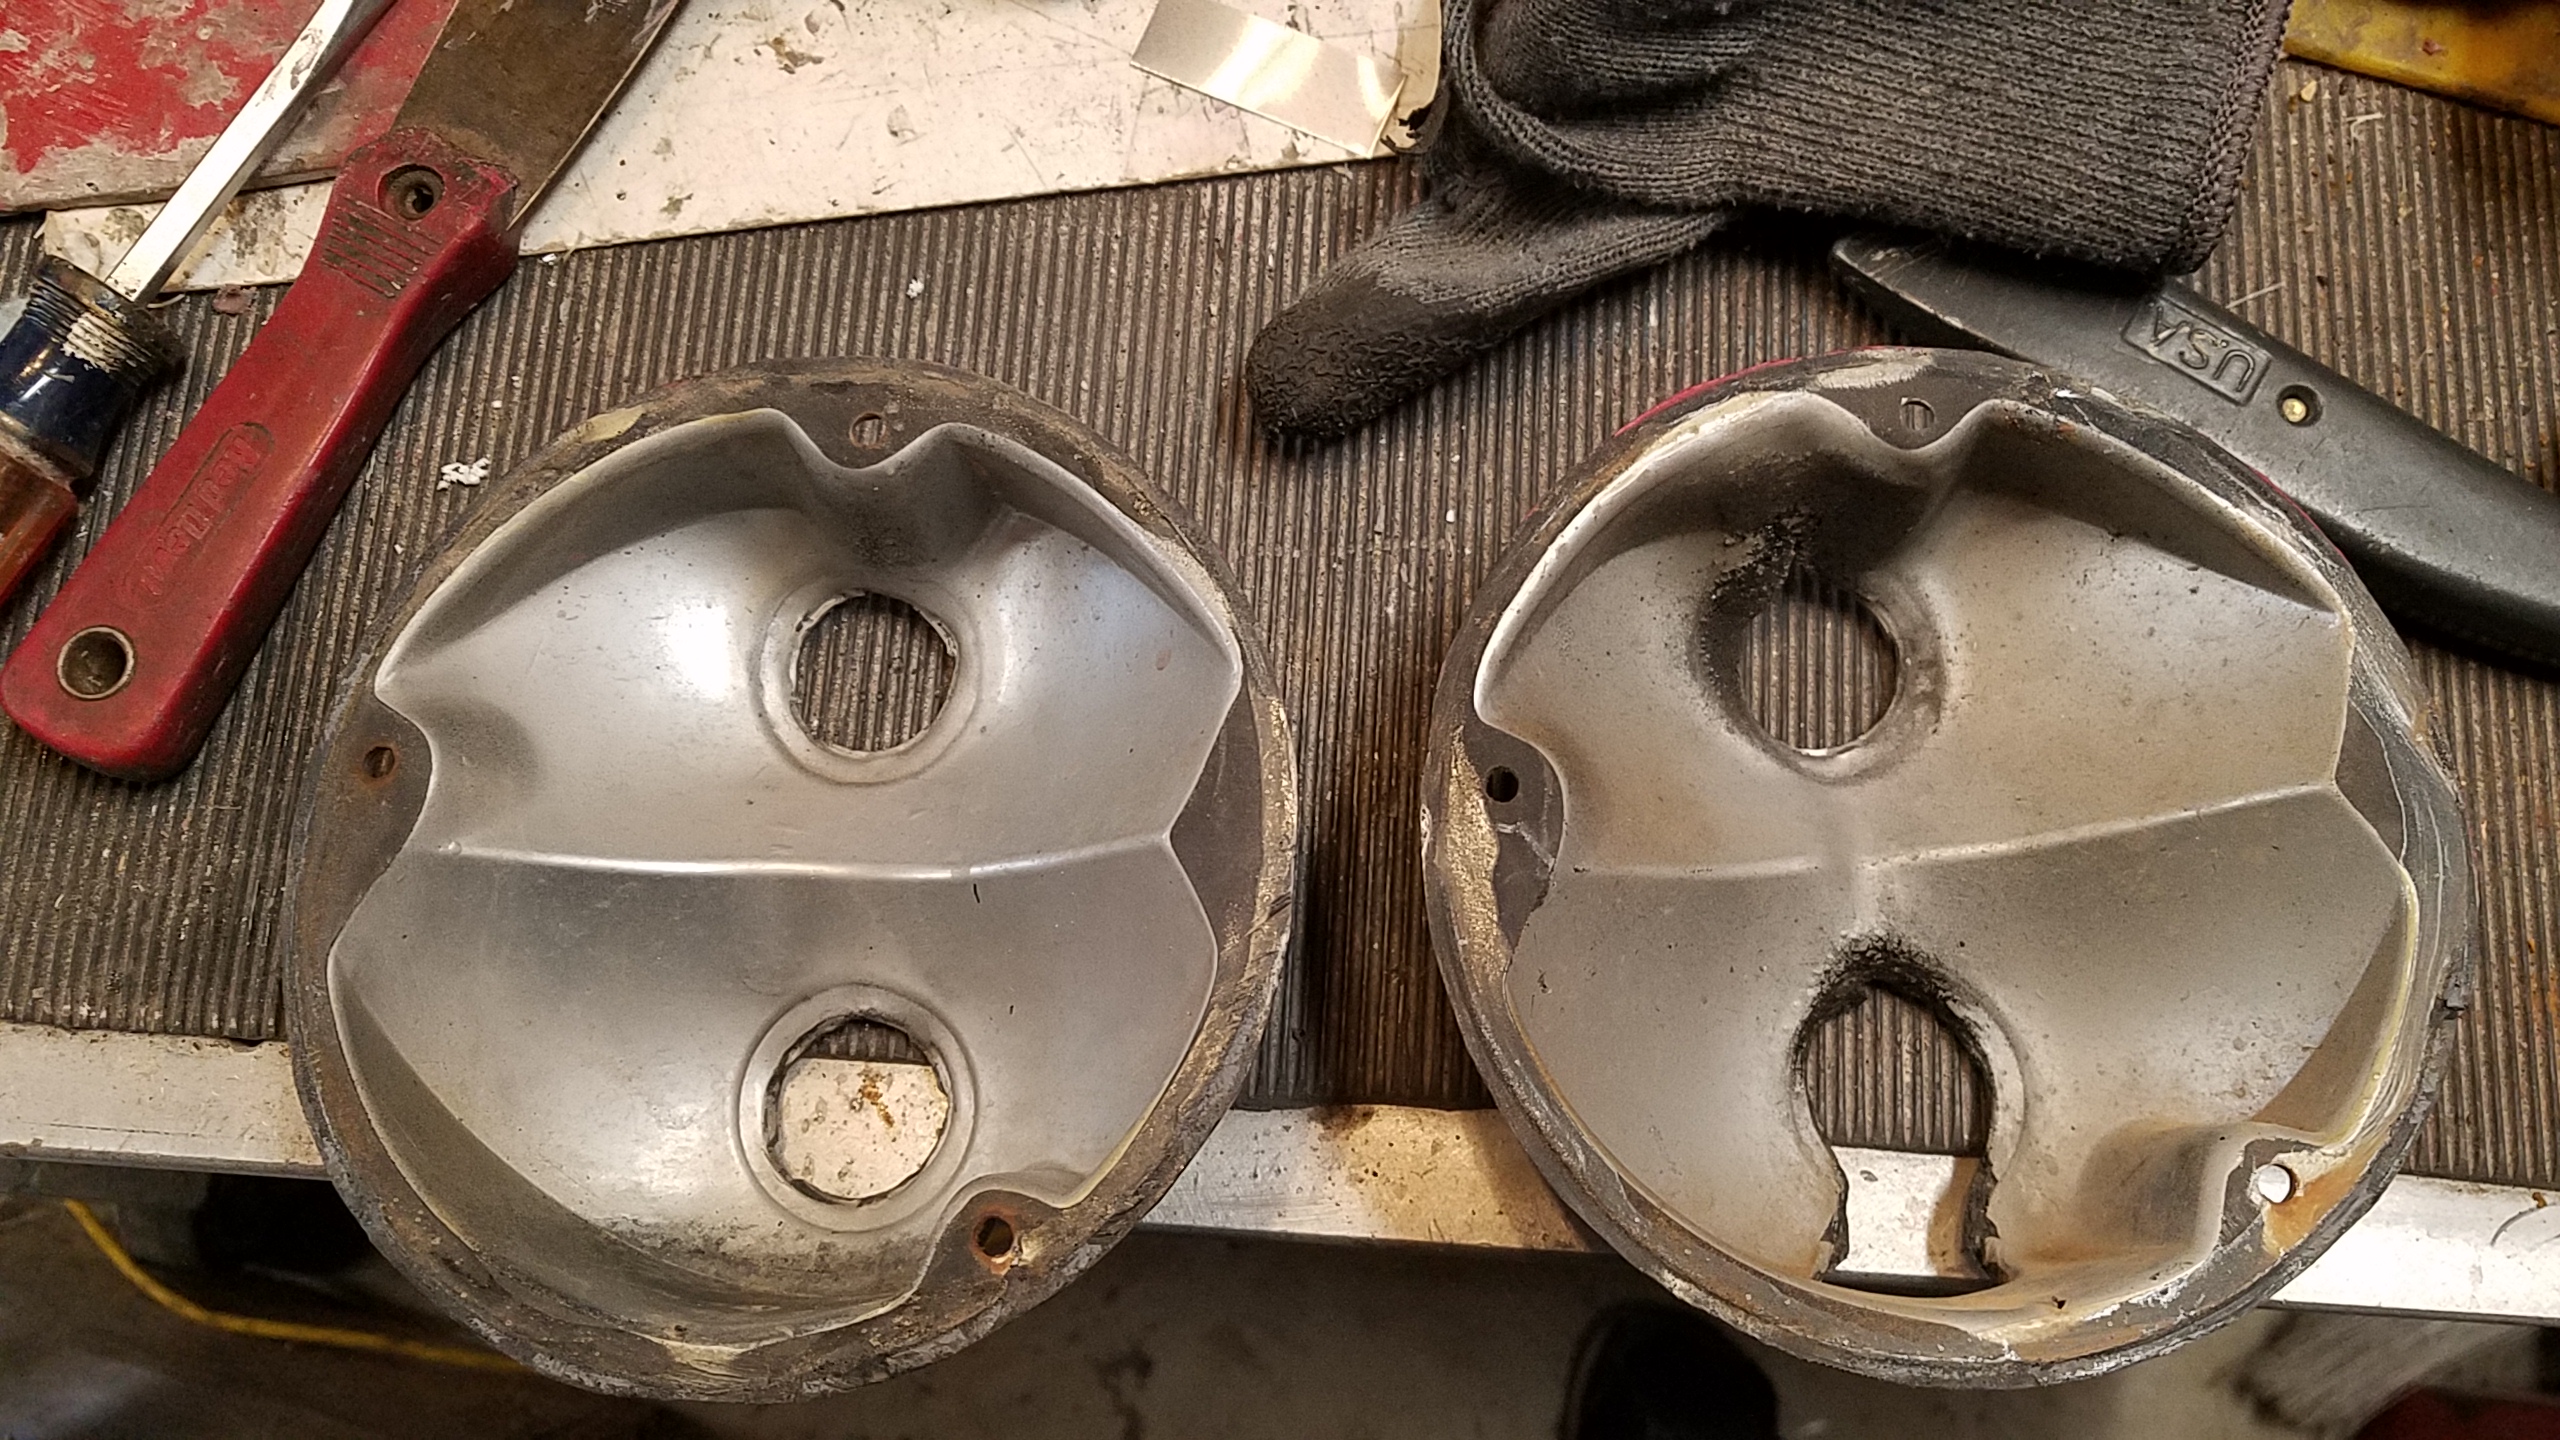
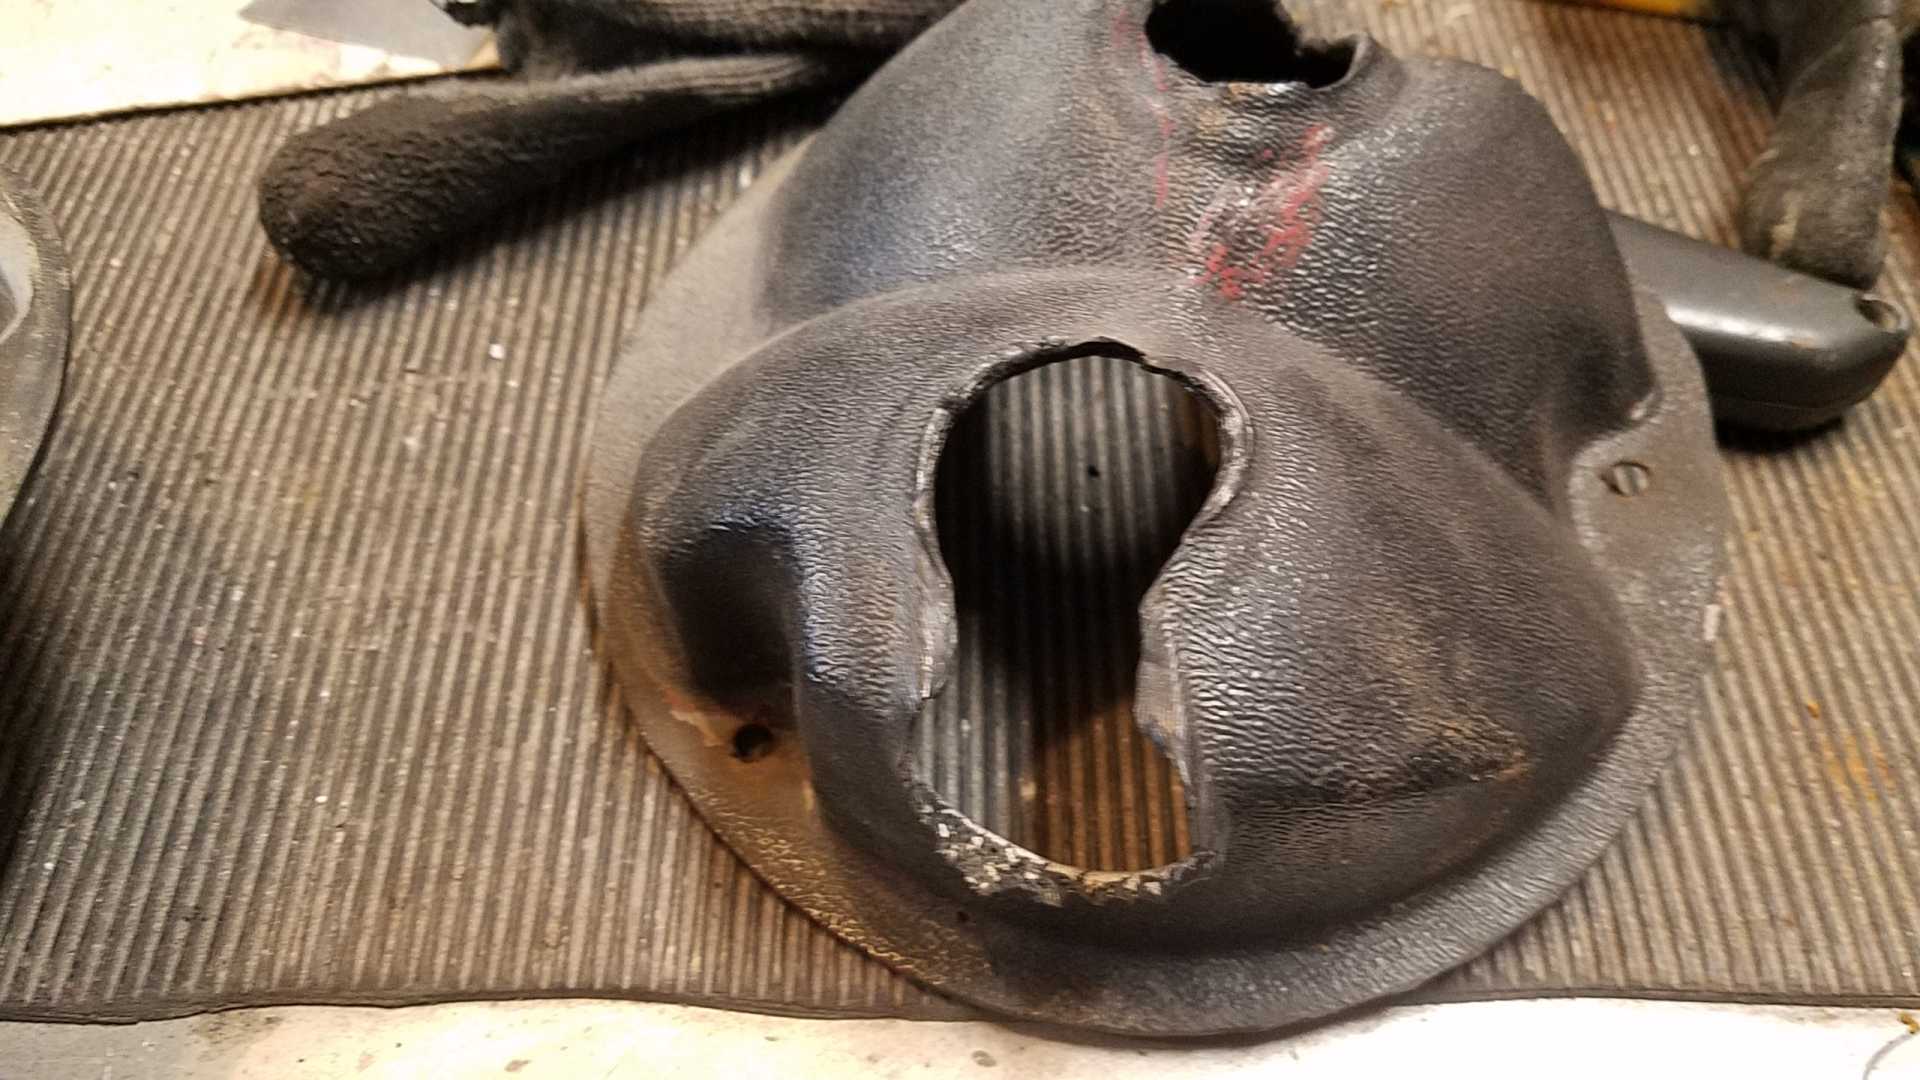
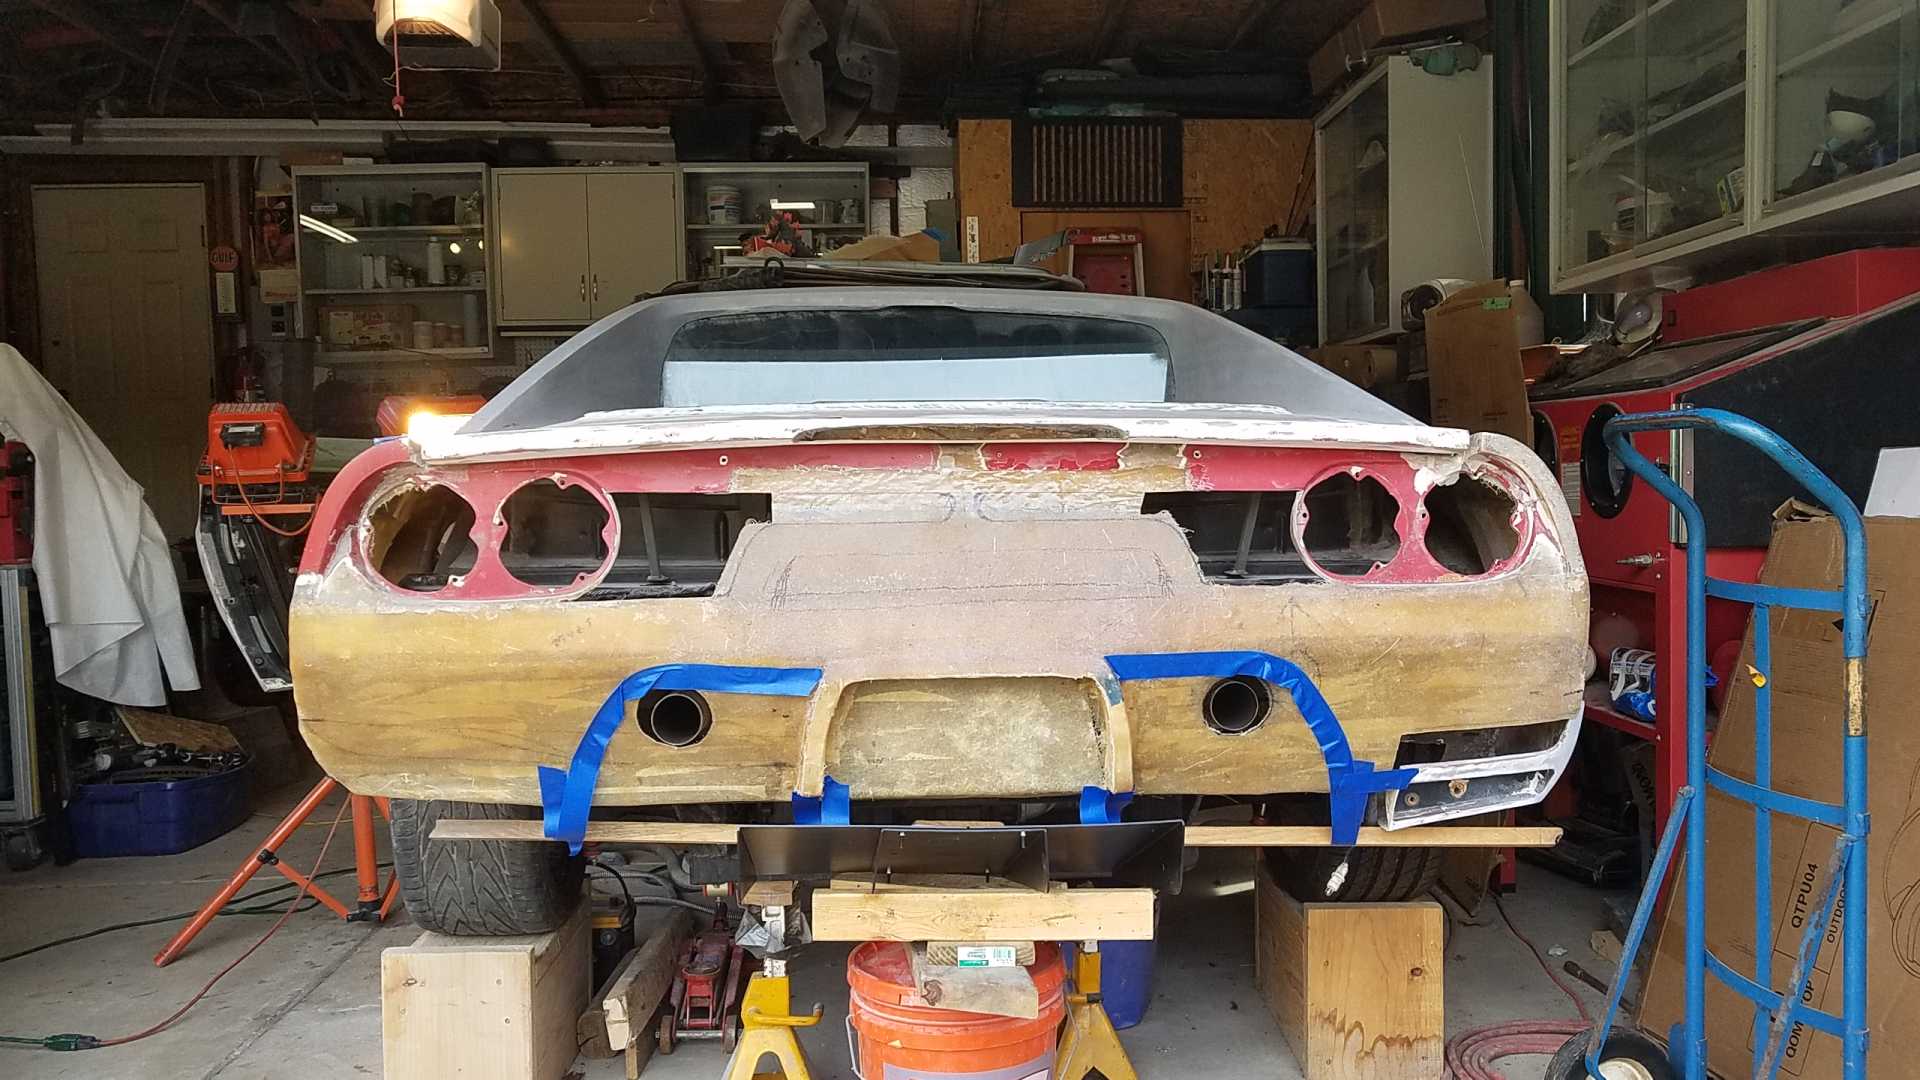
Another project I'm working on are the tail lights. My lights were in poor shape, namely the backs of the lights. The lenses are in good shape. That's a good thing, because replacements are like hen's teeth.

I don't know if other Mera's are like mine, but the backs were made of vacuum formed plastic. The heat of the lights totally melted 3 of the 4. So, I decided to make new backs, Still a work in progress, but here's where I'm at.

After carefully removing the back from the lens. One good, one bad


A little melted.


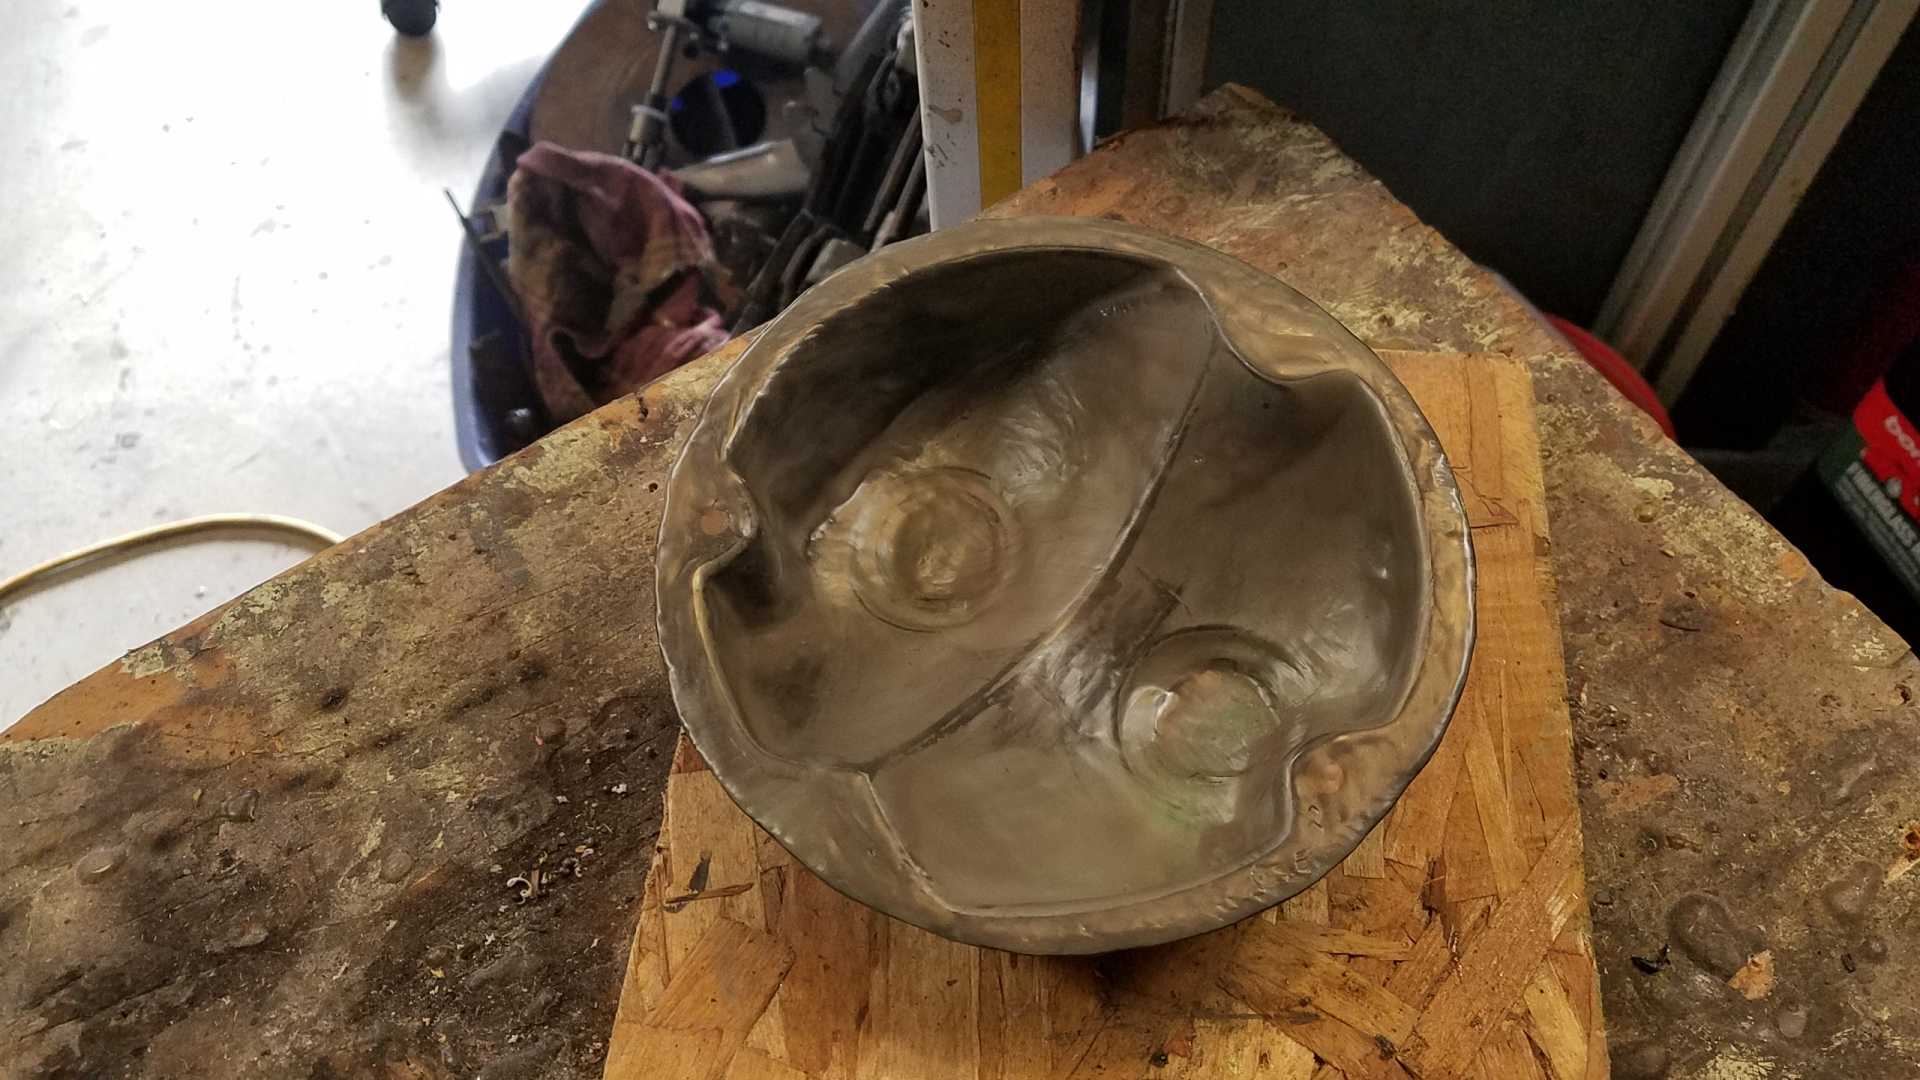
Cleaned the good one. Prepping to make a mold.


A bit of wax. Some PVA mold release, And some glass.
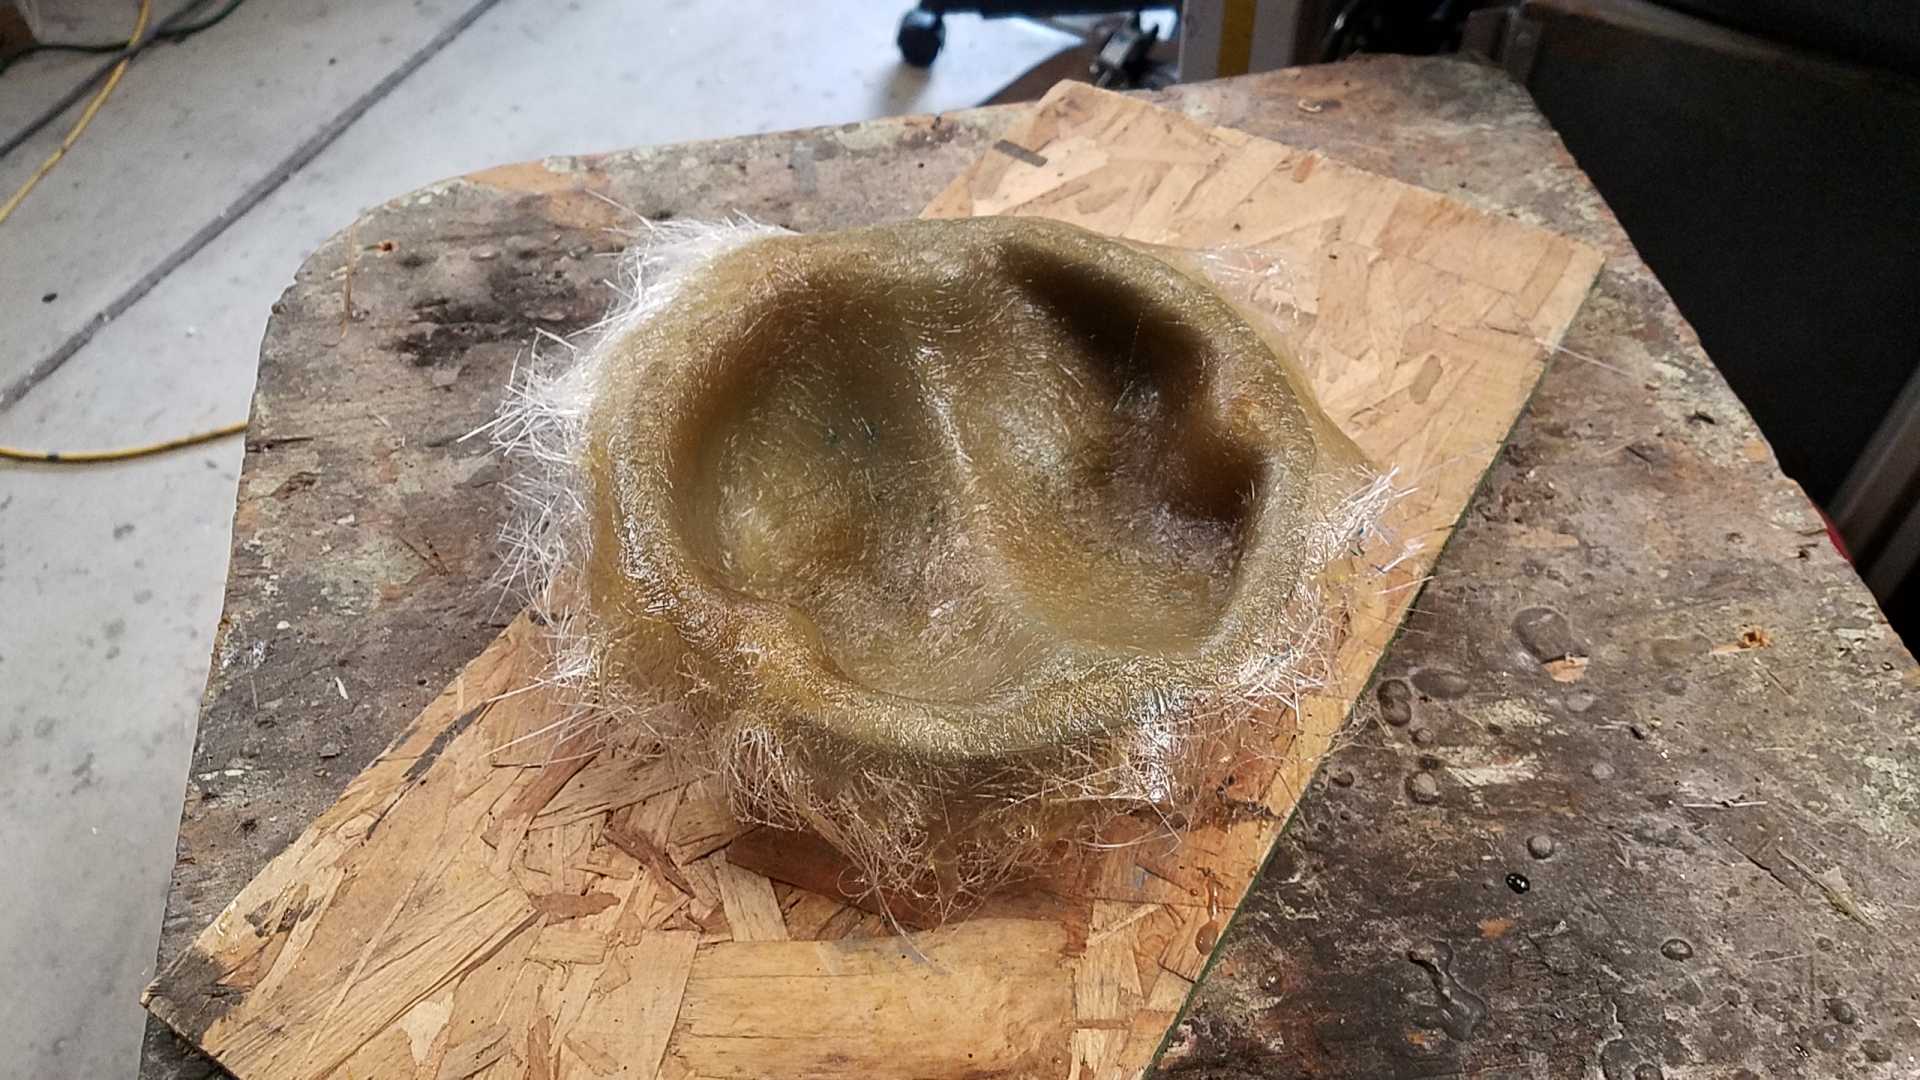

Voile...


Once the temps improve, I'll try making 4 new backs.

...to be continued...

[This message has been edited by RCR (edited 04-28-2021).]

IP: Logged
RCR
Member
Posts: 4397
From: Shelby Twp Mi
Registered: Sep 2002


Feedback score:    (7)
Leave feedback


Total ratings: 102
Rate this member

Report this Post04-25-2021 08:01 PM Click Here to See the Profile for RCRSend a Private Message to RCREdit/Delete MessageReply w/QuoteDirect Link to This Post

RCR

4397 posts
Member since Sep 2002
And...
I also started working on the rear. That required finishing the lower rear quarter. Which required it to be sectioned into 3 pieces.

First it needed to be lowered.


Then it needed to be shorted.


Then it needed lots of glass and sanding.


All that so I can start hacking up the rear. Goy out the tape to help imagine things.


Put masking tape down to draw some lines. Getting serious now.


This is the look I'm after...


That brings us up to date. Thanks for stopping by.

Bob

[This message has been edited by RCR (edited 04-25-2021).]

IP: Logged
RCR
Member
Posts: 4397
From: Shelby Twp Mi
Registered: Sep 2002


Feedback score:    (7)
Leave feedback


Total ratings: 102
Rate this member

Report this Post05-03-2021 07:55 PM Click Here to See the Profile for RCRSend a Private Message to RCREdit/Delete MessageReply w/QuoteDirect Link to This Post
A few more pics from last weekend.

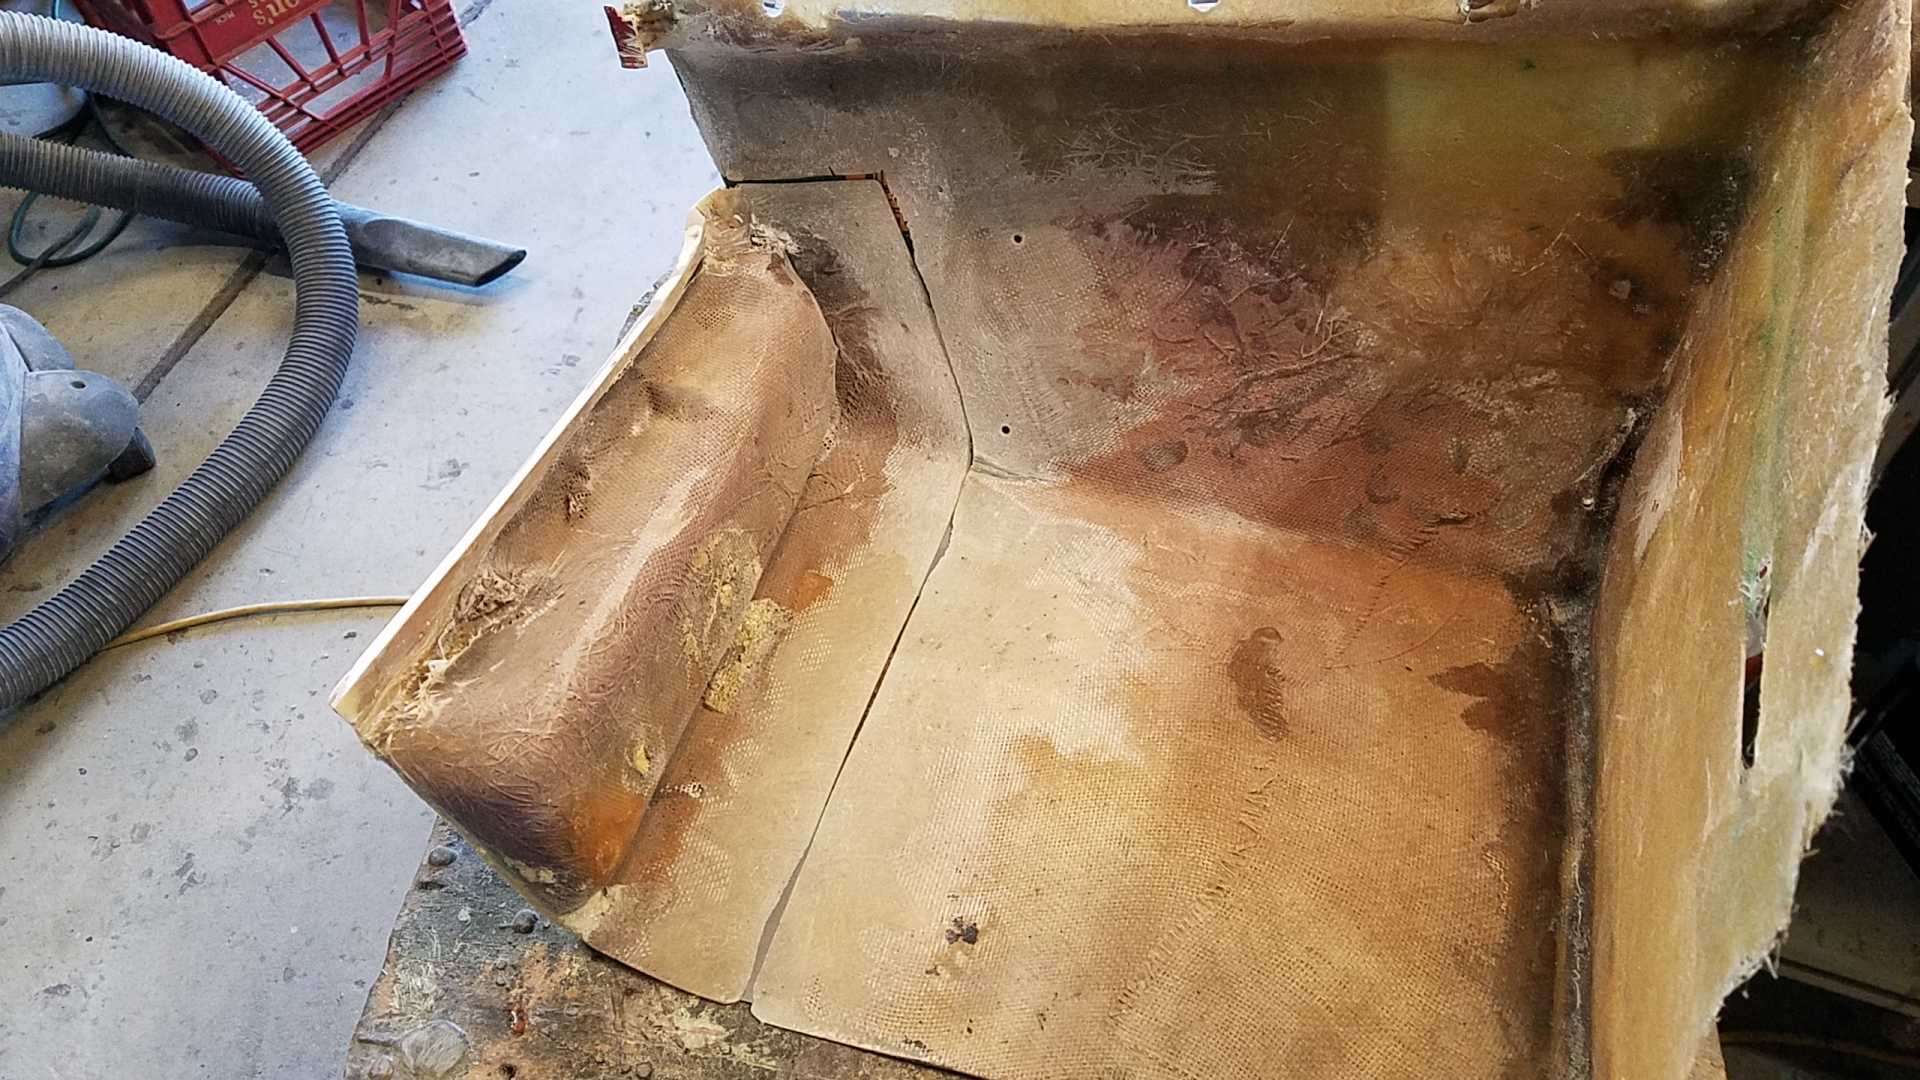
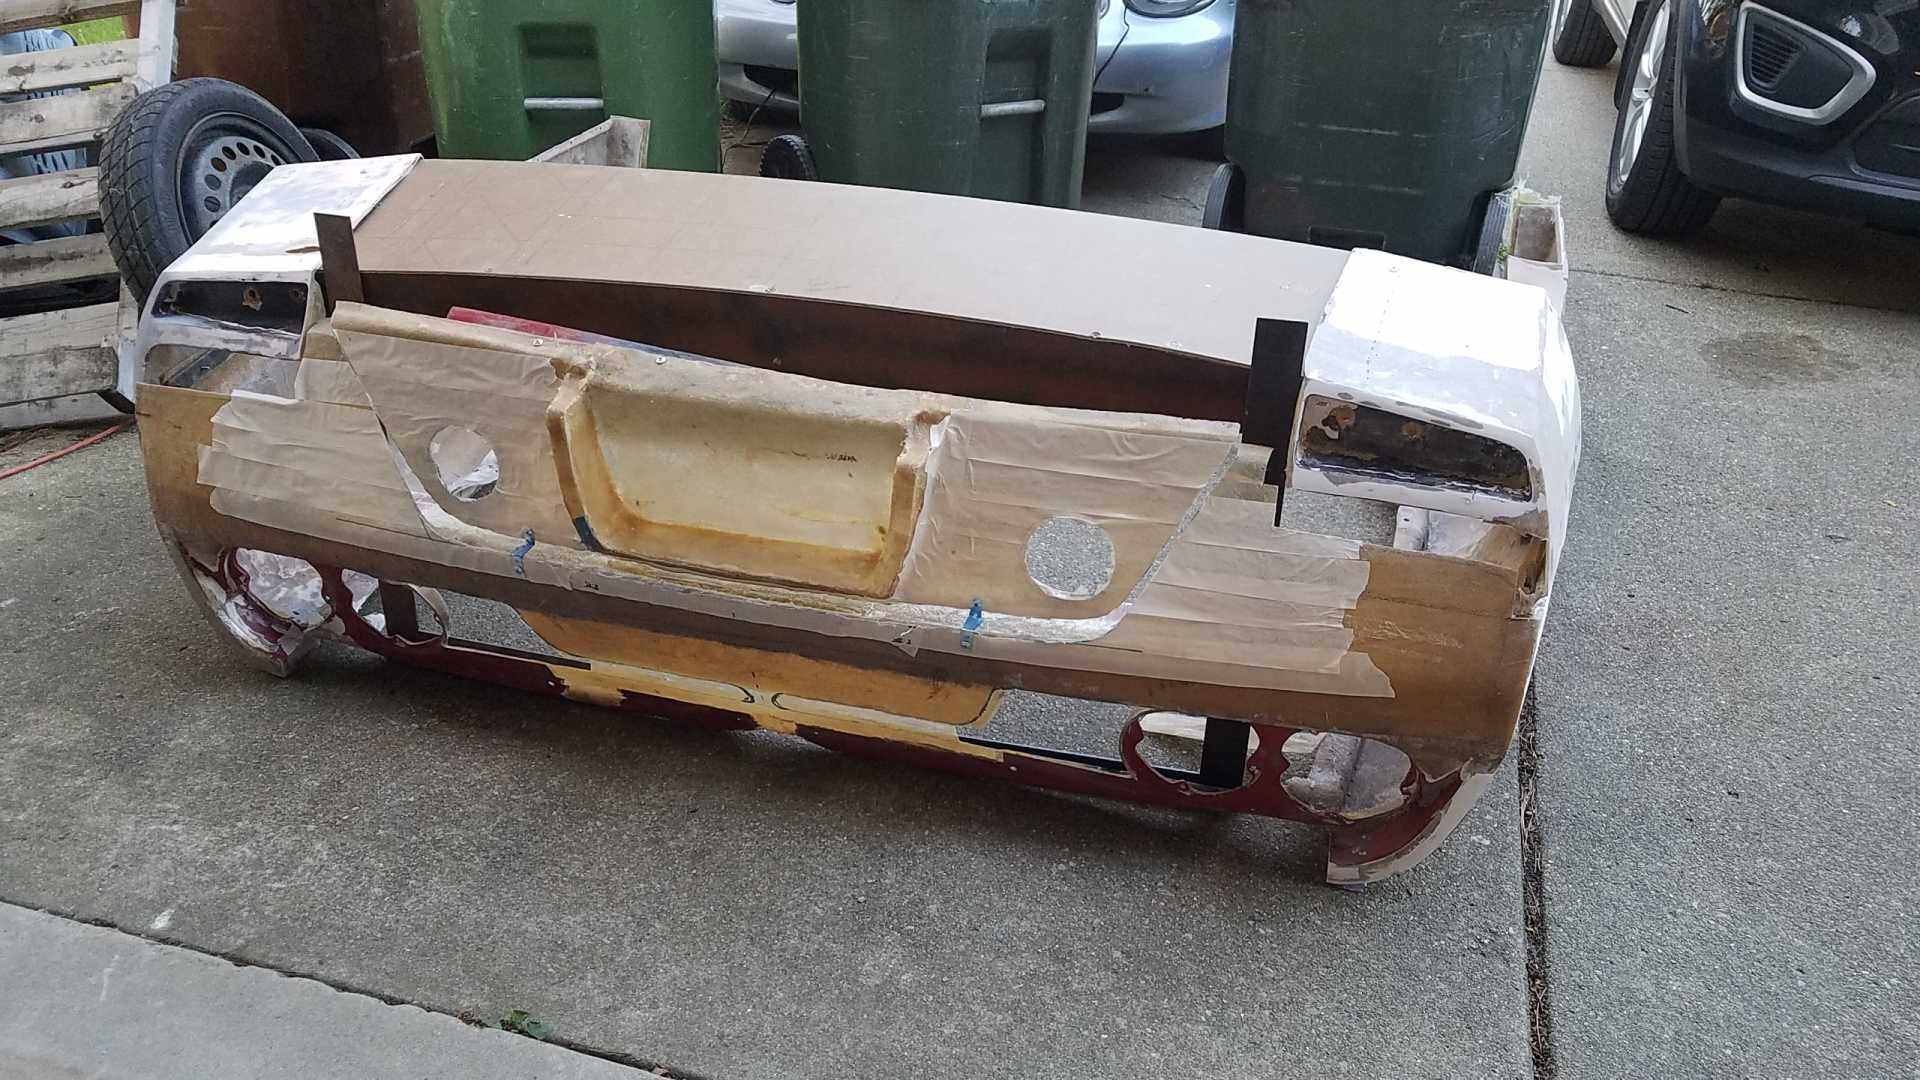
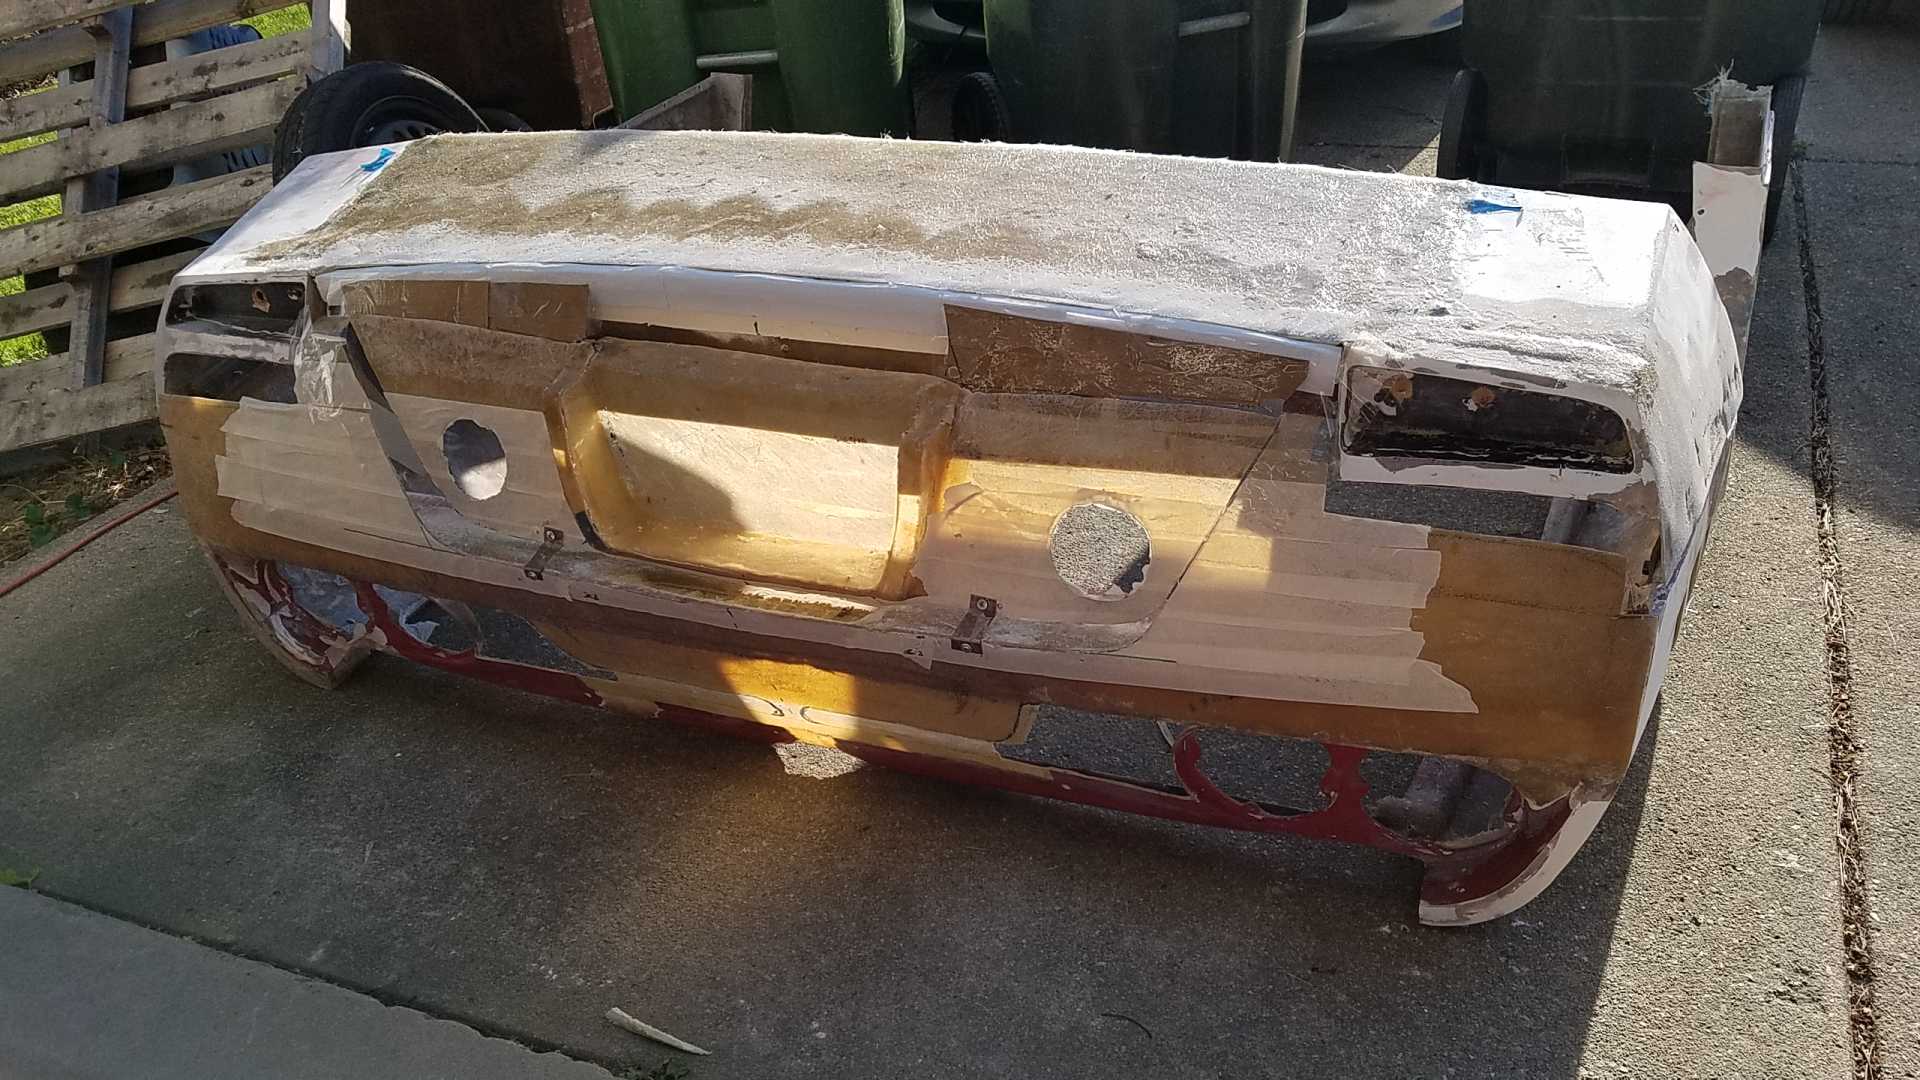
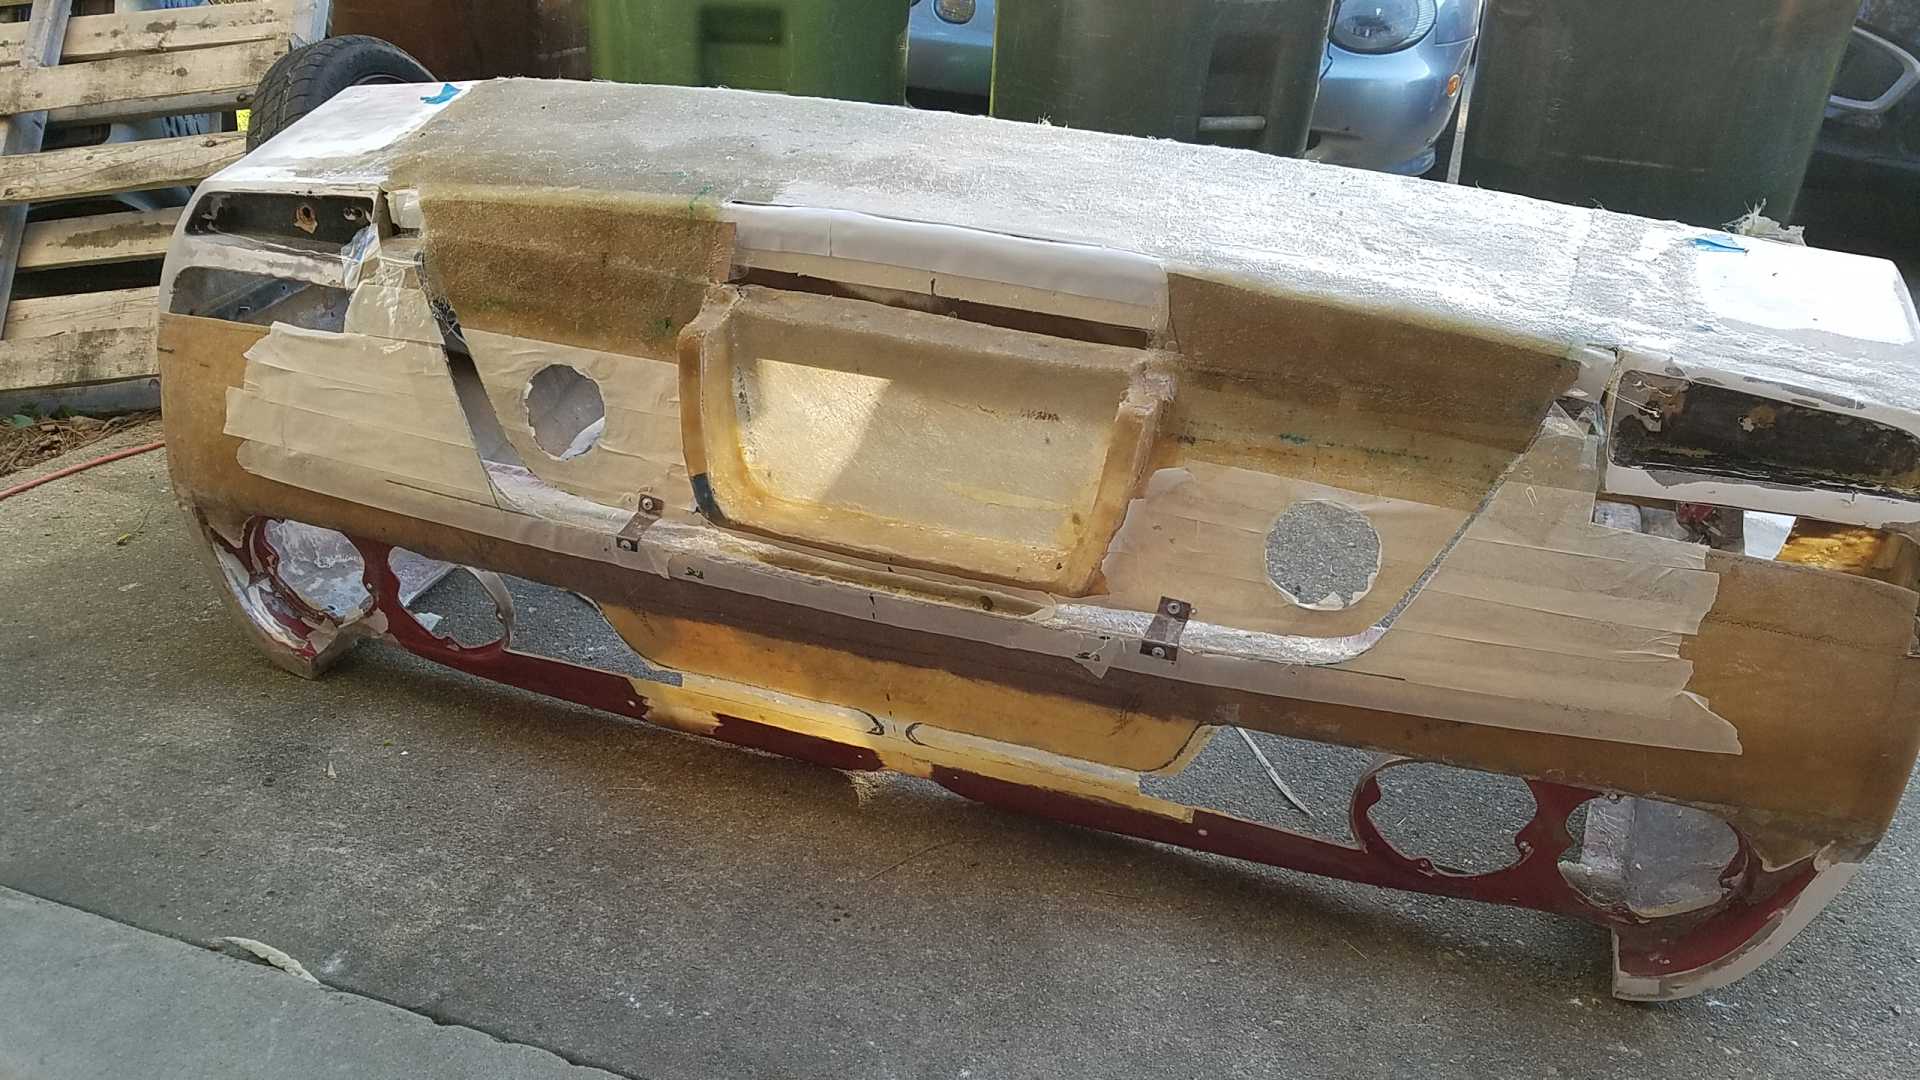
I pulled the rear off and started tying things together. I used a piece of old masonite and created a piece to hold the shape.
Then I fit all of the parts together with some screws. The masonite got a layer of packing tape to keep it from sticking.


Tied together.


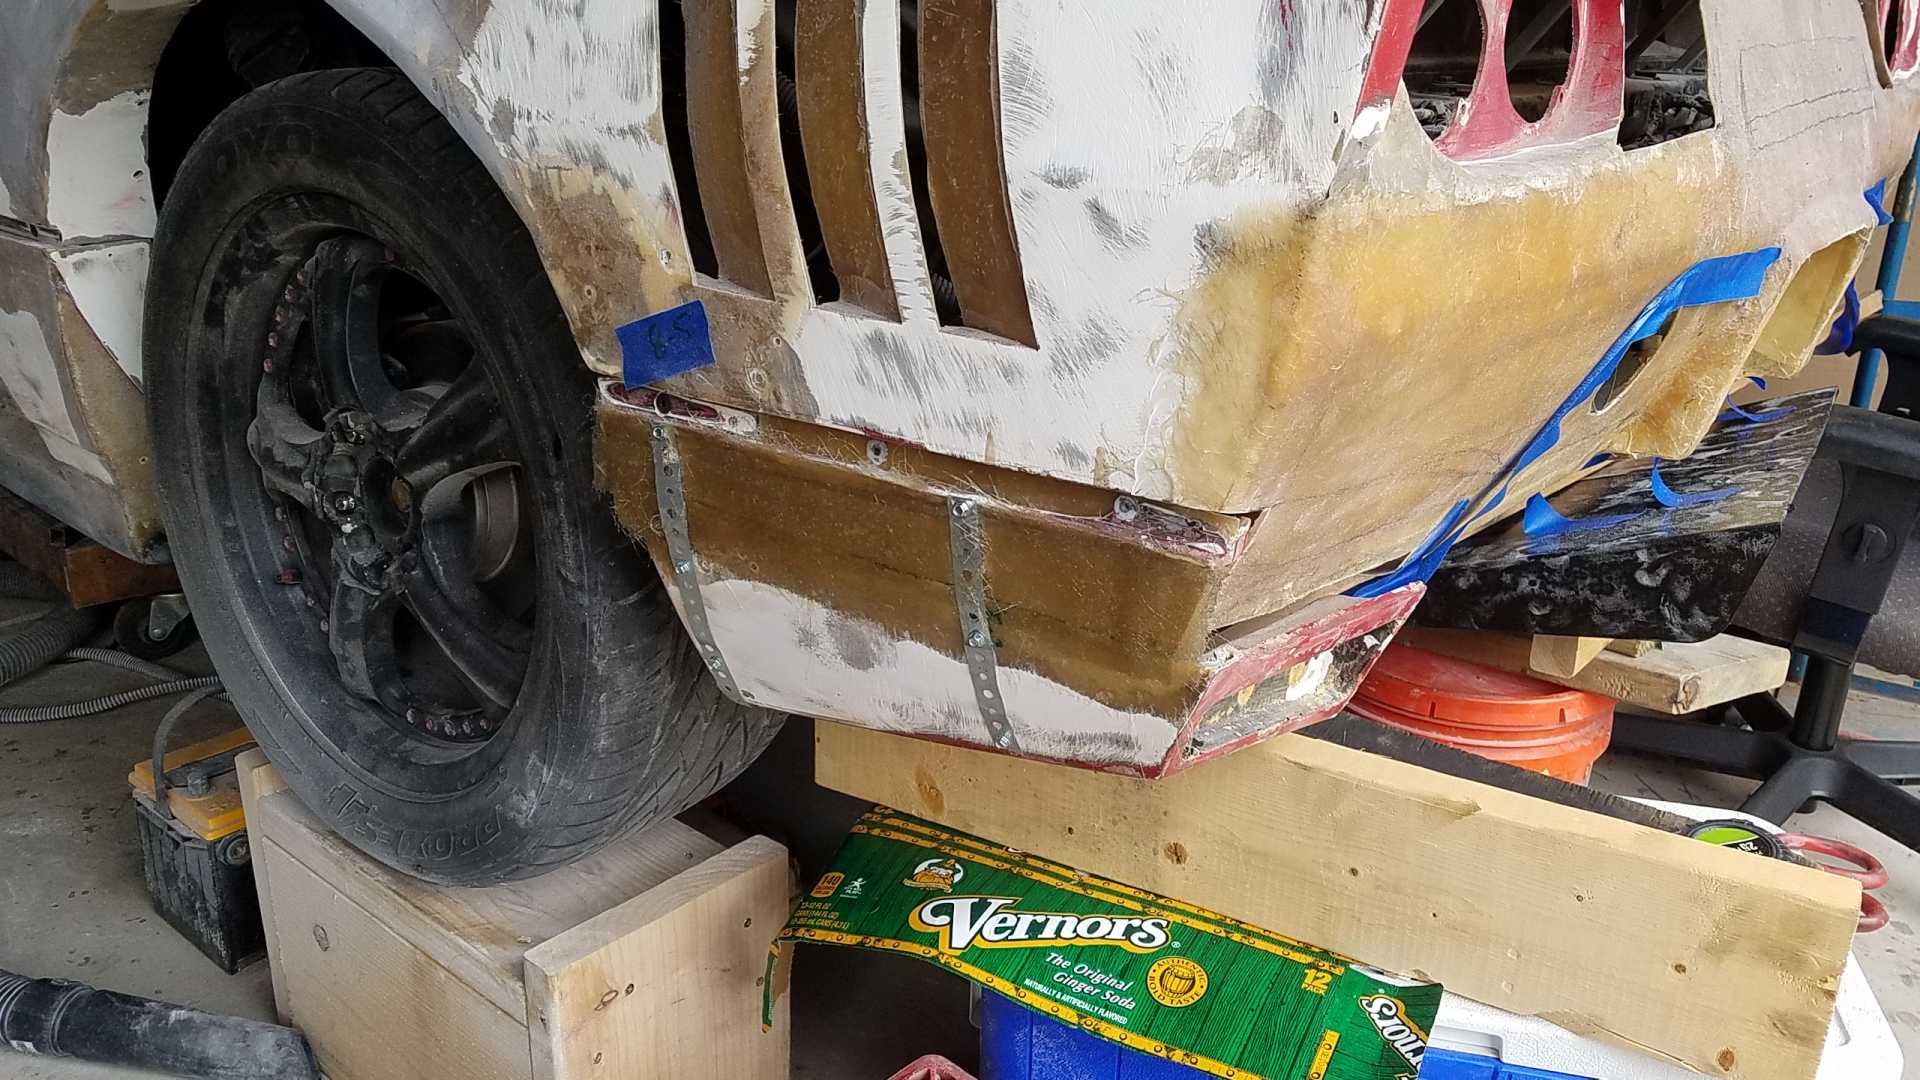
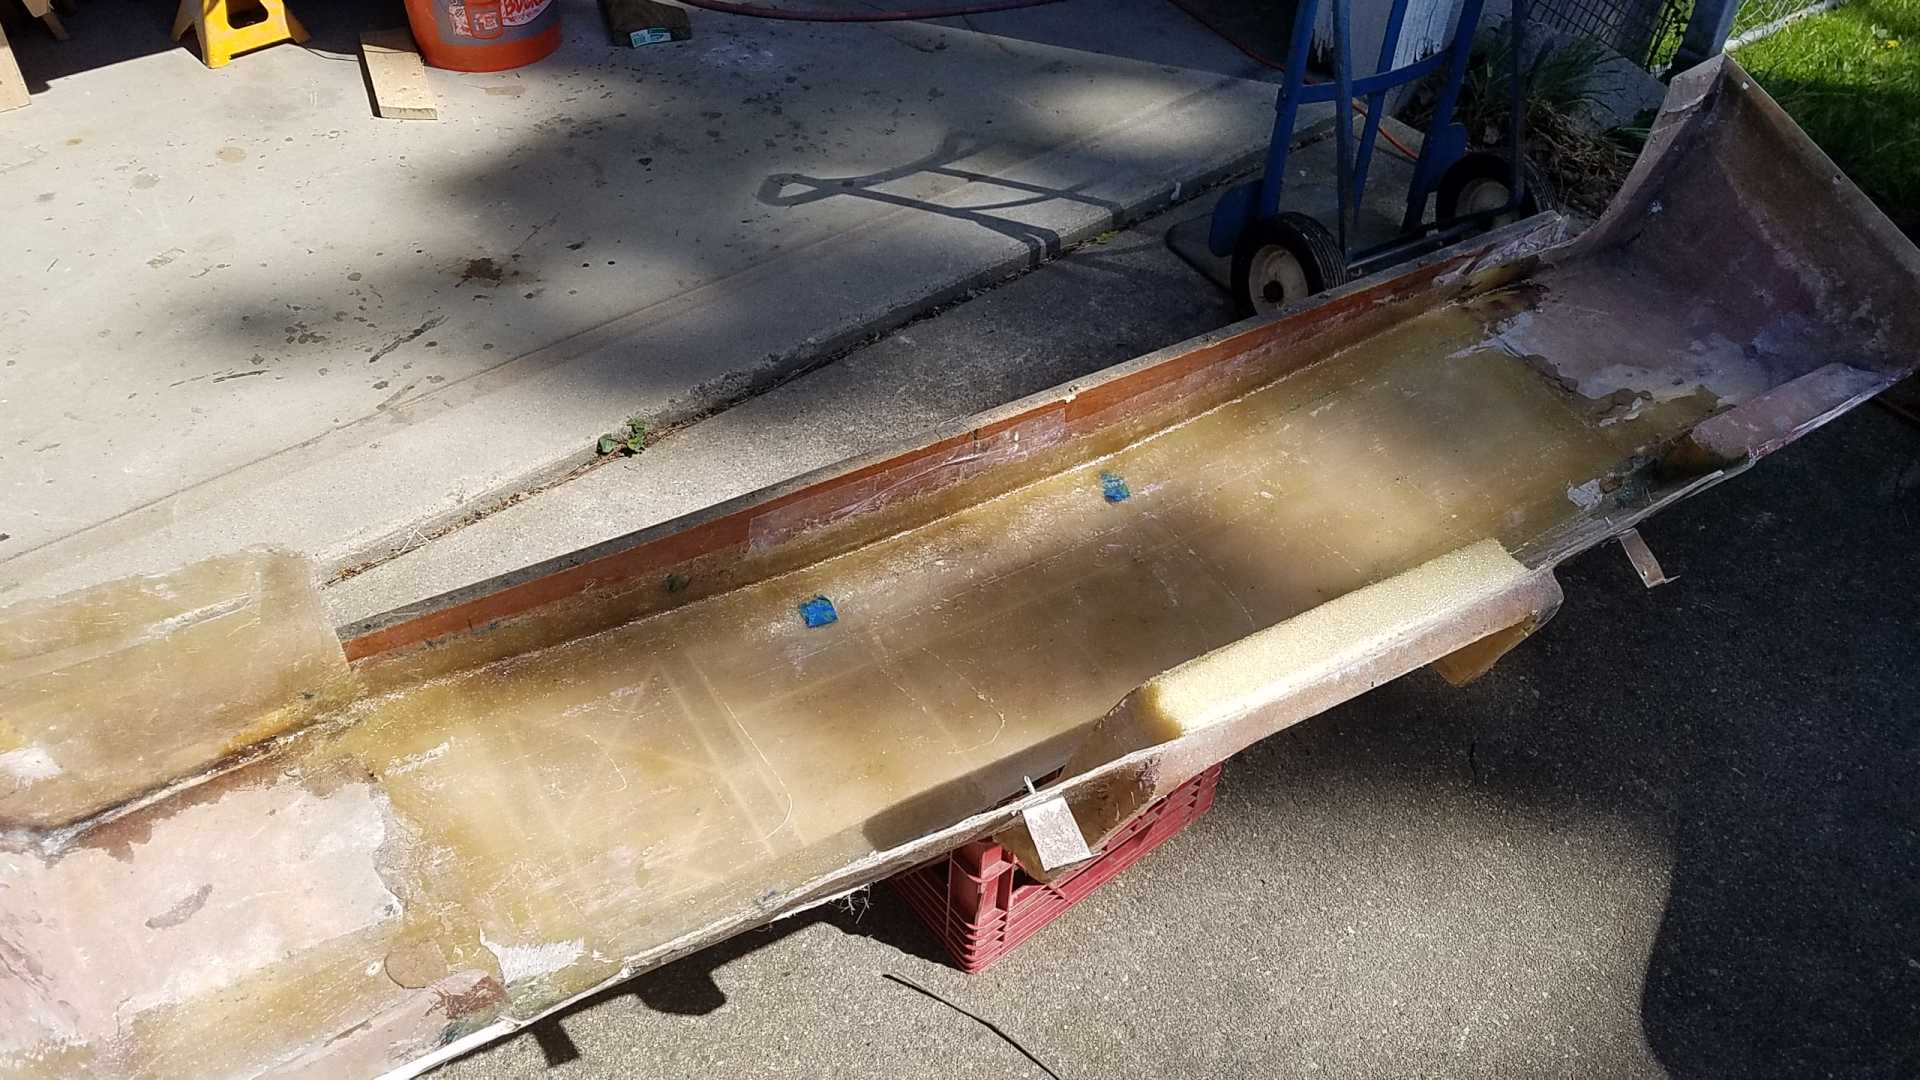
Started connecting the rear exaust cutout to the bottom. I'm filling the openings with cardboard and created a rounded edge with foam and duct tape.


Started working on the bottom section. I pulled the form off, spun it around and placed it underneath, this allowed me to make a flange that really stiffened it up.
I plan on a couple more layers on the inside once it's more complete.


Thanx for the visit... Take care,

Bob

[This message has been edited by RCR (edited 05-03-2021).]

IP: Logged
Trinten
Member
Posts: 1352
From: Mebane, N.C.
Registered: Sep 2008


Feedback score:    (8)
Leave feedback

Rate this member

Report this Post05-03-2021 08:48 PM Click Here to See the Profile for TrintenSend a Private Message to TrintenEdit/Delete MessageReply w/QuoteDirect Link to This Post
I applaud your mock-up creativity.

That's even better than the guy (I think he was doing a V12 swap on his Fiero, hasn't updated it in a while), he was buying Great Stuff expanding foam by the case and would fill boxes/bags with the rough outside dimensions, then just shave/sand it down to form his mock-ups.

Your method is definitely cleaner.
IP: Logged
RCR
Member
Posts: 4397
From: Shelby Twp Mi
Registered: Sep 2002


Feedback score:    (7)
Leave feedback


Total ratings: 102
Rate this member

Report this Post05-04-2021 06:58 AM Click Here to See the Profile for RCRSend a Private Message to RCREdit/Delete MessageReply w/QuoteDirect Link to This Post
 
quote
Originally posted by Trinten:

I applaud your mock-up creativity.

That's even better than the guy (I think he was doing a V12 swap on his Fiero, hasn't updated it in a while), he was buying Great Stuff expanding foam by the case and would fill boxes/bags with the rough outside dimensions, then just shave/sand it down to form his mock-ups.

Your method is definitely cleaner.


Hey there Trinten,
I did enjoy Engineman's build. Very cool.

I've used about every material possible on this build. Can foam is probably my least favorite, but it does have it's place. The whole rear section was formed using two-part foam, originally. For this, I just needed something flat and would take a bend.

Thanx for stopping in. and btw, enjoying your build. I might try some of that one day.

Bob
IP: Logged
RCR
Member
Posts: 4397
From: Shelby Twp Mi
Registered: Sep 2002


Feedback score:    (7)
Leave feedback


Total ratings: 102
Rate this member

Report this Post06-27-2021 05:22 PM Click Here to See the Profile for RCRSend a Private Message to RCREdit/Delete MessageReply w/QuoteDirect Link to This Post
It's been too long. A lot of reshaping going on on the rear. I've also been working on a side project to redo the tail lights. I'll post up pics later once I up[load them. I just wanted to give a shout out to Bloozberry. He posted up a great how-to on rewiring the tail lights.

tail light rewiring

I have an 84, so it did require running a new line through the C500 to the brake switch. A bit of a pain, and it required an 86 Monte Carlo at the salvage yard to donate the body connector for parts, but it's done and it works.

I ordered some Deutch connectors to wire in the lights, eliminating the existing bulbs. The new lights will be all LED. More coming on those, too (not going to be Ogre approved ).

I will also be doing a new reverse lamp and wiring in the third brake light.

Stay tuned (but off on vacation next week).

take care

Bob

[This message has been edited by RCR (edited 06-27-2021).]

IP: Logged
Neils88
Member
Posts: 4045
From: Jeddore,Nova Scotia
Registered: Aug 2013


Feedback score: N/A
Leave feedback


Total ratings: 56
Rate this member

Report this Post06-27-2021 10:04 PM Click Here to See the Profile for Neils88Send a Private Message to Neils88Edit/Delete MessageReply w/QuoteDirect Link to This Post
It's been a while since I've checked your build, Bob. You continue to do amazing work! I've got some catching up to do now...
IP: Logged
RCR
Member
Posts: 4397
From: Shelby Twp Mi
Registered: Sep 2002


Feedback score:    (7)
Leave feedback


Total ratings: 102
Rate this member

Report this Post06-29-2021 06:43 PM Click Here to See the Profile for RCRSend a Private Message to RCREdit/Delete MessageReply w/QuoteDirect Link to This Post
 
quote
Originally posted by Neils88:

It's been a while since I've checked your build, Bob. You continue to do amazing work! I've got some catching up to do now...


It's time consuming, but pretty simple compared to yours. Thanx for stopping by...

The connectors are in. I also took a pile of scrap wire from the trash bin at work to build harnesses. Making progress.

Bob

[This message has been edited by RCR (edited 06-29-2021).]

IP: Logged
Awalker W02
Member
Posts: 179
From: Country Club MO
Registered: Jan 2020


Feedback score: N/A
Leave feedback

Rate this member

Report this Post06-30-2021 03:01 PM Click Here to See the Profile for Awalker W02Send a Private Message to Awalker W02Edit/Delete MessageReply w/QuoteDirect Link to This Post
Awesome work

[This message has been edited by Awalker W02 (edited 06-30-2021).]

IP: Logged
Previous Page | Next Page

This topic is 17 pages long:  1   2   3   4   5   6   7   8   9   10   11   12   13   14   15   16   17 
next newest topic | next oldest topic

All times are ET (US)

Post New Topic  Post A Reply
Hop to:

Contact Us | Back To Main Page

Advertizing on PFF | Fiero Parts Vendors
PFF Merchandise | Fiero Gallery | Ogre's Cave
Real-Time Chat | Fiero Related Auctions on eBay


Copyright (c) 1999, C. Pennock