I've always planned to post a thread about my engine swap, but figured I'd do it once the swap was complete and the car was on the road. But since it's taking so long, I decided to go ahead and start the thread in spite of all the work I have left to do.
The other reason for starting the thread now is to hopefully break the curse that's befallen my family's cars. As I've posted in other threads, every time I make significant headway on the Fiero, something goes wrong with one of the other cars in the family. Most recently my wife's 2002 Grand Prix GTP 40th Anniversary edition suddenly needed transmission work, then on Monday she hit a deer, or more precisely the deer hit her car, causing major damage.
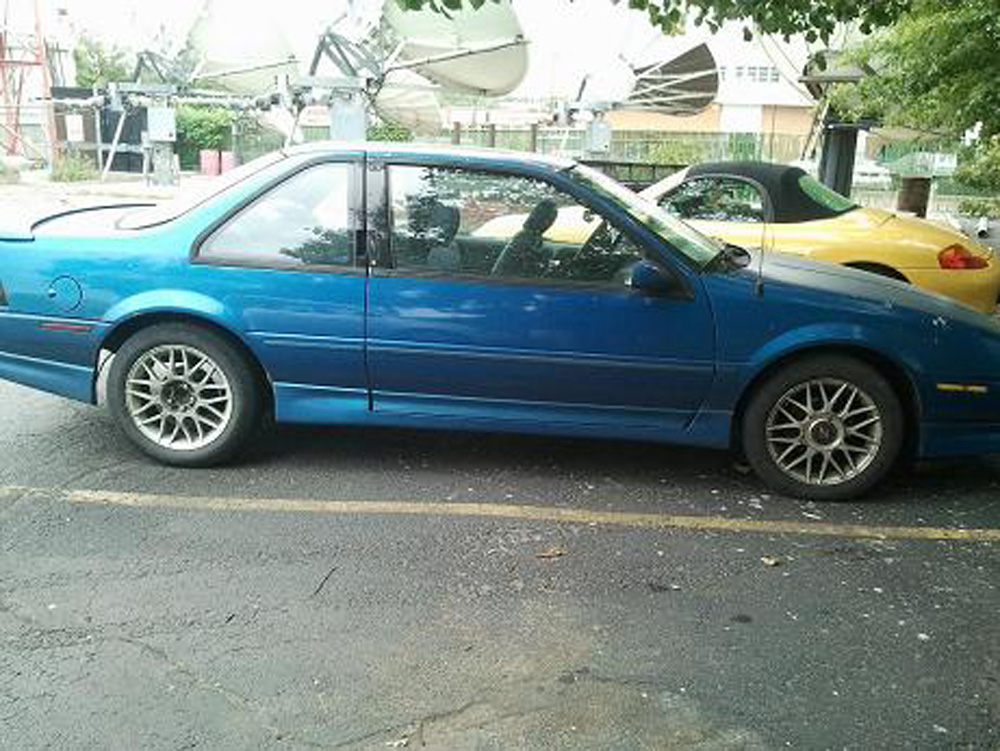
My brother bought this 1992 Quasar Blue Beretta GTZ in 2007 in St. Louis. I went up there with him to look at it then drove his truck home after he bought it. It had the H.O. Quad in it, which I believe is the second most powerful Quad GM offered, after the W41 version sold in the Olds 442 (the Quad is an Oldsmobile engine, after all).
Roger drove the GTZ for about six months and then it blew a head gasket. He gave it to me and I fixed the HG and made some other repairs and then drove it every day for four years. I work in downtown Tulsa and my commute is about 30 miles each way. I fell in love with that car. So much power but I'd get 30+ mpg on the highway. The AC didn't work, the suspension was worn out and the sunroof leaked, but damn it was fun to drive, especially up an on ramp.
Some time near the end of those 4 years, I got into the car to leave work and the seat fell over backwards. When I pulled up the carpet to see what the problem was, I was stunned to see a giant rust hole. I welded in some replacement steel and eventually tried replacing the whole driver's side floor pan, but the rust was just too much, so I started looking around for a replacement. I wanted another GTZ but couldn't find one in at least decent shape. Then one morning on the drive to work I saw a Fiero heading the opposite direction. I asked my brother Roger about swapping the engine/transmission from the GTZ into a Fiero and he loved the idea. He had owned two Fiero GTs and a couple other GTZs over the years and knew instantly what a great combo they'd be.
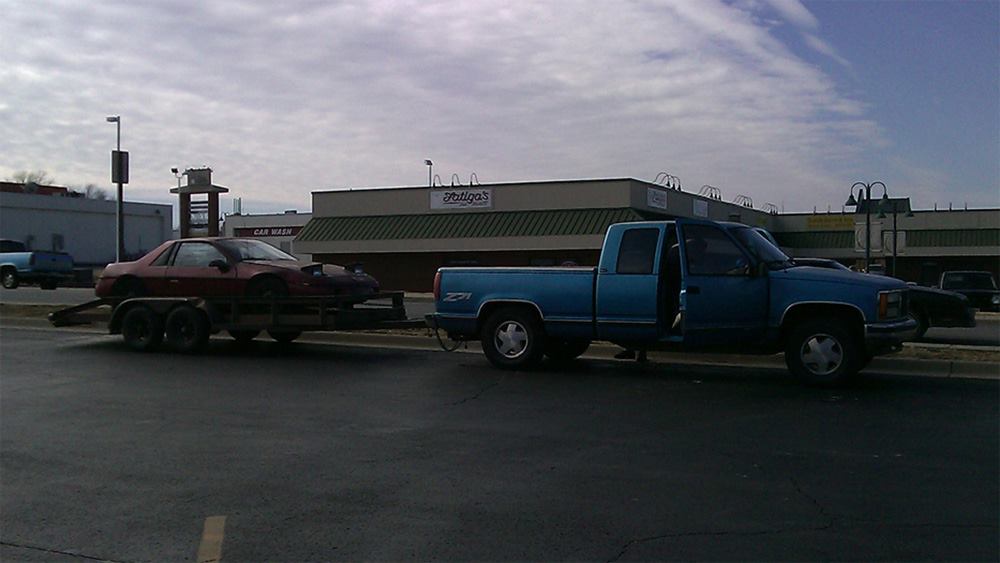
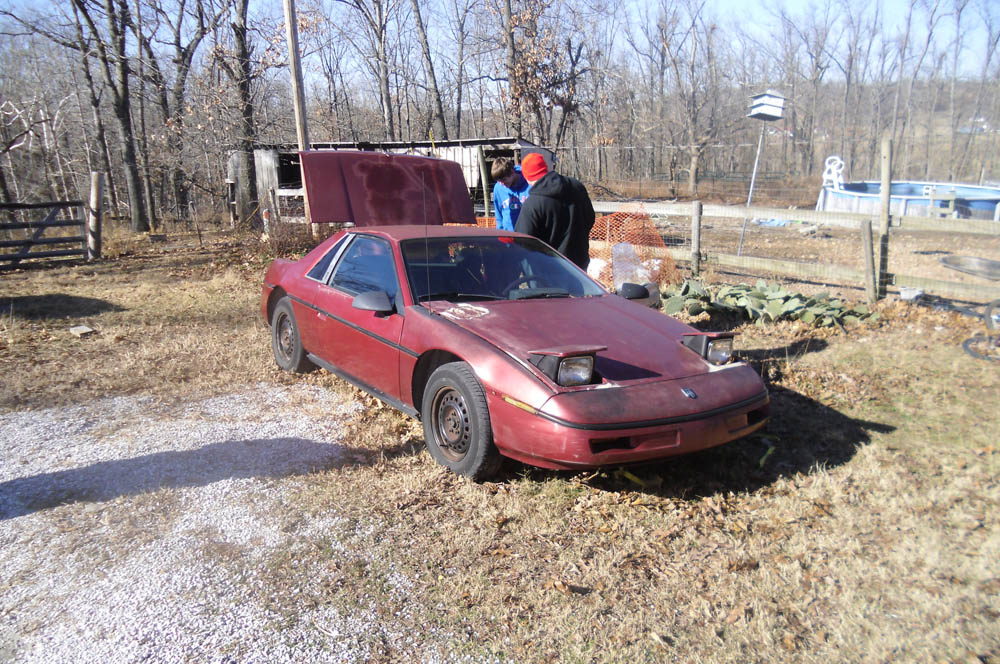
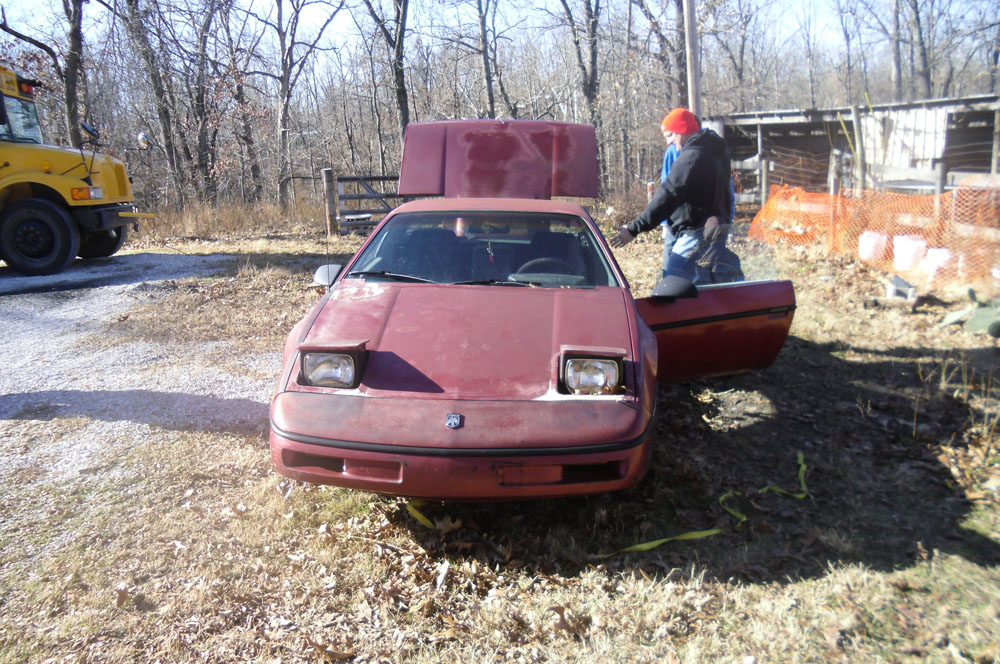
I found a 1987 Coupe in Fayetteville, Arkansas and we went to look at it on New Year's Day 2011. The original owner was selling it because it had quit the previous October and she just didn't want to deal with it anymore. She still loved the car but was ready for something else. On the way over to look at it, we passed through the town of Cincinnati, Arkansas where a tornado had hit the night before. Maybe that was a signal that things wouldn't go as planned.
Two weeks later we went back to pick up the car and bring it home. The plan was to paint the car and make the modifications I wanted, then put the GTZ engine and transmission in it. I thought it would take about 6 months, total. Nine months later, my Quad's timing chain tensioner broke and the engine chewed up its timing gears and bent four valves, so that was the first major change in the plan.
The biggest problem was the sudden loss of my brother last August. He died of sudden cardiac arrest. It's been hard, at times, to work on the car since then, but I know he would want me to finish it and I'm determined to do so.
So here's what I've done to the car: -rebuilt headlight motors -repaired broken headlight door frame -repaired broken horn buttons -fabricated under-spare battery tray -fabricated Quad 4/Getrag mounts -modified cradle to fit Quad 4 -installed solid cradle mounts -shortened rear tie rods 3"/moved mounts -converted to sunroof -disassembled Quad -obtained/painted GTZ wheels -fabricated custom center wheel caps
I will post more photos. Right now I have them saved on three or four different devices but now that I've started this thread it will be easier to collect and post them.
Right now the body panels are off the car and I'm sanding and priming them. More on that soon.
Over the 6 and 1/2 years, here are the extra items I've collected: -two doors with power windows and locks -two power window/lock wiring harnesses -three sets of seats -three sets of sail panels -two extra front fascias -'88 rear fascia -'88 deck lid with wing -'88 cradle and rear suspension -two extra Quad 4s -extra Getrag
[This message has been edited by Quad Raider (edited 07-15-2017).]
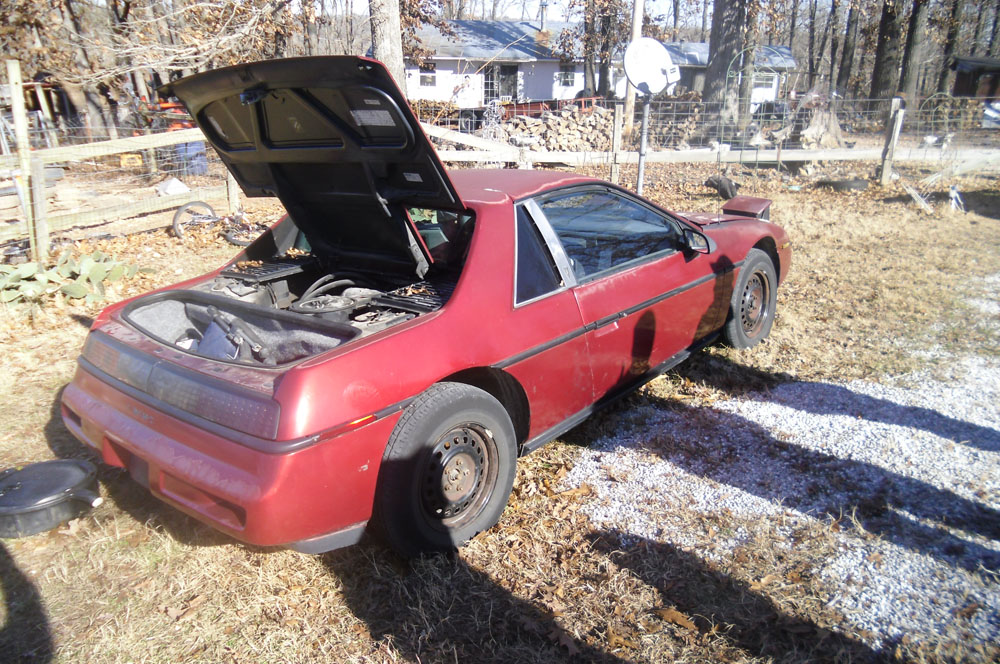
Here are the two cars together shortly after we got the Fiero back to Oologah.
There was a stick of firewood propped under the right headlight. The paint and interior were rough but the car was almost 100% complete, and it was a 5-speed so I bought it.
[This message has been edited by Quad Raider (edited 06-27-2018).]
Glad to see a post not to far from my neck of the woods! I used to go swimming up by Oolagah!!! BTW, nice find. I need to get lucky and find a complete car in need of some attention to detail for the right price!!
You would think it is the slowest quad4 swap, I was starting mine over a decade ago, I was going to go turbo. But right as I was going to buy my forged pistons, my GT came for sale, and used the money for that. Then blew my engine on the way home, see my GT sitting there with no engine I went to "just quickly throw one in" and started with the whole 3.4 game, I just never quit with the GT. I had all the parts for the quad, plus many extras, but over 10 years later I got a quad drop out from Fierobssed (total thanks) and decide to finish it. Plus at the time there was no way to program the ECM as the whole turbo Idea, I got the quad forum, (when it first started) to bug tunerCAT non stop until they came out with the code, but by then I took my turbo knowledge and put it into my GT.
On the plus side, with all the info I gathered over the years I was able to assemble the biggest collection of Quad 4 info in one place anywhere on the net, right here on PFF. And with the pallet of Quad parts I have, if you need something, let me know.
The Quad should have been the stock 4 cyl in the Fiero, to bad it didn't come out until after it's demise.
Good luck on the swap, yea another Quad 4 Fiero!!!!!
Thank you. I've used your thread for reference a lot already.
A couple years ago I accidentally deleted all the photos on my phone. They included all the pictures I took while disassembling the car. I had saved some of them along the way for various reasons so I'll share what I have, but reassambly will be more challenging.
If you were closer, I'd certainly lend you a hand working on this Quad 4 swap. On another forum, there's a guy selling a Quad 4 Fiero for cheap. Road trip with a trailer? Check it out here.
I'm having trouble tracking down photos of some of the work I've already done. For instance, I can't find the pictures I took while I was mating the Quad to the Fiero's cradle. They're probably on one of my old phones. (side note: One of the many lessons I've learned on this build: use one device for taking and storing photos during a project).
Since the HO Quad from my GTZ is disassembled, I used one of my spare quads to fabricate the engine and transmission mounts. Early on my plan was to rebuild my HO and install it in the car, THEN do the bodywork and paint and finish the interior. That changed because I started buying body and other parts and the shop was so cramped it was difficult to get anything done. Plus, I came across a sunroof car in the salvage yard and this forum convinced me to switch over (what a huge load of work that was, since I had to rebuild the first sunroof panel I bought because I broke the A pillars getting it off the donor car). So I switched gears, deciding to do the body work and get the panels installed on the car, then worry about the engine and the rest of the mechanical work.
Right now the engine and transmission mounts are just roughed in. I need to weld in some extra bracing and paint them, so I'll post photos once I'm done with the body work and pull the cradle out again.
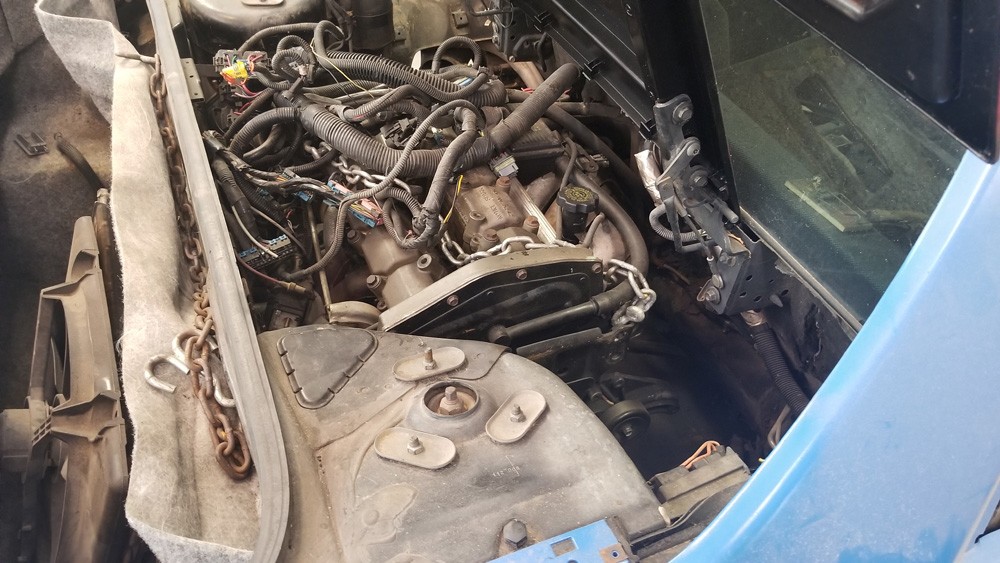
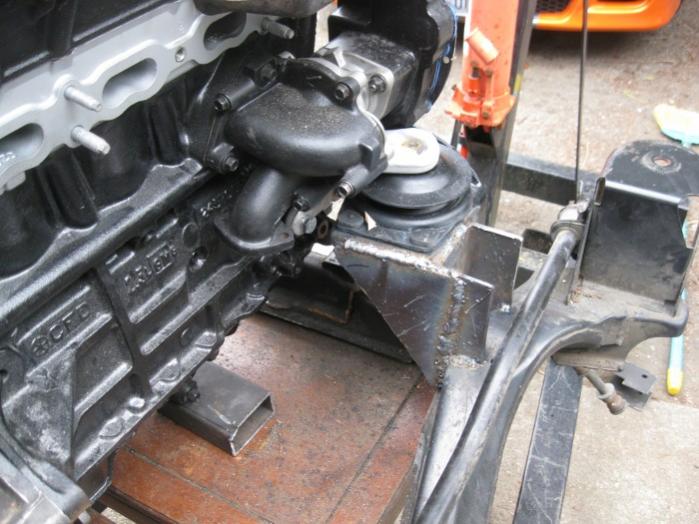
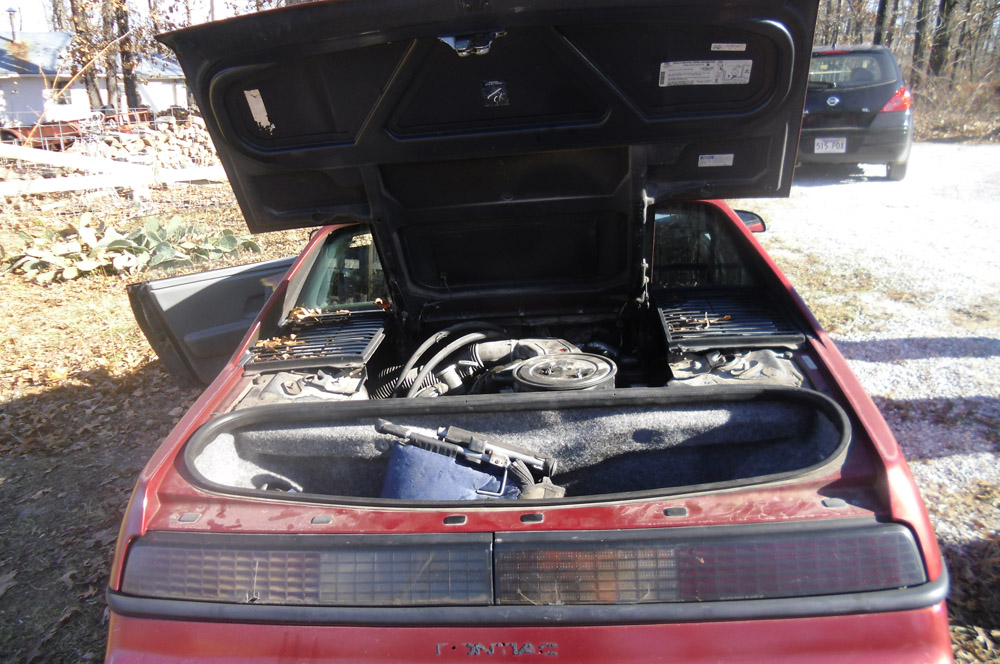
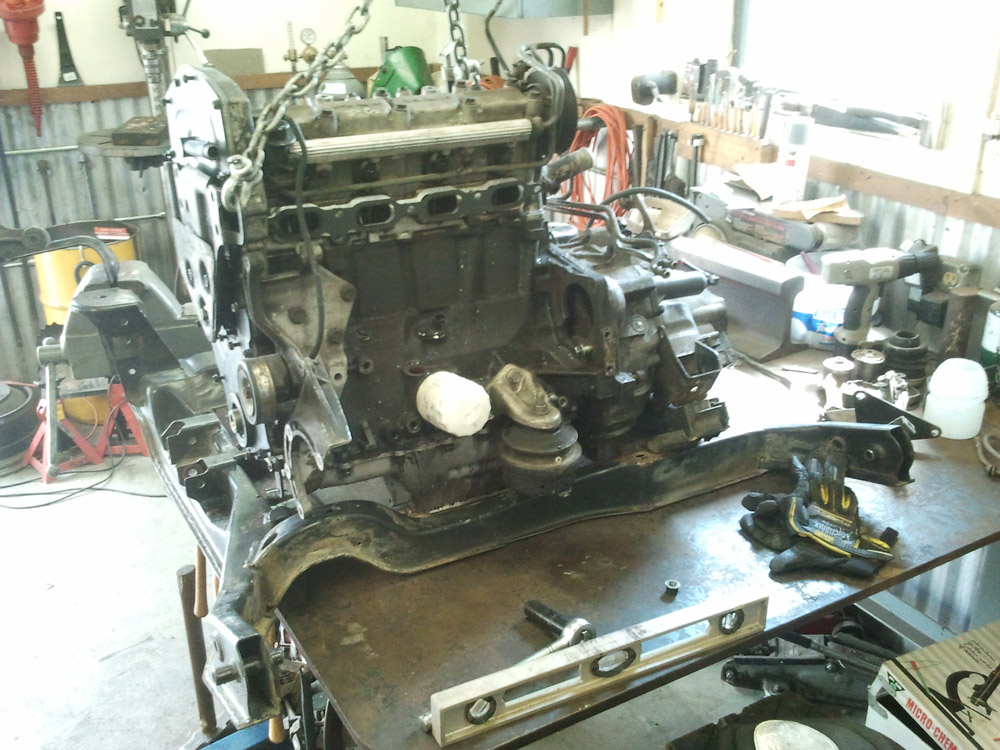
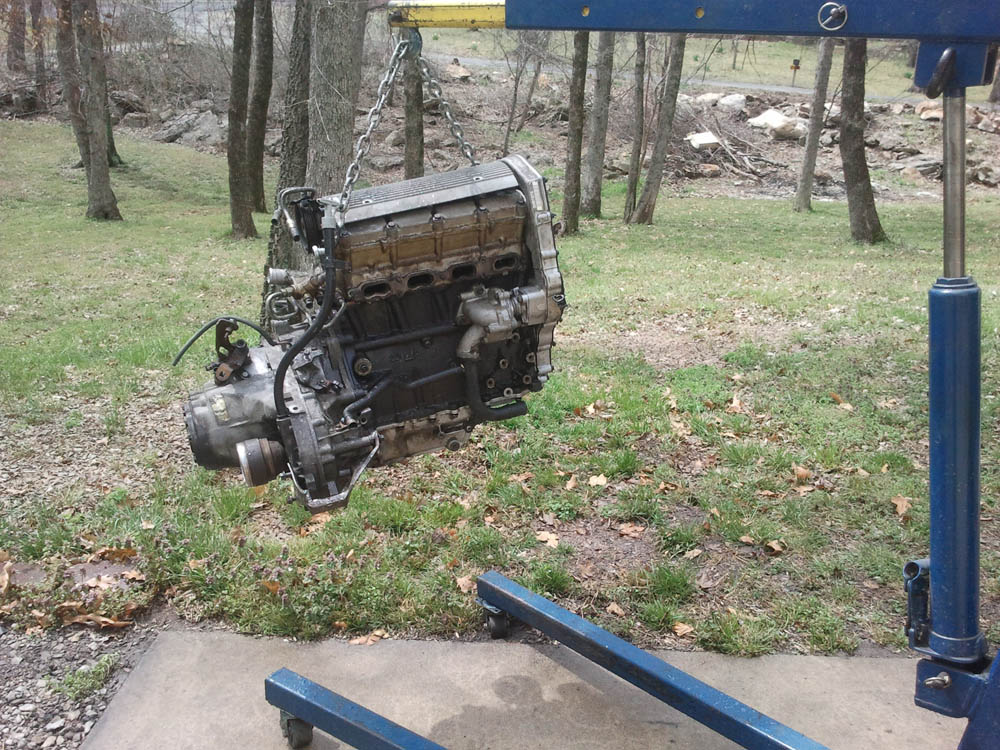
This is one of my spare Quads sitting in the car. As you can see it fits great, like it was meant to be there.
Notice that the exhaust side of the Quad is to the back of the car. This is important for another reason.
Moving the battery to the front of the car really helps open space.
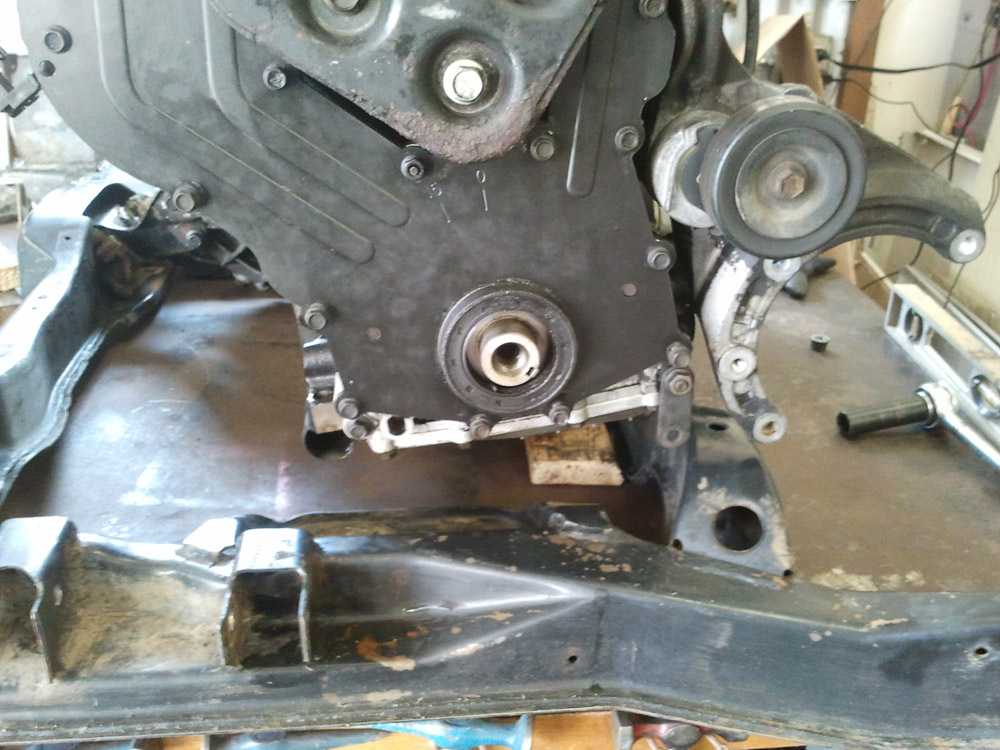
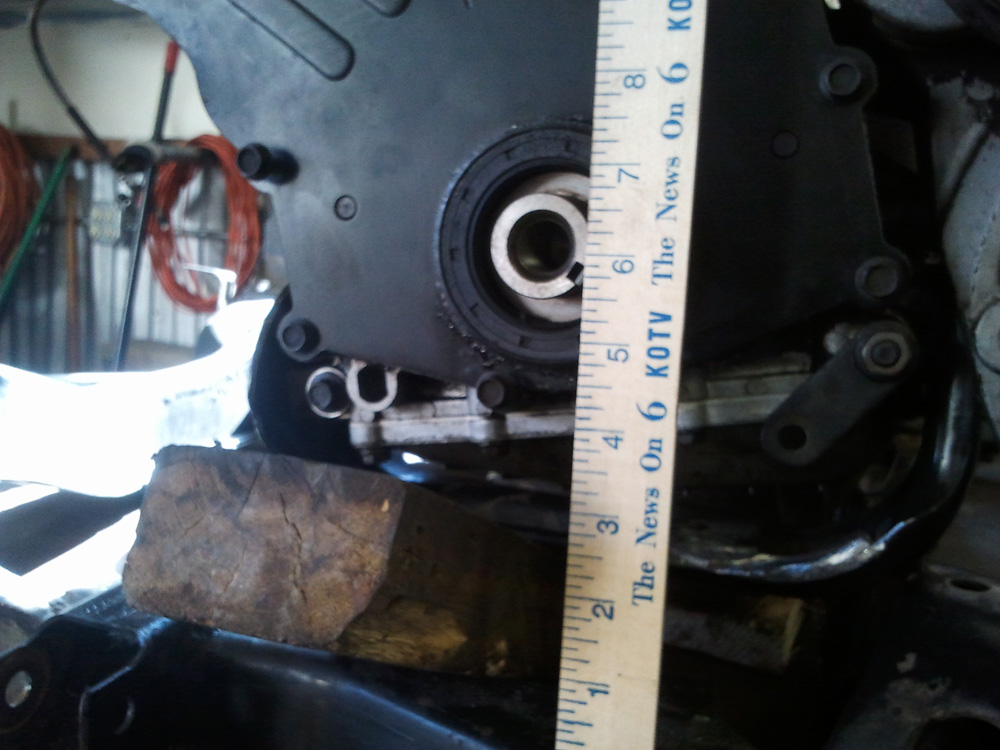
I was very careful when fabricating the mounts to make sure I'd have room to close the deck lid without having to modify it. Some owners have had to cut away part of the deck lid frame because the Quad is so much taller than the Duke. There's a sweet spot where the crank pulley sits about 3/4" above the cradle and the top of the engine clears the deck lid by about a quarter of an inch. Again, pictures of this step to come later.
The AC compressor on the Quad sits much lower than on the Duke, so the exhaust hump has to be modified. Some owners just cut a small part off the arch, but I decided to remove it altogether since there's no reason for it with a Quad.
I used some scrap 3" square tubing. I wish I'd taken more photos of the process.
Right now I'm sanding and priming the body. More on that in a future post.
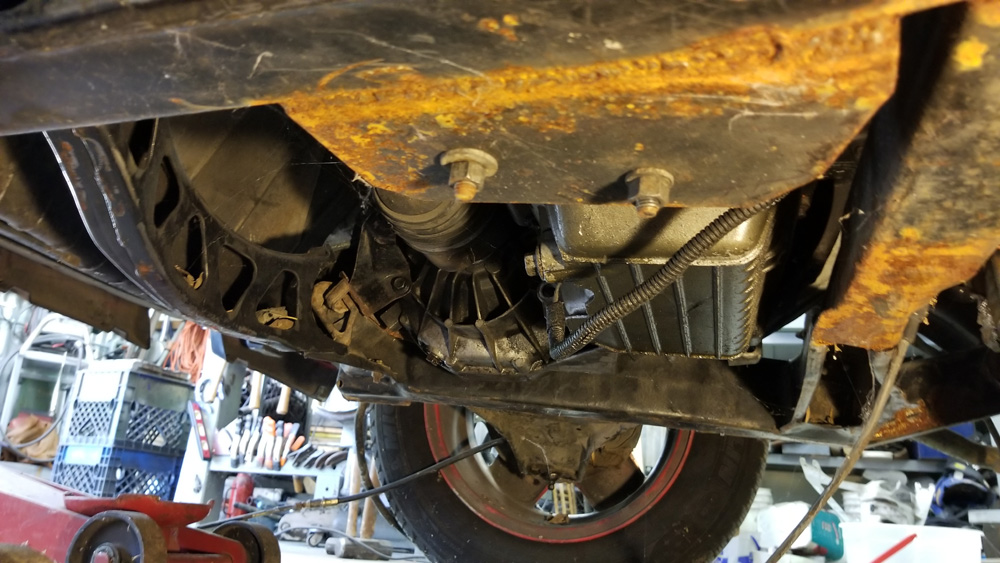
Here are some more photos of how the engine fits in the car.
As I mentioned, it's possible to get the engine and trans to fit without having to modify the decklid.
It's been so long since I did the work, I'd forgotten how well everything fits.
I got to this point by putting the cradle on my heavy duty welding table, then lowering the Quad/Getrag onto it. Unfortunately, the photos I took of the process were some of the ones I accidentally deleted. I used blocks of wood and a level to get the engine to sit where I wanted, then fabricated the mounts to fit.
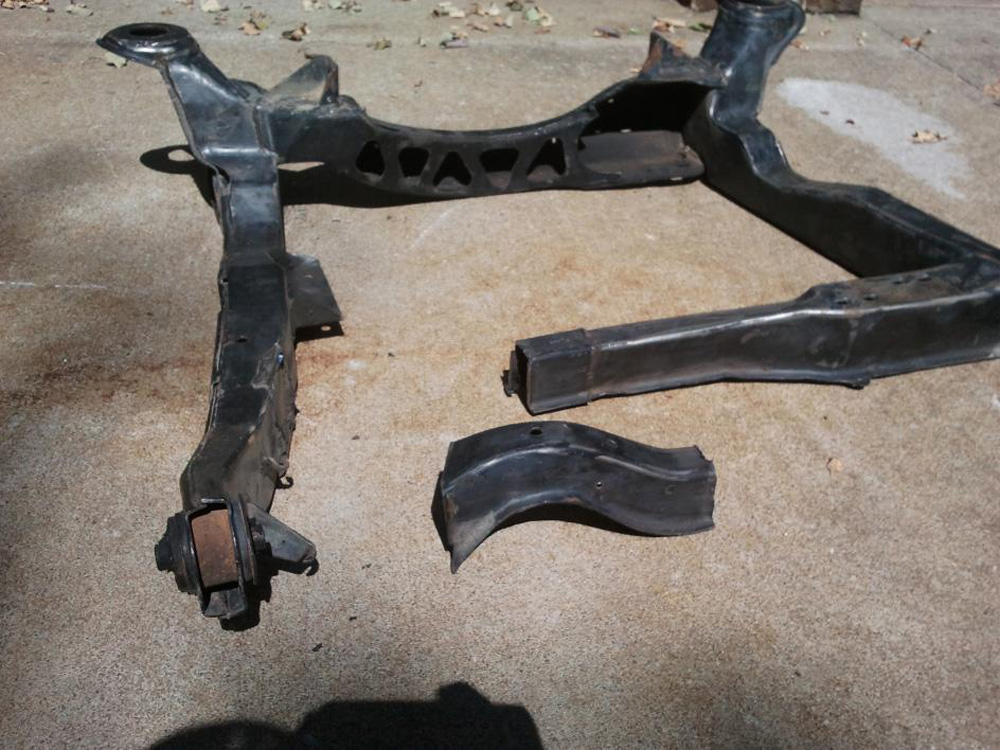
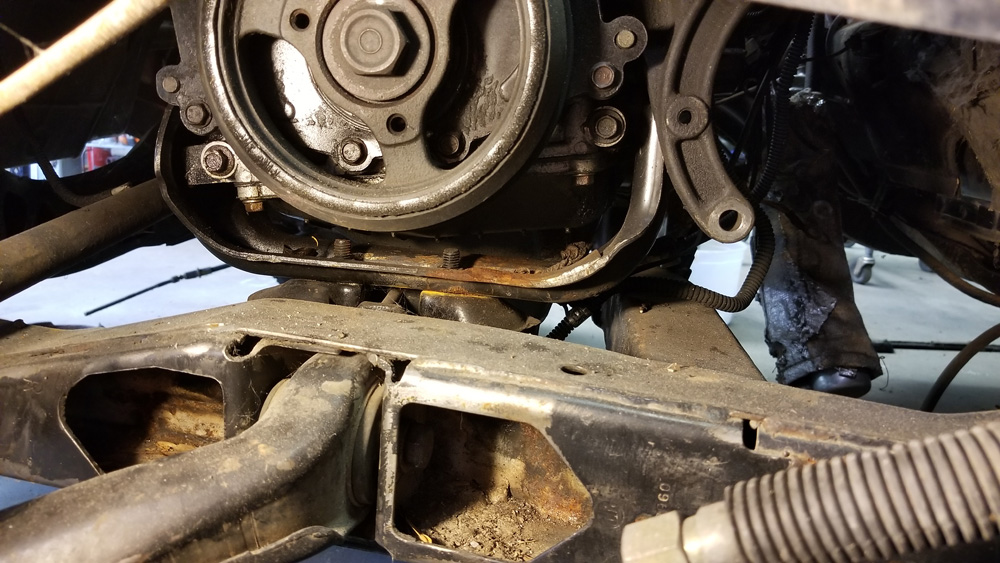
There were two basic engine mount designs for factory Quads. The Grand Am type has a mount on the intake side and one on the exhaust side. The GTZ type is similar to the Iron Duke type, with a u-shaped flange around the oil pan that sits on a big rubber mount bolted to a plate. At first I was planning to convert to the Grand Am type, mostly because that was the kind I found in other swaps. After I cut the flange off my cradle I realized how similar the Duke/GTZ mounts were and changed my mind (a common theme in this swap), so I had to weld in a new flange. It worked out OK because that made it possible to put the flange where I wanted it.
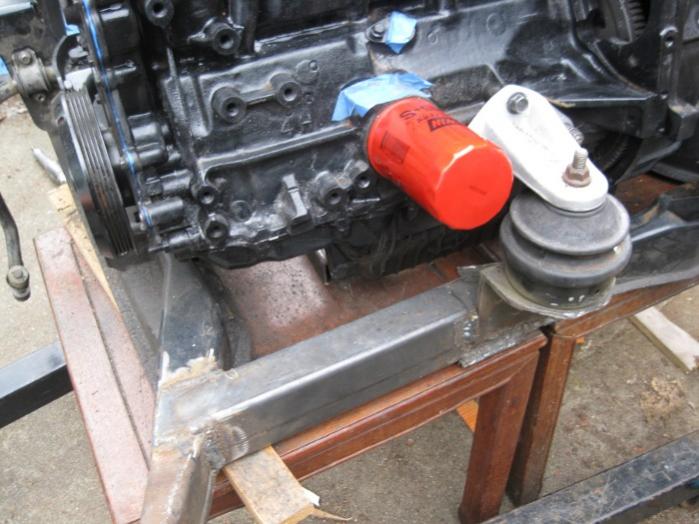
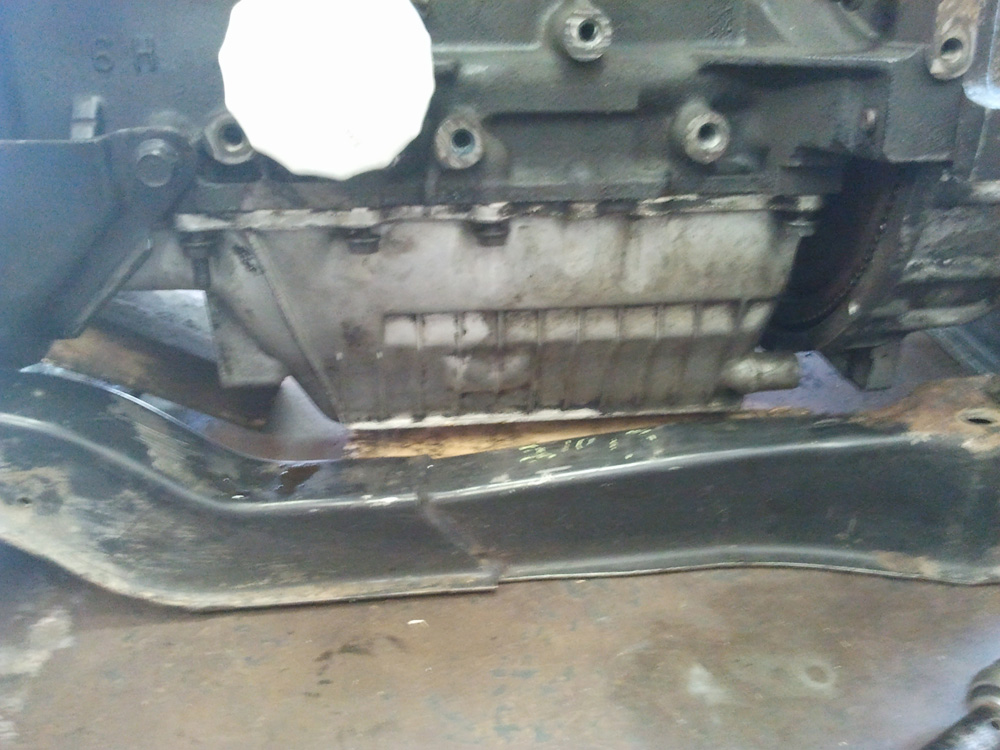
I decided I didn't want the oil pan to be flush with the bottom of the cradle, so I used a piece of 1/4" plywood to raise it up a bit.
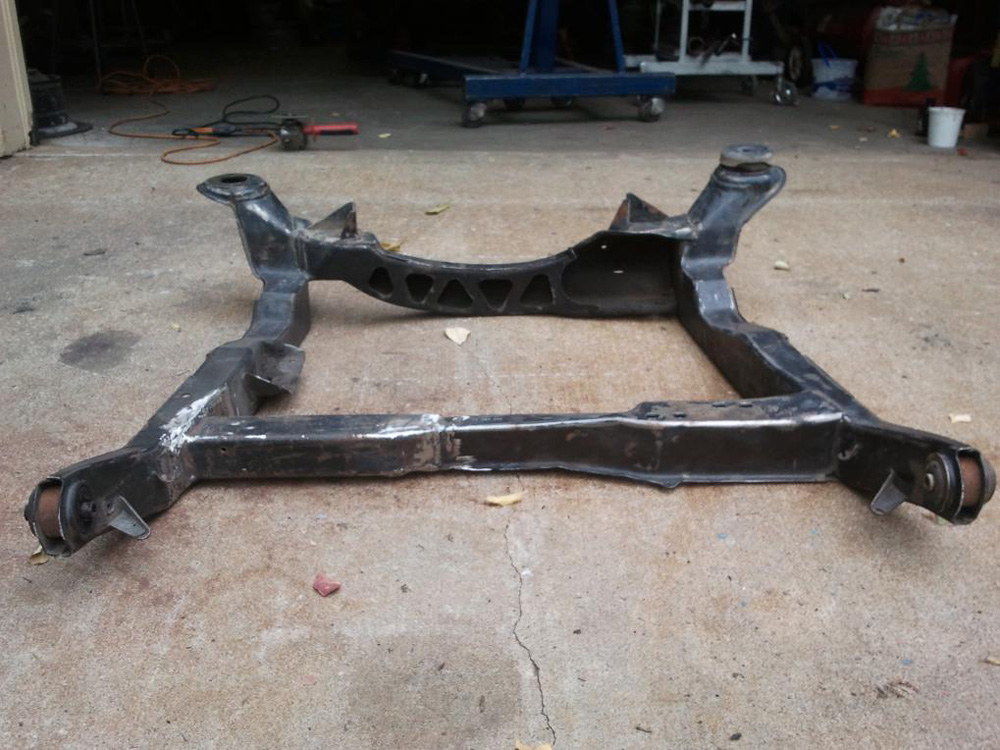
There is some surface rust on my welds because the Fiero had to spend some time outdoors due to the aforementioned major repairs to other cars in the family. Once I'm done with the painting and have reassembled the body, I will pull the engine and cradle and take care of all of this.
Here's the AC bracket on the Quad. You can see how low it sits on the engine, requiring modification of the exhaust hump.
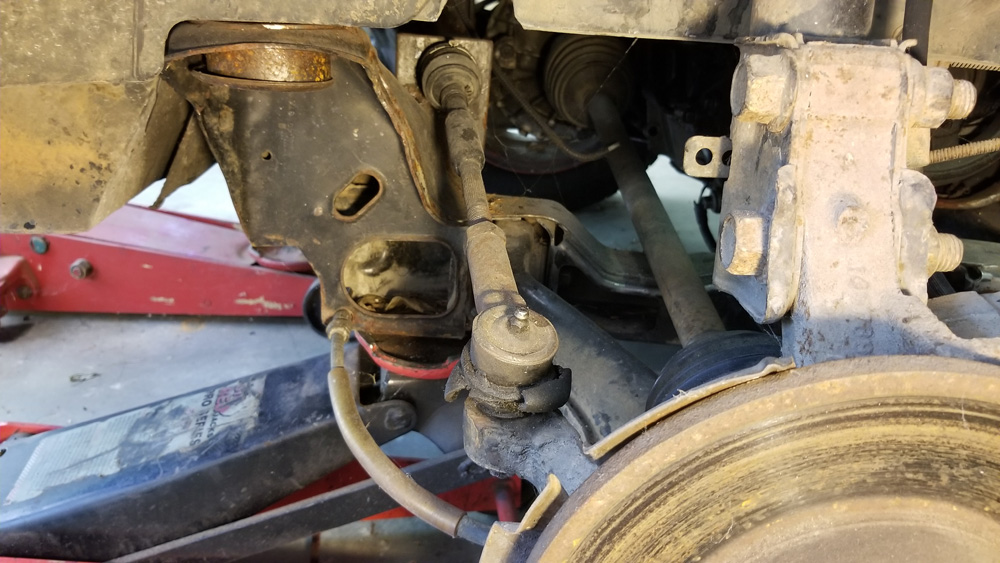
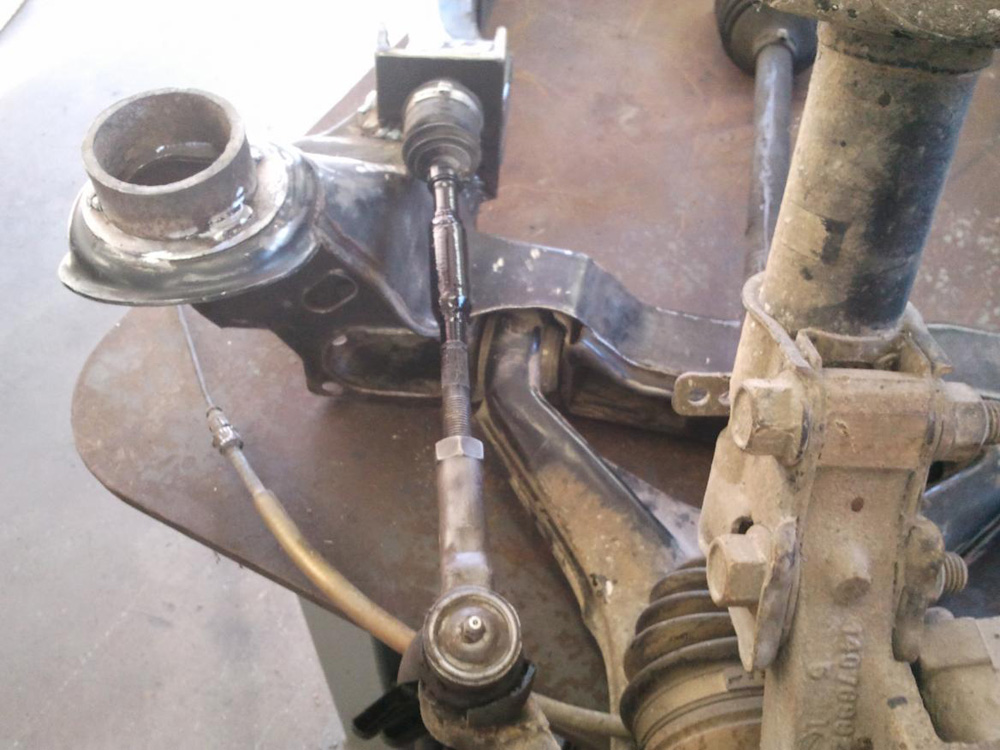
These pictures show how I shortened the tie rods by 3". I found several pages on the internet discussing the poor geometry of the design and the recommendation to move the pivots at least 2" toward the outside. I had the time so I decided to go 3". Discovering whether this was a good idea is one of the great mysteries I hope to solve by finishing the swap.
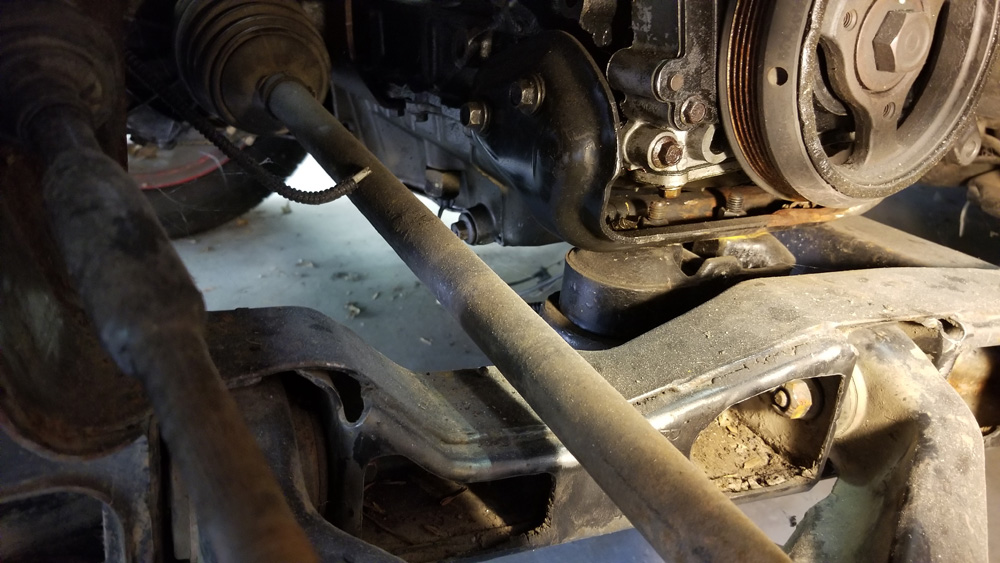
One cool feature of this swap is that the Fiero axles fit the Quad's Getrag. These photos also show how I converted to solid mounts on the cradle. I cut a short section of pipe and welded it onto the cradle.
Found some of the photos from the process of mounting the Quad to the Fiero cradle.
I noticed that the stock Isuzu transmission mounts were very close to fitting the GTZ's Getrag, so I modified them as a starting point.
It's been so long I don't remember exactly what I did to the rear mount. I think I had to cut one side of it and add some metal.
The front transmission mount was more straightforward. The mounting holes lined up, but part of the metal on the mount had to be removed. (Sorry for the blurry photos)
I decided this wouldn't be strong enough, so I used a piece of wide angle iron for the vertical piece. I can't find a picture of it so it'll have to wait until I can take some new ones.
In a previous post I said the clearance issue was with the crank pulley but that's incorrect. The issue is with the transmission. With the engine sitting level, there's a spot where the decklid is about 1/4" above the timing cover while the transmission is about a half an inch from the driver's side frame rail. It took a while, maybe a few hours over a couple of days, to get the engine/transmission to sit in that spot.
[This message has been edited by Quad Raider (edited 07-22-2017).]
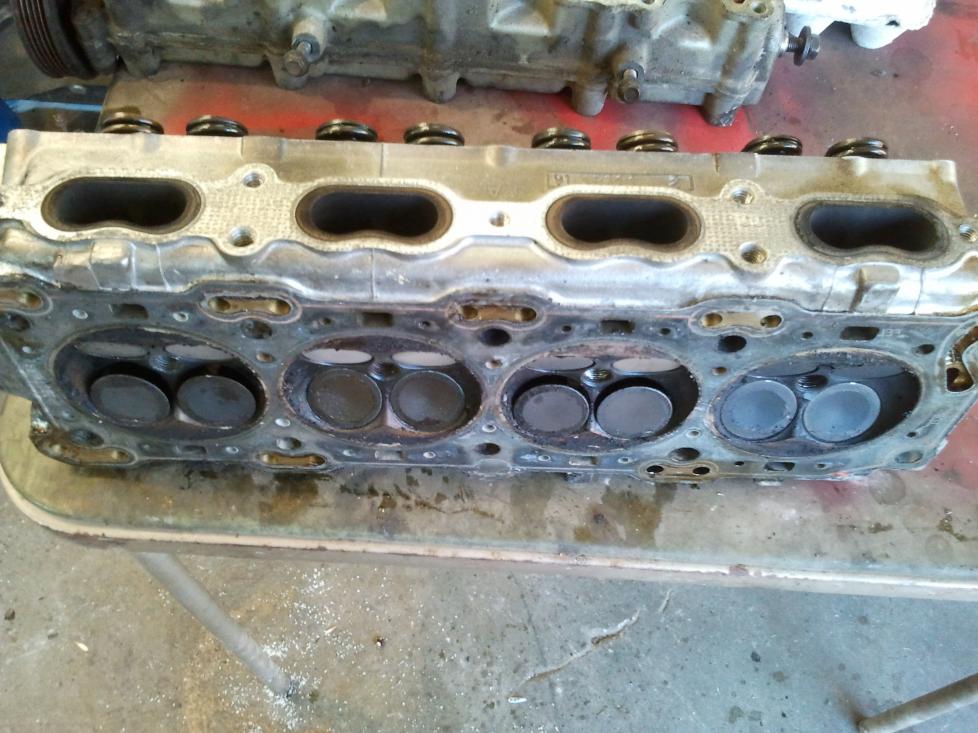
As I mentioned, I was still driving my GTZ as I began working on the Fiero when the timing chain tensioner broke and the Quad chewed up its timing gears and chain. The Quad is an interference engine, so the engine bent four valves.
I don't think the head is damaged, but I will check when I get to that point in the reassembly.
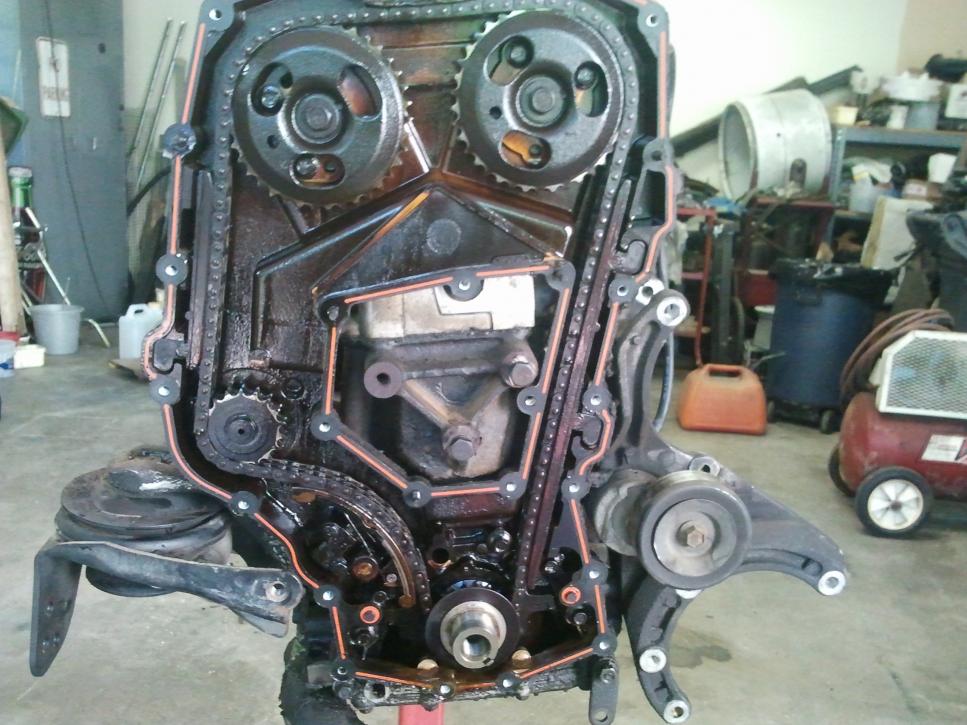
The Quad has a rather long timing chain, which is kept tight by the tensioner shoe between the crank and the water pump sprocket. This photo is of one of my spare Quads. The tensioner shoe on my HO broke in half, right about where the spring is, allowing the tensioner to tighten the chain too much and screw up the timing, too.
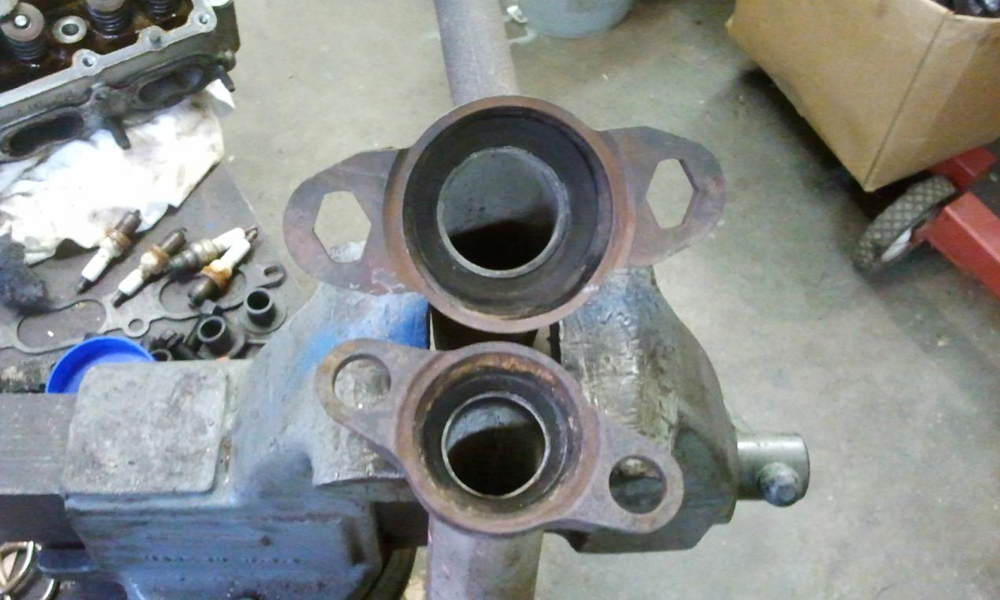
This is an interesting comparison between different Quads. The exhaust pipe on the top is from the HO Quad out of my GTZ. The one on the bottom is from a regular Quad out of a Grand Am.
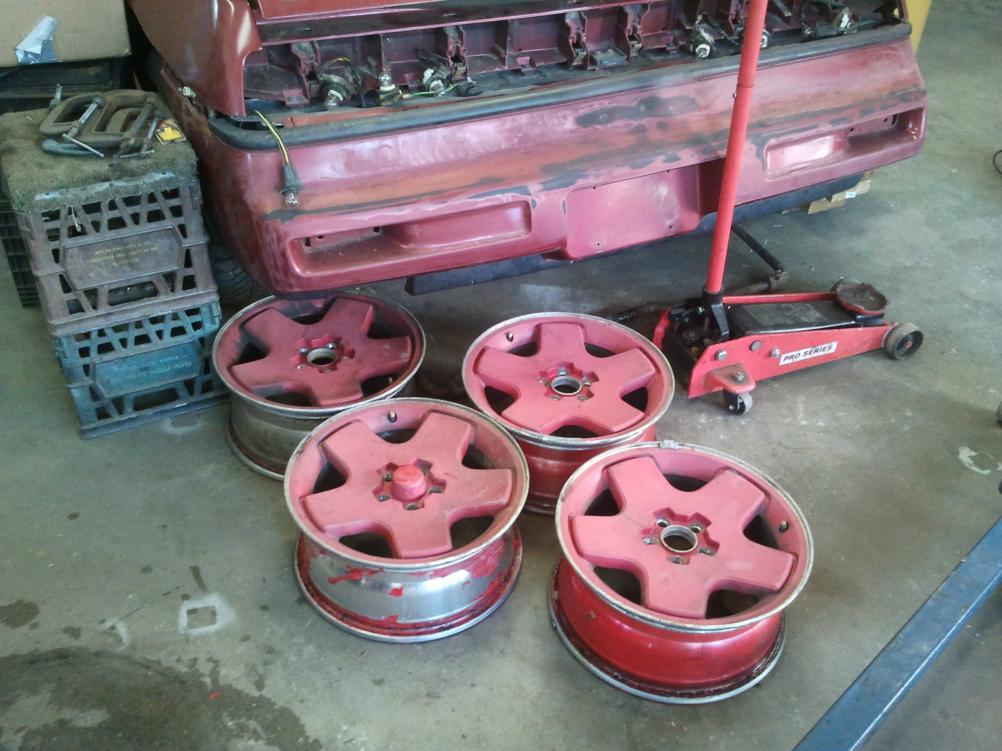
My GTZ came with aftermarket wheels that I never really liked. After I junked it, I came across a set of GTZ wheels in the salvage yard and bought them on sale for $100.
I then spent many months trying to find the other three center caps. One day while checking the salvage I saw a set of Grand Am hubcaps with center sections that looked like they would fit. Here's the thread about the conversion:
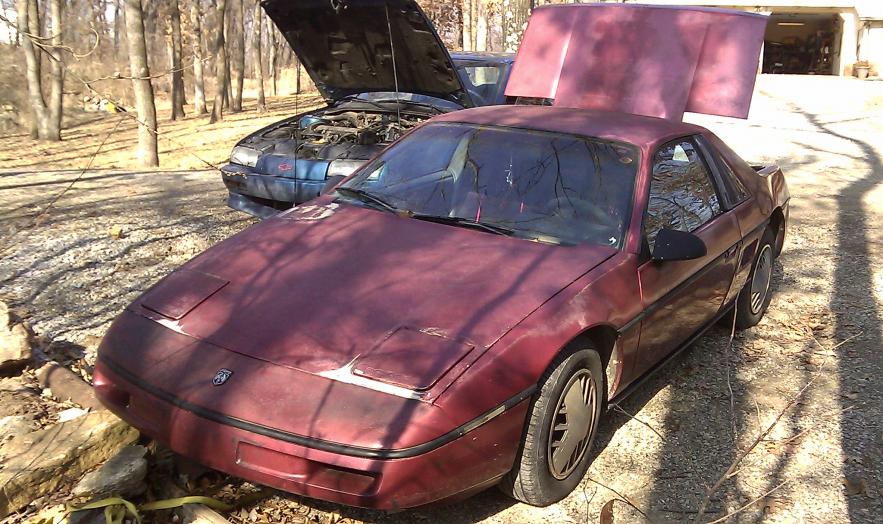
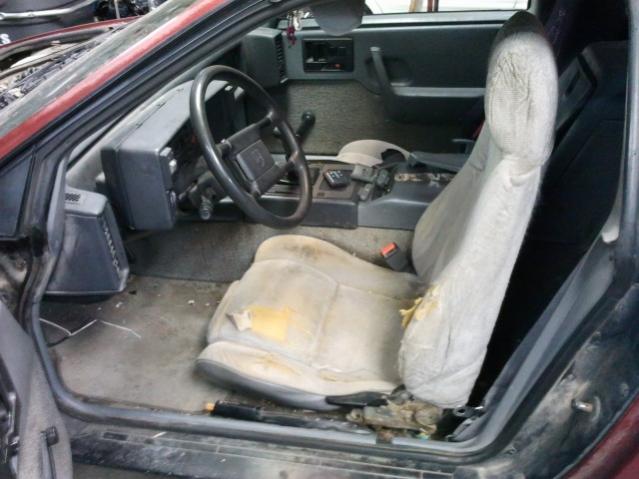
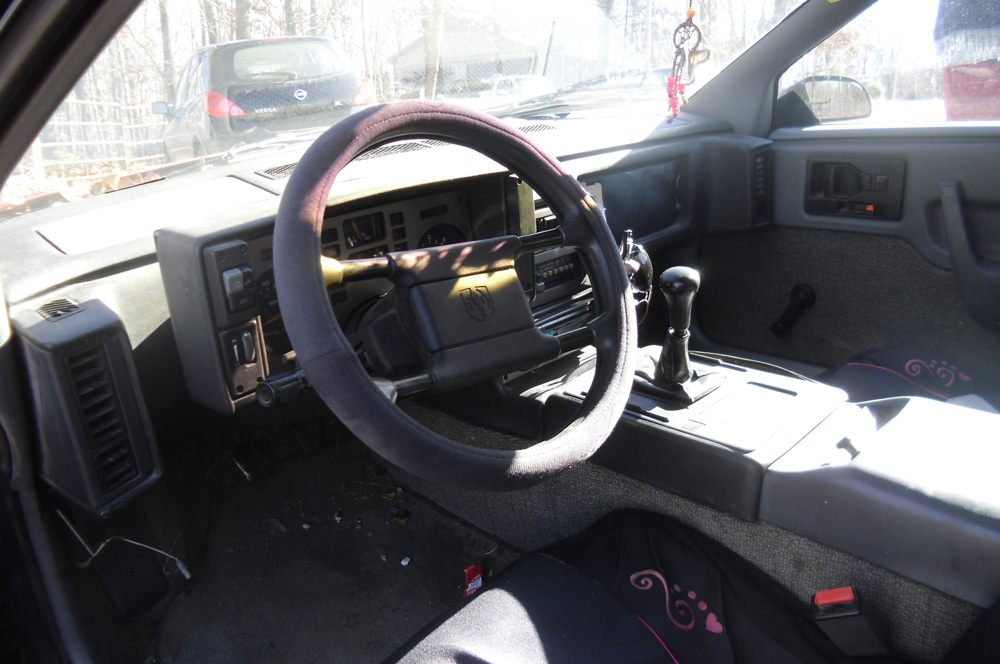
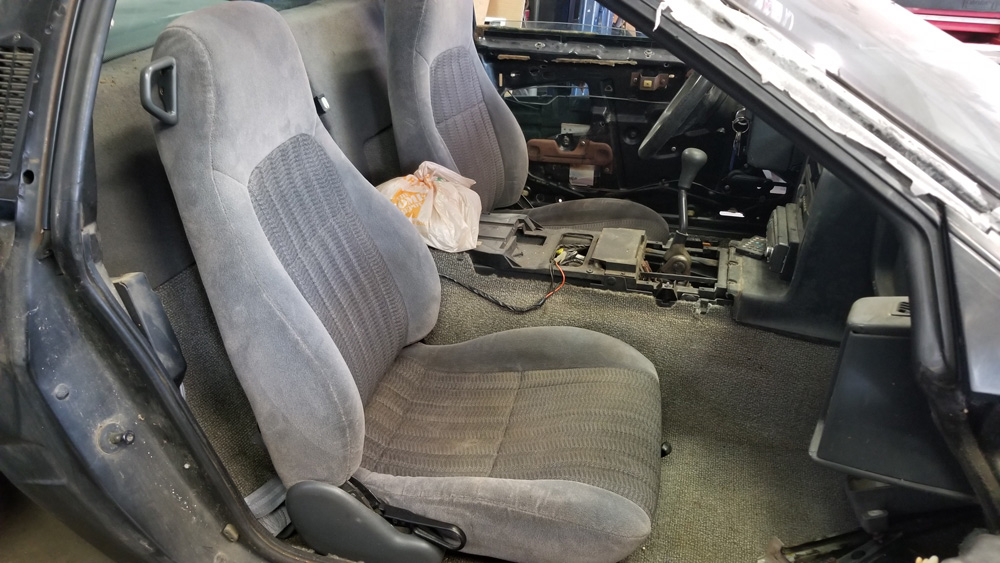
Here's what the car looked like when I first started working on it on March 6th, 2011. When I saved this photo I made a note that I'd finally finished working on the engine in my daughter's car. I don't remember which daughter, which car or what the problem was with the engine.
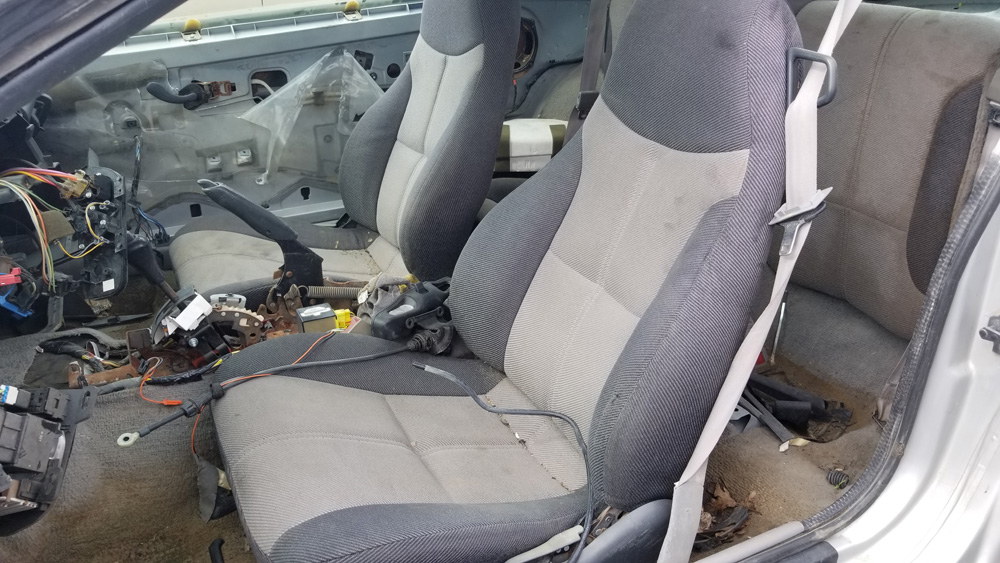
The car was pretty tired. The seats had three covers on them. I guess the original owner would get tired of one and just put the new one right over it. The passenger seat is actually in decent shape, except that she spilled a whole bottle of perfume or air freshener on it.
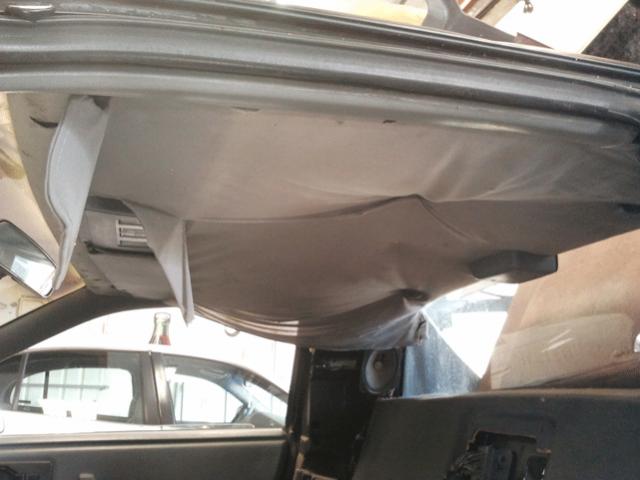
The headliner was toast, but it doesn't matter anymore since I switched over to a sunroof.
[This message has been edited by Quad Raider (edited 07-21-2017).]
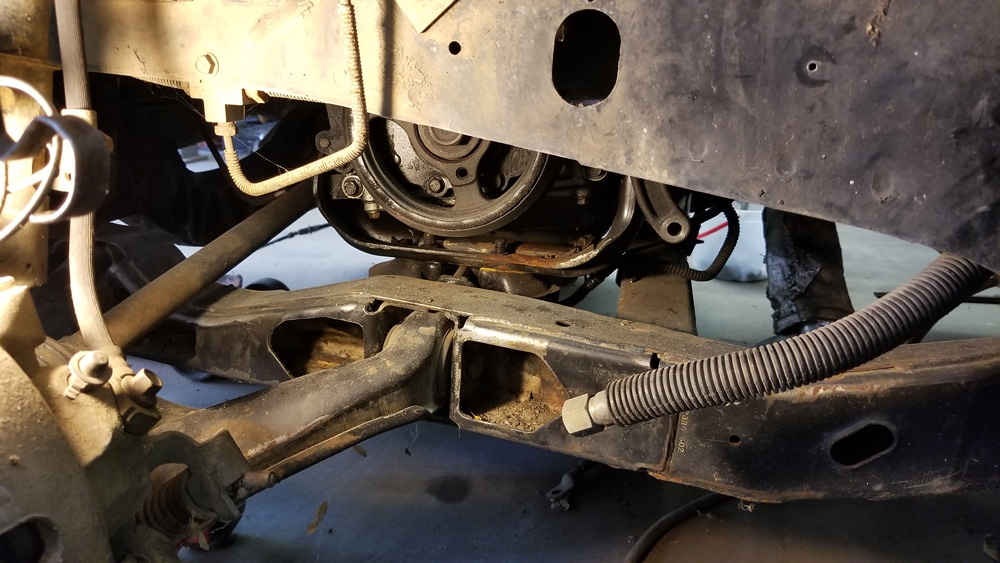
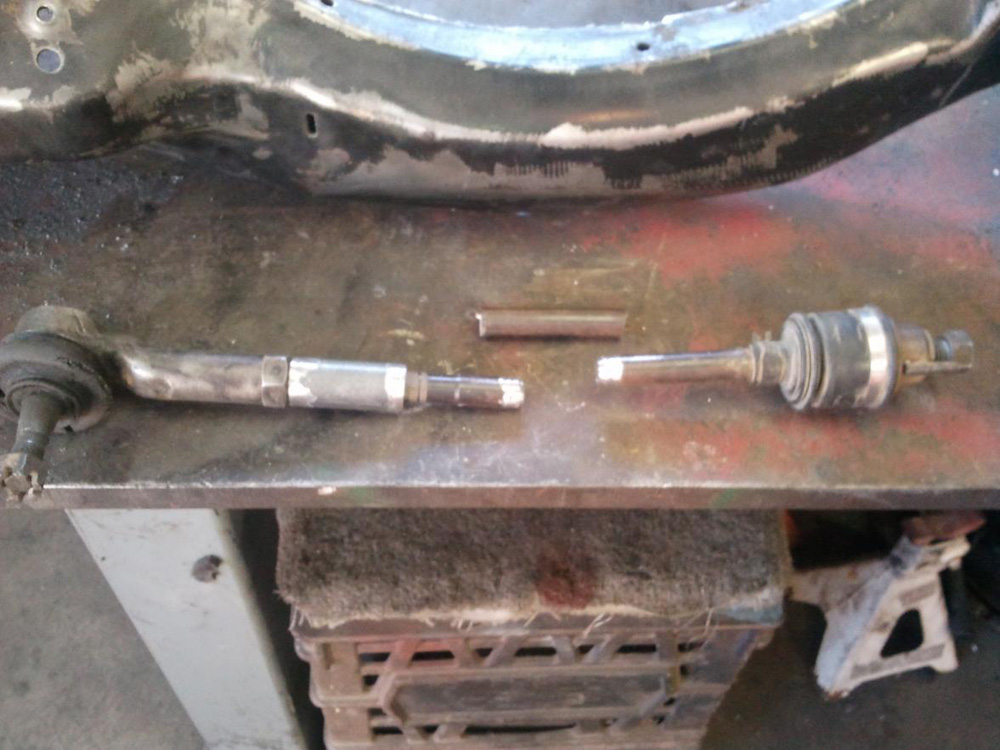
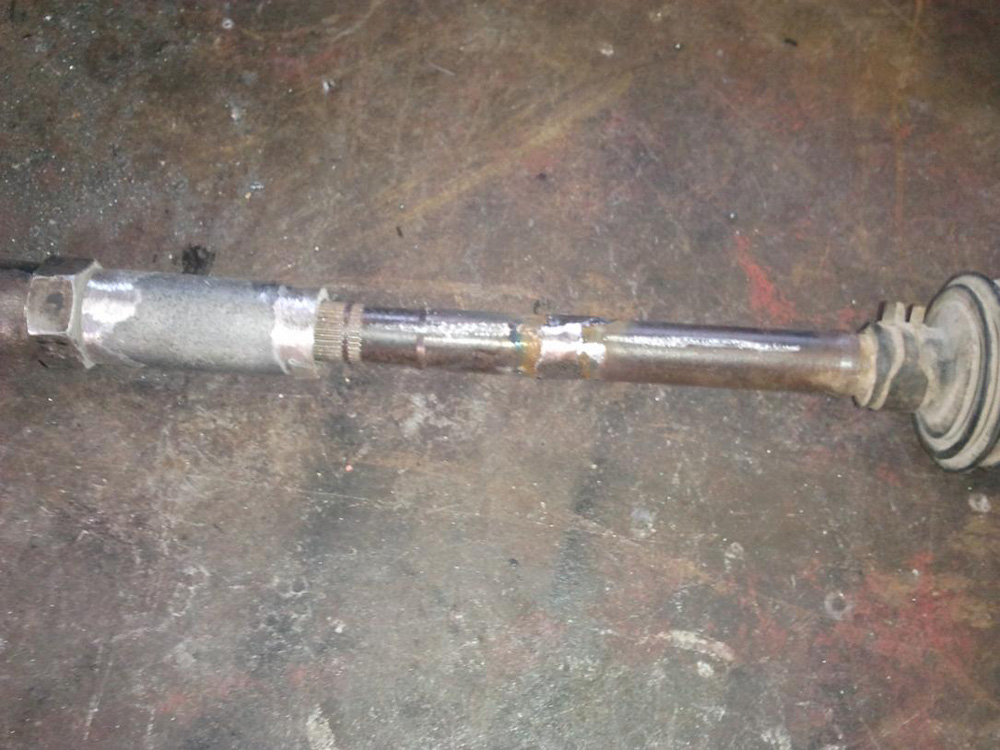
Here are more photos of how I shortened the rear tie rods. I read a lot of posts about the bad geometry of the '84-'87 rear ends and finally settled on moving the mounts 3" toward the outside of the cradle.
The first step was cutting the tie rod, putting a piece of thick-walled pipe over one end, welding the tie rod and grinding the weld, then sliding the pipe over the junction and welding each end of it.
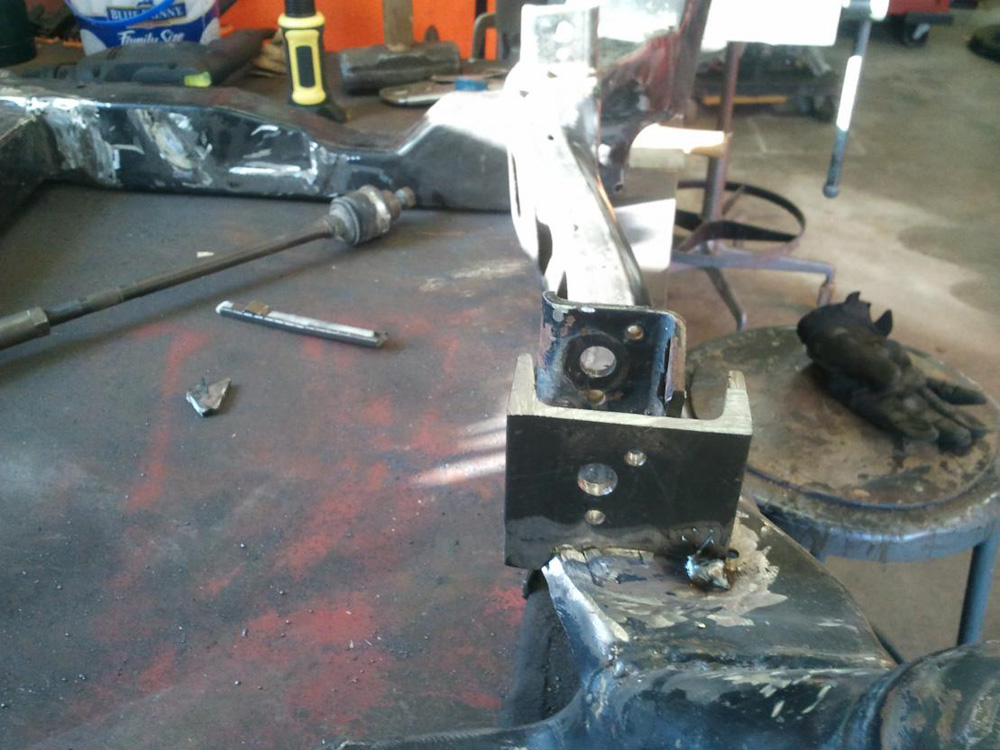
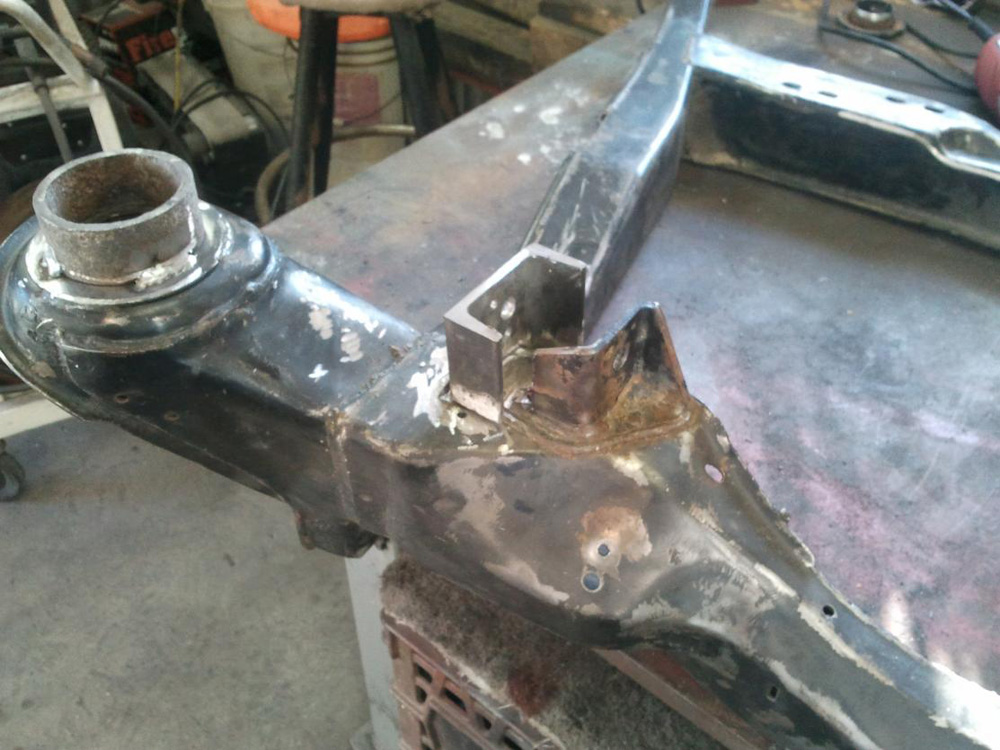
Heavy-walled C channel worked for new mounts. I lined up the mounting holes then lined up the mount and welded it on. This took a while because of all the grinding required.
I'm confident the modifications will be strong enough, but obviously I have no idea if they'll actually work and eliminate bump steer. Hopefully they won't CAUSE any problems.
Side note about my blurry photos. They're not a problem anymore for two reasons. One, I have a Galaxy S8 now and its camera is spectacular. Two, last summer my doctor convinced me to quit wearing a contact in my right eye. I'm near-sighted but my right eye isn't too bad. Wearing contacts in both eyes required me to wear reading glasses, which was a pain and I often didn't do it, especially working in the shop.
It took me about two weeks to get used to it, but the difference is amazing. If I need to focus up close, my brain automatically uses my right eye.
I think ideally would be to move the tie rods to the control arms, but yet I have never seen anyone do it, except the "bump steer kit" It would completely eliminate the bump steer.
I think ideally would be to move the tie rods to the control arms, but yet I have never seen anyone do it, except the "bump steer kit" It would completely eliminate the bump steer.
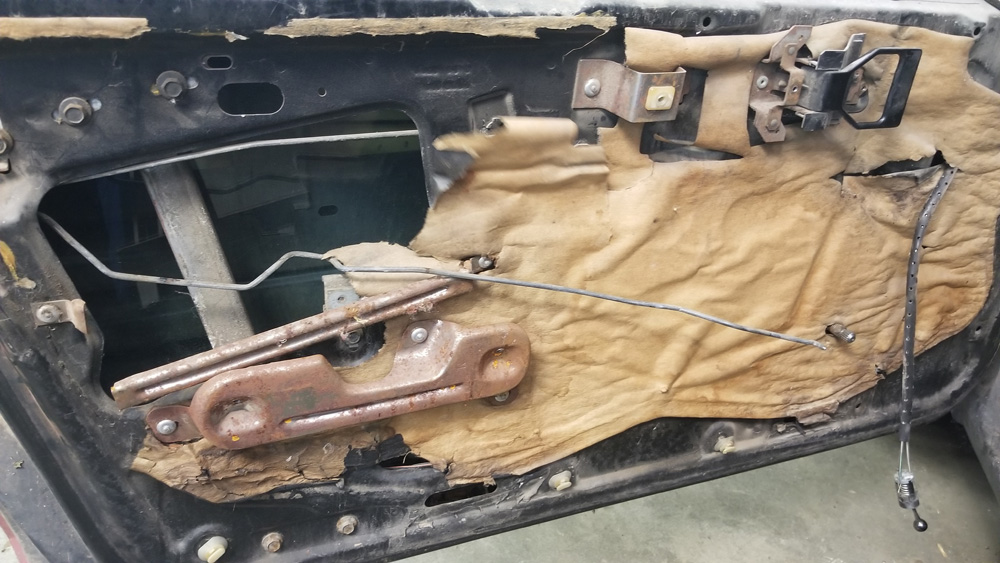
I've been working an evening shift for the last week, so my mornings have been free to work on the car. I put off removing the door skins as long as I possibly could, but the time finally came as I prepare to paint. I found some surprises.
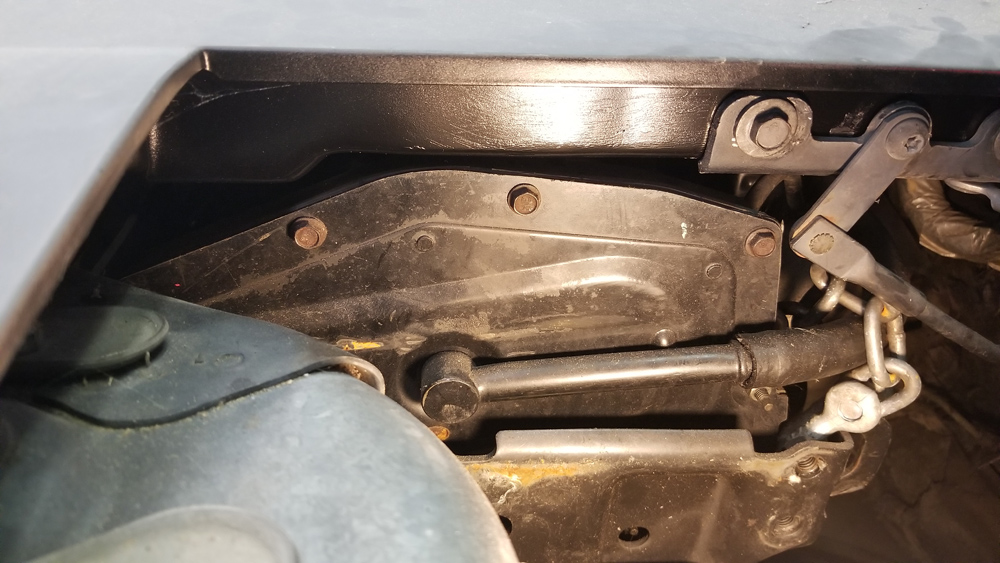
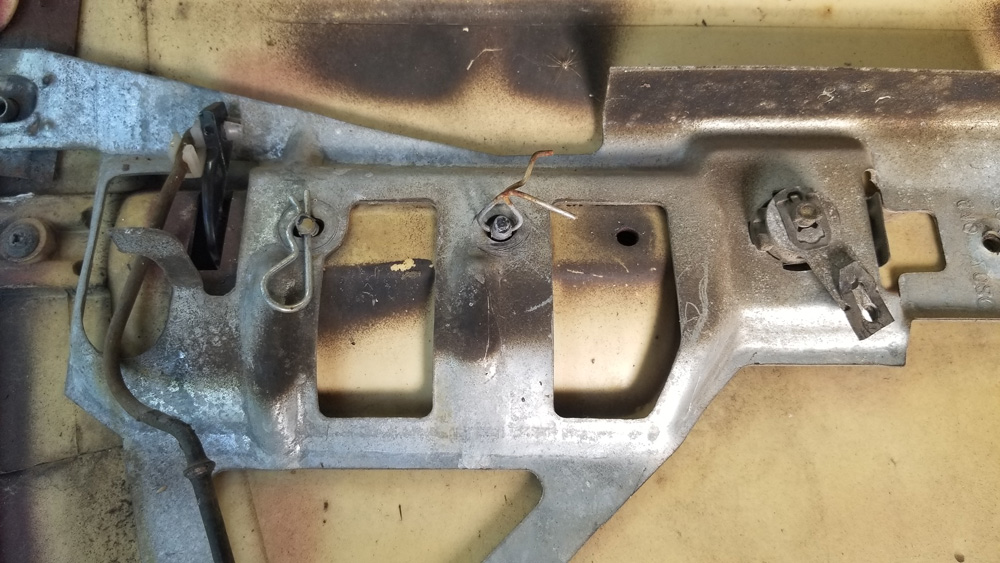
The driver's side door handle has always been loose. Here's why:
I think the previous owner had someone try to fix the door handle for her and whoever it was may have gotten carried away. This brace looks like it was deliberately cut.
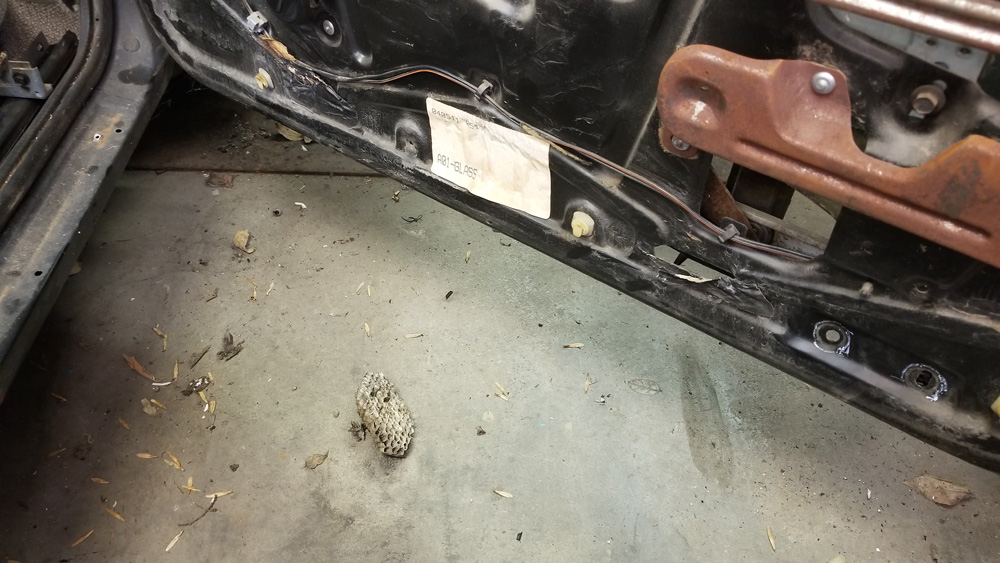
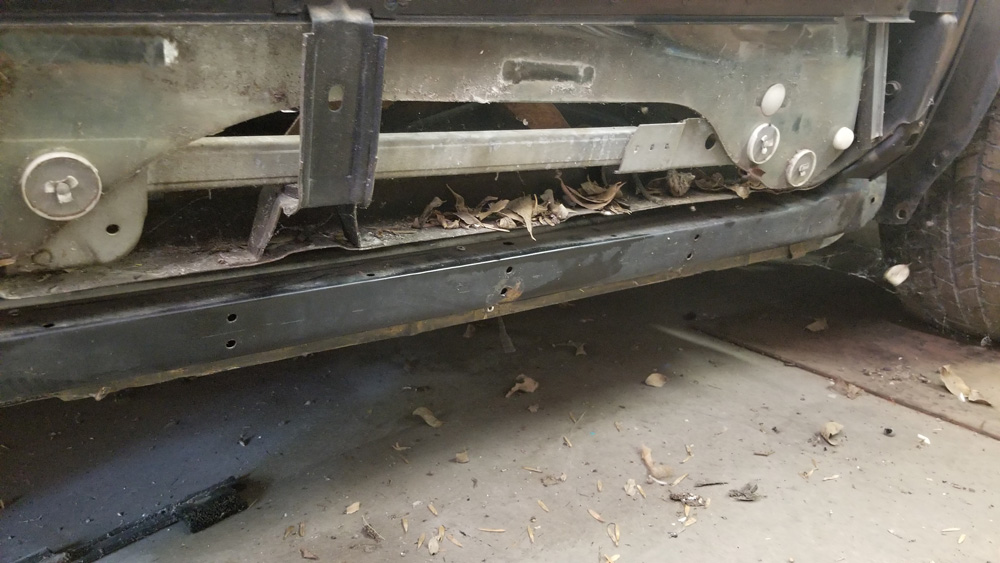
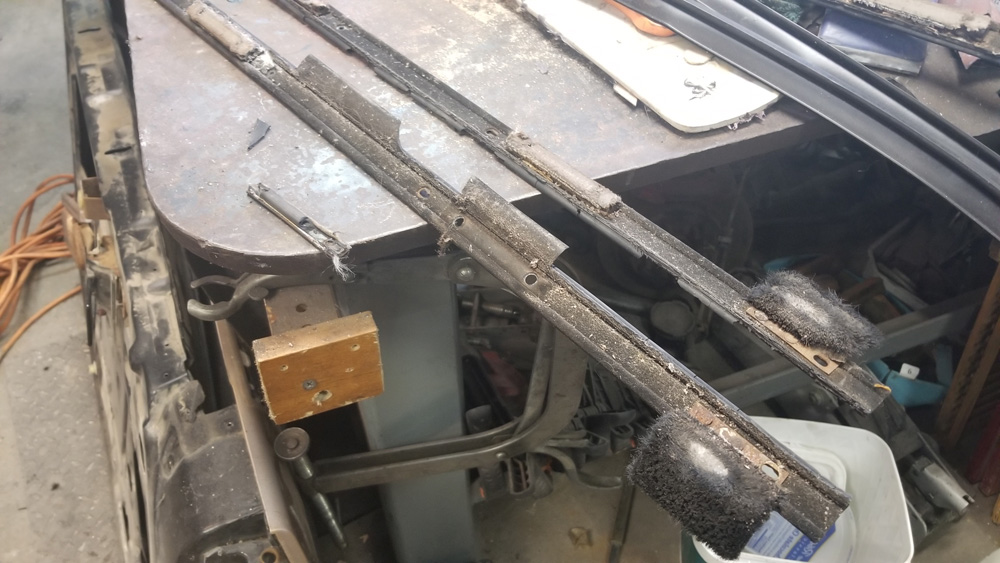
Since my dew wipes were in bad shape, the doors were full of crap, including a giant wasp nest.
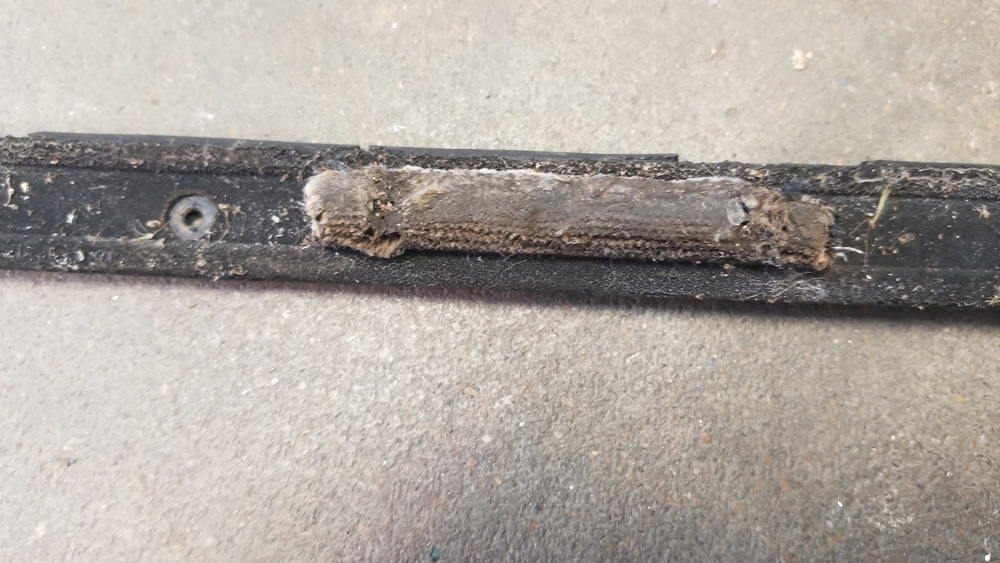
Three or four years ago I ordered raw dew wipe material, planning to drill out the rivets on the old ones and move the flanges and felts to the new stuff. Well, to continue the theme of this build, that plan has been scrapped. The felts on my wipes are horrible.
I'll be ordering new dew wipes as soon as I can afford it.
[This message has been edited by Quad Raider (edited 07-25-2017).]
On Saturday we had a family get-together to celebrate my older brother's birthday. I took advantage of all the manpower and got my two brothers and a nephew to help me roll the car out of the shop, turn it around and put it back in the shop nose out. It's funny how a simple change can provide such a big lift. Aside from the times when it had to sit outside, it's been in the shop, "nose in," since early 2011.
I'm still sanding and priming body panels and hoping to paint in a couple of weeks. My wife and I are taking a trip next week so i won't make much progress for a while.
[This message has been edited by Quad Raider (edited 07-31-2017).]
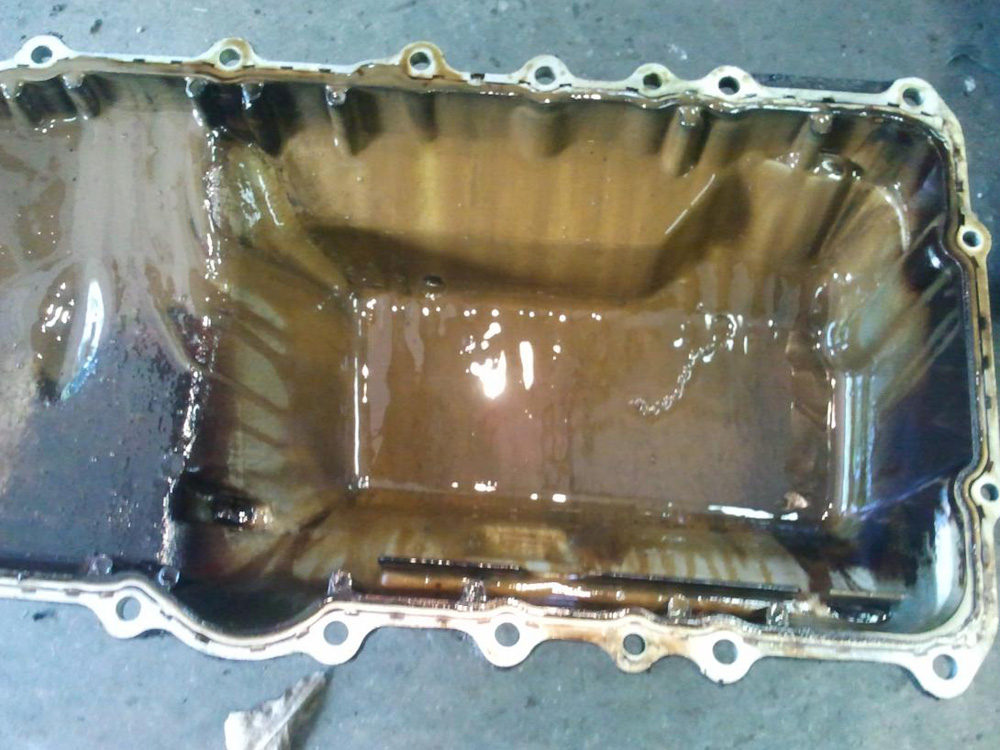
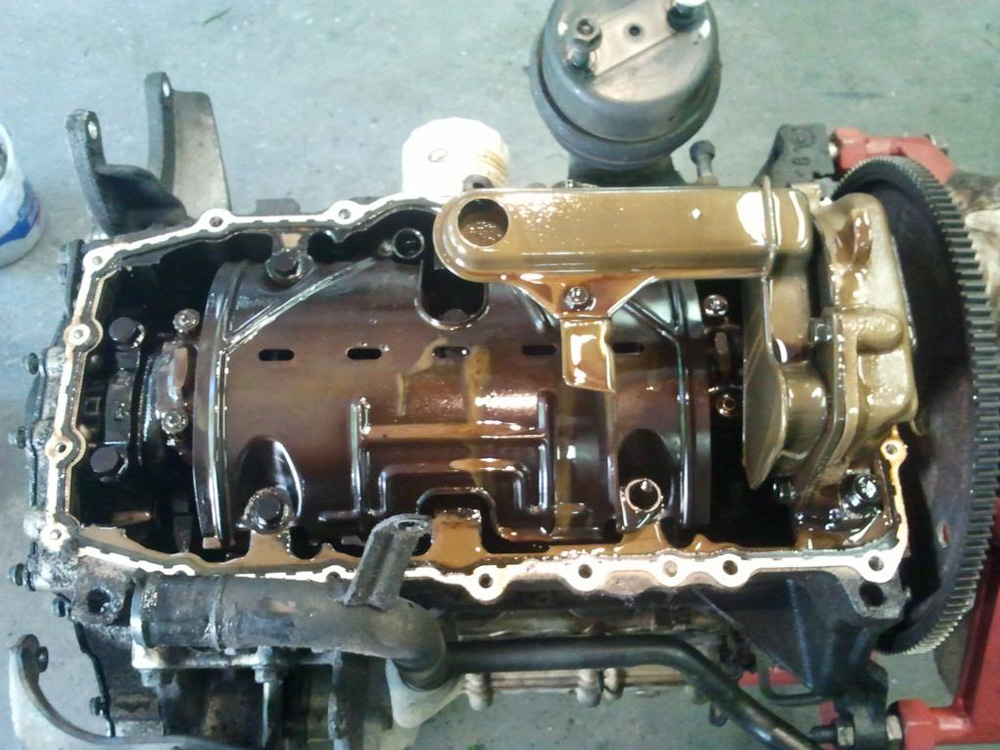
Found some more old photos. These are pictures of one of my spare Quads. This came out of an '89 Grand Am.
The car was in decent shape, so I figured it probably had a blown head gasket, which caused the owner to junk the car. When I pulled the oil pan, I found the infamous chocolate milk.
I didn't see any other issues with the motor, so it's kind of sad that the car was sent to the salvage just because of a blown head gasket. I bought this engine during one of the salvage yard's sales for $115.
I was surprised to discover that it had an 086 head, the same as the HO Quad out of my GTZ. GM put several different heads on Quads, but everything I've read says the 086 is the best mix of strength, power and performance.
[This message has been edited by Quad Raider (edited 08-01-2017).]
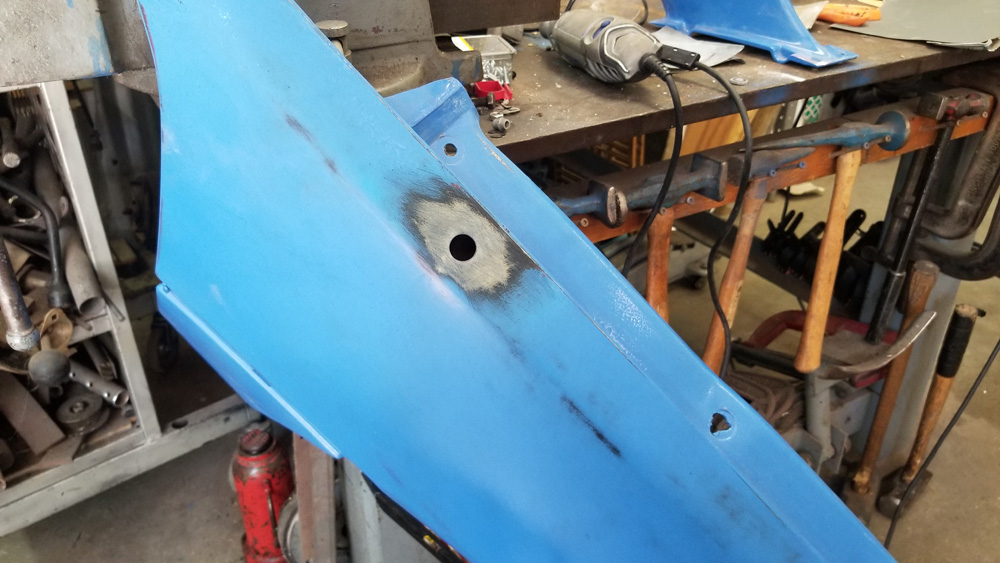
I came across some old threads about deleting the radio antenna. Since I have all the body panels off the car, now is the perfect time to make this modification. I will run the antenna up the A pillar, because I think it makes more sense than setting the antenna horizontally under the fender.
I've been looking for a set of seats in decent condition but haven't had any luck yet. I have three sets now, but they're all different and there aren't two seats in good condition. Then I came across this post from 78_elky about using 4th generation Camaro seats.
quote
Originally posted by 78_elky:
So I still have yet to work on the cruise control but I did get some good stuff done on the car. I robbed the 4th gen Camaro seats from my El Camino and threw them in the car. I really like the seats but I never liked that they were grey in my El Camino's black interior so this was perfect. I'm going to pick up another set for the El Camino this weekend (for $40!) and I'll throw some aftermarket black leather skins on them. I really love them and they work great in the Fiero. I know this has been done before but its still great to me :-D Jessica
I think her seats look great, plus 4th gen Camaros and Firebirds are very common at my favorite salvage. In fact, I found this set.
These seats are in good shape, but not perfect, so I think I'll wait for a better set. Seats from 4th gen Firebirds will also work, but they have a separate head rest that I don't like.
I haven't done much work on the car lately. My wife and I took a trip for a week in early August. Plus, I'm a youth soccer referee so when the fall season starts my weekends get pretty full.
I've bought some more extra parts from an '88 coupe in my favorite salvage, as well as some more bodyworking tools. The weather is supposed to cool off significantly next week so I'll be more likely to get back to work.
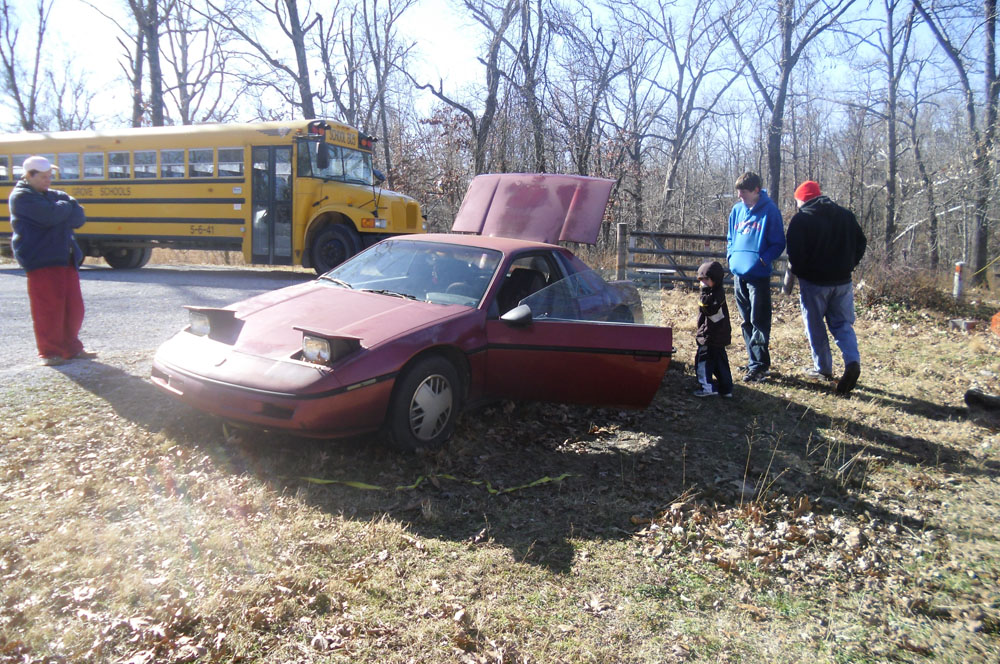
Today I stumbled across the photos I took when I first laid eyes on my Fiero. It was January 1st, 2011. My brother and I had taken our two sons to Fayetteville, Arkansas to see the car. It was pretty tired but it was all there and it was a 5-speed car.
The woman on the left side of the photo is the original owner. She still loved the car and was happy to know it was going to someone who'd love it, too.
I'm thrilled to see the pictures of the car, but they bring back the grief over the loss of my brother.
I'd forgotten what a redneck experience it was to find the car.
[This message has been edited by Quad Raider (edited 06-27-2018).]
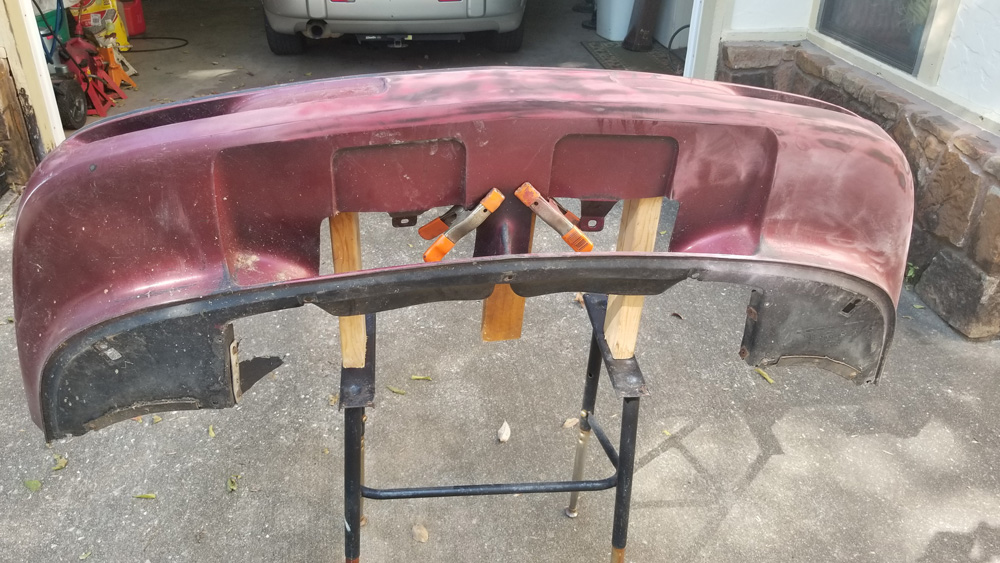
I've been busy with work and soccer, so I haven't had much time to work on the car. When I do get an hour here or there to get over to the shop, I sand body parts. I saved the two most challenging pieces for last: the front and rear fascias.
They have such weird shapes, sanding them was difficult until I came up with a jig. I found the legs of a desk in a dumpster at my local high school. Some 2x4s screwed to it make a decent platform to hold the fascias at waist level while I sand.
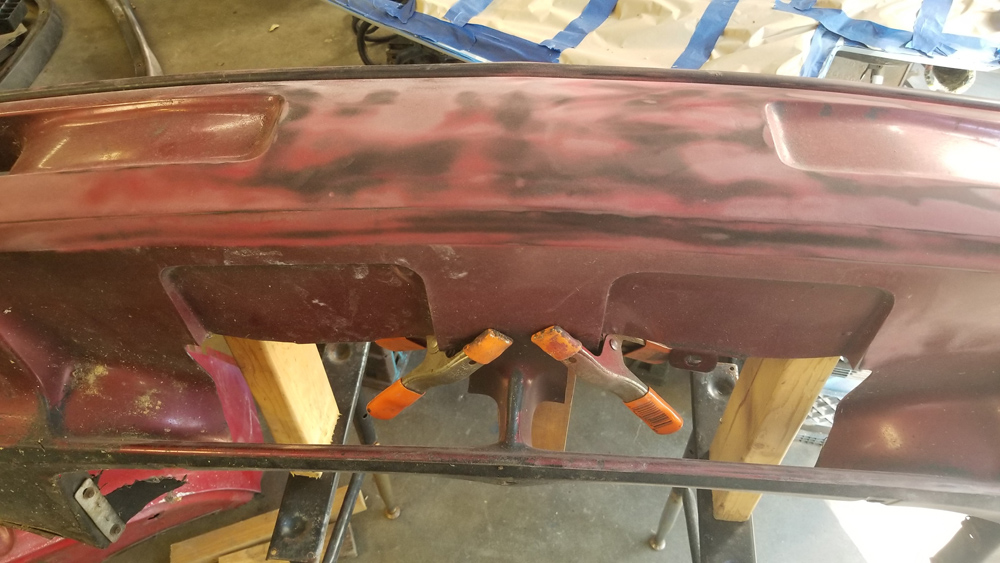
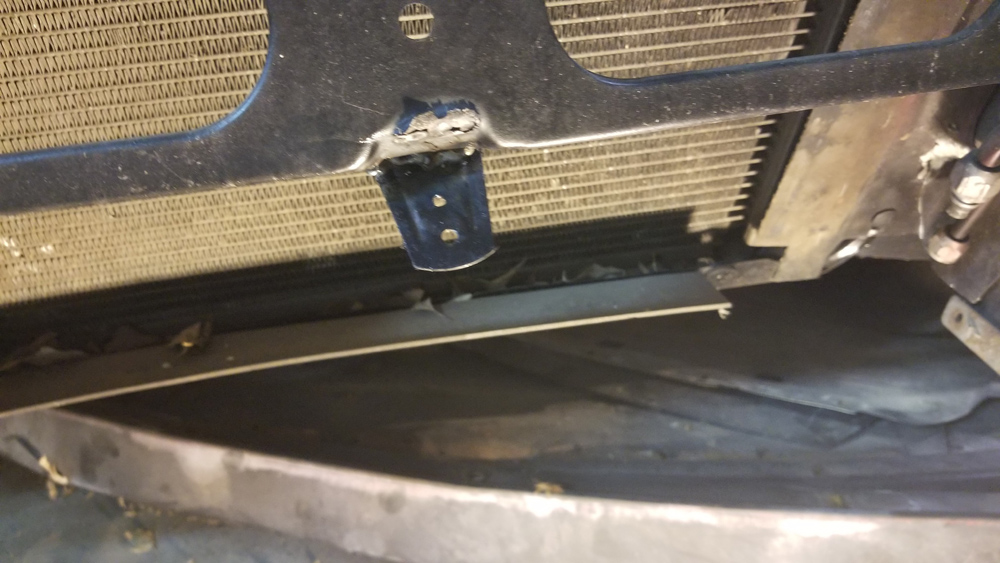
When I first removed the stock front fascia years ago, I noticed it had a serious sag problem in the center. Part of this was caused by the fact that the car was missing the metal bracket that runs from the space frame down to the center of the fascia. I bought three other fascias looking for a good one, but they all have issues. I then took a closer look at the stock one and decided I could fix the sag.
These photos show a piece of wood clamped to the back side of the sag. I'm thinking I could fiberglass a piece of aluminum plate where the wood is, extending it to the sides for a few inches.
Anyone have a different way to solve this problem?
Not much progress to report. I tried to using fiberglass to fix the sag in the front fascia but I mixed it wrong and it never hardened. I'll try again. I've also been sanding and wet sanding body parts to get them ready for paint. I have a lot of time off in December so I'm hoping to make major progress on all fronts.
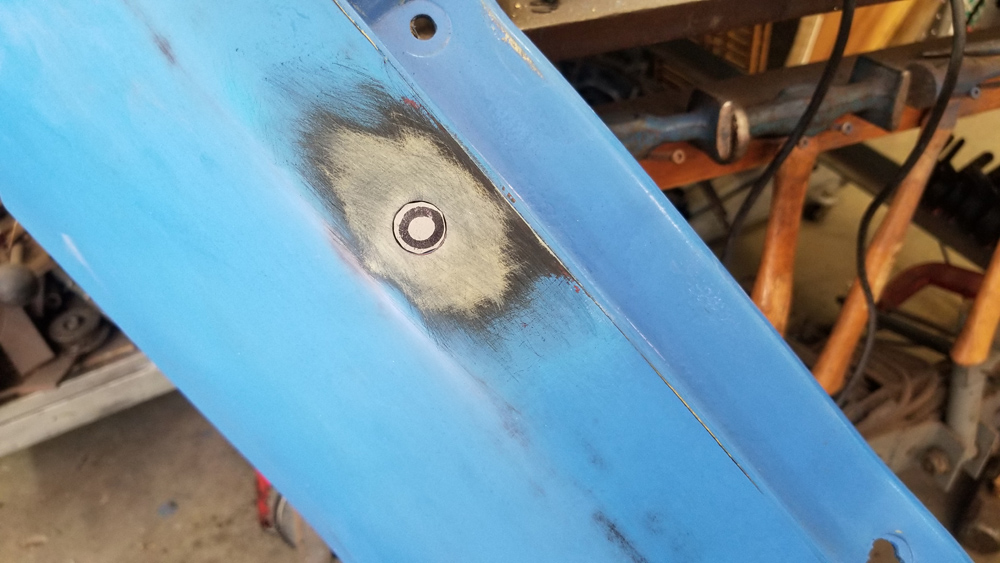
I replaced the tang that holds the center bracket for the front fascia. I wish I would've taken photos of the salvage yard car to get a better idea of where it needed to be.
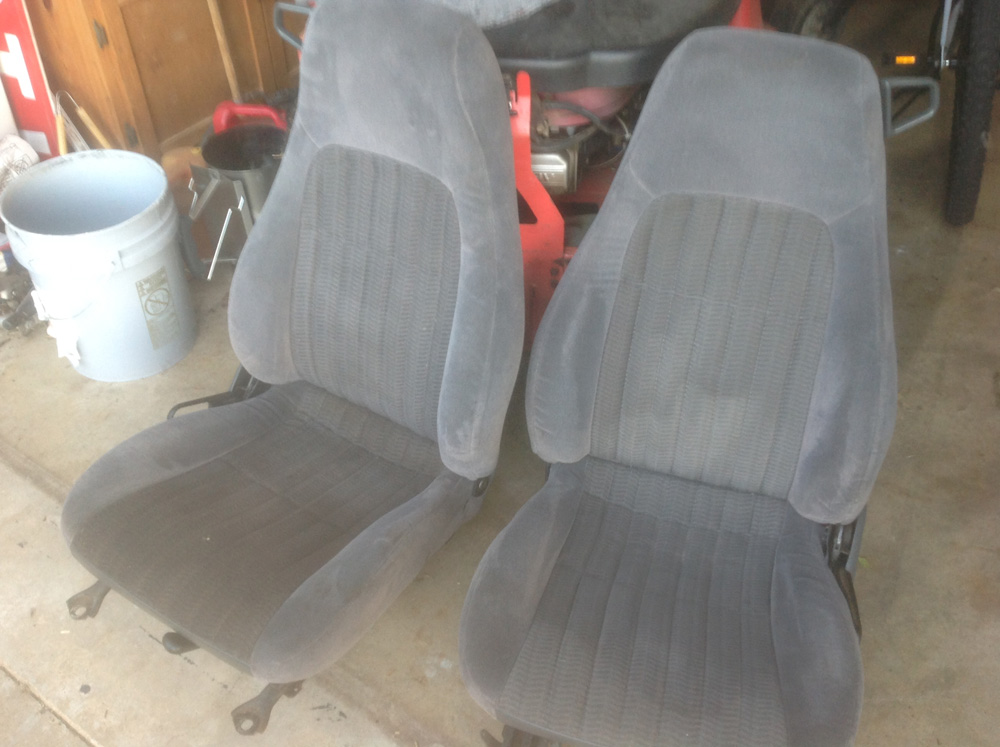
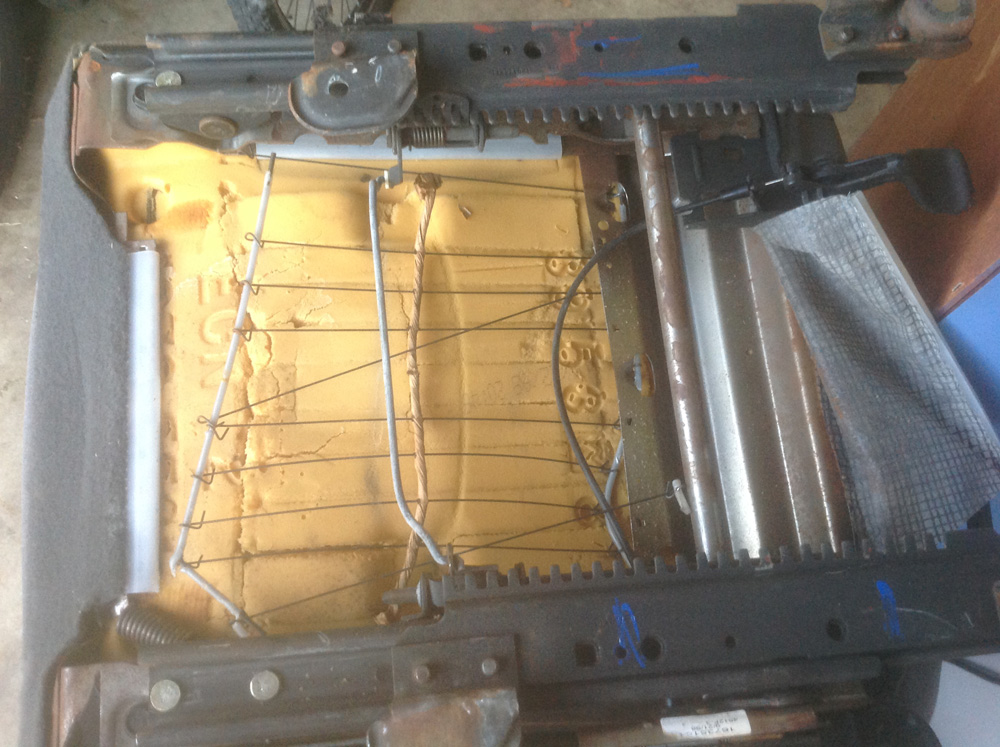
My favorite salvage yard is having a 40-percent off sale this weekend, so I spent yesterday afternoon there. I scored these seats out of a '99 Camaro for $15 a piece. The upholstery is in great shape, but I found a problem with the driver's seat.
One of the springs is missing and parts are broken.
Another trip to the salvage is in order, but I haven't decided yet whether to just get the parts to fix this seat, or exchange the seats. Yesterday I saw a nice set in a '99 Cavalier so I'll look them over carefully and decide then.
[This message has been edited by Quad Raider (edited 11-25-2017).]
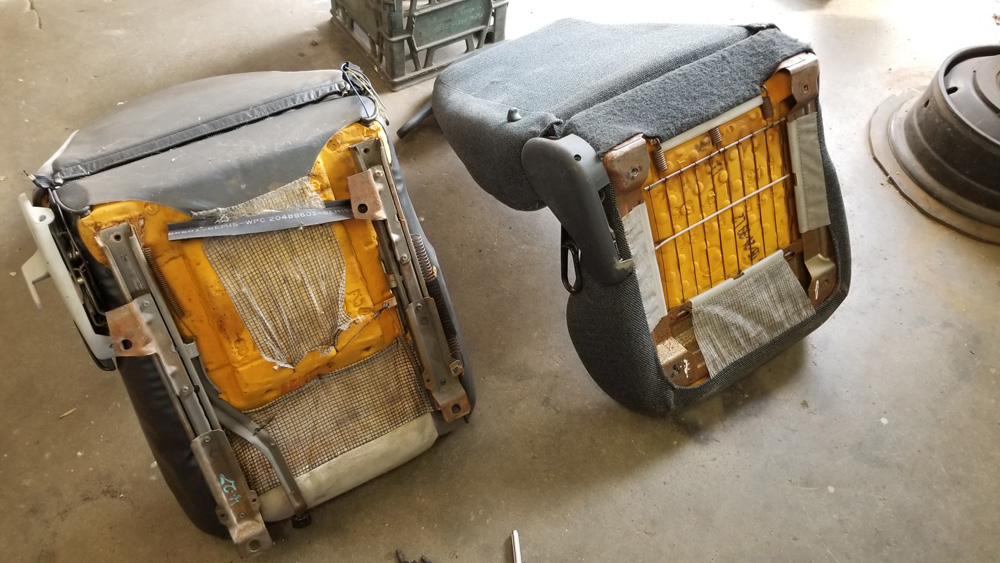
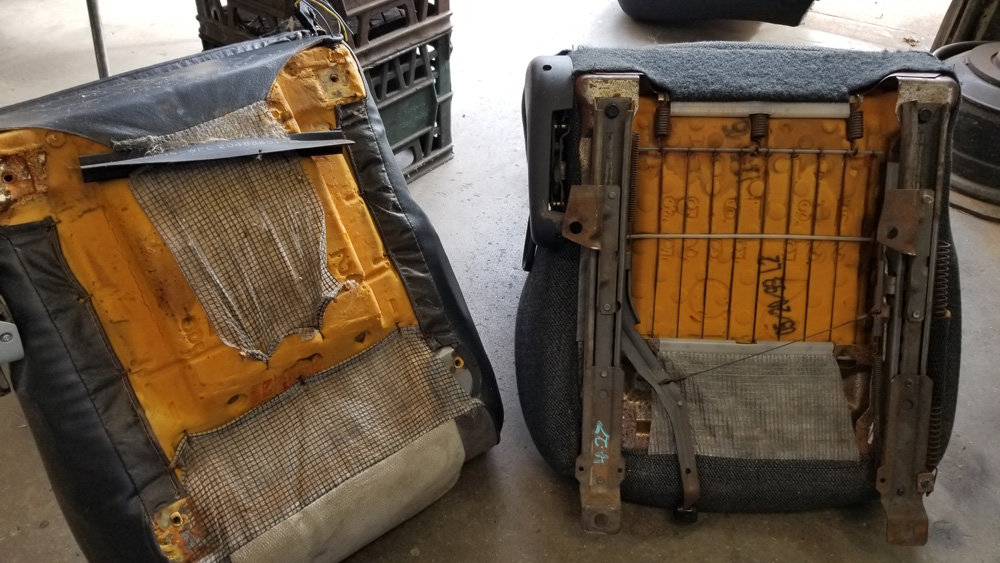
Over the years I've collected two other sets of Fiero seats, but I don't have two matching seats that are in good shape. In the process I learned the Fiero came with many different types:
I went back to the salvage and got the Cavalier seats. I'm not going to use them.
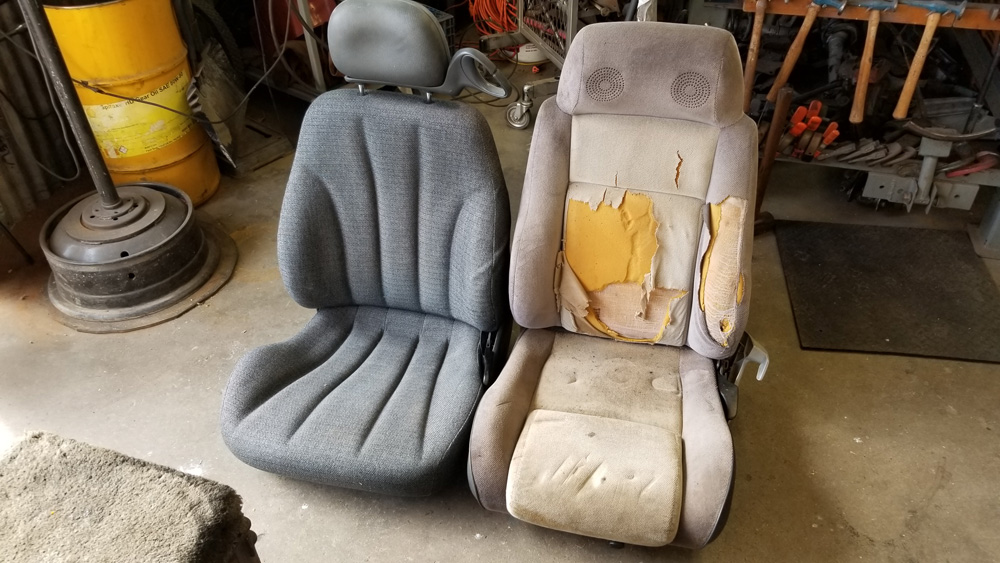
Cavalier seat on the left, Fiero seat on the right:
As you can see, the bottom of the Cavalier seat is shorter and wider than the Fiero. While moving both seats around, the Fiero seat just feels more substantial. The Cavalier seats feel downright flimsy by comparison.
Changing over the brackets is easy:
Direct bolt-in.
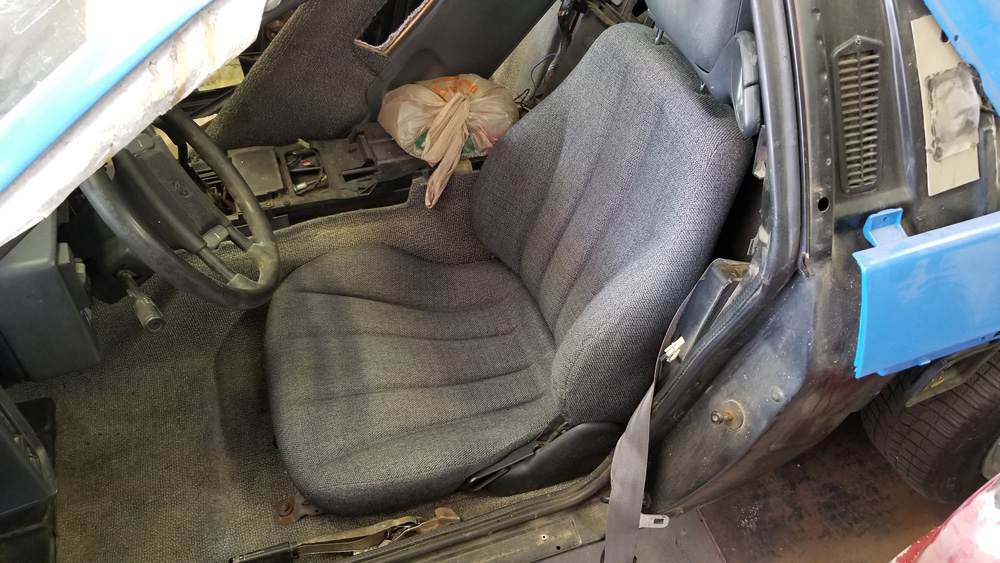
The Cavalier seat looks good in the car, even though the bottom is wider than the stock seat.
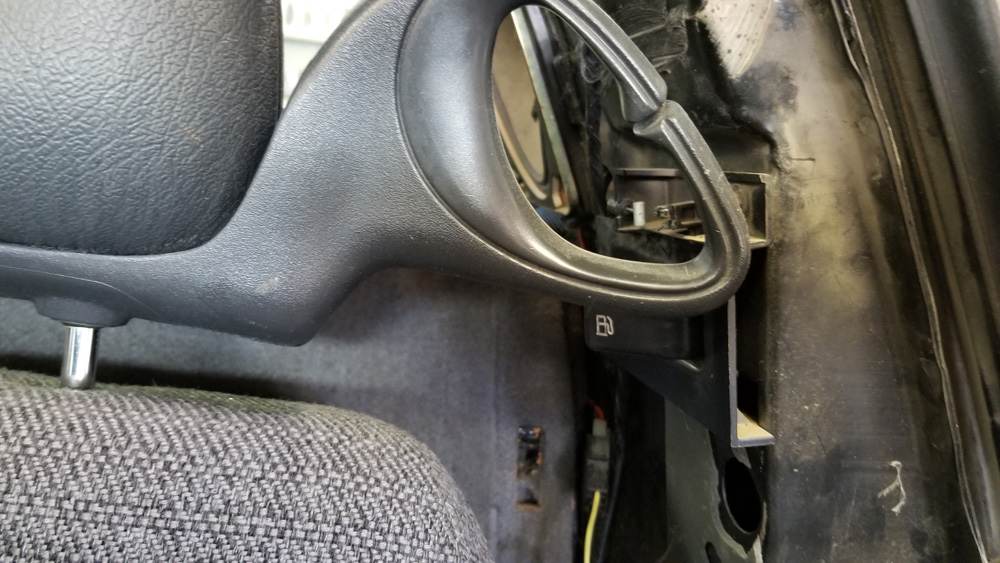
Pro tip: remove the Cavalier's seat belt guide BEFORE you put the seat in the car. I didn't, and when I sat down in the seat and moved it all the way back, that stupid guide broke the fuel filler door lever.
After all that, I've decided I'll use the Camaro seats instead. I'll take the Cavalier seats back to the salvage tomorrow. I've already taken the covers off the Camaro seats and washed them and tomorrow I'll just get a bottom from another Camaro to replace the damaged one.
[This message has been edited by Quad Raider (edited 11-26-2017).]
Here's a photo of the Camaro seats installed in the car. I think they look great and may just keep these covers instead of trying to find the gray/dark gray version. The only downside is that they look so good they make my original carpets look pretty worn. Once I get the car on the road I may spring for new black carpets.
[This message has been edited by Quad Raider (edited 01-17-2018).]
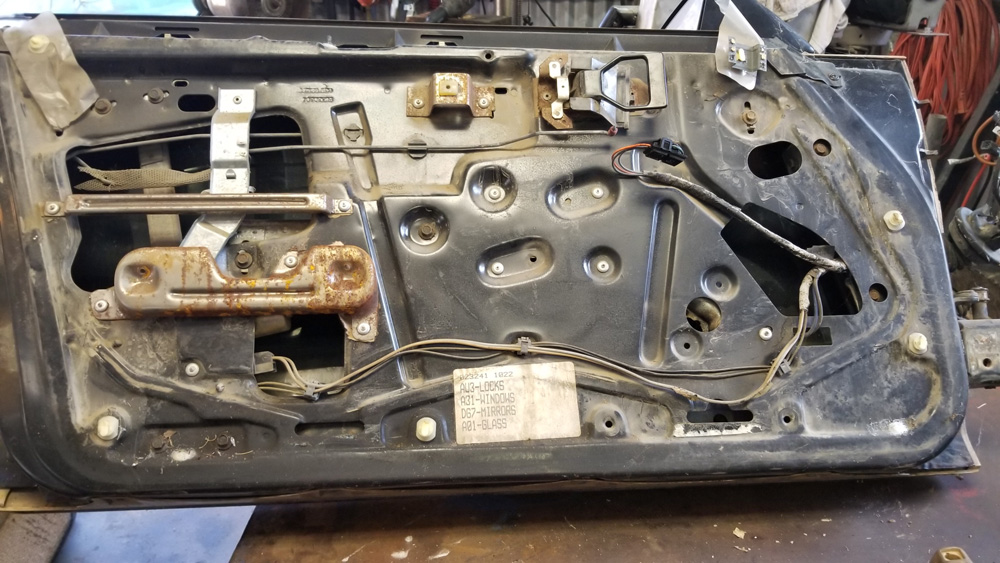
Since I have all the body panels off the car, I decided now is a good time to convert the manual windows to power. Five or six years ago I bought a pair of power-everything doors from a salvage-yard '86 GT. Nice to finally get them out and take them apart.
I'm amazed at how many doodads and gadgets there are in these doors.
The insides of this door are pretty clean compared to the doors on my '87. Makes me wonder if the salvage yard car was stored for quite a while before being junked.
I eventually removed the glass from my driver's side door so I could get the guides out, and to be able to clean everything. I figured if it's taken seven years to get to this point, I might as well take a little extra time to fix and clean things that need it.
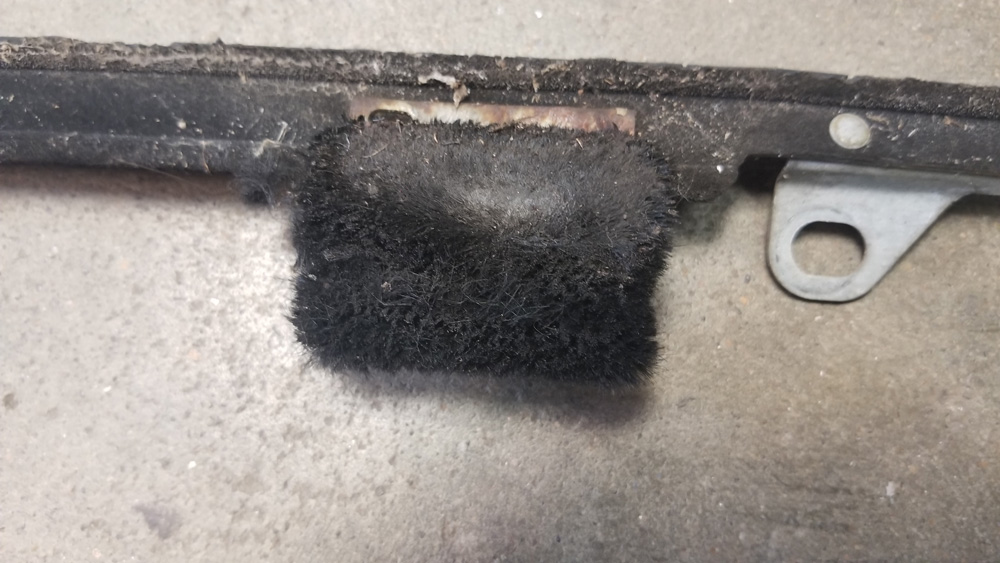
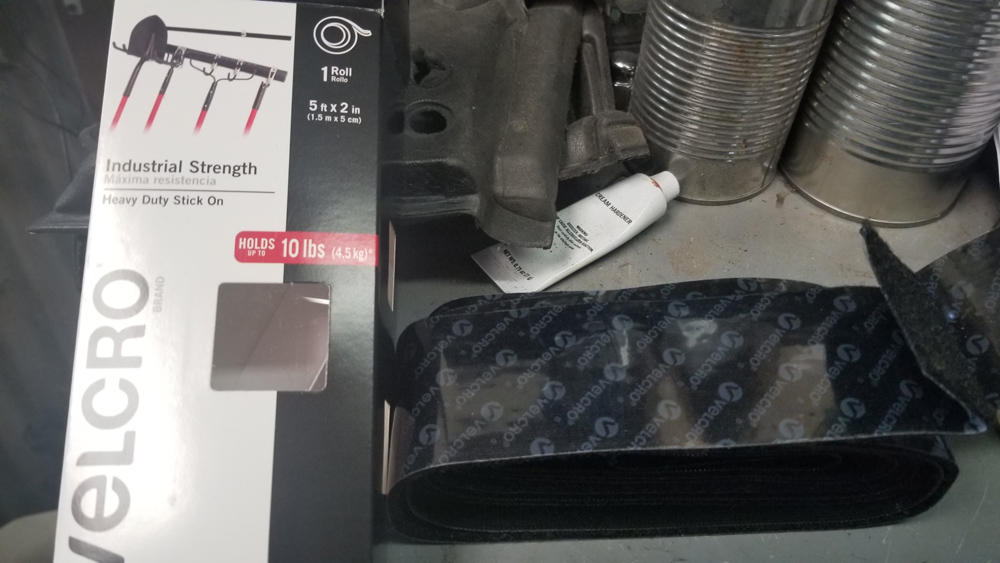
My guides were in bad shape, but I didn't want to buy new ones, so today I went to Walmart to try to find suitable material to replace the felt. The term "industrial strength" on the box caught my eye. It was about $8.
I just peeled the old stuff off, then wire brushed the metal.
The new stuff goes right on.
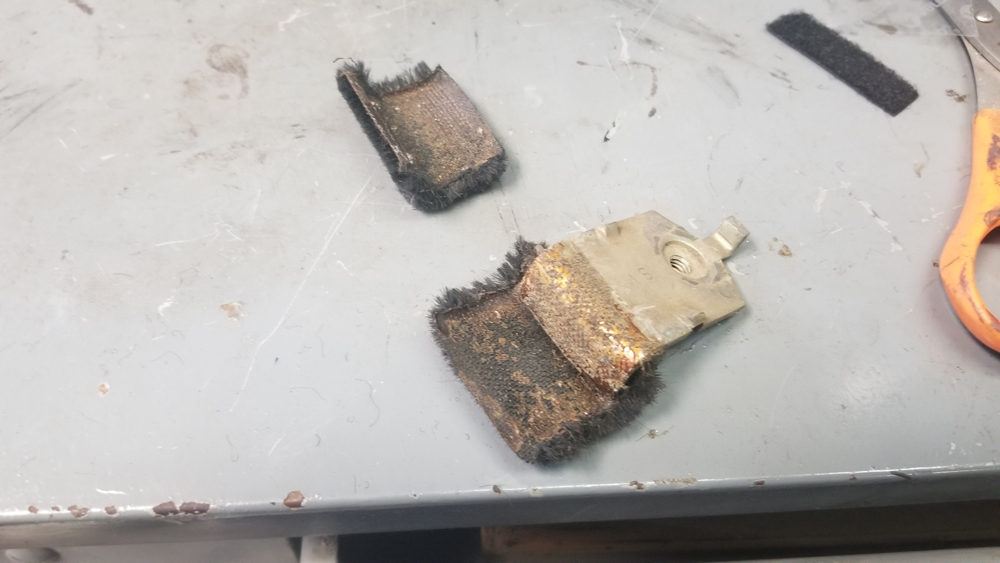
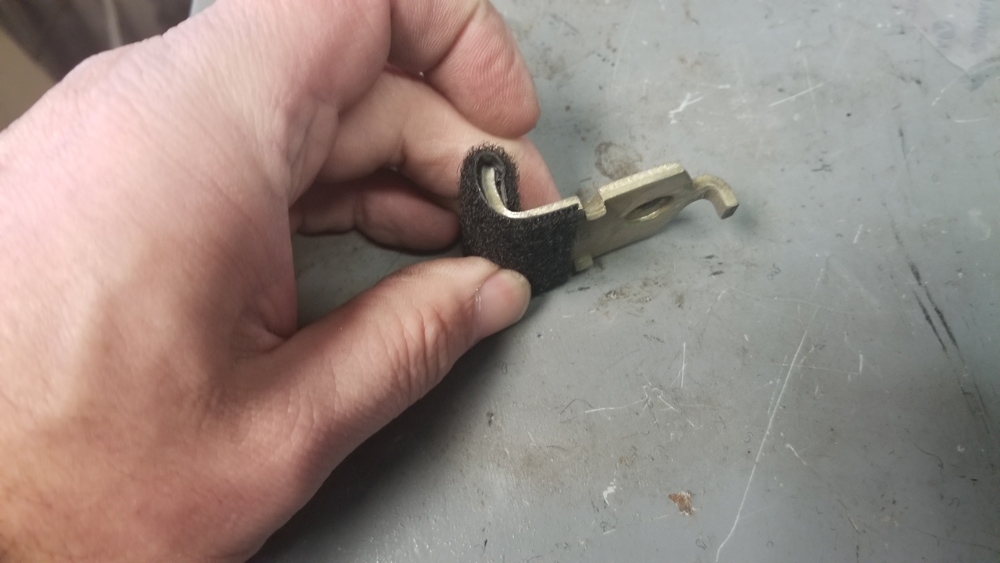
I was planning to use the same stuff for my DIY dew wipes, until I encountered a problem. The original wipes are in horrible condition.
The worst parts are the little rubber inserts. What do you all use to replace these parts?
I'll search the archive, but if anyone has any guidance about how to replace these rubber parts, please speak up.
[This message has been edited by Quad Raider (edited 01-14-2018).]
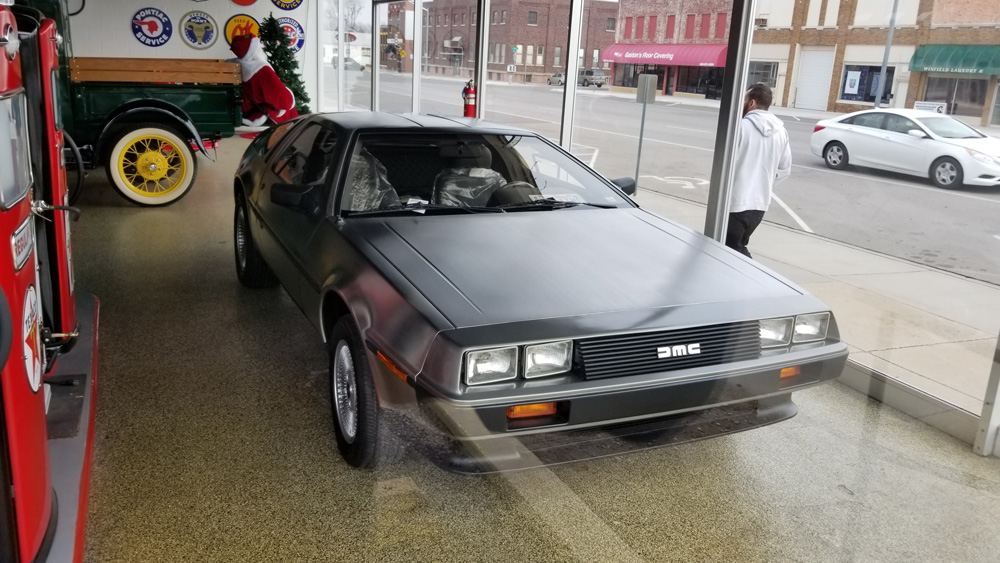
I had a week's vacation over Christmas, so my son and I made the 3-hour drive to Wichita to look at a couple Fieros in a salvage yard up there. On the way we stopped in Winfield, Kansas which is home to a guy who owns all kinds of exotic cars. He keeps them in an old storefront right on the main drag, and periodically trades them out.
Last time we were there, which was a couple years ago, it was full of Pontiac muscle: an early 70s TA, a couple '69 GTOs including a Judge, etc. This time there was something just as cool:
It looked brand new, like it had just come from the dealer.
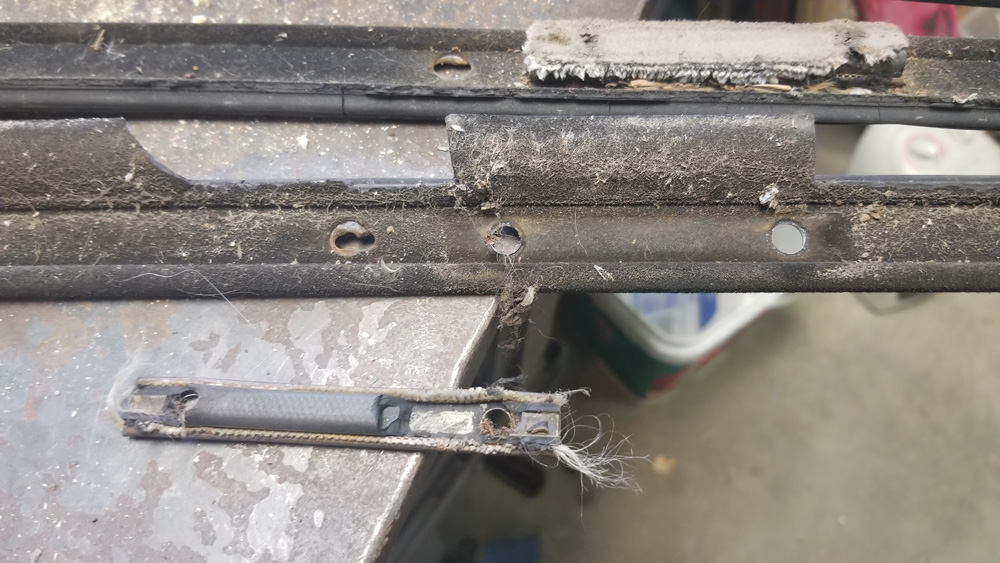
Spent most of the day working on the car today. I wet sanded several body panels, but also started working on my DIY dew wipes. I used the tips in this thread to order the parts:
A couple years passed before I removed my old dew wipes and I was surprised at how worn out they were, so then I figured I'd just order all new wipes. After a couple of days I changed my mind again (a common theme in this project), and decided to go ahead and use the parts I'd already bought to make my own. Velcro works great for the felt material, and it has adhesive on one side, making installation simple.
The one part I'm struggling with is the small guides. The felt is so stiff it crumbles off but the rubber underneath has turned to stone and will not come off the bracket.
At first I considered using vacuum hose to replace the rubber, but then found some weatherstripping at Home Depot that's shaped exactly the same, flat on one side and rounded on the other. It even has adhesive.
I may try burning the old stuff off.
I hope to finish painting and installing all the body panels in the next few weeks. I know that that will give me a huge emotional boost and help inspire me to finish.
I was cleaning out my computer yesterday and I found hundreds of photos I thought were lost. As I've mentioned, I accidentally deleted all the photos on my phone a few years ago, including most of the ones I took of my Fiero project. I must have saved them to my computer and forgotten all about it. Oh well.
Here's the first batch. They show how I set a Quad on the Fiero engine cradle to figure out how to mount it.
This Quad is out of a Grand Am, but I don't remember which one. If you're going to mate a Quad to a Fiero cradle, I highly recommend using a welding table. This table was a gift from my brother and it made the process much easier.
As you can see, the exhaust hump is very close to the AC compressor on the Quad, so most people cut it out and weld in a straight piece. I showed that process earlier in this thread.
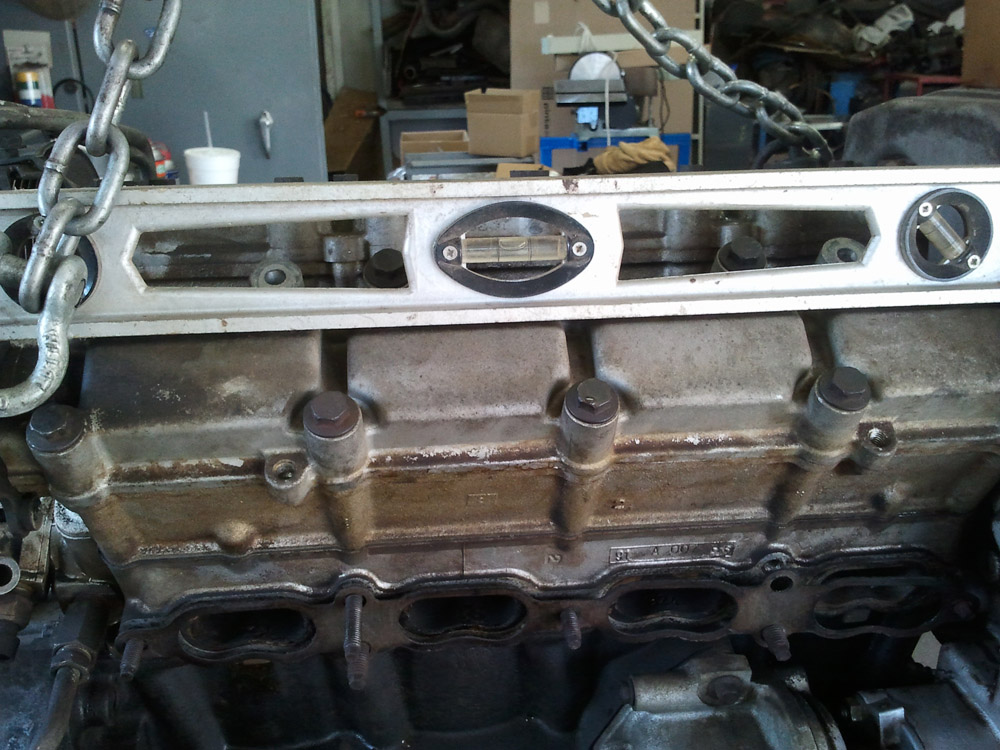
I used a level on the Quad's cam towers to make sure the engine was sitting level from side to side. It took some jockeying, but there's a sweet spot where both ends clear the cradle yet the top of the engine fits under the deck lid with NO modifications. It's difficult to describe but it does exist.
I used pieces of wood of varying thicknesses to get the engine level. It's been 7 years since I did this, but I think the bottom of the oil pan does not sit level, it's angled, with the drain plug at the bottom of the incline. The Quad is such a weird looking engine, I figured it made sense to have it sitting crooked in this way.
In previewing this post, I realized the cradle pictured in these photos is an '88 that I bought at the salvage. At some point I decided not to switch to the '88, because of all the other modifications it would require. It's obviously different from my '87, but the process is still similar.
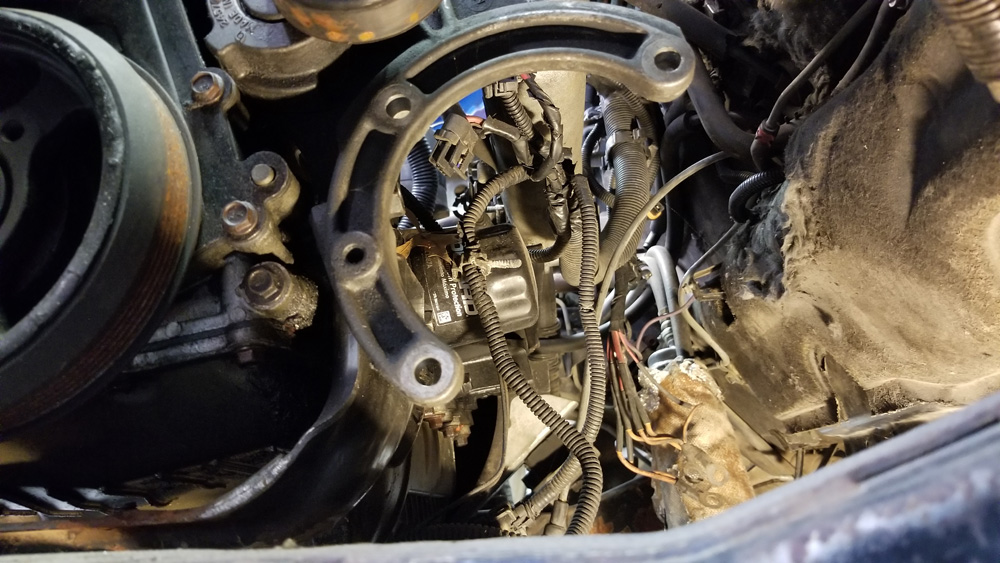
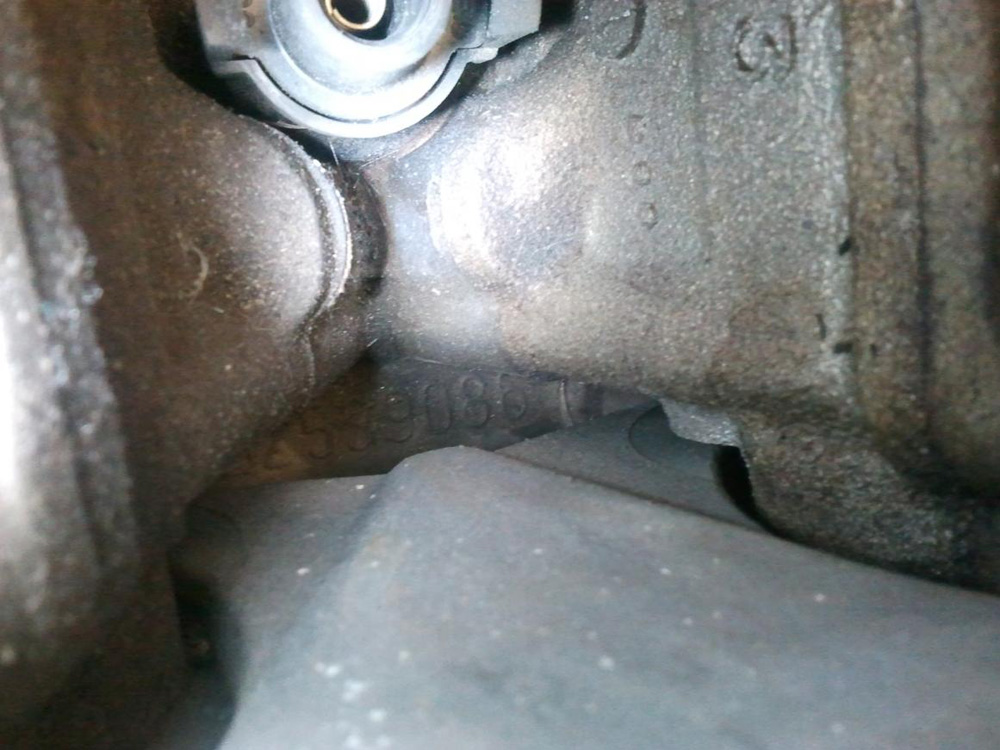
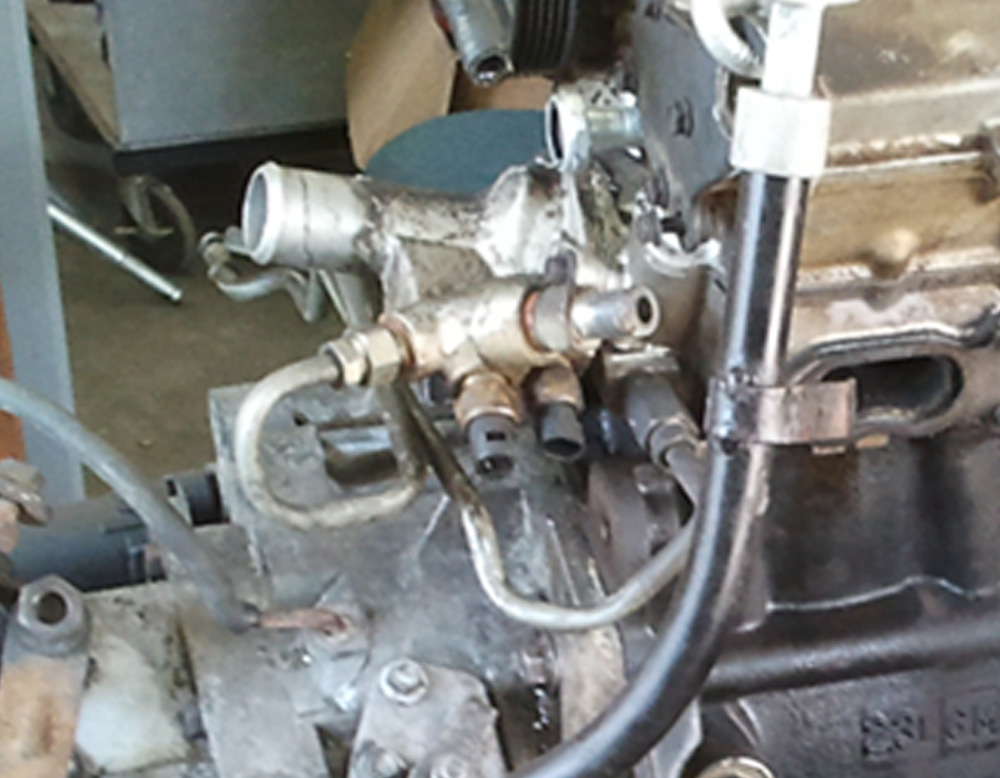
A quick note about one of the odd features of the Quad 4. They came from the factory with a coolant line that runs from the thermostat housing to the throttle body and then back to the head. The system was probably designed to warm the throttle body in cold climates, but it's not needed. It's common to remove the lines and plug the coolant fittings on the t-stat housing and head, and just leave the openings on the throttle body.
[This message has been edited by Quad Raider (edited 03-11-2018).]
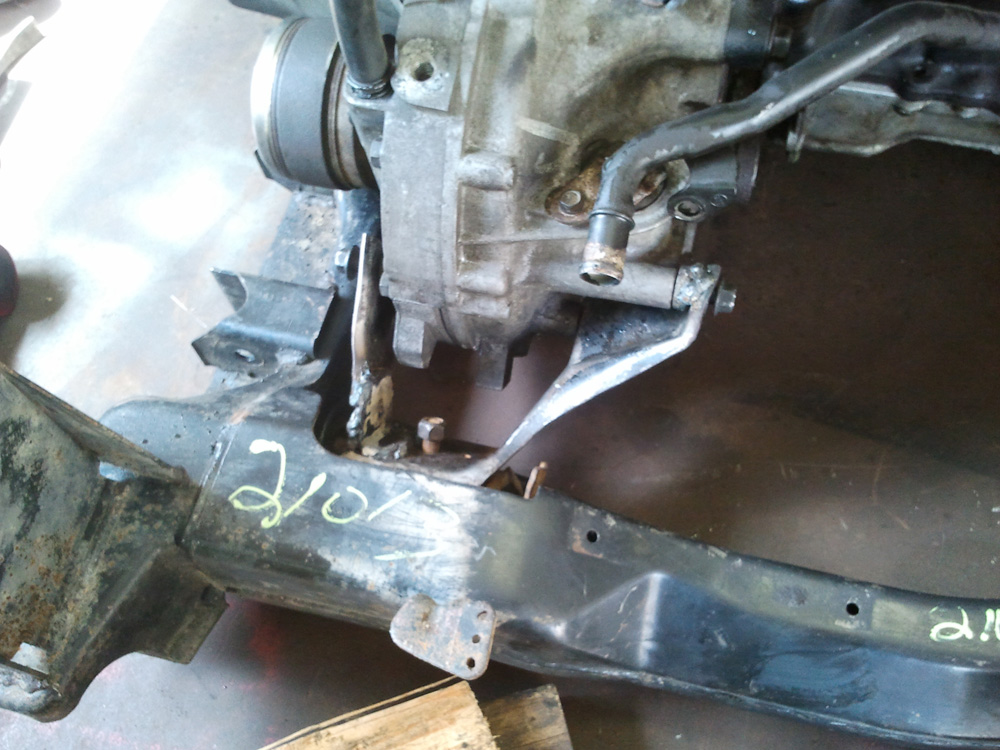
I found the whole series of photos I took when I modified the Fiero's transaxle mounts to fit the Quad's Getrag. I could've fabbed new mounts, as I've seen some other guys do, but I knew using the Fiero mounts as a starting point would be faster.
The Fiero's front transaxle mount won't fit around the Getrag's housing.
I used a piece of cardboard to make a pattern, then cut the Fiero mount.
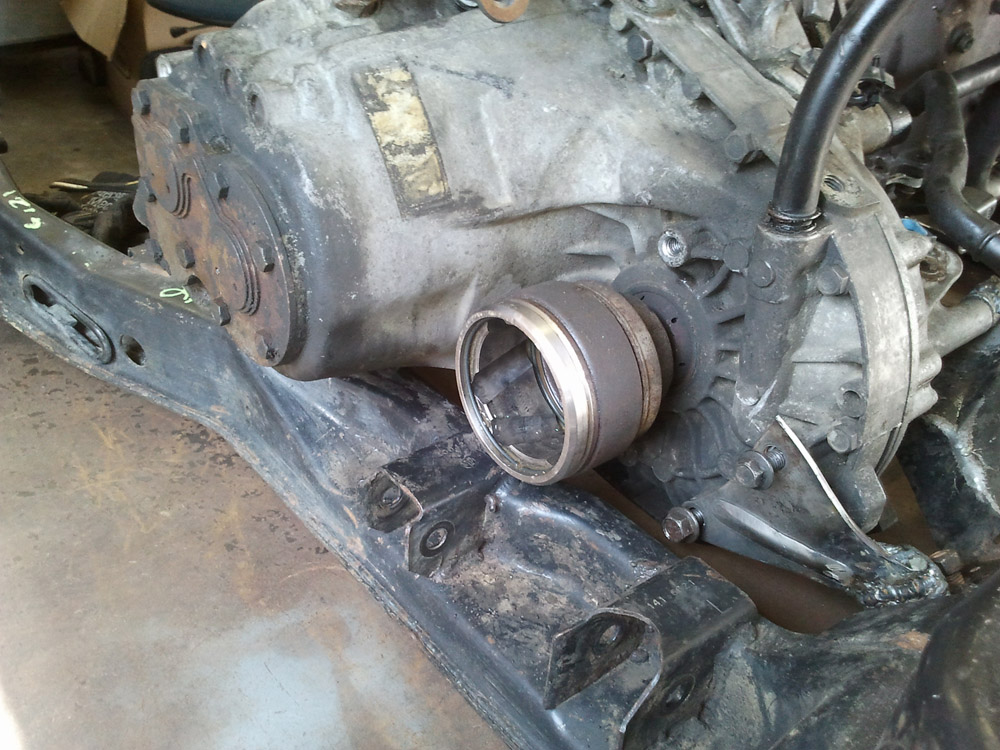
After cutting down the Fiero mount and attaching it to the Getrag, I decided what was left was too flimsy. You can see why.
Somewhere I have a photo of the angle iron I used, instead. Maybe I already posted it here. I'm too tired to check.
The rear mount would almost fit, but the holes were just a little off. I cut one side and welded in a small piece of angle iron to move the bolt hole about a half an inch toward the transaxle. I welded a spacer onto the other hole so it would fit tightly to the case.
I did all this work this way just to get the engine and transaxle mounted securely enough to put the cradle in the car to make sure everything fit without needing to modify the deck lid. It worked.
My plan has always been to pull the cradle out and go over these mounts again, either beefing up and beautifying what I've already done, or starting over to make something better.