I'm watching you Blooz! I've never been into one of these yet. Looks very interesting. That chain tensioner reminds me of the ones on a 2.3/2.4 Quad four. If it goes, look out. And great idea on the extension in the dowel trick. Nice!
I mostly have a collection of other peoples stuff. PBJs turbo set up, J Strickers wiring and intake, Ryans 7730. My N* fiero was built by a NC caddy mechanic, and the 355 body manufactured and factory installed by John Watson of Air Dynamics. Blooz is the expert here. We just have common interests.
[This message has been edited by dratts (edited 05-10-2010).]
If I was going to buy new pistons I would be looking at lower compression so that I could add more boost. As it is I plan to limit my boost to 5 lbs.
I may be wrong, but I think you'd have to have custom pistons made, or pistons from something else turned down. As far as I know it's only been two years now that anyone even makes stock oversized pistons for the N*. I'll get into that later in my thread, but I only found two company's that made them oversized. They're not cheap either... $80 a piece. Will's thread here www.fiero.nl/forum/Forum2/HTML/044924-6.html about halfway down starts getting into what he did for custom pistons. If you have the time his whole thread is a good read.
I was on the chrfab forum yesterday and there was an old for sale posting of a N* shortblock with custom rods and pistons for a boosted motor. It was going for $2500. That might be cheaper than rebuilding yours. Especially if you are thinking of boost. (Don't know if you are, but don't we all occasionally)
Thanks for the comments Lambo nut, Zac and 328 mera.
dratts: I'm actually a fair bit further along than my thread. My engine is complete at this stage, so the money's already spent. (I got the impression reading other people's threads that it's wise to start a thread only after you've got a fair bit of work done.) I dont' regret having taken it apart at all since my curiosity wouldn't have been satisfied any other way! All said and done, I only spent CDN$5000 to get the engine where I wanted it, which I don't consider to be out of the ordinary for a Northstar rebuild up here.
I know I keep butting in here cause you totally have my interest. I called about the chrfab forum engine and the phone # is no longer in service. I was interested for myself even though I own two used N*s. I know that I couldn't build one for any where that price.
Blooz, man that engine definantly falls into the "rode hard and put away wet" catigory.
Starting a thread after you've got a good start is a good idea, but is no garanty life won't get in the way, my N'star build has gotten so derailed that I won't even bump the thread anymore 'till I can actually work on the car again (maybe latter this year).
So now you’ve seen all the bad news about this particular engine, there were no more surprises waiting for me (whew!). To summarize for those not wanting to read the whole thread to date, the exhaust cams, cam followers, valves, and timing chain tensioner were worn out, as well, three pistons had broken ring lands. If that’s not enough hidden damage to make anyone think twice about just slapping a used Northstar into their car, then nothing will.
The last couple steps before my favorite part (the rebuild), were to remove the lower case half, and remove the crank. Removing the lower case half was actually a lot easier than I thought it would be. Cadillac machined several thin slots along the parting line to let you stick a screwdriver in between and pry the lower half off. The orange lines down the length of the block on either side are formed neoprene-like case half seals. GM found that they didn't seal very well so the first iteration of a fix was to employ an anaerobic sealant (one that doesn't need air to cure) on the orange seal and in between the case halves. That's the dark brownish-black stuff you see along side the orange seals. It's actually brittle and flakes off. Now GM recommends not using the orange seal at all and filling the groove with a new engine case sealant (AC Delco 88901148). It's a light grey silicone-like sealer that comes in a short caulking gun tube. More on that later.
This is the top side of the lower case half (this side mates with the block). You can see how the baked-on oil left a coating of varnish on the inside of the engine. It makes for some pretty cool pictures with neat colors, but the chemical cleaning would soon take care of that.
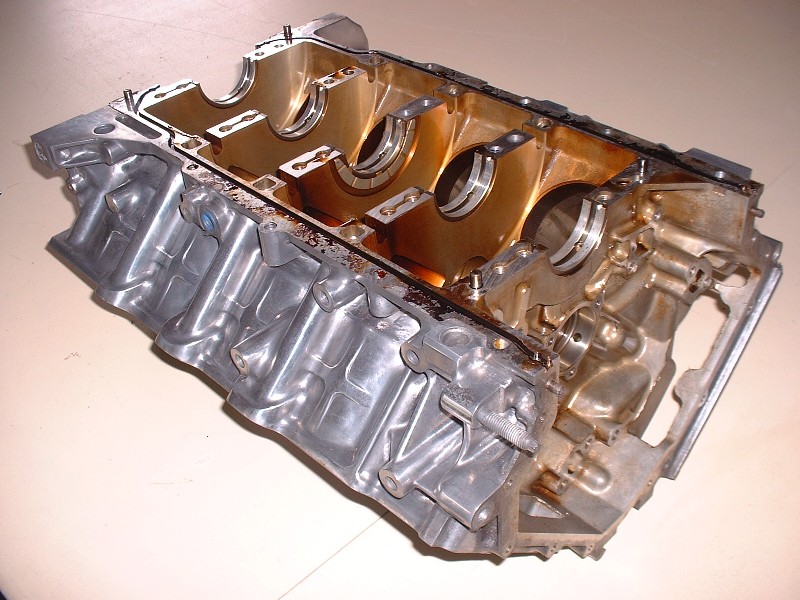
This is the underside of the lower case half. This is the side that mates with the oil manifold plate. You can see the reason for the oil manifold plate if you look carefully. There are grooves machined around the main crank bearing bolt holes in the foreground that interconnect with the ones in the background. Oil to the main bearings is pumped in these grooves, around the bolts, and up to the main bearings. The oil manifold plate turns these machined grooves into sealed channels. The thin darker lines are just old sealant traces to separate the various passages from leaking and losing pressure.
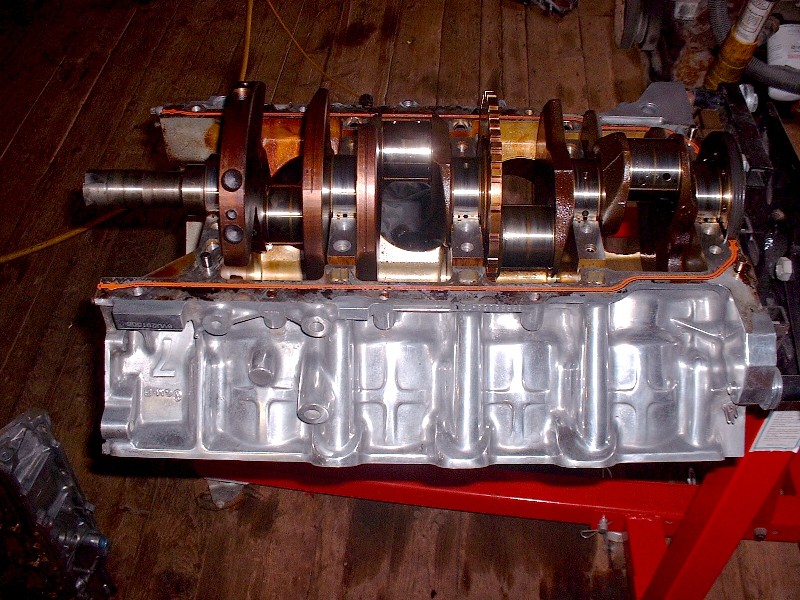
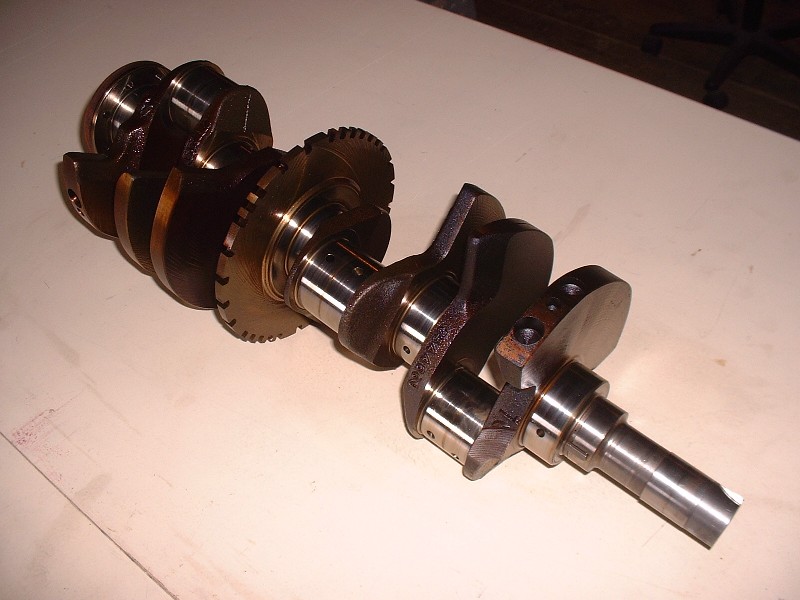
So here’s the crank once it was lifted out of the upper block half. It needed the main bearings to be turned down 0.25 mm (0.010") to get rid of some light scoring, but the connecting rod journals only needed a polishing. For those of you who aren’t familiar with newer engines, the machined disk in the middle of the crank that has the square saw-teeth is the rotating portion of the crank position sensor. Two stationary magnetic probes bolted to the side of the the engine “read” the position of the teeth as they pass by and send the information to the PCM for spark control, misfire detection, etc.
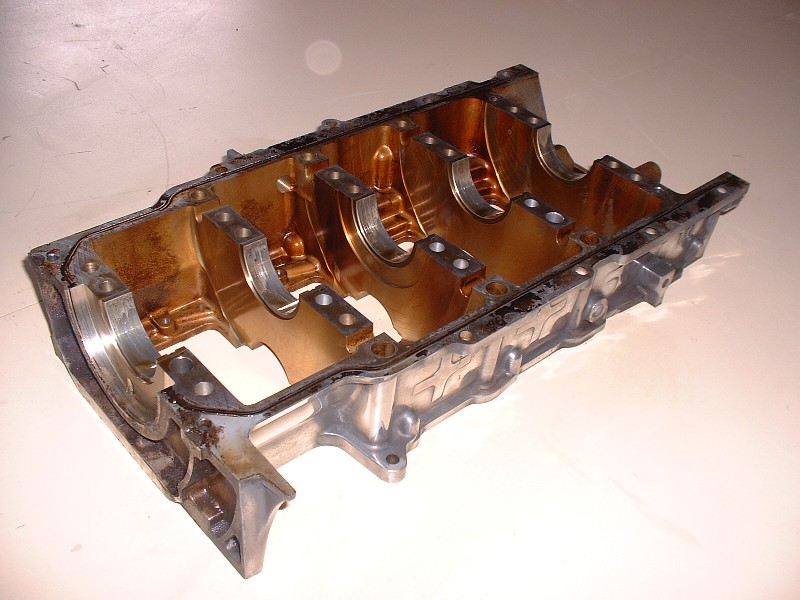
Here’s the upper case half (upside-down). Notice that the crank thrust bearing is located on the number three main bearing web. What concerns me somewhat is that the thrust bearing is very thin, and only has a thrust surface on the bearing half that fits in the top half of the case. If you scroll two pictures, you’ll notice that the #3 bearing in the lower case-half doesn’t mirror the bearing half in the upper case. It’s missing the thrust flange. I suppose that’s perfectly fine for an automatic, which doesn’t see much axial loading of the crank, but with a manual transmission there’s considerably more every time you push in the clutch. I hope this doesn’t cause problems in the future.
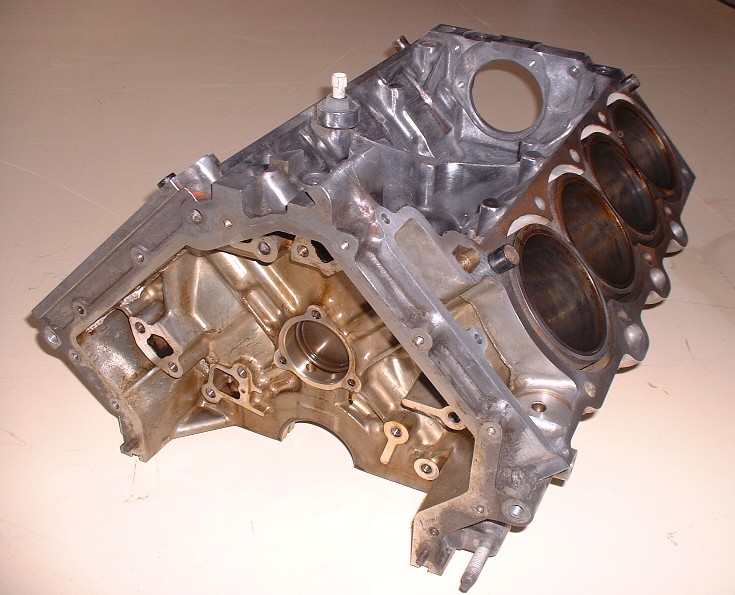
Lastly, here’s the top view of the upper case-half. It’s amazing how light-weight this thing is… one hand to move it around, no problem. Looking in the bores, it’s clear that the original cylinder honing was glazed-over in the one axis and worn in the other. Next stop: the machine shop for measuring and machining.
What engine management system are you going to be using? If you're going to use the 7730 you can ditch the knock sensor in the "lifter valley" as the one it uses threads into a boss on the back side of the motor.
I'm still on the fence with that one. I'm waiting for the latest possible moment to decide in case something new comes along. As it stands, I'd like to stay OBD2 and will soon check out Wester's Garage's claim that for $500 they can recode a stock Caddy PCM. But thanks for the info.
I'm still on the fence with that one. I'm waiting for the latest possible moment to decide in case something new comes along. As it stands, I'd like to stay OBD2 and will soon check out Wester's Garage's claim that for $500 they can recode a stock Caddy PCM. But thanks for the info.
I didn't have much luck with Westers on my Ramjet engine. They advertized they could reflash the MPFI controller for the crate engine and I asked about and purchased a 7730 prom for my Ramjet... all I got was a base TPI tune that didn't even come with the correct vortec head timing tables... total disappointment. But at the time I wasn't up to speed on tuning to know what they gave me... just knew it didn't work as well as it should.
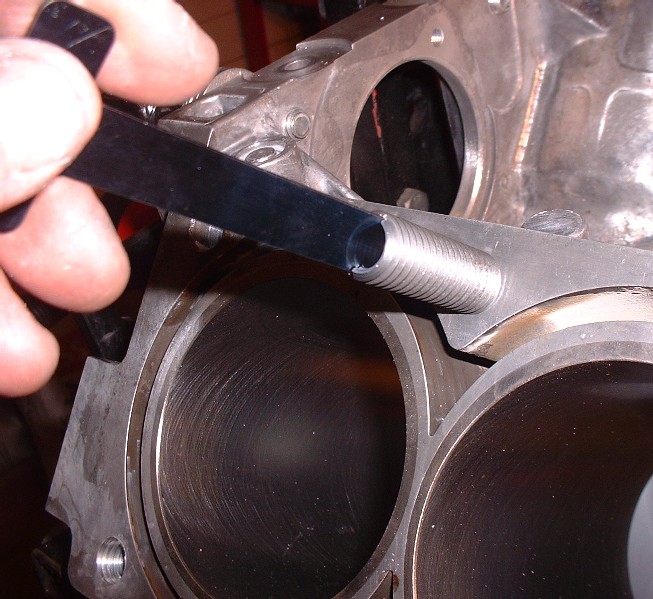
the proper way to remove dowels is fill them with grease then use a piece of steel rod that fits snug into the dowel then drive it in with a hammer and the grease will hydraulic the dowel right out
...and if that doesn't work, it'll squirt you in the eye with a jet of high pressure grease. But seriously, there's no way my dowels would've come out that way. They were an extremely tight interference fit.
[This message has been edited by Bloozberry (edited 05-06-2010).]
I'm still on the fence with that one. I'm waiting for the latest possible moment to decide in case something new comes along. As it stands, I'd like to stay OBD2 and will soon check out Wester's Garage's claim that for $500 they can recode a stock Caddy PCM. But thanks for the info.
Here are the some of the available Northstar Engine Management options:
My personal perceptions and comments on these options are: 1. The CHRFab Holley works, but is crude compared to OEM computers. 2. Ryan Hess ECM has also been proven, but I personally don’t like 80’s technology batch fire ECMs. 3. AJ’s LS1 PCM from the Shelby Aurora 4.0l project has a lot of potential, even for boosted applications, but AJ became quiet in 2009 and I haven’t seen a completed implementation yet. 4. The Webster’s tuned OBDII Northstar PCS came up recently, but again I haven’t seen the final word that it’s working yet. Don’t know if manual transmission or boost will be possible. Anyone with comments or updates on these options?
Might want to check with Ryan @ Sinister Performance. He found the GM program for the Aurora/LS1 ecm that AJxtcman was using and might be able to assist.
MEFI 4B will run the N* as well. That is currently what I have for mine, as it is the 2002 style.
--Allen
Jebus...I see what you were saying about that little guy being a costly bugger. $1,300 and you're not even into a harness yet. I still think I'm going to try my luck with a Shelby Series-1 09354896 PCM from Lyndon here shortly. Otherwise, if it weren't so damn expensive, that MEFI would be right behind it. I just love it because it's so tiny. About the size of two packs of smokes, I'm told.
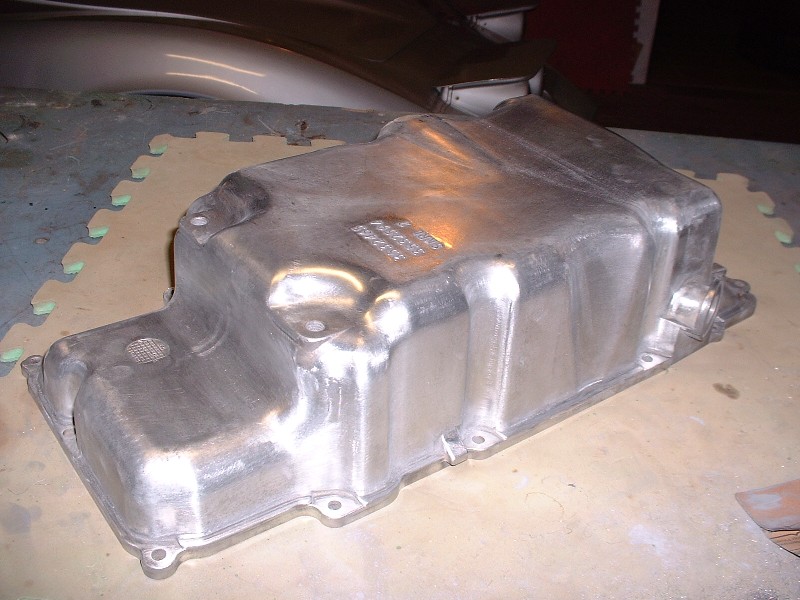
OK, so I lied. The next stop wasn’t actually the machine shop… although “machining” work was done. At this stage I decided that if I was going to polish the engine block, now would be a good time so that the chemical cleaning later on would also take care of the grinding and polishing growlies. I started with the oil pan knowing that if it turned out to be too tedious a task to carry on with the whole block, that at least some of it might show, albeit only me and the local garage techie who does the annual inspections would ever know. I started by sanding the big casting lines off it, then got progressively finer with the sand paper until I stopped at 400 grit. That took the better part of 12 hours to do. Here it is part way through around the 220 grit phase.
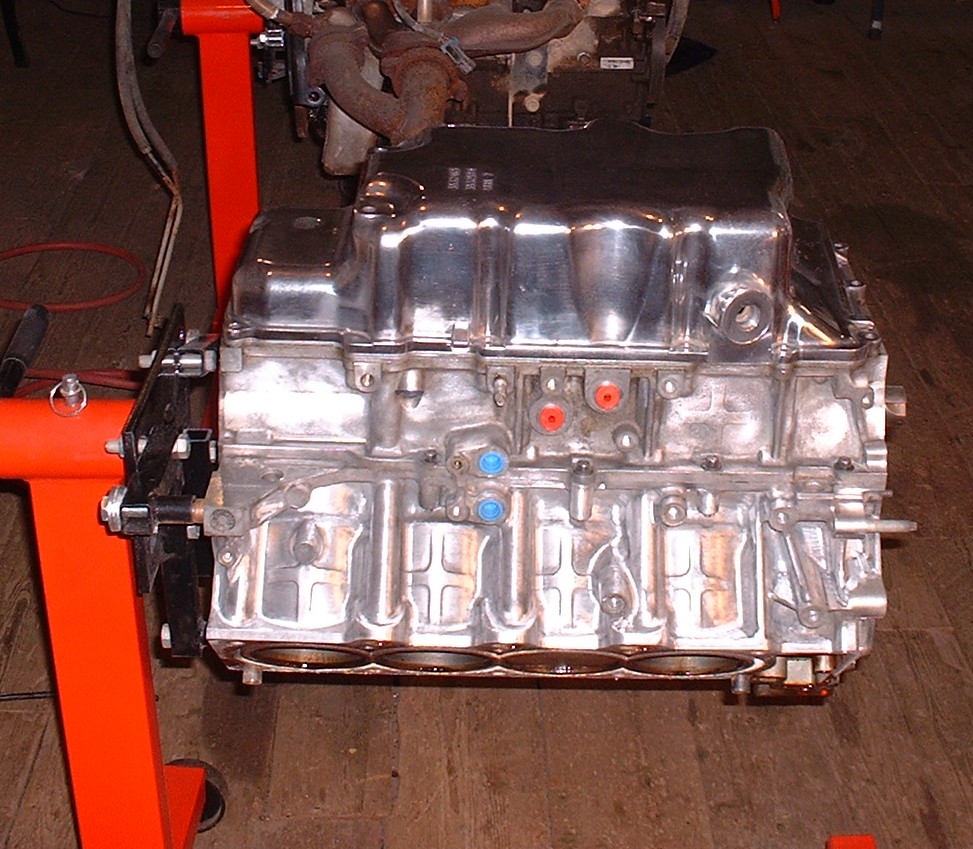
Then I broke out the polishing compound and my 8” bench-mounted buffer and had-at-it for another 3.5 hours. I found that the oil pan isn’t made of the highest quality aluminium and there are swirls of different colors here and there. But that’s OK because at 120 km/h only the bugs at road level will ever see it… just before they get sucked into the vortex left behind by my rear bumper. I find photographing polished aluminium always disappointing; it never looks anywhere near as nice as it does in real life. I loosely assembled the engine block back together so that I could work on it at a comfortable work height on the engine stand. This is what it looked like with the pan done and halfway through the block sanding process. All said and done, the oil pan took 15.5 hours while the block took 25... sure makes the winter pass by quickly, and if you're a thief, it's a good way to get rid of your fingerprints too.
The next messy task was taken straight out of a page from Will’s Northstar build thread, and I quote:
“When the Northstar was being designed, GM found that holes in the main bearing bulkheads to allow each bay to exchange air with its neighbors were practically a necessity. Because of the Northstar's lower crank case design, each main bearing bulkhead comes down almost to, if not touching the surface of the oil, essentially sealing off each bay from its neighbors, dramatically increasing pumping losses. In testing otherwise identical prototype engines, it was found that engines without windows gave up something like 30+ HP to engines with windows.”
He goes on to explain more about this so check it out here if you want the full scoop: www.fiero.nl/forum/Forum2/HTML/044924-6.html In summary, there’s two different sets of windows; one small U-shaped set on each side of each main crank bearing web, and another much larger circular set through the block where the cam would otherwise be on a cam-in-block engine design. The bottom line is that these window passages have sharp edges that don’t optimize the flow of air through them. A simple hotrodding trick to squeeze a few more ponies (more like hooves) out of a Northstar is to radius the sharp edges to enable better flow. While I didn’t go quite as whole-hog about it as Will, here’s the results of my effort. I found that a high speed cutting bit in my air die grinder made quick work of this… in fact I had to “hold-back”.
These are the larger windows. They’re a little awkward to do because the adjacent webbing keeps getting in your way.
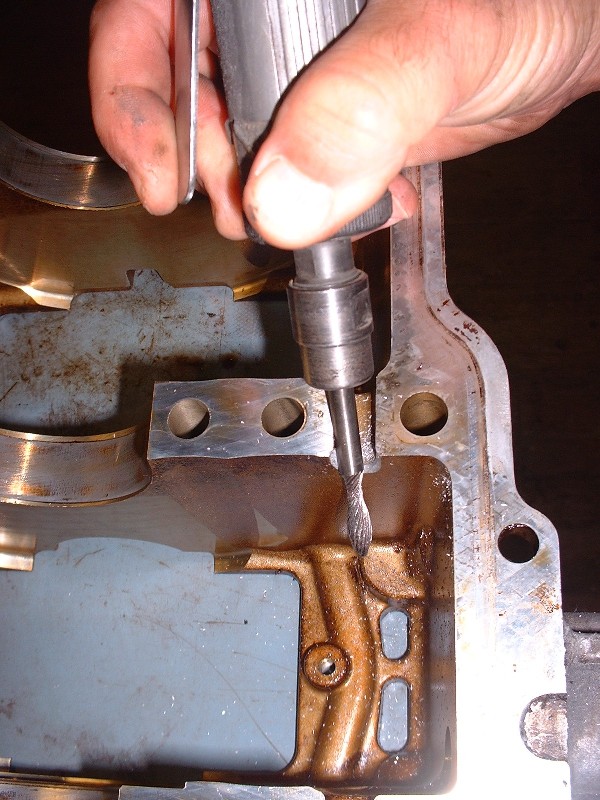
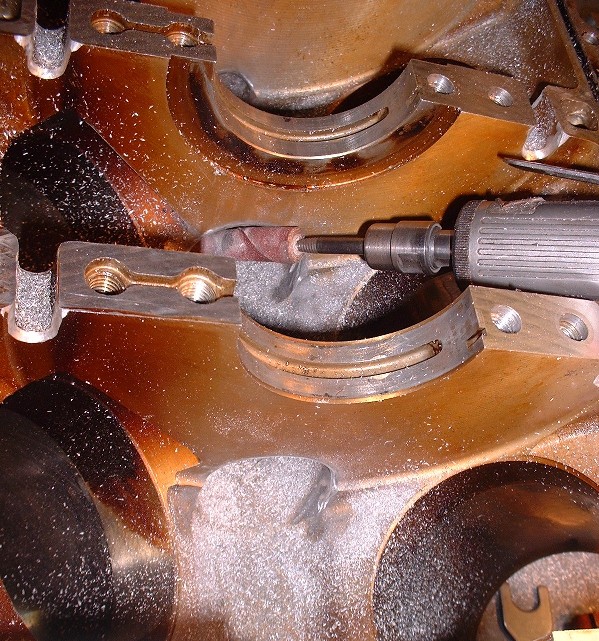
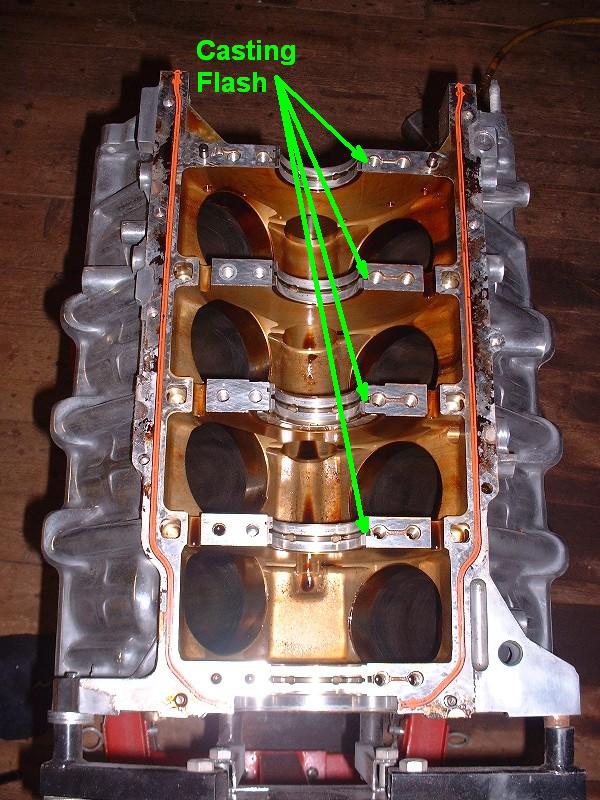
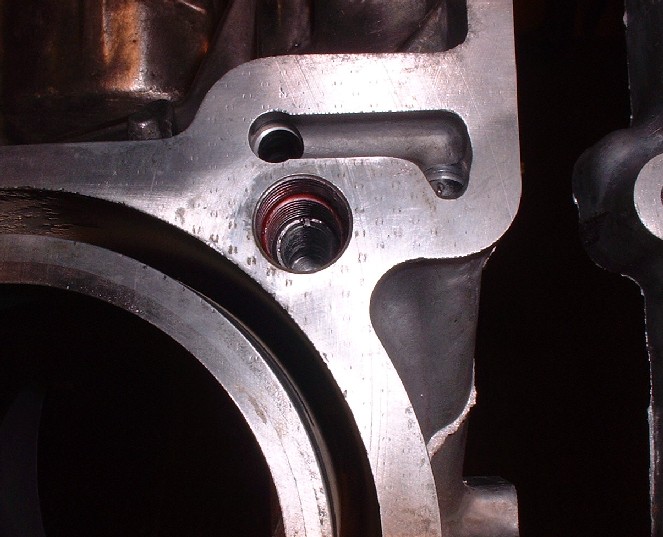
Lastly, in my search for any other little improvements, I found casting flash in all of the oil passages around the main bearing bolts. It wasn’t serious, but clearly an impediment to the oil flow up to the main bearings. Here’s a general picture to orient you with respect to where I found this problem.
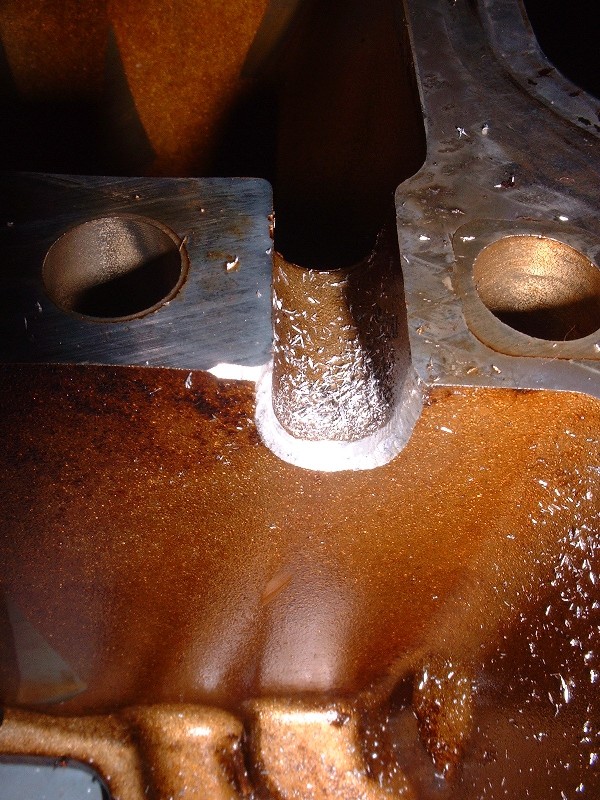
And here’s a close up view of the casting flash. This passage was the worst one but all of them had some to one degree or another.
A one-second twirl of a little dremel router bit took care of the offending metal. This is before I cleaned it up with a bit of sandpaper, but you get the idea.
Originally posted by 1986 Fiero GT: Jebus...I see what you were saying about that little guy being a costly bugger. $1,300 and you're not even into a harness yet. I still think I'm going to try my luck with a Shelby Series-1 09354896 PCM from Lyndon here shortly. Otherwise, if it weren't so damn expensive, that MEFI would be right behind it. I just love it because it's so tiny. About the size of two packs of smokes, I'm told.
I picked mine up for much less than that new, and UNLOCKED which is a huge deal. Most people that you are going to find that sell you the, what I call the muffy, are going to lock it. I had a buddy that had the program / cord to interface with it as well and picked that from him so that I have access to the whole kit and caboodle. I bought the plugs to make the harness, as I didn't know where I wanted to put it and I didn't want to risk having to rip it apart after paying to have it completed.
It is infact about the size of some smokes, which as we all know we should not know what their dimensions are...
quote
Originally posted by joshua riedl: I've done buisness with westers. I wouldn't consider them an option.
Please elaborate, as I know there are a few here that are seriously considering spending more that the cost of a super sized happy meal with this shop, myself included.
Blooze - sorry for the thread jack, and GREAT thread - I've always wondered what was inside these things but have been too afraid to open it up for fear of what it would cost to put it back together.
------------------ Is this where I insert something witty?
My setup was obd1. Running a 3900 with a 3.4tdc computer. He knew ahead of time and agreed to do the work. He basically deleted the egr and evap and sent it back for $300. We exchanged emails for a while and as politely as I could tried telling him it was running way too rich and has 28lb injectors, and like a lot of people doing the same thing for too long had an attitude. Anyway, the money was a waste and the support was non existant. If there are more opinions on the matter I will be glad to PM but this is a very interesting thread and don't want to take up any more space here. Great build!
Great work Blooz...!!! Im following, your a patient perfectionist with an eye for detail, all the polishing looks fantastic..!! Good, clear pics with descriptions, really interesting..!!
Please elaborate, as I know there are a few here that are seriously considering spending more that the cost of a super sized happy meal with this shop, myself included.
...and me. I still haven't bought anything from him yet, so we'll see.
Any more leads on another unlocked MEFI-4B, haha? There's nothing on eBay and everybody on forums wants like a grand. No thanks.
While I was waiting on new head bolt inserts, I decided to run the block out to my favorite machine shop for cylinder honing and to have it checked out generally for squareness and trueness. This place doesn’t look like much from the outside, but it’s a whole different story on the inside. The place is called A&J Armstrong Machine Ltd and the line up of trailers hauling Pro Street, NASCAR, Top Fuelers… you name it, parked outside on any given day is amazing. He gets business from across the US and Canada daily. To walk in and see the tens of millions of dollars worth of CAD, CAM, & CNC machines whirling turning and doing their thing is out of this world.
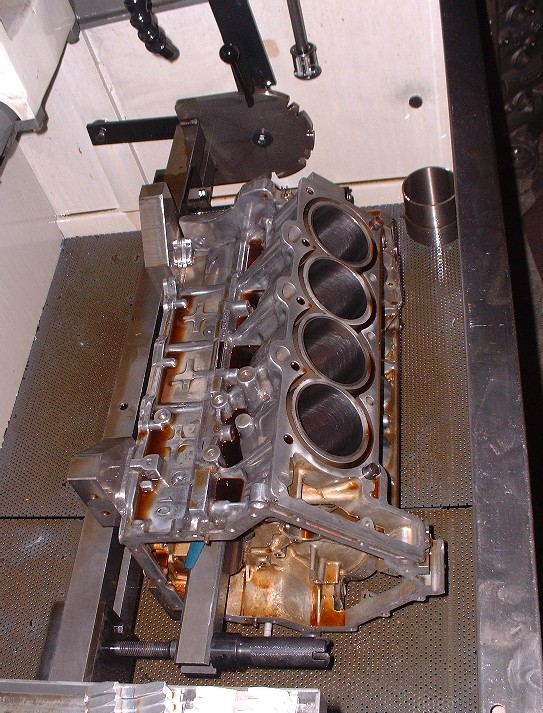
Anyways, with all the talk here on PFF about how important it is to find a machine shop that can do a proper bore and hone on a Northstar, I knew he’d be able to satisfy my need. He measured the cylinders up and found that to bring them back into round he’d need to over-bore by 0.25 mm (or 0.010”). In this case though, it isn’t really bored, but rather just subjected to an extensive hone job. I had told him of the especially hard cylinder liners and that only aluminum oxide stones were going to cut the biscuit. Well, forget the silicon carbide stones… forget the aluminum oxide stones… he dug out the 280 grit diamond hones for my engine. His machine is fully automated too, continuously measuring, honing, and truing at the same time by cyclically varying the stone pressures to render the cylinder round, while the operator just stands by and watches. Here’s the block sitting in the bed of the honing machine after doing one bank.
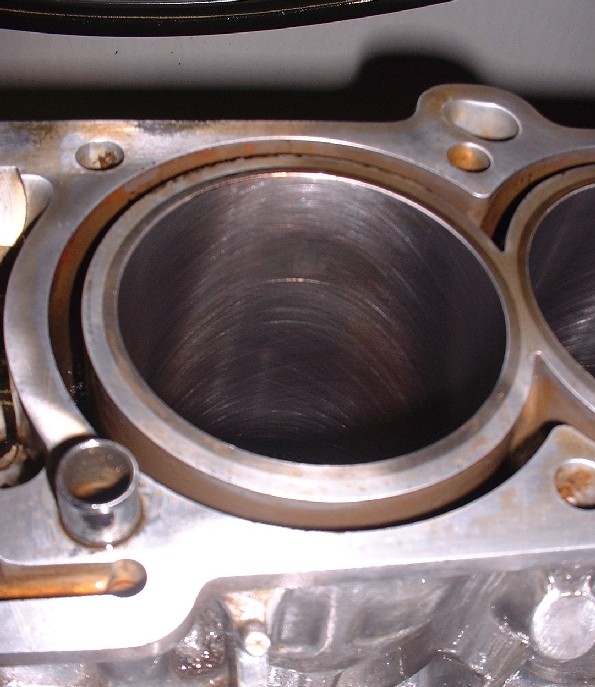
And here’s what a typical cylinder looked like up-close after it was done (albeit a little out of focus).
At this point, I opted not to get the block chemically cleaned yet since the machine shop couldn’t guarantee that all my hard work polishing the block wouldn’t be tarnished or slightly etched for that matter. But that was OK since I had a back-up plan… and besides, I still needed to do more dirty work… the long dreaded head bolt inserts!
For head bolt inserts I was trying to save whatever money I could by dropping in on the local dealership and sweet-talking them and showing them pictures of my project before springing the question of potentially “borrowing” their Timesert tool kit. (In case anyone wasn’t aware, the Caddy Timesert kit is made by Kent Moore (p/n J-42385-500) and retails for $770!!!) In exchange, I would buy the actual inserts from the dealership at $7 each X 20 inserts for a total of $140 they wouldn’t otherwise make off me that day. I had one foot out of the Service Dept door with the kit under my arm and on my way to the parts counter when the service manager stopped me in my tracks. Dough! So close. He said they couldn’t lend me the kit at all, fearing it would set a “dangerous precedent”, but he would see about getting me a cut-rate if I let the shop do the work for me. Uh-huh. The “great deal” turned out to be a half-hour labour per hole X 20 holes X $70 an hour, plus $140 of inserts, plus taxes… at, you guessed it, just shy of $1000, IF all went well. Just then, the Kent Moore kit suddenly sounded like a steal.
According to another PFF’er here who’s a Caddy technician (AJxtcman) about 50% of the blocks get junked during Timeserting because of porosity. The factory procedure calls for initially drilling and tapping for a fine thread insert, but then if too much porosity is found, a larger insert with more aggressive threads can be substituted after re-drilling and re-tapping. But even then, there’s a distinct possibility that the larger insert won’t solve the porosity issue in the vicinity of the head bolt.
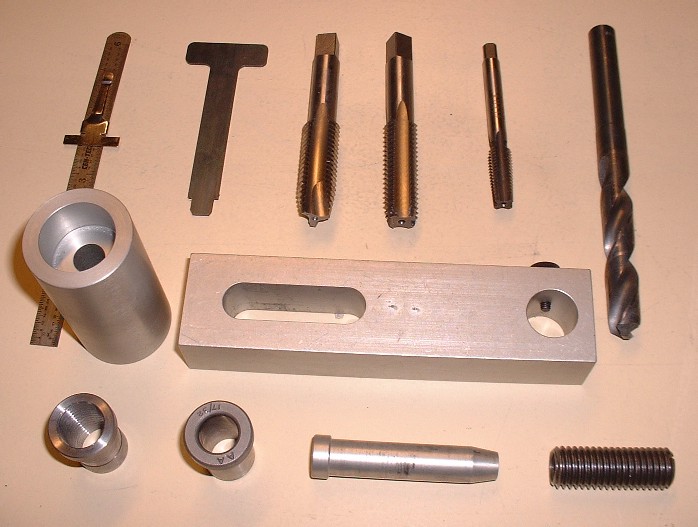
Anyways, it was about at that time I PM’d several PFF’ers who had done Timeserts themselves seeking anyone who would lend or sell me their tool kit. While nobody stepped up (and I don’t blame them, but I had to try), IXSLR8 (Dave, a PFF’er) put me on to Norm Huhn (www.huhnsolutions.com) who’s developed his own insert kit that’s marketed as being superior to the Timesert kit. His inserts have an even larger diameter and coarser thread than the over-sized Timesert kit, giving his inserts greater load spreading capacity and holding strength. The best thing? His entire kit, including 21 solid inserts and the optional bore-alignment jig, was only $500 delivered to my door after taxes. Here’s what the kit looks like (I know, I know... $500... doesn't look like it goes very far... but this is a Northstar! Everything is more expensive.)
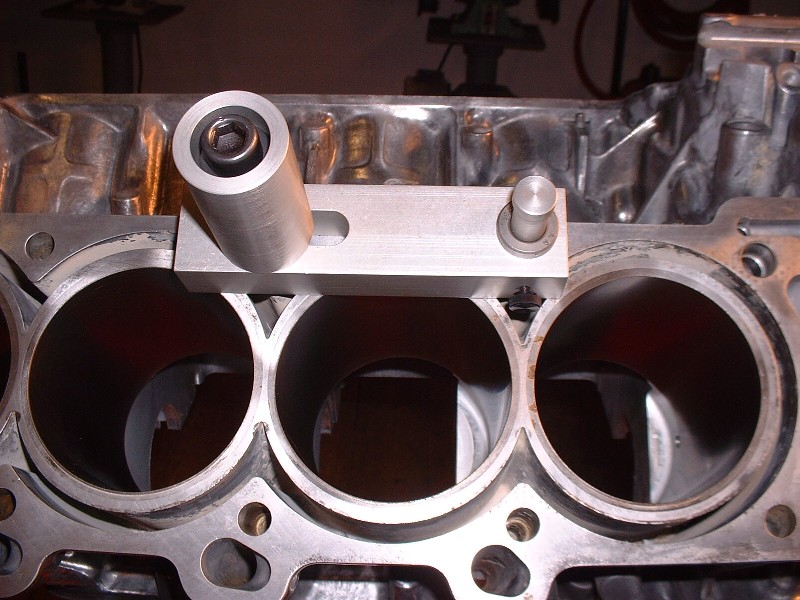
The jig is bolted to one head bolt hole using an old head bolt, and is swivelled around to drill and tap any of the adjacent holes. There are separate collars and a guide pin that slides through the jig to accurately locate the jig before drilling and tapping since both tools have different diameters.
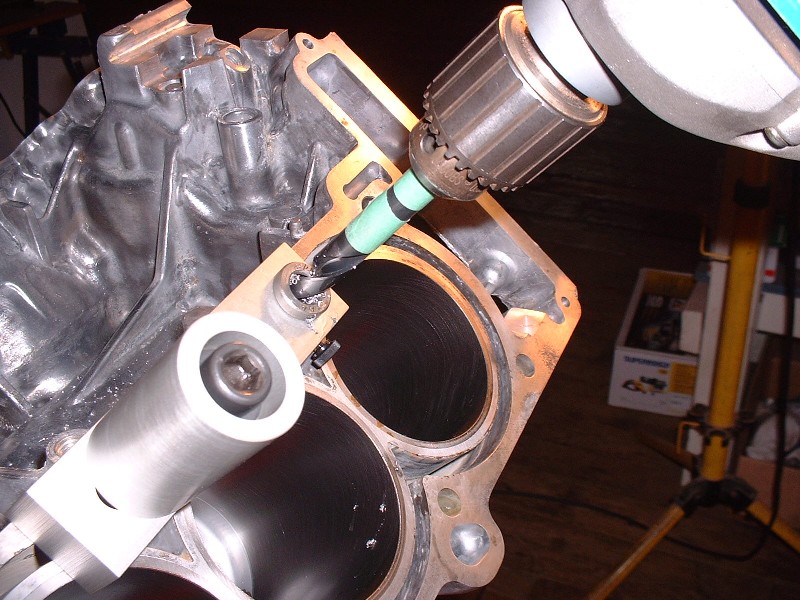
The instructions say that because of the depth of the holes, the soft nature of the aluminium, and the aggressive pitch of the drill bit, you have to drill without using a lot of pressure and you have to pull the bit out and clean the flutes three to four times before hitting the bottom of each hole. If you don’t, the shavings accumulate and gall-up the hole and can cause you problems when tapping. I found this to be good advice. The other thing to be aware of is that it takes a drill with a 1/2" chuck, not the run-of-the-mill 3/8" chuck.
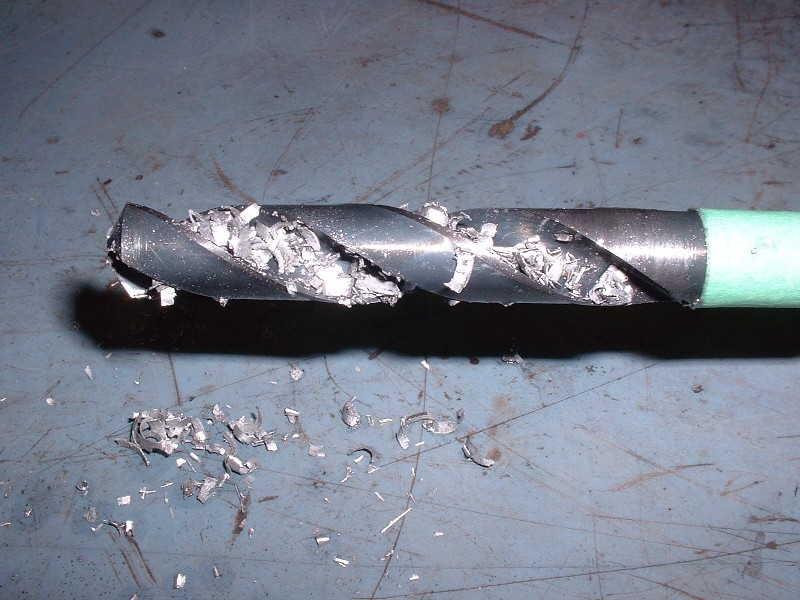
Here’s the nature of the shavings that came out… the bit really bites into the block and I found that if I placed any more than a light pressure on the bit, it would bite hard into the block and twist the drill right out of my hands. Notice the tip of the bit… Norm even thought about removing the cutting edge from the tip to prevent you from going any further down into the block than the original hole. As an added precaution, I stuck a piece of masking tape on the bit to mark the maximum depth of the hole.
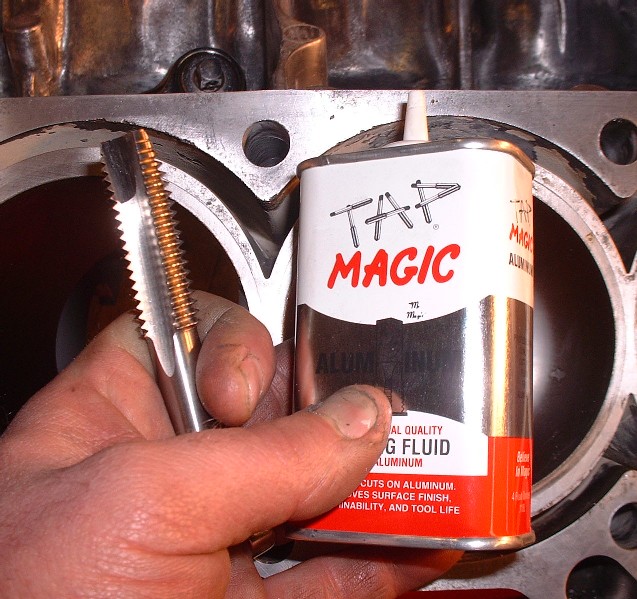
After drilling out the factory threads, the next step was to tap the new holes for the inserts. Norm’s kit also included the tapping oil and the Locktite to secure the inserts in place.
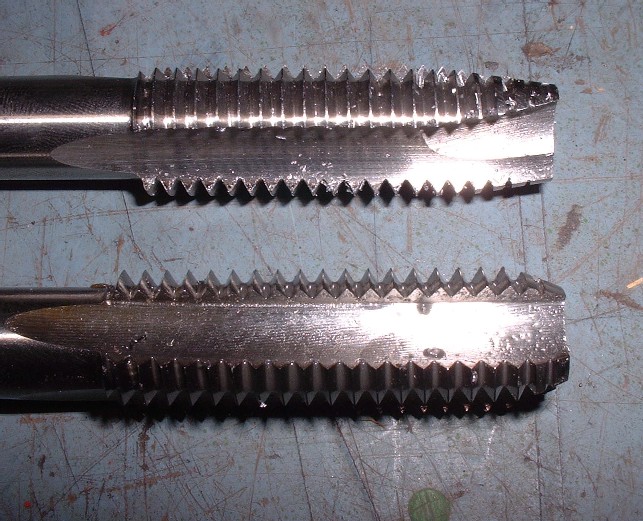
Here are the two taps he provided with his kit. Notice that the top one is more tapered at the end than the other. This is the tap that’s run through first. It’s tapered to make each cutting thread take a progressively larger bite out of the material you’re tapping instead of trying to do it all at once. The bottom tap is called just that… a bottom tap. It’s used to finish up the last few threads in the bottom of the hole that the tapered tap can’t do.
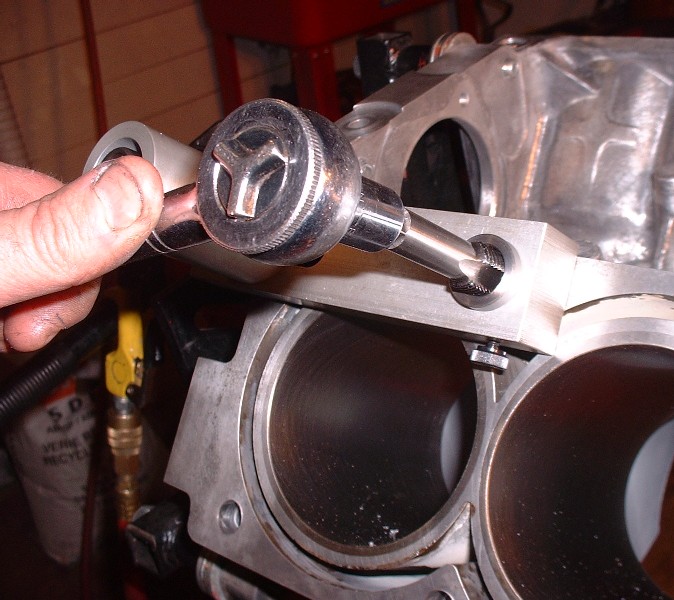
To start the tap squarely in the hole, it’s necessary to use the alignment jig again with a different collar inserted in it to accommodate the larger diameter of the tap. Tapping the holes is much like drilling the holes except that you have to back out the tap more often and blow out the chips to prevent them from galling your newly cut threads. I found that with the engine on the stand, it was easier to rotate the engine upside-down and then blow the chips out with compressed air than trying to blow them out with the engine right side up.
Once you’re done tapping each hole, you have to inspect the new threads to be sure that you didn’t come across any porosity that would lead you to reconsider using the block or getting a new one. Porosity will show up as several threads with chunks missing here and there. Luckily, all my holes tapped well.
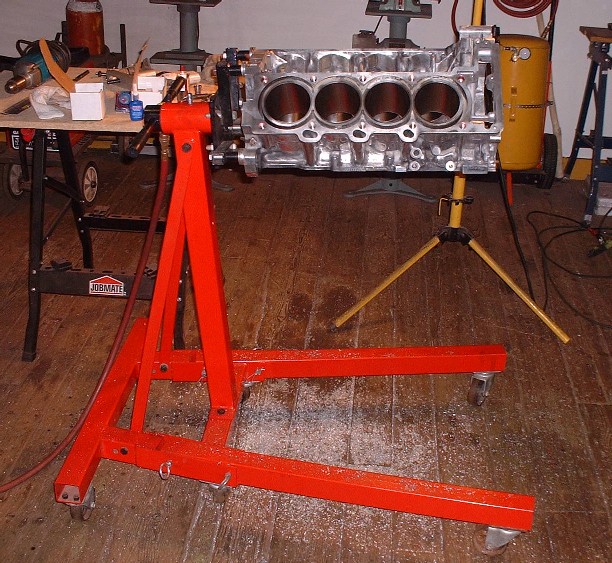
It’s a pain-staking process to do all 20 holes and you can’t be in a rush. There’s a learning curve that goes with it too. In reviewing my build notes, I see that it took me 4.5 hours to set up the alignment jig and drill and tap the first 10 holes. With experience behind me, I was able to do the other cylinder bank in 2.5 hours, and from there, it took a final half hour to apply Locktite and screw all those inserts in. If you weren’t counting, that’s 7.5 hours in total! Here’s the pile of chips left on the floor after I was done all the drilling and tapping.
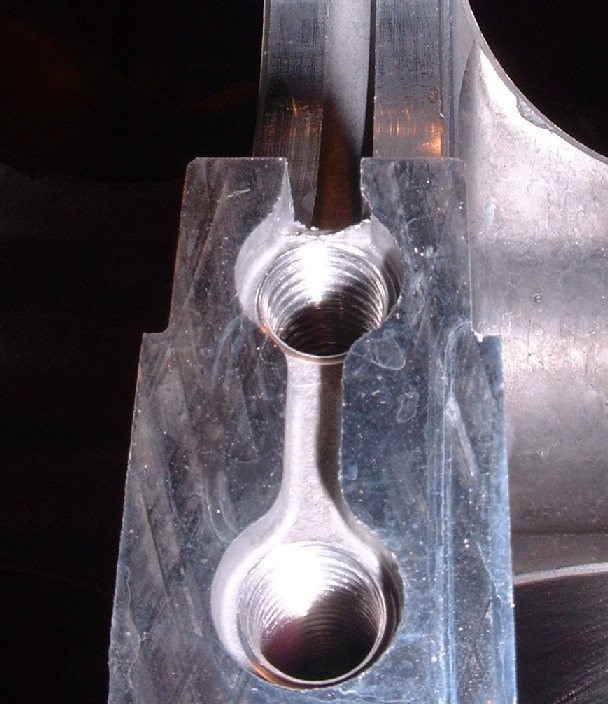
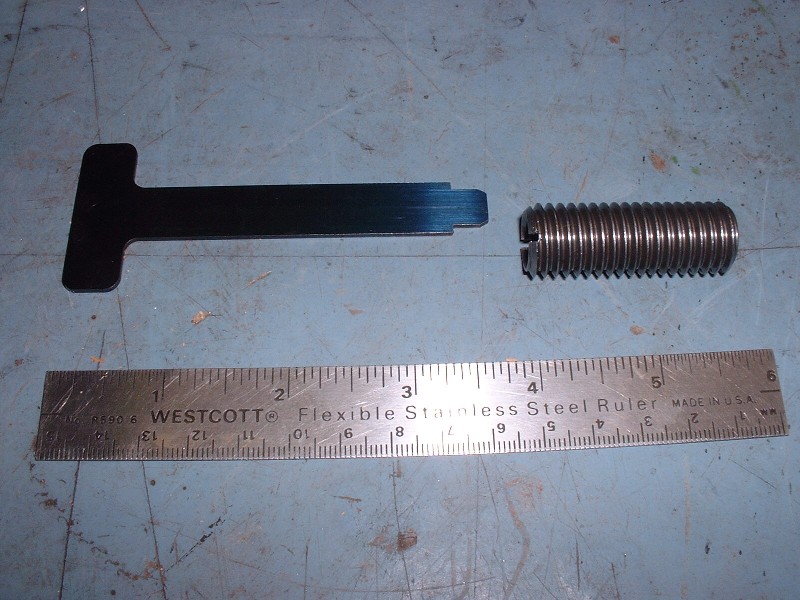
Here’s a close-up of Norm’s new threaded inserts. They’re gigantic compared to a Helicoil, and they’re solid too… not a wound spring-like insert. Also, unlike the Timesert inserts which expand as you’re threading them in and cinch themselves to the block mechanically, Norm’s inserts are held in place only with Locktite… presumably making them easier to remove if ever the need arose. The T-handle is the tool to thread them into the new holes.
Before you actually apply the Locktite, you have to thread all the inserts into the block and make a final measurement to be sure they seat at a specified depth. Then remove them all a final time (or re-tap any hole that wasn’t quite deep enough… it happened on one hole for me) and re-install with the thread locker.
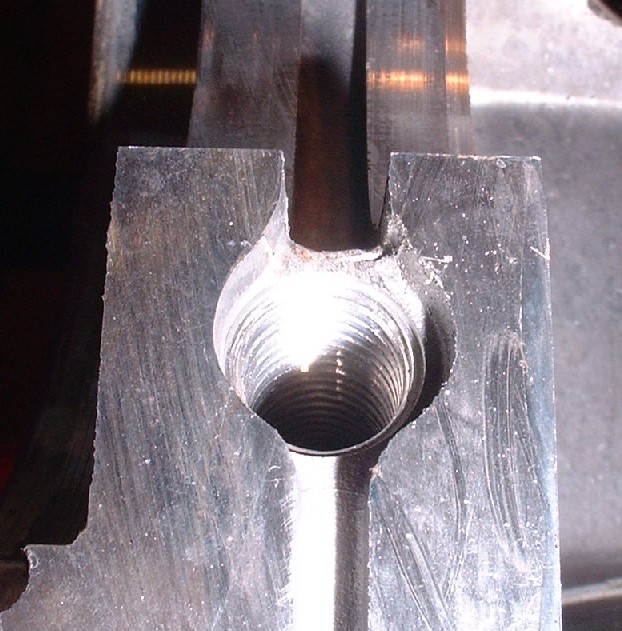
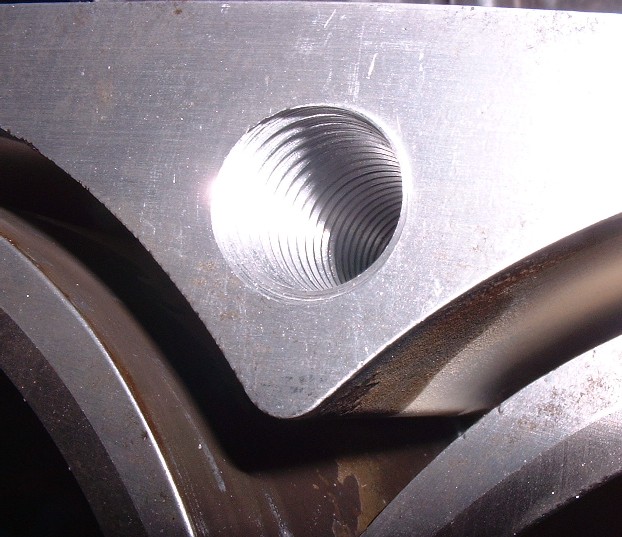
Finally, here’s what the insert looks like fully threaded in and locked in place. Pretty deep down in there eh?


 But seriously, there's no way my dowels would've come out that way. They were an extremely tight interference fit.
 Nice work