glad to hear it will be a relatively easy fix! aren't you running aftermarket steel rockers?
------------------ "I am not what you so glibly call to be a civilized man. I have broken with society for reasons which I alone am able to appreciate. I am therefore not subject to it's stupid laws, and I ask you to never allude to them in my presence again."
Sorry to hear. At least you found the problem fast!
------------------ Astronomy says we will find a coded signal from outer space. Then we'll KNOW that life exists there, for coded signals aren't by chance.
Biology says there are coded genetic signals in every cell, but we KNOW that no intelligence created life.
I'm the original owner of a white ' 84 2M4 purchased Dec 10, 1983 from Pontiac. Always garaged, no rust, 3800SC, 4-wheel drifts are fun!
Yeah, a bit of a pain, but things could be worse. I should be able to fix this without removing the engine from the car.
Here is the history of rocker arms since the engine rebuild:
Comp Cams Magnum 1.52 ratio roller-tipped rockers, grooved balls. 15W-40 Shell Rotella T4 + 4 oz Redline ZDDP additive. 2042 km until failure.
Comp Cams Magnum 1.52 ratio roller-tipped rockers, grooved balls. 10W-40 Liqui-Moly MoS2 Anti-Friction. Lifespan about 200 km until failure.
Melling MRK-407 stock replacement rockers for Fiero, smooth balls. 10W-40 Liqui-Moly MoS2 Anti-Friction. Lifespan about 9945 km until failure.
Stock Fiero 2.8 stamped steel style rockers have been the best so far, but not good enough.
I have the feeling that maybe average RPMs are higher than stock Fiero, and that oil temperature is higher than stock Fiero because of the turbo. So I'm thinking that I might need fancier rockers with needle-bearing trunnions. Once I remove the valve covers and look inside I might have more insights.
quote
Originally posted by La fiera: Oh wow! You caught that on time Patrick! Too much POWA!!!
I was lucky enough to have the problem at just the right place! My work colleague was driving the car on the autoroute, and when the sound began, we happened to be at an exit, so he pulled off the autoroute.
Once he stopped, I took over the driving, so he wouldn't have the stress of driving someone else's damaged project car. We were close to my home (1.2 km), so I decided to limp home driving calmly at 1500 RPM.
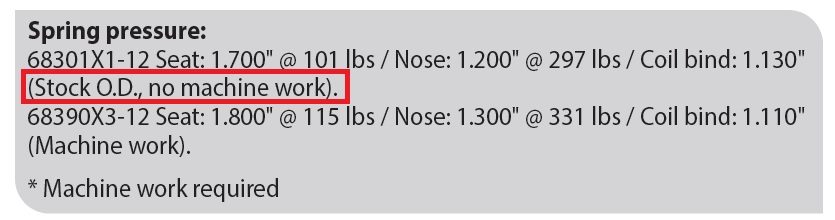
I'm not sure what the actual spring heights are on the base circle or nose of the lobe on my installation, but these catalog numbers give a rough idea.
Coil bind would increase the rocker arm pivot force dramatically, and while I do vaguely remember checking for that, I don't have any written record of having done so. So the possibility of coil bind might be worth investigating.
Why don't you invest in a set of fully roller aluminum rockers? You can you any "Narrow Body" "NON self Align" rocker for a Chevy, those are the ones I use. You can easily get an 1/4 inch spacer machined to make raise the valve covers. Part# SCP1037-1 $23 each at Summit Racing.
Why don't you invest in a set of fully roller aluminum rockers? You can you any "Narrow Body" "NON self Align" rocker for a Chevy, those are the ones I use. You can easily get an 1/4 inch spacer machined to make raise the valve covers. Part# SCP1037-1 $23 each at Summit Racing.
Yeah, I'm considering the Scorpion SCP1037 rockers. Is raising the valve covers the only mod needed?
What hits the valve cover? Is it the rocker arm, or the polylock?
Ideally, if I can find a rocker arm that fits under stock valve covers, I would prefer that, but I am ready to raise them if needed.
This guy here has some Scorpion rockers, but one one pair the rockers are almost touching: https://www.fiero.nl/forum/...314-2-116255.html#p4 I suspect that he's using self-aligning rockers, so the positioning the the rocker arms in the pushrod area isn't as precise as with non-self-aligning rockers and guideplates.
The SCP1037 rockers don't have that almost-rubbing issue, right?
[This message has been edited by pmbrunelle (edited 05-12-2022).]
https://www.summitracing.co...19-12/make/chevrolet You'll need Chromoly studs to use the aluminum rockers, I can't remember ARP's part number but this is its equivalent. As far as the raising of the valve cover, I have a neighbor with a CNC plasma cutter that can make the spacers. If you can't get them done let me know and I'll make a batch to get what you need and sell the rest on ebay. And no, the rockers don't have the robing issue.
I'm not sure what the actual spring heights are on the base circle or nose of the lobe on my installation, but these catalog numbers give a rough idea.
Coil bind would increase the rocker arm pivot force dramatically, and while I do vaguely remember checking for that, I don't have any written record of having done so. So the possibility of coil bind might be worth investigating.
Higher lift than stock, I assume? Higher spring loads as well?
Originally posted by La fiera: https://www.summitracing.co...19-12/make/chevrolet You'll need Chromoly studs to use the aluminum rockers, I can't remember ARP's part number but this is its equivalent.
Originally posted by La fiera: As far as the raising of the valve cover, I have a neighbor with a CNC plasma cutter that can make the spacers. If you can't get them done let me know and I'll make a batch to get what you need and sell the rest on ebay.
Thanks for the offer!
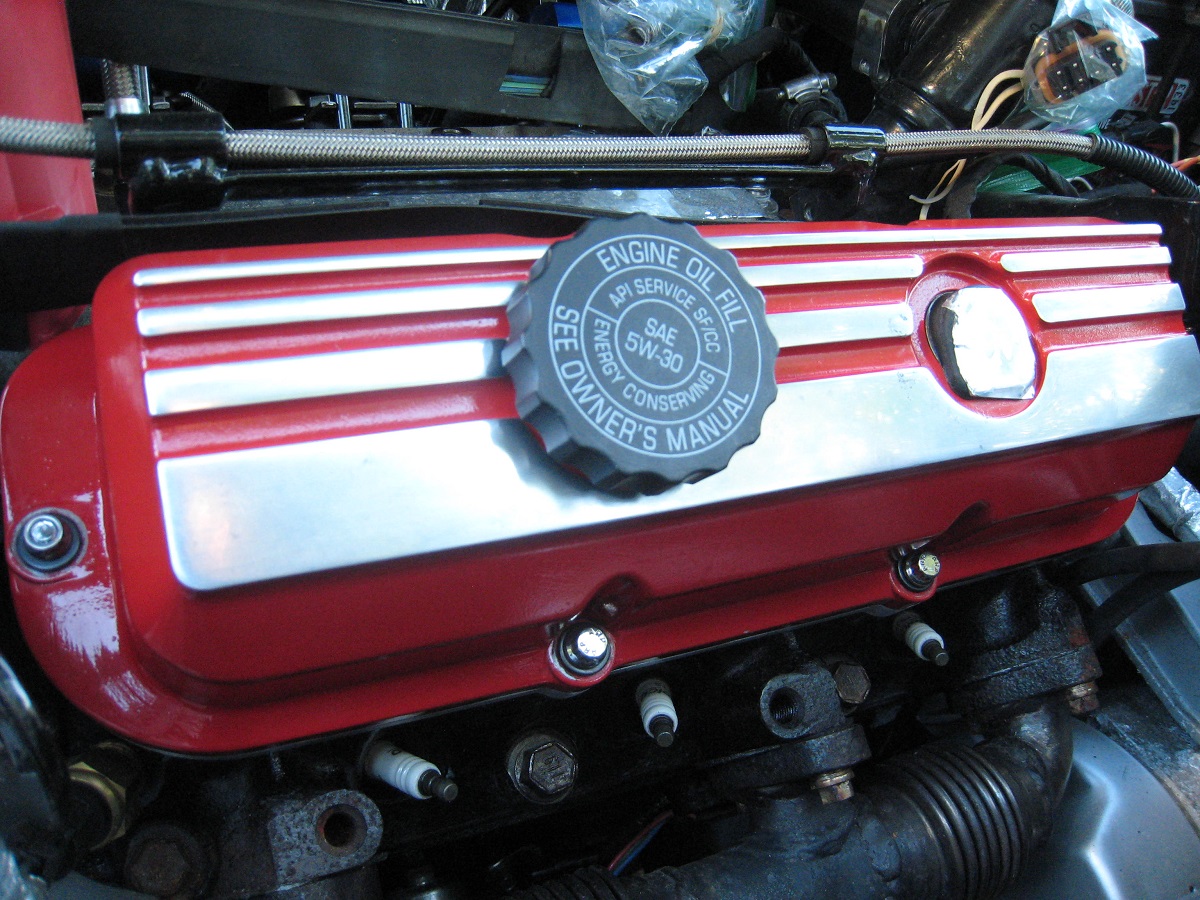
For now my plan is to make taller valve covers like this:
First, I'll discuss with SDP Autosport to see if this plan is good; they're my goto automotive tuning shop. They do aluminium welding.
Then, I would have to get a slitting saw for the milling machine to make the cuts, which I would do myself.
quote
Originally posted by Will: Higher lift than stock, I assume? Higher spring loads as well?
It is possible that my Fiero falls outside the application area of a ball-and-socket rocker arm pivot... so perhaps the issue is that I made a mistake in rocker arm selection for my project.
quote
Originally posted by La fiera: What's the advertise duration and LSA of the cam Patrick?
Oops, I mixed up the intake and exhaust numbers in my previous post. Now this information is good:
It is possible that my Fiero falls outside the application area of a ball-and-socket rocker arm pivot... so perhaps the issue is that I made a mistake in rocker arm selection for my project.
I don't think it's outside the performance envelope of a ball and socket rocker pivot, but it looks like it's outside the load limits of THOSE rocker arms. Are those stock replacement rockers? With a higher lift, higher acceleration cam and stiffer springs, you're running well in excess of the OE load case.
Remember that in your earlier attempts, your load case wasn't too much for the pivot... the aftermarket rockers had design flaws related to lubrication.
[This message has been edited by Will (edited 05-16-2022).]
Right... I was conflating the performance envelope of the pivot with the performance envelope of the rocker arm structure. Good thing Will is there to point out errors in logic and steer us on the correct path!
So from what I saw, there are basically two families of ball-and-socket rocker arms that can easily be installed on the Fiero V6:
Cast steel rockers with roller tip. The ones that aren't Comp Cams are copycat designs, including the wrong oil hole orientation. -Comp Cams Magnum (failed twice on me with burned up pivots, oil hole is pointing the wrong way) -Speedmaster Procomp Electronics -PRW Sportsman
Stamped steel rockers. Some have shoe tips, some have roller tips (I don't really care about this feature). All of the stamped rockers have the oil hole pointing towards the stud. They all have the same basic shape, so any increase in fatigue strength would have to come from better materials/treatments and care in reducing stress concentrations. -Melling MRK-407 (the stamped steel stock replacements I most recently used that failed) -Comp Cams High Energy (looks stock-ish, no evidence to suggest it would be superior) -Manley 43140 (looks stock-ish) -Summit Racing brand (looks stock-ish) -Proform Stamped Roller Tip (looks stock-ish) -Howards Cams Track Smart Nitro-Carbided (maybe this magic treatment might do something)
I decided to order a set of Scorpion SCP1037 rocker arms as recommended by Rei.
I am still curious about the wear resistance of the ball-and-socket on a stock-style rocker. Prior to installation, I measured the mass of every ball and rocker. When I remove the old rocker parts, I'll re-measure them and see if any mass was lost.
Glad the bottom end is ok, and I think it is wise to move away from the ball pivots with the additional RPMs and load from the cam/springs, especially when GM has moved to needle bearings. Interested to see if the pivots have lost some mass over time.
GM used ball pivot rockers on the Camaro RS/SS 302 and other high winding/big valve/stiff spring combos over the years. Do Small Block Chevy rockers not fit?
Just make sure you clean the valve covers very good. My fabricator had a hard time welding it because he said it was like pot aluminum. My theory is that the valve covers have been impregnated with oil due to their age. Dip them in acid or something!
Glad the bottom end is ok, and I think it is wise to move away from the ball pivots with the additional RPMs and load from the cam/springs, especially when GM has moved to needle bearings. Interested to see if the pivots have lost some mass over time.
Oops, I only measured the parts from the 2nd set of rocker hardware.
quote
Originally posted by Will: GM used ball pivot rockers on the Camaro RS/SS 302 and other high winding/big valve/stiff spring combos over the years. Do Small Block Chevy rockers not fit?
The rocker arm alternatives I've identified above are mostly SBC rockers.
Actually, the Scorpion ones I bought are SBC rockers too. I have a set of 16.
quote
Originally posted by La fiera:
Just make sure you clean the valve covers very good. My fabricator had a hard time welding it because he said it was like pot aluminum. My theory is that the valve covers have been impregnated with oil due to their age. Dip them in acid or something!
Yeah, SDP Autosport said it was tricky to weld my transmission case when the mount area cracked, so I'm aware of that issue.
Since these valve covers have no plastic parts, I'll be able to bake them at a high temperature for a long time to boil off the junk.
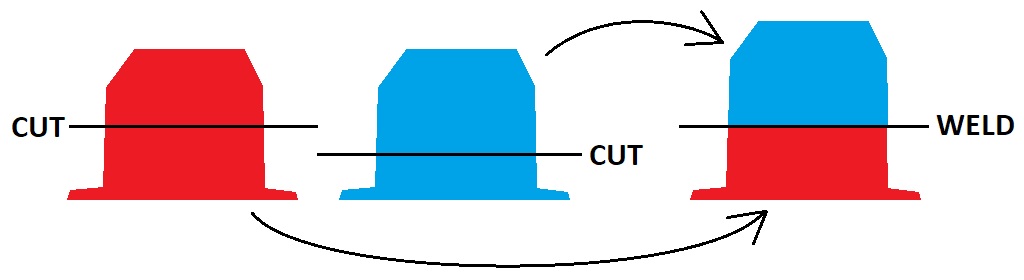
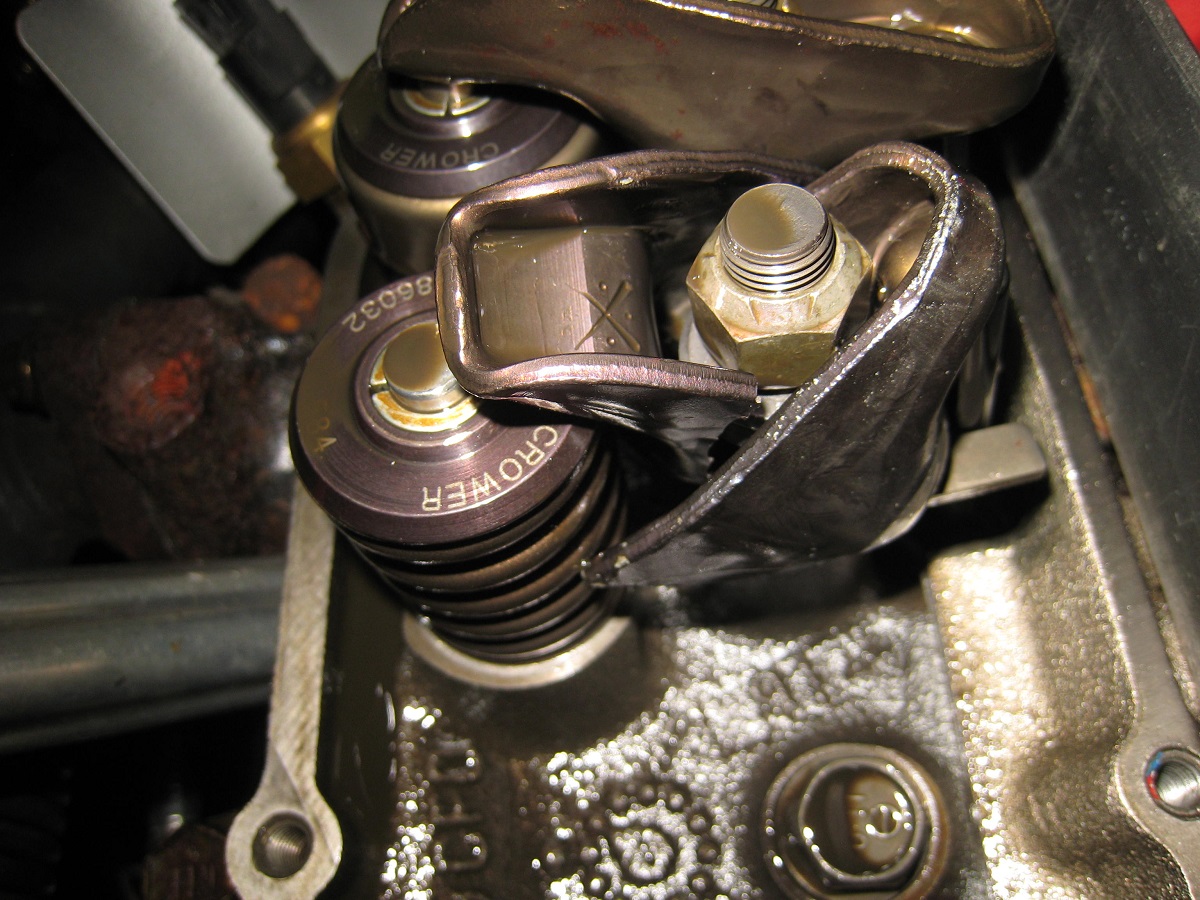
And now, the investigation! I had a peek in the valve cover last night. Not much collateral damage. The valve cover and spring retainer got cosmetic dings. The tip of the valve stem had a slight burr; I filed that away. The spring wasn't scratched.
All rockers, including the broken one, had about the same amount of oil pooled in the cup above the valve. Furthermore, the pushrod serving the broken rocker had a clear hole. Not much coked oil (suggesting enough cooling) around the pivot area as with the Magnums. From these observations, oil starvation is discarded as a possible cause of the failure.
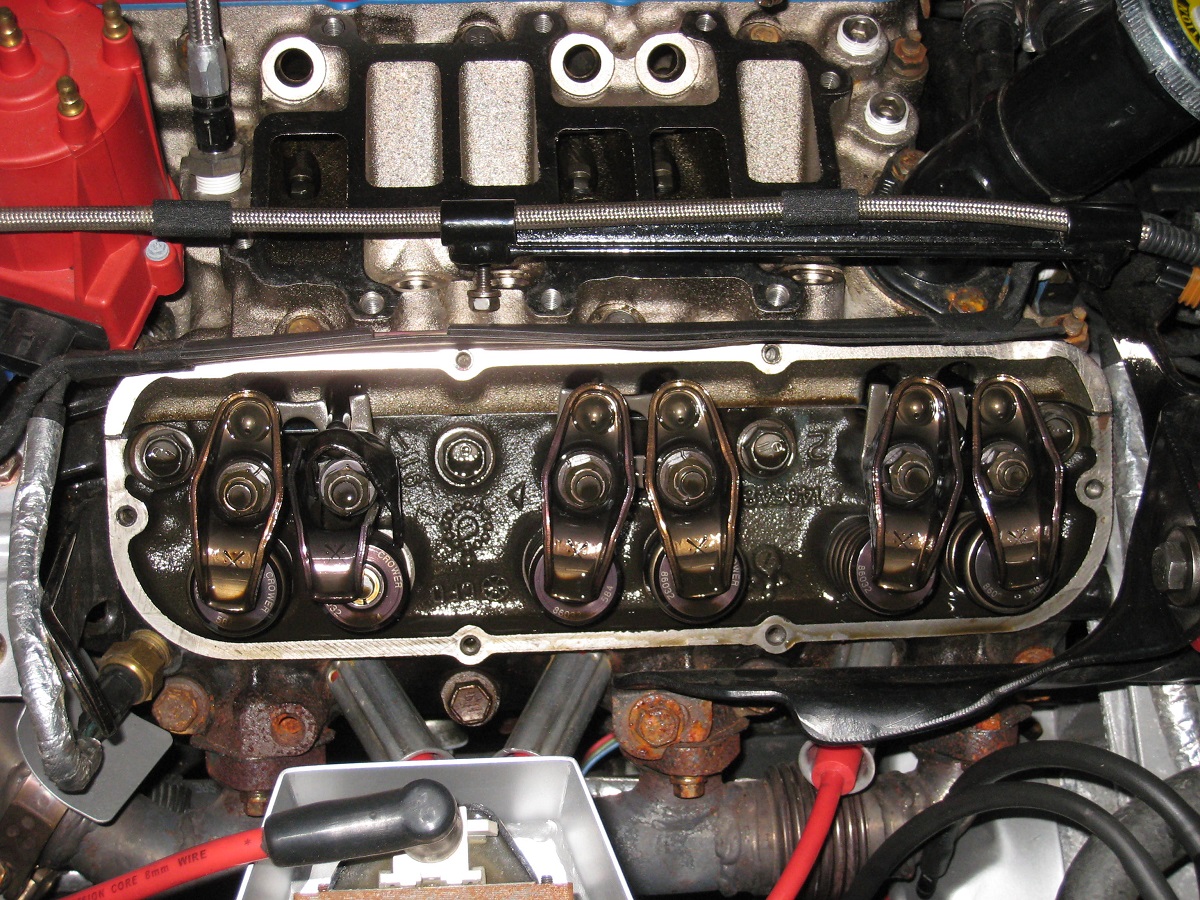
The rocker ball was heavily worn (about 1 mm of material gone) on the pushrod side, while things were OK on the valve side.
Ideally, the rocker ball is polished everywhere. In this case, it looks like the curvature of the rocker arm was wrong, so it was only touching the ball in two spots rather than all around.
With the load concentrated in those two spots, I think that created a high-stress area (and high-heat too) where the crack started (marked by the "X" on the photo). The crack then slowly zipped upwards over time. This crack took a while to develop; its face is stained with oil.
As the crack on the left side grew, more bending moment had to be handled by the right side, which is what started the right side crack. The right side crack began at the rocker slot, and then grew upwards. The right side crack wasn't stained with oil. Maybe the right side crack was only initiated during the last drive.
There wasn't much plastic deformation. The broken pieces almost fit together like a broken ceramic tile. Not quite, but close.
So, I'd say that the primary cause of the rocker failure was that the socket shape wasn't close enough to an ideal sphere.
Now, onto a contributing factor!
quote
Originally posted by pmbrunelle: Coil bind would increase the rocker arm pivot force dramatically, and while I do vaguely remember checking for that, I don't have any written record of having done so. So the possibility of coil bind might be worth investigating.
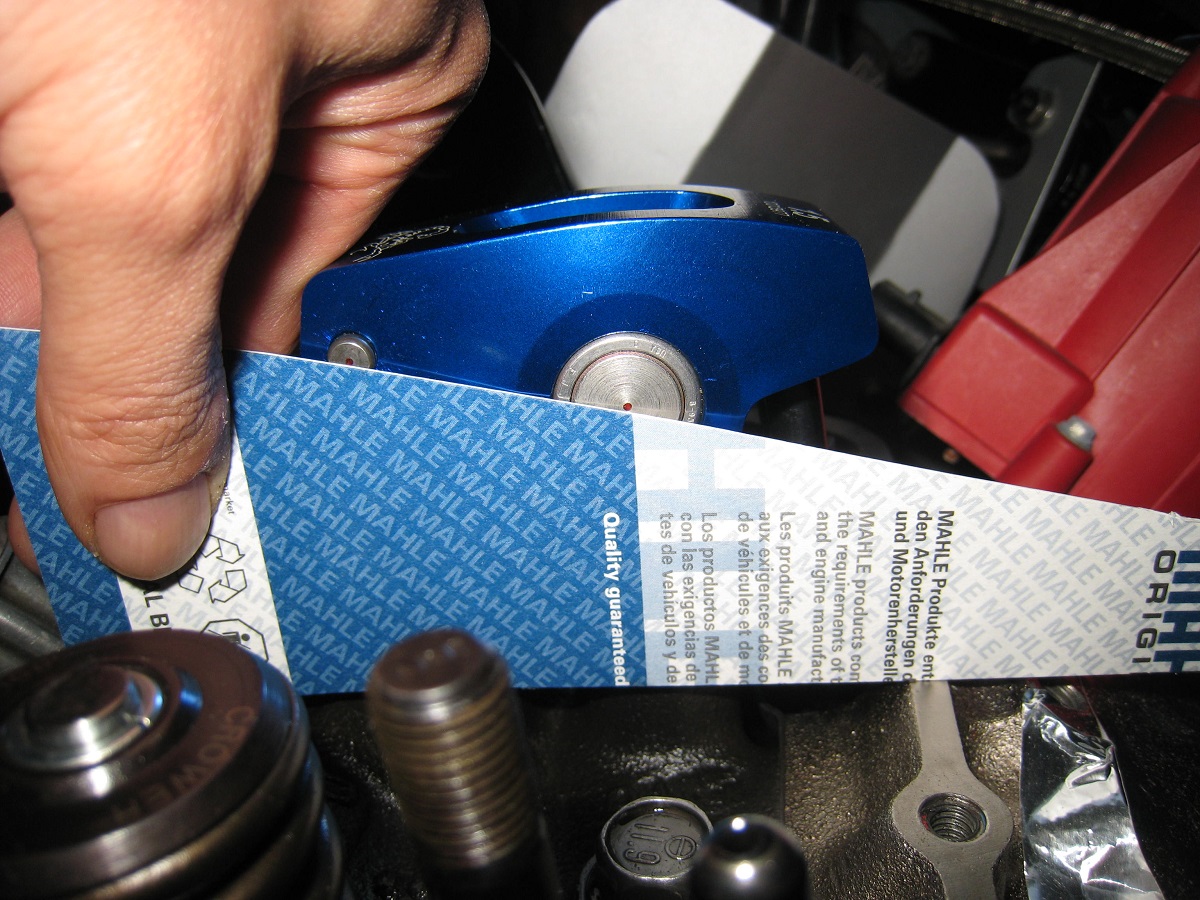
Here I checked the installed height of the spring of the failed rocker.
1.609" installed height. Coil bind height is 1.130".
Here is the remaining travel before coil bind for different rocker ratios: Stock "1.5" ratio, estimated 1.45 ratio (because stamped rockers often don't deliver on their specified ratio). 0.434" valve lift. 0.045" remaining. Scorpion 1.5 ratio. 0.448" valve lift. 0.031" remaining. Comp Magnum 1.52 ratio. 0.454" valve lift. 0.025" remaining.
With the stock rocker arm, there is enough remaining travel to avoid coil bind. Not a lot, but at the low end of what is considered acceptable. 0.060" clearance is a common guideline. I may have had coil bind issues with the Magnum rockers.
Even though I don't believe I ran into coil bind with the failed rocker, I still consider the short installed height to be a contributing factor. When the spring is working closer to the coil bind region, the spring force is greater than it would be with a taller installed height.
And now, the human factor behind this contributing factor...
There was no record of checking for coil bind, because I didn't.
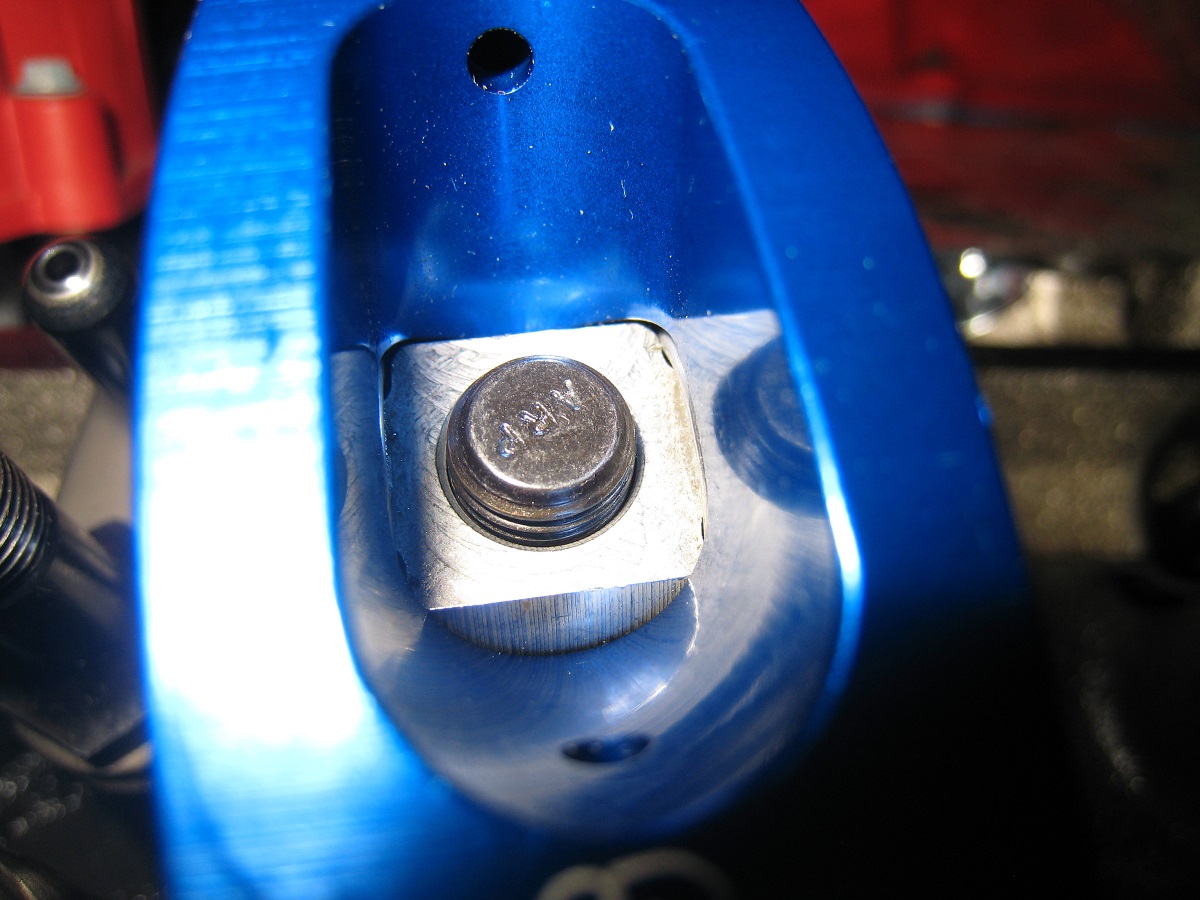
Now I remember what happened. I saw this in the Crower catalog:
And then I thought, oh cool, the springs are supposed to work as-is, I don't have to check the springs.
Lesson: In engine assembly, check everything.
Today, I ordered a set of +0.050" offset valve keepers that will raise the spring retainers. I'll have a more comfortable margin with respect to coil bind, especially with the Scorpion rockers. I also ordered a stud-mounted valve spring compressor (works with 7/16-20 or 3/8-24 rocker arm studs). With the spring compressor, I should be able to swap valve keepers without removing the engine from the car.
[This message has been edited by pmbrunelle (edited 05-20-2022).]
Here I checked the installed height of the spring of the failed rocker.
1.609" installed height. Coil bind height is 1.130".
Here is the remaining travel before coil bind for different rocker ratios: Stock "1.5" ratio, estimated 1.45 ratio (because stamped rockers often don't deliver on their specified ratio). 0.434" valve lift. 0.045" remaining. Scorpion 1.5 ratio. 0.448" valve lift. 0.031" remaining. Comp Magnum 1.52 ratio. 0.454" valve lift. 0.025" remaining.
With the stock rocker arm, there is enough remaining travel to avoid coil bind. Not a lot, but at the low end of what is considered acceptable. 0.060" clearance is a common guideline. I may have had coil bind issues with the Magnum rockers.
Even though I don't believe I ran into coil bind with the failed rocker, I still consider the short installed height to be a contributing factor. When the spring is working closer to the coil bind region, the spring force is greater than it would be with a taller installed height.
And now, the human factor behind this contributing factor...
There was no record of checking for coil bind, because I didn't.
Now I remember what happened. I saw this in the Crower catalog:
And then I thought, oh cool, the springs are supposed to work as-is, I don't have to check the springs.
Lesson: In engine assembly, check everything.
Today, I ordered a set of +0.050" offset valve keepers that will raise the spring retainers. I'll have a more comfortable margin with respect to coil bind, especially with the Scorpion rockers. I also ordered a stud-mounted valve spring compressor (works with 7/16-20 or 3/8-24 rocker arm studs). With the spring compressor, I should be able to swap valve keepers without removing the engine from the car.
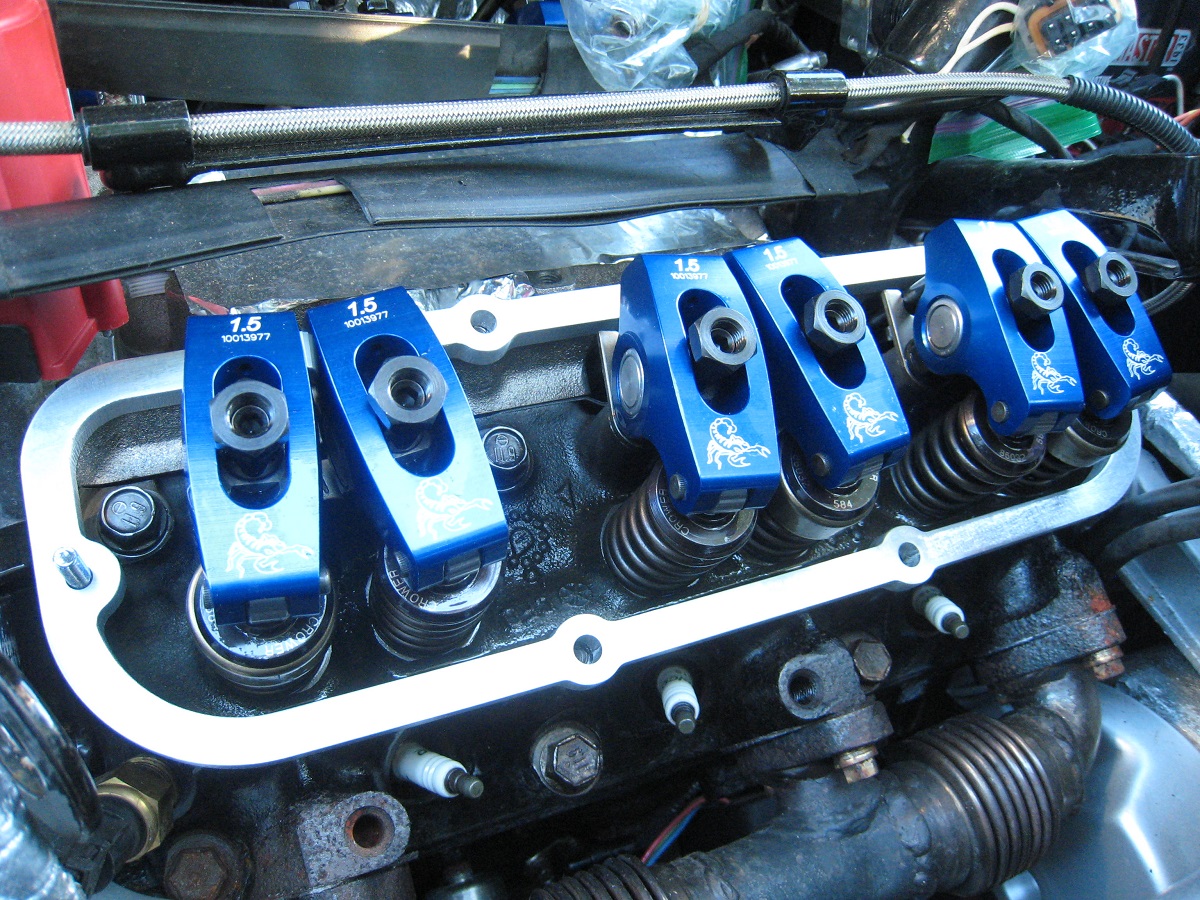
I have commenced the fit and futz cycle with the Scorpion rocker arms.
With a stud-mount rocker arm, changing the pushrod length changes the height of the trunnion, and the angle the rocker arm makes with the valve.
Here is a cardboard alignment tool I made. If I set the roller-tip axis and trunnion axis coincident with the edge of the tool, then I know the rocker arm will be perpendicular with the valve at 2/3 max lift. Some people optimize for 1/2 lift, but there is some logic to optimizing for perpendicularity closer to the open valve, when the spring force is highest.
The roller-tip to trunnion distance is a bit too long with these rocker arms. The roller tips touch the valves somewhat out towards the exhaust manifold side, but they still do land sufficiently on the valves.
If I shorten the pushrod length, I can have a better centering of the contact pattern on the valve, at the expense of a wider contact pattern. Seems like it's more important to prioritize perpendicularity.
Stock Fieros have 6.163" pushrods. With this method, I found that I need 6.53" pushrods. Not sure if there's a problem, or if this amount of change is normal with aftermarket parts that never seem to fit out-of-the-box.
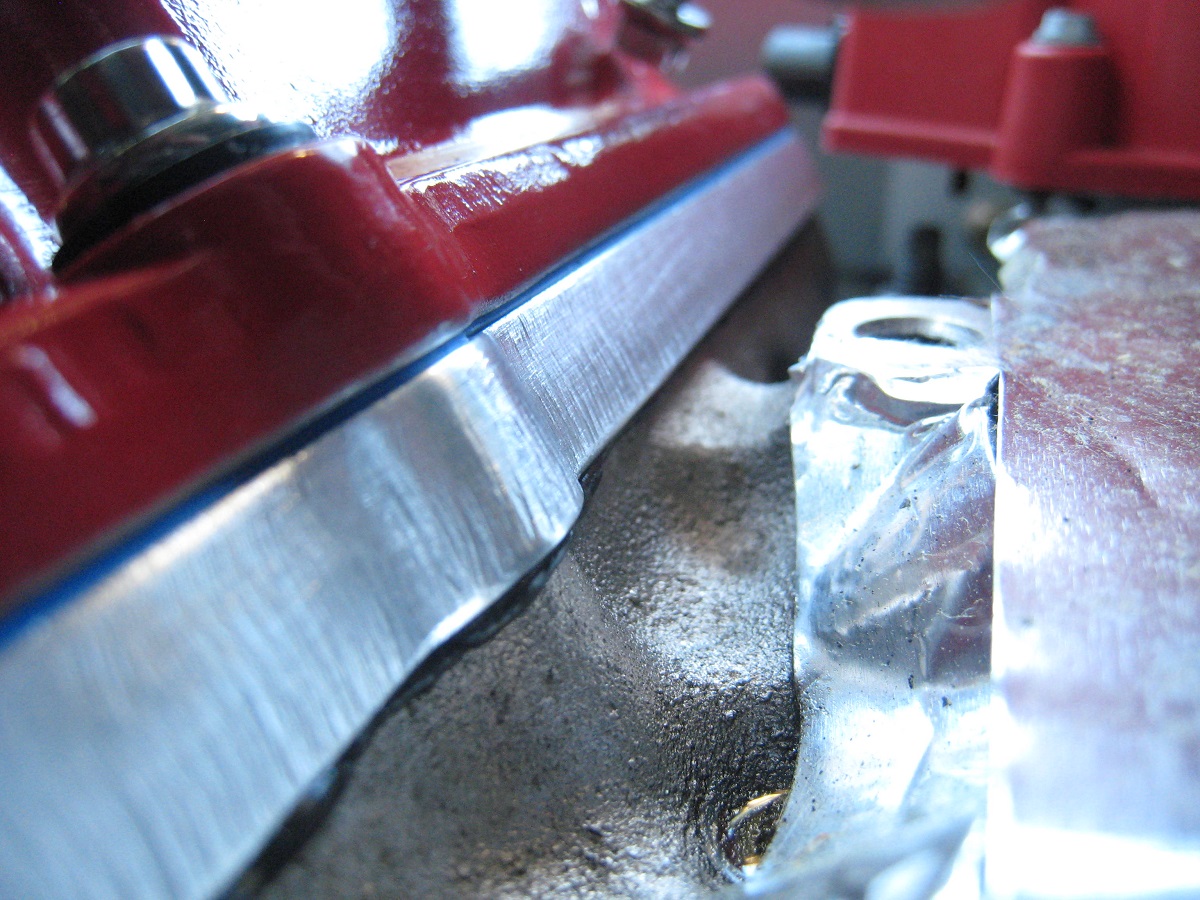
With the longer pushrod length, there's no longer enough thread engagement for the adjusting nut:
That can be addressed by raising the studs with washers (ARP for good quality and parallelism).
Yes, it's a Crower stud, even though it's stamped ARP on the end. Nobody seems to make anything anymore in automotive. Everything is subcontracted!
The CAD model (cardboard aided design) of the valve cover shows that I definitely need to raise the valve covers:
[This message has been edited by pmbrunelle (edited 06-07-2022).]
I just installed a set of 1.6 rockers to optimize the cam timing and I got plenty of thread. Maybe those studs are too short or your pusrods are too long. I'm using 6.250 pushrod length and I can switch between 1.7, 1.6 and 1.5 with the same pushrods and get the exact lift, duration and LSA expected on the different ratios. I have .019 shaved off the deckheight to meet my compression target on this specific short block. PM me if you need help.
I decided on 6.400" pushrods. Not quite the 6.500" I would like to keep the rocker arm more perpendicular to the valve (for minimizing valve guide wear), but it will give a more comfortable amount of thread engagement for the polylock.
Can't be too focused on copying other people when it's my project! Anyway, unless you're in mass production where everything is the same, engines/setups will be different.
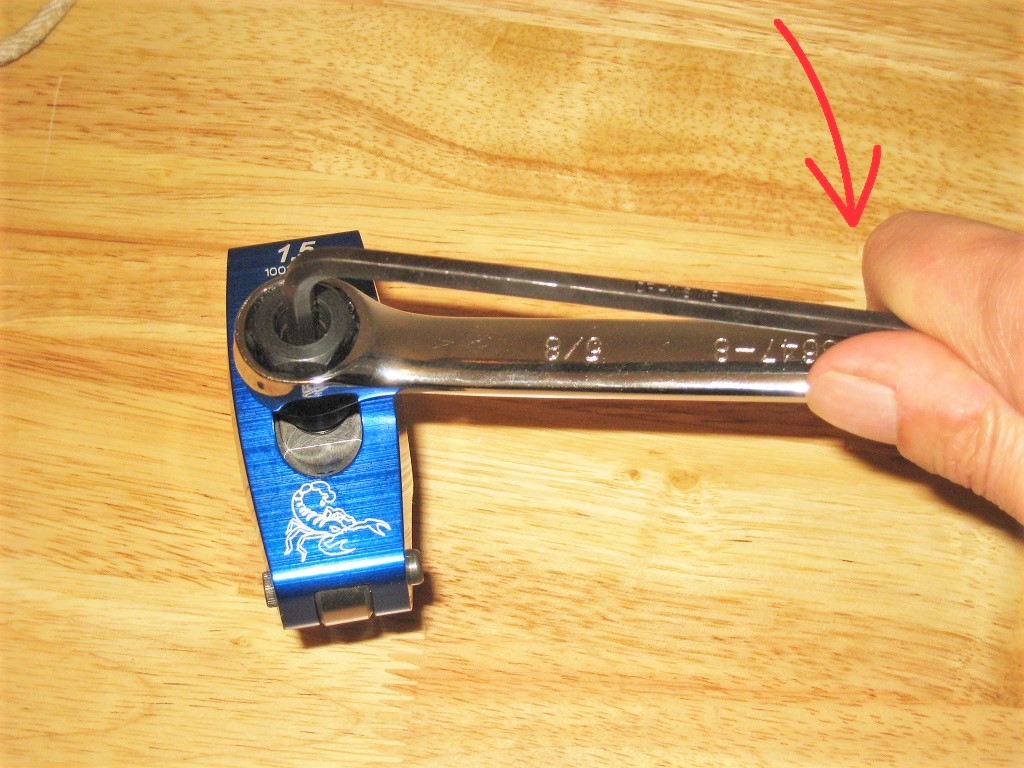
What procedure do you use to tighten the polylock nuts to keep them from loosening?
Do you first tighten the set screw, and then tighten the nut body afterwards?
Since I have hydraulic lifters, it's OK if the polylock nuts turn a bit after my initial adjustment.
I've always seen:
1.Set lash, then go back 1/8-1/4 turn 2.tighten set screw 3.Simultaneously tighten setscrew and nut the 1/8-1/4 turn loosened in step 1 4. Recheck lash
------------------ "I am not what you so glibly call to be a civilized man. I have broken with society for reasons which I alone am able to appreciate. I am therefore not subject to it's stupid laws, and I ask you to never allude to them in my presence again."
Some people say they torque the polylock with a torque wrench, but I don't see how the setscrew and nut can be simultaneously tightened with a socket.
I'm imagining it like this with an Allen key and closed-end wrench, grabbing both tools with the hand:
just like your picture is the only way I've seen or done it.
------------------ "I am not what you so glibly call to be a civilized man. I have broken with society for reasons which I alone am able to appreciate. I am therefore not subject to it's stupid laws, and I ask you to never allude to them in my presence again."
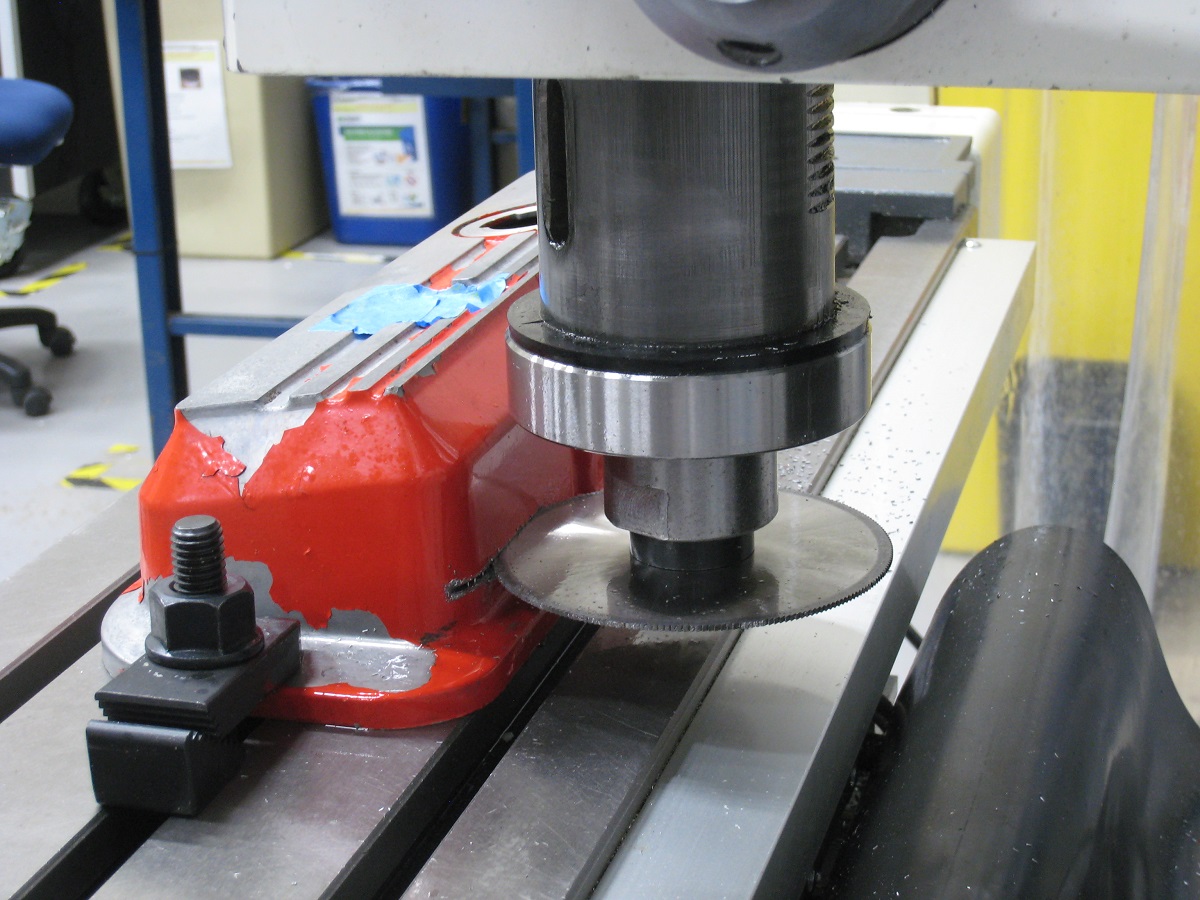
how did you continue your cut up to the clamp? change clamp positions? cut as close as you can and finish by hand?
------------------ "I am not what you so glibly call to be a civilized man. I have broken with society for reasons which I alone am able to appreciate. I am therefore not subject to it's stupid laws, and I ask you to never allude to them in my presence again."
I moved the clamps around as needed to stay out of the way of the saw.
The Z height of the valve covers changed a bit when I undid and retightened the clamps, which created minor steps between the different cuts. I was able to use a file to blend the different cuts into one continuous surface.
It would have been better to make a drilled+tapped flat plate jig on which the valve cover could bolt, but that would have required more time/effort/materials.
The way I cut the valve covers was "good enough" with satisfactory results.
Patrick make sure you do a good degreasing job on those valve covers before welding. My fabricator had a hard time welding them and I attribute that to the poor degreasing job I did on them before welding. With all the years of oil impregnation I can see the difficulty on welding.
Running them through my transmission washer (160 degrees) for 20 minutes works well. Maybe you could ask a local trans shop if they would throw them in when they are washing a batch of parts.
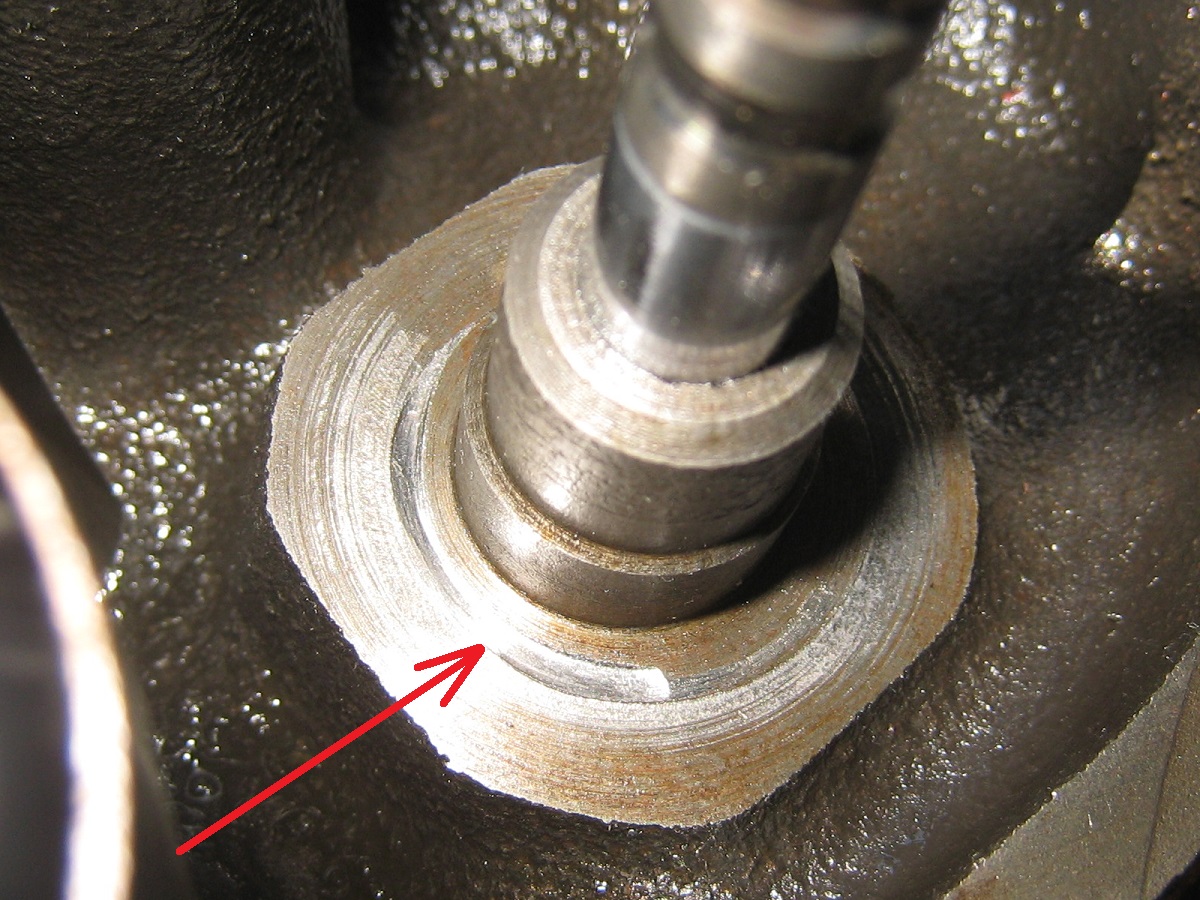
Originally posted by pmbrunelle: With the stock rocker arm, there is enough remaining travel to avoid coil bind. Not a lot, but at the low end of what is considered acceptable. 0.060" clearance is a common guideline. I may have had coil bind issues with the Magnum rockers.
quote
Originally posted by La fiera:
Looks like the valve springs were being pushed hard into the head (probable coil bind) with the 1.52 ratio Magnum rockers.
Notice the imprint of the spring on the head:
Oops!
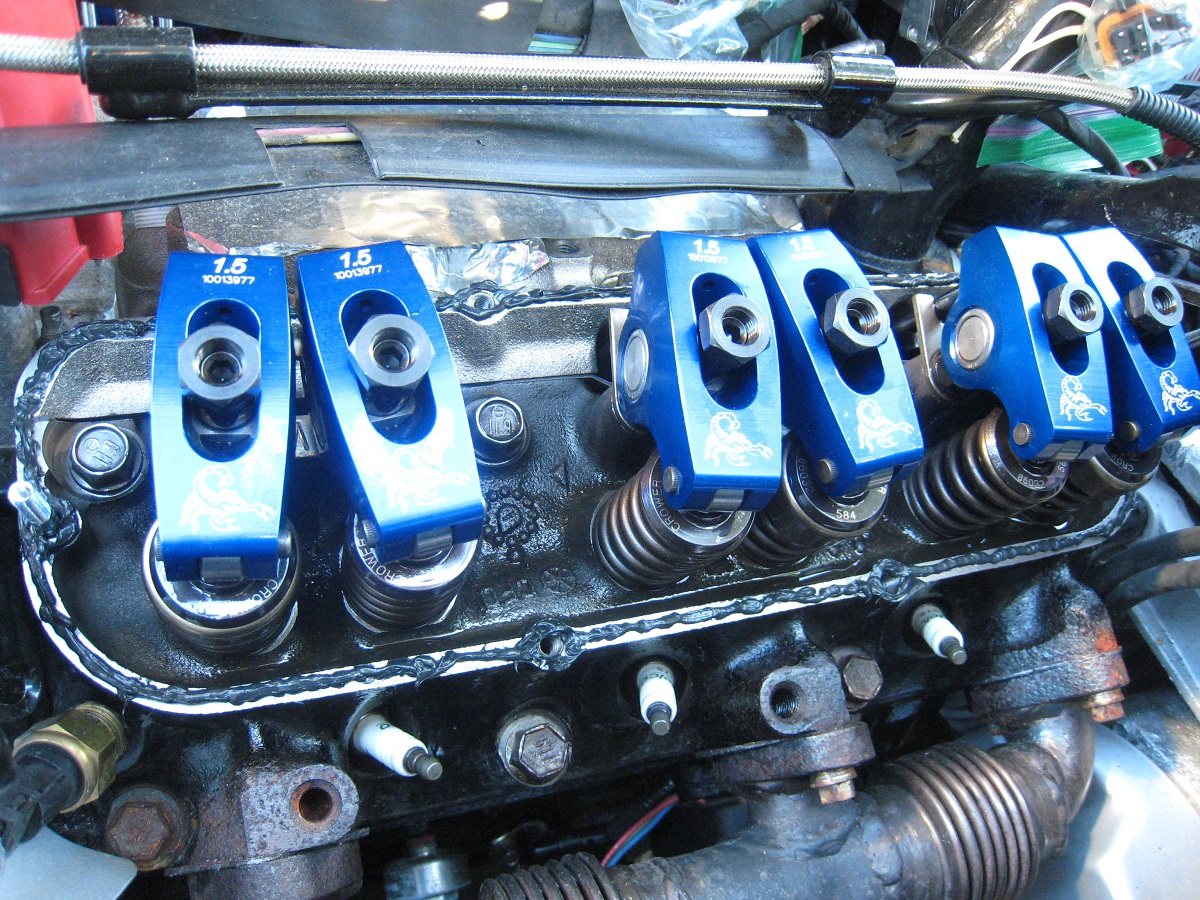
The +0.050" offset valve keepers are now installed on the engine.
looks like it's running nice! did you draw the valve cover spacers? the looks like they turned out to be a very good fit!
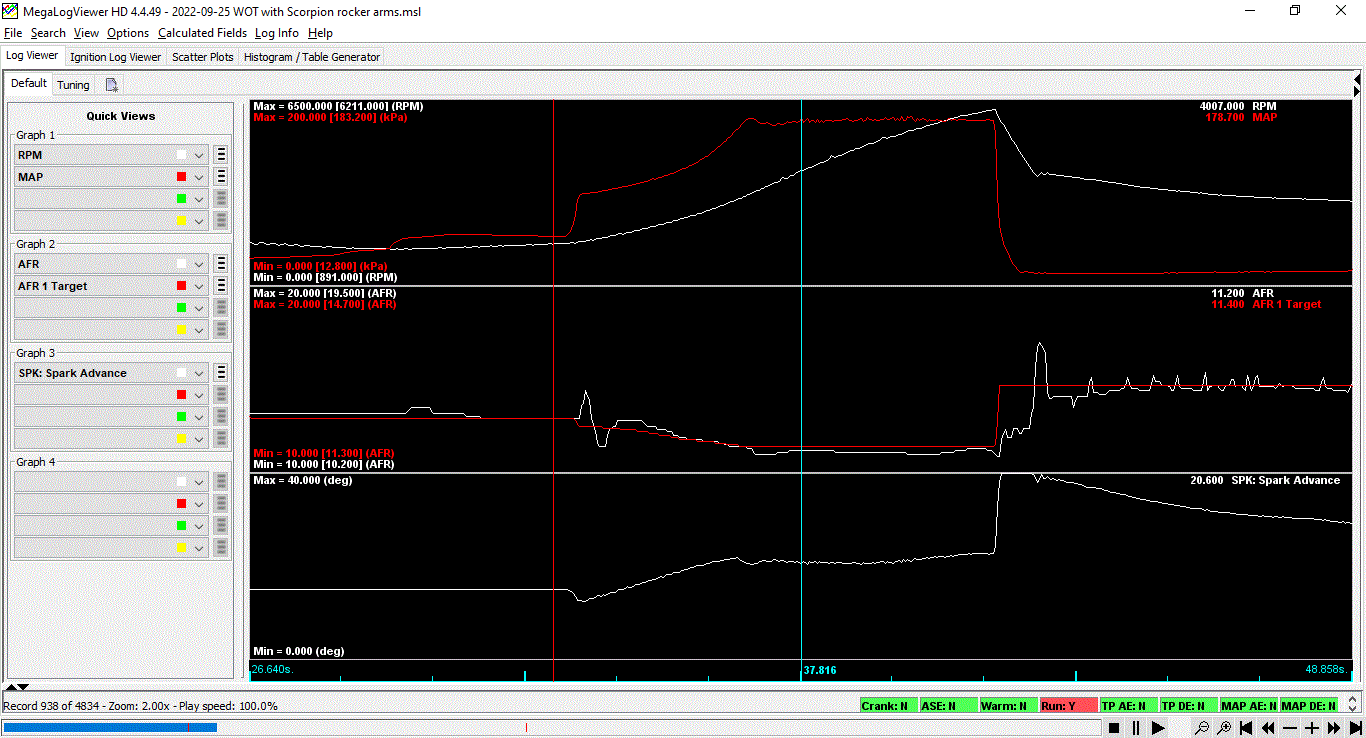
FYI, you don't have to take screenshots of MLV, under "file" there's an option to "save graph as PNG or JPEG"
------------------ "I am not what you so glibly call to be a civilized man. I have broken with society for reasons which I alone am able to appreciate. I am therefore not subject to it's stupid laws, and I ask you to never allude to them in my presence again."
I invited Lou Dias to trash me in my own thread, he refused. sorry. if he trashes your thread going after me. I tried.
[This message has been edited by ericjon262 (edited 09-27-2022).]
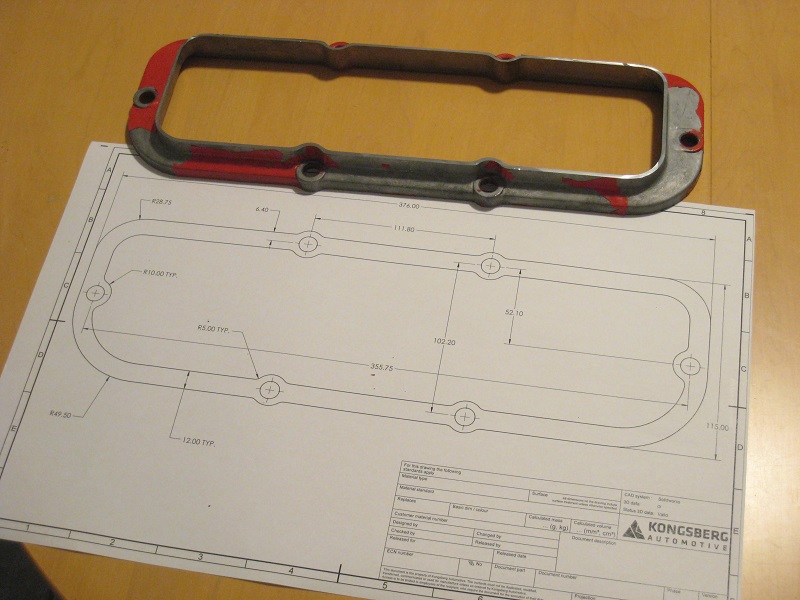
We have a 24" slide caliper at work which helped with taking measurements; it was rather useful compared to just the usual 6" slide caliper.
I also printed the drawing 1:1 on an 11x17 sheet of paper, so I could place the valve cover on top of the printed drawing, and then make adjustments as necessary where things looked off.
[This message has been edited by pmbrunelle (edited 09-28-2022).]
We have a 24" slide caliper at work which helped with taking measurements; it was rather useful compared to just the usual 6" slide caliper.
I also printed the drawing 1:1 on an 11x17 sheet of paper, so I could place the valve cover on top of the printed drawing, and then make adjustments as necessary where things looked off.
you did a great job of it, although based on some of our other conversations, I think it's fair to assume you have a bit of practice.
I've been looking at getting a 12" and 24" dial caliper. I've recently fallen in love with dial calipers compared to digital, something about being able to watch the needle move as I move the caliper is very satisfying,
------------------ "I am not what you so glibly call to be a civilized man. I have broken with society for reasons which I alone am able to appreciate. I am therefore not subject to it's stupid laws, and I ask you to never allude to them in my presence again."
I invited Lou Dias to trash me in my own thread, he refused. sorry. if he trashes your thread going after me. I tried.