Originally posted by La fiera: The reason I want to install them back is because since the cam on the 3.7 wont make much vaccuum I'm wondering if by installing these back would give me a bit more bite if I run out of vaccuum assist.
Assuming that you're keeping the revs above 2000 RPM during braking, you'll have more vacuum than the "idle vacuum" of the engine.
Do you really need full vacuum assist when the engine is idling?
Assuming that you're keeping the revs above 2000 RPM during braking, you'll have more vacuum than the "idle vacuum" of the engine.
Do you really need full vacuum assist when the engine is idling?
With the cam I had on the 3.4L at idle it only had 8inhg. If I suddenly took off in 1st and shift to 2nd and then hit the brake twice then I had no brake assist. The pedal would get hard and I had to REALLY press down on the brake pedal to slow it down. When I installed the vaccum assist pump that problem was cured. If I can install these bigger bore calipers and I can slow down the car with less pedal effort without or very little assist then I have a "Plan B" in place to use when the vaccum pump decides to quit without giving me 2 weeks notice.
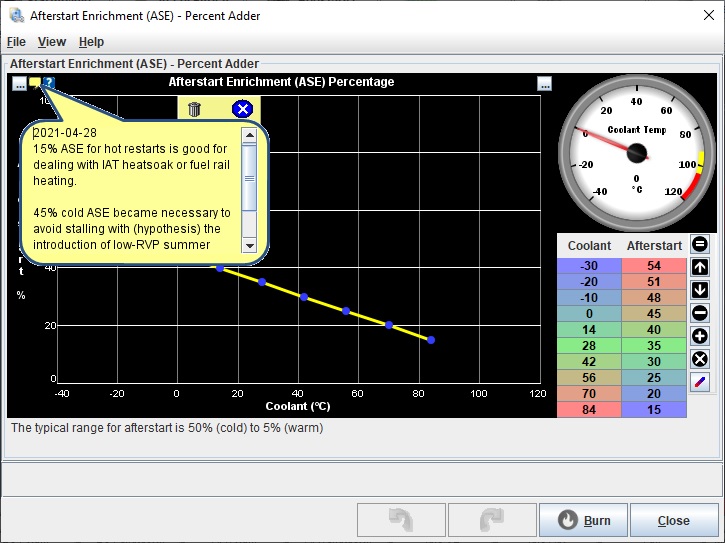
I've been daily-driving my Fiero since the end of March, but in the last two weeks or so, the engine would stall a few seconds after firing up.
This happened after cold starts with the engine coolant temperature at 0°C... however, I had no stalling issues at the end of November last year.
I suspect that at the end of last year, I was running the more volatile winter-blend gasoline, and I tweaked my tune using that fuel.
That tune worked fine at the beginning of this year, but probably the combination of summer-blend gasoline AND 0°C coolant temps caused problems. The onset of my problems seems to coincide with the introduction of the summer-blend gasoline...
To address this situation, I increased the amount of afterstart fuel enrichment, and the stalling went away. My objective is to run the same tune year-round, just like any normal car.
Glad to hear you are driving your car regularly, I'm very tempted to throw something together stupid quick to get mine back on the road, but I think I need to take a step back and wait until after my move.
do you have a flexfuel sensor installed?
If so, did you notice any differences in output between the "winter" and "summer" fuels might be able to add some compensation that way to improve the tune without having a tune work better on one or the other. I doubt it would show anything useful, but it may be worth investigating.
------------------ "I am not what you so glibly call to be a civilized man. I have broken with society for reasons which I alone am able to appreciate. I am therefore not subject to it's stupid laws, and I ask you to never allude to them in my presence again."
I don't have a flex-fuel sensor. E85 isn't a thing here in Canada; the most ethanol you're going to get is up to 10% mixed in with your 87 AKI regular gasoline. Some gas stations have 94 AKI, with an unspecified amount of ethanol, but this isn't widely available.
I run my car on 91 AKI premium gasoline, which is generally ethanol-free here (removing a variable).
The real way to distinguish the difference in volatility between summer/winter gasoline is with the Reid Vapor Pressure test. That's a lab test, not something that can be easily implemented in a car.
So apparently, to meet the RVP limit (depends on the season), almost no butane (4 carbon atoms, very volatile) is used in summer, while refineries may mix up to 2% butane in winter. I think it would be pretty tricky to have some sensor that could detect such a small amount of butane, not to mention that the recipe of gasoline in general is unpredictable.
I began tracking my changes at the end of last summer by saving "milestone tunes" (not necessarily every little micro-change or quick test) with descriptive file names. TunerStudio also has a file comparison function, which is handy.
Unfortunately, I haven't been documenting my reasons for each change; I only have records of the changes themselves.
I don't remember from tuning the afterstart enrichment last year if more enrichment had no effect (except wasting fuel), or if more enrichment caused driveability problems. So I'll just have to wait and see what happens in the fall.
Check this, I just decided to click around a bit in TunerStudio, and I clicked on the bubble icon of this window.
You can leave notes to yourself in the *.msq. I should have played with this feature long ago!
gotcha, I didn't think it would show anything, but I figured it was worth a shot. I installed a flex sensor on my car as a means of "future proofing" I've only seen a couple of E85 pumps in my life but having the sensor installed leaves the option open. An added bonus is the the flex sensors display % ethanol via frequency, but also display fuel temperature based on peak voltage of the output frequency, but I'm not sure how useful that would be so... lol.
the notes tabs are super handy, I really should be using them more. Hopefully before too much longer the new MS3 firmware will be released and I'll be able to go full sequential, right now, I'm limited to "semi sequential" due to compatibility issues between my crank and cam position wheels, theoretically, I could grind the stock cam wheel and make it work, but for now, I'll wait for the firmware corrections, and an engine with rod bearings... lol!
do you have your water injection setup operational again? seem to be working well? I need to start exploring charge cooling options for when I start turning the boost up, I like your 6 nozzle setup, but I don't have the same IAC passage setup. I think I would either do a plate behind the TB, or nozzles in the top of the plenum. eventually, it will get an A2W intercooler though.
------------------ "I am not what you so glibly call to be a civilized man. I have broken with society for reasons which I alone am able to appreciate. I am therefore not subject to it's stupid laws, and I ask you to never allude to them in my presence again."
For me, I think that the most useful fuel temperature measurement would be at the rail.
I have noticed that on hot restarts, after letting the car sit 15 minutes or so (looks like a heatsoak phenomenon), that it would run about 10% lean (and sometimes rough running), tapering off over 30 seconds. I do not explain this with IAT heatsoak, because the IAT reading only increases 2 degrees Celsius or so; not enough to explain the 10% lean running. My only other suspect is the heating of the fuel in the rail itself; the heatsoaked fuel becomes less dense, so less fuel mass is injected into the engine during each squirt.
The hot afterstart enrichment patches this behaviour nicely. The extra fuel doesn't cause problems on a non-heatsoaked hot restart, besides wasting gasoline...
I still have my slipping clutch (Fierostore RAM HD) right now, so I haven't been playing with WOT or heavy loads (situations requiring water injection). I haven't yet had the opportunity to install my Spec Stage 3+.
I still managed to do a lot of cold driveability tuning on the failing clutch, though I've pretty much zeroed in on that now. By cold driveability, I mean hopping into the car with a cold engine, turning the key, and driving off immediately without too much weirdness.
My truck is currently in pieces in my parents garage; during weekends it's my priority to go there and get it running, because I need the truck for my move which is coming soon. Since my truck isn't running, the Fiero has to assume the DD duty. Half-throttle in the Fiero will still get me from A to B...
I'm not actually planning on renting a cube van for the move. Since the new place is only about 1 mile away, I'm just going to drive my truck back and forth a dozen times or so, with friends at either end helping me load/unload.
I am quite happy with my overall tune, but I don't know how much of it is because of the sequential injection. As a future experiment (like in November when it's cold), I should revert to batch fire and see what difference it makes for the cold driveability.
[This message has been edited by pmbrunelle (edited 05-02-2021).]
how long is your fuel pump prime? do you let the pump run prior to starting? the metal in the rail would still hold heat, but I wouldn't think the new fuel would be able to absorb that much heat that quickly. it would be quite interesting to put a temp sensor on the supply and return as close to the rail as possible and see what the difference is. that said, the fuel rail on your engine is completely encapsulated by the intake, and much larger/heavier than later 3x00 style rails, so the rail itself is probably hotter, and holds more heat. can you hit the rail with an IR thermometer and see how hot it is under these conditions? do you have a fuel pressure sensor?
the joys of having your project become a DD, what's up with the truck?
I'm very much looking forward to having full sequential available on my engine, it should be available in the next round of beta testing, I'd rather not run beta code, but it will need someone to test it, hopefully I'll have my garbage fixed by then.
------------------ "I am not what you so glibly call to be a civilized man. I have broken with society for reasons which I alone am able to appreciate. I am therefore not subject to it's stupid laws, and I ask you to never allude to them in my presence again."
Maybe the fuel heating is a bad hypothesis with the return-style system; probably the prime flushes out the hot fuel quickly, though the rail itself would stay hot. Returnless would be different. Even though I have a line of sight, I wouldn't trust an IR thermometer on the fuel rail; it's too shiny.
I should pick up a set of temperature-indicating wax crayons; they would be more handy for situations like this, measuring the surface temperature without having to worry about reflections.
I haven't been measuring the fuel pressure, but I don't think that Fiero regulators have a known problem.
There's also the theory of fuel injector heatsoak. As the injector gets heatsoaked, the electrical resistance of its copper winding increases. With greater resistance, it takes longer for the injector to open; less fuel is injected for a given electrical pulse width. I think I like this theory now.
My Fiero is a pretty nice DD (well, except for the clutch), so as long as I'm not driving it in the corrosive winter salt, I'm happy DD-ing it.
The truck had a leaking exhaust manifold, and one bolt was broken off in a cylinder head. I removed the head, drilled out the bolt, and heli-coiled the hole. I did that in a day. So it's just putting it back together that's long.
I'm not good at slapping things quickly back together, things need to be cleaned/wirebrushed/painted.
[This message has been edited by pmbrunelle (edited 05-02-2021).]
Maybe the fuel heating is a bad hypothesis with the return-style system; probably the prime flushes out the hot fuel quickly, though the rail itself would stay hot. Returnless would be different. Even though I have a line of sight, I wouldn't trust an IR thermometer on the fuel rail; it's too shiny.
I should pick up a set of temperature-indicating wax crayons; they would be more handy for situations like this, measuring the surface temperature without having to worry about reflections.
I haven't been measuring the fuel pressure, but I don't think that Fiero regulators have a known problem.
There's also the theory of fuel injector heatsoak. As the injector gets heatsoaked, the electrical resistance of its copper winding increases. With greater resistance, it takes longer for the injector to open; less fuel is injected for a given electrical pulse width. I think I like this theory now.
My Fiero is a pretty nice DD (well, except for the clutch), so as long as I'm not driving it in the corrosive winter salt, I'm happy DD-ing it.
The truck had a leaking exhaust manifold, and one bolt was broken off in a cylinder head. I removed the head, drilled out the bolt, and heli-coiled the hole. I did that in a day. So it's just putting it back together that's long.
I'm not good at slapping things quickly back together, things need to be cleaned/wirebrushed/painted.
I think electrical heat soak makes more sense, the fuel would be refreshed quite quickly through the rail, the injector windings would need some about of time to cool.
I worry less about non critical surfaces when I'm crunched for time, but otherwise, I try to also clean things up as best as I can. it makes later work easier, and makes finding new problems easier.
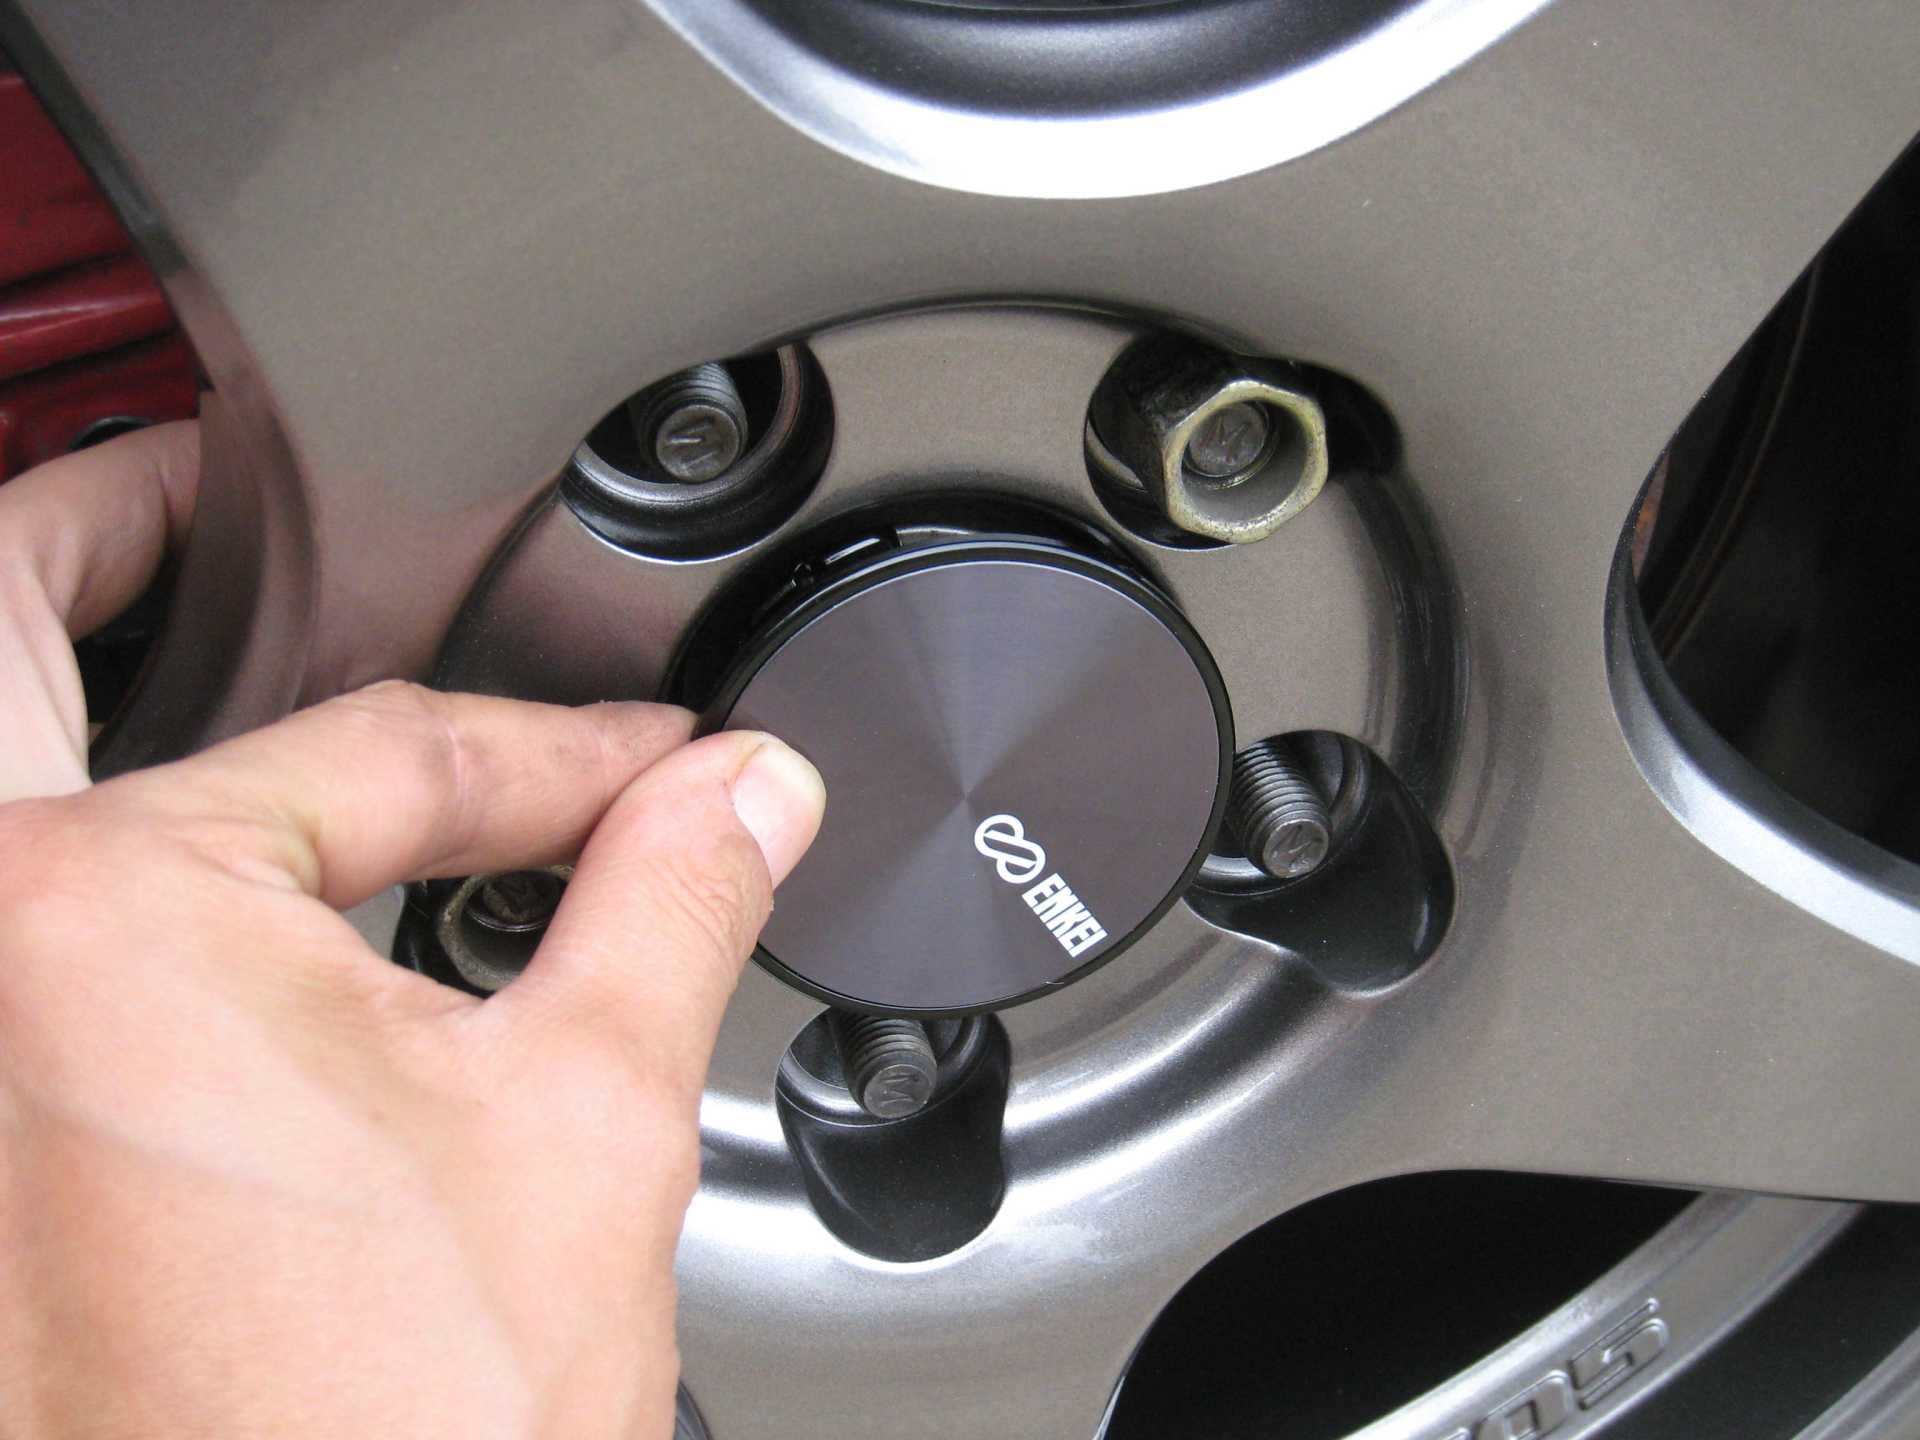
the wheels look great! FWIW, I was able to 3d print cap extenders. I printed them in PLA, the entire time I was in WA, they were fine, but when I moved back down south, the passenger side warped can fell off. I haven't had time to find a proper solution yet, but eventually I'll either print them in ABS and try again, or try some kind of exotic filament.
The file I made is available for download here if you need/want it:
------------------ "I am not what you so glibly call to be a civilized man. I have broken with society for reasons which I alone am able to appreciate. I am therefore not subject to it's stupid laws, and I ask you to never allude to them in my presence again."
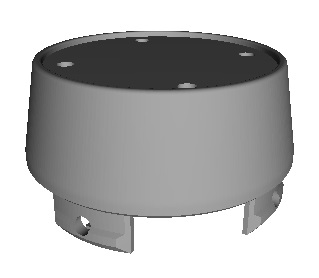
I recently ordered (for work) 3D-printed parts made on a Multijet Fusion (black PA 12 material), and I liked the results. I liked the look of the plastic, and I thought that it had the right balance of stiffness/flexibility for use with springy tabs in plastic. From that experience, I decided to try the same thing for my Fiero parts. The Multijet Fusion won't delaminate between layers since it is not filament-based. I do not own my own 3D printer.
The price was not too bad, but there was a $90 minimum order, so I also ordered a cap (and a spare) to protect my oil pressure sender from rain.
It slides over the oil pressure sender to keep rainwater out of its connector.
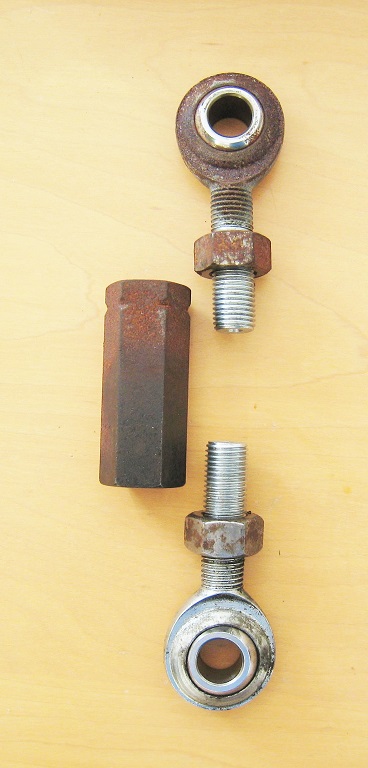
So here we see the applicability of a racecar turbo support solution on a street car:
Over the last year of summer driving, nothing got frozen, though the upper ball near the turbo is a bit stiff. In general, the upper rod end fared worse, I suppose with the heat burning off the zinc plating from the carbon steel rod end.
I'll probably look for some stainless steel replacements. The jam nuts (400-series stainless IIRC) with surface rust don't bother me too much; they'll just get Scotchbrited and oiled.
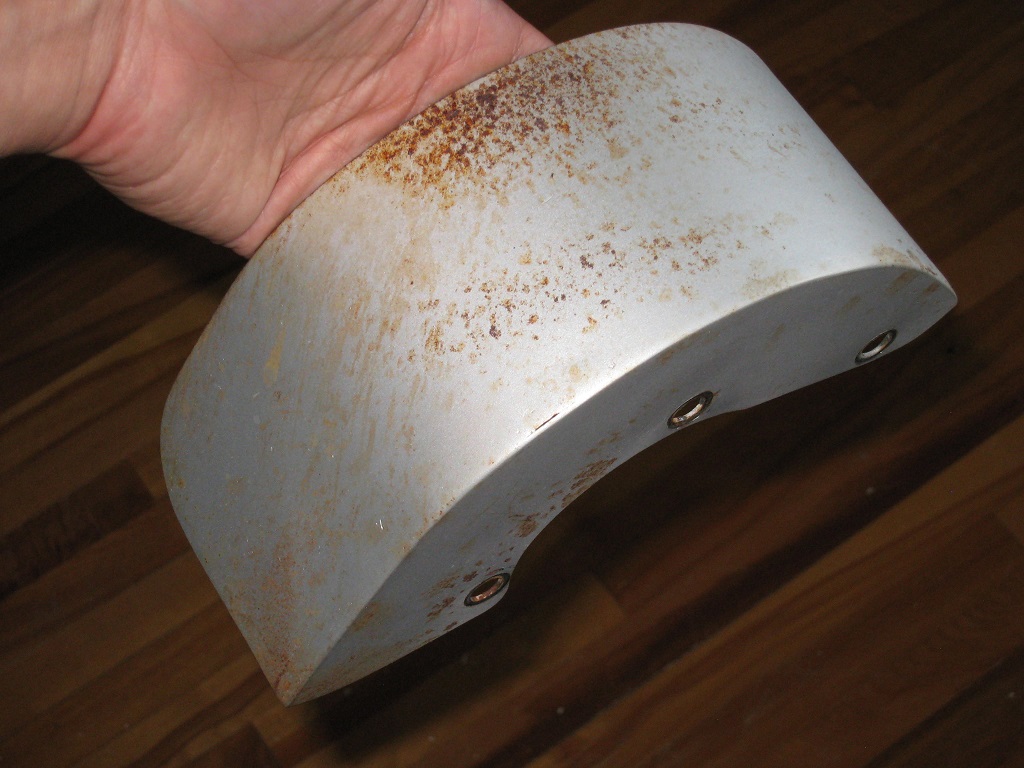
For the threaded hex piece, which was cold-blued and oiled, I'll most likely be getting that Cerakoted, along with a bunch of other heat shields. I will be meeting a local Cerakote shop next week.
My sandblast + VHT header paint job didn't hold up on many of the heat shields.
The heat shields closest to the hottest parts of the exhaust are the ones that rusted the most, presumably with the paint being burned off, and ambient temperature accelerating the oxidation of the metal.
With the stock 2.8, VHT paint did OK on the heat shields. With the present setup, it is not rare to see some parts of the exhaust glowing a dark cherry red (visible at night).
So the car has been out of service since late August.
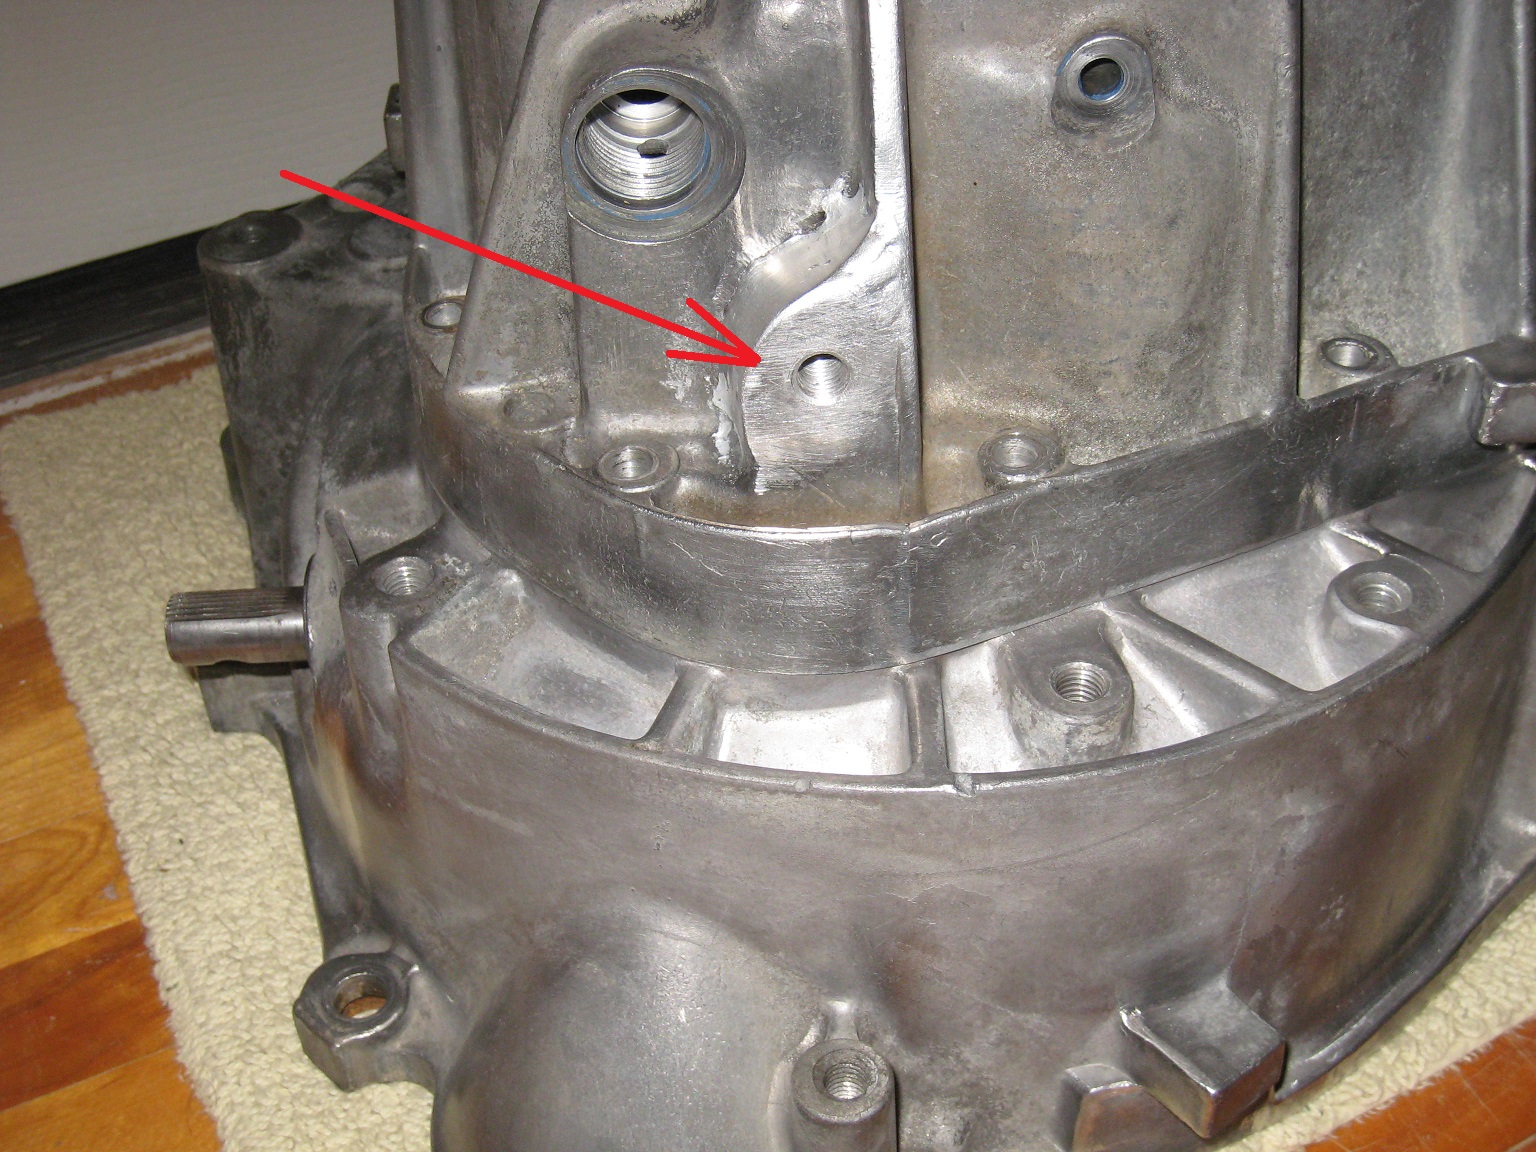
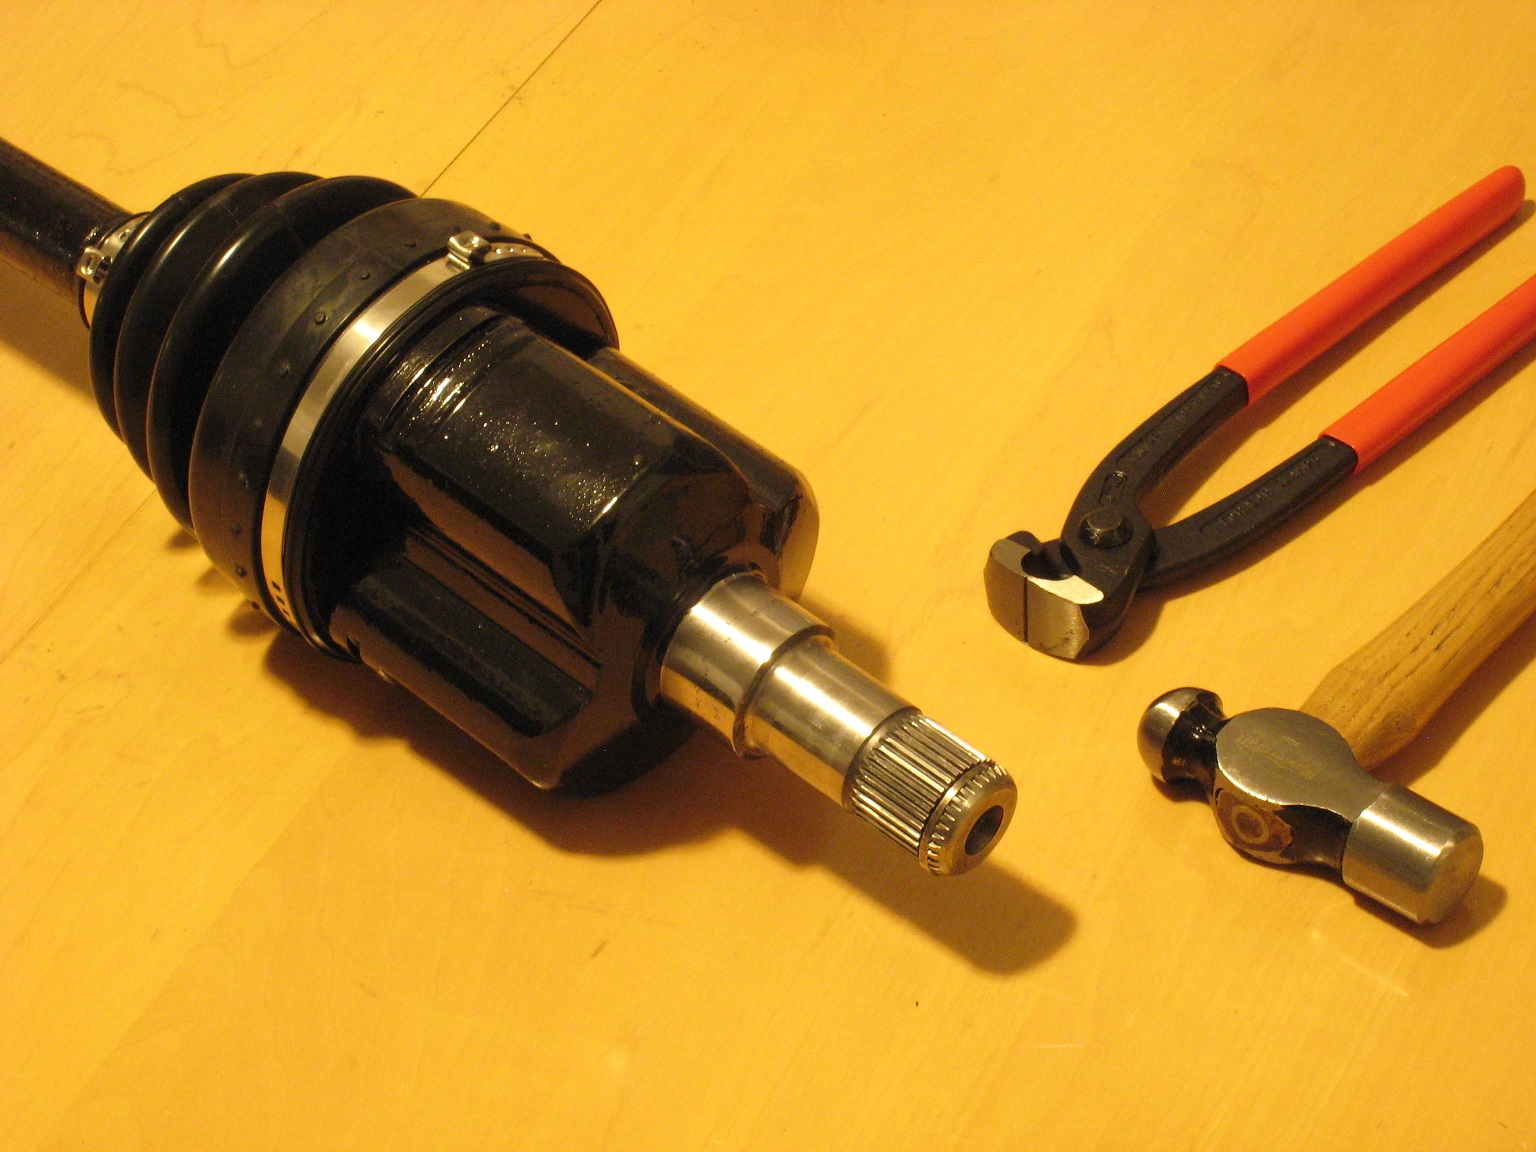
Since then, I have done/prepared: General degreasing/washing New oil-pressure sender (was water-damaged) with 3D-printed protective cap Replaced alternator (bad bearing) Replacement of various rusty bolts/nuts Spec Stage 3+ clutch (RAM HD was slipping at 175 kPa) Retorqued the not-so-tight harmonic balancer bolt, then painted with reference marks. Cerakote (subcontracted) C-7700 coating on heat shields and some small hardware items. Stainless steel rod ends for turbo support, PTFE-lined Sandblasted + recleared (with better quality spray can clear) some aluminium brackets (alternator, shift linkage, clutch slave) New coolant hoses, T-bolt clamps Ground away and rewelded (subcontracted) broken transmission mount boss on transmission case. Drilled and tapped for mount. Ground away the sharp edges / parting lines from the transmission case. Resprayed some steel parts black Scavenged some tripod cups, polished the seal journals, and assembled onto my axles (hope to fix the transmission oil leak). New transmission seals as well. Repaired broken transmission mounts (overtightened on attempted installation, damaged fasteners)
I'm getting very close to being able to button up everything together.
i used the Spec stage 3+ clutch in my 3800SC application into my MY8 4 speed and i still have some chattering going on in first and reverse. i am on my third full tank of gas - odometer doesn't work - so i don't know the mileage, but hope that this annoying chattering stops.
jon
PS i didnt build a frankentranny with a M17 and an MY8 cuz it would have slowed down my build and i figured that it might never get done that way. However i am picking up some parts for an M17 today just in case, for the future
At 0* C I doubt steel embrittlement is an issue. For the rubber seals just use a heat gun or blow dryer to warm them before axle entry. Cool build.
Good tip on the heat gun. I dropped into my parents place to borrow my dad's heat gun.
quote
Originally posted by longjonsilver:
i used the Spec stage 3+ clutch in my 3800SC application into my MY8 4 speed and i still have some chattering going on in first and reverse. i am on my third full tank of gas - odometer doesn't work - so i don't know the mileage, but hope that this annoying chattering stops.
jon
PS i didnt build a frankentranny with a M17 and an MY8 cuz it would have slowed down my build and i figured that it might never get done that way. However i am picking up some parts for an M17 today just in case, for the future
Do you have rubber or polyurethane engine/trans mounts? If you have rubber, that may aggravate the chatter.
If I wrap up things quickly, I'll find out soon enough for myself how the chatter is like.
I know what you mean about leaving out things to finish the build quicker. For instance, I ran the axles I had, knowing that their seal journals weren't smooth, and likely to leak oil. That's what happened, and that's what I ended up fixing a year after the big rebuild project.
What transmission do you have now? The benefit of driving with something else is that it gives you a baseline; from there you can ask yourself what you like changed in the transmission to suit your tastes better. Or maybe you like it how it is now?
I would be very careful with a heat gun on/around the seals. it wouldn't take much to overheat the seals an deform them if you're not. I would think a small camping heater, that heats the whole area, with less focus might be a smarter plan, something like I have linked below:
I though your new place had a garage? I guess it's time to get started on one... lol!
------------------ "I am not what you so glibly call to be a civilized man. I have broken with society for reasons which I alone am able to appreciate. I am therefore not subject to it's stupid laws, and I ask you to never allude to them in my presence again."
Originally posted by pmbrunelle: Do you have rubber or polyurethane engine/trans mounts? If you have rubber, that may aggravate the chatter.
If I wrap up things quickly, I'll find out soon enough for myself how the chatter is like.
I know what you mean about leaving out things to finish the build quicker. For instance, I ran the axles I had, knowing that their seal journals weren't smooth, and likely to leak oil. That's what happened, and that's what I ended up fixing a year after the big rebuild project.
What transmission do you have now? The benefit of driving with something else is that it gives you a baseline; from there you can ask yourself what you like changed in the transmission to suit your tastes better. Or maybe you like it how it is now?
Rubber trans and motor mounts - Dodge motor mounts - one on each side of the engine, plus a modified GPrix dogbone.
i left out replacing the front main seal and now it appears to be leaking oil, however i replaced the inner and outer boots on the axles.
i am using my MY8 transmission, and the only thing is that Reverse is a higher gear than 1st. Same on my S10. Why would they do that? Its sooooo annoying. Nice on the highway with the high 4th gear.
But i got some questions for you. There is a slight droning that seems to be coming out of the wheels and it gets louder on the highway. Could it be the gears in the tripot? Or the transmission? It didn't seem to be there with my old motor and tranny (M19)
N when i shift on the driveway (never on the road???) there is a clunk - it used to be there with my old motor and tranny, and its still there. Any ideas?
------------------ Astronomy says we will find a coded signal from outer space. Then we'll KNOW that life exists there, for coded signals aren't by chance.
Biology says there are coded genetic signals in every cell, but we KNOW that no intelligence created life.
I'm the original owner of a white ' 84 2M4 purchased Dec 10, 1983 from Pontiac. Always garaged, no rust, 3800SC, 4-wheel drifts are fun!
Originally posted by ericjon262: I though your new place had a garage? I guess it's time to get started on one... lol!
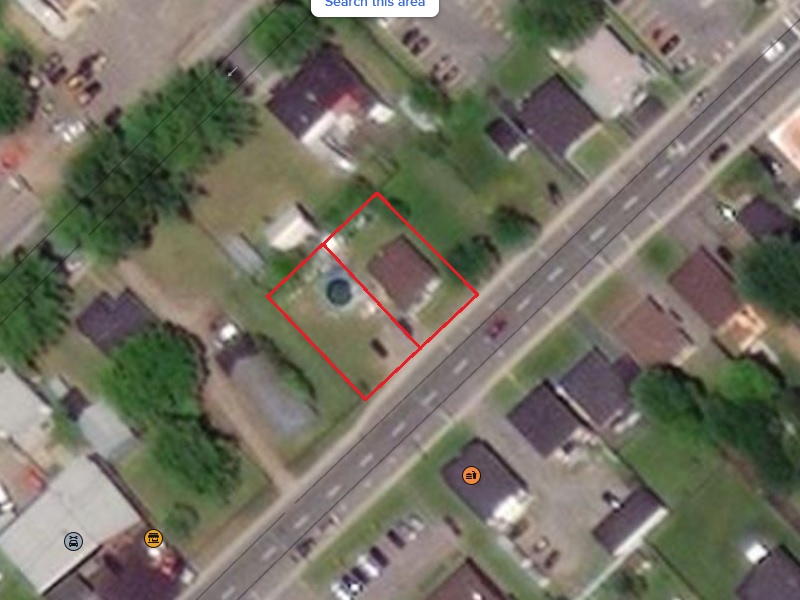
No garage. The lack of garage is a downside of this place, however, I liked the location and the general characteristics of the house itself.
In addition to the house and its lot, I also purchased the neighboring vacant lot:
The satellite image shows an above-ground swimming pool, but the image is out of date. Now the vacant lot is just grass.
My plan is to build a large enough garage on the vacant lot. Since I don't know much about house construction, I figured that building a garage (the way I want it) would be a good learning experience.
While I do like the house, it is somewhat of a dump, and requires repair/renovation. I need to make more progress on the house before I add the garage construction project to my plate.
quote
Originally posted by longjonsilver: But i got some questions for you. There is a slight droning that seems to be coming out of the wheels and it gets louder on the highway. Could it be the gears in the tripot? Or the transmission? It didn't seem to be there with my old motor and tranny (M19)
N when i shift on the driveway (never on the road???) there is a clunk - it used to be there with my old motor and tranny, and its still there. Any ideas?
Did you also change the tires? Tire noise maybe?
Does the clunk happen when you shift the gear lever? Or when you release the clutch pedal to get going? If it's when you release the clutch pedal, it could be looseness in the rear tie-rod ends, or ball joints.
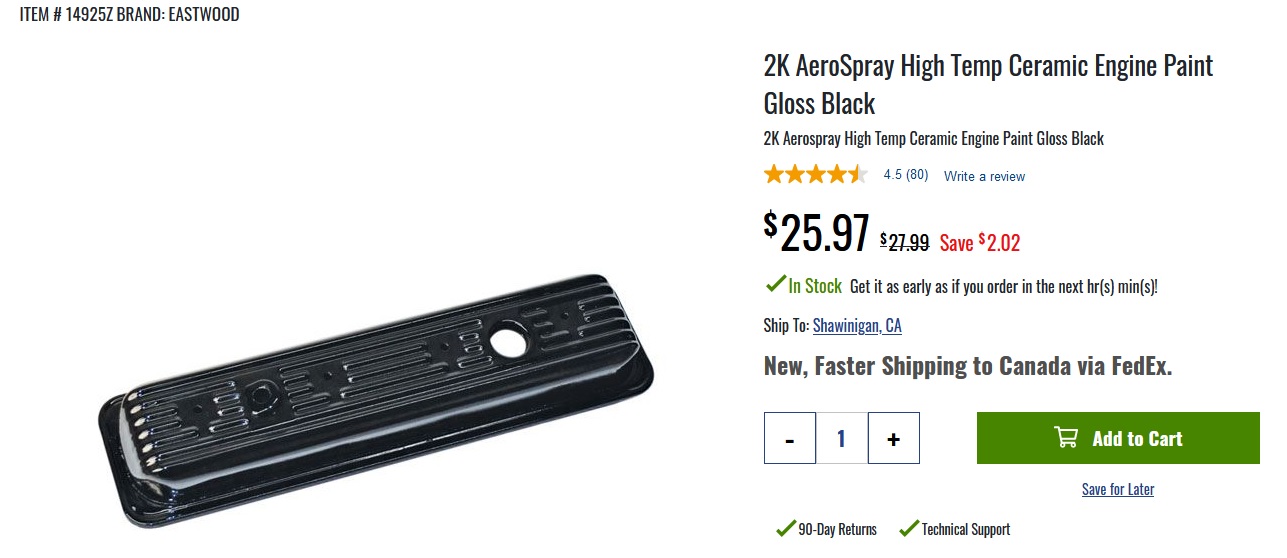
I have been reading this build for a while now and just finished it. Very nice work overall. These Eastwood paints have an inner compartment that you break open from the bottom to get a two part mixture to occur. You have to use the whole can in a couple hours once you do, but the paint quality is amazing and it is extremely durable. You can also buy it in non aerosol cans and shoot it out of an HVLP gun or brush it on. It was recommended to me by the machine shop I brought my engine to. My brother used some similar 2K chassis paint made by Eastwood on his Legacy GT rocker panels when he replaced them fully, and the paint has held up through quite a few NE winters. I recommend the ceramic engine paint (/caliper paint) because of the engine bay temps. My brother painted his Miata rear calipers with the same paint I painted my motor with.
[This message has been edited by zkhennings (edited 11-15-2021).]
Originally posted by longjonsilver: i used the Spec stage 3+ clutch in my 3800SC application into my MY8 4 speed and i still have some chattering going on in first and reverse. i am on my third full tank of gas - odometer doesn't work - so i don't know the mileage, but hope that this annoying chattering stops.
quote
Originally posted by pmbrunelle: If I wrap up things quickly, I'll find out soon enough for myself how the chatter is like.
I buttoned up my car last night, and I did about 8 km of driving in town.
The Spec 3+ pedal effort is like normal, and I can leave from a stop at 1000 RPM like usual, without chatter.
The friction zone is a bit narrow, but I think I'll get used to it. Seems like it will be a livable clutch.
Unfortunately, when I was 4 km away from home, the water pump gasket decided to leak a boatload of coolant (nice cloud of steam visible in the mirror). I shut off the engine (which had reached 115 °C, according to ECU sensor), and walked back home to get some more coolant.
I was able to limp the car home once I refilled it with coolant. I also removed the thermostat for the 4 km trip home. The indicated coolant temperature (instrument cluster gauge) was cold on the way home.
Now the car is parked outside for the winter under a tarp, on an asphalt surface. I'll look into the coolant leak in the spring.
Well, its good to hear that your clutch is working so good. Mine was better last week on my drive around town. Funny you saw steam coming out. i did too. My thermostat housing cap popped off twice. The first time i thot my car was on fire. A cap from a friend and another gallon of aunty freeze seems to have solved the problem.
jon
------------------ Astronomy says we will find a coded signal from outer space. Then we'll KNOW that life exists there, for coded signals aren't by chance.
Biology says there are coded genetic signals in every cell, but we KNOW that no intelligence created life.
I'm the original owner of a white ' 84 2M4 purchased Dec 10, 1983 from Pontiac. Always garaged, no rust, 3800SC, 4-wheel drifts are fun!
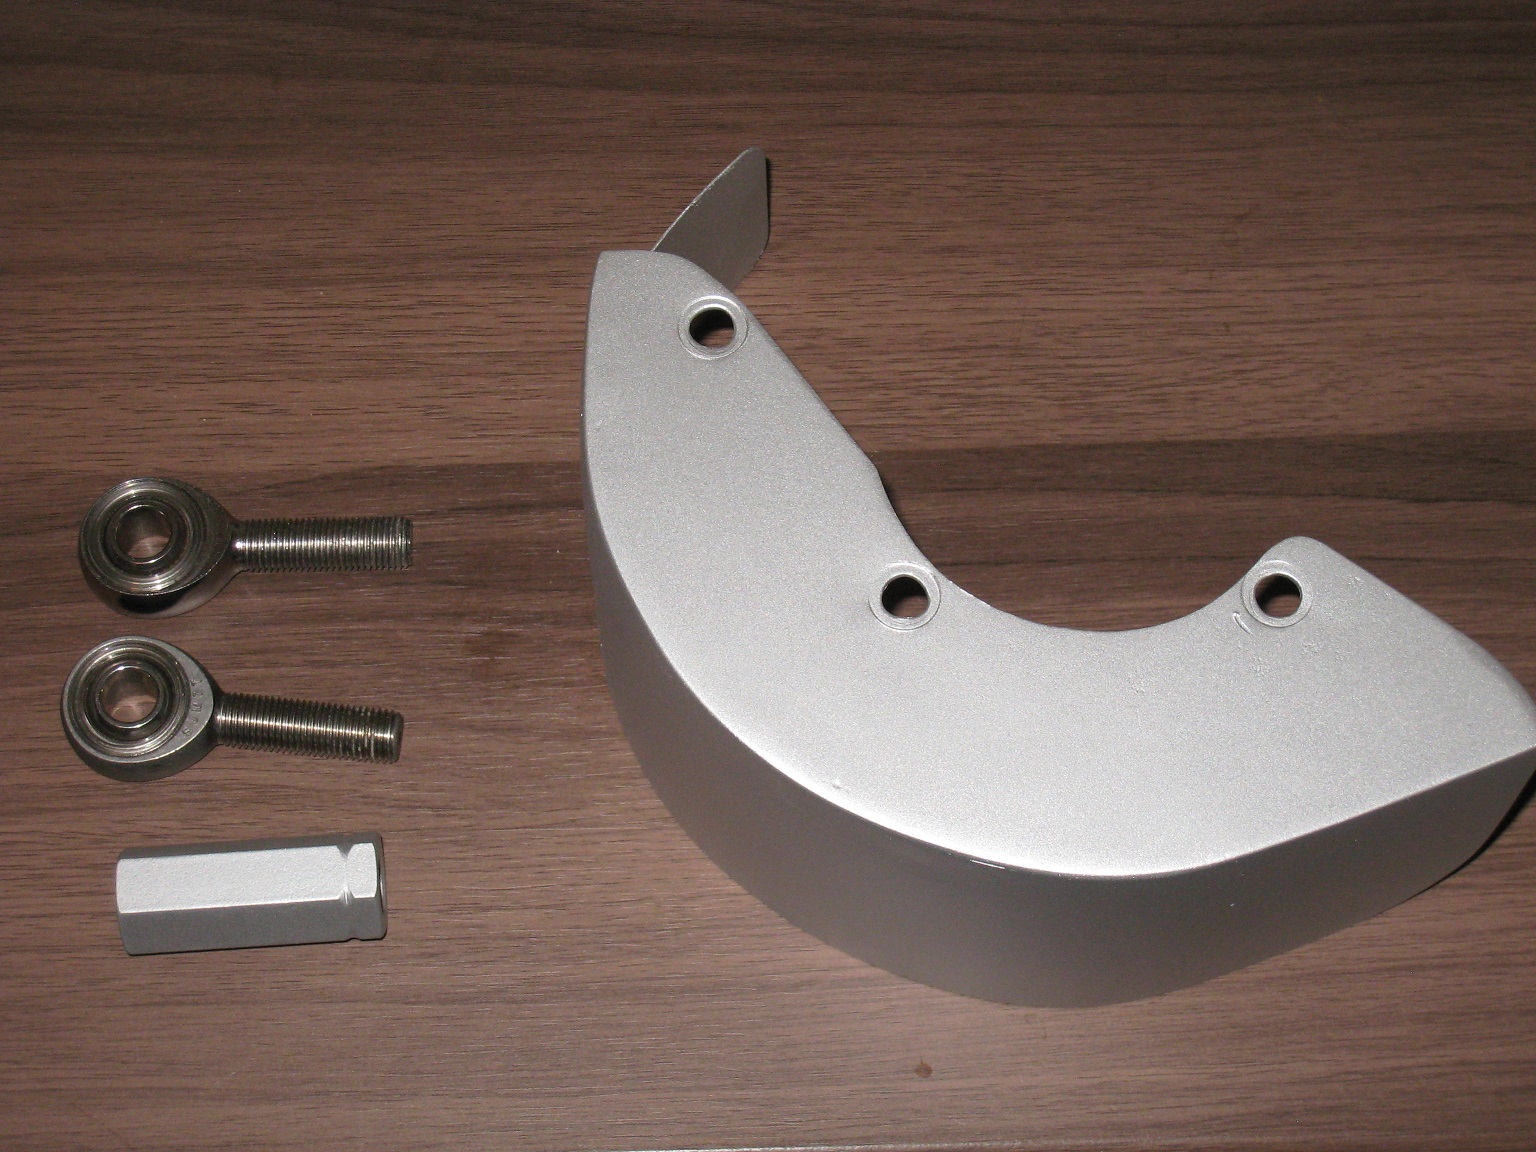
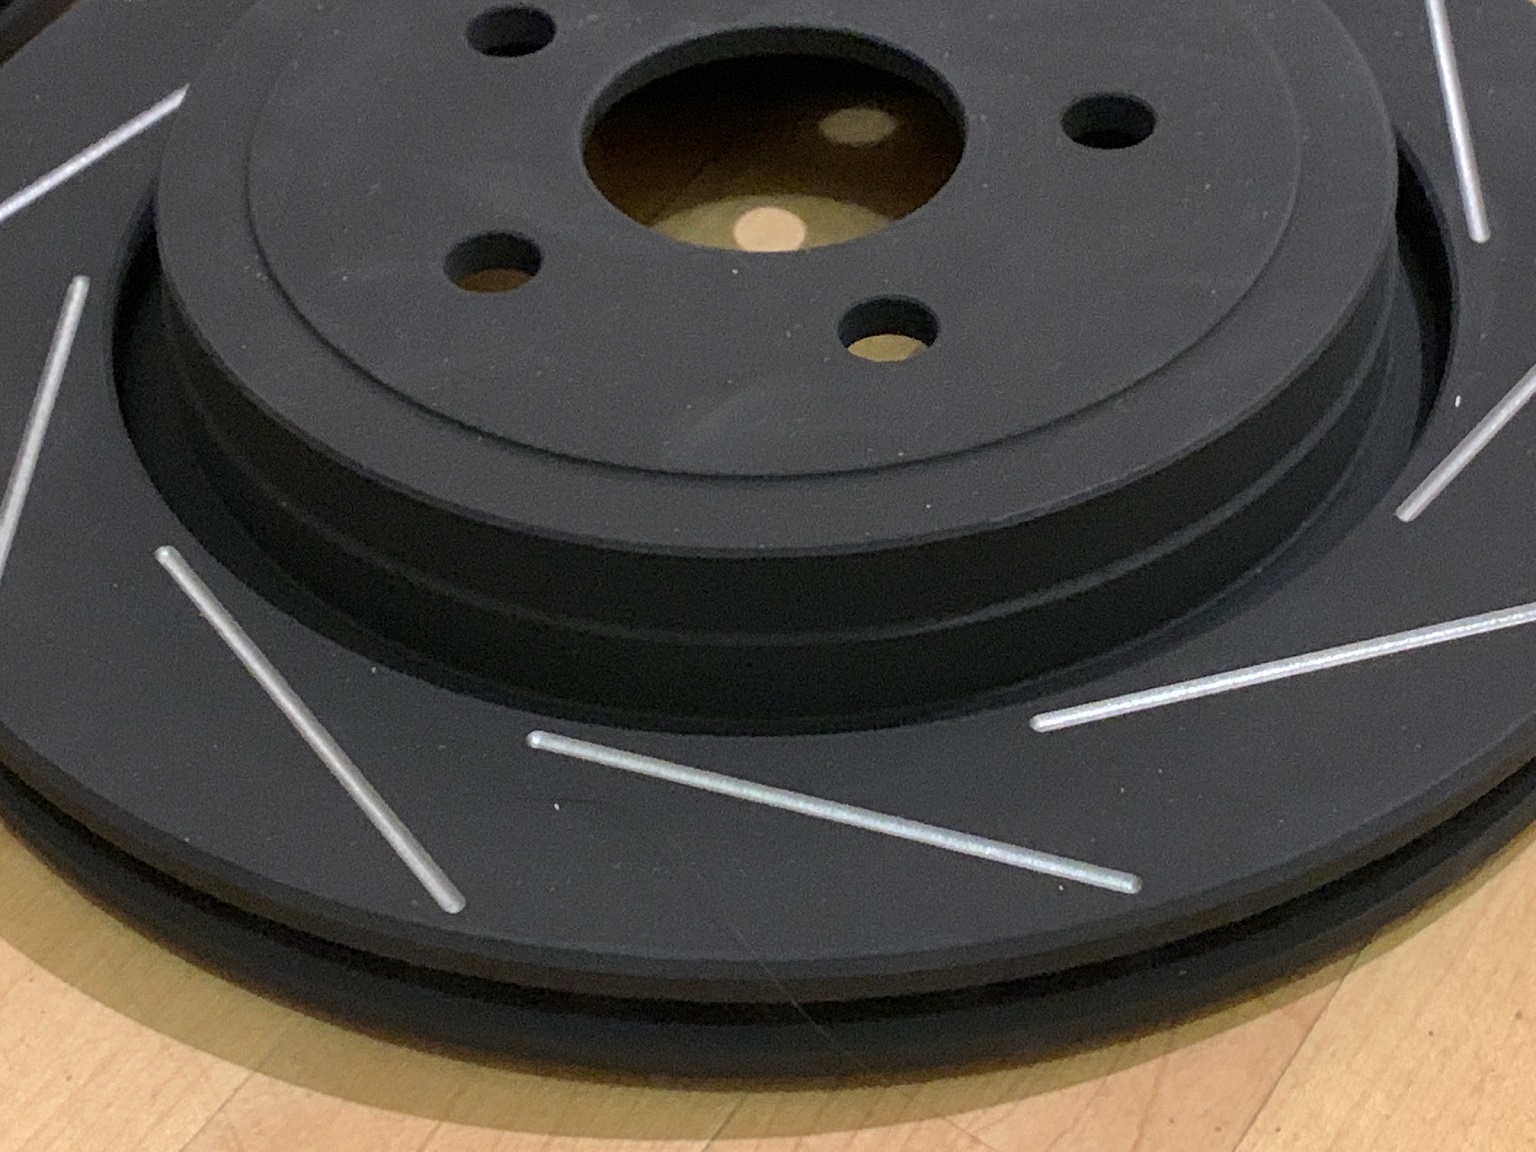
I had the opportunity to use the CNC router table at my dad's work, so I used it to slot the outboard faces of my LeBaron brake rotors.
To locate the rotor on the router table, I made a sacrificial one-time use jig, made from stacked/glued MDF sheets. The jig was cut-in-place. I used a 1/8" ball-nose mill to cut the actual slots.
The job was pretty time-consuming; I was only able to slot the outboard faces.
On another weekend, I'll make another one-time use jig (that supports the rotor inboard face-up), and slot the inboard faces.
When both sides are done, I'll check the balance with my wheel balancer.
You really don't want to drill and slot the rotors yourself. They are cast parts with thicker and thinner spots. When you drill the holes, you are not removing the exact same material from every hole, which will lead to the need to have them rebalanced. When you buy drilled/slotted rotors, they have already been balanced post drilling.
Now I have my first taste of experience with this!
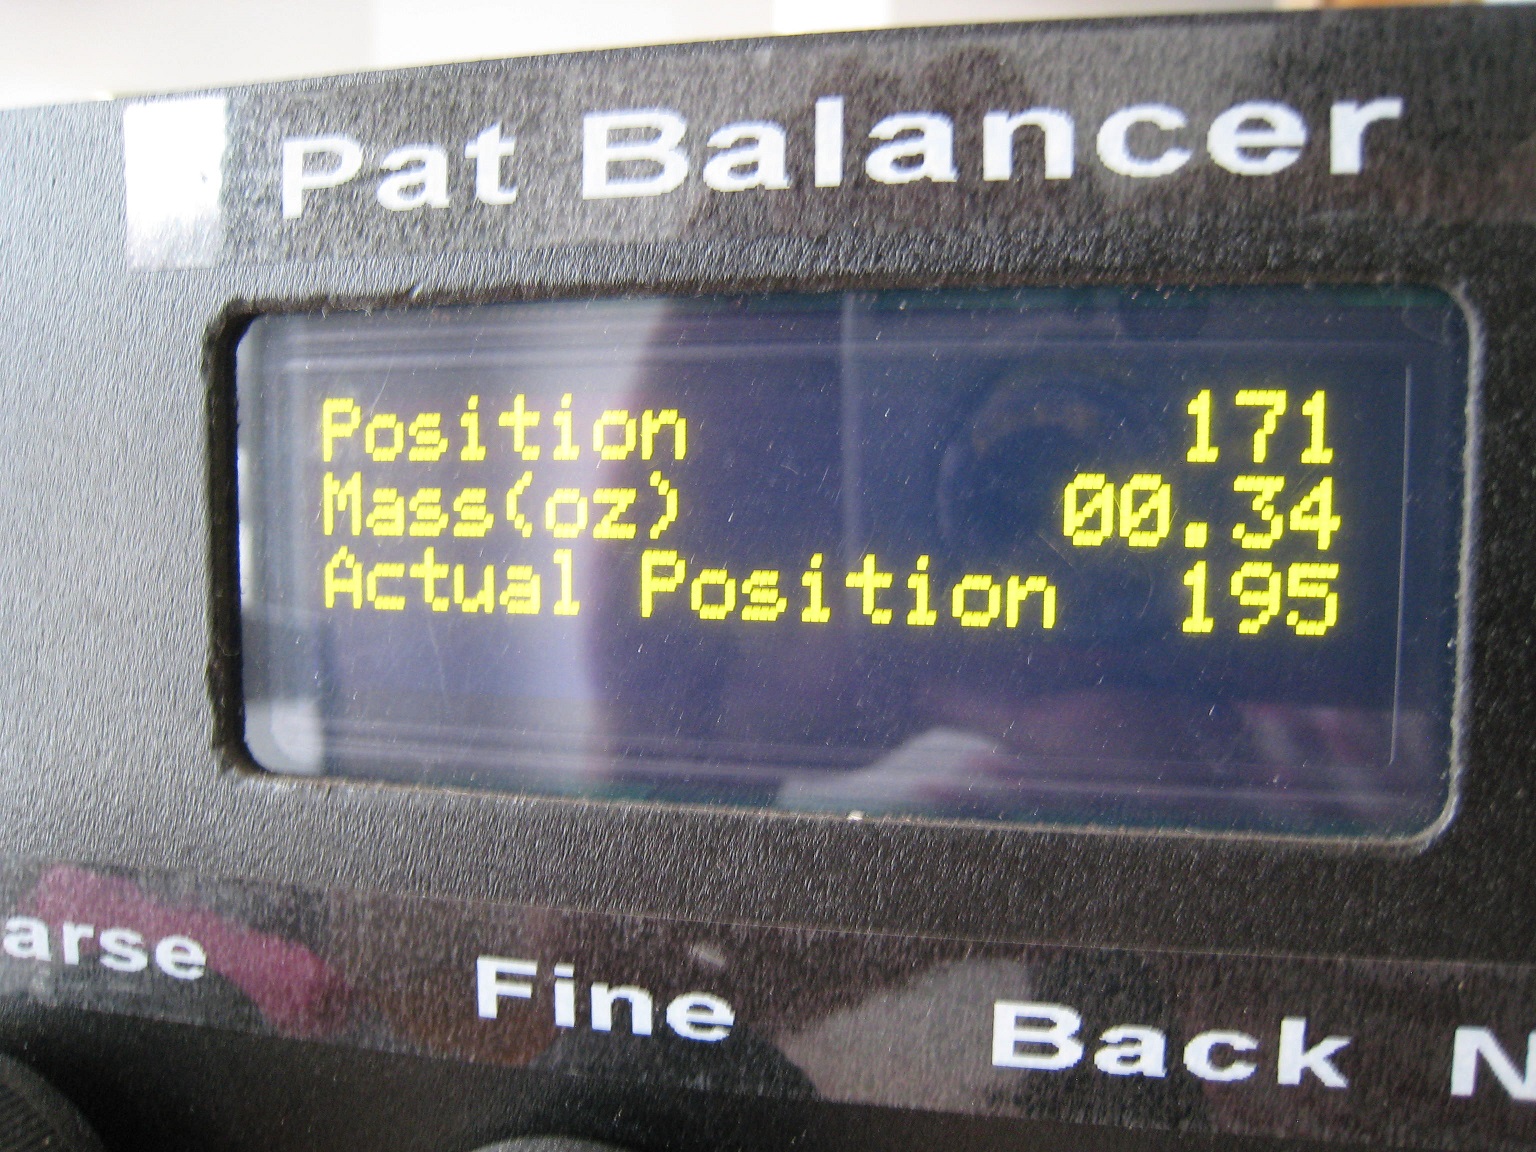
So first I checked a Centric/Stoptech pre-slotted rotor.
The Centric/Stoptech pre-slotted rotor had 0.34 oz of imbalance (at the rotor edge). Not so great:
It showed no signs (material removal by machining) of having been balanced. Maybe other fancier brands such as Brembo/Wilwood are better.
The DIY rotors were Raybestos 7993R that I slotted.
The Raybestos rotor was also imbalanced, but I think that the main cause of imbalance was a poor centering of the casting when it was machined at Raybestos. A visible runout in the 0.050" to 0.100" range was visible between the as-cast surfaces (the vanes) and the machined surfaces.
My slots were cut pretty evenly, so I don't think they are much of a factor.
This is the material I removed with an angle grinder:
The material I removed was pretty much 180° away from the low runout spot of the casting, which supports the poor machining setup (at Raybestos) hypothesis for the main cause of rotor imbalance.
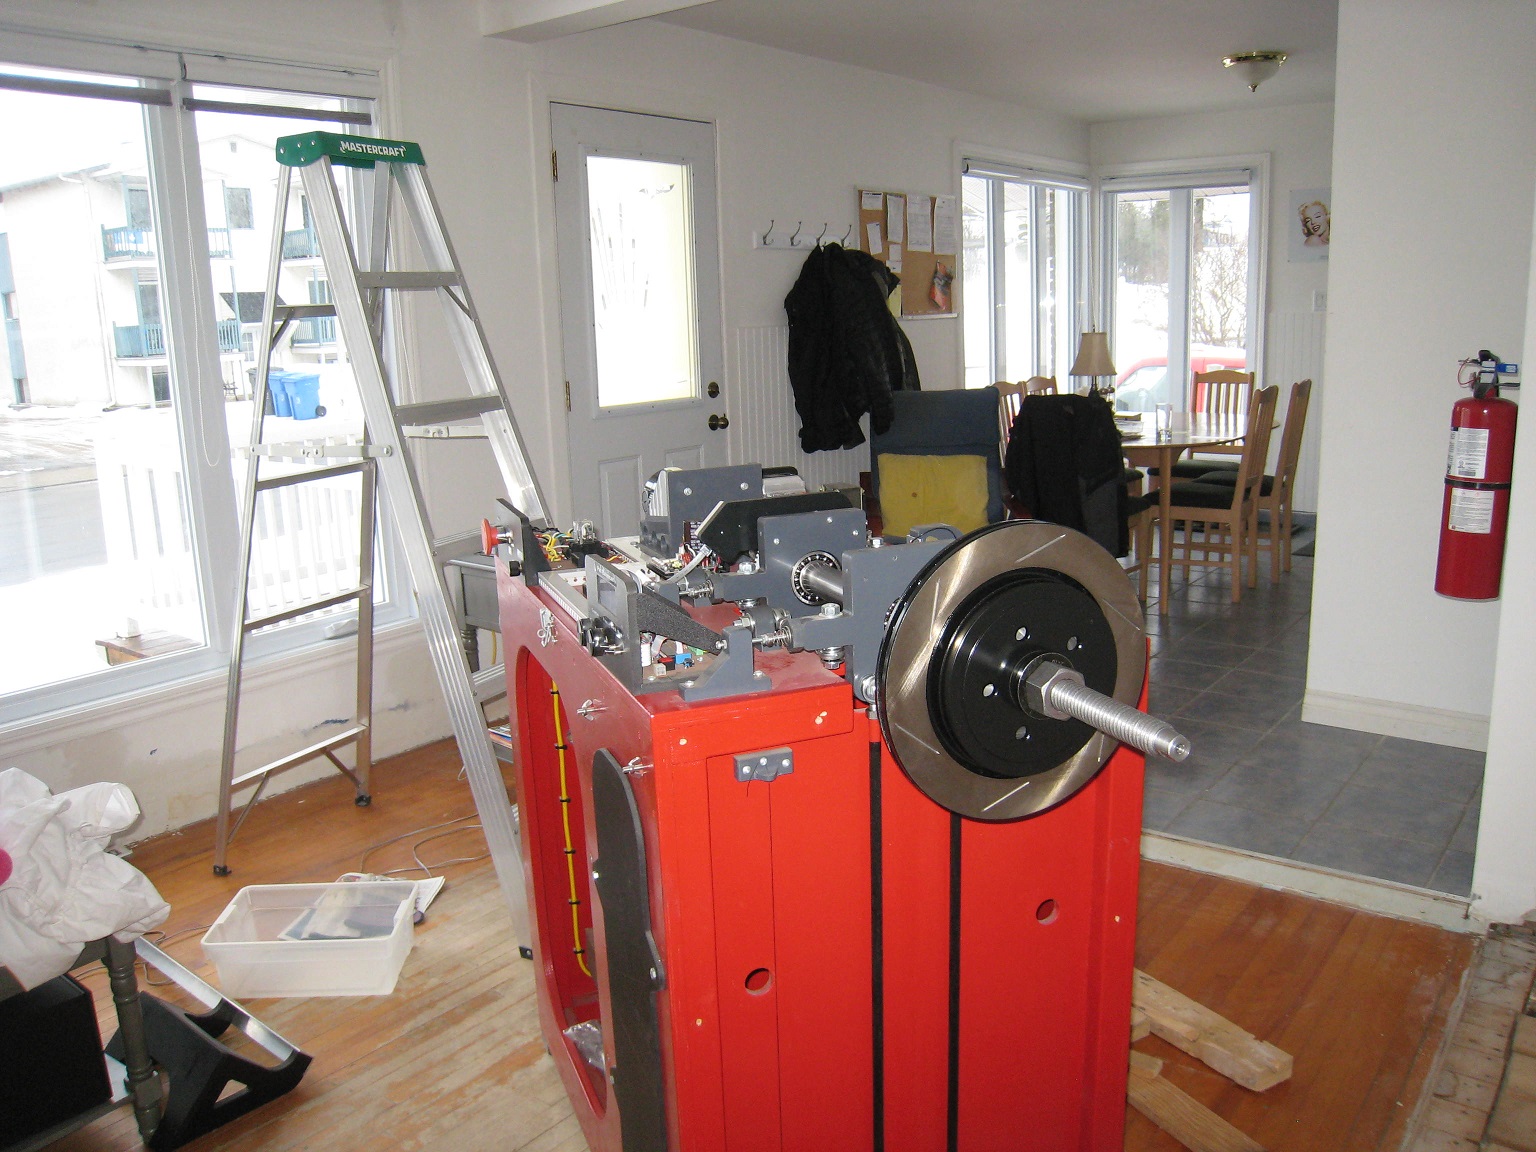
wheel balancer in the middle of a dining room. you truly are my kind of people.
------------------ "I am not what you so glibly call to be a civilized man. I have broken with society for reasons which I alone am able to appreciate. I am therefore not subject to it's stupid laws, and I ask you to never allude to them in my presence again."
The dining room is in the background... that's clearly the toy room.
oh, please excuse my egregious mistake... LOL!
PMBrunelle, Where are you picking up the oil feed for your turbo? what size line are you running for the feed/Are you running any kind of restrictor?
quote
Originally posted by pmbrunelle:
So here we see the applicability of a racecar turbo support solution on a street car:
Over the last year of summer driving, nothing got frozen, though the upper ball near the turbo is a bit stiff. In general, the upper rod end fared worse, I suppose with the heat burning off the zinc plating from the carbon steel rod end.
I'll probably look for some stainless steel replacements. The jam nuts (400-series stainless IIRC) with surface rust don't bother me too much; they'll just get Scotchbrited and oiled.
For the threaded hex piece, which was cold-blued and oiled, I'll most likely be getting that Cerakoted, along with a bunch of other heat shields. I will be meeting a local Cerakote shop next week.
My sandblast + VHT header paint job didn't hold up on many of the heat shields.
The heat shields closest to the hottest parts of the exhaust are the ones that rusted the most, presumably with the paint being burned off, and ambient temperature accelerating the oxidation of the metal.
With the stock 2.8, VHT paint did OK on the heat shields. With the present setup, it is not rare to see some parts of the exhaust glowing a dark cherry red (visible at night).
This guy zinc plated parts for his turbo Sonoma, turned out pretty good, I wonder how that would hold up for you heat sheilds?
------------------ "I am not what you so glibly call to be a civilized man. I have broken with society for reasons which I alone am able to appreciate. I am therefore not subject to it's stupid laws, and I ask you to never allude to them in my presence again."
cognita semper
[This message has been edited by ericjon262 (edited 03-31-2022).]
Originally posted by Will: The dining room is in the background... that's clearly the toy room.
Well it used to be my living room, now it's sort of the wheel balancer / tool storage room, as well as being a construction site
Technically, I have a TV in there.
quote
Originally posted by ericjon262: PMBrunelle, Where are you picking up the oil feed for your turbo? what size line are you running for the feed/Are you running any kind of restrictor?
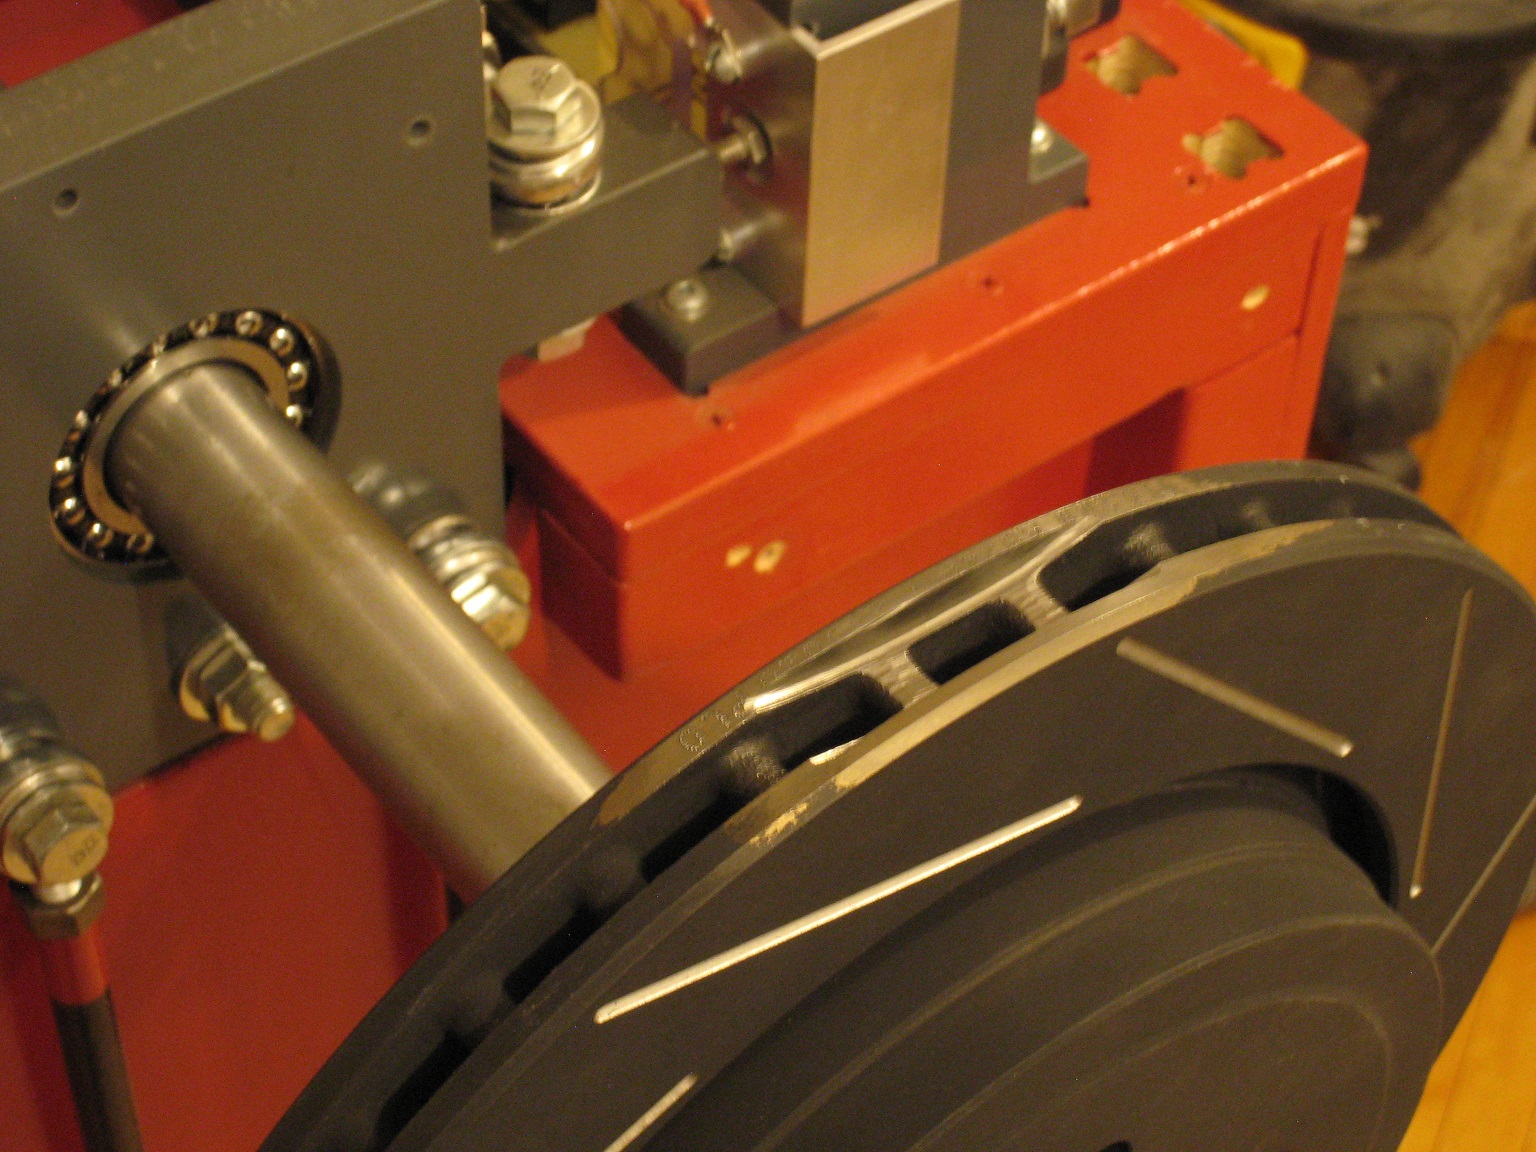
I'm grabbing a 1/8" NPT port on the engine block next to the oil filter:
From there, I have a -6AN cupro-nickel hard line to a T-block, where the oil pressure sender is connected. Then, there is an Aeroquip -4AN PTFE-lined braided hose going into the turbo. My dad convinced me that I shouldn't mess with rubber hoses for handling hot pressurized oil, especially when failure could result in a spray of oil over a red-hot turbo...
My turbo has journal bearings. Journal bearing turbos are often run with an unrestricted oil supply, so I did the initial setup that way. After a few thousand kilometres, I noticed a thin oil film inside the charge pipe. Presumably, the oil came from the turbocompressor. Engine oil pressure seemed high in general. At cold start, I was seeing 60+ psi. From these factors, I decided to run a 0.0625" restrictor (typical size for journal bearing turbos).
Some people use a smaller -3AN line to supply a turbo with some restriction, but the restriction it provides is less "well-defined" than the restriction created by an orifice. I have some unsupported lengths of hose, so I also thought that -4AN would support itself better than -3AN, while having more mechanical robustness at the fittings. -3AN may be better if you want to flex the hose with tighter-radius bends.
Ball bearing turbos need a less oil than journal bearing. A 0.035" to 0.040" orifice seems typical.
Since you have a "dummy distributor" rather than a real distributor, you might be able to modify the dummy distributor to get oil from it. The dummy distributor does intersect an oil gallery on the LX9, right? The dummy distributor is also close to your turbo.
quote
Originally posted by ericjon262: This guy zinc plated parts for his turbo Sonoma, turned out pretty good, I wonder how that would hold up for you heat sheilds?
I had the heat shields done with Cerakote. We shall see how the Cerakote holds up compared to VHT header paint that was on there before.
I had zinc-plated bolts fixing the turbo heat shield to the turbine housing. The heat burned the zinc off the bolts, so I'd say that zinc is a no-go around the turbine/CHRA area. I have replaced the zinc-plated bolts with black oxide bolts. We shall see how the black oxide finish holds up.
Homebrew zinc plating still could be useful for many other parts, such as the trigger disc in the video, or other random bracketry.
Due to the risk of hydrogen embrittlement, I would avoid homebrew zinc plating parts made of high strength steel that are under constant stress, such as bolts.
I think the wide and flat strip of zinc is key to the guy's success. Electrolysis works better when the electrodes have large surface areas, so the current density is not too high.
after posting that, I saw the hardware and thought about how it faired, either way the plating process was interesting enough for me to share it.
Thanks for the description for your turbo oil setup, I'm running a similar setup to oil my turbo. the biggest curiosity was the restrictor. I'm not currently running one, but planning on putting one in.
as far as using the dummy distributor as an oil source, that's not something I had considered, it's an interesting idea, but I would want to map the oil galleries and ensure it was filtered source before dedicating it to my turbo. I'm also not sure the design for the dummy distributor would permit an oil passage to be installed in it.
------------------ "I am not what you so glibly call to be a civilized man. I have broken with society for reasons which I alone am able to appreciate. I am therefore not subject to it's stupid laws, and I ask you to never allude to them in my presence again."
Originally posted by pmbrunelle: Since you have a "dummy distributor" rather than a real distributor, you might be able to modify the dummy distributor to get oil from it. The dummy distributor does intersect an oil gallery on the LX9, right? The dummy distributor is also close to your turbo.
I took apart a spare dummy distributor, I don't think that would be a good way to get an oil supply for a turbo.
here are all the parts laid out, left to right, we have the drive shaft, the main body, a wear plate, a thrust washer, and finally, the gear. not pictures is the roll pin that holds the gear, and the plug that seals the top of the unit.
the body is not quite as simple as just being a big hunk of aluminum, there's a support bushing inside to maintain alignment, which is supported by 5 radial supports, there's not really a way to make a passage for oil to flow up to the top where a fitting could be attached.
additionally, the oil gallery is only sealed on one side, I assume this is to provide oiling for the drive gear. this is the main reason why I don't want to use it for an oil feed, I would prefer to provide a more positive source of oil to the turbo.
there may be a way to build something to work better, but I think running a line from the oil filter is the safer/easier way.
------------------ "I am not what you so glibly call to be a civilized man. I have broken with society for reasons which I alone am able to appreciate. I am therefore not subject to it's stupid laws, and I ask you to never allude to them in my presence again."
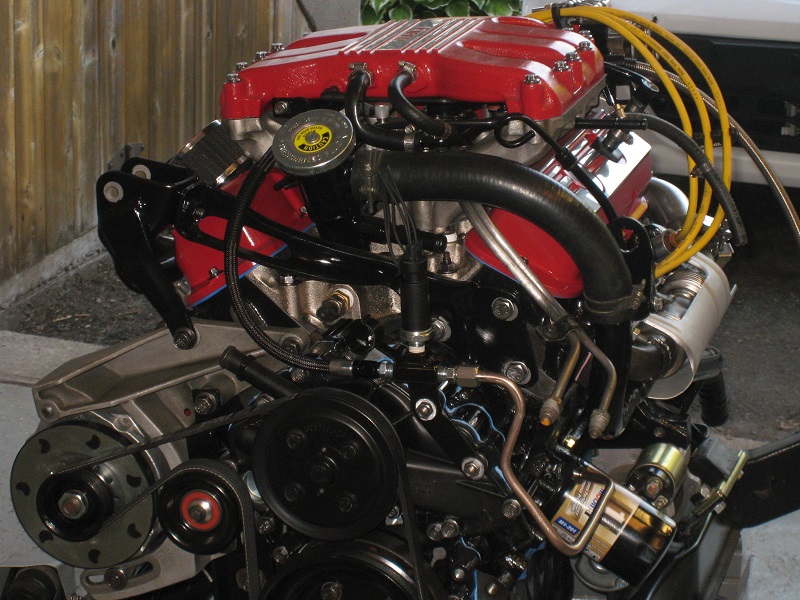
So at the end of last year, the engine puked a bunch of coolant (not sure if any damage occurred then); I then parked the car for the winter and left it alone. Last weekend, I tightened a loose coolant hose clamp, and drove the car for a bit.
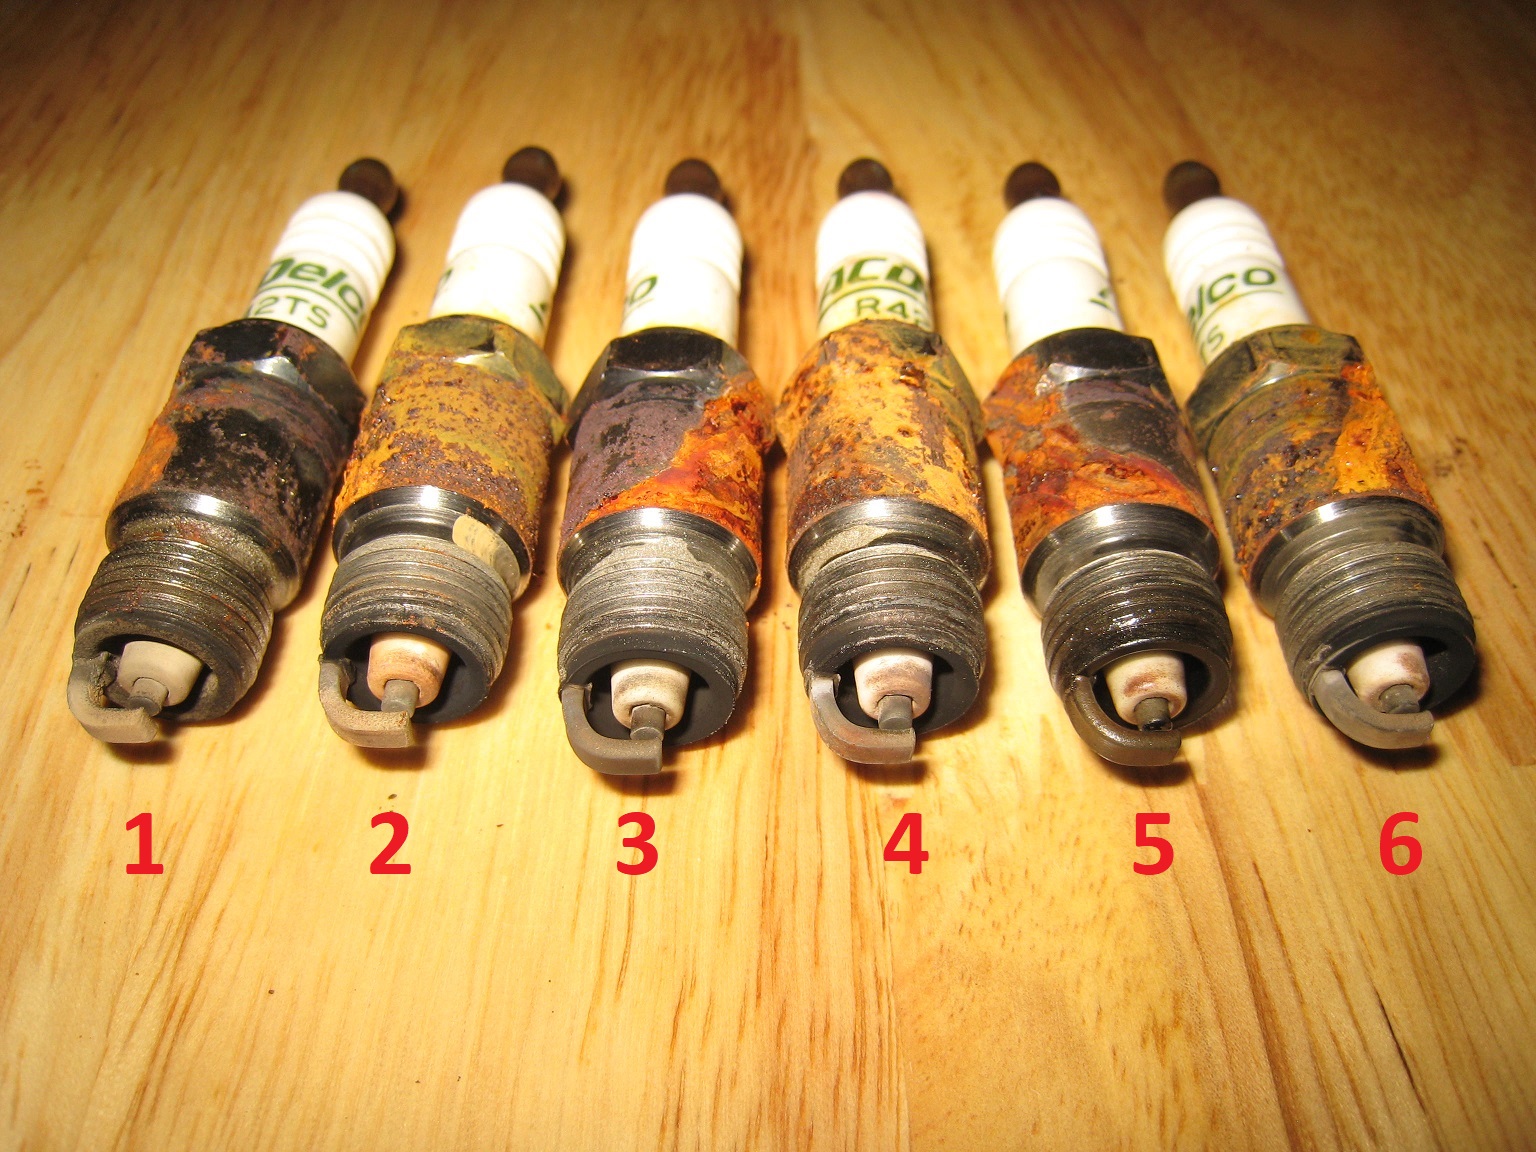
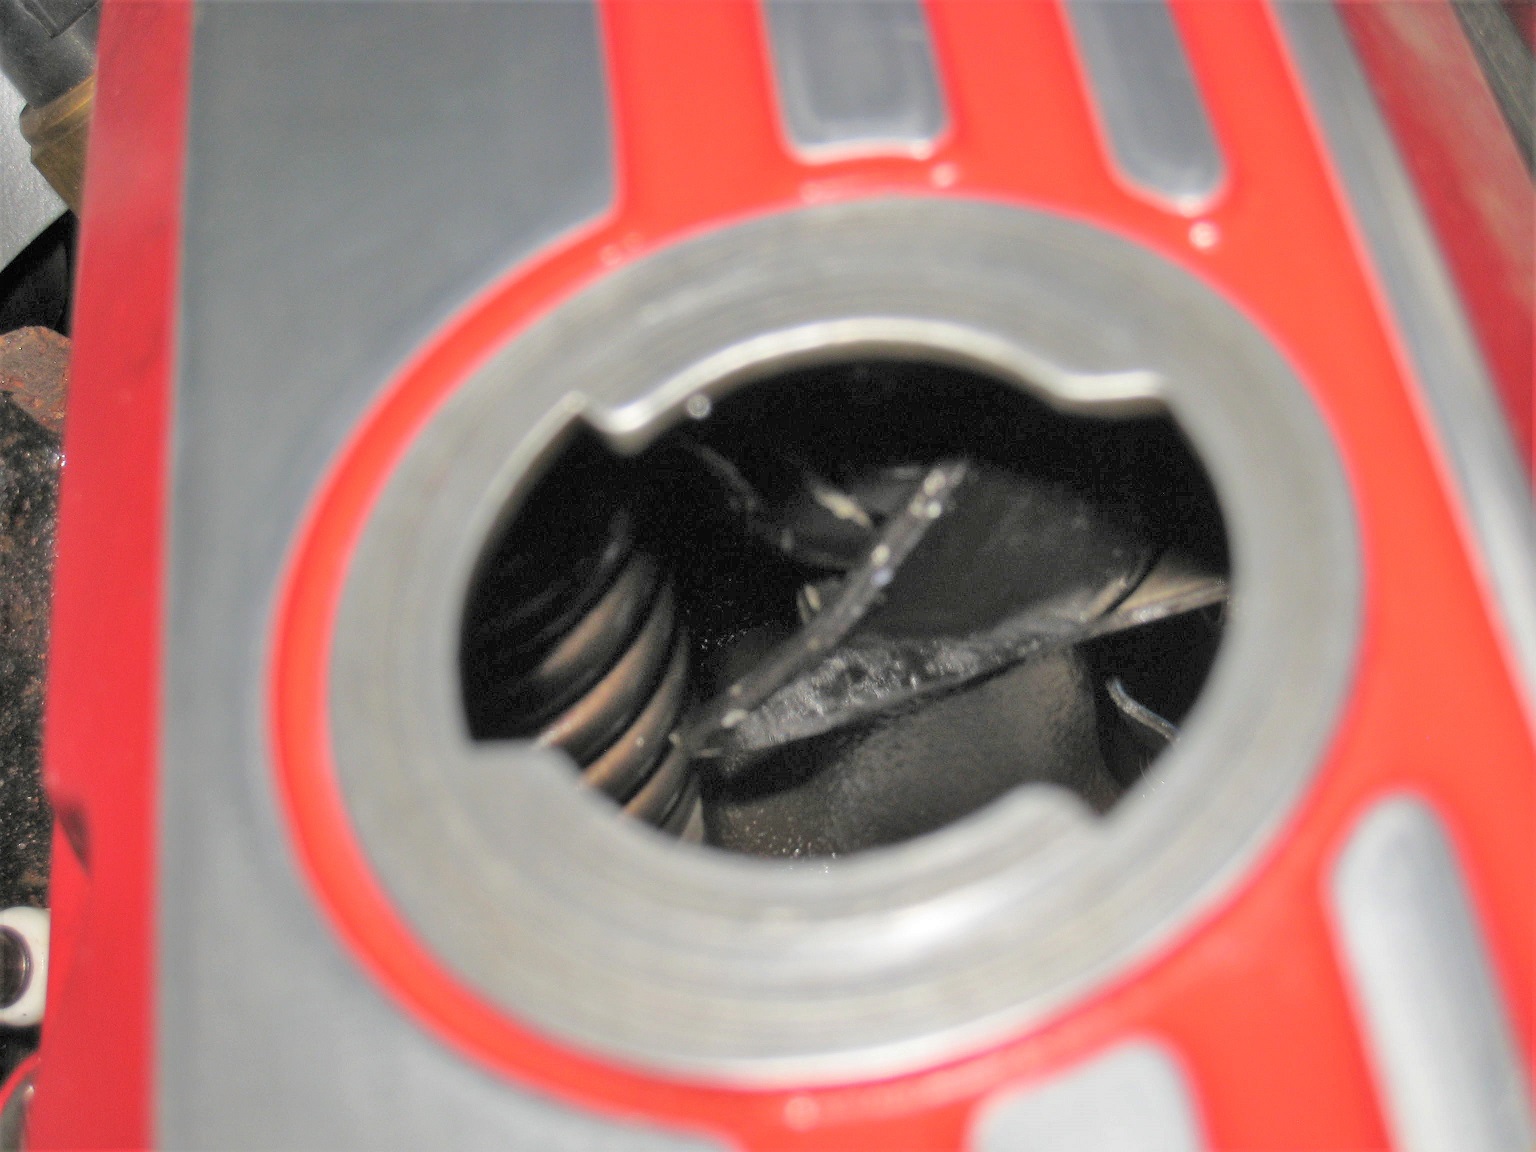
Today, my car started to make a knocking sound (after running for a few seconds at WOT). More of a bottom end knock than a valvetrain tick. I'm not really sure what happened.
No apparent disaster that I can see on the spark plugs.
This year, I did observe some knock retard. I had never seen knock retard in 2020 or 2021. The ECU has an SD card datalogging every drive I take. I retrieved the datalog of the last drive when the knocking began.
For 2022, I slightly advanced the ignition timing by 1.6°.
[This message has been edited by pmbrunelle (edited 05-10-2022).]