Well enough procrastinating… it’s finally time to get some order in my digital shoebox of photos, so I figured: "What better way than to start a build thread?" That'll force me to sort through the photos and notes I've taken, bit by bit, on a regular basis and avoid having to tackle the whole shemozzle at the end... when I definitely will be more interested in driving the car than writing about it. The problem I’ve seen with many rebodies though, is that too many of them end up looking like accidental explosions. They start off with someone banging away on something that would be best left alone, and end up with parts strewn all over the place with no hope of being reassembled, let alone ever being driven again. So I vow to keep this thread alive until the only semblance of an explosion near this car are the ones inside those eight high tech cylinders, and the one I feel in the seat of my pants as I hit the gas.
So like the title says, this thread is about building a Ferrari F355 coupe on a 3” stretched ’88 chassis powered by a ’97 Northstar and Pontiac G6 six speed manual transmission. Not exactly breaking new ground, except that I think I’ll be the first one to start and finish an F355 build thread here on PFF. To start the show, a little background first: About ten years ago a friend saw my completed 308 rebody with 305 TPI and decided he wanted something similar. He bought an '88 GT auto with 97,000 kms on the clock and, after buying and returning his first F355 body kit from IFG due to stunningly poor quality panels, he got an exchange for one that was head and shoulders better. (That doesn't say alot if you 've ever dealt with IFG bodies though.) He lost interest in the car after having had the frame professionally stretched the necessary 3" behind the passenger compartment and installing the rear quarters and doors. I bought it as-is a year ago and have been working away to do it justice ever since. Afterall, an '88 GT deserves better than to languish as an unfinished kit.
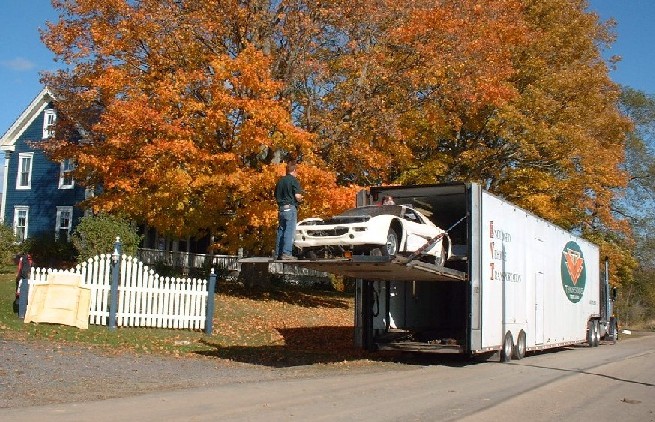
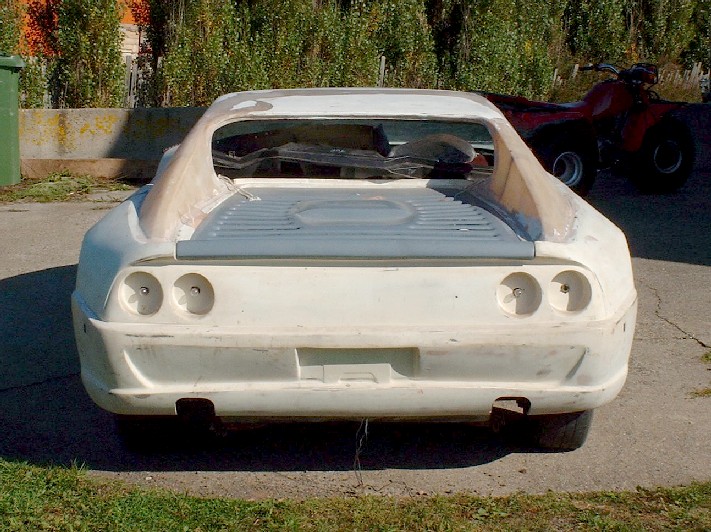
So here it was in all of my excitement as the transport truck pulled up in front of the house to deliver the car to Nova Scotia from Cornwall, Ontario.
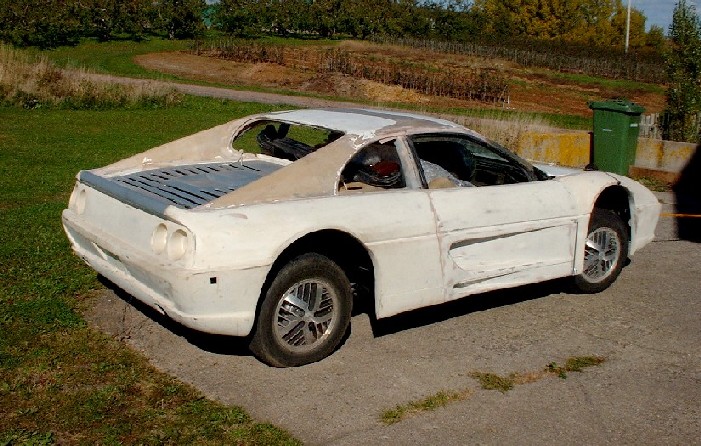
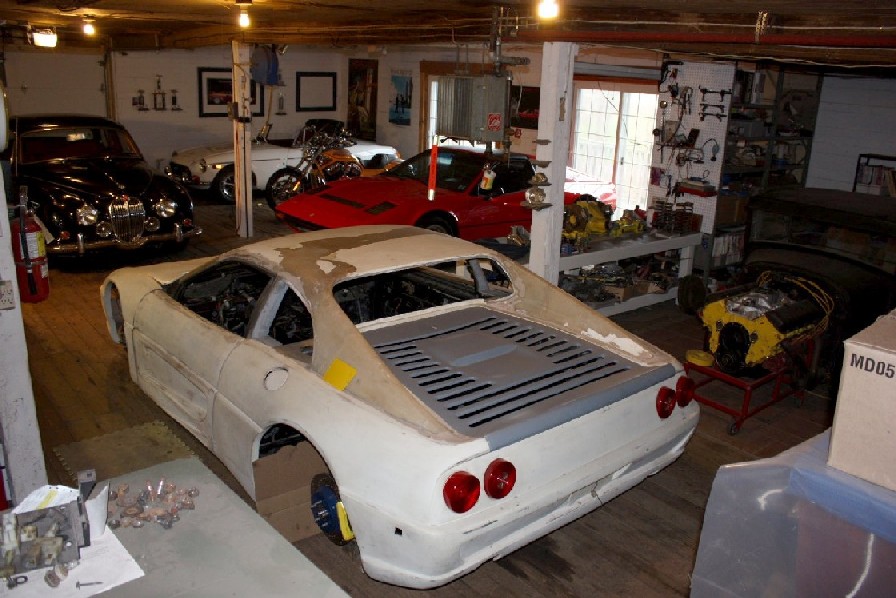
For the price that was being offered, I bought it sight unseen and wasn't disappointed. Obviously it would need lots of work, money, space, and patience to make it look anything like a real F355, but I'm no stranger to this kind of work as my 308 kit was no better when it started its life. Here it is once it was unloaded and dragged up to the back of my workshop, and like everything else, it soon found a happy spot among some cool other cars.
Edit: Seeing how this build thread has grown to an unwieldy number of pages, I've decided to add an index here at the beginning to help new and old readers alike find certain phases of the project more easily than by having to scroll through it all:
Pg1. Introduction & Northstar teardown and inspection.
Pg2. Northstar engine case separation, block machining, installation of threaded inserts.
Pg3. Rebuild of case halves, installation of crank, pistons, heads, and rebuild of starter.
Pg4. Installation of timing chains, oil pump, chain cover; disassembly and modification of intake manifold.
Pg5. Intake manifold painting & rebuild; throttle body rebuild; installation of CHRFab valve covers, oil filter mount, water pump, and water pump manifold.
Pg 6. Installation of pulleys, rear main seal; alternator rebuild; fuel rail installation.
Pg 7. Fuel injector harness and serpentine belt installation; F40 notching; jackshaft bearing support fabrication.
Pg8. Fuel injector cleaning; F40 to engine installation; stock engine/trans/cradle removal; three-view stock '88 cradle drawings; front cradle cross member removal; Held parts for '88 rear 6" track width increase; rear strut to coil-over conversion; rear knuckle rebuild.
Pg9. Cross drilling Corvette C4 rotors; installation of rear brake caliper, rotor, pads; three-view drawings of F40 transmission, and stock rear knuckle, strut, links, bearing, rotor, and complete rear suspension assembly; discussion and drawings of stock '88 rear swing arm length, roll center, camber change, toe change, and anti-squat.
Pg10. Stock front suspension removal and cross member refinishing; Held parts for '88 front 6" track width increase; installation of Held front suspension components and Corvette C4 brakes.
Pg11. three-view drawings of stock '88 front cross member and stock upper control arm.
Pg 12. three-view drawings of stock '88 front lower control arm, knuckle, bearing, ball joints, tie rod, and complete front suspension; 3D coordinates of major stock front and rear suspension points; discussion and drawings of stock '88 front anti-dive, roll center, swing arm, and roll axis; stock front suspension kinematics graphs & discussion on stock '88 suspension vs Held 6" track width increased control arms vs Held 6" increase with 2" drop springs and 3" wheel base increase.
Pg13. Stock '88 rear suspension kinematics graphs & discussion on stock '88 rear suspension vs Held 6" track width increased control arms vs Held 6" increase with 2" drop springs and 3" wheel base increase. More kinematics graphs and discussion of the effects on '88 front geometry by swapping out 2" drop springs with 1.5" drop spindles, and shortening and relocating the upper control arms; modification of front cross member and Held upper control arms; discussion and drawings of potential modifications to '88 rear suspension including raising the cradle and links, and adding larger wheels and tires.
Pg14. A continuation of the discussion from page 13 including shortening springs, and modifying the fenders; rear suspension kinematics graphs & discussion of negative effects of above modifications; discussion and brainstorming of alternative short and long A arm (SLA) geometry to solve problems identified with McPherson strut design.
Pg15. Continuation of discussion and design of SLA concept; three-view drawings of '88 rear frame; discussion and drawings of pushrod and bell crank coil-over shock concept; three-view drawings and discussion of conceptual SLA suspension in full jounce and rebound.
Pg16.Refinement of SLA component locations; kinematics graphs and discussion showing benefits of SLA design over previous McPherson strut designs; three-view drawings of new '88 cradle design to support SLA suspension and Northstar engine and F40 transmission; three-view drawings of prototype SLA suspension; final wheel selection.
Pg17. Wheel and tire mock ups; new cradle fabrication; three-view drawings of Northstar and F40 transmission mounts; fabrication of engine and transmission mounts.
Pg18. Continuation of engine and transmission mount fabrication; engine bay preparation (removal of decklid hinge boxes, dog bone mount, and various brackets); first attempted test fit of new cradle with engine and transmission; strut tower trimming.
Pg19. Second attempted test fitting of new cradle with engine and transmission, with further engine bay modifications; third test fitting of cradle with engine and transmission following revised engine/transmission mount relocation on cradle; parts list for SLA suspension; removal of F355 body from chassis; QA1 coil-over build up.
Pg20. Upper and lower lateral link mount fabrication; discovery of upper forward outboard link interference with wheel rim and discussion of possible solutions; flipped knuckle design drawings.
Pg21. Kinematics graphs and discussion of impact of flipping knuckles side to side; fabrication of outboard upper lateral link mounts (on knuckle); relocation of lower lateral link mounts due to knuckle swap; fabrication of new upper inboard lateral link mounts; mock up of 5 link design (less bell crank and coil-over); mock up of bell crank and lower bell crank mount; Nissan 300ZX headlights; design and fabrication of trailing link mounts; upper knuckle camber bolt fabrication; suspension travel cycling to determine jounce and rebound limits due to chassis interference;
Pg22. Upper frame rail notching for jounce clearance; upper frame rail reinforcement fabrication; discussion on crashworthiness; 1:1 bell crank ratio design; coil-over and bell crank drawings at full rebound, jounce, and ride height; redesign of bell crank to 1:0.88 ratio; three-view drawings and discussion of bell crank mounts; bell crank fabrication;
Pg23. Bell crank completion; bell crank mount fabrication; cabin firewall cross member fabrication;
Pg24. Coil-over mount fabrication; shock absorber discussion; final rear suspension and cradle welding; 2nd test fitting of engine, transmission, cradle with suspension; Youtube video of suspension travel;
Pg25. Discussion on axles, CV joints, tripot joints; disassembly and measurements of Fiero and Cobalt SS axles;
[This message has been edited by Bloozberry (edited 03-18-2014).]
Good luck on the build, that is probably one of my favorite replica rebodies. Curious as to what you have planned for the interior, are you going to be using Amida's interior or something of your own?
That's funny. Maybe you got my friend's returned kit! As for wheels, I've seen several really nice designs that replicate the 355's pretty darned close, but all of them are discontinued. I''ve got my wheel-money set aside while I wait for one of the many wheel manufacturers to come up with something that turns my crank. That's one area I'm not rushing into until I see the perfect wheel.
Thanks guys for the interest (BTW Rourke, it's my '29 model A five window you noticed... it's out on the 5-year build-horizon though... the F355 is gettin' done first).
I'd be posting an update right now except that 'someone' said it would be better for the longevity of the thread if I used PIP instead of Photobucket for my pictures. OK, I thought... I'll go along with that... except I keep getting a "Run-Time Error '13' Type Mis-Match" error message every time I try to open PIP. What's up with that? I've reloaded PIP three times now and still get the same thing. Damned software gremlins! Arrrggh.
[This message has been edited by Bloozberry (edited 04-25-2010).]
I used to own a 355 on an 86 chassis. I purchased it assembled after somebody installed the body, but then when they lost interest, did a really poor job on the interior and sold it to the guy I bought it from. It sat for many years and I was bold enough to drive it home 25 miles with an engine barely running on 5+ year old gas. After an oil change, all filters, and new plugs, the car ran great after I used up all the old gas. The engine was a 3.1, blueprinted and balanced, roller cam etc. It had an automatic which only had 200 miles on a rebuild. After all the money dumped into the body, engine and transmission, it was sad what a poor job was done on the interior. I pulled all of the interior out. It had a 355 interior kit, which I reglassed in some areas an then recovered. It had brand new Mr Mikes seats, which were fine. After new carpeting, headliner, and gauges, the interior came out great. While the body was installed well, the unkown builder did the following strange things:
* The mirrors were Ferrari replicas and were fixed mounted. A subsequent owner to me broke one of them off. Also, the passenger side mirror was mounted in such a way that you could not adjust it to actually see anything useful. * The body was mounted over the battery and there was no way to remove it. * The body was not stretched, but the wheel wells were moved foward * The body was mounted over the air filter and I had to cut the assembly to change the filter * The replica dash dumped almost all the air out the center vents * The only way to open the engine cover was by the solenoid. A dead battery meant you were dead. * The only way to lock/unlock the doors were via aftermarket lockers. A dead battery meant you also had a problem. * The center console was one piece and did not vent the ECM. So to get to the ECM, you had to remove part of the dash, then remove the whole console. When I did the custom console on my 87 t-top coupe, I made it in two pieces, so I could access the engine computer * The vents were not cut in the rear decklid and the engine had headers. It never overheated, but I bet it was very hot back there.
A 355 is a cool looking car and it really drew attention. I wonder where it is now. It went from WA to OH and then to CA.
Jim
------------------ 87 T-top 2.8 5sp Camaro Dash Bonneville door panels; 86 355 body & interior kits 3.1 Auto; 85 SE 2.5 5sp, 86 SE 2.8 auto parts car
OK, PIP worked this time... I think it heard me threatening to post the error message on Photobucket.
I want to apologize for anyone who was hoping that I'd spend the first ten pages of this thread with the body work. It's just not going to happen in that order. I'm an engine-man at heart so that's where I first really delved into it. After lurking for years on the forum and drooling over threads by Will, Daviero, Ryan Hess, Zac88GT, AJXTCman, and others, I fell in love with the notion of an all-aluminum, 4 cam, 32 valve V8. I give credit to those guys for being among the pioneers who learned alot of stuff the hard way and took the time to write about it so the rest of us could benefit from their experiences. From those threads I learned I wanted an early engine for their "relative simplicity" (as compared to say, a nuclear reactor) and cheap initial purchase cost. But I knew it would cost every bit as much to get one running as it would a later engine. I had it in mind that regardless of the claimed mileage or exterior condition of the block, it would need to be overhauled for my own peace of mind.
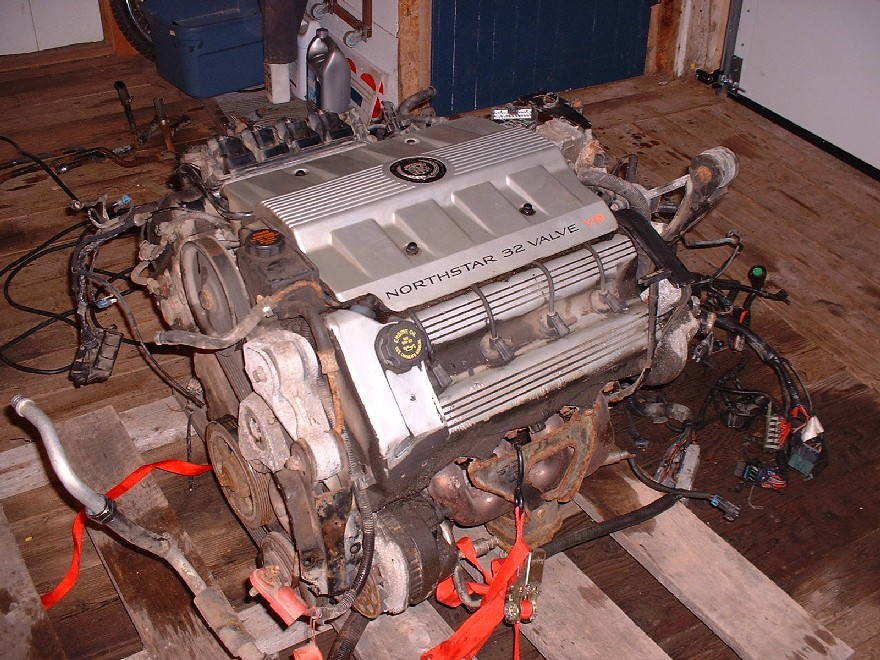
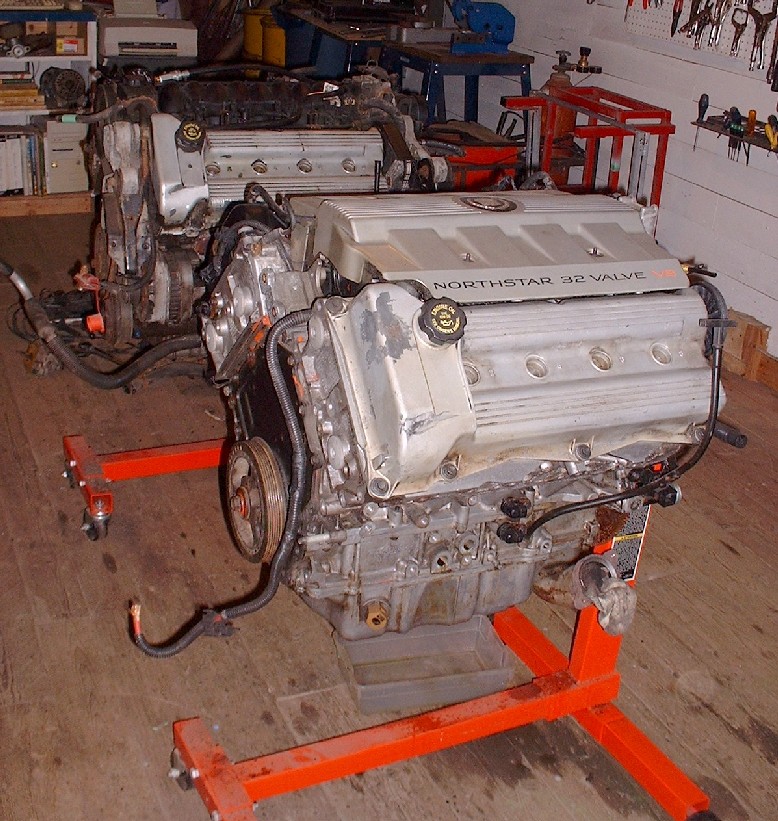
In the end, I bought two '97 VIN Y's, one from a car in a local yard with 250K kms on it, and one on eBay from Ontario that had 100K kms on it (yeah right!). I bought two because the first one came with anything and everything I wanted for $450 and the eBay one which was supposed to be better was more or less just a long block... no beauty cover, accessories, wiring harness, PCM, MAF, etc for about the same price. In Canada we call it a "two-fer" (two for the price of one). I know that the VIN 9's are the more desireable engines because of the 300 HP output, but I'm OK with 275 HP. Besides, this leaves growth potential!
So enough background, here's what they looked like when I picked them up in our trusty-dusty utility trailer and unloaded them in the shop. From the crustiness of both engines, I don't think either Caddy-owner ever cleaned anything except maybe windshield every now and then with the wipers.
[This message has been edited by Bloozberry (edited 04-25-2010).]
I'm jealous! My garage just got sold so I'm using plastic ones until I find another one. Sure interested in the drivetrain as you know. My 355 spider has the N* and fiero auto, but I have two f40s, jstrickers intake, and pbjs turbo.
Blooz, you are one of the most knowledgeable folks that we have on this forum. You are always helping out, and lending a general hand to so many of us. The first thing that I thought, when looking over your pics, was, "Man, that is the garage that that guy deserves!" You have an obvious passion for automobiles, and those cars deserve an owner like you. Good luck with the build, and marked as a favorite.
Thanks guys for the interest (BTW Rourke, it's my '29 model A five window you noticed... it's out on the 5-year build-horizon though... the F355 is gettin' done first).
I'd be posting an update right now except that 'someone' said it would be better for the longevity of the thread if I used PIP instead of Photobucket for my pictures. OK, I thought... I'll go along with that... except I keep getting a "Run-Time Error '13' Type Mis-Match" error message every time I try to open PIP. What's up with that? I've reloaded PIP three times now and still get the same thing. Damned software gremlins! Arrrggh.
I've never been able to get pip to work, hell, I've had friends who are computer geeks that couldn't get it to work!!!
The only downside is that it only allows 100k or smaller, and the smallest that my camera takes seems to be about 112k so I have to spend some time resizing. I really wish that would get an upgrade!!!
That's a big project in front of ya' Blooz', good luck with it.
You might be a king, or a little street sweeper, but sooner or latter you'll dance with the Reaper. Joe
[This message has been edited by motoracer838 (edited 04-25-2010).]
Thanks for little tips there bowrapennocks... I'll have to make sure I don't make any of those mistakes! And thanks for the encouragement there Dratts, Tony, Charlie and Joe. I'm banking all these positive comments to help keep me going when I'm sweaty and full of fibreglass dust later this summer.
[This message has been edited by Bloozberry (edited 04-25-2010).]
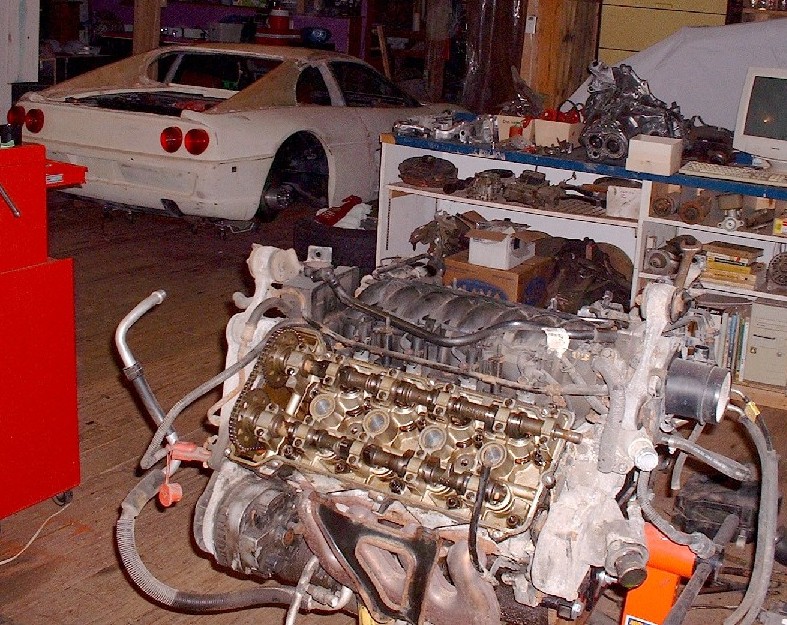
It wasn’t very long after I got my engines that I could hear the lower mileage one calling out “Pick me! Pick me!”. But like any engine builder knows, it’s a good idea to run a few tests to make sure a used engine has the potential to be anything more than an anchor. I like to turn the engine over with a breaker bar at least two full crank revolutions to be sure there aren’t any bent or broken valvetrain parts. If there’s no obvious grinding, seizing, or blockages, then a compression test is in order to get an idea how well the valve and pistons are sealing. At first I was hopeful, it spun the needed 720* and I got 170 psi plus or minus 5 psi on all eight cylinders. That’s right in the range for good static compression for a Northstar. So far so good. Maybe I would avoid the nightmares of some of the other PFF members.
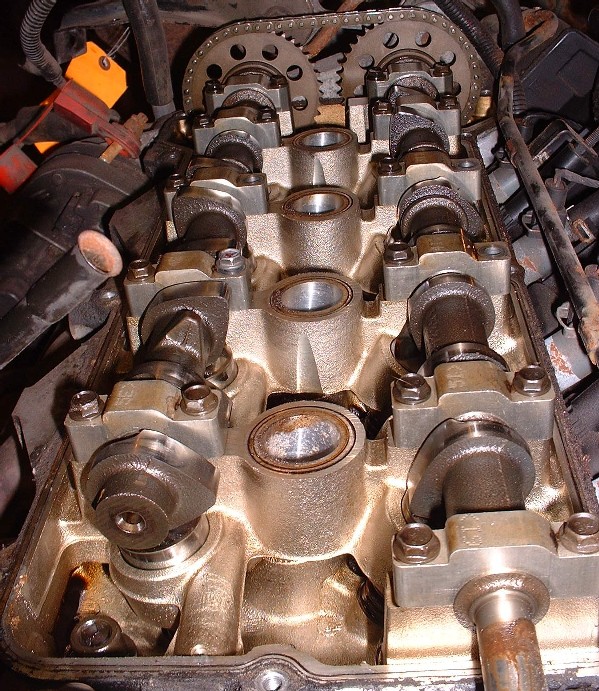
Next up, I cleaned the outside of the engine off so that I wouldn’t contaminate the insides with the crud from the outside. Then I took the valve covers off, and apart from the valvetrain being a little discolored from hot oil, there was no sludge which indicated that the engine probably saw at least semi-regular oil changes. Another thing I learned from AJxtcman was to look for a fine metallic deposit built up on the inside of the valve covers in the area of the sprockets. I forget what the source of it is, but in any case it’s not a good sign if you have it. Mine didn’t… whew!
What it did have though was worn out exhaust cams. This was my first clue that I’d been “had” by the eBay seller. 100K kms doesn’t make flat spots on the nose of your cam lobes. (I could’ve sworn I took close-up pictures of those so I’ll post them later when I find them). Closer inspection of the cam followers also revealed that some of them had the tell-tale wear circles in the middle where the case-hardening had worn through to the softer underlying metal. Cha-ching!… I could hear the cash register at my local machine shop ringing already.
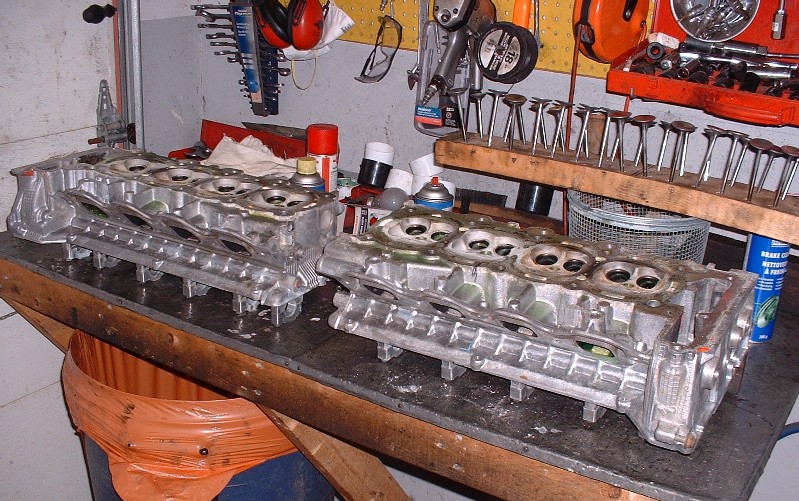
I had decided from the get-go that I was going to do the Timesert repair whether it needed it or not, so I went ahead, removed the heads and dropped them off at my favorite cylinder head shop (that’s all he does) for an in depth inspection and rebuild estimate... keeping my fingers crossed.
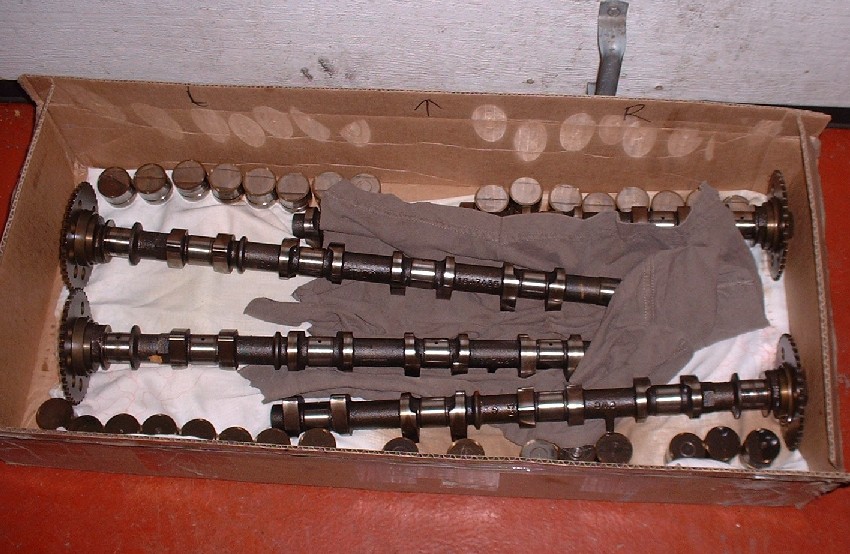
I finally found the pictures of the cam lobes and followers in my digital "shoebox". First though, here’s a close up of the hot oil varnished cams. It’s hard to see anything problematic from this photo, although you’ll notice here how several cam-bearing cap bolts have been removed because I got curious after finding one of them loose!
Now I doubt this is a common problem with Northstars, because I would’ve probably read about it given the volumes of info I researched before diving into this, but it is something you should check if planning on using a warmed-over Caddy engine. The one cap bolt was loose because it was broken(!) where the threaded portion met the shank, its weakest point. From the fracture site, the failure mode was obviously tensile loading and not shear, in other words, it broke after it was torqued and not during the tightening of the bolt. I'm guessing that someone didn’t have the torque specs for the bolts or didn’t use a torque wrench to tighten the caps at some point in the engine’s history. In any case, this one was torqued beyond the bolt’s yield point but not quite enough to break it. The loading of the bearing caps from operating forces on the cam were enough to tip the scales on it and break it in tension.
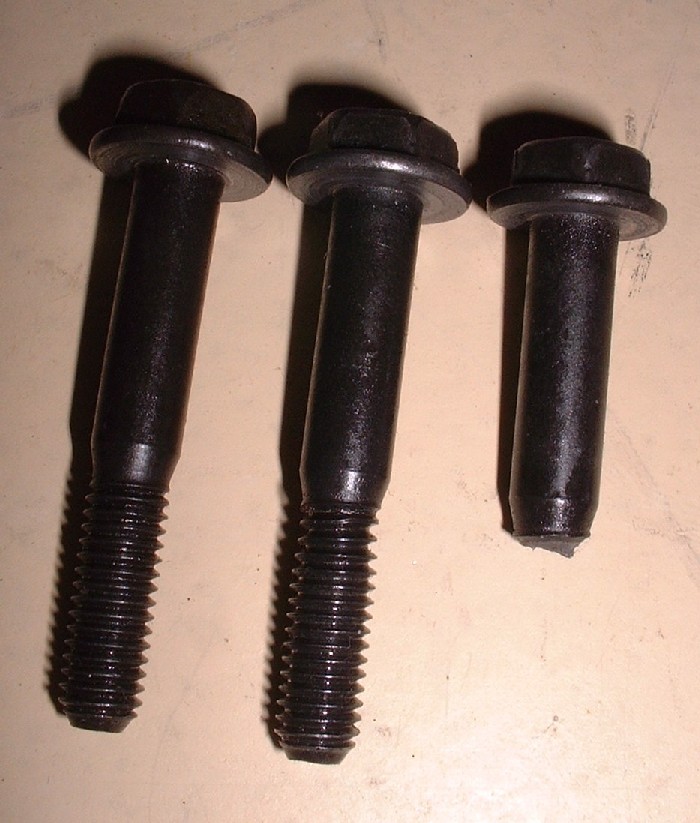
Now have a look at the picture. The bolt on the left is an unused one, the one on the right is the broken one (duh), and the one in the middle is what four other cam-bearing cap bolts looked like on that head after I removed them. See anything a little off? The eagle-eyed among you will notice the “necking” or narrowing of the bolt diameter where the threads meet the shank… exactly where the other one broke. Someone clearly used the “it feels tight enough” approach on these caps. I couldn’t be certain of the condition of the remaining bolts, so I turfed them all.
Here’s the picture of the exhaust cam lobe I promised earlier. All the lobes on both exhaust cams were like this. Clearly worn beyond reuse without reconditioning or replacement.
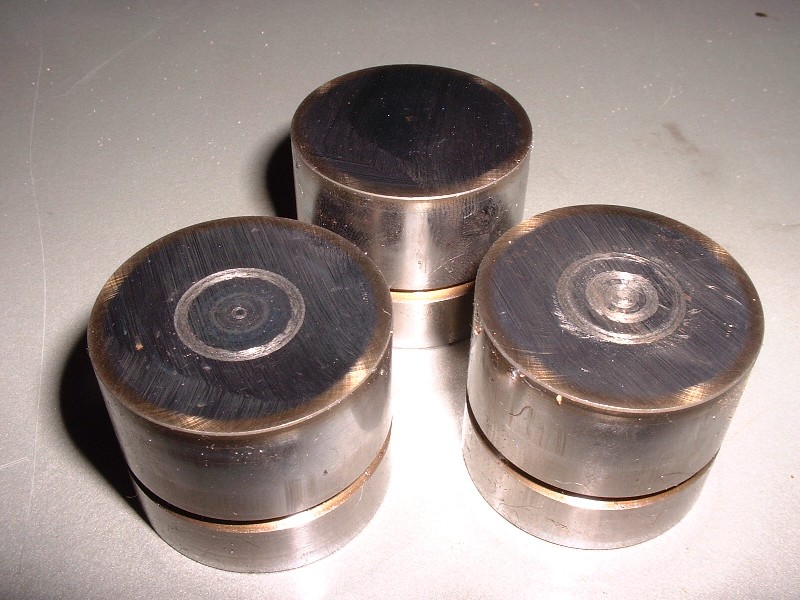
And here’s what worn cam lobes do to cam followers. The one in the background is from an intake cam so it’s better, but at this stage there was no point in keeping any of the followers.
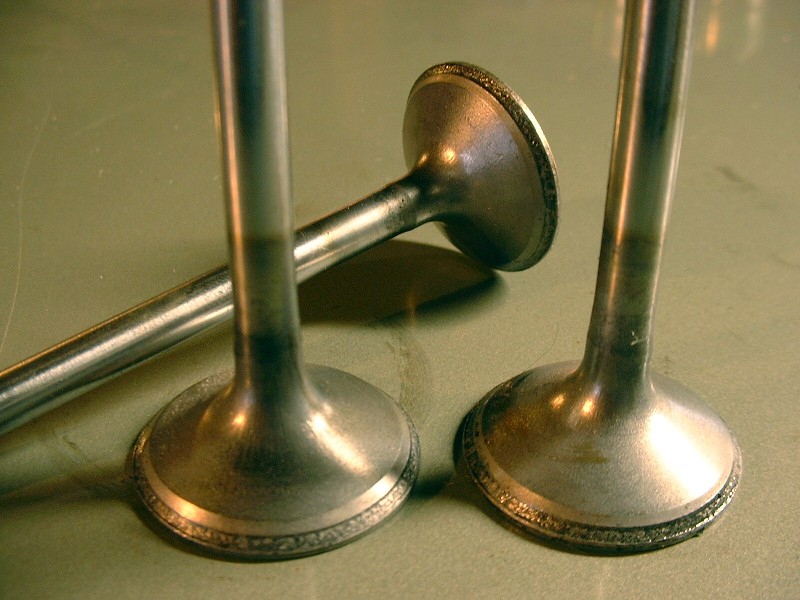
And here’s what the exhaust valves looked like. Beyond grinding. Kaput. Cha-ching! More cash register sounds at my machine shop. By the way, this was supposed to be the low mileage engine. When I removed the valve covers off the high mileage engine, they looked about the same for wear and tear. But that’s OK because I probably would’ve replaced most of this stuff on spec anyways. No point in rebuilding an engine if you’re just going to throw the old parts back in it.
I didn't disassemble the heads on the other engine to the same degree, but I knew that engine had 250K kms on it. Even if it looked better after taking it apart, I would've replaced the moving parts anyways. 250K kms is just too much to just transplant into a car and hope for the best.
My first thought was look around for another set of heads. Then I thought "I wonder what the rest of the engine is like." I hope it doesn't turn into a huge build and lots of dollars. I agree, I would pull any engine apart to check the cams valves bearings and crank, and to install time serts, but at the point you are I think it might be cheaper to source a good engine over a rebuild. Just an opinion. From what some of the storys I've heard you can throw money at these engines just like they're boats.
I hope it doesn't turn into a huge build and lots of dollars.
Thanks for your advice dratts... but I think if you want a reliable Northstar in the long term, there's no cheap way to do it. You either spend your money up front and buy a late model engine (and try to figure out the cam phasing), or buy a cheap early engine and spend your money rebuilding it. You have to expect (as I did) that a 10 to 15 year old engine is going to be worn close to the end of it's useful first life. One way or the other, you really really have to want one to be able to justify a N* financially because there are several engines out there that are cheaper and more powerful. Realistically, I think you have to set aside $5000-$6000 for this engine, in Canada anyways. More if you haven't got the space, time, skills or tools to do it yourself.
Well I shouldn't be giving "advice". If your posts didn't convince me that you probably know a lot more than me, your shop would. Still I remember when cadillac dealers didn't fix these engines, they just replaced them. There was a time when you could get a brand new N* for $2500 from an outfit I think was called speedway motors or something like that, but that was a while back. Anyway have fun it's gonna be a great engine.
I thought that the unabombers shack was in a museum. I love all the pictures. Everything looks so clean and neat. I have a tendency to get spread all over the place.
[This message has been edited by dratts (edited 04-28-2010).]
What happens if you just get a regular 300hp northstar from a junkyard, put it in, and run it till it dies?
There's nothing wrong with doing what you suggest, but unlike some engine swappers, my goal isn't only about injecting HP. I find that a car with questionable reliability is hard to go anywhere with and have fun. Crawling under the car on the side of a freeway in the rain never appealed to me! My goals are to have a car I won't have second thoughts about taking over long distances, and for it to be a show quality ride. Spending 100 hours polishing a worn out N* engine doesn't make sense in my case.
Originally posted by darkhorizon: It is rare that I see a rebuild motor last longer than a OEM one.
"Rebuild" means many different things to different people.
Foe example, some people will knurl their valve guides and call them good as new, rather than press in new ones... (like the moronic previous owner of my car).
You've probably seen mostly half-assed rebuilds, which is probably more common than good ones.
Very true pmbrunelle. I've seen some "rebuilt" engines that are little more than a tune up...
Anyways, next up in the disassembly phase was to remove the oil pump, which mounts to the front of the crankshaft on the Northstar. Since it was on the list of things to be replaced regardless of its condition, I couldn’t help but take it apart and examine it.
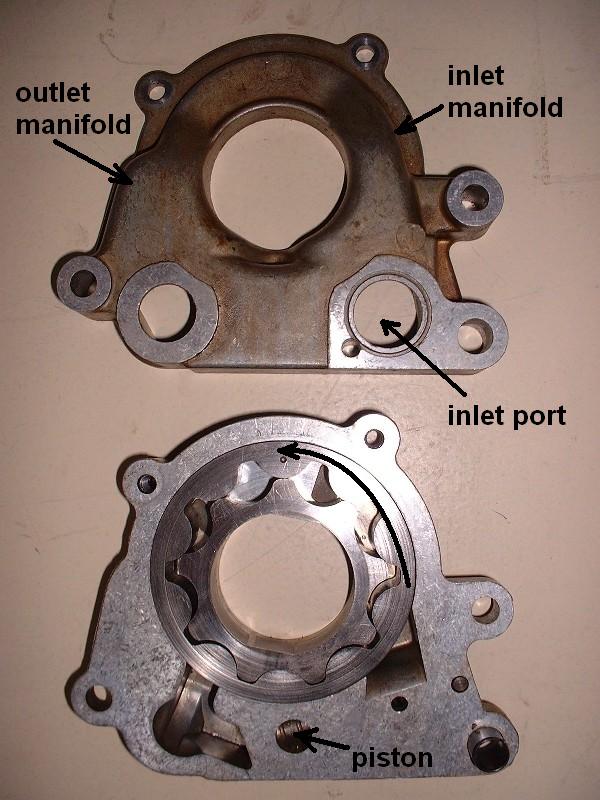
It’s a gerotor-style pump which uses a nine toothed pump gear (or inner rotor) in a ten-toothed gear housing (or outer rotor). As the crank turns counter clockwise in the image below, the inner rotor is keyed to the crank through two flats on the shaft. Since the two rotor's teeth mesh at the bottom, both rotors turn with the crank. As they do so, the space between the teeth of the inner and outer rotor increases towards the top from the 4 o’clock to the 1 o’clock postions, creating a vacuum. The vacuum pulls oil into the pump through the circular port on right hand side of the pump housing. The channel or manifold leading up from the inlet port narrows in diameter as it swirls up to the top of the pump where it meets a dead end and oil is forced between the teeth. The oil is carried around through to the 10 o'clock position where a new manifold opens up. As the rotor continues to turn, the area between the teeth decreases from the 10 o’clock to the 7 o’clock position, pumping the oil into the outlet manifold and through the outlet port.
If you look carefully, the outlet manifold branches the right where the pressurized oil acts on a pressure regulating piston that you can see through a circular hole at the bottom. As higher oil pressure in the outlet manifold moves the piston further into the bore, it uncovers the circular hole which has an interconnecting passage in the other pump case half that redirects the surplus oil pressure to the inlet port area.
Things to look for if keeping an old pump: a. check the mating surfaces of the teeth for deep scratches or uneven wear; b. check the sides of the rotors and their mating surfaces on the pump housings for scoring; c. check the OD of the outer rotor for scoring; and d. check to make sure the pressure regulating piston is free to move fully into it’s bore;
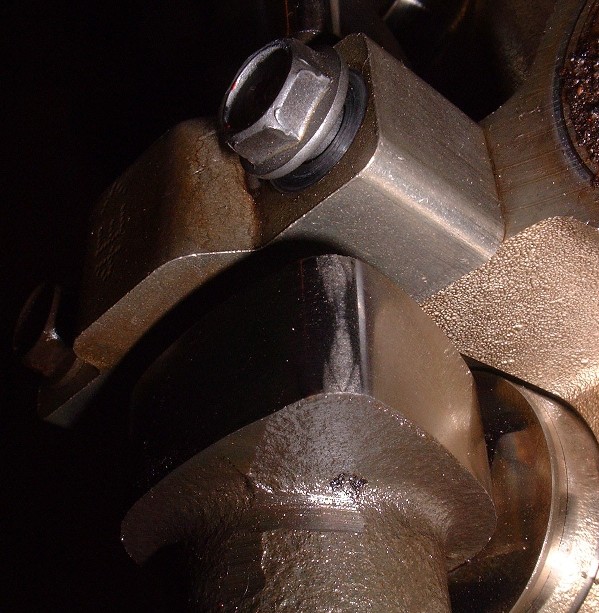
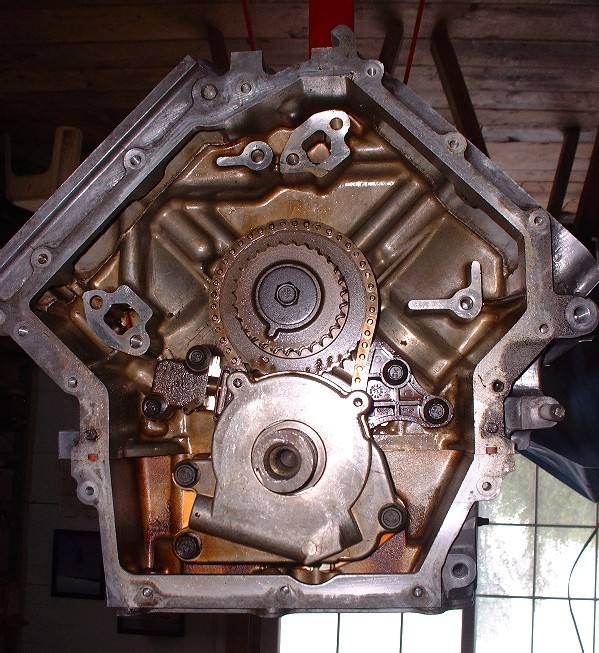
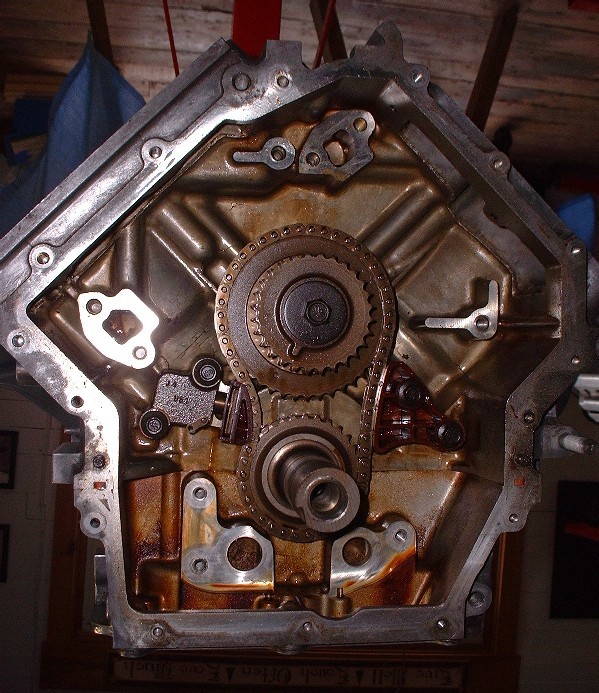
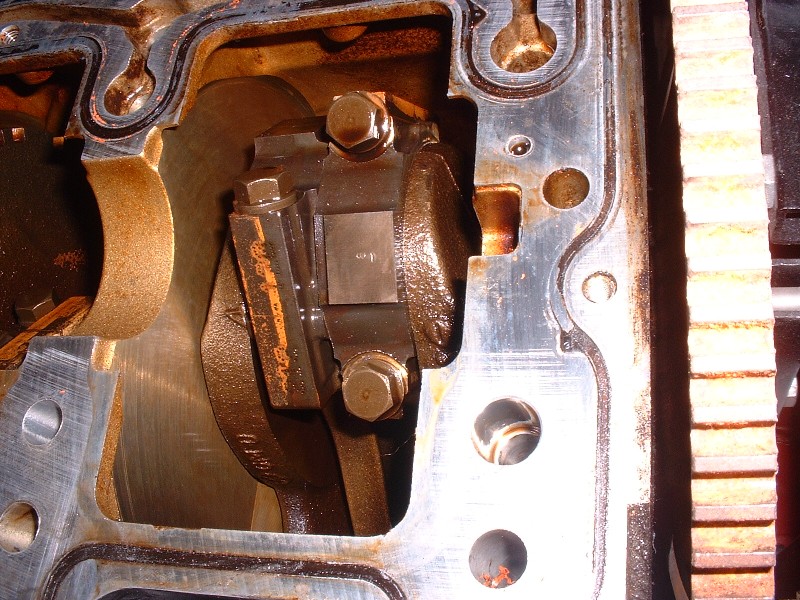
Darkhorizon mentioned it, but I’m sure there are lots of other people who would rather just drop in a used N* and run it until it dies rather than taking it apart. But here’s another reason (and there’s more to come…) why it may not last very long and you’ll find yourself dropping the cradle sooner rather than later. After the oil pump was off, I was able to get to the primary timing chain, crank and secondary sprockets. Have a look at how much the spring loaded chain tensioner on the LH side of the chain is extended.
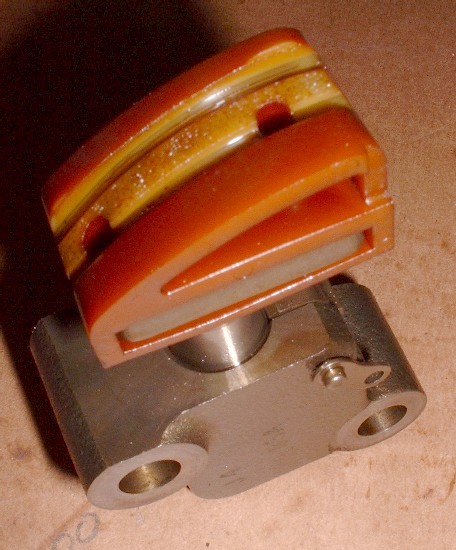
At first I thought it was due to the chain being stretched, but after I removed the tensioner, I found another reason. The cushion block on the tensioner was eaten through nearly 75% of its thickness from the chain passing over it. It’s the kind of thing that might last another 20K miles, or finish chewing through it after 5K. And you just know when that happens it’ll be catastrophic because it’ll relax the chain tension, cause the chain to jump the sprocket, and all hell will break loose when the pistons start hitting the valves. It’s important to note that this is all hidden wear that you won’t be able to see without some major disassembly. And remember, this was on an engine with a "claimed" 100K kms. To borrow a phrase (well, almost) from Forest Gump... "used engines are like a box of chocolates... "
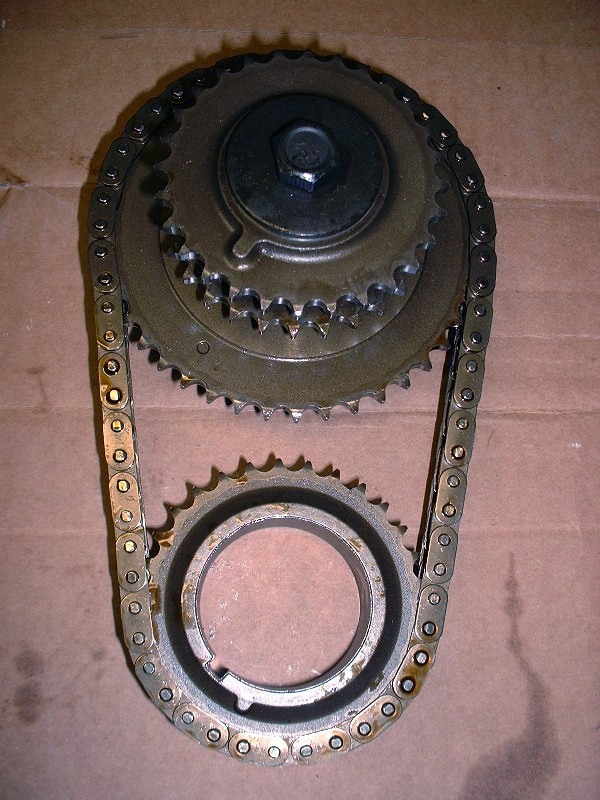
This is what the sprocket assembly looks like when it’s removed from the engine. The upper sprocket bolts onto a bearing assembly situated where the cam would be on an overhead valve (cam-in-block) engine.
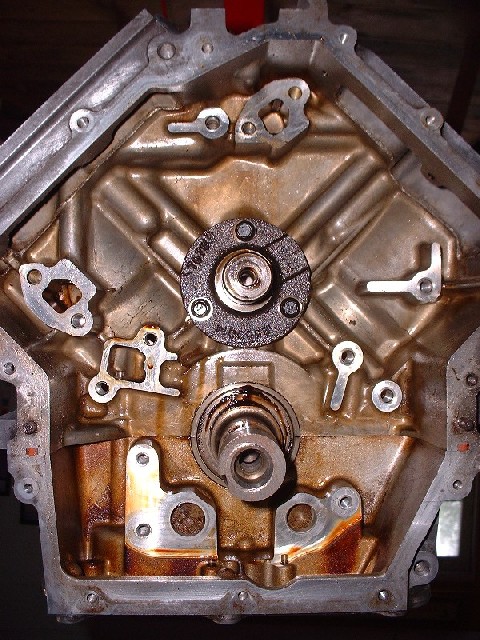
Here’s the bearing assembly the upper sprocket rotates on… note that it gets fed oil from passages cast in the block.
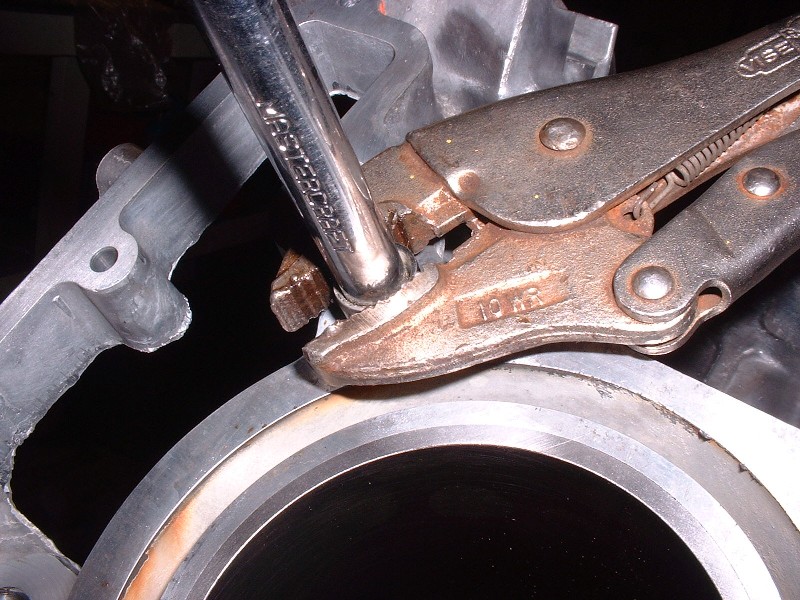
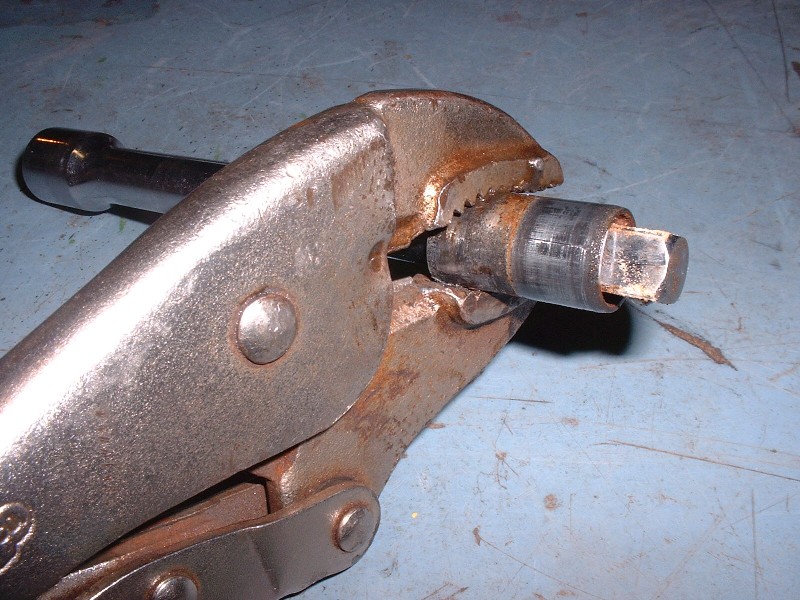
Next up was to remove the four steel head-alignment dowels on the deck surface. They’re swaged in the holes very tightly and are impossible to remove without ruining them. At first I thought they’d come out with a little gentle persuasion, but that gave way to more draconian measures. I’ve seen someone here on PFF remove them by welding a steel rod across the tops and twisting them out that way, but I found an easier method. I used Vise-grips to twist them out but found out that unless you push something into the hollow dowel, the Vise-grips will just deform it and slip rather suddenly. An extension for a 3/8” drive socket wrench fits just right. The extension prevents the dowel from collapsing and from there it was a simple matter of twisting and pulling at the same time. It still took a couple minutes per dowel though.
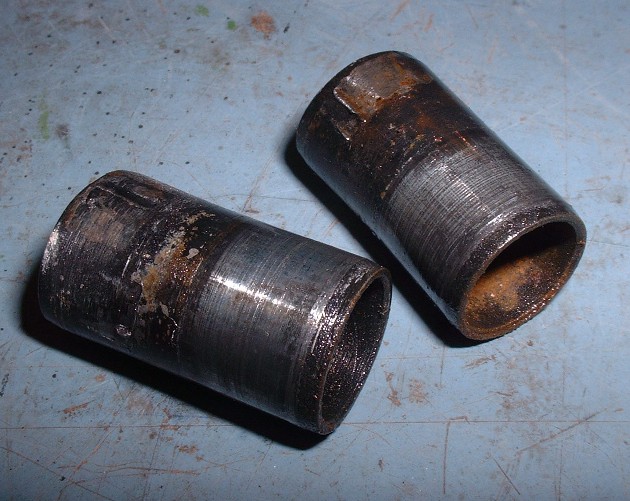
Here’s what they looked like after they came out. Definitely not reusable, and after a quick call to the local dealership, I found out that they wanted $17(!) for each one! And, to top things off, they are discontinued. There were still a few sets here and there across the good ol’ US of A, but I’m certain that shipping, brokerage fees, and taxes would have nearly doubled the price of these puppies. Luckily I have a friend with a metal lathe who turned some new ones for me for $20 labor.
[This message has been edited by Bloozberry (edited 05-03-2010).]
The next step on the tear-down was “The Big Decision”… Do I go the whole nine yards and pull the pistons, separate the case halves and renew everything? Or just listen to reason and leave the lower rotating assembly together... after all, the compression test results I did at the start were good. I had also read several horror stories of hone jobs gone amok here on PFF. In the end, a combination of the problems I’d found to date, the slightly out of round cylinders, and plain ol’ curiosity “made” me go the distance and commit to opening it (and my wallet) up.
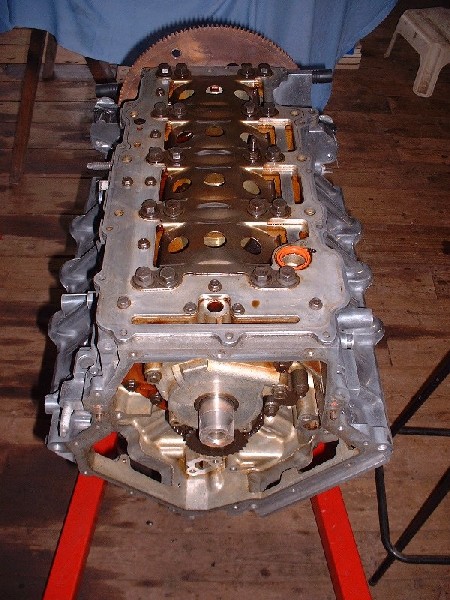
One of the interesting things about the Northstar, is that the windage tray, an oil manifold plate, and the lower case half are all held in place with the main crank bearing cap bolts.
To gain access to the connecting rod cap bolts, you must remove the main bearing cap bolts (all 20 of them) and remove the, pick-up tube...
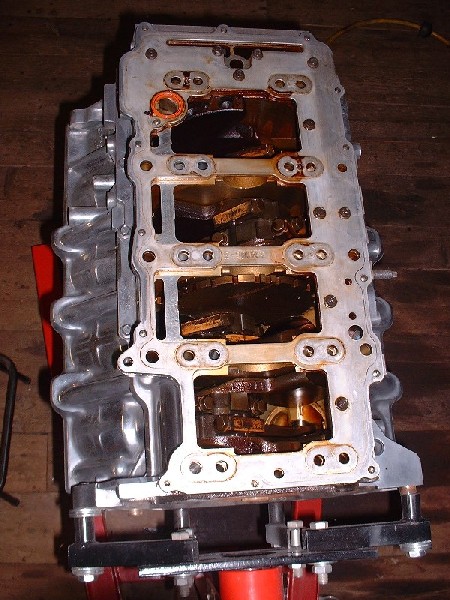
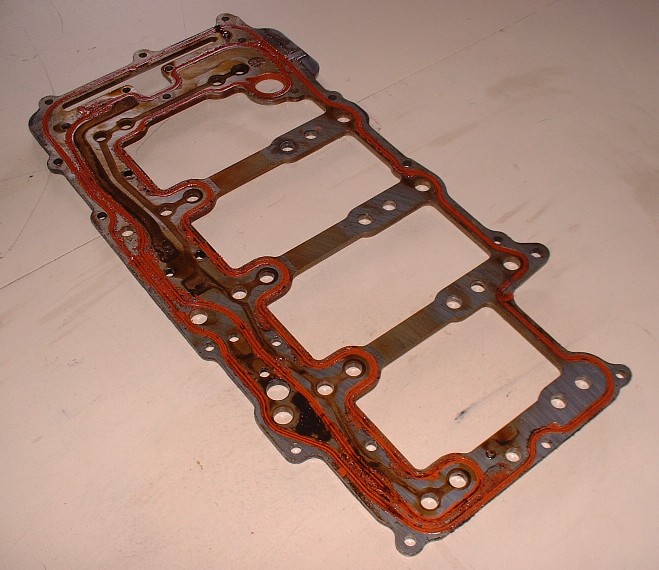
…the windage tray, and the oil metering plate...
I finally had access to the connecting rod bolts, which I numbered with my stamps like a good boy before taking them apart.
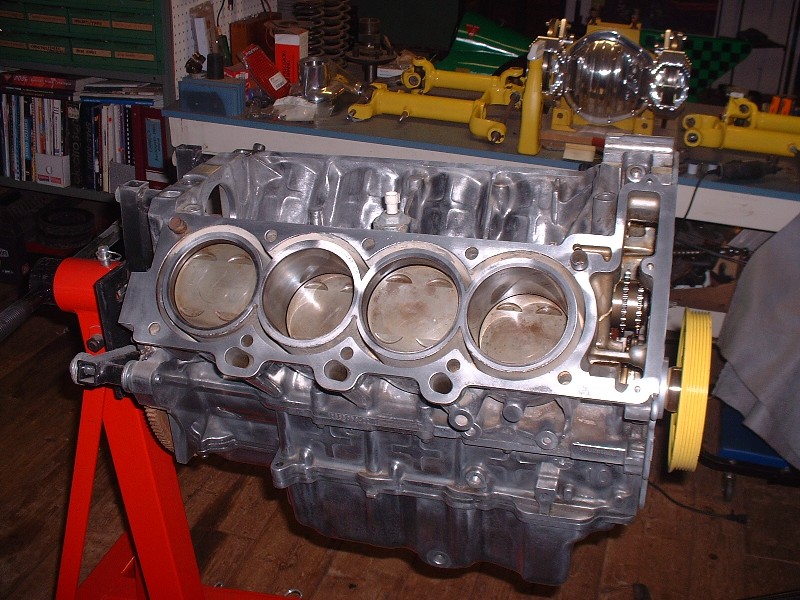
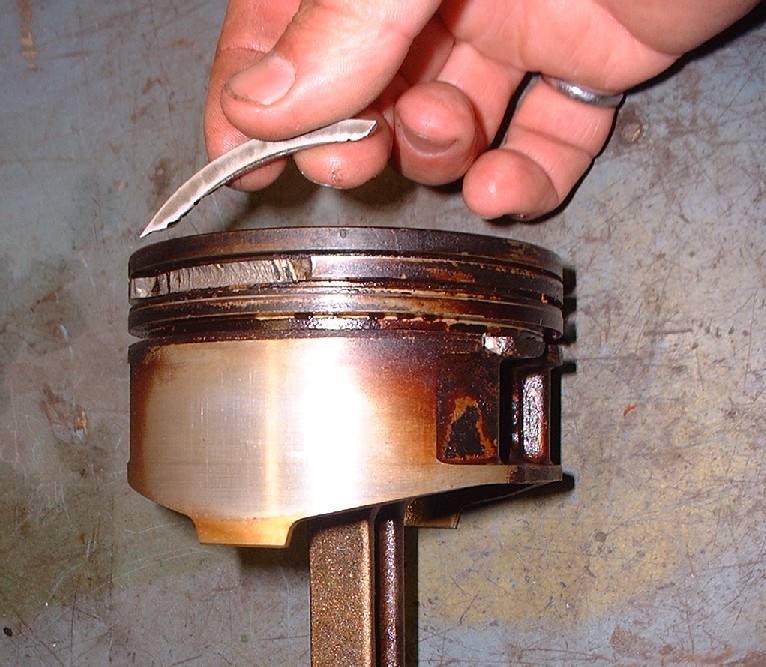
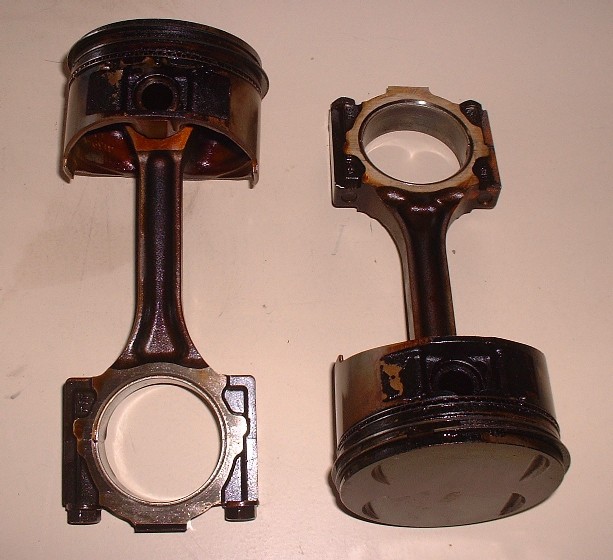
Here’s where being skeptical of the condition of the engine paid off big time… after I had removed the rod bolts and caps, and while I was pushing the pistons downward out of the bores, something went clinkity-clink on the floor when pistons 2, 4 AND 6 cleared the block. Unfortunately it wasn’t just a couple broken rings.
The amazing part is that even with these broken ring lands, the compression was still at 170 psi at cranking speeds. Well, that and the fact that the pieces had stayed in place and hadn’t scored the cylinder walls at all. After having exchanged posts here on PFF with a few of you, and consulting my machine shop, the consensus was that this was probably caused by detonation. It didn’t appear as though the engine was run for any length of time, or at all, after this damage occured since there was no secondary damage… well, except to my wallet... cha-ching! Have you ever priced out new Caddy pistons?


 I know that the VIN 9's are the more desireable engines because of the 300 HP output, but I'm OK with 275 HP. Besides, this leaves growth potential!
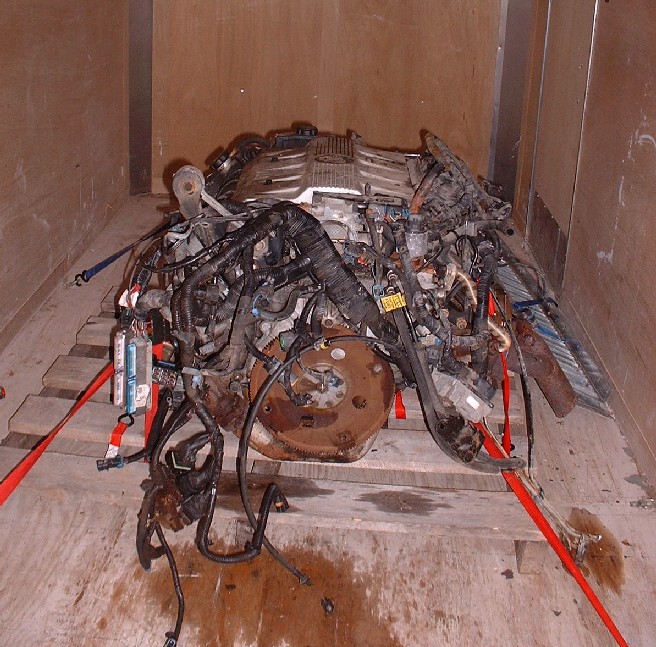
 You have an obvious passion for automobiles, and those cars deserve an owner like you. Good luck with the build, and marked as a favorite.