Hello, great work like your idea on shorting the front clip. Make you an offer, trade you the compmotive wheels and tires for a rear window. Thanks again from Norm
Thanks norm but your window wont fit my car, I also cut 4" out of the back of the car to shorten it. I also extended the rear of the roof about 7-8". My windows quite a bit smaller now. Im happy w the window I made, I need to clean up the corners but thats it. Those wheels will fetch a pretty penny.
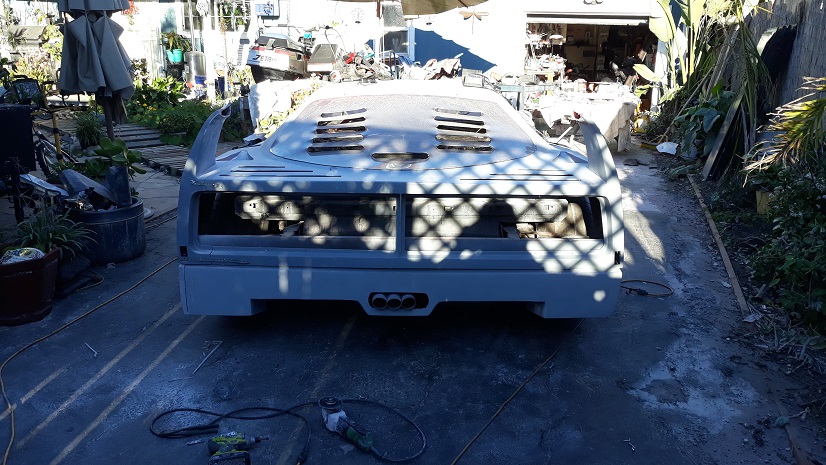
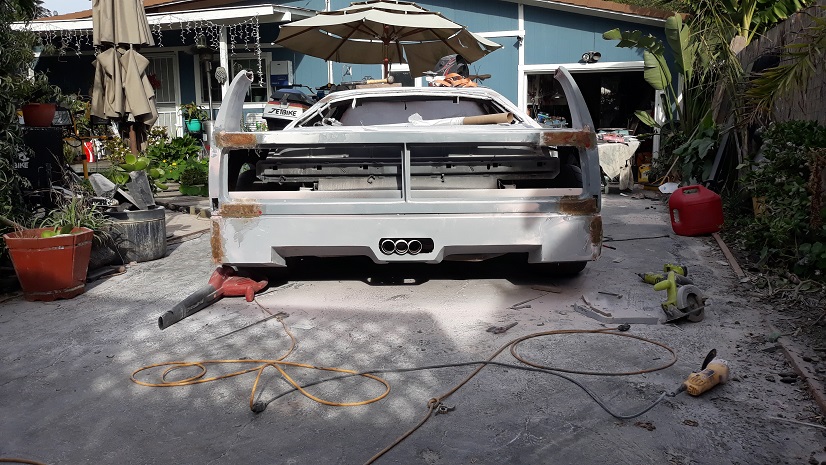
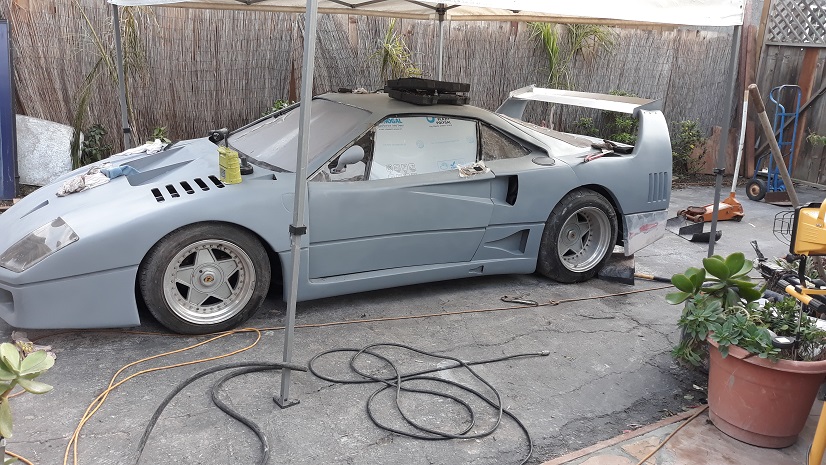
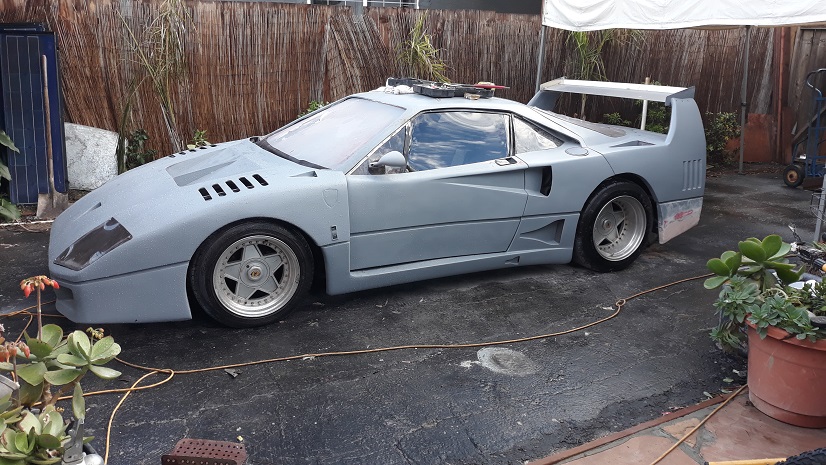
Got tons o body work done and a second coat of primer. Looks good from far but far from good. To me at least. I didnt start sanding this coat yet so I can see the sheen. Even w all the longblocking I can see the sheen line isnt straight moving my head meaning itll look like crap if I paint it cuz I dunno what im doing. So Im still looking for a body guy and may hit up some shops for bids. Do need to get it to the smog shop so I bolted down the rear grill and need to find the tail light harness I made, installed the side mirrors and gas door. Cleaned all the garbage from inside, bolted the gauge cluster back down. Real thing has plastic windows so im going to just make em outta 1/8", gotta compromise. Should have those in soon if the rain lets up. Looking forward to driving it, not looking forward to the cloud of bondo n fiberglass dust thatll be swirling around in the cabin. Ill hafta keep the windows down. Pretty damn sick of fb and sanding, looking forward to working on other stuff. Next in line is windows, seals, interior Walked into one of the spoilers vertical pieces, right in the ribs. Fu@k that hurt and still hurts days later lol
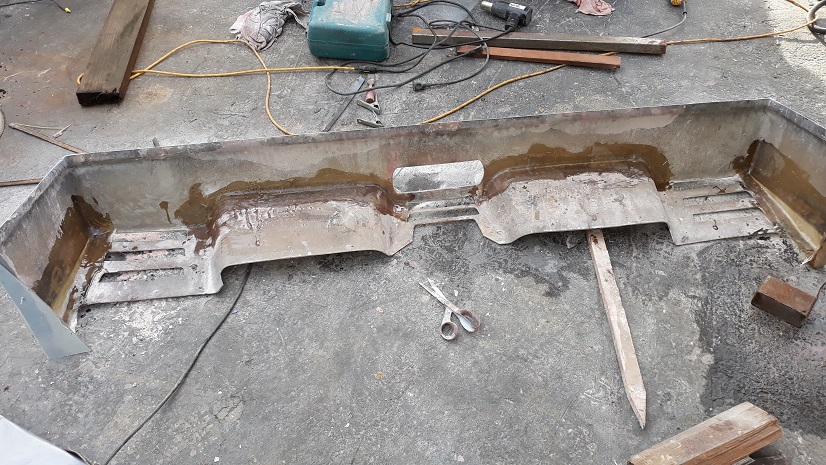
Thanks you guys! Details schmetails! they are being vanquished little by little, but I still find a few things to do. One piece of the car I never cut much into was the rear lower piece. Its a lil small n the devils been bugging me for that for ages now so I cut into it. Heres the inside boogered up w 2 layers o mat n 1 layer clof
Looks much meaner now. Almost done with it. Taped off the bottom of the door handles w hvac tape(works awesome) and wedged a bunch of mat underneath to make a mounting area for the handles to bolt to. Also made door handle rods outta some drip irrigation stakes.
If you get really low you can see the vents
Oh yeah made me some winduhs. Had to move the front window pillar forward to be pretty much parallel w the rear. Looks ok but hadta compromise. Pulled the window frames out and cleaned up the insides and boogered holes shut.Was like john wayne w the dual wield heat guns melting the windows to shape. Heres the pass side w window felt. N yes they move up and down with minimal resistance! I can think of 2 tiny areas that need fb to make the groove smaller, but thats pretty much it for the fb
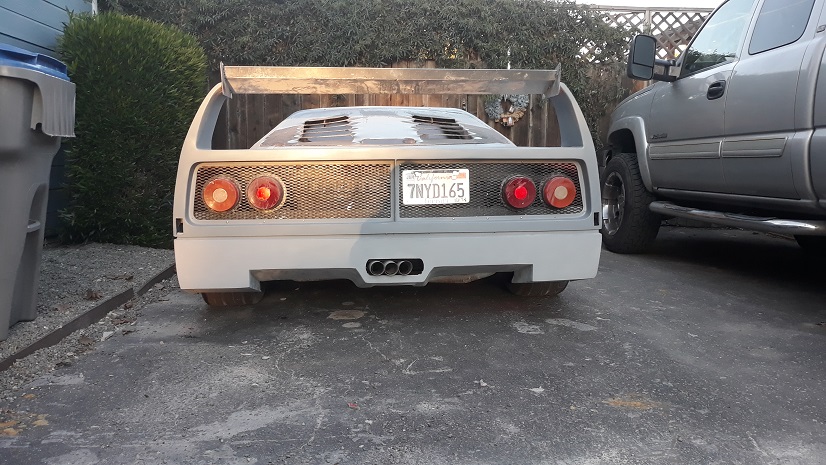
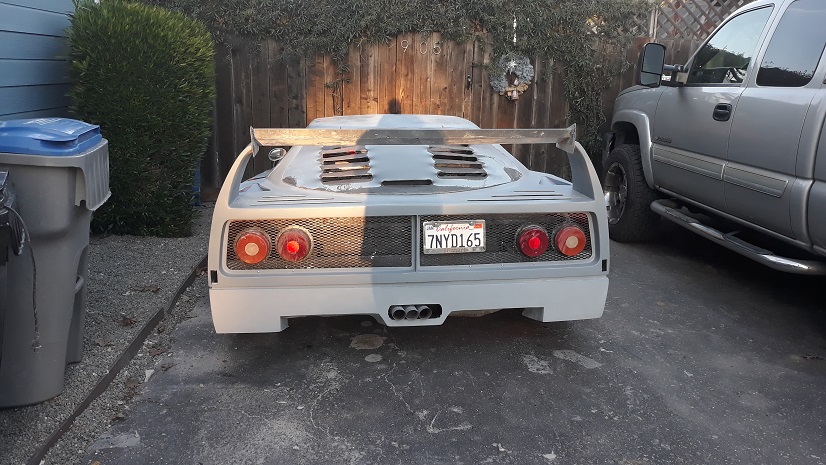
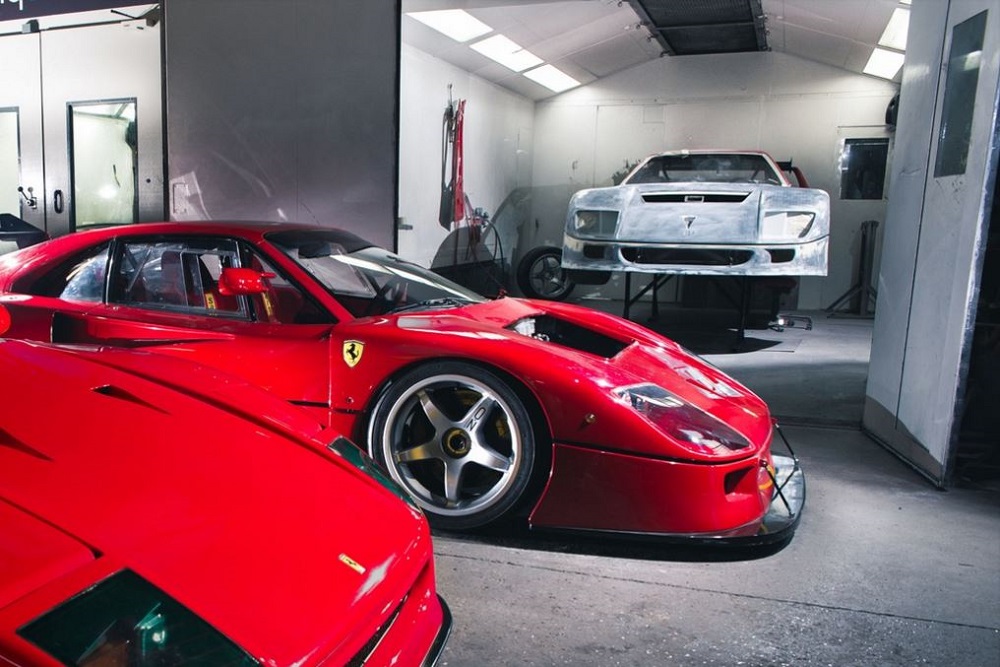
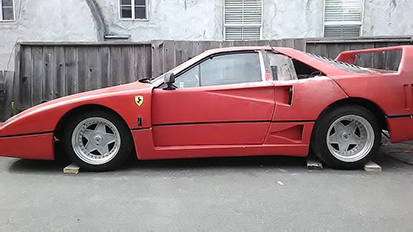
A lot of times, people don't realize how subtle details change the entire look of the car. Here are photos from the very first post and the current car. One hell of a difference:
I go back to page 1 often and look at the first few pics. What a stupid looking car lol what was I thinking buying that. I kinda had to start doing what im doing to it as I got the stones to. I cut up every pice of fiberglass on this car n cut the fiero roof completely off! WTF?! Yeah pretty proud of the car the car but more so the skills n tools Ive picked up along the way. Had some good tips n lotsa cool comments along the way! Kinda tired o working on it tho, wanna wrap this sh!t up lol. Got the drivers window bent up and almost finished. Hooked it up to the fiero window motor but its so flimsy that it doesnt want to slide down equally and the window motors not strong enuf to move it. I have an 1/8 thick piece o steel screwed to the bottom of the window to keep it straight. The windows will work till I get the 1/4 window bending down. The window shape is what it is so I can start on the seals and some final welding. Once the interior is sealed good, I can install the interior. Looking forward to that day
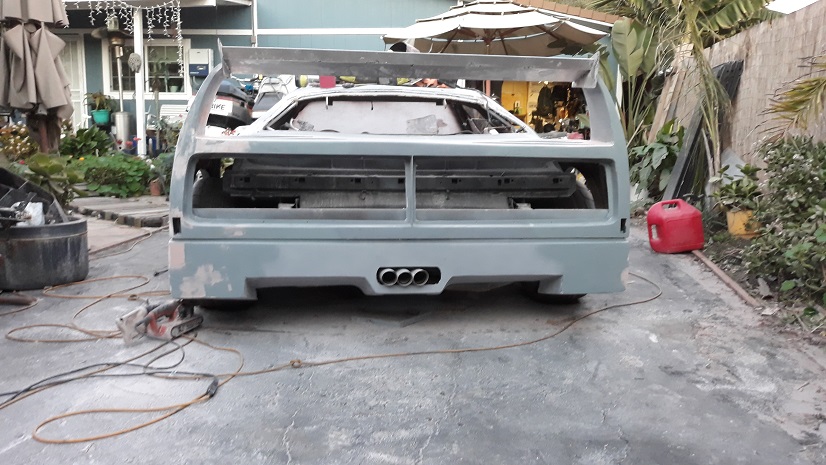
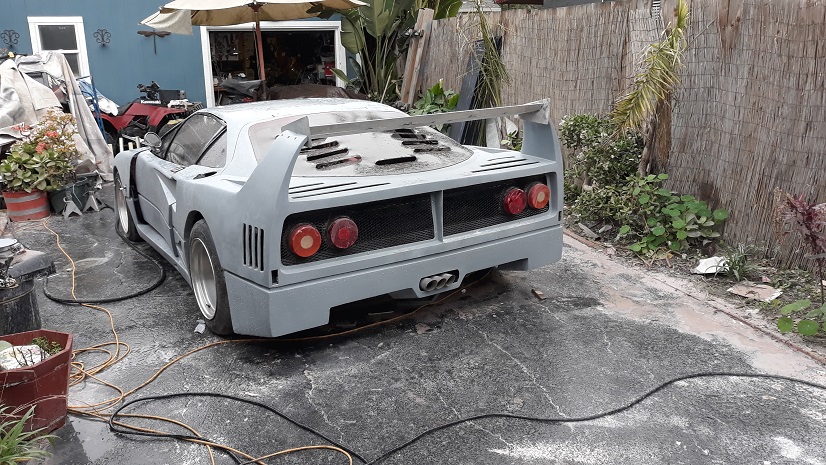
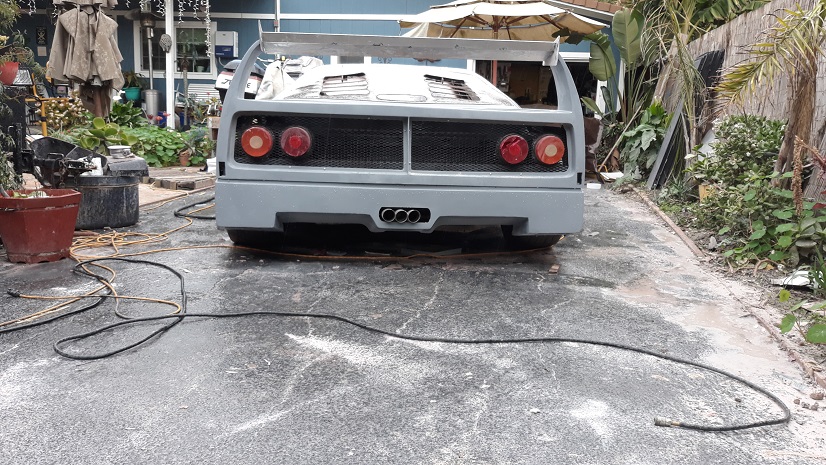
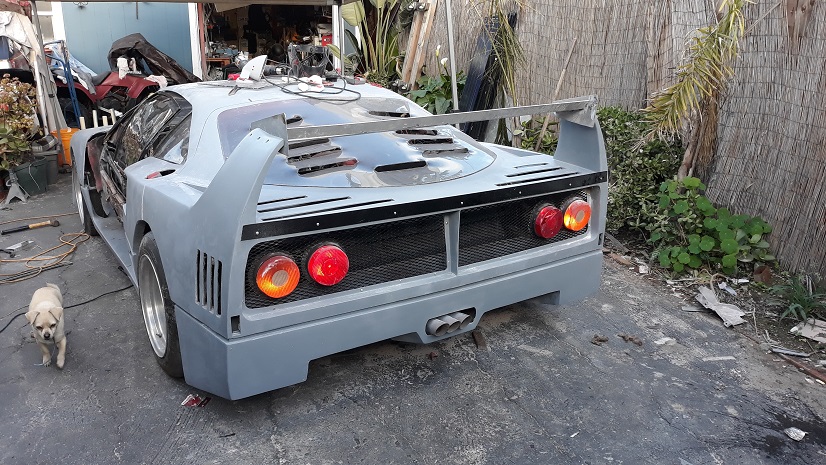
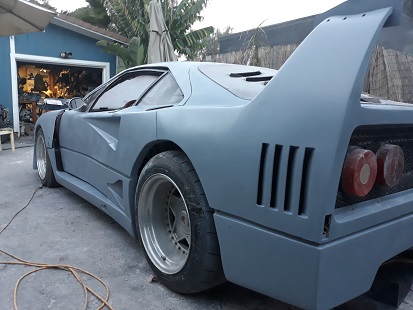
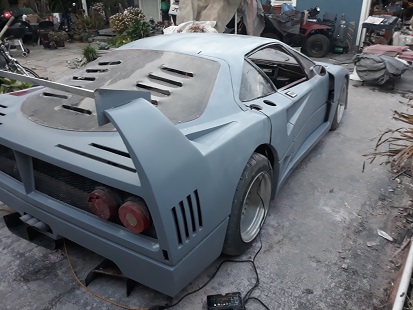
The back end doesnt look bad in person but when i put the camera lens to it it looks like sh!t. I went through some pics I made ages ago and found this Looks like I still have about 1/3 left o fb can #14, gonna go for it when time and weather allow, straighten the bottom and cut the inner areas sharper The back now looks like a regular f40 rear, n wah wah I want the LM rear!
That LM rear end is possible but you sound as if you've had enough of this project. I could tell you exactly how to get that look but there are so many steps and so much fab work that you may just say screw it and leave the rear end as-is. I will say that the LM rear end would finish this car perfectly.
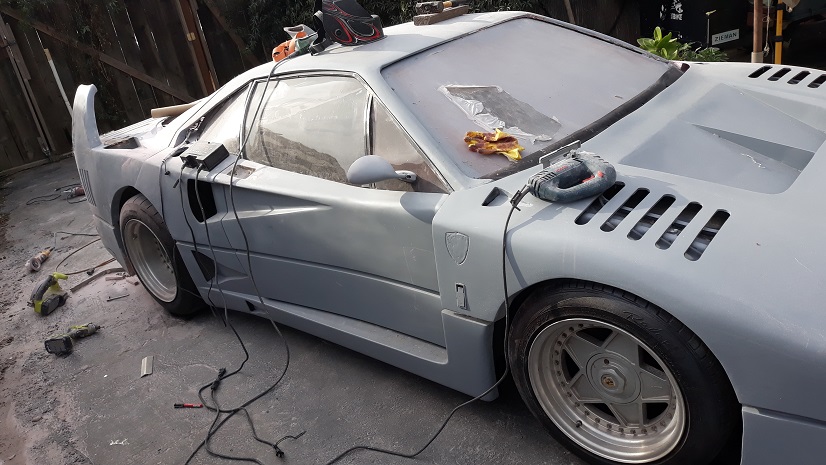
Your inputs always appreciated, saved the day w the headlight mod! I can see what it needs to look right, not too much work. The lower section that is. The upper is still a wee bit big and the opening is also. Matching up the lower to the real thing will make it blend better. Just tired of sanding lol, but the belt sander and cutting wheel have been good friends through this project. The belt sander w 36grit belt knocks stuff down instantly. Love the car but wanna get onto other stuff(and drive it!). Still so many things to do, still have this big box of airbag parts hoggin prime real estate in my tiny garage. Wanna get the interior in, wanna put the wheels on, etc. Going to be tough getting in n outta driveways, the body is 5" off the ground n the frame n cradle a bit lower. When I make the new rear lower vent thingies that hang down, I def wont be going in n outta driveways without the bags. Should be able to throw some time at it this weekend.
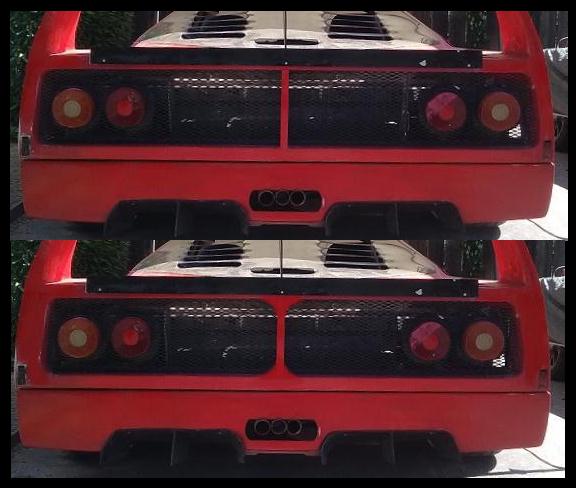
Here's a basic change just to say you made another mod I moved the lights inward about 3 inches each, made the side panels above the latches fatter to compensate for the lights being moved, and rounded the corners of the center divider.
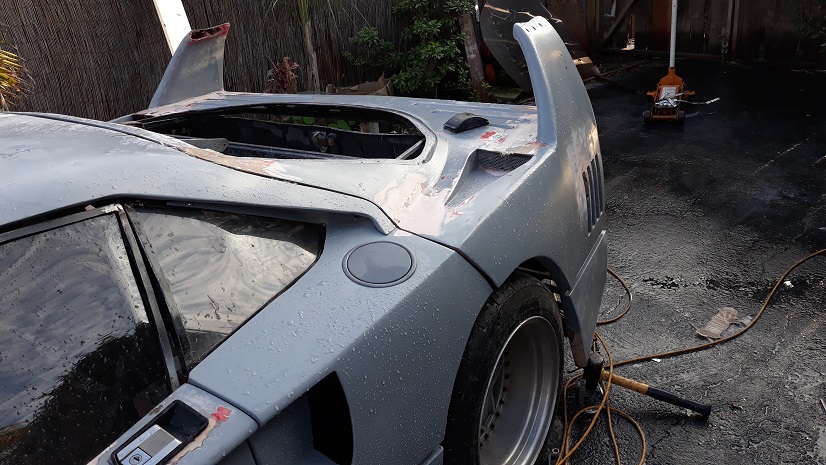
Interesting you went for the top, I went for the bottom. Cut the bottom outer sections off, held em where I wanted em w screws n plumbers tape, cupla layers o mat n 1 cloth on the inside. After that dried i cleaned up n did a few layers on the outside, 2 coats o bondo, 4 hours n bam! ba-bam! The back upper section would be a nightmare to modify, I see what you mean. I would need to narrow the top. The how just popped in my head right now lol. Im going to cut the sides of the taillight opening and leave the bottom as is and narrow the top a few inches to give me that curve. Theres a giant support of 3/4" tubing buried around the taillight opening so its a ***** to cut and always catches fire quick around there. The back area only looks bad in the pictures, in person you dont notice it. Maybe saturday. Rv shop just called, the brake inspections not part of the full inspections, so they recommended an axle pack. Theyre booked up so theyll have it another 2 weeks! Sweet I can move the car back from the drive way!
Thank ya thank ya- thank ya virry muuuch! made this while babys sleeping I need to narrow the whole back and taper in the top a smidge gonna be tricky, tough, n messy ill be back
Had some time today after work, n cut up my car gar heres the first cut, took 1/2" outta everything lower sides straightened out, still cant see the side vents from the middle
Fu@ked up a buncha stuff deese panels wopped nah vents took some damage hyah
can see the back tapered in nowh
still need to trim the lower back down/ muffin top
thats as good as its gonna get, boogers tomorrow special treat for my hard work mmm happy
No whats impressive is what the fruit pie did to me, wowsers. Got time to start on boogering the rear back together. Used wedges from random sh!t I have around, and pieces of 2x4 n drywall screws to hold pieces level. Lotsa cutting n grinding but I got round 1 done in an hour. The front edges of the trunk that were sticking up super bad I was able to fix by propping up the trunk/frame on a 2x4, then putting some heavy flower pots on top to bend em down over night. had to cut the upper window pillars off to reset. Heres round 1 Been adding lotsa hardener to the mix so stuff dries in 20-30 mins regardless o temp. Round 2 thats pretty much everything glassed together mostly heres round 3 where I noticed, even though everythings dead nuts exact, the left side looks like its straight. So I pulled off that bit I just did, n cut the top again another 1/4" and redid it. No pics of that. Had to make a HD run for more glass n mat. Can #15 baby! heres the side, the rear kicks in a lot now Looking pretty good, the rear got 4-5' narrower. Doesnt look like a bumper car or a kids ride from the back so much. Tomorrow ill pull the trunk and lower and glass large areas to hold everything together. The outside boogers are just to hold the shape. Lots o areas where the panels cracking at the edges from all the flex im putting into it. After boogering everything, I should be able to lay some snot tomorrow
shem
[This message has been edited by shemdogg (edited 01-27-2019).]
A lot of times, people don't realize how subtle details change the entire look of the car. Here are photos from the very first post and the current car. One hell of a difference:
I had a LOT of doubts about where this was going to end up when it all started but I have to confess that I'm very impressed with the work so far.
Shem if you can keep that wheel and tire offset and chassis stance of the car as it appears now, (in primer), I really think it will be a success.
[This message has been edited by randye (edited 01-28-2019).]
Thank you! Stance will get better w suspension n wheels/tires. Good enuf for now. Almost done w the back, had a few hours to throw at it today. About a foot of water in the spare tire well drilled a bigger drain hole lol. Rained overnight and the interior stayed dry! This corners fighting me cut it up and extended it w a few other areas Almost done looking waaaay better def worth the work
now tell me how to get the hood looking like this The hoods good looking now but nowhere near as good looking as the real deal
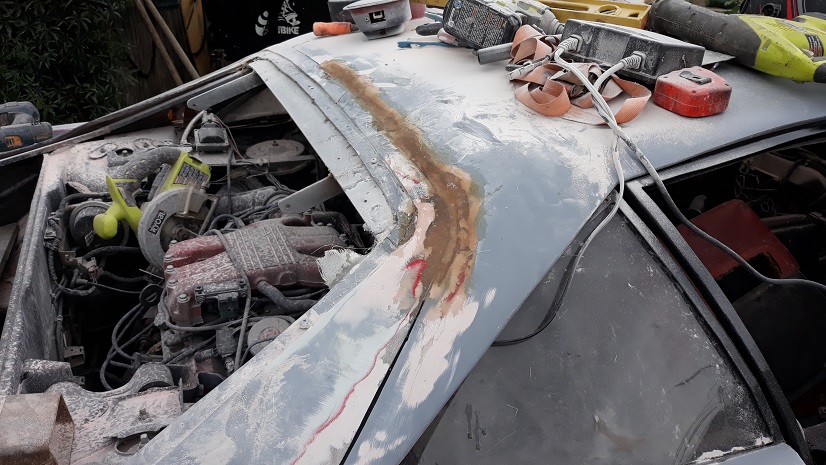
Thank you engine man I love reading your motor threads! Got a whole messerschmidt done yesterday n today Sand fill booger, repeat Started out yesterday w sanding n painting the door window frames cuz theyre starting to surface rust. Played w the gas filler, need to make a custom pipe from the cap housing to the fill hose. Car ran outta gas today when I went to move it. Batterys totally toast from sitting. had to join the trunk n roof again, gap was too big more boogers n snot everywhere, millions of details. & rounds of fb n 4 rounds bondo yesterday No time for love dr jones, rains coming. Finished it up n shot primer rear grille didnt fit no mo, so I cut it in half and took out from the middle what I didnt need looks much better, doesnt look like a bumper car as much
Finally pulled the sheet off the windshield. Way too late, hadta get it off w a chisel n heat gun
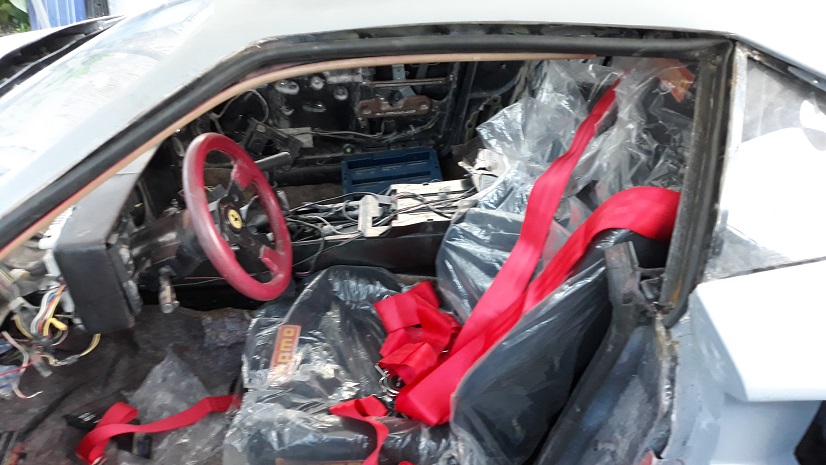
Thanks you guys the comments add motivation! Put the fiero door seals back in, I think theyll still work just need to be extended. The lower half of the doors fine, the back of the window is fine( the trim piece that originally goes there fits perfect), trimmed the outer dew wipes to fit. Doors sound solid now when closing, very nice. Worked on my door handle rods some more, very nice to have the windows up and be able to open the door. Cleaned the interior, boot and trunk of all the fiberglass, dust and bits of metal that collected there. Found my tail light harness! Wired up the taillights, rt signals not working and my brake lights stay on now. Headlights still work. Buffed out the windshield w a headlight lens restore kit. Trimmed down the back lip spoiler to fit, cut out a buncha old fb from the back of the roof. Once the door seals are in, the interiors next. To be followed by the airbags. Mighta founda 3.8sc to swap in if somebody doesnt snake it. If I get that car thatll be next. Only way ill do a motor swap is if its a turnkey turkey. Programming my own ecm sounds like a nightmare.
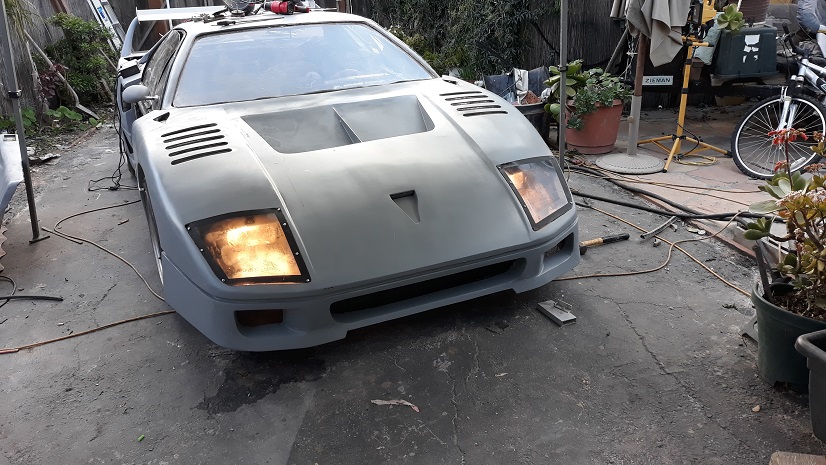
Me too tho itll be awhile before paint. Been working on lights, got everything working now except front turn signals. neghbor used my voltmeter now its not working so I used the dvm on my jumper box w a pick for testing. Bent up the ps window some more, hooked it up to the power window motor and it works! Mostly! Have some metal edged window channel coming. Gave up on modifying fiero door seals, finally found what im looking for after hours of searching. Instead of searching door seal, or universal car door weatherstripping, ect, it came up as universal push on top bulb seal. WTF!? So I should have the interior pretty airtight soon. Installed the grilles in the hood, glassed in the headlight buckets to the hood. made new hood hinges to get the wheelwell lined up better. Welded in the ds window frame better. Buncha other details done I cant think of but its coming along. Rains here for the next week so I prolly wont get much done. Got some tiny round side marker lights coming and a glass cutter for the windshield. Back windows installed now. Hands need a break theyre pretty mangled again. Had a fb splinter the other day, that sucked. Cant see the thing, dug around w a romex staple till I hit blood then squeezed and the thing shot out.
Lotsa rain and work, not a lotta time for the car. Been poking at it here and there. Got the windows to go up and down finally, in the felts, and with the power window motor! Lotsa cutting and welding and cuts on my hands from working inside the doors. Those windows vexed me for too long, that and getting the trunk to not hit the roof while opening. Made a new quarter window for the ps side, got my gas filler sealed up and changed the vent hose. Cut up a piece of angle ern to hold the new door seal and it came out great, just didnt buy enough. Heated up the windows more to get some of the waves out, getting the hang of lexan bending. Got a sealed drivers door now, and fitting some of the fiero trim pieces back in. This thing will be on the road soon.
Got a lil done in a lotta time today. Finished cleaning up n rewiring the headlights n turn signals. Pulled all the carpet n insulation out. carpets trashed, insulation was soaked in places. Let it dry out. Vacuumed the fb n bondo dust, then ran the leafblower inside for a few mins, got it really clean. Put the insulation back and swapped the seat rails to my new ds seat. Going to get carpet tomorrow. Made some brackets n welded em in place for the upper seat belt mounts, drilled n tapped.
Nah I love a deep gloss for sure! Havent really done much w it lately, no time. Still messing w making the door seals look good and placement. Waiting on carpet. The beefy plate I welded in is too high, seatbelts too long durr. Those seats barely clear the roof w a lil help but are damn comfy! Getting in n outta those harnesses is a freaking chore Experimenting w the headlights sommo, lowered n angles the lower end
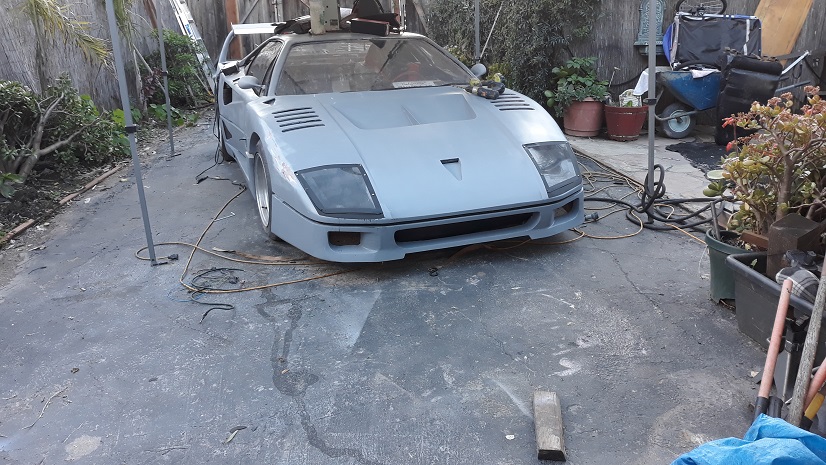
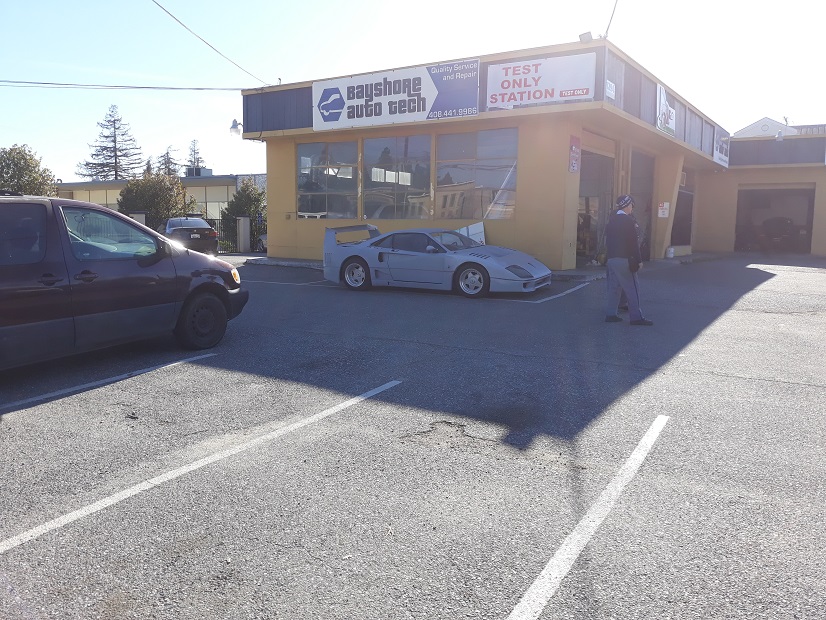
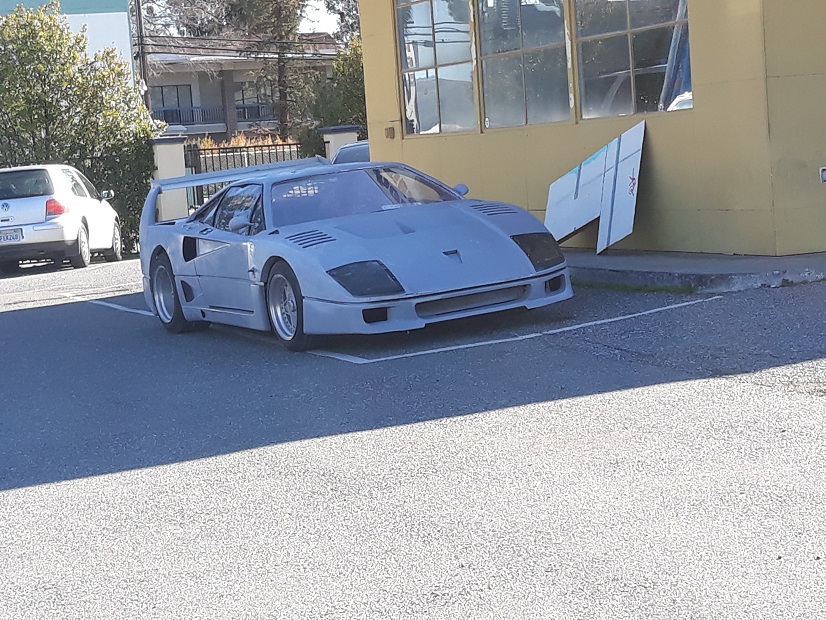
Took it to the smog place today it passed. I think the machine was trying to fail it, it ran the car at both speeds for the maximum time limit. But it passed w low emissions. The guy was shocked it passed. He almost didnt wanna smog it unitil I told him I was there almost 2 years ago and I had to go back 4-5 times and the car died on the lift lol. Man its so low the rear rockers were rubbing on the rollers a smidge, some coolant steam shot out from the ds wheelwell after he was done w the 50mph test but didnt come back later. Buncha people came to check out the car while I was waiting
bro-ferrari? no pontiac no way its a pontiac, looks like a ferrari gmc baby! what year? 86 oh I bet its rare then yeah not too many like this one
hey im not lying lol Car looks awesome from far Rides like sh!t tho, I think its on the bump stops. Rides n sounds like a rickety ashh pos. I run over a pebble im dukes o hazzard. Lost a hood latch. hafta go get it. The v6 sounds kinda like an old vw engine. Unless mines not supposed to sound like that. Its kinda ratty. One of the mechanics I was chatting with I mentioned it to as the smog guys trying to find first n revving the sh!t out of it and he agreed. More reason for a motor swap
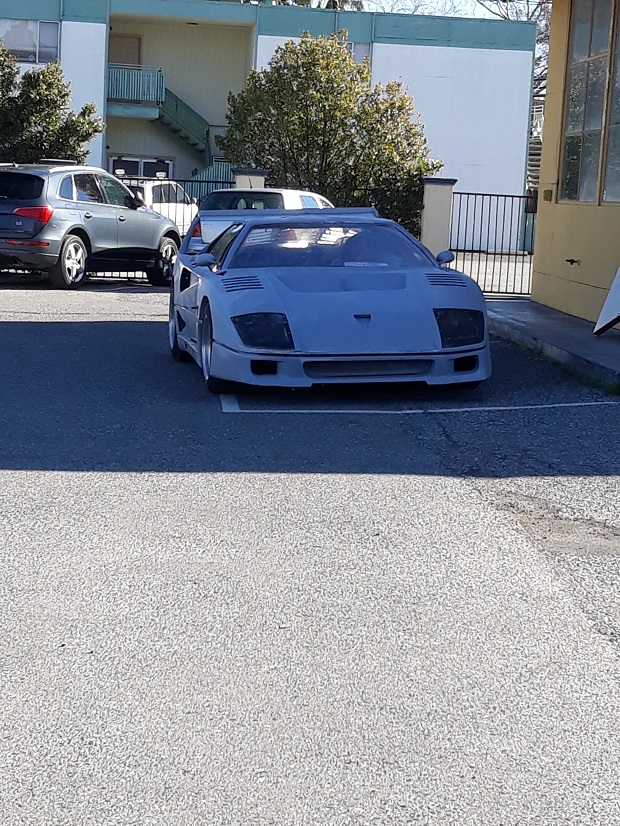
Drove back home to check for coolant leaks, seemed ok. Drove it to the glass shop and have an appt tuesday to get a winshield cut n installed. Gonna top that off w some chick magnet uber cool chrome dual wiper blade wiper blades yeah buddy! I dunno what im doin but im somehow doin it. Looking for a wiring diagram for the cluster that says what wires are what so I can hook up me new gauges n dashbird! Anybody got one handy, send it down hyah
Really looks right in a real world setting. Getter done, you can always ad a swap once all else is done. I have a used Archie V8 kit available, but not sure how you would get one through smog down there. I doubt I'll ever get another V8 done, running out of years! Can't wait to see that car all one glossy color.
The eye candy it offers is great now! I can't believe you actually did that in this amount of time. Most people drive boring crap cars. Ratty driving or not, people appreciate it and then realize they have a boring belly button with obstacle indicators in their mirrors. That power train fix should be easy compared to what you've done. The interior is small thankfully, so no biggie.
If you decided to make a fresh new custom kit of any kind (existing or new) like the Vader guy did, you could pretty easily do that.
Pm sent joedad thank you! Thanks for the kudos fellas! I think im taking a loooong time to finish this car. Its definitely looking good tho. The further away you are the better it looks lol. It was nice seeing it away from my house where I could look at it from more than 5' away. Looking at the car its quite a bit lower. Im petty sure its on the bump stops, that drive sucked. Didnt take it over 30mph. had to pull into driveways almost parallel to not scrape too bad. Gettin antsy for the airbag swap, might start looking around underneath the car soon.
Furnace is crapping out so I got a new one to install horizontally in the attic. Installed a pull down door yesterday and trying to round up some help to get the furnace up there. Lots of gas piping and electrical to do(gonna install lights up there and make storage), but the ducting will be much shorter so it should have more oomph.
The interior will be pretty easy to get the majority of it in. The only thing thatll slow me down is fabbing ducting to connect my new ducts to the fiero ducting, and making inside b pillar covers, door pnels, n making the door openings look decent. Piece o cake lol
I know me Ill get the easy interior stuff done then bounce over to the airbags. Just like a test in school I skip whats hard n move onto something easier. So ill stop halfway through the airbag install n finish up the interior. Good ol scatterbrain


 I moved the lights inward about 3 inches each, made the side panels above the latches fatter to compensate for the lights being moved, and rounded the corners of the center divider.