Pennock's Fiero Forum
  The Construction Zone
  Enterra "Dark Shadow" Restore Thread (Page 4)

Post New Topic  Post A Reply
Email This Page to Someone! | Printable Version

This topic is 17 pages long:  1   2   3   4   5   6   7   8   9   10   11   12   13   14   15   16   17 
Previous Page | Next Page
next newest topic | next oldest topic
Enterra "Dark Shadow" Restore Thread by Lady Lisa
Started on: 06-11-2012 09:44 AM
Replies: 640 (43490 views)
Last post by: FIERO JOHN-WI on 04-15-2019 08:49 PM
85SEnochie
Member
Posts: 2081
From: Tri-cities, WA
Registered: Oct 2007


Feedback score: N/A
Leave feedback


Total ratings: 58
Rate this member

Report this Post12-18-2012 05:17 PM Click Here to See the Profile for 85SEnochieSend a Private Message to 85SEnochieEdit/Delete MessageReply w/QuoteDirect Link to This Post
 
quote
Originally posted by troyboy:

Hummm... Interesting, can we try it with..... Keep the bumpers black, add her wheels, keep the vents white, keep the door Handel black, blackout side marker lights, keep the black sail panel window looks sharp. Boy oh boy Archie is going to hate you guys lol.

BTW I ordered the new tail lights today... Don't tell Lisa ......


Ok so I did change the sail panel a little but I think I got it all that you were asking for?

------------------

Love The Excitement! //www.fiero.nl/forum/Forum1/HTML/068738.html

IP: Logged
troyboy
Member
Posts: 2075
From:
Registered: Sep 2005


Feedback score: N/A
Leave feedback


Total ratings: 154
Rate this member

Report this Post12-18-2012 05:22 PM Click Here to See the Profile for troyboySend a Private Message to troyboyEdit/Delete MessageReply w/QuoteDirect Link to This Post
 
quote
Originally posted by 85SEnochie:


Ok so I did change the sail panel a little but I think I got it all that you were asking for?


Thanks looks good, but I will wait to see what the boss (lisa) has to say.

[This message has been edited by troyboy (edited 12-18-2012).]

IP: Logged
85SEnochie
Member
Posts: 2081
From: Tri-cities, WA
Registered: Oct 2007


Feedback score: N/A
Leave feedback


Total ratings: 58
Rate this member

Report this Post12-18-2012 05:28 PM Click Here to See the Profile for 85SEnochieSend a Private Message to 85SEnochieEdit/Delete MessageReply w/QuoteDirect Link to This Post
 
quote
Originally posted by Patrick:

I agree with all that. The side vents in particular stood out too much when black (as pictured). Makes them look "stuck on". It would probably look fine though if just the "hole" in the vents was black (if the holes aren't actually cut out).

Terry, could you do a version as Troyboy mentioned, but do the side panel I've pictured all black (as opposed to part of it as you've done). I'd like to see what it looks like as sort of an "extension" of the side window.


Thanks for clarifying that, Here you go I like it too!

------------------

Love The Excitement! //www.fiero.nl/forum/Forum1/HTML/068738.html

IP: Logged
85SEnochie
Member
Posts: 2081
From: Tri-cities, WA
Registered: Oct 2007


Feedback score: N/A
Leave feedback


Total ratings: 58
Rate this member

Report this Post12-18-2012 05:30 PM Click Here to See the Profile for 85SEnochieSend a Private Message to 85SEnochieEdit/Delete MessageReply w/QuoteDirect Link to This Post

85SEnochie

2081 posts
Member since Oct 2007
 
quote
Originally posted by troyboy:

Thanks looks good, but I will wait to see what the boss (lisa) has to say.


Sounds good Let me know what she thinks

Terry

------------------

Love The Excitement! //www.fiero.nl/forum/Forum1/HTML/068738.html

IP: Logged
Patrick
Member
Posts: 36251
From: Vancouver, British Columbia, Canada
Registered: Apr 99


Feedback score: (1)
Leave feedback


Total ratings: 458
Rate this member

Report this Post12-18-2012 06:03 PM Click Here to See the Profile for PatrickSend a Private Message to PatrickEdit/Delete MessageReply w/QuoteDirect Link to This Post
 
quote
Originally posted by 85SEnochie:

Thanks for clarifying that, Here you go I like it too!


She's looking pretty good!

This may be nit-picking, but I prefer the sail panel glass the same shape as you originally did it. IMO the rounded rear corner doesn't match anything else on the car. I much preferred it "pointy" (although if this actually becomes a glass window, that in itself may contribute somewhat to whatever shape the end needs to be fashioned).

[This message has been edited by Patrick (edited 12-18-2012).]

IP: Logged
85SEnochie
Member
Posts: 2081
From: Tri-cities, WA
Registered: Oct 2007


Feedback score: N/A
Leave feedback


Total ratings: 58
Rate this member

Report this Post12-18-2012 06:16 PM Click Here to See the Profile for 85SEnochieSend a Private Message to 85SEnochieEdit/Delete MessageReply w/QuoteDirect Link to This Post
 
quote
Originally posted by Patrick:

She's looking pretty good!

This may be nit-picking, but I prefer the sail panel glass the same shape as you originally did it. IMO the rounded rear corner doesn't match anything else on the car. I much preferred it "pointy" (although if this actually becomes a glass window, that in itself may contribute somewhat to whatever shape the end needs to be fashioned).


No worries I figured one of you would ask that Here you go.

------------------

Love The Excitement! //www.fiero.nl/forum/Forum1/HTML/068738.html

IP: Logged
Pete Matos
Member
Posts: 2291
From: Port St. Lucie, Florida
Registered: Jan 2010


Feedback score: (2)
Leave feedback

Rate this member

Report this Post12-18-2012 06:23 PM Click Here to See the Profile for Pete MatosSend a Private Message to Pete MatosEdit/Delete MessageReply w/QuoteDirect Link to This Post
Nice photoshop skills man. I gotta say that the black faux sail window whether or not they decide to make it real does nothing for the car. It actually makes it look like a firebird or something. The rear end of that car as it was made from the factory, while it probably does not do much for the blind spot area, is part of what makes it interesting and also what ties it in with the Fiero history even more. With the large black window there it almost makes me think people will be looking to see who is in the back seat LOL..... The whole large decklid and wing ties in with the flying buttress 80's exotic look rear end somehow for me it takes away some of that with the black window.

Also can you make the wheel inserts or spokes white like the picture is of them Troyboy posted or am I remembering it incorrectly..... Peace

Pete

IP: Logged
Patrick
Member
Posts: 36251
From: Vancouver, British Columbia, Canada
Registered: Apr 99


Feedback score: (1)
Leave feedback


Total ratings: 458
Rate this member

Report this Post12-18-2012 06:35 PM Click Here to See the Profile for PatrickSend a Private Message to PatrickEdit/Delete MessageReply w/QuoteDirect Link to This Post
 
quote
Originally posted by Pete Matos:

With the large black window there it almost makes me think people will be looking to see who is in the back seat LOL.....


To my knowledge, no one has ever tried to look through the factory sail panels of my '86 GT to see who's in the back seat.

Anyway, it's great to be able to see (through Terry's skills) what this car might look like one day. It's fun to dream up stuff.

IP: Logged
Pete Matos
Member
Posts: 2291
From: Port St. Lucie, Florida
Registered: Jan 2010


Feedback score: (2)
Leave feedback

Rate this member

Report this Post12-18-2012 06:49 PM Click Here to See the Profile for Pete MatosSend a Private Message to Pete MatosEdit/Delete MessageReply w/QuoteDirect Link to This Post
Yeah well just because you did not SEE them looking for that backseat does not mean it did not happen....kinda like the tree falling in the wilderness ya know....LOL

I just dunno man, everytime I look at that picture with the big black window in it, fake or real it screams firechicken. Without it you get a rare car that nobody knows what it is and it retains that exotic look somehow. It really is an unusual looking car especially from the back. You had something going with those quartering away shots from the rear with the black bumper and different taillights. I think that second one with a large black panel would really wake it up. I am also curious as to what these folks intend to do with that interior, I hope it does not look ANYTHING like a fiero inside it when it is done. I love the fiero interior but the car here needs something to set it apart. Peace

Pete
IP: Logged
Patrick
Member
Posts: 36251
From: Vancouver, British Columbia, Canada
Registered: Apr 99


Feedback score: (1)
Leave feedback


Total ratings: 458
Rate this member

Report this Post12-18-2012 07:26 PM Click Here to See the Profile for PatrickSend a Private Message to PatrickEdit/Delete MessageReply w/QuoteDirect Link to This Post
 
quote
Originally posted by Pete Matos:

I just dunno man, everytime I look at that picture with the big black window in it, fake or real it screams firechicken.


Sorry, but I don't see the connecton.


Hey, we've all got different tastes in cars and design. The Enterra will be great no matter what.

[This message has been edited by Patrick (edited 12-18-2012).]

IP: Logged
85SEnochie
Member
Posts: 2081
From: Tri-cities, WA
Registered: Oct 2007


Feedback score: N/A
Leave feedback


Total ratings: 58
Rate this member

Report this Post12-18-2012 07:42 PM Click Here to See the Profile for 85SEnochieSend a Private Message to 85SEnochieEdit/Delete MessageReply w/QuoteDirect Link to This Post
 
quote
Originally posted by Pete Matos:

Nice photoshop skills man. I gotta say that the black faux sail window whether or not they decide to make it real does nothing for the car. It actually makes it look like a firebird or something. The rear end of that car as it was made from the factory, while it probably does not do much for the blind spot area, is part of what makes it interesting and also what ties it in with the Fiero history even more. With the large black window there it almost makes me think people will be looking to see who is in the back seat LOL..... The whole large decklid and wing ties in with the flying buttress 80's exotic look rear end somehow for me it takes away some of that with the black window.

Also can you make the wheel inserts or spokes white like the picture is of them Troyboy posted or am I remembering it incorrectly..... Peace

Pete


Thank you for the complament on my photo shop skills I have a lot of fun helping with it.

------------------

Love The Excitement! //www.fiero.nl/forum/Forum1/HTML/068738.html

IP: Logged
PFF
System Bot
Archie
Member
Posts: 9436
From: Las Vegas, NV
Registered: Dec 1999


Feedback score:    (12)
Leave feedback


Total ratings: 546
Rate this member

Report this Post12-20-2012 12:16 PM Click Here to See the Profile for ArchieClick Here to visit Archie's HomePageSend a Private Message to ArchieEdit/Delete MessageReply w/QuoteDirect Link to This Post
How we are getting on to the "Nuts & Bolts" (& rivets) of the actual build.

About this time last week we started working on this project.

We got it into the shop & started some dis-assembly.


Before taking it apart, we wanted to see how it was put together. We soon found that virtually everything on this car was put together with pop-rivets. Not many parts were actually attached to the chassis with bolts. And almost all of the panels were attached to each other with only pop-rivets. Parts like the nose were not attached to the chassis at all & only attached to the fenders via Rivets.

We had seen a lot of rivets holding in the wheel well liners but there has to be at least 100 rivits holding the panels together too.


The nut plates for the doors were even rivited in place.


Even the close out panel under the nose has a share of pop-rivets.


Many of these rivets have been there for years & many of them have loosened enough that they've "wallowed" out the holes that they are in. Our goal is to have a well fitting (non rattling) body installation, doesn't make good sense to try to final fit panels to other panels that are loose or can come loose.

So in this stage we are fixing a few things, like adding to the retruns on the back of the door panels so we can fiberglass in the nut plates, then we are putting the body back together with nut plates & bolts. Then we can start adjusting the fit of the panels. We will be taking the panels off a few times during this build & we want to be able to bolt it on & off & not have to R&R rivets all the time.

So far, we've had the door panels, rocker panels, sail panels, nose & front fenders off of the car to correct the method of attachment & do some repairs.


The rocker panels had some "U" shaped rubber wrapped around all the edges. It was all dried out so we took it out. Then we converted the rocker panels to "non rivets" & reinstalled to see how much F-Glass we need to add around the edges to make up the space.


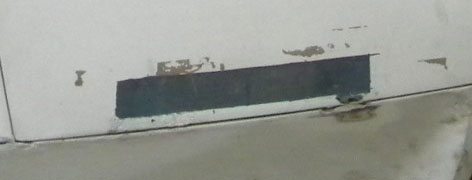
Here we have cut out the pocket for the rear side marker & are ready to lay up some F-Glass to make that area flat again so we can make a new posket later for the new markers.


Done...


One of the only parts that we removed that was actually bolted on was the Sail panels. They had "studs" sticking out from the bottom with nuts. Removing some of the nuts was a problem because they were kinda rusty. As you removed the nuts the "stud" started to spin. On those we had to cut off the "stud" above the nut.

Initially I had thought that the sail panels looked like about the only panels on the car that didn't need work done to them. They have a fiberglass outside skin & a fiberglass inside skin glued or attached to each other.

After getting them off, it appears that the outside & inside skins are bondo'd together & the "studs" for attachment are bolts that were bondo'd in. The reason the "studs" were spinning is bolts ("studs") were spinning in the broken up bondo.

We will have to replace these "studs" with something a little better.


Somethng else we noticed up inside the nose is a patch that was put in. We don't know why it was put in but it looks like it was installed by someone reaching it up into the nose & slapping it on. We should probaly try to find out what they were trying to patch.


So we continue.

Archie

[This message has been edited by Archie (edited 12-20-2012).]

IP: Logged
wftb
Member
Posts: 3692
From: kincardine,ontario,canada
Registered: Jun 2005


Feedback score: (4)
Leave feedback

Rate this member

Report this Post12-20-2012 10:48 PM Click Here to See the Profile for wftbSend a Private Message to wftbEdit/Delete MessageReply w/QuoteDirect Link to This Post
i dont think archie has got this far yet , but it will be interesting to see what is under those bumpers .it really looks like they were built to meet the old 5mph impact bumper regulations of the 80's .i think the car would look better with something other than those two box beams for bumpers .it is a nice looking car as is but it is like the difference between an early ferrari 308 and later ones with the big bumpers to meet the later regs .i allways enjoy archie's builds and this one should turn out top notch as usual .
IP: Logged
jwct7
Member
Posts: 157
From: San Antonio, TX
Registered: Mar 2004


Feedback score: N/A
Leave feedback

Rate this member

Report this Post12-20-2012 11:01 PM Click Here to See the Profile for jwct7Send a Private Message to jwct7Edit/Delete MessageReply w/QuoteDirect Link to This Post
I like the black accents on the bumpers, how about the rocker panels too and maybe even the spoiler.... the "fastback window look" looks cool too. Just my pennoth worth, keep it up.
IP: Logged
Archie
Member
Posts: 9436
From: Las Vegas, NV
Registered: Dec 1999


Feedback score:    (12)
Leave feedback


Total ratings: 546
Rate this member

Report this Post12-20-2012 11:18 PM Click Here to See the Profile for ArchieClick Here to visit Archie's HomePageSend a Private Message to ArchieEdit/Delete MessageReply w/QuoteDirect Link to This Post
You're exactly correct, the bumpers are 80's style impact bumpers.

I took pics of the hardware for them today & was going to post tonight but I'm having a problem with my portable HD.

So I'll post them tomorrow.

Archie

 
quote
Originally posted by wftb:

i dont think archie has got this far yet , but it will be interesting to see what is under those bumpers .it really looks like they were built to meet the old 5mph impact bumper regulations of the 80's .i think the car would look better with something other than those two box beams for bumpers .it is a nice looking car as is but it is like the difference between an early ferrari 308 and later ones with the big bumpers to meet the later regs .i allways enjoy archie's builds and this one should turn out top notch as usual .


IP: Logged
troyboy
Member
Posts: 2075
From:
Registered: Sep 2005


Feedback score: N/A
Leave feedback


Total ratings: 154
Rate this member

Report this Post12-21-2012 04:57 PM Click Here to See the Profile for troyboySend a Private Message to troyboyEdit/Delete MessageReply w/QuoteDirect Link to This Post
 
quote
Originally posted by Archie:

You're exactly correct, the bumpers are 80's style impact bumpers.

I took pics of the hardware for them today & was going to post tonight but I'm having a problem with my portable HD.

So I'll post them tomorrow.

Archie


IP: Logged
Archie
Member
Posts: 9436
From: Las Vegas, NV
Registered: Dec 1999


Feedback score:    (12)
Leave feedback


Total ratings: 546
Rate this member

Report this Post12-21-2012 05:03 PM Click Here to See the Profile for ArchieClick Here to visit Archie's HomePageSend a Private Message to ArchieEdit/Delete MessageReply w/QuoteDirect Link to This Post
 
quote
Originally posted by Archie:

You're exactly correct, the bumpers are 80's style impact bumpers.

I took pics of the hardware for them today & was going to post tonight but I'm having a problem with my portable HD.

So I'll post them tomorrow.

Archie


Front....


There are a pair of these on the rear....


Archie
IP: Logged
troyboy
Member
Posts: 2075
From:
Registered: Sep 2005


Feedback score: N/A
Leave feedback


Total ratings: 154
Rate this member

Report this Post12-22-2012 04:19 AM Click Here to See the Profile for troyboySend a Private Message to troyboyEdit/Delete MessageReply w/QuoteDirect Link to This Post
Thanks for the update! Lisa's new tail lights shipped today and you should have them by Thursday.
IP: Logged
motoracer838
Member
Posts: 3751
From: Edgewater Co. USofA
Registered: Jan 2006


Feedback score: (2)
Leave feedback


Total ratings: 83
Rate this member

Report this Post12-22-2012 11:49 AM Click Here to See the Profile for motoracer838Send a Private Message to motoracer838Edit/Delete MessageReply w/QuoteDirect Link to This Post
 
quote
Originally posted by Archie:

How we are getting on to the "Nuts & Bolts" (& rivets) of the actual build.
Before taking it apart, we wanted to see how it was put together. We soon found that virtually everything on this car was put together with pop-rivets. Not many parts were actually attached to the chassis with bolts. And almost all of the panels were attached to each other with only pop-rivets. Parts like the nose were not attached to the chassis at all & only attached to the fenders via Rivets.

We had seen a lot of rivets holding in the wheel well liners but there has to be at least 100 rivits holding the panels together too.


Let me be the first to say, "what a riveting experience".

This will be a cool project, I can't believe I'm the first to make a rivet joke.

Cheers Beers n Gearz. Joe

IP: Logged
Carcenomy
Member
Posts: 1109
From: Invercargill, New Zealand
Registered: Jan 2009


Feedback score: N/A
Leave feedback

Rate this member

Report this Post12-22-2012 08:56 PM Click Here to See the Profile for CarcenomyClick Here to visit Carcenomy's HomePageSend a Private Message to CarcenomyEdit/Delete MessageReply w/QuoteDirect Link to This Post
My mind is having issues comprehending those low impact bumpers. The wee shock absorber things, sure... but the sam hill is going on with how the bumpers themselves mount to them? Doesn't look like it would take much impact to wreck it all up. Is there more to this picture we're not seeing Archie?
IP: Logged
Archie
Member
Posts: 9436
From: Las Vegas, NV
Registered: Dec 1999


Feedback score:    (12)
Leave feedback


Total ratings: 546
Rate this member

Report this Post12-27-2012 11:08 PM Click Here to See the Profile for ArchieClick Here to visit Archie's HomePageSend a Private Message to ArchieEdit/Delete MessageReply w/QuoteDirect Link to This Post
I've got to try to bring this build up to date.

You'll recall the "patch job" we found on the inside of the nose.....


We needed to get up under that patch to see what they were trying to fix when they did it.

We felt that the patch was put on in a hurry without prepping the area where the patch was going & the patch was not rolled out to form it to the inside of the nose. Typically when you're patching older F-Glass, you should rough up the old surface to take dirt off & remove the "skin" off of the surface of the F-Glass in the area being repaired. Otherwise the patch just doesn't have a good surface to bond to.

This wasn't the only patch like this inside the nose, 2 other smaller patches were put on at the same time with the same material & methods.

We grabbed ahold of the patch & pulled it right off.


We found that the patches were all trying to repair a mishap to the right front corner of the nose. Here is a picture of the cracks that the larger patch was covering. Note: in these pics we have already cleaned & ground the old "skin" to give our new fiberglass repair some good F-Glass to bond to...


Here's what a repair patch should look like.


One of the things that we found on our evaluation of the car was that the nose area between the lights where it meets the hood was loose. You could touch the middle of the nose just forward of the hood & it would move up & down. There wasn't enough of a flange on this area of the nose to attach to the OEM Fiero bracket that attaches the Fiero nose to the chassis. While doing other things to the car, Kris was refiberglassing on a better lip so that the nose could attach properly.


Also as he has been working on the edges & returns on the body parts, he has been building up a F-Glass surface to properly attach the inner wheel well liners.


They aren't all done yet but as we go we are building up these area for the wheel well liners.

Today we got one of the new mirrors installed......


Archie

IP: Logged
PFF
System Bot
troyboy
Member
Posts: 2075
From:
Registered: Sep 2005


Feedback score: N/A
Leave feedback


Total ratings: 154
Rate this member

Report this Post12-28-2012 09:19 AM Click Here to See the Profile for troyboySend a Private Message to troyboyEdit/Delete MessageReply w/QuoteDirect Link to This Post
IP: Logged
Lady Lisa
Member
Posts: 24
From: New York
Registered: Jun 2012


Feedback score: N/A
Leave feedback

Rate this member

Report this Post12-28-2012 07:31 PM Click Here to See the Profile for Lady LisaSend a Private Message to Lady LisaEdit/Delete MessageReply w/QuoteDirect Link to This Post
Thanks so much you guys for the input & Archie for the update pictures. I think with the exception of the side mirror and the door handle, the side profile will remain white. I don't know about the side window. I can't wait to see the pics of the taillights.
IP: Logged
Carcenomy
Member
Posts: 1109
From: Invercargill, New Zealand
Registered: Jan 2009


Feedback score: N/A
Leave feedback

Rate this member

Report this Post12-28-2012 09:58 PM Click Here to See the Profile for CarcenomyClick Here to visit Carcenomy's HomePageSend a Private Message to CarcenomyEdit/Delete MessageReply w/QuoteDirect Link to This Post
This is just my humble opinion and shitey abilities with Paint.NET 'cause I can't afford Photoshop, but this is about as much black as I would go for your car:

------------------

IP: Logged
PaulJK
Member
Posts: 6638
From: Los Angeles
Registered: Oct 2001


Feedback score:    (25)
Leave feedback


Total ratings: 237
Rate this member

Report this Post12-29-2012 12:55 AM Click Here to See the Profile for PaulJKSend a Private Message to PaulJKEdit/Delete MessageReply w/QuoteDirect Link to This Post
nice mirrors - are they from a late model camaro ?
IP: Logged
madcurl
Member
Posts: 21401
From: In a Van down by the Kern River
Registered: Jul 2003


Feedback score: N/A
Leave feedback


Total ratings: 314
Rate this member

Report this Post12-29-2012 12:08 PM Click Here to See the Profile for madcurlSend a Private Message to madcurlEdit/Delete MessageReply w/QuoteDirect Link to This Post
Nice tweak using the newer Camero side mirrors.


[This message has been edited by madcurl (edited 12-29-2012).]

IP: Logged
troyboy
Member
Posts: 2075
From:
Registered: Sep 2005


Feedback score: N/A
Leave feedback


Total ratings: 154
Rate this member

Report this Post12-29-2012 01:33 PM Click Here to See the Profile for troyboySend a Private Message to troyboyEdit/Delete MessageReply w/QuoteDirect Link to This Post
 
quote
Originally posted by PaulJK:

nice mirrors - are they from a late model camaro ?


Yep, Lisa didn't like the way the stock mirrors looked on the car. She felt the mirrors needed to have hard lines like the car so she sent me on a replacement mirror hunt. She is really happy with the way they look on the car I just hope she paints them white as they shouldn't be the first thing you see on the car.
IP: Logged
troyboy
Member
Posts: 2075
From:
Registered: Sep 2005


Feedback score: N/A
Leave feedback


Total ratings: 154
Rate this member

Report this Post01-03-2013 05:11 PM Click Here to See the Profile for troyboySend a Private Message to troyboyEdit/Delete MessageReply w/QuoteDirect Link to This Post
IP: Logged
Carcenomy
Member
Posts: 1109
From: Invercargill, New Zealand
Registered: Jan 2009


Feedback score: N/A
Leave feedback

Rate this member

Report this Post01-03-2013 09:28 PM Click Here to See the Profile for CarcenomyClick Here to visit Carcenomy's HomePageSend a Private Message to CarcenomyEdit/Delete MessageReply w/QuoteDirect Link to This Post
 
quote
Originally posted by troyboy:


Darnit Troyboy, I get an email saying there's an update on this thread, come racing in here and it's you eating popcorn! Gaahhhh talk about getting people's hopes up!
IP: Logged
Archie
Member
Posts: 9436
From: Las Vegas, NV
Registered: Dec 1999


Feedback score:    (12)
Leave feedback


Total ratings: 546
Rate this member

Report this Post01-03-2013 10:31 PM Click Here to See the Profile for ArchieClick Here to visit Archie's HomePageSend a Private Message to ArchieEdit/Delete MessageReply w/QuoteDirect Link to This Post
It's been a very busy week, I'll get you all an update in the morning.

Archie
IP: Logged
Archie
Member
Posts: 9436
From: Las Vegas, NV
Registered: Dec 1999


Feedback score:    (12)
Leave feedback


Total ratings: 546
Rate this member

Report this Post01-04-2013 01:40 PM Click Here to See the Profile for ArchieClick Here to visit Archie's HomePageSend a Private Message to ArchieEdit/Delete MessageReply w/QuoteDirect Link to This Post
We got a lot done in the last weeks or so.

Been working on the nose, hood & front fenders.

When working on the front fenders, we found another oneof the famous quickie patch jobs....


With the associated cracks on the inside & outside


Here we are working on putting more of the lips for mounting the inner fender wells....


As we noticed when the car first got here the hood had a lot of flex in it. The hood moved around when openor closed & the headlight door rattled because they didn't have anything to close down onto. This was all on our list of things to fix.

The inner & outer parts of the hood were bonded together in a few places with bondo & in other areas they were left without a bond, so the hood has a lot of flex between the inner & outer panels.


In the areas we were going to glass, we had to grind all the paint off of the surfaces & get down into the bondo area to give the fiberglass some bite.


Here Kris is putting the last layer of glass over the cracks inside the nose.


Right now Kris is putting the front fenders & nose back on so we can see how he new surfaces adjasent to the gaps are looking & what we have to do to make them look better than new.

Archie

IP: Logged
PFF
System Bot
mwzephyr
Member
Posts: 203
From: Illinois
Registered: Aug 2012


Feedback score: N/A
Leave feedback

Rate this member

Report this Post01-04-2013 02:09 PM Click Here to See the Profile for mwzephyrSend a Private Message to mwzephyrEdit/Delete MessageReply w/QuoteDirect Link to This Post
I like your fiberglass skills!
IP: Logged
troyboy
Member
Posts: 2075
From:
Registered: Sep 2005


Feedback score: N/A
Leave feedback


Total ratings: 154
Rate this member

Report this Post01-04-2013 05:27 PM Click Here to See the Profile for troyboySend a Private Message to troyboyEdit/Delete MessageReply w/QuoteDirect Link to This Post
Thanks for the update Archie, you guys are doing an awesome job!! I can't wait to see what you do with the tail light mod. With the right wheels, interior and power plant Lisa is going to have one nice ride.
IP: Logged
Archie
Member
Posts: 9436
From: Las Vegas, NV
Registered: Dec 1999


Feedback score:    (12)
Leave feedback


Total ratings: 546
Rate this member

Report this Post01-06-2013 06:45 PM Click Here to See the Profile for ArchieClick Here to visit Archie's HomePageSend a Private Message to ArchieEdit/Delete MessageReply w/QuoteDirect Link to This Post
 
quote
Originally posted by troyboy:

Thanks for the update Archie, you guys are doing an awesome job!! I can't wait to see what you do with the tail light mod. With the right wheels, interior and power plant Lisa is going to have one nice ride.


I would expect that we might be getting into fitting the tail lights sometime this week.


We are fitting the front fenders & nose to to get all the refurbed seams & gaps where they need to be.

It will take some more work but it's coming along.


Archie
IP: Logged
Lady Lisa
Member
Posts: 24
From: New York
Registered: Jun 2012


Feedback score: N/A
Leave feedback

Rate this member

Report this Post01-06-2013 08:06 PM Click Here to See the Profile for Lady LisaSend a Private Message to Lady LisaEdit/Delete MessageReply w/QuoteDirect Link to This Post
Thanks Archie for the updates & all the work you and your workers are doing. It seems like a lot of work but I'm am happy with what I see. Keep up the good work.
IP: Logged
Archie
Member
Posts: 9436
From: Las Vegas, NV
Registered: Dec 1999


Feedback score:    (12)
Leave feedback


Total ratings: 546
Rate this member

Report this Post01-07-2013 08:06 AM Click Here to See the Profile for ArchieClick Here to visit Archie's HomePageSend a Private Message to ArchieEdit/Delete MessageReply w/QuoteDirect Link to This Post
 
quote
Originally posted by Lady Lisa:

Thanks Archie for the updates & all the work you and your workers are doing. It seems like a lot of work but I'm am happy with what I see. Keep up the good work.


You're welcome.

I'm looking forward to this week, the last 2 weeks have been 3 day work weeks. This week is a full week, so it'll be nice.

Archie
IP: Logged
exoticse
Member
Posts: 8649
From: Orlando, Fl
Registered: Jun 2003


Feedback score: N/A
Leave feedback


Total ratings: 108
Rate this member

Report this Post01-07-2013 10:36 AM Click Here to See the Profile for exoticseSend a Private Message to exoticseEdit/Delete MessageReply w/QuoteDirect Link to This Post


Maybe i missed it, but are you guys reusing the original tail lights or using something new ??

I saw the above pic, but was not clear if they are being refurbished ?
IP: Logged
troyboy
Member
Posts: 2075
From:
Registered: Sep 2005


Feedback score: N/A
Leave feedback


Total ratings: 154
Rate this member

Report this Post01-07-2013 11:01 AM Click Here to See the Profile for troyboySend a Private Message to troyboyEdit/Delete MessageReply w/QuoteDirect Link to This Post
The ones in the above pic are new custom sequential LED tail lights (just dusty), the old cavalier tail lights are in the trash .
IP: Logged
2.5
Member
Posts: 43222
From: Southern MN
Registered: May 2007


Feedback score: (1)
Leave feedback


Total ratings: 184
Rate this member

Report this Post01-07-2013 11:05 AM Click Here to See the Profile for 2.5Send a Private Message to 2.5Edit/Delete MessageReply w/QuoteDirect Link to This Post
 
quote
Originally posted by Archie:


Archie


Those tailights are going to be awesome.
IP: Logged
Archie
Member
Posts: 9436
From: Las Vegas, NV
Registered: Dec 1999


Feedback score:    (12)
Leave feedback


Total ratings: 546
Rate this member

Report this Post01-07-2013 11:37 AM Click Here to See the Profile for ArchieClick Here to visit Archie's HomePageSend a Private Message to ArchieEdit/Delete MessageReply w/QuoteDirect Link to This Post
 
quote
Originally posted by troyboy:

The ones in the above pic are new custom sequential LED tail lights (just dusty),


That's exactly right.

With dust in the air from working fiberglass & as dry as it is right now, the static electricity just has dust sticking to anything plastic.

Archie
IP: Logged
Previous Page | Next Page

This topic is 17 pages long:  1   2   3   4   5   6   7   8   9   10   11   12   13   14   15   16   17 
next newest topic | next oldest topic

All times are ET (US)

Post New Topic  Post A Reply
Hop to:

Contact Us | Back To Main Page

Advertizing on PFF | Fiero Parts Vendors
PFF Merchandise | Fiero Gallery | Ogre's Cave
Real-Time Chat | Fiero Related Auctions on eBay


Copyright (c) 1999, C. Pennock