------------------ Ron Freedom isn't Free, it's always earned. My imagination is the only limiting factor to my Fiero. Well, there is that money issue.
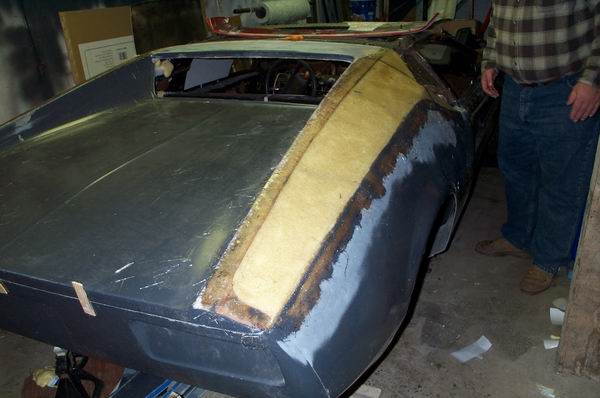
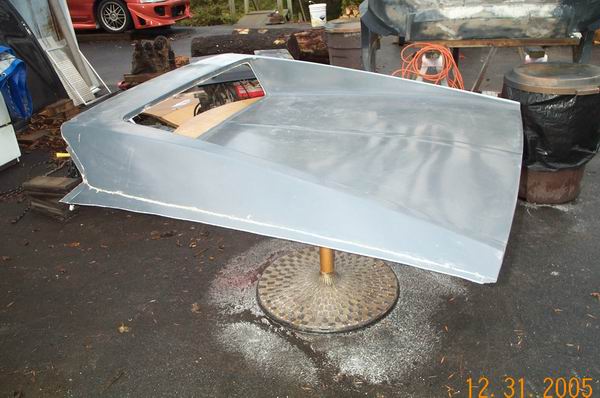
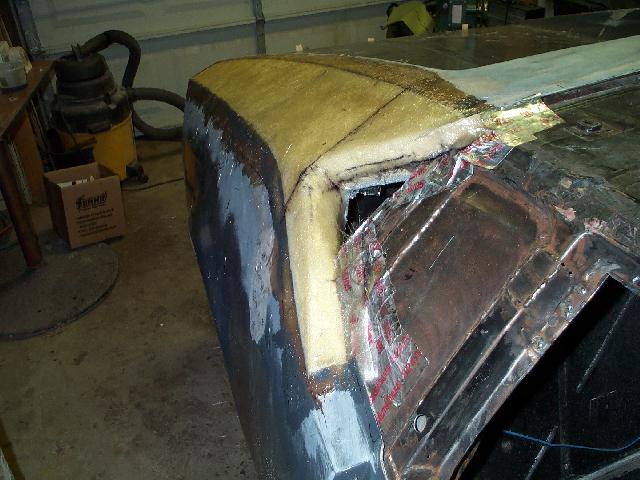
Here's the state of the Choptop Pantera this morning:
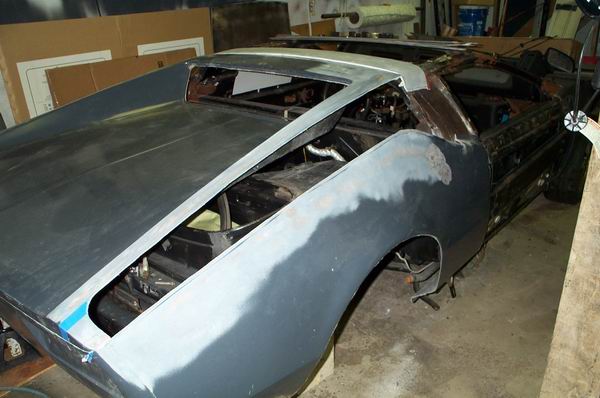
these pics are showing the rear clip mounted and chopped to match the chopped chassis. After altering the height of the rear clip to match the new roof line, foam was added to the cutout areas of the strakes. The foam was contoured and covered with a single layer of 3/4 oz matt cloth.
The plan is to use the 3/4 oz matt as a form or mold, and we will rebuild the rear clip from the inside. After curing 24 hours, the rear clip will be removed from the chassis and flipped on it's back. The foam will be removed, exposing the underside of the 3/4 oz matt. Then the rear clip will be rebuilt using 3 or 4 layers of 2oz matt. During final finishing, the 3/4 oz matt may or may not be sanded away, depends on how it goes.
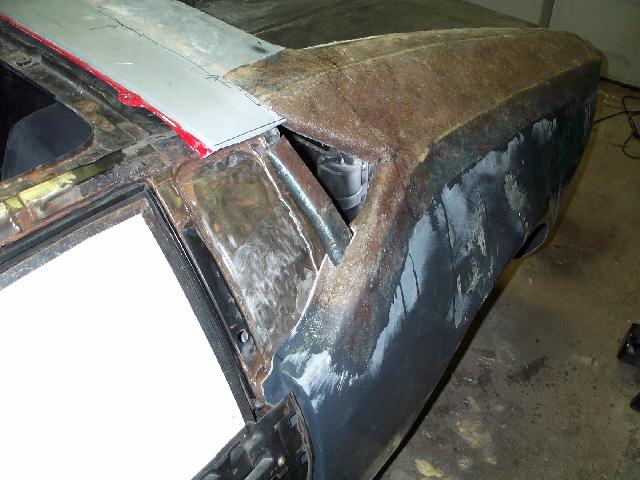
To get to this point, we had to attach the rear clip. There are three "self locating" points that easily position the rear clip: The outline of the door frame, an edge on the backside of the trunk-box, and the aft edge of the Fiero roof clip. Due to the chop, we were able to use two of these points.
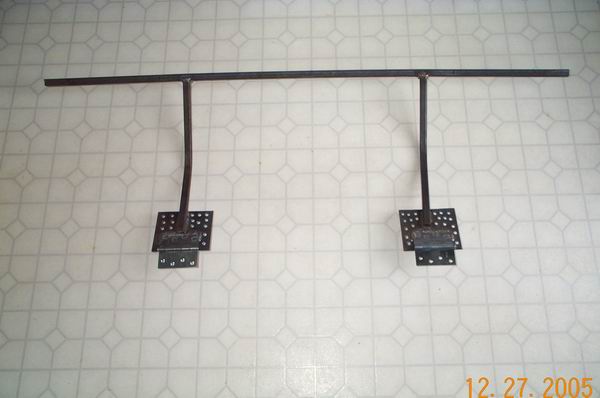
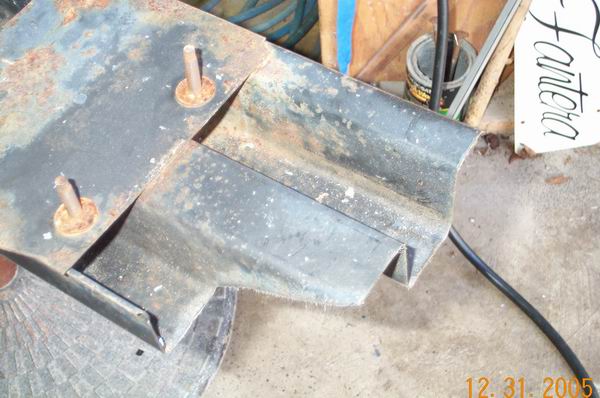
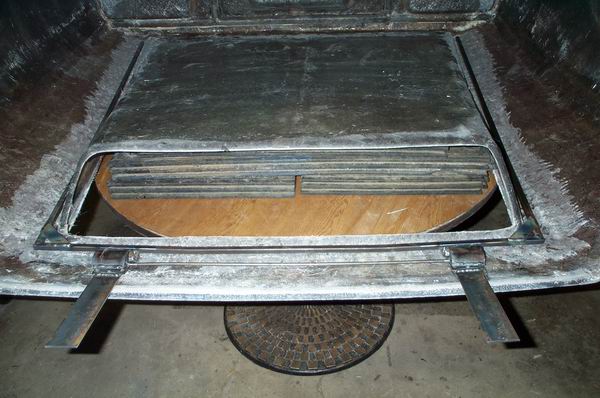
To attach the rear clip, part of the steel tube frame that reinforces it had to be installed:
This frame is made of 1" square tubing and 1/8" plate.
The plates are drilled to enhance bonding, and 4" steel hinges were selected and welded, with the hinge pins just at the bottom edge.
Note that the tubing is bent to follow the contours of the rear clip. While we used 1" tubing here, the prototype used 1/2" tubing. I have a tendency to overbuild. I'll show you what this size change meant later on.
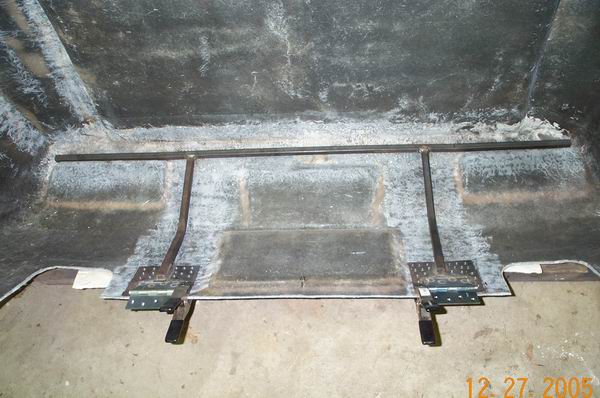
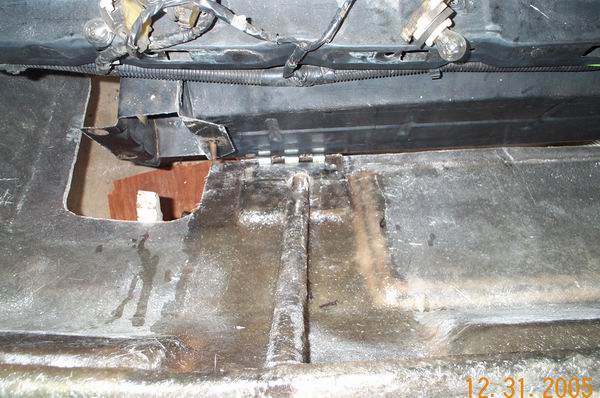
Then the inside of the rear clip was sanded with 80 grit where we wanted to bond in the frame. Two slightly oversized pads of 2oz matt were wetted out and placed where the steel plates go. We wanted to ensure a good squeeze out here.
Then the tubing of the frame was wrapped in two layers of woven BID cloth, to enhance the bonding of the metal to the fiberglass. The still wet frame was laid in place, and attached with two layers of 2oz matt. Only the outer 4" of each end of the frame were not glassed in. Later, additional steel will be bonded in and welded to this frame at these ends, using gusset plates.
Note that even though it's a fairly tight fit, the longer arm of the frame fits neatly across the top of the tail light boxes, and still leaves plenty of room for the opening to be cut for the clamshell rear decklid. The tubing is correctly positioned to become part of the trunklid seal, later on.
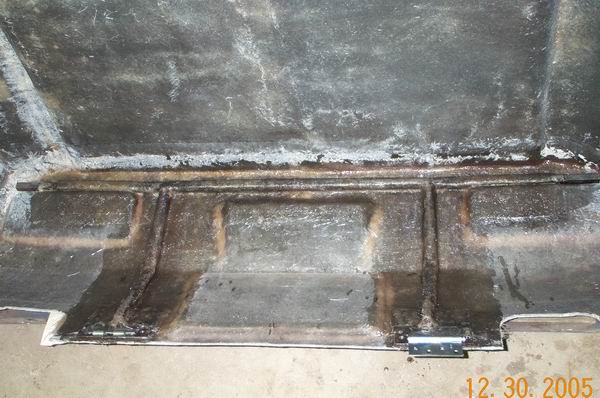
The addition of this small amount of framework greatly stiffened up the entire rear clip. After this had cured a couple of days, we were ready to proceed with attaching to the chassis.
With the frame bonded in and cured, the rear clip was sectioned. Along the back edge we used the parting line that forms the back edge of the clamshell:
But along the sides, we followed the curving body line that is just below the clamshell parting line:
This allowed us to get the rear clip into position and start checking for clearances:
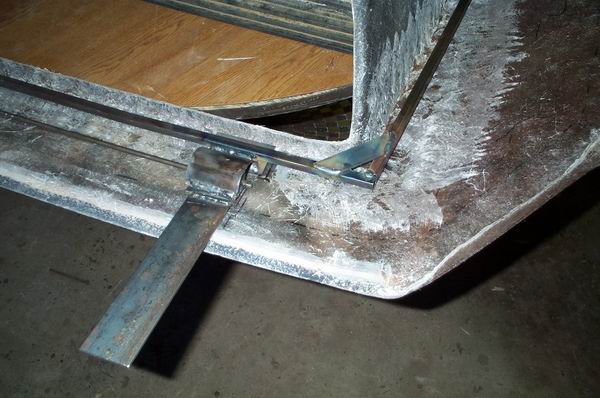
The rear bumper was removed and a small 3" corner removed from each end:
The other half of the mounting brackets is attached to the front ( or trunk ) side of the rear bumper. Strips of 1/2" square steel tubing were welded on to space the verticle 1/8" steel plate. This spacing places the verticle plate within 1/8" of the backwall of the trunk box. The matching half of the steel hinges is welded to the bottom of the verticle plate.
Now the rear bumper was reattached to the chassis and the rear clip joined to it at the hinge pins. I'll have to get a pic of that, later. But this pic shows the desired alignment of the hinge pin with the back edge of the trunk box. Position it there and the rear clip is at the right height.
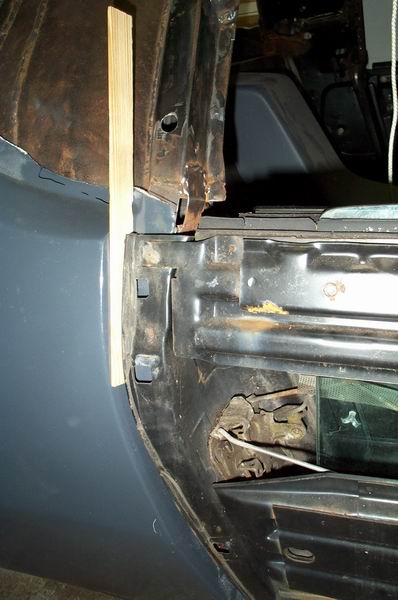
With the rear end firmly in place, the door jamb alignment was checked, using a stout paint stirring stick to set minimum clearance between the steel door panel and the rear clip fiberglass:
And the door jambs were temporarily attached using a single 8mm nut & bolt:
So, with the rear clip really firmly in place now, we were ready to trim the removed clamshell for the chop. The roof section of the Fiero rear clip was harvested and attached to the chassis using the 3 stock mounting pads. The clamshell was put in place, and the sides of the strakes was eventually removed:
Originally posted by PaulJK: In your spare time, i think you guys need to make some room for some trophys. Man, this is gonna be sweet ....
We appreciate the kind words. But I think we'll hold off on that particular task till we have a finished product and see how it is received. I think it's the coolest ride I've ever been involved with but, beauty is in the eye of the beholder. From the comments we've received up to this point, I'm feeling good about our efforts. Between Dave's expertise and my goofer abilities, I think it's coming along nicely. Again, thanks for the kind words.
------------------ Ron Freedom isn't Free, it's always earned. My imagination is the only limiting factor to my Fiero. Well, there is that money issue.
[This message has been edited by blackrams (edited 01-14-2006).]
Well, I did register Dave, thanks for the pics. I was just wondering, if the clamshell option is used what are the plans for the rear side windows? Fuel filler location?
[This message has been edited by bobm (edited 01-23-2006).]
Hi Bob, and welcome to Pennock's. There's lots of folks & info on this site to help you with your Fiero.
You bring up an interesting point. With the tilting rear clip, the stock fiero gas cap assembly is left in place, and easily accesed by tilting open the rear clip. The Fiero fuel trap door assembly isn't needed, and the rest of the stock fuel system does quite well.
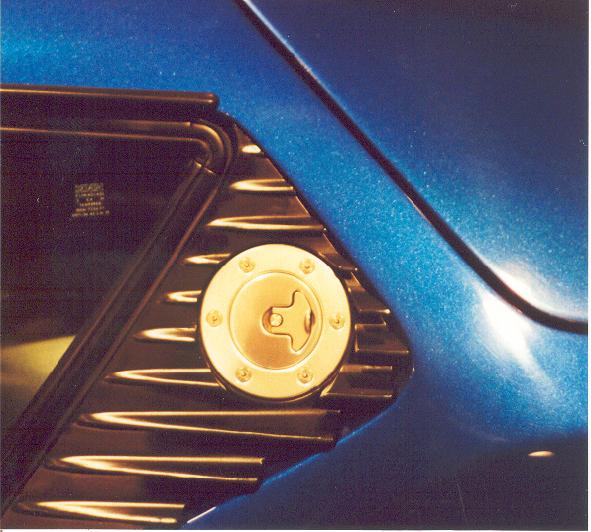
With a clamshell rear deck, more or less the stock Pantera type, something has to be done to locate a fuel cap. Here's a picture showing the gill location, used on many Panteras:
The devoute replica builder could easily build something like this. I do have molds for the gill, which is the corregated looking skin in the above pic.
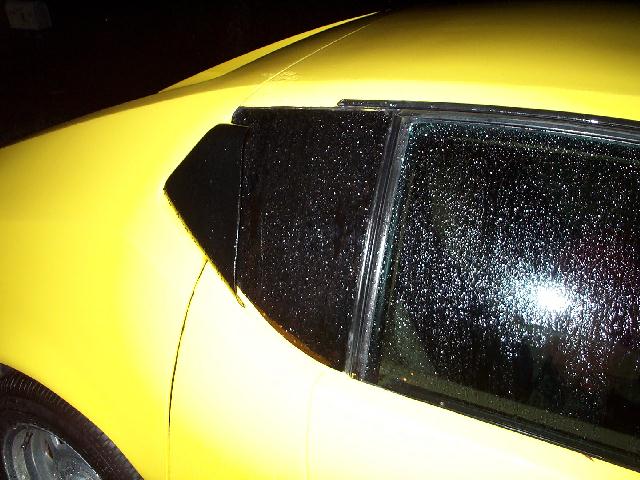
The Yellow prototype Pantera ( the Fantera ) was built with a tilting rear clip and internal gas cap, but it did use the corregated gill panels. Being a Fiero type guy, I sort of like to modify things and also like side scoops. So on that car, I removed the gills and added a couple of scoops:
Sorry, it was raining this morning. But here you see a modest sized scoop and the black plexiglass sailpanel treatment, ala' Paul MiCibbins.
There is plenty of room between the chassis and the fiberglass skin to reroute the gas tank lines to anywhere you want. I've sort of been considering a trap door, similar to the Fiero fuel filler door, set into the fender or the strake. I'll get a pic of this area as soon as I cut out the clamshell opening on the choptop. I do plan on adding totally functional scoops on both sides: one to blow directly on an engine oil cooler, and one to blow directly on a transmission cooler.
To show you the size opening we've developed by eleminating the gill and adding a scoop.......I'll finish the modification of the rear clip for a choptop story:
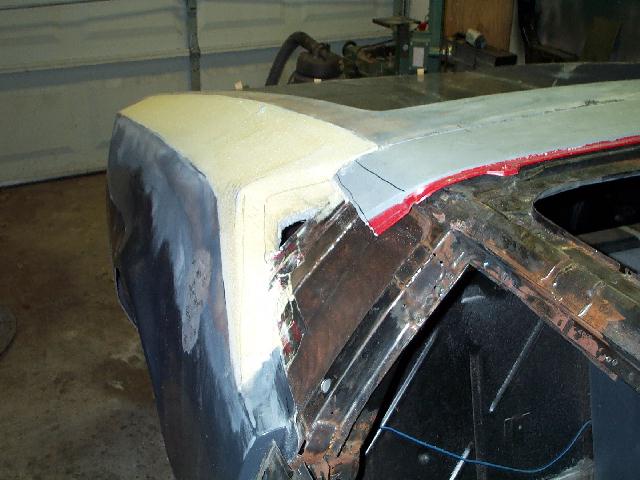
This was the calculated amount of lowering that would be needed, to make the stock fiberglass fit the now choptopped chassis. The entire side of the strakes was taken out, as shown in the pic a few posts back. This was in order to achieve a nice flat plane from one body line to another.
Once the cutout was made, the top of the clip was jiggedback into place, matching up to the unaltered trunkline at the rear ( where the keyhole is ) and matching up to the top of the roofline.
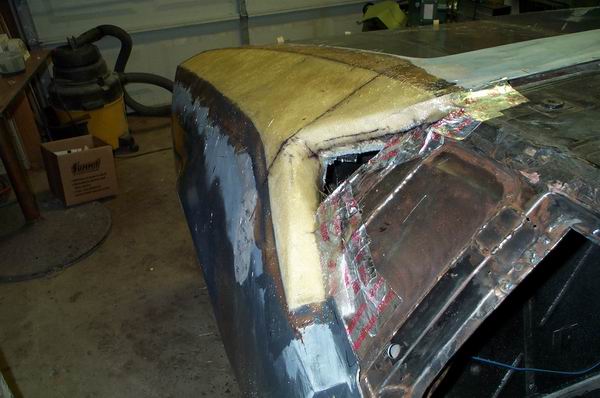
Then the cutout was closed in from the underside using white foamboard and tape, and finally a pour of urethane expanding foam was made. After curing a couple of days, the foam was sculpted into the shape we wanted. Both the strake sides and the scoop openings were shaped:
It's important to remember that this foam is being used to create the inside face of a mold, so all of the surfaces of both the foam and the rear clip can line up.
Once the shape is finalized, it was covered with one layer of 3/4oz matt. This single layer of fiberglass is the new mold.
After curing, the rear clip was removed from the chassis and flipped over, and all of that foam was removed. We now have a shell or mold that will allow us to rebuild the strake walls.
From the inside of the rear clip, three layers of 2oz matt are laid up, overlapping a healthy amount onto existing structure. This is cured, and the clip flipped over, right side up. Then the 3/4 oz mold layer was removed, and a final layer of 2oz matt was applied to the outside.
After curing, the now chopped clip was reinstalled to the chassis, and is now ready to cut out the clamshell trunk lid.
Damn, this is like dejavue, I feel like I've actually been there. Wait, I have been!!!! Another weekend and a little more progress. Someday, we'll have this ready.
------------------ Ron Freedom isn't Free, it's always earned. My imagination is the only limiting factor to my Fiero. Well, there is that money issue.
[This message has been edited by blackrams (edited 01-23-2006).]
You guys are doing an incredible job on the choptop rear section. It looks more Pantera like already with the lowered roof line. I can hardly wait to see the finished section after you have sanded and filled to perfection.
Thanks Don, Once the clamshell is cut out and hinged, and the wheel flares installed, the finishing work will begin. Don't you just love sanding?
So how has your current project been doing, Don? I think you've progressed into that relm of finishing work, haven't you? I'd be very curious to know what system or products you've been using !
Originally posted by 355Fiero: I can hardly wait to see the finished section after you have sanded and filled to perfection. /QUOTE]
Well Don, so far we haven't turned anyone down that wanted to offer help sanding.
------------------ Ron Freedom isn't Free, it's always earned. My imagination is the only limiting factor to my Fiero. Well, there is that money issue.
I have enough of my own sanding to do thanks Ron. Put the bondo on with a shovel and sand most of it back off. That is how it is done right???????
David, finishing work on a car is like finishing work on the house projects. Entire rooms get renovated in a few weeks but the base board and trim sits in the back room for another year at least and then another year after that to paint.........
I have been stymied on my car for a couple months now. Xmas buying frenzy slowed down the car purchases. I am getting back into it in a couple weeks as I have year end stuff to do on the business so not much car work going on. I am now shooting for Spring release so see how far off I am. I pretty much finished my interior bucks out of foam and fiberglass in the late fall early winter so I have a 355 interior now and will have all molds to make more if I ever want to. It has been really nice here for weather and is all the way up around 0* C so it is quite nice for our winters but still too cold to fiberglass comfortably.
Lately when I am avoiding year end, I have been working to design a new convertible top that folds up and sits on top of the firewall. I took the original Automoda rear folding section from pictures and then measured out my wife's Miata top front section for size relationships and I am marrying them together to fit the Fiero. The rear pieces will come down and sit on top of the firewall and the front will fold up and sit on top of them when done. All folded down, the top should rise up to about 4" - 5" above the firewall top. That way, I can open the engine hatch when the top is down or up and it gives a much more finished look to the car instead of a top that folds down out on to the engine lid like some I have seen. I pretty much have it nailed in software so now I have to take it out to start cutting and welding metal. The concept seems to be working fairly well. Wonder what the finished product will look like?.....
That choptop Fantera looks great from the pictures you have posted. Do you have a full or front quarter shot to see how it looks overall? It would be interesting to see how much of a difference it has for a look from the front versus your original yellow one. Also, are you going to go into the interior as well to create the authentic look of the Pantera or keep the Fiero interior?
Anyway, keep up the great work guys. It is coming closer to a successful conclusion all the time.
Don. I'm not sure we can even get to the front of the car much less back off far enough to take a pic. But, we'll figure out a way eventually. Would love to see more on the convertible build, I'm wanting to do one of those and would like to see what you're up to on this.
------------------ Ron Freedom isn't Free, it's always earned. My imagination is the only limiting factor to my Fiero. Well, there is that money issue.
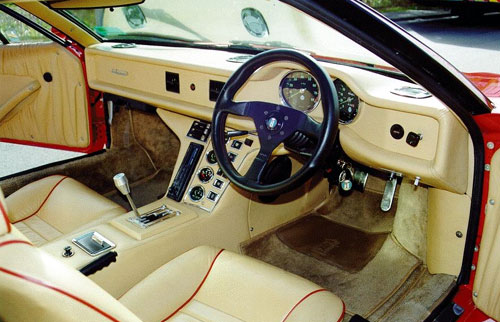
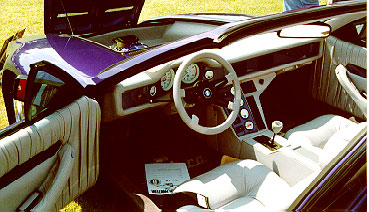
I like the above style of dash. I imagine Aus would like it even more
Yes, I do plan on an entire interior ( ie dash & center console ). But I really don't know if I'll have time to put it into this car, before Carslile Kitcar Show '06. My thoughts are to duplicate the overall shape, maybe relocate the vents, but use the existing rack for hvac & radio, and use the existing pod. It would be easy enough to scoot the pod back to flush mount with the rest of this type dash.
Right now, the cradle is not in the chassis, so it's pretty hard to roll it out for a good side or front view. We'll see what we can do this weekend.
On Blackram's advice, I'm in the middle of fitting the clamshell with it's internal steel tube reinforcing, and the hinge mechanism. This means the clamshell will be cut open sometime Sunday.
Back in the '80's & '90's when I was building airplanes, we avoided using bondo like the plague. I know that product has evolved a lot, since then. But shrinkage over time was the concern. I became pretty familiar with mixing the base resin with glass microballoons to make a creme or paste that is used just like bondo: shovel it on and sand most of it off
I've been real pleased with the Duratec high build sanding primer, which I've been using in the molds as a substitute for the gelcoat layer. I'm hoping to continue using the Duratec, after coarse filling with resin/micro, to achieve a guide-coated surface. Then a coata of PPG DP epoxy primer, and PPG Deltron basecoat/clearcoat. To be honest, I've never shot a basecoat/clearcoat. All of my experience is with one coat polyurethanes. But the repairability of a basecoat/clearcoat is hard to argue with.
I don't know if this was posted already and I missed it but, are you modifying the molds or producing new ones to make the lower profile available as well? And has documentation already been started to accompany the kits when available?
[This message has been edited by bobm (edited 01-27-2006).]
[QUOTE]Originally posted by bobm: Dave, I don't know if this was posted already and I missed it but, are you modifying the molds or producing new ones to make the lower profile available as well? And has documentation already been started to accompany the kits when available?
Not trying to speak for Dave, but I've spent virtually every weekend for the last year and a half with Dave working on this and the following is my personal opinnion. The answer to the second question is yes, we have been documenting each step of the process and plan to have a CD that would accompany any kit for the diy'er. Your first question is harder to respond to. We have discussed building a new mold of the chop top, but I personally think that each chop is going to be slightly different and therefore building a fibergalss rear clip for a chasis that still needs to be lowered might be just asking for problems. There are simply too many variables and we're not sure that we wouldn't just be wasting our time, efforts and money. Dave's 88 has about 4 inches of chop, can we guarantee that every person doing his own chop is going to build it to the same dimemsions, doubtful. so then what we've been doing for the past few months will have to be redone all over again. My personal opinnion is that we need and have to offer a pretty standard kit that the DIY'er can modify to his/her own style. My project is destined to be a Pantero Roadster, so we're going to have to rework the orginal rear clip to suit my needs, will anyone else want a roadster style Pantero, hard to say but building a new set of molds would be pretty costly and time consuming for what is likely to be very few sold and would also offer one style only that the new owner might have problems fitting to his car unless he/she did the exact modification to his car that I did. I have to say that producing molds that would fit all the variables is almost impossible. About the ony way to do something like that would be for us, Dave and I, to produce a turn key and though that is a possibility, it's a time consuming process. Just my two cents worth, happy Fieroing.
Editted to add, after thinking about it I guess we could produce a jig or the deminsional drawings to build a jig that wouldfit the chop top we have already come up with, but I can see how not everyone will want the same thing so I guess that puts us back to square one.
------------------ Ron Freedom isn't Free, it's always earned. My imagination is the only limiting factor to my Fiero. Well, there is that money issue.
[This message has been edited by blackrams (edited 01-28-2006).]
Oooooooo, making some progress this weekend, Dave's is gonna have to post some pics.
------------------ Ron Freedom isn't Free, it's always earned. My imagination is the only limiting factor to my Fiero. Well, there is that money issue.
[This message has been edited by blackrams (edited 01-28-2006).]
Bob, I think Blackrams pretty well answered where we are on creating a mold for a chopped rear clip. It could be done, but the builder would have to assure his chop was to the same rear window height as ours, within a certian range. Since there is some adjustability of the rear clip available, reguarding the rear roof of the Fiero matching up to the roof of the rear clip, it could be done. But I have to ask myself: for the time and money invested in sucsh a mold, how many chopped rear clips would I sell?
I certianly don't have a problem modifying a rear clip for a builder, but complete instructions on doing this for yourself will be a part of the instructions we are working on. Chester, another PFF'r has offered to shoot a DVD of the basic assembly process. That, the many pics we've been taking, and supportive text should provide enough to allow even the first timer to build a Pantera.
This weekend we managed to get the rear clip bracing and hinge mechanism fabricated and installed. We wanted a hidden hinge, that would allow the decklid to open up and away from the chassis. Many hinges make the leading edge turn down into the body at some point, or they have a hinge roll visible, or just look bad when closed.
So these hinges are made using 2 1/2" steel hinges and 2" dia. steel pipe. The strap rests on top of the Fiero chassis roof, under the fiberglass of the rear clip and the SMC of the Fiero, and will be welded in place later on.
The hinges are welded to a framework of 1/2" square steel tubing, which nestles up inside the strakes and crosses the front and rear. The corners are gusseted for additional strength.
BTW, whenever steel is bonded to our fiberglass, we wipe it down real well with Acetone to remove oils and contaminants. And we also spirally wrap steel tubing with a strip of BID fiberglass cloth, before laying the tubing in place. This extra skin of glass around the tubing gives the attaching matt fiberglass a better hold.
Here you can see the tubing glassed in place with three layers of 2oz matt. We cut 5" wide strips and tore them into handy 12" lengths for placing. We wet the strips out on the cardboard, using a 3" chip brush, and then we can easily pick them up and place them. For this type work, we usually mix 12 oz batches of resin.
We decided to let this layup cure untill Tuesday evening, when we will then reassemble the rear clip to the chassis and cut out the clamshell. Sunday afternoon I got a lot of work done on relocating the windshield wipers, but we'll get into that later on.
I am very curious as to how the back end looks with the clam shell cut away and functional. I bet it looks awesome.
I had an opportunity to get into the garage and get closer to having the convertible top prototype designed and built Ron. I'll send pics for you when I have the front section in and folding correctly.
I need to replace my alternator on my daily driver today though. An aweful racket it is making back there.....
Don, I'm very interested in seeing your progress on the Vert. I want one and some day I'll have one. I just gotta quit taking on all these other projects. Going to an auction this weekend, found out about an IRS auction that has Five 53 foot car haulers on the block. I'm thinking this is something worth going to, just maybe I'll drag one home. The clam shell does look great, though I get to see it up close, Dave is gonna have to post the pics.
------------------ Ron Freedom isn't Free, it's always earned. My imagination is the only limiting factor to my Fiero. Well, there is that money issue.
[This message has been edited by blackrams (edited 02-21-2006).]
Dave and Ron; This is really looking good, I can't wait to see the finished product. Are you going to the Fiero factory swap meet? Cheers Beers n Gears. Joe
Originally posted by motoracer838: Dave and Ron; This is really looking good, I can't wait to see the finished product. Are you going to the Fiero factory swap meet? Cheers Beers n Gears. Joe
I sincerely doubt we'll be ready to show off our efforts by then, we're shooting to have it ready for Carlysle later this year. But, I and several of the Bluegrass Fiero Group will be there. The orginal Pantero plug car may come along, we'll just have to see how things move along.
------------------ Ron Freedom isn't Free, it's always earned. My imagination is the only limiting factor to my Fiero. Well, there is that money issue.
However, I have ordered some flat sheets of urethane foam to make up the prototype.
Some input from you might be helpfull. For instance, I plan to use the Fiero dash to chassis mounting points, located just under the speaker covers. It seems logical to put the speakers & these mounts back where it is a user friendly thing to install.
Same with the windshield defroster, why reinvent the wheel.
However, should I incorporate the Fiero heating ducts at either end of the dash? Although they aren't located at the ends of the pictured Pantera dash, the hvac plumbing is there, and not having to reroute those two vents would again, make installation easier.
And the instrument pod. To achieve the overall profile of the pictured dash, it looks like the pod should be moved back about 2". This is easily done, since the pod mounts to the steering wheel collumn with two bolts on a flat plate. A simple flat plate extension would allow relocating the pod without getting into a bunch of rewiring.
The more I look at it, the less I like the factory Pantera dash in the pic above. FAR too much stuff in the console and almost nothing in the main dash. No glovebox ? No cup holders ? Vertical radio ? Also, the top should ALWAYS be a dark color or you'll get a lot of reflection in the windshield.
Yeah ..... I think we could come up with something (similar but ) much better (improved) than that ..... Pantera dash Rev 1
[This message has been edited by PaulJK (edited 03-01-2006).]
Yep, I agree with most of that. A few posts previously, I mentioned that the center stack I'm working on would pretty much retain the vents, hvac controll, and radio stack right where they are. After all, the chassis and wiring are there, and I really like the KIS approach to building anything.
My main objective would be to achieve the look of that entire dash, ie the shape or outline. And I do like the way the outline transitions from the arm rest, up along the center stack, and into the dash. BTW, I do have the arm rest portion ready.
Your pm & emails appreciated, and I'll be following up with them soon.
Sorry there hasn't been many pics lately. I will rectify that by this weekend.
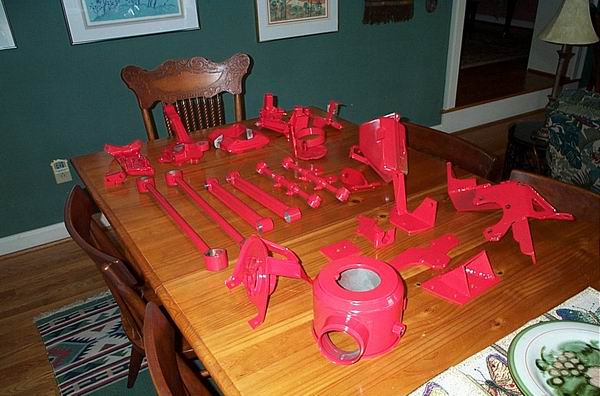
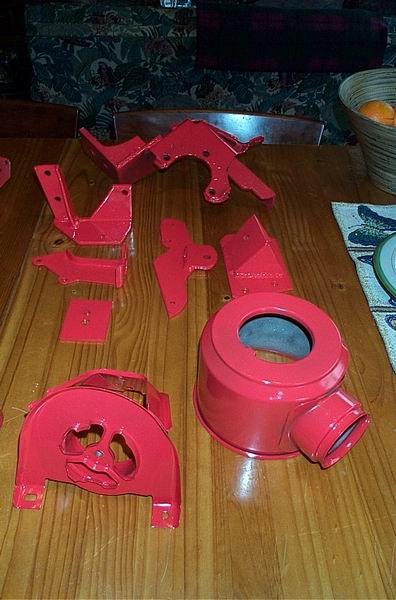
I've been working mostly on the various details concerning the rear clip & clamshell. Hinges, gas struts, trunk seal, latch, remote latch opener ( I just don't trust the stock Fiero remote latch :> ), lip & gasket seal, fuel filler, and tail lights. Just recieved a Spall kit for remote door latches and trunk latch. And I've been sandblasting & powdercoating everything that comes loose in the engine bay, various engine brackets & mounts, and the rear suspension.
The goal has been to have the car ready for Carslile Kitcar 2006, but I'm starting to doubt we'll make it.
There have been a few folks wanting to order a kit, and I've been telling them I'd go into the kit production mode after Carslile 2006. And I've promised to hold to the prices in this thread, if they are a member of Pennock's.
------------------ Ron Freedom isn't Free, it's always earned. My imagination is the only limiting factor to my Fiero. Well, there is that money issue.
We had some good weather, so I was able to get outside and sandblast a buch of parts for powdercoating. This is most of the rear suspension, engine mounts & brackets, and engine bay brackets....but not all.
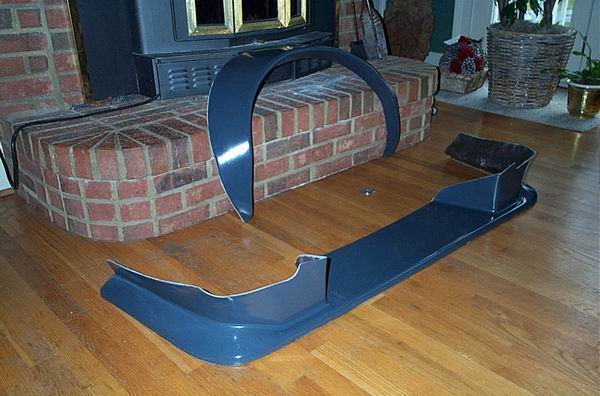
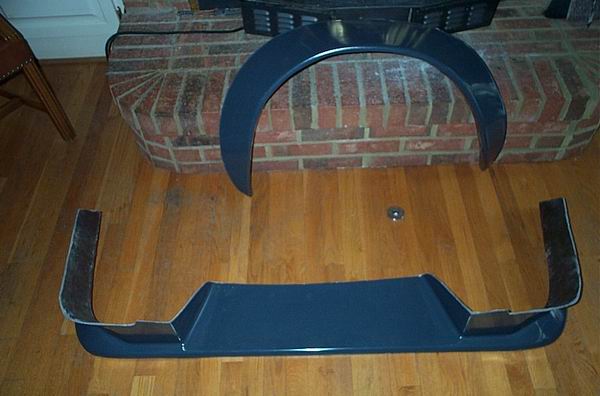
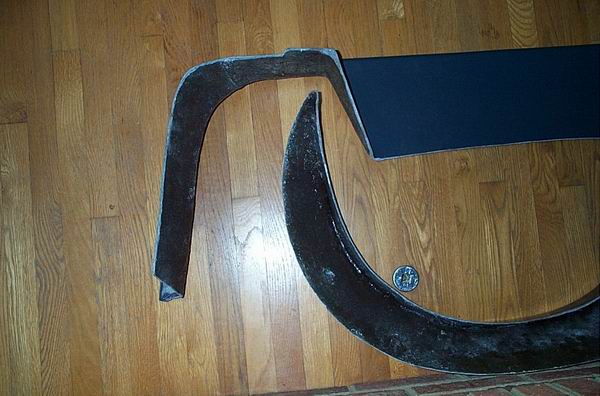
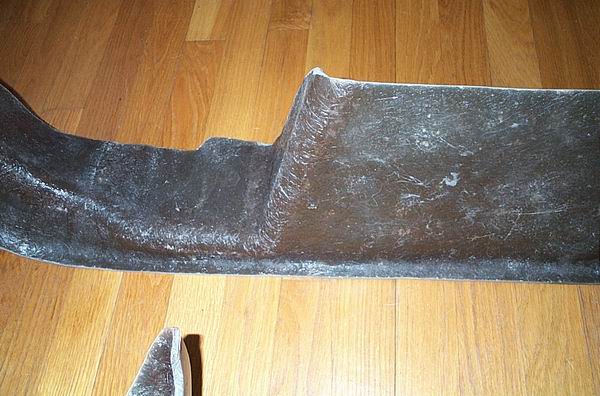
Don had asked to revisit the wheel flares & airdam
This is a front wheel flare. Both the airdam and all four wheel flares were made to match up to the Fiero rockers.
This view might show how well the uniformity of thickness is, and how all corners are reinforced. These were laid up with a 3/16" thickness, and they are incredibly stout.
When I made the mold for the air dam, I double the height of the bottom lip edge. It runs from one wheel well, across the front of the bottom tray, and across to the other wheel well. That gives you the option to use the lip as you see it, or trim it way down to a knife edge tray & lip.
Did I mention that I really like powder coating?
David Breeze
[This message has been edited by opm2000 (edited 03-12-2006).]


 .....
.....