$750 picked up or + shiping for a 4.6 N* 300hp obd1 but it is a GOOD takeout that just needs timeserts+ headgasket this was a picked motor by a head caddy dealers N* guy for his kids car I got three with the car in a package deal and only need one
------------------ Question wonder and be wierd are you kind?
Better airflow and better cams. Larger chambers and lower compression. Larger chambers and better airflow go hand in hand as the N* heads have less shrouded valves compared to the Aurora heads. This is done to avoid using dome pistons in the Aurora, as the flat top pistons result in a pretty nice combustion space that domes would screw up.
Thanks Will,
I was hoping you would say something like that. Any idea were I can find the difference in volume from the Aurora heads to the Caddy heads? I am wondering how much lower the compression would be. one of the reasons for using the vin-9 heads was to get the better cams without having to buy new ones for the Aurora. The only other issue i would be worried about is if the smaller bore in the Aurora would interfere with the valves on the Caddy head.
$750 picked up or + shiping for a 4.6 N* 300hp obd1 but it is a GOOD takeout that just needs timeserts+ headgasket this was a picked motor by a head caddy dealers N* guy for his kids car I got three with the car in a package deal and only need one
I was hoping you would say something like that. Any idea were I can find the difference in volume from the Aurora heads to the Caddy heads? I am wondering how much lower the compression would be. one of the reasons for using the vin-9 heads was to get the better cams without having to buy new ones for the Aurora. The only other issue i would be worried about is if the smaller bore in the Aurora would interfere with the valves on the Caddy head.
IIRC, the aurora cams have more duration or something else, which is like the "next step" after the 300hp cams in the 4.6 northstar. However, when someone put those cams in their northstar, they ran them for a little while, and switched back due to the lack of low end torque..... But of course, that's in a 4000lb caddy..... I don't know the exact specs on the aurora to compare though. (I like cheap HP)
IIRC, the aurora cams have more duration or something else, which is like the "next step" after the 300hp cams in the 4.6 northstar. However, when someone put those cams in their northstar, they ran them for a little while, and switched back due to the lack of low end torque..... But of course, that's in a 4000lb caddy..... I don't know the exact specs on the aurora to compare though. (I like cheap HP)
I really wish I knew enough about cams and N* engines to make an educated choice. I am going to have to rely on the input from you guys to help me out here. If the compression ratio does not fall below 10:1 or at least stays in the ball park, I could see using the vin-9 heads for the better airflow. I was just assuming that the vin-9 cams would provide for more HP and less torque than the Aurora cams would. Of the three engines, isn't the Aurora the only one that has more torque than HP?
[This message has been edited by cptsnoopy (edited 05-01-2005).]
Originally posted by cptsnoopy: I really wish I knew enough about cams and N* engines to make an educated choice. I am going to have to rely on the input from you guys to help me out here. If the compression ratio does not fall below 10:1 or at least stays in the ball park, I could see using the vin-9 heads for the better airflow. I was just assuming that the vin-9 cams would provide for more HP and less torque than the Aurora cams would. Of the three engines, isn't the Aurora the only one that has more torque than HP?
I'd bet you drop down to about 8:1 with the 4.6 heads. I don't have any specs on either though...
And I apologize - it was the other way around... The VIN 9 has the "best" cams, and the guy with the 4.0 put the 4.6L vin 9 cams in, and changed 'em back...
I'd bet you drop down to about 8:1 with the 4.6 heads. I don't have any specs on either though...
And I apologize - it was the other way around... The VIN 9 has the "best" cams, and the guy with the 4.0 put the 4.6L vin 9 cams in, and changed 'em back...
Hmmm, good reading there. I don't know if our cars being lighter and with a manual trans would make enough difference to take advantage of the power being so much higher in rpms.
oh well, it won't matter until I get this engine apart and see what is really wrong with it. or... get 4.6 if one becomes available locally.
I was hoping you would say something like that. Any idea were I can find the difference in volume from the Aurora heads to the Caddy heads? I am wondering how much lower the compression would be. one of the reasons for using the vin-9 heads was to get the better cams without having to buy new ones for the Aurora. The only other issue i would be worried about is if the smaller bore in the Aurora would interfere with the valves on the Caddy head.
Oh... forgot... I think that the Caddy's do have larger valves, but don't quote me on that. Yeah, Aurora cams are the same as LD8 Northstar cams. The L37 cams have more aggressive intakes. The Shelby Series 1 had L37 cams with the intakes ground 5 degrees advanced.
Originally posted by cptsnoopy: I don't know if our cars being lighter and with a manual trans would make enough difference to take advantage of the power being so much higher in rpms.
It absolutely would! If I could get a 500hp 8,000 rpm screamer for free, I'd have one in a heartbeat
ok, i've gotten over the mindset that I should only spend money on a 4.6L. I may still have to but we will take a closer look at this 4.0L before giving up. Russ544 was right about the exhaust valves being held open by carbon deposits. I took the cams off tonight and removed the lifters from number 8. then, with air pressure going into the spark plug hole so we could hear the hiss, we tapped the valves one at a time until the hiss went away. lots of carbon bits came flying out of the exhaust valves when we tapped on them. next, just for the fun of it we will use a differential compression tester to see if the rings on number 8 are about the same as the rest of the cylinders. we are going to try to borrow a ProVision fiberscope from a friend in CA. if we can get a look into the cylinder and find no obvious problems, i will probably just run the engine as is and see if it will seal up over time. if there is an obvious problem showing on the cylinder wall then we will take the head off and see if it can be fixed. the only reason for sticking with this engine is that everything about it looks new. it should last for a long time if the problem is found and fixed.
as for using the vin-9 heads, that does not look like a good idea unless we were planning on using a turbo or super charger. the compression ratio would fall to around 9.3-1 with the bigger chamber. if this engine is fixable then we will look into options for getting more out of it.
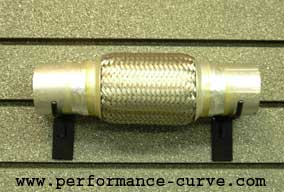
We had touched upon the flex pipe earlier in this thread. I wanted to mention that I picked up this part from Performance Curve. I figured for the price it was worth checking out and there wasn't anything local to look at. It came today and it looks like a good solid piece. Mine is the 2.5" diameter one. It maintains the diameter all the way thru. The stainless flex portion is a good 1/2" thick. It does not flex much, but there is some give. I'll post pics in a seperate thread once I get the exaust built.
So it's more for misalignments and not for 90 degree bends?
Not sure if you're kidding or not but to answer your question, No, it's not for bends. The flex section allows the exaust and/or engine to move seperately, thus preventing broken welds and such.
Originally posted by RCR: Not sure if you're kidding or not but to answer your question, No, it's not for bends. The flex section allows the exaust and/or engine to move seperately, thus preventing broken welds and such.
Well they've got this stuff that looks like giant electrical conduit (in fact, I'm sure that's what it is...), and you can make arcs with it... I used a section of it on my exhaust so I can install and remove it...... Otherwise my exhaust would've been permanent
We had touched upon the flex pipe earlier in this thread. I wanted to mention that I picked up this part from Performance Curve. I figured for the price it was worth checking out and there wasn't anything local to look at. It came today and it looks like a good solid piece. Mine is the 2.5" diameter one. It maintains the diameter all the way thru. The stainless flex portion is a good 1/2" thick. It does not flex much, but there is some give. I'll post pics in a seperate thread once I get the exaust built.
Well they've got this stuff that looks like giant electrical conduit (in fact, I'm sure that's what it is...), and you can make arcs with it... I used a section of it on my exhaust so I can install and remove it...... Otherwise my exhaust would've been permanent
I know what your talking about.
on my car i did not leave much room for a flex joint to take up the amount of movement i expect may occur under rotational loads in both directions. my fix is unlikely to work but it was cheap and i will try it first and if it is worthless then i will try something else.
well, I tried the differential compression tester and was somewhat surprised at the results. mostly because I don't know what I am doing...
since i had the cams off of the even side I just tested at the bottom of the cylinder on each of those. this was because I did not have a good method of keeping the engine from turning off of top dead center. keeping in mind that I spiked the valves on number 8 but left the rest untouched they came out like this. (input pressure at 80psi) 2) 58 4) 40 6) 40 8) 68
on the odd bank the cams were still installed so I used a position near tdc and stood on the breaker bar while it was under pressure. 1) 66 3) 56 5) 58 7) 70
hmmmm?
still the only cylinder that obviously had an oil problem was number 8. go figure... the ProVision fiberscope should be enroute as I type this so I will peek inside later this week.
in the meantime the body swap starts taking place...
[This message has been edited by cptsnoopy (edited 05-11-2012).]
I wanted to share a new tool for removing the roof panel from our cars. It is very simple and made the difference in many man-hours of work or worse yet a busted roof panel. I think this may only happen in a hot dry place like Phoenix but it may be the same all over after 18 years. What I am talking about is the windshield molding that is placed around the sides and top of the windshield. I realized right off that the molding needed to be removed because it seemed to be holding down on the edges of the roof panel. When I tried to remove it the molding just broke into lots and lots of small pieces because it was so dry and brittle. I was able to remove the top part the covers the edges of the windshield and the roof panel but the part that goes down into the slot between the windshield and the roof panel remained stuck in place. I then ran a knife down both sides of the molding in an attempt to remove it. It did help a little bit but I think I did more damage than good because I ended up getting a lot of small chips on the edge of the glass. The glass did not crack but I was just lucky. I gave up on trying to remove the rest of the molding and started working on the roof panel. I removed the headliner and all of the nuts and bolts that go into the roof using good info found here on PFF. I was able to raise the rear of the roof panel about 1/4" but that was all. I started working on the front of the panel. After the windshield wipers and the black plastic trim piece were removed I just had to break loose a couple of spots along the front of the windshield where too much windshield glue/sealant had adhered to the roof panel. I tried lifting the A-pillar body part and it was stuck good. I knew about the butyl rope that was holding it down so I went around it with a putty knife and felt pretty confident that I had cut it through. While I was doing that the putty knife was getting pretty gummed up with the butyl material and I found that the product "GOO GONE" worked like a champ to remove the butyl from the knife. So I had a bright idea and started wetting the putty knife with GOO GONE before stabbing it through the butyl rope. It seemed to help a bit. After cutting the butyl rope I was bummed to find that the A-pillar body part was still stuck firmly to the space frame. It appeared that the same glue/sealant used when putting the windshield in had also glued the roof panel all around the top and sides of the windshield. That is where the new "tool" came in handy. I had used a knife earlier all around the roof panel to separate the panel from the glue/sealant but it was apparent that the panel was also stuck to the glue below it and not just from the side facing the windshield. The tool was fashioned with a small cutting tab to cut under the roof panel and free the glue that it was stuck to. I had spent about 4 or 5 hours trying to free up the A-pillars when I finally made the tool. After making the tool it took about 15 minutes to run it all around the sides and top of the windshield and problem solved. The roof panel was quite easy to lift off after that and no broken or cracked A-pillars.
Here are a couple of pictures: This is what the tool looked like next to the glass. The little tab was under the edge of the roof panel.
This is how the tool was following along under the edge of the panel.
These are the tools used to make the tool. the hose clamp was the material. the file to sharpen the edges before bending the tab.
GOO GONE, good stuff for removing the butyl residue. plan on using and ruining a lot of rags...
[This message has been edited by cptsnoopy (edited 05-11-2012).]
I have been removing the butyl rope from the car. it's amazing how you can use a ball of the stuff to help remove what is stuck to the car and leave no residue. pics in awhile when i finally get it off the roof panel also.
I have been removing the butyl rope from the car. it's amazing how you can use a ball of the stuff to help remove what is stuck to the car and leave no residue. pics in awhile when i finally get it off the roof panel also.
the sad truth is i really did not know which he meant...
Ok, I just felt like taking a lot of pics tonight. In summary the first pic is of the butyl rope that came off the car. all of it... It is about 3" in diameter.
The next pics just show the areas where the butyl rope was and how nice it came off just using the ball of butyl... Like the blob, just roll it over the stuff you want off a couple of times and it becomes part of the ball.
continued...
[This message has been edited by cptsnoopy (edited 05-11-2012).]
Charlie, it was good to hear from you yesterday. I was thinking about a few things after we talked and I think I am just going to add the oil through the 1/2" small opening hole on the valve cover is where the tube goes in. Its going to take a little longer to add oil that way but there is no cutting or drilling needed then. Also I found a way to wire in the tech, its off the crank sensers on the side of the block, I will just need to replace the tech chip I think, that way I can use the stock tech. If I remember right its a green or purple wire that gives off the pulse needed? Did I miss something, whats going on with the red Fiero, is it a parts car?
P.S. the replacement ring will be in the mail today.
Originally posted by GSXRBOBBY: Charlie, it was good to hear from you yesterday. I was thinking about a few things after we talked and I think I am just going to add the oil through the 1/2" small opening hole on the valve cover is where the tube goes in. Its going to take a little longer to add oil that way but there is no cutting or drilling needed then.
Just preheat the oil and it goes in fine...
quote
Also I found a way to wire in the tech, its off the crank sensers on the side of the block, I will just need to replace the tech chip I think, that way I can use the stock tech. If I remember right its a green or purple wire that gives off the pulse needed?
The tach wire should be the middle wire in the three pin coil pack connector that has coil pack power and ground.
Thanks Will for answering that, I did not have a clue. Hi Bobby, the red 86 GT is a good running car but I like the fastback better than the coupe so the plan is to swap the body over to the 88 along with the electric windows, locks and mirrors. while I am at it I can change dew wipes, clean up the power locks and repair whatever needs it. the yellow coupe body will be going onto the 86 car and i will most likely sell it to get a little more money for the aurora car. (and a lot more room in the garage.) Thanks for all your hard work and help with the brake setup!
[This message has been edited by cptsnoopy (edited 05-12-2005).]
I got the fiberscope tonight and took a look into numbers 8 and 6 cylinders. The truth is that I could not see much difference between the two. The number 8 cylinder has more carbon and gunk in it but the bore looks pretty good. There does appear to be one possible area at the 2 o�clock position in the bore that has what looks to be vertical lines but very hard to tell with this scope. There does not appear to be a major problem in the part of the bore that can be seen with the piston down. The next step now is to put the engine back together and run it. If it smokes like crazy from the even number bank of cylinders then I will take the bottom end apart.
I got the fiberscope tonight and took a look into numbers 8 and 6 cylinders. The truth is that I could not see much difference between the two. The number 8 cylinder has more carbon and gunk in it but the bore looks pretty good. There does appear to be one possible area at the 2 o�clock position in the bore that has what looks to be vertical lines but very hard to tell with this scope. There does not appear to be a major problem in the part of the bore that can be seen with the piston down. The next step now is to put the engine back together and run it. If it smokes like crazy from the even number bank of cylinders then I will take the bottom end apart.
Vertical lines aren't a problem unless they're deep.
What I would do is get some of GM's 'top engine cleaner', or if you're cheap, something like 'seafoam', remove all the spark plugs, and toss some in every cylinder, and rotate the crank a bit... Maybe even let it sit all day, and drain it the next morning. Don't forget to change the oil after that, and siphon everything out of the cylinders with a hose. That'll take out most of the carbon. When you've got the engine in your car, a WOT run will clean out the rest of it.
just so you guys don't think i have been slacking... (ok so I have! )
I figured while I have the body off the 86 I should drop the cradle and install Darrells aluminum bushings. I used a drill to get the front bushings out. I was not very easy but after a little work with a wire brush they look nice and shiny inside. The pics are of the cradle with engine, the rear bushing location and the front one without bushing and the other with. The Aurora engine is back together and waiting for me to finish cleaning up and painting the mounts. However while I have the 86 cradle out I am going to clean the mess and see about replacing the mounts and hoses etc. Oh well, more distraction from the real project.
[This message has been edited by cptsnoopy (edited 05-11-2012).]
I was watching Barret Jackson on speed channel, and a Shelby Series-1 was up on the block and interestingly enough the anouncer guy said that the Series-1 is powered by a supercharged Olds Aurora 4.0 V8. I found this to be really interesting and felt the need to share.
Great thread! Did you ever get the clutch arm reconfigured to clear the water pump housing?
I have not tried that just yet. at first I was going to cut the original cast arm off and leave only the part that clamps to the trany. Then weld on a piece of 1/4" steel in the correct location for a "pull" style slave. Since then I have learned that welding to the cast metal is iffy at best so I am reconsidering how to fabricate the new arm. so far I am sure that it won't have any bends and that should reduce stress loads to the minimum required to do the job. I'll either make a complete arm that has the part that clamps to the trany or make just the extension and attach it to the original cast clamp with bolts or screws.
I was watching Barret Jackson on speed channel, and a Shelby Series-1 was up on the block and interestingly enough the anouncer guy said that the Series-1 is powered by a supercharged Olds Aurora 4.0 V8. I found this to be really interesting and felt the need to share.
that sounds very cool. I would love to see that up close!
I have not tried that just yet. at first I was going to cut the original cast arm off and leave only the part that clamps to the trany. Then weld on a piece of 1/4" steel in the correct location for a "pull" style slave. Since then I have learned that welding to the cast metal is iffy at best so I am reconsidering how to fabricate the new arm. so far I am sure that it won't have any bends and that should reduce stress loads to the minimum required to do the job. I'll either make a complete arm that has the part that clamps to the trany or make just the extension and attach it to the original cast clamp with bolts or screws.
cool...I am considering using one in my n* swap and know this will be an issue for me as well if I decide to use the isuzu..I would lean towards designing a new arm rather than trying to rig the stock arm unless it can be done without welding and still maintain its strength. I really like the cruise rpm potential of the isuzu behind the n* especially with these gas prices
[This message has been edited by Erik (edited 08-21-2005).]
I'm anxious to see your solutions to the Isuzu hurdle as well. There's plenty of meat in the stock arm to machine the sides flat and drill/bolt on an extension but I'm curious how you'll mount the slave. are you still planning to use the pull slave? You'd better get a move on ...... I expect to be doing a final install on mine next weekend still no computer to update my build progress pics, but maybe by mid week.


 but to answer your question, No, it's not for bends. The flex section allows the exaust and/or engine to move seperately, thus preventing broken welds and such.