Thanks for all the updates and great pics. Do you have any more of the clutch arm area? Do you have anything worked out for that yet? Any idea if a 4 speed would clear?
------------------ Alan Frazier '86 GT-'92 3.4 TDC 5 speed(sold) '84 2m4 project car
Thanks for all the updates and great pics. Do you have any more of the clutch arm area? Do you have anything worked out for that yet? Any idea if a 4 speed would clear?
the only pic that i have is the one showing the interference from the water manifold. I am thinking of three options.
modifing the arm lower and lowering the slave enough to match
cutting off the original arm extension and welding on an arm towards the front/drivers side of the car and using a "pull" slave.
taking out the arm altogether and trying a hydraulic T/O bearing.
I am waiting on the spec aluminum flywheel/clutch kit to get done before I start looking into the options...
I have not seen a 4 speed yet so I can't say if it will work with or wilthout mods...
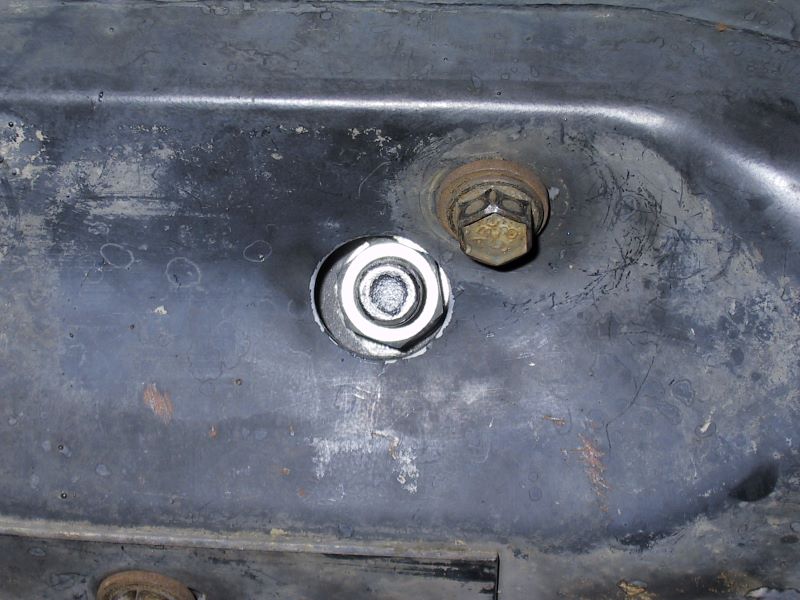
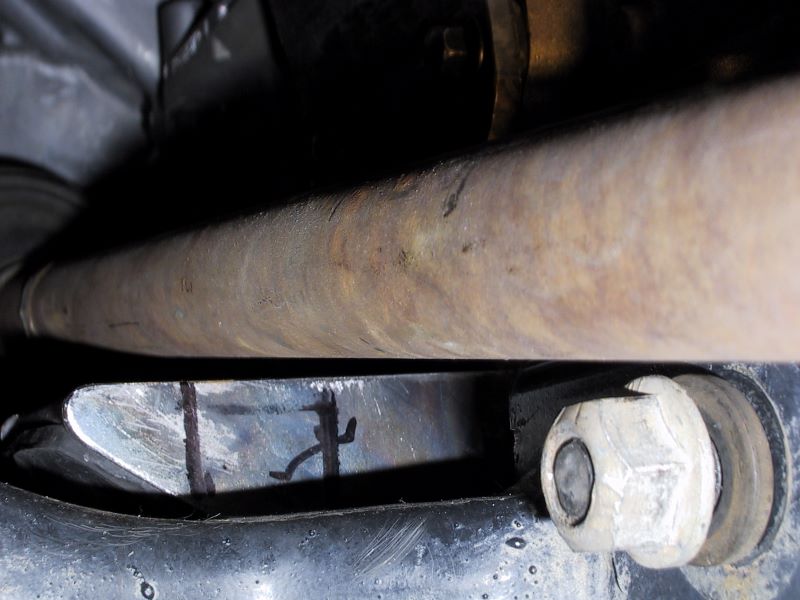
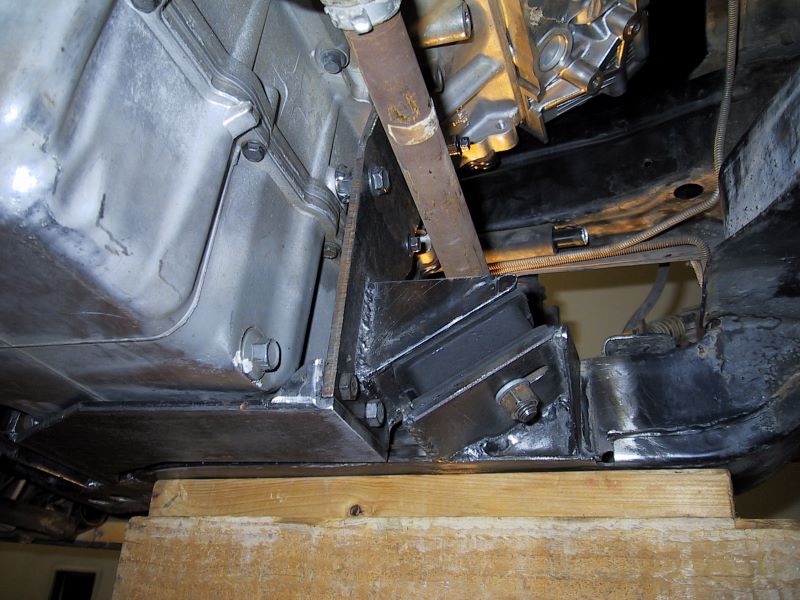
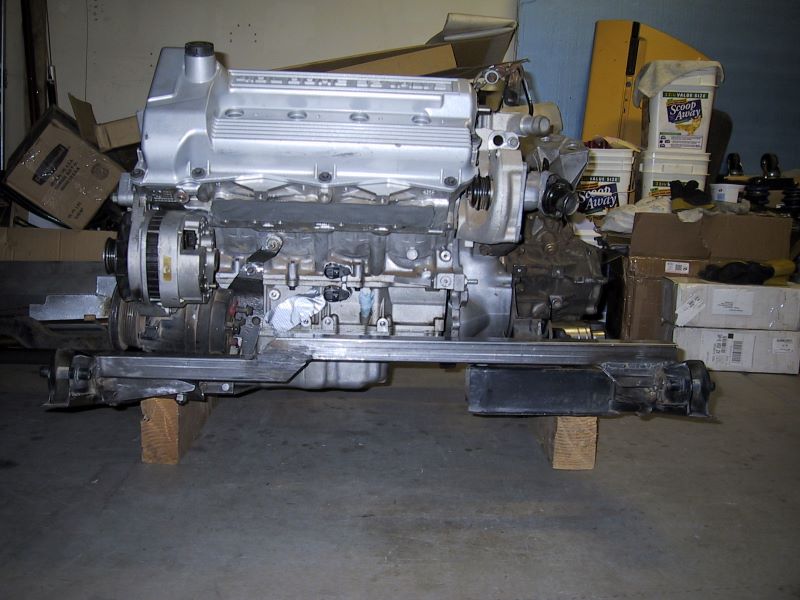
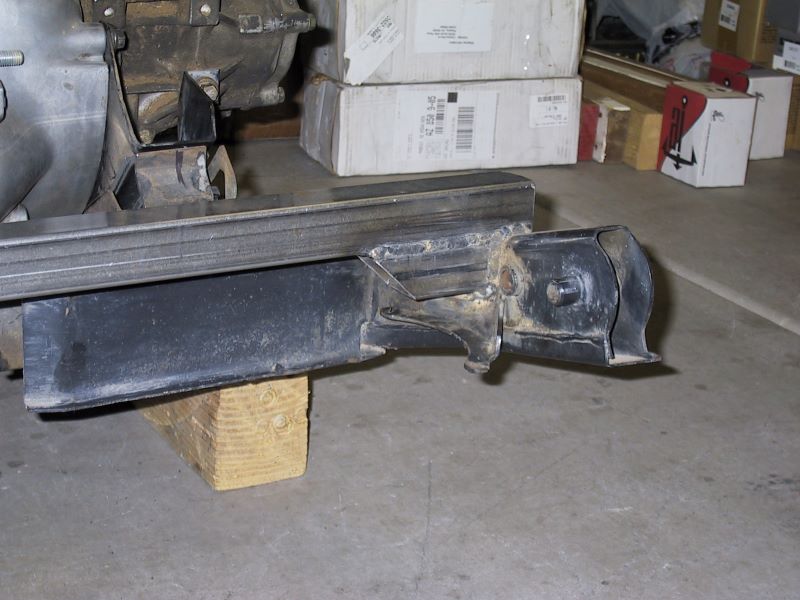
So much for stock tranny mounts. I replaced the rubber on the forward and rear tranny mounts with the 1/2 ton dodge p/u mounts that darthfiero suggests in his swaps. A 1" chassis punch was used to make a hole in the cradle for the "new" rear tranny mount stud and nut to fit through. The one surprise that I found is that all of the dodge mounts are slightly different in thickness. Up to 1/4" difference from the thickest one to the thinnest one that I have bought. The nice thing about that is you can choose the right size for the job. The bad thing is when you want to replace one, you will have to pick through the ones at the store to find the right size... I would have used stock fiero tranny mounts if they were both available from the local parts store. The only one I could find listed was the forward one. Once the mounts were installed on the trans and the front of the engine I put the engine back into the car to verify that the clearances had not changed. This also allowed a chance to look at the pass. side axle to rear engine mount clearance. It is approx 1/4". The gusset will be ground a little bit to increase this to at least 3/8" and hopefully up to 1/2�. Just for grins a picture of the "trimmed" oil filler cap is thrown in to show how it can be set up to fit ok. I don't plan on using it when the car is done. I hope to have a new oil fill hole made in the rear rocker cover nearer the driver�s side of the engine.
hole in cradle for rear tranny mount stud and nut
axle to rear pass. side engine mount clearance
lower rear engine mount and axle (this welder needs some help! )
trimmed oil filler cap
[This message has been edited by cptsnoopy (edited 09-08-2023).]
thanks Rickady88GT, SH, neverendingproject and KissMySSFiero for your complements.
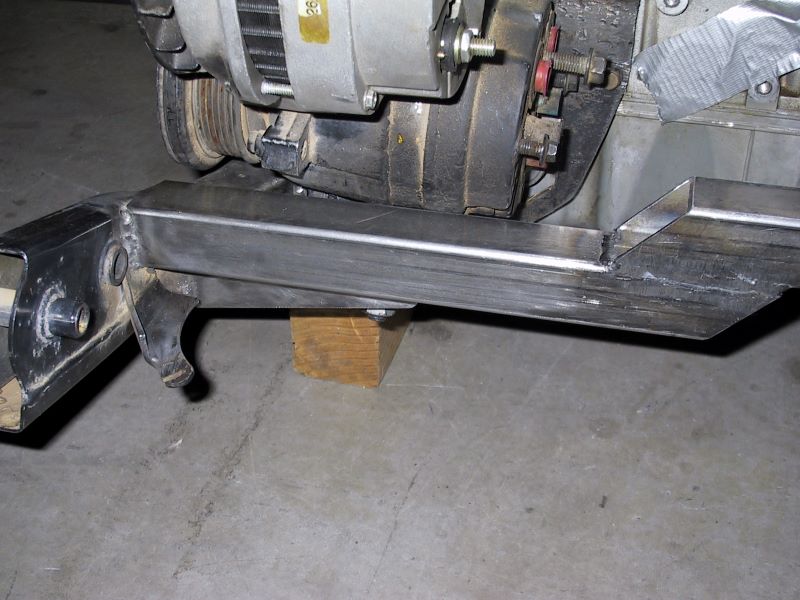
Tonight I tried welding on a front cross member that would help support the lower forward engine mount and still leave enough room to install a cat in the original location. I hope that it will be sturdy enough to prevent twisting. I found that I welded it just a wee bit close to the a/c compressor. I will know just how close once the compressor/alt. brackets are done. The plan is to weld a brace/end-cap on the original front cross member piece to the new cross member to help support the tranny.
[This message has been edited by cptsnoopy (edited 09-08-2023).]
Nice do you think the front member is enough or are you going to add to it? That stock piece is much taller than the one you put in. This is how I did mine.
[This message has been edited by Rickady88GT (edited 09-11-2004).]
Nice do you think the front member is enough or are you going to add to it? That stock piece is much taller than the one you put in. This is how I did mine.
I like the way yours looks. very clean on the front side.
I am going try and make the a/c compressor and alt brackets next to see if this crossmember is in the way. if it works were it is I will leave it alone until the rest of the exhaust and plumbing is routed. then I will see if I can beef up the cross member some more.
[This message has been edited by cptsnoopy (edited 09-11-2004).]
I have to say you have given me a few ideas on my Northstar mounts, good pictures with great deal. I would like to see the front cross memeber a little closer if you think about it next time you have the camera.
i will get some more pics out today. the front crossmember has me concerned. I don't think it is enough to prevent twisting as well as the original front crossmember. So I am going to try and come up with a way to brace it better with gussets or add another piece all the way across and tie the two together. I still would like to have some room left over to have a cat under the front of the engine in the original location.
I was just going to over kill it when it comes time, a local place sells 1/4" wall 3"X 3" tubing for $7.50 a foot.
i was thinking of doing that. then i thought I would try to retain some room in front of the engine for the cat. maybe I should not be "thinking"...
just as a note: compare the 1/4" wall with the 1/8" and 1/16". the 1/4" is very heavy stuff! that one piece may weigh as much as the whole subframe...
here are a couple more pics of where the front crossmember is for now. I am working on the a/c compressor mount to see if there will be enough room between the compressor and the crossmember when it is bolted up. I am thinking of putting another 1.5" square tubing crossmember further forward with gussets at each end. this poor subframe is going to weigh a ton. between the two crossmembers I will have a good solid base for the foward upper engine mount to the head.
[This message has been edited by cptsnoopy (edited 05-11-2012).]
thanks blackrams, I just hope it works when it is done...
the v5 a/c compressor main bracket is done enough to mount the compressor and see how it looks. the front crossmember will need to be modified to give the a/c compressor just a little more breathing room. the alt is going to be very close to the firewall. so close that the heat shield will have to be notched were the alt cooling fins rotate to prevent shredding of the material. if neccessary, a smaller alt will be used instead of the stock aurora one. this is the price for using the fat v5 compressor that comes with the 4cyl 88 fieros. if this system works, the only mods to the a/c system other than the compressor brackets will be extending the hoses from the compressor about an inch or so to reach the drivers side connection.
here is a pic of the 1/4" steel a/c compressor bracket... note: the empty hole is a gunked up set of threads when I tried to drill out a snapped off bolt. it will be drilled out larger and a bolt/nut used there.
[This message has been edited by cptsnoopy (edited 05-11-2012).]
wow! ran out of web space for my primary email name... too many pics! took awhile but I set up a secondary web space for more pics.
the original duke rear a/c compressor brace was cut and a new piece welded on to mount the rear of the compressor again, that bolt on the left will be replaced with the proper one later...
after looking at the various methods of routing the serpentine belt, I went with the stock location for the tensioner and made a bracket for a 76mm grooved idler pulley that replaces the power steering pump pulley. (thanks again darthfiero for the part #) if I decide to put in power steering like Rickady88GT is designing, then it should be a bolt on item for the pump and little bit longer belt. this may look like a strange setup for the bracket but I don't know if it is ok to put a 1/4" steel bracket between the block and the heads because of the different heat expansion properties of the two metals. ( I suppose that means I ought to be concerned about the main a/c compressor bracket too...) so the bracket just bolts to the block and a piece is welded to the back that fits snugly under a cast lip to brace and hold the pulley in place. the next two pics show the bracket and then the last one is the final pulley/accessory setup before the belt is added.
[This message has been edited by cptsnoopy (edited 05-11-2012).]
Cool. I like it. The front member should probably be more "beefy". I would not even think about a cat in the stock Fiero location. Getting that ultra hot pipe that comes out of the cat would be to hard to get back to the rear of the car with out burning something. The longer and more complex the exhaust system is, the heavier and more expensive it will be. I have a cat (3 inch in 3 inch out) in my S*, in fact it is the cat that cam on the S*. But I dont have a mufler. I have two res tips. Ya, I know the tips will rot out or blow out but if I need a mufler that bad I can fit one very small mufler on each side of the car in the stock Fiero tip locations. I dont think it is that loud at all. It just seems like it would be VERY hard to use a cat in the stock Fiero location. I would love to do a N* but I havent yet so I am not sure of any other way to get the exhaust pipe around the N* other than the stock N* place that is under the oil pan. That is just to close to the oil pan for a ultra hot pipe to go throu. Then you would need to get the custom made "Y" pipe to deliver the exhaust from the rear bank over to the front bank via the conventional "over the tranny" location. That will add more surface aria to the exhaust pipe and cool down the exhaust so the cat wont work that well anyway. Then all that extra surface aria in the engine bay will heat up the engine bay even more. So to keep heat in the pipe and out of the engine bay you would need to get the system coated or wrapped bringing the cost WAY up. It is like a domino effect that just gets wors and wors. The shorter the system is the better it will be. If I misunderstood you please disregard.
I thaught long and hard about the exhaust system, and list it as one of the three major arias of doing a swap. And it is most likely going to cost more than the mounts to do the swap. BTW I love to see how diferently we do things. It shows that we are getting better and better with each engine swap that is done.
[This message has been edited by Rickady88GT (edited 09-22-2004).]
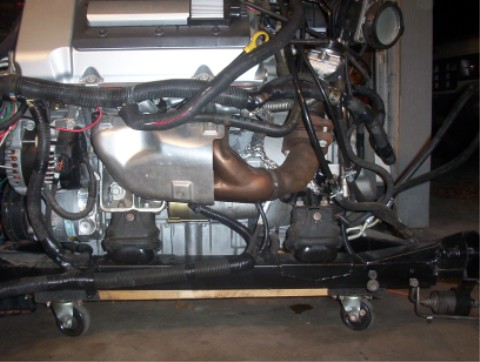
I am going to see how the exhaust system pans out before I make any changes to the front cross member. I agree it is too weak in its present form though. I think you are right about the heat. I hope to have dual exhausts with no common connections. For now the plan is to make manifolds that will be similar to the fiero's and after a 90-degree bend have a cat on each bank. The cats are 2" ID and are somewhat larger ID than the stock cross under. I do plan to go under the pan but with that section wrapped to carry the heat further rearward. The pipe under the pan will likely be a 2.5" pipe pressed into an oval shape to help it fit with enough space for the wrap. If I could I would wrap everything but the cats. I have no idea how much the stuff costs so I will have to find that out first. The exhaust tubing for the most part will all be 2" ID. For now I don't think that will be too restrictive and yet it won't be a big jump from stock either. I plan on the rear bank having the same length tubing as the front. Hopefully that will keep it reasonably balanced. It is definitely a compromise situation... There is room around the driver�s side of the trans to run a 2� pipe with some to spare. It requires more tubing to do that so it will be option number 2. Since you and Will have not mentioned anything about needing mufflers, I don�t plan on having any. Some sort of tips will be back there but I don�t know which yet. Maybe stock style to help keep the sleeper look� (The plan is subject to change... lol)
Thanks for your ideas and input.
Ps: That power steering project your working on looks way cool!
Originally posted by Rickady88GT: The front member should probably be more "beefy".
Maybe, maybe not. It looks like it's welded securely. What's the wall thickness of that tubing?
quote
I would love to do a N* but I havent yet so I am not sure of any other way to get the exhaust pipe around the N* other than the stock N* place that is under the oil pan. That is just to close to the oil pan for a ultra hot pipe to go throu.
Don't know why you think that... the factory front bank pipe goes through there just fine, and in fact wraps up very tightly on the rear face of the block. Caddy hasn't had problems with it. Just ceramic coat and/or tack a heat shield onto your crossunder pipe and you'll be fine. I wouldn't wrap it as that adds to the size of the pipe in a very tight area. Ceramic coating does just as good a job as wrapping, but doesn't hold moisture, make a mess, etc.
------------------ Turn the key and feel the engine shake the whole car with its lope; Plant the gas pedal and feel in your chest neither a shriek nor a wail but a bellowing roar; Lift and be pushed into the harness by compression braking that only comes from the biggest cylinders while listening to music of pops and gurgles. Know that you are driving and American V8. There are finer engines made, but none of them are this cool.
Luck, Fate and Destiny are words used by those who lack the courage to define their own future
Well the header wrap is $36 for 50' of 2" material (Jegs)... which would cover about 6' of 2.5" pipe with a 1" overlap. i.e. it's reasonably cheap. I think you're in the same boat that I am... I didn't install the stock crossover tube before mating and installing the engine/tranny. (oops) So now I have a pipe hanging down below the cradle, and need to insulate it from the oil pan (and tranny pan). I was thinking of tacking a small sheet of steel onto the tube, and stuffing the layer between it with housing fiberglass... It'll probably be cheaper and better insulating than wrapping it (plus, it's what came with it stock). I haven't researched this fully yet though, but I should have a decision fairly soon.
thanks for your input. I think the wall thickness is .125" but I will have to check on Friday when I get back home. my concern is that the cradle may be able to twist near the front adding twisting loads to the front cradle mounts on the chassis. I don't know if that is a problem or not. It appears the cradle is built much stronger across the rear cross member which is much closer to the rear suspension. maybe that is where all the strength needs to be anyway.
Ryan,
thanks for the info. I hope to get to that point in the exhaust before Halloween... I have to make the manifolds which will be new to me. I have the flanges but still need to buy some tubing and bends. I did mount the caddy manifolds and crossunder pipe but found that I would have to get a smaller diameter inner cv joint. that and having to cut the trunk is why I decided not to commit to the stock exhaust just yet. if this homemade plan does not work then I may go back to that.
[This message has been edited by cptsnoopy (edited 09-23-2004).]
cptsnoopy, I sat in the garage for a little while last night "could sleep, bad tooth" and I did deside a one piece bar and a 3" X 3" with a 1/8" wall is what I am going with, I think anything thicker would not allow me to get a good strong weld on and like you said it would be so much heavier than really needed. But I am sure on just using a 1 piece bar to make it stronger.
------------------ Bobby from NW Indiana 93 Northstar and 5 speed Getrag thespeedshop@sbcglobal.net My build thread
Originally posted by cptsnoopy: thanks for your input. I think the wall thickness is .125" but I will have to check on Friday when I get back home. my concern is that the cradle may be able to twist near the front adding twisting loads to the front cradle mounts on the chassis. I don't know if that is a problem or not. It appears the cradle is built much stronger across the rear cross member which is much closer to the rear suspension. maybe that is where all the strength needs to be anyway.
Are you saying that you're worried about the off center location of the engine mount pulling up harder on the right side of the cradle than the left? that is completely a non-issue. One important thing that it appears you have not done, however is brace the remainder of the stock cross member to the new cross member. Gotta support that trans mount better.
------------------ Turn the key and feel the engine shake the whole car with its lope; Plant the gas pedal and feel in your chest neither a shriek nor a wail but a bellowing roar; Lift and be pushed into the harness by compression braking that only comes from the biggest cylinders while listening to music of pops and gurgles. Know that you are driving and American V8. There are finer engines made, but none of them are this cool.
Luck, Fate and Destiny are words used by those who lack the courage to define their own future
cptsnoopy, I sat in the garage for a little while last night "could sleep, bad tooth" and I did deside a one piece bar and a 3" X 3" with a 1/8" wall is what I am going with, I think anything thicker would not allow me to get a good strong weld on and like you said it would be so much heavier than really needed. But I am sure on just using a 1 piece bar to make it stronger.
definitely a good idea. several of the swaps that I have read about use that or a very similar style of crossmember and they seem to like it. It should be a good size for adding mounts to if you decide to support the engine from the head like the stock cadillac mount.
quote
Originally posted by Will:
Are you saying that you're worried about the off center location of the engine mount pulling up harder on the right side of the cradle than the left? that is completely a non-issue. One important thing that it appears you have not done, however is brace the remainder of the stock cross member to the new cross member. Gotta support that trans mount better.
actually I am worried since my passenger side lower mounts will tend to twist the right rail inward that it may need more support from the front crossmember to help negate that effect. It may be nothing to worry about, I just don't have any idea how much twisting force will occur when I hit bumps and stuff like that. If it does twist, how bad would that be for the forward cradle mounts that are welded to the spaceframe? maybe they are plenty strong, I just don't have a good feel for what they can handle. If I am am able to support the engine front and rear using mounts near the drivers side of the heads then that should help minimize any twisting on the right side rail... you are right about the stock front crossmember not being supported. I was going to wait until I have a good idea about the exhaust routing and then tie the two front crossmembers together with gussets or some other type of bracing.
just a quick update: the idler pulley was too small at 76mm. very close to working though. I found an idler pulley that is 109mm and put it on instead. as luck would have it no changes had to be made to the mount. now there is actually a belt around the mess... since it looks like it will work this way the rest of the alternator brackets will be made next. the tensioner pulley mount has a little flex to it when the belt is put on so a gusset will be added to prevent that.
[This message has been edited by cptsnoopy (edited 05-11-2012).]
Originally posted by cptsnoopy: actually I am worried since my passenger side lower mounts will tend to twist the right rail inward that it may need more support from the front crossmember to help negate that effect. It may be nothing to worry about, I just don't have any idea how much twisting force will occur when I hit bumps and stuff like that. If it does twist, how bad would that be for the forward cradle mounts that are welded to the spaceframe? maybe they are plenty strong, I just don't have a good feel for what they can handle. If I am am able to support the engine front and rear using mounts near the drivers side of the heads then that should help minimize any twisting on the right side rail... you are right about the stock front crossmember not being supported. I was going to wait until I have a good idea about the exhaust routing and then tie the two front crossmembers together with gussets or some other type of bracing.
Don't forget that the stock V6, which is only a tiny bit lighter than the engine you're installing, has its forward mount cantilevered off the side of the cradle rail as well... I don't think it will be an issue at all.
------------------ Turn the key and feel the engine shake the whole car with its lope; Plant the gas pedal and feel in your chest neither a shriek nor a wail but a bellowing roar; Lift and be pushed into the harness by compression braking that only comes from the biggest cylinders while listening to music of pops and gurgles. Know that you are driving and American V8. There are finer engines made, but none of them are this cool.
Luck, Fate and Destiny are words used by those who lack the courage to define their own future
just a quick update: the idler pulley was too small at 76mm. very close to working though. I found an idler pulley that is 109mm and put it on instead. as luck would have it no changes had to be made to the mount. now there is actually a belt around the mess... since it looks like it will work this way the rest of the alternator brackets will be made next. the tensioner pulley mount has a little flex to it when the belt is put on so a gusset will be added to prevent that.
I guess there wasn't a slightly short belt available to work with the 76mm idler? What length belt are you using?
------------------ Turn the key and feel the engine shake the whole car with its lope; Plant the gas pedal and feel in your chest neither a shriek nor a wail but a bellowing roar; Lift and be pushed into the harness by compression braking that only comes from the biggest cylinders while listening to music of pops and gurgles. Know that you are driving and American V8. There are finer engines made, but none of them are this cool.
Luck, Fate and Destiny are words used by those who lack the courage to define their own future
I guess there wasn't a slightly short belt available to work with the 76mm idler? What length belt are you using?
when the 76mm was on there a 72" belt looked just right. but even though I checked clearances with a nylon strap the belt was just barely rubbing on the bottom of the tensioner. (the belt was a bit thicker than the strap) the pulley was not quite big enough to provide acceptable clearance both over the top and under the tensioner. going to the 109mm required a 74" belt and it clears under the tensioner by about 1/8" and has lots of clearance over the top. since the bottom part is so close the the tensioner wheel i don't think it can rub even with the belt moving back and forth a little.
[This message has been edited by cptsnoopy (edited 09-25-2004).]
Don't forget that the stock V6, which is only a tiny bit lighter than the engine you're installing, has its forward mount cantilevered off the side of the cradle rail as well... I don't think it will be an issue at all.
thanks for that info! the truth is i have not looked at the mounts on a stock v6... even though i have one outside.. dohhh...
does anyone know what the tensioner marks should look like when the belt length is correct. here is a pic of where the marks ended up.
this pic is the idler pulley bracket with a gusset added.
this one is the rear a/c compressor with a gusset added also.
the alternator brackets are done for now. just need to get the correct nuts and bolts to finish the job. the first pic is the front lower bracket. it is just a short piece of 1/4" steel. the second pic is the rear alt bracket.
[This message has been edited by cptsnoopy (edited 05-11-2012).]
The front cross member was cut to provide more clearance under the a/c compressor. A piece of 1/8� steel was welded over the cut area. Another length of 1.5� sq. tube was added below the modified piece to provide more support.
[This message has been edited by cptsnoopy (edited 05-11-2012).]
I really appreciate the info you are providing. Although I am not doing the swap, it helps to see the amount of innovations with detail. Great write up. A+ for you.
I am using a cadillac deville alternator that i got off ebay. it should be the same as the olds aurora alternator but I am not sure...
I looked at using the fiero alternator but the mounting holes are such that it does not save much space even though it is much smaller than the caddy alternator.
Maybe I'm dense... Did you not get brackets or accessories with your engine?
------------------ Turn the key and feel the engine shake the whole car with its lope; Plant the gas pedal and feel in your chest neither a shriek nor a wail but a bellowing roar; Lift and be pushed into the harness by compression braking that only comes from the biggest cylinders while listening to music of pops and gurgles. Know that you are driving and American V8. There are finer engines made, but none of them are this cool.
Luck, Fate and Destiny are words used by those who lack the courage to define their own future
Maybe I'm dense... Did you not get brackets or accessories with your engine?
No, you got it right Will, just a long block... it came with a couple of extras like the water pump and main belt tensioners. the rest I picked up on ebay. as Rickady88GT said, this is not the recommended way to go... I will know in a month or so if it is a good engine or a warranty engine. it was sold to me as a good engine.
on a happier note this just showed up today.
[This message has been edited by cptsnoopy (edited 05-11-2012).]
Is that the Holley Commander or just a redone wiring harness?
it is the Holley Commander from chrfab. it comes with the wiring harness, O2 sensor and software. I also bought the data cable for my laptop. I guess I am committed now. Alan was very quick getting it out. I ordered it on Wednesday.
[This message has been edited by cptsnoopy (edited 10-01-2004).]
I just wish CA would let us run those on the street That would make life sooo much easier. In fact I would bet money that that system on your N* will run cleaner than a stock Fiero. But you just cant tell some people that
I just wish CA would let us run those on the street That would make life sooo much easier. In fact I would bet money that that system on your N* will run cleaner than a stock Fiero. But you just cant tell some people that
do they plug in and look for a number? if you tell them it is the OBDI year and hide the computer where the stock one is would they be able to tell? out here i was told i could not use my analog holley projection on my pickup but they pass it every year even though the computer is sitting on the trans hump inside the cab. go figure...?


 )
) 


 that is completely a non-issue.


