Pennock's Fiero Forum
  Technical Discussion & Questions
  Quad 4 swap (lot of pics) (Page 5)

Post New Topic  Post A Reply
Email This Page to Someone! | Printable Version

This topic is 8 pages long:  1   2   3   4   5   6   7   8 
Previous Page | Next Page
next newest topic | next oldest topic
Quad 4 swap (lot of pics) by sardonyx247
Started on: 06-19-2012 04:54 AM
Replies: 306 (26932 views)
Last post by: Quadfather on 10-02-2022 07:45 AM
sardonyx247
Member
Posts: 5032
From: Nevada, USA
Registered: Jun 2003


Feedback score:    (88)
Leave feedback


Total ratings: 218
Rate this member

Report this Post11-09-2012 03:02 AM Click Here to See the Profile for sardonyx247Click Here to visit sardonyx247's HomePageSend a Private Message to sardonyx247Edit/Delete MessageReply w/QuoteDirect Link to This Post
Page 5
IP: Logged
34blazer660
Member
Posts: 88
From: Las Vegas
Registered: Sep 2012


Feedback score: N/A
Leave feedback

User Banned

Report this Post11-09-2012 03:10 AM Click Here to See the Profile for 34blazer660Send a Private Message to 34blazer660Edit/Delete MessageReply w/QuoteDirect Link to This Post
i was out in my garage and they buzzed the house like 4 times, afterburners and all. a couple of B1B's were practicing as well. openhouse at nellis this weekend, its going to suck because i switch to midnights tommorrow, bleh.

[This message has been edited by 34blazer660 (edited 11-09-2012).]

IP: Logged
Quad Raider
Member
Posts: 865
From: Oologah, Oklahoma
Registered: Dec 2010


Feedback score: (3)
Leave feedback

Rate this member

Report this Post11-09-2012 11:10 AM Click Here to See the Profile for Quad RaiderSend a Private Message to Quad RaiderEdit/Delete MessageReply w/QuoteDirect Link to This Post
Love the Thunderbirds and the Blue Angels. Saw the T-birds at McConnell back in September.

I have a stupid question about the wiring harness process. How exactly did you shorten/pin it for the Fiero? Did you attach it to the Quad, then one by one, by using the diagram, attach each wire to the Fiero plug, then go back and shorten each wire as needed?

IP: Logged
sardonyx247
Member
Posts: 5032
From: Nevada, USA
Registered: Jun 2003


Feedback score:    (88)
Leave feedback


Total ratings: 218
Rate this member

Report this Post11-09-2012 04:34 PM Click Here to See the Profile for sardonyx247Click Here to visit sardonyx247's HomePageSend a Private Message to sardonyx247Edit/Delete MessageReply w/QuoteDirect Link to This Post
 
quote
Originally posted by Quad Raider:

Love the Thunderbirds and the Blue Angels. Saw the T-birds at McConnell back in September.

I have a stupid question about the wiring harness process. How exactly did you shorten/pin it for the Fiero? Did you attach it to the Quad, then one by one, by using the diagram, attach each wire to the Fiero plug, then go back and shorten each wire as needed?


Pretty much, and /or reverse that. IE: from the plug to the harness. I tied in the C500 and the C203 to the harness. I had to unpin the 84 C500 and remove all that was not needed and add the 87 stuff. I think mainly I went from the plug and ran the plug wires to the harness. It isn't too bad, you look at the pinout for the C500 and see alt goes to the alt, coil power goes to the IDI pack, etc... once you get past being overwhelmed, it is not too hard.

The jets are practicing again today, this weekend should be great.
IP: Logged
Quad Raider
Member
Posts: 865
From: Oologah, Oklahoma
Registered: Dec 2010


Feedback score: (3)
Leave feedback

Rate this member

Report this Post11-09-2012 04:54 PM Click Here to See the Profile for Quad RaiderSend a Private Message to Quad RaiderEdit/Delete MessageReply w/QuoteDirect Link to This Post
 
quote
once you get past being overwhelmed, it is not too hard.


That's exactly how I'm feeling. The harness is the only part of this swap that has me concerned. Fabricating engine mounts, relocating the battery, re-upholstering the headliner, all that stuff doesn't phase me a bit, but that harness is intimidating. Really appreciate you posting all the photos and descriptions as you go.
IP: Logged
Carcenomy
Member
Posts: 1109
From: Invercargill, New Zealand
Registered: Jan 2009


Feedback score: N/A
Leave feedback

Rate this member

Report this Post11-10-2012 04:15 AM Click Here to See the Profile for CarcenomyClick Here to visit Carcenomy's HomePageSend a Private Message to CarcenomyEdit/Delete MessageReply w/QuoteDirect Link to This Post
With harnesses just take your time. They look super intimidating initially but really it's all just a slow, methodical process. Don't rush it, and if you're making any executive decisions on how things are wired, document them so you don't have dramas later if repairs are needed.
IP: Logged
sardonyx247
Member
Posts: 5032
From: Nevada, USA
Registered: Jun 2003


Feedback score:    (88)
Leave feedback


Total ratings: 218
Rate this member

Report this Post11-12-2012 12:00 AM Click Here to See the Profile for sardonyx247Click Here to visit sardonyx247's HomePageSend a Private Message to sardonyx247Edit/Delete MessageReply w/QuoteDirect Link to This Post
A few more pics of the air show this weekend, then on to the Quad 4 stuff.


And just to show how close they get to our shop. (the silver building)


Now on to the Quad 4 stuff,
I got my A/C worked out today, I pressure tested the compressor.
My friend Dave made me this nice tester.


It hooks to an air compressor and then you can just dunk the whole thing in water.


No Leaks!


On the 91' Quad 4 ECM it needs a A/C pressure sensor instead of hi/low switches, so one had to be added.
Here is the part and part number. BTW it can be bought at O'Rilleys for about $16


It has to go on the high side, the small line.
This is where I put mine.


The new part has to be crimped on, luckly my friend has a crimper.


The piece crimped on in place.


I also got all my wires shortened in the harness, just needs loom and then that's done too.

[This message has been edited by sardonyx247 (edited 11-12-2012).]

IP: Logged
Fierostarvin
Member
Posts: 292
From: Hazleton Iowa
Registered: Mar 2006


Feedback score: (3)
Leave feedback

Rate this member

Report this Post11-12-2012 09:48 AM Click Here to See the Profile for FierostarvinSend a Private Message to FierostarvinEdit/Delete MessageReply w/QuoteDirect Link to This Post
Does the pressure sensor screw onto the schrader fitting?
IP: Logged
sardonyx247
Member
Posts: 5032
From: Nevada, USA
Registered: Jun 2003


Feedback score:    (88)
Leave feedback


Total ratings: 218
Rate this member

Report this Post11-12-2012 06:59 PM Click Here to See the Profile for sardonyx247Click Here to visit sardonyx247's HomePageSend a Private Message to sardonyx247Edit/Delete MessageReply w/QuoteDirect Link to This Post
 
quote
Originally posted by Fierostarvin:

Does the pressure sensor screw onto the schrader fitting?


Yeah it just screws on to the fitting, if you have an 84' you don't need this as the high side schrader is allready in the engine compartment.
IP: Logged
hercimer01
Member
Posts: 2289
From: Rockford IL.
Registered: Mar 2008


Feedback score:    (9)
Leave feedback

Rate this member

Report this Post11-13-2012 01:47 PM Click Here to See the Profile for hercimer01Send a Private Message to hercimer01Edit/Delete MessageReply w/QuoteDirect Link to This Post
 
quote
Originally posted by sardonyx247:


I want one! Got a source?
IP: Logged
fieroguru
Member
Posts: 12128
From: Champaign, IL
Registered: Aug 2003


Feedback score:    (45)
Leave feedback


Total ratings: 258
Rate this member

Report this Post11-13-2012 02:33 PM Click Here to See the Profile for fieroguruSend a Private Message to fieroguruEdit/Delete MessageReply w/QuoteDirect Link to This Post
 
quote
Originally posted by hercimer01:

I want one! Got a source?


This looks like it:
http://www.yogisinc.com/ind...de=prod/prd10625.htm
IP: Logged
PFF
System Bot
sardonyx247
Member
Posts: 5032
From: Nevada, USA
Registered: Jun 2003


Feedback score:    (88)
Leave feedback


Total ratings: 218
Rate this member

Report this Post11-14-2012 08:00 AM Click Here to See the Profile for sardonyx247Click Here to visit sardonyx247's HomePageSend a Private Message to sardonyx247Edit/Delete MessageReply w/QuoteDirect Link to This Post
 
quote
Originally posted by hercimer01:


I want one! Got a source?


I have a great source, my friend Dave, he has one.


quote
Originally posted by fieroguru:

This looks like it:
http://www.yogisinc.com/ind...de=prod/prd10625.htm


That looks like one. Not really worth it unless you have to make alot of lines. I can get custom hoses made in town for around $90-$100ish.
Otherwise you have to buy a crimper, ends, connections, hoses, etc. It adds up real fast.

IP: Logged
sardonyx247
Member
Posts: 5032
From: Nevada, USA
Registered: Jun 2003


Feedback score:    (88)
Leave feedback


Total ratings: 218
Rate this member

Report this Post11-14-2012 02:33 PM Click Here to See the Profile for sardonyx247Click Here to visit sardonyx247's HomePageSend a Private Message to sardonyx247Edit/Delete MessageReply w/QuoteDirect Link to This Post

sardonyx247

5032 posts
Member since Jun 2003
FYI, For A/C lines you can not use the Fiero V6 lines as they will get in the way of the oil filter, you need 87-88 4 cyl lines.
The 4 cyl lines move the line away from the oil filter allowing you to be able to change the filter.
The line shown above is from a 87'.

Edit to add, The V5 compressor swaps the suction and discharge ports so you need the 87-88 4 cyl line as they do that allready in the line.

[This message has been edited by sardonyx247 (edited 06-05-2014).]

IP: Logged
Widow Maker
Junior Member
Posts: 1
From: Dublin, OH, USA
Registered: Nov 2012


Feedback score: N/A
Leave feedback

Rate this member

Report this Post11-16-2012 03:52 PM Click Here to See the Profile for Widow MakerSend a Private Message to Widow MakerEdit/Delete MessageReply w/QuoteDirect Link to This Post
Hey,

Just wanted to say thanks for putting up all the pictures in your build. I tore my 95 Grand Am apart and wasn't sure if I would bother putting it back together. Your pictures are great for remembering where everything goes (especially the bracketry).

Thanks, and good luck with the rest of it!

As for me, I wasn't looking for any great power change and am experimenting with putting a 96 2.4 engine in as a replacement.
IP: Logged
ericjon262
Member
Posts: 3082
From: everywhere.
Registered: Jan 2010


Feedback score:    (10)
Leave feedback


Total ratings: 66
Rate this member

Report this Post11-25-2012 11:20 PM Click Here to See the Profile for ericjon262Send a Private Message to ericjon262Edit/Delete MessageReply w/QuoteDirect Link to This Post
alright now slacker... back to work! we need updates!

------------------
there's a Group on 60degreeV6.com for us 660 Fiero owners!

Fiero Owner's group on 60degreeV6.com

I know these lines Look crooked on paper, but I swear I've got them straight in my head.

IP: Logged
sardonyx247
Member
Posts: 5032
From: Nevada, USA
Registered: Jun 2003


Feedback score:    (88)
Leave feedback


Total ratings: 218
Rate this member

Report this Post11-26-2012 05:48 PM Click Here to See the Profile for sardonyx247Click Here to visit sardonyx247's HomePageSend a Private Message to sardonyx247Edit/Delete MessageReply w/QuoteDirect Link to This Post
 
quote
Originally posted by ericjon262:

alright now slacker... back to work! we need updates!


I was out of town for a bit. I have been working out the exhaust and what I need for it.
The cradle was cut out for the exhaust it has now, but where it was notched it took out one side of a stock muffler spring mount.
So I can't use a stock style muffler, but I have an idea.

[This message has been edited by sardonyx247 (edited 11-26-2012).]

IP: Logged
Quad Raider
Member
Posts: 865
From: Oologah, Oklahoma
Registered: Dec 2010


Feedback score: (3)
Leave feedback

Rate this member

Report this Post11-27-2012 01:09 PM Click Here to See the Profile for Quad RaiderSend a Private Message to Quad RaiderEdit/Delete MessageReply w/QuoteDirect Link to This Post
Now that my Beretta has gone to that big parking lot in the sky, I've finally started disassembling its Quad. Here's one of the problems I found, four bent valves:


The timing belt tensioner shoe broke, allowing the tensioner piston to push the belt farther than it was designed to go, which wore the teeth on the intake cam gear, which then allowed the valves to hit the pistons.

I'll be referring to this thread a lot as I put the engine back together.

[This message has been edited by Quad Raider (edited 11-28-2012).]

IP: Logged
sardonyx247
Member
Posts: 5032
From: Nevada, USA
Registered: Jun 2003


Feedback score:    (88)
Leave feedback


Total ratings: 218
Rate this member

Report this Post11-28-2012 03:33 AM Click Here to See the Profile for sardonyx247Click Here to visit sardonyx247's HomePageSend a Private Message to sardonyx247Edit/Delete MessageReply w/QuoteDirect Link to This Post
That is alot of damage. Good luck on the rebuild.
IP: Logged
Quad Raider
Member
Posts: 865
From: Oologah, Oklahoma
Registered: Dec 2010


Feedback score: (3)
Leave feedback

Rate this member

Report this Post11-29-2012 09:50 AM Click Here to See the Profile for Quad RaiderSend a Private Message to Quad RaiderEdit/Delete MessageReply w/QuoteDirect Link to This Post
Did you use new rings, main and rod bearings, or did you reuse the old ones? If you reused the old ones, how did you know that they had life left in them?

The bottom end of my engine seems to be in good shape. I haven't disassembled the crank, etc. yet, but the cylinder walls are perfectly smooth. I've discovered that this is a replacement engine so it doesn't have the full 242,000 miles that the donor car had, but I know it has well over 100,000, since that's how many miles I put on it since I installed a new head gasket 4 years ago when it was given to me. The engine never smoked and didn't use any oil.
IP: Logged
sardonyx247
Member
Posts: 5032
From: Nevada, USA
Registered: Jun 2003


Feedback score:    (88)
Leave feedback


Total ratings: 218
Rate this member

Report this Post11-29-2012 09:15 PM Click Here to See the Profile for sardonyx247Click Here to visit sardonyx247's HomePageSend a Private Message to sardonyx247Edit/Delete MessageReply w/QuoteDirect Link to This Post
 
quote
Originally posted by Quad Raider:

Did you use new rings, main and rod bearings, or did you reuse the old ones? If you reused the old ones, how did you know that they had life left in them?

The bottom end of my engine seems to be in good shape. I haven't disassembled the crank, etc. yet, but the cylinder walls are perfectly smooth. I've discovered that this is a replacement engine so it doesn't have the full 242,000 miles that the donor car had, but I know it has well over 100,000, since that's how many miles I put on it since I installed a new head gasket 4 years ago when it was given to me. The engine never smoked and didn't use any oil.


I reused the old rings and bearings, this is suposed to be a low cost swap.
The bearings you can tell if one of the layers of metal is wiped out or on its way, or if there are nicks or gouges in them.
The block on mine had no ridge on it and you can still see the cross hatch, The P/O did not say it smoked or anything like that. And I didn't see anything physically wrong with the rings.
IP: Logged
Quad Raider
Member
Posts: 865
From: Oologah, Oklahoma
Registered: Dec 2010


Feedback score: (3)
Leave feedback

Rate this member

Report this Post11-30-2012 01:36 PM Click Here to See the Profile for Quad RaiderSend a Private Message to Quad RaiderEdit/Delete MessageReply w/QuoteDirect Link to This Post
 
quote
Originally posted by sardonyx247:

this is suposed to be a low cost swap.


Man, I hear you. Same here. I'm doing my swap as economically as possible, while making it as dependable and professional as possible. I guess that's what makes it such a challenge. And is also what will make it so satisfying if I pull it off.
IP: Logged
PFF
System Bot
sardonyx247
Member
Posts: 5032
From: Nevada, USA
Registered: Jun 2003


Feedback score:    (88)
Leave feedback


Total ratings: 218
Rate this member

Report this Post12-08-2012 02:24 AM Click Here to See the Profile for sardonyx247Click Here to visit sardonyx247's HomePageSend a Private Message to sardonyx247Edit/Delete MessageReply w/QuoteDirect Link to This Post
More pics


Here is the new shift bracket, I had to drill a new hole as the holes on the quad are closer together than the Fiero Getrag.


And where it goes. Still needs to be painted.


Parts left to paint.


The coolent line. Here is the one Fierobsessed used on the 84'.


Here is the one I am useing.


I had to bend it a bit to fit where I want it, under the hump in the cradle.
To make sure I didn't crack the pipe bending it, I made up a tester, I used an old inner tube and hose clamped it to the end and pressure tested it by dipping it in water after being pressurized. BTW you can use this method to test radiators.


No leaks.


IP: Logged
Quad Raider
Member
Posts: 865
From: Oologah, Oklahoma
Registered: Dec 2010


Feedback score: (3)
Leave feedback

Rate this member

Report this Post12-08-2012 02:58 PM Click Here to See the Profile for Quad RaiderSend a Private Message to Quad RaiderEdit/Delete MessageReply w/QuoteDirect Link to This Post
That leak tester is genius.

Where did you get that shift bracket? I'd like to make one like it.
IP: Logged
sardonyx247
Member
Posts: 5032
From: Nevada, USA
Registered: Jun 2003


Feedback score:    (88)
Leave feedback


Total ratings: 218
Rate this member

Report this Post12-08-2012 10:57 PM Click Here to See the Profile for sardonyx247Click Here to visit sardonyx247's HomePageSend a Private Message to sardonyx247Edit/Delete MessageReply w/QuoteDirect Link to This Post
 
quote
Originally posted by Quad Raider:

That leak tester is genius.


It is a trick to test radiators.

 
quote
Originally posted by Quad Raider:

Where did you get that shift bracket? I'd like to make one like it.


Fierobsessed just handed it to me, I know not much help, but that is where I got it.
IP: Logged
Fierobsessed
Member
Posts: 4782
From: Las Vegas, NV
Registered: Dec 2001


Feedback score: N/A
Leave feedback


Total ratings: 147
Rate this member

Report this Post12-09-2012 05:12 AM Click Here to See the Profile for FierobsessedSend a Private Message to FierobsessedEdit/Delete MessageReply w/QuoteDirect Link to This Post
IP: Logged
Quad Raider
Member
Posts: 865
From: Oologah, Oklahoma
Registered: Dec 2010


Feedback score: (3)
Leave feedback

Rate this member

Report this Post12-09-2012 02:24 PM Click Here to See the Profile for Quad RaiderSend a Private Message to Quad RaiderEdit/Delete MessageReply w/QuoteDirect Link to This Post
Ah, it's a Rodney Dickman shift bracket. I may have to just buy one, but I'd much rather fab my own.

I have some questions about cleaning the engine and internal parts.

What's the best way to clean the carbon off the pistons?

I pressure washed my block, too. Should I take any extra precautions to make sure I've gotten all the water out of it? I blew it out with compressed air.
IP: Logged
sardonyx247
Member
Posts: 5032
From: Nevada, USA
Registered: Jun 2003


Feedback score:    (88)
Leave feedback


Total ratings: 218
Rate this member

Report this Post12-09-2012 11:50 PM Click Here to See the Profile for sardonyx247Click Here to visit sardonyx247's HomePageSend a Private Message to sardonyx247Edit/Delete MessageReply w/QuoteDirect Link to This Post
 
quote
Originally posted by Quad Raider:

What's the best way to clean the carbon off the pistons?

I pressure washed my block, too. Should I take any extra precautions to make sure I've gotten all the water out of it? I blew it out with compressed air.


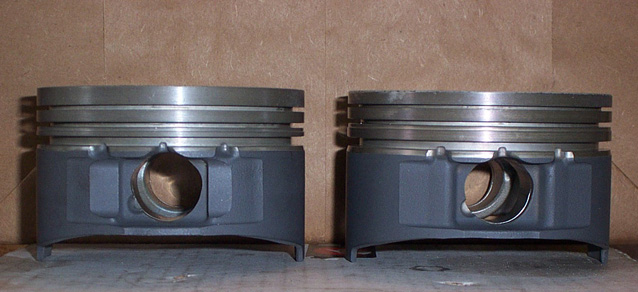
To clean off carbon from the pistons I use a wire wheel,(brass is preferred) I know everyone is going OMG, but it works and doesn't damage or even scratch the piston. And I have done hundreds of pistons. To get the carbon out of the ring groves, use an old broken ring, if you have one, or a small screwdriver or pick, be care not to scratch it, you only want to get the bulk of the carbon out, then wire wheel. then rubbing alc. and brake cleaner to get it all nice and shiny.

Compressed air in every hole is how to do it. (To get the water out of the block)
IP: Logged
ericjon262
Member
Posts: 3082
From: everywhere.
Registered: Jan 2010


Feedback score:    (10)
Leave feedback


Total ratings: 66
Rate this member

Report this Post12-09-2012 11:51 PM Click Here to See the Profile for ericjon262Send a Private Message to ericjon262Edit/Delete MessageReply w/QuoteDirect Link to This Post
mineral spirits has worked well for me on oil sludge, I imagine it would work well on carbon build up too.
IP: Logged
Will
Member
Posts: 14226
From: Where you least expect me
Registered: Jun 2000


Feedback score: (1)
Leave feedback


Total ratings: 237
Rate this member

Report this Post12-10-2012 09:11 AM Click Here to See the Profile for WillSend a Private Message to WillEdit/Delete MessageReply w/QuoteDirect Link to This Post
 
quote
Originally posted by sardonyx247:

To get the carbon out of the ring groves, use an old broken ring, if you have one, or a small screwdriver or pick,


*DO NOT* do this. The risk of scoring the top or bottom surfaces of the groove is just too great. *ANY* scoring in the groove comprompises ring seal and thereby power.

Carb cleaner (NOT the same as brake cleaner) will take the carbon off of pistons... just turn the pistons upside down and let them soak for a few days. Once the majority of the carbon has been removed (the originally yellow carb cleaner will turn darker) and use a nylon bristle brush to get any that may be left out of the grooves.

Results:


Yes, these have been coated, but the grooves were masked during the coating process, so the cleanliness of the grooves is my work.

[This message has been edited by Will (edited 12-10-2012).]

IP: Logged
Joseph Upson
Member
Posts: 4951
From:
Registered: Jan 2002


Feedback score: (2)
Leave feedback


Total ratings: 88
Rate this member

Report this Post12-10-2012 02:03 PM Click Here to See the Profile for Joseph UpsonSend a Private Message to Joseph UpsonEdit/Delete MessageReply w/QuoteDirect Link to This Post
 
quote
Originally posted by Will:
Carb cleaner (NOT the same as brake cleaner) will take the carbon off of pistons... just turn the pistons upside down and let them soak for a few days. Once the majority of the carbon has been removed (the originally yellow carb cleaner will turn darker) and use a nylon bristle brush to get any that may be left out of the grooves.


That's some really good stuff, comes in a gallon can with a dip tray from advance or autozone, it'll make old parts look like new it does such a good job of disolving carbon build up. It's on the expensive side though if you don't need to use that much.
IP: Logged
Quad Raider
Member
Posts: 865
From: Oologah, Oklahoma
Registered: Dec 2010


Feedback score: (3)
Leave feedback

Rate this member

Report this Post12-10-2012 02:24 PM Click Here to See the Profile for Quad RaiderSend a Private Message to Quad RaiderEdit/Delete MessageReply w/QuoteDirect Link to This Post
Didn't mean to hijack the thread. Now back to Sardonyx's build.
IP: Logged
PFF
System Bot
sardonyx247
Member
Posts: 5032
From: Nevada, USA
Registered: Jun 2003


Feedback score:    (88)
Leave feedback


Total ratings: 218
Rate this member

Report this Post12-10-2012 04:08 PM Click Here to See the Profile for sardonyx247Click Here to visit sardonyx247's HomePageSend a Private Message to sardonyx247Edit/Delete MessageReply w/QuoteDirect Link to This Post
On the throttle body adapter I found alot of corrosion that had to be taken care of.
Looks like even the air from back east will even eat aluminum. I'm glad I live in the rust free part of America.


After alot of sanding, I used the disk part of my belt/disk sander, I got it smooth again.
I finished it all the way up to 320 grit, should be leak free.


There are lots of little details I am finishing up, just about ready to go.

[This message has been edited by sardonyx247 (edited 12-10-2012).]

IP: Logged
Fierobsessed
Member
Posts: 4782
From: Las Vegas, NV
Registered: Dec 2001


Feedback score: N/A
Leave feedback


Total ratings: 147
Rate this member

Report this Post12-13-2012 04:18 AM Click Here to See the Profile for FierobsessedSend a Private Message to FierobsessedEdit/Delete MessageReply w/QuoteDirect Link to This Post
oooh pretty! I see you even managed to smooth out the marks from all the manual milling.
IP: Logged
sardonyx247
Member
Posts: 5032
From: Nevada, USA
Registered: Jun 2003


Feedback score:    (88)
Leave feedback


Total ratings: 218
Rate this member

Report this Post12-13-2012 03:22 PM Click Here to See the Profile for sardonyx247Click Here to visit sardonyx247's HomePageSend a Private Message to sardonyx247Edit/Delete MessageReply w/QuoteDirect Link to This Post
I wondered if you would notice that.
IP: Logged
sardonyx247
Member
Posts: 5032
From: Nevada, USA
Registered: Jun 2003


Feedback score:    (88)
Leave feedback


Total ratings: 218
Rate this member

Report this Post12-28-2012 04:30 PM Click Here to See the Profile for sardonyx247Click Here to visit sardonyx247's HomePageSend a Private Message to sardonyx247Edit/Delete MessageReply w/QuoteDirect Link to This Post
Now that the holidaze are over, time to get back to this.
IP: Logged
ericjon262
Member
Posts: 3082
From: everywhere.
Registered: Jan 2010


Feedback score:    (10)
Leave feedback


Total ratings: 66
Rate this member

Report this Post12-28-2012 06:36 PM Click Here to See the Profile for ericjon262Send a Private Message to ericjon262Edit/Delete MessageReply w/QuoteDirect Link to This Post
 
quote
Originally posted by sardonyx247:

Now that the holidaze are over, time to get back to this.


I didn't say you could have the holidaze off... YOU'RE FIRED!
IP: Logged
sardonyx247
Member
Posts: 5032
From: Nevada, USA
Registered: Jun 2003


Feedback score:    (88)
Leave feedback


Total ratings: 218
Rate this member

Report this Post12-29-2012 07:18 AM Click Here to See the Profile for sardonyx247Click Here to visit sardonyx247's HomePageSend a Private Message to sardonyx247Edit/Delete MessageReply w/QuoteDirect Link to This Post
 
quote
Originally posted by ericjon262:


I didn't say you could have the holidaze off... YOU'RE FIRED!


So, if I'm fired, does that mean I don't have to post any more pics .?.?
IP: Logged
sardonyx247
Member
Posts: 5032
From: Nevada, USA
Registered: Jun 2003


Feedback score:    (88)
Leave feedback


Total ratings: 218
Rate this member

Report this Post12-31-2012 03:02 AM Click Here to See the Profile for sardonyx247Click Here to visit sardonyx247's HomePageSend a Private Message to sardonyx247Edit/Delete MessageReply w/QuoteDirect Link to This Post
Well I am going to post more anyway.

Here is the 3.4L DOHC throttle body taken apart for paint and cleaning.


You can see here the throttle body has bearings for the shaft, what a nice TB.


Here it is all clean and painted.


The rest of the parts I had to paint.


On to the exhaust, still in progress.
I used a magnet under the cat to help hold it in place and to space it away from the cradle.
Then blocks of wood to hold it up and steady.


I used thick paper to get the angle just right, I got the paper from the gasket kit, usally used to seperate the head gasket and the rest of the gaskets.


The rubber band is to get the angle right and then I used a pencil to trace around the rubber band.


The piece cut and fitted.


The piece welded up and the bottom angle too.


I needed a piece to act as a slip joint so I can adjust the tip up , down, side to side, after it is in the Fiero.
I tried getting a coupler at Autozone but it was a bit too big, so I got a piece of pipe and used a tail pipe expander, bought at Harbor Freight for $15, to open it up so the other pipe can slip in and slide around.
Here one side is welded to the bend.


I still have to get the length right for the tip, I might wait untill it is in the Fiero, this exhaust is so easy to take off and drop out it should be no big deal.
IP: Logged
Quad Raider
Member
Posts: 865
From: Oologah, Oklahoma
Registered: Dec 2010


Feedback score: (3)
Leave feedback

Rate this member

Report this Post12-31-2012 09:39 AM Click Here to See the Profile for Quad RaiderSend a Private Message to Quad RaiderEdit/Delete MessageReply w/QuoteDirect Link to This Post
Very nice work. Are you concerned that it might be too loud?
IP: Logged
ericjon262
Member
Posts: 3082
From: everywhere.
Registered: Jan 2010


Feedback score:    (10)
Leave feedback


Total ratings: 66
Rate this member

Report this Post12-31-2012 10:33 AM Click Here to See the Profile for ericjon262Send a Private Message to ericjon262Edit/Delete MessageReply w/QuoteDirect Link to This Post
 
quote
Originally posted by sardonyx247:


So, if I'm fired, does that mean I don't have to post any more pics .?.?


I guess I'll let it slide this time...

------------------
there's a Group on 60degreeV6.com for us 660 Fiero owners!

Fiero Owner's group on 60degreeV6.com

I know these lines Look crooked on paper, but I swear I've got them straight in my head.

IP: Logged
Previous Page | Next Page

This topic is 8 pages long:  1   2   3   4   5   6   7   8 
next newest topic | next oldest topic

All times are ET (US)

Post New Topic  Post A Reply
Hop to:

Contact Us | Back To Main Page

Advertizing on PFF | Fiero Parts Vendors
PFF Merchandise | Fiero Gallery | Ogre's Cave
Real-Time Chat | Fiero Related Auctions on eBay


Copyright (c) 1999, C. Pennock