Pennock's Fiero Forum
  Technical Discussion & Questions
  Quad 4 swap (lot of pics) (Page 3)

Post New Topic  Post A Reply
Email This Page to Someone! | Printable Version

This topic is 8 pages long:  1   2   3   4   5   6   7   8 
Previous Page | Next Page
next newest topic | next oldest topic
Quad 4 swap (lot of pics) by sardonyx247
Started on: 06-19-2012 04:54 AM
Replies: 306 (26887 views)
Last post by: Quadfather on 10-02-2022 07:45 AM
Quad Raider
Member
Posts: 865
From: Oologah, Oklahoma
Registered: Dec 2010


Feedback score: (3)
Leave feedback

Rate this member

Report this Post07-07-2012 12:27 PM Click Here to See the Profile for Quad RaiderSend a Private Message to Quad RaiderEdit/Delete MessageReply w/QuoteDirect Link to This Post
Thanks for all the pictures. There are two or three of us working on Quad swaps right now, but fourpoint9 is making the most progress. Here's his thread:

//www.fiero.nl/forum/F...1/HTML/086515-2.html

He has good pictures of how he did his exhaust. He used the same kind of engine mounts you did. I was planning to go that route, but now I'm thinking I may use the stock lower and upper mounts from my '92 GTZ.

Please keep posting pics as you go.

IP: Logged
sardonyx247
Member
Posts: 5032
From: Nevada, USA
Registered: Jun 2003


Feedback score:    (88)
Leave feedback


Total ratings: 218
Rate this member

Report this Post07-13-2012 03:48 AM Click Here to See the Profile for sardonyx247Click Here to visit sardonyx247's HomePageSend a Private Message to sardonyx247Edit/Delete MessageReply w/QuoteDirect Link to This Post
Yeah he allready posted his swap. And as for making the most progress, I would hope so, he started a year ago, It is looking good so far though.

I just got back from taking a week off, it has been raining sideways since I got back. I haven't really wanted to open my Quad to the elements yet. I can't paint the last parts for the same reason. I did get my dash programed, and I am working on a bigger booster for it (prototype, no welding). When the rain lets up I will be posting another obsence amount of pics of the reassembly. I haven't decided on what exhaust I want to go with yet. I have to rewire the harness, figure out the fuel lines, reprogram the ECM a bit, build a trans. So I got some work to do, and crash a few browsers while I am at it. Wish me luck.


------------------
"DRIVE IT LIKE A FIERO"
'84 Fiero, engine to be determined
'87Blue GT 3.4L Swap Completed!!!!!!!! Boosted!!!!!!!
^^^^ Now in the Construction Zone^^^^
Las Vegas Fiero Club Parts/Sales/Service/Club
Fiero Road Club Of Northern Nevada

IP: Logged
Quad Raider
Member
Posts: 865
From: Oologah, Oklahoma
Registered: Dec 2010


Feedback score: (3)
Leave feedback

Rate this member

Report this Post07-13-2012 04:16 PM Click Here to See the Profile for Quad RaiderSend a Private Message to Quad RaiderEdit/Delete MessageReply w/QuoteDirect Link to This Post
Wish you could send some of that rain to Oklahoma. Fourpoint9 started his swap about the same time I started mine, but other projects keep popping and delaying mine. I've had to replace a transmission in one daughter's car twice, and fix a blown head gasket on another daughter's car. Now I'm rearranging my shop before diving back into the Fiero.
IP: Logged
sardonyx247
Member
Posts: 5032
From: Nevada, USA
Registered: Jun 2003


Feedback score:    (88)
Leave feedback


Total ratings: 218
Rate this member

Report this Post07-15-2012 08:53 AM Click Here to See the Profile for sardonyx247Click Here to visit sardonyx247's HomePageSend a Private Message to sardonyx247Edit/Delete MessageReply w/QuoteDirect Link to This Post
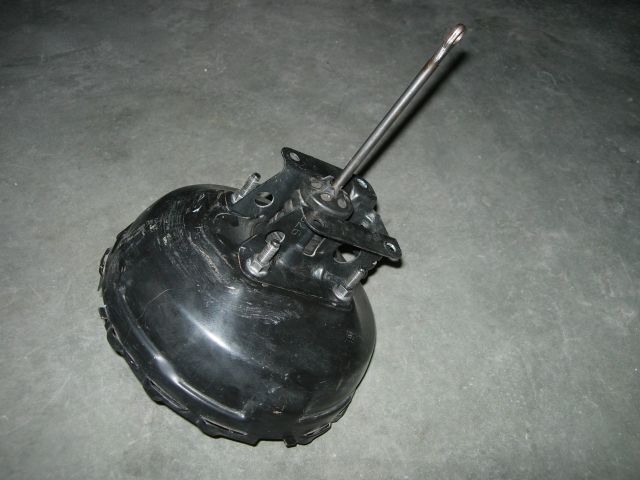
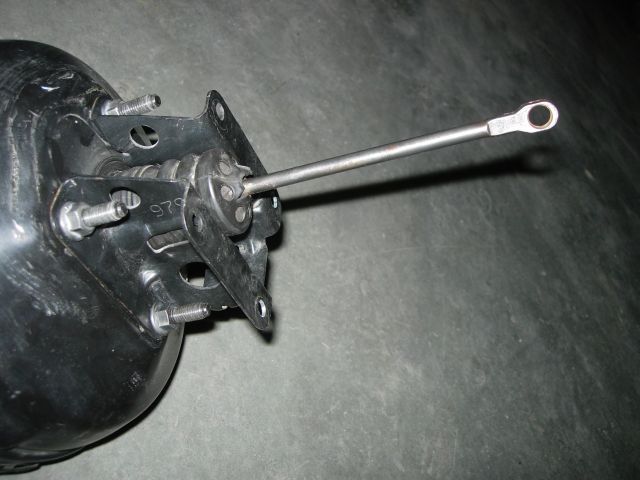
I got all the tools needed to rebuild brake boosters today.
This is the first one of the bigger boosters with the correct rod and not a welded rod that I made,
It is going into my Quad4 Fiero. I figure if I am going to double the HP of the duke, may as well double the brakes too.


I also got all the jumpers set on the dash I am going to use, for the higher rev limit and 4 cyl setting.
I will post pics when I install it. The stock tach just won't go to 7400RPM
IP: Logged
Quad Raider
Member
Posts: 865
From: Oologah, Oklahoma
Registered: Dec 2010


Feedback score: (3)
Leave feedback

Rate this member

Report this Post07-15-2012 02:16 PM Click Here to See the Profile for Quad RaiderSend a Private Message to Quad RaiderEdit/Delete MessageReply w/QuoteDirect Link to This Post
What is that booster from?
IP: Logged
sardonyx247
Member
Posts: 5032
From: Nevada, USA
Registered: Jun 2003


Feedback score:    (88)
Leave feedback


Total ratings: 218
Rate this member

Report this Post07-15-2012 05:35 PM Click Here to See the Profile for sardonyx247Click Here to visit sardonyx247's HomePageSend a Private Message to sardonyx247Edit/Delete MessageReply w/QuoteDirect Link to This Post
 
quote
Originally posted by Quad Raider:

What is that booster from?


It is the S10 type and Fiero booster combined.

They are available in the mall.

//www.fiero.nl/forum/Forum4/HTML/060500.html
IP: Logged
sardonyx247
Member
Posts: 5032
From: Nevada, USA
Registered: Jun 2003


Feedback score:    (88)
Leave feedback


Total ratings: 218
Rate this member

Report this Post07-16-2012 09:26 PM Click Here to See the Profile for sardonyx247Click Here to visit sardonyx247's HomePageSend a Private Message to sardonyx247Edit/Delete MessageReply w/QuoteDirect Link to This Post
To install the seals use a block of wood and a hammer.


Seals installed.


When you install the rear main seal housing cover put on the gasket first over the two dowel pins, and add some oil to the lip of the seal, then slip it on.


The block all preped for paint, with the rain and high winds I decided to hold off on painting it just yet.


IP: Logged
Quad Raider
Member
Posts: 865
From: Oologah, Oklahoma
Registered: Dec 2010


Feedback score: (3)
Leave feedback

Rate this member

Report this Post07-17-2012 01:36 PM Click Here to See the Profile for Quad RaiderSend a Private Message to Quad RaiderEdit/Delete MessageReply w/QuoteDirect Link to This Post
I love all the pics and the step by step descriptions. It's been four years since I had my Quad apart, and even then I only put a new head and timing chain/gears on it, I didn't disassemble the bottom end. That was almost 100,000 miles ago, so it's ready for a complete rebuild when I pull it out of the GTZ for the Fiero swap.
IP: Logged
Quad Raider
Member
Posts: 865
From: Oologah, Oklahoma
Registered: Dec 2010


Feedback score: (3)
Leave feedback

Rate this member

Report this Post07-17-2012 01:43 PM Click Here to See the Profile for Quad RaiderSend a Private Message to Quad RaiderEdit/Delete MessageReply w/QuoteDirect Link to This Post

Quad Raider

865 posts
Member since Dec 2010
Two more questions:

-Where did you get the polyurethane bushing for the custom transmission mount?
-How did you make that thermostat housing?
IP: Logged
sardonyx247
Member
Posts: 5032
From: Nevada, USA
Registered: Jun 2003


Feedback score:    (88)
Leave feedback


Total ratings: 218
Rate this member

Report this Post07-17-2012 04:27 PM Click Here to See the Profile for sardonyx247Click Here to visit sardonyx247's HomePageSend a Private Message to sardonyx247Edit/Delete MessageReply w/QuoteDirect Link to This Post
 
quote
Originally posted by Quad Raider:

I love all the pics and the step by step descriptions.


I want this to be both pics of my swap and a how-to.

 
quote
Originally posted by Quad Raider:

Two more questions:

-Where did you get the polyurethane bushing for the custom transmission mount?
-How did you make that thermostat housing?


Both came from PFF member Fierobsessed.
They were part of the swap stuff I got from him.


IP: Logged
sardonyx247
Member
Posts: 5032
From: Nevada, USA
Registered: Jun 2003


Feedback score:    (88)
Leave feedback


Total ratings: 218
Rate this member

Report this Post07-17-2012 04:32 PM Click Here to See the Profile for sardonyx247Click Here to visit sardonyx247's HomePageSend a Private Message to sardonyx247Edit/Delete MessageReply w/QuoteDirect Link to This Post

sardonyx247

5032 posts
Member since Jun 2003
The oil pan painted.


The block painted, it shines back the camera flash off the wet paint.


Without the flash.


IP: Logged
PFF
System Bot
Quad Raider
Member
Posts: 865
From: Oologah, Oklahoma
Registered: Dec 2010


Feedback score: (3)
Leave feedback

Rate this member

Report this Post07-17-2012 04:34 PM Click Here to See the Profile for Quad RaiderSend a Private Message to Quad RaiderEdit/Delete MessageReply w/QuoteDirect Link to This Post
Looks great. What kind of paint are you using?
IP: Logged
sardonyx247
Member
Posts: 5032
From: Nevada, USA
Registered: Jun 2003


Feedback score:    (88)
Leave feedback


Total ratings: 218
Rate this member

Report this Post07-17-2012 04:52 PM Click Here to See the Profile for sardonyx247Click Here to visit sardonyx247's HomePageSend a Private Message to sardonyx247Edit/Delete MessageReply w/QuoteDirect Link to This Post
Rust-oleum 500deg engine paint, gloss black.
IP: Logged
Fierobsessed
Member
Posts: 4782
From: Las Vegas, NV
Registered: Dec 2001


Feedback score: N/A
Leave feedback


Total ratings: 147
Rate this member

Report this Post07-17-2012 05:25 PM Click Here to See the Profile for FierobsessedSend a Private Message to FierobsessedEdit/Delete MessageReply w/QuoteDirect Link to This Post
The polyurethane insert was part of a Fierostore dogbone re-bush kit.

The thermostat housing was a normal Fiero 4 cylinder piece. I cut off the flange where it bolts to the head, and made one that matched the quad 4's head, then welded it on. I also cut off the outlet and welded in an extension using parts from another quad's water return tube. I also welded a bung to the bottom and screwed in the quad 4's heater core outlet. This was VERY important! because the quad 4's heater core outlet has a 1/4" (ish) restrictor inside it. The engine is so rev happy that it tends to over-pressure the heater core. I blew my first heater core, then made that little change.

I'm not sure, but I think I may have cut off the neck itself and re-clocked it and welded it back on. I don't remember if I did that or not. It was 8 or 9 years ago that I did it, so my memory is a little rusty about the details.
IP: Logged
Quad Raider
Member
Posts: 865
From: Oologah, Oklahoma
Registered: Dec 2010


Feedback score: (3)
Leave feedback

Rate this member

Report this Post07-17-2012 05:32 PM Click Here to See the Profile for Quad RaiderSend a Private Message to Quad RaiderEdit/Delete MessageReply w/QuoteDirect Link to This Post
Cool. Doesn't the Quad's t-stat housing have two fittings, one for temp sensor and one for fan switch? Does the duke's have the same two?

And while I'm pelting you with questions, how did you solve the clutch slave cylinder issue? Looks like you made an adapter plate to use the Fiero slave cylinder, instead of using the Quad/Getrag slave with an adapter fitting, right?

[This message has been edited by Quad Raider (edited 07-17-2012).]

IP: Logged
Fierobsessed
Member
Posts: 4782
From: Las Vegas, NV
Registered: Dec 2001


Feedback score: N/A
Leave feedback


Total ratings: 147
Rate this member

Report this Post07-17-2012 08:01 PM Click Here to See the Profile for FierobsessedSend a Private Message to FierobsessedEdit/Delete MessageReply w/QuoteDirect Link to This Post
The quad 4, and all gm enines using a "P4" style ECM do not have a fan switch. It uses the Coolant Temperature Sensor, which reports actual coolant temperature to the ECM which then controls a relay that runs the fan based on programmed set points. There is one more temperature sensor, and it is only used to operate the temp gage and light on the dash. That sensor is in the head right next to the thermostat housing. The duke did have an additional sensor for the fan.

As for the slave... The original slave cylinder was a large plastic one. No matter what i did, I could not get enough stroke out of that slave to get the clutch to release. It was either due to the fact that the slave cannot be bled, or just that it was too large a diameter for the master to actuate. I made an adaptor that will use a standard fiero getrag slave. But, then the stroke turned out to be a bit on the long side, and the clutch pedal is very hard and touchy, but still totally drivable. Rodney Dickman does sell an adaptor that does this same thing. Should probably be used with a pedal limiter, or an adjustable banjo, which rodney also sells.

[This message has been edited by Fierobsessed (edited 07-17-2012).]

IP: Logged
Fierobsessed
Member
Posts: 4782
From: Las Vegas, NV
Registered: Dec 2001


Feedback score: N/A
Leave feedback


Total ratings: 147
Rate this member

Report this Post07-17-2012 11:50 PM Click Here to See the Profile for FierobsessedSend a Private Message to FierobsessedEdit/Delete MessageReply w/QuoteDirect Link to This Post

Fierobsessed

4782 posts
Member since Dec 2001
Actually, I forgot that I put the sensor in the head as opposed to the water neck. So you are right about the two sensors in the water neck. I swapped the sensor for the heater core outlet I think...
IP: Logged
sardonyx247
Member
Posts: 5032
From: Nevada, USA
Registered: Jun 2003


Feedback score:    (88)
Leave feedback


Total ratings: 218
Rate this member

Report this Post07-18-2012 12:58 AM Click Here to See the Profile for sardonyx247Click Here to visit sardonyx247's HomePageSend a Private Message to sardonyx247Edit/Delete MessageReply w/QuoteDirect Link to This Post
The adjustable banjo he sells will not work as a pedal limiter, his will only make the pedal longer to be a band aid fix for other problems with a clutch system. IE: a garbage product. I will cut down and rethread my own banjo.

And yes there is one sensor in the custom neck and one in the head, the stock stat outlet has a throttle body feed with the two sensors inline with that. Without the need or want of TB coolent flow, what Fierobsessed did will work just fine. and for the ECM controled fan the 87 duke fan is allready ECM controlled, so no problem there.
IP: Logged
Quad Raider
Member
Posts: 865
From: Oologah, Oklahoma
Registered: Dec 2010


Feedback score: (3)
Leave feedback

Rate this member

Report this Post07-18-2012 09:44 AM Click Here to See the Profile for Quad RaiderSend a Private Message to Quad RaiderEdit/Delete MessageReply w/QuoteDirect Link to This Post
I remembered that I just happen to have examples of both engines sitting in my shop, so I took a couple photos:


This Quad is a spare non-HO I bought at a salvage a couple months ago. It still has the throttle body coolant lines attached. I removed them on the HO in my GTZ daily driver years ago. I never noticed the restriction on the Quad's heater hose fitting, so thanks for the tip about that.

[This message has been edited by Quad Raider (edited 07-18-2012).]

IP: Logged
sardonyx247
Member
Posts: 5032
From: Nevada, USA
Registered: Jun 2003


Feedback score:    (88)
Leave feedback


Total ratings: 218
Rate this member

Report this Post07-22-2012 06:27 AM Click Here to See the Profile for sardonyx247Click Here to visit sardonyx247's HomePageSend a Private Message to sardonyx247Edit/Delete MessageReply w/QuoteDirect Link to This Post
I haven't done much on the quad lately, I have been playing with my new brake booster equiment

I did get back to it today, and did some work on the head.
The surface needed cleaning bad, the old gasket was stuck on pretty good.


It took awhile being an aluminum head I didn't want to scratch it, so I had to figure out what would work and not scratch it.
I used rubbing alcohol and a scothbrite pad, and ALOT of elbow grease later, it came out pretty clean.


IP: Logged
sardonyx247
Member
Posts: 5032
From: Nevada, USA
Registered: Jun 2003


Feedback score:    (88)
Leave feedback


Total ratings: 218
Rate this member

Report this Post07-24-2012 09:28 PM Click Here to See the Profile for sardonyx247Click Here to visit sardonyx247's HomePageSend a Private Message to sardonyx247Edit/Delete MessageReply w/QuoteDirect Link to This Post
I Lapped in the valves to get a good seal.
I used lapping compound and a hand lapping tool. Wich is basicly a stick with suctions cups on it.


I added a little oil to the stem so it spins freely.


Then you add lapping compound the the valve where it touches the seat and use the tool to spins the valve tapping it up and down as you go.
there are a lot of how tos on lapping online so I won't get too into it.


The lapped valves on the left, not yet lapped on the right. You can see the gray ring around where they got grinded together.


The lapped exhaust valve seats on the left, non lapped on the right.


Before.


After.


IP: Logged
PFF
System Bot
sardonyx247
Member
Posts: 5032
From: Nevada, USA
Registered: Jun 2003


Feedback score:    (88)
Leave feedback


Total ratings: 218
Rate this member

Report this Post07-25-2012 10:02 AM Click Here to See the Profile for sardonyx247Click Here to visit sardonyx247's HomePageSend a Private Message to sardonyx247Edit/Delete MessageReply w/QuoteDirect Link to This Post
To install the valve seals put on the valve rotator (bearing) and then use a deep scocket to pound on the valve seals.


The exhaust valve seals on.


All the valve seals on.


With the valves in the head, I lubed up the valve stems with assambly lube.


The head reassembled.


IP: Logged
Quad Raider
Member
Posts: 865
From: Oologah, Oklahoma
Registered: Dec 2010


Feedback score: (3)
Leave feedback

Rate this member

Report this Post07-25-2012 01:39 PM Click Here to See the Profile for Quad RaiderSend a Private Message to Quad RaiderEdit/Delete MessageReply w/QuoteDirect Link to This Post
These photos are awesome. I'll be referencing them when I rebuild my engine, hopefully this fall. Are you using a standard valve spring compressor?
IP: Logged
sardonyx247
Member
Posts: 5032
From: Nevada, USA
Registered: Jun 2003


Feedback score:    (88)
Leave feedback


Total ratings: 218
Rate this member

Report this Post07-25-2012 08:13 PM Click Here to See the Profile for sardonyx247Click Here to visit sardonyx247's HomePageSend a Private Message to sardonyx247Edit/Delete MessageReply w/QuoteDirect Link to This Post
I used the big C clamp style.
IP: Logged
sardonyx247
Member
Posts: 5032
From: Nevada, USA
Registered: Jun 2003


Feedback score:    (88)
Leave feedback


Total ratings: 218
Rate this member

Report this Post07-27-2012 07:29 PM Click Here to See the Profile for sardonyx247Click Here to visit sardonyx247's HomePageSend a Private Message to sardonyx247Edit/Delete MessageReply w/QuoteDirect Link to This Post
Here are the cams.

This is the power steering pully.


What a pain to get this off. I used a big 3 claw puller and had to brace it with a huge pipe and a cheater bar on the wrench. I put a bolt into the cam to brace the puller on, BTW this bolt is SAE not metric. This pulley will not be going back on.


To seperate the cam housing cover, there are bolt holes used to pry the cover apart.


The intake cam, in the housing. Notice the lack of cam bearings, the quad is machined so well it doesn't need them and the cams ride in the housings.
BTW on the gaskets, blue is intake and red is exhaust.


The cams, still dirty, I havent cleaned them yet.


My head casting, notice the E, it shows that this is a replacement casting and should be stronger in the right areas.


Now that the cams are out of the housings, time for paint.


I put in some studs for the cams housings to slide over so they wouldn't fall off. I could have painted it all seprate but I was sick of taping and decided to paint it all at once.


With fresh wet paint.


Now that the parts are painted, time to assemble it all..........

IP: Logged
sardonyx247
Member
Posts: 5032
From: Nevada, USA
Registered: Jun 2003


Feedback score:    (88)
Leave feedback


Total ratings: 218
Rate this member

Report this Post07-29-2012 08:39 PM Click Here to See the Profile for sardonyx247Click Here to visit sardonyx247's HomePageSend a Private Message to sardonyx247Edit/Delete MessageReply w/QuoteDirect Link to This Post
Here is the block ready for parts. The pistons are down half way as when you put the cams on you dont want the valves to hit the pistons.


Turn the crank to either 3 oclock or 9 oclock


With the head on.


The lower cam cover, after I cleaned the gasket sealing surface I taped it off, so any oil that drips on it comes right off with the tape and no need to reclean it all.


The exhaust cam with assembly lube.


The exhaust cam in, with the red gaskets.


Make sure the peg on the cam is at the 12 oclock position.


The bolts I used from Fierobsessed so I can easly put on the IDI cover in the reverse direction. They look like small bolts put on top of other bolts and welded on.


Make sure you use 'Locktite pipe thread sealent with teflon' or 'Permatex #14' on the cam cover bolts. The reason for useing it is it stops any loosening of the bolts from heat cycles or vibration, as this is a high vibration engine.


I stored the lifters/tappets the wrong direction so the oil drained out, they should be stored bottom side up as seen in the next pic.


You can see the oil hole in the side of the tappet above, since they drained out I put them in a thing of oil and pumped the button in the middle untill no more air bubbles came out the hole.


The intake cam and tappets.


The cam housing.


The intake cam on, with the blue intake cam gaskets.


Again make sure the cam peg is at 12 oclock.


The cam covers on.


Now to get the water pump bearing and gear in. I used a big socket to drive in the bearing
Use locktite red on the outside of the bearing.


I used a smaller socket in the big socket to support the inner bearing race as I drove in the gear, make sure the hole in the center of the gear is clean as it feeds oil through it.


To keep track of where the studs went on the timing cover housing I dotted them with a sharpie.


More to come....

[This message has been edited by sardonyx247 (edited 07-29-2012).]

IP: Logged
Quad Raider
Member
Posts: 865
From: Oologah, Oklahoma
Registered: Dec 2010


Feedback score: (3)
Leave feedback

Rate this member

Report this Post07-30-2012 12:49 PM Click Here to See the Profile for Quad RaiderSend a Private Message to Quad RaiderEdit/Delete MessageReply w/QuoteDirect Link to This Post
Have you ever considered using studs instead of head bolts or cam cover bolts? When I installed a re-manufactured head four years ago, some of the upper threads in the cam cover bolt holes were bad. I ended up having to make my own studs to reach the good ones. I see from your photos that I could just make four longer studs in order to turn the IDI cover around.
IP: Logged
sardonyx247
Member
Posts: 5032
From: Nevada, USA
Registered: Jun 2003


Feedback score:    (88)
Leave feedback


Total ratings: 218
Rate this member

Report this Post07-30-2012 03:06 PM Click Here to See the Profile for sardonyx247Click Here to visit sardonyx247's HomePageSend a Private Message to sardonyx247Edit/Delete MessageReply w/QuoteDirect Link to This Post
 
quote
Originally posted by Quad Raider:

Have you ever considered using studs instead of head bolts or cam cover bolts? When I installed a re-manufactured head four years ago, some of the upper threads in the cam cover bolt holes were bad. I ended up having to make my own studs to reach the good ones. I see from your photos that I could just make four longer studs in order to turn the IDI cover around.


I have spent sooo much time getting rid of the studs the PO put in this engine, it was hell. studs on the cam covers suck as when you 'unbolt' the cam covers you can tip them sideways and all the tappets/lifters stay in the cam covers, that does not work with studs, you go to pull it off the studs and they all want to just fall out. Luckly I only had a couple fall out, before I stopped pulling up on one of the cam covers and it took two people, a magnet, and alot of time to get them out and keep them in order.

BTW as I was looking at it last night, for the IDI cover to fit with the bolts I used the holes in the cover have to be slotted and the bottom of the cover ground away a bit to make up for the bolt head thickness for it to sit flush where it is suppoed to sit.
IP: Logged
Will
Member
Posts: 14216
From: Where you least expect me
Registered: Jun 2000


Feedback score: (1)
Leave feedback


Total ratings: 237
Rate this member

Report this Post07-30-2012 03:44 PM Click Here to See the Profile for WillSend a Private Message to WillEdit/Delete MessageReply w/QuoteDirect Link to This Post
The Q4 looks like a '30's Indy engine if you polish the cam towers & covers....

[This message has been edited by Will (edited 07-30-2012).]

IP: Logged
sardonyx247
Member
Posts: 5032
From: Nevada, USA
Registered: Jun 2003


Feedback score:    (88)
Leave feedback


Total ratings: 218
Rate this member

Report this Post07-31-2012 08:30 PM Click Here to See the Profile for sardonyx247Click Here to visit sardonyx247's HomePageSend a Private Message to sardonyx247Edit/Delete MessageReply w/QuoteDirect Link to This Post
The timing cover gaskets on, on the cam gaskets felpro has both as the same gasket, in both gaskets sets. it works but the silicone imprint is on the wrong side for one side.


The timing cover housing on. The flash made a cool pic. I used a rag at the bottom to help hold the chain from falling off. To take out the chain slack follow the vids on the bottom of page 2


When I put in the waterpump gear it pushed the bearing back a little. It should be like the pic below.


To fix it I did this.


The tensioner assembled and locked, again follow the vids.


Timing chain put in, tensioner put in and all slack gone.


With the new gaskets and all the timing chain shoes put in.


The cover on.


Fierobsessed stopped by and said I should prob check out his old oil pump, Glad I listened, it is all scratched up.


With the new pump on.


Then the oil pan wouldn't fit
I found the pickup support was just a tad bit different. (the left side is a little longer)


New support on.


Now the pan fits.


As it sits...


[This message has been edited by sardonyx247 (edited 07-31-2012).]

IP: Logged
sardonyx247
Member
Posts: 5032
From: Nevada, USA
Registered: Jun 2003


Feedback score:    (88)
Leave feedback


Total ratings: 218
Rate this member

Report this Post08-01-2012 08:07 PM Click Here to See the Profile for sardonyx247Click Here to visit sardonyx247's HomePageSend a Private Message to sardonyx247Edit/Delete MessageReply w/QuoteDirect Link to This Post
Make sure to lube up the splines on the water pump with wheel bearing grease.


I spent alot of time cleaning and going through bolts, since I had 3 engines worth and one set I couldn't use.
I decided to get some pics to help people out finding some of the bolts they need. A bit excessive I know, but it may help someone in the future.


The water pump on and the engine mounts. the shiny spots are the flash, it is black all the way.


[This message has been edited by sardonyx247 (edited 08-01-2012).]

IP: Logged
PFF
System Bot
sardonyx247
Member
Posts: 5032
From: Nevada, USA
Registered: Jun 2003


Feedback score:    (88)
Leave feedback


Total ratings: 218
Rate this member

Report this Post08-02-2012 07:40 AM Click Here to See the Profile for sardonyx247Click Here to visit sardonyx247's HomePageSend a Private Message to sardonyx247Edit/Delete MessageReply w/QuoteDirect Link to This Post
The intake, oil fill tube and MAP sensor on, the flash makes it look dirty and weird, but trust me it is all Gloss Black.


The lower intake manifold support bracket that Fierobsessed was missing. (Could be just differences in years, but I added all I had from all the diff engines I had to work with)


The oil pickup tube and crank sensor.


Were the oil pan studs go for the exhaust manifold support.


Another bracket that was missing.


The knock sensor (torqued to 15lbs) and the ECM temp sensor (replaced the stock heater hose location)


I sanded off the paint where the alternator goes to ensure a good ground, top and bottom of pic.


The alt and A/C on with the belt


I was making good progress untill a scorpion walked by and I stomped him, at that point I figured I was good for the night.
The Joy of living in a desert.


BTW questions and/or coments are always welcome.
IP: Logged
Carcenomy
Member
Posts: 1109
From: Invercargill, New Zealand
Registered: Jan 2009


Feedback score: N/A
Leave feedback

Rate this member

Report this Post08-02-2012 07:49 AM Click Here to See the Profile for CarcenomyClick Here to visit Carcenomy's HomePageSend a Private Message to CarcenomyEdit/Delete MessageReply w/QuoteDirect Link to This Post
My only question is what made you want to paint your engine black? I bet it looks nice but it'd make spotting leaks a nightmare!
IP: Logged
sardonyx247
Member
Posts: 5032
From: Nevada, USA
Registered: Jun 2003


Feedback score:    (88)
Leave feedback


Total ratings: 218
Rate this member

Report this Post08-02-2012 06:00 PM Click Here to See the Profile for sardonyx247Click Here to visit sardonyx247's HomePageSend a Private Message to sardonyx247Edit/Delete MessageReply w/QuoteDirect Link to This Post
 
quote
Originally posted by Carcenomy:

My only question is what made you want to paint your engine black? I bet it looks nice but it'd make spotting leaks a nightmare!


The Fiero it is going into is black, polishing takes time and I allready have alot of polished parts in my GT.
And I want it to fade into the engine bay.

As far as leaks, even if the engine gets dirty as hell, it will still look good.
IP: Logged
Will
Member
Posts: 14216
From: Where you least expect me
Registered: Jun 2000


Feedback score: (1)
Leave feedback


Total ratings: 237
Rate this member

Report this Post08-02-2012 06:04 PM Click Here to See the Profile for WillSend a Private Message to WillEdit/Delete MessageReply w/QuoteDirect Link to This Post
You live in Nevada and black shows dust like crazy.
IP: Logged
Quad Raider
Member
Posts: 865
From: Oologah, Oklahoma
Registered: Dec 2010


Feedback score: (3)
Leave feedback

Rate this member

Report this Post08-03-2012 01:26 PM Click Here to See the Profile for Quad RaiderSend a Private Message to Quad RaiderEdit/Delete MessageReply w/QuoteDirect Link to This Post
I think the black looks great. And I love all the photos.

Did you get the IDI cover to fit facing the other direction?

[This message has been edited by Quad Raider (edited 08-03-2012).]

IP: Logged
weaselbeak
Member
Posts: 2604
From: se iowa
Registered: Jun 2008


Feedback score: (5)
Leave feedback


Total ratings: 76
Rate this member

Report this Post08-03-2012 01:33 PM Click Here to See the Profile for weaselbeakSend a Private Message to weaselbeakEdit/Delete MessageReply w/QuoteDirect Link to This Post
 
quote
Originally posted by Carcenomy:

My only question is what made you want to paint your engine black? I bet it looks nice but it'd make spotting leaks a nightmare!


With his attention to detail, I doubt there will ever be a leak.

IP: Logged
sardonyx247
Member
Posts: 5032
From: Nevada, USA
Registered: Jun 2003


Feedback score:    (88)
Leave feedback


Total ratings: 218
Rate this member

Report this Post08-05-2012 09:32 PM Click Here to See the Profile for sardonyx247Click Here to visit sardonyx247's HomePageSend a Private Message to sardonyx247Edit/Delete MessageReply w/QuoteDirect Link to This Post
The IDI cover I am useing is from Fierobsessed's swap. It is allready moded for the studs. I will get pics of the mods when I can/get to that point.


Here are a couple of the brackets that were missing/ or just from the other engine.


And where they go and bolt up. (Behind the Alt and A/C)


The exhaust manifold painted in 1200deg paint.


With the heat sheild on.


The lower heat sheild on with the lower heat sheild bracket.


The front engine lift bracket. This was wierd the block it came off of had smaller holes for the bracket, to the point I had to drill out the bracket and find new bolts to fit it.
It goes to show there are small differences in blocks.

The bracket and the bolts I had to use. (they are from the lower front motor mount bolt for 2 Fiero V6s)


The bracket on. Almost done with the engine build, Just a few more mods.


I also found that the transmission from the second Quad I pulled apart has the 3.61 gears, perfect for MPG. Now I don't have to combine two to make one. It even has the stronger Diff in it allready, So I am good to go with that. (Providing it is a good transmission)

IP: Logged
Fierobsessed
Member
Posts: 4782
From: Las Vegas, NV
Registered: Dec 2001


Feedback score: N/A
Leave feedback


Total ratings: 147
Rate this member

Report this Post08-05-2012 09:57 PM Click Here to See the Profile for FierobsessedSend a Private Message to FierobsessedEdit/Delete MessageReply w/QuoteDirect Link to This Post
That block is a 1993 SOHC block. It has a stronger front triangular brace on it because it was intended to have an entire engine mount there, It also had a cylinder deck with round holes when compared to the teardrop holes of the older block, which tended to crack sometimes. I had a cracked 91 block, so I got ahold of a SOHC motor, knowing that it was of a newer and stronger design block, even though the head was absolute JUNK!

This is why we mix match quads. The best parts never really came in just one engine. The 91 H.O. does have most of the best parts.
IP: Logged
sardonyx247
Member
Posts: 5032
From: Nevada, USA
Registered: Jun 2003


Feedback score:    (88)
Leave feedback


Total ratings: 218
Rate this member

Report this Post08-06-2012 08:18 AM Click Here to See the Profile for sardonyx247Click Here to visit sardonyx247's HomePageSend a Private Message to sardonyx247Edit/Delete MessageReply w/QuoteDirect Link to This Post
I don't even know all the years and/or Quads this is from.

[This message has been edited by sardonyx247 (edited 08-06-2012).]

IP: Logged
Previous Page | Next Page

This topic is 8 pages long:  1   2   3   4   5   6   7   8 
next newest topic | next oldest topic

All times are ET (US)

Post New Topic  Post A Reply
Hop to:

Contact Us | Back To Main Page

Advertizing on PFF | Fiero Parts Vendors
PFF Merchandise | Fiero Gallery | Ogre's Cave
Real-Time Chat | Fiero Related Auctions on eBay


Copyright (c) 1999, C. Pennock