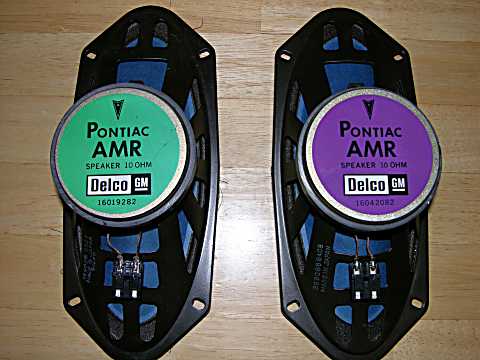
OK, here's that informative dash speaker post I was talking about a few days ago. There were two different dash speakers made for Fieros; one was the basic item that went in everything except cars with the Performance Sound option - the other only came with the Performance Sound option.
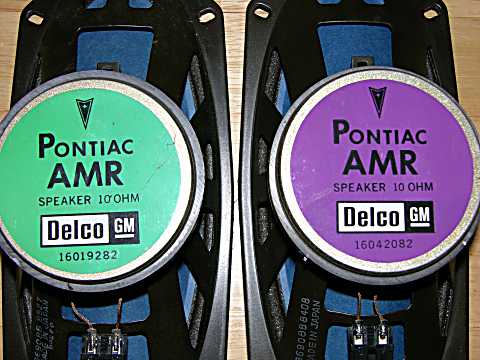
Here's what they look like from the label side: Green label is the basic unit, purple label is the upgrade speaker. Here's what the business end looks like on these: Once again, basic unit on the left, upgrade unit on the right. The upgrade speaker has the same basic cone and suspension, but also has a coaxial tweeter mounted to the frame. The tweeter is a piezoelectric unit with a composite cone and serves to increase the high end response of the speaker by an octave.
The difference is plainly audible. The basic unit is your typical car radio speaker; nothing special, cheap and sounds that way. The upgrade unit sounds pretty doggone nice for a 4 X 10 speaker; I've heard several aftermarket speakers in this size and they aren't audibly better than the Pontiac Performance Sound speaker.
Here's a closer look at the labels and part numbers:
The Performance Sound speaker is still available from GM as a new part; part number is 16042082. The basic speaker is no longer available from GM. If you're fixing up / repairing the stereo system in your Fiero and are going to run the speakers from the head unit (no external high power amps) then you should be very happy with the factory Performance Sound speakers. And at about $30 each, they're a good deal too...
IP: Logged
12:05 AM
Whuffo Member
Posts: 3000 From: San Jose, CA Registered: Jul 2003
Next step is to deal with the rotten battery tray. I've had the replacement parts for a while but have been putting it off.
On the rally last week I was noticing a squeak coming from the passenger side; thought it was the seat back squeaking 'cause there was nobody sitting in it. Later in the week while my wife was in the car with me I heard the squeak again; not the seat.
One of the items in the long-delayed GM parts shipment was a new oil pressure sending unit. I decided to pop it in yesterday, backed the car into the garage and looked at the old sender. Looks like the battery needs to come out to get a wrench on the sending unit. Leaned on the battery while I was looking around and heard the squeak. The squeak is coming from the remains of the old battery tray; guess it's time to do something about it.
Anyway, I was looking at the new parts today. I've got a battery tray, a battery clamp, and a heat shield. I can see how the heat shield mounts to the tray but the battery clamp has me bothered. As far as I can see from the new parts the only thing holding the battery clamp / battery in place is the one holddown bolt. Is that true? Is there something else holding the battery clamp to the battery tray that I don't know about?
The factory service manual is silent on this subject and the corroded remains in the car are beyond offering a clue as to how it used to be. Anyone got a suggestion?
IP: Logged
12:14 AM
May 10th, 2005
Whuffo Member
Posts: 3000 From: San Jose, CA Registered: Jul 2003
I need to get a welding blanket or two before I fire up the MIG welder and get after that battery tray; you'd think that things like this would be easy to find in the heart of Silicon Valley, but no... Hoods and gloves yes, aprons and blankets no.
I think I'll take a little trip up to Newark this evening and see what the Harbor Freight store has to offer.
IP: Logged
05:36 PM
May 11th, 2005
Whuffo Member
Posts: 3000 From: San Jose, CA Registered: Jul 2003
Well - the Harbor Freight store was interesting. They don't have nearly as much in the store as they do online but I was able to get my welding blankets and also pick up a nice set of air horns - and a few other random items.
The welding blankets weren't made in China like I expected - they're made in Russia. Nice pieces of workmanship; better than expected for Harbor Freight merchandise.
IP: Logged
12:25 AM
May 14th, 2005
Whuffo Member
Posts: 3000 From: San Jose, CA Registered: Jul 2003
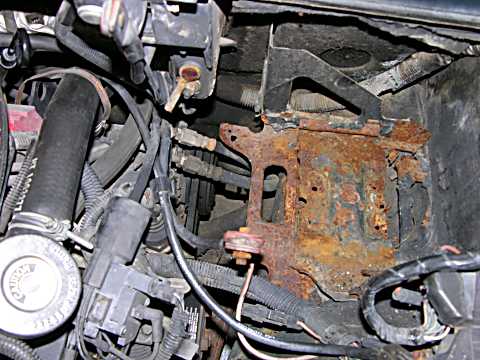
Got busy and dealt with that rotten old battery tray today. It's been squeaking and felt loose but I hadn't dug in yet - until today. Pulled the battery out and what do I see? Yup, it's shot - rotted completely through on one side and none too pretty on the others. Stuck a "foon" in my air hammer and took the old tray out: I don't know what was keeping the battery from falling out...
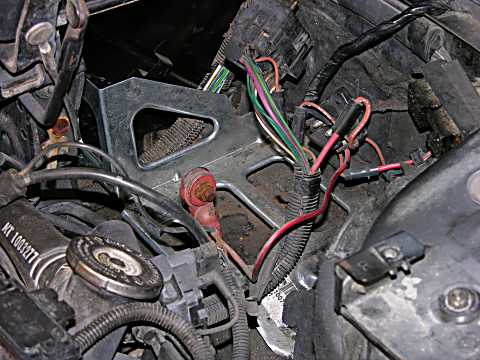
Test fit the new tray: Then pull it out, grind down to clean metal where it's going to mount and patch in some bad spots in the engine compartment. Weld the patches and the new tray into place, shoot some black paint, tack weld the battery clamp into place and give the whole thing another coat of paint. Looks nice:
Before putting the battery back in I changed out that old oil pressure sender and installed a new plastic heat shield to the battery tray; the original one was long gone. Cleaned up the battery terminals, fixed a couple of bad grounds, then reinstalled the battery. Gave it a wiggle; solid as a rock now.
Next step: go for a ride and see what the little car asks for next...
IP: Logged
08:30 PM
May 17th, 2005
Whuffo Member
Posts: 3000 From: San Jose, CA Registered: Jul 2003
Ordered up a bunch of parts from www.rockauto.com last night - enough to keep me busy for several weekends. While waiting for them to arrive I'll take some time to deal with some of the little cosmetic problems this car has. I'll photo-document some of these as I go along...
IP: Logged
02:46 PM
May 19th, 2005
Whuffo Member
Posts: 3000 From: San Jose, CA Registered: Jul 2003
Got some supplies in today; a shipment of tools from Harbor Freight and a couple of cases of German Castrol synthetic oil. Included in the tool shipment is everything necessary to do my own wheel alignments at home - I'm tired of paying $100 for shoddy work so I'll do it myself. Also filled in some other empty spots in my tool chest so I'm ready for the big shipement of suspension and steering parts to arrive.
IP: Logged
12:33 AM
May 24th, 2005
Whuffo Member
Posts: 3000 From: San Jose, CA Registered: Jul 2003
Got started on installing some new parts today. Still have lots more to do, but made some good progress.
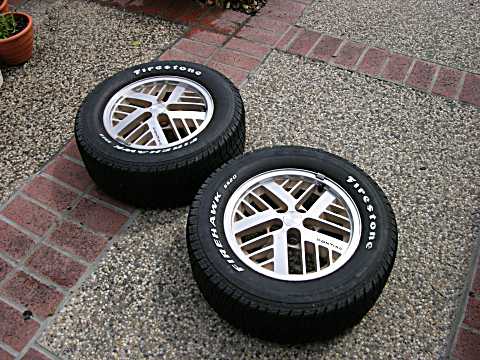
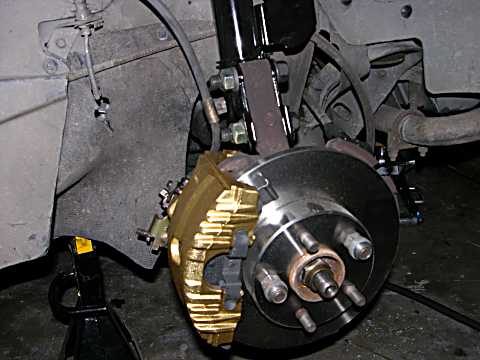
New rotors, calipers, wheel bearings, sway bar end links and shocks in the front end: Just couldn't resist giving the new calipers a coat of gold paint...
While I had the wheels off I noticed that there were chunks of grease and other junk built up on the insides of the rims; that can't be good for balance so I spent way too much time and cleaned them up:
Time to take a well deserved break now; there's a lot more new parts to go in the rear end next.
IP: Logged
07:39 PM
Whuffo Member
Posts: 3000 From: San Jose, CA Registered: Jul 2003
Also replaced the steering stabilizer; the one in the car was notchy and binding so having a nice smooth one in there will help a lot. Got started on the rear wheels but haven't got one done yet. Changing out the strut was fairly straightforward (be sure to buy new boots and bumpers when you do this) and I got as far as hooking up the new brake caliper when I discovered that the inlet hole (where the banjo bolt threads in) was crossthreaded. Rats.
I got the rear calipers from AutoZone and while I've had good luck with them before I'm not too impressed this time. The calipers didn't come with the slide bolts so I had to extract them from the old caliper and clean them up so they could be reused. The copper washers in the box weren't even close to the right size - and that crossthreaded hole makes the caliper useless. Wanted to do a quick exchange but they're out of stock now.
Oh well - the main problem with the old calipers were the bound up slide bolts and I had to fix that to get the bolts out. So I cleaned up the old caliper, transferred the new parts from the "rebuilt" one to the old one and it's in better shape than their so-called rebuilt. Its gold paint is drying right now; I've got some spare copper washers so it'll all work out OK in the end.
I'll snap some pics of the completed assembly then get started on the other rear wheel. It also has a bad wheel bearing to change so it should be lots of fun...
And by the way, the old strut from this side has internal valve problems - it goes down easy, but is very slow on the rebound. That made it pump itself down on bumpy roads and bottom out when I least expected it. I'll be glad to be rid of it.
IP: Logged
07:04 PM
Jun 3rd, 2005
Whuffo Member
Posts: 3000 From: San Jose, CA Registered: Jul 2003
To show our appreciation, we would like to give you and your friends a special discount on auto parts.
Here's how it works:
- You give this discount code: 238330109727 to friends, neighbors, relatives, the guy at the corner garage--anyone you know who works on cars or trucks. - When someone (including yourself) places an order at www.rockauto.com and enters your discount code, he or she will receive an immediate 5% discount on that order. * If you are using our Java Catalog, enter your discount code in the "How did you hear about us" line of the shopping cart * If you are using our non-Java Catalog, enter your the discount code in the "Discount Code" field of the Shopping Cart and click "Calculate Discount" - The discount code expires on August 2, 2005; so don't wait!
You may use this discount code as often as you wish until it expires, but only one discount code can be used per order.
**Each month we see people who put the word "discount" in front of their code and do not get the discount. Please enter ONLY the discount code.**
Please call or email if you have questions or suggestions. Thanks again for buying your auto parts at RockAuto!
Tom Taylor VP Marketing www.rockauto.com service@rockauto.com 1-866-ROCKAUTO (1-866-762-5288) (608) 661-1376
Enjoy!
IP: Logged
08:43 PM
Jun 4th, 2005
Whuffo Member
Posts: 3000 From: San Jose, CA Registered: Jul 2003
Finally got the first side of the rear done and also got started on the other side. Haven't had a problem with any of the strut / knuckle clamp bolts - a little PB Blaster and they came apart without a struggle.
When I pulled the hub I discovered the reason it had failed - only one of the hub bolts was tight, the other two were just finger tight (if that). That little bit of unwanted flexibility there tore up the wheel bearing seals and made the handling a bit iffy. It'll be nice to have that fixed; I've been wondering where the loose bit in the rear was but couldn't find it until now.
Too bad that Monroe doesn't supply the cam bolts for the struts anymore - when you buy the AK30 kit now it just comes with regular straight-headed bolts. This makes setting the alignment a bit of a nuisance...
IP: Logged
11:49 PM
Jun 5th, 2005
Whuffo Member
Posts: 3000 From: San Jose, CA Registered: Jul 2003
Finally took a picture of the left rear; it's all done except for bleeding the caliper: I wasn't sure if that metallic gold would be a good color for the calipers but I think it's starting to grow on me...
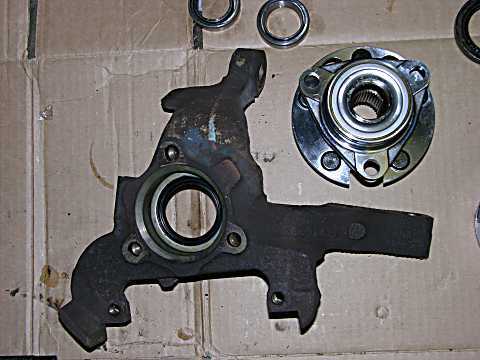
Worked on the right rear for a while today. It's slow going because everything has to come apart to make the necessary repairs. Here's the knuckle after getting its new seal installed; a little lube on the seal and that new bearing will have a home:
I've got that side all back together except for the brake; spent too much time getting the alignment set and have other things that I need to do to prepare for another week...
IP: Logged
07:12 PM
Jun 11th, 2005
Whuffo Member
Posts: 3000 From: San Jose, CA Registered: Jul 2003
Got the wheels back on the ground today and went for a drive; wow, what a difference. New struts and shocks, new brakes and wheel bearings - and a nice alignment (did it myself). Kitskaboodle came over this afternoon and helped out, he cleaned the rear wheels and got them looking great.
I also recharged the AC - it took 1 1/2 pounds of R12 to fill it up and now it's working perfectly. While i was at it I also changed the oil and filter (again). I think I've got all the "bad" mechanical problems taken care of now; there's still a few loose ends to take care of but it's all little stuff.
IP: Logged
10:59 PM
Jun 12th, 2005
Whuffo Member
Posts: 3000 From: San Jose, CA Registered: Jul 2003
Decided to spend a little time today making this old car look a little better. First up is the passenger side sail panel; the panel is cracked into about 5 pieces and the frame is so faded it looks gray. When I got the car it came with a right side frame / panel assembly in the trunk - but the mounting clips were broken off the back of the frame so it can't be used - at least not in a "stock" way.
First step was to remove the sail panel from the broken frame. The trick here is to gently lift the panel just far enough to get a blade behind it and cut the foam part of the foam tape. Go carefully and you can remove the sail panel in one piece; I got this one out intact.
Next is to remove the remains of the foam tape from the rear of the panel; I used Goo Gone and it worked adequately. After removing as much foam / adhesive as possible that way I switched to alcohol wipes to clean up the residue. Wash the whole panel in dish soap / water and rinse well. Then go over the area where the foam tape attaches with alcohol wipes one more time.
Now it's time to apply new tape, placing it in the same locations as the old tape. Once it's all stuck down, rub over the back of the tape firmly to make sure it's in full contact. We'll let this tape's adhesive set up for a few hours before attaching it to the car. Before that, I sprayed the back of the sail panel with gloss black to cover the few nicks and scratches in the black paint that were caused while removing it from the old frame.
I'm letting that dry / set up now. Later, I'll strip the broken panel from the car, clean up the tape remains with Goo Gone then mask around the frame AND where the tape attaches. Then, I'll scuff up the frame and give it a coat of satin black. When that's dry, I'll attach the salvaged / refurbished sail panel and it'll be done.
While I'm painting that sail panel frame I think I'll hit the rear vent grilles and maybe the rear view mirrors too. Before all this other stuff, I'm going to go for a drive and see how that AC works on this hot California day...
IP: Logged
05:35 PM
Jun 13th, 2005
Whuffo Member
Posts: 3000 From: San Jose, CA Registered: Jul 2003
AC works good and is holding its charge - thank goodness. I wasn't looking forward to chasing a leak in a Fiero AC system...
Got the passenger side sail panel completed. Used Rustoleum satin black on the frame; this is a very good match for factory color / finish. Mounted the salvaged sail panel and arrowhead and it looks great - looks like new parts. The driver side panel was in good condtion but had a big barcode decal stuck on it. The adhesive on that decal had baked in the sun until it was hard. Some Goo-Gone and careful scraping with a plastic scraper got it off and after a little cleaning it looks like new too. The arrowhead on this side is faded out and will need to be replaced - other than that, I got two perfect factory sail panels & frames for nothing more than the time to clean and paint them.
Tomorrow after work I'll pull the engine grilles and the pieces on their sides that fasten the inner sail trim and clean / paint them too. The engine grilles are down to bare metal (too much sun) so they'll just need to be degreased and scuffed up a little before shooting them with the satin black. After those are done I guess I'll tackle the mirrors - they'll be a little trickier to get looking nice. At least both of the mirrors on this car don't have any pits in the metal; they're smooth but badly faded. The trick is going to be masking them so that the paint goes where I want and nowhere else. Wonder how hard it is to get the glass out of these?
IP: Logged
01:02 AM
Whuffo Member
Posts: 3000 From: San Jose, CA Registered: Jul 2003
Working on the engine grilles and inner sail panel trim tonight. Degreased the parts with dish soap (Dawn is great for this stuff) and scuffed them up good with a green Scotchbrite pad. Rinsed again, dried, solvent rinsed once, dried and a couple of nice coats of satin black. All the extra prep work seems like a nuisance, but by taking the extra time I can get a very nice finish that will stay on the car for a long, long time.
One thing about this Rustoleum satin black is that it's slow drying; takes at least 4 hours to dry to where you can handle it and a couple of days to dry completely. I think it's worth it, though - I used the same paint in gloss black on my other Fiero and it still looks like I just painted it after more than a year.
IP: Logged
11:43 PM
Jun 14th, 2005
Whuffo Member
Posts: 3000 From: San Jose, CA Registered: Jul 2003
After drying for a day the engine grilles were ready to go back on. That satin black looks great; the grilles look like brand new. Now it's time to deal with those faded mirrors...
First step is to clean them off and scuff them up. These weren't pitted so I went over them with a green Scotchbrite pad lubricated with rubbing alcohol. This removes the oxidized paint and leaves a little "tooth" for the new paint to stick to. Neither one of them was down to bare metal and the primer was still in good shape. Thank goodness for small favors; no heavy prep work needed so I can shoot them on the car.
Got busy with the masking paper and tape and when everything was ready I gave the mirrors a quick rinse with Brakleen. Let that evaporate and hit them with the satin black. Looks glossy until it dries:
After they've dried for a couple of hours I'll remove the masking; they'll be completely dry by this time tomorrow. That's about it for the sun-faded black exterior trim; all the rest of it is still in good condition and only needs a good cleaning...
IP: Logged
11:33 PM
Jun 19th, 2005
Whuffo Member
Posts: 3000 From: San Jose, CA Registered: Jul 2003
That summer sun beating down through the sunroof made me think of ways to reduce the heat. Finally decided that adding some heat-reflecting window tint to the sunroof glass would be the best solution. Picked up a roll of 20% film and brought the sunroof inside where it'd be easy to work on.
To make it a nice job, the sunroof hardware needs to come off; that way the trimmed edges will be hidden under the washers and latch. This sunroof doesn't leak a drop and hasn't given me any problems - but when I tried to crack a screw loose I discovered that the sunroof hardware is a rusty mess. It's not going to just unscrew...
Fooey; put the sunroof back in the car. I'll wait until I can have a complete set of new sunroof hardware on hand before tackling this mess - I'll probably have to grind the heads off the old hardware to get it apart. Fortunately, all those bolts / washers / tabs / seals are still available and I'll get on the phone Monday and order a set. This looks like the perfect opportunity to use the Fiero Store gift certificate I've been holding onto for a while.
Only sunroof part that I still need and can't find new is the bushing that snaps into the end of the hinge pockets. I've got one, the other one is broken. This causes the roof glass to rattle on bumpy roads when the roof is open. Anyone know where one of these can be found?
IP: Logged
12:00 AM
PFF
System Bot
Jun 28th, 2005
Whuffo Member
Posts: 3000 From: San Jose, CA Registered: Jul 2003
Got my bag of hardware from the Fiero Store; sheesh, 55 bucks for a handful of stuff. Now I've got replacements for all the hardware attached to the sunroof glass so I can cut the old rusty stuff off, tint the glass, and put it back together with all new parts. Should come out nice, just need to find a few free hours to make it happen.
IP: Logged
10:08 PM
Jul 17th, 2005
Whuffo Member
Posts: 3000 From: San Jose, CA Registered: Jul 2003
It's been busy lately; business travel and such so I haven't had much of an opportunity to work on the car. Got some things done today, though. Finally stripped the sunroof down, tinted the glass and put it back together with new hardware.
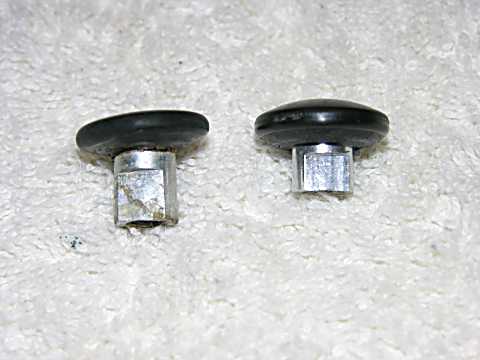
Ran into a little problem with the hardware I bought from the Fiero Store, though. Here's a picture to show what I found:
The original part is on the left, the Fiero Store replacement is on the right. I'm not sure where they get their parts or how they decide they're compatible - but you'll have trouble if you try to use their sunroof hardware and expect it to fit...
I ended up cleaning and reusing some of the old hardware since the new stuff was useless...
IP: Logged
09:11 PM
Jul 19th, 2005
Whuffo Member
Posts: 3000 From: San Jose, CA Registered: Jul 2003
After breaking that other auto-dim mirror while I was trying to install it I decided to try a different mirror instead. Shopped around for a while and finally chose a Gentex 313 - that's the auto-dim mirror with temperature and compass and Homelink too. Took a couple of hours to run all the wires but it turned out fine.
The tinted sunroof is just what I wanted, too - with the 20% heat-reflective tint I put on there it's much nicer on hot sunny days. They should have come this way from the factory...
IP: Logged
01:55 AM
Jul 31st, 2005
USFiero Member
Posts: 4879 From: Everywhere and Middle of Nowhere Registered: Mar 2002
It's been a little slow this summer but I'm starting to get back to work on this old car. Started off small; got a set of the black plastic trim caps for the lug nuts from a fellow club member and put them on the car. Now the factory wheel look is complete...
IP: Logged
11:42 PM
Nov 1st, 2005
Whuffo Member
Posts: 3000 From: San Jose, CA Registered: Jul 2003
It's getting to the time where I need to decide what this little car is going to look like when it's done. Spent a little time looking at wheels; those Mille Miglia MM11 wheels look nice on a Fiero (and I put a set on the red car) but I don't want to repeat myself. Nothing else I saw in the catalogs I checked today (about 20 manufacturers) struck my fancy; no decision here yet.
And the color - light gold isn't my favorite Fiero color; wonder what other colors would look awesome and go with the two-tone tan interior? There's a bronzish-platinum color on C5 Corvettes that might be a good choice; no decision here yet either. Talked with the owner of my favorite body shop this evening while dropping off the red car for touchup; he thinks I should stick with the factory color.
If I was going to do any body mods this would be the perfect time. I spent a little time looking at the car this evening and the only thing I can think of right off is that the notchie looks better with the bumperpad nose than it does with the aero nose...
IP: Logged
12:28 AM
Nov 3rd, 2005
30+mpg Member
Posts: 4062 From: Russellville, AR Registered: Feb 2002
I've been letting the car go for a while but decided it's time to get back to work on it. Took a nice long drive to see Fierobear's new house and noticed a few things that needed to be worked on...
First up was a broken exhaust manifold bolt. I tried using an extractor; broke it. Removed the broken piece of extractor, drilled to the next larger size and used a bigger extractor. Broke that one, too. Couldn't get the broken piece out (grumble). Finally chucked up a diamond dust tip in my Dremel and ground that broken extractor out, drilled the whole works out and retapped to a larger size. That should hold for a while - and no more exhaust leaks.
Spent some time going over the rear end, looking for the source of the torque steer problem. Everything seems tight & right; no looseness found in any joints or bushings. Hmmm... Rechecked the rear alignment and found it wasn't quite perfect. Touched it up - test drive reveals that the problem is lessened but still there. I'm starting to suspect cradle bushings...
And finished up the day by installing the air horns that I bought for this car last year. This one was a little trickier install than my other car; there's not many places to fit the trumpets so they point downwards and don't touch anything, and the options are even more limited with the sunroof storage pads installed. After much head scratching I found a way to make it all fit; the install looks neat in a WTF? kind of way - it'll snap a picture next time I'm out in the garage with my camera.
IP: Logged
10:35 PM
Whuffo Member
Posts: 3000 From: San Jose, CA Registered: Jul 2003
Went out for a nice long drive last night to test the success of recent repairs. One thing I noticed (now that the other noises are gone) is that the 'percolating' sound was back. The first time I heard this sound it seemed to be coming from behind my head - checked in back and found that the air filter top was loose. Thumping on the loose air filter housing produced the same sound I was hearing. So I tightened the bolt and the sound went away.
Based on that experience, I was going to tighten that thing back down and remember to order some new gaskets for it from Rodney. Imagine my surprise to discover it was still tight; something else is making that noise.
So I let it idle and listened around - and finally discovered the culprit. Bad catalytic converter; wonder how much of its remains are inside the muffler? Looks like next weekend I'll drop the whole exhaust system and use a shop vac / twist and shake the muffler to get all the junk out. I've got a nice Magnaflow low restriction cat ready to be installed - but need to obtain a foot or so of 2.125 inch stainless tubing to make it a clean install.
Anybody know where I can find a piece of 2.125 inch stainless exhaust tubing? I know the stuff exists, but I'm having trouble finding anybody that has some for sale...
IP: Logged
10:45 PM
PFF
System Bot
Jan 17th, 2006
Whuffo Member
Posts: 3000 From: San Jose, CA Registered: Jul 2003
After way too much research, I finally found someone who would sell a small quantity of 2 1/8" stainless steel exhaust tubing. Never imagined that this stuff would be so hard to come by; I can find 2.0 or 2.25 inch tubing all day long but that 2.125 inch stuff is rare.
Found it at www.classictube.com - it cost way too much but at least they have it. Why this particular size? Works perfectly for installing an aftermarket cat into a stock Fiero exhaust system. To make the newer (shorter) cats fit you need to extend the cat enough to fill the old hole. By using a 2.25 inch catalytic converter, the 2.125 tubing will be a snug fit in the cat tubes - and also a snug fit over the Fiero's 2.0 inch exhaust pipe. That makes the extension also serve as the adapter - no expanded tubing ends required. I'll weld it up and it'll be a nice clean installation...
Why reinvent the wheel? Two things; first is that the cat has to be CARB certified to be legal here in California. Some are, some aren't, and the people selling "custom fit" kits for Fieros don't know or don't say. Second reason: price. Between the Magnaflow low-restriction cat and the 304 stainless tubing to install it my parts cost is $57. Less than half the price, and CARB certified. What a deal...
IP: Logged
07:12 PM
Whuffo Member
Posts: 3000 From: San Jose, CA Registered: Jul 2003
Spent some time ordering up a bunch more parts for this car; they'll trickle in over the next week or two and I'll be able to make some major repairs that it's been needing.
IP: Logged
09:02 PM
Jan 23rd, 2006
Whuffo Member
Posts: 3000 From: San Jose, CA Registered: Jul 2003
Parts are starting to trickle in; got a shipment of ball joints from Rodney Dickman and some door tabs from Orief. There's still lots to come; looks like this weekend is going to be a busy one.
IP: Logged
05:41 PM
TG oreiF 8891 Member
Posts: 776 From: Cleveland, Ohio; USA Registered: Aug 2004
Hey, where's the pictures of the horn? What's it sound like?
Great thread, thanks for posting your progress, My 88GT and I only wish we had your stamina and persistence. Here in Ohio my car is a summer-time only hobby.
Keep up the great thread, I read every post.
IP: Logged
09:14 PM
Jan 24th, 2006
Whuffo Member
Posts: 3000 From: San Jose, CA Registered: Jul 2003
Hey, where's the pictures of the horn? What's it sound like?
Great thread, thanks for posting your progress, My 88GT and I only wish we had your stamina and persistence. Here in Ohio my car is a summer-time only hobby.
Keep up the great thread, I read every post.
I really need to dig out the camera and take a few pictures...
I wired the air horns to sound along with the stock horns; it'll get your attention for sure. They're the high-pitched Italian style (Italian made, in fact) air horns and somehow they're in tune with the factory "meep" horn. I picked them up at a Harbor Freight store some months ago and finally got around to installing them; I think they cost something like $10.
This is something every Fiero needs. I'm sure you've had the experience where some idiot tries to run you over and that "meep" doesn't do any good. Air horns change that; you won't be ignored.
As far as the "stamina" goes; it's always nice weather here in CA, so it's no problem working on the car year round. The reason it goes on so long is that it's not easy to find the right parts - as they show up I put 'em on the car. I got lucky on some things last week; I'll post updates and pictures as the good stuff shows up.
IP: Logged
01:38 AM
Whuffo Member
Posts: 3000 From: San Jose, CA Registered: Jul 2003
A couple more items arrived today; I finally got that 2.125 stainless exhaust tubing I've been waiting for so I can at least get the new cat installed. I also received a set of poly cradle bushings; these should help keep the rear of the car from wanting to steer...
IP: Logged
07:56 PM
Jan 25th, 2006
Whuffo Member
Posts: 3000 From: San Jose, CA Registered: Jul 2003