Spent some time this morning measuring the old cat and creating the necessary extensions for the new (much shorter) one. Fabricated the pieces and welded it up; looks nice and it's ready to go in. While I was under the car measuring, I noticed that one of the rear cradle bolts was missing (eek!) - so that explains why it was a bit squirrley in the back.
Wonder how hard it's going to be to scare up a rear cradle bolt and washer?
IP: Logged
05:33 PM
Jan 27th, 2006
Whuffo Member
Posts: 3000 From: San Jose, CA Registered: Jul 2003
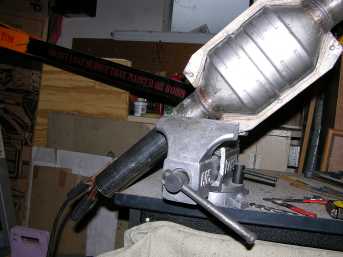
Spent some time pulling the exhaust system out of the car and cutting the old cat out. Once that was done, I duct-taped my shop vac to the cut off end of the pipe leading to the muffler and turned the muffler up, down, and all around with the shop vac running. A few minutes of this collected all the bits of bad cat out of the muffler - other than that, the muffler and piping is in fine shape. Fiero exhaust systems are made of 409 stainless steel; 409 is a ferritic stainless so it'll surface rust but it'll last almost forever.
Next step was to get some measurements and start putting it back together. Here's the new cat with its new stainless steel extension: I welded the head pipe to the inlet of the cat but still need to temporarily mount the exhaust system and get the exact spacing / angle for the other end before welding it up. I like welding these stainless pipes; my little MIG box usually turns out some shabby looking welds - but on this stuff it just purrs along and leaves a pretty bead. Almost makes me think I'm a welder...
I'll do a bunch of other work before I load the exhaust back in - cradle mounts, motor mounts, inner tie rods, etc. All of these things are much, much easier to to without the exhaust in the way.
IP: Logged
08:53 PM
Jan 29th, 2006
Whuffo Member
Posts: 3000 From: San Jose, CA Registered: Jul 2003
Toddster was nice enough to supply me with a replacment for my missing cradle bolt, so I've got everything I need to complete this little project. Another 20 or so hours of labor should do the trick...
IP: Logged
02:40 AM
Toddster Member
Posts: 20871 From: Roswell, Georgia Registered: May 2001
Toddster was nice enough to supply me with a replacment for my missing cradle bolt, so I've got everything I need to complete this little project. Another 20 or so hours of labor should do the trick...
Ohh, didn't I mention the part about that cradle bolt costing you your soul? Mwahahaha
IP: Logged
11:39 AM
Jan 31st, 2006
Whuffo Member
Posts: 3000 From: San Jose, CA Registered: Jul 2003
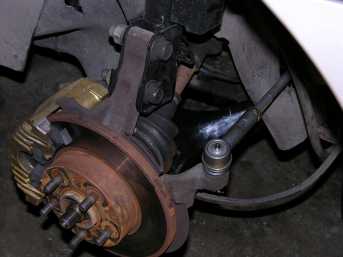
Got some work done today. Replaced the motor and transmission mounts, removed / cleaned / replaced the heat shields (they were a mess because of that bad halfshaft spraying grease all over). Replaced the toe rods and tie rod ends, installed the new O2 sensor.
Pulled the rear control arms and left them laying next to the car; enough for today.
Interesting thing about those control arms - they come out very easily. Remove the ball joint pinch bolt and the two control arm bushing bolts and pull / wiggle and out it comes. No other disassembly is necessary; that was a pleasant surprise.
Tomorrow I'll drill out the ball joint rivets and press out the old control arm bushings, then clean, prep, and paint the control arms. When the paint dries, I'll put them back together with new ball joints and bushings and pop them back into the car. Then I'll move on to the cradle bushings; that promises to be an interesting task...
IP: Logged
12:49 AM
Whuffo Member
Posts: 3000 From: San Jose, CA Registered: Jul 2003
Stripped the control arms, did a little rust removal, prepped them and gave them a good coat of black epoxy enamel. It'll take a day for the paint to cure so I'm taking the rest of the day off...
IP: Logged
08:12 PM
Feb 1st, 2006
Whuffo Member
Posts: 3000 From: San Jose, CA Registered: Jul 2003
Finsished rebuilding those control arms; nice new ball joints from Rodney, and a set of Citation X11 control arm bushings. Those bushings are rubber, but the rubber is firmer; it was designed for the Citation X11 - with a 2.8 driving the front wheels it had some torque steer problems until they came up with these firmer bushings. Want some for yours? Order AC Delco part 45G9708 - these fit the rear control arm on 84-87 Fieros. Control arm all rebuilt and ready to go back in:
Right one went right in; left one gave me some problems. The pockets in the cradle were a little tweaked on the left side so I had to spend some time straightening them back out so things would fit right. All back together:
Brakes and struts were done about 3,000 miles ago; this takes care of the rest of the rear suspension. Should drive much better with these new / upgraded parts. Also changed out the rear cradle bushings today - they looked good from the outside but once I got them out it was obvious that they were junk. Replaced them with nice new poly bushings; I'll attack the front cradle bushings tomorrow.
IP: Logged
09:47 PM
Feb 3rd, 2006
Whuffo Member
Posts: 3000 From: San Jose, CA Registered: Jul 2003
Finally got busy on those front cradle bushings. Spent about 3 hours cleaning out the old bushing sleeves; let the new poly bushings sit in the freezer while I was doing this. Used a drill to do the major part of the old bushing removal, then a sanding drum in my Dremel to clean out the last bits of rubber. When it came time to put in the new bushings, just a couple of taps with a hammer were needed to seat them properly. Sleeves went right in and wonder of wonders - when I jacked the cradle back up the bolt holes lined up first try. Operation Cradle Bushing was a success!
Now I just need to "fit and finish" the exhaust system and set the wheel alignment and I'll be able to go for a drive and see how it feels.
IP: Logged
09:23 PM
Feb 4th, 2006
Whuffo Member
Posts: 3000 From: San Jose, CA Registered: Jul 2003
Finished up the exhaust and mounted it today - I'd like to meet the guy that designed the support system. Those (expletive deleted) springs aren't bad enough, let's hide the hanger screws too. Jerk.
Took a little time and set up the rear wheel alignment the old school way; levels and tram gauge. Works well but you gotta think about what you're doing and take the time to get it right. Looked good so it was time to clean up the tools and take this thing for a ride.
Wow! All this definitely made a difference. The handling is vastly improved, there's no more of that funny stuff from the rear on acceleration / deceleration. I can feel a little more road / engine vibration from the back but it's not objectionable - you have to pay attention to notice it. All I did to the exhaust was change the cat and clean out the cat remains from the muffler. But it sounds completely different now. Before it had the V6 rumble in a quiet and understated sort of way - now it's got that V6 rumble in a brash and in-your-face kind of way. I like it, but I'd like it more if it was just a little quieter; maybe it'll tone down a bit as the new cat and pipe ages.
What's next? I dunno; parts keep trickling in from here and there but I don't have enough parts to complete any of the tasks still on my list. I still need to change the coolant temperature sender; more parts will show up next week and I'll be able to tell which part of the car gets redone next.
IP: Logged
09:49 PM
30+mpg Member
Posts: 4062 From: Russellville, AR Registered: Feb 2002
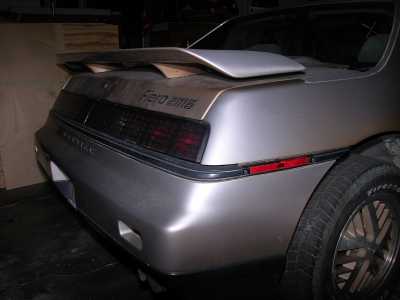
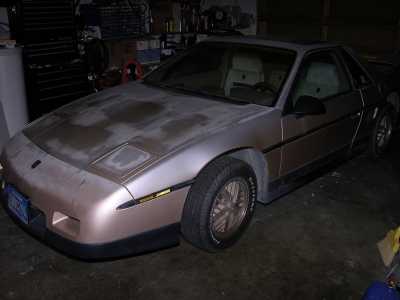
How about some in progress photos? or does it still look like this?
Other than being a bit cleaner and some cheap seat covers on the seats it still looks the same. I'll take some new pictures; it does look a lot better in some respects.
This is a long-term restoration - it'll be done in stages. Mechanical and electrical items first, then interior - and paint comes last. Best done this way so the new paint doesn't get scratched while performing other repairs.
IP: Logged
01:29 AM
PFF
System Bot
Feb 6th, 2006
Whuffo Member
Posts: 3000 From: San Jose, CA Registered: Jul 2003
Installed the new coolant temperature sender today; nice, I now have a working temp gauge. Starting to lay plans for all the additional wiring that'll be added to this car to support the new bells & whistles I'll be adding soon. Waiting for new seat upholstery to arrive, then it'll be time to tear into the interior and make it look new again...
IP: Logged
02:13 AM
Feb 8th, 2006
Whuffo Member
Posts: 3000 From: San Jose, CA Registered: Jul 2003
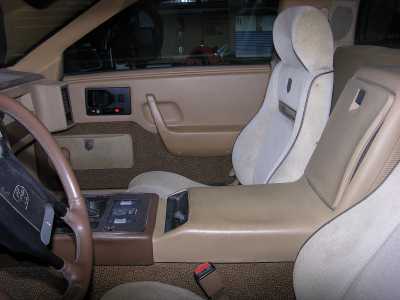
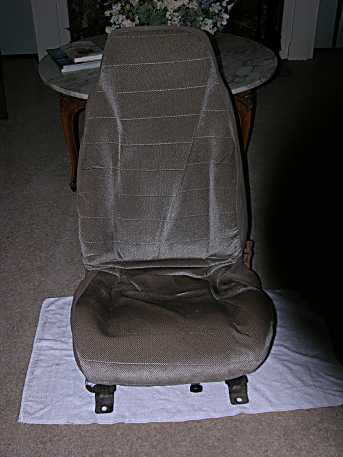
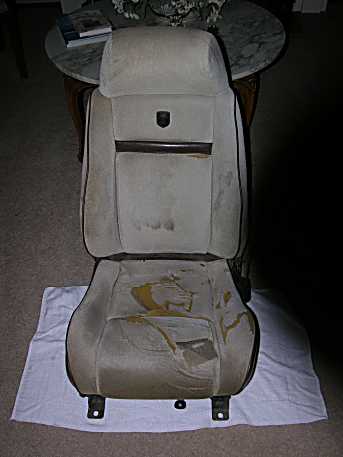
My new upholstery arrived so it's time to redo the interior. It needs a lot of work and I'll be making it better than new while I'm at it. Started by pulling the seats; brought one inside and got to work:
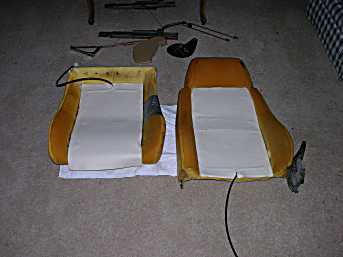
Here's the driver's seat - complete with the cheap seat covers I tossed on for road testing. Doesn't look too bad - but let's take that seat cover off and see the factory upholstery: Yow - that's a real mess. I've seen worse, but this is plenty bad. OK, let's break it down: Strip off the old upholstery and we're down to the foam: At this point I spent some time patching the hole in the foam and cleaning / deodorizing it. Ready to start putting things together - continued in next post.
IP: Logged
11:19 PM
Whuffo Member
Posts: 3000 From: San Jose, CA Registered: Jul 2003
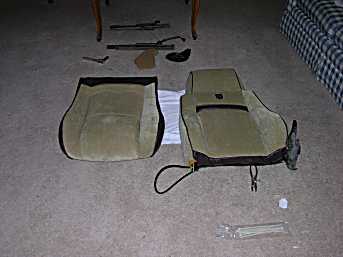
Before putting the new upholstery on, I mounted the seat heater elements. They fit very well; only minor trimming needed: Then I pulled on the new upholstery and went through a half a pound of hog rings fastening it down: Reassembled the seat; looks much better: I'll let it sit for 24 hours so that the new fabric can relax, then I'll use a steamer to do the final fit - that'll make the fabric hug the cushion like factory work. In the meantime, there's another seat to do...
IP: Logged
11:25 PM
Feb 9th, 2006
Whuffo Member
Posts: 3000 From: San Jose, CA Registered: Jul 2003
Finished up the passenger side seat this afternoon. After sitting for a day the driver's side is looking much better as the wrinkles relax and the cover finds it's comfy spot on the foam. I'll need to let the passenger side sit for at least a day too before doing the final fitting.
In the meantime, I'll pull the headliner out and recover it and find a friendly local upholstery shop to recover the sun visors in the same material. While the seats and headliner are out I'll strip out the console so I can run some wiring. I'll be putting in a new 12 volt accessory feed for the seat heaters; it'll be fed from the battery junction through a heavy duty relay which will be activated when the ignition is on. That'll prevent the heaters from running unless the engine is running and avoid loading the ignition switch with the seat heater load.
I still need to figure out where to put the seat heater control switches. This little car has all the factory options on it so every panel is filled in; gonna have to get creative...
IP: Logged
05:33 PM
Whuffo Member
Posts: 3000 From: San Jose, CA Registered: Jul 2003
To show our appreciation, we would like to give you and your friends a special discount on auto parts.
Here's how it works:
- You give the following discount code to friends, neighbors, relatives, the guy at the corner garage--anyone you know who works on cars or trucks:
371093109727
- When someone (including yourself) places an order at www.rockauto.com and enters your discount code, he or she will receive an immediate 5% discount on that order. * If you are using our Java Catalog, enter your discount code in the "How did you hear about us" line of the shopping cart * If you are using our non-Java Catalog, enter your the discount code in the "Discount Code" field of the Shopping Cart and click "Calculate Discount" - The discount code expires on April 11, 2006; so don't wait!
You may use this discount code as often as you wish until it expires, but only one discount code can be used per order.
**Each month we see people who put the word "discount" in front of their code and do not get the discount. Please enter ONLY the discount code.**
Enjoy!
IP: Logged
06:19 PM
30+mpg Member
Posts: 4062 From: Russellville, AR Registered: Feb 2002
Nice, it's your car and you can do it! This morning here in Kansas it was eighteen degrees F when I left for work.
But............how cold does it really get in San Jose? Aren't the seat heaters kind of like a guy in San Diego buying a set of snow tires for his car?
[This message has been edited by 30+mpg (edited 02-10-2006).]
IP: Logged
08:12 PM
Feb 10th, 2006
Whuffo Member
Posts: 3000 From: San Jose, CA Registered: Jul 2003
Nice, it's your car and you can do it! This morning here in Kansas it was eighteen degrees F when I left for work.
But............how cold does it really get in San Jose? Aren't the seat heaters kind of like a guy in San Diego buying a set of snow tires for his car?
I used to think the same way. When I bought my new Pacifica last year it came with seat heaters; since then I've decided that they're a very good thing even in this warm climate.
On those cool mornings a little warmth from the seat is very welcome...
And by the way, I did have to buy a set of tire chains for my car.
[This message has been edited by Whuffo (edited 02-10-2006).]
IP: Logged
08:16 PM
Whuffo Member
Posts: 3000 From: San Jose, CA Registered: Jul 2003
Got the headliner out of the car today. I was going to be extra careful not to break the backing - but it was already broken (grumble). Oh well; easy enough to fix with a little fiberglass. Before doing that, I removed all the remains of the old headliner material. I used my Dremel with a nylon cup brush to take the residue off the backing; worked great! Wish I'd discovered this trick years ago. I set the new headliner material out to "relax" before I glue it on.
While that's happening, I deep-cleaned the carpets. Much easier to do when the seats are out! The old carpeting cleaned up great; looks like new again. Gotta let them dry...
Also installed the DLD1 dome light delay / dimmer module into the dome light housing. There's plenty of room for it there and every circuit it connects to except one is present at the dome light. I'll drop a wire down to the dash area for this connection; it will kill the dome light delay when the key is on or the alarm is set.
IP: Logged
08:27 PM
30+mpg Member
Posts: 4062 From: Russellville, AR Registered: Feb 2002
Whuffo:...I removed all the remains of the old headliner material. I used my Dremel with a nylon cup brush to take the residue off the backing; worked great! ....
I deep-cleaned the carpets. ...
installed the DLD1 dome light delay / dimmer module into the dome light housing.. ...
3" wire wheel brush in an electric drill also works good. Drill has more reserve HP than the Dremel.
What did you clean the carpets with?
THE DLD1 module? Where did that come from?
Inquiring minds want to know.
IP: Logged
09:52 PM
Whuffo Member
Posts: 3000 From: San Jose, CA Registered: Jul 2003
3" wire wheel brush in an electric drill also works good. Drill has more reserve HP than the Dremel.
What did you clean the carpets with?
THE DLD1 module? Where did that come from?
Inquiring minds want to know.
I liked the Dremel for this task because it's a lot easier to control; no accidentally taking chunks out of the backing. That wire wheel in a drill would also be very effective if you've got very steady hands...
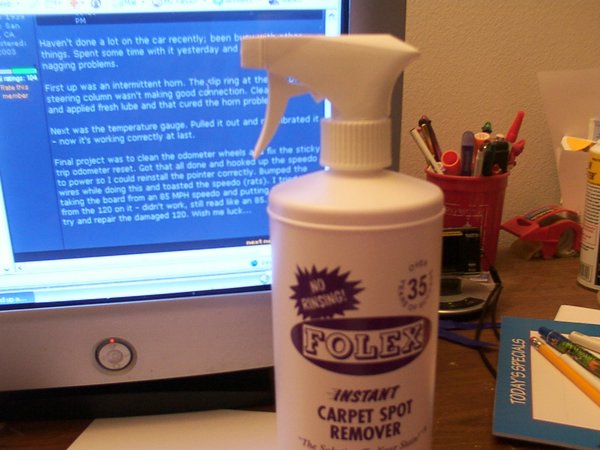
I use some stuff called Folex to clean carpets. It's pretty amazing stuff. First step was to hit the extra dirty / stained spots with straight Folex and scrub / blot dry with a towel. Turns towels black in a hurry! Then I used a "steam" cleaner with 1/4 Folex and hot water in the tank and went over the carpets about 4 times. That did the trick; they look great now.
The DLD1 module is available from www.webelectricproducts.com - it makes your domelight stay on for 20 seconds after the door is closed and then it fades to off. If you hook up a control line to the ignition it'll skip the delay when the car is running. Those extra seconds of light after you close the door come in handy.
I just got done gluing new headliner material to the backer board - using 3M 8080. I'll let the glue dry overnight before I trim the material and re-install the headliner after running a couple of new wires down from the dome light to the dash area (inside the left A pillar trim).
IP: Logged
11:08 PM
PFF
System Bot
Feb 11th, 2006
30+mpg Member
Posts: 4062 From: Russellville, AR Registered: Feb 2002
Whuffo:I liked the Dremel for this task because it's a lot easier to control; no accidentally taking chunks out of the backing. That wire wheel in a drill would also be very effective if you've got very steady hands...
I've use a 3/8" chuck drill for a couple of headliner replacements. That foam is a lot tougher than you think. Never had a problem with the wire wheel gouging the foam board.
[This message has been edited by 30+mpg (edited 02-11-2006).]
IP: Logged
07:22 AM
Whuffo Member
Posts: 3000 From: San Jose, CA Registered: Jul 2003
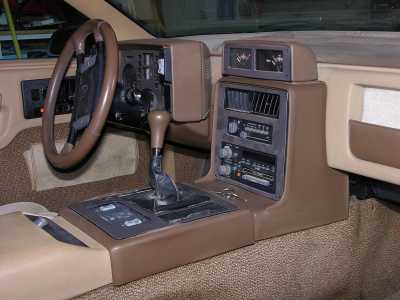
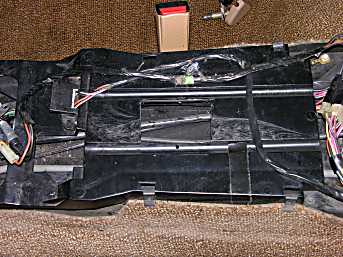
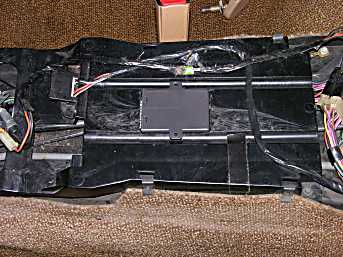
Worked on the car for a few more hours today. Started by installing the window rollup module; where to stash this module that's close to the window switches and has room? No such place - so let's make one. Cut opening in console skeleton: Just big enough for the window module. Now put it in the hole upside down: The wires run under the skeleton and everything fits nicely. Got that module wired into the window switches; the rest of the wiring will be done when the alarm finally gets installed.
Moved on to the overhead wiring - wires that run to and through the roof area. Constant and switched 12 volt power, the wiring harness to the thermometer probe and the one to the paging antenna - and that wire to control the dome light dimmer that I mentioned earlier. Got those wires all neatly taped / tie-wrapped / harnessed / clipped / etc. into place and re-installed the headliner. Looks nice - I'll take a picture after all the trim is back in. Still kinda disassembled to make the rest of the wiring go easier.
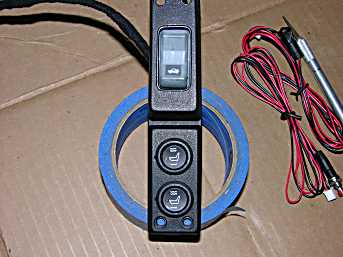
Finally decided to mount the seat heater switches underneath the trunk release: I had planned to use this location for the alarm blinky light but it'll just have to go somewhere else. Installed the paging antenna and decided that it was time to take a break. Still way too much to do...
IP: Logged
07:57 PM
Feb 12th, 2006
Whuffo Member
Posts: 3000 From: San Jose, CA Registered: Jul 2003
Spent a few hours today pushing this project forward. Got the rest of the interior trim cleaned and installed, found a mounting location for the alarm 'brain' and mounted it and started running wiring to the various locations. Still need to find locations for a couple of more items; space is very tight behind the dash of these cars; no luck yet.
The mounting locations for the various pieces need to be such that the car can still be serviced. I've seen too many installations where they put the blinky light in a trim panel - this makes it so you can't remove that panel without disconnecting the blinky light. If something has to be mounted in an access panel, it needs to have a connector right there. Finding useful spots is difficult but I'll work it out somehow. I wasn't sure I'd find a useful locaton for the alarm brain but finally found a location that'll hold it out of sight and hard to find.
Think I'll spend a little time tonight sorting through temperature gauges to see if I have one that works right. The new sending unit works fine - but the gauge reads very low. I'm going to correct the temp gauge wiring while I'm in there but also would like to replace the gauge with an accurate one.
IP: Logged
08:58 PM
Feb 13th, 2006
Whuffo Member
Posts: 3000 From: San Jose, CA Registered: Jul 2003
Got lucky on the temperature gauge! When I got this car, the temp gauge pointer was gone; fell off and was laying in the bottom. So when I switched out the speedometer I also switched in the temp / fuel gauge that came with the speedo. Too bad that the temp gauge is bad; the fuel gauge may be bad, too - hard to tell. Gas gauge does bizarre things; looks like it's working but whatever it's indicating doesn't have anything to do with how much fuel is in the tank. I suspect sending unit - but first I'll try a tested and known good set of temp and fuel gauges.
Broke out the 12 volt power supply and some resistors. Found full scale on the temp gauge with 55 ohms then reinstalled the pointer so that it pointed to 260. Checked with 1355 ohms and it read 100; perfect! It was good all along, just needed its pointer reinstalled. Checked the fuel guage also; calibration checks OK.
So I'll swap these guages in while I'm digging around in the dash - and correct the wiring so that it lights the temp warning bulb when you turn the key to start instead of slamming the temp gauge to the end. Sometimes I wonder - for 5 years they made Fieros with the temp gauge circuit miswired. They must have noticed that the gauge was acting strange, and the warranty claims for replacement gauges must have caught their attention too. Did they never think to fix the wiring problem - or did they just not care...
IP: Logged
12:42 AM
Feb 14th, 2006
Whuffo Member
Posts: 3000 From: San Jose, CA Registered: Jul 2003
Swapped out the temp / fuel gauges today. Decided to test the one I removed just to make sure - yup, it's NFG. So after changing the incinerated sender and bad gauge I should have an accurate temperature gauge.
Found places to stash the remaining relays and modules; puzzled over the location for the alarm blinky light for a bit and had a flash of inspiration. There's that unused indicator location in the instrument cluster - where the alternator light would be if it didn't have rally gauges. It's got a blank red lens on it and the alarm LED is red; sounds like a good location! I grabbed an old instrument lamp socket and removed the contacts and drilled out the middle to accept the alarm led housing. That'll get me an alarm indicator without drilling any holes in the dash - and if I ever need to remove the instrument cluster the alarm led socket can be easily twisted out. The location I put the hidden switch in was also an inspired choice; nobody would think to look for it there. Where? It's a secret...
Continued on with the process of pulling wires and making connections today. Finally decided where the seat heater wires needed to be located at the seat end - the seat needs to be able to move on it's tracks without pulling on the wires or getting them caught in the seat tracks. Kept trying to find an easy solution but ended up doing it right - the wires come up under the seat, just about in the middle. They run under the carpet up to the console, then through the wiring channel in the console to the dash.
It's turning out pretty nice; other than the seat heater switches the interior looks stock. No visible sign of the alarm system - well, the paging antenna in the back window is visible but everything else is hidden. One more day of work should have this stage of the project complete; still need to run and connect a few more wires then reassemble the dash and install the seats.
IP: Logged
01:31 AM
Feb 15th, 2006
Whuffo Member
Posts: 3000 From: San Jose, CA Registered: Jul 2003
Only had a little time to work on the car today. Reinstalled the instrument cluster and its rear cover - had to redress the wiring a bit to get things to fit nicely. As these things came from the factory, putting that rear cover on tends to knock the main connector out of the back of the cluster on the right side; I've had this happen twice, so I paid attention as it went back together and saw the problem - the cover hits the wiring clip on the side and pulls the wires. Simply removing that plastic clip and using a tie-wrap to dress the harness left enough room for the cover to go on without tugging on the wires.
Started looking at running the seat heater wires up through the console to the dash, tried a couple of things that didn't work. I'll get back to it tomorrow...
IP: Logged
12:42 AM
Feb 16th, 2006
Whuffo Member
Posts: 3000 From: San Jose, CA Registered: Jul 2003
Got the last wires connected, installed the seats, programmed and tested the alarm system - then looked for and fixed a couple of wiring errors (oops). Took the car out for a drive and checked the seat heaters - they work great! Alarm system does what it's supposed to; I think I may fine tune the programming one more time after I've used it some more.
Too bad the temperature gauge didn't work; completely dead. Oh well; it's always something...
I'll take some pictures tomorrow when the sun is out.
IP: Logged
01:00 AM
Whuffo Member
Posts: 3000 From: San Jose, CA Registered: Jul 2003
The temperature gauge problem turned out to be a simple one; apparently when I switched the connections back at the sender end, I put them back in the same places instead of actually switching them. Hmmm; don't think so, but switching them "again" solved the problem. Too bad that banging the gauge against the stop a few times while checking out the wiring knocked it out of calibration. Hmpf.
Looked for an upholstery shop to do the sunvisors today. The first one was recommended by my body and paint guy - but the shop is deserted and looks like it's about to be demolished. Moved on to another shop in the area where I was told that they couldn't use my fabric, it had to be special sunvisor fabric and they wouldn't be able to give me a quote until after they got into the job - but they thought it'd be around $100. Needless to say, they didn't get my business.
Oh well, there's other upholstery shops to try tomorrow...
IP: Logged
11:25 PM
Apr 28th, 2006
Whuffo Member
Posts: 3000 From: San Jose, CA Registered: Jul 2003
Haven't done a lot on the car recently; been busy with other things. Spent some time with it yesterday and corrected a few nagging problems.
First up was an intermittent horn. The slip ring at the top of the steering column wasn't making good connection. Cleaned it up and applied fresh lube and that cured the horn problem.
Next was the temperature gauge. Pulled it out and recalibrated it - now it's working correctly at last.
Final project was to clean the odometer wheels and fix the sticky trip odometer reset. Got that all done and hooked up the speedo to power so I could reinstall the pointer correctly. Bumped the wires while doing this and toasted the speedo (rats). I tried taking the board from an 85 MPH speedo and putting the crystal from the 120 on it - didn't work, still read like an 85. Next up is to try and repair the damaged 120. Wish me luck...
IP: Logged
05:18 PM
exoticse Member
Posts: 8656 From: Orlando, Fl Registered: Jun 2003
I use some stuff called Folex to clean carpets. It's pretty amazing stuff. First step was to hit the extra dirty / stained spots with straight Folex and scrub / blot dry with a towel. Turns towels black in a hurry! Then I used a "steam" cleaner with 1/4 Folex and hot water in the tank and went over the carpets about 4 times. That did the trick; they look great now.
Have to agree with you on the Folex ! We discovered this stuff about 6 months ago, and i swear by it now. I have not used it on the car, but we use it around the house and it will really kick some A** when it comes to stains.
It is really some amazing, well make that unbelievable stuff !
[This message has been edited by exoticse (edited 04-28-2006).]
IP: Logged
09:37 PM
PFF
System Bot
Whuffo Member
Posts: 3000 From: San Jose, CA Registered: Jul 2003
Originally posted by exoticse: Have to agree with you on the Folex ! We discovered this stuff about 6 months ago, and i swear by it now. I have not used it on the car, but we use it around the house and it will really kick some A** when it comes to stains.
It is really some amazing, well make that unbelievable stuff !
Wait until you try it on the Fiero carpets / door panels. Works great!
IP: Logged
10:53 PM
Whuffo Member
Posts: 3000 From: San Jose, CA Registered: Jul 2003
Whew; managed to save the 120 MPH speedo. It was only the input buffer chip that was smoked; the same part is used on 85 MPH speedos (which I have some of) so I just scrounged one from there and replaced the part on the 120. Tested it out; working fine now.
Felt so good about that I decided to rebuild the driver's side headlight motor. I did the other one last year; it was broken. Bought kits from Rodney to do both so I had the parts on hand. It was still working but on it's last legs. Back to "tight and right" now.
Think I'll go fill the gas tank and go for a drive tonight...
IP: Logged
10:57 PM
Apr 29th, 2006
30+mpg Member
Posts: 4062 From: Russellville, AR Registered: Feb 2002
Whew; been so busy helping others with their Fieros that I haven't had a lot of time to work on this one. I've been driving it from time to time and enjoying it; today I had a few free minutes (and I'm going to put some serious miles on this car this weekend) so I got busy again.
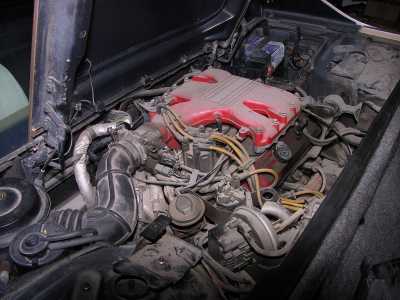
First item on the agenda was new plugs and wires. Plugs because it had a high-speed miss; wires because they fall apart when you try to unplug them. Found something interesting; the three plugs towards the trunk (the easy ones) were Bosch plugs - but the three on the hard side were AC Delco plugs and they looked to be the ones the car came with. Looks like the previous owner got ripped off on a tune-up.
Replaced the missing alternator heat shield; that was apparently "lost" when the AC Delco rebuilt alternator was installed for the previous owner. Thought about tightening the belt because of some occasional squeaking at startup - checked the tension and decided to leave it alone. I'll suffer some squeaking to avoid overtightening the belt and damaging the water pump. A Rodney idler pulley is on my "buy soon" list now.
Checked the thermostat - it's been running a little cool lately. Found that the thermostat was stuck open so I replaced it too. Followed up with an oil change; nice semi-synthetic oil and a new filter. Everything else checked OK.
It's funny how people say these cars are unreliable - after all my years of Fiero ownership, I've NEVER had a breakdown on the road; the few problems that I've encountered along the way have been ones that didn't keep the car from getting me to where I was going and back home again.
IP: Logged
01:25 AM
Sep 26th, 2006
Whuffo Member
Posts: 3000 From: San Jose, CA Registered: Jul 2003
Still haven't had time to do much of anything with this car (sigh). Now my wife has bought a Fiero of her own and I'm busy putting it back into good condition...
IP: Logged
04:28 PM
Oct 30th, 2006
Whuffo Member
Posts: 3000 From: San Jose, CA Registered: Jul 2003
OK, the wife's car (a bright red 86 SE) is done - as done as a Fiero gets, anyway. She loves it! Drove it on the California Coast Run this year and it performed flawlessly. That little car sure does run nice.
I've got a couple or three other Fieros to fix for people - and a box of new parts for this one. It looks like I'm actually going to get some more done on my own car soon...
IP: Logged
01:11 AM
Jan 6th, 2007
Whuffo Member
Posts: 3000 From: San Jose, CA Registered: Jul 2003
A quick bump to keep this thread out of the archives; I've got a bunch of pictures / descriptions to post. Just need to sort and resize all those little devils...


 .............................