Pennock's Fiero Forum
  Technical Discussion & Questions - Archive
  Dash convesion progress (Page 7)

T H I S   I S   A N   A R C H I V E D   T O P I C
  

Email This Page to Someone! | Printable Version

This topic is 7 pages long:  1   2   3   4   5   6   7 
Previous Page | Next Page
Dash convesion progress by RCR
Started on: 11-16-2003 10:22 AM
Replies: 267
Last post by: 2Sly4U on 03-29-2011 01:39 PM
Gokart Mozart
Member
Posts: 12143
From: Metro Detroit
Registered: Mar 2003


Feedback score: (1)
Leave feedback


Total ratings: 159
Rate this member

Report this Post01-11-2007 02:39 PM Click Here to See the Profile for Gokart MozartClick Here to visit Gokart Mozart's HomePageSend a Private Message to Gokart MozartDirect Link to This Post
bump for the new year and to keep it out of the archives. How's it going?
IP: Logged
pheonix97031
Member
Posts: 316
From: Corvallis, Oregon, USA
Registered: Sep 2006


Feedback score: N/A
Leave feedback

Rate this member

Report this Post01-14-2007 02:10 PM Click Here to See the Profile for pheonix97031Send a Private Message to pheonix97031Direct Link to This Post
Great work!

What are you intending to do for the center console?
IP: Logged
RCR
Member
Posts: 4397
From: Shelby Twp Mi
Registered: Sep 2002


Feedback score:    (7)
Leave feedback


Total ratings: 102
Rate this member

Report this Post01-15-2007 07:38 AM Click Here to See the Profile for RCRSend a Private Message to RCRDirect Link to This Post
Thanx guys for checking back in...As usual, I haven't worked on it in a while. Been sick the last few weeks and I really haven't felt like getting out in the garage.

Pheonix: Here's the start of the console in the dash's sister thread: https://www.fiero.nl/forum/F...1/HTML/058202-3.html

I won't be doing much more on the dash until I put the video system in. That will happen sometime after the console. I'm also looking at putting in an Aurora 4.0, so time will be split between multiple projects. I also have an 86GT that needs some TLC before I let her go.

Bob
IP: Logged
87SEV6Reborn05
Member
Posts: 185
From: KC,MO
Registered: Dec 2005


Feedback score: N/A
Leave feedback

Rate this member

Report this Post02-01-2007 05:44 PM Click Here to See the Profile for 87SEV6Reborn05Send a Private Message to 87SEV6Reborn05Direct Link to This Post
Hope you are feeling better, bump bump
IP: Logged
RCR
Member
Posts: 4397
From: Shelby Twp Mi
Registered: Sep 2002


Feedback score:    (7)
Leave feedback


Total ratings: 102
Rate this member

Report this Post02-03-2007 08:24 AM Click Here to See the Profile for RCRSend a Private Message to RCRDirect Link to This Post
Thanx man...I am feeling better...But now it's bitterly cold outside.

Bob
IP: Logged
Bubba G 1987 FieroGT
Member
Posts: 61
From: Oklahoma
Registered: Jun 2003


Feedback score: (1)
Leave feedback

Rate this member

Report this Post03-14-2007 07:54 PM Click Here to See the Profile for Bubba G 1987 FieroGTClick Here to visit Bubba G 1987 FieroGT's HomePageSend a Private Message to Bubba G 1987 FieroGTDirect Link to This Post
Any updates? I guess this will be my next project.. if the fiero doesn't sell... at least some kind of interior swap.
IP: Logged
RCR
Member
Posts: 4397
From: Shelby Twp Mi
Registered: Sep 2002


Feedback score:    (7)
Leave feedback


Total ratings: 102
Rate this member

Report this Post04-25-2007 12:20 PM Click Here to See the Profile for RCRSend a Private Message to RCRDirect Link to This Post
Still no updates. I've switched gears again, now I'm working on the engine...4.0 Aurora in 3800SC out. Don't ask why, I'm goofy that way. Once I get tired of that, I'll get back to the interior and dash.

bob
IP: Logged
1986GTV8
Member
Posts: 1259
From: Orlando,FL,USA
Registered: Mar 2002


Feedback score: N/A
Leave feedback

Rate this member

Report this Post07-08-2007 05:11 PM Click Here to See the Profile for 1986GTV8Send a Private Message to 1986GTV8Direct Link to This Post
WOW, post #1000 for me!

Can you help us slow ppl understand the A/C controlls? I have a grasp of it & want to adapt it to the Firebird dash if possible.

Thanks in advance.

John

[This message has been edited by 1986GTV8 (edited 07-08-2007).]

IP: Logged
RCR
Member
Posts: 4397
From: Shelby Twp Mi
Registered: Sep 2002


Feedback score:    (7)
Leave feedback


Total ratings: 102
Rate this member

Report this Post07-08-2007 05:21 PM Click Here to See the Profile for RCRSend a Private Message to RCRDirect Link to This Post
What part?

Bob
IP: Logged
1986GTV8
Member
Posts: 1259
From: Orlando,FL,USA
Registered: Mar 2002


Feedback score: N/A
Leave feedback

Rate this member

Report this Post07-08-2007 05:32 PM Click Here to See the Profile for 1986GTV8Send a Private Message to 1986GTV8Direct Link to This Post
Bob:

I was refering to the AC rotary switch.
IP: Logged
Sourmug
Member
Posts: 4538
From: Calgary, Alberta, Canada
Registered: Sep 2002


Feedback score:    (29)
Leave feedback


Total ratings: 144
Rate this member

Report this Post07-08-2007 05:47 PM Click Here to See the Profile for SourmugSend a Private Message to SourmugDirect Link to This Post
IP: Logged
PFF
System Bot
RCR
Member
Posts: 4397
From: Shelby Twp Mi
Registered: Sep 2002


Feedback score:    (7)
Leave feedback


Total ratings: 102
Rate this member

Report this Post07-08-2007 08:56 PM Click Here to See the Profile for RCRSend a Private Message to RCRDirect Link to This Post
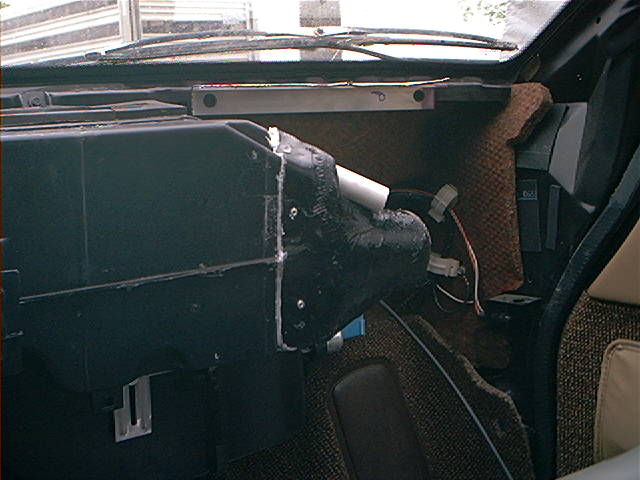
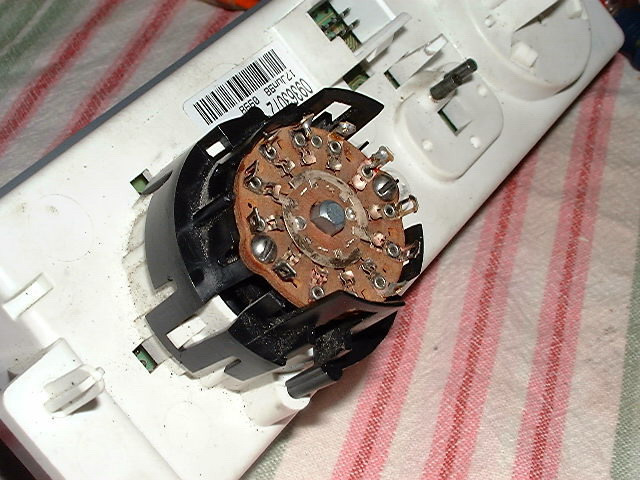
Well, I'm going to have to dig deep in the memory banks...Let's start with the picture of the rotary switch mounted and what I wrote:
 
quote
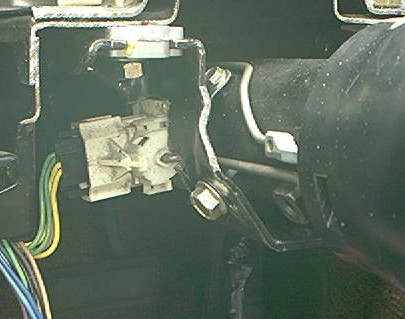
The switch is a double pole, 12 (or so) throw switch. Once dissassembled, the center posts can rotate all the way around. By using one pole, I get the six positions I need. By using the inards of the OEM switch, I still have the detent positions and the switch activation for the AC. Also, the original shaft fit nearly perfectly into the rotary switch, so I did not have to change anything. The shaft is held in by the OEM inards and cover, leaving everything near OEM. I need to come up with an 8 position connector and mate and I should be good to go.


This is going to be harder than I thought because that's the only pic I have...So, the existing control housing had several contacts embedded into the plastic. These contacts are used for the control of the AC circuit through the AC switch on the front panel. By using the rotary switch with the "OEM inards", I was able to wire my circuit from the attached schematic and keep the front AC switch working. At least theoretically, because since then, I've pulled the AC lines out to help fit the 4.0L. The AC is the only thing I haven't tested. As for the switch itself, well, I kind of cobbled it up as I went. It all seemed to fit together amazingly well.
The only thing not finished with the HVAC is the fan select switch. I was going to use a variable speed controller modifying a trailer brake controller but I thought it might be too noicey. I found a selector switch at work that should work. It's used as a rotary fan select on heavy truck HVACs. I do not know if it is comercially available.

I hope that answers your question. If you have anything more specific, please let me know and I'll try to get you your answer.

Bob


PS...I just realized I've been working on this for 3 and a half years...One year and some days to get it on the road for the 25'th...
IP: Logged
Gravitic Anomaly
Member
Posts: 137
From: Central MN, USA
Registered: Jul 2007


Feedback score: (1)
Leave feedback

Rate this member

Report this Post11-05-2007 03:33 PM Click Here to See the Profile for Gravitic AnomalyClick Here to visit Gravitic Anomaly's HomePageSend a Private Message to Gravitic AnomalyDirect Link to This Post
Well, inspired by this thread I took the plunge this weekend and put a GA dash into my '85 notchy. I gotta say for not being made for this car the damn thing fits very well. I was very fortunate to find a 1999 GA at the local junkyard and got the complete dash and instrument cluster for $60.
I did a few thing differently. I found if you remove the plastic panel that goes between the drivers side carpet and the tunnel ( the piece the stock cruise module mounts to) the console portion fits very nicely. I also discovered a 1.5" fender washer fits in the two mounting holes on the top of the dash and captures the plastic. I fashioned two brackets from alumium channel and mounted them to the car using the original dash mounting holes under the speaker covers. Then I ran bolts through the fender washers and brackets and finished with a nut on the underside. They hold the top down very firmly. I also glued some thin rubber to the brackets first so there wouldn't be any squeaks down the road. I hate squeaks.
Got some steel brackets bent up for the bottom and sides to hold them firm and moved the steering column over about a 1/4". I cut a notch to clear the headlight dimmer switch into the original steering column bracket and moved back away from the dash. I drilled new holes in it and bolted it into position.
Next I have to remove the dash and make all the wiring changes, and build a new airbox and ducting.
I really love the looks. Thanks RCR for the write up.

- Tim

------------------
Gravitic Anomaly
'85 SE 2m6 64K miles.
*'86 GT 2m6 43K miles (RIP)*

IP: Logged
RCR
Member
Posts: 4397
From: Shelby Twp Mi
Registered: Sep 2002


Feedback score:    (7)
Leave feedback


Total ratings: 102
Rate this member

Report this Post11-06-2007 07:33 AM Click Here to See the Profile for RCRSend a Private Message to RCRDirect Link to This Post
Congrats, Tim. Now the only thing you're missing is the pictures. Let's see what you did.

Bob

BTW, I also removed the plastic inserts along the tunnel, on both sides. Seems to provide alot more space.
IP: Logged
BMTFIERO
Member
Posts: 1187
From: Beaumont, TX
Registered: Dec 2007


Feedback score:    (18)
Leave feedback

Rate this member

Report this Post01-26-2008 02:15 PM Click Here to See the Profile for BMTFIEROSend a Private Message to BMTFIERODirect Link to This Post
MOVE IT ON DOWN!!!
IP: Logged
BMTFIERO
Member
Posts: 1187
From: Beaumont, TX
Registered: Dec 2007


Feedback score:    (18)
Leave feedback

Rate this member

Report this Post01-26-2008 02:24 PM Click Here to See the Profile for BMTFIEROSend a Private Message to BMTFIERODirect Link to This Post

BMTFIERO

1187 posts
Member since Dec 2007
MOVE IT ON DOWN!!!
IP: Logged
RCR
Member
Posts: 4397
From: Shelby Twp Mi
Registered: Sep 2002


Feedback score:    (7)
Leave feedback


Total ratings: 102
Rate this member

Report this Post01-26-2008 05:52 PM Click Here to See the Profile for RCRSend a Private Message to RCRDirect Link to This Post
thanx for bump
IP: Logged
PaulJK
Member
Posts: 6638
From: Los Angeles
Registered: Oct 2001


Feedback score:    (25)
Leave feedback


Total ratings: 237
Rate this member

Report this Post03-17-2008 01:38 AM Click Here to See the Profile for PaulJKSend a Private Message to PaulJKDirect Link to This Post
Believe it or not, sometimes I do a SEARCH just to read. Tonight I found this thread and wanted to mention:

Did you ever consider using after-market guages like this


I'm no fan of Dakota Digital, but they have these guages that might make your job a little easier. Diameter is 4.75 inches across each bezel.

What is the diameter of the 2 big guage faces in your dash ?

incredible work !

[This message has been edited by PaulJK (edited 03-17-2008).]

IP: Logged
RCR
Member
Posts: 4397
From: Shelby Twp Mi
Registered: Sep 2002


Feedback score:    (7)
Leave feedback


Total ratings: 102
Rate this member

Report this Post03-18-2008 05:40 PM Click Here to See the Profile for RCRSend a Private Message to RCRDirect Link to This Post
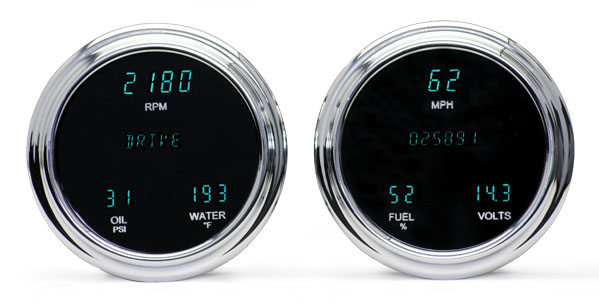
Thanx Paul,
I didn't consider Dakota Digital, but I did seriously look at other digital "analog" gauges, but when you work with a shoe string budget, aftermarket gauges quickly become a dream.

Bob
IP: Logged
War Hammer
Member
Posts: 377
From: Myrtle Beach, SC USA
Registered: Jan 2008


Feedback score: N/A
Leave feedback

Rate this member

Report this Post04-21-2008 10:37 PM Click Here to See the Profile for War HammerSend a Private Message to War HammerDirect Link to This Post
Just found this thread. Great work!

Paul

------------------
1988 Fiero
3800SC Series 1 w/5spd
Coilovers
18's w/Pirellis
Corvette Dash Mod

1985 GT
1986 Notchie
1987 Notchie

IP: Logged
Gravitic Anomaly
Member
Posts: 137
From: Central MN, USA
Registered: Jul 2007


Feedback score: (1)
Leave feedback

Rate this member

Report this Post05-26-2008 07:12 PM Click Here to See the Profile for Gravitic AnomalyClick Here to visit Gravitic Anomaly's HomePageSend a Private Message to Gravitic AnomalyDirect Link to This Post
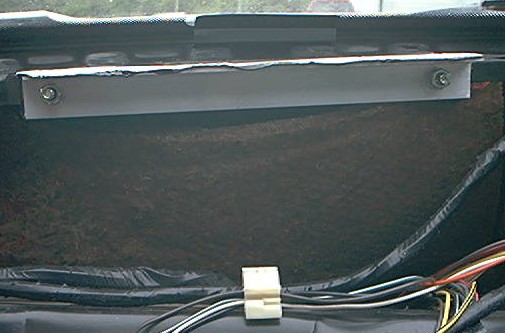
Well it took longer than I had hoped to get my car out of it's winter cocoon. I am just now posting the pictures I promised last fall of my dash install. To hold the top of the Grand Am dash I mounted a piece of angle stock to the firewall using the original mounting locations. The Tinnerman nuts were removed and 1/4" carraige bolts were placed in the oval slots from the back side. On top of the angle I have drilled a hole where the GA dash has a mounting hole. There is a plug that covers this hole in the dash. Ignore the wavy looking stuff on the angle stock. It is some self adhesive elastormeric tape I am using to prevent squeeks. I hate squeeks.


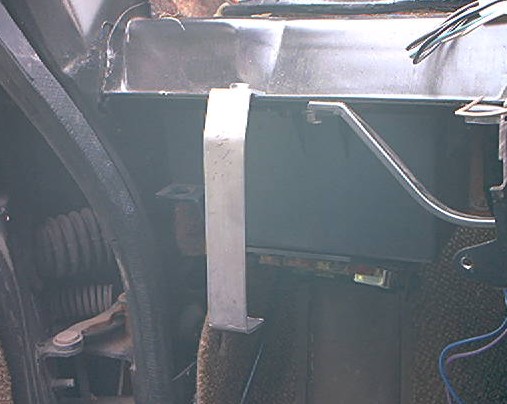
I bent up some brackets out of 1" x 1/8" flat stock to hold the dash at the bottom. Holes were drilled in the frame flange and the brackets were bolted into place.


I will use carraige bolts on the underside of the dash to attach it to these brackets.

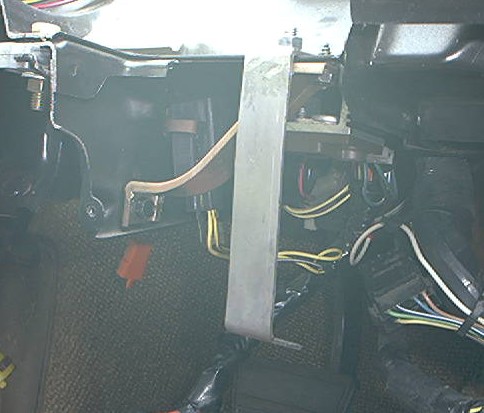
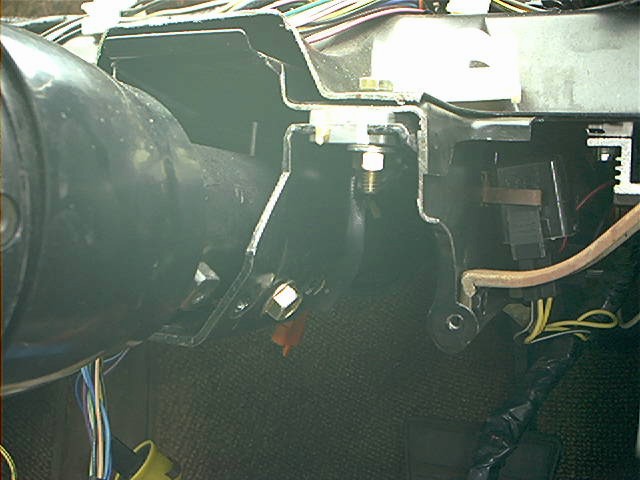
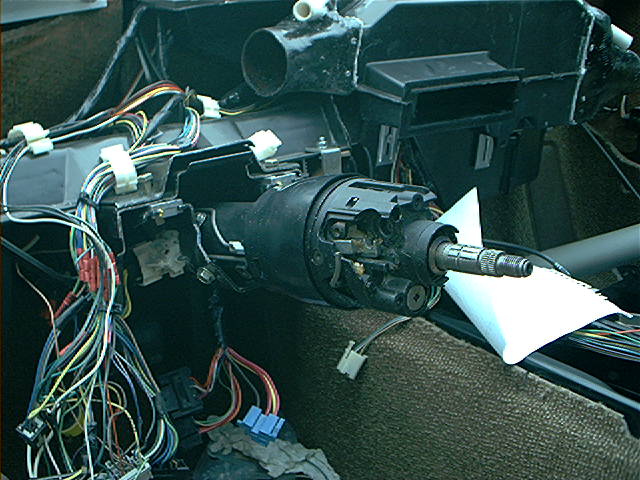
I cut back the steering column mount to clear the GA dash and instrument cluster. My solution for mounting the column is to remove the original "U" shaped bracket piece that is bolted to the column. Drill two new bolt holes. Flip it around and bolt it to the column with two bolts. I had to cut into the bracket to clear the High beam switch. I will be using the ignition switch from the GA so I removed the Fiero's ignition switch from the column.


I shifted the whole column to the right to center the wheel in the dash. This was done by the placement of the two holes required to mount the bracket to the frame.

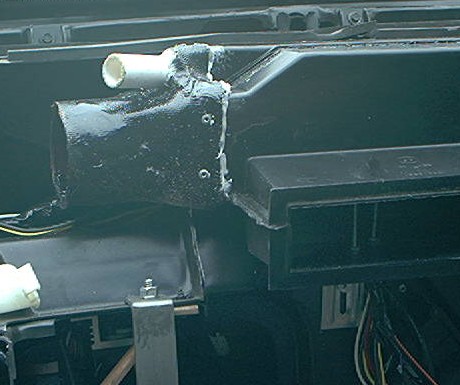
I preformed a ductectomy on the fiero's air duct piece. Fiberglass adapters were made and riveted to the cut off ducting piece. The fiberglass adapters are made to fit 3" diameter flex hose that will connect to the right and left dash vents. I used some 1" PVC pipe pieces to make a mount for the defroster tubes. Everything was then sealed up with RTV.


Next I will need to make up an adapter to go to the dash center vents.

------------------
Gravitic Anomaly
'85 SE 2m6 64K miles.
*'86 GT 2m6 43K miles (RIP)*

IP: Logged
PFF
System Bot
RCR
Member
Posts: 4397
From: Shelby Twp Mi
Registered: Sep 2002


Feedback score:    (7)
Leave feedback


Total ratings: 102
Rate this member

Report this Post05-27-2008 05:48 PM Click Here to See the Profile for RCRSend a Private Message to RCRDirect Link to This Post
Great. Looks good so far. I'm eager to see how you tackle some of the more strenuos parts.

Bob

PS, + for you

[This message has been edited by RCR (edited 05-27-2008).]

IP: Logged
RCR
Member
Posts: 4397
From: Shelby Twp Mi
Registered: Sep 2002


Feedback score:    (7)
Leave feedback


Total ratings: 102
Rate this member

Report this Post08-08-2008 07:20 AM Click Here to See the Profile for RCRSend a Private Message to RCRDirect Link to This Post
bump..I'll get back to it soon (maybe).
IP: Logged
BMTFIERO
Member
Posts: 1187
From: Beaumont, TX
Registered: Dec 2007


Feedback score:    (18)
Leave feedback

Rate this member

Report this Post11-29-2008 02:26 AM Click Here to See the Profile for BMTFIEROSend a Private Message to BMTFIERODirect Link to This Post
A KEEPING IT FRESH BUMP!!!
IP: Logged
1986GTV8
Member
Posts: 1259
From: Orlando,FL,USA
Registered: Mar 2002


Feedback score: N/A
Leave feedback

Rate this member

Report this Post03-04-2009 06:48 PM Click Here to See the Profile for 1986GTV8Send a Private Message to 1986GTV8Direct Link to This Post
I have been away from this thread too long.
IP: Logged
Gokart Mozart
Member
Posts: 12143
From: Metro Detroit
Registered: Mar 2003


Feedback score: (1)
Leave feedback


Total ratings: 159
Rate this member

Report this Post01-05-2010 09:29 PM Click Here to See the Profile for Gokart MozartClick Here to visit Gokart Mozart's HomePageSend a Private Message to Gokart MozartDirect Link to This Post
bump
IP: Logged
ghost187x
Member
Posts: 1026
From: El Paso, TX
Registered: Oct 2008


Feedback score: (1)
Leave feedback

Rate this member

Report this Post09-20-2010 08:11 PM Click Here to See the Profile for ghost187xSend a Private Message to ghost187xDirect Link to This Post
bump..
IP: Logged
2Sly4U
Member
Posts: 33
From: MO, USA
Registered: Mar 2011


Feedback score: N/A
Leave feedback

Rate this member

Report this Post03-29-2011 01:39 PM Click Here to See the Profile for 2Sly4USend a Private Message to 2Sly4UDirect Link to This Post
Bump...Any progress?
IP: Logged
Previous Page | Next Page

This topic is 7 pages long:  1   2   3   4   5   6   7 


All times are ET (US)

T H I S   I S   A N   A R C H I V E D   T O P I C
  

Contact Us | Back To Main Page

Advertizing on PFF | Fiero Parts Vendors
PFF Merchandise | Fiero Gallery | Ogre's Cave
Real-Time Chat | Fiero Related Auctions on eBay


Copyright (c) 1999, C. Pennock