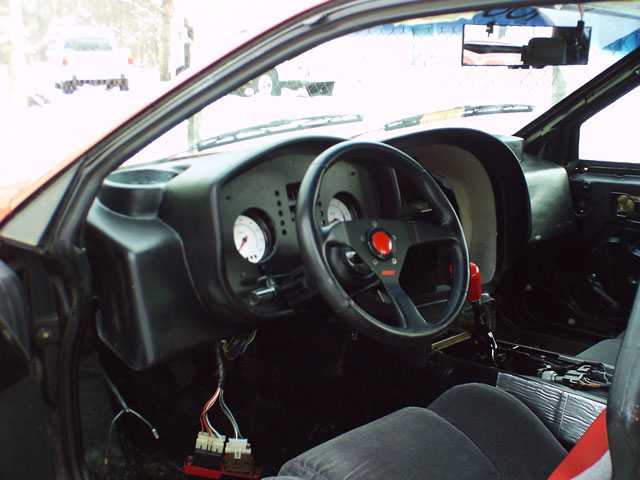
Bob, how close does the shifter come to hitting the radio surround?
It's pretty close. I pushed the dash back as far as I could to clear it. I think what I'm going to do is to cut about 1.5" off the shifter to gain some more clearance. Besides, I always thought the darn thing was too tall.
IP: Logged
07:44 AM
naskie18 Member
Posts: 6258 From: Commerce Twp, MI, USA Registered: Jun 2002
It's pretty close. I pushed the dash back as far as I could to clear it. I think what I'm going to do is to cut about 1.5" off the shifter to gain some more clearance. Besides, I always thought the darn thing was too tall.
Thats right...you need a shortened....automatic shifter....hehe. I does look really high in those pictures though, I bet you could pretty easily chop an inch off it.
Thanks for the pics of the GP dash, that looked pretty good...now I've got to figure out which dash I want, Firebird, Grand Am, or Grand Prix. I guess I'll look for some of each when I go to the yard today and see what they've got
[EDIT] Think a Grand Prix dash would be fairly simple to wire up with a 3800SC, or would it be the same sized mess regardless of which dash I pick? [/EDIT]
Nick
[This message has been edited by naskie18 (edited 11-26-2003).]
IP: Logged
08:13 AM
Dewie Member
Posts: 171 From: Truro, Nova Scotia, Canada Registered: Jul 2003
Those of you who have done Dash Swaps, could you please make a list of things to ask for when going to a salvage yard? Or is it just as simple as asking for a dash with cluster intact?
On my GT I reduced the interference of the shifter with dash even further by not only installing a short shifter, but I installed Rodney Dickman's Ultimate Getrag shift kit. My shifts are ridiculously short, but I like it
If you are looking for a dash in the yard, the best thing is to get everything. It's going to vary depending on the dash, but you want the dash, cluster, all bezels and filler panels, (for firebird there is an upper and lower panel, gauge cluster and radio bezel and the fuse box cover on the left) and the glovebox door.
Also try to pick up any switches and controls, (headlight switch, and a/c controls). The A/C switch is most likely going to need to be modified as the fiero's is electric and most other GM is vacuum.
For more details on my swap see my homepage (in my sig)
IP: Logged
12:43 PM
RCR Member
Posts: 4454 From: Shelby Twp Mi Registered: Sep 2002
So far, I've pieced my dash together via Ebay, that's why I'm missing some pieces. The best way would be to get the whole thing as an assembly.
quote
Think a Grand Prix dash would be fairly simple to wire up with a 3800SC, or would it be the same sized mess regardless of which dash I pick?
The GP dash would be a little easier because all the gauges are analog, but that requires more wires. You would still need to have the body controller to get all the dash lamps functioning properly. The GA is serial, so there are only 10 or so wires including turn signals, etc, to hook up. And again, with the body controller, most of the lamps should work. I don't have any problems with modifying my cluster to get the lights I want and to disable the ones I don't.
All in all, it's a mess regardless of the one you pick.
IP: Logged
01:41 PM
jscott1 Member
Posts: 21676 From: Houston, TX , USA Registered: Dec 2001
That's how I built my interior. You can't beat the convenience, but I probably paid twice what it would have cost if I had just bought a complete wrecked firebird.
IP: Logged
01:46 PM
boristheblade Member
Posts: 501 From: Rochester, MN Registered: Nov 2003
Hmm, anyone ever try Taking the 3800 and the dash out of a GTP to put into a fiero? How complicated would this get, and what would be the advantages as far as the wiring goes?
IP: Logged
01:48 PM
RCR Member
Posts: 4454 From: Shelby Twp Mi Registered: Sep 2002
Hmm, anyone ever try Taking the 3800 and the dash out of a GTP to put into a fiero? How complicated would this get, and what would be the advantages as far as the wiring goes?
Check out the Jim Ashlock link above. He used the entire GTP to build his car. It includes the 3800SC/trans, the suspension and cradle, anti-lock brakes, dash, etc.
IP: Logged
02:19 PM
Nov 30th, 2003
gascarracer Member
Posts: 129 From: Batavia, Ohio, USA Registered: Apr 2003
[QUOTE]Hmm, anyone ever try Taking the 3800 and the dash out of a GTP to put into a fiero? How complicated would this get, and what would be the advantages as far as the wiring goes?
Check out the Jim Ashlock link above. He used the entire GTP to build his car. It includes the 3800SC/trans, the suspension and cradle, anti-lock brakes, dash, etc.[/QUOTE]
Pictures in thread do not work.
IP: Logged
09:29 PM
naskie18 Member
Posts: 6258 From: Commerce Twp, MI, USA Registered: Jun 2002
They do if you click the link and go to that thread. Its a similiar set up to what Cliff has here, where images show up in our threads, but can't be remote linked to other places on the 'net.
Nick
IP: Logged
10:33 PM
PFF
System Bot
Dec 2nd, 2003
RCR Member
Posts: 4454 From: Shelby Twp Mi Registered: Sep 2002
Finally have an an update. It's been slow going the past few weeks. I'vew been splitting what little time I have on the engine swap and dash conversion. So here's what I've got.
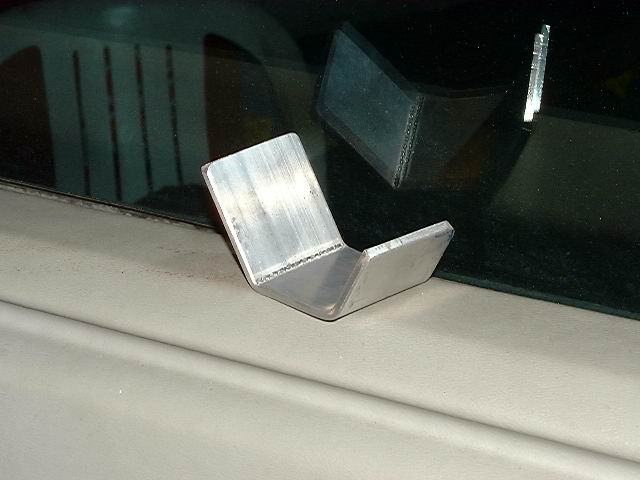
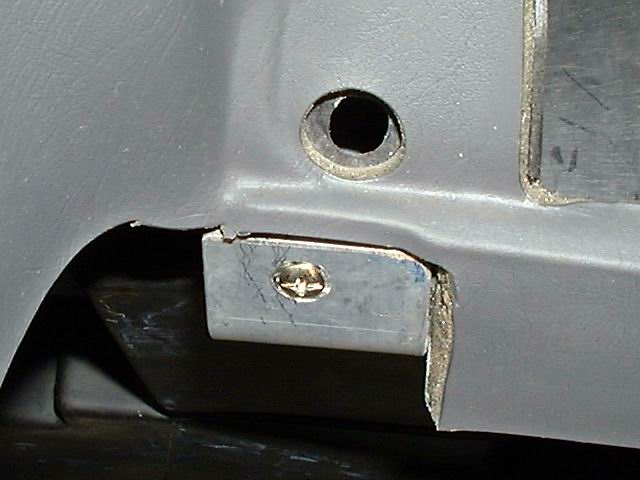
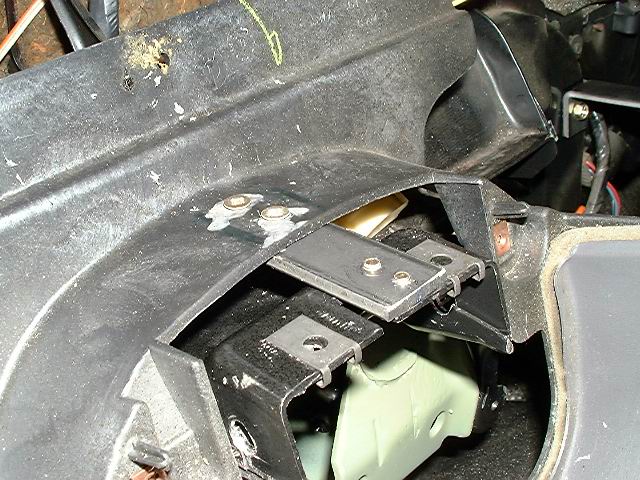
I atill need to finish securing the dash. The top is done, so I need to finish the bottom and sides. There is a bracket for the dash, just below and to the left of the glovebox opening (Still need a glovebow ). I bent up a bracket using 1.25" x .125" aluminum stock. The bracket is screwed to the heater box, and is setup so that the dash sits on it. Here are the pics: Forming the bracket: Mounting the bracket: How it supports dash:
IP: Logged
07:59 AM
RCR Member
Posts: 4454 From: Shelby Twp Mi Registered: Sep 2002
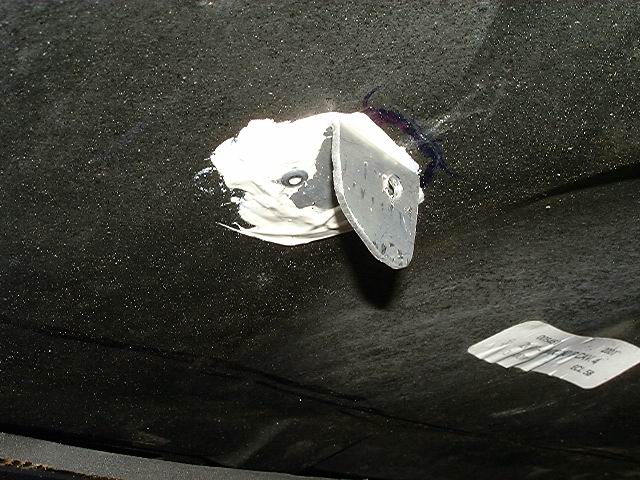
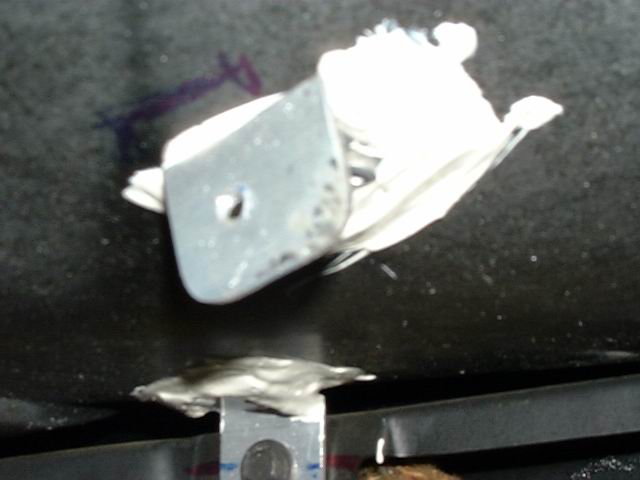
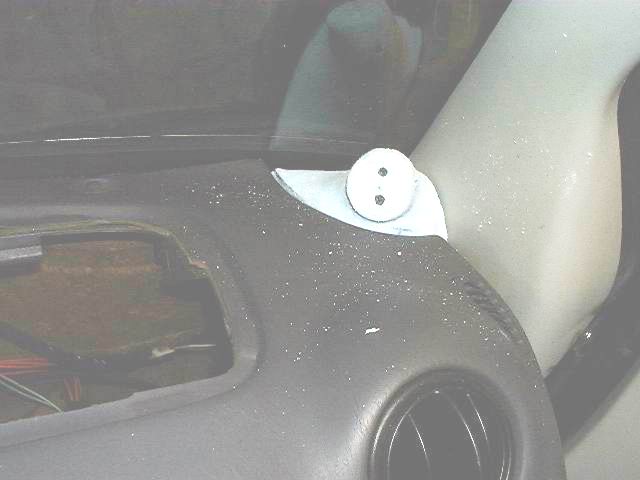
I still haven't quite figured out how I'm going to do the side mounts yet. So in the mean time, I made the mounts for the cluster. It appears that the cluster mounts to the plastic vent passages. I don't have that piece, so I had to make my own. I used the same technique that I did for the top mounts. I took the dash out, then put the cluster in dash. I cut two pieces of 1"x1" angle aluminum for the brackets. I formed the pieces slightly on a body dowel so they would rest more securely on the rounded portions of the dash. Then I glued and pop riveted them in place. Here are some more pics: Right mount: Left mount: Cluster in position on right mount:
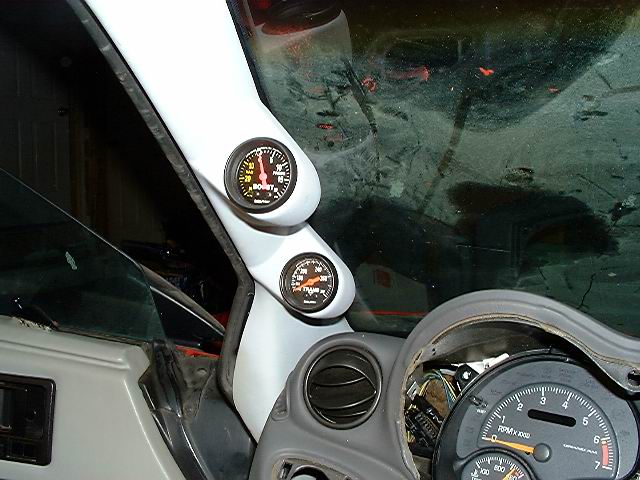
And to finish today's update, Here's a pic of the gauge pods I made. I used the pods from a GP (came with the trans temp gage and cooler) and formed them to the A-pillar trim. I put it in place to verify the fit.
IP: Logged
08:13 AM
RCR Member
Posts: 4454 From: Shelby Twp Mi Registered: Sep 2002
I need to post one correction. As you progress through the project, you always find a mistake. The bracket that holds the center of the clster to the column support had a little flaw. The way I mounted it, the braket was pop rivetted to the dash, and a screw came up through the column mount to fasten it together. While working on the center mount, it occured to me that this will not work if the column is in place (which it must be to final mount the dash). So, I had to drill out the rivets and thread the holes for screws. Now, I can screw the bracket to the column support, put the column in, then screw the dash to the mount.
[This message has been edited by RCR (edited 12-06-2003).]
IP: Logged
08:28 AM
David Bartlett Member
Posts: 1090 From: Ancaster, Ontario, Canada Registered: Aug 2001
I'm planning on using some form of vent hose, whether dryer vent or whatever, I'm not sure yet. We use some 2.5" to 3" black hose at work that I think I'm going to look into. I'm going to connect both side vents and defoggers, along with the right vent in the center. The other two center vents are probably going to be gauge housings. I'll plumb all of the hoses into the main Fiero vent box. The center windshield vent is still up for grabs. I'm thinking of cutting out a section of the dash, then forming a fiberglass cover with vent holes for it. We'll see
IP: Logged
05:07 PM
Dec 7th, 2003
RCR Member
Posts: 4454 From: Shelby Twp Mi Registered: Sep 2002
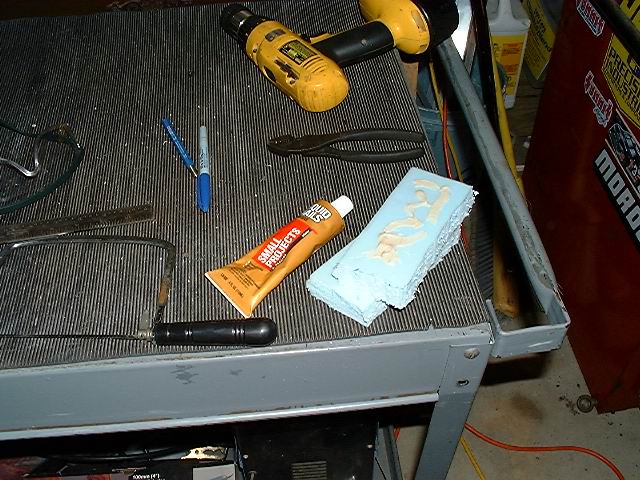
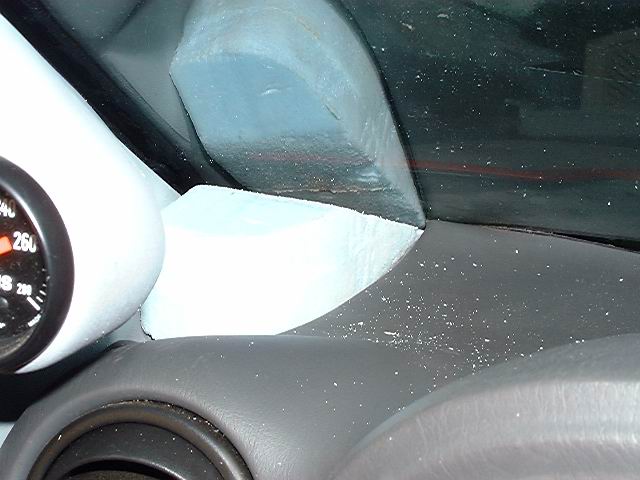
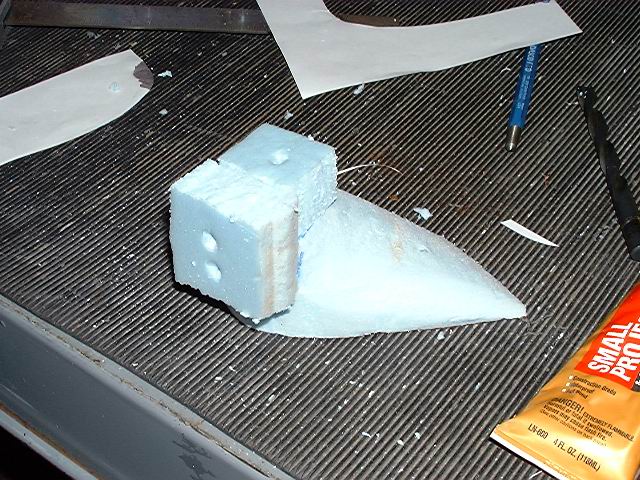
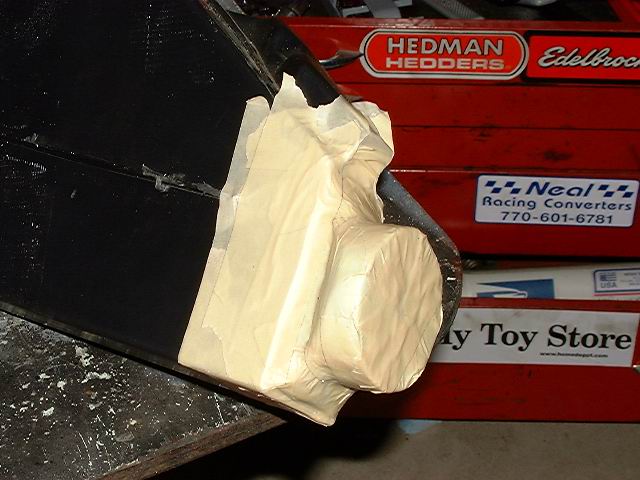
I've started forming the fill panels for the A-pillar holes. It's not a process I've completely figured out yet, so I won't go into too many details (could fill an entire new thread), but if there any specific questions, please ask. Here are a few pics (as usual). Please feel free to chime in and give me some tips:
Foam cut to the approxiamate size and glued together:
Good work. The project looks like it's coming along nicely. One hint that may be helpful: To form the filler pieces, you may want to consider using the course green strofoam like is used for crafts. You can easily shape it by simply rubbing it with a second piece. Once completed, cover it with masking tape and then a layer of fiberglass. You can then use bondo to shape and smooth it out.
Keep working , Roy
IP: Logged
11:20 AM
rube Member
Posts: 165 From: Indianapolis, IN Registered: Sep 2002
You probably already know but don't use polyester resin with styrene foam. Poly eats the blue foam your using. A layer of masking tape over the foam won't quite keep the resin at bay. When you fiberglass, use epoxy resin. Ask me how I know.
IP: Logged
11:43 AM
naskie18 Member
Posts: 6258 From: Commerce Twp, MI, USA Registered: Jun 2002
To form the filler pieces, you may want to consider using the course green strofoam like is used for crafts. You can easily shape it by simply rubbing it with a second piece.
I'm pretty much using the blue foam because it was available. It sands much easier than expected. I'm using a coping saw to rough shape it and 80 grit cloth to get it where I want. It didn't take very long to make the two peices.
quote
ou probably already know but don't use polyester resin with styrene foam. Poly eats the blue foam your using.
Yeah, I know. I'm not sure if I want to make a mold from the blanks, or if I should just fiberglass over it. Either way, I think I'm going to put a layer of joint compound on it to get it closer to the final shape. The joint compound will protect the foam in both cases.
IP: Logged
08:34 AM
Dec 10th, 2003
rube Member
Posts: 165 From: Indianapolis, IN Registered: Sep 2002
Cuz I built an entire dash mold plug out of blue styrofoam and started to lay up fiberglass mat with polyester resin. Giant mess. I was able to repair it to some degree.
IP: Logged
04:06 AM
Dec 11th, 2003
mrfixit58 Member
Posts: 3330 From: Seffner, Fl, USA Registered: Jul 99
You probably already know but don't use polyester resin with styrene foam. Poly eats the blue foam your using. A layer of masking tape over the foam won't quite keep the resin at bay. When you fiberglass, use epoxy resin. Ask me how I know.
The masking tape method is exactly how I built my custom computer cover. Just make sure you cover ALL the foam and that there are no wrinkles in the tape where the resin can sneek in. For smaller pieces, it should work fine. Rube is probably right though if you have a very large piece or something that has a lot of complex angles.
Thanx guys. These pods are pretty small, and do have a lot of curves. I think that a wide tape would be very difficult to use. I threw a layer of thinset (drywall mud) on it last night. Tonight I'll sand it smooth. I've read over at fiberglast.com that shellac can be used to seal the plaster for a mold. I'm still not set on a mold, but if I just cover it with glass I'll be able to get the plug out easier. Although now that I'm thinking about it, I suppose I could leave the plug in and drill out the opening for the tweeter. Too many choices.
IP: Logged
07:48 AM
PFF
System Bot
Dec 19th, 2003
RCR Member
Posts: 4454 From: Shelby Twp Mi Registered: Sep 2002
Sorry for the long delay in between the posts. I've been collecting materials to finish the pods, and working ideas for the vent. I also picked up some black vinyl(?) RV sewage pipe at Walmart that should work good for the ducts. I'm also working on the rear suspension parts for the engine swap. I should have some time into it this weekend for a better update.
See you then....
IP: Logged
10:10 AM
madcurl Member
Posts: 21401 From: In a Van down by the Kern River Registered: Jul 2003
Good job RCR! You are helping me with ideas on how to finish my finish my firebird interior.
------------------ If you find my advice useful, then please give me a positive rating, thanks... 1988 GT (Firebird Interior) 1988 Coupe (Daily Driver), 1985 SE (Project Car) Recent Addition 1985 Coupe (parts car) Firebird Interior Installation Website
IP: Logged
10:51 PM
Dec 21st, 2003
RCR Member
Posts: 4454 From: Shelby Twp Mi Registered: Sep 2002
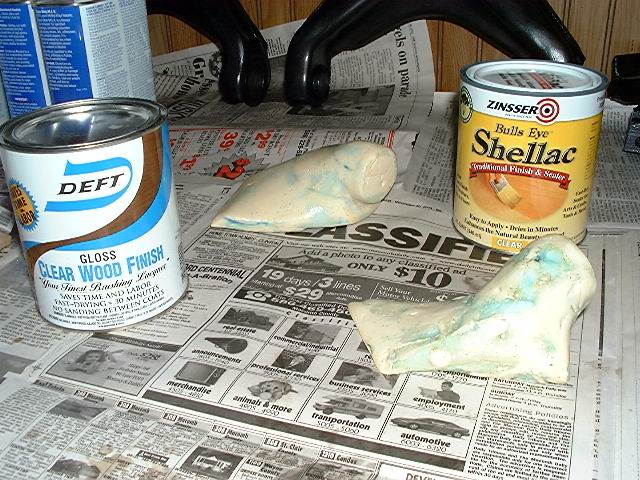
Ok, making a little progress after a little setback. First, lessons learned.
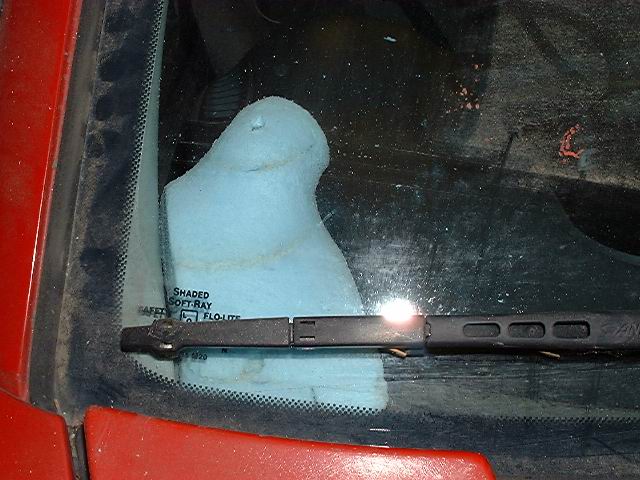
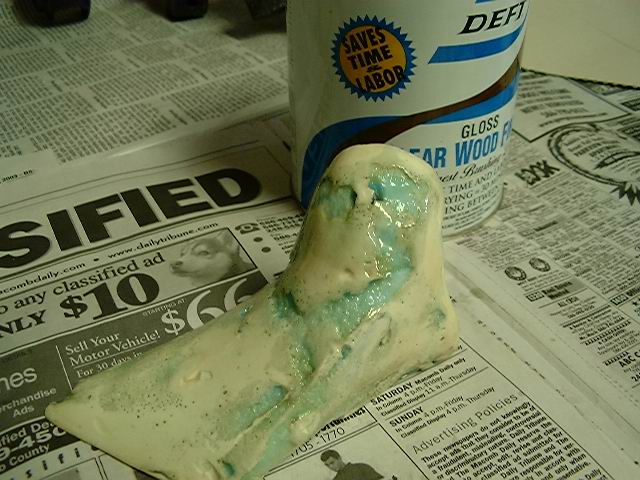
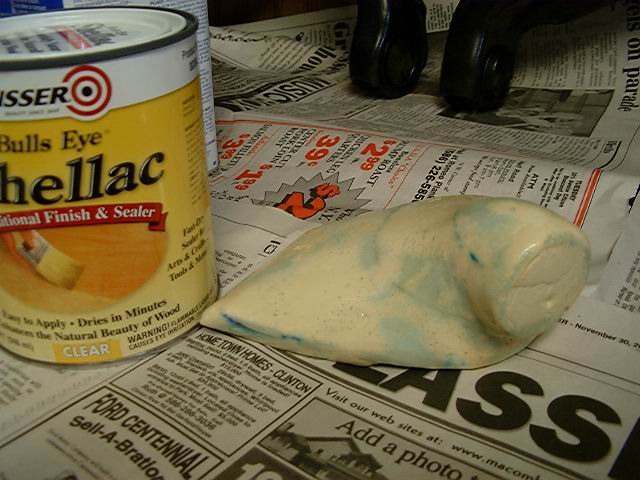
I had decided to shellac the pod plugs, so as to seal the plaster and foam. I looked all over the local Walmart, but couldn't find any. I thought I read that laquer could also be used. First lesson, check your facts. Laquer eats foam. Second lesson: patience. I should have waited to go to Home Depot, where I picked up some shellac. Both plugs:
The damage:
The good one, with the right stuff:
I shellaced the bad one, and will repair the damage with spot filler. Then I'll shellac it again.
IP: Logged
10:17 AM
RCR Member
Posts: 4454 From: Shelby Twp Mi Registered: Sep 2002
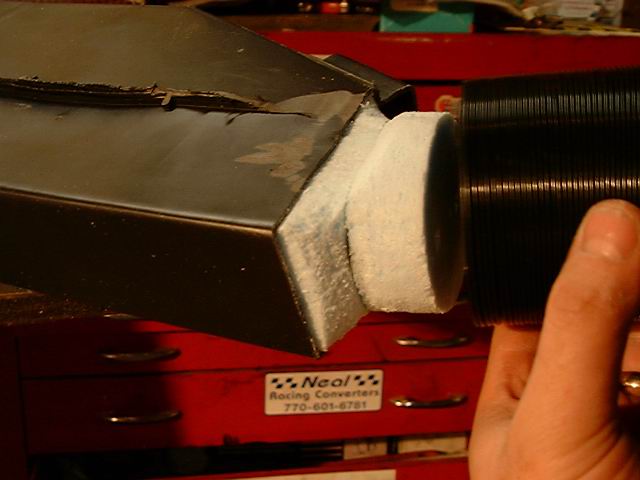
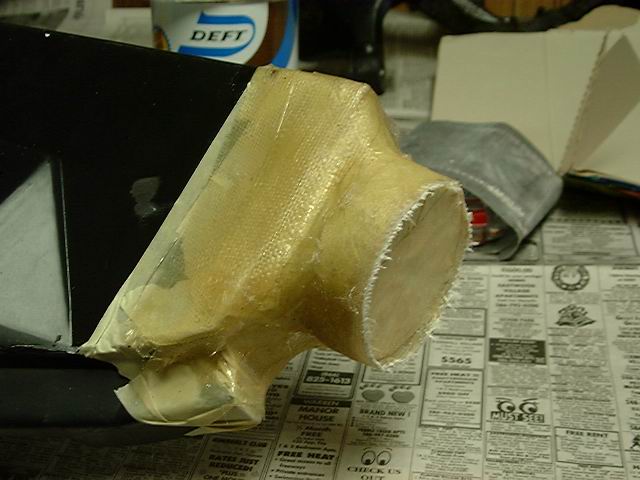
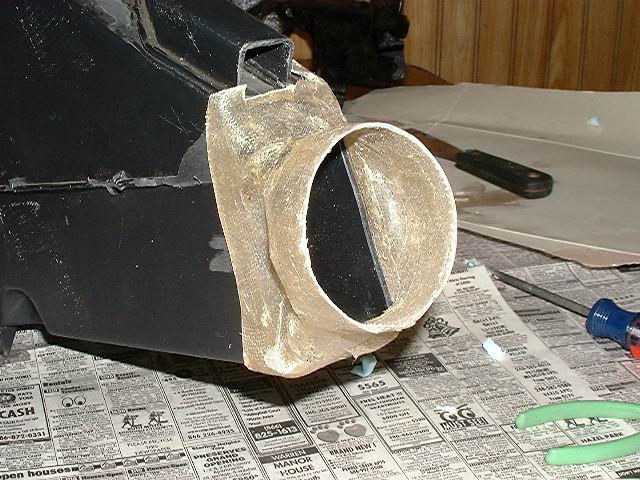
Using the same foam technique, I decided to work on the vents while the shellac was drying. I cut the ends off of the Fiero airbox. Then I made foam plugs to fit the ends, so that I can attach the RV pipe to it.
This is what both ends look like.
Then I taped over the plug real well. And for added protection, I waxed it with carnuba wax.
Then I glassed over it. I only did one side, just to make sure it would work.
This is what the finished end looks like, kind of looks like a shopvac attachment:
To get it off the plug, I pried between the air box and glass shell with a small screwdriver to break the tape loose. Once it popped off, then I broke the foam out, and shaped it on the belt sander. It really doesn't need to look that great, so I won't spend any time making it pretty.
That's it for now. Today I'll work on the pod plugs again, and lay up the other vent cover.
IP: Logged
10:46 AM
Dec 22nd, 2003
mrfixit58 Member
Posts: 3330 From: Seffner, Fl, USA Registered: Jul 99
Nice job. The masking tape method worked out well. I noticed that you left the side window defroster duct open. Are you planning on retaining this feature?
That looks great thank you for posting those pictures it helps to give me some really good Ideas. You definetly get a + from me, I whish I could give you more.
IP: Logged
10:24 AM
RCR Member
Posts: 4454 From: Shelby Twp Mi Registered: Sep 2002
Good question Roy. Yes, I do plan on keeping the side defoggers. I just haven't found a way to bring them out. I need a smaller diameter tube, maybe heater hose? Once I find the pipe, I'll glass in the "fitting".
Thanx 85Lamb
IP: Logged
10:43 AM
mrfixit58 Member
Posts: 3330 From: Seffner, Fl, USA Registered: Jul 99
Good question Roy. Yes, I do plan on keeping the side defoggers. I just haven't found a way to bring them out. I need a smaller diameter tube, maybe heater hose? Once I find the pipe, I'll glass in the "fitting".
Thanx 85Lamb
I wound up using a vacuum cleaner hose froma mini shop-vac. It was about $12 at home depot. I wanted something really flexible that would be ozone friendly (i.e., wouldn't breakdown due to heat and sunlight. I glued (using two part adheasive for rigid plastic) a modified 3/4" PVC coupling to the vent box for the nipple and the shop-vac hose slipped snuggly over the end. Another alternative may be a pool cleaning hose.