WOW thats all i have to say is wow.... the grand am dash is awesome and thats one of the reasons i have a grand am lol..... but this is just great i never really thought of this .... now would this work without the engine swap??? would you have to do a lot more converting with the wires or would it be basically the same project.... when you finish this you should make a guide with pictures and all... great work man
IP: Logged
12:34 PM
RCR Member
Posts: 4454 From: Shelby Twp Mi Registered: Sep 2002
CRNF2: I bought an Alero when they first came out. I really liked the look of the dash in that and the Grand Am. As for the swap, it is a lot easier due to the engine swap. As I was collecting pieces and info, I found that the instrument cluster is controlled off of the serial data bus. This means in an analog conversion, such as the stock Fiero, all of the gauges would need to be converted. That adds a whole new dimension to the swap. If you followed Jon and Roy's topic on the Firebird swap, they had to change the fuel gauge. Now imagine doing the speedo, tach, fuel, and temp gauges, plus all the lights. I would have tried if I had to, but that's just me.
IP: Logged
02:27 PM
Dec 30th, 2003
RCR Member
Posts: 4454 From: Shelby Twp Mi Registered: Sep 2002
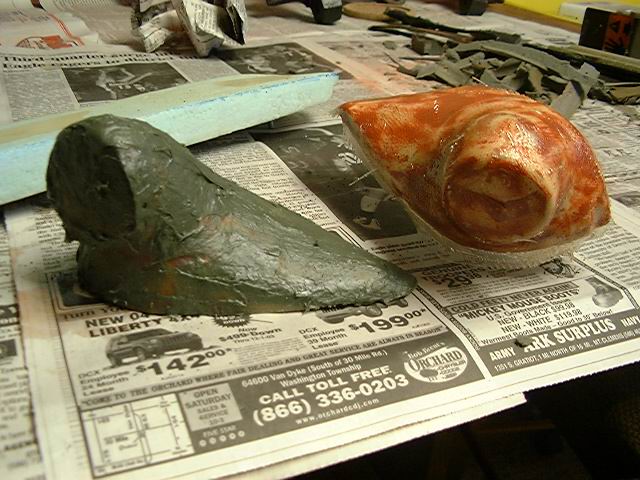
The Christmas week was busier than expected, so I should have a good update in the next couple of days. I decided to just glass over the end pods and see how it works. In preparation for this, I put a heavy coat of shellac on the plug, and will give it a coat of carnuba wax prior to the glass. Hopefully it doesn't melt. I also cut out the area for the windshield vent. I hope to have the foam plug made for that soon. If the pods work out, I'll use the same technique for that, too.
______________________________________________________________________________________________ Merry Christmas everyone and Happy New Year. May everyone's projects work out and be under budget.
IP: Logged
01:47 PM
Jan 1st, 2004
RCR Member
Posts: 4454 From: Shelby Twp Mi Registered: Sep 2002
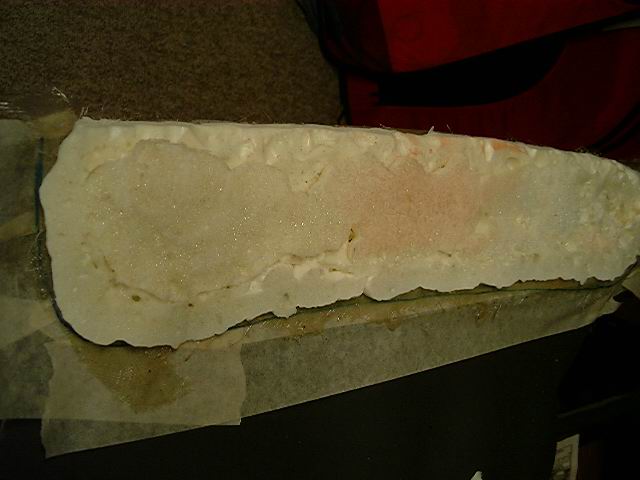
Nothing blockbuster to report, just some progress. In the continuing adventure of creating the end pods, I glassed over the foam bucks. I then applied a layer of fiber reinforced filler. Then comes sanding time.
IP: Logged
09:20 AM
RCR Member
Posts: 4454 From: Shelby Twp Mi Registered: Sep 2002
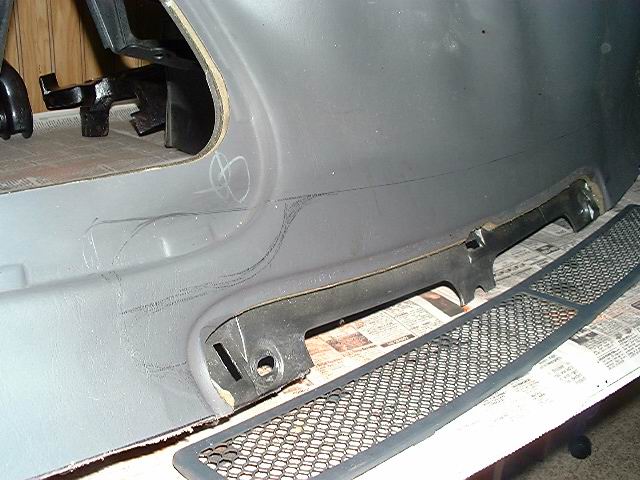
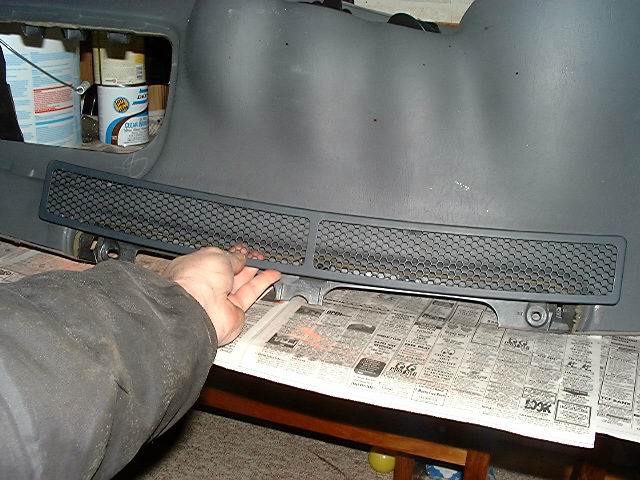
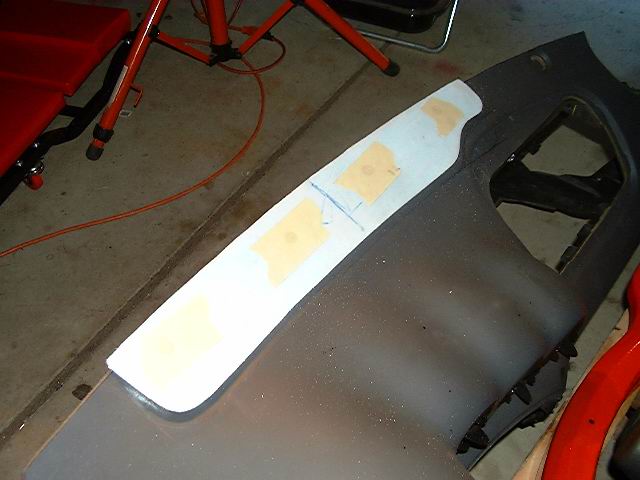
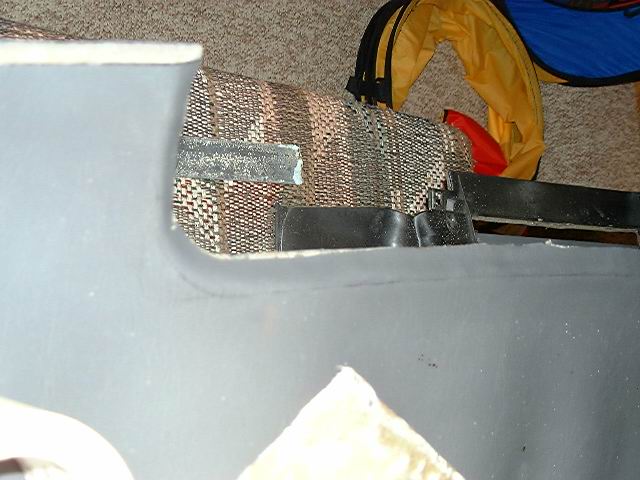
I've also started tackling the wind shield vent. This is the step that really points towards no turning back, as I had to shop up the top of the dash to make a vent opening. First off, with the dash in, I marked off where the original vent is located. Then I marked the dash with what I thought a nice "stock shaped" vent might look like. This picture shows the original screen, which I plan on using to keep the "stock" look.
This image shows where the stock vent would be located.
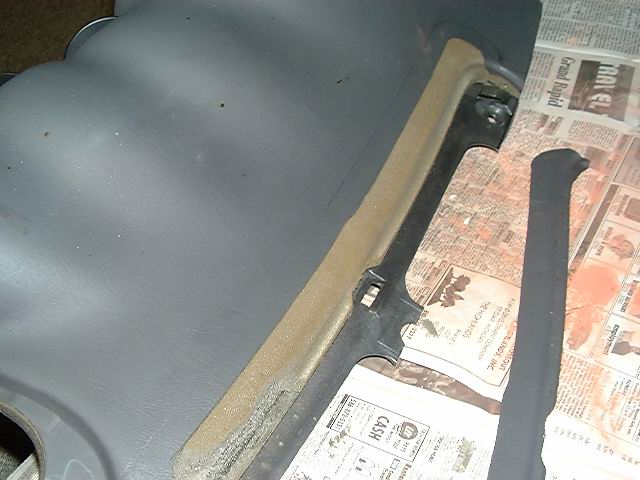
After marking it up, I carefully removed the top vinyl layer using an X-acto knife. I used the knife because I thought cutting it with a saw might leave a bad edge. As it turned out, it probably wouldn't matter.
I then cut out the plastic using a coping saw. After cleaning up the cut, I back-cut the foam out from under the vinyl using a sharp razor blade. By back cutting the foam, it will allow me to heat the vinyl and push/glue it down giving a more finished look.
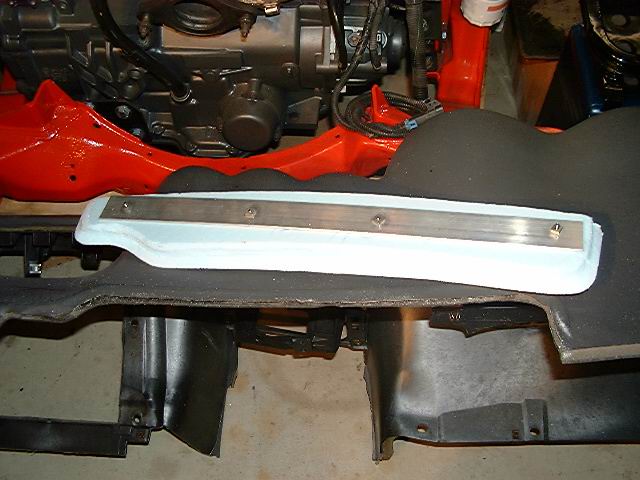
Once I was happy with that, I started making the foam plug for the cover. I plan on laminating the foam with fiberglass, then coutting out the center for the vent. I'll then use the stock screen in the hole. By lamentaing the foam, it'll give me a stronger piece and allow easier mounting. Here is the finished shape. The tape covers screw heads.
The screws are used to mount an aluminum bar across the back. The bar is bent to the curve of the dash, and allows the foam to maintain that curve. It will come off once the vent is cut out.
IP: Logged
09:41 AM
Jan 9th, 2004
RCR Member
Posts: 4454 From: Shelby Twp Mi Registered: Sep 2002
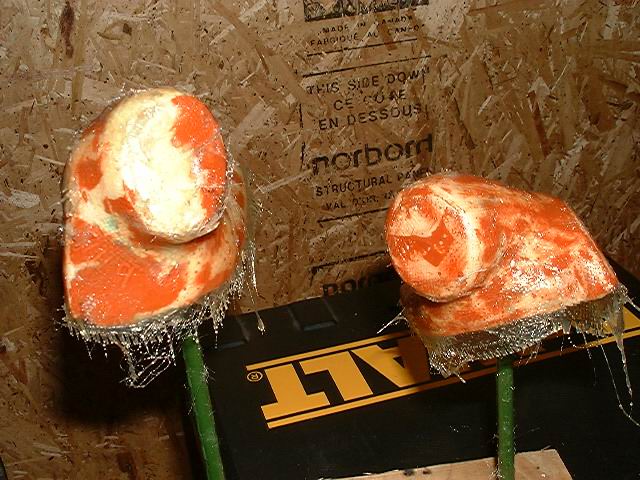
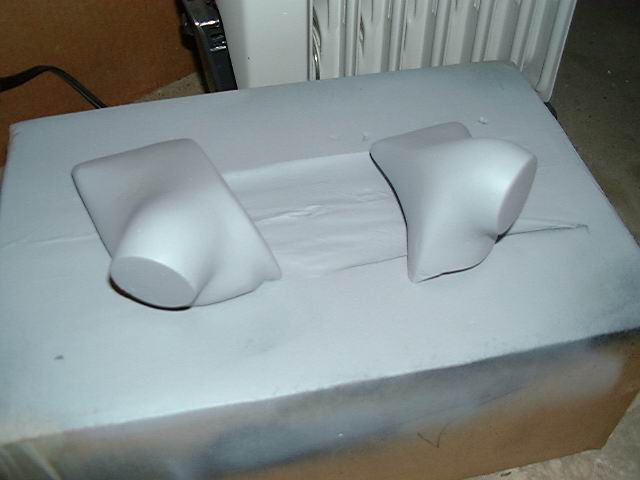
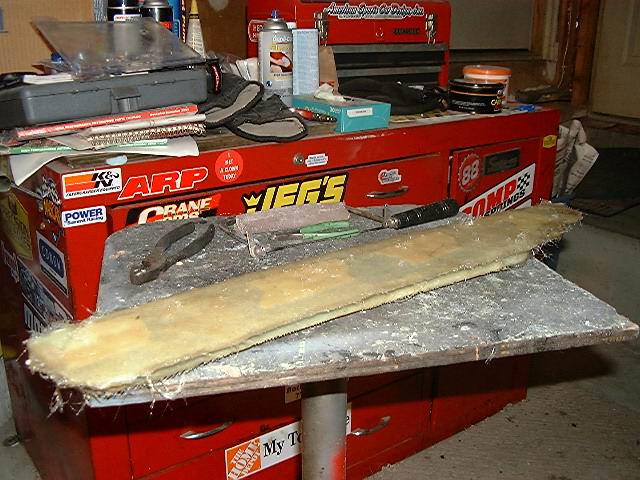
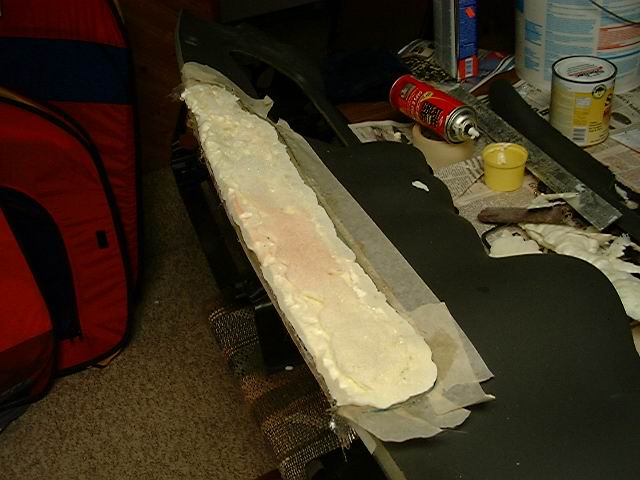
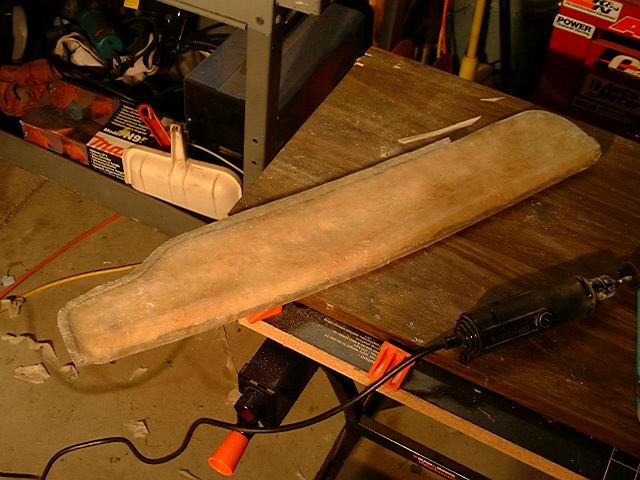
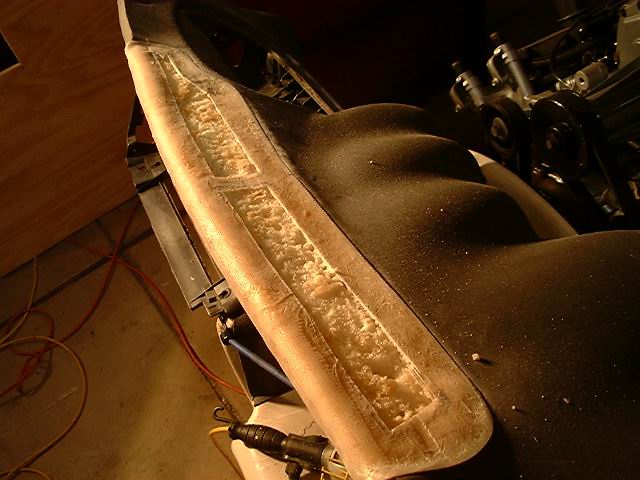
Another week has gone by and progress has crawled along. The speaker pods are almost complete.
They need a bit of spot putty and a final coat of primer before the final top coat. I'm figuring on mounting them with Velcro. Now I need some speakers.
[This message has been edited by RCR (edited 01-09-2004).]
IP: Logged
07:18 PM
RCR Member
Posts: 4454 From: Shelby Twp Mi Registered: Sep 2002
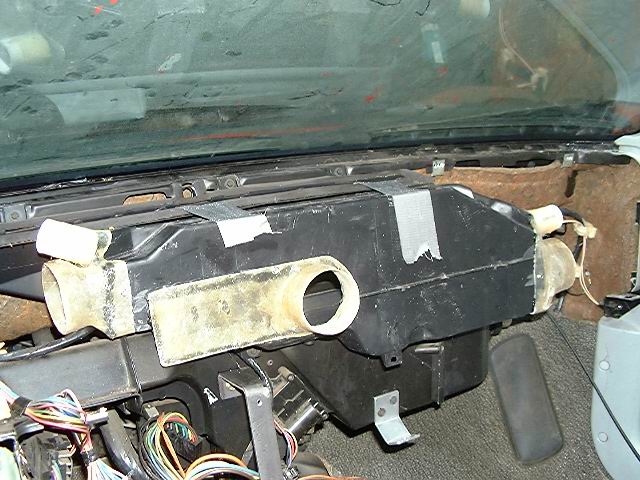
The airbox is also complete, yet needs to be permanently mounted. I cut the front extension off and made a plate with a single 3" outlet to go to the rightmost of the center vents. This will allow me to put gauges in the other two. I also made sure there was room on the blocking plate just in case I want to run one or two more vents.
All of the pieces were rtv'd into place. A couple of 1/4" screws makes sure each piece stays in place.
IP: Logged
07:24 PM
RCR Member
Posts: 4454 From: Shelby Twp Mi Registered: Sep 2002
The center windshield vent is in the beginning process. A couple of layers of glass need to be smoothed out and fit to the dash.
I've also solved the glove box problem. I found a new cover on Ebay. Hopefully it'll be here on Monday. I also found someone with a totalled GA. Hopefully I'll be able to get the rest of the missing pieces from him.
Not enuf progress for a real update. Just wanted to mention that the glove box door is in and that I've now picked up a cd/cass stereo from a 2001 Montana. (Had to be a Pontiac for the orange lamps). It should fit, but if it doesn't it'll end up in the wife's Montana. Now to go dig out my garage. (Big snowfall last nite.)
IP: Logged
08:21 AM
PFF
System Bot
Jan 31st, 2004
RCR Member
Posts: 4454 From: Shelby Twp Mi Registered: Sep 2002
-It's been a while for an update. Since my last update I became a father (third time) with my first daughter. Needless to say, between that and the extreme cold, it's not exactly easy to get anything done. I have managed to squeeze a little work in and I have pics.
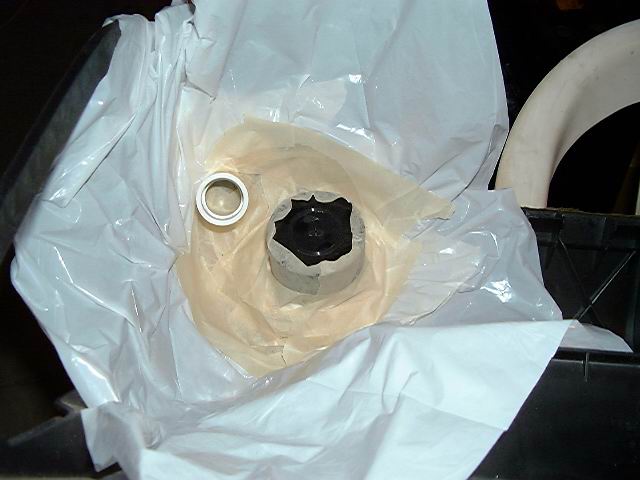
The installation of the vents requires some kind of fixture or bracket to mount the hoses to the dash. breaking out the fiberglass again, I made my own. Using some 1" pvc for the defrost side vents and a couple of paint can tops for the main side vents, I taped everything together iside the dash, and layed some glass on top.
This pic shows the "before" process on the passenger side. The dash is taped to keep the resin from sticking to it and the tubes are taped into place. A garbage bag is used here to protect areas from resin (I'm sloppy).
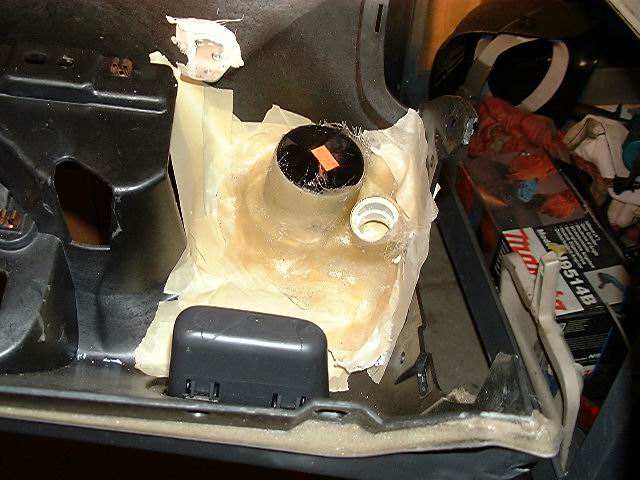
This pic shows the finished drivers side still in the dash. Both pieces popped out easily, but required some touching up with more glass to ensure that the both vents are sealed to the dash.
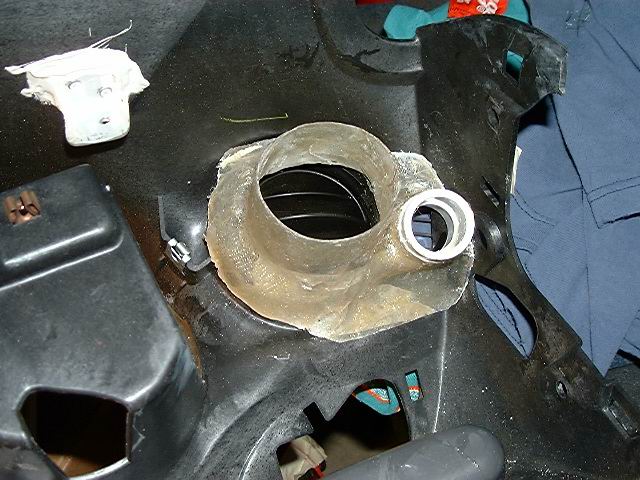
This is the completed drivers side adapter, ready to be mounted.
[This message has been edited by RCR (edited 01-31-2004).]
IP: Logged
03:00 PM
Feb 8th, 2004
tpeerson Member
Posts: 105 From: Sunny Chicagoland Registered: Feb 2001
Not much in the last week. Mounted the airbox. Prepped the glass vent covers. Checked the fit of the vent hoses. I'm trying to figure out how to finish the center vent. Kinda stuck on that. Another setback was the radio. The theft lock is based on the body controller, not an entered code. Not sure I'll be able to bypass it or even stick it in my Montana. All that and a new daughter as of the 23'rd of January. Still plugging along though.
IP: Logged
03:21 PM
doublec4 Member
Posts: 8289 From: Oakville, Ontario, Canada Registered: Jun 2003
I think I figured out what to do about the center vent. The the part I started previously was pretty much scrapped. I pulled all the foam and the metal plate out so all I had left was a flat piece of fiberglass. Then I went to work on the dash covering. As previously descibed, I undercut the foam so that the vynel could be folded over and provide an original finish. Then I coated the vynel and foam with contact cement. Once the cement was cured, I heated the vynel with a heat gun and pressed it into place.
With the dash ready, I taped up the edges and glued the flat piece of fiberglass to the bottom. Now I'm going to fiberglass the bottom to the edges. By doing this, I will have a piece the exactly conforms to the edges of the dash.
My next step is to get some urethane spray foam and build up the top. Once that is complete I will fiberglass over the top and hopefully have something close to what I need.
Baby's crying, gotta go.
IP: Logged
08:38 AM
Feb 25th, 2004
RCR Member
Posts: 4454 From: Shelby Twp Mi Registered: Sep 2002
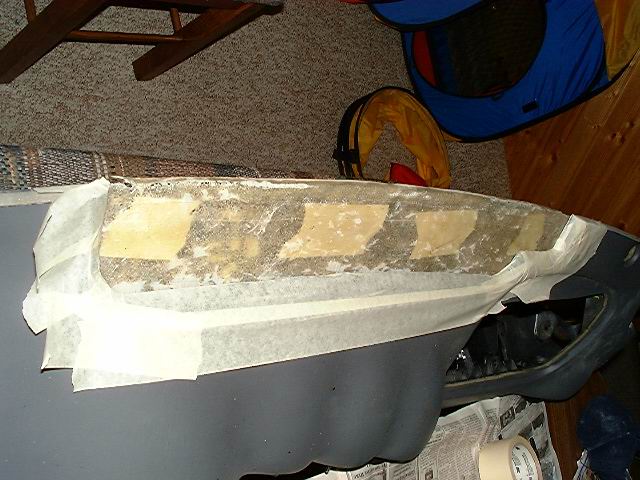
It's been a Hellofa week. I'm suprised I managed to get anything done. The vent is coming along nicely. That's actually all I have worked on. Continuing with the previous post: Fiberglassing the bottom to the edges worked excellent. It left me with a piece the conformed very close to the dash. Here's a look at the edges after the top was installed:
Once the glass was set, I filled the center with urethane foam. First I did the edges, then filled in the center. I found that if the foam is applied too thick, the center does not dry. I had to cut the top off and add more foam.
Here all the foam is applied and it is starting to be rough shaped. I used a hobby knife to cut it to shape. Then used 80 grit sandpaper to get it close to the final shape.
Once the desired shape was achieved, I put several layers of mat and cloth fiberglass on top. I concentrated a heaverier application of glass near the edges, nowing I was going to cut out the center anyway. This picture shows the layering well.
IP: Logged
07:12 PM
RCR Member
Posts: 4454 From: Shelby Twp Mi Registered: Sep 2002
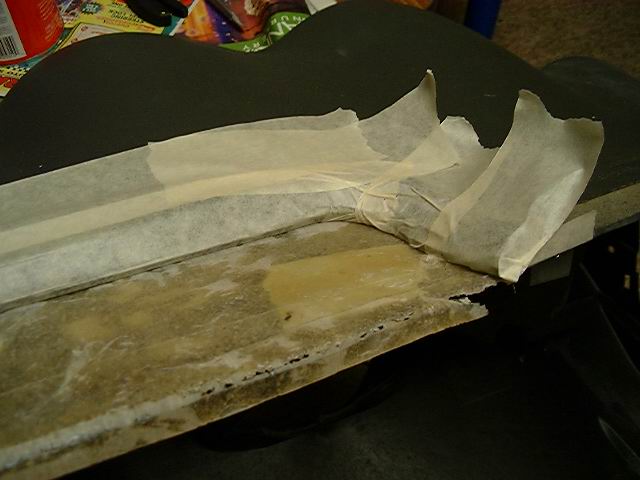
Then it's time to trim the outside egdes to fit the dash.
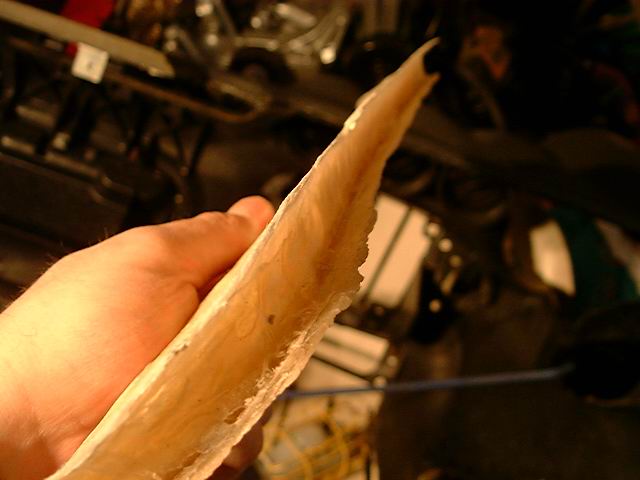
And to cut the rough center out. The foam in the center was scrapped out using a putty knife.
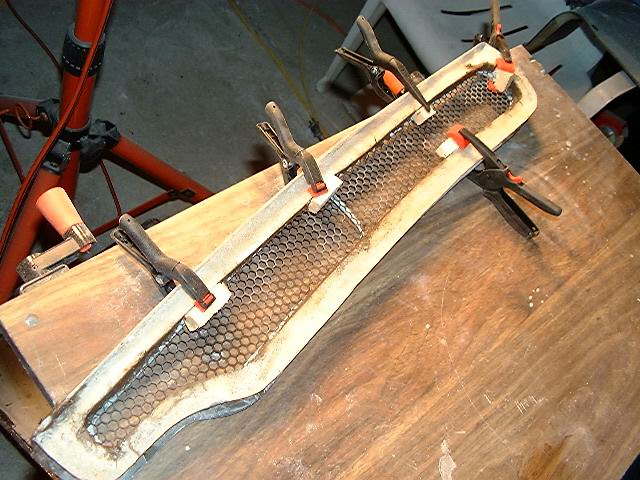
I used the template I originally made to trim the dash to give me the proper curve for the vent openings. I traced it onto the panel and used a cutting wheel to trim it close and sandpaper roll to finish the edges. Several layers of glass reinforced filler were used to shape the panel to a more finished look. Once I was happy with the top, I cut the bottom out so I could install the screen. I used the original hexagonal Fiero screen, cut down to size. I fit the screen in snug, and using some blocks of wood and little spring clamps to hold it in place, I ran a layer of filler all aroung the inside edge of the panel. This will give me a finished inner edge and hold the screen in place.
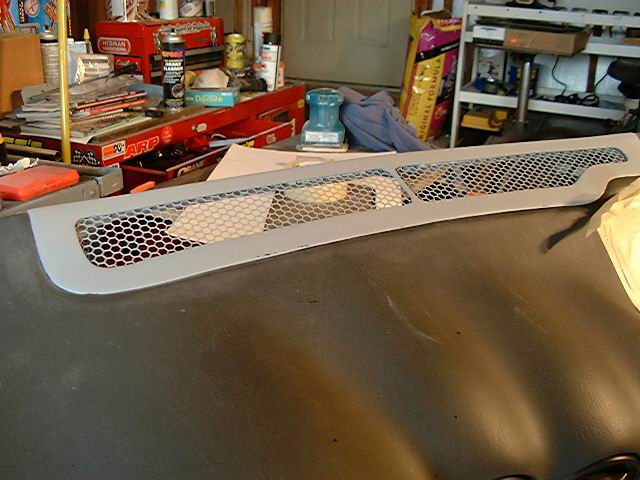
Here's a top view. Once the filler hardens and I can sand it down, I will get some pics of the panel on the dash. Overall I think it came out better than what I was expecting.
With warm weather coming, I should be able to get the primer on this weekend.
More to come... later....
IP: Logged
07:13 PM
Feb 26th, 2004
mrfixit58 Member
Posts: 3330 From: Seffner, Fl, USA Registered: Jul 99
Note: started center defroster vent on 1/1 and finished 2/25. Quality work takes quality time. My install took 10 1/2 months to complete and I didn't have to deal with freezing weather.
Your dash is coming along nicely.
Roy
IP: Logged
08:19 AM
Feb 28th, 2004
laffer98 Member
Posts: 194 From: Independence, Mo USA Registered: May 99
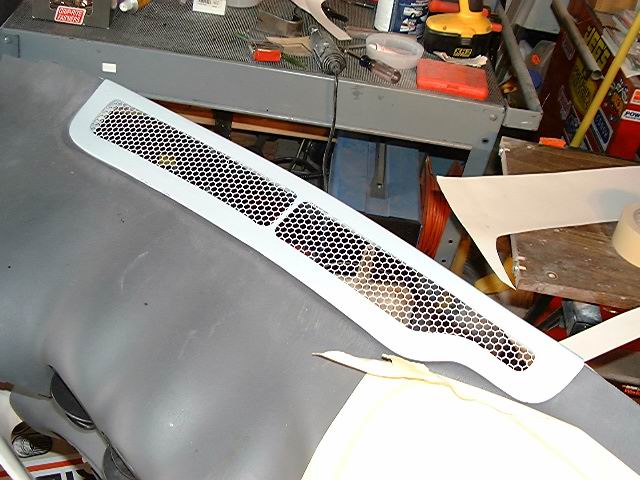
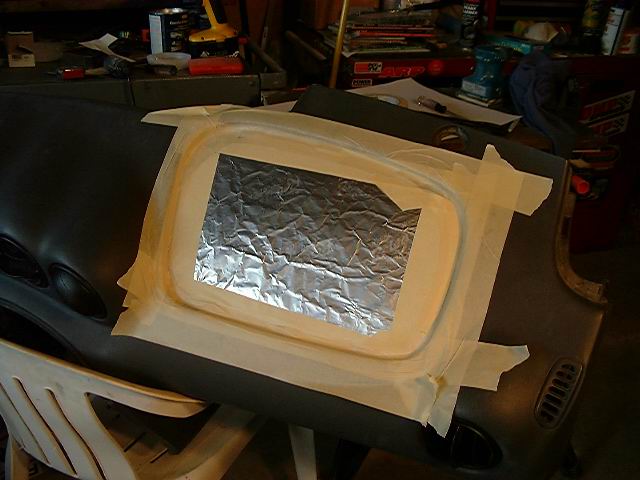
Just a quick update to add a couple more pics. We had nice weather, so I got a couple of coats of primer on it. Now I can really see what needs to be fixed :rolleyes A lot more work to do, but I'm going to wait until the rest of the pieces are together. Speaking of the rest, I started on my airbag cover. I found the aluminum foil works good to keep the fiberglass from sticking to the "mold". I think it was Roy that mentioned that somewhere. The Reynolds Wrap Non-stick adds extra protection
Here are the pics:
And here's the start of the airbag cover:
And I should mention a cudos to Cliff for this great forum and his PIP program, for whom this post would not be possible. Thanx Cliff.
-Thanx laffer98. It's appreciated. -
quote
Quality work takes quality time.
Yeah, but I'm also slow
[This message has been edited by RCR (edited 02-29-2004).]
Hey everyone. Thanx for checking in. If anyone has a comment or recommendation, please speak up. I'm always looking for new and better ideas.
Just a small update: I found the dash pieces at the dealership of all places. Couldn't beat the price at $4 each. They should be in today. Found another radio. Hope this one works better. It's a 2000 Grand Am CD/Cass Monsoon unit that does not have the theftlock activated. So far I can't get my Montana dash apart so I can try the other one in there. If it doesn't work, chalk it up to live and learn. The last part of theupdate is the bad news. I finshed the airbag cover last weekend, and I thought it came out great. I put the dash in the car to see how it looks with all the panels on. I put the airbag cover on and it did not fit. It seems I made a huge mistake when I made it. To make working on the dash easier, I bungee-cord it to a plastic deck chair. It would appear that in doing so, I inadvertantly twisted the dash. Now the airbag cover fits perfectly on a twisted dash, not when the dash is in the car. The cover is lamenated foam, so it's very stiff. There's pretty much nothing I can do with it, except start over. I'll post pics at a later time. I do have most of the wiring figured out, so hopefully I can get that done tonite.
later....
IP: Logged
07:49 AM
Mar 20th, 2004
RCR Member
Posts: 4454 From: Shelby Twp Mi Registered: Sep 2002
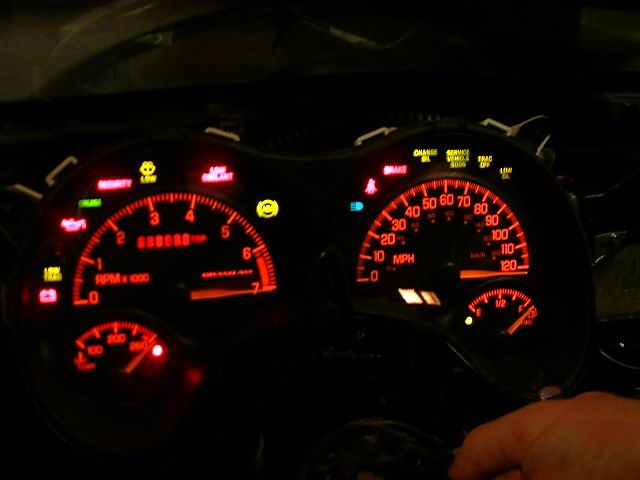
I've been trudging along slowly. I've been working on the wiring for the gauges, radio, etc for the last couple of days. I've got a good pic of the gauges lit up, too bad it's the only one that came out. All the gauges look great in the dark.
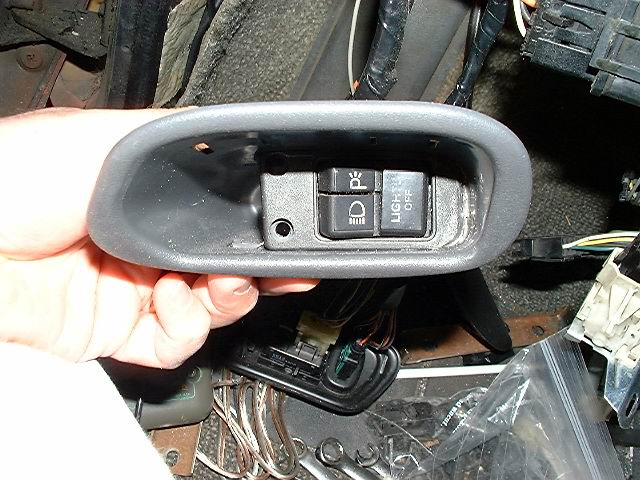
My last problem with the wiring concerns the headlights/dimmer circuit. The Grand Am does not have pop-up head lights, and are automatic at that. I'm not sure how I'm going to wire the stock Fiero controls into the new dash, as I don't have a head light switch. I was going to hide it in the change shelf under the GA dimmer, but I'm not sure. I'm also not too sure that the GA dimmer can handle the current of the Fiero dimmer. The Fiero one seems a lot heavier duty and the wire gauges are much larger. Anyone have a good idea they're willing to share?
The last thing I took care of was the trunk release. Again the GA doesn't have a provision for it, so I improvised. The GA has a ETS switch above the radio. ETS now stands for Electric Trunk System. I wired the switch into the release, so that should work well.
Thanx for tuning in. If anyone has some ideas, please feel free to shout them out.
later...
BTW, I have the wiring pinouts written down if anyone is intrested.
[This message has been edited by RCR (edited 03-20-2004).]
IP: Logged
08:23 PM
shop_rat45 Member
Posts: 3271 From: Lapeer, Michigan Registered: Mar 2004
Just thought you might like to know that the ETS button actually stands for either Engage Turbo System, or Eject Taco Switch This is a very interesting swap that I want to see pics of when it is done. The Grand Am dash is one of the major reasons that I bought my Grand Am GT back in 2000. I'm just curious though on how you got the (if you have yet) speedo and other gauges to work. Most of the gauges are on a serial data line. As for the teft lock, let me drop a line on one of my 12 volt message boards, and see what the experts say. I will let you know. BTW I have an extra instrument cluster sitting around from a 2000 Grand Am GT w/ the 150 MPH speedo. The clear plastic cover over the front of the cluster has a small crack in the bottom left corner, and has paint overspray over it. All you would have to do is swap the covers. If you want it, I'll take $30 for it shipped. LMK
Kris
------------------
IP: Logged
09:13 PM
Gary W Member
Posts: 1092 From: Cape Coral, FL Registered: Oct 2001
I've been trudging along slowly. I've been working on the wiring for the gauges, radio, etc for the last couple of days. I've got a good pic of the gauges lit up, too bad it's the only one that came out. All the gauges look great in the dark.
My last problem with the wiring concerns the headlights/dimmer circuit. The Grand Am does not have pop-up head lights, and are automatic at that. I'm not sure how I'm going to wire the stock Fiero controls into the new dash, as I don't have a head light switch. I was going to hide it in the change shelf under the GA dimmer, but I'm not sure. I'm also not too sure that the GA dimmer can handle the current of the Fiero dimmer. The Fiero one seems a lot heavier duty and the wire gauges are much larger. Anyone have a good idea they're willing to share?
The last thing I took care of was the trunk release. Again the GA doesn't have a provision for it, so I improvised. The GA has a ETS switch above the radio. ETS now stands for Electric Trunk System. I wired the switch into the release, so that should work well.
Thanx for tuning in. If anyone has some ideas, please feel free to shout them out.
later...
BTW, I have the wiring pinouts written down if anyone is intrested.
The GA dimmer will not handle the Fiero lighting circuit. AFAIK, the newer cars use a low-voltage circuit to control the lights through a module buried in the dash. I let all of the smoke out of 2 or 3 figuring my circuit out. I took the Fiero dimmer and attached it to the back of the GA facia. The wheel was almost the same size, I just had to enlarge the hole a bit.
As far as the headlight switch, you could always do what I did - put in the whole GA steering column. I modified the headlight control on the column by adding a SPDT switch to the internal mechanism of the headlight control. This is wired to the headlight control relays so when the lights are off, the relays are energized to close the doors. Parking light position sets the switch in the middle, which has no effect on the doors. Lights on raises the doors and turns on the lights. Switching back to parking lights turns off the headlights, but leaves them up. Back to off closes the doors. Mine was too old to have DRLs, but I believe I could have used the DRL circuit to control the headlight doors.
IP: Logged
09:36 PM
Mar 21st, 2004
RCR Member
Posts: 4454 From: Shelby Twp Mi Registered: Sep 2002
Hey Kris: Could you hold on to that cluster for me? It might be a while, but I'm very interested. As for making it work, I'm using the OBDII line from my 3800SC swap to control the dash. I hope it will work. I experimented by connecting the cluster to the diag port on my Montana. That worked, so this should....
Gary: Thanx for the info. What year did you use? Pics?
IP: Logged
06:56 AM
RCR Member
Posts: 4454 From: Shelby Twp Mi Registered: Sep 2002
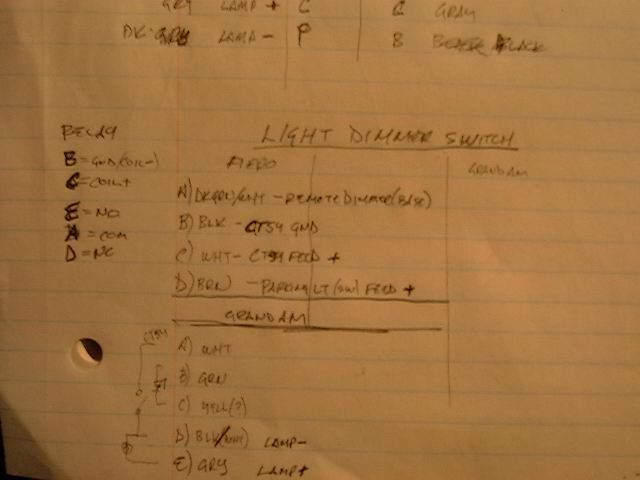
Well, most of the wiring is complete. I did not follow Gary's advice. So far it's holding up. I took the GA dimmer switch apart to figure out what it does. Essentially, there are two parts. A low current variable resistor and a higher (not high) current switch. I connected the resistor to the normal Fiero circuit, because it drives the base of a transistor used for dimming the lamps (low current drive) similar to the stock dimmer. Then I used the switch side to close a relay (low current again) that switches on the courtesy lamps (high current). I think this should work. I also have most of the work done on the headlight switch. I cut the original bezel in half, and shaped it to fit inside the left-hand change holder. This'll keep it hidden and out of the way, yet give me full function without taking another big jump into a new column. Thanx for the ideas, though. Let's keep'm flowing.
All that's left of the wiring is to come up with a new stereo, or figure out how to bypass the VIN encoded theft-loc.
[This message has been edited by RCR (edited 03-21-2004).]
IP: Logged
06:58 PM
Apr 12th, 2004
Wholf Member
Posts: 379 From: Cleburne, Texas Registered: Mar 2003
Let's see, I have the steering column plug started. The airbag cover (rev3) almost done. The tweeters have been chosen (Pinnacle) and the mounts are installed in the pods. The pods have been finish primed. The vent cover needs a bit more sanding and primer. The wiring is almost complete. The light switch is mounted. The stereo is in (Sony Xplod) so the wiring can be finished.So, where can I put the dish changer? Also, one of the side covers for the dash is almost complete (needs to be screwed on). So, excluding the console and door panels, I'm half done
Stay tuned for more garage fun....
IP: Logged
09:55 PM
Apr 19th, 2004
RCR Member
Posts: 4454 From: Shelby Twp Mi Registered: Sep 2002
Another small update.... Spent the weekend installing a cd changer in the dash. The changer is below the airbag cover, in front of air vent box. A very tight fit. I plan on having the cover removable so I can get at the changer. It's going to need some dress-up now, so I created more work for myself, again. Next time I take the dash cover off, I'll get pics of the bracketry.
Finally some good news with the stereo situation. I recieved the comm cable for the cd changer yesterday, so I had to try it out. Well, of course something was wrong. The player would not play or eject the cartridge. "Great" I thought. "Ripped off again". Well since I couldn't get it to work, I took it apart. It ended up having a cd stuck in it. It was easy to fix and now works great. That, and it was full of cd's, 10 to be exact. And the prize in this is the Led Zepplin 4 disk box set was included. I can't wait to jam to Zepplin in my new Feiro.
More to come...
IP: Logged
07:44 AM
Deabionni Member
Posts: 4088 From: Kalkaska, MI Registered: Mar 2004
Great thread, and awsome build-up! Do you have any recent pics?
Thanx, for the compliments. They help me keep going
No recent pics. The wife had the memory card for the camera last weekend, so I didn't get any. If I get to work on it this weekend, I should be able to get some new stuff, including a suprise I was working on.
later...
IP: Logged
11:37 AM
Apr 24th, 2004
RCR Member
Posts: 4454 From: Shelby Twp Mi Registered: Sep 2002
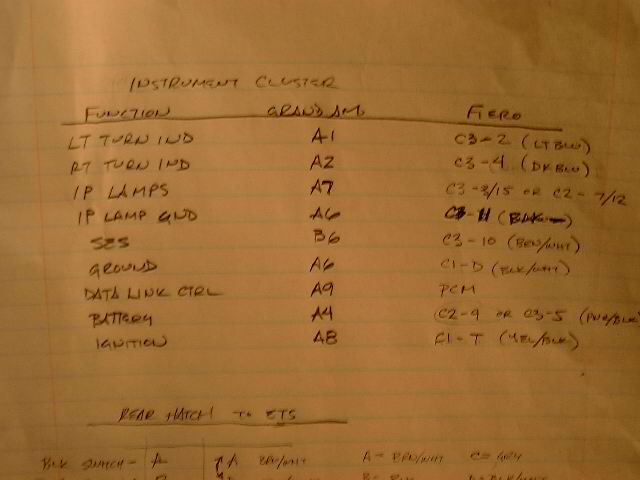
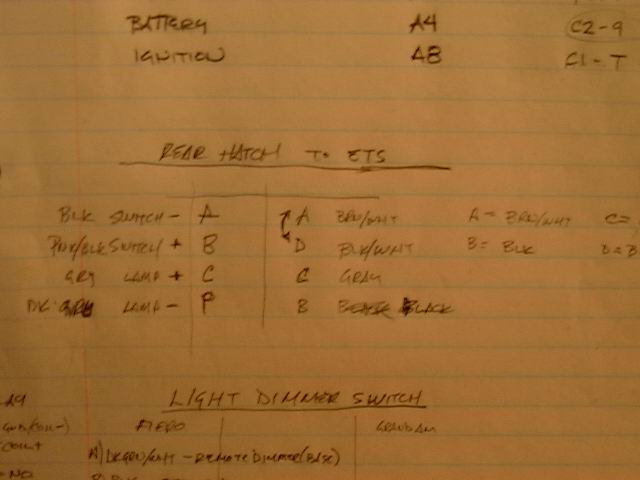
I'll start off with the wiring of the Instrument cluster. The pics aren't great, and you have to look close to make out my chicken scratchings, but they'll work.
And here is the wiring for the trunk release using the ETS switch (I have not tried it yet)
And here is the dimmer and head light switch:
Here is a pic showing how I'm mounting the headlight switch. I hid the switch in the lower left change pocket because the Grand Am does not have provisions for a headlight switch.
[This message has been edited by RCR (edited 04-24-2004).]
IP: Logged
06:57 AM
RCR Member
Posts: 4454 From: Shelby Twp Mi Registered: Sep 2002
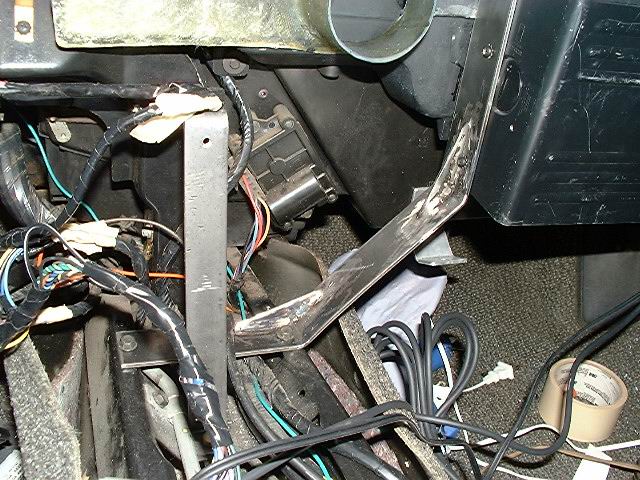
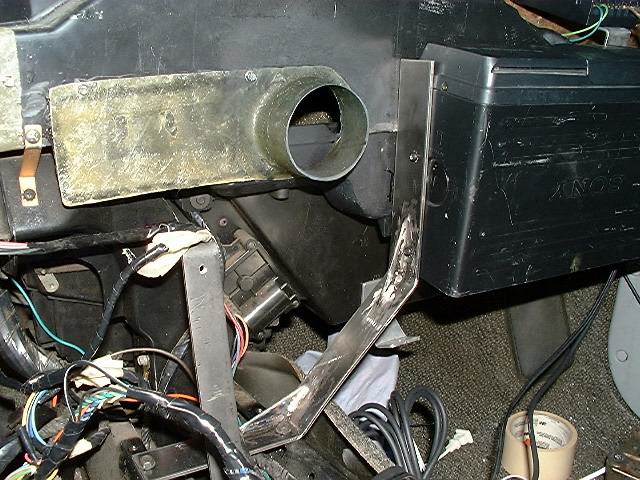
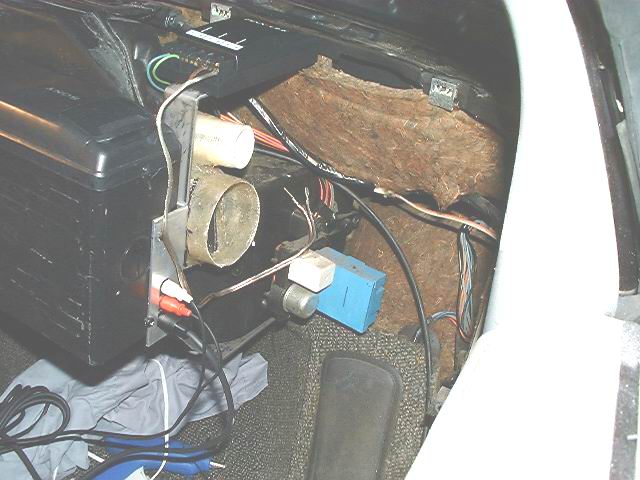
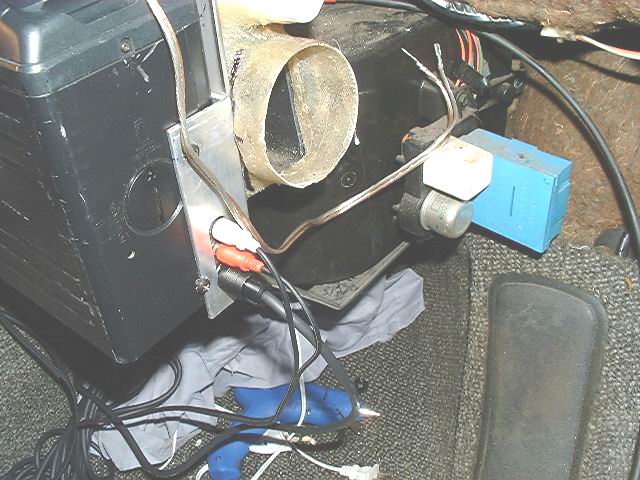
Now for the cd changer. I created two brackets to mount it in front of the air box. The first bracket is mounted to the center tunnel. I added some gussets for additional strength, so the bracket would not bounce. The second bracket is two pieces. The main piece is steel and wraps around the air box. It is mounted to the windshield frame at the top, and down on the front fire wall at the bottom. There is a third bracket made from aluminul angle that is screwed to the second that mounts to the changer. This bracketry allows the changer door to be centered under the airbag cover door. Obviously the airbag cover door will need to be removeable now. I might just use velcro or something to hold it down. I don't think I can hinge it, due to the door's odd shape.
Here's the first bracket, showing the mounting location and the gussets. (First time I made gussets).
This pic shows the gussets again, and how it's mounted to the changer:
This pic shows an overall view of the second bracket. There's a bunch of stuff in the way, including the crossover for the front speakers:
This one is a closer view of the angle bracket and shows the cut-out for the changer control cable and sound cables:
This one shows the changer in place. I'll add another once I get the dash back in.
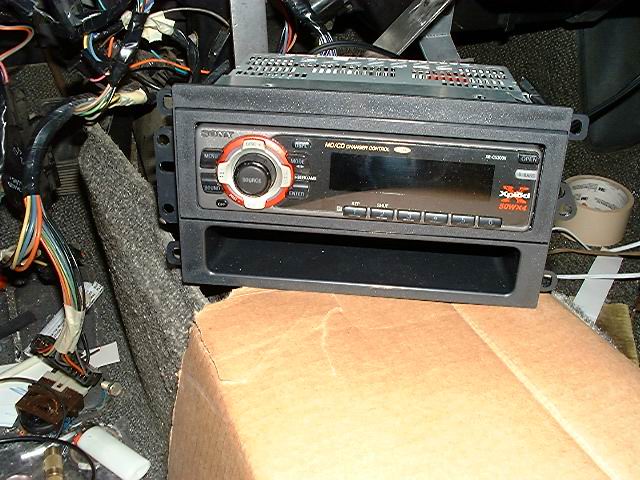
This last one is of the Sony Xplod head unit I'm using:
IP: Logged
07:16 AM
shop_rat45 Member
Posts: 3271 From: Lapeer, Michigan Registered: Mar 2004
You must not be a smoker, bcuz that change pocket is the perfect place for pack of smokes I know from being a previous smoker, and previous Grand Am owner


 I experimented by connecting the cluster to the diag port on my Montana. That worked, so this should....