Well...Not much progress, other than noting I think I'm going to take the advise of Jscott and ditch the cd changer. And, while I'm at it, I'm ditching the Sony Explode head unit. For some reason, I've got it in my head to add a DVD player and monitor. Sooooo... The DVD player will replace the head unit (allowing me to play MP3s, too), and the monitor will replace the cd changer. I'm thinking of having the monitor lift out from under the airbag cover. Should be pretty trick if I can pull it off. Now all I need is time. Hmmm??? Where can I find that?
PS..Door panels are in limbo. I need the dash in place to form the panels, DOH!!!
Bob
PPS Does anyone have any feelings on those "knock-off" Chinese DVD players and monitors? They look rather feature rich and inexpensive.
IP: Logged
12:35 PM
Sep 16th, 2005
RCR Member
Posts: 4454 From: Shelby Twp Mi Registered: Sep 2002
Well, I hope the Chinese DVD player is good, because I picked one up. Looks pretty good. I still need to get the monitor. If I ever start actual work on it again, I'll get more pics.
Bob
IP: Logged
03:31 PM
Oct 12th, 2005
theratdude64 Member
Posts: 236 From: Ogden, UT USA Registered: Sep 2005
Well...Not much progress, other than noting I think I'm going to take the advise of Jscott and ditch the cd changer. ... Bob
Whooo hooo, my work here is done!
I have chinese DVD players in all my cars. They work great for what they are. For about $100 if you get a few years out of them I think you got your money's worth. I can't see spending thousands for those motorized screen deals that you get from Crutchfield. The best part is you can burn 10 hours or so worth of tunes onto an MP3. I haven't tried buring an MP3 DVD yet, but that would store hundreds of hours of music...sweet
IP: Logged
08:45 PM
Nov 27th, 2005
RCR Member
Posts: 4454 From: Shelby Twp Mi Registered: Sep 2002
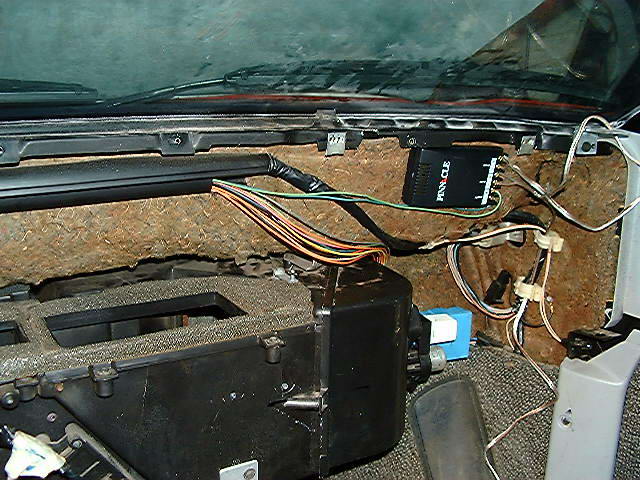
I found a little free time at work today. I decided to put a few moments into the HVAC controller. I purchased the heater box actuator that Riceburner mentioned in a previous post, so I should be able to control air flow with just a potentiometer. I also have a circuit draw up to control the HVAC selections using a single rotary switch, some diodes, and a relay. I have to draw it up and I'll post it. I also came up with an idea for modifying a circuit we sell at work to control the fan/blower. The GA has 5 speed selections plus off, whereas the Fiero has 3. I didn't want to use resistors and relays for the added speeds due to the power dissapation of the resistors, so I found a trailer brake controller that can pulse width modulate the fan to control the speed. Since I wrote the software for it, it shouldn't be hard to make a variable speed controller out of it. So, with two pots and a rotary switch, and a little control box I should be able to control everything.
More to come....
Bob
IP: Logged
08:19 PM
Jan 2nd, 2006
RCR Member
Posts: 4454 From: Shelby Twp Mi Registered: Sep 2002
Here is the schematic for the Mode select using a single rotary switch and some simole circuitry. Hope it works.. I'm using "putfile.com" only because of the size and I wanted to keep it readable. If for some reason you can't read it, send me a PM/email and I'll send over a copy.
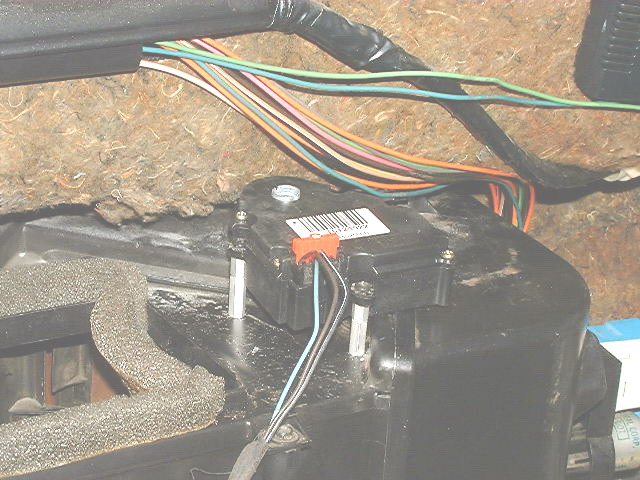
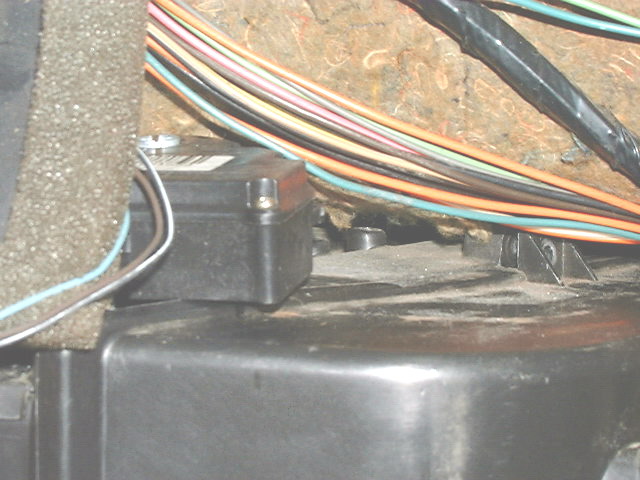
Finally...Some progress. Today I braved the cold (ok, it was in the 30's) and got some work done. The actuator came in last week, so I wanted to get it mounted. I should have taken some before pics, but the cold was affecting my thinking. Anyway. I cut the arm off the hot/cold door, and flattened two sides. This allowed the acutator to drop right on top (the actuator has a double-D shape) of the pivot. I cut about 1/4" off the actuator cam so it would fit a little closer to the heater box. I used some 1 1/8" spacers to fasten the actuator to the box. I also went through my box of wire harness parts and came across the exact connector to match the actuator, wired with the proper colors and all (I have 2 proto-type G6 dash harnesses and a GA harness I use for parts). Here's some pics:
And with the top of the heat box in place:
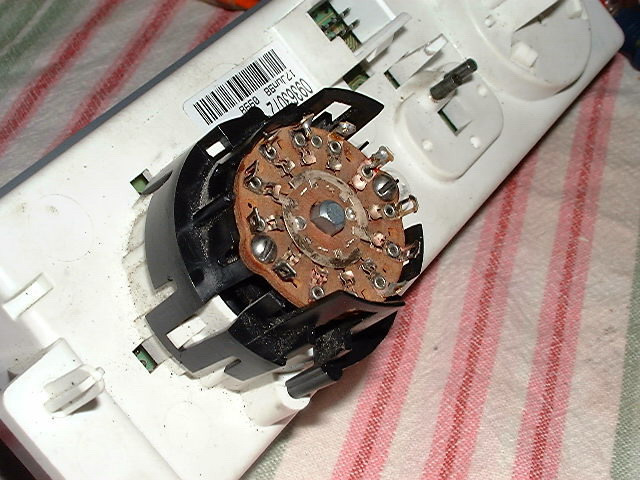
I also worked on the mode select switch. I lucked out big time. I took the vaccum portion of the switch off, and dissassembled a rotary switch. Luck would have it that the switch fit nearly perfectly where the vaccum switch was. I ended up trimming off one tab. I lined the switch up properly, drilled two holes, and screwed it together. More pics in a minute...
Edit for some more detail: The switch is a double pole, 12 (or so) throw switch. Once dissassembled, the center posts can rotate all the way around. By using one pole, I get the six positions I need. By using the inards of the OEM switch, I still have the detent positions and the switch activation for the AC. Also, the original shaft fit nearly perfectly into the rotary switch, so I did not have to change anything. The shaft is held in by the OEM inards and cover, leaving everything near OEM. I need to come up with an 8 position connector and mate and I should be good to go.
Bob
[This message has been edited by RCR (edited 01-07-2006).]
IP: Logged
06:01 PM
RCR Member
Posts: 4454 From: Shelby Twp Mi Registered: Sep 2002
Update: I finished up the mode select today. There were a couple small issues with the original circuit I came up with. I needed an extra diode to block feedback current in the re-circ circuit and I found that I can't drive to modes at the same time, thus I no longer have a feet/def function. I'll post a new schematic once I can update it at work. I should mention that I also had to mod the switch. Being that it was a 2-pole switch, the sweep I was needing was running off the end of the switch contacts, so I lifted one pole off and soldered a jumper to join the sweeps together (all on the back side). This in affect makes the switch a 12 position single pole switch. I also have the design of the variable speed control for the fan handled. I just need to get it in.
I am also currently thinking about the entertainment system. As mentioned, I have a 10.4" monitor that will find a home in here somewhere. But more to the point, I'm thinking of how and what to do with the sound system. I have a Kenwood 820 to power a subwoofer, and I was thinking of finding a 742(?) to power the front components and some rear drivers. I need to find a way to mount all this stuff....So much fun.
Edit to note that the schematics are gone for now. I'll have to re-post it on my web account. Also, here is the actuator part number: 16124922, from GMpartsdirect.com.
One more edit:
[This message has been edited by RCR (edited 10-28-2006).]
IP: Logged
05:07 PM
Jan 28th, 2006
Mickey_Moose Member
Posts: 7592 From: Edmonton, AB, Canada Registered: May 2001
Since I can't rename this thread "Bob's adventures in Fiero mod land", I'll probably start a new thread when pics are ready, but I have completed the fabrication of an amp rack in the front compartment. I still need to add some tie-downs and do all the finishing (paint/fabric, etc), but most of the wiring is complete and the concept works. Once that is to my liking, I can get back to the sub-woofer install and putting the dash back in.
Bob
IP: Logged
07:55 AM
Feb 13th, 2006
RCR Member
Posts: 4454 From: Shelby Twp Mi Registered: Sep 2002
The amp rack is together...Needs to be finished (covering, paint, etc.) I had a bad experience with a Rockwood crossover. I don't know if it's me or just junk, but I pulled it out and now I have some tunes. I put the dash back in to check room on some components. It allowed me to reach a conclusion on the 10.4" monitor...The damned thing isn't going to fit. Period. So I might just try to integrate it into the headliner since I need to redo that anyway. I was also able to check the subwoofer placement. I think I can squeeze it in (10" Kenwood). I think I'm going to use the top airbag door to make a glove box or something. Also, first shot on reprogramming my fan speed controller is done. I just need to remember to bring it in to work to test it.
Now back to your scheduled programming...
[This message has been edited by RCR (edited 02-13-2006).]
IP: Logged
11:11 AM
jscott1 Member
Posts: 21676 From: Houston, TX , USA Registered: Dec 2001
86V8: Looking forward to seeing how you do it. When working on the gauges, if your using the GA gauges, don't bother with the Fiero connectors. Find the GA connectors, or something different from AMP, or Delphi. The way I originally adapted the Fiero connectors did not work well.
Bob
IP: Logged
07:44 AM
Apr 9th, 2006
RCR Member
Posts: 4454 From: Shelby Twp Mi Registered: Sep 2002
Can't just let this old thread die. Still too much work to do on the dash.
So, I put the dash together temporarily. I want to build the cover section for the steering column. Using a few techniques I picked up on the FG fabrication forums, I made a base that will help hold the "face' in place. I will probably also make a ring that will fit snuggly around the steering colunm to support the middle. I'm not sure how it will look, as I'm still toying with placing two gauges in there. I mocked it up and it looks like it will work. I just need to build something that will support the fleece.
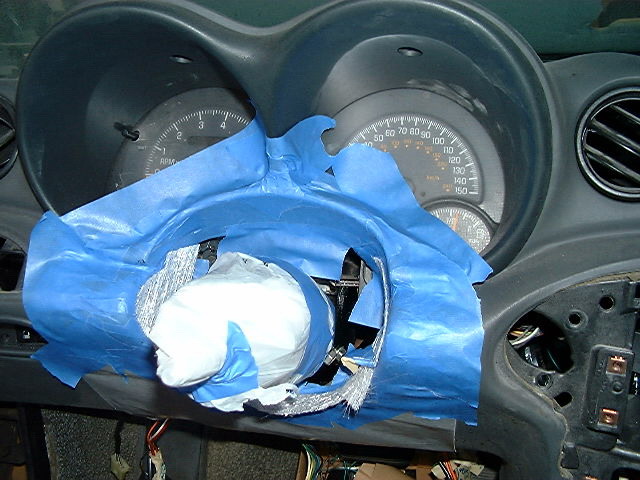
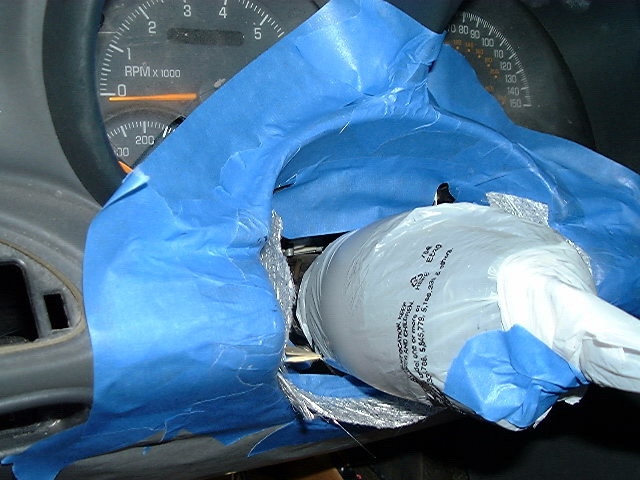
Now to the pics: This pic shows the painters tape I'm using to help seperate the glass from the dash. Another view:
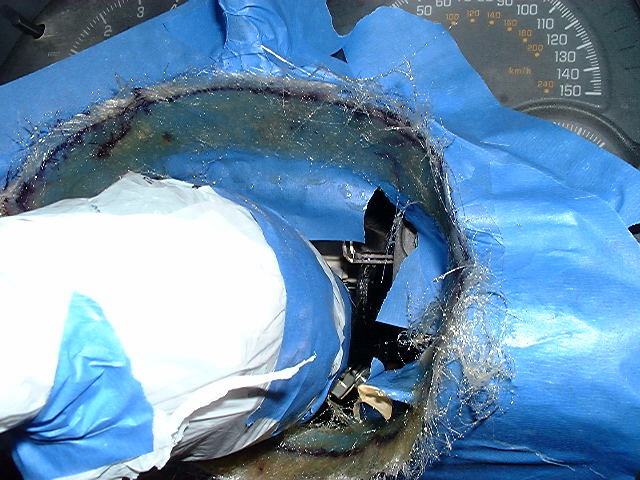
This pic shows two layers of 2oz mat all layed up.
As I was popping it out, I realized I forgot to wax the tape in my rush to get something done. No worries though, it all popped out and the tape came off fairly easily.
later... Bob
IP: Logged
07:52 PM
Apr 11th, 2006
RCR Member
Posts: 4454 From: Shelby Twp Mi Registered: Sep 2002
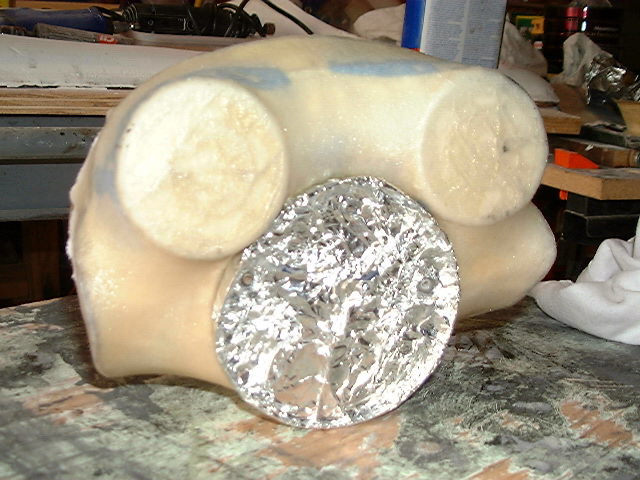
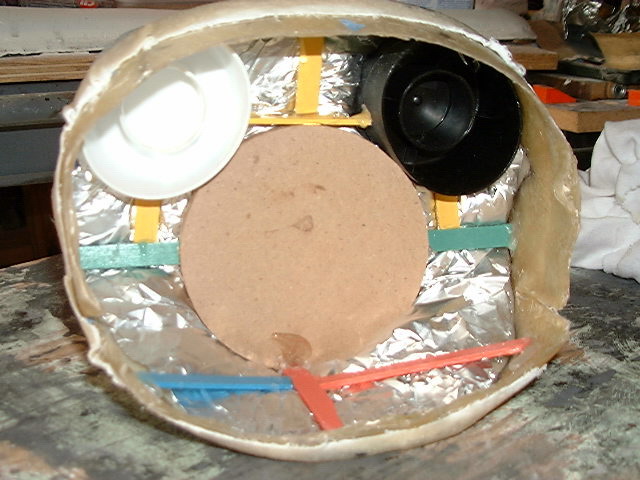
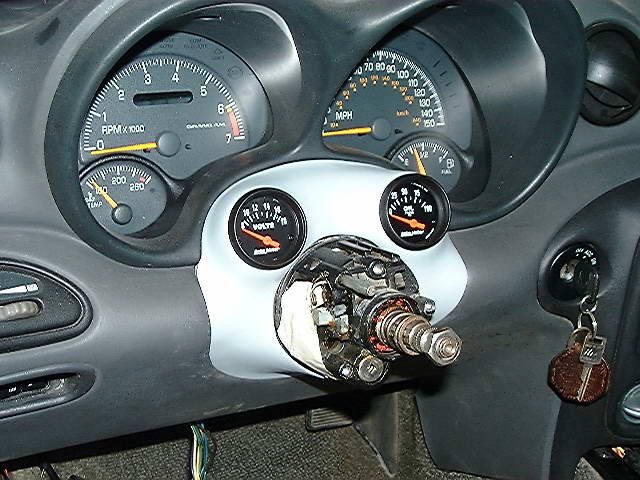
Yesterday, I cut out the rough shape of the fiberglass backing, and built up a framework for the outer skin. The problem I'm having is that the steering column is right in the middle of everything. To solve this, I built all of the framework out from what I want to be the finished edge of the column, and made it so the framework would center a MDF circle cut to the same size as the column. The MDF will serve to hold the fleece and give the piece some shape. Once the piece is glassed inside and out, I'll cut the framework and circle out, leaving just a shell. At least that's how it works in theory. Now to some pics: This pic shows the overall look. The gauge pods are two paint caps. The aluminum foil in the center is something I came up with quickly, because the fleece came unglued from the center disk. I grabbed a 4" babyfood lid, wrapped it in aluminum foil, shot it with some Pam, and screwed it down. Worked perfect for holding the material in place.
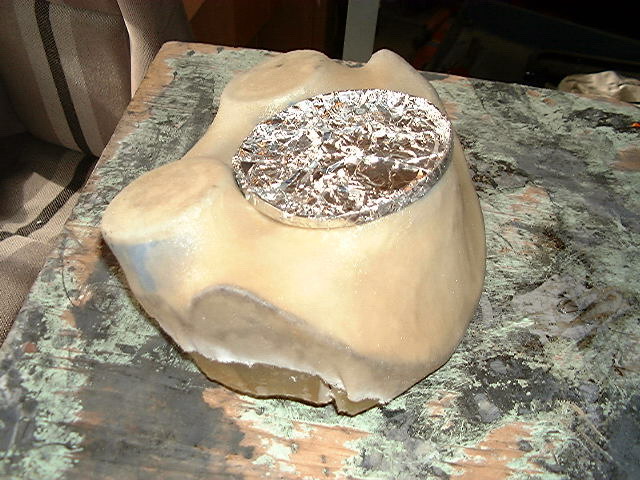
Side shot:
Here's a shot of the inside. It clearly shows the center disk, the paint caps, and the popsicle sticks that held it together. It seemed pretty firm, so I'm hoping the glass doesn't deform it. Normally I would do it in the car, but with the column in the way, that's not happening. (I'm not pulling the column again).
That's it for now. I wanted to put a layer of glass on it, but I ran out of paint brushes.
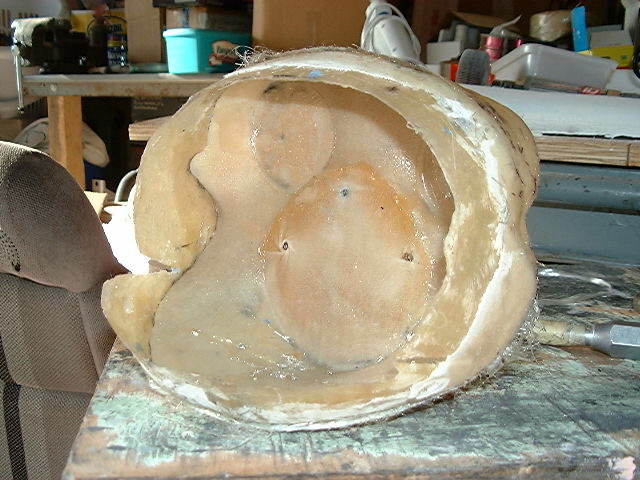
With the guts pulled out, now it is time to reenforce the connection between the shell and the top surface. What I did was take a page out of Mistress' spoiler repair and mix up a batch of resin mixed with chop strands of glass. I used it like a paste and just filled in the joint between the two surfaces. Then I put another layer of mat on top of that to give it added strength. I'm doing this so I can grind the outside surface back to the original backing shell so it will fit in the dash opening. All that extra cloth and resin would keep it from fitting properly.
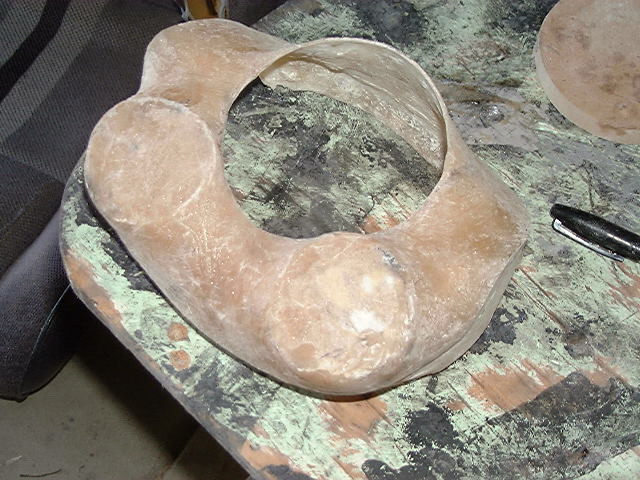
Once that is set, I ground the outside surface back to the original shell.
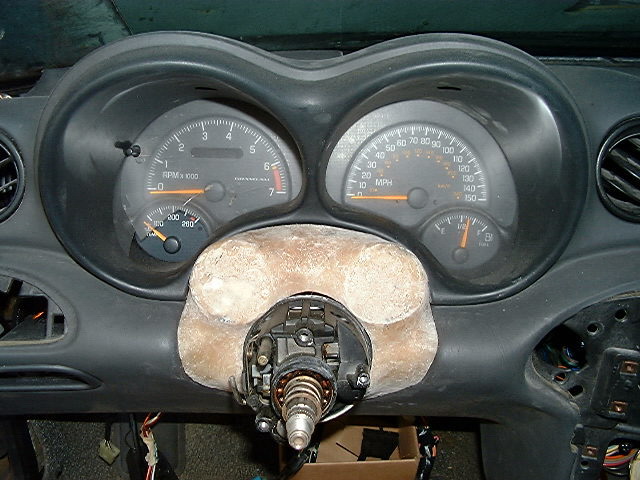
Then came the moment of truth. I cut the center section out and fit it to the dash. Not perfect, but not a badd fit if I do say so myself.
I did discover one issue I hadn't thought of. If I adjust the steering wheel up, the column hits the gages. Not sure what I'll do yet...
Bob
[This message has been edited by RCR (edited 04-16-2006).]
IP: Logged
11:22 AM
jscott1 Member
Posts: 21676 From: Houston, TX , USA Registered: Dec 2001
Awesome glassing work. I would trade anything to be able to do fiberglass
But I'm not sure I'm liking the gauges in the steering column hole. I would have done the lazy thing and shoved some foam in there and been done with it.
IP: Logged
01:37 PM
May 9th, 2006
RCR Member
Posts: 4454 From: Shelby Twp Mi Registered: Sep 2002
As with the other projects, this one continues...The surface has been ground/filled and a guide coat of primer applied. I need to fill and sand a bit more, but it's coming out better than I hoped. Pics will have to wait...
Bob
PS: Jon...Get your hands dirty, it's fun. (wear gloves, though )
[This message has been edited by RCR (edited 05-09-2006).]
IP: Logged
12:41 PM
May 11th, 2006
1986GTV8 Member
Posts: 1259 From: Orlando,FL,USA Registered: Mar 2002
Nothing going on really. If you look closely at the dash pictures, there are two holes up near the windshield. I'm not sure what they are for, but I picked up the caps at the junkyard yesterday. They had two 99 Grand Ams with complete dashes. One even had the air bag cover. Hmmm????
Bob
IP: Logged
07:44 AM
Jul 4th, 2006
RCR Member
Posts: 4454 From: Shelby Twp Mi Registered: Sep 2002
Getting the dash in isn't so hard. It's the electronics that pose the biggest hurdles. Good luck..If yoiu need anything, holler.And thanx for the nice words..and the bump.
Boy, it's been a long time since I updated this...But, I really have nothing to add yet. Things are moving slowly and morphing as I go. I did purchase two gauges for the the column pod, a voltmeter and oil pressure gauge. I was looking at different fancy chinese gauges, but couldn't find a complete set I liked, so I bought the matching units for my trans temp and boost, Auto Meter Z-Series. The weather has sucked for 6 weeks now, so I don't know when I'll get any painting in.
More surprises later... Bob
IP: Logged
07:36 AM
Oct 27th, 2006
RCR Member
Posts: 4454 From: Shelby Twp Mi Registered: Sep 2002
Hey there, Sorry...nothing to add. There was a question as to the actuator used for the HVAC door. The part number for the actuator is 16124922. I bought mine from GMpartsdirect.com for $29.76.
Bob
IP: Logged
07:18 AM
Oct 28th, 2006
1986GTV8 Member
Posts: 1259 From: Orlando,FL,USA Registered: Mar 2002


 Anyway. I cut the arm off the hot/cold door, and flattened two sides. This allowed the acutator to drop right on top (the actuator has a double-D shape) of the pivot. I cut about 1/4" off the actuator cam so it would fit a little closer to the heater box. I used some 1 1/8" spacers to fasten the actuator to the box. I also went through my box of wire harness parts and came across the exact connector to match the actuator, wired with the proper colors and all (I have 2 proto-type G6 dash harnesses and a GA harness I use for parts). Here's some pics: