I used a 4 cylinder throttle cable and it worked great. Slides right onto the mount on the throttle body and gives enough length to route it away from everything.
hmm - I do have an 84 parts car.. but pulling the cable is a pain.. probably the cleanest method though
IP: Logged
01:12 PM
Steven Snyder Member
Posts: 3326 From: Los Angeles, CA Registered: Mar 2004
man I read and reread and can't find where you said how to do the throttle cable.. stock cable is a loop and and the tdc needs a solid bar end..
Oh, sorry about that. Sometimes when I do these swaps I get on a roll and forget to document EVERYTHING that needs to be done.
You can use the stock V6 cable. You will need to modify the plastic retainer end so it will fit in the narrower groove on the 3.4DOHC throttle body, but a hack saw should do the trick (I used my dremel). As for the cable itself, if I remember correctly it is slightly too long and you can either cut it off and use a stop that can be purchased from a bicycle shop, or you can loop it around the slot in the throttle wheel and tie it off with a wire tie or drill a small hole in the wheel bracket and use a screw to secure the end of the cable (if you don't want to cut the cable).
ah one of those round ends from a bike cable - great idea.. that'd save me a little time.
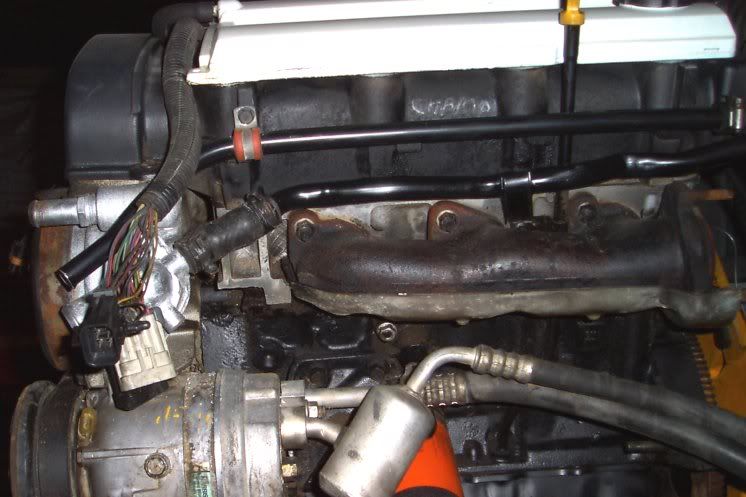
I had a small stroke of genious this weekend.. I removed the passenger heater line that wraps around the engine bay top the trunk wall.. cut it up and mounted it to the engine along side the bypass line - now the heater line fromt he LIM goes down around the engine and exists next to the return line..
you can see here how I routed it - for the rubber hose I used the stock rubber hose and cut straigh and 90* bend sections out of it to attach.
really cleans it up I think
I also routed my fuel lines - that 6$ tool from harbor freight was a gift from God.. worked so well and so easily
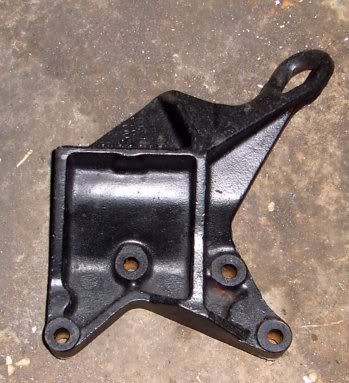
I also ground the dog bone portion off the front head lift loop.. so I can put that bracket back on
your swap was the milestone - i'm just trying to get close to that look.
Kohburn - That Fiero thermo housing you're using - how's that working out for you? I was considering doing the exact same thing (without any thermostat in the housing) to use as my coolant fill, but haven't tried it out. Keep up the good work!
Kohburn - That Fiero thermo housing you're using - how's that working out for you? I was considering doing the exact same thing (without any thermostat in the housing) to use as my coolant fill, but haven't tried it out. Keep up the good work!
My engine isn't up and running yet - but as for the placement - its perfect, puts it right by the left decklid hinge, you could put it on either side of the hinge for easy filling .. I'll keep posting pictures as the engine goes in and the last touches get finalized
Hey darth.. I checked on your website about the build and you mention 3 wires for the AC pressure switch.. but i can't figure out where they are and where to run them from.. any help on that?
i have all the wiring down except the A/C and the alternator
IP: Logged
09:46 PM
Darth Fiero Member
Posts: 5922 From: Waterloo, Indiana Registered: Oct 2002
Hey darth.. I checked on your website about the build and you mention 3 wires for the AC pressure switch.. but i can't figure out where they are and where to run them from.. any help on that?
i have all the wiring down except the A/C and the alternator
The 3.4 DOHC computers use an A/C hi-side pressure SENSOR. This sensor has a connector that looks similar to the TPS sensor connector. The wires are ground, 5v ref, and signal. This sensor needs to be connected to the hi-side pressure tap up by the spare tire (going to be the smaller of the two A/C lines). Since the Fiero originally used R-12, you will need a sensor that will screw onto the R-12 fitting. I suggest you locate a 1991-93 W-body at the junkyard equipped with this engine; it should have the correct sensor. The 94-up cars used R-134a, and the pressure taps had different threads and sizes.
IP: Logged
10:53 PM
Erik Member
Posts: 5628 From: Des Moines, Iowa Registered: Jul 2002
Hey darth.. I checked on your website about the build and you mention 3 wires for the AC pressure switch.. but i can't figure out where they are and where to run them from.. any help on that?
i have all the wiring down except the A/C and the alternator
its a 3 pin connector ..looks just like the TPS connector ..has a black wire @ position A on connector going to C5 pinout on ECM "sensor ground", gray wire @ position B on connector going to C7 pinout on ECM "5v reference", dark blue wire @ position C on connector going to C21 pinout on ECM "AC pressure in". The 3 wire connector originally runs out past the commom ground ring terminals on the DOHC harness
IP: Logged
11:02 PM
Apr 15th, 2005
AaronZ34 Member
Posts: 2322 From: Colorado Springs, CO Registered: Oct 2004
its a 3 pin connector ..looks just like the TPS connector ..has a black wire @ position A on connector going to C5 pinout on ECM "sensor ground", gray wire @ position B on connector going to C7 pinout on ECM "5v reference", dark blue wire @ position C on connector going to C21 pinout on ECM "AC pressure in". The 3 wire connector originally runs out past the commom ground ring terminals on the DOHC harness
whats it connect to? my 3.4 ac compressor only has two wires plugging into it right up by the a/c clutch -
The 3.4 DOHC computers use an A/C hi-side pressure SENSOR. This sensor has a connector that looks similar to the TPS sensor connector. The wires are ground, 5v ref, and signal. This sensor needs to be connected to the hi-side pressure tap up by the spare tire (going to be the smaller of the two A/C lines). Since the Fiero originally used R-12, you will need a sensor that will screw onto the R-12 fitting. I suggest you locate a 1991-93 W-body at the junkyard equipped with this engine; it should have the correct sensor. The 94-up cars used R-134a, and the pressure taps had different threads and sizes.
hmm - so would it be possible to weld in a tap on the high side line near the compressor?
otherwise i'd have to screw a new sensor onto the capped off pressure tap up front and run wires back to the ecm..
its so muhc fun mixing a 3.4dohc engine with a 3.1tgp ecm and fiero wiring
[This message has been edited by Kohburn (edited 04-15-2005).]
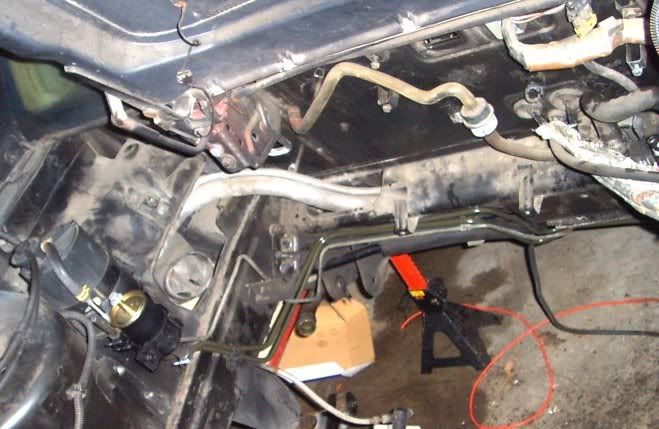
here is the 3.1tgp A/C wiring -- you can see where my dilema lies - it seems i need a coolant temp/ac fan switch (thinking of screwing a fiero fan switch into the coolant neck) and then their is the AC controls and sensors
in the red box is the fiero ac wiring.. a/c cycling switch? the high pressure switch to ground.. is that built into the stock fieros compressor?
[This message has been edited by Kohburn (edited 04-15-2005).]
now that i've put all 3 of the ac wirings together i can now see i am sceeereeewed
ok well not completely.. but atleast a little bit.. the 3.4 compressor relies entirely on that pressure sensor..
the tgp compressor works much the same as the fiero except the sensors are in different locations..
so to use a 3.4dohc compressor i'll need to add a high pressure switch to the system - where do i get one of those? its internal to the fiero compressor
IP: Logged
09:51 AM
ltlfrari Member
Posts: 5356 From: Wake Forest,NC,USA Registered: Jan 2002
On my system I am using the 3.4's compressor which is the variable swash plate type rather than the on/off cycling version used by the fiero. The a/c pressure sensor switch is just to tell the ecm when to a/c is one and under load so that it can increase te idle to allow for the extra load from the compressor. I intend to put a switch up by the compressor somewhere and just short out the switch up front. 'Course, I gotta get the bugger running right first
so you are saying the 3.4dohc compressor doesn't need a highpressure shutoff switch? i don't see one in the wiring, so if that pressure sensor is only to increase idle then there is nothing to tell the compressor to shut off except to turn off the a/c controls
IP: Logged
01:40 PM
Erik Member
Posts: 5628 From: Des Moines, Iowa Registered: Jul 2002
whats it connect to? my 3.4 ac compressor only has two wires plugging into it right up by the a/c clutch -
the 3 pin connector I am speaking of plugs into a high pressure transducer that on the original w body, is located right off the condensor on the high pressure side. It just unscrews. You will put it where the high pressure side shrader valve is on the Fiero AC line in the front spare tire compartment and run the 3 pin plug up to it. Ryan can remove the code on the chip if your using the 9396 ECM so you dont have to use it in order to get the AC to work
[This message has been edited by Erik (edited 04-15-2005).]
not using the 3.4 ecm - i'm using the TGP 7727? ecm
I can get the pressure switches new for 13$ - but the question is does the 3.4dohc compressor need them? I guess I can wire it up to allow me to plug them in later and just install the car with working or non-working a/c - a/c is not essential but rather important factor with summer coming up
IP: Logged
02:47 PM
Fierobsessed Member
Posts: 4782 From: Las Vegas, NV Registered: Dec 2001
The 16194396 and 1227727 are the same computer, just one controls a three solenoid EGR, and a 4T60-E/manuals, while the other is stuck with vacuume modulated/cabled autos or manuals. The wiring is 90% identicle. (again, EGR and Transmission are wired different)
I still suggest if you are going with the 1227727, just use a 1227730, because its the same computer, but utilizes FIERO v6 computer connectors, (plus one extra) and fits in a 87-88 4 cyl computer holder. Really trick way around alot of headaches. You don't have to change any of the pins on the connector, just move them around a whole bunch.
the wiring is already done except the AC - but thanks anyways
as for the pressure sensor mentioned - its not used on the TGP - just high and low pressure switches that cut power feed tot he compressor clutch.. just like the fiero only different locations.. but the 3.4dohc compressor doesn;t use any.. so the question remains - does the ecm control it based off the sensor.. or is the compressor controlling its pressure internally without help from the ecm..
untill i can find that out i am just going to wire it up with a connector to add a pressure switch later and just not add a switch at this time..
[This message has been edited by Kohburn (edited 04-15-2005).]
IP: Logged
09:45 PM
Erik Member
Posts: 5628 From: Des Moines, Iowa Registered: Jul 2002
the wiring is already done except the AC - but thanks anyways
as for the pressure sensor mentioned - its not used on the TGP - just high and low pressure switches that cut power feed tot he compressor clutch.. just like the fiero only different locations.. but the 3.4dohc compressor doesn;t use any.. so the question remains - does the ecm control it based off the sensor.. or is the compressor controlling its pressure internally without help from the ecm..
untill i can find that out i am just going to wire it up with a connector to add a pressure switch later and just not add a switch at this time..
on the 9396 ECM, using the DOHC compressor, when you turn on the AC the ECM checks the high side pressure via the sensor transducer, if within parameters, the ECM sends voltage to the AC relay which engages the AC clutch so, in effect yes the ECM does monitor the pressure to keep the AC sytem from being damaged + theres a pressure relief valve on the compressor
[This message has been edited by Erik (edited 04-15-2005).]
on the 3.1 it has a low pressure switch that it checks before turning on the a/c - and has a highpressure cut-off switch..
if the 3.4 compressor has a pressure relief built in then it could run with just the low pressure switch there to make sure it has enough gas in the system.
worset case senario i'll have to add a high pressure cut-out switch later.. it'd easy enough to splice into the ground wire of the a/c clutch.
fist I had my plug wires reveresed - that was an easy fix - second it has an SES code 54 - which apears to be a "fuel pump coltage low" guess i needed that wire after all -- aparantely it wants a tap off the fuel pump power line thats showing that the relay did in fact turn it on and that it is getting enough juice..
not other codes - but it won't idle without me ocassionally blipping the gas. pics to come after i run that last wire tomarrow.
edit: (good thing i ran a few extra wires through the firewall passthrough and plugged the ends just incase i needed em later )
[This message has been edited by Kohburn (edited 04-17-2005).]
IP: Logged
10:20 PM
Fierobsessed Member
Posts: 4782 From: Las Vegas, NV Registered: Dec 2001
The fuel pump voltage wire actually varies the PWM based on how much voltage the fuel pump is receiving. Kind of a neat feature. There is a table in the code just for this. I had the same problem with my 1227730, it kept sending that code. Wire it to the Fuel pump feed on the ALDL, thats the simplest way. I forget what position that wire is in.
fist I had my plug wires reveresed - that was an easy fix - second it has an SES code 54 - which apears to be a "fuel pump coltage low" guess i needed that wire after all -- aparantely it wants a tap off the fuel pump power line thats showing that the relay did in fact turn it on and that it is getting enough juice..
not other codes - but it won't idle without me ocassionally blipping the gas. pics to come after i run that last wire tomarrow.
edit: (good thing i ran a few extra wires through the firewall passthrough and plugged the ends just incase i needed em later )
Heh, heh, yeah I knew the ECM recieves a "signal" that the fuel pump is in fact recieving power, but had no clue that it varies PWM based on pump power! That's pretty cool. Does the 9396 (91-93 ECM) do the same thing too?
The fuel pump voltage wire actually varies the PWM based on how much voltage the fuel pump is receiving. Kind of a neat feature. There is a table in the code just for this. I had the same problem with my 1227730, it kept sending that code. Wire it to the Fuel pump feed on the ALDL, thats the simplest way. I forget what position that wire is in.
ooh good idea - i can even do a quick temporary thing to see if that fixes it and if that helps it idle
soo close -
still not sure why the tach isn't working - does it need something special? i connected the tach line from the DIS to the white tach wire on the C500? connector
[This message has been edited by Kohburn (edited 04-18-2005).]
IP: Logged
07:22 AM
Apr 19th, 2005
Darth Fiero Member
Posts: 5922 From: Waterloo, Indiana Registered: Oct 2002
still not sure why the tach isn't working - does it need something special? i connected the tach line from the DIS to the white tach wire on the C500? connector
You shouldn't need anything special. Don't use the stock Fiero tach filter, one it already built into the DIS ignition module.
fixed the code last night - it idles.. now.. but still pretty rough
I'll have to look for a break in my tach line I suppose and look into the other wiring gremlins
this weekend I should be able to hook a scantool up to it.. anything specific I should look for and mark down incase the program needs tweaking?
just a quick guage checklist: oil pressure is working voltage is working temp apears to be working but it hasn't run enough to warm up yet speedo is sitting pegged with the car off.. not sure what coudl cause that tach not working fuel guage sitting at full i really don't want to have to pull the tank again to change the sender unit.
[This message has been edited by Kohburn (edited 04-19-2005).]
IP: Logged
07:35 AM
Darth Fiero Member
Posts: 5922 From: Waterloo, Indiana Registered: Oct 2002
fixed the code last night - it idles.. now.. but still pretty rough
I'll have to look for a break in my tach line I suppose and look into the other wiring gremlins
this weekend I should be able to hook a scantool up to it.. anything specific I should look for and mark down incase the program needs tweaking?
just a quick guage checklist: oil pressure is working voltage is working temp apears to be working but it hasn't run enough to warm up yet speedo is sitting pegged with the car off.. not sure what coudl cause that tach not working fuel guage sitting at full i really don't want to have to pull the tank again to change the sender unit.
Since you are having issues with your fuel, speedo, and tach gauges, I would venture to guess you have a wiring issue at the dash or a ground problem. You might need to pull the backing off the cluster pod and wiggle the electrical connectors at the instrument cluster with the key on and see if your fuel gauge returns to normal. Are any of the gauges affected if you turn the lights on? Verify all fuses are good also.
bump AND a request Kohburn; could you post what you find out about scantools? I will need one, no doubt, so might as well get one that will do the job.
Thanks! gp
IP: Logged
08:19 AM
Darth Fiero Member
Posts: 5922 From: Waterloo, Indiana Registered: Oct 2002
working on getting my hands on a scantool.. what should I look for to make sure things are working properly or out of the ordinary?
Well, I will tell you about my great find. I have used the Snap On, Tech 1, Tech 2, Vetronix MasterTech, OTC scan tools over the years. Personally, I don't care for the Snap-On scanners because they are cumbersome and it takes forever to get around in their software to find what you want to see by just using that stupid thumbwheel and up/down, Y/N buttons. The Tech1 and Tech2 scan tools are very nice (Tech2 and MasterTech being the best), but good luck finding those for sale under $800 used.
That leaves us with the OTC. OTC manufactured their scan tools under the subnames of "OTC", "Cornwell", "MAC", "MATCO", etc. You are going to want an OTC Enhanced Monitor, or OTC Monitor 4000 Enhanced, minimum. The OTC Genesis is the newest one out, but very expensive. The Enhanced Monitors can do up thru 2001 domestic and import with the proper cartridge and cables. I bought my Monitor 4000 Enhanced off of ebay for $230 incl 97 pathfinder cartridge that does 89-97 GM, Ford, Chry. including the OBD1 and OBD2 cables and adapters. Very good deal and it was in like-new condition.
In any case, no matter what scan tool you get, make sure it does your vehicle and includes all of the cables and is in working condition. Since I bought mine, I have seen what I got go for as little as $150 +/- some accy's so there are good deals out there.
bump AND a request Kohburn; could you post what you find out about scantools? I will need one, no doubt, so might as well get one that will do the job.
the tool is working great and helping me relay information to Darth - he's been extremely helpful in this beyond what he actual charges to do the tuning of the chips.. I'd recommend him to anybody


 i really don't want to have to pull the tank again to change the sender unit.
